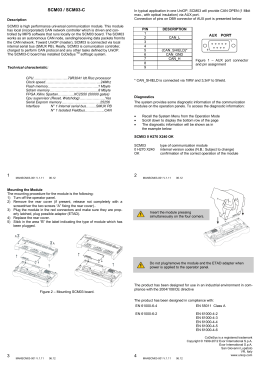
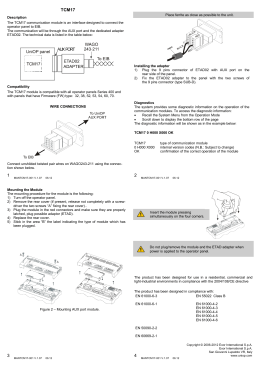
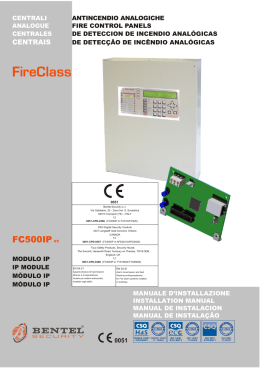
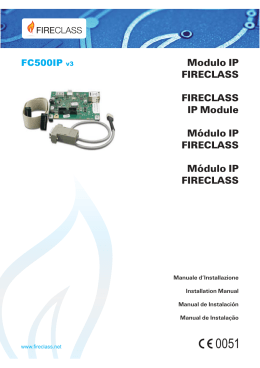
TCM15
Description/ Beschreibung/ Description/ Descripción/ Descrizione
The communication module is an interface designed to get the RS232 signals. The communication
will be through the AUX port (connector D-9 pin female). The technical data is listed in the table
below:
Pin Description
1
GND
2
Das Kommunikationsmodul ist eine Schnittstelle zur Erfassung der RS232 Signale. Die
Kommunikation erfolgt über den AUX Anschluß (Stecker D-9 pin female). Die technischen Daten
entnehmen Sie bitte der unten angeführten Tabelle:
3
TX
4
RX
1
9
5
Le module de communication TCM15 est une interface réalisée pour obtenir des signales type
RS232. La communication se réalise pour la porte AUX (connecteur femelle D-9 broches). Les
caractéristiques techniques sont les suivantes:
6
+5V 100mA max.
7
CTS
8
RTS
El módulo de comunicación TCM15 es un interfaz diseñado para recibir señales RS232. La comunicación se realiza mediante el puerto AUX (conector D-9 pin hembra). La lista de datos técnicos
se observa a continuación:
9
Figure 1 – AUX port connector and pin assignment/ AUXAnschluss und Signalbelegung/ AUX connecteur et
affectation du signal/ AUX puerto de conexión y
asignación de señales/ Connettore porta AUX e assegnazione segnali.
Il modulo di comunicazione è una interfaccia realizzata per ottenere segnali di tipo RS232. La
comunicazione avviene attraverso la porta AUX (connettore D-9 pin femmina). Le caratteristiche
tecniche sono le seguenti:
Note: Communication with the PLC will not be possible if the proper cable is not used/ Die
Kommunikation mit der SPS ist nur bei Verwendung mit einem geeigneten Kabel möglich./ la communication avec le PLC ne sera pas possible si vous n’utilisez pas le câble de raccordement approprié/ La comunicación con el PLC no es possible si no se usa el cable adecuado/ La comunicazione
con il PLC non sarà possibile se non si utilizza il cavo di collegamento appropriato.
Communication protocol
RS232
Max speed
38,4 Kbit/sec.
Optical insulation
No
Compatibility/ Kompatibilität/ Compatibilitè/ Compatibilidad/ Compatibilità
The TCM15 module is compatible with -0045, -0050 operator panels, ePAD03, ePAD05 operator
panels which have HW v. 39C or more, and eTOP03 operator panel which have HW v. 40B or more.
Das Kommunikationsmodul TCM15 ist kompatibel mit allen Bediengeräten welche den Nachsatz 0045 oder -0050 in der Gerätebezeichnung tragen, dem ePAD03 und ePAD05 mit einer Hardware
Revision 39C und größer sowie mit dem eTOP03 mit einer Hardware Revision 40B oder größer.
Le TCM15 est compatible avec les pupitres interface operateur –0045, -0050, ePAD03, ePAD05 avec
HW v.39C ou supérieur, et avec le pupitre interface operateur eTOP03 avec HW v.40B ou supérieur.
El módulo TCM15 es compatible con los paneles de operador -0045, -0050, ePAD03, ePAD05 con
versión de HW v.39C o superior, y eTOP03 con versión de HW v.40B o superior.
Il TCM15 è compatibile con i pannelli interfaccia operatore -0045, -0050, ePAD03, ePAD05 con HW
v. 39C o maggiore, e con il pannello interfaccia operatore eTOP03 con HW v. 40B o maggiore.
1
MANTCM15-002 V.1.01
12.13
Diagnostics/ Diagnose/ diagnostiques/ diagnóstico/ diagnostica
The system provides some diagnostic information of the communication modules on the operation
panels. To access the diagnostic information:/ Das System bietet einige Diagnose Informationen über
über die Kommunikation während der Betriebs. Um diese Informationen abzurufen führen Sie
folgende Schritte durch:/ L’insertion et le fonctionnement correctes du module peuvent être vérifiés de
la façon suivante :/ El sistema ofrece información de diagnóstico de los módulos de comunicación en
los paneles. Para acceder a la información de diagnóstico:/ Il corretto inserimento e funzionamento
del modulo può essere verificato nella maniera seguente:
•
•
•
Recall the System Menu from the Operation Mode/ Öffnen Sie das Systemmenü aus dem
Operationsmodus heraus/ Avec le pupitre en Operation Mode activez le menu System/ Rellamar
al System Menu desde Operation Mode/ con pannello in Operation Mode attivare il menu
System
Scroll down to display the bottom row of the page/ Nutzen Sie die Pfeiltasten um zur untersten
Zeile zu navigieren/ effectuez le scroll vers le bas jusqu’a’ la derniere ligne/ Desplazar hacia
abajo hasta ver la última fila de la página/ effettuare lo scroll verso il basso fino all’ultima riga
The diagnostic information will be shown as in the example below:/ Die Diagnose Informationen
werden wie im unten angeführten Beispiel angezeigt:/ le pupitre montrera une ligne diagnostique
qui avra la forme suivante:/ La información de diagnóstico se muestra como este ejemplo:/ il
pannello mostrerà una riga diagnostica che avrà questa forma:
TCM15 0 H000 X000 OK
TCM15
0 H000 X000
OK
type of communication module/ Art des Kommunikationsmoduls/ nom du mo
dule/ Tipo de módulo de comunicación/ nome del modulo
internal version codes (N.B.: Subject to change)/ interne Versionsschlüssel
(N.B.: Überschrift wechseln)/ codes intérieurs de version (N.B. : sujet a’ varia
tion)/ Códigos de versión internos (N.B.: sujetos a cambio)/ codici interni di
versione (N.B.: Soggetto a variazione)
confirmation of the correct operation of the module/ Bestätigung der korrekten
Funktion des Moduls/ confirmation insertion correcte/ Confirmación del correcto
funcionamiento del módulo/ conferma inserimento corretto
2
MANTCM15-002 V.1.01
12.12
Mounting the Module/ Einbau des Moduls/ Montage du module/ Montaje del módulo/
Montaggio del modulo
The mounting procedure for the module is the following/ Der Montagevorgang für das Modul folgende
ist/ La procédure de montage du module est la suivante/ El proceso de montaje del módulo es el
siguiente:/ La procedura di montaggio dei moduli è la seguente:
1) Turn off the operator panel/ Schalten Sie das Bedienfeld/ Fermez le pupitre/ Apagar el panel de
operador/ Spegnere il pannello.
2) Remove the rear cover (if present, release not completely with a screwdriver PH2 the two
screws “A” fixing the rear cover)./ Entfernen Sie die hintere Abdeckung (wenn möglich,
entfernen Sie die Schrauben "A" welche die Abeckung fixieren nicht vollständig mit einem
Schraubendreher PH2)/ Enlevez le couvercle (dévissez pas complètement avec un tornevis
PH2, le deux vis “A” qui fixent le couvercle des connecteurs, si il y a)/ Desmontar la cubierta
trasera (si existen, desatornillar con un destornillador PH2, no por completo, los dos tornillos “A”
que fijan la cubierta trasera)./ Rimuovere il coperchio (se presenti, svitare non completamente
con cacciavite PH2 le due viti “A” che fissano il coperchio dei connettori).
3) Plug the module in the red connectors and make sure they are properly latched, plug possible
adaptor (ETAD)./ Setzen Sie das Modul in die vorhandenen roten Kontaktleisten und stellen Sie
sicher, daß diese richtig eingerastet sind. Wenn vorhanden setzen Sie den Adapter (ETAD) ein./
Insérez le module dans les connecteurs rouges appropriés et assurez-vous qu’ils soient correctement crochés, connectez les possibles adaptateurs (ETAD)./ Conectar el módulo en el conector color rojo y asegurar que está correctamente conectado, conectar posible adaptador (ETAD)/
Inserire il modulo negli appositi connettori rossi ed assicurarsi che siano correttamente
agganciati, connettere eventuali adattatori (ETAD).
4) Replace the rear cover./ Montieren Sie die hintere Abdeckung./ Remontez le couvercle/ Quitar la
cubierta trasera./ Rimontare il coperchio.
5) Stick in the area “B” the label indicating the type of module which has been plugged./ Platzieren
Sie in dem markierten Bereich "B" den Aufkleber mit der Modellbezeichnung des eingesetzten
Moduls./ Appliquez dans l’espace ’B’ pointillé sur le couvercle l’étiquette qui décrit les caractéristiques de la porte AUX./ Pegar en el área “B” la pegatina indicativa del tipo de módulo conectado./ Applicare nello spazio “B” tratteggiato sul coperchio l’etichetta che descrive le caratteristiche
della porta AUX.
Figure 2 – Mounting TCM15 board/ TCM15 Montage/ TCM15 montage/ TCM15
montaje/ Montaggio modulo TCM15.
3
MANTCM15-002 V.1.01
12.13
4
MANTCM15-002 V.1.01
12.13
Insert the module pressing simultaneously on the
four corners.
Stecken Sie das Modul durch simultanes Drücken
auf allen vier Ecken des Moduls ein.
Insérez le module en puissant les quatre angles
au même temps.
Insertar el módulo presionando simultáneamente
en las cuatro esquinas.
Inserire il modulo premendo sui quattro angoli
contemporaneamente.
Do not plug/remove the module and the ETAD adapter when power is applied to the
operator panel.
Stecken / entfernen Sie das Modul und den ETAD Adapter auf keinen Fall während das
Gerät an die Stromquelle angeschlossen ist.
N’insérez pas/enlevez le module (et possible adaptateurs ETAD) avec le pupitre allumé
No conectar/desconectar el módulo y el adaptador ETAD cuando el panel de operador
tenga alimentación.
Non inserire/togliere il modulo (ed eventuali adattatori ETAD) a macchina accesa.
5
MANTCM15-002 V.1.01
6
12.13
The products have been designed for use in Hazardous Location according ANSI/ISA-12.12.01
Die Produkte sind für den Einsatz in explosionsgefährdeten Bereichen nach ANSI/ISA-12.12.01
konzipiert
Les produits ont été conçus pour une utilisation dans des endroits dangereux selon ANSI/ISA12.12.01
Los productos han sido diseñados para su uso en lugares peligrosos de acuerdo ANSI/ISA-12.12.01
I prodotti sono stati progettati per l'uso in aree pericolose secondo ANSI/ISA-12.12.01
The products have been designed for use in an industrial environment in compliance with the
2004/108/CE directive / Diese Produkte wurden für die industrielle Nutzung hergestellt. Ihr Betrieb
erfüllt die folgenden Bestimmungen 2004/108/CE / Ces pupitres ont été conçus pour utilisation dans
un environnement industriel. Ils répondent aux normas 2004/108/CE / Estos productos están diseñados para su instalación en ambientes industriales cumpliendo con las norma 2004/108/CE / I
prodotti sono stati progettati per l’impiego in ambiente industriale in conformità alla direttiva 2004/108/
CE
The products have been designed in compliance with:
Die Produkte wurden konform den geltenden Normen und Standards erstellt:
Les produits ont ete designes en conformite' aux normes:
El producto ha sido diseñado en conformidad con:
I prodotti sono stati progettati in conformità alle norme:
EN 61000-6-4
EN 55011 Class A
EN 61000-6-2
EN 61000-4-2
EN 61000-4-3
EN 61000-4-4
EN 61000-4-5
EN 61000-4-6
EN 61000-4-8
MANTCM15-002 V.1.01
12.13
WARNING - Power, input and output (I/O) wiring must be in accordance with Class I, Division 2 wiring
methods, Article 501.10 (B) of the National Electrical Code, NFPA 70 for installation in the U.S., or as
specified in Section 18-1J2 of Canadian Electrical Code for installations within Canada and in accordance with the authority having jurisdictions.
A. WARNING - EXPLOSION HAZARD - SUBSTITUTION OF ANY COMPONENT MAY IMPAIR
SUITABILITY FOR CLASS I, DIVISION 2
B. WARNING - EXPLOSION HAZARD – WHEN IN HAZARDOUS LOCATIONS, TURN OFF
POWER BEFORE REPLACING OR WIRING MODULES, and
C. WARNING - EXPLOSION HAZARD – DO NOT DISCONNECT EQUIPMENT WHILE THE
CIRCUIT IS LIVE OR UNLESS THE AREA IS KNOW TO BE FREE OF IGNITABLE CONCENTRATIONS.
D. SUITABLE FOR USE IN CLASS I, DIVISION 2, GROUPS A, B, C AND D HAZARDOUS LOCATIONS, OR NONHAZARDOUS LOCATIONS ONLY.
E. WARNING - EXPLOSION HAZARD – DO NOT CHANGE BATTERY UNLESS THE AREA IS
KNOWN TO BE FREE OF IGNITABLE CONCENTRATIONS
AVERTISSEMENT - Le câblage de l'alimentation, des entrées et des sorties doit être en accord avec
la méthode de câblage Classe I, Division 2, Article 501.10 (B) de la National Electrical Code; NFPA
70 pour les Etats-Unis, ou comme spécifié dans la section 18-1J2 de la Canadian Electrical Code
pour les installations au Canada et en accord avec les autorités qui ont la juridiction.
A. AVERTISSEMENT - RISQUES D'EXPLOSIONS - LE REMPLACEMENT DE COMPOSANTS
PEUT DIMINUER LA COMPATIBILITÉ À LA CLASSE I, DIVISION 2.
B. AVERTISSEMENT - RISQUES D'EXPLOSIONS - LORSQU'EN ZONE EXPLOSIVE, COUPER
L'ALIMENTATION AVANT DE REMPLACER OU BRANCHER LES MODULES.
C. AVERTISSEMENT - RISQUES D'EXPLOSIONS - NE PAS DÉCONNECTER LES ÉQUIPEMENTS ALORS QUE LE CIRCUIT EST SOUS TENSION OU SI LA ZONE EST CONNU POUR
ÊTRE DÉPOURVUE DE CONCENTRATIONS INFLAMMABLES.
D. PEUT ÊTRE UTILISÉ DANS LA CLASSE I, DIVISION 2, GROUPES A, B, C ET D ZONES
DANGEREUSES, OU ENVIRONNEMENTS NON DANGEREUX SEULEMENT.
E. AVERTISSEMENT - RISQUE D'EXPLOSION - NE PAS CHANGER LA BATTERIE SAUF SI LA
ZONE EST CONNUE POUR ÊTRE DÉPOURVUE DE CONCENTRATIONS INFLAMMABLES
Reproduction of the contents of this copyrighted document, in whole or part, without written
permission of Exor International S.p.A., is prohibited.
Dieses Dokument ist urheberrechtlich geschützt. Das vervielfältigen in Auszügen oder im Ganzen
darf nicht ohne die schriftliche Zustimmung von Exor International S. p. A. vorgenommen werden.
Il est interdit de reproduire ou transmettre tout ou partie de ce manuel, a quelques fins que ce soit,
sans l'autorisation expresse de Exor International S.p.A.
Se prohibe la reproducción de cualquier parte de éste manual sin el permiso escrito de
Exor International S.p.A.
Nessuna parte di questo manuale puo' essere riprodotta senza il preventivo permesso scritto di Exor
International S.p.A.
MANTCM15-002
V.1.01 20.12.2013
7
MANTCM15-002 V.1.01
12.13
8
Copyright © 2012-2013 Exor International S.p.A
Exor International S.p.A. - San Giovanni Lupatoto VR, Italy
www.uniop.com
Scaricare