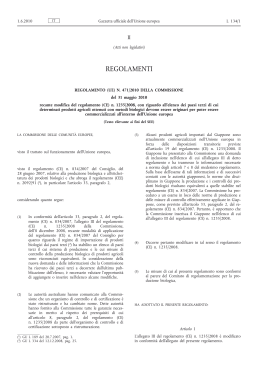
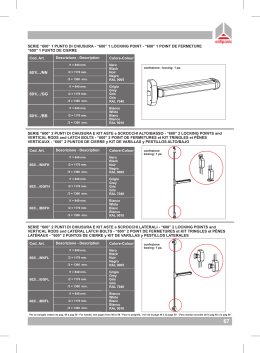
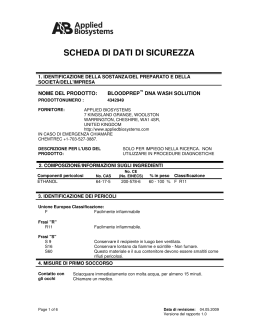
1 Norme di sicurezza ..................................................................................................................................... 2
2 Descrizione prodotto e collegamenti ........................................................................................................... 3
2.1
Pannello frontale .............................................................................................................................. 3
2.2
Pannello posteriore e connessioni ................................................................................................... 3
2.3
Telecomando.................................................................................................................................... 4
2.3.1
Batterie .................................................................................................................................... 4
2.3.2
Tasti e funzioni del telecomando ............................................................................................. 4
2.3.3
Programmazione del tasto TV ................................................................................................. 5
2.3.4
Utilizzo del telecomando.......................................................................................................... 7
3 Primo avvio del ricevitore ............................................................................................................................ 8
4 Impostazioni avanzate ................................................................................................................................ 9
4.1
Password .......................................................................................................................................... 9
4.2
Controllo Parentale (Protezione minori) ........................................................................................... 9
4.3
Protezione avanzata (Funzione Hotel) ............................................................................................. 9
4.4
Ricerca ed Aggiornamento Canali ................................................................................................... 9
4.4.1
Scansione canali ..................................................................................................................... 9
4.4.2
Aggiornamento canali in standby ............................................................................................ 9
4.5
Regolazione orario ......................................................................................................................... 10
4.6
Aggiornamento Software ................................................................................................................ 10
4.7
Risparmio energetico - Spegnimento Automatico.......................................................................... 10
4.7.1
Spegnimento Automatico ...................................................................................................... 10
4.7.2
Uscita/Loop Antenna ............................................................................................................. 10
4.8
Reset di fabbrica ............................................................................................................................ 10
5 Struttura del menu ..................................................................................................................................... 11
6 Caratteristiche tecniche............................................................................................................................. 11
7 Guida alla risoluzione dei problemi ........................................................................................................... 12
Appendix A.
Codici TV / TV Codes ............................................................................................................. i
NOTA: A causa di aggiornamenti o errori, il contenuto di questo manuale potrebbe non corrispondere esattamente al prodotto reale.
Italiano
Indice
TELE System
1 Norme di sicurezza
Per un utilizzo sicuro dell’apparecchio, e per la vostra incolumità, leggere attentamente i seguenti consigli
riguardanti le misure di sicurezza.
ALIMENTAZIONE
x
x
Il ricevitore deve essere collegato esclusivamente ad una presa di corrente da 230V~, 50Hz.
Non rimuovere il coperchio del ricevitore. All’interno dell’apparecchio possono essere presenti tensioni
superiori a quella di alimentazione che potrebbero mettere a repentaglio la sicurezza dell’utente. L’alta
tensione è presente anche quando il dispositivo è in modalità standby, prima di intervenire su di esso, è
necessario scollegarlo dalla rete elettrica. La rimozione non autorizzata del coperchio farà decadere
immediatamente la garanzia!
CAVO DI ALIMENTAZIONE
x
x
x
Prima di installare l’apparecchio controllare l’integrità del cavo di alimentazione, prestando particolare
attenzione al punto in cui entra nella presa di rete ed a quello in cui esce dal ricevitore. In caso il cavo
risultasse danneggiato, non collegare il dispositivo e rivolgersi al centro assistenza.
Installare il cavo di alimentazione in modo da non causarne lo schiacciamento con oggetti collocati sopra o
accanto ad esso. Evitare inoltre di posizionarlo vicino a zone di passaggio dove possa essere
accidentalmente calpestato, strappato o comunque danneggiato.
In caso di danneggiamento del cavo, scollegare con attenzione il ricevitore dalla presa di alimentazione e
rivolgersi esclusivamente a personale specializzato o al centro assistenza per la riparazione.
LIQUIDI
x
x
Tenere il prodotto lontano da qualsiasi tipo di liquido. Non collocare sull’apparecchio oggetti contenenti liquidi
come vasi, umidificatori ecc. Esso non deve essere installato in luoghi in cui possa venire a contatto con
spruzzi o schizzi di liquidi o in ambienti con alto tasso di umidità dove possano formarsi condense.
Nel caso in cui il ricevitore venga accidentalmente in contatto con liquidi, togliere immediatamente la spina
dalla presa di corrente. NON TOCCARE il dispositivo con le mani prima che sia stato scollegato.
PICCOLI OGGETTI
x
Tenere lontano dal ricevitore monete o altri piccoli oggetti. La caduta di oggetti all’interno dell’apparecchio,
attraverso le fessure per la ventilazione, può causare seri danni.
PULIZIA
x
x
Prima di procedere ad operazioni di pulizia, staccate il dispositivo dalla presa di corrente.
Per pulire l’esterno del ricevitore, usare un panno morbido e asciutto o leggermente inumidito d’acqua. Evitare
l’uso di prodotti chimici o solventi.
VENTILAZIONE
x
x
x
x
Assicurarsi che nel luogo di installazione dell’apparecchio ci sia una buona circolazione d’aria per una
sufficiente dissipazione del calore ed evitare surriscaldamenti.
Per consentire una ventilazione adeguata, è opportuno predisporre una distanza minima di 10 cm da entrambi
i lati ed una distanza di 15 cm sopra il dispositivo.
Le fessure per la ventilazione devono essere libere, non ostruite dalla presenza di oggetti tipo giornali,
tovaglie, stoffe da arredamento, ecc.
Evitate di installare il ricevitore vicino a fonti di calore (termosifoni, stufe, ecc) o sopra ad altre apparecchiature
che producono calore (videoregistratori, amplificatori audio, lettori DVD, ecc).
ATTENZIONE
x
x
x
x
x
x
x
2
Tenere il prodotto fuori dalla portata dei bambini.
I sacchetti di plastica degli imballaggi possono essere pericolosi. Per evitare soffocamenti, tenere i sacchetti
lontani dalla portata dei bambini.
Non esporre il ricevitore o il telecomando alla luce diretta del sole.
L’apparecchio deve essere posto su una base solida e sicura.
Collegare il ricevitore alla presa di corrente solo dopo aver completato l’installazione.
Non disperdere il prodotto nell’ambiente per evitare potenziali danni all’ambiente stesso e alla salute umana e
per facilitare il riciclaggio dei componenti/materiali contenuti in esso. Chi disperde il dispositivo nell’ambiente o
lo getta insieme ai rifiuti comuni è sanzionabile secondo la legislazione locale vigente.
Il produttore istituisce un sistema di recupero dei RAEE del prodotto, oggetto di raccolta separata e sistemi di
trattamento, avvalendosi di impianti conformi alle disposizioni vigenti in materia.
x Portare il prodotto non più utilizzabile (ed eventuali suoi accessori, ivi comprese le batterie) presso
un centro di raccolta autorizzato a gestire rifiuti di apparecchiature elettriche ed elettroniche, in quanto
non può essere unito ai rifiuti comuni oppure è sempre possibile riconsegnare allo stesso distributore
l’apparecchiatura usata o a fine vita all’atto dell’acquisto di una nuova di tipo equivalente.
Italiano
TS.UNICO
2 Descrizione prodotto e collegamenti
2.1 Pannello frontale
1. IR Sensore a raggi infrarossi per telecomando.
2. LED Indicatore di stato: VERDE=acceso, ROSSO=standby.
3. q ON/ST.BY Tasto accensione/standby.
2.2 Pannello posteriore e connessioni
AVVERTENZA
x
x
È buona regola effettuare le connessioni del dispositivo con altri apparecchi (TV, VCR, HI-FI, etc.) e l’antenna prima
di collegarlo all’alimentazione. Con il ricevitore in tensione è possibile infatti che, durante l’inserimento dei connettori,
si creino differenze di potenziale elettrico in grado di generare correnti che possono danneggiare gli apparati.
La connessione video diretta del dispositivo allo schermo/TV dovrebbe sempre essere fatta come primo test
funzionale, in quanto schemi di collegamento più complessi potrebbero portare a malfunzionamenti non riconducibili
a guasti e/o difetti dei singoli apparecchi ma a problemi di incompatibilità fra gli stessi.
1. RF IN Ingresso segnale d’antenna.
2. RF OUT Uscita passante segnale d’antenna per l’eventuale collegamento di un televisore o altro
dispositivo dotato di ricevitore televisivo integrato.
AVVERTENZA
Per ragioni di risparmio energetico, l’uscita passante antenna RF OUT non è attiva durante lo stato di stand.by; è
comunque possibile abilitarla agendo sull'opzione Loop Antenna del menu Installazione > Antenna (par. 4.7.2).
3. TV SCART Uscita audio-video analogica SCART da collegare allo schermo TV.
4. VCR SCART Connettore audio-video analogico SCART ausiliario.
AVVERTENZA
La presa VCR SCART può essere utilizzata anche come ingresso per una sorgente esterna (es. lettore DVD), ma solo a
ricevitore acceso e agendo sul tasto DTV/VCR del telecomando completo dedicato alla commutazione della SCART.
5. COAXIAL Uscita Audio Digitale Coassiale per amplificatori home-theatre.
6. POWER Cavo di alimentazione per il collegamento ad una presa elettrica da 230V~, 50Hz.
3
TELE System
2.3 Telecomando
La conoscenza del telecomando costituisce la base per l’utilizzo del ricevitore e per una facile navigazione
tra le varie funzioni e i menu. Il telecomando è dedicato principalmente al controllo remoto del decoder in
oggetto (premere il tasto STB); inoltre, dopo un’opportuna programmazione del tasto TV (par. 2.3.3), esso
permette anche di comandare il televisore o lo schermo collegato.
2.3.1 Batterie
Informazioni ed avvertenze
Inserire o sostituire le batterie al primo utilizzo del prodotto o quando il telecomando non risponde più
propriamente alla pressione dei tasti. Batterie compatibili: 2 x AAA, 1.5V.
Per evitare che la perdita di liquido corrosivo danneggi il telecomando, si consiglia di togliere le pile quando il
dispositivo non viene usato per un lungo periodo.
Evitare l’utilizzo di differenti tipi di batterie o batterie scariche e nuove contemporaneamente.
Inserimento e rimozione
Una volta aperto lo sportellino delle batterie posto sul retro del telecomando, inserite le 2 batterie (formato
AAA) rispettando le corrette polarità come indicato all’interno del vano. Chiudere quindi lo sportellino.
Rimuovere le batterie esaurite, che dovranno essere smaltite separatamente dai rifiuti domestici portandole
ad un qualsiasi punto vendita o di raccolta, ripetendo operazioni analoghe a quelle dell’inserimento.
2.3.2 Tasti e funzioni del telecomando
2.3.2.1 Telecomando completo
1. q POWER Accensione (ON)/spegnimento in standby (ST.BY).
2. LED Indicatore a LED di funzionamento telecomando.
3.
TV Abilitazione comando televisore. (*)
4.
STB Abilitazione comando decoder.
5.
SOURCE Selezione sorgente audio-video del televisore. (*)
6. 0÷9 Tasti alfanumerici Cambio canale o inserimento valori alfanumerici
nei menu.
7. EPG Guida Elettronica ai Programmi. (**)
8. INFO Informazioni sul programma visualizzato/canale sintonizzato. (**)
9. VOL +/- Regolazione livello volume audio.
10.
MUTE Inibisce l’audio.
11. TV/RADIO Cambio tra programmi TV e radio del dispositivo in uso.
12. PROG +/- Cambio canale successivo/precedente.
13. MENU Menu principale.
14. FAV Richiamo liste canali favoriti.
15. BACK Ritorno al menu precedente.
16. EXIT Uscita da menu, EPG o da altre funzioni attive.
17. , , , (Frecce del cursore) Navigazione nel menu e nell’EPG.
18. OK Conferma azioni e modifiche o accesso alla lista canali.
19. DTV/VCR / ROSSO Commutazione uscita SCART TV del decoder / Aziona
specifiche funzioni all’interno del menu.
20. VERDE, GIALLO, BLU Aziona specifiche funzioni all’interno del menu.
21. AUDIO Cambio traccia e modalità audio. (**)
22. SUB Sottotitoli DVB o televideo indicizzati. (**)
23. TEXT Televideo. (**)
24.
FILE, 1 PLAY, 2 PAUSE, 3 STOP, 4 REC, 7 PREV, 5 REW, 6
FWD, 8 NEXT (Tasti PVR) Nessuna funzione associata a questi tasti.
(*)
Al fine di poter comandare il televisore, il tasto TV deve essere opportunamente
programmato come descritto in questo manuale (par. 2.3.3).
(**)
Le informazioni sui programmi, i sottotioli, il televideo e le tracce audio supplementari
sono forniti dall’emittente televisiva del canale sintonizzato; tali dati potrebbero essere incompleti o
assenti.
4
Italiano
TS.UNICO
2.3.2.2 Telecomando semplificato
q POWER Accensione/spegnimento in stand.by.
LED Indicatore a LED di funzionamento telecomando.
TV Abilitazione comando televisore. (*)
STB Abilitazione comando decoder.
0÷9 Tasti numerici per cambio canale.
SOURCE Selezione sorgente audio-video del televisore. (*)
MUTE Inibisce l’audio del ricevitore.
P+ / P- Cambio canale successivo/precedente o scorrimento lista
canali.
9. OK Conferma azioni o accesso alla lista canali.
10. VOL- / VOL + Regolazione livello volume audio.
1.
2.
3.
4.
5.
6.
7.
8.
(*)
Al fine di poter comandare il televisore, il tasto TV deve essere opportunamente
programmato come descritto in questo manuale (par. 2.3.3).
2.3.3 Programmazione del tasto TV
2.3.3.1 Cambio codice TV
I codici TV predefiniti si trovano nella lista allegata alle presenti istruzioni (vedi Appendix A). Identificare
prima la marca del televisore da comandare, poi seguire i passi qui sotto elencati:
1. Accendere il televisore da comandare.
2. Tener premuto il tasto TV per più di 3 secondi fino a che l’indicatore LED del telecomando rimarrà
acceso.
3. Digitare il codice a 4 cifre corrispondente alla marca del televisore da comandare servendosi dei tasti
numerici 0÷9.
4. Se il codice inserito è valido, il LED si spegnerà. Altrimenti, in caso di codice errato, esso lampeggerà per
3 volte prima di spegnersi e; in tal caso, la programmazione terminerà (ricominciare dal punto 1).
5. Verificare che il televisore risponda propriamente alla pressione dei tasti del telecomando, almeno
limitatamente alle funzioni di base. Se così non fosse, ripetere la programmazione del tasto TV
servendosi di un altro codice, tra quelli in lista, dedicati alla marca del televisore interessato (riprendere
dal punto 1).
Se la marca non è presente in lista o nessuno dei codici predefiniti permette di comandare il televisore,
provare ad individuare o definire un programma consono seguendo uno dei metodi descritti di seguito.
2.3.3.2 Ricerca manuale del codice TV
1. Accendere il televisore da comandare.
2. Puntare il telecomando verso il sensore IR del televisore e mantenerlo puntato per tutta la procedura.
3. Tener premuto il tasto TV per più di 3 secondi fino a quando l’indicatore LED del telecomando rimarrà
acceso.
4. Premere in successione il tasto q POWER oppure PROG+/P+.
5. Non appena il televisore risponderà propriamente al comando, spegnendosi o cambiando canale (in
coerenza con il tasto premuto), premere il tasto OK per la memorizzazione del codice. Il LED quindi si
spegnerà.
5
TELE System
Verificare che il televisore risponda propriamente alla pressione degli altri tasti del telecomando, almeno
limitatamente alle funzioni di base. In caso negativo, riprendere la ricerca di un codice appropriato ripetendo
la procedura (riprendere dal punto 1).
2.3.3.3 Identificazione del codice TV in uso
L’identificazione del codice permette di riconoscere il codice TV attualmente utilizzato dal telecomando.
Procedere come segue:
1. Tener premuto il tasto TV per più di 3 secondi fino a quando l’indicatore LED del telecomando rimarrà
acceso.
2. Premere il tasto STB per circa 3 secondi, quindi rilasciarlo appena il LED si riaccende.
3. Per trovare la prima cifra del codice TV a quattro cifre, selezionare i tasti numerici da 0 a 9 fino a che
l’indicatore LED del telecomando emetta un singolo lampeggio. La cifra che fa eseguire il lampeggio
corrisponde a quella ricercata.
4. Per ricercare la seconda, la terza e la quarta cifra del codice, ripetere quanto descritto al precedente
punto 3.
5. Dopo il rilevamento dell’ultima cifra, l’identificazione dell’intero codice TV è terminato ed il LED si
spegnerà.
NOTA
Se il tasto TV non è ancora stato programmato o il telecomando è stato resettato (par. 2.3.3.5), verrà rilevato il codice
0000.
2.3.3.4 Programmazione tramite apprendimento
I codici TV elencati in Appendix A forniscono già le funzioni di base per comandare il televisore. È comunque
possibile estendere i programmi associati ai codici TV predefiniti grazie alla funzione Apprendimento. Per
usufruire della programmazione ad Apprendimento, è necessario disporre del telecomando originale del
televisore. Utilizzare batterie nuove sia per il telecomando da programmare del decoder che per quello
originale del televisore.
1. Tener premuto il tasto TV per più di 3 secondi fino a quando l’indicatore LED del telecomando rimarrà
acceso.
2. Premere il tasto
SOURCE per circa 3 secondi, finché il LED inizierà a lampeggiare, quindi rilasciarlo.
3. Puntare il trasmettitore del telecomando originale del televisore verso il sensore IR del telecomando del
decoder, ad una distanza di circa 3 centimetri. Assicurarsi che i due sensori IR siano allineati per tutta la
procedura.
4. Esercitare una singola pressione sul tasto del telecomando del decoder che si desidera programmare: il
LED resterà costantemente acceso.
5. Eseguire una semplice pressione del tasto del telecomando originale del televisore, corrispondente alla
funzione da associare al tasto del telecomando del decoder selezionato al punto precedente. A comando
acquisito, il LED del telecomando del decoder tornerà a lampeggiare ed il telecomando rimarrà in attesa
della prossima acquisizione.
NOTA
L’acquisizione non è immediata, essa può richiedere anche 2 o 3 secondi.
6. Ripetere i due passi precedenti, 4 e 5, per tutti i tasti da programmare.
7. Terminata la programmazione di tutti i tasti desiderati, premere il tasto TV per memorizzare il programma
ed uscire dalla modalità di apprendimento.
AVVERTENZE
x
x
x
I singoli tasti programmati mediante funzione di apprendimento manterranno sempre la funzione associata durante
tale programmazione, anche se se verrà cambiato il codice TV scegliendolo tra quelli predefiniti. Per cancellare la
funzione appresa, si dovrà procedere ad un ripristino ai valori di fabbrica (reset) del telecomando, come descritto nel
paragrafo 2.3.3.5.
Prima di eseguire la programmazione ad apprendimento, si consiglia di usare batterie nuove per entrambi i
telecomandi.
I tasti TV, STB e SOURCE non sono programmabili tramite apprendimento.
2.3.3.5 Ripristino valori di fabbrica (reset)
In caso di necessità, è possibile riportare il telecomando alle impostazioni originali di fabbrica come descritto
di seguito:
1. Premere il tasto TV per più di 3 secondi fino a quando l’indicatore LED del telecomando rimarrà acceso,
quindi rilasciarlo.
2. Tener premuto il tasto
SOURCE per circa 3 secondi finché il LED inizierà a lampeggiare.
3. Premere di nuovo il tasto
SOURCE sino allo spegnimento dell’indicatore LED: il reset è avvenuto.
NOTA
Il reset ripristinerà i programmi/codici TV predefiniti dalla fabbrica, riportando il programma TV al valore 0000 ed
eliminando l’eventuale programmazione dei tasti tramite apprendimento.
6
2.3.4 Utilizzo del telecomando
Dopo aver programmato il telecomando per il controllo del televisore, esso funzionerà come il telecomando
originale dello stesso televisore, quantomeno limitatamente alle funzioni principali, quali accensione e
spegnimento, regolazione del volume audio e cambio canale.
Per comandare il decoder o il televisore, eseguire una singola breve pressione sui rispettivi tasti funzione
STB o TV e puntare il telecomando verso il sensore IR del dispositivo interessato. Alla trasmissione di ogni
commando infrarosso, l’indicatore LED del telecomando si illuminerà.
7
Italiano
TS.UNICO
TELE System
3 Primo avvio del ricevitore
Una volta terminato il collegamento del ricevitore (par. 2.2) e poi connessa la spina dell’alimentazione alla
presa di rete elettrica, il ricevitore si avvierà automaticamente. Se non dovesse accadere, accendere il
dispositivo utilizzando l’apposito tasto q POWER del pannello frontale o del telecomando.
Verrà visualizzato a schermo il menu di Installazione Guidata, dove si dovranno confermare/modificare
alcuni parametri di configurazione e quindi eseguire la ricerca dei canali. Procedere come indicato di seguito:
Passo 1 – Lingua OSD
Scegliere la lingua del menu a schermo (On Screen Display - OSD) tra quelle disponibili col tasto freccia
/. Premere il tasto freccia per proseguire con l'impostazione seguente.
Passo 2 – Paese
Definire il Paese di installazione del ricevitore tramite tasto freccia /. Passare al parametro successivo
utilizzando il tasto freccia .
AVVERTENZA
L’impostazione errata del Paese può portare ad un incompleto o al mancato rilevamento dei canali.
Passo 3 – Modalità LCN
Grazie alla funzione di Numerazione Logica dei Canali (Logical Channel Numbering – LCN), dopo la
scansione canali, la lista dei servizi TV e Radio trovati verrà ordinata in automatico, secondo la posizione
richiesta dalle stesse emittenti televisive. Disattivare/attivare la funzione col tasto freccia /; si consiglia di
tenerla attiva. Andare al passo successivo con il tasto freccia .
NOTA
Quando la Modalità LCN è attiva, è sconsigliato utilizzare le funzioni di spostamento e ordinamento canali disponibili nel
menu Canali > Lista Canali TV/Radio.
Passo 4 – Alimenta Antenna
Attivare l’alimentazione antenna solo se si utilizza un’antenna attiva compatibile con il ricevitore da
alimentare tramite il connettore antenna RF IN del ricevitore. Accendere/spegnere l’alimentazione col tasto
freccia /. Avanzare poi premendo il tasto freccia .
ATTENZIONE
Se si utilizza un’antenna classica da tetto o un’antenna già alimentata, l’alimentazione antenna deve inevitabilmente
rimanere spenta: rischio di sovraccarico!
Passo 5 – Definizione Password
In corrispondenza della voce Nuova Password, premere OK ed immettere una password numerica a
quattro cifre (PIN) per il Controllo Parentale (par. 4.2), poi reinserire la stessa password su Conferma
Password e premere nuovamente OK per salvare. Usare il tasto freccia per proseguire.
AVVERTENZA
La definizione della password è obbligatoria, altrimenti non sarà permesso uscire dall’Installazione Guidata.
Passo 6 – Ricerca
Premere il tasto OK sul riquadro Ricerca per avviare la scansione automatica dei canali. Al termine della
scansione, se non saranno rilevati conflitti tra le posizioni LCN richieste dai canali (in Modalità LCN), il
ricevitore passerà in automatico alla modalità di visione, quindi andare direttamente al passo numero 8,
altrimenti riferirsi al passo seguente.
Passo 7 – Soluzione Conflitti LCN
Se la funzione LCN è attiva e più di un servizio richiede la stessa posizione in lista canali, il sistema rileverà
il conflitto e, a fine scansione canali, proporrà a schermo l’elenco dei canali coinvolti. Posizionarsi sul canale
preferito con i tasti freccia e e confermare la scelta col tasto OK. In alternativa, optare per la soluzione
automatica. In aggiunta, se l’utente non effettuerà alcuna preferenza, dopo qualche istante il dispositivo
risolverà i conflitti in automatico. Terminato questo processo, il ricevitore passerà alla visione dei canali.
Passo 8 – Regolazione Orario
Accedere al menu Configura > Paese ed Ora per regolare l’orario del ricevitore. In particolare, verificare
l’opzione Ora Legale (par. 4.5); per modificarla servirsi del tasto freccia / ed uscire dal menu con BACK
ed EXIT.
Passo 9 – Configurazione Video
Per mettere a punto l’uscita TV SCART, entrare nel menu Configura > Sistema TV e definire i valori del
Rapporto d’Aspetto (16:9 Full Screen/Pillar Box o 4:3 Letter Box/Pan Scan) e dell’Uscita Video (RGB o
CVBS) più adatti alle caratteristiche dello schermo collegato al ricevitore, nonché alle proprie preferenze.
8
Italiano
TS.UNICO
4 Impostazioni avanzate
La procedura di prima installazione (cap. 3) permette già l’utilizzo base del ricevitore. Esso presenta
comunque potenzialità e personalizzazioni più avanzate che sono brevemente descritte nei paragrafi
seguenti.
4.1 Password
La modifica di parametri importanti del menu e l’accesso ad eventi protetti tramite Controllo Parentale (par.
4.2) richiede l’inserimento di una password numerica a quattro cifre (Personal Identification Number - PIN).
Essa viene definita dall’utente in fase di prima installazione del dispositivo (cap. 3), successivamente può
essere modificata tramite il menu Configura > Protezione Ricevitore.
ATTENZIONE
Se si dimentica la password, è necessario riportare il ricevitore allo stato di prima installazione tramite un reset, funzione
offerta dal menu Strumenti > Ripristino Impostazioni di Fabbrica.
4.2 Controllo Parentale (Protezione minori)
La funzione di protezione minori, comunemente chiamata anche Controllo Parentale, attua un controllo sulla
visione di alcuni eventi sensibili. Quando il canale sintonizzato trasmette un evento con informazione di
protezione di visione da parte di un pubblico di età uguale o superiore al livello impostato a menu, il
ricevitore bloccherà il canale. Apparirà quindi a video la richiesta di sblocco visione canale tramite
inserimento del codice PIN (par. 4.1).
Il livello d’età è predefinito a 18 anni; per modificarlo, raggiungere il menu Configura > Protezione
Ricevitore e regolare il valore del parametro Blocca Canale.
4.3 Protezione avanzata (Funzione Hotel)
La Funzione Hotel è una funzione nascosta, che consiste nella protezione avanzata del menu del ricevitore.
Una volta attivata, essa non consente l’accesso al menu, permettendo all’utente l’utilizzo di base del
ricevitore.
Per attivare questa protezione, accedere al menu principale premendo MENU, azionare un qualsiasi tasto
numerico ed apparirà a video una finestra di immissione dati, quindi inserire la password di sistema (par.
4.1) o il PIN 3327. Successivamente, per la disattivazione, premere MENU e digitare la stessa password.
4.4 Ricerca ed Aggiornamento Canali
Durante la prima installazione, viene eseguita la ricerca automatica dei canali disponibili. Periodicamente, in
occasione dell’attivazione di nuovi servizi televisivi e radiofonici o di altre modifiche da parte delle emittenti
televisive, è consigliato aggiornare o reinstallare la lista canali del ricevitore.
4.4.1 Scansione canali
Per accedere alla funzione di scansione canali, dalla modalità visione canali premere il tasto MENU del
telecomando, selezionare il menu Installazione e scegliere uno dei seguenti sotto-menu, a seconda della
scansione desiderata:
1. Scansione Automatica: ricerca automatica di tutti i canali digitali terrestri rilevabili in zona col proprio
impianto d’antenna. All’interno del menu, scegliere il tipo di canali da rilevare (quelli trasmessi solo In
chiaro o Tutti) ed il tipo di scansione da attuare (Aggiorna oppure Reinstalla tutti i canali). Premere OK
sulla voce Ricerca per avviare la scansione.
NOTA
Una nuova installazione dei canali (opzione Reinstalla) sostituirà tutti i canali memorizzati in precedenza con quelli
rilevati durante la nuova scansione.
2. Scansione Canale (per utenti esperti): ricerca di un singolo canale RF tra i canali predefiniti o per
frequenza. Definire i parametri del canale RF interessato e premere OK sulla voce Ricerca per far
partire la scansione.
4.4.2 Aggiornamento canali in standby
Il ricevitore è configurato per effettuare giornalmente l’operazione di aggiornamento canali in modalità
standby all’ora definita nel menu Strumenti > Aggiornamenti Automatici > Aggiornamento Canali. Dallo
stesso menu, è possibile modificare l’Orario della ricerca, nonché disabilitare la funzione.
9
TELE System
4.5 Regolazione orario
Per attuare tale regolazione, premere il tasto MENU e selezionare il menu Configura Sistema > Paese ed
Ora. Sono disponibili tre modalità, distinguibili dal valore del parametro Uso GMT:
1. Spento: impostazione manuale di data ed ora da parte dell’utente.
2. Tramite Paese: il ricevitore regolerà l’ora seguendo l’impostazione della voce Paese. Si dovrà inoltre
definire l’opzione Ora Legale (Spento, Acceso).
3. Manuale: il ricevitore regolerà l’ora seguendo la differenza oraria rispetto al riferimento del meridiano di
Greenwich (parametro Scostamento GMT).
AVVERTENZE
Alcuni servizi digitali terrestri includono informazioni, la cui visualizzazione è strettamente correlata alla esatta
impostazione dell’orario del ricevitore. Inoltre, in modalità d’uso GMT, l’orario viene aggiornato direttamente dalle
informazioni trasmesse dal canale sintonizzato.
4.6 Aggiornamento Software
Al fine di apportare migliorie o aggiungere eventuali nuove funzioni al ricevitore, il produttore può rilasciare
aggiornamenti software.
Il ricevitore è in grado di prelevare, dal segnale digitale terrestre proveniente dall’antenna, i dati
dell’aggiornamento software, quando essi sono trasmessi da un’emittente televisiva.
AVVERTENZA
L’operazione di scarico ed installazione di un nuovo software può richiedere diverso tempo, soprattutto in caso di
ricezione difficoltosa. Durante tale periodo, non interagire col ricevitore e non staccare l’alimentazione: rischio di blocco
irreversibile del ricevitore!
Manuale
Il menu Strumenti > Aggiornamento Software > Aggiornamento via etere (Over The Air - OTA) mette a
disposizione la funzione di ricerca manuale di nuovo aggiornamento software, tramite la quale il ricevitore
eseguirà, a scelta dell’utente, una scansione su tutte le frequenze (consigliata) o puntuale (per esperti).
Automatico
Il menu Strumenti > Aggiornamenti Automatici > Aggiornamento SW è invece dedicato alla
personalizzazione della ricerca aggiornamento software automatica. L’aggiornamento software automatico
può avvenire in Modalità Standby (Acceso/Spento) ed in Modo Operativo (Acceso/Spento). Questo
ultimo, se attivo, controlla anche l’orario della ricerca (vedi parametro Ora a menu), altrimenti, se esso è
disattivato, la ricerca in standby avverrà 45 minuti il posizionamento del ricevitore in standby.
4.7 Risparmio energetico - Spegnimento Automatico
Questo ricevitore è dotato di funzioni per il risparmio energetico:
4.7.1 Spegnimento Automatico
Passate tre ore in modo acceso senza alcun comando da parte dell’utente, il ricevitore si posizionerà in
standby automaticamente. Qualche istante prima dello spegnimento, apparirà a video un avviso, mediante il
quale l’utente potrà annullare l’interruzione della visione.
Questa funzione è preselezionata di fabbrica, ma la si può disattivare dal menu Configura > AutoSpegnimento (Acceso/Spento).
AVVERTENZA
Prima di definire un timer di accensione-spegnimento con durata maggiore di tre ore, dal menu Configura >
Impostazione Timer o dalla Guida Elettronica ai Programmi (EPG), disattivare la funzione di spegnimento automatico.
4.7.2 Uscita/Loop Antenna
Per consentire un maggior risparmio energetico, l’uscita passante antenna RF OUT, sita nel pannello
posteriore del ricevitore (par. 2.2), non è attiva durante la modalità di standby. Si tratta di un’impostazione di
fabbrica comunque attivabile agendo sul parametro Loop Antenna (Spento/Acceso) del menu Installazione
> Antenna.
4.8 Reset di fabbrica
Se necessario, è possibile riportare il ricevitore alle condizioni di fabbrica mediante un reset software. Tale
operazione è realizzabile premendo il tasto OK del telecomando in corrispondenza del menu Strumenti >
Ripristino Impostazioni di Fabbrica.
ATTENZIONE
L’operazione di reset comporta l’annullamento di tutti i canali memorizzati e delle personalizzazioni effettuate
dall'utente; ad ogni modo, l’ultima versione software installata verrà tuttavia preservata.
10
Italiano
TS.UNICO
5 Struttura del menu
Il menu del ricevitore è così strutturato:
Canali
Menu Principale
Installazione
Configura
Strumenti
-Lista Canali TV
-Scansione Automatica
-Lingua OSD
-Informazioni Ricevitore
-Lista Canali Radio
-Scansione Canale
-Sistema TV
-Giochi
-Lista CH TV Rimossi
-Antenna
-Paese ed Ora
-Ripristino Impostazioni
di Fabbrica
-Lista CH Radio Rimossi
-Impostazione Timer
-Aggiornamento
Software
-Cancella Tutti i Favoriti
-Configurazione OSD
-Aggiornamenti
Automatici
-Cancella Tutti
-Protezione Ricevitore
-Rinomina Gruppo
-Auto-Spegnimento
NOTA
La navigazione tra i menu è semplice ed intuitiva. Utilizzare i tasti MENU, BACK, EXIT, cursore (frecce ed OK) e
numerici del telecomando. Attenersi inoltre alle indicazioni poste su ogni finestra di dialogo del menu.
6 Caratteristiche tecniche
Tipo prodotto
Frequenza in ingresso
Larghezza di banda di canale
Display
Lingue menu
OSD menu
Televideo (ETSI EN 300 472)
Sottotitoli ( ETSI EN 300 706)
Guida Elettronica ai Programmi (EPG)
Modulatore RF
Rapporto di formato video
Uscita Audio Digitale Coassiale (SPDIF)
Uscita Audio Digitale Ottica (SPDIF)
Uscita SCART TV
Presa SCART VCR
Connettori (RCA) Audio Stereo
Connettore (RCA) Video
Porta dati seriale RS232
Aggiornamento software
Funzione reset di fabbrica
Liste canali favoriti
Programmazione Timer
Auto-spegnimento (risparmio energia)
Aggiornamento canali automatico
Telecomando
Alimentazione
Consumo (tipico)
Dimensioni
Ricevitore digitale terrestre (ETSI EN 300 744) per canali in chiaro
147÷230 MHz (VHF) / 470÷862 MHz (UHF)
6 / 7 / 8 MHz
Eng, Fra, Spa, Ita, Deu, Cze, Pol
16:9 Full Screen / 16:9 Pillar Box / 4:3 Pan Scan / 4:3 Letter Box
Out: Video RGB / CVBS, audio L+R
Out/In: Video CVBS, audio L+R
Via etere (OTA)
2 versioni: avanzato e base; 2in1 (STB + TV)
230V~, 50 Hz
Standby: 0.41W
Acceso: 2.96 W
168x110x36 mm
11
TELE System
7 Guida alla risoluzione dei problemi
PROBLEMA
1. Il ricevitore non si accende
(indicatore LED sul pannello frontale
del ricevitore è totalmente spento)
2. Nessun segnale Video o Audio
3. Immagine a video con tonalità
colore tendente al verde.
4. I canali non vengono caricati
5. Le regolazioni impostate non sono
state memorizzate.
6. Il telecomando non funziona.
7. Avete dimenticato la Password.
8. Non è possibile accedere al menu.
9. Il Box non interagisce con i tasti del
telecomando.
10. Non è possibile uscire dal menu
Installazione Guidata.
11. Timer eventi programmati non
funzionano correttamente.
12. Il ricevitore si spegne in
automatico.
13. L’uscita passante antenna non
funziona in standby.
POSSIBILI CAUSE
COSA FARE
La spina di alimentazione non è Controllare che la spina sia inserita
inserita nella presa di corrente.
correttamente nella presa di corrente.
Dopo aver tolto la spina dalla presa,
La spina è inserita, ma il box non controllare l’integrità del cavo di
alimentazione (Attenzione: pericolo di
funziona ugualmente
scossa elettrica!).
Il segnale d’antenna non c’è o è Verificare l’installazione dell’antenna e
debole.
la qualità del segnale ricevuto.
Cavo SCART o cavo segnale antenna Controllare il collegamento SCART e il
sconnesso e/o danneggiato.
cavo d’antenna.
Controllare che il volume del TV e del
Volume audio basso o nullo.
ricevitore non siano a zero.
Il TV non è commutato sull’apposito Controllare che il TV sia commutato
canale audio-video (AV).
sul canale AV (vedi manuale del TV).
Cavo SCART difettoso.
Sostituire il cavo SCART.
Ingresso SCART dello schermo TV Importare l’Uscita Video del menu
non compatibile con video RGB.
Configura > Sistema TV su CVBS.
Verificare la presenza di segnale
Mancanza di segnale d’antenna.
antenna dal menu Scansione Canale.
L’impianto d’antenna non è adeguato
Consultare un installatore di fiducia.
al sistema digitale terrestre.
Provare ad effettuare una scansione
manuale su un canale noto.
Mancata conferma dopo una modifica Prima di uscire dal menu premere
delle impostazioni.
l’eventuale tasto di conferma.
Utilizzo del telecomando in modalità Premere il tasto STB e verificare il
errata.
funzionamento verso il ricevitore.
Premere il pulsante q sul pannello
Il ricevitore è in standby.
frontale per verificare il buon
funzionamento del ricevitore.
Il telecomando non è puntato Puntare il telecomando. Verificare che
correttamente verso il sensore non vi siano ostacoli davanti al
infrarossi del ricevitore.
pannello frontale.
Le batterie sono scariche.
Sostituire le batterie.
Le batterie sono cariche ma non Controllare il corretto inserimento
inserite nel verso corretto.
delle batterie.
Il telecomando vi è caduto e i
Rivolgersi al proprio rivenditore per
componenti
interni
si
sono
l’acquisto di un nuovo telecomando.
danneggiati.
Consultare il par. 4.1.
La funzione protezione Hotel è attiva. Consultare il par. 4.3.
Scollegare l’alimentazione del box per
Blocco momentaneo del ricevitore.
un minuto e poi ripristinarla.
Riavviare il box con l’antenna
scollegata, cancellare il canale
Un’emittente trasmette dati errati.
problematico, quindi ripristinare la
connessione antenna.
Consultare i suggerimenti al punto 6 di
Problemi con il telecomando.
questa tabella.
Modalità Hotel attiva.
Disattivare il modo Hotel (par. 4.3).
La password non è stata ancora
Consultare il cap. 3.
definita.
L’orario del ricevitore non è impostato Regolare propriamente l’orario (vedi
correttamente.
par. 4.5).
I canali coinvolti non trasmettono un
orario corretto.
Disattivare la funzione per il risparmio
Funzione Auto-Spegnimento attiva.
energetico (par. 4.7.1).
Attivare l’opzione Loop Antenna del
L’uscita RF OUT è disattivata.
menu Antenna (par. 2.2 e 4.7.2).
AVVERTENZA
Generalmente, in caso di comportamento anomalo del ricevitore, un ripristino delle impostazioni di fabbrica tramite reset
(par. 4.8) o un riavvio del sistema può aiutare a risolvere il problema riscontrato.
12
1 Safety regulations ....................................................................................................................................... 2
2 Product description and connections .......................................................................................................... 3
2.1
Front Panel ....................................................................................................................................... 3
2.2
Rear panel and connections ............................................................................................................ 3
2.3
Remote Control Unit ......................................................................................................................... 4
2.3.1
Batteries................................................................................................................................... 4
2.3.2
Buttons and related functions .................................................................................................. 4
2.3.3
TV button programming ........................................................................................................... 5
2.3.4
How to use the remote control................................................................................................. 6
3 First time installation ................................................................................................................................... 7
4 Receiver settings ......................................................................................................................................... 8
4.1
Password .......................................................................................................................................... 8
4.2
Parental Control ............................................................................................................................... 8
4.3
Advanced menu protection (Hotel Function) .................................................................................... 8
4.4
Channel scanning and updating....................................................................................................... 8
4.4.1
Channel scanning .................................................................................................................... 8
4.4.2
Standby channel updating ....................................................................................................... 8
4.5
Clock setting ..................................................................................................................................... 8
4.6
Software Upgrading.......................................................................................................................... 9
4.7
Energy saving................................................................................................................................... 9
4.7.1
Auto Standby ........................................................................................................................... 9
4.7.2
Antenna loop-through .............................................................................................................. 9
4.8
Factory Reset ................................................................................................................................... 9
5 The menus ................................................................................................................................................ 10
6 Technical Specifications............................................................................................................................ 10
7 Problem solver .......................................................................................................................................... 11
Appendix A.
Codici TV / TV codes.............................................................................................................. i
CAUTION: Due to updates or mistakes, the content of this user manual could not correspond exactly to the real product.
English
Index
TELE System
1 Safety regulations
We advise you to read the following advice concerning the safety regulations carefully in order to ensure
safe use of the appliance.
ELECTRICAL SUPPLY
x
x
x
The appliance should only be supplied by a current of 230V~, 50Hz.
The appliance must not be repaired in any way by the user, in case of breakages or failures please refer to the
nearest centre for assistance.
Do not remove the cover. The inside of the appliance could contain higher voltages than that of the supply
voltage which could endanger the user. High voltage is also present when the appliance is on standby. The
receiver should be disconnected from the electrical supply before performing any intervention. Non-authorised
removal will mean that the warranty is no longer valid!
POWER CABLE
x
x
x
Before installing the appliance make sure that the cable is intact, paying particular attention to its connection
to the power supply and to the receiver. If the cable is damaged do not attempt to connect the appliance and
refer the problem to an authorised centre for assistance.
When installing the cable make sure that it cannot be flattened in any way by items placed above or next to
the appliance. Avoid placing the cable in an area where it could accidentally be stepped on, removed from the
wall or damaged in any way.
If the cable is damaged in any way carefully disconnect from the appliance and refer to specialised technicians
or the centre for assistance to get a replacement.
LIQUIDS
x
x
Keep the appliance far from any liquids. Do not place any objects containing liquids on the appliance, such as
vases, humidifiers, etc. The appliance must not be installed in areas where it could come into contact with
sprays or drops of water or in an environment with a high level of humidity where condensation could occur.
If the receiver should accidentally come into contact with liquids, disconnect immediately from the wall. DO
NOT TOUCH the device until it has been disconnected.
SMALL OBJECTS
x
Keep the receiver away from needles or other small objects. Items which fall into the appliance via the
ventilation gaps could cause serious damage.
CLEANING
x
x
Before cleaning, disconnect the device from the power supply.
To clean the outside of the receiver use a soft and dry or slightly damp cloth. Avoid using products which
contain chemicals or solvents.
VENTILATION
x
x
x
x
Make sure that the area where the appliance is to be installed has good air circulation so that the heat can be
dissipate well in order to avoid overheating.
In order to allow enough ventilation it is necessary to have a distance of at least 10 cm on either side of the
appliance and 15 cm above the appliance.
The vents must be kept clear from any obstructions such as newspapers, table cloths, furniture material,
curtains, carpets etc.
Avoid installing the receiver close to any heat sources (i.e. radiators, stoves etc) or on top of any other
appliances which omit heat (i.e. video players, audio amplifier, DVD recorder/player, etc).
WARNING!
x
x
x
x
x
x
x
x
2
Keep the appliance out of reach of children.
The plastic bags used for packaging can be dangerous. To avoid suffocating keep the bags out of reach of
children.
Do not expose the receiver or remote control to direct sunlight.
The appliance must be placed on a solid and stable base.
Connect the device to the power supply only after installation is complete.
Remove the batteries from the remote control if they will not be used for a long period of time. The remote
control could be damaged by any eventual battery leakages.
Dispose of the product correctly so as to avoid damage to the environment and human health as well as to
facilitate recycling of the components/materials used in the appliance. If the product is not disposed of properly
this could be punishable according to the involved law.
The manufacturers recommend that the parts are recycled separately and are taken to sites which conform to
current regulations.
x Take the product, including its accessories and batteries, when no longer usable to a collection
point which is authorised to handle waste from electrical or electronic appliances that should be kept
separate from regular household waste.
TS.UNICO
2 Product description and connections
English
2.1 Front Panel
1. IR Infrared sensor for remote control.
2. LED Status indicator: Green=On, RED=standby.
3. q On/Standby button.
2.2 Rear panel and connections
CAUTION
x
x
It is good practice to connect the receiver with other appliances (e.g. TV, VCR, HI-FI, etc.) and the antenna before
plugging in the mains lead. When the receiver is powered, electrical voltage differences may be created when
plugging in the jacks, which may generate currents that could damage the appliances.
The direct audio-video connection with TV screen should always be used as a first operating test, since other more
complex connection sequences may give malfunctions that are not caused by faults or defects of the actual
appliances but by problems of incompatibility.
1. RF IN Antenna Input.
2. RF OUT Antenna TV loop through output.
CAUTION
For energy saving, during standby mode the RF OUT is disabled by default, but it can be activated by setting On the RF
Loop parameter in the Installation > Power Control menu (see sect. 4.7.2).
3. TV SCART Analogue audio-video output for connecting TV screen.
4. VCR SCART Auxiliary analogue audio-video socket.
CAUTION
The VCR SCART socket can be used even as an input for an external source (e.g. DVD player), but only in operative
mode and by pressing the DTV/VCR button of the advanced remote control unit.
5. Coaxial S/PDIF Coaxial Digital Audio output for home-theatre amplifier.
6. POWER Power lead for 230V~ 50Hz.
3
TELE System
2.3 Remote Control Unit
Get well acquainted with your remote control and you will find it much easier to navigate through the various
menu options.
This set top box is equipped with a remote control units that are able to command the receiver itself (press
STB button) and even a TV set after having programmed the TV button (sect. 2.3.3).
2.3.1 Batteries
Information and warnings
Battery type: 2 x AAA, 1.5V.
Insert/replace the batteries at the first installation or when the remote control doesn’t work well.
It’s recommended to remove batteries from the remote control if it is not used for long time, in order to avoid
any possible damage.
Do not use different types of battery or flat and new batteries at the same time.
Insertion and removal
Open the battery cover on the bottom of remote control and insert the two batteries (AAA format) respecting
the right polarity direction as indicated on their place. Then, close the cover.
Remove the flat batteries, that must be disposed separately from common garbage and they must be taken
to the shop or waste collection point, repeating similar operations done during the insertion.
2.3.2 Buttons and related functions
2.3.2.1 Advanced remote control
1. q POWER On / Standby.
2. LED LED indicator.
3.
TV Enable TV set control. (*)
4.
STB Enable set top box control.
5.
SOURCE Audio-video source of the TV set. (*)
6. 0÷9 Tasti alfanumerici Change channel or enter number in menu input
boxes.
7. EPG Electronic Program Guide. (**)
8. INFO Display channel information. (**)
9. VOL +/- Adjust audio volume.
10.
MUTE Mute.
11. TV/RADIO Switch between TV and Radio programs of the device.
12. PROG +/- Next/previous program.
13. MENU Main menu.
14. FAV Display favourite channel list.
15. BACK Previous menu.
16. EXIT Quit menu, EPG or other functions.
17. , , , Menu navigation.
18. OK Confirmation button or channel list recall.
19. DTV/VCR / ROSSO TV SCART switching / Contextual menu functions.
20. VERDE, GIALLO, BLU Contextual menu functions.
21. AUDIO Audio track and mode selection. (**)
22. SUB Subtitles. (**)
23. TEXT Teletext. (**)
24.
FILE, 1 PLAY, 2 PAUSE, 3 STOP, 4 REC, 7 PREV, 5 REW, 6
FWD, 8 NEXT (PVR buttons) No function.
(*)
For controlling the TV set, the TV button has to be programmed properly (refer to sect.
2.3.3).
(**)
Program information, subtitles, teletext and additional audio track are optional data
provided by the broadcasters.
4
TS.UNICO
English
2.3.2.2 Basic remote control
1.
2.
3.
4.
5.
6.
7.
8.
9.
10.
q POWER On/Standby.
LED LED indicator.
TV Enable TV set control. (*)
STB Enable set top box control.
0÷9 Channel change.
SOURCE Audio-video source of the TV set. (*)
MUTE Mute function.
P+ / P- Next/previous program.
OK Confirmation button or channel list recall.
VOL- / VOL + Adjust audio volume.
(*)
2.3.3).
For controlling the TV set, the TV button has to be programmed properly (refer to sect.
2.3.3 TV button programming
2.3.3.1 Setup by TV brand code
The default TV brand codes are listed in the Appendix A. Detect the brand of your TV set, then follow these
steps:
1. Switch on the TV set.
2. Press and hold the TV button for 3 second. Release it as soon as the LED indicator is lighted up.
3. Enter the 4-digit TV brand code by using the numeric buttons 0÷9.
4. The LED will turn off if the remote control accepts the code. Instead, if the code is wrong, the LED will
flash 3 times and turn off; in this last case, repeat the procedure.
5. Check the functions of the buttons of the remote control. If it does not function correctly, try another 4digit TV set code from the list under the same brand by repeating the steps from 1 to 5 until all basic
functions operate correctly.
If the TV brand is not present in the list or the setup is unsuccessful, try the next method.
2.3.3.2 Setup by manual search
1.
2.
3.
4.
5.
Switch on the TV set.
Keep pointed the remote control at your TV set for all the procedure.
Press and hold the TV button for 3 seconds until the LED lights up.
Press the
POWER or PROG+/P+ button progressively.
As soon as the TV set responds to the command, by going in standby or changing channel, press the
OK button to save the code. The LED will turn OFF.
6. Check whether the other buttons of the remote control function properly. If the majority of the buttons
does not function correctly, repeat the procedure starting from the first step.
2.3.3.3 Display the TV brand code
To identify the TV brand code in use by the remote control, follow these steps:
1. Press and hold the TV button for 3 seconds until the LED lights up.
2. Press and hold the STB button for 3 second, then release it.
5
TELE System
3. To get the first digit of the code, press singularly the numeric button from 0 to 9 until the LED flashes
once. The number that lights up the LED corresponds with the searched digit.
4. Repeat the above step 3 times in order to find the remaining three digits of the code.
5. After having the last digit of the code, the LED will turns OFF.
NOTE
When the TV button is not programmed or after a reset (sect. 2.3.3.5), the code is 0000.
2.3.3.4 Setup by learning function
The learning function is used to extend the default programs of the standard TV code list (Appendix A),
thanks to the Learning function. A fully functional original remote control of the TV set is required. Please
also use new batteries for both the original TV remote control and the Learning remote control.
1. Press and hold the TV button of the Learning remote control. Release it when the LED turns on.
2. Press and hold the
SOURCE button until the LED starts flashing: now the remote control is in
learning mode.
3. Align the IR sensors of both remote control units and keep them so at a closed distance (around 3 cm)
for all the procedure.
4. Press and release the target button on the Learning remote control which you want to program: the LED
will light up.
5. Press the button of the original remote control that match with the button mentioned on previous step. If
the command is accepted, the LED of the Learning remote control will restarts flashing.
CAUTION
The capturing is not immediate, it may take some seconds.
6. Repeat the steps 4 and 5 for all the other buttons to learn from the original remote control.
7. When you finish learning all needed buttons, press the TV button to save all commands you have learnt
from original remote control and exit the learning mode.
CAUTIONS
x
x
Every button keeps the learned function even after changing the TV program code. For restoring the original function
of the buttons, perform a reset (see sect. 2.3.3.5).
The buttons TV, STB and SOURCE are not programmable.
2.3.3.5 Remote Control Unit Reset
To restore the factory settings of the remote control, proceed as follows:
1. Press and hold the TV button of the Learning remote control. Release it when the LED turns on.
2. Press and hold the
SOURCE button until the LED starts flashing.
3. Press and hold again the
SOURCE button until the LED turns OFF: the reset is done.
CAUTION
A reset will cancel any learned function and restore the TV code to 0000.
2.3.4 How to use the remote control
After having properly programmed the remote control unit for controlling the TV set, it will work like the
original remote control of the TV set, limited to main functions, such as On/standby switching, audio volume
adjustment and channel change.
Press the proper function button STB or TV to control respectively the receiver or the TV set, then point the
remote control at the IR sensor of the target device. At each IR transmission, the LED indicator will blink.
6
TS.UNICO
When all the connections on the receiver are ready (section 2.2) and the power lead is plugged in, the
receiver will start up automatically. If this does not happen, press the q button on the front panel of the
receiver or on the remote control.
An Easy Installation menu will be displayed where you can set different parameters and then run the channel
scan:
Step 1 – OSD Language
Use the arrow / button to select a language for the On Screen Display menu (OSD). Press to go to
the next parameter.
Step 2 – Region
Use the arrow / buttons to select your Country. Press to proceed.
CAUTION
If a wrong Region is selected the channel scan may not detect all the channels available.
Step 3 – LCN Mode
When the Logical Channel Numbering option is active, after the scanning, TV and Radio services will be
automatically stored in the list following the order requested by the broadcasters. Press to go forward.
NOTE
When LCN mode is turned on, we suggest to not change the channel positions in the TV/Radio Channel List menu.
Step 4 – Tuner Power
If you are using an active antenna press / to power the antenna; this is necessary when, for instance, an
indoor amplified antenna has to be powered by the receiver.
CAUTION
With a traditional antenna, like typical rooftop models, or an independently powered antenna, the antenna power option
must be set to off: risk of overload!
Step 5 – Password Definition
Press OK on New Password field and input a 4-digit numeric password (PIN), then reinsert the same
password on Confirm Password and push OK again. Press to proceed.
CAUTION
Password definition for Parental Control (sect. 4.2) is mandatory for completing the installation.
Step 6 – Channel Scan
Press OK item to start the automatic channel scan. When the scan is completed, if there are no LCN conflict
the receiver will enter the viewing mode, otherwise see below step.
Step 7 – LCN Conflict Resolution
When the LCN function is active and more than a service asks for the same channel list position, the system
will recognize that conflict and display on screen a list of the involved services. Choose the preferred channel
by using / arrow buttons e confirm with OK. As an alternative, go to the automatic solution. Also, if the
user doesn’t make a choice, after a few time the appliance will carry out a solution by itself. After these
actions, the receiver will enter the viewing mode.
Step 8 – Time Setting
We suggested to check the time setting. Press MENU and go to Setup > Region and Time menu, choose
the proper Summer Time option (Off/On) or change another type of time regulation (sect. 4.5).
Step 9 – Video Configuration
For TV SCART output settings, go to Setup > TV System menu and regulate Aspect Ratio (16:9 Full
Screen/Pillar Box or 4:3 Letter Box/Pan Scan) and Video Output (RGB or CVBS) respecting the technical
characteristics of the connected screen.
7
English
3 First time installation
TELE System
4 Receiver settings
The first time installation procedure (chapter 3) will allow the receiver to be used with its basic functions.
However the receiver offers some advanced features and options that are illustrated in the following
sections.
4.1 Password
To access settings and events locked by the Parental Control (sect. 4.2), a password has to be entered. The
password is defined by the end-user at the first time installation (cap. 3), but it can be changed by pressing
MENU and selecting the Setup > Parental Lock.
CAUTION
If you forget your personal password, you have to reset the device by using Tools > Load Factory Default menu.
4.2 Parental Control
The Parental Control protects children by the viewing of sensitive contents. When an event is broadcasted
with a parental rating equal or higher than the parental lock level defined on receiver menu, a system
message will notify that the channel is locked. To see that channel, you have to enter the password (sect.
4.1).
The factory set level is Age=18 and it can be changed by the user on Setup > Parental Lock > Channel
Lock menu.
4.3 Advanced menu protection (Hotel Function)
The Hotel Function is a hidden utility, which consists in an advanced protection of the receiver. It allows to
enter the main menu only by typing a password.
For enabling that function, press MENU and any numeric button of remote control, then input the system
password (sect. 4.1) or the special PIN 3327. For disabling it, press MENU and type the password.
4.4 Channel scanning and updating
The first time guided installation procedure runs a channel scan and saves any channels available at that
time. However later scans may become necessary if, for instance, a new channel becomes available or
when an existing channel changes frequency.
4.4.1 Channel scanning
To access the channel scan function from the viewing mode, press MENU on the remote control to open the
main menu, select Installation and go to one of the following submenus:
1. Auto Scan: an automatic scan of all digital terrestrial channels through whole frequency range. Define
the Scan Mode parameter (All for all channels or Free for Free to air) and the type of Action (Update or
Reinstall). Press OK on Search to start the scan.
CAUTION
When a reinstallation is run, the previous existing channel list will be lost.
2. Channel Scan (for expert users): set all needed parameters displayed on video related to the interested
RF channel, then select Search and press OK.
4.4.2 Standby channel updating
In standby mode, this receiver is set to search daily for new available channels, at the exact Time defined on
Tools > Automatic Upgrade Setting > Automatic Channel List Update menu. Through this menu, it’s
possible to modify the searching Time or to disable the In Standby Mode option.
4.5 Clock setting
In viewing mode, press MENU and go to Setup > Region and Time menu. These kind of settings are
available under GMT Usage item:
x Off: the user manually sets date and time.
x By Region: the receiver will automatically set the time according to the selected Region. In addition, set
properly the Summer Time option (Off, On).
x User Define: the receiver will automatically set the time according to Greenwich Mean Time offset (GMT
Offset parameter).
CAUTION
Some digital terrestrial services transmit information, which is strictly linked to a correct time setting of the receiver. In
addition, under GMT usage, the receiver will follow the time data transmitted by the broadcaster.
8
TS.UNICO
Since this receiver is made to last, the time may come when its software needs to be modified or improved
by updates. These updates will optimise the receiver’s functions or correct minor flaws.
Updates may be distributed to the receiver Over The Air (OTA).
CAUTION
An OTA upgrade could take several time, in particular in case of weak signal. During the upgrade, do not interact with the
receiver and never turn off the main leads: risk of permanent damage!
Manual
When an update is made available, enter the Tools > Software Upgrade > Upgrade by Air.
Automatic
Thanks to the Tools > Automatic Upgrade Setting > Automatic Software Upgrade menu, the user may
customize the automatic software upgrading, which can take place In Standby Mode (On/Off) and/or In
Operate Mode (On/Off) at the Time defined on menu.
4.7 Energy saving
This receiver is equipped with energy saving functions:
4.7.1 Auto Standby
After three hours in active mode without any action of the user, the receiver will be switched automatically
into standby mode. A few minutes before the switching, a notification message will appear on screen.
The automatic power-down function is set to On (active) by default, but the user may disable it from the
Setup > Auto Standby menu.
CAUTION
If you set a program timer on Setup > Timer Setting menu or from EPG with a duration greater than three hours, we
suggest to disable the Auto Standby function.
4.7.2 Antenna loop-through
During standby mode, the antenna loop-through (RF OUT connector, see sect. 2.2) is disabled by default. It
can be activated by setting On the RF Loop parameter of the Installation > Power Control menu.
4.8 Factory Reset
The factory settings of the receiver can be restored by a software reset. To do so, press MENU on the
remote control, select Tools and then Load Factory Setting.
CAUTION
A reset will lose all personal options and features settings saved in the receiver.
9
English
4.6 Software Upgrading
TELE System
5 The menus
The menu map:
Main Menu
Channel
Installation
Setup
Tools
-TV Channel List
-Auto Scan
-OSD Language
-Receiver Information
-Radio Channel List
-Channel Scan
-TV System
-Load Factory Default
-TV Channel Recycle
List
-Power Control
-Region and Time
-Software Upgrade
-Radio Channel Recycle
List
-Timer Setting
-Automatic Upgrade
Setting
-Delete All Favourites
-OSD Setting
-Delete All
-Parental Lock
-Group Rename
-Auto Standby
CAUTION
The menus are simple and easy to navigate. Use the arrows, OK and number buttons and always follow the instructions
given in the bottom toolbar.
6 Technical Specifications
Product type
Input frequency range
Bandwidth
Front Panel Display
Menu language
OSD menu
Teletext (ETSI EN 300 472)
Subtitle ( ETSI EN 300 706)
Electronic Program Guide (EPG)
RF modulator
Video format ratio
Coaxial Digital Audio Output (SPDIF)
Optical Digital Audio Output (SPDIF)
TV SCART Output
VCR SCART Output
Stereo Audio Output RCA
Video Output RCA
RS232 Serial Data Port
Software Upgrade
Factory Reset Function
Favourite Channel List
Timer Reservation
Auto-Standby (power saving)
Channel Auto-Updating
Remote Control Unit
Power Supply
Power Consumption
Dimensions
10
Free to air digital terrestrial receiver (ETSI EN 300 744)
147÷230 MHz (VHF) / 470÷862 MHz (UHF)
6 / 7 / 8 MHz
Eng, Fra, Spa, Ita, Deu, Cze, Pol
16:9 Full Screen / 16:9 Pillar Box / 4:3 Pan Scan / 4:3 Letter Box
Out: Video RGB / CVBS, audio L+R
Out/In: Video CVBS, audio L+R
Over The Air (OTA)
2 versions: advanced and basic; 2 in 1 (STB + TV)
230V~ 50Hz
Standby mode: 0.41 W
Active mode: 2.96 W
168x110x36 mm
TS.UNICO
7 Problem solver
POSSIBLE CAUSE
REMEDY
Disable the Hotel function (see section
4.3).
10. Cannot exit the Easy Install menu. The password is not defined.
See chapter 3.
The receiver time has not been set Set the time from the menu (see
section 4.5).
11. The scheduled event timer doesn’t correctly.
work properly.
The specific program transmits a
wrong time information
12. The receiver goes down into
Disable the automatic power-down
The Auto Standby function is active
standby mode automatically.
function (see section 4.7.1).
13. The antenna loop-through is not
RF OUT is disabled.
See section 2.2 and 4.7.2.
working.
Hotel mode protection in use.
CAUTION
Generally, in case of dysfunctional behaviours of the receiver, a factory reset (sect. 4.8) or a system reboot could solve
the problem.
11
English
PROBLEM
Plug in the power lead.
1. The receiver does not start (the The power lead is not plugged in.
status LED on front panel is not The power lead is plugged in but the Disable the electric power and check it
lighted up).
receiver still does not work.
for damage. RISK of electric shock!
Verify the antenna installation and
No signal or a poor signal.
signal quality.
SCART cable or antenna cable not
Check the SCART connection.
connected properly.
2. No Video or Audio signal.
Make sure the volumes of TV and
Audio volume low or zero.
receiver are not set to zero.
Make sure the AV channel is selected
AV channel not selected on TV set.
on the TV set (consult the TV user
manual).
Problematic SCART cable.
Replace the SCART cable.
3. Video on screen with green colour
Change the Video Output in CVBS
shade.
RGB not supported by the TV set
from Setup > TV System menu.
Check for a signal using the receiver
No antenna signal.
menu.
Your antenna system is not fully
4. The channel scan gives no results.
compliant with the digital terrestrial Ask for an antenna technician help.
signal.
Manually scan for channels.
Before quitting a menu, press the
Setting changes are not confirmed
5. The settings are not saved.
confirm button to save the changes (if
before quitting.
any).
Press STB button and check the
Wrong remote control mode in use.
response of the box. See also 2.3.4
Press the q button on the front panel
The receiver is in standby.
to check if the receiver is working
properly.
The remote control is not being Make sure nothing is obstructing the
directed towards the receiver.
front panel.
6. The remote control does not work.
The remote control batteries are flat.
Change batteries.
The batteries have been inserted in
Check the battery polarities.
the wrong direction.
The remote control has been dropped
Contact the local dealer and buy a
and its internal components have
new remote control.
been damaged.
7. You have forgotten the Password.
Consult this manual at section 4.1.
8. Accessing the menu denied.
Hotel Mode enabled.
See section 4.3.
Unplug the mains lead of the receiver
The receiver is temporarily blocked.
for at least one minute and then plug it
back in.
Reboot the box without the antenna
connection, delete the problematic
9. The receiver does not interact with A broadcaster transmits wrong data.
channel, then connect again the
the remote control buttons.
antenna.
There is a problem with the remote
Go to point 6 of this table.
control.
A
A.R.SYSTEMS
1170 1222
1224
ACCENT 1235 1252
ACTION 1235
ADMIRAL 1201 1235 1282
1296 1297 1309 1311
ADURA
1169 1170 1235
1243 1252 1291 1293
AGASHI 1170 1173
AIKO 1223 1235 1243
AIM 1169 1170 1171 1173
1224 1237 1253 1300
AIOSTAY 1235 1294
AIWA 1354 1396 1422 1084
AKAI 1170 1171 1173 1178
1198 1223 1232 1235 1237
1242 1243 1253 1271 1273
1280 1291 1293 1294 1295
1310 1313 1371 1381 1403
1082
AKI 1223
AKIRA 1169 1172
ALBA 1170 1243 1294 1351
ALBIRAL 1170 1173 1217
1222 1224 1247 1248 1252
1269 1274 1294
ALHORI 1223
ALLOGRAN 1223 1284 1287
1375
AMPLIVISION 1223 1224
AMSTRAD 1173 1235 1252
1253 1297 1347
ANEX 1170
ANGLO 1252
ANITECH 1170 1173 1195
1235 1269 1274 1298
ANSONIC 1170
ANTECNO 1243
ARCELIK 1023 1024 1118
1119 1134 1138 1065 1170
1183 1256 1264 1294 1303
1306 1325 1340 1392 1062
ARDEM 1325
ART TECH 1170 1235 1273
ASA 1182 1192 1193 1199
1200 1204 1282 1295
ASTHON 1170
ASTON 1333
ASTRA 1170 1173 1224 1232
1235 1294 1330 1336 1401
1402 1415
ASTRO SOUND 1170 1224
1269 1274 1294
ASUKA 1243 1294
ATAKI 1330
ATLANTIC ATORO
1170
1175 1183 1298 1375 1235
AUDIO STAR 1243 1330
AUDIOSONIC
1170 1173
1183 1217 1222 1223 1235
1243 1252 1269 1279 1285
1325 1382 1437
AUDIOSTAR 1243 1330
AUDIOTON 1223 1235 1243
1298 1330
AURORA 1201 1223 1235
1237
AUSIND 1189
AUTOVOX 1170 1192 1197
1198 1219 1223 1235 1237
1273 1284 1287 1353 1375
1376 1400
AUVISAT 1438
AWA 1170 1173 1223 1229
1235 1237 1273
B
BAIRD 1273 1300
BANG&OLUFSEN 1170 1173
1201
BARCO
1201 1212 1213
1215 1247 1248 1250 1294
1300
BASIC LINE 1170 1243 1284
1287 1288 1330
BAUR 1169 1170 1172 1173
1178 1179 1180 1226 1227
1235 1284 1286 1287 1291
1310 1428
BAZIN 1206 1223 1285
BEKO 1170 1173 1183 1256
1264 1285 1294 1303 1306
1308 1313 1325
BEKO 1337 1340 1392 1425
1437 1098 1166 1062
BEKO DVDLI 1072
BEKOTEKNIK 1174
BENQ 1164
BEON 1271
BIFONIC 1223 1235
BIGSTON 1235 1237 1252
BLAUPUNKT
1178 1179
1180 1181 1185 1187 1222
1229 1239 1242 1329 1348
1382
BLAUSONIC 1223
BLUE STAR 1294
BLUESKY 1170 1438
BRENDSTAR 1235
BRIONVEGA
1170 1171
1201 1203 1204 1212 1220
1221 1266 1296 1297 1353
1359 1426
BRITANNIA 1170 1223 1292
BROTHER 1252 1336 1413
BRUNS
1201 1267 1269
1274 1291
BSR 1285 1290 1347 1351
1377
BUSH(ATAKI)
1286 1293
1294 1330
C
CAMPER 1285
CAPSONIC 1170 1252
CARTEL 1064 1096
CASIO 1170 1171
CBM 1195
CENTURY 1201 1217
CGE 1170 1173 1183 1195
1211 1217 1235 1240 1243
1271 1285 1293 1294 1298
1311
CGM 1170 1174 1183 1235
1252 1325 1330 1369
CHANG HONG 1147
CIE 1235 1237 1243 1377
CIHAN 1170 1173 1285 1294
CLARIVOX 1170 1173 1196
1201 1217 1222 1224 1267
1278 1279
CLATRONIC 1341
COCA COLA 1159
COFADEL 1215 1256 1261
1265
COMPUTRON
1170 1173
1235 1253 1295 1362
CONCORDE 1235
CONDOR 1170 1173 1195
1235 1252 1269 1271 1274
1298
CONIC 1232
CONTEC 1223 1225 1229
1235 1252 1377
CONTI 1170 1173 1061
CONTIN.EDISON 1205 1214
1215 1241 1256 1261 1264
1265 1374
CONTIN.FR 1170 1362
COSMEL 1235 1279
COSMOS 1123
COSMOS 84 EKRAN 1067
COSMOS/TOKAI 1170 1235
CREA 1149 1157 1060
CROSLEY 1184 1195 1201
1211 1217 1240 1299
CROWN/ONWA SAKY 1170
1174 1183 1184 1195 1235
1243 1252 1253 1271 1325
1330 1369
CRYSTAL 1170
CS ELECTR 1243
CTC CLATRONIC 1170 1183
1195 1217 1223 1243 1252
1269 1271 1274 1341
CURTIS 1173
CYMATIC 1222 1223 1285
1294
D
DAEWOO 1170 1171 1173
1217 1219 1223 1235 1237
1243 1273 1280 1331 1382
1409 1410 1140
DANSAI 1232 1252
DAWA 1170 1173
DE GRAAF 1286
DECCA
1170 1172 1173
1222 1223 1228 1268 1273
DENVER 1170 1235
DESMET 1170 1173 1222
1235 1294 1298
DIAMOND 1235 1237
DIGILINE 1170
DIXI 1235
DOMEOS 1170 1407
DOMOH 1170
DORIC 1189 1299
DUAL 1169 1170 1173 1176
1182 1217 1223 1235 1284
1287 1291 1293 1294 1297
1320 1347
DUAL-TEC 1169 1170 1173
1176 1182 1217 1223 1235
1284 1287 1291 1293 1294
1297 1347 1382 1406 1407
1428
DUMONT 1170 1173 1182
1193 1195 1199 1200 1201
1239 1269 1271 1274 1299
DUX 1170 1173
D-VISION 1170
DYNAMIC 1235
DYNATECH DYNISTY 1170
1237
E
EDAN LINE 1170 1300
ELBE 1177 1222 1223 1224
1229 1261 1266 1294 1296
1297 1299 1309 1311 1386
1431
ELECTRO TECH 1235
ELEKTRONSKA 1222 1294
ELIN 1170 1173 1182 1223
1235 1291 1295
ELITE 1239 1298
ELMAN
1269 1274 1294
1347
ELTA 1246
EMERSON 1170 1173 1174
1183 1193 1195 1199 1201
1217 1223 1252 1269 1274
1294 1298
ENGEL 1267 1294
EPSON 1104
ETRON 1235 1253 1363
EUROCOM 1294
EUROLINE 1436
EUROMAN 1170 1173 1184
1223
EUROPHON 1217 1222 1223
1269 1274 1277 1294
EXPERT 1175 1262 1284
F
FAGOR 1294 1332
FALCON 1235
FENNER 1170 1173 1235
1237
FIDELIS
1170 1173 1223
1232 1235
FIDELITY 1214 1217 1223
1232 1243 1253 1264 1284
1287 1292 1294
FILSAI 1223 1235
FINLANDIA 1285 1286
FINLUX
1170 1173 1182
1189 1192 1193 1199 1200
1219 1222 1235 1269 1271
1273 1274 1291 1295 1299
1361 1381 1403
FIRST LINE 1170 1171 1173
1196 1217 1223 1224 1225
1235 1237 1273 1284 1287
1288 1291 1293 1294 1296
1298
FISHER
1174 1182 1201
1223 1225 1229 1230 1231
1234 1267 1284 1287 1299
1300 1310 1428
FLINT 1170 1280 1431
FORMENTI 1170 1173 1183
1189 1195 1201 1222 1223
1235 1239 1252 1269 1271
1274 1285 1294 1298 1299
1347
FORTRESS 1201
FRABA 1170
FRONTECH 1170 1217 1219
1223 1232 1235 1286 1294
1347
FUJITEC 1170
FUJITSU 1170 1176 1200
1223 1232 1243 1269 1274
1290 1297 1375 1376 1400
FUMEO 1290
FUNAI 1229 1235 1252 1377
G
GALACTEX 1223 1252
GALAXI 1170 1193
GALAXIS 1170 1183 1193
1271
GALAXY
1178 1183 1193
1195 1223 1269 1271 1274
GALERIA 1235
GBC 1170 1173 1217 1229
1235 1237 1243 1253 1273
1282 1294 1299 1330
i
Appendix A
Appendix A. Codici TV / TV codes
GE 1264
GEBER 1284 1287 1288
GEC 1209 1222 1223 1229
1273 1284 1285 1286 1299
1378
GELESO 1217 1222 1235
1237 1243 1282 1294 1299
GENERAL STAR 1328
GENERAL TECHNIC 1235
GIANT 1170 1173 1223 1259
1345
GITEM 1170 1173 1179 1180
1256 1264 1288 1289
GM 1170 1235 1252
GMG 1170 1235 1252 1271
GOLDFUNK 1369
GOLDSTAR 1170 1173 1176
1185 1191 1219 1223 1232
1235 1270 1275 1286 1290
1294 1328 1370 1407 1434
1439
GOODING 1362
GOODMAN 1025
GOODMANS
1170 1171
1173 1223 1229 1235 1237
1243 1253 1264 1294 1337
1369 1382
GORENJE 1170 1174 1183
1184 1284 1287
GPM 1243 1235
GRAETZ(ITT)
1337 1404
1433 1437
GRANADA 1170 1173 1196
1222 1223 1229 1242 1250
1259 1285 1286 1292 1299
1303 1312 1321 1345 1384
1417
GRANDIN 1170 1262 1284
1294 1298 1299 1431
GREAT WALL
1252 1279
1280
GRENADIER
1170 1235
1294 1328
GRONIC
1170 1173 1223
1235 1267 1269 1274 1294
GRUNDIG 1170 1171 1173
1178 1179 1180 1181 1185
1194 1196 1235 1298 1362
1380 1382 1427 1089 1117
1141
GTT 1170 1235 1271 1330
H
HAMERSTEIN
1223 1236
1252 1254
HAMPTON 1223 1299
HANIMEX 1243
HANSEATIC 1169 1170 1179
1180 1222 1223 1229 1235
1284 1286 1287 1291 1298
1299 1377 1382 1410 1434
HANTAREX 1170 1222 1235
HCM 1223 1235 1246 1294
1330
HEMMERMANN 1223 1263
1269 1274 1284 1287
HEXA 1278 1294
HIGASHI 1223
HILINE 1235 1252 1253
HINARI 1170 1228 1232 1235
HISENSE 1286 1300 1054
HISONIC 1234
HITACHI
1171 1223 1229
1232 1261 1270 1284 1285
1286 1287 1294 1295 1299
1306 1307 1308 1346 1356
1378 1379 1381 1382 1410
1429 1075 1097
HOSHAI 1330
ii
HUMAX 1042 1043
HUNTER 1393
HYPER
1170 1219
1235 1238 1243 1253
1294 1330 1346
HYPSON 1170 1173
1252
HYUNDAI 1170 1173
1414 1100 1127
1223
1285
1235
1368
I
IBERVISAO 1284 1287 1294
ICE 1243 1252 1253
IEG 1223
IMPER 1170 1171 1173 1235
1243 1252 1336
IMPERIAL 1170 1173 1183
1195 1211 1217 1240 1252
1271 1285 1293 1294 1311
INDESIT 1257
INF.REM.CONTR 1361
INNO HIT 1170 1173 1191
1217 1222 1223 1232 1235
1243 1253 1273 1299 1330
1126
INTERBUY 1219
INTERDISCOUNT 1170 1226
1256 1264
INTERFUNK 1169 1170 1173
1191 1204 1217 1222 1223
1232 1235 1243 1250 1253
1256 1271 1273 1284 1287
1288 1291 1299
INTERVISION
1170 1217
1219 1223 1269 1274 1275
1276 1294
IRRADIO 1170 1173 1189
1191 1196 1219 1232 1235
1243 1252 1253 1294 1369
1382
ISKRA 1222 1223 1269 1274
1294 1325
ITC 1223 1294
ITL 1170 1235
ITT 1068 1069 1070 1091
ITT SCHAUB LORENZ 1170
1235 1284 1287 1294 1299
1337 1403 1067 1165 1183
1237 1243 1291 1295 1300
1330
ITT/NOKIA 1169 1170 1173
1175 1182 1183 1199 1235
1237 1243 1271 1281 1284
1285 1286 1287 1288 1291
1292 1294 1295 1296 1299
1300 1310 1330 1342 1361
1369 1375 1381 1403
J
JET POINT 1170 1254
JINALIPU 1235
JOHNSON 1223
JVC 1029 1077 1229 1253
1254 1364 1365 1382 1411
1204
K
KORTING 1081
KAISER 1170
KAISUI 1170 1223 1235 1243
1271 1280 1330 1403 1431
KALRMAX 1222 1223 1224
1247 1248 1250 1285 1294
KAMAR 1234
KAMBROOK 1170 1223 1252
1275
KAMOSONIC 1223
KAPSCH 1175 1182 1299
1375
KARCHER 1170 1173 1174
1183 1200 1223 1224 1235
1277 1285 1286 1330
KARDON 1375 1376 1400
KAUASONIC 1393
KELVINATOR 1270
KENDO
1170 1173 1176
1217 1223 1235 1266 1269
1274 1282 1290 1296 1299
1311 1375 1376 1400
KENNEDY 1176 1217 1256
1266 1290 1297 1299 1311
1375 1376 1400
KENNEX 1170 1369
KERION 1170 1173
KIC 1223
KIOTA 1252
KITT 1223 1252
KIYOGIN 1170
KNEISSEL 1170 1177 1225
1311 1370 1382 1431
KOBIC 1235
KOENIG 1298 1299
KOERTING 1170 1174 1201
1209 1284 1287 1288
KOLSTER 1170 1173 1217
1219 1223 1224 1269 1274
1294
KONDA 1094
KONKA 1388 1391
KONTAKT 1362
KOTRON 1252
KRONNE 1223 1294
KUBA ELETRONIC 1428
KYOTO 1222 1223 1294
L
LAVIS 1222
LEADER 1235 1421
LEGEND 1170 1173 1223
1235 1252 1279
LENCO
1170 1173 1237
1269 1274 1291 1369
LENOIR
1170 1173 1223
1235 1237 1284 1287 1330
LEYCO 1170 1252 1273 1347
1377
LG 1425 1439 1407 1434
1083 1135 1155 1063
LIESENKOTTER 1170 1239
LIFE 1235
LLOYD'S 1196 1223 1235
1252 1299
LOEWE 1284 1143 1168
LOEWE OPTA 1169 1170
1172 1182 1201 1203 1204
1222 1223
LOGIK 1216 1228
LUMA 1282 1290 1297 1375
LUMATRON 1170 1113
LUXOR
1191 1219 1223
1270 1285 1286 1289 1291
1295 1299 1300 1357 1403
M
M.ELECTRONIC 1169 1170
1173 1182 1185 1191 1193
1199 1200 1201 1217 1219
1222 1235 1237 1241 1266
1269 1271 1274 1282 1284
1287 1294 1295 1299 1381
1382 1407 1428 1434 1436
MAAZ 1247 1248 1250
MACTH-ITALIA 1170
MAGNADYNE
1170 1173
1178 1201 1217 1222 1235
1269 1271 1274 1282 1284
1287 1294 1299
MAGNAFON 1170 1189 1193
1222 1223 1269 1274 1299
MAGNASONIC 1170 1173
MAGNEX 1170
MANESTH 1170 1285 1288
1291 1294 1298 1303
MANHATTAN 1369
MARANTZ 1170 1173
MARECH 1298
MARK 1325
MASCOT 1217
MATCH ITALIA 1170 1235
MATSUI
1170 1201 1223
1228 1235 1252 1284 1285
1286 1287 1294 1299 1301
1347 1351 1362 1373
MATSUKA 1223 1252 1351
MAXAM 1223 1235 1252
MAXELL 1235
MAXWELL 1170 1222 1248
1250 1269 1274
MCE 1235
MEDIACOM 1124
MEDION 1046
MEGA 1170 1171
MEMPHIS 1279
MERCURY 1223 1235 1252
1321
METZ 1178 1179 1180 1185
1186 1187 1204 1207 1208
1369
MGA 1169 1237 1243 1252
MICRON 1223
MINERVA 1178 1179 1180
1185 1196 1241 1362
MITRONIC 1232
MITSUBISHI 1102 1178 1201
1204 1228 1229 1235 1237
1259 1345 1349 1382 1169
MIVAR 1177 1188 1190 1191
1218 1222 1223 1323
MTC 1183 1294
MULTITECH 1169 1170 1174
1217 1219 1222 1223 1228
1229 1235 1243 1246 1252
1269 1274 1294 1330 1337
MURPHY 1189 1223 1285
1293 1294 1299
N
NAGEL 1210
NAGOTA 1285
NAKASHI 1170
NAMSONIC 1235
NAMSUNC 1235
NARITA 1237
NEC 1224 1228 1229 1235
1237 1280 1329
NECKERMANN 1170 1171
1173 1179 1180 1183 1185
1204 1223 1226 1227 1239
1266 1282 1285 1286 1298
1370 1377 1382 1436
NECSTAR 1393
NEI 1170 1173 1279 1285
1294
NEWMAR 1223 1285 1294
NEWTECH 1170 1223
NIKKAI 1223 1232 1252 1270
NIKKEI 1170 1173 1369 523
NIKKO 1170 1173 1279
NIPPON 1146
NOBLEX
1229 1230 1231
1234 1235 1236 1237
NOBLIKO 1189 1193 1195
1196 1217 1223 1269 1274
NORDMENDE
1202 1214
1215 1256 1261 1264 1283
1299 1352 1433
NORDWAY 1293
NORTEK 1170 1382
1170 1235
O
O.GENERAL 1229 1235
OCEANIC(ITT)
1258 1262
1281 1284 1285 1286 1288
1289 1291 1295 1299 1300
1381
OCTAL 1223
OKANO 1183
OLYMPIC 1235
ONCEAS 1217 1223 1235
ONIDA 1173
ONWA 1252 1253 1271 1403
ORAVA SLOV
1170 1201
1294
ORAVA/OTF 1170 1235
ORIENT
1170 1235 1335
1090
ORION 1170 1171 1228 1232
1235 1236 1252 1263 1281
1284 1285 1287 1304 1305
1308 1317 1347 1351 1360
1370 1373 1377
ORION HUNGARY
1170
1173 1281 1285 1357 1358
ORMOND 1170 1222 1369
OR-ON 1330
ORSOW'E 1170 1173 1222
1252
OSAKI 1170 1173 1252 1276
OTHER LINE 1173 1222
OTHERS 1101 1105 1106
1107 1108 1133 1396 1324
1343 1367 1148 1158 1116
OTTO VERSAND 1169 1170
1171 1172 1173 1178 1179
1180 1185 1219 1223 1226
1227 1229 1235 1242 1246
1264 1285 1286 1287 1291
1298 1299 1325 1428
P
PAEL 1189 1196 1223
PALLADIUM 1183 1204 1266
PALSONIC 1170 1173 1223
1232 1243 1252
PANAMA 1170 1173 1217
1252
PANASHIBA 1235
PANASONIC 1139 1294 1299
1344 1348 1366 1399 1179
1180 1242
PANAVOX 1170 1235 1299
PANAVSION 1252
PANORAMA 1223 1235 1243
PANORAMIC 1256
PATHE CINEMA 1183 1222
1223 1224 1278 1294 1298
PAUSA 1235
PCM 1170 1173
PEGASUS 1099
PERSHIN 1196 1278
PHILARMONIC 1223
PHILCO
1170 1173 1183
1195 1201 1211 1217 1224
1229 1235 1240 1271 1284
1285 1287 1293 1294 1299
1311
PHILIPS
1041 1145 1150
1151 1156 1170 1171 1173
1179 1180 1201 1204 1223
1224 1249 1250 1251 1271
1334 1355 1372 1382 1407
1412 1428 1435 1436
PHOENIX>FORMENTI 1318
1321
PHONOLA>PHILIPS
1314
1315
PILOT 1408 1433
PIONEER 1170 1173 1291
1370 1418 1073 1058
PLANTRON 1217 1222 1235
1282 1285 1299
PORTLAND 1170
PRANDONI PRINCE
1189
1217 1222 1269 1274 1282
1285 1299
PREMIER 1028 1052 1086
1128 1129 1142 1080 1170
1171 1327 1336 1393 1421
PRIMA 1223 1232 1235 1252
PRINCESS 1232 1235
PROFEX 1195 1235 1239
1291
PROFILO 1131
PROIFLO 1170 1173 1222
1264 1294 1370 1397
PROLINE 1304
PROSONIC 1170
PROTECH 1170 1173 1235
1271 1294 1304 1325 1369
1436
PYE 1170 1171 1173 1237
1250
Q
QUAL CRAFT
1189
1243 1269 1274 1347
QUASAR 1189 1232
1274 1299 1347
QUELLE
1169 1170
1178 1182 1189 1191
1193 1196 1199 1200
1223 1226 1228 1231
1239 1240 1252 1284
1291
1232
1269
1173
1192
1219
1232
1287
R
RADIOLA 1170 1171 1173
1250
RADIONETTE
1182 1200
1284 1299
RADIOTONE 1325 1341
RANK/RBM 1189 1286 1293
1299 1316
RC 903A 1115
RECOR
1169 1170 1173
1252
REDIFFUSION 1291 1299
REFLEX 1170 1369
REGENTE 1235
RFT 1201 1325
RITAR 1295
RIZ 1294
RM 1369
RM2000 1170
ROADMASTER 1050
ROADSTAR 1170 1173 1232
1235 1243 1330 1369 1370
1371 1440
ROB.ELECTR 1201 1267
ROWA 1223 1235 1252
ROWIDO/KONIG 1189 1294
ROWSONIC 1223
ROYAL 1173 1223 1235 1243
1252 1271
RTF 1201
S
S.LORENZ 1170 1183
1237 1243 1284 1287
1295 1299 1300 1330
SABA 1170 1204 1205
1215 1222 1235 1237
1259 1261 1264 1285
1294 1299 1335 1338
1352 1370 1374 1397
1112 1137
1235
1291
1214
1256
1288
1341
1405
SABERG 1170 1173 1195
1271
SAGEM 1431
SAISHO
1223 1224 1228
1237 1243 1303 1347 1351
SAKURA 1235
SALORA
1170 1199 1270
1282 1285 1286 1288 1291
1292 1295 1300 1361
SALORA
1381 1385 1403
1423
SAMBERS 1189 1191 1193
1195 1196 1222 1224 1269
1274
SAMSUNG 1170 1171 1173
1174 1183 1191 1204 1223
1228 1232 1234 1235 1236
1254 1273 1276 1327 1334
1347 1378 1382 1383 1419
1432
SAMSUNG 1435 1144 1059
SANDRA COLOR 1222 1223
SANG 1170 1337 1437
SANKYO 1233 1384
SANSUI
1170 1235 1253
1300 1330 1430
SANYO
1174 1182 1201
1223 1225 1228 1229 1230
1231 1235 1267 1273 1276
1299 1300 1310 1312 1319
1346 1384 1417
SAR 1170 1223 1294
SCHAUPLORENTZ 1337
SCHAUPT LORENZ
1067
1165
SCHNEIDER 1170 1171 1173
1176 1197 1219 1223 1235
1243 1250 1253 1284 1285
1286 1287 1293 1294 1297
1299 1347 1370 1382 1406
SCOTT 1170 1298
SEG 1170 1173 1195 1217
1223 1269 1274 1294 1369
SEIKON 1026 1160
SELECO
1170 1171 1173
1175 1176 1219 1229 1264
1266 1282 1283 1290 1294
1296 1297 1311 1375 1376
1400
SEMP 1313
SENDAY 1170
SENTRA 1303 1321
SEPHIM 1027
SET 1170 1294
SHARP
1229 1244 1245
1246 1321
SHIVAKI 1170 1171
SHOV 1085 1088 1091 1092
1069 1070 1398 1416
SHOV 1170 1171 1173 1235
1252
SHOW 1390 1393
SIAREM
1201 1222 1269
1274 1299
SICATEL 1224 1294
SICE 1178
SIDEC 1294
SIEL 1195
SIEMENS 1170 1173 1178
1179 1180 1181 1185 1196
1222 1231 1232 1239 1344
1384 1417 1074
SILMA 1170
SILVA 1235
SILVER 1243 1252
SIMTEL
1170 1243 1252
1330 1428
SINGER
1170 1173 1201
1217 1222 1223 1235 1253
1262 1269 1274 1299 1311
1347
SINUDYNE 1170 1171 1201
1243 1263 1266 1269 1274
1284 1287 1297 1299 1304
1305 1317 1347 1351 1364
1370 1377
SIREL 1222
SKAY 1330
SLAVA 1223
SOLAVOX 1270 1284 1292
1295
SONITRON 1201 1223
SONOKO 1170 1173 1223
1235 1243 1252 1330
SONTEC 1170 1183 1219
SONY 1229 1322 1066 1103
1152 1154 1163 1424 1226
1227 1228
SOUND COLOR 1170
SOUND MASTER 1235
SOUTHERN CROSS 1219
SOWTECH 1169 1219
SPECTRA(ASTRA)
1170
1336 1401 1402 1413 1420
STANDARD 1217 1223 1235
1243 1298
STAR 1173
STAR LINE 1170
STARLITE 1235
STARLUX 1235
STERN 1175 1176 1256 1266
1282 1290 1296 1297 1375
STVI 1223 1294
STZ SUNKAI 1170 1305 1330
SUNNY
1022 1044 1122
1125 1130 1253 1387 1389
1393
SUNSTAR 1170
SUNWATT 1170 1173
SUPERLA 1222 1294
SUPERSONIC
1169 1253
1300 1330
SUPERTEC 1170 1173 1235
1243
SUPRA
1170 1234 1235
1237 1328
SUPREME 1193
SYC LINE 1235
SYDNEY 1222
T
TADISTAR 1271
TALENT 1178
TANDBERG 1186 1192 1203
1204 1208 1222 1256 1261
1297
TANDY 1262 1285 1286
TASHIKO 1223 1286 1378
1384 1417
TATUNG 1172 1178 1222
1223 1228 1268 1273
TCL 1413
TEAK 1169 1170 1173 1223
1235
TEC 1170 1176 1217 1223
1235 1293 1294 1347 1407
TECHLINE 1170
TECHNICA 1243
TECHNICS 1242 1348 1167
TECHNISAT 1170 1370
TECHNOL 1169 1223 1235
1237 1252
TEDELEX 1170 1173 1223
1235 1285 1294
TEINEL 1170 1294
TEKNANT 1170 1235
iii
Appendix A
NOVATRONIC
1237 1252
TELE+ 1170 1235 1326
TELECHROM 1243 1330
TELEFAC 1235
TELEFUNKEN
1095 1111
1114 1137 1294 1335 1341
1350 1370 1397 1405 1170
1216 1217 1222 1235 1236
1237 1240 1256 1257 1259
1260 1264 1265
TELEOPTA 1235
TELEPOINT 1170
TELE SYSTEM 1001 1021
1003 1004 1005 1006 1007
1008 1009 1010 1011 1012
1013 1014 1015 1016 1017
1018 1022
TELESTAR 1170 1235 1252
TELETECH 1170 1217
TELEVIDEON
1170 1173
1189 1223 1285 1298 1299
TELKOM 1170 1294
TELRA 1170 1264 1294 1112
1137
TEMPEST 1223 1235 1243
TENSAI
1170 1173 1182
1200 1217 1223 1232 1235
1237 1243 1269 1274 1275
1277 1294 1298 1369
TESLA 1224
TESLASLOV 1170 1201 1250
1294
TETRAN 1294 1298
THOMSON 1170 1189 1196
1201 1214 1215 1241 1250
1255 1256 1261 1264 1265
1285 1294 1354 1358 1362
1374 1395 1405 1071
THORN 1303 1361
iv
THORN FERGUSON
1169
1170 1171 1173 1178 1179
1180 1182 1195 1196 1199
1200 1216 1222 1223 1224
1226 1227 1229 1231 1252
1254 1256 1262 1264 1268
1272 1273 1276 1284 1285
1287 1288 1291 1292 1297
1299 1300 1301 1303 1310
1312 1319 1320 1322 1345
1346 1350 FERGUSON 1361
1365 1379 1382 1405 1434
TIBISHI
1223 1235 1243
1252
TLFNKN 1074
TOBO 1235
TOKAI 1170 1173 1235 1252
TOKYO 1330
TOMITA 1223
TOPVISION 1170 1285 1294
1325
TOSHIBA 1169 1223 1229
1301 1302 1303 1311 1313
1076 1093 1153
TR CONTINENTS 1170 1222
1282
TRANSONIC 1170 1173 1252
1271
TREVI 1235 1243 1330
TRIAD 1170 1173 1224
TRIDENT 1045 1047 1048
1049 1051 1053 1055 1056
1393 1421 1170 1033 1034
1035 1036 1037 1038 1039
1040 1057 1031 1032
TRILUX 1170 1325
TRIMAX 1161
TRIMAX-SIERRAGRUNBERG-SOFTLINE
1079
TRIUMPH 1193 1347
TRIVISION 1235
TTR 1175
TV STAR 1285
TVD 1375
U
UHER 1175 1197 1285 1298
1375 1428
ULTRAVISION 1214 1224
ULTRAVOX 1169 1170 1173
1178 1201 1217 1223 1269
1274 1282 1299 1313 1372
UNIC RADIO 1174 1222 1223
1291 1294
UNIVERSUM
1169 1170
1173 1178 1179 1180 1182
1184 1189 1191 1192 1193
1196 1199 1200 1219 1223
1226 1228 1229 1231 1232
1235 1239 1240 1252 1284
1287 1288 1291 1294 1295
1384 1417
UNIVOX
1170 1173 1201
1217 1224 1284 1294
UNK 1170
URANYA 1170 1189 1222
1235 1237 1269 1274 1298
UTAX 1223 1235
UYDULU 1132
V
VANGUARD 1223 1235 1286
VECO 1170 1173 1235
VESTEL
1077 1120 1121
1136 1162 1078 1170 1171
1173 1183 1195 1217 1233
1286 1293 1294 1369 1394
1436
VEXA 1170 1171 1223 1235
1243 1286 1330
VICEROY 1223 1232 1252
VIDEOCON 1173
VIDEOLOGIC 1223 1243
VIDEOMAC 1223 1252
VIDEOTON 1170 1219 1222
1223 1271 1281 1285 1286
1293 1294 1357
VIDIKRON 1298
VIDION 1235
VISA 1189 1282
VISAELECT 1195 1223 1294
VISION 2000 1170 1235
VISIOREX 1222
VISTAR 1288 1295
VOXSON 1189 1201 1269
1274 1282
W
WALKIE 1176
WALTHAM 1217 1285 1294
WATSON 1170 1173 1239
1252 1282 1294 1298 1299
1347 1369
WATT RADIO
1223 1224
1269 1271 1274 1277 1284
1287 1299 1347 1369
WEGA COLOR 1229
WEGA VISION 1229
WEGAVOX 1170 1217 1235
1271 1293 1369
WELTBLICK 1170 1298
WESTON 1294
WHITE WESTING HOUSE
1169 1170 1175 1183 1193
1195 1223 1235 1266 1269
1271 1294 1298 1375
WINERSAT 1235 1330
WINSTON 1170 1235 1330
WINTERNITZ
1235 1237
1238 1346
WORLD TECH 1170
Y
YOKO 1170 1223 1235 1252
1256 1285
YORK 1243
YU-MA-TU 1170 1235 1252
1271 1339 1030 1080 1087
1109 1110
Z
ZAMPA 1283
ZIRWATEL
1235 1405
ZODIAC
Codice Prodotto Product Code
21005238
Ricevitore Digitale terrestre SD Zapper SD Digital Terrestrial receiver Free To Air
TELE System TS.UNICO
Dichiarazione di conformità CE
Tele System Electronic dichiara sotto la propria
responsabilità che questo prodotto soddisfa i requisiti
fondamentali delle direttive europee 2009/125/CE
reg. n. 107/2009 (Energy related Products - ErP),
2004/108/CE (Electromagnetic Compatibility - EMC)
e 2006/95/CE (Low Voltage Directive - LVD)
rispettando le seguenti normative tecniche:
x
x
CE conformity declaration
Tele System Electronic states that this product
meets the basic European requirements of
2009/125/EC reg. no. 107/2009 (Energy related
Products - ErP), 2004/108/EC (Electromagnetic
Compatibility - EMC) and 2006/95/EC Low Voltage
Directive - LVD), following the technical standards:
Compatibilità elettromagnetica/Electromagnetic compatibility:
o EN 55013: 2001+A1:2003+A2:2006
o EN 55020: 2007+A11:2011
o EN 61000-3-2: 2006+A1:2009+A2:2009
o EN 61000-3-3: 2008
Bassa Tensione/Low Voltage:
o EN 60065: 2002+A1:2006+A11:2008+A2:2010+A12:2011
Bressanvido, 24/07/2013
Flavio de Poli
Presidente/Chairman
Rev.00 24/07/2013
ITALY
TELE System Electronic
Via dell’Artigianato, 35
36050 Bressanvido (VI)
Internet: www.telesystem-world.com
Tel. assistenza guasti: 199 214 444
Scaricare