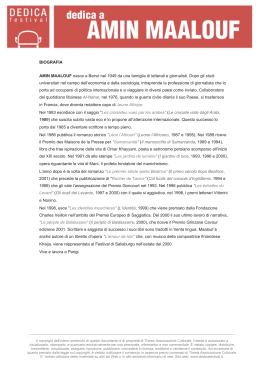
BARRIERA A CATENA
BARRIÈRE À CHAÎNE
CHAIN BARRIER
Operatore
Operateur
Operator
Alimentazione
Alimentation
Power Supply
Peso max. catena
Poids max de la chaîne
Max chain weight
codice
code
code
PIL CHAIN MASTER
230V ~ 50Hz
8,5 kg
AA51200
PIL CHAIN SLAVE
230V ~ 50Hz
8,5 kg
AA51205
ITALIANO pag. 04 / FRANÇAIS pag. 12 / ENGLISH page 20
I
IMPORTANTI ISTRUZIONI PER LA
SICUREZZA
- ATTENZIONE PER LA SICUREZZA DELLE PERSONE É IMPORTANTE
CHE VENGANO SEGUITE TUTTE LE ISTRUZIONI
SEGUIRE TUTTE LE ISTRUZIONI DI INSTALLAZIONE
F
INSTRUCTIONS IMPORTANTES POUR LA
SECURITE
- ATTENTION POUR LA SECURITE DES PERSONNES IL EST IMPORTANT
QUE TOUTES LES INSTRUCTIONS SOIENT SUIVIES
SUIVRE TOUTES LES INSTRUCTIONS D’INSTALLATION
1° - Questo libretto d’istruzioni è rivolto esclusivamente a del
personale specializzato che sia a conoscenza dei criteri costruttivi e dei dispositivi di protezione contro gli infortuni per i cancelli,
le porte e i portoni motorizzati (attenersi alle norme e alle leggi
vigenti).
2° - Il cablaggio dei vari componenti elettrici est erni all’operatore (ad
esempio fotocellule, lampeggianti, ecc.) deve essere effettuato
secondo la EN 60204-1.
3° - L’eventuale montaggio di una pulsantiera per i l comando manuale del movimento deve essere fatto posizionando la pulsantiera in
modo che chi la aziona non si trovi in posizione pericolosa; inoltre
si dovrà fare in modo che sia ridotto il rischio di azionamento
accidentale dei pulsanti.
4° - Tenete i comandi dell’automatismo (pulsant iera, telecomando
etc.) fuori dalla portata dei bambini. I comandi devono essere
posti ad un’altezza minima di 1,5 m dal suolo e fuori dal raggio
d’azione delle parti mobili.
5° - Prima di eseguire qualsiasi operazione di installazione, regolazione, manutenzione dell’impianto, togliere la tensione agendo
sull’apposito interruttore magnetotermico collegato a monte dello
stesso.
1° - Ce livret d’instructions est adressé exclusivement à un
personnel spécialisé qui connaît les critères de construction et
les dispositifs de protection contre les accidents concernant les
portails, les portes et les grandes portes motorisés (s’en tenir aux
normes et aux lois en vigueur).
2° - Le câblage des divers composants électriques e xternes à l’opérateur (par exemple photocellules, clignotants, etc) doit être effectué selon la EN 60204-1.
3° - Le montage éventuel d’un tableau pour la comma nde manuelle
du mouvement doit être fait en positionnant le tableau de façon à
ce que la personne qui l’actionne ne se trouve pas en position de
danger ; de plus, il faudra faire en sorte que le risque d’actionnement accidentel des boutons soit réduit.
4° - Tenir les commandes de l’automatisme (tableau, télécommande,
etc) hors de portée des enfants. Les commandes doivent être
placées à une hauteur minimum de 1,5 m du sol et hors du rayon
d’action des parties mobiles.
5° - Avant l’exécution de toute opération d’in stallation, de réglage,
d’entretien de l’installation, couper le courant en agissant sur
l’interrupteur magnétothermique à cet effet, branché en amont de
l’installation.
LA
DITTA
PILOMAT SRL
NON
ACCETTA
NESSUNA
RESPONSABILITÀ per eventuali danni provocati dalla mancata
osservanza nell’installazione delle norme di sicurezza e delle leggi
attualmente in vigore.
LA
SOCIETE
PILOMAT SRL
N’ACCEPTE
AUCUNE
RESPONSABILITE pour d’éventuels dommages provoqués par
la non-observation dans l’installation, des normes de sécurité et
des lois actuellement en vigueur.
CONSERVARE CON CURA QUESTE ISTRUZIONI
CONSERVER SOIGNEUSEMENT CES INSTRUCTIONS
1° - Se non é previsto nella centralina elett rica, installare a monte
della medesima un’interruttore di tipo magnetotermico (onnipolare con apertura minima dei contatti pari a 3 mm) che riporti un
marchio di conformità alle normative internazionali. Tale dispositivo deve essere protetto contro la richiusura accidentale (ad
esempio installandolo dentro quadro chiuso a chiave).
2° - Per la sezione ed il tipo dei cavi la PILOMAT SRL consiglia di
utilizzare un cavo di tipo H05RN-F con sezione minima di 1,5
mm2 e comun- que di attenersi alla norma IEC 364 e alle norme
di installazione vigenti nel proprio Paese.
1° - Si ce n’est pas prévu dans la centrale électrique, installer en
amont de celle-ci un interrupteur de type magnéto-thermique
(omnipolaire avec ouverture minimum des contacts égale à 3
mm) qui porte la marque de conformité aux normes internationales. Ce dispositif doit être protégé contre la re-fermeture accidentelle (par exemple en l’installant dans un cadre fermé à clé).
2° - Pour la section et le type des câbles, la PILO MAT SRL conseille
d’utiliser un câble de type H05RN-F ayant une section minimum
de 1,5 mm2 et de toute façon s’en tenir à la norme IEC 364 et
aux normes d’installation en vigueur dans le propre pays.
N.B.: É obbligatoria la messa a terra dell’impianto
I dati descritti nel presente manuale sono puramente indicativi.
PILOMAT SRL si riserva di modificarli in qualsiasi momento.
Realizzare l’impianto in ottemperanza alle norme ed alle leggi vigenti.
N.B.: La mise à terre de l’installation est obligatoire.
Les données figurant dans le présent manuel sont fournies à titre
purement indicatif. PILOMAT SRL se réserve le droit de les
modifier à tout moment, sans aucun préavis. Effectuer
l’installation en conformité avec les normes et les lois en vigueur.
G
B
IMPORTANT INSTRUCTIONS FOR THE
SAFETY
- ATTENTION FOR THE SAFETY OF THE PEOPLE IT IS IMPORTANT TO
FOLLOW ALL THE INSTRUCTIONS.
FOLLOW ALL INSTALLATION INSTRUCTIONS
1° - This handbook is exclusively addressed to the specialized
personnel who knows the constructive criteria and the protection
devices against the accidents for motorized gates, doors and
main doors (follow the standards and the laws in force).
2° - The wiring harness of the different electric components external
to the operator (for example photoelectric cells, flashlights etc.)
must be carried out according to the EN 60204-1.
3° - The possible assembly of a keyboard for the m anual control of
the movement must be done by positioning the keyboard so
that the person operating it does not find himself in a dangerous
position; moreover, the risk of accidental activation of the buttons
must be reduced.
4° - Keep the automatism controls (push-button pan el, remote control
etc.) out of the children way. The controls must be placed at a
minimum height of 1,5 m from the ground and outside the range
of the mobile parts.
5° - Before carrying out any installation, re gulation or maintenance
operation of the system, take off the voltage by operating on the
special magnetothermic switch connected upstream it.
THE PILOMAT SRL COMPANY DOES NOT ACCEPT ANY
RESPONSIBILITY for possible damages caused by the non
observance during the instal- lation of the safety standards and of the
laws in force at present.
KEEP THESE INSTRUCTIONS WITH CARE
1° - If it is not forecast in the electric gearcase, install a switch of
magnetothermic type upstream, (omni polar with minimum
port of the contacts of 3 mm) with a check of conformity to the
international standards. Such devise must be protected against
the accidental lockup (for example by installing inside a locked
board).
2° - For the section and the type of the cables, PI LOMAT SRL
advices to use a cable of the H05RN-F type with minimum
section of 1,5 sqmm and, in any case, to keep to the IEC
364 standard and to the installation standards in force in your
country.
N.B.: The system must be grounded
Data described by this manual are only Indicative and PILOMAT
SRL reserves to modify them at any time. Install the system
complying with current standards and regulations.
I
CARATTERISTICHE TECNICHE / INSTALLAZIONE PILOMAT CHAIN
INSTALLAZIONE TIPO
Cavo
2x2,5 mm2
1
Legenda:
1 - PILOMAT CHAIN
2 - Centrale di comando
3 - Guida catena ACG5481
4 - Catena ACG5480
5 - Trasmettitore radio
Lunghezza catena (m)
Altezza
CHAIN
DATI TECNICI
Alimentazione
Assorbimento
4
10 12
14
16 18
20
65 60 55
50
45 40
35
6
catena X (cm) 75 70
8
ATTENZIONE: I valori in tabella sono stati misurati utilizzando un catena di 400
grammi/metro
Coppia
Servizio
Temperatura
Grado di protezione
Lubrificazione
Peso
Peso max catena
A
Nm
°C
IP
kg
kg
230 V-/50 Hz
1.0
645
50%
-20 ÷ +55
34
Permanente
25
8.5
DESCRIZIONE E DIMENSIONI ARMADIO
Anello di aggancio
per catena
2
3
I
INSTALLAZIONE
Tutte le misure riportate sono espresse in mm, salvo diversa
indicazione.
CONTROLLI PRELIMINARI
• Controllare la stabilità e la robustezza della zona di ancoraggio
dell’armadio.
• Collegare l’alimentazione ad un interruttore unipolare con distanza di
apertura dei contatti di almeno 3 mm.
• Il collegamento alla rete deve avvenire su canale indipendente e
separato dai collegamenti ai dispositivi di sicurezza e di comando.
INSTALLAZIONE COLONNA (fig. 1, fig. 3, fig. 4)
1. Avvitare per 1,5 - 2 cm le 4 viti M 10x70 fornite in dotazione nella
base.
2. Annegare piastra e teste delle viti in una piazzola di cemento (fig. 3)
3. Legare la testa delle viti all’armatura della piazzola.
4. La parte superiore della piastra deve essere pulita e in bolla.
5. Far passare le canaline passa cavi nel foro centrale della piastra.
6. Assicurarsi della robustezza e della stabilità del fissaggio prima di
continuare nell’installazione.
7. Svitare le 8 viti (10) e togliere il coperchio frontale (8) e il coperchio
posteriore (9) della colonna (fig. 4).
8. Inserire la colonna sulla piazzola facendo attenzione che le viti si
inseriscano negli appositi fori.
9. Fissare la barriera alla piastra con le 4 rondelle (5) e i 4 dadi (4)
forniti.
10. Rimontare il coperchio anteriore (8) su entrambe le colonne e fissarlo
con le 4 viti (10).
11. Fissare la catena agli anelli di aggancio che sporgono dai coperchi
anteriori e tensionarla in modo che la catena al centro del passaggio
sia ad un’altezza X rispetto a terra (fig. 1)
PIANO DI MANUTENZIONE (OGNI 6 MESI)
1. Togliere l’alimentazione 230V e/o le batterie se presenti. Pulire e
ingrassare la guida a monorotaia e i pignoni catena interni.
2. Ingrassare la catena di traino (fig.5).
Legenda:
1 - Colonna centrale
2 - Motoriduttore con encoder
3 - Centrale di comando
4 - Dado M10 autobloccante
5 - Rondella 20x10
6 - Piastra di fondazione
7 - Vite M10x70
8 - Coperchio anteriore
9 - Coperchio posteriore
10 - Vite di chiusura M5x10
4
INSERIMENTO DEL GIUNTO DI ROTTURA
5
3. Controllare che le viti che sorreggono la colonna siano ben avvitate
(fig.6).
6
4. Controllare i collegamenti elettrici.
5. Ridare alimentazione.
6. Controllare il funzionamento di rilevamento ostacolo (sistema a
encoder).
7. Controllare il corretto funzionamento di tutte le funzioni di comando e
sicurezza.
8. Sostituire eventuali parti usurate.
Vite TCEI M8X25 INOX Tornita
Molla D17 L13
Rondella piana M12
I
QUADRO ELETTRONICO PILOMAT CHAIN
1.
INTRODUZIONE
PILOMAT CHAIN è una centralina dedicata alla movimentazione di una
barriera a catena mossa da due motori a 24Vdc. La coesistenza di vari
tipi di sicurezze, quali ad esempio il controllo della corrente assorbita dal
motore ed il controllo della velocità, permette di operare in tutta
tranquillità. La particolare tecnologia utilizzata consente l’apprendimento e
la regolazione dinamica degli sforzi richiesti ai motori nel normale
funzionamento. La gestione della posizione tramite encoder montato sul
motore ne consente
2.
l’utilizzo in assenza di finecorsa elettrici. PILOMAT CHAIN possiede
ingressi dedicati al collegamento del pulsante passo-passo, ingresso
fotocellule ed ingresso stop di sicurezza oltre all’uscita per lampeggiante
24Vac. La centrale permette la regolazione tramite trimmer del tempo di
sollevamento automatico della catena e della forza esercitata dai motori.
PILOMAT CHAIN può controllare motori con un consumo massimo di 7A a
24÷30Vcc.
CONFIGURAZIONE
Sollevamento
automatico
della catena
Utilizzare questo punto
per collegare la
carcassa del motore alla
centralina e alla terra
I impostazione soglia
massima coppia.
Ponticelli (se presenti)
per inversione fase
Motore
Tasti:
1 = Giallo
2 = Blu
3 = Rosso
Connettore per scheda
caricabatteria ACG5482
Selettore manuale (Sinistra) /
automatico (Destra).
Connettore Motore/Encoder
3.
COLLEGAMENTI ELETTRICI
Morsetto
Funzione
1-2
Uscita lampeggiante
Out: 24 Vac 25W MAX
Impostazione
3
Positivo alimentazione TX & RX fotocellula
Out: +24Vcc
4
Negativo alimentazione TX fotocellula
Out: GND TX
5
Negativo alimentazione RX fotocellula e
comune pulsanti e sicurezze
Out: GND RX
Comune
6
STOP innalzamento catena
Norm. Chiuso (NC)
7
STOP abbassamento catena
Norm. Chiuso (NC)
8
Ingresso pulsante STOP
Norm. Chiuso (NC)
9
Ingresso contatto RX fotocellula
Norm. Chiuso (NC)
10
Ingresso pulsante pedonale
Norm. Aperto (NA)
11
Ingresso pulsante passo/passo
Norm. Aperto (NA)
12
Non utilizzare
13
Non utilizzare
Alimentazione
fotocellule
Connettore Motore/Encoder
Esempio di collegamento
Qualunque Contatto chiuso
Normalmente Chiuso (N.C.)
CARCASSA MOTORE
CAVO DI
COLLEGAMENTO
A TERRA
VITI FISSAGGIO
CARCASSA MOTORE
deve essere ponticellato al
comune se non utilizzato.
CAVO DI
COLLEGAMENTO
Encoder +5Vcc (marrone)
Segnale (verde)
GND (bianco)
Motore
CENTRALINA
Al fine di ottenere un corretto funzionamento degli accessori (fotocellule in
particolare) collegati alla centralina è molto importante che tutto il sistema
(motore + centralina) abbia un unico riferimento di massa. Si deve quindi
collegare con un cavetto la carcassa del motore e la centralina nel punto
indicato in figura. Se si dispone poi di una buona terra è opportuno
collegare ad essa tutto il sistema.
I
4.
IMPOSTAZIONI
Questo capitolo contiene importanti informazioni per una sicura e
corretta installazione. Seguire scrupolosamente tutte le istruzioni in
quanto un errato montaggio può comportare rotture o malfunzionamenti
dell’automazione.
4.1 CONTROLLI PRELIMINARI
Prima di dare alimentazione al sistema, controllare tutti i cablaggi
effettuati. In particolare controllare che non ci siano fili spellati, cortocircuiti
tra fili e che tutti gli accessori siano collegati alla morsettiera nei punti
indicati nello schema della pagina precedente.
Una volta data alimentazione:
1. Verificare che il led POWER sia acceso fisso e che la catena sia in
posizione alta.
2. Verificare che il radio ricevitore sia correttamente collegato..
3. Verificare il collegamento dei motori e degli encoder seguendo la
procedura descritta di seguito.
Questa procedura permette di verificare il senso di rotazione dei
motori, eventuali inceppamenti o malfunzionamenti durante il movimento
dell’anta. È importante eseguire questo controllo per evidenziare errori di
cablaggio o quant’altro possa pregiudicare un normale funzionamento.
NOTA BENE: durante queste movimentazioni le fotocellule, la radio e i pulsanti NON sono attivi.
NO
Posizione SW1
MAN
La catena non si muove.
Verificare i cablaggi e ripetere la
prova.
La catena si alza.
Modificare l’orientamento dei 2 jumper
presenti sulla scheda. Se non presenti,
invertire le fasi del motore. Ripetere la prova.
Premere con un impulso il tasto
BLU. La catena si deve abbassare.
AUT
SI
NO
NO
SI
Posizione SW1
MAN
AUT
Rilasciare il tasto BLU e premere quello GIALLO.
La catena si deve alzare. Riportarla in posizione
alta.
4.2 MOVIMENTAZIONE MANUALE
Questa procedura va effettuata SOLO dall’installatore e SOLO durante
la messa in opera del sistema. Questa movimentazione deve essere
Posizione SW1
MAN
Verificare i cablaggi e
ripetere la prova.
eseguita solo in particolari condizioni in cui non sia possibile riportare la
catena in posizione alta.
Per alzare la catena
Premere il tasto GIALLO
Per abbassare la catena
Premere il tasto BLU
AUT
ATTENZIONE: La riattivazione della modalità
automatica (AUT) comporta
l’utilizzo della posizione
raggiunta come posizione
completamente alzata.
ATTENZIONE: Durante la movimentazione
manuale il sensore di corrente
è escluso.
I
4.3 PROGRAMMAZIONE DELLA CORSA
Questa procedura va effettuata SOLO dall’installatore e SOLO durante
la messa in opera del sistema. Per una corretta programmazione, prima
A
Premere brevemente il tasto BLU. Il
lampeggiatore inizia a lampeggiare
lentamente.
Posizione SW1
MAN
AUT
SI
di effettuare modifiche, riportare sempre la catena in posizione alta (vedi
paragrafo 4.2).
NO
Verificare che la catena sia in posizione alta, e che
SW1 sia in posizione AUTO e ripetere la prova.
NO
Premere brevemente il tasto BLU. La
catena inizia ad abbassarsi lentamente.
Verificare i cablaggi del motore. Ripetere la prova.
SI
Quando la catena raggiunge la posizione
abbassata, premere nuovamente il tasto
BLU. La catena si ferma.
NO
Premere nuovamente il tasto BLU.
SI
Premere il pulsante di passo-passo
(morsetti 5 ed 11). La catena si alza
completamente.
SI
Durante la memorizzazione della corsa e per i successivi 2 cicli
completi di movimentazione (innalzamento/abbassamento) evitare
interventi sugli ingressi di stop e fotocellule, evitare anche la verifica
del sensore, in quanto la centrale in queste 2 prime movimentazioni
acquisisce i parametri per un corretto funzionamento.
NO
Se la catena si è fermata durante il movimento, riportarla in posizione
alta manualmente posizionando SW1 in manuale e utilizzando i
tasti sulla scheda. Una volta che la catena è alzata riportare SW1 in
posizione automatica e ripartire da A.
NO
Se la catena si è fermata durante il movimento, riportarla in posizione
alta manualmente posizionando SW1 in manuale e utilizzando i
tasti sulla scheda. Una volta che la catena è alzata riportare SW1 in
posizione automatica e ripartire da A.
SI
Premere il pulsante di passo-passo
(morsetti 5 ed 11). La catena si abbassa
completamente.
SI
La corsa e’ memorizzata.
Per riprogrammare la corsa ripartire da A.
4.4 REGOLAZIONE DEL SENSORE DI CORRENTE
Questa procedura va effettuata SOLO dall’installatore e SOLO durante
la messa in opera del sistema. Per una corretta programmazione, prima
Regolare il trimmer
al minimo
Posizione SW1
MAN
AUT
MAX
DISABLE
di effettuare modifiche, riportare sempre la catena in posizione alta (Vedi
paragrafo 4.2).
Con l’automazione in movimento,
controllare la sensibilità di intervento
della sicurezza e verificare che si
abbia un funzionamento regolare
della barriera.
Verificare che il funzionamento sia regolare e
che la sensibilità sia impostata in modo
corretto, aumentare leggermente il trimmer per
bilanciare gli attriti che possono variare con il
tempo e la temperatura.
SENSE
troppo sensibile o
funzionamento non regolare
poco sensibile
Diminuzione
forza
MAX
DISABLE
SENSE
Ruotare il trimmer TORQUE
STOP in senso antiorario
per diminuire la forza del
motore.
ripetere la misura
della sensibilità
E’ possibile ruotare il trimmer
TORQUE STOP in senso orario
per aumentare la forza del
motore.
Aumento
forza
MAX
DISABLE
SENSE
ATTENZIONE: Con trimmer in posizione DISABLE (lampeggiante acceso) la sicurezza è esclusa.
4.5 REGOLAZIONE DELLA RICHIUSURA AUTOMATICA
Questa procedura va effettuata SOLO dall’installatore e SOLO durante
la messa in opera del sistema. Per una corretta programmazione, prima
L’attesa è breve
Posizione SW1
MAN
AUT
Con la catena in posizione
alta dare un comando di passo
passo ed attendere l’apertura
completa.
Ruotare il trimmer A. RECL.
TIME tutto in senso orario.
In questo modo si disabilita la
richiusura automatica.
Ruotare il trimmer A. RECL. TIME
in senso antiorario.
In questo modo si diminuisce il
tempo di richiusura automatica.
MAX
DISABILITA
A. RECL. TIME
AUMENTO
TEMPO
MAX
Ruotare il trimmer A. RECL. TIME
in senso orario.
In questo modo si aumenta il
tempo di richiusura automatica.
A. RECL. TIME
L’attesa è lunga
Disabilitate la
richiusura automatica
di effettuare modifiche, riportare sempre la catena in posizione alta (Vedi
paragrafo 4.2).
RICHIUSURA
Ruotando il trimmer A. RECL. TIME completamente in
senso antiorario nella fascia 1 la richiusura è controllata
dall’intervento delle fotocellule (dopo alcuni secondi dal
rilascio del contatto fotocellule, la catena richiude).
DIMINUZIONE
TEMPO
MAX
A. RECL. TIME
I
5.
FUNZIONI AVANZATE
Queste procedure sono rivolte SOLO all’installatore e SOLO durante la
messa in opera del sistema. Per una corretta programmazione, prima di
effettuare modifiche, riportare sempre la catena in posizione alta. (Vedi
paragrafo 4.2).
5.1 RESET
Qualora si renda necessario effettuare un reset della centraline
(cancellazione dei parametri della corsa e disabilitazione delle funzione di
prelampeggio, test fotocellule e condominiale), procedere come segue:
6.
1.
2.
3.
4.
5.
Togliere l’alimentazione al sistema.
Impostare il selettore SW1 su AUT (automatico).
Premere il tasto rosso.
Mantenerlo premuto mentre si ridà alimentazione al sistema.
Mantener ancora premuto finché il lampeggiante non si accende 3
volte.
6. A questo punto rilasciarlo e attendere che il lampeggiante si spenga.
Il reset è stato effettuato.
ABILITAZIONE / DISABILITAZIONE DEL PRELAMPEGGIO, TEST FOTOCELLULE E FUNZIONE CONDOMINIALE
Per modificare lo stato di una qualsiasi di queste funzioni è necessario
abilitare la modalità apprendimento. Questo particolare stato della
centrale può essere attivato solo a catena ferma e in posizione alta. Nella
fase di apprendimento la centrale scorre automaticamente le funzioni su
cui è possibile intervenire. Il led del lampeggiante ed il led POWER sulla
scheda segnalano la funzione selezionata di volta in volta con un numero di
lampeggi variabile. Il passaggio da una funzione ad un’altra viene eseguito
automaticamente (basta mantenere sempre premuto il tasto rosso).
La centrale inizia selezionando la prima funzione (segnalata da 1
lampeggio), successivamente mantenendo premuto il tasto rosso si passa
alla seconda funzione (segnalata da 2 lampeggi) e così via.
Per abilitare la modalità di apprendimento procedere nel seguente modo:
1. Alzare completamente la catena (il pulsante SW1 deve essere in
posizione AUT).
2. Premere e mantenere sempre premuto il pulsante rosso.
3. Dopo 4-5 secondi il led del lampeggiante esegue una serie di 8 lampeggi
(che avvisano della prossima entrata in modalità apprendimento).
Terminata la serie di lampeggi la centralina è in apprendimento. Non
rilasciare ancora il tasto.
4. Una volta individuata (tramite il numero di lampeggi del led del
lampeggiate) la funzione che si desidera modificare, rilasciare il tasto
rosso. In questo modo la funzione desiderata viene selezionata. Una
volta selezionata la funzione, la centrale ne evidenzia l’impostazione
lampeggiando con una frequenza lenta (1 lampeggio al secondo) o
con una frequenza veloce (2 lampeggi al secondo) secondo quanto
evidenziato in tabella.
5. Premere quindi il tasto corrispondente (si faccia riferimento alla tabella)
al nuovo stato che si desidera impostare per la funzione selezionata.
La frequenza di lampeggio varierà a seconda della scelta fatta.
A questo punto è possibile modificare ulteriori funzioni o, se si è terminato,
uscire dalla fase di apprendimento. Nel caso si desideri modificare altre
funzioni premere e mantenere premuto nuovamente il tasto rosso. Dopo
alcuni secondi la centrale inizierà nuovamente a selezionare in sequenza
le varie funzioni. Procedere quindi come spiegato sopra.
Se invece si desidera uscire dall’apprendimento è sufficiente portare la leva
del selettore S1 in posizione manuale, attendere 1-2 s e successivamente
riportarla in posizione automatica. In questo modo la centrale esce dalla
modalità di apprendimento e si predispone per il funzionamento normale.
N° lampeggi
Funzione selezionata
Lampeggio
Tasto giallo
Tasto blu
1
Prelampeggio
Lento = disattivato / Veloce = attivo
attivazione
disattivazione
altri 2
Test fotocellule
Veloce = disattivato / Lento = attivo
attivazione
disattivazione
altri 3
Condominiale
Lento = disattivato / Veloce = attivo
attivazione
disattivazione
altri 4
Riservato
altri 5
Riservato
altri 6
Riservato
6.1 PRELAMPEGGIO
Questa funzione esegue PRIMA di ogni movimentazione un breve
lampeggio ad indicare l’imminente movimento.
6.2 FUNZIONE CONDOMINIALE
Durante l’apertura della barriera, ogni comando viene ignorato. Una volta
aperta la barriera, se la richiusura automatica è disabilitata, la si può
chiudere con un comando di passo-passo. Se la richiusura automatica
è attiva, ogni comando di chiusura viene ignorato e la richiusura viene
affidata alla richiusura automatica. Durante la chiusura della barriera, un
comando di passo-passo blocca ed inverte il movimento.
6.3 TEST FOTOCELLULE
Questa centrale è dotata di una funzione che permette di effettuare un
controllo sul funzionamento delle fotocellule prima di ogni azionamento del
motore. Si ha così la possibilità di incrementare la sicurezza del sistema in
caso di danneggiamento delle fotocellule (p.es. relè di uscita incollato) o
di un cortocircuito indesiderato sull’ingresso fotocellule. In caso di guasto
la centrale lo segnala accendendo fisso il lampeggiante e non eseguendo
alcuna movimentazione. Questo controllo viene effettuato dopo che la
centrale ha ricevuto un comando a muovere, ma prima di dare tensione
al motore.
I
7.
GUIDA ALLA RISOLUZIONE DEI PRINCIPALI PROBLEMI
Problema
Probabile causa
Mancanza di alimentazione
Attivando il comando di apertura, elettrica
l’automazione non si muove
Fusibile bruciato
Soluzione
Verificare la presenza della tensione elettrica e tutti i
collegamenti alla rete elettrica.
Sostituire il fusibile con uno di pari caratteristiche
Attivando il comando di
abbassamento, la catena si muove Collegamento encoder non
corretto
per un breve tratto e poi si ferma
Verificare il cablaggio dei fili dell’encoder
Attivando il comando di abbassamento,
Jumper direzione motore invertiti
la catena si alza
Invertite i Jumper (se presenti) oppure invertire i cavi di
alimentazione del motore.
Non si riesce ad entrare in
programmazione corsa
Riportare (in manuale) la catena in posizione alta. Se la catena era
La catena non è in posizione alta alzata, impostare il selettore SW1 in manuale, attendere 1 secondo
e riportarlo in automatico. Riprovare ad entrare in apprendimento.
La centrale è alimentata ma la
catena non si muove.
Un ingresso normalmente chiuso Verificare l’ingresso fotocellule, l’ingresso stop e i
non è attivo.
finecorsa. Se non utilizzati cortocircuitarli con il comune.
OPTIONAL - Per i collegamenti ed i dati tecnici degli accessori attenersi ai relativi libretti di istruzione.
CATENA IN ACCIAIO
Ø 6 mm rossa e bianca. Tagliata su misura
GUIDA CATENA
cod. ACG5480
BATTERIA
1,2Ah 12V
da interrare. L = 2 m
cod. ACG5481
CARICA BATTERIE PILOMAT CHAIN
cod. ACG9511
cod. ACG5482
I
F
CARACTERISTIQUES TECHNIQUES / INSTALLATION PILOMAT CHAIN
INSTALLATION
Câble
2x2,5 mm2
1
Legenda:
1 – PILOMAT CHAIN
2 - Unité de contrôle
3 - Canal à terre pour la chaîne ACG5481
4 - Chaîne ACG5480
5 - Transmetteur radio
Longueur de la chaîne (m)
4
6
Hauteur de la chaîne X (cm) 75 70
DONNÉE TECHNIQUE
8
10
12
14
16 18
20
65 60
55
50
45 40
35
ATTENTION: les valeurs du tableau ont été mesurée en utilisant une chaîne de
400 gramme/mètre
Alimentation
Absorption
Puissance moteur
Couple
Service
Température
Indice de protection
Lubrification
Poids
Poids max de la chaîne
PILOMAT CHAIN
A
W
Nm
°C
IP
kg
kg
230 V-/50 Hz
1.0
60
645
50%
-20 ÷ +55
34
Permanente
25
8.5
DESCRIPTION ET DIMENSION DE LA COLONNE
œillet
2
3
1
F
INSTALLATION
Toutes les mesures reportées sont exprimées en mm, sauf indication
différente.
CONTRÔLE PRÉLIMINAIRE
• Contrôler la stabilité et la robustesse de la zone d’encrage des
colonnes.
• Relier l’alimentation à un interrupteur unipolaire avec une distance
d’ouverture des contactes d’au moins 3 mm
• La connexion à la ligne d’alimentation doit être faite sur une tranchée
indépendante et séparée des connexions aux dispositifs de sécurité et
de commandes.
INSTALLATION COLONNE (fig. 1, fig. 3, fig. 4)
1. Visser dans la base pour 1.5-2 cm les 4 vis M10x70 fournie.
2. Noyer la plaque de fondation et la tête des vis dans le ciment (fig. 3)
3. Lier la tête des vis au coffrage.
4. La partie supérieur de la plaque doit être propre et à niveau.
5. Faire passer les câbles dans le trou centrale de la plaque de
fondation.
6. S’assurer de la robustesse et de la stabilité de l’installation avant de
continuer.
7. Dévisser les 8 vis (10) et ôter le couvercle antérieur (8) et le couvercle
postérieur (9) de la colonne (fig. 4).
8. Incérer la colonne sur la plaque de fondation en faisant attention a ce
que les vis entre dans les trous prévus
9. Fixer la barrière à la plaque de fondation avec les 4 rondelles (5) et
les 4 écrous (4) fournis.
10. Remonter le couvercle antérieur (8) sur les deux colonnes et fixer les
avec les 4 vis (10).
11. Fixer la chaîne aux œillets qui dépassent des couvercles antérieurs
et tirer la chaîne pour faire en sorte que le milieu de la chaîne soit à
une hauteur X (fig.1).
ENTRETIEN (TOUS LES 6 MOIS)
1. Débrancher l’alimentation 230Vac et/ou les batteries si présentes.
Nettoyer et engraisser les rails et les pignons à chaîne.
2. Engraisser la chaîne d’entrainement (fig. 5).
Legenda:
1 - Colonne centrale
2 - Motoréducteur avec encodeur
3 - Unité de contrôle
4 - Dé M10 autobloquant
5 - Écrou 20x10
6 - Plaque de fondation
7 - Vis M10x70
8 - Couvercle antérieur
9 - Couvercle postérieur
10 - Vis de fermeture M5x10
4
INSERTION DU MANCHON FUSIBLE
5
3. Contrôler que les vis de fixation au sol soient correctement vissées (fig.
6).
6
Vis TCEI M8X25 INOX Tournée
Ressort D17 L13
4. Contrôler les connexions électriques.
5. Rebrancher l’alimentation.
6. Contrôler le fonctionnement de la détection d’obstacle (système à
encodeur)
7. Contrôler le fonctionnement correct de toutes les commandes et de
toutes le sécurités.
8. Remplacer les éventuelles pièces usagées.
1
Rondelle plate M12
F
1.
COFFRET ELECTRONIQUE PILOMAT CHAIN
INTRODUCTION
STOPPER est une unité de contrôle pour le mouvement de barrière à
chaîne, actionné par un moteur à 24Vcc. La coexistence de différents
types de sécurités, comme, par exemple, le contrôle du courant
absorbé par le moteur et le contrôle de la vitesse, permet une rapide
intervention pour l’anti-écrasement. La particulière technologie utilisée
permet l’apprentissage et le réglage dynamique des efforts demandés
aux moteurs pendant le fonctionnement normal. La gestion de la position
2.
par encodeur installé sur le moteur, permet l’utilisation en absence de fins
de course électriques. STOPPER possède des entrées pour la connexion
du bouton pas à pas, des photocellules et du stop de sécurité ainsi que
la sortie pour le clignotant 24Vac. La centrale permet le réglage par
trimmer du temps de remontée automatique de la chaîne et de la force
exercée par les moteurs. STOPPER peut contrôler des moteurs avec une
absorption maximale de 7A à 24-30Vcc.
CONFIGURATION
Fermeture
automatique
Utiliser ce point pour
brancher la carcasse du
moteur à la centrale et à
la terre
Réglage du seuil
maximale du couple
Ponts ( si présents )
pour l’inversion de la
phase du moteur
Boutons:
1= Jaune
2= Bleu
3= Rouge
Connecteur pour la carte
chargeur de batterie ACG5482
Sélecteur manuel (gauche)/
automatique (droite)
Connecteur moteur/encodeur
3.
CONNEXIONS ÉLECTRIQUES
Bornes
Fonctions
1-2
Sortie clignotant
Out: 24 Vac 25W MAX
Réglage
3
Positif alimentation Tx et Rx photocellule
Out: +24Vcc
Négatif alimentation TX photocellule
Out: GND TX
5
Négatif alimentation RX photocellule et
commun boutons et sécurités
Out: GND RX
Commun
6
Fin de course montée chaîne
Norm. Fermé (NF)
7
Fin de course descente chaîne
Norm. Fermé (NF)
8
Entrée bouton STOP
Norm. Fermé (NF)
9
Entrée contact RX cellule photoélectrique
Norm. Fermé (NF)
10
Entrée bouton piétons
Norm. Ouvert (NO)
11
Entrée bouton de pas à pas
Norm. Ouvert (NO)
12
Ne pas utiliser
13
Ne pas utiliser
4
Alimentation
photocellule
Connecteur Moteur/ Encodeur
Exemple de connexion
CÂBLE DE
CONNEXION
À TERRE
CARCASSE MOTEUR
VIS DE FIXAGE
DU MOTEUR
Tous les contacts
normallement fermés (N.F)
doivent être shuntés si non
utilisés
Encodeur +5Vcc (marron)
Signal (vert)
GND (blanc)
CÂBLE DE
CONNEXION
Moteur
CENTRALE
Pour obtenir un fonctionnement correct des accessoires connectés au
boîtier de commande (dispositifs photoélectriques en particulier), il est très
im-portant que tout le système (moteur + boîtier de commande) soit relié à
1
une unique masse. Il faut donc brancher un fils entre la carcasse du moteur
et le boîtier de commande au point indiqué sur la figure. Si on dispose
d’une bonne mise à la terre, il convient y brancher tout le système.
F
4.
RÉGLAGES
Ce chapitre contient d’importantes informations pour une sûre et correcte
installation. Suivre scrupuleusement toutes les instructions car, une
installation erronée peut provoquer des ruptures ou mal fonctionnements
de l’automatisme.
4.1 CONTRÔLES PRÉLIMINAIRES
Avant de brancher l’alimentation au système, contrôler tous les câblages
effectués. En particulier contrôler qu’il n’aie pas de fils coupés, de courtscircuits entre les fils et que tous les accessoires soient connectés aux
bornes aux points indiqués sur le schéma de la page précédente.
Une fois branchée l’alimentation au système:
1. Vérifier que le led POWER soit allumé fixe et que le portail soit en
position de fermeture.
2. Vérifier que le module radio soit branché.
3. Vérifier le branchement des moteurs et des encodeurs en suivant la
procédure décrite ici de suite.
Cette procédure permet de vérifier le sens de rotation des
moteurs,d’éventuelles coincements ou mal fonctionnements pendant le
mouvement de la chaîne. Il est très important d’effectuer ce contrôle pour
mettre en évidence des erreurs de câblage ou d’autres types d’erreurs qui
peuvent compromettre le fonctionnement normal.
IMPORTANT: pendant ces mouvements, les photocellules, la radio et les boutons NE sont PAS actifs.
NON
Position SW1
MAN
La chaîne ne bouge pas.
Vérifier les câblages et répéter le
test.
la chaîne se lève.
Modifier l’orientation des deux jumpers
présents sur la centrale. S’ils ne sont présents,
inverser les phases du moteur. Répéter le test.
Appuyer et relâcher le bouton
BLEU. La chaîne s’abaisse.
AUT
OUI
NON
NON
OUI
Position SW1
MAN
AUT
Appuyer sur la touche la JAUNE. La chaîne doit se
lever. Reporter la chaîne en position de fermeture
total (complètement vers le haut).
4.2 MOUVEMENTS MANUELS
Cette procédure doit être effectuée SEULEMENT par l’installateur et
SEULEMENT pendant la mise en œuvre du système. Ces mouvements
Position SW1
MAN
Vérifier les câblages
et répéter le test.
doivent être effectués seulement dans des conditions particulières là où il n’est
pas possible de reporter automatiquement la chaîne totalement vers le haut.
Pour lever la chaîne
Appuyer sur le bouton JAUNE
Pour abaisser la chaîne
Appuyer sur le bouton BLEU
AUT
1
ATTENTION: Le rétablissement de la
modalité automatique (AUT) comporte
l’utilisation de la position rejointe comme
position complètement relevée.
ATTENTION: Pendant les mouvements
manuels la sécurité anti-écrasement est
exclue.
F
4.3 RÉGLAGE DE LA COURSE
Cette procédure doit être effectuée SEULEMENT par l’installateur et
SEULEMENT pendant la mise en oeuvre du système. Pour un réglage
A
Appuyer brièvement sur le bouton BLEU.
Le clignotant commence à clignoter
lentement.
Position SW1
MAN
AUT
correct, avant d’effectuer toutes modifications, reporter toujours la chaîne
totalement vers le haut (voir paragraphe 4.2).
NON
Vérifier que la chaîne soit complètement levée et que
SW1 soit en position AUTO et répéter le test.
OUI
NON
Appuyer brièvement sur le bouton BLEU. La
chaîne commence à s’abaisser lentement.
Vérifier les câblages du moteur. Répéter le test.
OUI
NON
Quand la chaîne arrive à la position
abaissée désirée, appuyer sur le bouton
BLEU. La chaîne s’arrête.
Appuyer de nouveau sur le bouton BLEU
OUI
Appuyer la commande de pas à pas
(bornes 5 et 11). La chaîne se relève
complètement.
OUI
Pendant la mise en mémoire de la course et pour les 2 cycles complèts
successifs d’élèvation et d’abaissement, éviter l’intervention sur les
entrées de stop et cellules photoélectriques, éviter aussi de faire
intervenir le capteur de courant, car la centrale, dans ces deux premiers
mouvements, acquières les paramètres pour un fonctionnement correct.
NON
Si la chaîne s’est arrêté pendant ces deux premiers cycles, reporter
le manuellement totalement vers le haut en positionnant SW1 sur
manuel et en utilisant les boutons sur la centrale. Une fois la chaîne
levée, reporter SW1 en position automatique et repartir du point A.
NON
Si la chaîne s’est arrêté pendant ces deux premiers cycles, reporter
le manuellement totalement vers le haut en positionnant SW1 sur
manuel et en utilisant les boutons sur la centrale. Une fois la chaîne
levée, reporter SW1 en position automatique et repartir du point A.
OUI
Appuyer la commande de pas à pas
(bornes 5 et 11). La chaîne s’abaisse
complètement.
OUI
La course est mémorisée.
Pour reprogrammer la course repartir du point A.
4.4 RÉGLAGE DE LA SÉCURITÉ ANTI-ÉCRASEMENT
Cette procédure doit être effectuée SEULEMENT par l’installateur et
SEULEMENT pendant la mise en oeuvre du système. Pour un réglage
Régler le trimmer
au minimum
Position SW1
MAN
AUT
MAX
DISABLE
correct, avant d’effectuer toutes modifications, reporter toujours la chaîne
totalement vers le haut (voir paragraphe 4.2).
Avec l’automatisme en mouvement,
contrôler la sensibilité d’intervention
de la sécurité anti-écrasement et
vérifier que l’on aie un fonctionnement
régulier de la chaîne.
Vérifier que le fonctionnement soit régulier et
que la sensibilité soit programmée de manière
correcte, augmenter légèrement le trimmer
pour compenser les frottements qui peuvent
varier avec le temps et la température.
SENSE
Trop sensible ou fonctionnement
non régulier
Peu sensible
Diminution
de la force
MAX
DISABLE
SENSE
Tourner le trimmer SENSE
STOP dans sens anti-horaire
pour diminuer la force du
moteur.
Répéter la mesure
de la sensibilité
Il est possible de tourner le
trimmer SENSE STOP dans le
sens horaire pour augmenter
la force du moteur.
Augmentation
de la force
MAX
DISABLE
SENSE
ATTENTION: Avec trimmer en positon DISABLE (clignotant allumé) la sécurité anti-écrasement est exclue.
4.5 RÉGLAGE DE LA FERMETURE AUTOMATIQUE
Cette procédure doit être effectuée SEULEMENT par l’installateur et
SEULEMENT pendant la mise en oeuvre du système. Pour un réglage
Position SW1
MAN
AUT
Tourner le trimmer A.RECLTIME
complètement dans le sens horaire.
De cette manière, on désactive la
fermeture automatique.
L’attente est brève
Tourner le trimmer A.RECL.TIME
dans le sens horaire.
De cette manière, on augmente le
temps de fermeture automatique.
L’attente est longue
Tourner le trimmer A.RECL.TIME
dans le sens anti-horaire.
De cette manière, on diminue le
temps de fermeture automatique.
Avec la chaîne totalement vers
le haut, donner une commande
de pas à pas et attendre que la
chaîne soit totalement abaissée.
Désactivation de la
fermeture automatique
AUGMENTATION
DU TEMPS
MAX
A. RECL. TIME
MAX
A. RECL. TIME
correct, avant d’effectuer toutes modifications, reporter toujours la chaîne
totalement vers le haut (voir paragraphe 4.2).
FERMETURE
AUTOMATIQUE
DÉSACTIVÉE
En tournant le trimmerA.RECL.TIME complètement dans le sens antihoraire, dans la zone 1, la fermeture est contrôlée par l’intervention
des cellules photoélectriques (la chaine remonte quelques secondes
après le relachement du contact des photocellules).
1
DIMINUTION
DU TEMPS
MAX
A. RECL. TIME
F
5.
FONCTIONS AVANCÉES
1.
2.
3.
4.
Débrancher l’alimentation du système
Régler le sélecteur SW1 sur AUT (automatique)
Appuyer sur le bouton rouge
Maintenir la pression pendant que l’on rebranche l’alimentation au
système
5. Maintenir encore la pression jusqu’à ce que le clignotant ne s’allume
3 fois.
6. À ce point, relâcher-le et attendre que le clignotant s’éteigne. Le reset
a été effectué.
Cette procédure doit être effectuée SEULEMENT par l’installateur et
SEULEMENT pendant la mise en oeuvre du système. Pour un réglage
cor-rect, avant d’effectuer toutes modifications, reporter toujours la chaîne
totalement vers le haut (voir paragraphe 4.2).
5.1 RESET
Dans le cas où il soit nécessaire effectuer un reset de la centrale de
contrôle (effacement des paramètres de la course et la désactivation
des fonctions de pré clignotement, test cellules photoélectriques et
copropriété), procéder comme suit:
6.
ACTIVATION / DÉSACTIVATION DU PRÉ CLIGNOTEMENT, TEST CELLULES PHOTOÉLECTRIQUES ET FONCTION DE COPROPRIÉTÉ
Pour modifier l’état d’une de ces fonctions, il est nécessaire d’activer la
modalité d’apprentissage. Cet état particulier de la centrale peut être
activé seulement avec la chaîne à l’arrêt et complètement vers le haut.
Pendant la phase d’apprentissage la centrale passe automatiquement
d’une fonction à l’autre sur lesquelles il est possible d’intervenir. La led
du clignotant, ainsi que celle située sur la platine, signalent la fonction
sélectionnée avec un nombre d’éclairs variable. Le passage d’une fonction
à l’autre vient effectué automatiquement (il suffit de maintenir toujours la
pression sur le bouton rouge).
La centrale commence en sélectionnant la première fonction (signalée par
1 éclair), successivement en maintenant la pression sur le bouton rouge
on passe à la deuxième fonction (signalée par 2 éclairs) et ainsi de suite.
Pour activer la modalité d’apprentissage, procéder comme suit:
1. Porter la chaîne complètement vers le haut (le sélecteur SW1 doit être
en position AUT).
2. Appuyer et maintenir toujours la pression sur le bouton rouge.
3. Après 4-5 secondes le led du clignotant effectue une série de 8 éclairs
(qui avisent de la prochaine entré en modalité de apprentissage). Une
fois terminé la série d’éclairs, la centrale est en apprentissage. Ne
relâcher pas encore le bouton.
4. Une fois déterminé (par le nombre d’éclairs du led clignotant) la fonction
que on désire modifier, relâcher le bouton rouge. De cette manière la
fonction désirée vient sélectionnée. Une fois sélectionnée la fonction,
la centrale évidence le réglage en clignotant avec une fréquence lente
(1 éclairs à seconde) ou avec une fréquence rapide, en suivant ce qui
est indiqué dans le tableau suivant.
5. Appuyer donc sur le bouton correspondant (faire référence au tableau
ci-dessus) au nouvel état que l’on désire pour la fonction sélectionnée.
La fréquence de clignotement variera selon la choix effectuée. A ce point,
il est possible de modifier d’autres fonctions ou, si l’on a terminé, sortir
de la phase d’apprentissage. Dans le cas où l’on désire modifier d’autres
fonctions, appuyer et maintenir encore la pression sur le bouton rouge.
Après quelques secondes, la centrale commencera encore à sélectionner
en séquences les différentes fonctions. Procéder donc comme expliqué
au-dessus. Si, au contraire, on désire sortir de l’apprentissage, si au
contraire, on désire sortir de l’apprentissage, il est suffisant de déplacer
le sélecteur SW1 en position «MAN». Attendre 1 à 2 secondes et le
remettre en position «AUT». De cette façon, la centrale sortira du mode
apprentissage pour retourner en mode de fonctionnement normal.
N° clignotement
Fonction sélectionnée
Clignotement
Bouton jaune
Bouton bleu
1
Pré clignotement
Lent = désactivé / Rapide = activé
Activation
Désactivation
encore 2
Test photocellule
Rapide = désactivé / Lent = activé
Activation
Désactivation
encore 3
copropriété
Lent = disactivé / Rapide = activé
Activation
Désactivation
encore 4
Réservé
encore 5
Réservé
encore 6
Réservé
6.1 PRÉ CLIGNOTEMENT
Cette fonction effectue AVANT chaque mouvement une série de
clignotement pour indiquer le mouvement imminent.
6.2 FONCTION DE COPROPRIÉTÉ
Pendant l’abaissement de la chaîne, toutes les commandes sont ignorées.
Une fois que la chaîne est totalement abaissée, si la fermeture automatique
est désactivée, on peut relever la chaîne avec une commande de pas
à pas. Si la fonction de fermeture automatique est active, toutes les
commandes de fermeture sont ignorées. Pendant que la chaîne se relève,
une commande de pas à pas bloque et inverse le mouvement.
1
6.3 TEST CELLULES PHOTOÉLECTRIQUES
Cette centrale est doté d’une fonction qui permets d’effectuer un contrôle
sur le fonctionnement des photocellules avant chaque activation du moteur.
De cette manière on a la possibilité d’augmenter la sécurité du système
en cas d’endommagement du photo dispositif (ex: relais de sortie collé),
ou d’un court-circuit non désiré sur l’entrée cellules. En cas de panne
la centrale le signale en faisant clignoter le clignotant et en effectuant
aucun mouvement. Ce contrôle vient effectué quand la centrale reçoit une
commande de mouvement, mais avant de donner tension au moteur.
F
7.
RÉSOLUTION DES PROBLÈMES PRINCIPAUX
Problème
En activant la commande
d’abaissement, l’automatisme ne
bouge pas.
Cause probable
Soluzione
Manque d’énergie électrique
Vérifier la présence de la tension électrique et toutes les
connexions au réseau électrique.
Fusible brûlé
Remplacer le fusible avec un autre qui a les mêmes caractéristiques.
En activant la commande
Connexion encodeur non correcte
d’abaissement, la chaîne se déplace
pour un bref instant et ensuite s’arrête.
Vérifier le câblage des fils de l’encodeur
En activant la commande d’abaissement,
Jumpers direction moteur inversé
la chaîne se déplace vers le haut.
Invertir les jumpers (si présents) ou invertir les câbles de
l’alimentation du moteur.
On ne peut pas programmer les
télécommandes
La chaîne n’est pas totalement vers
le haut.
Reporter (en manuel) la chaîne vers le haut. Placer le sélecteur
SW1 sur manuel, attendre 1 second et reporter-le sur automatique.
Réessayer d’entrer en apprentissage.
La centrale est alimentée mais la
chaîne ne bouge pas.
Une entrée normalement fermée n’est Vérifier l’entrée des cellules photoélectriques, l’entrée stop et les fins de
course. Si ils ne sont pas utilisés, court-circuiter les avec le commun.
pas active.
1
les branchements et les données techniques des accessoires, se conformer aux livrets
OPTIONS - Pour
d’instruction correspondants.
CHAÎNE EN ACIER
Ø 6 mm rouge et blanche. Coupée sur mesure
CANAL À TERRE POUR LA CHAÎNE
code ACG5480
à enterrer. L = 2 m
BATTERIE
1,2Ah 12V
code ACG5481
CHARGEUR BATTERIES PILOMAT CHAIN
code ACG9511
code ACG5482
1
F
G
B
GB TECHNICAL DATA / INSTALLATION PILOMAT CHAIN
LAY-OUT
Cable
2x2,5 mm2
1
Description:
1 - Chain barrier PILOMAT CHAIN
2 - Control unit
3 - Chain protection ramp ACG5481
4 - Chain ACG5480
5 - Radio transmitter
Lenght of the chain (m)
Relative height
in the middle X (cm)
TECHNICAL DATA
Power supply
Current Draw
4
6
75 70
8
10
12
14
16 18
20
65 60
55
50
45 40
35
ATTENTION: The value in the table has been determinated using a chain of 400
gramms/meter.
CHAIN
A
230 V-/50 Hz
1.0
Force
Service
Nm
645
50%
Protection Degree
Lubrification
Weight
Max chain weight
IP
34
Permanent
25
8.5
kg
kg
DESCRIPTION AND DIMENSION OF THE COLUMN
Hole
2
3
0
G
INSTALLATION
All measures are expressed in milimeters unless otherwise indicated.
PRELIMINARY CONTROLS
• Control the stability and solidity of the zone where the columns are
going to be fixed.
• Use an omnipolar interrupter with contact distance of at least 3 mm.
• The connection to the power supply must be seperated than the
connections to the security and commanding devices.
INSTALLATION OF THE COLUMN (fig. 1, fig. 3, fig. 4)
1. Screw in for 1,5 - 2,0 cm the 4 screws M10x70 in dotation to the
base.
2. Place than the base on the previously prepared base of cement (fig.
3).
3. The upper part of the base should be clean and perfectly horizontal.
4. Pass the plastic tubes of the cables through the central opening on the
base and check again the stability of the base.
5. Unscrewing the 8 screws (10) take off the frontal (8) and the rear cover
(9) of the column (fig. 4).
6. Place now the column structure on the base.
7. Fix now the column to the base with the 4 washers (5) and 4 nuts (4).
8. Fix the frontal covers (8) of both columns with 4 screws (10).
9. Now you can fix the chain to the apposite holes on both columns
respecting the level X in the middle of the chain barrier indicated at the
table (fig. 1).
Description:
1 - Column
2 - Gearmotor with encoder
3 - Control unit
4 - Autoblocking nut M10
5 - Washer 20x10
6 - Backing plate
7 - Screw M10x70
8 - Anterior cover
9 - Posterior cover
10 - Closing screw M5x10
MAINTANENCE PLAN (EVERY 6 MONTHS)
1. Cut the power supply off or disconnect the batteries if present. Clean
and grease the guide and the pignons internally.
2. See if there are weared parts and replace these if neccessary.
3. Grease the internal transmitting chain (fig. 5).
4
MECHANICAL FUSE INSTALLATION
5
4. Check the fixation nuts (fig. 6).
Screw TCEI M8X25 INOX
6
5. Control the electrical connections.
6. Supply the power again.
7. Check out the correct functioning of the obstacle recognition (encoder
system).
8. Check out the correct functioning of all and of the security commands.
Spring D17 L13
Washer M12
1
G
B
GB
1.
CHAIN CONTROL BOARD
INTRODUCTION
STOPPER is a control unit dedicated to the movement of the chain barrier
with 24Vdc motor. The coexistance of various types of safeties such as
the control of the absorbed power by the motor and the velocity of the
motor allows a rapid intervention of the anti - squeezing security (sense).
Through the encoder present in the motor it is possible to control the exact
position of the chain and to use it without mechanical limit switches. The
2.
control unit has inputs for mechanical limit switches, for the step by step
button, for the pedestrian opening, for the safety photocells and the output
for flashing light 24 Vac. The unit also allows the regulation by trimmer
both the automatic chain lifting and the motor force. Action can control
motors at 24 - 30 Vcc with a maximum consumption of 7A.
CONFIGURATION
Automatic
chain lifting
Use this point to connect
the motor’s casing to the
control panel and to the
ground.
Setting maximum
torque threshold
Jumper (if present)
in order to invert the
motor phases
Buttons:
1 = yellow
2 = Blue
3 = Red
Connector for the
battery charger ACG5482
Manual selector (Left) /
automatic (Right)
Motor/Encoder Connector
3.
ELECTRICAL CONNECTIONS
Terminal
Function
Setting
1-2
Flashing signal output
Out: 24 Vac 25W MAX
3
Positive power supply TX & RX photocell
Out: +24Vcc
4
Negative power supply TX photocell
Out: GND TX
5
Negative power supply RX photocell and
common button and safety
Out: GND RX
Common
6
STOP of the chain raising
Normally closed (NC)
7
STOP of the chain lowering
Normally closed (NC)
8
STOP button input
Normally closed (NC)
9
RX photocell contact input
Normally closed (NC)
10
Pedestrian button input
Normally open (NO)
11
Step by step button input
12
Not to use
13
Not to use
Photocells
Power supply
Normally open (NO)
Motor/ Encoder Connector.
Example of connection
CABLE
OF EARTH
CONNECTION
MOTOR CASING
MOTOR CASING
FIXTURE SCREWS
Any contact which is
Normally Closed (N.C.)
Must be bridged to the
common if not used.
CONNECTION
CABLE
Encoder +5Vcc (brown)
Signal (green)
GND (white)
Motor
CONTROL UNIT
IMPORTANT: to obtain a correct working of the accessories (photo
devices in particular) connected to the control box, it is very important
that the entire system (motor+ control box) has a single mass reference
system. You must therefore connect a small cable between the motor
casing and the control box at the point shown in the figure. If there is a
good ground connection it is advisable to connect it to the system.
G
4.
SETTINGS
can cause serious damages to the automation.
This chapter contains important informations for a secure and correct
installation. Follow exactly all the instructions because a wrong installation
4.1 PRELIMINARY CHECKS
Before powering up the control panel, check the wirings. In particular
check that there are no damaged wires, short-circuits between wires and
that all the accessories are connected to the terminal board in the points
indicated in the diagram on the previous page.
Once the power supply is on check that:
1. The POWER LED is constantly on.
2. The radio module is inserted and working.
3. The motor and the encoder connections are correct by following the
procedure described below.
This procedure allows us to check the rotation sense of the motors, any
possible blockages during the movement of the chain.
It is important to carry out this check in order to locate any wiring errors or
anything else that can jeopardize.
N.B.: During this handling the photocells, the radio and the buttons are NOT active.
NO
SW1 position
MAN
The Chain does not move.
Check the cables and repeat the
test.
The chain begins to lift.
Modify the orientation of the 2 jumpers
present on the card. If not present, invert the
phases of the motor. Repeat the test.
Push the BLUE button. The chain
begins to lower.
AUT
YES
YES
NO
NO
SW1 position
MAN
AUT
Release the BLUE button and press the YELLOW
button. The chain begins to lift to the complete
upper position.
4.2 MANUAL MOVING
This procedure must be carried out ONLY by the installer and ONLY
during the setting up of the system. The movement can be effectuated
SW1 position
MAN
Check the cables and
repeat the test.
in particular situations in which it is not possible to move the chain to the
lifted position in automatic mode.
To lift the chain
Press the YELLOW button
To lower the chain
Press the BLUE button
AUT
WARNING: the reactivation of the automatic
mode (AUT) implies the use of
the reached position as totally
lifted position.
WARNING: During the manually moving,
the anti-squeezing safety is not
active.
G
B
4.3 SETTING THE CHAIN MOVEMENT
This procedure must be carried out ONLY by the installer and ONLY
during the setting up of the system. The movement can be effectuated
A
Press the BLUE button for a while.
The flashing signal begins flashing
slowly.
SW1 POSITION
MAN
AUT
YES
in particular situations in which it is not possible to lift the chain in
automatic mode.
NO
Check if the chain is into the complete lifted position.
Check if SW1 is in the AUTO position and repeat the test.
NO
Press the BLUE button. The chain begins
to lower.
Check the wiring of the motor. Repeat the test.
YES
When the chain reaches the desired lower
position, re-press the BLUE button.
The chain stops.
NO
Re-press the BLUE button.
YES
Press the step by step button (terminal
blocks 5 and 11). The chain rises to the
upper position.
YES
During the memorization of the course and for the successive 2
complete cycles of moving (lowering-raising) avoid interventions on
the inputs of stops and photocells, avoid also the verify of the sense,
because the central in these 2 first movings acquires the parameters
for a correct functioning.
NO
If the chain inverts the movement, bring it back to the upper position
with the SW1 in MAN position. Once the chain is lifted, move back
the SW1 to AUT.
YES
Press the step by step button (terminal
blocks 5 and 11). The chain begins to
lower.
NO
If the chain inverts the movement, bring it back to the upper position
with the SW1 in MAN position. Once the chain is lifted, move back
the SW1 to AUT.
YES
To re-program the rising and lowering repeat this procedure
The rising and lowering are stored.
4.4 REGULATION OF THE ANTI-SQUEEZING SECURITY
This procedure must be carried out ONLY by the installer and ONLY
during the setting up of the system. The movement can be effectuated
Set the trimmer to a
reasonable minimum
SW1 POSITION
MAN
AUT
MAX
DISABLE
in particular situations in which it is not possible to move the chain to the
lifted position in automatic mode.
With the chain in movement, check
the sensibility of the intervention of
the antisqueezing security and check
that there is a regular functioning of
the chain.
Check that the functioning is regular and
that the sensibility is setted in a correct way,
increase lightly the trimmer to balance the
frictions wich can vary with the time and the
temperature.
SENSE
If it is too low
DECREASE
OF FORCE
MAX
DISABLE
SENSE
Turn
the
trimmer
in
anti-clockwise sense to
decrease the force of the
motors.
If it is too high
Repeat the force
measurement
It is possible to turn the
trimmer in clockwise sense
to increase the force of the
motors.
INCREASE
OF FORCE
MAX
DISABLE
SENSE
WARNING: With the trimmer in disabled position ( flashing light turned on), the anti-squeezing security is excluded.
4.5 REGULATION OF THE AUTOMATIC RE-CLOSURE TIME
This procedure must be carried out ONLY by the installer and ONLY
during the setting up of the system. The movement can be effectuated
SW1 POSITION
MAN
AUT
Turn the A. RECL. TIME trimmer
completely in clockwise sense.
In this way you can disable
automatic re-closure.
The time is too brief
Turn the A. RECL. TIME trimmer
in clockwise sense.
In this way, the automatic reclosure time is increased.
The time is too long
Turn the A. RECL. TIME trimmer
anticlockwise sense.
In this way the automatic reclosure time is reduced.
With the chain completely
raise give a relay command
and wait for complete
opening.
Disabled Automatic
Re-closure
INCREASE
OF TIME
MAX
A. RECL. TIME
MAX
A. RECL. TIME
in particular situations in which it is not possible to move the chain to the
lifted position in automatic mode.
DISABLED
AUTOMATIC
RE-CLOSURE
By turning the A. RECL. TIME trimmer completely in
anticlockwise sense in band 1. The re-closure is controlled
by the intervention of the photocells (after a few seconds
from the photocell contact release, the chain rises).
DECREASE
OF TIME
MAX
A. RECL. TIME
G
B
5.
ADVANCED FUNCTIONS
This procedure must be carried out ONLY by an installer and ONLY
during setting up of the system. For correct setting, before carrying out
alterations, bring the chain to the completely closed position (up) (see
paragraph 4.2).
5.1 RESET
In case if it is necessary to reset the control unit proceed as follows (total
erasing of the memory and deactivation of pre-blinking, photocell test and
multi-user function):
6.
1.
2.
3.
4.
5.
6.
Remove power supply from the system.
Set the selector SW1 on AUT (automatic).
Press the red button.
Keep it pressed while reconnecting the power supply.
Keep it pressed until the flashing signal lights up for the 3rd time.
Release the button and wait until the flashing light turns off. The reset
is done
ENABLING AND DESABLING THE PRE-FLASHING, PHOTOCELL TEST AND THE MULTI-USER FUNCTION
To modify the status of any of these functions it is necessary to enable the
setting mode. in the phase of learning the control unit automatically goes
through all possible functions in which it is possible to intervene. The led
of the flashing light and the POWER led on the control board indicate that
the selected function each time with a variable number of flashings. The
passage from a function to another one is executed automatically (it is
enough to maintain always pressed the red button).
The control unit starts selecting the first function ( signaled by 1 flashing),
successively, keeping pressed the red button you pass at the second
function (signaled by 2 flashings) and so on. To enable the setting /
learning mode proceed as follows:
1. Raise the chain to its upper position (the SW1 switch ha sto be turned
to the AUT position).
2. Press and keep pressed the red button.
3. After 4 - 5 seconds the led of the flashing - light executes a series of
8 flashings (notifying the next entry to the learning mode). Once the
series of flashings end the control unit is in the learning mode. Do not
release the red button yet.
4. Once individualized (through the number of flashings of the flashinglight led) the function that you want to modify, release the red button. In
this way the function is selected. Once selected the function, the control
unit puts in evidence the setting by flashing with a slow frequence (1
flashing/second) or with a rapid frequence (2 flashings / second) as
pointed out on the next table.
5. Press now the button (see table) correspondant to the new status you
wish set for the selected function. The frequency of flashing will vary
according to the chosen mode.
At this point it is possible to modify further functions or, if you have finished,
go out from the setting phase. In case you want to modify other functions,
press and keep pressed the red button. After few seconds, the control unit
will start again to select in sequence the several functions. Instead if you
want to exit from the learning mode, it is sufficient to bring the lever of the
selector Sw1 in manual position, wait 1-2 sec and successively report it
in automatic position. In this way, the control unit gets out of the learning
mode and prepares itself for the normal functioning.
No. of flashes
Selected function
Flash
Yellow button
Blue button
1
Pre-flashing
Slow = disabled
activation
deactivation
other 2
Photocell Test
Fast = disabled
activation
deactivation
other 3
Multi-user setting
Slow= disabled
activation
deactivation
other 4
Reserved
other 5
Reserved
other 6
Reserved
6.1 PRE-FLASHING
The chain movement is always signalized by a pre-blinking, advising the
user that the chain is next to move.
6.2 MULTI-USER FUNCTION
During the opening phase of the chain, every other command is ignored.
Once opened the chain (completely down, it is possible to close it using
the step-by-step command or using the automatic re-closure. During
the closing phase, a step-by-step command blocks and inverts the
movement.
6.3 PHOTOCELL TEST
Every time the motor is switched on, the control unit automatically controls
if the photocells are functioning properly.
This operation increases the security system. If a photocell is damaged (for
instance output relay stuck) or in case of undesired photocell input short
circuit. This test is executed immediately after that the control unit has
received an order of “moving“, but before power is applied to the motor.
G
B
7.
PROBLEMS AND THEIR SOLUTIONS
Type of problem
Once a lift command is pressed,
the chain does not move.
Probable cause
Solution
Lack of electrical power supply
Check the presence of the electrical voltage and all the
connections to the electrical network
Burned fuse
Replace the fuse with a similar one
Once a lift command is pressed,
the chain rises for brief time and
then stops.
Incorrect encoder connection
Check the connections of the encoder’s wires
Once a lower command is pressed,
the chain rises.
Jumper direction motor inverted
Invert the Jumpers.
The programming procedure
cannot be activated.
Lift the chain with the manual procedure. If the chain is
The chain is not completely lifted. already lifted, turn SW1 to MAN, wait 1 second, turn SW1
to AUT. Try again.
The control panel is powered but
the chain does not move.
A normally closed input is not
active
Check the photocell, stop and limit switch input. If not
used they must be bridged to the common.
OPTIONALS - For the connections and the technical data of the fixtures follow the relevant handbooks.
STEEL CHAIN
Ø 6 mm red and white.
CHAIN PROTECTION RAMP
code ACG5480
BATTERY
1,2Ah 12V
to fit at floor level. L = 2 m
code ACG5481
BATTERIES CHARGER PILOMAT CHAIN
code ACG9511
code ACG5482
G
B
COMPANY WITH QUALITY
SYSTEM CERTIFIED
BY DNV
AZIENDA CON SISTEMA DI
QUALITÀ CERTIFICATO
DA DNV
DICHIARAZIONE DI CONFORMITÁ - DECLARATION OF COMPLIANCE
DÉCLARATION DE CONFORMITÉ
Dichiariamo sotto la nostra responsabilità gli operatori serie PILOMAT CHAIN sono conformi alle seguenti norme e Direttive:
Le fabricant certifie en engageant sa seule responsabilité que les produits de la série PILOMAT CHAIN sont conformes aux Normes et Directives cidessous:
We declare, on our own responsibility, that operating devices of the series PILOMAT CHAIN comply with the following standards and Directives:
EN 55014-1
EN 55014-2
EN 60335-1
2000
1997
2002
EN 61000-3-2
EN 61000-3-3
EN 61000-6-1
2000
1995
2001
EN 61000-6-2
EN 61000-6-3
EN 61000-6-4
1999
2001
2001
Come richiesto dalle seguenti Direttive - Comme demandé par les suivantes Directives
As requested by the following Directives - Según lo requerido por las siguientes Directrices:
89/106/EEC
93/68/EEC
2006/95/CE
2004/108/CE
92/31/EC
1999/5/CE
Il presente prodotto non può funzionare in modo indipendente ed è destinato ad essere incorporato in un impianto costituito da ulteriori elementi.
Rientra perciò nell’Art. 6 paragrafo 2 della Direttiva 2006/42/CE (Macchine) e successive modifiche, per cui segnaliamo il divieto di messa in
servizio prima che l’impianto sia stato dichiarato conforme alle disposizioni della Direttiva
Le présent dispositif ne peut fonctionner de manière indépendante, étant prévu pour être intégré à une installation constituée d’autres éléments. Aussi
rentre-t-il dans le champ d’application de l’art. 6, paragraphe 2 de la Directive machines 2006/42/CEE et de ses modifications successives. Sa mise
en service est interdite avant que l’installation ait été déclarée conforme aux dispositions prévues par la Directive
This product can not work alone and was designed to be fitted into a system made up of various other elements. Hence, it falls within Article 6,
Paragraph 2 of the EC-Directive 2006/42 (Machines) and following modifications, to which respect we point out the ban on its putting into service
before being found compliant with what is provided by the Directive.
RESPONSABILE TECNICO
(TOFFETTI SERGIO)
Questo prodotto è stato completamente progettato e costruito in Italia · Ce produit a été complètement développé et fabriqué en Italie
This product has been completely developed and built in Italy
Scarica