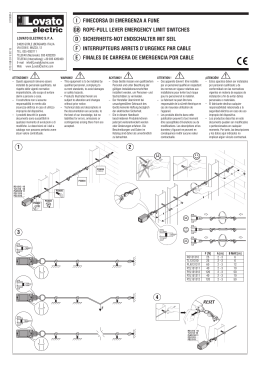
cool ideas to ke
Bitte mit Aufmerksamkeit lesen und zusammen mit dem Möbel
aufbewahren.
INHALTSVERZEICHNIS
1.
2.
3.
4.
5.
6.
7.
Allgemeine Regeln
Reklamationen
Garantie
Installation
Anlassung
Reinigung und Instandhaltung
Funktionierungsanomalien
Inhaltsverzeichnis
eep it fresh
Nachtrollo
Lampe
Luftausfuhr
Elektronische Schalttafel
Lichtschalter
Lampe
Bild > 1
Ansauggitter
>
>
>
Modelle:
Alaska, Bloody Mary, Casanova, Clipper
Daiquiri, Manhattan, Oriental
Motorgitter
Bescheinigungen des Produktes CE, IMQ
IMQ stimmt folgendermaßen überein:
Austria OVE
Germany VDE
Belgium CEBEC
Great Britain BEAB/BSI
Czechoslovakia EZU Ireland NSAI
Finland SETI
Slovenia and Croatia FIS
France UTE
Holland KEMA
Bild > 2
Poland CBW
Switzerland SEV
Denmark DEMKO
Spain AEE
Qualitätsbescheinigungen der Firma UNI EN ISO 9001: 2000
1> ALLEGMEINE REGELN
Die Haupteigenschaften wie Größen, Inhalte, Zubehöre u.s.w. sind in jedem
Verkaufskatalog enthalten.
Für eine korrekte Funktionierung des WKR und für die Vermeidung von Schäden
an Personen und Dingen, bitten wir Sie diese Bedienungsanleitung zu beachten.
Der Hersteller lehnt jede Verantwortung ab für Probleme die auf Grund der
Nichtbeachtung der Bedienungs - und Instandhaltungsregeln entstehen können.
2> REKLAMATIONEN
Beim Erhalten der Ware sich sofort vergewissern das es keine Transportschäden
gegeben hat.
Packen Sie das WKR sofort aus und vergewissern Sie sich das alle Zubehöre
beigelegt worden sind.
Im Falle von Transportschäden teilen Sie dies sofort dem Fahrer mit und heben
Sie den Schaden auf den Lieferschein hervor . Die Mitteilung von Transportschäden
muss innerhalb von 3 Tagen nach dem Wareneingang durch Einschreiben der
Transportfirma mitgeteilt werden.
Jede andere Reklamation muss uns innerhalb von 8 Tagen zukommen.
3> GARANTIE
24 Monate für das WKR (elektrische Teile ausgeschlossen).
4> INSTALLATION
Das WKR ist in der Klimaklasse 3 klassifiziert. Um eine korrekte Funktionierung
zu garantieren sollte das Umgebungsklima mit den Parametern der Klimaklasse
übereinstimmen (siehe Tabelle*). Sollte dies nicht respektiert werden könnten
folgende Probleme auftauchen: Nicht Einhaltung der eingestellten Temperatur,
übertriebener Energieverbrauch, Eisbildung auf dem Verdampfer.
Das WKR darf nicht in der Nähe von Luftströmungen, Türen, Fenstern
und Wärmequellen gestellt werden (Bild 3).
Anderenfalls könnte es zu den oben genannten Problemen kommen
NEIN !
Bild > 3
UMGEBUNGSKONDITIONEN *
Geschlossener Raum
Höchstemperatur +25°C
Raumfeuchtigkeit max 60%
Beleuchtung 100 lx
! Es ist absolut verboten Gegenstände auf dem Dach des WKR zu legen.
Das Ansaugitter darf
! nicht
abgedeckt werden
6
6
Bild > 4
Das Möbel muss mindestens 6 cm von der Wand, oder von jedem anderen Gegenstand
das die Luftzirkulation stören könnte, abstehen. Es ist absolut verboten Gegenstände auf
dem Dach des WKR zu legen. Die beigefügten Abstandelemente an der Aussenrückwand
des WKR anbringen.
Eine unkorrekte Luftzirkulation kann zur Tauwasserbildung und zu einer geringeren
Leistung des Möbels bringen. Das Lüftungsgitter, das Ansauggitter und das Motorgitter
müssen frei bleiben (Bild 4).
Nach der Installation muss der Stecker zugänglich bleiben.
> Anschluss an das Stromnetz
Die elektrische Anlage des Lokals wo das Möbel angeschlossen ist muss gemäß den
Regeln und Prozessordnungen sein. Die Stromversorgung des Möbels muss unabhängig
von anderen Stromversorgungen sein. Das Gerät an eine Steckdose mit hochsensiblen
Differentialschalter (30 mA) und Schutzkontakt zur Erdung anschliessen. Sich versichern
das die Anweisungen bezüglich der Spannung und der Frequenz, die auf der Etikette der
Aussenrückwand des Möbels vermerkt sind, berücksichtigt werden.
ACHTUNG! DAS REGAL NUR AN EINER ERDUNGSANLAGE ANSCHLIESSEN
5 > EINSCHALTUNG
Bild > 5
Um ein steckerfertiges
Möbel einzuschalten
reicht es den Stecker
in die Steckdose zu
drücken. Die Schalttafel
ist eingestellt um eine
korrekte Funktionierung
gemäß der Klimaklasse
des WKR zu garantieren.
Sich versichern das die
Klimaklasse dem Produkt
entspricht das im Möbel
aufbewahrt werden
soll (dazu Kataloge und
technische Tabellen
beraten). Die Abtauzyklen
sind voll automatisch
und für normale
Raumkonditionen eingestellt. In besonderen Raumkonditionen (z.B. besonders feuchte
Klimas) könnte es nötig sein die Häufigkeit der Abtauungen zu erhöhen (beraten Sie hierzu
die Bedienungsanleitung der Schalttafel).
Es ist immer besser den Verkäufer des Möbels zu kontaktieren; eine unkorrekte
Programmierung könnte zu einer falschen Funktionierung des Möbels bringen.
Damit eine richtige Funktionierung des Gerätes garantiert wird, sich versichern das alle
Etagen eingebaut sind, das diese
mit der Innenrückwand in Kontakt
sind und das die Lebensmittel
gleichmäßig verteilt sind. Jede Etage
sollte nicht komplett bestückt sein;
es sollte einen Abstand von ca.
6 cm zwischen der Ware und der
oberen Etage geben (siehe Bild 5).
Ein überbestücktes Möbel oder ein
halb leeres Gerät könnte die Ursache
einer falschen Funktionierung sein.
Höchstgewicht pro Etage: 70 kg
gleichmäßig verteilt.
Wichtig:
Ein WKR für die Austellung und den
Verkauf von Ware ist nicht dazu
gedacht verderbliche Lebensmittel zu
kühlen sondern um Lebensmittel auf
die gleiche Temperatur zu behalten mit
denen sie in das WKR gestellt worden
sind. Lebensmittel sollten nicht auf der
Palette oder änlichen Strukturen, im
Geschäft oder außerhalb, für mehr Zeit
als notwendig gelassen werden.
Bild > 6
Sollte das WKR ein Nachtrollo haben sollte dieses immer nach Tagesabschluss
heruntergezogen werden um Energie zu sparen (siehe Bild 6).
Bild > 7
> Modell BLOODY MARY
6 > REINIGUNG UND INSTANDHALTUNG
ACHTUNG! VOR JEDER REINIGUNG UND INSTANDHALTUNGSARBEIT, DEN STECKER AUS DER
STECKDOSE ZIEHEN. Die Innen und Aussenwände können mit lauwarmem Wasser und
einer Seifenlösung von 5% gereinigt werden (Neutralseife z.B.); aggressive Lösungen
vermeiden und mit einem feuchten Tuch trocknen (mit einem trockenen Tuch könnte es
elektrostatischen Druck geben).
ACHTUNG! DAS WKR DARF NICHT DURCH WASSERSTRAHLE GEREINIGT WERDEN.
!
Mindestens jede 2 Monate sollte der Kondensator gereinigt werden und von eventuellem
Staub befreit werden. Das Motorgitter abschrauben und mit einer Bürste oder mit
einem Staubsauger reinigen (siehe Bild 6). Dieser Prozess ist grundlegend für eine
korrekte Funktionierung des WKR! Sollte das WKR mit dem Selbstreinigungssystem des
Kondensators ausgestattet sein kann dieser Prozess ausfallen.
AUSTAUSCHEN DER INNENRAUMLAMPEN
Zum Austauschen einer ausgefallenen Lampe bitte folgende Anweisungen beachten:
1. Das WKR ausschalten und den Stecker aus der Steckdose ziehen.
2. Die Lampenabdeckung in Plastik wegnehmen
3. Die Lampe drehen bis sich diese von dem Lampenhalter trennt
4. Die neue Röhre montieren und sich vergewissen das diese mit der alten übereinstimmt
5. Die Lampenabdeckung montieren
6. Das WKR wieder an die Steckdose anschließen
7 > FUNKTIONSPROBLEME
A > Das WKR schaltet sich nicht ein:
. Sich versichern das der Stecker richtig in die Dose gesteckt worden ist.
. Sich versichern das der allgemeine Schalter an der Wand eingeschaltet ist.
. Sich versichern das es sich nicht um einen allgemeinen BLACK OUT handelt.
B > Das WKR erreicht nicht die eingestellte Betriebstemperatur:
. Sich versichern das der Kondensator gereinigt ist.
. Sich versichern das alle Etagen richtig eingebaut sind und das die Ware gleichmäßig
verteilt ist.
. Sich versichern das das Möbel nicht in der Nähe von Hitzequellen oder
Luftströmungen gestellt worden ist.
. Sich versichern das das Ansauggitter und das der Luftrückkehr nicht behindert ist.
INDICE GENERALE
1.
2.
3.
4.
5.
6.
7.
norme generali
reclami
garanzia
installazione
avviamento
pulizia e manutenzione
anomalie di funzionamento
indice generale
eep it fresh
tendina notte
lampada
feritoia
di uscita aria
pannello elettronico
interruttore illuminazione
lampada
figura > 1
griglia di aspirazione
>
modelli:
Alaska, Bloody Mary, Casanova, Clipper
Daiquiri, Manhattan, Oriental
griglia di protezione frontale
figura > 2
>
Certificazioni di prodotto CE, IMQ (dove previsto)
>
Certificazioni sistema qualità aziendale UNI EN ISO 9001: 2000
IMQ corrisponde a: Austria OVE
Belgium CEBEC
Czechoslovakia EZU
Finland SETI
France UTE
Germany VDE
Great Britain BEAB/BSI
Ireland NSAI
Slovenia and Croatia FIS
Holland KEMA
Poland CBW
Switzerland SEV
Denmark DEMKO
Spain AEE
1 > NORME GENERALI
Le caratteristiche principali : dimensioni, capacità, accessori, ecc. sono indicate
in ogni catalogo di vendita.
Vi preghiamo di consultare con attenzione questo libretto ai fini di un corretto
funzionamento del banco e onde evitare danni a persone o cose.
Il produttore declina ogni responsabilità per problemi causati dalla non
osservanza delle norme d’uso e manutenzione.
2 > RECLAMI
Al ricevimento del murale, verificate subito che non vi siano stati danni
da trasporto.
Sballate l’apparecchio e assicuratevi che gli accessori siano stati aggiunti
all’imballo. In caso di avarie da trasporto effettuate subito le Vs. riserve
all’autista e indicatele sul documento di trasporto. Entro un termine di 3 giorni
queste riserve dovranno essere confermate tramite lettera raccomandata
alla ditta che ha effettuato il trasporto.
Ogni altro reclamo, dovrà pervenirci entro 8 giorni.
3 > CONDIZIONI DI GARANZIA
24 mesi sul mobile escluso le parti elettriche.
4 > INSTALLAZIONE
Il mobile refrigerato è classificato in classe climatica 3 . Per un corretto
funzionamento è necessario mantenere il clima ambiente nel luogo
di installazione entro i limiti stabiliti (vedere tabella * ).
Diversamente si possono presentare problemi come il non mantenimento della
temperatura , il consumo eccessivo e la formazione di ghiaccio sull’evaporatore.
La posizione del mobile deve essere tale da evitare correnti d’aria.
Non deve essere installato vicino a porte , finestre o bocchette di aerazione
e a fonti di calore (figura 3).
Diversamente si possono verificare i problemi di cui sopra.
NO !
figura > 3
CONDIZIONI AMBIENTALI *
locale chiuso
temperatura max 25°C
umidità relativa max 60% U.R.
illuminazione 100 Ix
! non ostruire l’aspirazione
6
6
figura > 4
Installare i distanziatori forniti a corredo nella parte posteriore del banco, avvitandoli con
le viti a testa esagonle e applicando una coppia non superiore a 2,5 Nm.
Assicurarsi che tra lo schienale del banco e il muro e tra le due spalle laterali ed eventuali
pareti o altri mobili si mantenga una distanza di almeno 6 cm per assicurare una sufficiente
circolazione d’aria. Diversamente si possono presentare problemi di formazione di
condensa e di resa frigorifera.
Non ostruire le griglie di aereazione, aspirazione e la feritoia di uscita aria (vedi figura 1 e 4).
Dopo l’installazione la spina di alimentazione deve rimanere accessibile.
> Collegamento alla rete elettrica
L’impianto elettrico del locale dove viene posizionato il mobile deve essere conforme ai
regolamenti e ai codici di sicurezza vigenti. L’alimentazione di energia elettrica del mobile
deve essere indipendente da altre alimentazioni. Collegare l’apparecchio ad una presa
provvista di contatto di terra, alimentata da un interruttore differenziale ad alta sensibilità
(30mA). Attenersi alle indicazioni di tensione e frequenza riportate sull’etichetta posta nella
parte retro del mobile.
ATTENZIONE: IL PRODOTTO DEVE ESSERE COLLEGATO AD UN IMPIANTO DI TERRA.
5 > AVVIAMENTO
figura > 5
Per avviare il mobile
con unità condensatrice
incorporata, è sufficiente
collegare la spina alla presa
di rete.
Il pannello di regolazione
elettronico è già
programmato per garantire
un funzionamento
conforme alla classe di
temperatura prodotto del
mobile. Assicurarsi che tale
classe sia conforme al tipo
di prodotto da conservare
(a tal fine consultare i
cataloghi e le tabelle
tecniche).
I cicli di sbrinamento sono
completamente automatizzati ed impostati per un clima ambientale medio. In particolari
condizioni (ad esempio climi particolarmente umidi) potrebbe essere necessario aumentare
la frequenza degli sbrinamenti (consultare il libretto d’uso del pannello elettronico).
In ogni caso è preferibile rivolgersi al rivenditore; una scorretta programmazione può causare
malfunzionamenti del mobile refrigerato.
Al fine di ottenere un ottimale funzionamento del frigorifero , installare tutti i ripiani previsti,
assicurarsi che siano a contatto con
lo schienale del banco e distribuire
uniformemente gli alimenti da
conservare. Ogni ripiano non deve
essere riempito completamente;
bisogna lasciare uno spazio di circa
6 cm tra la merce e il ripiano sopra
(vedi figura 5).
Un sovraccarico o diversamente un
banco mezzo vuoto non permettono
un funzionamento corretto dello
stesso.
Massimo peso per ripiano: 70Kg
uniformemente distribuiti.
Importante :
Un mobile refrigerato per esposizione
e vendita non è destinato a raffreddare
prodotti alimentari deperibili , bensi’
a mantenerli alla temperatura alla
quale vi sono introdotti.
Non lasciare prodotti alimentari su
pallet o strutture similari all’interno
o fuori del negozio per un tempo
superiore a quello strettamente
necessario per il trasporto ed il
caricamento.
figura > 6
Se il mobile è fornito di tendina notte , ricordarsi di svolgerla sempre nei periodi di chiusura
del negozio in modo da risparmiare energia (vedi figura 6).
fig > 7
> modello BLOODY MARY
6 > PULIZIA E MANUTENZIONE
ATT.NE: PRIMA DI OGNI OPERAZIONE DI PULIZIA E MANUTENZIONE STACCARE L’APPARECCHIO
DALLA RETE DI ALIMENTAZIONE.
Le pareti interne ed esterne dell’apparecchio vanno pulite con acqua tiepida
e soluzione saponosa a 5 % (sapone neutro o tipo Marsiglia); evitare accuratamente di
utilizzare dei prodotti detergenti aggressivi ed asciugare con panno umido (un panno
secco provocherebbe cariche elettrostatiche).
ATT.NE: NON LAVARE L’APPARECCHIO CON GETTI D’ACQUA.
!
Con frequenza almeno bimestrale, procedere alla pulizia del condensatore da polvere,
ragnatele, ecc. ritirare la spina dalla presa di corrente, rimuovere la protezione frontale
svitando le due viti laterali e procedere con una spazzola o aspirapolvere (vedi figura 7).
Installare nuovamente la protezione frontale e avvitare le due viti di fissaggio
applicando una coppia non superiore a 1,2 Nm.
Questa operazione risulta fondamentale per un corretto e duraturo funzionamento
del banco! Nel caso in cui il murale fosse provvisto dell’apposito optional
> sistema autopulente < questa operazione non risulta necessaria.
METODO E SOSTITUZIONE LAMPADA DI ILLUMINAZIONE
Per sostituire una lampada nel caso di non funzionamento della stessa, attenersi alle
seguenti istruzioni:
1. spegnere il banco staccando la spina dalla rete di alimentazione
2. levare la protezione lampada in plastica
3. ruotare il tubo fluorescente fino al suo distacco dal portalampada
4. montare il nuovo tubo fluorescente accertandosi che sia dello
stesso tipo e dello stesso vattaggio di quello sostituito
5. rimontare la protezione lampada
6. riallacciare il banco alla presa di rete
7 > ANOMALIE DI FUNZIONAMENTO
A > Il frigorifero non si accende:
verificare di aver inserito correttamente la spina di alimentazione
verificare che l’interruttore generale a parete sia acceso
verificare che non ci sia un black-out generale
B > Il frigorifero non raffredda a dovere:
assicurarsi della pulizia del condensatore
assicurarsi della corretta installazione dei ripiani e degli alimenti
assicurarsi che il murale non sia in prossimità di correnti d’aria o fonti di calore
assicurarsi che le griglie di aspirazione e uscita aria non siano ostruite.
cool ideas to ke
to be read carefully and to be kept with the cabinet
general index
eep it fresh
GENERAL INDEX
1.
2.
3.
4.
5.
6.
7.
General Specifications
Complaints
Guarantee
Installation
Starting
Cleaning and maintenance
Operating problems
night blind
lamp
air flow slit
electronic display
light switch
lamp
fig > 1
aspiration grill
>
models:
Alaska, Bloody Mary, Casanova, Clipper
Daiquiri, Manhattan, Oriental
> CE, IMQ Certifications
IMQ corresponds to: Austria OVE
Belgium CEBEC
Czechoslovakia EZU
Finland SETI
France UTE
>
front grill
fig > 2
Germany VDE
Great Britain BEAB/BSI
Ireland NSAI
Slovenia and Croatia FIS
Holland KEMA
Poland CBW
Switzerland SEV
Denmark DEMKO
Spain AEE
Company Quality System Certifications UNI EN ISO 9001: 2000
1 > GENERAL STANDARD
Main features as dimensions, capacity, accessories etc. are specified in the sales
catalogue.
Please read this manual carefully to assure a correct performance of the cabinet and
avoid damages to people or property.
The manifacturer does not bear any responsibility for damages caused by failure
to observe the instructions for the correct use and maintenance of the cabinet as
detailed in this manual.
2 > COMPLAINTS
Upon receipt of the cabinet, please check it immediately in order to assure that the
cabinet is in good conditions and that no damage during the transport has occurred.
Unpack the cabinet and make sure that all the accessories have been delivered.
In case of damage occurred during the transport please notify the driver about the
complaint and point it out on the delivery document.
Within three days the complaint has to be confirmed to the transport company by
registered letter.
Any other complaints concerning performance and appearance of the cabinet
should be sent to Fogal Refrigeration s.r.l. not later that eight days from the day
of receipt of the cabinet.
3 > GUARANTEE
The cabinet is guaranteed for 24 months excluding electrical parts.
4 > INSTALLATION
The cabinet is classified in climatic class three .
For a correct performance it is necessary to keep the ambient conditions where the
cabinet is placed within the indicated limits (see table *)
If this point is not observed, some problems may occur as extreme consumption, ice
on the evaporator and temperature loss.
The cabinet has to be placed in a dry place, avoiding direct contact to sunlight and
sources of heat like radiators, fans, doors or air current (fig.3).
If these directions are not observed, the above mentioned problems may occur.
NO !
fig > 3
AMBIENT CONDITIONS *
Closed place
Max. temperature 25°c
Max. relative humidity 60%
Illumination 100 lx
! It is strictly forbidden to place any kind of thing on the upper part of the cabinet
not block up the
! do
aspiration grill
6
6
fig > 4
Do not place the cabinet less than 6 cm from the wall or from any other thing that could
prevent the cabinet from having a proper air circulation.
It is strictly forbidden to place any kind of thing on the upper part of the cabinet.
Use the distancers supplied with the cabinet.
An inadequate air circulation around the cabinet could cause condensate formation and
problems in the refrigerating yield.
Do not block up the aeration grills, the aspiration grills and the air flow slit (fig. 4).
After installation, the power supply plug has to be accessible.
> Connection to the electrical system
Be sure that the electric system of the place where the cabinet has to be installed
is in conformity with the regulations and the security codes in force.
The power supply of the cabinet has to be independent from other supplies.
Connect the case to an earthed plug powered by a high sensivity differential switch
(30mA).
Please follow tension and frequency instructions shown on the label on the back
of the cabinet.
ATTENTION : THE CABINET MUST BE CONNECTED TO AN EARTHED SYSTEM.
5 > STARTING
fig > 5
To start an integral cabinet
up is enough to connect
the plug with the socket.
The electronic display is
set to guarantee a proper
working based on the class
temperature of the case.
Be sure that the
temperature class complies
with the products that
have to be kept in the
case (see catalogues and
technical tables).
Defrosting cycles are
automatic and set for a
medium ambient climate.
In particular conditions
it should be necessary to
increase the defrosting frequency (see the manual of the electronic display).
For any information please get in touch with the retailer. A wrong setting could cause
a malfunction of the cabinet.
To have the best performance of the cabinet fix all the shelves, be sure they are in contact
with the back of the case and distribute uniformly the goods on them.
Every shelf has not to be completely
filled.
A space of 6 cm between the goods
and the upper shelf is necessary
(fig. 5).
An overload or, on the contrary,
an underload of the shelves does
not allow the case to work in
a correct way.
Maximum weight for each shelf : 70
kgs evenly distributed.
important :
A refrigerated display cabinet is not
destined to cool perishable foodstuff
but it is destined to keep it at the
temperature it has when it is placed
in the cabinet.
Do not leave foodstuff out of the case
for more than the needed time to carry
and load it.
If the case is provided with a night
blind, remember to unwind it during
the shop’s closing time in order to
save energy (fig. 6).
fig > 6
fig > 7
> BLOODY MARY model
6 > CLEANING AND MAINTENANCE
ATTENTION : BEFORE ANY CLEANING OR MAINTENANCE OPERATION DISCONNECT THE CABINET FROM
THE ELECTRICAL SYSTEM.
Internal and external parts of the cabinet can be cleaned with lukewarm water and a soap
mixture of 5% (neutral or Marseille soap).
Avoid using aggressive detergents and dry with a damp cloth (a dry cloth would create
electrostatic charges).
ATTENTION : DO NOT WASH THE CABINET WITH WATER JETS.
!
At least every two months clean the condensor from dust, webs, etc.
Take off the front grill and clean with a brush or a vacuum cleaner (fig.7).
This operation is extremely important to assure a good and long performance
of the cabinet.
If the cabinet is supplied with the condenser self cleaning system this operation
is not necessary.
REPLACEMENT OF THE LIGHTING LAMP
To replace a lamp in case of bad functioning, follow carefully the instructions:
1. Unplug the cabinet
2. Take off the plastic protection of the lamp
3. Turn the fluorescent tube and remove it from its holder
4. Fix the new fluorescent tube and make sure that it is the same of the previous one.
5. Reassemble the lamp protection
6) Plug the cabinet in.
7 > TROUBLE SHOOTING
A > the cabinet does not start
check the connection between plug and socket
make sure that the general switch is on
make sure that there is not a black-out in the area
B > the cabinet does not refrigerate enough
check for a proper cleaning of the condensor
check that shelves and goods are properly fixed and loaded
check that the cabnet is not placed near heating sources or air current
check that the aspiration grill is not blocked up
cool ideas to ke
Nous vous prions de lire et conserver cet manuel avec la vitrine
eep it fresh
1.
2.
3.
4.
5.
6.
7.
Spécifications générales
Réclamations
Garantie
Installation
Mise en marche
Nettoyage et maintenance
Fonctionnement défectueux
index general
INDEX GENERAL
rideau de nuit
lampe
fente pour la
sortie de l’air
cadre électronique
interrupteur éclairage
lampe
ill. > 1
grille d’aspiration
>
modèles:
Alaska, Bloody Mary, Casanova, Clipper
Daiquiri, Manhattan, Oriental
grille de protection frontale
ill. > 2
>
Certifications CE, IMQ
>
Certifications système qualité de l’entreprise UNI EN ISO 9001:2000
IMQ correspond à: Austria OVE
Belgium CEBEC
Czechoslovakia EZU
Finland SETI
France UTE
Germany VDE
Great Britain BEAB/BSI
Ireland NSAI
Slovenia and Croatia FIS
Holland KEMA
Poland CBW
Switzerland SEV
Denmark DEMKO
Spain AEE
1 > SPECIFICATIONS GENERALES
Les spécifications générales comme dimensions, capacité, accessoires etc. sont
indiquées sur le catalogue de vente.
Nous vous prions de lire avec attention cet manuel pour garantir un fonctionnement
correct de la vitrine et pour éviter des dégât à personnes ou choses.
Le producteur n’est pas responsable pour les dégâts causés pour la non observation
des normes d’usages et manutention.
2 > RECLAMATIONS
A’ l’arrivée de la vitrine nous vous prions de la contrôler avec attention pour vérifier
son état et pour vérifier l’absence de dégâts de transport.
Déballez la vitrine et vérifiez que toutes les accessoires indiqués sur le document
de transport soient livrés avec elle.
Dans le cas de dégâts de transport nous vous prions de les communiquer au chauffeur
et les indiquer sur le document de transport.
D’ici trois jours il faut aussi les confirmer à la société de transport par lettre
recommandée.
Toutes autres réclamations doivent parvenir à Fogal Refrigerations dans les huit jours
après la livraison de la marchandise et pas plus tard.
3 > GARANTIE
Nos vitrines sont garanties pour 24 mois.
Attention : La garantie ne comprend pas les parties électriques.
4 > INSTALLATION
Nos vitrines sont classifiées dans la classe climatique 3.
Pour un fonctionnement correct il est nécessaire garder les conditions de l’ambiance
de l’endroit où la vitrine sera installée entre les limites indiqués (voir tableau*).
Si ces indications ne sont pas observées, on pourra avoir des problèmes comme
consommation excessive, formation de la glace sur l’évaporateur ou non maintien
de la température. La vitrine doit être installée en un endroit sec, loin de sources
de chaleur ou de courantes d’air.
Elle ne doit pas être installée à côté de portes, fenêtres, sources de chaleur ou
goulotte d’air (voir ill. 3).
Si ces indications ne seront pas respectées, on pourra avoir les
problèmes mentionnés au dessous.
NON !
ill. > 3
CONDITION AMBIANTE *
Endroit fermé
Température max 25°c
Humidité relative max. 60%
Eclairage 100 lx
! Il est formellement interdit de placer n’importe quelle choses sur la partie supérieure
de la vitrine.
! n’ obstruer pas l’aspiration
6
6
ill. > 4
La distance entre la vitrine et le mur (ou n’importe quel objet qui puisse empêcher la
circulation d’air autour de la vitrine même) doit être de au moins 6 cm.
Il est formellement interdit de placer n’importe quelle choses sur la partie supérieure
de la vitrine.
Utiliser les entretoises fournies sur la partie postérieure de la vitrine.
Une circulation d’air insuffisante autour de la vitrine peut causer la formation de la
buée et problèmes pour le rendement frigorifique.
N’ obstruer pas les grilles de aération, aspiration et la fente pour al sortie de l’air (voir ill. 4).
Après l’installation la fiche d’alimentation doit être accessible.
> Connexion au circuit électrique
Le système électrique de l’endroit ou la vitrine doit être installée doit être en conformité avec
le règlement et les codes de sécurité en vigueur.
L’alimentation électrique de la vitrine doit être indépendante des autres alimentations .
Connecter la vitrine avec une prise de terre qui doit être alimentée par un interrupteur
différentiel haute sensibilité (30 mA).
Il faut respecter les indications de tension et fréquence indiquées sur l’étiquette qui se trouve
sur la partie postérieure de la vitrine.
ATTENTION: LA VITRINE DOIT ÊTRE CONNECTÉE AVEC UNE INSTALLATION DE TERRE.
5 > MISE EN MARCHE
ill. > 5
Pour mettre en marche une
vitrine avec groupe logé il est
suffisant brancher la fiche avec
la prise de courant.
Le régulateur électronique
est déjà programmé pour
garantir un fonctionnement
conformément à la classe de
température produit de la
vitrine.
Assurez-vous que la classe de
température soit conforme
au produit à conserver (voir
les catalogues et les tableaux
techniques).
Les cycles de dégivrage sont
complètement automatiques
et programmés pour un climat ambiante moyen.
Dans le cas de conditions particulières (p.e. climat avec beaucoup de humidité) il pourra
être nécessaire d’ augmenter la fréquence des dégivrages (voir le manuel d’usage du cadre
électronique).
En tous cas il est préférable contacter le revendeur.
Une programmation qui n’est pas correcte peut provoquer la défaillance de la vitrine.
Pour obtenir un fonctionnement optimal de la vitrine il faut installer toutes les étagères
fournis et s’assurer qu’ils soient en contact avec le dossier de la vitrine.
Il faut aussi distribuer uniformément
les aliments à conserver.
Chaque étagère ne doit être
complètement rempli ; il faut respecter
un espace de environ 6 cm entre la
marchandise et l’ étagère supérieur
(voir ill.5).
Un surchargé ou, au contraire, un
sous-chargé de la vitrine ne permet pas
le fonctionnement correct de la vitrine
même.
Poids max pour chaque étagère : 70
kgs uniformément répartis.
Important : Une vitrine réfrigérée n’est
pas destinée à réfrigérer des produits
alimentaires périssables mais elle est
destinée à garder la température des
produits à laquelle ils ont étés introduits.
Ne lassez pas les produits alimentaires
sur les palettes dans ou hors du magasin.
La marchandise doit être transportée
et donc chargée dans la vitrine le plus
vite possible.
ill. > 6
Si la vitrine est fournie avec le rideau de nuit, nous vous prions de le dérouler toujours
pendant le fermeture du magasin pour économiser de l’énergie (voir ill.6).
ill. > 7
> modèle BLOODY MARY
6 > NETTOYAGE ET MAINTENANCE
ATTENTION: DÉBRANCHER LA VITRINE DU CIRCUIT ÉLECTRIQUE AVANT CHAQUE OPÉRATION DE
NETTOYAGE OU DE MAINTENANCE.
Les parties intérieures et extérieures de la vitrine peuvent être nettoyées en utilisant de
l’eau tiède et une solution de savon au 5% (savon de Marseille au savon neutre).
N’utiliser pas des détergents agressifs et essuyer la vitrine avec un linge humide
(un linge sec cause des charges électrostatiques).
ATTENTION: NE PAS LAVER LA VITRINE AVEC DES JETS D’EAU.
!
Au moins chaque deux mois, nettoyer le condenseur et enlever la poudre, toiles
d’araignée etc. en utilisant une brosse ou un aspirateur.
Cette opération est fondamentale pour un fonctionnement correct et durable
de la vitrine ! (voir ill.5).
Si la vitrine est fournie avec l’option du systeme auto nettoyant du condenseur,
cette operation n’est pas necessaire.
REMPLACEMENT DE LA LAMPE D’ECLAIRAGE
Pour remplacer une lampe d’éclairage dans la cas qu’elle ne fonctionne pas, il est
nécessaire suivre les instructions suivantes :
1) Débrancher la vitrine
2) Enlever la protection en plastique de la lamp
3) Tourner le tube fluorescent jusqu’au son détachement du porte-lampe
4) Monter le nouveaux tube fluorescent en vérifiant qu’il soit le même
(type et wattage) du tube remplacé.
5) Remonter la protection en plastique de la lampe
6) Brancher la vitrine.
7 > PROBLEMES DE FONCTIONNEMENT
A > la vitrine ne demarre pas
. Contrôler d’avoir bien branché la prise d’alimentation
. Contrôler l’état de l’interrupteur général
. Contrôler qu’on ne se trouve pas dans un cas de coupure d’électricité général
B > la vitrine ne fait pas assez de froid
. Contrôler que le condenseur soit bien propre
. Contrôler que les étagères et les aliments soient bien fixés et chargés
. Contrôler que la vitrine ne soit pas installée à côté de sources de chaleur ou
de courantes d’air
. Contrôler que les grilles d’aspiration et de sortie d’air ne soient pas obstruées.
Scaricare