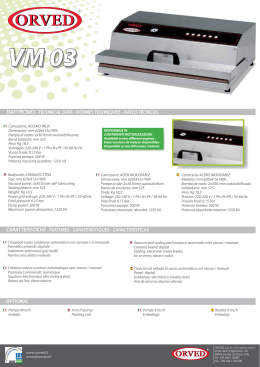
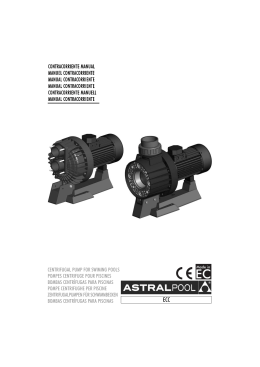
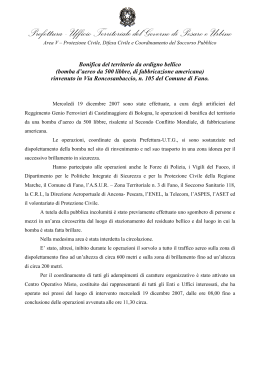
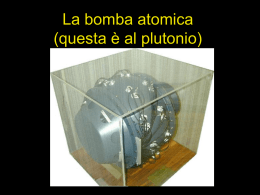
-
CE
I E D ES F P -
Manuale d’uso e manutenzione
User and maintenance manual
Betriebs - und Wartungsanleitung
Manual de uso y mantenimiento
Notice d’utilisation et d’entretien
Instruções por instalação e manutenção
Made in Italy
2
Italiano
INSTALLAZIONE E PRIMA ACCENSIONE
GENERALITÀ
SuperSimplex (SS) è il più completo regolatore per pompe per
realizzare, con estrema semplicità, gruppi di pressurizzazione.
Un unico prodotto per automatizzare elettropompe da 1,5
fino a 8 bar.
Arresta la pompa, in caso di mancanza dell’acqua, proteggendola dalla marcia a secco (solo per SS E).
Esegue tentativi automatici di riarmo ogni 15’ (solo per
SS E).
Prima di installare SS innescare la pompa e spurgare l’impianto da eventuali residui di lavorazione!
Collegare idraulicamente il SS alla pompa e all’utenza.
Porre un filtro a cartuccia a monte del SS per preservare il
funzionamento (normativa UNI-CTI 8065 e Decreto Min.
Salute del 21-12-1990).
Collegare elettricamente il SS (vedi schema in Figura Pag. 5).
Dopo l’installazione aprire un rubinetto e far funzionare la
pompa, (per SS E tenere premuto il tasto service &) fino a che
non sia scaricata tutta l’aria dall’impianto (circa 30 sec.)
Settaggio Pressione di riavvio P(r) per SuperSimplex E (SS E) e SuperSimplex M (SS M)
P(r)
1,5
2,2
0,6
Prevalenza Min. Pompa
P> 3 bar (SS M) - P> 2,5 bar (SS E)
P> 3,7 bar (SS M) - P> 3,2 bar (SS E)
P> 2,1 bar (SS M) - P> 1,6 bar (SS E)
Regolazione
Valore già impostato in fabbrica
Avvitare la manopola (◆) fino a fondo corsa
Svitare completamente la manopola (◆) togliere il cilindretto (●)
posto fra la manopola e la molla (■) e riavvitare la manopola per 4 giri.
Regolazioni intermedie sono possibili avvitando la monopola per aumentare la pressione e svitandola per diminuire la pressione.
Per il funzionamento e la soluzione di problemi vedi Pagina 7.
AVVERTENZE
• SuperSimplex non può essere utilizzato su condotti contenenti liquidi abrasivi, sostanze solide fibrose, liquidi infiammabili,
esplosivi e aggressivi.
• SuperSimplex deve essere installato in ambienti protetti dalle
intemperie e dal gelo (Tmax + 50 °C - Tmin + 4 °C).
• Prima di ogni intervento accertarsi che SuperSimplex sia
scollegato dall’alimentazione elettrica e che l’impianto non
English
GENERAL REMARKS
sia sotto pressione.
di SuperSimplex al quadro elettrico deve
essere eseguito da personale qualificato nel rispetto delle
norme vigenti, installato con interruttore magneto-termico ed
efficiente impianto di terra.
• MAC3 S.p.A. non risponde di danni provocati da
SuperSimplex causati da un suo uso improprio o proibito
• L’allacciamento
INSTALLATION AND INITIAL STARTING UP
SuperSimplex (SS) is the most complete mechanical regulator
for the extremely simple creation of pressurization units.
A single product for the automation of pumps between 1,5
and 8 bar.
It stops the pump protecting it against dry running (only
Version E)
Automatic restarts each 15’ (only SS E).
To prime the pump before installing the SS and to bleed the
system from any processing residue!
Hydraulically connect the SS to the pump and onto the piping
position a cartridge filter at the top of the SS in order to ensure
that its function (standard UNI-CTI 8065 as the provisions of
the Ministerial Health Decree dated 21-12-1990).
Electrically connect the SS (diagram shown Pag. 5)
After installation open the tap, and put the pump into operation (for SS E keep pressed Service button &) until all the air
in the system is discharged (approx. 30 sec.).
Setting restart pressure P(r) for SuperSimplex E (SS E) and SuperSimplex M (SS M)
P(r)
1,5
2,2
0,6
Head Min. Pump
P> 3 bar (SS M) - P> 2,5 bar (SS E)
P> 3,7 bar (SS M) - P> 3,2 bar (SS E)
P> 2,1 bar (SS M) - P> 1,6 bar (SS E)
Setting
Value calibrated at the factory
Screw the knob (◆) fully
Completely loosen the knob (◆) and remove the small cylinder (●) located
between the knob and the spring (■) and re-tighten the knob for 4 turns
Intermediate regulations are possible: screw the knob to increase the pressure or unscrew the knob to decrease the pressure.
For Function and solving problems see Pag. 8.
WARNINGS
• SuperSimplex must not be used on conduits containing abrasive liquids, solid-fibrous substances and inflammable and
explosive liquids.
• SuperSimplex must be installed in environments protected
against the elements and freezing conditions, which is not dangerous with non-aggressive water, with a maximum temperature of + 50 °C and a minimum temperature of + 4 °C.
• Before undertaking any operations ensure that the
SuperSimplex is disconnected from the power supply and that
the system is not pressurized.
• SuperSimplex connection to the electrical panel must be
undertaken by qualified personnel in accordance with current
regulations, installed with a magnet-thermal switch and efficient
earthing system.
• MAC3 S.p.A. will not accept liability for any damage caused by
the SuperSimplex as the result of improper or forbidden use.
3
Deutsch
ALLGEMEINES
INSTALLATION UND ERSTINBETRIEBNAHME
SuperSimplex (SS) ist der kompletteste Regler, mit welchem in
einfachster Form Druckregelgruppen zusammengestellt werden
können.
Das gleiche produkt fur elektropumpen von 1,5 bis 8 bar.
Es deaktiviert die Elektropumpen im falle es keine Wasser
gibt: auf dieser Weise ist die Pumpe geschützt vor Betrieb
ohne Wasser (nur fur SS E)
Es aktiviert sich automatische von selbst jedes 15 minuten
(nur fur SS E)
Bevor Sie den SS installieren, muss die Pumpe gefüllt und die
Anlage von Schmutzrückständen gereinigt werden!
SS jetzt hydraulisch an die Pumpe und an die Leitung
geschraubt wird.
Soll für einen einwandfreien Betrieb gemäss der UNI-CTI 8065Norm sowie dem Ministerdekret für die Gesundheit vom
21.12.1990 vor dem SS eine Filterkartusche eingesetzt werden.
Schließen Sie den SS jetzt elektrisch an wie aus der
Abbildung Seite 5 hervorgeht.
Nach erfolgter Installation Hahn öffnen und Pumpe solange
laufen lassen, (nur für das SS E müssen Sie die betätigte
taste “Service” & Unterhalt sich) bis die Luft vollständig aus
der Anlage entwichen ist. (ca. 30 Sek.)
Einstellen den Anlaufdrucks P(r) fur SuperSimplex E (SS E) und SuperSimplex M (SS M)
P(r) Knopf Min. Pumpe
Einstellung
1,5
P> 3 bar (SS M) - P> 2,5 bar (SS E)
Schon Steuerert im Haus
2,2
P> 3,7 bar (SS M) - P> 3,2 bar (SS E)
Schraubknopf bis zum Hubende fest anziehen (◆)
voll abschrauben Schraubknopf (◆) und den kleinen Zylinder (●) der zwischen
0,6
P> 2,1 bar (SS M) - P> 1,6 bar (SS E)
dem Schraubknopf und der Feder liegt (■) ausnehmen und wieder schrauben den
Schraubknopf für 4 Drehungen.
Nachregeln ist möglich: den Drehknopf zudrehen, um den Druck zu erhöhen oder den Drehknopf aufdrehen, um den Druck zu verringern.
Für Betrieb und Beheben von Problemen sehen Sie Seite 9
HINWEISE
• SuperSimplex
darf nicht in Leitungen, die abreibende
Flüssigkeiten, feste faserige Substanzen und entflammbare,
explosive Flüssigkeiten enthalten, angewandt werden.
• SuperSimplex darf nur in ungefährlichen Räumlichkeiten, die
Frost und Wetter geschützt sind, installiert werden; die maximale Temperatur darf +50°C und die Mindesttemperatur darf
+4°C nicht überschreiten.
• Vor Eingriffen muss sich vergewissert werden, dass Super
Español
Simplex von der elektrischen Stromzufuhr getrennt wurde und
dass dieser nicht unter Druck steht.
• Der Anschluss des SuperSimplex an die elektrische
Schalttafel muss gemäss den geltenden Vorschriften von
Elektroinstallateuren erfolgen, einen Thermomagnetschalter
und eine leistungsstarke Erdung vorsehen.
• MAC3 S.p.A. haftet nicht bei Schäden, die durch einen zweckentfremdeten oder verbotenen Einsatz entstehen.
INSTALACIÓN Y PRIMER ENCENDIDO
GENERALIDADES
SuperSimplex (SS) es el más completo regulador para realizar
grupos de presurización con suma simplicidad.
único producto que se pueda utilizar con electrobombas de
1,5 hasta 8 bares.
Parar la bomba, si no hay agua, y evita el funcionamiento
seco (para SS E).
cada 15 minutos se pone en marcha de nuevo la bomba
(para SS E).
Antes de instalar el SS ¡es indispensable cebar la bomba y
purgar la instalación de eventuales residuos de elaboración!
Conecte hidráulicamente el SS a la bomba y a la tubería
ponga un filtro de cartucho antes del SS para preservar el
funcionamiento (normativa UNI-CTI 8065 y con el decreto del
ministerio de la salud del 21-12-1990).
Conecte eléctricamente el SS tal como se indica en el esquema (figura pagina 5).
Despues de la instalación, abra una llave y haga funcionar la bomba,
(para SS E tener pulsando el botòn “Service” &) hasta que se descargue todo el aire de la instalación. (Aproximadamente 30 seg.)
Para ajuste la presiòn de inicio P(r) por SuperSimplex E (SS E) y SuperSimplex M (SS M)
P(r) Alturas de elevaciòn Min. Bomba
Regulaciòn
1,5
P> 3 bar (SS M) - P> 2,5 bar (SS E)
Valor calibrado en fàbrica
2,2
P> 3,7 bar (SS M) - P> 3,2 bar (SS E)
a atornillar la perilla (◆) hasta el fondo de su recorrido
0,6
P> 2,1 bar (SS M) - P> 1,6 bar (SS E)
Destornille completamente la perilla (◆) y quite el peque_o cilindro (●)
puesto entre la perilla y el muelle (■) yvuelva a atornillar la perilla por 4 vueltas
Las regulaciones intermedias son posibles: atornillar la perilla para aumentar la presión o para desatornillar la perilla para disminuir la presión.
Para funcionamento y Solución de los Problemas pagina 10.
ADVERTENCIAS
• SuperSimplex no puede ser utilizado en conductos que contengan líquidos abrasivos, sustancias sólidas fibrosas y líquidos inflamables y explosivos.
• SuperSimplex debe ser instalado en ambientes protegidos
contra la intemperie y el hielo, no peligrosos con aguas no
agresivas que tengan una temperatura máxima de + 50 °C y
una temperatura mínima de + 4 °C.
• Antes de efectuar cualquier intervención, hay que asegurarse
de que SuperSimplex esté desconectado de la alimentación
eléctrica y que la instalación no esté bajo presión.
• La conexión de SuperSimplex al cuadro eléctrico debe ser llevada a cabo por personal cualificado y en el respeto de las normas vigentes, instalado con interruptor magneto-térmico y una
eficiente instalación de tierra.
• MAC3 S.p.A. no responde por daños provocados por
SuperSimplex, causados por su empleo impropio o prohibido.
4
Français
GENERALITES
INSTALLATION ET PREMIERE MISE EN SERVICE
SuperSimplex (SS) est le régulateur de pompe le plus complet
permettant de réaliser, avec une extrême simplicité, des groupes
de surpression.
Un seul produit permet d’automatiser des électropompes de
1,5 à 8 bars.
Il arrête la pompe en cas de manque d’eau et la protège d’un
fonctionnement à sec (uniquement sur SS E).
Il effectue des tentatives automatiques de réarmement toutes
les 15 (uniquement sur SS E).
Avant d’installer le SS, il faut amorcer la pompe et purger l’équipement de tout résidu d’usinage!
Raccorder hydrauliquement le SS à la pompe en le vissant
directement sur la tuyauterie.
placer un filtre à cartouche en amont afin de protéger le fonctionnement (réglementation UNI-CTI 8065 et au décret du
ministère de la santé du 21-12-1990).
Raccorder électriquement le SS (comme illustré sur la figure
page 5).
Après l’installation, ouvrir un robinet et faire fonctionner la
pompe (pour la SS E, maintenir la touche Service enfoncée &)
afin de décharger tout l’air de l’installation (30 s environ).
Pour placer pression du redémarrage P(r) pour SuperSimplex E (SS E) et SuperSimplex M (SS M)
P(r)
1,5
2,2
0,6
Hauteur manométrique Min. Pompe
P> 3 bar (SS M) - P> 2,5 bar (SS E)
P> 3,7 bar (SS M) - P> 3,2 bar (SS E)
P> 2,1 bar (SS M) - P> 1,6 bar (SS E)
Arrangement
Valeur taré en usine
Revisser le bouton (◆) à fond
Dévisser complètement le bouton (◆) et retirer le cylindre (●)
placé entre le bouton et le ressort (■) et revisser le bouton pour 4 tours.
Les règlements intermédiaires sont possibles: visser le bouton pour augmenter la pression ou pour dévisser le bouton pour diminuer la pression.
Pour fonctionnement resolution des dysfonctionnements voir Page 11.
AVERTISSEMENTS
• Le SuperSimplex ne peut être utilisé sur des conduites contenant des liquides abrasifs, des substances solides fibreuses ou
des liquides inflammables et explosifs.
• Le SuperSimplex doit être installé dans une ambiance protégée des intempéries et du gel, non dangereuse, et avec des
eaux non agressives à une température comprise entre + 4°C
et + 50°C.
• Avant toute intervention, s’assurer que le SuperSimplex est
Portoghese
débranché de l’alimentation électrique et que l’équipement
n’est pas sous pression.
• Le raccordement du SuperSimplex au tableau électrique doit
être réalisé par un personnel qualifié dans le respect des normes en vigueur, avec un interrupteur magnétothermique et une
installation de terre efficace.
• MAC3 S.p.A. ne répond pas des dommages occasionnés par
un usage impropre ou interdit du SuperSimplex.
GENERALIDADE
INSTALAÇÃO E PRIMEIRA LIGAÇÃO
O SuperSimplex (SS) é o mais completo regulador para bombas para realizar, com extrema simplicidade, grupos de pressurizzação.
Um único produto para automatizar eletrobombas de 1,5 até
8 bar.
Pára a bomba, em caso de falta de água, protegendo-a do
funcionamento a seco (só para SS E).
Efetua tentativas automáticas de rearmamento cada 15’ (só
para SS E).
Antes de instalar o SS é indispensável ativar a bomba e purgar a instalação de eventuais resíduos!
Conectar hidráulicamente o SS da bomba e nos tubos.
pôr um filtro de cartucho a montante do SS para preservar o
funcionamento (normas UNI-CTI 8065 e decreto do ministério da saúde do 21-12-1990).
Conectar elétricamente o SS conforme (esquema da figura
Pag. 5).
Depois da instalação abrir uma torneira e ativar a bomba, (para
SS E manter premida a tecla service &) até que todo o ar não
esteja descarregado da instalação (aproximadamente 30 seg.).
Para ajustar-se a pressão de arranque P(r) por SuperSimplex E (SS E) e SuperSimplex M (SS M)
P(r)
1,5
2,2
0,6
Prevalência Min. Bombas
P> 3 bar (SS M) - P> 2,5 bar (SS E)
P> 3,7 bar (SS M) - P> 3,2 bar (SS E)
P> 2,1 bar (SS M) - P> 1,6 bar (SS E)
Regulamento
Valor regulado na fábrica
Parafusar o botão (◆) até o limite de curso
Desaparafusar completamente o botão (◆) e extrair o cilindro (●)
posicionado entre o botão e a mola(■) e parafusar o botão por 4 voltas.
Os regulamentos intermediários são possíveis: parafusar o botão para aumentar a pressão ou para desaparafusar o botão para diminuir a pressão.
Para funcionamento e Solução Problemas ver Pag. 12.
ADVERTÊNCIAS
•O
SuperSimplex não pode ser utilizado em tubagem com
líquidos abrasivos, substancias solidas fibrosas e líquidos inflamáveis e explosivos.
• O SuperSimplex deve ser instalado em ambientes protegidos
das intempéries e do gelo, não perigosos com águas não
agressivas com temperatura máxima de + 50 °C e uma temperatura mínima de + 4 °C.
• Antes de qualquer intervenção controlar que o SuperSimplex
esteja desconetado da alimentação elétrica e que a instalação
não esteja sob pressão.
• A conexão do SuperSimplex ao quadro elétrico deve ser efetuada por pessoal qualificado no respeito das normas vigentes,
instalado com interruptor magneto- termico e eficiente instalação de terra.
• A MAC3 S.p.A. não considera-se responsável pelos danos
causados pelo uso impróprio ou proibido do SuperSimplex.
5
4
Connessioni Elettriche
Connection electrique
Electric connections
Conessioni Elettriche
Elektrische Anschlüsse
Conexiones electricas
6
Filtro (filter)
Filtro (filter)
7
FUNZIONAMENTO
SuperSimplex rileva la pressione esistente nelle tubazioni e la
presenza o meno di flusso. Al raggiungimento della pressione
minima impostata per l’impianto P(r) la pompa si attiva. Il flussostato interno a SuperSimplex provvede a mantenere in funzione
la pompa; nel momento in cui termina il prelievo di acqua, con
impianto in pressione, SuperSimplex spegne la pompa con un
ritardo di alcuni secondi. Attenzione non taglia la pressione max
della pompa.
Problema
Diagnosi
La pompa
non attacca
con utenza
aperta
Riduzione di
portata
2. Pressione Ripartenza P(r) impostata
troppo alta, rispetto alla prevalenza
della pompa.
3. aria nell’impianto.
4. Mancanza di acqua.
5. blocco della valvola di flusso (*) per
presenza detriti.
1. Pressione di riavvio P(r) impostata
troppo bassa.
2. Pressione di impianto a rubinetti aperti
> max P(r) impostabile.
3. Mancanza di alimentazione elettrica.
4. Pompa bloccata da galleggiante per
mancanza acqua.
Filtro in ingresso otturato
Problema
La pompa
non stacca a
rubinetti chiusi
Led mancanza
acqua acceso,
con acqua
presente
La pompa non
attacca con utenza
aperta, led pompa
spento e led
“mancanza acqua”
spento
alimentazione presente →
pompa accesa →
presenza d’acqua →
alimentazione presente →
pompa spenta →
presenza d’acqua →
Soluzione SuperSimplex M
1. Malfunzionamento ritardatore.
La pompa
non stacca
a rubinetti
chiusi
Nel normale funzionamento, una volta completata l’installazione
si ha che: la pompa si attiva a rubinetti aperti e si spegne a utenza chiusa;
Per SS E si hanno i seguenti led
Pulire il ritardatore (vedi istruzioni “Pulizia ritardatore”). Se il problema
persiste praticare delle incisioni con una lama sulla superficie superiore del
ritardatore
Ridurre la P(r) svitando la manopola. (vedi istruzioni “installazione”)
Aprire un rubinetto per scaricare l’impianto
Installare un galleggiante di protezione, contro la marcia a secco
Verificare lo stato della valvola e pulire la valvola e la sede (vedi istruzioni
“Pulizia valvola di flusso”)
Avvitare la manopola fino a quando la pompa attacca e verificare che la
pompa stacchi con utenza nulla, se non stacca la prevalenza fornita
dall’elettropompa è insufficiente.
Prodotto installato su colonna d’acqua maggiore a 20 mt. Non compatibile.
Verificare collegamento elettrico e la presenza di alimentazione elettrica
Verificare la presenza di acqua.
Pulire il filtro come da istruzioni “Pulizia filtro”
Diagnosi
1. blocco della valvola di flusso (*) per
presenza detriti
2. Tasto service rimasto premuto
1. pressione ripartenza P(r) impostata
troppo alta, rispetto alla prevalenza
della pompa.
2. aria nell’ impianto
Soluzione SuperSimplex E
a. verificare lo stato e pulire la valvola e la sede (vedi istruzioni
“Pulizia valvola di flusso” )
Sbloccare il tasto Service.
Ridurla svitando la manopola. (vedi istruzioni “installazione”)
aprire un rubinetto, premere il tasto “Service” per scaricare
eventuale aria dall’impianto.
pulire il ritardatore (vedi istruzioni “Pulizia ritardatore”). Se il
3. Malfunzionamento ritardatore:
problema persiste fare incisioni sulla superficie superiore del
ritardatore.
4. Sistema in attesa di riavvio automatico. Azionare manualmente con tasto service.
Pulire il filtro come da istruzioni “Pulizia filtro”
5. Filtro in ingresso otturato
aumentarla avvitando la manopola (vedi istruzioni
1. Pressione di riavvio impostata troppo
“installazione”)
bassa:
2. Pressione di impianto a rubinetti aperti Prodotto installato su colonna d’acqua maggiore a 20 mt. Non
compatibile.
maggiore della max pressione di
riavvio impostabile.
La pompa non
attacca con led
pompa acceso.
Errata connessione della pompa alla
morsettiera
Nessun led acceso
Verificare collegamento elettrico del dispositivo e la presenza di alimentazione elettrica.
8
FUNCTION
SuperSimplex monitors the pressure that exists inside the piping and the presence of flow. At the minimal pressure P(r), set up
for the system, the SuperSimplex activates the pump.
The flow gauge inside the SuperSimplex keeps the pump in
operation; when the water collection operation is over and with
maximum pressure, SuperSimplex acts to disenable the pump
with delay of a few seconds.
Warning: it does not cut the max pressure of the pump.
Problem
Diagnosis
Case 1. Retardant malfunction:
The pump
fails to
disconnect with
the taps
closed
The pump
fails to
engage with
the user
point open
Case 2. the re-start pressure P(r) is set
too high, in relation to the pump head.
Case 3. air in the system
Case 4. check for the presence of water
Case 5. flow valve blocked (*) due to the
presence of waste particles
Case 1. The re-start pressure P(r) is set
too low
Case 2. The plant pressure with open
taps is greater than the re-start pressure
P(r) that can be set.
Case 3. No Power Supply
Case 4. Pump blocked due to lack of
water. Check that water is present.
Flow reduction
Problem
The pump does
not disconnect
with closet taps
Insufficient water
Led on, although
water is
present
The pump fails to
engage with user
point open, pump
led off, and “lack
of water” led off
Normal operation, once completed the installation: pump is ON
with tap open and OFF with tap closed.
Led for SSE:
Input filter blocked
Pump ON →
Pump ON →
Presence of water →
Power Supply ON →
Pump OFF →
Presence of water →
Solution SuperSimplex M
Clean the retardant device (see instructions entitled “Retardant
cleaning”). If the problems persists make some incisions with a sharp
blade on the upper surface of the retardant device.
Reduce it by loosening the knob (see instructions entitled “installation”)
Open a tap to discharge the system.
Install a protective float, against dry running.
Check the conditions and clean the valve and its slot (see instructions
“Cleaning the flow valve”)
Turn the knob in a clockwise sense when the pump engages, check that
the pump disconnects with null use, if it fails to disconnect it means that
the head supplied by the electropump is insufficient for the required
performance levels.
The device is installed with water column > 20mt. Not compatible
Check the electrical connection of the device and for the presence of any
electricity supply.
Verify presence of water
Clean the filter (see instructions “Cleaning Filter”)
Diagnosis
Case 1. flow valve blocked (*) due to the
presence of waste particles
Case 2. the “Service” button has
remained pressed.
Case 1. the re-start pressure P(r) is set
too high, in relation to the pump head.
Case 2. air inside the plant
Case 3. Retardant malfunction:
Case 4. System awaiting automatic
re-start.
Case 5. Input filter blocked
Case 1. The re-start pressure P(r) set too
low
Case 2. Pressure of the plant with taps
open greater than the max. restart
pressure P(r) that can be set.
Solution SuperSimplex E
Check the conditions and clean the valve and its slot (see
instructions “Cleaning the flow valve” )
Unblock the “Service” button.
Reduce it by loosening the knob (see instructions entitled
“installation”)
Open the tap, press the “Service” key to discharge any air from
the plant.
Clean the retardant device (see instructions entitled “Retardant
cleaning”). If the problems persists make some incisions with a
sharp blade on the upper surface of the retardant device.
Operate manually with service key.
Clean the filter (see instructions “Cleaning Filter”)
Increase by tightening the knob (see instructions under
“installation”).
The device is installed with water column > 20mt. Not
compatible
Water fails to
arrive with user
points open,
pump led on
Pump incorrectly connected to the
terminal board.
No led on
Check the electrical connection of the device and for the presence of any electricity supply.
9
BETRIEB
SuperSimplex erfasst den Druck in den Rohrleitungen und die
Wasserflussen.
Es aktiviert Die Pumpen wenn der Druck unter den eingestellten
Mindestdruck fallt.
Der in SuperSimplex angeordnete Durchflussmesser sorgt
dafür, dass die Pumpe stets in betrieb ist.
Wenn die Wasserntnahme mit einem maximalen Druck beendet
ist, wird SuperSimplex die Pumpe mit einer Verzögerung von
jeder Sekunden ausschalten.
Störung
Diagnose
Pumpe
schaltet sich
bei geöffnetem
Hahn nicht ein
Durchflussreduzierung
Fall 2: Anlaufdruck für die Förderhöhe der
Pumpe zu stark.
Fall 3: Luft in der Leitung.
Fall 4: Prüfen, ob Wasser vorhanden ist.
Fall 5: Durchflussventil (*) aufgrund von
Rückständen blockiert.
Fall 1: Anlaufdruck zu niedrig eingestellt:
Fall 2: Der Druck der Anlage ist bei
geöffneten Hähnen höher als der max.
einstellbare Wiederanlaufdruck.
Fall 3: Keine Energieernährung
Fall 4: Pumpe blockiert, weil Wasser fehlt.
Eingangsfilter blockiert
Störung
Pumpe schaltet
sich bei
geschlossenen
Hähnen nicht aus
Wasserspion bei
vorhandenem
Wasser
eingeschaltet
Pumpe läuft bei
geöffnetem Hahn nicht
an – Pumpenspion
ausgeschaltet –
Spion Wasser fehlt
ausgeschaltet.
Die geöffneten
Hähne erhalten
kein Wasser;
Pumpenspion
eingeschaltet..
Kein Spion eingeschaltet
Elektrische versorgung AN →
Pumpe AN →
Vorhandensein des Wassers →
Elektrische versorgung AN →
Pumpe AUSGESCHALTEN →
Vorhandensein des Wassers →
Lösung f. SuperSimplex M
Fall 1: Verzögerer gestört.
Pumpe
schaltet sich
bei
geschlossenen
Hähnen nicht
aus
Warnung: sie schneidet nicht den maximalen Druck der Pumpe.
Normalbetrieb, einmal durchgeführt der Installation: mit dem
Hahn geöffnet Pumpe ist EINGESCHALTET und AUSGESCHALTET mit dem geschlossenen Hahn.
LED für SSE:
Reinigen (s. Kap. “Reinigung Verzögerergruppe”) Sollte das Problem
nicht behoben werden, an der oberen Fläche des Verzögerers mit einem
Messer Einschnitte vornehmen.
An Knopf niedriger einstellen. (siehe Kap. “Installation”)
Ablasshahn aufdrehen und Luft ablassen.
Schutzschwimmer installieren, um Trockenlauf zu vermeiden.
Ventil und Sitz reinigen (siehe Kap. “Reinigung des Durchflussventils”).
Knopf solange in Uhrzeigersinn drehen, bis Pumpe anspringt; danach
prüfen, ob sich die Pumpe ohne Hahn ausschaltet; sollte das nicht der Fall
sein, bedeutet das, dass die Förderhöhe der Elektropumpe für die
geforderten Leistungen nicht ausreicht.
die Vorrichtung wird mit Wasserspalte > 20 Meter angebracht. Nicht
kompatibel.
Elektrischen Anschluss der Gruppe und ob diese mit Strom versorgt wird,
prüfen.
Wasserstand prüfen
Reinigen Sie den Filter (siehe Anleitung “Reinigung Filter”)
Diagnose
Fall 1: Durchflussventil (*) aufgrund von
Rückständen blockiert
Fall 2: kontrollieren, ob die “Service”Taste eingeschaltet wurde.
Fall 1: Wiederanlaufdruck für die
Förderhöhe der Pumpe zu hoch.
Fall 2: Luft in der Anlage
Fall 3: Verzögerer gestört
Fall 4: System steht auf Wartezeit des
automatischen Wiederanlaufens.
Fall 5. Eingangsfilter blockiert
Fall 1: Eingestellter Anlaufdruck zu
niedrig
Fall 2: Anlagendruck bei geöffneten
Hähnen höher als der maximale
Anlaufdruck
Lösung f. SuperSimplex E
Ventil und Sitz reinigen (siehe Kap. “Reinigung des
Durchflussventils”).
Die Taste “Service” freizusetzen.
An Knopf regeln. (siehe Kap. “Installation”)
Hahn aufdrehen und Luft an “Service” - Taste ablassen.
Reinigen (s. Kap. “Reinigung Verzögerergruppe”) Sollte das
Problem nicht behoben werden, an der oberen Fläche des
Verzögerers mit einem Messer Einschnitte vornehmen
Service-Taste manuell bedienen.
Reinigen Sie den Filter (siehe Anleitung "Reinigung Filter")
An Knopf höher einstellen (siehe Kap. “Installation”).
die Vorrichtung wird mit Wasserspalte > 20 Meter angebracht.
Nicht kompatibel.
Anschluss der Pumpe an Klemmenbrett
falsch
Elektrischen Anschluss der Einrichtungen und elektrische Stromspeisung prüfen.
10
FUNCIONAMENTO
SuperSimplex detecta la presiòn existente y el flujo en la tuberìas.
Se dicha presiòn desciende por debajo de la presiòn minima P(r)
programmada, activa la bomba.
El medidor del flujo interno de SuperSimplex se encarga de
mantener en funcionamiento la boma; en el momento que termina la torna de agua, con una presiòn màxima, SuperSimplex
apaga la bomba con un atraso de algunos segundos.
Problema
Diagnosis
Caso 1. Malfuncionamiento del retardador
La bomba
no se
desconecta
con las
llaves
cerradas
La bomba no
arranca con el
dispositivo
utilizador
abierto
Advertencia: no corta la presión máxima de la bomba.
Operación normal, una vez terminada la instalación: la bomba
está ENCENDIDO con el llave abierto y APAGADO con el llave
cerrado.
LED para SSE:
Caso 2. presión reinicio P(r) programada
demasiado alta, respecto de la altura de
elevación de la bomba.
Caso 3. aire en la instalación
Caso 4. comprobar la presencia de agua.
Caso 5. bloqueo de la válvula de flujo (*)
por la presencia de detritos
Caso 1. Presión de reinicio P(r)
programada demasiado baja
Caso 2. Presión de la instalación con las
llaves abiertas mayor de la presión máxima
de reinicio que se puede programar
Caso 3. Ninguna fuente de alimentación
Caso 4. Bomba bloqueada por falta de agua
Reducción de flujo Filtro de entrada bloqueada
Problema
La bomba
no se desconecta
con las
llaves cerradas
Led falta de
agua encendido,
con agua
presente
La bomba no arranca
con el dispositivo
utilizador abierto,
led bomba apagado y
led “falta de agua” apagado
No llega agua
con dispositivo
utilizador
abierto, led
bomba encendido.
Ningún led encendido
Fuente de alimentación
ENCENDIDO →
Bomba ENCENDIDO →
Presencia del agua. →
Fuente de alimentación
ENCENDIDO →
Bomba APAGADO →
Presencia del agua. →
Solución SuperSimplex M
Limpiar el retardador (véanse las instrucciones “Limpieza retardador”). Si
el problema persiste, practicar unas incisiones con una cuchilla sobre la
superficie superior del retardador.
Reducirla destornillando el botón. (véanse las instrucciones “instalación”)
Abrir una llave para descargar la instalación.
Instalar un flotador de protección, contra la marcha en seco.
Controlar su estado y limpiar la válvula y el asiento (véanse las
instrucciones “Limpieza válvula de flujo”)
Girar hacia la derecha el botón hasta cuando la bomba arranca, comprobar
luego que la bomba se desconecte sin ningún dispositivo utilizador, si no
se desconecta significa que la altura de elevación suministrada por la
electrobomba es insuficiente para las prestaciones requeridas.
El dispositivo está instalado con la columna del agua > 20 metros. No
compatible
Controlar la conexión eléctrica del dispositivo y la presencia de
alimentación eléctrica.
Comprobar la presencia de agua.
Limpie el filtro (véanse las instrucciones “Limpieza del filtro”)
Diagnosis
Caso 1. bloqueo de la válvula de flujo (*)
por la presencia de detritos
Caso 2. comprobar que la tecla “Service”
no haya quedado presionada.
Caso 1. presión de reinicio P(r)
programada demasiado alta, respecto de
la altura de elevación de la bomba.
Caso 2. aire en la instalación
Caso 3. Malfuncionamiento del
retardador
Caso 4. Sistema en espera de reinicio
automático.
Caso 5. Filtro de entrada bloqueada
Caso 1. Presión de reinicio programada
demasiado baja
Caso 2. Presión de la instalación con las
llaves abiertas mayor de la presión máxima
de reinicio que se puede programar.
Conexión incorrecta de la bomba a la
bornera.
Solución SuperSimplex E
Comprobar el estado y limpiar la válvula y el asiento (véanse
las instrucciones “Limpieza válvula de flujo”)
Desbloquear el botón “Service”.
Reducirla desenroscando el botón. (véanse las instrucciones
“instalación”).
Abrir una llave, pulsar la tecla “Service” para descargar el
eventual aire de la instalación.
Limpiar el retardador (véanse las instrucciones “Limpieza
retardador”).
Si el problema persiste, practicar unas incisiones con una
cuchilla sobre la superficie superior del retardador.
Accionar manualmente con la tecla service.
Limpie el filtro (véanse las instrucciones “Limpieza del filtro”)
Aumentarla atornillando el botón. (véanse las instrucciones
“instalación”).
El dispositivo está instalado con la columna del agua > 20
metros. No compatible
Controlar la conexión eléctrica del dispositivo y la presencia de alimentación eléctrica.
11
FONCTIONNEMENT
SuperSimplex relève la pression dans les tuyauteries et la présence du débit.
Lorsque la pression minimale imposée est atteinte, la pompe
s’active.
Le fluxostat interne au SuperSimplex maintient la pompe en
marche. Lorsque le prélèvement d’eau est terminé, avec une
pression maximale, le SuperSimplex éteint la pompe avec un
retard de quelques secondes.
Dysfonctionnement
La pompe ne
démarrage
pas avec une
utilisation
ouverte
Alimentation d’énergie DESSUS →
Pompe DESSUS →
Présence de l’eau →
Diagnostic
Cas 1. Dysfonctionnement du retardateur
La pompe ne
s’arrête pas,
robinets
fermés
Avertissement: il ne coupe pas la pression maximum de la
pompe.
Opération normale, une fois accomplie l’installation: la pompe est
allumée avec le robinet ouvert et AU LOIN avec le robinet fermé.
LED pour SSE:
Cas 2. Pression de redémarrage P(r)
imposée trop haute par rapport à la
hauteur manométrique de la pompe.
Cas 3. Air dans l’installation
Cas 4. Vérifier la présence d’eau.
Cas 5 Blocage de la vanne de flux (*) par
présence de détritus
Cas 1. Pression de redémarrage P(r)
imposée trop basse
Cas 2. Pression de l’installation, robinets
ouverts, supérieure à la pression
maximale de redémarrage imposée.
Cas 3. Aucune alimentation d’énergie
Cas 4. Pompe bloquée par manque d’eau
Flux de réduction Input filtre bloqué
Dysfonctionnement
La pompe ne
s’arrête pas,
robinets
fermés.
Action corrective SuperSimplex M
Nettoyer le retardateur (voir instructions “Nettoyage du retardateur”). Si le
problème persiste, pratiquer des incisions à l’aide d’une lame sur la
surface supérieure du retardateur.
La réduire en dévissant la poignée (voir instructions “Installation”).
Ouvrir un robinet pour décharger l’installation.
Installer un flotteur de protection contre la marche à sec.
En vérifier l’état et nettoyer la vanne et le siège (voir instructions
“Nettoyage de la vanne de flux”).
Tourner la poignée, dans le sens horaire, jusqu’à ce que la pompe
démarre, vérifier ensuite que la pompe s’arrête sans utilisation. Si elle ne
s’arrête pas, c’est que la hauteur manométrique fournie par l’électropompe
est insuffisante pour les prestations requises.
le dispositif est installé avec la colonne de l’eau > 20 mètres. Non
compatible
Vérifier le raccordement électrique du dispositif et la présence de
l’alimentation électrique.
vérifier la présence d’eau.
Nettoyer le filtre (voir les instructions “Nettoyage du filtre”)
Diagnostic
Cas 1. Blocage de la vanne de flux (*)
par présence de détritus
Cas 2. Vérifier que la touche “Service”
n’est pas restée enfoncée.
Cas 1. Pression de redémarrage P(r)
imposée trop haute par rapport à la
hauteur manométrique de la pompe.
Cas 2. Air dans l’installation
Voyant de
manque d’eau
allumé en
présence d’eau.
Cas 3. Dysfonctionnement du retardateur
La pompe ne démarrage
pas avec une utilisation
ouverte. Voyant de la
pompe éteint et voyant
de manque d’eau éteint.
Cas 4. Système en attente de
redémarrage automatique.
Cas 5. Input filtre bloqué
Cas 1. Pression de redémarrage P(r)
imposée trop basse
Cas 2. Pression de l’installation, robinets
ouverts, supérieure à la pression
maximale de redémarrage imposée.
Mauvaise connexion de la pompe au
bornier.
L’eau n’arrive pas à
l’utilisation ouverte.
Voyant de la
pompe allumé.
Aucun voyant allumé
Alimentation d’énergie DESSUS →
Pompe AU LOIN →
Présence de l’eau →
Action corrective SuperSimplex E
En vérifier l’état et nettoyer la vanne et le siège (voir
instructions “Nettoyage de la vanne de flux”).
Dégager le bouton “Service”
La réduire en dévissant la poignée (voir instructions
“Installation”).
Ouvrir un robinet, appuyer sur la touche “Service” pour
décharger l’air de l’installation.
Nettoyer le retardateur (voir instructions “Nettoyage du
retardateur”).
Si le problème persiste, pratiquer des incisions à l’aide d’une
lame sur la surface supérieure du retardateur.
L’actionner manuellement à l’aide de la touche Service.
Nettoyer le filtre (voir les instructions “Nettoyage du filtre”)
L’augmenter en vissant la poignée (voir instructions
“Installation”).
le dispositif est installé avec la colonne de l’eau > 20 mètres.
Non compatible
Vérifier le raccordement électrique du dispositif et la présence de l’alimentation électrique.
12
FUNCIONAMENTO
O SuperSimplex releva a pressão existente nos tubos e a presença ou a falta de fluxo.
Ao alcançar a pressão mínima selecionada P(r) para a instalação a bomba ativa-se.
Il fluxostato interno do SuperSimplex mantém a bomba em funcionamento; quando a água acaba de entrar, com pressão máxima, o SuperSimplex desliga a bomba com um atraso de alguns
segundos.
Problema
Diagnóstico
Caso1. Malfuncionamento retardador
A bomba
não desliga
com
torneiras
fechadas
A bomba não
liga com
utilização
aberta
Aviso: não corta a pressão máxima da bomba.
Operação normal, terminada uma vez a instalação: a bomba é
SOBRE com a torneira aberta e FORA com a torneira fechada.
Led para SSE:
Caso2. pressão reacionamento P(r)
selecionada alta demais, em relação à
prevalência da bomba.
Caso3. ar na instalação
Caso4. Controlar a presença de água.
Caso5. bloco da válvula de fluxo (*)
por presença detritos
Caso1. Pressão de reacionamento P(r)
selecionada baixa demais
Caso 2. Pressão de instalação com
torneiras abertas maior da max
pressão de reacionamento selecionável.
Caso 3. nenhuma fonte de alimentação
Caso 4. Bomba bloqueada por falta água
Problema
Led falta
água aceso,
com água
presente
A bomba não liga
com utilização
aberta, led bomba
apagado e led
“falta água” apagado
Não chega água
à utilização aberta
led bomba aceso.
Nenhum led aceso
Fonte de alimentação
SOBRE →
Bomba FORA →
Presença da água →
Solução SuperSimplex M
Limpar o retardador (ver instruções “Limpeza retardador”). Se o problema continua fazer pequenos cortes com uma lamina sobre a
superfície superior do retardador.
Reduzí-la desaparafusando o botão. (ver instruções “instalação”)
Abrir uma torneira para descargar a instalação.
Instalar um flutuante de proteção, contra a marcha a seco.
Controlar o estado e limpar a válvula e a sede (ver instruções
“Limpeza válvula de fluxo”)
Virar no sentido horário o botão até quando a bomba liga, controlar
depois que a bomba desligue com direito de utilização nulo, se não
desliga significa que a prevalência fornecida pela eletrobomba é insuficiente para as prestações desejadas.
o dispositivo é instalado com coluna da água > 20 mt. Não compatível
Controlar a conexão elétrica do dispositivo e a presença de alimentação elétrica.
Controlar a presença de água.
Limpe o filtro (ver instruções “Limpeza Filtro”)
Fluxo de redução Input filtro bloqueado
A bomba
não desliga com
torneiras
fechadas
Fonte de alimentação
SOBRE →
Bomba SOBRE →
Presença da água →
Diagnóstico
Caso1. bloco da válvula de fluxo (*)
por presença detritos
Caso2. controlar que a tecla “Service”
não fique premida.
Caso 1. pressão reacionamento P(r)
selecionada alta demais, em relação à
prevalência da bomba.
Caso 2. ar na instalação
Caso 3. Malfuncionamento retardador
Caso 4. Sistema em espera de
reacionamento automático.
Caso 5. Input filtro bloqueado
Caso 1. pressão reacionamento P(r)
selecionada baixa demais
Caso 2. pressão de instalacao com
torneiras abertas maior da max. pressão reacionamento selecionada.
Conexão errada da bomba à tira de
terminais
Solução SuperSimplex E
Controlar o estado e limpar a válvula e a sede (ver instruções “Limpeza válvula de fluxo”)
unblock a tecla “Service”
Reduzí-la desaparafusando o botão. (ver instruções
“instalação”)
Abrir uma torneira. Premer a tecla “service” para descargar
eventual ar da instalação.
Limpar o retardador (ver instruções “Limpeza retardador”).
Se o problema continua fazer pequenos cortes com uma
lamina sobre a superfície superior do retardador.
Acionar manualmente com tecla service.
Limpe o filtro (ver instruções “ Limpeza Filtro”)
aumentá-laaparafusando o botão. (ver instruções
“instalação”)
o dispositivo é instalado com coluna da água > 20 mt. Não
compatível
Controlar a conexão elétrica do dispositivo e a presença de alimentação elétrica.
13
→
→
→
→
→
→
14
Pulizia valvola di flusso
Limpieza de la válvula de flujo
Flow valve cleaning
Nettoyage de la vanne de flux
Reinigung des Durchflussventils
Limpeza válvula de fluxo
1 ITALIANO:
ENGLISH:
DEUTSCH:
ESPAÑOL:
FRANÇAIS:
PORTUGUÊS:
ARABO:
estrarre anello di Seeger tramite pinza a punta
remove the Seeger ring using a sharp pliers
Seegerring mit einer spitzen Zange ausziehen
extraer el anillo de Seeger mediante la pinza de punta
Extraire l’anneau Seeger à l’aide d’une pince à bec.
extrair anel de Seeger com uma pinça de ponta
2 ITALIANO:
ENGLISH:
DEUTSCH:
estrarre la valvola; pulire valvola e sede da detriti eventuali
extract the valve, clean the valve and slot of any dirt or remains
Ventil ausziehen; Schmutzrückstände an Ventil und in Sitz
entfernen
ESPAÑOL:
extraer la válvula; limpiar la válvula y el asiento de eventuales
detritos
FRANÇAIS:
Extraire la vanne. Nettoyer la vanne et le siège.
PORTUGUÊS: extrair a válvula; limpar válvula e sede dos detrítos eventuais
ARABO:
3 ITALIANO:
ENGLISH:
DEUTSCH:
inserire la valvola con A a sinistra, B in alto e C in basso.
insert valve A on the left, B at the top and C At the bottom
Ventil mit Zeichen A nach links, B nach oben und C nach
unten gerichtet einsetzen.
ESPAÑOL:
insertar la válvula con A a la izquierda, B arriba y C abajo.
FRANÇAIS:
Insérer la vanne avec le A à gauche, le B en haut et le C en
bas.
PORTUGUÊS: inserir a válvula com A a esquerda, B em alto e C em baixo.
ARABO:
4 ITALIANO:
inserire l’anello di Seeger con le pinze a punta.
Attenzione: chiusura effettiva solo con anello allargato.
insert the Seeger ring with sharp pliers.
Important; closure only effective with widened ring.
DEUTSCH:
Seegerring mit einer spitzen Zange einlegen.
Achtung: Ein effektiver Verschluss erfolgt nur bei
ausgebreitetem Ring
ESPAÑOL:
insertar el anillo de Seeger con las pinzas de punta.
Atención: cierre efectivo sólo con el anillo ensanchado
FRANÇAIS:
Insérer l’anneau Seeger à l’aide d’une pince à bec.
Attention: La fermeture n’est réelle que lorsque l’anneau s’est
élargi.
PORTUGUÊS: inserir o anel de Seeger com as pinças de ponta.
Atenção: fecho efetivo só com anel aberto
ARABO:
ENGLISH:
Pulizia filtro
Limpieza del filtro
Cleaning Filter
Nettoyage du retardateur
Reinigung Filter
Limpeza Filtro
ITALIANO
ENGLISH
DEUTSCH
ESPAÑOL
FRANÇAIS
PORTUGUÊS
ARABO
togliere il filtro, pulirlo, rimetterlo in verticale sotto il dispositivo
steps: extract the filter, clean it, replace in a vertical sense beneath the device
hier wie folgt vorgehen: Filter ausziehen, reinigen, Gruppe vertikal von unten einlegen
Pasos por efectuar: extrae el filtro, limpiarlo, reponerlo en vertical desde abajo del dispositivo
Etapes à suivre: extraire le filtre, Le nettoyer, Le replacer à la verticale par-dessous le dispositif
O que fazer: extraí o filtro, limpá-lo, posicioná-lo em vertical debaixo do dispositivo
Filtro (filter) →
15
Sostituzione Scheda elettronica
Sustitución de la Tarjeta electrónica
Electronic card replacement
Remplacement de la carte électronique
Auswechseln der elektronischen
Steuerkarte
Substituição Ficha eletrônica
ITALIANO Passi da fare:
1. rimuovere il coperchio e svitare le 3 viti che serrano la scheda al corpo
2. rimuovere la scheda e inserire la nuova scheda
3. serrare le tre viti e rimettere il coperchio
ENGLISH steps:
1. remove the lid and loosen the 3 screws that attach the card t the body
2. remove the card and insert the new one
3. tighten the three screws and replace the lid
DEUTSCH hier wie folgt vorgehen:
1. Deckel abnehmen und die drei Schrauben, die die Karte an den Körper
befestigen, abschrauben
2. Karte ausnehmen und neue Karte einsetzen
3. Die drei Schrauben montieren und Deckel aufsetzen
ESPAÑOL Pasos por efectuar:
1. extraer la tapa y destornillar los 3 tornillos que aprietan la tarjeta al cuerpo
2. extraer la tarjeta e introducir la nueva tarjeta
3. apretar los tres tornillos y reponer la tapa
FRANÇAIS Etapes à suivre:
1. Retirer le couvercle et dévisser les 3 vis de fixation de la carte au corps.
2. Retirer l’ancienne carte et insérer la nouvelle.
3. Serrer les trois vis et replacer le couvercle.
PORTUGUÊS: O que fazer:
1. tirar a tampa e desparafusar os 3 parafusos que fixam a ficha ao corpo
2. tirar a ficha e inserir a nova ficha
3. apertar os três parafusos e reposicionar a tampa
Pulitura ritardatore
Limpieza del retardador
Retardant cleaning
Nettoyage du retardateur
Reinigung der Verzögerermittel
Limpeza retardador
ITALIANO Passi da fare:
1. svitare il ritardatore ed estrarlo
2. pulirlo
3. rimetterlo in verticale da sotto il dispositivo
ENGLISH steps:
1. loosen the retardant and extract it
2. clean it
3. replace in a vertical sense beneath the
device
DEUTSCH hier wie folgt vorgehen:
1. Verzögerermittel abschrauben und
ausziehen
2. reinigen
3. Gruppe vertikal von unten einlegen
ESPAÑOL Pasos por efectuar:
1. destornillar el retardador y extraerlo
2. limpiarlo
3. reponerlo en vertical desde abajo del
dispositivo
FRANÇAIS Etapes à suivre:
1. Dévisser le retardateur et l’extraire
2. Le nettoyer
3. Le replacer à la verticale par-dessous le
dispositif
PORTUGUÊS: O que fazer:
1. desaparafusar o retardador e extraí-lo
2. limpá-lo
3. posicioná-lo em vertical debaixo do
dispositivo
Mac3 S.p.A.
Via Maestri del Lavoro 27 - 50013 Campi Bisenzio - Firenze (Italia)
Tel. +39 055 88 77 672 055 88 77 372 055 88 79 276
Fax +39 055 88 77 068
e-mail [email protected] - www.mac3.it
Technical Customer Support
monday friday 08:30-12:30 13:30-17:00
e-mail [email protected]
Scaricare