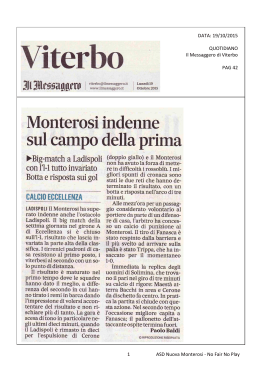
ARC 3 TABLETOP CD PLAYER QUICKSTART GUIDE ENGLISH ( 1 – 3 ) MANUAL DE INICIO RÁPIDO ESPAÑOL ( 5 – 7 ) GUIDE D’UTILISATION RAPIDE FRANÇAIS ( 9 – 11 ) MANUALE RAPIDO DI UTILIZZAZIONE ITALIANO ( 13 – 15 ) KURZANLEITUNG DEUTSCH ( 17 – 19 ) BOX CONTENTS ARC3 IEC Power Cable Quickstart Guide Safety & Warranty Information Booklet REGISTRATION Please go to http://www.numark.com to register your ARC3. Registering your product ensures that we can keep you up-to-date with any last-minute product developments and provide you with world-class technical support, should you run into any problems. GROUND RULES 1. 2. 3. 4. 5. 6. 7. 8. 9. 10. Make sure all items listed in the BOX CONTENTS section are included in the box. READ SAFETY & WARRANTY INFORMATION BOOKLET BEFORE USING THE PRODUCT. Study the connection diagram in this guide. Place mixer in an appropriate position for operation. Make sure all devices are turned off and all faders and gain knobs are set to “zero” Connect all stereo input sources as indicated in the diagram. Connect the stereo outputs to power amplifier(s), tape decks, and/or other audio sources. Plug all devices into AC power. Switch everything on in the following order. • audio input sources (i.e. turntables, CD players, etc.) • mixer • last, any amplifiers or output devices When turning off, always reverse this operation by, • turning off amplifiers • mixer • last, any input devices CONNECTION DIAGRAM RELAY CABLE CD PLAYER MIXER LINE OUT CD PLAYER LINE IN LINE OUT AUDIO CABLE FADER START CABLE AUDIO CABLE POWER SUPPLY 1 FADER START CABLE TOP PANEL FEATURES 1. 2. 3. 4. 5. 6. 7. 8. 9. 10. PLAY/STUTTER – Starts the music from the initial cue point. PAUSE – Pauses the music. CUE – Returns and pauses the music at the last set cue point. The cue point is where the music will begin when play is pressed. The cue point is the beginning of a track or can be set when play is started after the music is paused. For instance if the music is paused then PLAY is pressed, a new cue point is set. You can easily edit the cue point by turning the wheel during pause. As you rotate the wheel the music will sound. By stopping the wheel and pressing play a new point is set. Alternately pressing the PLAY button and the CUE button allows the CD to be played from the same position any number of times. Note: Pressing cue 2 times plays music temporarily from this point until the button is released. JOG WHEEL – Cue Function: As explained under “CUE”, when the music is paused and you rotate the wheel, music will sound. By pressing play a new cue point is set. Search Function: As explained under “TRACK SELECT/SEARCH”, when search is pressed and you rotate the wheel, the music will rapidly scan the music to find a cue point. Pitch Bend Function: Allows the user to temporarily change the speed of the music to align beats. When the beats of the music of the CD you wish to match is fast compared to the tempo of the other music rotate the jog wheel counter clockwise (to the left). When the CD is behind rotate the jog wheel clockwise (to the right). The pitch changes temporarily while the jog wheel is rotated. The faster you rotate the wheel the more pitch is changed. Releasing the wheel results in a return to the original pitch. Scratch Function: As explained under “SCRATCH,” while activated, jogging the wheel creates a “scratch” effect. LCD DISPLAY – Indicates all the functions, as they are occurring, with the CD. OPEN/CLOSE – Pressing will open or close the disc tray on the transport. SGL – To set play mode in single or continuous play. TIME – Controls display indication of time mode. PROGRAM – Depress this button and the unit will stop and the program indicator will light. Select each track to be programmed and press the PROGRAM button between selections. You can program up to 21 tracks. Press PLAY to start the program. To exit and erase program, either hold the program button down for more than 2 seconds while the unit is stopped, open the disc tray, or turn off the power. TRACK SELECT/SEARCH – Rotation – selects tracks Pressing while rotating – selects tracks +10 Pressing once- Puts wheel in search mode. 2 11. 12. 13. 14. 15. 16. 17. 18. 19. 20. 21. 22. 23. PITCH – Activates the pitch slider and adjusts the amount of control the pitch slider has on the overall speed of music. Tapping the pitch will toggle slider between 8% and 16% pitch ranges. Holding the pitch for 3 seconds will deactivate the pitch control. KEYLOCK – Engages and disengages the Keylock feature. – /+ – Works as pitch bend and controls key and pitch functions. PITCH SLIDER – Controls the overall speed of the music. PITCH RANGE LED – Indicates current pitch range of the pitch slider LOOP IN – Used to set stutter and loop in points. LOOP OUT – Used to set loop out points and release the loop. RELOOP/STUTTER – Used for repeated play (stutter) from the loop in point, repeating a previously set, and hot start. RELAY – Used for setting Alternating play start between attached units. TAP – Tap this button with the beat of the music to determine the current Beats Per Minute (BPM). This button also switches the mode of the display between showing the BPM and the percentage change in pitch. To do this, hold the button for 1 second. SCRATCH – Pressing once puts the jog wheel in Scratch Mode. CD ILLUMINATION LIGHT (unit front) – lights up the CD drawer and CD when open. CD DRAWER (unit front) – Place your CDs you wish to play in here. This unit is designed to play commercially available CDs, mp3 CDs, and properly burned and finalized CD-Rs. Due to variances on the specification of certain CD burners and CDs some discs home made CDs may not play properly. REAR PANEL FEATURES 24. 25. 26. 27. 28. 29. 30. POWER SWITCH – Turn on and turn off the machine with this button. The unit should always be shut down with this button first before any external power is removed. Typically, it is recommended that the CD player is powered on before amplifiers and off after amplifiers to avoid an audio spike to be sent through your equipment. IEC CONNECTOR – Plug your supplied power cord in here. VOLTAGE SELECTOR – Set this switch to the voltage for your location. RCA CONNECTORS – Connect your CD player to your mixer from this line level output. DIGITAL OUTPUT – The format is type 2, form 1, also known as S/PDIF (Sony/Phillips Digital Interface Format). RELAY CONNECTOR – If you wish to use the relay function plug in your 3.5mm stereo control cables into here and then into your other unit. The cable must be a stereo style plug for the units to work properly REMOTE START CONNECTOR – Use this connector to plug into your fader start compatible mixer or remote switch. This function is always active. To use this connector for fader start, connect the supplied fader start cable to a fader start compatible mixer. Every time you move the crossfader on the mixer over to the side that the unit is on, it will automatically start playing. When you move the fader away from that side, the unit will stop. Moving the fader back to the unit side will start play again. 3 CONTENIDO DE LA CAJA ARC3 Cable IEC Guía de inicio rápido Folleto de información sobre la seguridad y la garantía REGISTRO Visite http://www.numark.com y registre su ARC3. El registro de su producto asegura que podamos mantenerle actualizado con los desarrollos de productos de último momento y brindarle apoyo técnico de categoría mundial en caso de que tenga algún problema. REGLAS BÁSICAS 1. 2. 3. 4. 5. 6. 7. 8. 9. 10. Asegúrese de que todos los artículos indicados en “Contenido de la caja" estén incluidos en la caja. LEA EL FOLLETO DE INFORMACIÓN SOBRE LA SEGURIDAD Y LA GARANTÍA ANTES DE UTILIZAR EL PRODUCTO. Estudie el diagrama de conexión incluido en esta guía. Coloque el mezclador en una posición adecuada para su funcionamiento. Asegúrese que todos los dispositivos estén apagados y que todos los faders y perillas de ganancia estén en posición «cero». Conecte todas las fuentes de entrada estéreo como se indica en el diagrama. Conecte las salidas estéreo a los amplificadores de potencia, bandejas de cinta magnética y/o otras fuentes de audio. Enchufe todos los dispositivos al suministro de corriente alterna. Encienda todo en el siguiente orden: • fuentes de entrada de audio (por ejemplo, giradiscos, reproductores de CD, etc.) • el mezclador • por último, cualquier amplificador o dispositivo de salida Al apagar, realice siempre esta operación en sentido inverso: • apague los amplificadores • el mezclador • por último, cualquier dispositivo de entrada ECTION DIAGRAM DIAGRAMA DE CONEXIÓN CABLE DE RELAY LECTER DE CD LECTER DE CD MEZCLADOR LINEA ADENTRE LINE NACIA FUERA LINE NACIA FUERA CABLE AUDIO CABLE DE FADER START CABLE AUDIO FUENTE DE ALIMENTACIÓN 5 CABLE DE FADER START CARACTERÍSTICAS DEL PANEL SUPERIOR 1. 2. 3. 4. 5. 6. 7. 8. 9. 10. PLAY/STUTTER – Para comenzar la música de la señal inicial señale. PAUSE – Para detenerse brevemente la música. CUE – vuelve a reproducir y para la música en el último punto de cue determinado. El punto cue es donde la música comenzará cuando se pulse play. El punto cue se establece como el punto de partida inicial en una pista o puede trasladarse cuando se comienza a reproducir desde un punto diferente. Por ejemplo, si la música está en pausa y se pulsa play, se establece un nuevo punto cue. Puede modificar el punto cue fácilmente al girar la rueda durante la pausa. Al girar la rueda se escuchará la música. Al parar la rueda y pulsar play, se establece un nuevo punto de partida. Si se pulsan alternativamente los botones PLAY y CUE, el CD será reproducido desde la misma posición cuantas veces se desee. Nota: Si se pulsa el botón cue dos veces, se reproducirá música temporalmente desde este punto hasta que suelte el botón. JOG WHEEL – Función Cue: tal y como hemos explicado en “Cue”, cuando la música esté pausada y usted gire la rueda, se escuchará música. Si pulsa play, establecerá un nuevo punto cue. Función de búsqueda: como se ha explicado bajo el botón de búsqueda “TRACK SELECT/SEARCH”, cuando se pulse SEARCH y se gire la rueda, se escaneará la música rápidamente para encontrar un punto de cue. Función Pitch Bend: permite que el usuario cambie la velocidad de la música temporalmente para alinear los beats. Cuando los beats de la música del CD que usted desea alinear son rápidos comparados con el tempo de la otra música, debe girar la rueda de avance lento (jog wheel) en el sentido contrario al de las agujas del reloj (hacia la izquierda). Cuando el CD se retrase, gire la jog wheel en el sentido de las agujas del reloj (hacia la derecha). El pitch cambia temporalmente mientras gira el jog wheel (rueda de avance lento). Cuanto más rápido gira la rueda, más cambia el pitch. Soltar la rueda hace que se vuelva al pitch original. Función Scratch (Rayar): como se ha explicado bajo el botón de búsqueda “SCRATCH”, Cuando se activa, al moverse la rueda se crea un efecto ‘scratch’ (Rayado) LCD DISPLAY – Indica todas las funciones, mientras está ocurriendo, con el CD. OPEN/CLOSE – Al presionar se abrirá o cerrará la bandeja que transporta el disco. SGL – Para fijar el modo de operación en solo o continuo. TIME – Indicación de la visualización de los controles del modo de tiempo. PROGRAM – Pulse este botón y la unidad se detendrá y el indicador de programa se iluminará. Seleccione todas las pistas que desee programar y pulse el botón de PROGRAMA entre cada selección. Podrá programar hasta 21 pistas. Pulse PLAY para activar el programa. Para salir y borrar el programa, mantenga pulsado el botón de programa durante más de 2 segundos mientras la unidad está parada, abra la bandeja del disco, o apague la fuente de alimentación. TRACK SELECT/SEARCH – Rotación – selecciona las pistas. Al presionar mientras que rota – selecciona las pistas +10. Al presionar una vez rueda puesta adentro empezará la búsqueda. 6 11. 12. 13. 14. 15. 16. 17. 18. 19. 20. 21. 22. 23. PITCH – activa al deslizador del pitch y ajusta la cantidad de control que tiene el deslizador del pitch sobre la velocidad total de la música. Si le da un golpecito al pitch alternará el deslizador entre rangos de pitch de 8% y de 16%. Mantenga el botón PITCH pulsado durante 3 segundos para desactivar el control del pitch. KEYLOCK – Activa y desactiva la característica Key Lock (Bloqueo de tonalidad). –/+ – Funciona como Pitch Bend y controla las funciones llave y pitch. PITCH SLIDER – Controla la velocidad total de la música PITCH RANGE LED – indica los limites corrientes del Pitch LOOP IN – Fija el tartamudeo y las puntas de entrada del bucle. LOOP OUT – Fijar las puntas de la salida del bucle y deja salir del bucle. RELOOP/STUTTER – Utilizado para una canción repetada (tartamudeo) del punto de entrada del bucle, repetando un comienzo previamente fijado, y hot start. RELAY – Utilizado para fijar el comienzo de la cancion que se alterna entre las unidades adjuntos. TAP – Golpee este botón con el beat de la música para determinar los beats por minuto (BPM) en ese momento. Este botón también cambia alterna el modo de la pantalla entre la visualización de los BPM y el porcentaje de cambio en el tono (pitch). Para hacer esto, sostenga el botón para 1 segundo. SCRATCH (Rayar) – Cuando se activa, al moverse la rueda se crea un efecto ‘scratch’ (Rayado). LUZ DE LA ILUMINACIÓN DEL CD (frente a la unidad) – ilumina el cajón del CD y el CD cuando está abierto. CAJÓN DEL CD (frente a la unidad) – coloque su CDs que usted desea poner adentro. Esta unidad está diseñada para poner el CD comercial disponible, mp3 CD, y a CD-R correctamente escritos y cerrados. Debido a las variaciones en la especificación de ciertos escritores de CD y CDs que están hechos en casa pueden funcionar incorrectamente. CARACTERÍSTICAS DEL PANEL TRASERO 24. 25. 26. 27. 28. 29. 30. POWER SWITCH – enciende y apaga la máquina con este botón. La unidad se debe cerrar siempre con este botón primero antes de que se quite cualquier potencia externa. Se recomienda típicamente que accione el lector de CD, encendido antes de los amplificadores y apagado después de los amplificadores para evitar un punto audio que se enviará a través de su equipo. CONECTOR DEL ENCHUFE DE PODER DEL IEC – enchufe su cable eléctrico previsto aquí. SELECTOR DEL VOLTAJE – fije este interruptor al voltaje para su localización. LOS CONECTORES AUDIO RCA – conecte a su lector de CD con su mezclador de esta línea salida. SALIDA DIGITAL – El formato es de tipo 2, form 1, también conocido como S/PDIF (Sony/Phillips Digital Interface Format). RELAY CONNECTOR – si usted desea utilizar la función de relay enchufa sus cables estéreos de control de 3.5mm aquí y después en su otra unidad. El cable debe ser un enchufe estéreo para que las unidades trabajen correctamente. REMOTE START CONNECTOR – utilice este conector para tapar en su mezclador compatible fader start o mando. Esta función siempre está activa. Conecte el cable previsto al fader start con un mezclador compatible fader start para utilizar este conector para el fader start. Cada vez que usted mueve el crossfader en el mezclador hacia la unidad, comenzará automáticamente a cantar. Cuando usted mueve el crossfader lejos de esta unidad se parará. El movimiento del crossfader otra vez hacia la unidad comenzará a cantar de nuevo. 7 CONTENU DE LA BOÎTE ARC3 Câble IEC Guide d'utilisation simplifié Le livret des consignes de sécurité et des informations concernant la garantie ENREGISTREMENT Veuillez visiter le site internet http://www.numark.com pour enregistrer votre nouvelle ARC3. L'enregistrement des produits vous permet d'être informé sur les toutes dernières nouveautés concernant les produits et de vous offrir un soutien technique de niveau international, si vous en aviez besoin. RÈGLES DE BASE 1. 2. 3. 4. 5. 6. 7. 8. 9. 10. Assurez-vous que tous les articles énumérés dans le contenu de la boîte de ce guide sont inclus dans la boîte. VEUILLEZ LIRE LE LIVRET DES CONSIGNES DE SÉCURITÉ ET DES INFORMATIONS SUR LA GARANTIE AVANT D'UTILISER LE PRODUIT. Examinez le schéma de connexion de ce guide. Placez la console de mixage en position de fonctionnement. Assurez-vous que tous les appareils sont hors tension et que tous les atténuateurs et le gain sont réglés à « zéro ». Connectez toutes les sources d'entrées stéréo tel qu'indiqué sur le schéma. Branchez toutes les sorties aux amplificateurs de puissance, aux lecteurs de cassette et aux sources audio. Branchez tous les appareils à une prise de courant alternatif (AC). Mettre tous les appareils sous tension dans l'ordre suivant. • sources d'entrée audio (c.-à-d.tourne-disques, lecteurs de disques compacts, etc.) • Consoles de mixage • en dernier, tous amplificateurs ou appareils de sortie Pour mettre hors tension, toujours inverser l'opération : • Éteindre les amplificateurs • Consoles de mixage • En dernier, tous les appareils d'entrée SCHÉMA DE CONNEXION CABLE RELAY LECTEUR DE CD CONSOLE LIGNE HORS LECTEUR DE CD LIGNE DANS LIGNE HORS CABLE AUDIO CABLE START POTENTIOMÈTRE CABLE AUDIO SOURCE D’ÉLECTRICITÉ 9 CABLE START POTENTIOMÈTRE CARACTÉRISTIQUES DU PANNEAU SUPÉRIEUR 1. 2. 3. 4. 5. 6. 7. 8. 9. 10. PLAY/STUTTER – pour commencer la musique du point initiel. PAUSE – pour faire la pause. CUE – Retourne et pause sur le dernier point de repère mémorisé. Le point de repère est la position de démarrage de la prochaine lecture. Le point de repère est l’endroit de départ sur une piste et il peut également être modifié lorsque la lecture est commencée. Par exemple, si la musique est mise en mode pause et ensuite en mode lecture, un nouveau point de repère sera mémorisé. Vous pouvez facilement modifier le point de repère en tournant la roue en mode pause. Lorsque vous tournez la roue, la musique se fait entendre. Lorsque vous cessez de tourner la roue et que vous passez en mode lecture, un nouveau point de repère est mémorisé. Par contre, appuyer sur la touche lecture (PLAY) et ensuite sur la touche de repérage (CUE) permet de recommencer la lecture toujours au même endroit plusieurs fois. Note: En appuyant sur la touche Repèrage (CUE) 2 fois, la lecture de la musique se fait temporairement à partir de ce point jusqu’à ce que la touche soit relâchée. JOG WHEEL – Fonction repérage : Comme il est expliqué un peu plus haut sous Repérage, lorsque vous tournez la roue, la musique se fait entendre. Un nouveau point de repère est mémorisé en appuyant sur lecture (PLAY). Fonction de recherche (Search) : Comme il est expliqué sous TRACK SELECT/SEARCH, lorsque vous tournez la roue pendant que la touche de recherche est enfoncée, le lecteur se met rapidement à la recherche d’un point de repère. Fonction de contrôle de vitesse de lecture (Pitch Bend) : Cette fonction permet à l’utilisateur de modifier temporairement la vitesse de la lecture pour synchroniser le tempo. Lorsque le tempo de la musique du lecteur sélectionné est plus rapide que celui de l’autre musique, tournez la roue dans le sens contraire d’une montre (vers la gauche). Lorsque le lecteur est en retard, tournez la roue JOG dans le sens des aiguilles d’une montre (vers la droite). La hauteur tonale change temporairement en même temps que tourne la roue JOG. Plus vous tournez rapidement la roue, plus vous modifiez la hauteur tonale. Lorsque vous relâchez la roue, la hauteur tonale revient à son niveau initial. Fonction de Scratch : Comme il est expliqué sous SCRATCH, lorsqu’activée, tourner la molette cré un effet de scratch. DISPLAY LCD – indique toutes les fonctions, comme elle apparaîssent, avec le CD. OPEN/CLOSE – en appuyant on peut ouvrir ou fermer la boîte du disque. SGL – pour établir le play –mode en single (seul) ou continous (continu). TIME – contrôle le display du mode temps. PROGRAM – Premendo questo tasto l’apparecchio si ferma e si accende l’indicatore di programma. Selezionare ciascuna traccia da riprodurre e premere il tasto PROGRAM tra una selezione e l’altra. È possibile programmare fino a 21 tracce. Premere PLAY per avviare il programma. Per uscire e cancellare il programma, mantenere la pressione sul tasto program per più di 2 secondi ad apparecchio fermo, aprire il vassoio del disco, o disconnettere l’alimentazione. TRACK SELECT/SEARCH – Rotation-sélecte la musique Appuyer en même temps avec la rotation-selecter musique +10 Appuyer une seule fois- Met la manche en search-mode (recherche). 10 11. 12. 13. 14. 15. 16. 17. 18. 19. 20. 21. 22. 23. PITCH – Active l’atténuateur de la hauteur tonale et ajuste le niveau de contrôle de l’atténuateur sur la vitesse générale de la lecture de la musique. En tapant sur cette touche l’atténuateur vous permet de sélectionner un niveau de hauteur tonale variant de 8% à 16%. La commande est désactivée en maintenant la hauteur tonale pendant 3 secondes. KEYLOCK – Active et désactive la fonction de verrou de sécurité. –/+ – Fonctionne comme pitch bend et contrôle les touches et les fonctions pitch. PITCH SLIDER – Contrôle la vitesse moyenne de la musique. PITCH RANGE LED – Indique la rate courrante du pitch slider LOOP IN – Utilisé à établir le stutter et loop dans des points. LOOP OUT – Utilisé à déterminer les points loop et éliberer le loop. RELOOP / STUTTER – utilisé pour un play répété du loop au point, en répétant un préétablissement. RELAY – Utilisé pour établir un commencement alternative entre les unités attachées. TAP – Tapez répétivement cette touche au rythme de la musique pour déterminer le nombre de battements par minute (BPM). Ce bouton permet également de modifier le mode d’affichage entre le BPM et le pourcentage de modification de la tonalité. Pour faire ceci, appuyez sur le bouton pour 1 seconde. SCRATCH – Lorsqu’activée, tourner la molette cré un effet de scratch. CD ILLUMINATION LIGHT (façade de l’unité) – il s’allume au moment ou on retire le tiroir du CD et le CD. CD DRAWER (façade de l’unité) – Placez les CD que vous voulez écouter ici. Cette unité est fait pour les CD disponibles, pour les CD mp3, et pour les CD-R finalisés. A cause de la variabilité de chaque CD disque, ceux qui sont fait à la maison ne peuvent pas réprésenter correctement. CARACTÉRISTIQUES DU PANNEAU ARRIÈRE 24. 25. 26. 27. 28. 29. 30. POWER SWITCH – c’est le button qui permet d’allumer ou d’éteindre la machine. L’unité doit être éteinte premièrement par ce button avant de débrancher la machine. En général il est recommandé d’allumer avant le CD player et après les amplificateurs pour éviter un choque audio à l’intérieur de votre système. IEC CONNECTOR – branchez votre corde d’alimentation ici. VOLTAGE SELECTOR – Etablit le voltage pour votre location. RCA AUDIO CONNECTORS – Connectez votre CD player au mixer de ce niveau output. DIGITAL OUTPUT – Le format est de type 2, forme 1, aussi nommé S/PDIF (Sony/Phillips Digital Interface Format). RELAY CONNECTOR – Si vous voulez utiliser la fonction relay branchez vos cables 3.5 mm stereo ici et ensuite dans l’autre unité. Pour fonctionner correctement le cable doit avoir la prise stereo. REMOTE START CONNECTOR – Utilisez ce connecteur pour brancher votre potentiomètre dans votre mixer compatible. Cette fonction est toujours active. Pour utiliser ce connecteur, connectez le cable à votre mixer. Chaque fois que vous bougez le cable connecteur du mixer sur la partie où l’unité fonctionne, cela va commencer a fontionner automatiquement. Quand vous éloignez le cable fader, l’unité arrêtera. En bougeant le fader sur l’unité, cela va recommencer à fonctionner. 11 CONTENUTI DELLA CONFEZIONE ARC3 Cavo IEC Guida rapida Libretto di istruzioni di sicurezza e garanzia REGISTRAZIONE Recarsi alla pagina http://www.numark.com per registrare il ARC3. La registrazione del prodotto garantisce che possiamo tenervi aggiornati con tutti gli ultimissimi sviluppi del prodotto e offrirvi assistenza tecnica di livello mondiale, in caso di eventuali problemi. NORME FONDAMENTALI 1. 2. 3. 4. 5. 6. 7. 8. 9. 10. Assicurarsi che tutti gli elementi elencati sul frontespizio della presente guida si trovino nella confezione. LEGGERE ATTENTAMENTE IL LIBRETTO DELLE ISTRUZIONI DI SICUREZZA PRIMA DI UTILIZZARE IL PRODOTTO. Studiare con cura lo schema dei collegamenti fornito nella guida. Sistemare il mixer in una posizione adeguata all’uso. Assicurarsi che tutti i dispositivi siano spenti e che tutti i fader e le manopole di guadagno siano impostati su “zero”. Collegare tutte le sorgenti di ingresso stereo come indicato nello schema. Collegare le uscite stereo ad amplificatori, mangianastri e/o altre sorgenti audio. Collegare tutti i dispositivi all’alimentazione CA. Accendere tutto nel seguente ordine: • sorgenti di ingresso audio (giradischi, lettori CD, ecc.) • il mixer • infine, eventuali amplificatori o dispositivi di uscita Al momento dello spegnimento, invertire questa operazione spegnendo: • gli amplificatori • il mixer • infine, qualsiasi dispositivo di ingresso SCHEMA DEI COLLEGAMENTI CAVO RELAY LETTORE CD MIXER LINEA DI USCITA LETTORE CD ENTRATA DE LINEA LINEA DI USCITA CAVO AUDIO CAVO D’INIZIO PER IL POTENZIOMETRE CAVO D’INIZIO PER IL POTENZIOMETRE CAVO AUDIO FENTE DI ALIMENTAZIONE 13 CARATTERISTICHE PANNELLO SUPERIORE 1. 2. 3. 4. 5. 6. 7. 8. 9. 10. PLAY/STUTTER – per cominciare la musica da un punto iniziale. PAUSE – per spegnere la musica (mettere la pausa). CUE – fa tornare la musica all’ultimo punto cue impostato e ne interrompe temporaneamente la riproduzione (pausa). Il punto cue è quello da cui ripartirà la musica al momento in cui viene premuto play. Il punto cue è impostato come il punto iniziale di avvio di una traccia, oppure può essere spostato in un punto diverso quando viene avviata la riproduzione. Ad esempio, se la musica viene interrotta temporaneamente (pausa), premendo play viene impostato un nuovo punto cue. Il punto cue è facilmente editabile facendo girare la rotella durante la pausa. Ruotando la rotella, la musica suonerà. Fermando la rotella e premendo play viene impostato un nuovo punto. Alternando la pressione dei tasti PLAY e CUE è possibile riprodurre il CD dalla stessa posizione per un numero qualsiasi di volte. Nota: Premendo cue 2 volte la musica suona temporaneamente da questo punto fino a quando il tasto viene rilasciato. JOG WHEEL – Funzione Cue: come indicato per “CUE”, quando la musica viene messa in pausa, ruotando la rotella, la musica verrà riprodotta. Premendo ‘play’ viene impostato un nuovo punto cue. Funzione di Ricerca: come spiegato sotto “TRACK SELECT/SEARCH”, premendo search e ruotando la rotella, la musica verrà rapidamente analizzata per trovare un punto cue. Funzione Pitch Bend: permette all’utente di modificare temporaneamente la velocità della musica per allineare i beat. Quando il beat della musica del CD che desiderate accordare è veloce rispetto al tempo dell’altra musica, ruotare la jog wheel in senso antiorario (a sinistra). Quando il CD è in ritardo, ruotare la jog wheel in senso orario (a destra). Il pitch cambia temporaneamente durante la rotazione della jog wheel. Più la rotella verrà ruotata velocemente, maggiore sarà il cambiamento. Rilasciando la rotella si torna al pitch originale. Funzione di Scratch: come spiegato sotto “SCRATCH”, quando attivato, spingendo leggermente la rotella si crea un effetto di ‘scratching’. LCD DISPLAY – indica tutte le funzioni, mentre appaiono, con il CD. OPEN/CLOSE – premendo si chiuderà o si aprirà il cassetto di trasporto del disco. SGL – per stabilire il modo di funzionamento (play mode) in single o continuo. TIME – i controlli affissano le indicazioni del modo di tempo. PROGRAM – Lorsque cette touche est enfoncée, le lecteur cesse la lecture et l’indicateur de programme s’allume. Sélectionnez chaque piste à programmer et appuyez sur la touche PROGRAM entre chacunes des sélections. Vous pouvez programmer jusqu’à 21 pistes. Appuyez sur PLAY pour débuter le programme. Pour sortir et effacer le programme, vous pouvez maintenir la touche PROGRAM enfoncée pour plus de 2 secondes lorsque lecteur est arrêté, ouvrir le compartiment à disques ou encore, mettre l’appareil hors tension. TRACK SELECT/SEARCH – Rotazione – seleziona la musica Premendo mentre si svolge la rotazione – seleziona la musica + 10 Premendo una sola volta – Mette la marcia nel modo di ricerca (search mode). 14 11. 12. 13. 14. 15. 16. 17. 18. 19. 20. 21. 22. 23. PITCH – attiva il cursore del pitch e regola la quantità di controllo del cursore stesso sulla velocità globale della musica. Il battito del tasto PITCH button commuterà il cursore all’interno della gamma del pitch, dall’8% al 16%. Mantenendo la pressione del tasto PITCH per 3 secondi il comando pitch verrà disattivato. KEYLOCK – Attiva e disattiva la funzione Key Lock (blocco tonalità). –/+ – Funziona come pitch bend e controlla le funzioni chiave e le funzioni pitch. PITCH SLIDER – Controlla la velocità totale della musica. PITCH RANGE LED – Indica l’intervallo corrente del cursore pitch LOOP IN – Utilizzato per selezionare i punti di loop in e di stutter. LOOP OUT – Utilizzato per selezionare i punti di loop out e di terminazione loop. RELOOP/STUTTER – Utilizzato per un play ripetuto (stutter) dal punto loop in, ripetendo un set precedente, e hot start. RELAY – Utilizzato per alternare il play fra le unità allegate. TAP – Battere questo tasto a tempo con la musica per determinare i Battiti al Minuto (BPM) attuali. Questo tasto inoltre commuta la modalità di visualizzazione a display tra BPM e la percentuale di cambiamento del pitch. Per fare questo, tenga il tasto per 1 secondo. SCRATCH – Quando attivato, spingendo leggermente la rotella si crea un effetto di ‘scratching’. CD ILLUMINATION LIGHT (facciata dell’unità) – Illumina il cassetto CD e il CD quando questo è aperto. CD DRAWER (facciata dell’unità) – Si collocano i CD che uno desidera ascoltare (play) qui dentro. Questa unità è progettata per utilizzare dei CD disponibili nel commercio, dei CD mp3, e dei CDR iscritti e finalizzati correttamente. A causa delle variazioni nelle specificazioni dei diversi iscrittori (burner) di CD e dei CD stessi, certi CD manufatti potrebbero non funzionare correttamente. CARATTERISTICHE PANNELLO POSTERIORE 24. 25. 26. 27. 28. 29. 30. POWER SWITCH – Questo è il pulsante che permette di accendere e di spegnere l’apparecchio. L’unità deve essere spenta sempre con questo pulsante prima che qualsiasi cavo di alimentazione sia tolto. Tipicamente, si raccomanda che il CD player sia acceso prima degli amplificatori e spento dopo gli amplificatori per evitare che un choc audio sia trasmesso tramite l’equipaggiamento. IEC CONNECTOR – Introdurre il cavo di alimentazione fornito qui. VOLTAGE SELECTOR – Collocare questo commutatore alla tensione della sua locazione. RCA AUDIO CONNECTORS – Connettere il CD player all’apparecchio da missare di questa uscita con livello di linea. DIGITAL OUTPUT – il formato è di tipo 2, forma 1, nota anche come S/PDIF (Interfaccia Digitale Sony/Phillips). RELAY CONNECTOR – Se loro desiderano utilizzare la funzione relay, devono introdurre i cavi stereo di controllo di 3.5 mm qui e dopo all’altra unità. Il cavo deve essere stereo perchè le unità funzionino adeguatamente. REMOTE START CONNECTOR – Utilizzare questo connettore per introdurlo nell’apparecchio da missare o il telecommando compatibile fader start. Questa funzione è sempre attiva. Per utilizzare questo connettore allo scopo di accendere il fader, si collegga il cavo fader start fornito a un apparecchio da missare compatibile fader start. Ogni volta che si muove il crossfader dell’apparecchio da missare nella parte in cui si trova l’unità, questo comincerà a cantare automaticamente. Quando si muove il cavo fader nella parte opposta, l’unità si spegne. Muovendo il cavo fader indietro verso la parte dell’unità, questa comincerà a cantare di nuovo. 15 INHALT DER VERPACKUNG ARC3 IEC Kabel Kurzanleitung Broschüre mit den Sicherheits und Garantierichtlinien REGISTRIERUNG Registrieren Sie Ihren ARC3 bitte auf http://www.numark.de. Dadurch geben Sie uns die Möglichkeit, Ihnen Informationen bei Produktaktualisierungen zukommen zu lassen und Ihnen bei möglichen Problemen den bestmöglichen technischen Support zu bieten. GRUNDREGELN 1. 2. 3. 4. 5. 6. 7. 8. 9. 10. Vorderseite der Anleitung abgebildeten Bestandteile im Karton befinden. LESEN SIE VOR DER VERWENDUNG DES PRODUKTS DIE SICHERHEITSHINWEISE. Sehen Sie sich die Anschlussübersicht in dieser Anleitung an. Stellen Sie den Mixer in einer für den Betrieb geeigneten Position auf. Achten Sie darauf, dass alle Geräte ausgeschaltet sind und dass alle Fader und Gain Regler Ihres Mixers auf dem niedrigsten Wert stehen. Verbinden Sie alle Stereo Eingangsquellen, wie in der Anschlussübersicht gezeigt, mit dem Mixer. Schließen Sie die Stereo Ausgänge an Verstärker, Kassettendecks oder andere Audiogeräte an. Schließen Sie alle Geräte an den Stromkreis an. Schalten Sie die Geräte in der folgenden Reihenfolge ein: • Audio Eingangsquellen (z.B. Turntables, CD Player, usw.) • Mixer • Zuletzt Verstärker und Ausgangsgeräte Schalten Sie Ihr System IMMER in genau der umgekehrten Reihenfolge aus, indem Sie: • Zuerst Verstärker • Dann den Mixer • Und am Schluss die Eingangsquellen ausschalten ANSCHLUSSÜBERSICHT RELAY-KABEL CD SPIELER SIGNAL AUSTRITT MIXER CD SPIELER LINE EINGÄNGE SIGNAL AUSTRITT AUDIOKABEL FADE-STARTKABEL AUDIOKABEL STROMVERSORGUNG 17 FADESTARTKABEL ÜBERSICHT ÜBER DIE OBERSEITE 1. 2. 3. 4. 5. 6. 7. 8. 9. 10. PLAY/STUTTER – um die Musik von einem ursprünglichen Punkt zu starten. PAUSE – um die Musik abzustellen (oder in Pause). CUE – Setzt das Musikstück zum zuletzt gesetzten Cue-Punkt zurück und stoppt es. Der Cue-Punkt ist der Punkt, an welchem angefangen wird, das Musikstück abzuspielen wenn die Abspieltaste gedrückt wird. Der Cue-Punkt wird als ursprünglicher Anfangspunkt in einem Musikstück gesetzt oder kann, sobald der Abspielvorgang begonnen hat, an einen anderen Punkt verlegt werden. Wenn, zum Beispiel, das Abspielen des Musikstücks angehalten wird und dann die Abspieltaste wieder gedrückt wird, wird ein neuer Cue-Punkt gesetzt. Sie können den Cue-Punkt leicht verändern, indem Sie das Einstellrad im Pausenbetrieb drehen. Bei Bewegen des Rads wird Musik gehört. Wenn das Einstellrad angehalten wird und die Spieltaste gedrückt wird, wird ein neuer Cue-Punkt gesetzt. Abwechselndes Drücken der Abspiel- und der CUE-Taste ermöglichen ein beliebig oftmaliges Abspielen der CD von der gleichen Position. Hinweis: Bei zweimaligem Drücken der Cue-Taste wird das Musikstück zeitweilig abgespielt, bis die Taste freigegeben wird. JOG WHEEL – Cue-Funktion: Wie bereits unter dem Abschnitt “CUE” erklärt wurde, ertönt Musik wenn das Musikstück angehalten ist und Sie das Einstellrad bewegen. Wenn die Abspieltaste gedrückt wird, wird ein neuer Cue-Punkt gesetzt. Suchfunktion: Wie bereits unter dem Abschnitt “TRACK SELECT/SEARCH” erklärt wurde, sucht diese Funktion die Musik schnell nach einem Cue-Punkt ab, wenn die Suchtaste gedrückt ist und das Einstellrad bewegt wird. Tonhöhenbeugungsfunktion: dies ermöglicht die zeitweilige Veränderung der Musikgeschwindigkeit um Takte anzupassen. Falls der Takt der Musik jener CD, welche Sie anpassen möchten, schneller ist als das Tempo der anderen Musik, drehen Sie das Einstellrad gegen den Uhrzeigersinn (nach links). Falls die CD langsamer ist, drehen Sie das Einstellrad im Uhrzeigersinn (nach rechts). Die Tonhöhe verändert sich zeitweilig während das Rad gedreht wird. Je schneller Sie das Rad bewegen, desto mehr verändert sich die Tonhöhe. Wird das Rad freigegeben, kehrt die Musik wieder zur ursprünglichen Tonhöhe zurück. Scratch-Funktion: Wie bereits unter dem Abschnitt ‚SCRATCH’ erklärt wurde, falls aktiviert, erzeugt das JOG WHEEL einen ‘Scratch’ Effekt. LCD DISPLAY – zeigt alle Funktionen, während es passiert, mit CD. OPEN/CLOSE – auf Druck schließt oder öffnet das Transporttablett des Disks. SGL – um die Vorgehensart einzustellen (play mode) in single oder ständig. TIME – die Kontrollen zeigen die Anzeigne des Zeitmodus. PROGRAM – Drücken Sie diese Taste herunter, wird das Gerät anhalten und die Programmanzeige leuchtet auf. Wählen Sie alle Titel, welche in das Programm aufgenommen werden sollen, aus und drücken Sie die PROGRAMM-Taste nach jeder Wahl. Sie können bis zu 21 Titel vorprogrammieren. Drücken Sie PLAY, um das Programm zu starten. Um aus dem Programm auszusteigen oder es zu löschen, halten Sie entweder die Programmtaste für mehr als 2 Sekunden gedrückt während das Gerät gestoppt ist, öffnen die Einlegevorrichtung oder schalten den Strom ab. TRACK SELECT/SEARCH – Rotation – selektiert die Tracks Drückend während der Rotation – selektiert die Tracks + 10 Drückend nochmals – stellt das Rädchen in Bewegung im Suchungsmode (search mode). 18 11. 12. 13. 14. 15. 16. 17. 18. 19. 20. 21. 22. 23. TONHÖHENBEREICH – aktiviert den Tonhöhen-Schieberegler und bestimmt den Bereich, in welchem der Tonhöhenregler Kontrolle auf die allgemeine Geschwindigkeit der Musik hat. Ein Antippen dieser Taste bewirkt ein Umschalten des Reglers zwischen den Tonhöhenbereichen 8 und 16%. Wird die Tonhöhe für 3 Sekunden gehalten, wird die Tonhöhensteuerung abgeschaltet. KEYLOCK – Aktiviert und deaktiviert die Key Lock Funktion. –/+ – funktionieren als Pitch Bend und kontrollieren die Schlüsselfunktionen und Pitch. PITCH SLIDER – kontrollieren die totale Geschwindigkeit der Musik. PITCH RANGE LED – zeigt den kurrenten Intervall des Pitch-Kursors LOOP IN – benutzt um die Punkte Loop in und sttuter zu wählen. LOOP OUT – benutzt um die Punkte Loop out und Loop fertig zu wählen. RELOOP/STUTTER – benutzt für wiederholtes Play (Stutter) vom Loop in – Punkt, repetant eine vorherige Einstellung, und Hot Start. RELAY – benutzt um das Play zwischen den angelegten Einheiten zu abwechseln. TAP – Antippen dieses Knopfes im Takt der Musik führt zur Errechnung der augenblicklichen Takte Pro Minute (TPM). Dieser Knopf schalter auch zwischen Anzeigeart TPM und prozentuale Veränderung der Tonlage um. Um dies zu tun, halten Sie den Knopf für 1 Sekunde. SCRATCH – Falls aktiviert, erzeugt das JOG WHEEL einen ‘Scratch’ Effekt. CD ILLUMINATION LIGHT (Vorseite der Einheit) – beleuchtet das CD Tablett und das CD wenn es geöffnet ist. CD DRAWER (Vorseite der Einheit) – setzen Sie die CD die Sie hören wollen (Play) hier hinein. Diese Einheit wurde projektiert um CD aus dem Handel zu benutzen mp3 CD und korrekt eingebrannte und abgeschlossenen CDR. Wegen den Variierungen der Spezifikationen der verschiedenen Brenner (Burner) von CD, und den CD-s, können einige selbstgemachte CD-s nicht richtig funktionieren. ÜBERSICHT ÜBER DIE RÜCKSEITE 24. 25. 26. 27. 28. 29. 30. POWER SWITCH – starten Sie und stellen Sie die Maschine mit dieser Taste. Die Einheit muss immer mit deser Taste abgstellt werden bevor jede Versorgungskabel herausgenommen wird. Typisch wird empfohlen dass der CD Player vor den Verstärker gestartet wird und abgestellt nach den Verstärker, um zu vermeiden dass ein Audiogipfel durch die Ausstattung übertragen wird. IEC CONNECTOR – stecken Sie den gelieferten Versorgungskabel hier ein. VOLTAGE SELECTOR – stellen Sie diese Taste zur Spannung von Ihrem Standort ein. RAC AUDIO CONNECTORS – schließen Sie den CD Player zum Mixer aus diesem Austritt mit Linienniveau ein t. DIGITAL OUTPUT – Die Ausgabe erfolgt im Format Typ 2, Format 1, auch unter der Bezeichnung S/PDIF (Sony/Phillips Digital Interface Format) bekannt. RELAY CONNECTOR – wenn Sie die Relay-Funktion benutzen wollen stecken Sie die Stereokontrollekabeln von 3,5 mm hier und dann in die andere Einheit. Die Kabel muss stereo sein damit die Einheiten entsprechend funktionieren REMOTE START CONNECTOR – benutzen Sie diesen Connector um ihn im Mixer oder Fernbedienung kompatibel Fader Start zu stecken. Diese Funktion ist immer aktiv. um diesen Connector zum Starten von Fader zu benutzen, schließe den gelieferten Fader Kabel Start zu einem Mixer kompatibel Fader Start an. Jedes Mal wenn Sie den Crossfader des Mixers gegen die Einheit bewegen, wird dieser automatisch beginnen zu singen. Wenn Sie den Fader zur anderen Seite bewegen, wird die Einheit aufhören. Bewegen Sie den Fader zurück gegen die Einheitsseite, dieser wird wieder zu singen beginnnen. 19 www.numark.com
Scarica


![[Company Name or Logo]](http://s2.diazilla.com/store/data/000010155_1-390d1da58980e6ad7e1fa389f27b6be0-260x520.png)