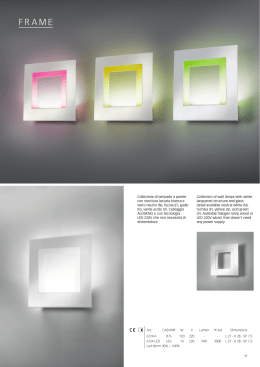
K-LCD Manuale di installazione ed uso Installation Manual CARATTERISTICHE e FUNZIONAMENTO Tensione di alimentazione: 13.8Vdc Corrente nominale: 65mA Corrente massima: 150mA Compatibile con: Serie S (S412 – S840 – S8128) Serie C (C16 – C40, C288, C72GSM) Retroilluminazione fissa Buzzer per tempo di ingresso e uscita sonori Jumper per la disabilitazione del switch tamper Pressione dei tasti segnalata da un breve impulso sonoro (escludibile da centrale) Sportello di protezione della tastiera Leds di segnalazione o Led verde acceso: sistema pronto (tutte le zone chiuse) o Led rosso acceso: nuovo evento da leggere in memoria eventi o Led giallo acceso: centrale inserita FISSAGGIO E COLLEGAMENTO Aprire l’involucro spingendo con un cacciavite la linguetta nella parte inferiore con lo sportello aperto. (fig1 punto1) Separare la parte posteriore della tastiera e fissarla al muro. (tutta l’elettronica rimane fissata sul coperchio anteriore). Durante il fissaggio fare attenzione all’elemento a strappo (fig 2 punto1), se si desidera avere una protezione antistrappo maggiore è necessario fissarlo al muro con una vite, la stessa terrà premuto lo switch di tamper della tastiera. Se non si desidera utilizzare la vite antistrappo è necessario piegare la linguetta dello switch in modo che la stessa rimanga premuta una volta chiuso l’involucro tastiera. Settare i dip-switch in funzione dell’impostazione numerica richiesta dalla Vs. installazione (vedi manuale tecnico della centrale) Collegare i fili di alimentazione e dati facendo in modo di non lasciare residui di rame sul circuito, l’operazione di cablaggio deve essere fatta in assenza di alimentazione. (la mancata osservazione di questi dettagli può comportare dei malfunzionamenti o addirittura rotture dell’apparecchiatura). Richiudere appoggiando la parte anteriore nelle clips sulla alta del corpo, dopodiché fare pressione sulla parte inferire fino a sentire il “clic” dell’avvenuto bloccaggio. Fig1 fig 2 1 1 2 Tutti i ns. prodotti sono conformi ai requisiti richiesti dalla norma CEI 79-2 2°ed. 1993. L’installazione deve essere eseguita a regola d’arte da personale specializzato. AMC Elettronica S.r.l. declina ogni responsabilità nel caso in cui il prodotto venga manomesso da persone non autorizzate. Si raccomanda di verificare il corretto funzionamento del sistema d’allarme almeno una volta al mese, tuttavia un sistema di allarme elettronico affidabile non evita intrusioni, rapine, incendi o altro, ma si limita a diminuire il rischio che tali situazioni si verifichino. In caso di riscontro incongruenze su manuali pregasi contattare immediatamente assistenza tecnica AMC Elettronica S.r.l. K-LCD Installation Manual FEATURES Supply voltage: 13.8Vdc Rated current draw: 65mA Max. current draw: 150mA It can be used for alarm panels of the S-Series (S8128 – S840 – S412) and C-Series (C16 – C40 – C288) Fixed backlight Buzzer provides audible feedback for pre-alert and exit delay The keypad emits a beep whenever a button is pressed (feature excludible in the programming) Keypad protection door LED indicators o Green LED on: System Ready (All zones are in the rest state) o Red LED on: New event to read in memory o Yellow LED on: Area Armed FIXATION AND CONNECTIONS Open the keypad housing pushing the flap in the lower part with a screwdriver by keeping the keypad door open. (Fig. 1 Point 1) Take the posterior part of the keypad and fix it to the wall (the electronic board remains fixed to the anterior part). During the fixation pay attention to the tearing element (Fig. 2 Point 1), if you want to have an anti-tearing protection it is necessary to fix it to the wall with a screw, so as to keep the tamper switch of the keypad closed. If you do not want to use the anti-tearing protection you have to bend the switch flap, so as to keep it pressed when the housing is closed. Set the keypad address by using the dip-switches (refer to your Alarm Panel’s Technical Manual) Connect the supply and data terminals to the bus terminals on the control unit board, do not leave any copper debris on the circuit board. The wiring must be carried out only when the board is unsupplied. Not respecting the correct installation guidelines will lead to malfunctioning or even damage of the keypad Close the case by leaning the anterior part onto the clips of the posterior part. Then push the anterior part of the housing until it clicks and fits together with the posterior part. Fig. 1 Fig. 2 1 1 2 Our products/systems comply with the essential requirements of EEC directives. Installation must be carried out following the local installation norms by qualified personnel. AMC Elettronica S.r.l. refuses any responsibility when changes or unauthorized repairs are made to the product/system. It is recommended to test the operation of the alarm product/system at least once a month. Despite frequent testing and due to, but not limited to, any or all of the following: tampering, electrical or communication disruption or improper use, it is possible for the product/system to fail to prevent burglary, robbery, fire or otherwise. A properly installed and maintained alarm system can only reduce the risk that this happens.
Scaricare