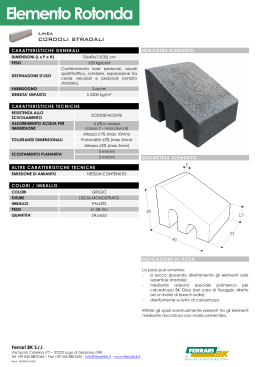
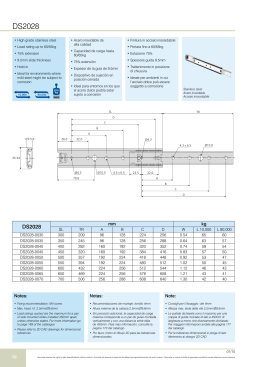
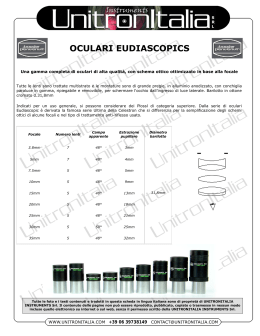
H.M.S. Fly 1776
Sixth Rate Swan Class Ship Rigged Sloop
Scale 1:64
INSTRUCTIONS
H.M.S. Fly was the fifth vessel built of the Swan Class of
ship rigged sloop, of which twenty five of the class were built
from 1766 to 1780.
Fly, as with the entire Swan class was designed by Williams
and her construction was ordered by the Admiralty on 1st
August 1775 to be built at Sheerness Dockyard. The keel was
laid in January 1776 and launched on 14th September 1776.
The Swan class of 6th Rate sloops were unusually attractive for the class of vessel, with not only very sleek hull lines
but also the unusual amount of decoration for the size of vessel. They were built just before the Admiralty issued orders
that all vessels (especially lesser rates) were to have the minimal amount of decoration and carvings to save any unnecessary costs, due to the seemingly ever continuing war with
France and other nations.
There is little remaining about H.M.S. Fly’s operational
career, but from what little evidence there is, Fly was commissioned mainly for convoy escort duty and dispatch duty. She
did capture a French privateer, Le Gleneur, off Portland after
a long chase.
In 1800 she captured another French privateer, the Cutter
trompeur off La Hogue.
Fly continued convoy duties until she foundered and was
lost off Newfoundland during 1802.
The Swan Class measured 97’ 7” on the gun deck and
displaced 300 tons. They carried 125 officers and men and
initially carried 14 guns (later 16) and 16 swivel guns.
The original plans of the Fly still exist, and it is with these
plans the kit is based upon.
GETTING STARTED
H.M.S. Fly is an exact scale model designed using the original Admiralty plans. All fittings, masts and rig have been
researched using contemporary sources and the most up to
date reference material available as is all of the Victory
Models range of kits.
Although the kit of H.M.S. Fly is as prefabricated as we can
make it, basic woodworking skills are required. Estimated
build time is between 60- 80 hours, so a work space will have
to be put aside for the job. Do not remove parts from the Laser
cut sheets until needed for fitting or working on.
Carefully study the plans together with the instructions until
you are confident to tackle each stage of construction.
Patience is the key word when building any model. Treat each
stage as a separate project and the overall effect of the completed subject will be enhanced.
The structural parts of the model are cut from high quality
birch plywood; the remaining wood parts are cut from high
quality walnut ply and walnut proper. Care should be taken
when cutting parts from the Laser and brass etched sheets
.Lay the sheet from which you are going to cut the parts on a
hard, flat surface. Use a heavy duty craft knife with a good
strong blade to cut through the tabs holding the parts in place.
Before removing the wooden parts from their sheets, it is advisable to number them using the identification sheets as reference. It is easier to paint most of the photo-etched parts before removing them from their sheets. They can be touched up
again once in place on the model.
RECOMMENDED TOOL LIST
1:
2:
3:
4:
5:
item)
6:
7:
8:
9:
10:
11:
12:
13:
14:
15:
16:
17:
18:
19:
20:
21:
22:
Craft knife (Amati Art 7477 – knife set is recommended)
A selection of needle files (Amati Art 7348/01 are recommended)
Razor saw
Small wood plane (Amati Art 7100/02 is recommended)
Pin vice or small electric drill (the latter is the more recommended
Selection of drill bitts from 0.5mm to 3mm
Selection of abrasive paper and sanding block
Selection of good quality paint brushes
Pliers/wire cutters (Amati 7119/57 & 7119/55 are recommended)
Good quality tweezers (Amati Art 7272/01 is recommended)
Dividers or compass
Steel rule (300mm)
Clothes pegs or Amati Fast Clamps (Amati Art 7398)
Tee-Square
Good quality pencil or drawing pen
Masking tape
waterline tool (Amati Art. 7378 is recommended)
Amati Pin Pusher (Amati Art 7384)
Amati Plank Nipper (Amati Art 7381)
Modellers Bench Vice (Amati Art 7126 is recommended)
Keel Clamp (Amati Art 7382 is recommended)
Masking tape
PAINTS, STAINS AND ADHESIVES
1:
White PVA wood glue
2:
Dark wood dye (for topmasts, topgallant masts and winch drums)
3:
Cyanoacrelate (superglue) thick and medium viscosity
4:
dark wood filler
5:
Indian ink (Black for ratlines)
6:
White spirit
7:
Matt polyurethane varnish (Not satin or gloss)
8:
Black paint (Humbrol 85) 3 tins
9:
White paint (Humbrol 34) 1 tin
10: Blue paint (Humbrol 25) 1 tin
11: Yellow paint (Ochre) (Humbrol 74-linin) 3 tins
12: Red paint (Humbrol matt 60 mixed with 25% matt 70) 3 tins of 60 and
1 tin of 70 for inside of bulwarks.
13: Gold paint
7
HULL CONSTRUCTION
FIRST PLANKING
Cut out the main keel (14) from the 5mm ply sheet, along
with the prow (33), keel (34 and 35) and rudder post (36).
Glue these parts into position along the ply keel edges using
PVA wood glue and taping into position until the glue has
dried.
Remove all the bulkheads (1-13) lower deck (19), and plank
termination patterns (15,16,17 and 18) from the 5mm ply sheets. (Make sure all parts have been numbered before removing) Dry fit the bulkheads in place to ensure all parts are a
snug fit. Dry fit the lower deck (19) into position.
When you are satisfied with the fit, disassemble the deck
and bulkheads ready for gluing proper into position. Before
gluing the bulkheads into position, it is advisable to roughly
bevel the edges of the front and rear bulkheads and plank termination patterns. The bottom edge of bulkhead (13) needs
severe bevelling as this is where the planking under the counter terminates. Once you have roughly sanded the bulkheads,
glue them into their respective slots in the keel. Glue and temporarily pin the lower gun deck into position at the same time.
Cut out and glue the two sets of stern counter patterns (23)
and (24) into the slots at the rear of bulkhead (13). The larger
pair (23) are to be glued nearest the keel. The smaller pair (24)
are glued into the slots near the edge of the bulkhead.
Cut out the main gun deck (28) from the 1mm ply sheet and
mark a centre line down the length of the deck to aid deck
planking. Before pinning the main gun deck into position, the
fore and aft sections must be planked, as shown on plan sheet
4. Use 0.5x3mm Tanganyika strips for the deck planks. To aid
the fitting of the deck into place, it is advisable to cut the deck
in half down the centre lengthways as once the ‘hidden’ planking has been glued in place; the deck will be less flexible.
Pin as well as glue the deck into place.
Before fixing the upper deck beams in place, varnished the
planked area of the main gun deck and make up the fittings
and hatch coaming that will be inaccessible once the upper
decks are finally in place. Make the capstan, rear Main Mast
bitts, Main pump cistern assembly, Riding bitt assembly and
gratings as shown on Plan Sheet 4.
Glue these assemblies in their respective positions on the
main gun deck.
Cut out and glue in place the fore and aft deck support
beams as shown on the Hull assembly 3 drawing.
The first planking can now be applied using1.5x5mm lime
wood strip. Refer to the Hull assembly 6 drawing for visual
reference for the start of the first planking. The first or master
plank is laid at the bottom edge of the gun port strip as shown.
Because the plywood bulkheads are very strong, it is recommended that 0.5mm holes be drilled into the bulkheads before
the insertion of the pins. When pushing the brass pins into the
planks and bulkheads, leave at least 3mm protruding so they
can be easily pulled out once the planks are secure. Glue the
planks using PVA wood glue.
The first plank each side is relatively straight forward to lay
as less tapering is required. As you start down to the curved
side of the bow, the planks will need to be tapered to follow
the natural run of the planks. In order to determine the amount
of taper needed for each plank to lie naturally, lay a plank at
the 6th bulkhead and lay it around the bow. Mark the excess
area of plank that overlaps the one immediately above it.
Repeat this for the stern also. Although the planks may not
require tapering at the stern, it is better to let the planks run a
natural as possible. Before cutting the taper into the planks,
soak them in warm water for an hour or so as this minimises
the chance of the blade of the knife following the grain of the
wood rather than the edge of the steel rule. Lay the first wet
plank to be tapered on a clean, flat surface; (a cutting mat is
ideal.) Press firmly with a steel rule onto the marked taper line
on the plank and score down the line with a heavy duty craft
knife several times until the excess is cut off. Pin and glue the
tapered planks into position on the hull, leaving a little excess
at the stern which can be trimmed to shape once the planking
is complete. Glue two or three strips each side alternately. This
method should prevent any possible warping or twisting of the
frames and keel
Cut out, and pin only at this stage the fore deck (29) and aft
deck (30) in place as shown on the Hull assembly drawing 4.
Give the edges of the bulkheads and decks a final sand so that
the side gun port strips will have maximum contact with each
edge when pinned and glued into position.
Cut out the 2 side gun port strips (32) from the 1mm ply
sheet. It is advisable to soak these parts in warm water for an
hour or so before fitting into place to make them more pliable.
Dry fit the strips with brass pins only initially and take great
care to get both sides symmetrical. When you are happy with
the fit, take them off and then glue, as well as pin into place
along the bulkhead edges as shown.
When dry, remove the pins and trim the stern area to the
same shape as the stern counter patterns if necessary.
8
Use this planking procedure right down to the keel. When
planking is almost complete, you will notice triangular shaped
gaps at the stern. This was also the case in full size practise,
although not so simplified. The use of triangular shaped
planks is needed for the gaps. These are called stealers. Cut
these to shape using the excess lime wood from the ends of the
planking and glue them into the gaps. Trim off the excess stern
planks to shape and leave the hull to fully cure for at least 24
hours.
Sand the hull with a coarse grade abrasive paper, followed
by medium grade. This will entail a few hours work. If you
can, sand the hull in a well-ventilated area, preferably in an
open space as the dust particles could present a fire and health
hazard. Also the use of light duty gloves is recommended to
minimise the risk of blisters from sanding.
Cut out the stern counter pattern from the 1.5mm walnut
sheet. Pin and glue in place as shown. Once set in place, sand
the edges of the stern counter pattern so that it is flush with the
first planking.
Make up the building cradle (20, 21 and 22) and place the
hull into it. If you intend to fix your completed model on brass
pillars, now is the time to drill two holes along the bottom
edge of the keel. When the hull is complete, three brass pillars
can be inserted into the keel for the final fixing of the model
to your chosen display base.
SECOND PLANKING
The second planking is laid using 1mm x 4mm walnut strip.
Refer to the Hull assembly drawing 7 for the start of the planking.
The first plank is laid at the top edge of the gun port strip.
The method of planking and tapering is the same as the first
planking apart from the whole under surface of the walnut
strip is to be glued to the first planking, as well as edge to
edge.
Do not completely cover the gun port and oar port openings
as planking progresses, leave a gap to make trimming off the
excess once planking is complete easier.
Take your time with the second planking. Try and avoid any
unsightly gaps in between the plank edges to minimise filling
once complete. The planks can either be pinned and glued into
position using PVA wood glue or alternatively, glue the planks
into position using cyano. The latter method avoids unsightly
pin holes which will need to be filled, but much more care is
needed as the cyano will dry very quickly, leaving only a little
time to make any adjustments to the planks.
Once the second planking is complete, sand the hull down
with medium grit, followed by fine grit abrasive paper. Once
sanded, cut the gun port and oar port openings to shape with a
sharp craft knife. Take care to avoid splitting any of the planks
along their vertical edges.
Once the second planking is fully complete, carefully take
off the fore and aft deck so that the cannon carriages that will
be hidden under the upper decks can be glued into position.
Carefully glue into position using either PVA wood glue, or, to
ensure that the carriages will never break off, Epoxy Resin
glue. Place each carriage (not cannon barrel, but carriage only)
inside each gun port opening, the barrels can be carefully
inserted and glued to the carriage slots once the hull is fully
complete.
The upper decks can now be finally pinned and glued into
position.
DECK AND INNER BULWARK
PLANKING & CAPPING
The bulkhead tabs above deck level can now be removed.
This can be done by using a pair of pliers and twisting and pulling the tabs off. File and sand the remaining ‘stubs’ to deck
level. Sand off any excess glue on the inside of the gun port
strip. This is so it has a smooth surface for the inner bulwark
planking.
The remaining deck planking is laid using 0.5x3mm
Tanganyika and a medium viscosity cyano glue to fix the
planks in place. Start the planking along the marked centre
line of the decks and work outwards until the whole deck is
planked. The outer planks will require shaping to follow the
curved along the edge of the deck. Take care not to completely cover the deck openings as you lay the planks. Trim the
deck openings back to position once planking is complete and
then sand the deck with a fine grade abrasive paper. Once
complete brush on a couple of coats of matt varnish to seal the
grain. This minimises the possibility of the deck being marked.
The inner bulwarks can now be planked using 1x4mm walnut strip. (Hull assembly drawing 8). Start at the deck edge
and work upwards. As with the outer planking, make sure you
leave a gap in between the gun port and oar port openings,
which will be trimmed and filed back to shape once planking
is complete. Once the planking is complete, sand the bulwarks
smooth and trim any excess off above the bulwark edges. The
insides of the bulwarks and the inner edges of the port openings can now be painted red if desired.
Refer to Hull Assembly 9 for the fitting of the bulwark capping rails and timberheads. Fit parts (79 and 80) in place and
paint black. Use 1.5x5mm walnut strip cut to the appropriate
lengths for the mid-section bulwark capping as shown. Add
the timberheads and paint black once in position.
Make up the forward main mast bitts and gallows (42, 43
and 72) and drill and insert the pump handle brackets (195) to
(42), as shown on the Pump Assembly drawing on Plan Sheet
5. The pump handle is simply 1mm brass wire bent into shape
as shown in the Pump Assembly drawing. Paint the pump handles black, along with the pump stanchions (177) and brackets
(195).
Border the forward main gun deck companionway with
2x3mm walnut strip and place the ladder into position, along
with the 4 companionway stanchions (178), again, painting
the stanchions black before fixing into position.
Cut out and glue the mid deck gangways (31) and support
brackets (104) in place as shown, along with the 3mm walnut
step (65) and plank the gangway upper facing with 0.5x3mm
Tanganyika.
HEADRAIL AND CATHEAD ASSEMBLY
Cut out from the 3mm plywood sheet the head timbers (25,
26 and 27) and paint black.
Cut out the upper prow rail (127) and lower prow cheek
(126) and paint top edges black. Carefully fix them in place to
the position shown on plan sheet 6.
Cut out the two sets of bow cheeks (54). Before fixing in
place, the edges of the cheeks that are glued to the hull need to
be bevelled to sit correctly due to their angle.
Once in place, cut out and fix the hawse hole bolsters (120)
into position as shown. Drill out the holes through the hull to
take the hawse rope for the anchor.
Cut out the two catheads (52) from the 3mm walnut sheet.
Mark out the area on the front capping rail where the catheads
will intersect with the bulwarks. Very carefully cut out the area
of the bulwarks to a depth of about 3mm. constantly check
progress by placing the cathead into the newly formed slot
until it sits correctly on the deck and glue in place.
Cut out and glue the cathead brackets (53) in place under the
catheads as shown.
Carefully glue the bow head rails (113) in place to the outer
edges of the head timbers (25, 26 and 27) as shown. Cut out
the lower bow rail (125) and very carefully glue it in place into
the slots in the bow head rails. The extended rail which runs
from the end of the lower bow rail to the bottom edge of the
cathead support is decorative brass strip (288), which needs to
be bent and manipulated to the shape shown as on plan sheet
4.
Once in place, cap the outer edges of the head timbers with
1x3mm walnut which should also be painted blue. Glue the
figurehead in place and paint as suggested on Plan sheet 4.
Finally, paint gold (or ochre) the 0.25 etched brass decorative
detail and fix in place on the individual bow parts as shown on
Plan Sheet 4.
9
MAIN WALE AND UPPER RAIL
The main wale can now be applied by using 3 strips per side
of 1mm x 4mm walnut strip. Cyano can again be used for the
fixing of these planks. From the side profile drawing carefully mark the position of the top edge of the main wale onto the
hull. The lower edges of the gun port openings can be used to
gauge and measure the distance between the bottom edge of
the ports and the top edge of the main wale. Take great care to
ensure that both sides are symmetrical.
Once the wales are complete, sand them smooth using fine
grit abrasive paper. Fill any slight gaps with wood filler and
sand back until completely smooth. Paint the main wale black.
Using the main side profile drawing, mark the position for
the upper rails, which is 1x2mm walnut strip and runs in between the gun port openings. Glue the strip in place using
cyano. Once the lowest 1x2mm strip is in place, it is advisable
at this stage to paint the area above the lowest rail (1x2mm
walnut strip) black if you intend to add the frieze work (Blue
if you intend to omit the frieze work) Add the side fenders
(129) and chesstrees (130) at this stage to the side of the hull
as shown.
Assuming that frieze work will be applied, the following
sequence is suggested;
Paint all of the 0.25mm brass etched decoration gold, or
ochre. Very carefully cut out the lower frieze work decoration
and glue each strip in place along the bottom edge of the lower
1x2mm walnut strip rail. Once complete, add the upper rail
(again 1x2mm walnut strip), so that the bottom edge of the
upper rail strip is touching the upper edges of the lower decorative strip. Once complete, add the upper 0.25mm brass
etched decoration, so that the lower edge of the decoration is
sited on the upper edge of the upper rail.
The ‘drift’ rail can now be added. This is 1x1mm walnut
strip and runs along the top edge of the upper brass etched
decoration. The start of the fore and aft rails are pre cut, (85
and 86) and should be added before the 1x1mm walnut strip.
Once complete, add the swivel gun posts (59-64) and the
upper quarter deck rail (81) and paint black.
Add the side steps as shown, along with the quarter badges
(275 & 276) and lower finishing’s (273 & 274).
Once the main wale and all outer hull work has been fixed
in place, the stern fascia (114) can be pinned and glued in
place at the stern. If you want to ‘glaze’ the windows (using
clear acetate or similar), do this before fixing the fascia in
place. The stern window frames (197, 199, 201, 203 and 205)
are to be painted ochre before removing from the brass etched
sheet and fixed into place.
Employ the method of glazing (if desired) as follows:
1
2
3
4
5
10
Place the pattern with the window opening onto the sheet of
glazing provided and carefully draw the inside edge of the
window opening onto the glazing.
Carefully glue the photo-etched window frame (painted) into
place in the recess of the bulkhead window opening.
Carefully cut out the marked window panel from the glazing
using a steel rule and sharp craft knife.
Check the fit by pressing the window panel into the aft side
of the window opening and up against the frame.
Very sparingly, apply a slither of PVA wood glue or cyano
around the inside of the brass window frame and carefully
push the glazing into place.
Follow this procedure until all window frames are glazed
and fix the fascia in place.
Add the rest of the etched brass and cast decoration as
shown on the drawings.
The hull below the waterline can now be painted off- white
if desired. Mark onto the hull the waterline position as seen on
the side profile on plan sheet 2. Ensure the hull is completely
level on its stand and mark out the waterline using an Amati
waterline marker or similar. Mask off the area above the
waterline and paint the hull bottom. This will take several
coats of paint, with sanding in between coats to ensure a smooth surface. Mask off and paint the rudder (37) at the same
time.
RUDDER ASSEMBLY
Paint black and cut out the rudder gudgeon and pintle braces
(185-194) from the photo etched sheet. Bend and glue each
part into position on the rudder and post as shown. Drill a
1mm hole in the back edges of the rudder post and rudder,
through the hole in the gudgeons and pintles. Fix a copper eyelet into each hole of the rudder post and a small length of 1mm
brass wire, bent to an angle of 90 degrees into the holes in the
back edge of the rudder. Drill another 1mm hole near the top
edge of the rudder to take the tiller arm and fix the rudder in
place as shown on plan sheet 8.
CHANNELS
Cut out the fore, main and mizzen channels (91, 93 and 94),
along with the smaller fore back stay channels (92) from the
1.5mm walnut sheet. Using the plans for correct positioning,
pin as well as glue the channels into place. A strong join must
be attained as the channels take a considerable amount of
stress from the shrouds and back stays.
Using the drawing on plan sheet 8, assemble the deadeyes
and associated etched brass chain plate parts. Paint all the
strops and chain plate links black before removing them from
their sheet. Note that the angle of the chain plate should follow the angle of the shrouds. Plank the edges of the channels
with 2x1mm walnut strip
Drill the various holes into the hull for rigging, including
eyelets as indicated on plan sheet 2
To finish the outer hull off, add the gun port lids and insert
the cannon barrels into position through the gun port openings
(if you desire to have the gun port lids in the open position)
DECK FITTINGS
Make up and glue in place the remaining deck fittings as
shown in plan sheet 5 and 6, along with the various cleats, eyelets and belaying pins for the rigging.
MASTS AND BOWSPRIT (plan sheets 7-8)
Cut to length the masts and bowsprit as follows:
1:
2:
3:
4:
5:
6:
7:
8:
9:
10:
Bowsprit
8mm dowel x 161 mm long
Jib-boom
4mm dowel x 153mm long
Fore mast
8mm dowel x 269mm long
Fore topmast
6mm dowel x 178mm long
Fore topgallant mast
4mm dowel x 119mm long
Main mast
8mm dowel x 304mm long
Main topmast 6mm dowel x 192mm long
Main topgallant mast
4mm dowel x 135mm long
Mizzen mast
6mm dowel x 252mm long
Mizzen topmast 4mm dowel x 175mm long
Note each mast top should have an appropriate sized tenon
into which the mast cap slots. Taper and shape each mast to
the sizes shown on the drawing. Taper the masts by using a
David plane or similar to obtain an octagonal taper. Sand the
taper with a medium sand paper followed by a fine sand paper
to finish as shown on plan sheet 9.
BOWSPRIT
The bowsprit is tapered at both ends, with the top end being
filed flat at the top and bottom to take the Bees (66). The top
should be filed to a diameter of 4mm to form a tenon to the
cap. Gammoning cleats and all other cleats to the masts and
yards are made from 5mm lengths of 2x1mm walnut strip
glued in position. They are then shaped to a wedge by cutting
with a sharp craft knife.
Mark out the position of the Jib boom saddle (87) and glue
in position. The bowsprit/jib boom cap (50) is now bevelled to
follow the same angle as the bowsprit. Glue the lower hole in
the cap into the tenon on the end of the bowsprit (make sure
the cap is 90 degrees to the keel), slot the jib boom through the
upper holes in the cap until the jib boom is about 10mm past
the jib boom saddle . It is then held in place by lashing 0.5
black thread round the jib boom a few times, just forward of
the jib boom saddle.
Using the drawing for sizes and placement, tie on all the
blocks, eyelets and deadeyes associated with the bowsprit.
MASTS
LOWER MAST
The make up of the fore, main and mizzen mast sets is
almost identical therefore only a detailed make up of the fore
mast will be given.
Mark on the lower mast the lowest trestle tree (76) position.
Cut from the timber sheet the cheeks (89) mark the lengths of
the cheeks onto the mast at opposite sides. Plane or file the
area of the mast to which the cheeks fit, so the surface of the
cheeks lay on flush with the mast sides. Glue the cheeks into
position taking great care that both cheeks are at exactly the
same height. Cut out the bibs (95) and glue them so that the
flat back end is flush with the back of the cheek, and the top is
flush with the cheek. Take care to obtain exact alignment on
both sides. Stain the lower masts with a dark wood dye before woolding them. Using the drawings mark up the length of
the mast woolding positions (fore and mainmast only). Use
0.5 black thread for the woolding and wrap around the mast
several times.
Cut out the lower mast top (100), gunwales (101), crosstrees (75) and trestle trees (76).Glue the gunwale to the top of the
mast top so that it is flush with the edges. Cut to size 1x1mm
walnut for the battens and glue in place on the top surface.
Start at the edge of the centre opening and finish flush against
the inside edge of the gunwale.
Paint black and cut out from the photo etched sheet the stanchions (210) and glue in place into each of the four slots located at the rear top surface of the gunwale (101). Cut to the
same width as the top (100) a length of 1x2mm walnut strip
and glue it into the slots located at the top of the stanchions for
the railing.
Carefully mark and drill 1mm holes around the front rim of
the tops as shown for the crows feet rigging to thread through.
Carefully glue the trestletrees to the top edge of the bibbs and
the upper mast sides. When fully cured, slot and glue the crosstrees into position in the trestletrees. Check that both ends are
equally spaced. Cut from 3x3mm walnut strip the shroud bolsters. File each bolster to a half round shape, glue in position
either side of the mast top with the lower edge glued to the top
of the trestletrees.
Glue the mast top assemblies into position on the top of the
crosstrees and trestletrees. Drill for and glue in position all
eyelets as shown on the drawing.
TOPMAST
Drill a 2mm hole for the fid. Take dimensions from the drawing. The fid is made from 2mm square basswood cut to a
length of 5mm longer than the width of the mast. Push the fid
into position until about 2.5mm is showing at both sides.
Cut out the lower mast cap (48). Slot the mast cap over the
top of the topmast. Place the topmast into position on the
lower mast and push the mast cap down onto its tenon on the
top of the lower mast. The fid on the lower part of the topmast
should sit on the lower mast trestletrees. Before applying a
drop of glue, ensure that both masts are aligned correctly by
running your eye down the masts. Cut out the top mast crosstrees and trestle trees from the 1.5mm walnut sheet. Glue the
two sets of parts together and slot over the top of the topmast
down to the hounds and glue in place. Make up a pair of bolsters in the same manner as the lower top bolsters and glue
into position.
TOPGALLANT MAST
Slot the topgallant mast into the square hole in the trestletrees and crosstrees forward of the topmast until the bottom of
the topgallant mast is about 2mm past the lower edge of the
trestletree. Mark the position of the fid hole on the topgallant
mast above the top side edge of the trestletree. Drill a 2mm
hole in the marked position. Insert 2mm square basswood
strip into the hole and cut the ends of the strip so that about
2mm is exposed on both sides of the mast. Drill a 1mm hole
in the position shown for the topgallant yard tie.
11
Cut out the topmast cap from the 5mm walnut sheet and slot
into position as with the lower mast cap.
The area in between the bibbs to the mast caps on the lower
and upper tops should be painted black.
Finish off the mast assemblies by tying on all blocks/deadeyes which fit directly on the masts.
YARDS (PLAN SHEET 9)
All yards and stun sail booms are to be made up to the
dimensions shown on the drawings using appropriate sizes of
dowel. Plane or file the yards octagonal and then mark the
centre of each yard. The centre of the yards remains octagonal (except for the topgallant and spritsail yards, which remain
round throughout their length) and the last third of each end is
tapered to the dimensions shown.
Pin and glue the stun sail boom brackets (180 & 280) in
place on the lower and upper main and fore yards to the positions shown. Do not insert the stun sail booms through their
brackets until the yards have been painted. Make up the yard
and sling cleats using 1x1mm walnut strip cut to size.
Mark and drill the holes for the foot rope stirrups on the
under side of the mast using a 0.5mm drill bitt. The stirrups
can be made up using the .25 brass wire (223). Cut each stirrup to a length of about 20mm and make a small loop in one
end for the footrope to thread through. Glue and push the stirrups into their slots in the mast so that each stirrup has an
exposed length of 15mm. The stirrup "ties" can be simulated
by simply tying 0.5mm black thread around the mast at the
position of the stirrups.
Paint all yards black, including the mizzen gaff and boom.
Using 0.5mm black thread, tie the footropes to the ends of
the yards. Thread them through the loops at the ends of the
stirrups and tie the end to the other side of the sling cleat. Do
not tie the thread taut, but slightly loose, to simulate the natural hang.
Tie on all blocks and brace pendants to the yards as shown
ready for fixing to the masts. The spritsail yard, main yard and
crossjack yard are tied to the mast with "trusses" which is
0.5mm black thread tied as shown.
The remaining yards are tied to the masts with parral beads
and ribs held together by 0.5mm black thread pushed through
the holes in the beads and ribs and then tie to the mast inside
the sling cleats. The parral ribs are photo etched parts and will
have to be painted black before making up.
The mizzen gaff and boom are held in place onto the mast
with parrel beads, as is the mizzen topgallant yard.
The fixing of the yards to the masts can be made a little less
awkward by pinning and gluing the yards onto the masts. Drill
a 1mm hole to the centre back of each yard and a 1mm hole
on the yard position on the mast. Insert a small length of 1mm
brass wire into the hole in the yard to act as a pin, then glue
the yard to the mast.
Once all the yards are tied to the masts, the masts and bowsprit can be stepped into their respective holes in the deck.
Apply a small amount of PVA glue to each mast before stepping into position.
12
RIGGING (PLAN SHEETS 10, 11 AND 12)
Using the three rigging plan sheets for reference, rig the
masts and yard to the 6 rigging sequences shown. These are
drawn is stages to help simplify the rigging sequence as much
as possible. Use the accompanying belaying plan to belay the
ends of the lines in the proper place on the hull. Do not over
tension any of the rigging as this may pull the masts/yards out
of alignment.
Before rigging the masts, the bowsprit needs to be lashed
down with ‘gammoning, as shown on plan sheet 10.
Rig the lower shrouds first, followed by the futtock shrouds,
topmast shrouds and then main topgallant shrouds as shown
on the rigging stage 1 drawing. Tie the ratlines using 0.1mm
natural thread using clove hitch knots to secure them. When
the ratlines have been tied, brush on watered down PVA wood
glue to secure the end knots. Trim off the excess ends of the
ratlines using a sharp pair of scissors. To finish off the ratlines,
stain them using black Indian ink applied very carefully with
a brush. All ‘standing rigging’ was ‘tarred’ to protect the non
moving rigging from the elements, therefore all standing rigging like shrouds, backstays etc should be a very dark colour.
Rig the mast stays and back stays as shown on the rigging
stage 2 drawing. Start with the mast stays, working from the
lowest position to the top. Take care when rigging the crows
feet as it is very easy to over tension the fine thread when reeving through the lower top and euphroe block holes. Rig the
back stays next, starting with the inner most stays and working
back to the top gallant back stays.
The running rigging starts with rigging the yard ties, as
shown on the drawing for rigging stage 3 on plan sheet 5, followed by rigging the yard lifts as shown on rigging stage 4. As
most of the blocks have already been rigged to the masts and
yards, the rigging sequence should be mostly a case of matching the thread to the blocks, and belaying the ends to their
appropriate position on the deck.
Next rig the clue lines, sheets and tacks as shown on rigging
stage 5 on plan sheet 6, followed by the yard braces and bowlines on the rigging stage 6 drawings. It is strongly recommended that the main yard braces, sheets and tacks are rigged in
place last of all, as their positions would greatly hinder the
belaying of the remaining rigging.
When the rigging is complete look over the whole hull carefully to see if there are any scraps of wood or pieces of thread
left on the deck.
PARTS LIST
Pt. No Description
Material
Qty
1
2
2a
3
3a
4
4a
5
6
7
8
9
9a
10
10a
11
11a
12
13
14
15
16
17
18
19
20
21
22
23
24
25
26
27
28
29
30
31
32
33
34
35
36
37
38
39
40
41
42
43
44
45
46
47
48
49
50
51
52
53
54
55
5mm Plywood
5mm Plywood
5mm Plywood
5mm Plywood
5mm Plywood
5mm Plywood
5mm Plywood
5mm Plywood
5mm Plywood
5mm Plywood
5mm Plywood
5mm Plywood
5mm Plywood
5mm Plywood
5mm plywood
5mm Plywood
5mm Plywood
5mm Plywood
5mm Plywood
5mm Plywood
5mm Plywood
5mm plywood
5mm Plywood
5mm Plywood
5mm Plywood
5mm Plywood
5mm Plywood
5mm Plywood
3mm Plywood
3mm Plywood
3mm Plywood
3mm Plywood
3mm Plywood
1mm Plywood
1mm Plywood
1mm Plywood
1mm Plywood
1mm Plywood
5mm Walnut
5mm Walnut
5mm Walnut
5mm Walnut
5mm Walnut
5mm Walnut
5mm Walnut
5mm Walnut
5mm Walnut
5mm Walnut
5mm Walnut
5mm Walnut
5mm Walnut
5mm Walnut
5mm Walnut
5mm Walnut
5mm Walnut
5mm Walnut
5mm Walnut
3mm Walnut
3mm Walnut
3mm Walnut
3mm Walnut
1
1
1
1
1
1
1
1
1
1
1
1
1
1
1
1
1
1
1
1
2
2
2
2
1
1
1
2
2
2
1
1
1
1
1
1
2
2
1
1
1
1
1
1
1
1
2
2
1
2
1
2
1
2
2
1
1
2
2
4
2
Bulkhead
Bulkhead
Deck support frame
Bulkhead
Deck support frame
Bulkhead
Deck support frame
Bulkhead
Bulkhead
Bulkhead
Bulkhead
Bulkhead
Deck support frame
Bulkhead
Deck support frame
Bulkhead
Deck support frame
Bulkhead
Rear Bulkhead
Main Keel
Plank termin. patterns
Stern termin. patterns
Plank termin. patterns
Plank termin. patterns
Lower deck
Front hull stand
Rear hull stand
Hull stand support beams
Inner stern counter frames
Outer stern counter frames
Head Timber (rear)
Head Timber (middle)
Head Timber (Front)
Main Gun deck
Poop deck
Fore deck
Quarter deck gangways
Gun port pattern for hull
Prow
Keel (forward)
Keel (aft)
Rudder Post
Rudder
Deck beam for Bulkhead 8
Deck beam
Stove chimney
Main Mast Bitts (rear)
Main Mast Bitts/Gallows
Gallows cross beam
Main Pump casing
Belfry canopy
Riding Bitts
Riding Bitts cross beam
Fore and Main Mast caps
Fore and Main Top caps
Bowsprit cap
Mizzen mast cap
Catheads
Cathead Supports
Upper and Lower cheeks
Fish Davit cleat
56
57
58
59
60
61
62
63
64
65
66
67
68
69
70
71
72
73
74
75
76
77
78
79
80
81
82
83
84
85
86
87
88
89
90
91
92
93
94
95
96
97
98
99
100
101
102
103
104
105
106
107
108
109
110
111
112
113
114
115
116
117
118
119
120
Snatch Block (Bow)
Supports for Riding Bitts
Bow Timberheads
Swivel Gun Posts
Swivel Gun Posts
Swivel Gun Posts
Swivel Gun Posts
Swivel Gun Posts
Swivel Gun Posts
Step for Quarter gangway
Fore mast Bitt (Aft)
Fore mast Bitt crossbeam
Fore mast Bitt (Fore)
Fore mast Bitt crossbeam
Main Pump cylinder canopies
Mast bitt crossbeam (Aft)
Mast bitt crossbeam (Fore)
Main mast Trestle Trees
main Mast Cross Trees
Fore Mast Cross Trees
Fore Mast Trestle Trees
Mizzen Mast Cross Trees
Mizzen Mast Trestle Trees
Fore Capping rail
Aft Capping rail
Aft Capping rail (upper)
Binnacle Fascia
Binnacle end pieces
Binnacle Canopy
Fore Rail Moulding end piece
Quarter Deck Moulding
Jib boom Saddle
Bowsprit Bee blocks
Fore Mast cheek
Main Mast Cheek
Fore channel
Fore Backstay Channel
Main Channel
Mizzen Channel
Fore mast Bibs
Main mast Bibs
Mizzen mast Bibs
Main Top
Main Top Gunwale
Fore Top
Fore Top Gunwale
Mizzen Top
Mizzen Top Gunwale
Quarterdeck Gangway supports
Capstan Ring
Capstan Notched ring
Capstan top
Capstan Pawls
Ships Wheel standards
Ships Wheel tackle barrel
Ships Wheel tackle barrel
Gaff/Boom Jaws
Main Bow head rail
Stern Fascia
Stern Tafferal
Mizzen Mast base
Fore and Main Mast base
Fore Deck hatch combing
Fore Deck chimney base
Hawse Bolsters
3mm Walnut
3mm Walnut
3mm Walnut
3mm Walnut
3mm Walnut
3mm Walnut
3mm Walnut
3mm Walnut
3mm Walnut
3mm Walnut
3mm Walnut
3mm Walnut
3mm Walnut
3mm Walnut
3mm Walnut
3mm Walnut
3mm Walnut
3mm Walnut
3mm Walnut
3mm Walnut
3mm Walnut
3mm Walnut
3mm Walnut
1.5mm Walnut Ply
1.5mm Walnut Ply
1.5mm Walnut Ply
1.5mm Walnut Ply
1.5mm Walnut Ply
1.5mm Walnut Ply
1.5mm Walnut Ply
1.5mm Walnut Ply
1.5mm Walnut Ply
1.5mm Walnut Ply
1.5mm Walnut Ply
1.5mm Walnut Ply
1.5mm Walnut Ply
1.5mm Walnut Ply
1.5mm Walnut Ply
1.5mm Walnut Ply
1.5mm Walnut Ply
1.5mm Walnut Ply
1.5mm Walnut Ply
1.5mm Walnut Ply
1.5mm Walnut Ply
1.5mm Walnut Ply
1.5mm Walnut Ply
1.5mm Walnut Ply
1.5mm Walnut Ply
1.5mm Walnut Ply
1.5mm Walnut Ply
1.5mm Walnut Ply
1.5mm Walnut Ply
1.5mm Walnut Ply
1.5mm Walnut Ply
1.5mm Walnut Ply
1.5mm Walnut Ply
1.5mm Walnut Ply
1.5mm Walnut Ply
1.5mm Walnut Ply
1.5mm Walnut Ply
1.5mm Walnut ply
1.5mm Walnut Ply
1.5mm Walnut Ply
1.5mm Walnut Ply
1.5mm Walnut Ply
2
2
2
2
2
2
2
2
6
2
2
1
2
1
2
1
1
2
2
2
2
2
2
2
2
2
2
2
1
2
2
1
2
2
2
2
2
2
2
2
2
2
1
1
1
1
1
1
4
5
2
2
16
2
2
3
2
2
1
1
1
2
1
1
2
13
121
122
123
124
125
126
127
128
129
130
131
132
133
134
135
136
137
138
139
140
141
142
143
144
145
146
147
148
149
150
151
152
153
154
155
156
157
158
159
160
161
162
163
164
165
166
167
168
169
170
171
172
173
174
175
176
177
178
179
180
181
182
183
184
14
Quarterdeck rail
Quarterdeck rail (top)
Quarterdeck rail
Poop deck belaying racks
Lower Bow rail
Lower Prow cheek
Upper prow rail
Timberheads
Hull Fenders
Chesstree
Quarter deck rail support
Poop deck rail support timber
Skylight end pattern (outer)
Skylight end pattern (inner)
Skylight window frames
Skylight top piece
Skylight side patterns
End opening for tiller housing
Tiller housing canopy
Tiller housing side patterns
Tiller arm
Fore Main Top Cross Trees
Fore Main Top Trestle Trees
Main topgallant mast capping
Fore Mizzen Topgallant caps
1.5mm Walnut Ply
1.5mm Walnut Ply
1.5mm Walnut Ply
1.5mm Walnut Ply
1.5mm Walnut Ply
1.5mm Walnut Ply
1.5mm Walnut Ply
1.5mm Walnut Ply
1.5mm Walnut Ply
1.5mm Walnut Ply
1.5mm Walnut Ply
1.5mm Walnut Ply
1.5mm Walnut Ply
1.5mm Walnut Ply
1.5mm Walnut Ply
1.5mm Walnut Ply
1.5mm Walnut Ply
1.5mm Walnut Ply
1.5mm Walnut Ply
1.5mm Walnut Ply
1.5mm Walnut Ply
1.5mm Walnut Ply
1.5mm Walnut Ply
1.5mm Walnut Ply
1.5mm Walnut Ply
2
1
1
2
2
2
2
40
4
2
2
2
2
2
2
1
2
1
1
2
1
6
4
1
2
Hull side decoration
Hull side decoration
Hull side decoration
Hull side decoration
Hull side decoration
Hull side decoration
Hull side decoration
Hull side decoration
Hull side decoration
Hull side decoration
Hull side decoration
Decoration for upper prow rail
Bow Rail decoration
Bow Rail decoration
Bow Rail decoration
Bow hull decoration
Bow hull decoration
Bow hull decoration
Bow hull decoration
Decoration for Bow cheeks
Decoration for Lower Prow Cheek
Lower Chainplate
3.5mm Futtock Deadeye Strop
Rigging Hook
Futtock Shroud Hook
Parral Rib
Chainplate securing bracket
Upper Chainplate
5mm Deadeye Strop
3.5mm Deadeye Strop
Main Pump Handle Stanchions
Stanchions
Gun Port Hinges
Inner Stun sail Boom brackets
Fore and Main Euphroe blocks
Mizzen Euphroe block
Fore/Main Yard Stun Sail brackets
Fore/Main yard Stun brackets
0.25mm Brass Etch
0.25mm Brass Etch
0.25mm Brass Etch
0.25mm Brass Etch
0.25mm Brass Etch
0.25mm Brass Etch
0.25mm Brass Etch
0.25mm Brass Etch
0.25mm Brass Etch
0.25mm Brass Etch
0.25mm Brass Etch
0.25mm Brass Etch
0.25mm Brass Etch
0.25mm Brass Etch
0.25mm Brass Etch
0.25mm Brass Etch
0.25mm Brass Etch
0.25mm Brass Etch
0.25mm Brass Etch
0.25mm Brass Etch
0.25mm Brass Etch
0.5mm Brass Etch
0.5mm Brass Etch
0.5mm Brass Etch
0.5mm Brass Etch
0.5mm Brass Etch
0.5mm Brass Etch
0.5mm Brass Etch
0.5mm Brass Etch
0.5mm Brass Etch
0.5mm Brass Etch
0.5mm Brass Etch
0.5mm Brass Etch
0.5mm Brass Etch
0.5mm Brass Etch
0.5mm Brass Etch
0.5mm Brass Etch
0.5mm Brass Etch
2
2
2
2
2
2
2
2
2
2
2
2
2
2
2
2
2
2
2
4
2
60
24
48
32
32
34
60
34
32
4
12
24
8
2
1
4
4
185
186
187
188
189
190
191
192
193
194
195
196
197
198
199
200
201
202
203
204
205
206
207
208
209
210
211
212
213
214
215
216
217
218
219
220
221
222
223
224
225
226
227
228
229
230
231
232
233
234
235
236
237
228
239
240
241
242
243
244
245
246
248
249
250
Rudder Gudgeon
Rudder Gudgeon
Rudder Gudgeon
Rudder Gudgeon
Rudder Gudgeon
Rudder Pintle
Rudder Pintle
Rudder Pintle
Rudder Pintle
Rudder Pintle
Main Pump Handle brackets
Stern fascia pillar moulding
Stern fascia window frame
Stern fascia pillar moulding
Stern fascia window frame
Stern fascia pillar moulding
Stern fascia window frame
Stern fascia pillar moulding
Stern fascia window frame
Stern fascia pillar moulding
Stern fascia window frame
Stern fascia pillar moulding
Stern fascia decoration
Stern fascia decoration
Stern fascia decoration
Lower mast top stanchions
stern counter decoration (left)
stern counter decoration (right)
‘FLY’ letters for stern counter
15mm Boxwood stanchion
8mm belaying pin
Cannon and Carriage
Swivel Gun
Ships bell
Ships Wheel
Parral beads
Copper eyelet
Ladder
0.25mm Brass wire
Brass pins
Anchor
Wooden Cleat
1mm diameter Brass Wire
7mm Sister Block
3mm Deadeye
5mm Deadeye
3mm Single block
5mm Single block
6mm Double block
4mm Double block
2mm Single block
6mm Closed heart block
1.3mm Black Hemp
1mm Black Hemp
0.75 Black Hemp
0.5mm Natural Hemp
0.1mm Natural Hemp
0.25mm Natural Hemp
0.5mm Natural Hemp
0.75mm Natural Hemp
1mm Natural Hemp
1,3mm Anchor Hawse Thread
1.5x5mm Lime wood strip
1x4mm Walnut strip
1x3mm Walnut strip
0.5mm Brass Etch
0.5mm Brass Etch
0.5mm Brass Etch
0.5mm Brass Etch
0.5mm Brass Etch
0.5mm Brass Etch
0.5mm Brass Etch
0.5mm Brass Etch
0.5mm Brass Etch
0.5mm Brass Etch
0.5mm Brass Etch
0.5mm Brass Etch
0.5mm Brass Etch
0.5mm Brass Etch
0.5mm Brass Etch
0.5mm Brass Etch
0.5mm Brass Etch
0.5mm Brass Etch
0.5mm Brass Etch
0.5mm Brass Etch
0.5mm Brass Etch
0.5mm Brass Etch
0.5mm Brass Etch
0.5mm Brass Etch
0.5mm Brass Etch
0.5mm Brass Etch
0.25mm Brass Etch
0.25mm Brass Etch
0.25mm Brass Etch
4030/15
4104/08
4162
4150/03
4140/06
4350/20
4380/02
4703
4320/01
2820/02
4134/07
4015/40
4270
2820/10
4086/07
4050/03
4050/05
4070/03
4070/05
4080/06
4080/04
4070/02
4061
4126/13
4126/10
4126/07
4124/05
4124/01
4124/02
4124/05
4124/07
4124/10
4124/13
2430/02
2460/06
2460/05
1
1
1
1
1
1
1
1
1
1
4
1
1
1
1
1
1
1
1
1
1
1
1
1
1
12
1
1
3
2
12
16
16
1
1
60
120
2
1m
400
4
4
1m
14
100
70
120
40
16
30
6
8
2m
30 m
30 m
40 m
50 m
40 m
10 m
10 m
5m
2m
46
90
12
251
252
253
254
255
256
257
258
259
260
261
262
270
271
272
273
274
275
276
277
278
279
280
281
282
283
284
285
286
287
288
289
290
291
292
1x2mm Walnut strip
2460/04
1x1mm Walnut strip
2410/01
0.5x3mm Tanganyika strip (deck) 2458/01
2x2mm basswood strip
2400/02
3x3mm basswood strip
2400/03
2x3mm Walnut strip
4060/17
10mm Diameter Ramin dowel 2525/10
8mm Diameter Ramin dowel
2525/08
6mm Diameter Ramin dowel
2525/06
4mm Diameter Ramin dowel
2525/04
3mm Diameter Ramin dowel
2525/03
Grating
4325/06
Figurehead (Casting)
Casting
Quarter figure (left) (Casting)
Casting
Quarter figure (right) (Casting) Casting
Lower finishing (left) (casting) Casting
Lower finishing (right) (casting) Casting
Quarter Badge (left) (Casting)
Casting
Quarter badge (right) (Casting) Casting
Main stern Tafferal decoration
Casting
Quarter Badge decoration (left) Casting
Quarter Badge decoration (right) Casting
Stun Sail boom ring (Copper strap)2835/03
8mm Stanchion
4035/08
Lower Forecastle railing
1.5mm Walnut Ply
Upper Forecastle railing
1.5mm Walnut Ply
Belfry Support Pillars
1.5mm Walnut Ply
Forecastle railing Timber Posts 1.5mm Walnut Ply
Ships Bell Support
3mm Walnut
Gun Port Lids
1.5mm Walnut Ply
Decorative Brass Strip x 600mm 5500/02-B
Quarter Badge decoration (Left) Casting
Quarter Badge decoration (Right) Casting
1.5x5mm Walnut strip
2460/07
2mm diameter dowel
2525/02
12
8
75
3
1
2
8 cm
3
4
4
5
4
1
1
1
1
1
1
1
1
1
1
50 cm
6
2
2
2
4
1
8
1
1
1
2
10cm
300
Metal hooks for anchors rope
3
4705/02
15
H.M.S.
FLY
Sloop del 1776 - Swan Class
item codes
Plans
1100/03
Kit
1300/03
Scala 1:64
H.M.S. Fly fu il quinto vascello su venticinque della Sloop
Swan Class ad essere costruito tra il 1766 e il 1780. (Classe
Cigno)
La Fly, fu progettata da Williams e fu commissionata
dall’Ammiragliato il 1 Agosto 1775. La sua costruzione iniziata nel gennaio del 1776 presso il cantiere di Sheerness terminò nel settembre del 1776 mese in cui fu varata.
Le sloop Swan Class avevano linee eleganti e molte decorazioni, cosa assai rara per vascelli di quelle dimensioni. Infatti
furono costruite prima dell’ordine dell’Ammiragliato che
imponeva di ridurre le spese di decorazioni ed intagli a causa
delle continue guerre con la Francia e molti altri paesi.
La Fly durante la sua carriera venne utilizzata per servizio
di scorta e comunicazioni. Catturò un corsaro francese, Le
Greneur, a Portland dopo un lungo inseguimento e nel 1800
catturò un altro corsaro, Trompeur, a la Hague.
La Fly fu persa a Newfoundland nel 1802.
Le Sloop Swan Class misuravano 30 metri e pesavano 300
tonnellate.
L’equipaggio era composto da 125 tra ufficiali e uomini.
La Fly aveva in dotazione 14 cannoni (successivamente 16)
e 16 colubrine.
Il modello è basato sui piani e sui disegni ufficiali ed originali.
Prima di incollarle, rastremare i bordi delle ordinate verso la
prua e la poppa in modo che i listelli del fasciame abbiano il
massimo contatto con le ordinate. Il bordo inferiore del’ordinata (13) dovrà essere molto rastremato, essendo al termine
del fasciame. Incollare in posizione le ordinate e il ponte inferiore. Inchiodare provvisoriamente il ponte fino ad essicazione della colla.
PREFAZIONE ALLA COSTRUZIONE
Staccare i ponti 29 e 30 e mettere in posizione provvisoriamente (vedi disegno 4 ). Levigare i bordi delle ordinate e dei
ponti. Staccare le due fasce da lmm. (32) e immergerle in
acqua calda per circa un’ora prima di inchiodarle e incollarle
come da figura.
Fare attenzione ad allineare le fasce così da garantire la simmetria di entrambi i lati.
H.M.S. Fly è un modello in scala progettato utilizzando
piani originali.
Preparare un luogo destinato al lavoro di costruzione che
potrà impegnare tra le 60 e le 80 ore.
Non rimuovere le parti di legno tagliato al laser fino a quando non sia il momento di utilizzarle.
Studiare attentamente i piani di costruzione prima di iniziare la costruzione del modello in modo da avere ben chiari i
vari processi di montaggio .
Le parti strutturali del modello sono in compensato di betulla di alta qualità, le altre parti in legno sono in compensato di
noce e in noce naturale.
Maneggiare con molta attenzione tutte le fotoincisioni in
ottone e se possibile appoggiarle su di un piano solido.
Inoltre, è consigliabile verniciare tutte le fotoincisioni prima
di rimuoverle dai fogli di ottone.
ASSEMBLAGGIO DELLO
SCAFO
Staccare la chiglia principale (14), la ruota di prua (33), la
chiglia (34 e 35) e il dritto del timone (36) dalle tavolette di
legno da 5mm. Incollare queste parti in posizione lungo il
bordo della chiglia, utilizzando colla vinilica.
Staccare le ordinate (1-13), il ponte inferiore (19) e i pezzi
(15,16,17 e 18) dal compensato da 5 mm solo dopo averle
numerate.
Fare un’assemblaggio di prova delle ordinate e del ponte
inferiore (19).
Staccare e incollare in posizione le mensole di poppa (23 e
24) negli appositi incastri nella parte posteriore dell’ordinata
(13) La più grande (23) andrà posizionata vicino alla chiglia,
24) e verso il bordo dell’ordinata.
Staccare il ponte (28) dalla tavola da l mm e marcare una
linea centrale in direzione longitudinale. Prima di inchiodare
il ponte (28) eseguire il rivestimento della parte a prua e a
poppa (vede tavola 4) utilizzando Tanganica 0,5x3mm.
Iniziare dal centro del ponte e procedere verso l’esterno.
Fissare in posizionare il ponte con colla e chiodini (vedi
disegno). Completato il rivestimento del ponte, levigare e
applicare uno strato di vernice opaca. Assemblare gli accessori, argano, bittoni, cisterna di pompa, paiolati etc. (vedi disegno) e incollare in posizione. Incollare i supporti dei ponti di
prua e poppa (vedi disegno 3 )
PRIMO FASCIAME
Iniziare il primo fasciame utilizzando listelli in legno di
tiglio l.5x5mm. Partire dalla parte inferiore della fascia delle
murate (vedi disegno). Utilizzare la colla vinilica e provvisoriamente dei chiodini, facendo prima un foro da 0.5mm per
facilitare l’ entrata del chiodino nell’ordinata.
I listelli dovranno essere assottigliati e smussati verso prua
e poppa così da assicurarsi che si uniscano correttamente
lungo la curva del scafo. Si consiglia di immergere i listelli in
acqua calda prima di marcarli e tagliarli con l’aiuto di una riga
d’acciaio. Applicare i due listelli ai lati dello scafo alternandoli in modo da evitare deformazioni.
Eventuali aperture verso la poppa potranno essere rifinite
utilizzando avanzi di listelli tagliati a triangoli.
Levigare con cura. Staccare dalla tavola di noce da l.5mm il
pezzo 146 e applicarlo alla poppa. A essicazione completata,
levigare i bordi a livello del fasciame.
Assemblare il supporto del modello (pezzi 20, 21, e 22) e
posizionarvi lo scafo. Se si avrà intenzione di montare il
modello su delle colonne di ottone è questo il momento per
eseguire i fori nella chiglia.
1
SECONDO FASCIAME
Per il secondo fasciame utilizzare listelli di noce
1x4mm.(vedi disegno 7).Il primo listello andrà posizionato sul
bordo superiore della fascia.
Utilizzare lo stesso metodo del primo fasciame, incollando
tutto la lunghezza del listello. Non coprire completamente i
portelli dei cannoni. Lasciare un po’ di spazio per facilitare la
finitura delle aperture.
Una volta che il secondo fasciame sia completato, tagliare
ogni eccedenza dai portelli e levigare con cura lo scafo utilizzando carta abrasiva a grana media seguita da grana fine.
Rimuovere i due ponti a prua e poppa e incollare in posizione
gli affusti (senza canne). I ponti possono essere adesso incollati in posizione
RIVESTIMENTO PONTI E MURATE
Rimuovere i falsi scalmotti dal ponte e livellare mediante
seppiatura. I ponti sono rivestiti con Tanganica 0.5x3mm utilizzando colla ciano acrilica. Iniziare dal centro e procedere
verso l’esterno in direzione dei lati. Una volta completato
levigare e applicare al ponte uno strato de vernice opaca.
Rivestire le murate utilizzando listelli di noce lx4mm (disegno 8) comminciando dal ponte verso il bordo superiore e
lasciando uno spazio per le aperture dei portelli dei cannoni.
Completato il fasciame, tagliare accuratamente le aperture e
levigare tutto con la carta seppia fine. L’interno delle murate
e delle aperture dei cannoni potrà essere dipinto con il colore
rosso scuro.
Vedi disegno 9 per la finitura delle murate. Posizionare i
pezzi 79 e 80 e dipingere con il colore nero. I capodibanda
sono di noce 1.5x5mm tagliato su misura e dipinto di nero.
Assemblare i pezzi 42,43 e 72 e inserire le maniglie e i supporti 195 nei fori 42. Dipingere in nero le maniglie e pezzi
177 e 195. Fare un bordo all’apertura della scala utilizzando
noce 2x3mm. Posizionare la scala e gli appoggi 178 dipinti
nero. Staccare e incollare in posizione i pezzi 31, 104 e 65
(noce 3mm) e rivestire la passerella superiore con Tanganica
0.5x3mm.
FISSAGGIO GRU DI CAPONE
Staccare pezzi 25, 26 e 27 dal compensato 3mm e dipingere
con il colore nero. Staccare pezzi 127 e 126 e dipingere in
nero i bordi superiori. Posizionarli come da disegno.
Staccare le guancette 54. Prima di incollarle in posizione,
sagomare i bordi da fissare allo scafo in modo che l’angolo
abbia un buon contatto.
Staccare e posizionare i pezzi 120 e praticare dei fori nello
scafo per far passare il cavo dell’ancora.
Staccare dal compensato 3mm le due gru di capone e marcare sul capobanda le posizioni delle gru. Tagliare accuratamente e ad una profondità di 3mm , posizionare la gru e incollare.
Staccare i pezzi di supporto (53) e incollarli sotto le gru.
Incollare i pezzi 113 in posizione ai bordi dei pezzi 25,26,e
27 (vedi disegno). Staccare il pezzo 125 e incollarlo negli
appositi incastri. Il pezzo decorativo in ottone (288) andrà
piegato delicatamente nella forma corretta come da disegno.
Il capodibanda è realizzato con noce 1x3mm dipinto con il
2
colore blu. Posizionare la polena e dipingere (vedi disegno) i
pezzi decorativi in ottone.
ASSEMBLAGGIO CAPODIBANDA
Applicare la cinta utilizzando 3 listelli di noce 1x4mm. per
lato. Verificare l’esatto posizionamento della cinta rilevandone le quote dalla tavola . Riempire ogni piccola fessura con
dello stucco scuro. Levigare e dipingere di nero.
Utilizzando il disegno marcare la posizione delle battagliole superiori, utilizzare noce 1x2mm fra le aperture dei portelli
dei cannoni e incollarle. Si consiglia di colorare adesso il
listello inferiore. Se si desidera realizzare l’opera utilizando la
decorazione si dovrà utilizzare il colore nero se invece si decide di tralasciarla si dovrà utilizzare il colore blu.
Un listello di noce 1x1mm andrà applicato sopra il bordo
superiore della decorazione, dopo aver posizionato i pezzi 85
e 86 .Posizionare i posti per le colubrine 59-64 insieme con il
pezzo 81 e dipingere con il colore nero. Posizionare i pezzi
275 e 276, 273 e 274,
Incollare lo specchio di poppa. Le finestre 197,199, 201,
203 e 205 devono essere dipinti in ocra prima di essere staccati. Potrà essere utilizzato un pezzo di acetato per simulare i
vetri. Incollare in posizione finestre e decorazioni.
A questo punto, lo scafo sotto la linea di galleggiamento
potrà essere colorato.
TIMONE
Colorare di nero i pezzi 185-194, staccarli e incollarli in
posizione. Fissare gli occhielli in fori da 1mm di diametro.
Anche il filo di ottone dovrà essere modellato come mostrato
nel disegno.
Posizionare il timone (vedi disegno)
PARASARTIE
Tagliare i pezzi 91, 92 ,93 e 94 dalla tavola di noce 1.5mm.
Inchiodare e incollare in posizione. Assemblare le bigotte
(vede disegno). Colorare di nero tutte le parte metalliche
prima di staccarle. Fare i fori nello scafo e inserire gli occhielli per il fissaggio delle sartie (vedi disegno)
Applicare i portelli cannoni e le canne. Posizionare tutti gli
attrezzi dei ponti, le caviglie, gli occhielli e i cunei.
ALBERI
Tagliare a misura gli alberi e il bompresso.
Bompresso – tondino 8mm diam. x 161mm
Asta di fiocco – tondino 4mm diam. x 153mm
Albero di trinchetto – tondino 8mm diam. x 269mm
Albero di parrochetto – 6mm diam .x 178mm
Alberetto di velaccino – tondino 4mm diam. x 119mm Albero
di maestra – tondino 8mm diam, x 304mm
Albero di gabbia – tondino 6mm diam, x 192
Alberetto di gran velaccio – tondino 4mm diam x 135mm
Albero di mezzana – tondino 6mm x 252mm
Albero di contromezzana – tondino 4mm diam. x 175
La cima di ogni albero dovrà avere una sede della misura
corretta per inserire la testa di moro. Rastremare gli alberi utilizzando un piallino e facendo riferimento al disegno.
BOMPRESSO
Il bompresso dovrà essere rastremato da entrambi i lati. La
parte superiore dovrà essere rastremata ad un diametro di
4mm per incastrarla nella testa di moro. I cunei per la trinca
sono in listello di noce 2x1mm x 5mm incollati in posizione.
Tracciare la posizione della sella dell’asta di fiocco (87) e
incollarla.
Limare il pezzo (50) testa di moro, per ottenere l’angolo del
bompresso. Incollare la testa di moro (attenzione che sia perpendicolare rispetto alla chiglia). Incastrare l’asta di fiocco nei
fori della testa di moro affinchè l’asta sia a l0mm oltre la sella.
Assicurarla con la trinca di filo nero 0.5mm.
Legare tutte le bigotte e gli occhielli associati al bompresso
(vedi disegno)
ALBERO DI TRINCHETTO
La tecnica per la costruzione degli alberi è la stessa per tutti,
quindi seguire queste istruzioni anche per gli alberi di maestra
e di mezzana.
Marcare sull’albero inferiore la posizione della barra costiera (76). Tagliare le maschette (89) e marcare la lunghezza
delle maschette ai lati opposti dell’albero. Limare l’albero formando una sede per ricevere le maschette e incollarle in posizione. Tagliare i pezzi (95) e incollarli in posizione.
Colorare in tinta legno scuro prima di eseguire la trinca utilizzando filo nero 0.5mm.
Tagliare pezzi (100), (101), crocetta (75) e barra costiera
(76). Seguire il disegno per assemblaggio.
Colorare in nero i pezzi fotoincisi (210), staccare e incollare nei 4 incastri alla parte superiore di (101). La battagliola è
formata da listello di noce 1x2mm.
Praticare i fori 1mm diam. per ricevere il filo per il piede
d’oca. Incollare la barra costiera all’albero.
A essicazione completata, incollare in posizione la crocetta.
Incollare l’assemblaggio della coffa.
Fare fori e incollare tutti gli occhielli (vedi disegno)
ALBERO DI PARROCHETTO
Fare un foro da 2mm per la chiave d’albero (vedi disegno)
La chiave è ricavata da listello da 2x2mm tagliato 5mm più
largo dell’albero. Inserire la chiave d’albero nel foro in modo
che fuoriesca dall’albero di 2.5mm per parte.
Staccare la testa di moro (48) e incastrarla sulla cima dell’albero di trinchetto. Posizionare l’albero di parrochetto sull’albero inferiore e inserirlo sul suo tenone.
Prima di applicare la colla, controllare che entrambi gli alberi siano allineati correttamente. Staccare dalla tavola di noce
1.5mm le crocette e le barre costiere e incollare le due parti
insieme. Inserire sull’albero. Costruire due mensole e incollarle in posizione.
ALBERETTO DI VELACCINO
Incastrare l’albero nei fori quadrati delle crocettte e barre
costiere. Marcare la posizione del foro per la chiave dell’albero e fare un foro 2mm. Inserire un listello 2x2mm e tagliare
in modo che 2mm siano esposti su entrambi i lati dell’albero.
Praticare un foro da lmm per la drizza del pennone (vedi dise-
gno). Staccare la cima dell’albero dalla tavola di noce 5mm e
incollarla in posizione.
L’area tra le maschette e le cime dell’albero dovrà essere
dipinta in nero. Terminare l’assemblaggio dell’albero legando
tutte le bigotte.
PENNONI
Tutti i pennoni e i buttafuori di vela dovranno essere costruiti seguendo le misure illustrate sui disegni. Rastremare i pennoni conferendo loro una forma ottagonale, dopodichè marcare il centro.
Le estremità dovranno essere rastremate fino ad ottenere le
dimensioni riportate sui disegni. (I pennoni piu alti rimangono
arrotondati per tutto la loro lunghezza). Inchiodare e incollare le mensole di sostegno (180 e 280) come da disegno. Non
inserire i buttafuori di vela fino a che i pennoni non siano stati
dipinti con il colore nero.
Costruire le gallocce di sospensione utilizzando noce
1x1mm tagliata a misura.
Marcare e fare dei fori da 0.5mm per le staffe del marciapiede sul lato al di sotto del pennone.
Le staffe sone costruite utilizzando filo di ottone 0.25mm.
Tagliare ogni staffa a una lunghezza di 20mm e fare un piccolo cappio sulla parte terminale per fare passare il marciapiede. Incollare e inserire le staffe in modo che fuoriesca un
pezzo da l5mm di lunghezza. Le legature possono essere
simulate annodando refe nero da 0.5mm attorno al pennone
nella posizione delle staffe. Colorare i pennoni in nero incluso picco e boma.
Utilizzare refe nero da 0.5mm per legare i marciapiedi ai
pennoni. Inserirlo attraverso il cappio al termine delle staffe
e legare la parte terminale all’altro lato delle gallocce.
Non tendere troppo la legatura ma lasciarla andare naturalmente. Legare sui pennoni tutti i bozzelli e i bracci come illustrato e prepararsi a incollarli agli alberi.
Il pennone di bompresso, il pennone di maestra e il pennone
maggiore di mezzana sono legati all’albero con refe nero da
0.5mm (vedi disegno)
I pennoni restanti sono legati agli alberi con trozze e separatori tenute insieme da refe nero. Le trozze dovranno essere
dipinte di nero prima di essere applicate.
Il picco di mezzana e il boma sono tenuti insieme sull’albero con delle trozze come per il pennone di gabbia di mezzana.
Il fissaggio dei pennoni agli alberi dovrà essere fatto con
chiodini e colla.
Praticare un foro di 1mm nel centro delle parte anteriore di
ogni pennone e un foro da 1mm sull’albero.
Inserire un piccolo pezzo di filo di ottone nel foro dei pennoni che avrà la funzione di una pinza, dopodichè incollare il
pennone all’albero.
Una volta che tutti i pennoni saranno legati agli alberi, alberi e bompresso potranno essere inseriti nei loro rispettivi incastri sul ponte.
Applicare una piccola quantità di colla vinilica prima di
posizionarli.
MANOVRE
Il bompresso dovrà avere la trinca (vedi disegno). Usando i
piani delle manovre come riferimento, iniziare le sei fasi.
Non sovratensionare il refe. Iniziare con la parte inferiore
(fase1). Legare le griselle utilizzando refe colore naturale
3
0.1mm. Quando le griselle saranno ben legate, applicare una
soluzione di acqua e colla vinilica distribuendola con un pennello. Tagliare la parte in eccesso . Dipingere le griselle, le
sartie e i paterazzi con un colore nero molto scuro.
Eseguire le manovre degli stragli come mostrato (fase 2).
Iniziare dalle manovre inferiori.
Seguono le manovre delle legatura dei pennoni (fase 3),
quindi le manovre dei mantigli dei pennoni (fase 4).
A questo punto iniziare le manovre degli imbrogli, scotte e
mura come mostrato. Procedere quindi con le manovre dei
bracci dei pennoni e delle boline.
È importante che le manovre dei bracci dei pennoni ,delle
scotte e delle mura vengano eseguite per ultime.
ELENCO DEL MATERIALE
1
2
2a
3
3a
4
4a
5
6
7
8
9
9a
10
10a
11
11a
12
13
14
15
16
17
18
19
20
21
22
23
24
25
26
27
28
29
30
31
32
33
34
35
36
37
38
39
40
41
42
4
Ordinata
Compensato 5mm
Ordinata
Compensato 5mm
Supporto ponte
Compensato 5mm
Ordinata
Compensato 5mm
Supporto ponte
Compensato 5mm
Ordinata
Compensato 5mm
Supporto ponte
Compensato 5mm
Ordinata
Compensato 5mm
Ordinata
Compensato 5mm
Ordinata
Compensato 5mm
Ordinata
Compensato 5mm
Ordinata
Compensato 5mm
Supporto ponte
Compensato 5mm
Ordinata
Compensato 5mm
Supporto ponte
Compensato 5mm
Ordinata
Compensato 5mm
Supporto ponte
Compensato 5mm
Ordinata
Compensato 5mm
Ordinata di poppa
Compensato 5mm
Chiglia
Compensato 5mm
Rinforzo di poppa
Compensato 5mm
Rinforzo di poppa
Compensato 5mm
Rinforzo di poppa
Compensato 5mm
Rinforzo di poppa
Compensato 5mm
Ponte inferiore
Compensato 5mm
Dritto di prua
Compensato 5mm
Dritto di poppa
Compensato 5mm
Supporti
Compensato 5mm
Ordinata
Compensato 3mm
Ordinata
Compensato 3mm
Sostegno di poppa
Compensato 3mm
Sost. di mezzana
Compensato 3mm
Sostegno di prua
Compensato 3mm
Ponte di coperta
Compensato 1mm
Castello
Compensato 1mm
Cassero
Compensato 1mm
Passerella
Compensato 1mm
Sost. port. cannoni
Compensato 1mm
Prua
5mm noce
Chiglia (prua)
5mm noce
Chiglia (poppa)
5mm noce
Dritto del timone
5mm noce
Timone
5mm noce
Baglio
5mm noce
Baglio
5mm noce
Fumaiolo
5mm noce
Bitte albero di maestra 5mm noce
Bitte albero di maestra 5mm noce
1
1
1
1
1
1
1
1
1
1
1
1
1
1
1
1
1
1
1
1
2
2
2
2
1
1
1
2
2
2
1
1
1
1
1
1
2
2
1
1
1
1
1
1
1
1
2
2
43
44
45
46
47
48
49
50
51
52
53
54
55
56
57
58
59
60
61
62
63
64
65
66
67
68
69
70
71
72
73
74
75
76
77
78
79
80
81
82
83
84
85
86
87
88
89
90
91
92
93
94
95
96
97
98
99
100
101
102
103
104
105
106
107
Traversa
5mm noce
Casotto pompa maestra 5mm noce
Sostegno
5mm noce
Bitte
5mm noce
Bitte
5mm noce
Testa di moro albero
5mm noce
Testa di moro albero
5mm noce
Testa di moro di bomp. 5mm noce
Testa di moro di velac. 5mm noce
Gru di capone
3mm noce
Supporti gru di capone 3mm noce
Maschette
3mm noce
Galloccia
3mm noce
Galloccia
3mm noce
Supporti bitte
3mm noce
Sostegni di prua
3mm noce
Colubrine
3mm noce
Colubrine
3mm noce
Colubrine
3mm noce
Colubrine
3mm noce
Colubrine
3mm noce
Colubrine
3mm noce
Scalino
3mm noce
Bitte albero
3mm noce
Bitte albero
3mm noce
Bitte albero
3mm noce
Bitte albero
3mm noce
Elemento pompa
3mm noce
Bitta
3mm noce
Traversa
3mm noce
Crocette albero
3mm noce
Crocette albero
3mm noce
Crocette albero
3mm noce
Crocette albero
3mm noce
Crocette albero
3mm noce
Crocette albero
3mm noce
Capo di banda
1.5mm Com.noce
Capo di banda
15mm Com.noce
Capo di banda
1.5mm Com.noce
Elementi chiesuola
1.5mm Com.noce
Elementi chiesuola
1.5mm Com.noce
Elementi chiesuola
1.5mm Com.noce
Supporti
1.5mm Com.noce
Supporti
1.5mm Com.noce
Sella del boma
1.5mm Com.noce
Sostegno
1.5mm Com.noce
Maschette albero
1.5mm Com.noce
Maschette albero
1.5mm Com.noce
Parasartie
1.5mm Com.noce
Parasartie
1.5mm Com.noce
Parasartie
1.5mm Com.noce
Parasartie
1.5mm Com.noce
Maschette albero
1.5mm Com.noce
Maschette albero
1.5mm Com.noce
Maschette albero
1.5mm Com.noce
Base coffa
1.5mm Com.noce
Bordo di coffa
1.5mm Com.noce
Base coffa
1.5mm Com.noce
Bordo di coffa
1.5mm Com.noce
Base coffa
1.5mm Com.noce
Bordo di coffa
1.5mm Com.noce
Supporti
1.5mm Com.noce
Elementi argano
1.5mm Com.noce
Elementi argano
1.5mm Com.noce
Elementi argano
1.5mm Com.noce
1
2
1
2
1
2
2
1
1
2
2
4
2
2
2
2
2
2
2
2
2
6
2
2
1
2
1
2
1
1
2
2
2
2
2
2
2
2
2
2
2
1
2
2
1
2
2
2
2
2
2
2
2
2
2
1
1
1
1
1
1
4
5
2
2
108
109
110
111
112
113
114
115
116
117
118
119
120
121
122
123
124
125
126
127
128
129
130
131
132
133
134
135
136
137
138
139
140
141
142
143
144
145
146
147
148
149
150
151
152
153
154
155
156
157
158
159
160
161
162
163
164
165
166
167
168
169
170
171
172
Elementi argano
Rondella tamburo
Rondella tamburo
Rondella tamburo
Trozza del picco
Braccio della serpa
Fascia di poppa
Coronamento
Base albero
Base albero
Battente
Base camino
Occhi di cubia
Balaustra
Balaustra
Balaustra
Cavigliere
Filaretto
Maschette
Filaretto
Bitte
Cinta
Bozzello
Colonnine balaustra
Colonnine balaustra
Lucernaio
Lucernaio
Ordinate finestre
Ordinate finestre
Sostegni laterali
Elemento sede
Pozzetto barra
Sede timone
Barra timone
Crocette
Crocette
Trozza pennone
Trozze
non in uso
Decorazione
Decorazione
Decorazione
Decorazione
Decorazione
Decorazione
Decorazione
Decorazione
Decorazione
Decorazione
Decorazione
Decorazione
Decorazione
Decorazione
Decorazione
Decorazione
Decorazione
Decorazione
Decorazione
Decorazione
Decorazione
Landre inferiori
Bigotte 3.5mm
Gancio
Gancio
Trozza
1.5mm Com.noce
1.5mm Com.noce
1.5mm Com.noce
1.5mm Com.noce
1.5mm Com.noce
1.5mm Com.noce
1.5mm Com.noce
1.5mm Com.noce
1.5mm Comp.noce
1.5mm Comp.noce
1.5mm Comp.noce
1.5mm Comp.noce
1.5mm Comp.noce
1.5mmComp.noce
1.5mm Comp.noce
1.5mm Comp.noce
1.5mm Comp.noce
1.5mm Comp.noce
1.5mm Comp.noce
1.5mm Comp.noce
1.5mm Comp.noce
1.5mm Comp.noce
1.5mm Comp.noce
1.5mm Comp.noce
1.5mm Comp.noce
1.5mm Comp.noce
1.5mm Comp.noce
1.5mm Comp.noce
1.5mm Comp.noce
1.5mm Comp.noce
1.5mm Comp.noce
1.5mm Comp.noce
1.5mm Comp.noce
1.5mmComp.noce
1.5mm Comp.noce
1.5mm Comp.noce
1.5mmComp.noce
1.5mm Comp.noce
16
2
2
3
2
2
1
1
1
2
1
1
2
2
1
1
2
2
2
2
40
4
2
2
2
2
2
2
1
2
1
1
2
1
6
4
1
2
Ottone 0.25mm
Ottone 0.25mm
Ottone 0.25mm
Ottone 0.25mm
Ottone 0.25mm
Ottone 0.25mm
Ottone 0.25mm
Ottone 0.25mm
Ottone 0.25mm
Ottone 0.25mm
Ottone 0.25mm
Ottone 0.25mm
Ottone 0.25mm
Ottone 0.25mm
Ottone 0.25mm
Ottone 0.25mm
Ottone 0.25mm
Ottone 0.25mm
Ottone 0.25mm
Ottone 0.25mm
Ottone 0.25mm
Ottone 0.5mm
Ottone 0.5mm
Ottone 0.5mm
Ottone 0.5mm
Ottone 0.5mm
2
2
2
2
2
2
2
2
2
2
2
2
2
2
2
2
2
2
2
4
2
60
24
48
32
32
173
174
175
176
177
178
179
180
181
182
183
184
185
186
187
188
189
190
191
192
193
194
195
196
197
198
199
200
201
202
203
204
205
206
207
208
209
210
211
212
213
214
215
216
217
218
219
220
221
222
223
224
225
226
227
228
229
230
231
232
233
234
235
236
237
Sostegno landra
Ottone 0.5mm
Landre
Ottone 0.5mm
Bigotte 5mm
Ottone 0.5mm
Bigotte 3.5mm
Ottone 0.5mm
Candelieri
Ottone 0.5mm
Candelieri
Ottone 0.5mm
Cerniera portello
Ottone 0.5mm
Accessori buttafuori
Ottone 0.5mm
Bozzello
Ottone 0.5mm
Bozzello
Ottone 0.5mm
Rinforzo
Ottone 0.5mm
Rinforzo
Ottone 0.5mm
Perno timone
Ottone 0.5mm
Perno timone
Ottone 0.5mm
Perno timone
Ottone 0.5mm
Perno timone
Ottone 0.5mm
Perno timone
Ottone 0.5mm
Cerniera timone
Ottone 0.5mm
Cerniera timone
Ottone 0.5mm
Cerniera timone
Ottone 0.5mm
Cerniera timone
Ottone 0.5mm
Cerniera timone
Ottone 0.5mm
Pompa di sentina
Ottone 0.5mm
Elementi finestre
Ottone 0.5mm
Elementi finestre
Ottone 0.5mm
Elementi finestre
Ottone 0.5mm
Elementi finestre
Ottone 0.5mm
Elementi finestre
Ottone 0.5mm
Elementi finestre
Ottone 0.5mm
Elementi finestre
Ottone 0.5mm
Elementi finestre
Ottone 0.5mm
Elementi finestre
Ottone 0.5mm
Elementi finestre
Ottone 0.5mm
Elementi finestre
Ottone 0.5mm
Decorazioni
Ottone 0.5mm
Decorazioni
Ottone 0.5mm
Decorazioni
Ottone 0.5mm
Rinforzi
Ottone 0.5mm
Decorazioni
Ottone 0.25mm
Decorazioni
Ottone 0.25mm
Cartiglio
Ottone 0.25mm
Colonne legno
4030/15
Caviglie
4104/08
Cannoni con affusto
4162
Colubrine
4150/03
Campanelle
4140/06
Ruote timone
4350/20
Palline con foro
4380/02
Occhielli in rame
4703
Scaletta
4320/01
Filo di ottone cotto
2820/02
Chiodini di ottone
4134/07
Ancora
4015/40
Galloccia in legno
4270
Filo di ottone 1mm
2820/10
Bozzelli a violino 7mm
4086/07
Bigotte 3mm
4050/03
Bigotte 5mm
4050/05
Bozzelli noce 3mm
4070/03
Bozzelli noce 5mm
4070/05
Bozzelli noce 6mm
4080/06
Bozzelli noce 4mm
4080/04
Bozzelli noce 2mm
4070/02
Bigotta a cuore 6mm
4061
Refe nero 1.3mm
4126/13
34
60
34
32
4
12
24
8
2
1
4
4
1
1
1
1
1
1
1
1
1
1
4
1
1
1
1
1
1
1
1
1
1
1
1
1
1
12
1
1
3
2
12
16
16
1
1
60
120
2
1mt
400
4
4
1mt
14
100
70
120
40
16
30
6
8
2mt
5
238
239
240
241
242
243
244
245
246
248
249
250
251
252
253
254
255
256
257
258
259
260
261
262
270
271
272
273
274
275
276
277
278
279
280
281
282
283
284
285
286
287
288
289
290
291
292
300
6
Refe nero 1mm
4126/10
Refe nero 0.75mm
4126/07
Refe naturale 0.5mm
4124/05
Refe nero 0,1mm
4124/01
Refe naturale 0.25mm
4124/02
Refe naturale 0.5mm
4124/05
Refe naturale 0,75mm
4124/07
Refe naturale 1mm
4124/10
Refe 1,3mm
4124/13
Listello tiglio 1.5x5mm
2430/02
Listello noce 1x4mm
2460/06
Listello noce 1x3mm
2460/05
Listello noce 1x2mm
2460/04
Listello noce 1x1mm
2410/01
Listello tanganica
2458/01
Listello tiglio 2x2mm
2400/02
Listello tiglio 3x3mm
2400/03
Listello noce 2x3mm
4060/17
Tondino ramino 10mm
2525/10
Tondino ramino 8mm
2525/08
Tondino ramino 6mm
2525/06
Tondino ramino 4mm
2525/04
Tondino ramino 3mm
2525/03
Paiolato
4325/06
Polena
Fusione
Galleria sinistra
Fusione
Galleria destra
Fusione
Finitura
Fusione
Finitura
Fusione
Stemma
Fusione
Stemma
Fusione
Decorazione
Fusione
Decorazione
Fusione
Decorazione
Fusione
Accessori buttafuori
2835/03
Colonnine in legno 8mm 4035/08
Rastrelliere
1,5mm noce
Rastrelliere
1,5mm noce
Piloncini di supporto
1,5mm noce
Ringhiera
1,5mm noce
Supporto campanella
3mm. noce
Portelli cannone
1,5mm noce
Decorazioni
5500/05-B
Decorazioni
Fusione
Decorazioni
Fusione
Listello noce 1.5x5mm
2460/07
Tondino ramino 2mm
2525/02
Ganci ottone
4705/02
30mt
30mt
40mt
50mt
40mt
10mt
10mt
5mt
2mt
46
90
12
12
8
75
3
1
2
8cm
3
4
4
5
4
1
1
1
1
1
1
1
1
1
1
50cm
6
2
2
2
4
1
8
25cm
1
1
2
10cm
3
Scaricare