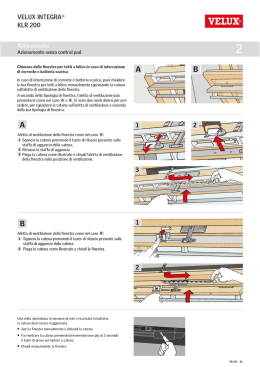
Via Mattei 18/a 48025
Riolo Terme (Ra) ITALY
Tel.+39 0546 70310 fax 74623
[email protected]
6. If the chain rubs against the outer cage (4), add two 0,8mm thick shims between the clamp body (1) and the inner
7.
8.
GUIDACATENA KCU
ITALIANO
9.
ISTRUZIONI DI MONTAGGIO DELLA VERSIONE A COLLARINO
1.
2.
3.
4.
5.
6.
7.
8.
9.
Aprire la falsa maglia della catena per separare le due estremità
Svitare con chiave Torx 25 le due viti in titanio (2) del braccialetto (1) e ungere i filetti con il grasso per titanio fornito
Fissare il braccialetto al telaio, senza serrare le viti (2), ad una altezza per cui le guance interna (3)ed esterna (4) siano
più basse della catena
Infilare una estremità della catena entro le guance e tra i due rullini (5). Chiudere la catena con la falsa maglia
Posizionare la catena nel pignone più piccolo. Ruotare il guidacatena fino a che la piastra esterna (4) sia parallela alla
catena
Nel caso in cui la catena venga a contatto con la piastra esterna aggiungere un paio di rondelline spesse 0,8mm tra il
collarino e la piastra interna (3) svitando le due viti M4 a testa conica in titanio (6)
In caso di corone ovali ruotare la guarnitura e riposizionare l'altezza del guidacatena in modo che la catena non venga a
contatto con i rullini (5) nelle due posizioni estreme dell'ovale
Cambiare pignoni fino a quello di diametro maggiore e verificare che la catena non tocchi contro la piastra interna (3)
Eventualmente correggere la rotazione del braccialetto (1)
Serrare le viti (2) del braccialetto a 5Nm
ISTRUZIONI DI MONTAGGIO DELLA VERSIONE DIRECT-MOUNT S3
1.
2.
3.
4.
5.
6.
7.
8.
9.
Aprire la falsa maglia della catena per separare le due estremità
Svitare con chiave Torx 25 le due viti in titanio (2) del supporto S3 (1) e ungere i filetti con il grasso per titanio fornito
Avvitare il supporto S3 (1) al telaio, senza serrare le viti (2), ad una altezza per cui le guance interna (3) ed esterna (4)
siano più basse della catena
Infilare una estremità della catena entro le guance e tra i due rullini (5). Chiudere la catena con la falsa maglia
Posizionare la catena nel pignone più piccolo e verificare che la piastra esterna (4) sia parallela alla catena
Nel caso in cui la catena venga a contatto con la piastra esterna aggiungere un paio di rondelline spesse 0,8mm tra il il
supporto S3 (1)e la piastra interna (3) svitando le due viti coniche in titanio (6)
In caso di corone ovali ruotare la guarnitura e riposizionare i'altezza del guidacatena in modo che la catena non venga a
contatto con i rullini (5) nelle due posizioni estreme dell'ovale
Cambiare pignoni fino a quello di diametro maggiore e verificare che la catena non tocchi contro la piastra interna (3)
Serrare le viti (2) del supporto S3 a 5Nm
GARANZIA
cage (3), unscrewing both cone-head bolts in titanium (6)
In case of non-round chain-rings, turn the crankset and reposition the clamp height so that the chain does not come
into contact with the rollers (5)
Shift the chain onto the biggest rear cog and verify that the chain does not rub the inner cage (3). In this case slightly
turn the collar to avoid contact
Tighten the bolts (2) of the collar at 5Nm
SET-UP INSTRUCTIONS FOR S3 DIRECT-MOUNT TYPE
1. Disengage the link of the chain to open it
2. Wih a Torx 25key unscrew both titanium bolts (2) of the S3 mount (1). Lube them with the titanium-grease as supplied
3. Install the S3 mount on the frame without tightening the bolts (2) at the hight where the inner (3) and outer (4) cages
are positioned below the chain
4. Re-link the chain after sliding one of its ends between the chain-guide rollers (5)
5. Shift the chain onto the smallest rear cog and verify that the outer cage (4) is parallel to the chain
6. If the chain rubs against the outer cage (4), add two 0,8mm thick shims between the clamp body (1) and the inner
cage (3), unscrewing both cone-head bolts in titanium (6)
7. In case of non-round chain-rings, turn the crankset and reposition the clamp height so that the chain does not come
into contact with the rollers (5)
8. Shift the chain onto the biggest rear cog and verify that the chain does not rub the inner cage (3)
9. Tighten the bolts (2) of the S3 mount at 5Nm
WARRANTY
FRM products are guaranteed against any defects for a period of 2 years from the date of purchase by the first owner,
registered in a dealer shop. OBLIGATIONS: In case of defects, FRM pledge to replace or repair, at their discretion, the part recognised as defective. To be
accepted, the rider compliant must be communicated to FRM through the dealer/importer after his own control. If FRM after sales checking reveals that the damage
is due to one of the reasons mentioned in the following paragraph, the replacement is no longer accepted and the defective item is sent back to the plaintiff who
supports the shipping fees. LIMITATIONS: The guarantee does not cover damage resulting from transportation, warehousing, accidents, negligence, impact or falls,
non-compliance with the information in the instruction manuals, assembly errors, assembly using non-compatible products, bad maintenance, modifications or
alterations to the product. The guarantee does not cover par ts and components subject to normal wear and tear such as ball-bearings, bushings, seals, etc.
1
—————————————————————————————————————
KCU CHAIN-GUIDE
6
5
I prodotti FRM sono garantiti contro difetti di materiale e costruzione per un periodo di 2 anni dalla data di acquisto del primo utilizzatore,
certificata dallo scontrino fiscale del negozio. La garanzia decade nel caso in cui la manutenzione ordinaria o straordinaria consigliata in questo manuale non
sia stata eseguita OBBLIGHI: in caso di vizio, FRM si impegna ad effettuare la sostituzione o la riparazione, a sua discrezione dell’elemento riconosciuto difettoso.
Per essere accettato, il difetto deve essere comunicato dal legittimo proprietario al negoziante dove il prodotto è stato acquistato e da quest’ultimo, dopo averlo
verificato, alla FRM. Nel caso in cui la FRM non riconosca l’esistenza del difetto o stabilisca che questo è dovuto ad una delle cause riportate nel seguente paragrafo,
la sostituzione non è dovuta ed il componente viene restituito a spese del destinatario LIMITI: la garanzia non copre i danni risultanti da traspor to, giacenza,
incidenti, negligenze, colpi o cadute, mancato rispetto delle informazioni del libretto istruzioni, montaggio errato o con prodotti non compatibili, cattiva manutenzione,
usura normale, modifiche o alterazioni del prodotto. La Garanzia non copre le parti soggette a normale usura (cuscinetti, paraolio ecc.)
3
3
5
6
4
ENGLISH
SET-UP INSTRUCTIONS FOR CLAMP TYPE
1.
2.
3.
4.
5.
2
CLAMP TYPE
Disengage the link of the chain to open it
Wih a Torx 25key unscrew both titanium bolts (2) of the collar (1). Lube them with the titanium-grease as supplied
Install the clamp on the frame without tightening the bolts (2) at the hight where the inner (3) and outer (4) cages are
positioned below the chain
Re-link the chain after sliding one of its ends between the chain-guide rollers (5)
Shift the chain onto the smallest rear cog and turn the collar until the outer cage (4) is parallel to the chain
1
4
DIRECT-MOUNT TYPE
2
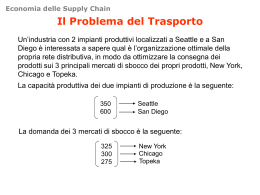
Scaricare