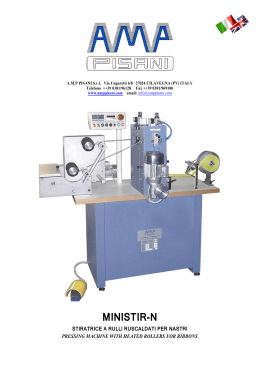
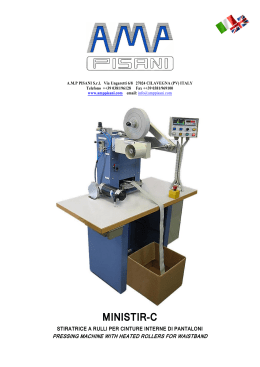
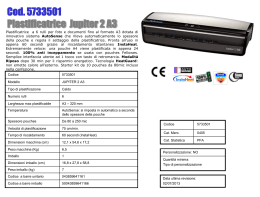
Product instruction manual
Linea DH-360, DH-460 and DH-650
Manuale
ITALIANO
The Linea has been designed to be user friendly,
however we strongly recommend you take a few minutes
to read through this manual to ensure correct operation.
Keep this manual safe for future reference.
Thank you for purchasing the Linea. Please read through this instruction booklet carefully and keep it safe in case
needed for future reference.
Contents
Grazie per aver acquistato la Plastificatrice a Bobine TiTanium Linea. Si prega di leggere con attenzione
questo libretto istruzioni e tenerlo al sicuro in caso di necessario riferimento futuro.
Page 2 - Safety precautions
Page 3 - MachineContenuto
parts and stand (options extra) assembly
Page
2 - Norme di sicurezza
Page 4 - Control panel and functions of digital display
Page 3 - Le parti della macchina e il supporto (opzioni extra) assemblaggio
Page 5 - Operating instructions
Page 4 - Pannello di controllo e le funzioni del display digitale
Page 6-8 - Loading/threading
the film
Pagina 5 - Istruzioni
per l’uso
Page 9 - CleaningPagina
and maintenance
6-8 - Caricamento / filettatura del film
Page 9 - Troubleshooting
Page 9 - Pulizia e manutenzione
Page 9 - Specification
Page chart
9 - Risoluzione dei problemi
Page
- foglio specifico
Page 10 - Warranty
and9 incorrect
use
Pagina 10 - Garanzia e uso scorretto
Precauzioni di sicurezza
Safety Precautions
Non utilizzare la macchina se il cavo di alimentazione è danneggiato in alcun modo. Non utilizzare un
Do not
the
machine
thelapower
cordnominale
is damaged
in anyway. Do not use a power supply
alimentatore
cheuse
non
è in
accordoifcon
tensione
indicata.
that is not in accordance with the rated voltage.
Non tentare di smontare, modificare o riparare la macchina da soli. Se si verifica un problema
chiamare un tecnico qualificato.
Do
not itry
to disassemble,
repaircome
the machine
If you encounter
a problem
Tenere
capelli
lunghi, abiti modify
larghi eor
oggetti
cravatte eyourself.
gioielli lontano
dai rulli della
macchinayou
in ogni
must call a qualified engineer.
momento per evitare il rischio di rimanere intrappolati. Se si verifica, premere il tasto REVERSE
o togliare immediatamente la corrente.
Keep long hair, loose clothing and items such as ties and jewellery away from the rollers of the
Mantenere
i liquidi
macchina in ogni
momento. Non occurs,
utilizzarepress
la macchina
con le
machine
at l’acqua
all timese to
avoidlontani
dangerdalla
of entanglement.
If entanglement
the REVERSE
mani
bagnate.
button or cut off the power immediately.
Utilizzare il dispositivo di sicurezza in ogni momento.
Keep
water
andad
liquids
away from the
machine
all times. Do
nottoccare
operatei rulli
the omachine
La Linea
lavora
una temperatura
elevata,
quindiatassicurarsi
di non
qualsiasiwith wet
hands.
Do
not
cut
off
the
power
to
the
machine
whilst
in
operation
(except
if
entanglement
parte della macchina in cui si indica ‘HOT’ o ‘ATTENZIONE’, mentre è in funzione. Non coprire la occurs).
Use the safety guard at all times.
macchina quando calda, se è ancora in fase raffreddamento. Non plastificare qualsiasi altro materiale
rispetto a quanto dichiarato in questo manuale e non utilizzare alcun film di laminazione diverso da ciò che
è raccomandato per questo sistema.
The Linea works at a high temperature, therefore ensure you do not touch the rollers or any
part
of the machine
whichinstates
‘HOT’ben
or ‘CAUTION’
whilste itasciutto
is in operation.
Do not
cover
the
Far funzionare
la macchina
un luogo
ventilato, pulito
con un grande
spazio
sufficiente
per
machine if it is still cooling down. Do not laminate any material other than what is stated in this
lavorare sulla parte anteriore e posteriore della macchina.
manual and do not use any lamination film other than what is recommended for this system.
Further
Assicurarsi che il cavo di alimentazione non sia lasciato sul pavimento e possa causare un pericolo per gli
operatori.
advice
Per produrre
di altissima
qualità
è necessario
di laminazione
di alta
qualità.
Operate the machine
in a wellrisultati
ventilated,
clean, dry
place
with a largeutilizzare
enoughfilm
working
space at the
front
and rear
of the machine.
Ensure the power cable is not dragging on the floor or causing a hazard to operators.
For producing the top quality results that this machine is designed to do, you must use high quality lamination
film. Pro life film is the suggested brand by the manufacturer.
Frizione Sup.
Mandrino
Bobina film
Sgancio Protezione
Albero porta
film sup.
Protezione sup.
Piano alimentatore
Regolazione
apertura/
pressione
Rulli
Frizione Inf.
Albero porta
film inf.
display
Rullo riscaldato
Bobina film
Guida Laterale
Pannello diControl
controllopanel
e le funzioni
del displayofdigitale
and functions
the digital display
Error messages
Should the LCD display panel show the words
OPN fault or CLS fault, there maybe a problem
with your machine. This very rarely occurs but
if it does contact your supplier immediately and
turn off the power.
Display LCD
LOAD (carica)
Velocità
Familiarise yourself with the control panel
before commencing operation of the machine
Temperatura
RUN (Partenza) STOP (Ferma)
FWD (avanti)/ REV (indietro)
HOT (caldo) COLD (freddo)
Temperature control
Controllo della temperatura
The temperature setting you require for laminating can vary and can be effected by many different factors, these
L’impostazione
dellathickness
temperatura
la plastificazione
può
può
dipendere
da molti fattori diversi,
include
of media,desiderata
thickness andper
construction
of laminating
film,variare
speed ofethe
machine
and temperature
and
humidity
of
the
room
you
are
working
in.
For
this
reason,
we
do
not
provide
a
precise
chart
detailing
the exactdella macchina
questicomprendono spessore del supporto, spessore e la consistenza di film di laminazione , la velocità
temperature required for operation. Please refer to the guide at the bottom of this page if you need help. Always
e della temperaturae
l’umidità
stanza
cui sibefore
sta lavorando
dentro your
Per work.
questo motivo, non forniamo un diagramma
use a test print
to senddella
through
the machine
starting to laminate
preciso specificando l’esatta temperatura necessaria per il funzionamento. Si prega di fare riferimento alla guida in
fondo a questaThepagina
se avete
bisogno
aiuto.orutilizzare
sempre
una stampa
di prova
l’inserimento
temperature
control
knob willdi
increase
decrease the
set temperature
as it is turned
andper
the set
temperature nella macchina
will show
on the LCD
display.
The
current temperature of the rollers will also be displayed on the LCD display. The
da laminare prima
di
iniziare
il
vostro
lavoro.
temperature ranges from 0oC-140oC. If the temperature reaches 140oC, the over heating protection function will
La manopola di
controllo activate
della temperatura
aumenta
o diminuisce
automatically
to prevent the machine
getting
any hotter. la temperatura impostata come è regolata e la temperatura impostata verrà visualizzato sul display LCD. La temperatura dei rulli sarà anche essere visualizzate sul display
LCD. le temperature comprese tra 0 ° C-140oC. Se la temperatura raggiunge i 140oC, la funzione di protezione sovra
Temperature
riscaldamento viene attivata automaticamente per evitare che la macchinaCurrent
si surriscaldi
troppo.
Temperatura di guida approssimativa
Temperature esatta delle impostazioni per la
Questa tabella è una guida approssimativa e non deve essere presa comeSet
un’indicazione
laminazione lavoro. Come detto in precedenza, diversi fattori possono influenzare la temperatura e la velocità richiesta.
Il fornitore faApproximate
non è responsabile
dell’esattezza impostazioni
errate essere applicato.
temperature
guide
This chart is a rough guide only and should NOT be taken as an exact indication of the settings for your laminating
job. As previously stated, many different factors can effect the temperature and speed required. The supplier does
Spessore di film
temperatura velocità Ca.
not accept responsibility for incorrect settings being applied.
75 Micron 100 ° -110 ° 0,5 m per minuto
125 Micron 110 ° -120 ° 1.0 m Encapsulating
al minuto
Example film
Approx temperature
Approx speed
(ridurre la velocità
di
per
documenti
più
spessi
75 Micron
100°-110°
0.5 m per min
e aumentare la temperatura per quelli più leggeri)
1.0 m per min (decrease speed for thicker documents
125 Micron
110°-120°
and increase the temperature slightly)
Speed control
The speed control function allows adjustment of the speed of the machine. This can be
adjusted by turning the knob anti clockwise to increase the speed and clockwise to dec
speed. The speed can range from 0M per min to 1.4M per min
Controllo della velocità
and
cold settings
La funzione di controllo della velocità Hot
consente
la regolazione
della velocità di plastificazione. Questa può essere regolabile manualmente ruotando la manopola in senso orario per aumentare la velocità e in senso anti orario per diminuirla.
La velocità può variare da 0 metri al minuto
a 1.4mthe
al function
minuto of the machine to either hot or cold press the HOT/COLD switch
To change
switched to hot the set temperature will show on the LCD display. When it is switched t
willeshow
on the LCD display.
Impostazioni plastificazione a caldo
a freddo.
La Linea funziona sia con i film di plastificazione a caldo, che con i film adesivi a freddo di laminazione. Per modificare la
funzionalità della macchina premete o caldo o freddo l’interruttore HOT / COLD.
Quando è settata a caldo la temperatura
impostata verrà
visualizzato
sul display
LCD. Quando si passa al freddo, COLD
Forward
and
reverse
switch
verrà visualizzato sul display LCD.
The FWD/REV switch changes the working direction of the motor. When it is switched t
Interruttore avanti e indietro
the motor will run forward and
will show on the LCD display. This function is used
L’interruttore FWD / REV cambia la direzione
di lavoro del motore. Quando viene
commutato a trasmettere
laminating and encapsulating.
il motore avanza e FWD e mostrerà sul display LCD. Questa funzione viene utilizzata per la
plastificazione e incapsulazione.
When it is switched to reverse the motor will run backwards and REVERSE will show on
Quando si viene commutato per invertire
motore girerà
indietro is
e REVERSE
verrà visualizzato
sulincorrectly or by mistake - plea
LCDil display.
This function
used to remove
items fed in
Display LCD. Questa funzione viene utilizzata
peritems
rimuovere
gli be
elementi
inseriti in modo non corretto o per errori - tenremoved
will not
reuasable
ere presente che gli elementi rimossi non saranno riutilizzabili
Run and stop switch
istruzioni per l’uso
Assicurarsi che il laminatore sia posto su una superficie piana e stabile di lavoro o sullo stand montato (optional). contrThe RUN/STOP switch enables you to start and stop the motor. When it is switched to R
ollare la tensione di alimentazione della
macchina
machine
willper assicurare che questo soddisfi la base dell’apparecchio. Collegare
il cavo di alimentazione nella parte posteriore della macchina e nella vostra alimentazione. Contattare il fornitore se non
si dispone di un cavo di alimentazione con l’apparecchio.
Accendere l’interruttore di alimentazione, il display del pannello di controllo verrà illuminato, significa che la corrente è
collegata.
Sovraccarico motore (interruttore)
Operating instructions
Se la macchina dovesse incepparsi in modo che il motore possa sovraccaricarsi, l’interruttore interrompe l’alimentazione
in modo automatico per evitare danni.Ensure
Una volta
il sovraccarico
è stato
premere
il pulsante
interruttore
e
theche
laminator
is placed
on a rimosso,
flat, sturdy
work surface
or on
the assembled
stand
il motore si avvierà nuovamente. Il pulsante
interruttore
di
protezione
si
trova
nella
parte
posteriore
della
macchina
acpower voltage for the machine to ensure this meets your own supply. Plug the power c
machine
and into
your power supply. Contact your supplier if you do not have a power
canto l’interruttore di accensione. Il pulsante
è rosso
di colore.
Turn on the power switch, the c
light, this indicates the power is
Run and stop
Motor overload circuit breaker
L’interruttore RUN / STOP consente di avviare e arrestare il motore. Quando si è acceso apparecchio emette un suono.
If the machine should jam in a way that the motor could be effected, the circuit breaker
to avoid damage. Once the overload has been cleared, press the circuit breaker button
again. The circuit breaker button is located at the rear of the machine next to the powe
in colour.
Loading/threading the film - Encapsulating
Loading/threading
the
film
Encapsulating
Please
follow thedel
step
step guide
load your film;
Caricamento
filmby- Plastificazione
Loading/threading
thebelow
filmto--correctly
Encapsulating
Loading/threading
the
film
Encapsulating
Si
prega
di
seguire
la
guida
passo
passo
qui
sotto
per
caricare
correttamente
il vostro film;
Please follow the step by step guide below to correctly load
your film;
Remove
guard
the feed tray by retracting the bolt
Please follow
thethe
stepsafety
by step
guide below to correctly loadRemove
your film;
Please follow the step by step guide below to correctly load your film;
Remove
theprotettivo
safety guard
Remove
thedelfeed
retracting
the bolt il piano ed estrarlo
Sganciare
lo schermo
in plexiglass. Sganciare il meccanismo
simile
pianotray
di by
Sollevare leggermente
Remove
the safety guard
Remove
the feed
tray
by retracting
the bolt
alimentazione localizzato
sottothe feed tray by retracting
delicatamente
rimuoverlo.
Remove the safety guard
Remove
theper
bolt
Remove the top mandrel
Sganciare l’albero porta film superiore e
Remove the top mandrel
rimuoverlo
Remove the top mandrel
Remove the top mandrel
Posizionare
un mandrino
e bloccarlocon
la
Core holder
located
on mandrel
vite in una delle posizioni standard (utilizzare
Core holder located on mandrel
il foroCore
che permette
di centrare
bobina)
holder located
onlamandrel
Core holder located on mandrel
Completely unscrew the mandrel
and cap
Completely
the mandrel
Svitare
l’estremitaunscrew
per rimuovere
il mandrino.
Completely unscrew the mandrel
and
cap
Completely unscrew
and cap the mandrel
and cap
Load the film onto the mandrel and
make sure it is loaded with the film
Load the film onto the mandrel and
Load the
the of
mandrel
coming
offfilm
theonto
bottom
the rolland
with
makethe
sure
it isonto
loaded
with
the film
Load
film
mandrel
and
Refit the mandrel complete with
make
sure
itside
is loaded
with
the
the
adhesive
up.the
Tighten
the film
screw
coming
off the
bottom
of
thethe
rollfilm
with
make
sure
it
is
loaded
with
Inserire
la
bobina
sull’albero
fino
a
bloccarla
Riposizionare
l’albero
porta film
film superiore,
the
loaded
coming
offwith
the screwdriver
bottom of the
roll with
back up
provided
Refit the mandrel complete with
the
adhesive
sidebottom
up. Tighten
the
screw
coming
off
the
of
the
roll
with
contro
il mandrino
fissato
precedenza,
prima
un estrimità
e poi l’altra.
Refit the
mandrel
complete
with
the adhesive
side
up. in
Tighten
the screw inserendo
the
loaded
film
up with
screwdriver
provided
Refit the
mandrel
complete
theback
adhesive
side
Tighten
the screw Allentare
dopodiche
bloccare
il up.
secondo
mandrino.
la frizione
laterale
esterna. with
the
loaded
film
back
up
with
screwdriver
provided
the loaded film
back up with screwdriver provided
Thread film from top mandrel down
Load film onto bottom mandrel in
under top idler bar and over top
Thread film from top mandrel down
thel’albero
same fashion
with the
Thread
from top
down Togliere
porta filmas
inferiore
ed top
Tirare
50cm difilm
film (attenzione:
ilmandrel
lato colla
laminating
roller
surface
as deve
shown
Load film onto bottom mandrel in
under film
top idler
bar
and
over down
top
Thread
from
top
mandrel
Loadlefilm
onto
bottom
inas
mandrel,
remove
bottom
mandrel
under
top
bar
and
over
top eseguire
(ensure
film Spostare
is
loaded
with
stesse
operazioni
permandrel
montare la
essere
rivolto
versoidler
l’alto).
la barra
tendithe same
fashion
as with
the topin
laminating
roller
surface
as shown
Load
film
onto
bottom
mandrel
under
top
idler
bar
and
over
top
thedisame
as with the top
shown
rolleril surface
as shown bobina
film. fashion
filmlaminating
in avanti e far
passare
film
sotto
quest’ultima.
adhesive
side
up)
remove
bottom
(ensure
film issurface
loaded
with
the same
fashion
as withmandrel
the top as
laminating
shown mandrel,
mandrel,
remove
bottom
mandrel
as
(ensureroller
film is loadedas
with
shown
adhesive
side
up) with
mandrel,
remove
bottom
mandrel
as
(ensure
film
is
loaded
shown
adhesive side up)
shown
adhesive side up)
6
6
6
NOTE: Indents are drilled in the
mandrels to locate core holder so
NOTE: Indents are drilled in the
NOTE:
Indents
arefilms
drilled
inup
the
top and
bottom
line
L’albero
portaIndents
film
presenta
una holder
predispomandrels
to locate
core
NOTE:
are
drilled
in
theso
mandrels to locate core holder
so
sizione
di
fori
per
le
misure
standard
di
film.
top
and
bottom
films
line
up
mandrels
locate films
core holder
top andto
bottom
line upso
top and bottom films line up
Sbloccare la barra tendifilm inferiore
Move bottom
barbassa.
forward
facendola
scenderestabilizer
alla posizione
to assist film loading
Move bottom stabilizer bar forward
Move bottom stabilizer bar forward
to assist
film loading
Move bottom
stabilizer
bar forward
to assist
film loading
to assist film loading
NOTE: Ensure stabilizer bar is
relocated in the back position when
NOTE: Ensure stabilizer bar is
loaded
NOTE: in
Ensure
stabilizer
barwhen
is
relocated
the back
position
NOTE:
Ensure
stabilizer
bar is
Larelocated
barra
tendifilm
dovrà
essere
riposizioin the
back
position
when
loaded
relocated
in montato
the
back
nata
dopo aver
la position
bobina di when
film.
loaded
loaded
Take a piece of cardboard insert it in
Riposizionare
Piano
di lavoro.
Connip)
l’aiuto
betweenilthe
rollers
(in the
Take a piece of cardboard insert it in
diTake
un pezzo
di
cartone
(più
largo
è
meglio
a piecethe
of cardboard
insert
between
rollers (in the
nip)itit in
Take
a piece of cardboard
insert
in
è) spingere
piano
far entrare
i lembi
between
theper
rollers
(in the
nip) di
between the rollers (in the nip)
Load bottom film around roller bar
as shown
Load bottom film around roller bar
Tirare
circa
50cm
di film,
facendo
attenziLoad bottomas
film
around
roller
bar
shown
Load bottom film
around roller bar
one di farlo passare
sotto la barra tendifilm
as shown
as shown
(attenzione: lato colla verso l’alto)
Bring top film down under idler bar
and web the films together as shown
Bring top film down under idler bar
overlapping
thedown
top &under
bottom
film
by
Bring
topthe
film
idler
bar
and
web
films
together
shown
Bring
top film
down
under as
idler
bar
several
inches
and web thethe
films
together
as shown
overlapping
top
& bottom
by
and web the
films
together
as film
shown
Sovrapporre
i film
(quello
superiore
scende
overlapping
the
top
&
bottom
film
by
several
inches
overlapping
the top & bottom
film by
fino al rullo inferiore,
several quello
inchesinferiore sale
several inches
fino al rullo superiore).
I rulli sono aperti.
Lift top roller by turning roller
pressure
handle
anti-clockwise
film
(in modo
uniforme)
Lift
top roller
by turning roller
Chiudere
i
rulli
(che
rano
aperti) utilizzando
Lift top roller
byanti-clockwise
turning
roller
pressure
handle
Lift top roller
by turning roller
la pressure
maniglia laterale.
handle anti-clockwise
pressure handle anti-clockwise
Ensure the roller pressure is in the
‘LOCK’ position when running the
Ensure the roller pressure is in the
machine
Ensure
roller
pressure
is in the
the
‘LOCK’the
position
running
Ensure
the
rollerwhen
pressure
is in the
Assicurarsi
sempre
di
aver
portato
in
‘LOCK’ position
when running the
machine
‘LOCK’ position
when running the
posizione “lock” (chiusa)
machine
machine
Re-fit the feed tray
Re-fit the plastic safety guard - With the
NOTE: SAFETY TRIP SWITCH
guard and/or tray not in position you can Please note: There is a trip safety
Re-fit the plastic safety guard - With the
NOTE: SAFETY TRIP SWITCH
put the
switch to guard
run and
then the
by
Re-fit
thedrive
plastic
- With
NOTE:
SAFETY
TRIPthat
SWITCH
switch which
means
the
guard
traysafety
not in guard
position
you the
can Please
Re-fit and/or
the plastic
safety
- With
NOTE:
SAFETY
SWITCH
note:
There TRIP
is a trip
safety
pressing
thetray
loadnot
button
the machine
and/or
in run
position
you can
machine
will
not
work
if
the
feed
Far avanzare piano piano il film tra i rulli guard
ormente
e
tagliarlo
via..
attenzione:
per
la
vostra
sicurezza
un
put
the
drive
switch
to
and
then
by
Please
note:
There
is
a
trip
safety
guard and/or tray not in position you can Please
switch
which
means
the
note:
There
is a that
trip safety
will
run
forward
whentothe
load
button
is
put
the
drive
switch
run
and
then
by
tray
and
safety
guard
are
not
utilizzando il tasto FWD, RUN e il tasto
Riposizionare
protezione
di sicurezza
in by microinterruttore
fawork
funzionare
lafeed
pressing
thelaload
button
the
machine
switch which
that
put
the drive
switch
to run
and
then
machine
willnon
notmeans
thethe
switch which
means ifthat
the
Re-fit the feed tray
released
machine
will stop
pressing
the the
load
button
correctly
in
place.
Load. Fare fuoriuscire il cartoncino posteri- will
plexiglass
se
la
protezione
non
è
inserita.
run forward
when
the the
loadmachine
button ismacchina
machine
will
not
work
if
the
feed
pressing
the load
button
the
machine
tray andwill
safety
not guard
work ifare
thenot
feed
will run
forward
the load
button is machine
Re-fit the feed tray
released
thewhen
machine
will stop
tray and
safety
guard
are
not
will run
forward
when
the load
button is
correctly
in
place.
tray and safety guard are not
Re-fit the feed tray
released the machine will stop
correctly in place.
Re-fit the feed tray
released the machine will stop
correctly in place.
Re-fit the feed tray
Re-fit
Re-fit the
the feed
feed tray
tray
Film threading diagram IMPORTANTE: L’installazione delle bobine di film in modo
appropriato
determina
il risultato di plastificazione. Il diaAuto
memory
function
gramma qui accanto visualizza il passaggio film corretto.
Auto
memory
function
Cercate
sempre di allineare
bene le due bobine in modo
Auto
memory
function
The
linea
has
an
auto memory function, that
Auto
memory
che i film
entrino trafunction
i rulli perfettamente allineati. Se ci
means
if you
work
on the
samefunction,
roll
The
has
anmillimetri
auto
memory
that
sonolinea
anche
pochi
di differenza,
la of
collafilm,
esposThe
linea
has
an
auto
memory
function,
that
the
temperature
and
speed
will
be
set
to
the
ta andrà
depositarsi
sui rulli
della
plastificatrice
che
si
The
linea
has
an auto
memory
function,
that
means
if ayou
work
on
the
same
roll of film,
means
if
you
work
on
the
same
roll
of
film,
smae
settings
as
the
last
time
the
machine
sporcheranno.
Per
eliminare
residui
di
colla
dai
rulli
utilizmeans
if you workand
on speed
the same
of film,
the
temperature
will roll
be set
to the
the
and
speed
will
be
set
the
was
used.
zaretemperature
solo
Alcol Isopropilico
in spray.
Perthe
rimuovere
residui
the
temperature
andlast
speed
will
bemachine
set to
to
the
smae
settings
as the
time
smae
settings
as
the
last
time
the
machine
più
importanti
utilizzare
un
pezzetto
di
“Para”
(il
materiale
smaeused.
settings as the last time the machine
was
was
used.
usato
per le scarpe) in quanto la sua morbidezza non danwas
used.
neggia i rulli in silicone della plastificatrice.
Film threading diagram Film threading diagram Film threading diagram -
Come plastificare a caldo
Accendere la plastificatrice, premere il tasto HOT che aziona le resistenze per permettere alla macchina di riscaldarsi. Regolare la
temperatura in base al tipo di film che si utilizzerà. La plastificatrice sarà pronta a operare in circa 6 minuti.
1) Prova preliminare
Se si utilizza per la prima volta la bobina di film installata, si consiglia di effettuare alcune prove di laminazione.
Dopo che la spia READY si è accesa (quindi la macchina è alla temperatura impostata) chiudere i rulli di riscaldamento con
la manopola sulla parte della destra della macchina (posizione Lock), premere il tasto FWD (avanti) ed impostare una velocità
lenta per fare avanzare il film di almeno 25 cm attraverso i rulli prima di inserire il foglio da plastificare. Verificare che il film
fuoriesca sul retro della macchina. Regolare i settaggi di temperatura e velocità della macchina in modo da ottenere un risultato
ottimale. Per familiarizzare e trovare le impostazioni ottimali è normale far scorrere un po’ di film senza carta da plastificare.
Meglio fare esperienza con utilizzando film lucidi. E’ giusto sapere che i film di plastificazione sono in Polyestere spalmati
con colla EVA termosensibile. La colla che sulla bobina risulta opaca, rinviene con il calore e diventa lucida e trasparente. Se
in uscita sul retro della plastificazione è ancora opaca o presenta zone opache vuol dire che la temperatura non è sufficiente
(accertarsi però di aver chiuso i rulli e che il display indichi “ready” = pronta). Accertarsi anche che i rulli siano leggermente
“frenati” tramite le frizioni esterne. Se sono troppo frenati o troppo laschi avrete dei problemi durante la plastificazione.
RICORDA: questa macchina ha una funzione di memoria automatica per aiutarti ogni volta che l’accendi a riprendere le ultime
impostazioni utilizzate, in questo modo si potrà iniziare immediatamente a plastificare.
2) Dopo che la prova di plastificazione ha dato risultato soddisfacenti posiziona (se vuoi) le guide laterali sul piano di lavoro
e introduci i fogli nella plastificatrice.
RICORDA: tieni abbastanza spazio sul retro della macchina in modo che il foglio plastificato possa fuoriuscire facilmente. Se
non utilizzi la plastificatrice per un periodo prolungato, ricordati di diminuire la temperatura a 80° in modo da prolungare la
durata dei rulli.
Premi il tasto STOP dopo che il foglio plastificato è passato completamente attraverso i rulli posteriori, altrimenti
rimarranno segni sullo stesso.
Regolazione della temperatura: consultare il tuo fornitore di film per i settaggi della temperatura (normalmente tra i 100°
e i 110° - velocità 3-4).
3) Manutenzione
Non laminare oggetti metallici o altri materiali duri che possano danneggiare i rulli in silicone della plastificatrice.
Quando si ferma la plastificatrice alzare sempre i rulli con la manopola destra.
Pulire regolarmente la macchina previene la presenza di particelle di sporco sui documenti plastificati e allungherà la vita della
macchina
4) Pulizia dei rulli
Durante la normale attività di plastificazione l’adesivo in eccesso fuoriesce dal film e si attacca ai rulli in silicone. Ricordarsi
di pulire regolarmente i rulli togliendo i residui di colla.
Per pulire i rulli in silicone aprire i rulli con la manopola, togliere il film di plastificazione dalla macchina e scaldare i rulli a
30° - 40 °. Questa temperatura permetterà di rimuovere l’adesivo in modo semplice. Utilizzare solamente panni soffici e puliti
imbevuti di Alcool Isopropilico, e rimuovere i residui più importanti con della normale para (reperibile da un calzolaio).
Non utilizzare mai materiali abrasivi o metallici perché possono pregiudicare in maniera definitiva i rulli in silicone che sono
abbastanza delicati. Far avanzare i rulli piano in modo da pulire tutte le parti.
Non utilizzare nessun altro tipo di detergente o solvente per pulire i rulli.
PROBLEMI E SOLUZIONI
Problema: La plastificatrice non si accende.
Soluzione. Assicurarsi che il cavo di alimentazione sia collegato ad entrambi i lati e che ci sia corrente. Ci sono fusibili all’interno
del laminatore ma nella maggior parte dei casi i problemi sono imputabili solitamente ai cavi di alimentazioni o alle prese.
Problema: Il materiale plastificato presenta delle pieghe
Soluzione: E’ abbastanza inevitabile che succeda con qualsiasi tipo di plastificatrice soprattutto se si utilizzano materiali spessi.
Per ovviare il più possibile a questo problema assicurarsi che le bobine di film siano ben tensionate e regolare la pressione dei
rulli con la manopola esterna.
Problema: Il film risulta accartocciato intorno ai rulli mentre si effettua la plastificazione a caldo.
Soluzione: Il film non è stato montato o tensionato in modo appropriato. Vedi punto 2
Problema: il documento plastificato si presenta ondulato
Soluzione: la temperatura è troppo alta, quindi diminuire il settaggio della temperatura e attendere che la macchina abbia
raggiunto i nuovi valori impostati
Problema: La plastificazione appare in alcuni punti non trasparente
Soluzione: La temperatura di plastificazione è troppo bassa perciò non si è sviluppato abbastanza calore per sciogliere l’adesivo.
Aumentare la temperatura o diminuire la velocità.
IMPORTANTE: i film di plastificazione a caldo sono utilizzabili solo per plastifcare stampe su carta. Per plastificare stampe su
materiali plastici o sintetici occorre utilizzare film di laminazione con adesivi a freddo. In questo caso la plasticiatrice si utilizza
solo come una calandra per stendere il film in modo uniforme e non si usa la temperatura. In alcuni casi una leggera temperatura
sui rulli (60° C) aiuta comunque gli adesivi ad aderire meglio.
Per problemi diversi contattare il Vostro rivenditore di fiducia. Per problemi tecnici contatate Sales Logic Srl.
Sales Logic Srl offre una serie completa di soluzioni per Rilegare, Plastificare, Tagliare, Calcolare e Distruggere i documenti
con una serie di apparecchiature in grado di rispondere alle varie esigenze, siano esse quelle aziendali, domestiche o di centri
stampa e service.
TiTanium è un Marchio di Sales Logic Srl - www.saleslogic.it
Scaricare