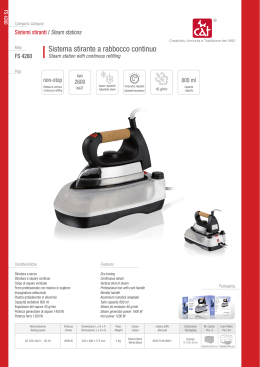
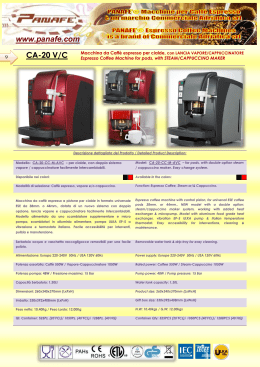
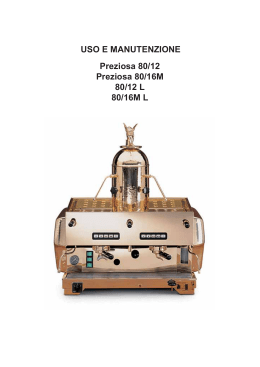
MANUALED’USO
VIBIEMME
USEHANDBOOK
VIBIEMME
VIBIEMME S.p.A. : Via Gounod, 25/27 - 20092 Cinisello B.mo Milano - Italy
Tel. +390266016691 - Fax +390266016636 - www.lavibiemme.it - E-mail: [email protected]
INDICE
INDEX
AVVERTENZE SU L’USO DELLA MACCHINA
Pag. 02
INFORMATION REGARDING THE USE OF THE MACHINE Page. 02
NORME GENERALI DI SICUREZZA E GARANZIA
Pag. 03
GENERAL SAFETY RULES AND WARRANTY
Page. 03
CARATTERISTICHE TECNICHE
Pag. 04
TECHNICAL CHARACTERISTICS
Page. 04
INSTALLAZIONE
Pag. 05
INSTALLATION
Page. 05
REGOLAZIONE PRESSIONE IN CALDAIA
Pag. 06
BOILER PRESSURE SETTING
Page. 06
REGOLAZIONE PRESSIONE POMPA
Pag. 07
PUMP PRESSURE SETTING
Page. 07
ISTRUZIONI D’USO PER MODELLO MANUALE
Pag. 08
INSTRUCTION FOR MANUAL MACHINES
Page. 08
ISTRUZIONI D’USO PER MODELLO SEMIAUTOMATICO
Pag. 09
INSTRUCTION FOR SEMIAUTOMATIC MACHINES
Page. 09
ISTRUZIONI D’USO PER MODELLO AUTOMATICO
Pag. 10
INSTRUCTION FOR USE FOR AUTOMATIC MACHINES
Page. 10
PROGRAMMAZIONE DOSI
Pag. 11
DOSES PROGRAMMING
Page. 11
ANOMALIE E ALLARMI
Pag. 12
ANOMALIES – ALARMS
Page. 12
FARE L’ESPRESSO
Pag. 13
TO MAKE ESPRESSO
Page. 13
MONTARE IL LATTE
Pag. 14
TO STEAM MILK
Page. 14
MANUTENZIONE GENERALE
Pag. 15
GENERAL MAINTENANCE
Page. 15
PULIZIA DEI PORTAFILTRI
Pag. 15
CLEANING OF FILTER-HOLDERS
Page. 15
PULIZIA DELLE PARTI ESTERNE
Pag. 16
CLEANING OF OUTER PARTS
Page. 16
FOTO DELLA MACCHINA
Pag. 18
PHOTO OF MACHINE
Page. 18
1
AVVERTENZE SULL’USO DELLA MACCHINA
Leggere attentamente le avvertenze contenute nel presente libretto perché forniscono importanti suggerimenti riguardanti la sicurezza
sia di chi utilizza la macchina sia di chi è preposto all’installazione e alla manutenzione della stessa. Questo manuale è da considerarsi
parte integrante della macchina che deve essere utilizzata solo nei modi e per i servizi per i quali è stata concepita. VIBIEMME declina
ogni responsabilità per danni a persone e/o cose derivanti da una errata installazione o da un uso improprio.
A tal proposito si raccomanda di:
* non usare la macchina senza acqua nella caldaia
* non toccare parti calde (tubo vapore / acqua – gruppo)
* non togliere il portafiltro durante l’erogazione del caffè
* non lasciare la macchina spenta in ambienti con temperatura sotto zero
* non lasciare i portafiltri agganciati a macchina spenta
* rigenerare il depuratore alle scadenze previste.
L’uso di qualsiasi apparecchio elettrico comporta l’osservanza delle seguenti regole elementari:
- non toccare la macchina con le mani bagnate
- non manovrare la macchina a piedi nudi
- non tirare il cavo per scollegare l’apparecchio
- non permettere che la macchina sia utilizzata da bambini o da personale non autorizzato
- non coprire il piano appoggiatazze con strofinacci
- non caricare la macchina con sostanze alcoliche.
INFORMATION REGARDING THE USE OF THE MACHINE
Carefully read the information contained into this book because they are important suggestions for security of the persons who
use the machine and those who make servicing. The machine must be used only in the way and for the service it has been built
for. This manual is considered an integral part of the machines. VIBIEMME cannot be considered responsible for any damage due
to an incorrect use.
* do not use the machine without water into the boiler
* do not touch hot parts (hot water or steam pipes)
* do not remove the filter holder during the coffee delivery
* do not leave the machine off if the temperature is below zero
* do not leave the filter holders hooked to the groups if the machine is not in use
* regenerate the softener at adviced periods.
The use of any kind of electric machine means the observance of the very simple following rules:
- do not touch the machine with wet hands
- do not use the machine barefoot
- do not pull out the electric cable to disconnect the machine
- do not let children or unauthorised personnel use the machine
- do not cover the top of the machine with a dish cloth.
- do not charge the machines with alcoholic substance.
2
NORME GENERALI DI SICUREZZA E GARANZIA
Qualsiasi tipo di modifica arbitraria apportata alla macchina, così come l’assenza o cattiva manutenzione dell’attrezzatura, sollevano
il produttore da qualsiasi responsabilità per danni derivati da tale incauto uso.
Pertanto la garanzia decade nel caso di:
- mancato rispetto delle istruzioni contenute nel presente manuale
- mancato rispetto dell’uso prescritto nelle suddette avvertenze
- mancato rispetto della manutenzione programmata
- l’uso di ricambi non originali nella manutenzione dell’attrezzatura e/o da personale non addetto
- mancata osservanza delle normali regole di prevenzione degli incidenti e di medicina del lavoro.
GENERAL SAFETY RULES AND WARRANTY
Should any unauthorised modification be performed on the equipment or should the maintenance be defective and/or inadequate,
the manufacturer is relieved from every liability for damages due to the improper or wrong use of the equipment.
Therefore the warranty is cancelled in case of:
- non-observance of the instructions contained in this handbook;
- non-observance of the intended use, as per instructions;
- failure to comply with the recommended maintenance schedule;
- use of non-original spare parts during maintenance and repairs and/or when maintenance works are performed by unqualified
personnel;
- failure to comply with general measures for accident prevention and Industrial Medicine provisions.
3
CARATTERISTICHE TECNICHE
Le macchine per caffè VIBIEMME vengono fornite nelle versioni
ad erogazione continua ed elettronica, in modalità manuale,
semiautomatica o elettronica.
Tutti i modelli sono completi di pompa vibrante incorporata ed i
gruppi sono ad erogazione continua con camera d’infusione
brevettata.
Predisposizioni nominali delle tensioni di alimentazione sono di
serie su tutta la gamma.
➣ 230 V monofase ± 10% 50 HZ
➣ 120 V monofase ± 10% 60 HZ
TECHNICAL CHARACTERISTICS
The espresso coffee machines VIBIEMME are produced both in
the continous delivery and in the electronic versions as well,
available in manual, semiautomatic and automatic models.
All models are complete with a built-in vibration pump, the
groups are of the continous delivery type with a patented
infusion chamber.
Standard pre-arrangements for power supply voltage are
provided on all models.
➣ 230 V monophase ± 10% 50 HZ
➣ 120 V monophase ± 10% 60 HZ
4
INSTALLAZIONE
Le macchine vengono fornite nell’apposito imballo a norma di legge
e con coordinate identificatrici del prodotto.
Qualsiasi difformità o cattiva ricezione dell’imballo deve essere
comunicata alla casa produttrice entro 8 giorni dalla consegna.
E’ a cura del cliente lo smaltimento dell’imballo nel rispetto delle
norme vigenti in materia nel paese di riferimento; pertanto VIBIEMME
non sarà considerata responsabile dell’uso improprio dello stesso.
Ogni macchina viene venduta corredata di manopole portafiltri, filtri,
filtri ciechi, beccucci e molletta portafiltro.
Gli allacciamenti sono a cura del cliente e l’installazione deve essere
effettuata secondo le istruzioni del presente libretto. Un’errata
installazione può causare danni alle persone e/o alle cose, indi per cui
il costruttore declina ogni responsabilità per la mancata osservanza
delle norme qui riportate.
INSTALLATION
The equipment will be supplied in a suitable package, in conformity
with the law, including a suitable marking for the correct identification
of the item therein contained. Any non-conformity or bad conditions
of the package shall be notified to the manufacturer within 8 (eight)
days after the receipt of the goods.
The purchaser shall dispose of the package in full compliance with the
concerning dispositions in force in the destination Country.
VIBIEMME shall not be held responsible for damages due to the
improper use of the package.
All equipments will be provided with filter-holding hand grips, filters,
blind filters, spouts, filter holding-springs.
The connections must be provided for, by the customers.
The installation must be carried out by following the instructions of
this manual. A wrong installation may cause damages to persons
and/or things and the producer will not be held responsible for damages
due to the lack of respect of installation normes given into this book.
5
REGOLAZIONE PRESSIONE IN CALDAIA
La regolazione della pressione in caldaia avviene agendo sul pressostato (1).
Ruotare la vite di regolazione (3) in senso orario o in senso antiorario
rispettivamente per aumentare o diminuire la pressione in caldaia.
Verificare i valori selezionati sul manometro pressione (2) (vedi scala
compresa da 0-2,5 bar).
2
PRESSURE SETTING
Set the boiler pressure by means of the provided pressure
switch (1).
Move the adjusting screw (3) clockwise or counter clockwise to
increase or lower the boiler pressure respectively.
The selected values can be checked on the pressure gauge (2) (see
reference scale from 0 to 2,5 bar).
6
REGOLAZIONE PRESSIONE POMPA
La regolazione della pressione pompa permette di avere il valore di
pressione desiderato indipendentemente dal valore di rete.
Per la regolazione del by-pass agire sulla vite di regolazione del
by-pass in senso orario per aumentare la pressione, in senso
antiorario per diminuirla.
Il valore ottimale di pressione è di 9 ± 1 bar: per verificare il valore
desiderato si controlli il valore espresso dal manometro (3) (vedi scala
compresa fra 0-16 bar).
3
PUMP PRESSURE SETTING
This setting allows the selection of a specific pressure value for
the pump that is not dependent on the actual waterworks pressure.
To set the by-pass valve, rotate the head screw of by pass
adjusting screw clockwise to increase the pump pressure or
counter clockwise to lower it. The optimal value is 9 ± 1 bar: check
the selected value on the relevant pressure gauge (3) (see reference
scale from 0 to 16 bar).
7
ISTRUZIONI D’USO PER MODELLO MANUALE
a) Riempire la vaschetta (1).
b) Inserire la spina nella presa di corrente.
c) Portando la manopola del commutatore (2) in posizione 1 si accenderà la spia verde on/off (3) e il caricamento dell’acqua in
caldaia inizierà automaticamente.
d) Portando la manopola del commutatore (2) in posizione 2 si accenderà la spia rossa della resistenza (4); quando si spegne,
verificare sul manometro che la pressione in caldaia (5) sia compresa tra 0,9-1,1 bar.
Attenzione: è necessario in questa fase aprire il rubinetto vapore (6) per permettere la fuoriuscita dell’aria presente in caldaia;
richiuderlo quando comincia a fuoriuscire vapore.
e) Sotto la vaschetta dell’acqua è installato un sensore che spegne automaticamente la macchina qualora il livello di acqua in
caldaia fosse troppo basso; in tal caso la spia rossa (7) si accende; ciò evita che la resistenza possa accidentalmente bruciarsi.
Note: durante il trasporto può capitare che il sensore fuoriesca dalla sua sede; è necessario allora togliere la vaschetta e spingere
il sensore al suo posto: Si udirà un “click” a riposizionamento avvenuto.
A QUESTO PUNTO LA MACCHINA FUNZIONA IN MODALITA’ MANUALE
- per erogare caffè agire sulla leva (9)
- per erogare vapore aprire il rubinetto (6)
- per erogare acqua aprire il rubinetto (8)
INSTRUCTIONS FOR MANUAL MACHINES
a)
b)
c)
d)
Fill the reservoir (1).
Plug in the espresso machine.
Put the commutator (2) in position 1, the on/off indicator green lamp (3) will light and the boiler water inlet will automatically start.
Putting the commutator (2) in position 2 the resistance red indicator lamp (4) will light. When it is off, it’s better to verify that
boiler’s pressure (5) will be indicated - about 0,9-1,1 bar – on manometer.
ATT.: In this phase it is necessary to open the steam tap (6) and let the air present into the boiler go out; as soon as the steam
starts coming out, close the steam tap.
e) Under the water tank there is a weight sensor which will turn the machine off if the water supply gets too low to keep the
element covered: in this case a red indicator lamp (7) will light. This ensures the element cannot be accidentally burnt out.
Note: In transport the sensor plate occasionally pops out of its mounting position. Remove the water tank and push down on
the plate. You should hear a “click” reposition the plate.
THE MACHINE IS NOW WORKING IN A MANUAL WAY
- for coffee delivery act on command lever (9)
- for steam delivery open tap (6)
- for water delivery open tap (8)
8
ISTRUZIONI D’USO PER MODELLO SEMIAUTOMATICO
a) Riempire la vaschetta (1).
b) Inserire la spina nella presa di corrente.
d) Portando la manopola del commutatore (2) in posizione 1 si accenderà la spia verde on/off (3) e il caricamento dell’acqua in
caldaia inizierà automaticamente.
d) Portando la manopola del commutatore (2) in posizione 2 si accenderà la spia rossa della resistenza (4); quando si spegne,
verificare sul manometro che la pressione in caldaia (5) sia compresa tra 0,9-1,1 bar.
Attenzione: è necessario in questa fase aprire il rubinetto vapore (6) per permettere la fuoriuscita dell’aria presente in caldaia;
richiuderlo quando comincia a fuoriuscire vapore.
e) Sotto la vaschetta dell’acqua è installato un sensore che spegne automaticamente la macchina qualora il livello di acqua in
caldaia fosse troppo basso; in tal caso la spia rossa (7) si accende; ciò evita che la resistenza possa accidentalmente bruciarsi.
Note: durante il trasporto può capitare che il sensore fuoriesca dalla sua sede; è necessario allora togliere la vaschetta e spingere
il sensore al suo posto: Si udirà un “click” a riposizionamento avvenuto.
A QUESTO PUNTO LA MACCHINA FUNZIONA IN MODALITA’ SEMIAUTOMATICA
- per erogare caffè agire sul pulsante (14)
- per erogare vapore aprire il rubinetto (6)
- per erogare acqua aprire il rubinetto (8)
INSTRUCTIONS FOR SEMIAUTOMATIC MACHINES
a)
b)
c)
d)
Fill the reservoir (1).
Plug in the espresso machine.
Put the commutator (2) in position 1, the on/off indicator green lamp (3) will light and the boiler water inlet will automatically start.
Putting the commutator (2) in position 2, the resistance red indicator lamp (4); will light and when it is off, it’s better to verify
that boiler’s pressure (5) will be indicated - about 0,9-1,1 bar.
ATT.: In this phase it is necessary to open the steam tap (6) and let the air present into the boiler go out; as soon as the steam
starts coming out, close the steam tap.
e) Under the water tank there is a weight sensor which will turn the machine off if the water supply gets too low to keep the
element covered: in this case a red indicator lamp (7) will light. This ensures the element cannot be accidentally burnt out.
Note: In transport the sensor plate occasionally pops out of its mounting position. Remove the water tank and push down on
the plate. You should hear a “click” reposition the plate.
THE MACHINE IS NOW WORKING IN A SEMIAUTOMATIC WAY
- for coffee delivery act on command button (14)
- for steam delivery open tap (6)
- for water delivery open tap (8)
9
ISTRUZIONI D’USO PER MODELLO AUTOMATICO
a) Riempire la vaschetta (1).
b) Inserire la spina nella presa di corrente.
e) Portando la manopola del commutatore (2) in posizione 1 si accenderà la spia verde on/off (3) e il caricamento dell’acqua in
caldaia inizierà automaticamente.
d) Portando la manopola del commutatore (2) in posizione 2 si accenderà la spia rossa della resistenza (4); quando si spegne,
verificare sul manometro che la pressione in caldaia (5) sia compresa tra 0,9-1,1 bar.
Attenzione: è necessario in questa fase aprire il rubinetto vapore (6) per permettere la fuoriuscita dell’aria presente in caldaia;
richiuderlo quando comincia a fuoriuscire vapore.
e) Sotto la vaschetta dell’acqua è installato un sensore che spegne automaticamente la macchina qualora il livello di acqua in
caldaia fosse troppo basso; in tal caso la spia rossa (7) si accende; ciò evita che la resistenza possa accidentalmente bruciarsi.
Note: durante il trasporto può capitare che il sensore fuoriesca dalla sua sede; è necessario allora togliere la vaschetta e spingere
il sensore al suo posto: Si udirà un “click” a riposizionamento avvenuto.
A QUESTO PUNTO LA MACCHINA FUNZIONA IN MODALITA’ AUTOMATICA
- per erogare caffè agire sul pulsante di comando automatico desiderato (15)
(vedi paragrafo “Programmazione dosi”)
- per erogare vapore aprire il rubinetto (6)
- per erogare acqua aprire il rubinetto (8)
INSTRUCTIONS FOR USE FOR AUTOMATIC MACHINES
a)
b)
c)
d)
Fill the reservoir (1).
Plug in the espresso machine.
Put the commutator (2) in position 1, the on/off indicator green lamp (3) will light and the boiler water inlet will automatically start.
Puting the commutator (2) in position 2 the resistance red indicator lamp (4) will light and when it is off, it’s better to verify that
boiler’s pressure (5) will be indicated - about 0,9-1,1 Bar ATT.: In this phase it is necessary to open the steam tap (6) and let the air present into the boiler go out; as soon as the steam
starts coming out, close the steam tap.
e) Under the water tank there is a weight sensor which will turn the machine off if the water supply gets too low to keep the
element covered: in this case a red indicator lamp (7) will light. This ensures the element cannot be accidentally burnt out.
Note: In transport the sensor plate occasionally pops out of its mounting position. Remove the water tank and push down on
the plate. You should hear a “click” reposition the plate.
THE MACHINE IS NOW WORKING IN AUTOMATIC WAY
- for coffee delivery act on command automatic button (15)
(See paragraph “Doses Programming”)
- for steam delivery open tap (6)
- for water delivery open tap (8)
10
PROGRAMMAZIONE DOSI
1. Premere il tasto PROG/CONT (11) e tenerlo premuto fino all’accensione lampeggiante del led corrispondente.
2. Premere il tasto simbolo che si vuole programmare; quando si ritiene che la dose sia quella voluta, premere nuovamente il tasto
PROG/CONT (11) o il tasto simbolo di programmazione desiderata per memorizzare la dose.
A memorizzazione avvenuta il led PROG/CONT (11) resterà spento.
3. Per altre regolazioni ripetere la programmazione dosi indicata al punto 1 e 2.
La programmazione dosi consigliata è: 1. Un caffè corto (30 ml). 2. Due caffè corti (60 ml). 3. Un caffè lungo (40ml). 4. Due caffè
lunghi (80 ml).
Il tasto di programmazione può anche essere utilizzato per erogare caffè; premere una volta per iniziare l’erogazione del caffè e
ripremere una seconda volta per terminare l’erogazione.
DOSES PROGRAMMING
1. Press key PROG/CONT (11) and keep it pressed until the led PROG/CONT (11) starts blinking.
2. Press the symbol key you want to programm and when the quantity of coffee you want is reached, press key PROG/CONT (11)
(or press again the symbol key that you are programming) to store the dose. At the programming end the led PROG/CONT (11)
will be switched off.
3. Repeat instructions point 1 and 2 to make other regulations.
A recommended setup for the four buttons is 1. One single (30ml) shot. 2. Double (60 ml) shot. 3. One long shot (40 ml) 4. Two long
(80 ml) shots. The programming button (11) can be use also to do a normal coffee; you have to press one time to start the
diffusion screen and another one to stop it.
11
ANOMALIE E ALLARMI
a) In fase di erogazione: lampeggio veloce del led PROG/CONT (11).
b) In fase di erogazione o anche in stato di riposo: lampeggio lento
del led PROG/CONT (11).
In questi casi rivolgersi al Centro Assistenza Tecnica.
ANOMALIES - ALARMS
a) During coffee delivery: very rapid blinking of led PROG/CONT (11).
b) During coffee delivery or when the machine is not working: very
slow blinking of led PROG/CONT (11).
In this cases call the Technical Maintenance Servicing.
12
FARE L’ESPRESSO
Sganciare il portafiltro dal gruppo e riempire il filtro con caffè
macinato in quantità proporzionale al filtro usato; pressare
leggermente il contenuto nel filtro, agganciare il portafiltro
facendo attenzione che il manico sia in posizione centrale,
quindi alzare la levetta.
Per prelevare acqua ruotare la manopola e richiudere dopo il
prelievo. Per prelevare vapore ruotare la manopola e richiudere dopo il prelievo.
Dopo un prelievo prolungato di acqua/vapore, attendere alcuni
secondi per l’erogazione del caffè e controllare che la lancetta
del manometro (5) indichi la pressione 1,1.
Il manometro pompa (13) è un buon indicatore della qualità di
estrazione del caffè. Quando il caffè comincia a fuoriuscire dal
gruppo erogatore prestare attenzione allindicazione del
manometro; la perfetta estrazione si ha quando il manometro
segna tra 8,6 / 9,2 bar.
Se il valore è superiore il caffè sarà troppo denso; se il valore è
inferiore significa che il caffè è stato macinato troppo finemente.
TO MAKE ESPRESSO
Remove the filter holder from the group head and fill the
filter with ground coffee accordingly to the filter in use and
slightly press the coffee in the filter. Put the filter holder back
in place making sure that the handle is in the centre position,
then lift the lever up.
To draw water, turn handle and close it afterwards.
To get steam, turn handle and close it afterwards.
After getting a certain amount of water/steam, wait for a few
seconds before delivering the coffee and check that the
pressure gauge (5) is on 1,1.
The pump manometer (13) is a good quality indicator for
diffusion screen of coffee. When coffee starts going out from
handled, look at pressure gauge, the perfect diffusion screen
is when the pressure gauge indicates between 8,6/9,2 bar.
If the value is higher means that coffee is too much dense
while if the is lower means coffee has been ground too
much thin.
13
MONTARE IL LATTE
Prima di montare il latte, aprire il rubinetto vapore (6) per circa 5 secondi. Questo
consente una generale pulizia del tubo vapore da acqua o da bolle d’aria nei tubi.
Posizionare l’asta vapore dentro un contenitore in acciaio con la relativa punta (12) sotto
la superficie del latte orientata a ore 4.
Aprire il rubinetto e mettere una mano sotto il contenitore; dopo circa 10 secondi alzare
leggermente il contenitore in modo che lo spruzzatore (12) sia più vicino al fondo del
contenitore. Quando il contenitore sarà “scomodo” da tenere in mano, chiudere il
rubinetto a vapore.
Riaprire il rubinetto (6) per 5 secondi in modo da assicurarsi che il latte non venga
risucchiato nella caldaia, causando contaminazioni. Pulire l’asta (10) con un panno umido
così che il latte non si secchi sul tubo.
TO STEAM MILK
Before steaming milk turn steam wand (6) on for about five seconds. This is to clear
any water from the pipe and clear any vacuum in pipes.
Place steam wand inside stainless steel (12) jug with the tip of the wand just below
the milk surface at about 4 o’clock. Turn steam wand on and place one hand at base
of the jug. After about ten seconds raise jug slightly so that the steam nozzle (12) is
closer to the bottom of the jug. Once the jug starts to feel uncomfortable to hold turn
off the steam.
Again turn on the steam wand (6) for a five second burst. This will ensure no milk is
accidentally sucked back into the boiler where it will cause contamination. Wipe
steam wand (10) with damp clothe so that the milk won’t harden onto the wand.
14
PULIZIA DEI PORTAFILTRI
Si consiglia di effettuare questa operazione giornalmente così come segue:
Togliere il portafiltro (1) dal gruppo di erogazione e col manico di un cucchiaio far leva fra il corpo del portafiltro (2) ed il filtro stesso (3)
fino alla sua avvenuta estrazione.
Dopo aver sciacquato con cura la parte interiore del corpo portafiltro (3) inserire il filtro cieco (4) in dotazione con il corredo e procedere
all’erogazione di un paio di caffè.
Ad operazione effettuata togliere il portafiltro (1) e reinserire il filtro originario (3) senza agganciarlo al gruppo erogatore.
4
3
2
1
CLEANING OF THE FILTER HOLDERS
The filter holders shall be cleaned at the end of every working day.
Cleaning procedure:
Remove the filter holders (1) from the delivery unit; using a tablespoon handle, lever up between the filter holder body (2) and the
filter (3) and take the filter out.
Rinse carefully the inner part of the filter holder (3), insert the blind filter (4) and deliver a couple of coffees.
Remove again the filter holder (1) from the unit and place again the original filter inside (3).
Do not couple the holder to the delivery unit.
15
Scaricare