MIO 640
Gebruiksaanwijzing
NL
Notice d’emploi
FR
Bedienungsanlettung
D
Operating instructions
EN
Utente
IT
Usuario
ES
Użytkownik
PT
©Boretti BV
Mio gasoven-13
*5
$BSPDMJFOUF
(#
%FBSDVTUPNFS
'3
$I SFDMJFOUF$IFSDMJFOU
TFOUJUBNFOUF-BSJOHSB[JBNP 8 F U I B O L Z P V B O E
FDJDPOHSBUVMJBNPQFSMB DPOHSBUVMBUFZPVPOZPVS
TDFMUBEB-FJGBӃB
DIPJDF
.FSDJFUTJODSFT
G MJDJUBUJPOT QPVS MF DIPJY
RVFWPVTBWF[GBJU
M-system
M-system
M-system
Fig. 1 - Abb. 1 - Afb. 1
!
2
!! IMPORTANTE !!
!! IMPORTANT !!
!! IMPORTANT !!
QUESTO PRODOTTO È STATO
CONCEPITO PER UN IMPIEGO DI
TIPO DOMESTICO. IL COSTRUTTORE
DECLINA OGNI RESPONSABILITÀ
NEL CASO DI EVENTUALI DANNI A COSE O
PERSONE DERIVANTI DA UNA NON CORRETTA
INSTALLAZIONE O DA USO IMPROPRIO,
ERRONEO OD ASSURDO.
L’APPARECCHIO
NON
DEVE
ESSERE USATO DA PERSONE
(COMPRESI
BAMBINI)
CON
RIDOTTE CAPACITÀ FISICHE,
SENSORIALI O MENTALI, O DA PERSONE
CHE MANCANO DELL’ESPERIENZA E DELLE
CONOSCENZE NECESSARIE SE NON SOTTO
LA SUPERVISIONE O DIETRO ISTRUZIONI
SULL’USO DELL’APPARECCHIO DA PARTE
DI UNA PERSONA RESPONSABILE PER LA
LORO SICUREZZA. I BAMBINI DEVONO
ESSERE CONTROLLATI PER ASSICURARSI
CHE NON GIOCHINO CON L’APPARECCHIO.
THIS APPLIANCE IS CONCEIVED
FOR DOMESTIC USE ONLY. THE
MANUFACTURER SHALL NOT IN
ANY WAY BE HELD RESPONSIBLE
FOR WHATEVER INJURIES OR DAMAGES ARE
CAUSED BY INCORRECT INSTALLATION OR
BY UNSUITABLE, WRONG OR ABSURD USE.
THIS APPLIANCE IS NOT
INTENDED FOR USE BY
PERSONS
(INCLUDING
CHILDREN) WITH REDUCED
PHYSICAL, SENSORY OR MENTAL
CAPABILITIES,
OR
LACK
OF
EXPERIENCE
AND
KNOWLEDGE,
UNLESS THEY HAVE BEEN GIVEN
SUPERVISION
OR
INSTRUCTION
CONCERNING USE OF THE APPLIANCE
BY A PERSON RESPONSIBLE FOR
THEIR SAFETY. CHILDREN SHOULD BE
SUPERVISED TO ENSURE THAT THEY
DO NOT PLAY WITH THE APPLIANCE.
CE
PRODUIT
EST
CONÇU
EXCLUSIVEMENT POUR USAGE
DOMESTIQUE. LE CONSTRUCTEUR
DÉCLINE TOUTE RESPONSABILITÉ
POUR DOMMAGES ET BLESSURES CAUSÉES
PAR UNE INSTALLATION INCORRECTE OU PAR
UN USAGE IMPROPRE, ERRONÉ OU ABSURDE.
L’APPAREIL NE DOIT PAS ÊTRE
UTILISÉ PAR DES PERSONNES
(ENFANTS INCLUS) DISPOSANT DE
CAPACITÉS
PHYSIQUES,
SENSORIELLES OU MENTALES RÉDUITES, OU
PAR DES PERSONNES N’AYANT PAS
L’EXPÉRIENCE OU LES CONNAISSANCES
REQUISES, SI CE N’EST SOUS LA SURVEILLANCE
D’UNE PERSONNE RESPONSABLE DE LEUR
SÉCURITÉ OU APRÈS AVOIR REÇU DE CELLE-CI
LES INSTRUCTIONS RELATIVES À L’UTILISATION
DE L’APPAREIL. LES ENFANTS DOIVENT ÊTRE
SURVEILLÉS, AFIN DE S’ASSURER QU’ILS NE
JOUENT PAS AVEC L’APPAREIL.
L’apparecchio deve essere
allacciato
da
personale
professionalmente
qualificato e in conformità
alla norme vigenti.
La targhetta (a) delle
caratteristiche del forno
è accessibile anche ad
apparecchio
installato.
In
questa
targhetta,
visibile
aprendo
la
porta, sono riportati tutti
i dati di identificazione
dell’apparecchio,
la
pressione e il tipo di gas per
il quale è stato regolato.
L’apparecchio
essendo
da incasso appartiene alla
classe III.
Pertanto Vi invitiamo a
seguire attentamente le
istruzioni ed i suggerimenti
per un corretto utilizzo dei
nostri prodotti.
The appliance must be
connected
by
qualified
technician in accordance with
the applicable regulations.
The data plate (a) of the
oven is still visible after the
appliance has been installed.
This plate, which is visible
when the oven door is open,
contains all the identification
data of the appliance, as well
the type of gas and service
pressure for which it has
been calibrated.
Since the appliance is builtin, it belongs to class III.
Follow the instructions and
suggestions carefully to
ensure the safe and proper
use of this product.
L’appareil doit être installé
par un personnel qualifié
dans le respect des normes
en vigueur. La plaque (a) des
caractéristiques du four est
accessible appareil installé.
Sur cette plaque, visible en
ouvrant la porte, se trouvent
toutes les données de
l’appareil, la pression et le
type de gaz pour lequel il a
été réglé.
Cet appareil à encastrer
appartient à la classe III.
Nous vous invitons à suivre
attentivement les instructions
et les suggestions pour une
utilisation correcte de nos
produits.
%&
4FISHFFISUFS,VOEF
&4
&TUJNBEP$MJFOUF
/(FBDIUFLMBOU
15
&TUJNBEP$MJFOUF
XJSEBOLFO*IOFOVOE -FBHSBEFDFNPTNVDIPZMF XJKEBOLFOVFOGFMJDJUFSFOV "HSBEFDFNPTNVJUP
CFHMDLXOTDIFO4JF[V*ISFS GFMJDJUBNPTQPSTVFMFDDJ O NFUEFEPPSVHFEBOFLFV[F TJODFSBNFOUFBTVBFTDPMIBF
BQSPWFJUBNPTBPDBTJ PQBSB
8BIM
PGFMJDJUBS
M-system
M-system
M-system
M-system
Das
Gerät
muss
von
einem
Fachmann
den
geltenden
gesetzlichen
Auflagen
entsprechend
angeschlossen werden. Das
Identifikationsschild (a) ist
auch nach der Installation
des Gerätes sichtbar. Auf
diesem Schild, das nach
dem Öffnen der Tür sichtbar
wird, stehen alle für die
Identifikation des Gerätes
erforderlichen
Daten
sowie der Gastyp und der
Gasdruck, auf den das Gerät
eingestellt ist.
Das Gerät gehört als
Einbaugerät zur Klasse III.
Voraussetzung
für
eine
korrekte Benutzung unserer
Produkte ist die genaue
Befolgung aller Anleitungen
und Hinweise.
!! WICHTIG !!
El aparato tiene que ser
instalado según las normas
vigentes por profesionales
cualificados. La chapa (a)
con las características del
horno puede verse abriendo
la puerta y, por lo tanto,
no queda escondida tras
efectuar la instalación. En
esta chapa se facilitan todos
los datos de identificación del
horno así como la presión y
el tipo de gas para el cual se
ha regulado.
El aparato al ser empotrable
pertenece a la clase III.
Para un uso correcto de
nuestros
aparatos,
se
aconseja leer atentamente
y por completo las presentes
instrucciones.
!! IMPORTANTE !!
!! BELANGRIJK !!: !! IMPORTANTE !!
Het apparaat moet door
gekwalificeerd
personeel
en volgens de geldende
voorschriften
worden
aangesloten. Het typeplaatje
(a) van de oven is ook
toegankelijk als het apparaat
geïnstalleerd is. Dit plaatje,
dat zichtbaar is als de deur
wordt geopend, vermeldt
alle
identificatiegegevens
van het apparaat, de druk en
de gassoort waarvoor het is
ingesteld.
Het apparaat is van het
inbouwtype en behoort tot
klasse III.
Wij verzoeken u dan ook de
aanwijzingen en adviezen
voor een juist gebruik van
onze producten nauwgezet
te volgen.
O
aparelho
deve
ser
instalado
por
pessoal
profissionalmente qualificado
e em conformidade com as
normas em vigor. A chapa (a)
de características do forno
está acessível mesmo com o
aparelho instalado.
Nesta chapa, visível abrindo
a porta, encontram-se todos
os dados de identificação
do aparelho, a pressão e o
tipo de gás para o qual está
regulado.
O aparelho, por ser de
encastrar, pertence à classe
III.
Assim, convidamolo a seguir
atentamente as instruções
e sugestões para uma
utilização
correcta
dos
nossos produtos.
DIESES PRODUKT IST ALS
HAUSHALTSGERÄT GEDACHT. FÜR
SCHADEN AN SACHEN ODER
PERSONEN, DIE AUF FALSCHE
INSTALLATION
BZW.
UNGEEIGNETEN
GEBRAUCH
ODER
MISSBRAUCH
ZURÜCKZUFÜHREN SIND, ÜBERNIMMT DER
HERSTELLER KEINERLEI VERANTWORTUNG.
DAS GERÄT DARF NICHT VON
PERSONEN
(EINSCHLIESSLICH
KINDERN) MIT EINGESCHRÄNKTER
KÖRPERLICHER ODER GEISTLICHER
KAPAZITÄT ODER PERSONEN OHNE
ERFAHRUNG UND DIE NOTWENDIGEN
KENNTNISSE BENUTZT WERDEN, ES SEI DENN,
DIES GESCHIEHT UNTER DER AUFSICHT ODER
NACH UNTERWEISUNG IM GEBRAUCH DES
GERÄTS DURCH EINER FÜR DEREN SICHERHEIT
VERANTWORTLICHEN PERSON. KINDER SIND
ZU BEAUFSICHTIGEN, UM SICHERZUSTELLEN,
DASS SIE NICHT MIT DEM GERÄT SPIELEN.
ESTE PRODUCTO FUE CONCEBIDO
PARA UN USO DE TIPO DOMÉSTICO.
EL
CONSTRUCTOR
DECLINA
CUALQUIER RESPONSABILIDAD EN
EL CASO DE DAÑOS EVENTUALES A COSAS O
PERSONAS QUE DERIVEN DE UNA
INSTALACIÓN INCORRECTA O DE UN USO
IMPROPIO, ERRADO O ABSURDO.
NO PUEDEN UTILIZAR EL APARATO
PERSONAS (INCLUIDOS NIÑOS) CON
CAPACIDADES FÍSICAS, SENSORIALES
O MENTALES REDUCIDAS, NI
PERSONAS QUE NO DISPONGAN DE LA
EXPERIENCIA Y DE LOS CONOCIMIENTOS
NECESARIOS, A MENOS QUE ESTÉN BAJO LA
SUPERVISIÓN DE UNA PERSONA RESPONSABLE
DE SU SEGURIDAD O HAYAN RECIBIDO LAS
INSTRUCCIONES NECESARIAS SOBRE LA
UTILIZACIÓN DEL APARATO. LOS NIÑOS TIENEN
QUE ESTAR CONTROLADOS PARA ASEGURARSE
DE QUE NO JUEGAN CON EL APARATO.
DIT
PRODUKT
IS
ALS
HUISHOUDELIJK
APPARAAT
GEDACHT.VOORBESCHADIGINGEN
AAN SPULLEN OF PERSONEN DIE
AAN VERKEERDE INSTALLATIE, MISBRUIK OF
VERKEERDE GEBRUIK ZIJN TE WIJTEN, NEEMT
DE
FABRIKANT
GEEN
VERANTWOORDELIJKHEID OP ZICH.
DIT APPARAAT IS NIET BEDOELD
VOOR GEBRUIK DOOR PERSONEN
(MET INBEGRIP VAN KINDEREN) MET
VERLAAGDE FYSIEKE, SENSORISCHE
OF MENTALE VERMOGENS, OF MET GEBREK
AAN ERVARING EN KENNIS, TENZIJ ZIJ LEIDING
OF INSTRUCTIES HEBBEN ONTVANGEN
BETREFFENDE HET GEBRUIK VAN HET APPARAAT
DOOR MIDDEL VAN EEN PERSOON DIE VOOR
HUN VEILIGHEID VERANTWOORDELIJK IS.
KINDEREN MOETEN WORDEN GECONTROLEERD
OM TE GARANDEREN DAT ZIJ NIET MET HET
APPARAAT SPELEN.
ESTE PRODUTO FOI CONCEBIDO
PARA UMA UTILIZAÇÃO DE TIPO
DOMÉSTICA.
O
FABRICANTE
DECLINA
TODAS
AS
RESPONSABILIDADES NO CASO DE EVENTUAIS
DANOS A COISAS OU PESSOAS DERIVADOS DE
UMA INSTALAÇÃO INCORRECTA OU DE USO
IMPRÓPRIO, ERRÓNEO OU ABSURDO.
O APARELHO NÃO DEVE SER USADO
POR
PESSOAS
(INCLUSIVE
CRIANÇAS) COM CAPACIDADES
FÍSICAS, SENSORIAIS OU MENTAIS
REDUZIDAS, OU POR PESSOAS QUE NÃO
TENHAM EXPERIÊNCIAS NEM CONHECIMENTO
NECESSÁRIO A NÃO SER QUE SEJAM
SUPERVISIONADAS E INSTRUÍDAS, SOBRE O
USO DO APARELHO, POR UMA PESSOA
RESPONSÁVEL PELA SEGURANÇA DAS MESMAS.
AS CRIANÇAS DEVEM SER CONTROLADAS PARA
CONTROLADAS PARA SE TER CERTEZA DE QUE
NÃO BRINQUEM COM O APARELHO.
3
IT
GB
INDICE
FR
CONTENTS
INDEX
ISTRUZIONI PER
INSTRUCTIONS FOR
INSTRUCTIONS POUR
L’INSTALLATORE (PAG. 6) THE INSTALLER (PAG. 6) L’INSTALLATEUR (PAG. 6)
NORME PER L’INSTALLAZIONE INSTRUCTIONS FOR INSTALLATION NORMES D’INSTALLATION
PAG. 6 DE L’APPAREIL
DELL’APPARECCHIO
PAG. 6 OF THE APPLIANCE
PAG. 6
6 POSITIONING
UBICAZIONE
VENTILAZIONE DEL LOCALE 6 VENTILATION
8 GAS CONNECTION
ALLACCIAMENTO GAS
RIGID PIPE CONNECTION
ALLACCIAMENTO DEL TUBO
METALLICO
8
6 EMPLACEMENT
6
6 VENTILATION DU LOCAL
6
8 BRANCHEMENT DU GAZ
8
8 BRANCHEMENT DU TUBE
MÉTALLIQUE
8
CONVERSIONE AD ALTRO
TIPO DI GAS
CONVERSION TO A
12 DIFFERENT TYPE OF GAS
CONVERSION DE TYPE
12 DE GAZ
12
TABELLA DEGLI UGELLI
14 NOZZLE TABLE
14 TABLE DES GICLEURS
14
REGOLAZIONE DEL MINIMO
NEL CASO DELLA
CONVERSIONE AD ALTRO
TIPO DI GAS
16
ADJUSTMENT OF THE
REGLAGE DU MINIMUM
MINIMUM SETTING
EN CAS DE CONVERSION
FOLLOWING CONVERSION TO DE GAZ
A DIFFERENT GAS TYPE
16
20 FLUSH FITTING
INCASSO DEL FORNO
16
20 ENCASTREMENT DU FOUR 20
ALLACCIAMENTO ELETTRICO 22 ELECTRICAL CONNECTIONS 22 BRANCHEMENT ELECTRIQUE 22
ISTRUZIONI PER
INSTRUCTIONS FOR
INSTRUCTIONS POUR
L’UTENTE
(PAG. 26) THE USER
(PAG. 26) L’UTILISATEUR (PAG. 26)
PRIMO UTILIZZO
PAG. 26 THE FIRST TIME YOU
PREMIERE
USE THE OVEN
PAG. 26 UTILISATION
PANNELLI AUTOPULENTI
DESCRIZIONE FRONTALE
COMANDI
- FORNO A GAS
CON GRILL ELETTRICO
30
- TERMOSTATO DEL FORNO30
- GRILL ELETTRICO
32
- CONTAMINUTI MECCANICO 32
DESCRIPTION OF THE FRONT
CONTROL PANEL
- GAS OVEN
WITH ELECTRIC GRILL
30
- OVEN TEMPERATURE CONTROL 30
- ELECTRIC GRILL
32
- MECHANICAL MINUTE TIMER 32
DESCRIPTION DU BANDEAU
DE COMMANDE
- FOUR AU GAZ AVEC GRIL
ÉLECTRIQUE
30
- THERMOSTAT DU FOUR 30
- GRIL ÉLICTRIQUE
32
- MINUTERIE MÉCANIQUE 32
DESCRIZIONE FRONTALE
COMANDI
- FORNO A GAS
CON GRILL GAS
34
- TERMOSTATO DEL FORNO34
- GRILL GAS
36
- LUCE FORNO-GIRARROSTO 36
DESCRIPTION OF THE FRONT
CONTROL PANEL
- GAS OVEN
WITH GAS GRILL
34
- OVEN TEMPERATURE CONTROL 34
- GAS GRILL
36
- OVEN LIGHT- SPIT ROASTER 36
DESCRIPTION DU BANDEAU
DE COMMANDE
- FOUR À GAZ
AVEC GRIL GAZ
34
- THERMOSTAT DU FOUR 34
- GRIL GAZ
36
- ECLAIRAGE FOUR - BROCHE 36
CUOCERE AL FORNO
42 COOKING IN THE OVEN
42 CUISSON AU FOUR
EXTRACTION DE LA SOLE
42
ESTRAZIONE DELLA SUOLA 48 REMOVAL OF THE BURNER
COVER PLATE
48
SOSTITUZIONE DELLA
LAMPADA DEL FORNO
REPLACING
50 THE OVEN LIGHT
REMPLACEMENT
50 DE LA LAMPE DU FOUR
50
SMONTAGGIO DELLA
PORTA DEL FORNO
REMOVING
52 THE OVEN DOOR
DEMONTAGE
52 DE LA PORTE DU FOUR
52
RESPECT DE
54 L’ENVIRONNEMENT
54
RISPETTO DELL’AMBIENTE 54 RESPECT FOR THE
ENVIRONMENT
4
PAG. 26
28 SELF-CLEANING CATALYTIC
PANNEAUX AUTONETTOYANTS
PANELS
28 CATALYTIQUES
28
48
DE
ES
INDEX
NL
INDICE
PT
INHOUD
INDICE
ANLEITUNGEN FÜR DEN
INSTRUCCIONES PARA EL AANWIJZINGEN VOOR DE INSTRUÇÕES PARA O
INSTALLATEUR/MONTEUR (S. 7) INSTALADOR
(PAG. 7) INSTALLATEUR (PAG. 7) INSTALADOR
(PÁG. 7)
FÜR DIE INSTALLATION DES GERÄTES NORMAS PARA INSTALAR EL
INSTALLATIEVOORSCHRIFTEN NORMAS PARA A INSTALAÇÃO
RELEVANTE NORMEN
S. 7 APARATO
PAG. 7 VAN HET APPARAAT
PAG. 7 DO APARELHO
PÁG. 7
STANDORT
7 UBICACIÓN
7 PLAATS
BELÜFTUNG DES RAUMS
7 VENTILACIÓN DEL LOCAL
7 VENTILATIE VAN HET VERTREK 7 VENTILAÇÃO DO LOCAL
7
GASANSCHLUSS
9 CONEXIÓN DEL GAS
9 GASAANSLUITING
9 LIGAÇÃO DO GÁS
9
ANSCHLUSS DES
METALLSCHLAUCHES
CONEXIÓN DEL TUBO
9 METÁLICO
AANSLUITING VAN DE
9 METALEN LEIDING
LIGAÇÃO
9 DO TUBO METÁLICO
9
UMSTELLEN AUF EINEN
ANDEREN GASTYP
13
TABELLE DER DÜSEN
15 TABLA DE LAS BOQUILLAS
7 LOCALIZAÇÃO
CAMBIO DE UN GAS A OTRO 13 OMBOUWEN NAAR EEN
ANDERE GASSOORT
7
CONVERSÃO PARA OUTRO
13
13 TIPO DE GÁS
15 TABEL VAN DE INSPUITERS 15 TABELA DOS BICOS
15
EINSTELLEN DES MINIMUMS
REGULACIÓN DEL MÍNIMO EN
AFSTELLING VAN HET MINIMUM REGULAÇÃO DO MÍNIMO EM
BEI UMSTELLUNG AUF EINEN
CASO DE CAMBIO DE GAS 17 BIJ HET OMBOUWEN NAAR EEN CASO DE CONVERSÃO PARA
ANDEREN GASTYP
17
17
ANDERE GASSOORT
17 OUTRO TIPO DE GÁS
EINBAU DES BACKOFENS
21 ENCASTRE DEL HORNO
21 INBOUW VAN DE OVEN
21 ENCASTRE DO FORNO
STROMANSCHLUSS
23 CONEXIÓN ELÉCTRICA
23 ELEKTRISCHE AANSLUITING 23 LIGAÇÃO ELÉCTRICA
21
23
ANLEITUNGEN FÜR DEN
INSTRUCCIONES PARA EL GEBRUIKSAANWIJZINGEN INSTRUÇÕES PARA O
BENUTZER
(S. 27) USUARIO
(PAG. 27)
(PAG. 27) UTILIZADOR
(PÁG. 27)
ERSTMALIGE BENUTZUNG S. 27 PRIMERA UTILIZACIÓN PAG. 27 EERSTE GEBRUIK
SELBSTREINIGENDE
KATALYTISCHE PLATTEN
PANELES CATALÍTICOS
29 AUTOLIMPIANTES
BESCHREIBUNG DER
BEDIENBLENDE
- GASOFEN MIT
ELEKTROGRILL
31
- BEDIENUNGSEINRICHTUNGEN 31
- ELEKTROGRILL
33
- MECHANISCHE MINUTENUHR 33
PAG. 27 PRIMEIRA UTILIZAÇÃO PÁG. 27
KATALYSERENDE
PAINÉIS DE AUTOLIMPEZA
29 ZELFREINIGENDE PANELEN 29 CATALÍTICOS
DESCRIPCIÓN DEL FRONTAL
DE MANDOS
- HORNO DE GAS CON GRILL
ELÉCTRICO
31
- TERMOSTATO DEL HORNO 31
- GRILL ELÉCTRICO
33
- MINUTERO MECÁNICO
33
BESCHREIBUNG DER
DESCRIPCIÓN DEL FRONTAL
BEDIENBLENDE
DE MANDOS
- GASOFEN MIT GASGRILL 35 - HORNO DE GAS CON GRILL
DE GAS
35
- BEDIENUNGSEINRICHTUNGEN 35 - TERMOSTATO DEL HORNO 35
- GASGRILL
37 - GRILL DE GAS
37
- BELEUCHTUNG OFEN - LUZ DEL HORNO Y ASADOR 37
BRATSPIESS
37
BESCHRIJVING VAN HET
FRONTBEDIENINGSPANEEL
- GASOVEN MET
ELEKTRISCHE GRILL
31
- OVENTHERMOSTAAT
31
- ELEKTRISCHE GRILL
33
- MECHANISCHE KLOK
33
29
DESCRIÇÃO FRONTAL DOS
COMANDOS
- FORNO A GÁS COM
GRILL ELÉCTRICO
31
- TERMÓSTATO DO FORNO 31
- GRILL ELÉCTRICO
33
- CONTA-MINUTOS MECÂNICO 33
BESCHRIJVING VAN HET
DESCRIÇÃO FRONTAL DOS
FRONTBEDIENINGSPANEEL
COMANDOS
- GASOVEN MET GASGRILL 35 - FORNO A GÁS COM
GRILL A GÁS
- OVENTHERMOSTAAT
35 - TERMÓSTATO DO FORNO
- GASGRILL
37 - GRILL A GÁS
- OVENVERLICHTING - LUZ DO FORNO - ESPETO
DRAAISPIT
37
IM OFEN BRATEN/BACKEN
43 COCER EN EL HORNO
43 BAKKEN MET DE OVEN
43 COZINHAR NO FORNO
HERAUSZIEHEN
DES BODENS
DESMONTAJE
49 DE LA SOLERA
VERWIJDEREN VAN DE
49 BODEM
49
RETIRAR A COBERTURA
35
35
37
37
43
49
AUSWECHSLUNG DER OFENCAMBIO DE LA BOMBILLA DEL HET VERVANGEN VAN HET
SUBSTITUIÇÃO DA LÂMPADA
51 DO FORNO
BELEUCHTUNG
51 HORNO
51 LAMPJE VAN DE OVEN
51
AUSBAUEN DER OFENTÜR
53 DESMONTAJE DE LA PUERTA DEMONTAGE VAN DE
DEL HORNO
53 OVENDEUR
UMWELTVERTRÄGLICHKEIT 55 RESPETO POR EL MEDIO
AMBIENTE
55
DESMONTAGEM DA PORTA
53 FORNO
53
RESPECT VOOR HET MILIEU 55 RESPEITO PELO AMBIENTE 55
5
IT
GB
FR
ISTRUZIONI PER INSTRUCTIONS FOR INSTRUCTIONS POUR
L’INSTALLATORE THE INSTALLER
L’INSTALLATEUR
NORME PER L’INSTALLAZIONE
DELL’APPARECCHIO
(ubicazione e ventilazione locale)
Le norme italiane che regolano
l’installazione, la manutenzione
e
la
conduzione
degli
apparecchi a gas per uso
domestico sono le seguenti:
- UNI-CIG n. 7129
- UNI-CIG n. 7131
INSTRUCTIONS FOR
INSTALLATION OF THE
APPLIANCE (positioning and
ventilation requirements)
The regulations covering the
installation, maintenance and
operation of gas appliances for
domestic use are applicable
regulations.
NORMES
D’INSTALLATION
DE L’APPAREIL
(emplacement et ventilation
locale)
Les normes d’installation,
d’entretien et de conduite des
appareils à gaz à usage
domestique sont les normes
en viguer.
An extract of these regulations
appears below. For all
Riportiamo di seguito uno indications not covered, refer to
above-mentioned
stralcio di tali norme. Per tutte the
le indicazioni non riportate è regulations.
necessario consultare le norme
citate.
Vous trouverez ci-dessous un
aperçu de ces textes. Pour
toutes les indications non
reportées consulter les textes
de référence.
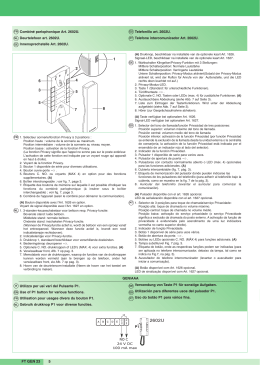
UBICAZIONE:
(Fig. 2) gli apparecchi di cottura
devono sempre scaricare i
prodotti della combustione in
apposite cappe, che devono
essere collegate a camini,
canne fumarie o direttamente
all’esterno.
In caso non esista la possibilità
di applicazione della cappa, è
consentito l’impiego di un
elettroventilatore, installato su
finestra o su parete affacciata
sull’esterno, da mettere in
funzione contemporaneamente
all’apparecchio, purché siano
tassativamente rispettate le
norme inerenti la ventilazione.
POSITIONING:
(Fig. 2) the products of
combustion from cooking
appliances must always be
discharged
into
suitable
extractor hoods, which must be
connected to a chimney, flue or
vented directly to outside the
building. In situations where it
is not possible to install an
extractor hood, an electric
extractor fan installed in a
window or external wall may be
used,
provided
that
all
requirements of the ventilation
regulations are satisfied; the
fan should switch on whenever
the appliance is in operation.
EMPLACEMENT
(Fig. 2) Les appareils de
cuisson
doivent
toujours
évacuer les produits de
combustion dans des hottes ad
hoc, qui doivent être reliées à
des carneaux de fumées ou
directement à l’extérieur. En
cas d’impossibilité d’installation
de la hotte, utiliser un
électroventilateur installé sur la
fenêtre ou sur un mur orienté
vers l’extérieur, à démarrer
simultanément avec l’appareil,
à condition de respecter
impérativement les normes de
ventilation.
VENTILATION:
VENTILATION DU LOCAL
(Fig. 2) it is essential that the
room in which gas appliances
are installed is adequately
ventilated to ensure that all the
appliances receive the required
quantity of fresh air for
combustion.
To ensure an adequate air
flow, it may be necessary to
create apertures in accordance
with
the
following
requirements:
a) with cross-sectional area of
6 cm2 per kW with a
minimum
cross-sectional
area of 100 cm2 (these
apertures may also be
created by increasing the
(Fig. 2) Il est indispensable que
le local d’installation des
appareils à gaz soit aéré en
quantité d’air suffisante pour la
combustion des gaz.
Il est donc indispensable de
pratiquer des ouvertures ad
hoc qui présentent les
caractéristiques suivantes:
a) avoir une section libre totale
de 6 cm2 par kW avec un
minimum de 100 cm2 (ces
ouvertures peuvent être
pratiquées en majorant les
ouvertures entre porte et
sol);
b) être situées dans la partie
basse d’une paroi externe,
VENTILAZIONE DEL
LOCALE:
(Fig. 2) è indispensabile che
nel locale in cui sono installati
degli apparecchi a gas possa
almeno affluire tanta aria
comburente quanta ne viene
richiesta dalla combustione del
gas consumato dai vari
apparecchi.
È quindi necessario, per
l’afflusso dell’aria nel locale,
praticare delle aperture che
Fig. 2 - Abb. 2 - Afb. 2
rispondano
ai
requisiti
seguenti:
a) avere una sezione libera
totale di 6 cm2 per ogni kW
con un minimo di 100 cm2
(tali
aperture
possono
eventualmente
essere
6
DE
ES
NL
PT
ANLEITUNGEN FÜR DEN INSTRUCCIONES
AANWIJZINGEN VOOR INSTRUÇÕES PARA
INSTALLATEUR/MONTEUR PARA EL INSTALADOR DE INSTALLATEUR
O INSTALADOR
FÜR DIE INSTALLATION
DES GERÄTES RELEVANTE
NORMEN (Standort und
Belüftung des Raums)
Für die Installation, die
Wartung und die Benutzung
von Gasgeräten für den
privaten Gebrauch die vor
handenen
Normen
zu
beachten.
Es folgt ein Auszug aus diesen
Normen. Für alle nicht hier
angeführten Hinweise wird auf
die
relevanten
Normen
verwiesen.
NORMAS PARA INSTALAR
EL APARATO
(ubicación y ventilación del
local)
Las
normas
sobre
la
instalación, el mantenimiento y
el uso de los aparatos de gas
para uso doméstico son las
normas vigentes.
A continuación, se facilita la
información más importante de
dichas normas. Para cualquier
otra información, hay que
consultarlas directamente.
INSTALLATIEVOORSCHRIFTEN
VAN
HET
APPARAAT
(plaats en ventilatie van het
vertrek)
De normen voor installatie,
onderhoud en bediening van
gasapparaten
voor
huishoudelijk gebruik zijn de
volgens de geld mende voor
schriften.
Hieronder volgen een aantal van
deze voorschriften. Voor alle niet
vermelde aanwijzingen moeten
de geciteerde voorschriften
worden geraadpleegd.
NORMAS
PARA
A
INSTALAÇÃO DO APARELHO
(localização e ventilação
local)
As normas que regulam a
instalação, a manutenção e o
funcionamento dos aparelhos a
gás para uso doméstico são as
normas en vigor.
Apresentamos, de seguida, um
extracto dessas normas. Para
todas as indicações não
apresentadas, é necessário
consultar as normas citadas.
STANDORT:
(Abb. 2) Kochgeräte müssen ihre
Verbrennungsprodukte immer in
eine
zu
diesem
Zweck
vorgesehene Haube ableiten, die
an einen Kamin oder einen
Rauchkanal angeschlossen sein
muss, oder den Rauch direkt nach
außen abführt. Besteht keine
Möglichkeit,
eine
Dunstabzugshaube zu installieren,
kann
auch,
sofern
die
belüftungsrelevanten
Normen
eingehalten werden, ein am
Fenster oder einer Außenwand
installierter Elektroventilator benutzt
werden, der gleichzeitig mit dem
Gerät betrieben werden muss.
UBICACIÓN
(fig. 2) Los aparatos de cocción
han
de
descargar
los
productos de la combustión en
campanas que, a su vez, han
de conectarse a chimeneas o
dar directamente al exterior. Si
no es posible instalar una
campana, se permite instalar
un ventilador eléctrico, en una
ventana o pared que dé al
exterior, que funcione siempre
que se ponga en marcha el
aparato. En cualquier caso, se
han
de
respetar
obligatoriamente las normas
sobre ventilación.
PLAATS:
(Afb. 2) de verbrandingsproducten
van kook- en bakapparaten
moeten altijd worden afgevoerd
via een afzuigkap die is
aangesloten op een schoorsteen
of rookkanaal of die rechtstreeks
naar buiten voert. Als het niet
mogelijk is om een afzuigkap toe
te passen, mag een elektrische
ventilator worden gebruikt die op
een raam of op een aan de
buitenmuur grenzende wand is
gemonteerd en die tegelijkertijd
met het apparaat in werking moet
worden
gesteld,
mits
de
ventilatievoorschriften uitdrukkelijk
in acht worden genomen.
BELÜFTUNG DES RAUMS:
VENTILACIÓN DEL LOCAL
VENTILATIE VAN HET VERTREK: VENTILAÇÃO DO LOCAL:
(Abb. 2) der Raum, in dem mit
Gas funktionierende Geräte
installiert
sind,
muss
mindestens mit so viel
Frischluft versorgt werden, wie
zur Verbrennung des von allen
Geräten verbrauchten Gases
erforderlich ist.
Es müssen also für die
Belüftung
des
Raums
Zuluftöffnungen
angebracht
werden, die die folgenden
Voraussetzungen erfüllen:
a) freier Gesamtquerschnitt von
6 cm2 pro kW mit mindestens
100 cm2 (diese Öffnungen
können gegebenenfalls auch
durch
Erweiterung
des
(fig. 2) Es indispensable que
en el local con los aparatos de
gas llegue todo el aire
comburente requerido por la
combustión de gas de los
diferentes aparatos.
Para ello, hay que realizar
aberturas conformes con los
siguientes requisitos:
a) sección libre total de 6 cm2
para cada kW con un
mínimo de 100 cm2 (si es
necesario, estas aberturas
pueden
realizarse
aumentando la rendija entre
las puertas y el suelo);
b) estar en la parte baja de
una
pared
exterior,
(Afb. 2) in het vertrek waarin
gasapparaten zijn opgesteld
moet voldoende aanvoer van
verbrandingslucht zijn voor de
verbranding van het gas dat
door de verschillende apparaten
wordt verbruikt.
Voor de aanvoer van lucht in
het vertrek moeten er dus
openingen worden gemaakt die
aan de volgende eisen voldoen:
a) de openingen moeten een
totale doorlaat hebben van 6
cm2 voor elke kW met een
minimum van 100 cm2 (deze
openingen kunnen eventueel
worden verkregen door de
spleet tussen de deur en de
LOCALIZAÇÃO:
(Fig. 2) os aparelhos de cozedura
devem sempre descarregar os
produtos da combustão através
de exaustores adequados, que
devem ser ligados a chaminés,
tubagens para evacuação de
fumos ou directamente ao
exterior.
Caso
não
haja
possibilidade de aplicação do
exaustor, é permitida a utilização
de um electroventilador, instalado
na janela ou na parede virada
para o exterior, que deve ser
ligado ao mesmo tempo que o
aparelho, para que sejam
respeitadas as normas inerentes
à ventilação.
(Fig. 2) é indispensável que no
local onde estejam instalados
aparelhos a gás possa afluir
tanto ar comburente quanto o
exigido pela combustão do gás
consumido
pelos
vários
aparelhos.
É, assim, necessário, para o
afluxo de ar no local, efectuar
aberturas que correspondam
aos seguintes requisitos:
a) ter uma secção livre total de
6 cm2 por cada kW com um
mínimo de 100 cm2 (tais
aberturas
podem
ser
efectuadas aumentado o
espaço entre a porta e o
solo);
7
8
IT
GB
FR
ricavate maggiorando la
fessura
tra
porta
e
pavimento);
b) essere situate nella parte
bassa di una parete
esterna,
preferibilmente
opposta a quella in cui si
trova l’evacuazione dei gas
combusti;
c) la loro posizione deve
essere scelta in modo tale
da evitare che possano
essere ostruite e, se
praticate sui muri esterni,
esse
devono
essere
protette con griglie, reti
metalliche ecc. poste sulla
faccia esterna del muro con
una sezione netta.
In caso nel locale sia installato
un
elettroventilatore
per
l’evacuazione dell’aria viziata,
le aperture per il ricambio d’aria
devono garantire un passaggio
d’aria di almeno 35 m3/h per
ogni kW di potenza installata in
ambiente.
gap between the bottom of
doors and the floor);
b) situated at the bottom of an
external wall, preferably
opposite the wall on which
combustion products are
extracted ;
c) the
positions
of
the
apertures should selected
so as to avoid the possibility
of their being obstructed
and, if made in external
walls, they must be
protected with grilles, metal
meshes, etc. installed on
the outside face of the wall.
If an electric extractor fan for
the removal of foul air is
installed in the room, the
apertures provided for air
changes
must
allow
a
ventilation rate of at least 35
3
m /h per kW of power installed.
de préférence opposée à
celle dans laquelle se trouve
l’évacuation des gaz brûlés;
c) leur position doit être choisie
de façon à éviter qu’elles
soient obstruées et, si
pratiquées sur des murs
externes, elles doivent être
protégées avec des grilles,
des réseaux métalliques
etc. placés sur la façade
externe du mur avec une
section nette.
Si le local est équipé d’un
électroventilateur d’évacuation
de l’air vicié, les ouvertures de
changement d’air doivent
garantir un passage d’air d’au
3
moins 35 m /h par kW de
puissance installée dans le
local.
ALLACCIAMENTO GAS
Il forno può funzionare a gas
naturale (metano) a gas liquido
(GPL), e può essere facilmente
eseguita la conversione da un
tipo all’altro di gas, come
descritto nei successivi capitoli.
L’allacciamento alla rete di
distribuzione deve essere
eseguito
da
personale
specializzato e secondo le
prescrizioni relative alle norme
UNI-CIG 7129, 7131.
Nel caso l’apparecchio venga
alimentato con gas liquido
(GPL) in bombola, deve essere
utilizzato un regolatore di
pressione conforme alla norma
UNI CIG 7432.
GAS CONNECTION
The oven is designed to
operate with both natural gas
(methane) and liquid gas
(LPG), and can be easily
converted from one type to
another
following
the
instructions given in the relative
section
of
this
booklet.
Connection to the gas supply
must be carried out by qualified
technicians and in conformance
with the requirements.
If the appliance is to operate
with gas bottles (LPG), a
pressure regulator conforming
to the requirements.
BRANCHEMENT DU GAZ
Le four peut fonctionner au gaz
naturel (méthane) ou liquide
(GPL). La conversion d’un gaz
à l’autre est facile, comme
expliqué dans les pages
suivantes. Le branchement au
réseau de distribution doit être
fait
par
une
personne
compétente dans le respect
des normes.
Si l’appareil est alimenté en
gaz liquide (GPL) en bouteille,
utiliser un régulateur de
pression conforme à la norme.
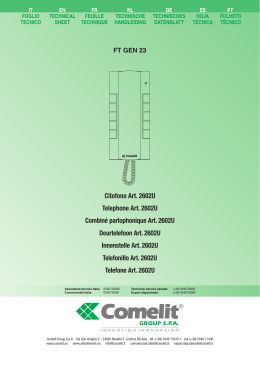
ALLACCIAMENTO DEL
TUBO METALLICO
L’allacciamento
gas
può
essere eseguito mediante un
tubo metallico rigido conforme
alla norma UNI 8863 fissato
saldamente al raccordo “G”
(Fig. 3), oppure, mediante un
tubo flessibile di acciaio
inossidabile a parete continua,
di cui alla norma UNI CIG 9891
con lunghezza max. 2 mt.
Il raccordo “G” e la guarnizione
RIGID PIPE
CONNECTION
Connection to the mains gas
supply may be made via a rigid
pipe firmly attached to the
fitting “G” (Fig. 3), or via a
flexible
stainless
steel
continuous-wall
hose,
conforming with a maximum
length of 2 metres.
The fitting “G” and seal “C” are
supplied with the appliance,
and comply with standards.
BRANCHEMENT DU TUBE
MÉTALLIQUE
Le branchement du gaz doit
être
effectué
par
tube
métallique
rigide
fixé
solidement au raccord “G” (Fig.
3) ou par flexible acier inox à
mur continu, d’une longueur
max. 2 mètres.
Le raccord “G” et le joint
d’étanchéité “C” sont fournis
comme accessoires avec
l’appareil et sont conformes
DE
ES
NL
PT
Schlitzes zwischen Tür und
Fußboden erhalten werden);
b) sie müssen sich im unteren
Abschnitt einer Außenwand
befinden, die vorzugsweise
gegenüber der Wand, an der
die Verbrennungsprodukte
abgeführt werden, liegt;
c) sie müssen so platziert
werden, dass sie nicht verlegt
werden können, und wenn sie
sich in einer Außenmauer
befinden, müssen sie durch
klar
abgegrenzte
Gitter,
Metallnetze o. ä. Vorrichtungen
an der Außenseite der Mauer
geschützt sein.
Sollte
im
Raum
ein
Elektroventilator zur Abführung
der schlechten Luft installiert sein,
müssen die Öffnungen für den
Luftaustausch einen Luftdurchsatz
von mindestens 35 m3/h pro kW
im Raum installierter Leistung
ermöglichen.
preferiblemente en el lado
opuesto a la pared en la
cual se encuentra la salida
de gases quemados;
c) han de estar en una
posición en la cual no
puedan quedar obstruidas
y, si se realizan en paredes
exteriores,
han
de
protegerse con rejillas,
redes metálicas, etc. por el
lado exterior con una
sección neta.
Si en el local hay un ventilador
eléctrico para evacuar el aire
viciado, las aberturas para
recambiar el aire han de
asegurar un paso de aire de al
3
menos 35 m /h para cada kW
de potencia instalada.
vloer te vergroten);
b) de openingen moeten zich
onderaan een buitenwand
bevinden,
bij
voorkeur
tegenover de afvoer van de
verbrande gassen;
c) de positie van de openingen
moet
zodanig
worden
gekozen dat verstoppingen
worden voorkomen en als ze
zich in de buitenmuren
bevinden, moeten ze worden
beschermd met roosters,
metalen netwerken, enz. op
de buitenkant van de muur
met een schone doorlaat.
Indien in het vertrek een
elektrische
ventilator
is
geïnstalleerd voor de afvoer van
afgewerkte lucht, moeten de
openingen
voor
de
luchtverversing een luchtdoorlaat
van minstens 35 m3/h voor elke
kW geïnstalleerd vermogen in de
ruimte garanderen.
b) estarem situadas na parte
baixa de uma parede
externa, de preferência no
lado oposto àquela em que
se encontra a evacuação
dos gases de combustão;
c) a sua posição deve ser
escolhida de forma a evitar
que possam ficar obstruídas
e, se efectuadas nas paredes
externas,
devem
ser
protegidas com grelhas, redes
metálicas, etc., colocadas no
lado externo da parede com
uma secção limpa.
Caso esteja instalado no local
um electroventilador para a
evacuação do ar viciado, as
aberturas para a renovação do
ar devem garantir uma
passagem de ar de pelo
menos 35 m3/h por cada kW
de potência instalada no local.
GASANSCHLUSS
Der Ofen kann mit Erdgas
(Methan) oder Flüssiggas
betrieben und ganz einfach
von einem Gastyp auf den
anderen umgestellt werden
(siehe folgende Abschnitte).
Der Anschluss an das Gasnetz
muss von einem Fachmann
gemäß ausgeführt werden.
Wird das Gerät mit Flüssiggas
aus einer Gasflasche gespeist,
muss ein Druckregler gemäß
benutzt werden.
CONEXIÓN DEL GAS
El horno puede funcionar con
gas natural (metano) o con gas
líquido (GPL). El cambio de un
gas a otro es fácil de realizar y
se describe en los capítulos
siguientes. La conexión a la
red de distribución tiene que
ser realizada por profesionales
cualificados según las normas.
Si el aparato se alimenta con
gas
líquido
(GPL)
en
bombona, se ha de emplear un
regulador de presión conforme
con la norma.
GASAANSLUITING
De oven kan op aardgas
(methaan) en op vloeibaar gas
(LPG) werken en kan eenvoudig
van de ene naar de andere
gassoort worden omgebouwd,
zoals in de volgende hoofdstukken
is beschreven. De aansluiting op
het distributienet moet door
gespecialiseerd personeel worden
verricht volgens de bepalingen
van de normen. Indien het
apparaat wordt gevoed met
vloeibaar gas (LPG) uit een
gasfles, moet gebruik worden
gemaakt van een drukregelaar die
aan de norm.
LIGAÇÃO DO GÁS
O forno pode funcionar com gás
natural (metano) ou gás líquido
(GPL), e pode ser facilmente
efectuada uma conversão para
outro tipo de gás, tal como
descrito
nos
capítulos
seguintes. A ligação à rede de
distribuição deve ser efectuada
por pessoal especializado e de
acordo com as indicações
relativas às normas. Caso o
aparelho seja alimentado por
gás líquido (GPL) de botija,
deve utilizar-se um regulador de
pressão em conformidade com
a norma.
ANSCHLUSS DES
METALLSCHLAUCHES
Der Gasanschluss kann mit
Hilfe
eines
steifen
Metallschlauches hergestellt
werden, der fest mit den
Anschluss “G” (Abb. 3)
verbunden sein muss, oder mit
einem
rostfreiem
Stahlschlauch
mit
durchgehender Wand mit einer
maximalen Länge von 2 m.
Der Anschluss “G” und die
CONEXIÓN
DEL
TUBO
METÁLICO
La conexión del gas puede
realizarse mediante un tubo
metálico rígido firmemente
fijado al empalme “G” (fig. 3) o
bien mediante un tubo flexible
de acero inoxidable de pared
continua con una longitud
máxima de 2 metros.
El empalme “G” y la junta de
retén “C” se suministran como
accesorios con el aparato y
AANSLUITING
VAN
DE
METALEN LEIDING
De gasaansluiting kan worden
verricht met een starre metalen
leiding die voldoet aan en die
stevig aan het verbindingsstuk
“G” (Afb. 3) is bevestigd, of met
een doorlopende buigzame
leiding van roestvrij staal met
een maximale lengte van 2
meter.
Het verbindingsstuk “G” en de
afdichting “C” worden als
LIGAÇÃO
DO
TUBO
METÁLICO
A ligação de gás pode ser
efectuada através de um tubo
metálico rígido, fixo por solda à
união “G” (Fig. 3), ou então,
através de um tubo flexível em
aço inoxidável de parede
contínua,
com
um
comprimento máximo de 2
metros.
A união “G” e a junta de
vedação “C” são fornecidas
9
IT
GB
FR
di tenuta “C” sono forniti come
accessori
assieme
all’apparecchio,
e
sono
conformi rispettivamente alle
norme UNI ISO 7/1 e UNI 9264.
Importante:
Per l’orientamento del raccordo
“G” operare con due chiavi.
Ottenuta la direzione voluta
bloccare energicamente il dado
“A” (Fig. 3).
Important:
Use two wrenches to turn the
fitting “G” to the required
position. When the fitting is in
the desired position, firmly
tighten nut “A” (Fig. 3).
aux normes.
Important
Pour l’orientation du raccord
“G” utiliser 2 clés. Une fois la
direction obtenue, bloquer
énergiquement avec l’écrou “A”
(Fig. 3).
Fig. 3 - Abb. 3 - Afb. 3
ATTENZIONE - IMPORTANTE:
Al termine delle operazioni
di collegamento dell’apparecchio
alla
rete
di
distribuzione gas (o alla
bombola di gas liquido)
CONTROLLARE LA TENUTA
dell’accoppiamento
con soluzione di acqua
saponata, mai con una
fiamma.
10
WARNING - IMPORTANT:
after
connecting
the
appliance to the gas
supply (or to the liquid gas
bottles)
CHECK
FOR
LEAKS at the union using
a solution of soapy water
(never use a naked flame).
ATTENTION - IMPORTANT:
à la fin des opérations de
branchement de l’appareil
au réseau de distribution
gaz (ou à la bouteille de
GPL)
CONTRÔLER
L’ÉTANCHÉITÉ de l’accouplement avec solution
d’eau savonneuse, jamais
avec une flamme.
DE
ES
NL
PT
Dichtung
“C”
werden
zusammen mit dem Gerät als
Zubehör
geliefert
und
entsprechen den Normen.
Wichtig:
Zum
Ausrichten
des
Anschlusses
“G”
zwei
Schlüssel benutzen. Wenn der
Anschluss in die gewünschte
Richtung zeigt, die Mutter “A”
(Abb. 3) fest anziehen.
son conformes con la norma.
Importante:
Para orientar el empalme “G”
hay que emplear dos llaves.
Tras colocar el empalme en la
dirección deseada, bloquear
bien la tuerca “A” (fig. 3).
accessoires bij het apparaat
geleverd
en
voldoen
respectievelijk aan de normen.
Belangrijk:
werk voor het richten van het
verbindingsstuk “G” met twee
sleutels. Als de gewenste
richting is bereikt, moet de
moer “A” (Afb. 3) krachtig
worden aangedraaid.
como acessórios do aparelho
e estão em conformidade com
as normas.
Importante:
Para a orientação da união
“G”, trabalhe com duas
chaves. Obtida a direcção
pretendida, aperte com força a
porca “A” (Fig. 3).
ACHTUNG - WICHTIG:
Nach dem Anschließen des
Gerätes an das Gasnetz
(oder die Gasflasche) mit
Seifenwasser - auf keinen
Fall jedoch mit einem
Feuerzeug, einem Zündholz
oder einer offenen Flamme
- KONTROLLIEREN, ob der
Anschluss DICHT ist oder
Gas austritt.
ATENCIÓN - IMPORTANTE:
una vez efectuada la
conexión del aparato a la
red de distribución o a la
bombona de gas líquido,
hay que CONTROLAR LA
ESTANQUEIDAD
del
acoplamiento con una
solución de agua y jabón.
No utilizar jamás una
llama.
LET OP - BELANGRIJK:
CONTROLEER
na
de
aansluiting
van
het
apparaat op het gasnet (of
op
de
gasfles)
de
AFDICHTING
van
de
koppeling met sopwater,
nooit met een vlam.
ATENÇÃO - IMPORTANTE:
No final das operações de
ligação do aparelho à rede
de distribuição de gás (ou
à botija de gás líquido)
VERIFIQUE A VEDAÇÃO
da ligação com uma
solução de água e sabão,
nunca com uma chama.
11
*5
(#
'3
CONVERSIONE AD ALTRO CONVERSION
TO
A CONVERSION DE TYPE DE
TIPO DI GAS
DIFFERENT TYPE OF GAS
GAZ
Prima della conversione ad
altro tipo di gas, accertatevi del
tipo per il quale l’apparecchio è
stato
regolato.
(etichetta
adesiva (Figura 1) applicata
sull’apparecchio).
Rendere privo di tensione
l’apparecchio;
Per il diametro dell’ugello
riferirsi alla tabella degli ugelli.
Before
converting
the
appliance for operation with a
different gas type, check which
type of gas it is currently set to
operate with (adhesive label
(Figure 1) on appliance).
Disconnect
the
electrical
power supply to the appliance;
For
the
correct
nozzle
diameter, refer to the relative
table in this booklet.
Avant la conversion du gaz,
vérifier que le gaz actuel est
correctement réglé (étiquette
adhésive (Figure 1) appliquée
sur l’appareil).
Couper la tension;
Pour le diamètre du gicleur,
consulter la table des gicleurs.
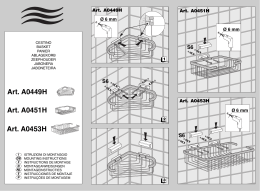
Sostituzione dell’ugello del
bruciatore inferiore
1) Estrarre
la
suola
copribruciatore
(vedi
ESTRAZIONE
DELLA
SUOLA pagina 42).
2) Svitare la vite di fissaggio
del bruciatore del forno ed
estrarre
dal
supporto
insieme all’elemento termico
e
alla
candela
di
accensione. (Figura 5)
3) Togliere l’ugello dall’attacco
con una chiave a tubo da 7
(Figura 6)
4) Avvitare a fondo il nuovo
ugello (diametro impresso in
centesimi
di
millimetro
sull’ugello)
facendo
attenzione all’inserimento
preciso del filetto.
5) Montare
il
bruciatore
procedendo
in
ordine
inverso rispetto a quanto
descritto al punto 2.
6) Reinserire la suola nella
posizione giusta.
7) Regolazione del minimo (vedi
istruzioni a pagina 16)
Replacing the lower burner
nozzle
1) Remove the burner cover
plate (see REMOVAL OF
THE BURNER COVER
PLATE page 42).
2) Remove the screw securing
the oven burner and
withdraw the burner from
the support together with
the heat sensor and the
ignition spark plug. (Figure
5)
3) Remove the nozzle using a
7 mm box wrench (Figure 6)
4) Screw the new nozzle in
fully (diameter in hundredths
of millimetre stamped on the
nozzle), taking care not to
cross the thread.
5) Replace
the
burner
reversing the operations in
step 2 above.
6) Replace the cover plate.
7) Adjusting the minimum flame
(see instructions on page 16)
Remplacement du gicleur
du brûleur inférieur
1) Extraire la sole cachebrûleur (voir EXTRACTION
sole page 42).
2) Dévisser la vis de fixation du
brûleur et extraire du
support avec l’élément
thermique et la bougie
d’allumage (Figure 5).
3) Retirer le gicleur de la
fixation avec une clé à
douille de 7 (Figure 6)
4) Visser à fond le nouveau
gicleur
(diamètre
en
centièmes de millimètres
sur le gicleur) en faisant
attention à l’insertion précise
du filetage.
5) Monter le brûleur en
procédant dans l’ordre
inverse du point 2.
6) Remettre en place la sole.
7) Réglage du minimum (voir
directives page 16)
Fig. 5 - Abb. 5 - Afb. 5
12
Fig. 6 - Abb. 6 - Afb. 6
%&
UMSTELLEN AUF
ANDEREN GASTYP
&4
/-
EINEN CAMBIO DE UN GAS A OMBOUWEN NAAR
OTRO
ANDERE GASSOORT
15
EEN CONVERSÃO PARA OUTRO
TIPO DE GÁS
Vor dem Umstellen auf einen
anderen Gastyp den Gastyp
feststellen, auf den das Gerät
eingestellt ist (Klebeetikett
(Abbildung 1) auf dem Gerät).
Das
Gerät spannungsfrei
schalten.
Für den Düsendurchmesser
siehe Tabelle der Düsen.
Antes de cambiar de gas, hay
que controlar para qué tipo se
ha regulado el aparato. Para
ello, véase la chapa adhesiva
(figura 1) del aparato.
Cortar la tensión del aparato.
Para el diámetro de la boquilla,
véase la tabla de las boquillas.
Voor de ombouw naar een
andere gassoort moet u
controleren voor welke gassoort
het apparaat is ingesteld. (sticker
(Afbeelding 1) op het apparaat).
Sluit het apparaat van de
voedingsspanning af;
Raadpleeg voor de diameter van
de inspuiter de tabel van de
inspuiters.
Antes da conversão para outro
tipo de gás, verifique o tipo para
o qual o aparelho está regulado.
(etiqueta adesiva (Figura 1)
aplicada no aparelho).
Desligue a tensão do aparelho;
Para conhecer o diâmetro dos
bicos, consulte a tabela dos
bicos.
Austausch der Düse des
unteren Brenners
Brennerabdeckung
Die
herausziehen
(siehe
HERAUSZIEHEN
DES
BODENS Seite 42).
Die Schraube, mit der der
Ofenbrenner befestigt ist,
ausschrauben und ihn
zusammen
mit
dem
Heizelement
und
der
Zündkerze herausnehmen.
(Abbildung 5)
Die Düse mit einem 7erSteckschlüssel abnehmen.
(Abbildung 6)
Die
neue
Düse
aufschrauben
(der
Durchmesser in mm ist auf
der Düse eingestanzt) und
dabei darauf achten, dass
das Gewinde exakt sitzt.
Den
Brenner
wieder
montieren (wie oben ab
Punkt
2,
jedoch
in
umgekehrter Reihenfolge).
Die Abdeckung wieder
korrekt einsetzen.
Mindesteinstellung (siehe
Anleitungen auf S. 17)
Sustitución del inyector
del quemador inferior
1) Quitar la solera que cubre el
quemador
(véase
DESMONTAJE DE LA
SOLERA, página 42).
2) Desenroscar el tornillo de
fijación del quemador del
horno
y
extraer
conjuntamente el elemento
térmico y la bujía de
encendido de su soporte
(figura 5).
3) Quitar la boquilla del
empalme con una llave de
tubo de 7 (figura 6).
4) Enroscar hasta el tope la
nueva boquilla (diámetro
impreso en centésimas de
milímetro en la boquilla)
controlando que la rosca se
introduzca bien.
5) Montar
el
quemador
efectuando las operaciones
del punto 2 en orden
inverso.
6) Montar la solera.
7) Ajuste del mínimo (véanse las
instrucciones en la pág. 17)
De spuitmond van de
onderste brander vervangen
1) Neem de bodem weg die
de brander afdekt (zie
VERWIJDEREN VAN DE
BODEM pagina 42).
2) Draai de bevestigingsschroef
van de ovenbrander los en
neem hem samen met het
verwarmingselement en de
ontsteker van de steun weg.
(Afbeelding 5)
3) Verwijder de inspuiter van
de aansluiting met behulp
van een steeksleutel nr. 7.
(Afbeelding 6)
4) Draai de nieuwe inspuiter
goed aan (de diameter staat
op de inspuiter gedrukt in
honderdsten
van
een
millimeter) en let er daarbij
op
de
schroefdraad
nauwkeurig te plaatsen.
5) Monteer de brander in de
omgekeerde volgorde als bij
punt 2 is beschreven.
6) Plaats de bodem weer in de
juiste positie.
7) De laagste stand afstellen
(zie instructies op pag. 17)
Substituição do bico do
queimador inferior
1) Extraia a cobertura do
queimador
(consultar
EXTRACÇÃO
DA
COBERTURA página 42).
2) Desaperte o parafuso de
fixação do queimador do
forno e extraia do suporte,
juntamente com o elemento
térmico e a vela de ignição.
(Figura 5)
3) Retire o bico do respectivo
suporte com uma chave de
tubos de 7. (Figura 6)
4) Aperte totalmente o novo
bico (diâmetro impresso em
centésimas de milímetros
no bico), certificando-se de
que
insere
a
rosca
correctamente.
5) Monte o queimador na
ordem inversa à descrita no
ponto 2.
6) Volte a colocar a cobertura
na posição adequada.
7) Regulação do mínimo (ver
instruções da pág.17)
1)
2)
3)
4)
5)
6)
7)
13
IT
GB
TABELLA DEGLI INIETTORI
FR
INJECTORS TABLE
TABLE DES INJECTEURS
I diametri sono impressi The diameters in hundredths of Les diamètres sont imprimés
sull’ugello in centesimi di millimetre are stamped on the sur le gicleur en centièmes de
millimetri.
nozzle.
millimètres.
Bruciatore
Forno
IT
Grill
Burner
GB
IE
Oven
Grill
P.min/P.max
mbar
Portata termica
nominale in kW
Consumo
Ø iniettori
1/100mm
G20
20
17/25
G30/G31
28-30/37
25/45
2,5
238 l/h
113
2,5
182 g/h
76
G20
20
17/25
2,2
210 l/h
112
G30/G31
28-30/37
25/45
2,2
160 g/h
75
Type of gas
Pressure
mbar
P.min/P.max
mbar
Eat Imput kW
G20
20
17/25
G30/G31
28-30/37
25/45
G20
20
17/25
G30/G31
28-30/37
25/45
Consumption
Ø injectors
1/100mm
2,5
238 l/h
113
2,5
182 g/h
76
2,2
210 l/h
112
2,2
160 g/h
75
Brûleur
Type de gaz
Pression
mbar
P.min/P.max
mbar
Four
G20/G25
20/25
17/25
2,5
238 l/h
113
G25
25
20/30
2,5
238 l/h
113
G30/G31
28-30/37
25/45
2,5
182 g/h
76
G20
20
17/25
2,2
210 l/h
112
G25
25
20/30
2,2
210 l/h
112
G30/G31
28-30/37
25/45
2,2
160 g/h
75
FR
Gril
14
Pressione
mbar
Tipo di gas
Débit calorifique
Consommation
en kW
Ø injecteurs
1/100mm
DE
ES
TABELLE DER INJEKTOREN
NL
TABLA DE LOS
INYECTORESLAS
PT
TABEL VAN DE
GASINJECTOR
TABELA DOS INJETOR
Die Durchmesser sind auf der Los diámetros están impresos De diameters zijn op de Os diâmetros estão impressos
Düse in Hundertstelmillimeter en la boquilla en centésimas inspuiter
gedrukt
in no bico em centésimas de
angegeben.
de milímetro.
honderdsten
van
een milímetros.
millimeter.
Brenner
Ofen
DE
Grill
Quemador
Horno
ES
Grill
Brander
Grill
Verbrauch
Ø
injektoren
1/100mm
G20
20
17/25
2,5
238 l/h
113
G25
20
18/25
2,5
277 l/h
128
G30/G31
50
42,5/57,5
2,5
182 g/h
67
G20
20
17/25
2,2
244 l/h
112
G25
20
18/25
2,2
244 l/h
120
G30/G31
50
42,5/57,5
2,2
160 g/h
65
Tipo de gas
Presión
mbar
P.mín/P.máx
mbar
Capacidad
térmica kW
Consumo
Ø inyectores
1/100mm
G20
20
17/25
2,5
238 l/h
113
G30/G31
28-30/37
25/45
2,5
182 g/h
76
G20
20
17/25
2,2
210 l/h
112
G30/G31
28-30/37
25/45
2,2
160 g/h
75
verbruik
Ø gasinjector
1/100mm
minD./maxD.
mbar
Thermisch
vermogen in kW
G25
25
20/30
2,5
277 l/h
120
G30/G31
30
25/35
2,5
182 g/h
76
G25
25
20/30
2,2
244 l/h
115
G30/G31
30
25/35
2,2
160 g/h
75
Queimador
Forno
Wärmeeintrag
in kW
Druk mbar
Grill
PT
minD./maxD.
mbar
Gastype
Oven
NL
Druck
mbar
Gastyp
Pressão
mbar
P.mín/P.máx
mbar
Capacidade
Térmica kW
G20
20
17/25
G30/G31
28-30/37
25/45
G20
20
17/25
G30/G31
28-30/37
25/45
Tipo de gás
Consumo
Ø injetor
1/100mm
2,5
238 l/h
113
2,5
182 g/h
76
2,2
210 l/h
112
2,2
160 g/h
75
15
IT
GB
FR
4')1.#<+10'«&'.«/+0+/1
0'.«
%#51«
&'..#
%108'45+10'« #&« #.641
6+21«&+«)#5
#&,756/'06« 1(« 6*' 4d).#)'« &7« /+0+/7/« '0
/+0+/7/«
5'66+0) %#5« &'« %108'45+10« &'
(1..19+0)« %108'45+10 )#<
61«#«&+(('4'06«)#5«6;2'
Procedere allo smontaggio
del frontale:
- per il frontale inox svitare le
due viti di fissaggio posteriori
- per i frontali in vetro svitare
le due ghiere sotto la
manopola.
Proceed to disassemble the Démonter le panneau frontal:
- pour le panneau frontal en
front panel:
inox, dévisser les deux vis
- for the front panel, unscrew
de fixation postérieures
the two rear fixing screws
- for glass fronts, unscrew - pour le panneau frontal en
the two lock rings under the
en verre, dévisser les deux
bagues sous le bouton.
knob.
Conversione da gas
naturale a gas liquido
Dopo aver tolto il frontale, con
il cacciavite passare attraverso
il foro della parete anteriore
del cruscotto e ruotare a fondo
in senso orario la vite A di
regolazione (fig. A)
Conversion from
natural gas to liquid gas
After removing the front
panel, insert the screwdriver
in the hole in the front wall
of the instrument panel and
turn regulation screw A (fig.
A) clockwise.
Conversion du gaz
naturel au gaz liquide
Après avoir enlevé le panneau
frontal, passer le tournevis à travers
le trou de la paroi antérieure du
bandeau de commande et tourner
à fond en sens horaire la vis A de
réglage (fig. A)
Conversione da gas
liquido a gas naturale
Dopo aver tolto il frontale,
accendere il forno con
termostato posizionato a
250°C per almeno 10-15
minuti. Ruotare quindi il
termostato nella posizione
di minimo. Quindi ruotare la
vite del bypass A in senso
antiorario fino a vedere una
fiamma ridotta ma stabile.
Verificare che con apertura/
Conversion from
liquid gas to natural gas
After removing the front
panel, light the over with
thermostat set to 250 °C
for at least 10-15 minutes.
Then, turn the thermostat
to the minimum position.
Then turn the bypass screw
A counterclockwise until you
see a reduced by stable
flame.
Check that the flame does
Conversion du gaz
liquide au gaz naturel
Après avoir enlevé le
panneau frontal, allumer le
four en tournant le thermostat
sur250°C pendant 10-15
minutes au moins. Ensuite,
positionner le thermostat au
minimum et tourner la vis du
by-pass A en sens inverse
horaire jusqu’à ce que la
flamme soit réduite mais
stable.
A
(KI«««#DD«««#HD«
16
DE
ES
NL
PT
'+056'..'0«&'5«/+0+/7/5 4')7.#%+Ï0« &'.« /Ë0+/1 #(56'..+0)«8#0«*'6«/+0+/7/ 4')7.#c1« &1« /Ë0+/1
$'+« 7/56'..70)« #7( '0« %#51« &'« %#/$+1« &' $+,«*'6«1/$179'0«0##4«''0 '/« %#51« &'« %108'451
'+0'0«#0&'4'0«)#56;2
)#5
#0&'4'«)#551146
2#4#« 17641« 6+21« &'
)È5
Für den Ausbau der Frontverkleidung: Efectuar el desmontaje del frontal: Overgaan tot de demontage Proceda à desmontagem do painel frontal:
- FürdieEdelstahl-Frontverkleidung - para el frontal de acero van de voorkant:
- para o painel frontal de aço
die
beiden
rückwärtigen
inoxidable desatornillar los dos - voor de voorkant in inox de twee
inoxidável, desatarraxe os dois
Befestigungsschrauben lösen
tornillos de fijación posteriores
parafusos de fixação traseiros
achterste bevestigingsschroeven
- Für die Frontverkleidungen aus - para los frontales de cristal
losdraaien;
- para os painéis frontais de
Glas die beiden Nutmuttern
desatornillar los dos anillos - voor de voorkanten in glas de twee
vidro, desatarraxe as duas
ringen onder de knop losschroeven.
unter dem Drehknopf lösen.
debajo del mando rotativo.
porcas em baixo do manípulo.
Umstellung von
Erdgas auf Flüssiggas
Nach dem Abnehmen der
Frontverkleidung
mit
dem
Schraubendreher durch das Loch
der Vorderwand des Armaturenbretts
gehen und die Stellschraube A
im Uhrzeigersinn ganz bis zum
Anschlag drehen (Abb. A)
Conversión de
gas natural a gas líquido
Después de sacar el frontal,
pasar con el destornillador a
través del orificio de la pared
anterior del frontal y girar a
fondo en el sentido de las
agujas del reloj el tornillo A
de regulación (fig. A)
Omzetting van
aardgas op vloeibaar gas
Na het verwijderen van de
voorkant, de schroevendraaier
door de opening in de
voorste wand van het
bedieningspaneel steken en
de afstelschroef A volledig met
de klok mee draaien (fig. A).
Conversão de gás
natural para gás liquefeito
Depois de tirar o painel
frontal, passe a chave de
parafusos através do furo da
parede dianteira do painel de
comando e rode o parafuso
de regulação A (fig. A) até ao
fim no sentido horário.
Umstellung von
Flüssiggas auf Erdgas
Nach dem Abnehmen der
Frontverkleidung den Ofen mit
Thermostat auf 250°C mindestens
10-15 Minuten einschalten. Dann
das Thermostat auf die niedrigste
Position stellen. Anschließend
die Schraube von Bypass gegen
den Uhrzeigersinn drehen, bis
die Flamme zwar klein, aber
stabil ist.
Conversión de gas
líquido a gas natural
Después de sacar el frontal,
encender el horno con el
termostato situado a 250°C
durante por lo menos 1015 minutos. Girar luego el
termostato en la posición de
mínimo. Luego girar el tornillo
del bypass A en el sentido
contrario a las agujas del reloj
hasta que se vea una llama
Omzetting van
vloeibaar gas op aardgas
Na het verwijderen van de
voorkant, de oven minstens
10-15 minuten lang aanzetten
met de thermostaat op 250°C.
De thermostaat vervolgens in
de minimumpositie draaien.
Daarna de schroef van de
bypass A tegen de klok in
draaien, tot er een kleine
maar stabiele vlam wordt
Conversão de gás
liquefeito para gás natural
Depois de tirar o painel
frontal, acenda o forno com
o termóstato ajustado a
250°C durante pelo menos
10-15 minutos. Em seguida,
rode o termóstato para a
posição de mínimo. Rode
então o parafuso do bypass
A no sentido anti-horário até
a chama ficar reduzida, mas
17
18
*5
(#
'3
chiusura
ripetute
della
porta del forno, la fiamma
non si spenga. In caso di
spegnimento della fiamma
aumentare leggermente la
regolazione del minimo.
not go out when the door
of the oven is opened and
closed repeatedly. If the flame
goes out, slight increase the
minimum regulation setting.
Vérifier que la flamme ne
s’éteint pas en ouvrant/
fermant plusieurs fois la porte
du four. Le cas échéant,
augmenter légèrement le
réglage du minimum.
Dopo la conversione ad un
altro tipo di gas bisogna
correggere
la
targhetta
dell’apparecchio con i nuovi
dati (tipo e pressione del gas).
(Fig. 1)
After converting the appliance to
a different type of gas,
remember to change the data
plate to one with the new data
(gas type and pressure). (Fig. 1).
Après la conversion corriger la
plaquette de l’appareil avec les
nouvelles données (type et
pression du gaz). (Fig. 1)
SOSTITUZIONE DELL’UGELLO
PER IL GRILL GAS
1) Svitare la vite di fissaggio del
bruciatore che si trova nella
parte alta anteriore della
muffola.
2) Estrarre dalla sua sede il
bruciatore assieme ai suoi
elementi termici.
3) Togliere l'ugello con la chiave
a tubo da 7mm.
4) Avvitare a "fondo" il nuovo
ugello che deve essere del
diametro indicato nella
tabella di pag. 14.
5) Reinserire il bruciatore nella
sua sede e fissarlo con la
vite.
REPLACING THE GAS GRILL
NOZZLE
1) Remove the burner screw
located at the top front of the
oven cavity.
2) Remove the burner together
with its heat elements.
3) Remove the nozzle using the
7 mm socket wrench.
4) Fully tighten the new nozzle
which must be of the diameter
indicated in the table on
page 14.
5) Put back the burner and secure
it with the screw.
REMPLACEMENT DU GICLEUR
POUR LE GRILL A GAZ
1) Dévisser la vis de fixation du
brûleur qui se trouve sur
l’avant du moufle.
2) Extraire le brûleur de son
siège avec l’ensemble des
éléments thermiques.
3) Démonter le gicleur à l’aide
d’une clé à tube 7 mm.
4) Visser à fond le nouveau
gicleur, qui doit impérativement
être de la taille indiquée au
tableau de la page 14.
5) Réinstaller le brûleur dans
son siège et le fixer avec la
vis.
%&
&4
/-
15
Kontrollieren, dass die Flamme
bei wiederholtem Öffnen und
Schließen des Ofens nicht
ausgeht. Falls die Flamme
ausgehen sollte, muss die
Mindestposition etwas höher
eingestellt werden.
reducida pero estable.
Comprobar que con repetidas
aperturas/cierres de la puerta
del horno, la llama no se apague.
En caso de que se apague la
llama, aumentar ligeramente la
regulación del mínimo.
waargenomen.
Controleren of de vlam niet
uitgaat bij herhaald openen/
sluiten van de ovendeur.
Mocht de vlam doven, de
minimumafstelling lichtelijk
verhogen.
estável.
Verifique se a chama não
apaga abrindo e fechando
a porta do forno repetidas
vezes. Se apagar, aumente
ligeiramente a regulação do
mínimo.
Nach der Umstellung auf einen
anderen Gastyp müssen die
Daten auf dem Geräteetikett
korrigiert werden (neue Werte
für Gastyp und Gasdruck).
(Abb. 1)
Tras cambiar de gas, hay que
corregir la chapa del aparato
con los nuevos datos de
manera que conste el tipo y la
presión del gas correctos. (fig. 1)
Na de ombouw naar een
andere gassoort moeten de
nieuwe gegevens op het
typeplaatje van het apparaat
worden ingevuld (gassoort en
gasdruk). (Afb. 1)
Após a conversão para um
outro tipo de gás, é necessário
corrigir a chapa do aparelho
com os novos dados (tipo e
pressão do gás). (Fig. 1)
AUSTAUSCH DER DÜSE FÜR
DEN GASGRILL
1) Die Befestigungsschraube
des Brenners, die sich im
vorderen Teil oben der Muffe
befindet, abschrauben.
2) Den Brenner zusammen mit
seinen Heizelementen aus
seiner Aufnahme entfernen.
3) Mit einem 7mm-Steckschlüssel
die Düsen entfernen.
4) Die neue Düse mit einem in
der Tabelle auf S. 15
angegebenen Durchmesser
"tief" einschrauben.
5) Den Brenner wieder in seine
Aufnahme einsetzen und mt
der Befestigungsschraube
befestigen.
SUSTITUCIÓN DEL INYECTOR
PARA EL GRILL GAS
1) Destornillar el tornillo de fijación
del quemador que se encuentra
en la parte superior delantera
de la caja estanca.
2) Sacar de su alojamiento el
quemador junto con sus
elementos térmicos.
3) Quitar el inyector con la llave
de tubo de 7mm.
4) Enroscar hasta el "fondo" el
nuevo inyector que debe tener
el indicado en la tabla
de la pág. 15.
5) Volver a introducir el quemador
en su alojamiento y fijarlo
con el tornillo.
DE SPUITMOND VAN DE
GASGRILL VERVANGEN
1) Draai de bevestigingsschroef
van de brander los, die zich in
het bovenste gedeelte van de
oven aan de voorkant bevindt.
2) Neem de brander samen met
de verwarmingselementen
van zijn plaats.
3) Verwijder de spuitmond met
een steeksleutel van 7mm.
4) Draai de nieuwe spuitmond,
die de doorsnede moet hebben
die in de tabel van pag. 15
wordt aangeduid, volledig aan.
5) Breng de brander weer op
zijn plaats aan en bevestig
hem met de schroef.
SUBSTITUIÇÃO DO BICO
PARA O GRILL À GÁS
1) Desaparafusar o parafuso de
fixação do queimador que se
encontra na parte anterior alta
da mufla.
2) Extrair o queimador do seu
alojamento junto com os
seus elementos térmicos.
3) Retirar o bico com a chave
de tubo de 7 mm.
4) Aparafusar a “fundo” o bico
novo que deve ter o diâmetro
indicado na tabela da pág. 15
5) Introduzir de novo queimador
no seu alojamento e fixá-lo
com o parafuso.
19
IT
GB
INCASSO DEL FORNO
FLUSH FITTING
ENCASTREMENT DU FOUR
Il forno può essere installato
sotto un piano di cottura
oppure in colonna. Le dimensioni dell’incasso devono essere come riportato in
figura 7.
Il materiale del mobile deve
essere in grado di resistere
al calore. Il forno deve essere centrato rispetto alle pareti
del mobile e fissato con le
viti e bussole che sono
fornite in dotazione.
The oven can be installed
under a work top or in a
cooking
column.
The
dimensions of the housing for
the oven are given in figure 7.
Make sure that surrounding
materials are heat resistant.
Align the oven centrally with
respect to the side walls of
the units surrounding it and
fix it in place with the screws
and Allen screws provided.
Le four peut être installé
sous un plan de cuisson ou
dans une colonne. Les dimensions de l’encastrement
doivent être indiquées figure 7.
Le matériau avec lequel le
meuble est réalisé doit être
en mesure de résister à la
chaleur. Le four doit être
centré par rapport aux parois
du meuble et fixé avec les
vis et les douilles fournies à
cet effet.
Per
l’abbinamento
del
forno con i piani di cottura
polivalenti gas (figura 8)
vedere
le
istruzioni
allegate al piano cottura.
If a gas hob is to installed in
combination with the oven
refer to the instructions
supplied with the hob (figure
8).
Pour l’accouplement du four
avec des plans de cuisson
polyvalents de gaz (figure 8)
voir les instructions en
annexe du plan de cuisson.
Fig. 7 - Abb. 7 - Afb. 7
20
FR
DE
ES
NL
PT
EINBAU DES BACKOFENS ENCASTRE DEL HORNO
INBOUW VAN DE OVEN
ENCASTRE DO FORNO
Der Ofen kann unter einem
Kochfeld oder in einen
Schrank eingebaut werden.
Die Einbaumaße müssen den
Angaben auf der Abbildung 7
entsprechen.
Das Möbelmaterial muss
hitzebeständig sein.
Der
Backofen muss zu den
Möbelwänden zentriert, und
mit
den
mitgelieferten
Schrauben und Buchsen
befestigt werden.
El horno puede ser instalado
debajo de la encimera o en
una columna. Las medidas
del hueco han de serlas
ilustradas en la figura 7.
El material del mueble debe
ser capaz de resistir al calor.
El horno debe ser centrado
respecto de las paredes del
mueble y fijado con los tornillos y casquillos suministrados junto con el producto.
De oven kan worden geïnstalleerd onder een kookplaat of in een hoge kast. De
afmetingen van de inbouw
moeten zodanig zijn als in
afbeelding 7 is weergegeven.
Het materiaal van het
meubel moet hittebestendig
zijn. De oven moet tussen de
wanden van het meubel
worden gecentreerd, en
worden vastgezet met de
inbusschroeven die bij de
oven geleverd zijn.
O forno pode ser instalado
debaixo de um plano de
cozedura ou então na
coluna. As dimensões do
encaixe devem ser as
indicadas na figura 7.
O material do móvel deve
ser capaz de resistir ao
calor. O forno deve ser
centrado respeito ás paredes
do móvel e fixado com os
parafusos e buchas que são
fornecidas em dotação.
Für das Kombinieren des
Ofens mit den für mehrere
Gastypen
geeigneten
Kochmulden (Abbildung 8)
sind die der Kochmulde
beiliegenden Hinweise und
Anleitungen zu beachten.
Para instalar el horno con
placas
de
cocción
polivalentes de gas (figura
8), véanse las instrucciones
de la placa de cocción.2
Zie voor de combinatie van
de oven met polyvalente
gaskookplaten (afbeelding
8) de bij de kookplaat
geleverde instructies.
Para a ligação do forno a
placas polivalentes a gás
(figura 8), consulte as
instruções fornecidas com a
placa de fogão.
Fig. 8 - Abb. 8 - Afb. 8
21
IT
GB
FR
ALLACCIAMENTO
ELETTRICO
ELECTRICAL
CONNECTIONS
BRANCHEMENT
ELECTRIQUE
Prima di effettuare l’allacciamento elettrico accertarsi
che:
- le caratteristiche dell’impianto siano tali da soddisfare quanto indicato sulla
targa matricola applicata
sul fronte del forno;
- l’impianto sia munito di un
efficace collegamento di
terra secondo le norme e
le disposizioni di legge in
vigore. La messa a terra è
obbligatoria a termini di
legge.
Il cavo in nessun punto
dovrà raggiungere una
temperatura superiore di
50° C quella ambiente.
Se un apparecchio fisso
non è provvisto di cavo di
alimentazione e di spina,
o di altro dispositivo che
assicuri la disconnessione
dalla rete, con una
distanza di apertura dei
contatti che consenta la
disconnessione completa
nelle
condizioni
della
categoria
di
sovratensione
III,
tali
Before connecting the oven
to the mains power supply,
make sure that:
- The supply voltage corresponds
to
the
specifications on the data
plate on the front of the
oven.
- The mains supply has an
efficient earth (ground)
connection complying with
all applicable laws and regulations. Correct earthing
(grounding) is a legal requirement.
The power cable should
never reach a temperature
50° C above ambient temperature at any point along
its length.
If a fixed appliance is not
provided with a power
cable and plug, or some
other device permitting it
to be disconnected from
the
mains
electricity
supply,
with
a
gap
between the contacts big
enough
to
guarantee
class
III
overvoltage
protection, then such a
Avant d’effectuer le branchement électrique, s’assurer que :
- les caractéristiques de l’installation permettent de respecter ce qui est indiqué
sur la plaque d’identification qui est appliquée sur
le devant du four;
- l’installation est munie
d’un raccordement à la prise de terre conforme aux
normes et aux dispositions
prévues par la loi. La mise
à la terre est obligatoire
aux termes de la loi.
Le câble ne doit en aucun
cas
atteindre
une
température supérieure de
plus de 50° C par rapport
à la température ambiante.
Si un appareil fixe n’a pas
de cordon d’alimentation
et de fiche ou d’autre
dispositif
assurant
la
déconnexion du secteur,
avec
une
distance
d’ouverture des contacts
permettant
une
déconnexion
complète
dans les conditions de la
Fig. 9 - Abb. 9 - Afb. 9
22
DE
ES
NL
PT
STROMANSCHLUSS
CONEXIÓN ELÉCTRICA:
ELEKTRISCHE
AANSLUITING
LIGAÇÃO ELÉCTRICA
Vor der Durchführung des
Stromanschluss muss sichergestellt werden, dass:
- die Eigenschaften der
Stromnetzes
mit
den
Werten auf dem vorne am
Ofen angebrachten Typenschild übereinstimmen;
- das Stromnetz gemäß den
geltenden Bestimmungen
und Rechtsvorschriften geerdet ist.
Die Erdung ist gesetzlich
vorgeschrieben.
Das
Kabel darf an keiner Stelle
eine Temperatur von über
50° C erreichen.
Wenn ein Standgerät
nicht mit Netzkabel und stecker
oder
einer
sonstigen
Vorrichtung
ausgestattet ist, das die
Trennung
vom
Netz
gewährleistet, und dessen
Öffnungsweg
der
Kontakte die vollständige
Trennung
unter
den
Bedingungen
der
Überspannungskategorie
III gestattet, so müssen
diese Trenneinrichtungen
Antes de efectuar la conexión eléctrica cerciorarse de
que:
- las características de la instalación se correspondan
con las indicadas en la
placa situada en la parte
frontal del horno;
- la instalación esté provista
de una eficaz conexión a
tierra según las normas y
las disposiciones de la ley
en vigor. La conexión a
tierra es obligatoria según
la ley.
El cable en ningún punto
deberá
alcanzar
una
temperatura superior de
50° C a temperatura
ambiente.
Si un aparato fijo no está
provisto de cable de
alimentación con enchufe,
en la red de alimentación
debe
incluirse
un
dispositivo
de
corte,
instalado con arreglo a
las disposiciones vigentes
y con una distancia de
apertura de los contactos
que
asegure
la
Controleer, voordat u de
elektrische aansluiting tot
stand brengt, of:
- de eigenschappen van de
elektrische installatie overeenstemmen met de gegevens op het typeplaatje
op de voorzijde van de
oven;
- de installatie goed geaard
is volgens de geldende
voorschriften en wettelijke
bepalingen. De aarding is
volgens de wet verplicht.
De kabel mag in geen
geval meer dan 50°
warmer worden dan de
omgevingstemperatuur.
Als een vast apparaat niet
beschikt
over
een
voedingskabel en stekker
of
over
een
ander
systeem
dat
de
afkoppeling
van
het
elektriciteitsnet
garandeert
(met
een
afstand
tussen
de
contacten
die
in
overspanningscategorie
III
een
complete
afkoppeling
mogelijk
Antes de efectuar a ligação
eléctrica certificar-se que:
- as características da instalação sejam tais que
possam satisfazer quanto
indicado na placa da
matrícula
aplicada
na
fronte do forno;
- a instalação esteja dotada
de uma eficaz ligação a
terra segundo as normas e
as disposições de lei em
vigor. A ligação a terra é
obrigatória nos termos da
lei.
O cabo em nenhum ponto
deverá atingir uma temperatura superior de 50° C aquela ambiente.
Se um aparelho fixo não
estiver equipado com
cabo de alimentação e
ficha, ou outro dispositivo
que
garanta
a
desactivação da rede,
com uma distância de
abertura dos contactos
que
permita
a
desactivação
completa
nas
condições
da
categoria de sobretensão
TIPI E DIAMETRO MINIMO DEI CAVI
CABLE TYPES AND MINIMAL DIAMETERS
TYPES ET DIAMÈTRE MINIMAUX DES CÂBLES
KABELTYPEN UND MINIMALE DURCHMESSER
TIPOS Y DIÁMETRO MÍNIMO DE LOS CABLES
KABELTYPES EN MINIMALE DOORSNEDEN
TIPOS E DIÁMETRO MÍNIMO DOS CABOS
H05RR-F
3x1 mm²
H05VV-F
3x1 mm²
H05RN-F
3x1 mm²
H05V2V2-F 3x1 mm²
23
IT
24
GB
FR
dispositivi
di
disconnessione
devono
essere previsti nella rete
di
alimentazione
conformemente
alle
regole di installazione.
La presa o l’interruttore
onnipolare devono essere
facilmente
raggiungibili
con l’apparecchiatura installata.
device must be fitted to
the power supply in
compliance
with
the
regulations
governing
electrical installations.
The socket or switch must
be easily reachable with
the oven fully installed.
catégorie de surtension
III, ces dispositifs de
déconnexion doivent être
prévus dans le réseau
d ’ a l i m e n t a t i o n
conformément
aux
normes d’installation.
La prise ou l’interrupteur
omnipolaire doit pouvoir
être atteint facilement
lorsque
l’appareil
est
installé.
N.B. Il costruttore declina
ogni responsabilità nel caso
che quanto sopra e le usuali
norme antinfortunistiche non
vengano rispettate.
N.B. The manufacturer declines all responsibility for
damage or injury if the above
instructions
and
normal
safety precautions are not
respected.
N.B. Le fabricant décline
toute responsabilité si les
indications présentées dans
ce document et les normes
adoptées habituellement en
matière de prévention des
accidents du travail ne sont
pas respectées.
DE
ES
NL
PT
gemäß
den
Installationsvorschriften
im
Versorgungsnetz
vorgesehen sein.
Die Steckdose bzw. der
allpolige Schalter müssen
bei installiertem Gerät
problemlos
zugänglich
sein.
desconexión completa en
las
condiciones
estipuladas
para
la
categoría de sobretensión
III.
La toma o el interruptor
omnipolar deben ser de
fácil acceso una vez instalado el aparato.
maakt), dan moeten deze
stroomverbrekers in het
elektriciteitsnet
worden
opgenomen
in
overeenstemming met de
installatievoorschriften.
Het stopcontact of de
meerpolige
schakelaar
moeten gemakkelijk te
bereiken zijn, ook wanneer
de
apparatuur
geïnstalleerd is.
III, esses dispositivos de
desactivação devem estar
previstos na rede de
alimentação,
em
conformidade com as
instruções de instalação.
A tomada ou o interruptor
omnipolar devem-se poder
atingir facilmente com a
aparelhagem instalada.
N.B. Der Hersteller ist nicht
haftbar, wenn die obigen
Anweisungen
und
die
üblichen Unfallverhütungsvorschriften nicht befolgt
werden.
Nota: El fabricante declina
toda responsabilidad en el
caso de que todo lo mencionado arriba y las usuales
normas para la prevención
de accidentes no sean respetadas.
N.B. De fabrikant aanvaardt
geen enkele aansprakelijkheid in het geval het bovenstaande en de gebruikelijke regels voor ongevallenpreventie niet in acht
genomen worden.
N.B. O fabricante declina todas as responsabilidades no
caso que quanto acima e as
usuais normas de prevenção
contra os acidentes não
sejam respeitadas.
25
IT
GB
FR
ISTRUZIONI PER
L’UTENTE
INSTRUCTIONS
FOR THE USER
INSTRUCTIONS
POUR L’UTILISATEUR
PRIMO UTILIZZO
THE FIRST TIME YOU USE
THE OVEN
PREMIERE UTILISATION
Il forno va pulito a fondo con
acqua e sapone e risciacquato accuratamente. Per
togliere i telai laterali nei forni
con pareti lisce procedere
come illustrato in figura.
Riscaldare il forno per circa
20 minuti alla massima temperatura;
verranno
così
eliminati tutti i residui grassi
di
lavorazione
che
potrebbero causare sgradevoli odori in fase di cottura.
Clean the oven thoroughly
with soapy water and rinse
well. To remove the lateral
frames from smooth-walled
ovens, proceed as shown in
the figure.
Operate the oven for about
20 minutes at maximum
temperature to burn off all
traces of grease which might
otherwise create unpleasant
smells when cooking.
Le four doit être nettoyé à
fond à l’eau et au savon,
puis rincé méticuleusement.
Pour enlever les cadres latéraux dans les fours à parois lisses, procéder comme
indiqué sur la figure.
Il convient de n’insérer la
nourriture que lorsque le four
a atteint la température
préétablie, c’est-à-dire quand
s’éteint le voyant lumineux.
Fig. 10 - Abb. 10 - Afb. 10
Importante:
come precauzione di sicurezza prima di procedere a
qualsiasi operazione di pulizia del forno staccare sempre la spina della presa di
corrente o togliere la linea di
alimentazione
dell’apparecchio. Inoltre evitare di usare sostanze acide o alcaline (succhi di limone, aceto,
sale, pomodori ecc.). Evitare
di usare prodotti a base di
cloro, acidi o abrasivi specialmente per la pulizia delle
pareti verniciate.
26
Important:
As a safety precaution,
before cleaning the oven,
always disconnect the plug
from the power socket or the
power cable from the oven.
Do not use acid or alkaline
substances to clean the oven
(lemon juice, vinegar, salt,
tomatoes etc.). Do not use
chlorine based products,
acids or abrasive products to
clean the painted surfaces of
the oven.
Important:
A titre de précaution, avant
d’effectuer toute opération
de nettoyage du four quelle
qu’elle
soit,
débrancher
toujours la fiche de la prise
de courant ou couper la ligne
d’alimentation de l’appareil.
Veiller à ne pas utiliser de
substances
acides
ou
alcalines (jus de citron,
vinaigre, sel, tomate, etc.).
Ne pas utiliser de produits à
base de chlore, acides ou
abrasifs, surtout pour le
nettoyage
des
parois
peintes.
DE
ES
NL
PT
ANLEITUNGEN FÜR INSTRUCCIONES GEBRUIKSAANWIJZINGEN INSTRUÇÕES PARA
DEN BENUTZER
PARA EL USUARIO
O UTILIZADOR
ERSTMALIGE BENUTZUNG PRIMERA UTILIZACIÓN
EERSTE GEBRUIK
PRIMEIRA UTILIZAÇÃO
Der
Backofen
muss
gründlich mit Seifenwasser
gesäubert werden. Wie auf
der Abbildung dargestellt
vorgehen, um bei den Öfen
mit glatten Wänden die
seitlichen
Backbleche
herauszunehmen.
Den Backofen für etwa 20
Minuten
auf
Höchsttemperatur aufheizen;
auf diese Weise werden alle
f e t t h a l t i g e n
Be a rbeit u n g s r ü c k s t ä n d e
eliminiert, die beim Backen
unangenehme
Gerüche
verursachen könnten.
El horno se limpia a fondo
con agua y jabón y se
enjuaga
cuidadosamente.
Para sacar los armazones
laterales en los hornos con
paredes lisas proceder como
se ilustra en la figura.
Recalentar el horno alrededor de 20 minutos a la
máxima temperatura; serán
así eliminados todos los
residuos grasos ya que podrían causar olores desagradables durante la fase de
cocción.
De oven moet grondig worden schoongemaakt met
water en zeep, en zorgvuldig
worden afgespoeld. Voor het
verwijderen van de zijframes
in ovens met gladde wanden
dient u te werk te gaan zoals
op de afbeelding wordt
geïllustreerd.
Verwarm de oven gedurende
ongeveer 20 minuten op de
hoogste
temperatuur;
zodoende
worden
alle
achtergebleven
vetten
geëlimineerd die onaangename geuren zouden kunnen
veroorzaken
tijdens
het
bereiden van voedsel.
O forno deve ser limpo a
fundo com água e sabão e
depois cuidadosamente secado com um pno. Para tirar
as estruturas laterais nos
fornos com paredes lisas
proceder como ilustrado na
figura.
Aquecer o forno à máxima
temperatura por cerca de 20
minutos; assim serão eliminados todos os resíduos de
gorduras de fabrico que poderiam causar cheiros desagradáveis ao cozinhar.
Wichtig:
Als
Sicherheitsvorkehrung
muss vor jeder Reinigung
des Backofens immer das
Stromnetz
abgeschaltet
werden.
Zum
Reinigen
dürfen keine sauren oder
alkalischen Substanzen verwendet werden (Zitronensaft,
Essig,
Salz,
usw.).
Chlorhaltige Produkte, sowie
Säuren oder Scheuermittel
sind ebenfalls zu vermeiden,
dies gilt vor allem für die
Reinigung der lackierten
Wände.
Importante:
Como precaución de seguridad, antes de proceder con
cualquier operación de limpieza del horno quitar
siempre el enchufe de la
toma de corriente o quitar la
línea de alimentación del
aparato. Además evitar el
uso de sustancias ácidas o
alcalinas (jugos de limón,
vinagre, sal, tomates, etc.).
Evitar el uso de productos a
base de cloro, ácidos o abrasivos especialmente para la
limpieza de las paredes
barnizadas.
Belangrijk:
als veiligheidmaatregel moet
altijd de stekker uit het
stopcontact worden gehaald
of moet de voeding van het
apparaat
worden
afgekoppeld alvorens de
oven te gaan schoonmaken.
Gebruik bovendien geen
zure of alkaline stoffen (citroensap, azijn, zout, enz.).
Gebruik geen producten op
chloorbasis, of zure of
schurende producten, vooral
voor het reinigen van gelakte
oppervlakken.
Importante:
como precaução de segurança antes de proceder a
qualquer operação de limpeza do forno tirar sempre a
ficha da tomada de corrente
ou tirar a linha de alimentação do aparelho. Além
disso evite usar substâncias
ácidas ou alcalinas (sumos
de limão, vinagre, etc.).
Evitar a utilização de
produtos à base de cloro,
ácidos ou abrasivos especialmente para a limpeza
das paredes envernizadas.
27
IT
GB
FR
PANNELLI AUTOPULENTI
CATALICI
SELF-CLEANING
CATALYTIC PANELS
PANNEAUX
AUTONETTOYANTS
CATALYTIQUES
I nostri forni con pareti lisce
hanno la possibilità di montare all’interno della muffola
dei pannelli autopulenti che
ricoprono le pareti.
Questi speciali pannelli, da
agganciare alle pareti prima
dei telai laterali, sono ricoperti di uno speciale smalto
catalitico microporoso che
ossida e vaporizza gradualmente gli schizzi di olio e
grasso eliminandoli durante
le cotture sopra i 200° C.
Se dopo una cottura di cibi
molto grassi il forno non è
pulito, farlo funzionare a
vuoto alla massima temperatura per un tempo massimo
di 60 minuti.
I pannelli autopulenti non devono essere lavati né puliti
con prodotti abrasivi o prodotti contenenti acidi o alcali.
Our smooth walled ovens
can be fitted with selfcleaning panels to cover the
inside walls.
These special panels are
simply hooked on to the
walls before the side frames
are fitted. They are coated in
a special, micro-porous catalytic enamel which oxidises
and gradually vaporises
splashes of grease and oil at
cooking temperatures above
200° C.
If the oven is not clean after
cooking fatty foods, operate
the empty oven for 60 minutes (max.) at maximum
temperature.
Never wash or clean selfcleaning panels with abrasive,
acid,
or
alkaline
products.
Nos fours à parois lisses
peuvent être munis, à l’intérieur, de panneaux autonettoyants qui recouvrent les
parois.
Devant être accrochés sur
les parois, avant les châssis
latéraux, ces panneaux spéciaux sont recouverts d’un
émail spécial catalytique microporeux
qui
provoque
l’oxydation et l’évaporation
graduelles
des
éclaboussures d’huile et de
graisse qui sont ainsi éliminées pendant les cuissons
à plus de 200° C.
Si le four n’est pas propre
après la cuisson d’aliments
très gras, le faire fonctionner
à vide à la température
maximum pendant 60 minutes maximum.
Les
panneaux
autonettoyants ne doivent être ni
lavés, ni nettoyés avec des
produits abrasifs ou des
produits
contenant
des
acides ou des alcalis.
Fig. 11 - Abb. 11 - Afb. 11
28
DE
ES
NL
PT
SELBSTREINIGENDE
KATALYTISCHE PLATTEN
PANELES CATALÍTICOS
AUTOLIMPIANTES
KATALYSERENDE
ZELFREINIGENDE
PANELEN
PAINÉIS DE
AUTOLIMPEZA
CATALÍTICOS
Unsere Backöfen mit glatten
Wänden bieten die Möglichkeit,
in
der
Muffel
selbstreinigende Platten zu
montieren, mit denen die
Wände verkleidet werden.
Diese Spezialplatten, die vor
den seitlichen Rahmen an
den Wänden eingehängt
werden, sind mit einem
mikroporösen katalytischen
Speziallack bedeckt, der
oxidiert, die Öl- und Fettspritzer nach und nach verdampfen lässt, und so bei
den Backvorgängen über
200°C eliminiert.
Sollte der Ofen nach dem
Backen
sehr
fetthaltiger
Speisen nicht sauber sein,
lässt man ihn maximal 60
Minuten
lang
leer
bei
Höchsttemperatur
eingeschaltet.
Die
selbstreinigenden
Platten dürfen weder gewaschen,
noch
mit
scheuernden oder säurehaltigen bzw. alkalischen
Produkten gereinigt werden.
Nuestros hornos provistos
de paredes lisas, tienen la
posibilidad de llevar montados en su interior paneles
autolimpiantes que recubran
dichas paredes.
Estos paneles especiales,
que se enganchan a las paredes
antes
de
los
bastidores laterales, están
recubiertos de un especial
esmalte
catalítico
microporoso que oxida y
vaporiza gradualmente las
salpicaduras de aceite y
grasa eliminándolas durante
las cocciones por encima de
los 200° C.
Si después de una cocción
de alimentos muy grasos el
horno no está limpio,
hacerlo funcionar en vacío a
la máxima temperatura por
un tiempo máximo de 60
minutos.
Los paneles autolimpiantes
no deben ser lavados ni limpiados con productos abrasivos o productos que contengan ácidos o álcali.
In onze ovens met gladde
wanden kunnen in de moffel
zelfreinigende
panelen
worden geplaatst die de
wanden afdekken.
Deze speciale panelen, die
aan de wanden moeten
worden bevestigd voordat
de zijframes worden geplaatst (afb. ...), zijn bedekt
met speciale microporeuze,
katalytische lak die geleidelijk de olie- en vetspatten oxideert en laat
verdampen, zodat ze geëlimineerd worden bij bereidingen boven 200° C.
Als de oven na het bereiden
van erg vet voedsel niet
schoon is, laat hem dan leeg
functioneren op de maximum
temperatuur
gedurende
maximaal
60
minuten”.
De zelfreinigende panelen
mogen niet afgewassen of
schoongemaakt worden met
schurende producten of met
zuur- of alkalihoudende
producten.
Os nossos fornos com paredes lisas têm a possibilidade
de montar dentro da mufla
painéis de autolimpeza que
recobrem as paredes.
Estes painéis especiais, que
se engancham às paredes
antes dos bastidores laterais, estão recobertos de um
esmalte especial catalítico
microporoso que oxida e vaporiza gradualmente os salpicos de óleo e gorduras eliminando-as
durante
o
funcionamento acima dos
200° C.
Se depois de uma cozedura
de alimentos com muito
gordura o forno não estiver
limpo, fazê-lo funcionar a
vazio à máxima temperatura
por um tempo máximo de 60
Os painéis de autilimpeza
não devem ser lavados nem
limpos com produtos abrasivos ou produtos que contenham na sua composição
ácidos ou álcalinos.
29
IT
DESCRIZIONE
COMANDI
GB
FR
FRONTALE DESCRIPTION
OF
THE DESCRIPTION DU BANDEAU
FRONT CONTROL PANEL
DE COMMANDE
FORNO A GAS CON GRILL GAS OVEN WITH ELECTRIC FOUR AU GAZ AVEC GRIL
ELETTRICO
GRILL
ÉLECTRIQUE
COMANDI (Fig. 12)
CONTROLS (Fig. 12)
1. Termostato forno a gas
1. Gas oven temperature
2. Manopola grill, girrarosto e
control
luce forno
2. Grill, spit roaster and oven
3. Spia forno a gas
light knob
4. Contaminuti meccanico
3. Gas oven indicator light
5. Spia grill
4. Mechanical timer
5. Grill indicator light
COMMANDES (Fig. 12)
1. Thermostat four
2. Manette gril, broche
éclairage
3. Voyant four
4. Minuterie mécanique
5. Voyant gril
et
Fig. 12 - Abb. 12 - Afb. 12
Fig. 13 - Abb. 13 - Afb. 13
TERMOSTATO DEL FORNO
Il
termostato
serve
ad
impostare
la
temperatura
desiderata del forno ed è
completo
di
valvola
di
sicurezza. Quando è in
funzione si illumina la spia
verde.
OVEN
TEMPERATURE
CONTROL
The temperature control knob
serves to set the desired oven
temperature and is equipped
with a safety valve. When the
oven is in operation the green
light is illuminated.
THERMOSTAT DU FOUR
Le
thermostat
sert
à
programmer la température
désirée du four, il est équipé
d’une soupape de sûreté.
Quand il fonctionne le voyant
est vert.
La posizione di minimo
corrisponde
ad
una
temperatura del forno di 130°C.
Essa dispone di una posizione
d’arresto.
The
minimum
position
corresponds to an oven
temperature of 130°C. The
control knob has stop in the
minimum position.
La position de minimum
correspond à une température
du four de 130°C. Elle dispose
d’une position d’arrêt.
La posizione “max” corrisponde
ad una temperatura del forno di
250°C, e costituisce la
posizione finale del termostato.
The
“max”
position
corresponds to an oven
temperature of 250°C, and is
obtained when the knob is
turned fully anticlockwise.
To light the burner, push in the
temperature control knob and
turn it anticlockwise to the
desired temperature.
La position “max” correspond à
une température du four de
250°C, et constitue la position
finale du thermostat. Pour
allumer le brûleur, appuyer la
manette du thermostat et la
tourner en sens antihoraire
jusqu’à la température voulue.
Hold the knob pressed in for 510 seconds. The burner will be
ignited electrically, and the
safety
valve
temperature
sensor will heat up thereby
allowing gas to continue to flow
to the burner.
Appuyer la manette pendant 510 secondes. Pendant ce
temps le brûleur est allumé
électriquement,
l’élément
thermique est chauffé et
permet la distribution du gaz au
brûleur.
Per accendere il bruciatore,
premete la manopola del
termostato e ruotatela in senso
antiorario fino alla temperatura
desiderata.
Tenete premuta la manopola
per circa 5-10 secondi. Durante
questo tempo, il bruciatore
viene acceso elettricamente,
l’elemento
termico
viene
riscaldato
e
permette
l’erogazione
di
gas
al
bruciatore.
Non azionate l’accensione per Do not operate the ignition for Ne pas actionner l’allumage
30
DE
ES
NL
PT
BESCHREIBUNG DER
BEDIENBLENDE
DESCRIPCIÓN DEL FRONTAL BESCHRIJVING VAN HET DESCRIÇÃO FRONTAL DOS
DE MANDOS
FRONTBEDIENINGSPANEEL COMANDOS
GASOFEN MIT
ELEKTROGRILL
HORNO DE GAS CON GRILL GASOVEN MET
ELEKTRISCHE GRILL
ELÉCTRICO
BEDIENUNGSEINRICHTUNGEN
(Abb. 12)
1. Thermostat Gasofen
2. Drehregler Grill, Bratspieß
und Innenbeleuchtung
3. Kontrolllampe Gasofen
4. Mechanische Minutenuhr
5. Kontrolllampe Grill
MANDOS (fig. 12)
1. Termostato del horno de
gas
2. Mando del grill, el asador y
la luz del horno
3. Testigo del horno de gas
4. Minutero mecánico
5. Testigo del grill
BEDIENINGEN (Afb. 12)
COMANDOS (Fig. 12)
1. Thermostaat gasoven
1. Termóstato do forno a gás
2. Regelknop grill, draaispit en 2. Manípulo do grill, espeto e
ovenverlichting
luz do forno
3. Controlelampje gasoven
3. Luz piloto do forno a gás
4. Mechanische klok
4. Conta-minutos mecânico
5. Controlelampje grill
5. Luz piloto do grill
THERMOSTAT DES OFENS
Der Thermostat dient zum
Einstellen der gewünschten
Ofentemperatur und ist mit
einem
Sicherheitsventil
ausgestattet. Wenn er in
Betrieb ist, leuchtet das grüne
Lämpchen.
TERMOSTATO DEL HORNO
Sirve para programar la
temperatura deseada del
horno e incorpora una válvula
de seguridad. Cuando está en
marcha, el testigo verde se
enciende.
OVENTHERMOSTAAT
De thermostaat dient om de
gewenste temperatuur van de
oven in te stellen en is uitgerust
met een veiligheidsklep. Als de
thermostaat werkt, brandt het
groene controlelampje.
TERMÓSTATO DO FORNO
O termóstato serve para
programar a temperatura
pretendida do forno e está
equipado com uma válvula de
segurança. Quando está a
funcionar, a luz piloto verde
acende-se.
Die Position min. entspricht
einer Ofentemperatur von
130°C. Sie hat auch eine
Einraststellung.
La posición de mínimo
corresponde
a
una
temperatura del horno de
130°C. Tiene una posición de
apagado.
De minimale stand stemt
overeen
met
een
oventemperatuur van 130°C.
Deze beschikt over een
stopstand.
A
posição
do
mínimo
corresponde
a
uma
temperatura do forno de
130°C. Esta dispõe de uma
posição de paragem.
Die Position “max” entspricht
einer Ofentemperatur von
250°C und ist auch die obere
Endeinstellung
des
Thermostats. Zum Anzünden
des Brenners den Drehregler
des Thermostats drücken und
gegen den Uhrzeigersinn auf
die gewünschte Temperatur
drehen.
La posición de máximo
corresponde al tope del
termostato y calienta el horno a
250°C. Para encender el
quemador, apretar el mando
del termostato y girarlo en
sentido contrario a las agujas
del reloj hasta la temperatura
deseada.
De “max” stand stemt overeen
met een oventemperatuur van
250°C en vormt de eindstand
van de thermostaat. Druk op
de thermostaatknop en draai
hem tegen de klok op de
gewenste temperatuur om de
brander te ontsteken.
A posição “máx” corresponde
a uma temperatura do forno de
250°C e constitui a posição
final do termóstato. Para
acender o queimador, prima o
manípulo do termóstato e
rode-o para a esquerda até à
temperatura pretendida.
Den Drehregler etwa 5 bis 10
Sekunden
lang
gedrückt
halten. In dieser Zeit wird der
Brenner elektrisch gezündet,
das
Heizelement
wird
aufgeheizt und macht so die
Versorgung des Brenners mit
Gas möglich.
Mantener apretado el mando
entre 5 y 10 segundos.
Durante este tiempo, el
quemador
se
enciende
eléctricamente, el elemento
térmico se calienta y el gas
llega al quemador.
Houd de knop ongeveer 5-10
seconden
ingedrukt.
De
brander wordt nu elektrisch
ontstoken,
het
verwarmingselement
wordt
verwarmd en maakt de
gastoevoer naar de brander
mogelijk.
Mantenha premido o manípulo
durante cerca de 5-10
segundos.
Durante
este
tempo, o queimador acende-se
electricamente, a resistência
aquece e permite a distribuição
do gás ao queimador.
Die Zündung nicht länger als 15 No
mantener
apretado
FORNO A GÁS COM GRILL
ELÉCTRICO
el Druk de ontsteking niet langer Não accione a ignição durante
31
IT
IT
Fig. 14 - Abb. 14 - Afb. 14
Fig. 14 - Abb. 14 - Afb. 14
Fig. 14 - Abb. 14 - Afb. 14
Fig. 14 - Abb. 14 - Afb. 14
Fig. 15 - Abb. 15 - Afb. 15
Fig. 15 - Abb. 15 - Afb. 15
Fig. 15 - Abb. 15 - Afb. 15
32Fig. 15 - Abb. 15 - Afb. 15
più di 15 secondi. In caso di
più
di 15 secondi.
In casodel
di
mancata
accensione
IT a premere
mancata
accensione
del
bruciatore, tornate
bruciatore,
tornate
premere
la manopola
solo a
dopo
aver
più
di 15 secondi.
In caso
di
IT
la
manopola
solo
lasciato
aperta
la dopo
porta aver
per
mancata
accensione
del
lasciato
aperta
la
porta
per
almeno
1 minuto.
bruciatore,
tornate aIn premere
più
di 15
secondi.
caso di
almeno
1 minuto.
la manopolaaccensione
solo dopo aver
mancata
del
Se
l’accensione
elettrica
non
lasciato aperta
la aporta
per
bruciatore,
tornate
premere
Se
l’accensione
elettrica
non
dovesse
funzionare,
avvicinare
almeno
1 minuto.
la
solo acceso
dopo
aver
dovesse
funzionare,
avvicinare
un manopola
fiammifero
in
lasciato
aperta del
laacceso
porta
per
un
fiammifero
in
corrispondenza
foro
che
Se
l’accensione
elettrica
non
almeno 1 minuto.
corrispondenza
del foro cheil
permette
di visualizzare
dovesse funzionare,
avvicinare
permette
di e visualizzare
il
bruciatore
contemporaun
fiammifero
acceso non
in
Se
l’accensione
elettrica
bruciatore
e premere
contemporaneamente
la
corrispondenza
del
foro
che
dovesse
avvicinare
neamente
premere
la
manopolafunzionare,
del
nella
permette
di termostato
visualizzare
un
fiammifero
acceso
inil
manopola
del
termostato
nella
posizione
“max”
per
5÷10
bruciatore e del
contemporacorrispondenza
foro
che
posizione
“max” per 5÷10
secondi.
neamente di premere
lail
permette
visualizzare
secondi.
AVVERTENZA:
Nel caso
manopola deletermostato
nella
bruciatore
contemporache,
ruotando
la
manopola
posizione “max”
per 5÷10
neamente
premere
la
del
termostato,
si noti un
secondi.
manopola
del termostato
nella
GRILL
ELETTRICO
comportamento
anomalo
posizione
“max” chiudete
5÷10
GRILL
ELETTRICO
Grill
infrarosso:
il per
forno
della
stessa,
ilè
secondi.
Grill
infrarosso:
il forno
è
provvisto
di mandata
un regolatore
di
rubinetto
di
del gas
provvisto
un
regolatore
di
energia.
L’intensità
al
fornoELETTRICO
edichiamate
il centro
GRILL
energia.
L’intensità
di
irraggiamento
della
di
assistenza
più
vicino.
Grill
infrarosso:
il resistenza
forno è
irraggiamento
della
resistenza
grill
può
essere
regolata
da
1
a
provvisto
di un regolatore di
GRILL
ELETTRICO
grill
può
essere
regolata
da 1 a
MAX
con
l’apposita
manopola
energia.
L’intensità
di
Grill
infrarosso:
il
forno
è
MAX
con Quando
l’appositalamanopola
(Fig.
14).
funzione
irraggiamento
della
resistenza
provvisto
di
un
di
(Fig.
Quando
la funzione
grill
è14).
inserita
siregolatore
accende
la
grill può
essere
regolata
da 1 di
a
energia.
L’intensità
grill
è contemporaneamente
inserita si accende la
spia
e
MAX
con l’apposita
manopola
irraggiamento
della
resistenza
spia
einterna
contemporaneamente
la
luce
del
forno.
Per
far
(Fig.
14).essere
Quando
la funzione
grill può
da 1far
a
luce
interna
delregolata
Per
funzionare
ilsiforno.
motorino
grill
inserita
accende
la
MAXècon
l’apposita
manopola
funzionare
il
motorino
girarrosto
si
deve
ruotare
la
spia
e
contemporaneamente
la
(Fig. 14). Quando
laruotare
funzione
girarrosto
si deve
la
manopola
fino
simbolo
luce
delalsiforno.
Per far
grill èinterna
inserita
accende
la
manopola
fino
al
simbolo
funzionare
il
motorino
e sie contemporaneamente
avvertirà uno scatto.
spia
la
e
siinterna
avvertirà
uno
scatto.
girarrosto
si del
deve
ruotare
la
Portare
quindi
la manopola
alla
luce
forno.
Per
far
Portare
quindi
la
manopola
alla
potenza fino
desiderata,
da
manopola
alil simbolo
funzionare
motorino
potenza
da
posizione
0siadesiderata,
8.
girarrosto
deveuno
ruotare
la
e si avvertirà
scatto.
posizione 0 a 8.
Portare quindi
manopola
fino laalmanopola
simbolo alla
ATTENZIONE:
Il grill non
potenza
desiderata,
da
e
si avvertirà
ATTENZIONE:
Iluno
grillscatto.
non
funziona
quando
è inserita
la
posizione
0
a
8.
Portare quindi
la forno.
manopola
funziona
quando
è inseritaalla
la
funzione
gas
del
potenza gasdesiderata,
da
funzione
del forno.
ATTENZIONE:
Il
grill
non
posizione 0 a 8.
funziona quando è inserita la
funzione
gas del forno.
ATTENZIONE:
Il grill non
CONTAMINUTI MECCANICO
funziona
quando
è avvisatore
inserita la
CONTAMINUTI
Il contaminuti
è MECCANICO
un
funzione
del
Ilacustico
contaminuti
è forno.
un
avvisatore
agas
tempo,
indipendente
acustico
a tempo, indipendente
dal
funzionamento
del forno,
CONTAMINUTI
MECCANICO
dal
funzionamento
del per
forno,
che
può
essereèregolato
un
Il contaminuti
un avvisatore
che
puòmassimo
essere regolato
per un
periodo
di
60 minuti.
acustico
a
tempo,
indipendente
CONTAMINUTI
MECCANICO
periodo
massimodi
diregolazione
60 minuti.
La
manopola
dal
funzionamento
del
forno,
Il contaminuti
èdiunregolazione
avvisatore
La
manopola
(Fig.
15) essere
deve essere
ruotata
in
che
può
regolato
per un
acustico
a
tempo,
indipendente
(Fig.
15)
deve
essere
ruotata in
senso
orario
fino
alla
posizione
periodo
massimo
di
60
minuti.
dal
funzionamento
del
forno,
senso
orarioefino
allaposizionata
posizione
60 minuti
poi
La
manopola
di
regolazione
che
può
essere
regolato
per un
60
minuti
e senso
poi
posizionata
ruotandola
in
antiorario
(Fig.
15)
deve
essere
ruotata
in
periodo
massimo
di l’indice
60antiorario
minuti.
ruotandola
in senso
facendo
coincidere
con
senso
orario
finodialla
posizione
La
manopola
regolazione
facendo
coincidere l’indice con
il60tempo
desiderato.
minuti
e essere
poi posizionata
(Fig.
15)desiderato.
deve
in
ilTrascorso
tempo
il senso
tempo ruotata
stabilito
ruotandola
in
antiorario
senso
orario
alla posizione
Trascorso
ilfino
tempo
stabilito
interviene
un
segnale
acustico
facendo
coincidere
l’indice con
60
minuti
e segnale
poi posizionata
interviene
un
acustico
che
cessa
automaticamente.
ilruotandola
tempo
desiderato.
in senso antiorario
che cessa automaticamente.
Trascorso
il
tempo
stabilito
facendo coincidere l’indice
con
interviene
un segnale acustico
il tempo desiderato.
che
cessa
automaticamente.
Trascorso il tempo stabilito
interviene un segnale acustico
che cessa automaticamente.
GB
GB
longer than 15 seconds. If the
longer
15ignite,
seconds.
If the
burner than
fails to
leave
GB
burner
fails tofor
ignite,
leave one
the
door open
at least
door
for again.
at least one
minute,open
then 15
try
longer
than
seconds.
If
the
GB
minute, then try
again.
burner fails to ignite, leave the
door open
for seconds.
at least If one
longer
than 15
the
minute,fails
thento
tryignite,
again.leave the
burner
If the electrical
ignition fails to
door
for ignition
at least
one
If
the open
electrical
fails
to
produce
a spark,
hold
a lit
taper
minute,
then
try again.
produce
a spark,
hold
taper
or match
near
thea litburner
or
match hole
nearandthe
burner
inspection
press
If the electrical
ignition
failsand
to
inspection
hole and press
and
hold
thea spark,
temperature
produce
hold a litcontrol
taper
hold
the
temperature
control
knobmatch
in the “max”
position
for 5
or
nearignition
the fails
burner
If
knob
inelectrical
the “max”
position
forto
5
to the
10 seconds.
inspection
hole and
and
produce
a spark,
holdpress
a lit taper
to
10 seconds.
hold
the
temperature
control
or match near the burner
knob in thehole
“max”
position
5
inspection
and
press for
and
to 10 seconds.
hold
the temperature
control
WARNING:
If you notice
that
knob
in the “max” is
position
for 5
the thermostat
behaving
to
10 seconds.when you turn
abnormally
ELECTRIC
GRILLthe tap that
the knob, close
ELECTRIC
Infrared
grill:GRILL
equipped
withand
an
sends gas
to
the oven
Infrared
grill:
equipped
withheat
an
energy
regulator.
The
call the
nearest
service
energy
regulator.
Thebeheat
intensity
the
grill can
set
centre. of
ELECTRIC
GRILL
intensity
ofto the
grill can
be set
from 1 grill:
MAX
using
Infrared
equipped
with the
an
from
1 control
to MAX
using
the
relative
knob
(Fig.
14).
energy regulator.
The heat
ELECTRIC
GRILL
relative
control
knob operation,
(Fig. 14).
When
is
intensitythe
of grill
the
grillincan
be set
Infrared
grill:
equipped
with
an
When
the
grill
is in operation,
the
and
the
fromgrill1 indicator
to MAXlight
using
the
energy
regulator.
The
the
grillinterior
indicatorlight
light will
andheat
the
oven
be
relative control
knobcan
(Fig.
intensity
of the
grill
be14).
set
oven
interior
light will
be
illuminated.
To operate
the
spit
When
the
grill
is
in
operation,
from 1motor,
to ToMAX
using
the
illuminated.
operate
the spit
roaster
turn
the
knob
to
the
grill
indicator
light
and
the
relative motor,
controlturn
knob
(Fig.
14).
roaster
the
knob
to
the
symbol
until
you
feel
a
oven
interior
light
will
be
When the grill is in operation,
the
symbol
until
you
feel
a
illuminated.
To
operate
the
spit
click.
Then
turn
the
knob
to
the grill indicator light and the
click. Then
turn
the
knob
roaster
motor,
turn
thefrom
knob
desired
power
setting
0be
to
oven
interior
light
will
desired
power
from
0spit
to
8. symbol
the
until you
feel
a
illuminated.
To setting
operate
the
8.
roaster
motor,turn
turnthe
the knob
knob to
click. Then
desired
power setting
fromfeel
0 to
the
symbol
until you
a
8.
click.
Then turn the knob to
desired
powerThe
setting
to
WARNING:
grillfrom
will 0not
8.
WARNING:
grill is
willon.not
operate
whenThe
the oven
operate when the oven is on.
WARNING: The grill will not
operate when the oven is on.
WARNING: The
grill will
not
MECHANICAL
MINUTE
TIMER
operate
when
the
ovenbe
isTIMER
on. to
MECHANICAL
MINUTE
The
minute
timer
can
set
The
minute timertime
can beofset60
to
a maximum
a
maximum
time
of tone
60
minutes;
it emits
an alarm
MECHANICAL
MINUTE
TIMER
minutes;
emits
an period
alarm tone
when
theit set
time
The minute
timer
can be sethas
to
when
the set
periodtimer
has
elapsed.
Thetime
minute
a
maximum
time
of 60
MECHANICAL
elapsed.
The MINUTE
minute TIMER
timer
operates
independently
of
the
minutes;
it emits
alarm
tone
The minute
timeran
can
be of
set
to
operates
independently
the
oven.
when
the set time
has
a maximum
timeperiod
of must
60
oven.
The
timer
knob
(Fig.
15)
elapsed.
The
minute
timer
minutes;
it knob
emits
an alarm
tone
The
timer
(Fig.
15)tomust
first be
turned
clockwise
the
operates
independently
of has
the
when
set
time
period
first
bethe
turned
clockwise
the
60 minute
position
andtothen
oven.
elapsed.
The
minute
timer
60
minute
position
and
then
turned
anti-clockwise
to
the
The timerindependently
knob (Fig. 15)ofmust
operates
turned
anti-clockwise
to the
the
desired
time
setting.
first be turned
clockwise to the
oven.
desired
time
setting.
When
the
set
time
has
elapsed,
60 minute
position
and
then
The
timer
knob
(Fig.
15)
must
When
the will
set sound.
time has
elapsed,
the
alarm
The
turned
anti-clockwise
toalarm
the
first
bewill
turned
clockwise
the
the
alarm
will
sound.
The to
alarm
tone
stop
automatically
desired
time
setting.
60 minute
position
and then
tone
will
stop
automatically
after
a
certain
period.
When
the
set time has elapsed,
turned
anti-clockwise
after
a certain
period. to the
the
alarm
willsetting.
sound. The alarm
desired
time
tone
will
stop
When the set time automatically
has elapsed,
after
a certain
period. The alarm
the alarm
will sound.
tone will stop automatically
FR
FR
pendant plus de 15 secondes.
pendant
plus de 15de
secondes.
En cas d’absence
brûleur,
FR après
En
cas d’absence
brûleur,
appuyer
la manette de
avoir
appuyer
la manette
après
avoir
laissé ouverte
la porte
pendant
pendant
plus FR
de
15 secondes.
laissé
ouverte
la
porte
pendant
1 minute.
En
cas d’absence de brûleur,
1 minute.
appuyer la
manette
avoir
pendant
plus
de 15après
secondes.
laissé
ouverte
la porte
En
cas
d’absence
de pendant
brûleur,
Si
l’allumage
électrique
ne
1 minute.la manette après avoir
appuyer
Si
l’allumage
électrique une
ne
fonctionne
pas, approcher
laissé
ouverte
la
porte
pendant
fonctionne
pas, approcher
allumette allumée
du regardune
de
1 minute. allumée
allumette
dubrûleur
regard de
visualisation
et
Si l’allumage duélectrique
ne
visualisation
brûleur du
et
appuyer
la duapprocher
manette
fonctionne pas,
une
appuyer
ladansmanette
du
thermostatallumée
laregard
position
allumette
du
de
Si
l’allumage
électrique
ne
thermostat
dans
lasecondes.
position
“max”
pendant
5÷10
visualisation
brûleur une
et
fonctionne
pas,du
approcher
“max”
pendant
5÷10
secondes.
appuyer
la
manette
du
allumette allumée du regard de
thermostat dans
position
visualisation
du la
brûleur
et
“max” pendant
secondes.
appuyer
la 5÷10
manette
du
AVERTISSEMENT
: Si,
thermostat
la position
en
tournantdans
le bouton
du
“max” pendant on
5÷10 remarque
secondes.
thermostat,
GRILcomportement
ÉLECTRIQUE anormal
un
GRIL
ÉLECTRIQUE
Gril ce
infrarouge:
four est
de
dernier, lefermez
le
Gril
infrarouge:
le régulateur
four du
est
équipé
robinet
ded’un
refoulement
équipé
d’un
régulateur
d’énergie.
gaz
et
appelez leL’intensité
centre
GRIL
ÉLECTRIQUE
d’énergie.
L’intensité
d’irradiation
delelaplus
résistance
gril
d’assistance
Gril
infrarouge:
le proche.
four est
d’irradiation
de
la
résistance
gril
peut
être réglée
1 à MAX
équipé
d’un de régulateur
GRIL
ÉLECTRIQUE
peut
être
réglée
de (Fig.
1 à MAX
avec
la
manette
14).
d’énergie.
L’intensité
Gril
infrarouge:
le (Fig.
four
est
avec
la lamanette
Quand
fonction
gril 14).
est
d’irradiation
de
la résistance
gril
équipé
d’un
régulateur
Quand
la voyant
fonctions’allume
gril est
insérée
le
et
peut être réglée de L’intensité
1 à MAX
d’énergie.
insérée
le voyant s’allume
et
simultanément
l’éclairage
avec
la
manette
(Fig.
14).
d’irradiation
defour.
la résistance
gril
simultanément
l’éclairage
interne
du
Pour
faire
Quand
la
fonction
gril
est
peut êtreduréglée
dePour
1 àde
MAX
interne
faire
fonctionner
lefour.
moteur
la
insérée
voyant
s’allume
et
avec laletourner
manette
fonctionner
le moteur
de14).
la
broche
la (Fig.
manette
simultanément
l’éclairage
Quand la
fonction
gril est
broche
tourner
la manette
jusqu’au
symbole
,
on
interne
du
four.
Pour
faire
insérée le voyant s’allume et
jusqu’au
, on
fonctionner
le
moteur
de
la
entend
unsymbole
déclic.
Porter
simultanément
l’éclairage
entend
déclic.
Porter
la
broche un
tourner
manette
manette
à
la puissance
voulue,
interne
du
four. laPour
faire
manette
la le
puissance
de
0 à 8.à symbole
jusqu’au
, on
fonctionner
moteur voulue,
de
la
de
0 à 8. tourner la manette
broche
entend un
déclic. Porter la
manette à symbole
la puissance voulue,
jusqu’au
, on
ATTENTION:
le gril ne
de 0 à 8.un déclic.
entend
Porter
la
ATTENTION:
gril est
ne
fonctionne pas le quand
manette
la pas
puissance
voulue,
fonctionne
quand
est
insérée
laà fonction
gaz
du
four.
de
0 à 8.la fonction gaz du four.
insérée
ATTENTION: le gril ne
fonctionne pas quand est
insérée la fonctionlegazgril
du four.
ATTENTION:
MINUTERIE MÉCANIQUE ne
fonctionne
pas
quand
est
MINUTERIE
MÉCANIQUE
La minuterie est un avertisseur
insérée
la fonction
du four.
La
minuterie
est ungaz
avertisseur
acoustique
temporisé,
acoustique
temporisé,
indépendant MÉCANIQUE
du
MINUTERIE
indépendant
du
fonctionnement
du avertisseur
four, qui
La
minuterie est un
fonctionnement
four, qui
peut être réglé du
pendant
60
acoustique
temporisé,
MINUTERIE
MÉCANIQUE
peut
être
réglé
pendant 60
minutes
maximum.
indépendant
du
La
est
avertisseur
minutes
maximum.
La minuterie
manette
de un
réglage
fonctionnement
du
four, (Fig.
qui
acoustique
temporisé,
La
de
réglage
(Fig.
15) manette
doit
êtreréglé
tournée
en sens
peut
être
pendant
60
indépendant
15)
doit
être
tournée
en
sens
horaire jusqu’à
la position du
60
minutes
maximum.
fonctionnement
du
four,
qui
horaire
jusqu’à
la
position
60
minutes,
et en
inverse
La
manette
de sens
réglage
(Fig.
peut
êtretemps
pendant
60
minutes,
etréglé
envoulu.
sens
inverse
jusqu’au
15)
doit maximum.
être tournée
en sens
minutes
jusqu’au
temps
voulu. fixé une
A
la
fin
du
temps
horaire
jusqu’à
laréglage
position(Fig.
60
La
de
A
lamanette
fin du
temps
fixé une
sonnerie
déclenche
et
minutes,
etseen
sens en
inverse
15)
doit
être
sens
sonnerie
se tournée
déclenche
et
cesse
automatiquement.
jusqu’aujusqu’à
temps voulu.
horaire
la
position
60
cesse automatiquement.
A
la
fin
du
temps
fixé
une
minutes, et en sens inverse
sonnerie
se voulu.
déclenche et
jusqu’au temps
cesse
automatiquement.
A la fin
du temps fixé une
sonnerie se déclenche et
cesse automatiquement.
DE
DE
Sekunden betätigen. Wenn der
Sekunden
betätigen.
der
Brenner beim
ersten Wenn
Mal nicht
DE
Brenner
nicht
gezündet beim
wurde,ersten
den Mal
Drehregler
gezündet
wurde,
den Wenn
Drehregler
loslassen
aus Sicherheitsgründen
Sekundenund
betätigen.
der
DE
loslassen
aus
Sicherheitsgründen
erst
dannund
wieder
drücken,
wennnicht
die
Brenner
beim
ersten
Mal
DE
erst
dann
wieder
drücken,
wenn
die
Ofentür
1 Minute
lang
gezündetmindestens
wurde, den
Drehregler
Sekunden
betätigen.
Wenn
der
Ofentür
mindestens
1 ist,
Minute
offen
gelassen
worden
damit lang
das
loslassen
und
aus
Sicherheitsgründen
Sekunden
betätigen.
der
Brenner
beim
erstenist,Wenn
Mal
nicht
offen
gelassen
worden
damit
das
Gas
entweichen
kann.
erst
dann
wieder
drücken,Mal
wennnicht
die
Brenner
beim
ersten
gezündet
wurde,
den Drehregler
Gas
entweichen
kann.
Ofentür
mindestens
1
Minute
lang
gezündet und
wurde,
den Drehregler
loslassen
aus
Sicherheitsgründen
Sollte
die elektrische
Zündung
offen
gelassen
worden
ist, damit
das
loslassen
und
aus
Sicherheitsgründen
erst
dann
wieder
drücken,
wennOfen
die
Sollte
die
elektrische
nicht
funktionieren,
kann Zündung
der
Gas entweichen
kann.
erst
dann
wieder
drücken,
wenn
die
Ofentürfunktionieren,
mindestens werden,
1 Minute
lang
nicht
kann
derindem
Ofen
auch
angezündet
Ofentür
mindestens
1 ist,
Minute
lang
offen ein
gelassen
worden
damit
das
auch
angezündet
werden,
indem
man
brennendes
Zündholz
an
Sollte
die elektrische
Zündung
offen
gelassen
worden
ist, damit
das
Gas Loch
entweichen
kann. das
man
ein
brennendes
Zündholz
an
das
hält, durch
manOfen
den
nicht
funktionieren,
kann
der
Gas Loch
entweichen
kann. das man den
das
hält,
durch
Brenner
beobachten
kannindem
und
auch angezündet
werden,
Sollte
diebeobachten
elektrische
Zündung
Brenner
kann
und
gleichzeitig
den Drehregler
des
man
eindie
brennendes
Zündholz
an
Sollte
elektrische
Zündung
nicht
funktionieren,
kann
der Ofen
gleichzeitig
den
des
Thermostats
5durch
bisDrehregler
10
Sekunden
das
Loch
hält,
das
man
den
nicht
funktionieren,
kann
der
Ofen
auch
angezündet
werden,
indem
Thermostats
5gedrückt
bis 10 kann
Sekunden
lang
auf “max”
hält. und
Brenner
beobachten
auch
angezündet
werden,
indem
man
ein
brennendes
Zündholz
an
lang auf
“max”
gedrückt
hält.beim
HINWEIS:
Falls
Sie
gleichzeitig
den
Drehregler
des
man
ein brennendes
Zündholz
an
das Loch
hält, durch das
man den
Drehen
des5 bis
Drehgriffs
ein
Thermostats
10
Sekunden
das
Loch hält,
durch daskann
man den
Brenner
beobachten
und
ELEKTROGRILL
ungewöhnliches
Verhalten
lang auf “max”
gedrücktkann
hält. und
Brenner
gleichzeitigbeobachten
den
ELEKTROGRILL
Infrarot-Grill:
DerDrehregler
Ofen
ist des
mit
desselben
feststellen
gleichzeitig
den
des
Thermostats
5Der
bisDrehregler
10
Sekunden
Infrarot-Grill:
Ofen
mit
einem
Energieregler
ausgestattet.
sollten,
schließen ist Sie
Thermostats
bis 10
Sekunden
lang aufEnergieregler
“max”5gedrückt
hält. des
einem
ausgestattet.
Die
Strahlungsintensität
den
Gashahn
und
rufen
ELEKTROGRILL
lang aufStrahlungsintensität
“max” gedrückt hält. des
Die
Grillwiderstandes
kann
Sie
das Der
nächstgelegene
Infrarot-Grill:
Ofen mitist dem
mit
Grillwiderstandes
mit 1dem
Drehregler
(Abb. kann
14)ausgestattet.
von
bis
Kundendienstzentrum.
einem Energieregler
ELEKTROGRILL
Drehregler
(Abb. werden.
14) von Wenn
1 des
bis
MAX
eingestellt
Die
Strahlungsintensität
ELEKTROGRILL
Infrarot-Grill:
Der
Ofen
ist
mit
MAX
eingestellt eingeschaltet
werden.
die Grillfunktion
ist,
Grillwiderstandes
kann
mitistWenn
dem
Infrarot-Grill:
Der
Ofen
mit
einem
Energieregler
ausgestattet.
die
Grillfunktion
eingeschaltet
ist,
leuchtet
das
Drehregler
(Abb.Kontrolllämpchen
14)ausgestattet.
von 1 bis
einem
Energieregler
Die
Strahlungsintensität
des
leuchtet
das Kontrolllämpchen
und eingestellt
gleichzeitig
auch Wenn
die
MAX
werden.
Die
Strahlungsintensität
des
Grillwiderstandes
kann
mit
dem
und
gleichzeitig
auchOfens.
die
Innenbeleuchtung
des
die Grillfunktion
eingeschaltet
ist,
Grillwiderstandes
mitOfens.
Drehregler Einschalten
(Abb. kann
14)desvon
1dem
bis
Innenbeleuchtung
Zum
des
leuchtet das
Kontrolllämpchen
Drehregler
(Abb.
14)
von
1
bis
MAX eingestellt
werden.
Wenn
Zum
Einschalten
des
Bratspießmotors
muss
der
und
gleichzeitigwerden.
auch Wenn
die
MAXGrillfunktion
eingestellt
die
eingeschaltet
ist,
Bratspießmotors
muss gestellt
der
Innenbeleuchtung
des
Ofens.
Drehregler
die Grillfunktion
eingeschaltet
ist,
leuchtet
dasaufKontrolllämpchen
Drehregler
auf
gestellt
Zum
Einschalten
des
werden;
es
ist
ein
Einschnappen
leuchtetgleichzeitig
das Kontrolllämpchen
und
auch die
Bratspießmotors
muss
der
werden;
es
ist
ein
Einschnappen
zu verspüren.
Dann
den
und
gleichzeitig des
auchOfens.
die
Innenbeleuchtung
zu
Dann
den
Drehregler
auf
gewünschte
auf die des
gestellt
Innenbeleuchtung
Ofens.
Zum verspüren.
Einschalten
des
Drehregler
auf
die0Einschnappen
gewünschte
Leistungsstufe
bis
8 stellen.
Zum
des
werden; es Einschalten
ist von
ein
Bratspießmotors
muss
der
Leistungsstufe
von 0 Dann
bis 8 stellen.
Bratspießmotors
muss
der
zu
verspüren.
den
Drehregler
auf
gestellt
ACHTUNG:
Derdie
Grillgewünschte
funktioniert
Drehregler
auf
Drehregler
auf
gestellt
werden;
es
ist
ein
Einschnappen
ACHTUNG:
Der
Grill
funktioniert
nicht,
wenn die
Gasfunktion
des
Leistungsstufe
von
0Einschnappen
bis
8 stellen.
werden;
es ist
zu
Dann
den
nicht,
wenn
dieein
Gasfunktion
des
Ofensverspüren.
eingeschaltet
ist.
zu
verspüren.
Dann
den
Drehregler
auf
die
gewünschte
Ofens
eingeschaltet
ist.
ACHTUNG:
Derdie
Grillgewünschte
funktioniert
Drehregler auf
Leistungsstufe
von 0 bis
8 stellen.
nicht,
wenn dievon
Gasfunktion
des
Leistungsstufe
0 bis 8 stellen.
Ofens eingeschaltet ist.
ACHTUNG:
Der
Grill
funktioniert
MECHANISCHE MINUTENUHR
ACHTUNG:
DerGasfunktion
Grill
funktioniert
nicht,
die
des
MECHANISCHE
MINUTENUHR
Die wenn
Minutenuhr
funktioniert
nicht,
die Gasfunktion
des
Ofens
eingeschaltet
ist.
Die wenn
Minutenuhr
funktioniert
unabhängig
vom Gerät,
weist
Ofens
eingeschaltet
ist.
unabhängig
Gerät,
weist
durch
einvomMINUTENUHR
akkustisches
MECHANISCHE
durch
eindaraufakkustisches
Warnsignal
hin, dass
Die Minutenuhr
funktioniert
Warnsignal
darauf
hin, weist
dass
die
eingestellte
ZeitGerät,
abgelaufen
unabhängig
vom
MECHANISCHE
MINUTENUHR
die
eingestellte
Zeitakkustisches
abgelaufen
ist
und
kann
auf 60
durch
ein maximal
MECHANISCHE
MINUTENUHR
Die
Minutenuhr
funktioniert
ist
und kann
maximal
60
Minuten
eingestellt
werden.
Warnsignal
darauf
hin,aufdass
Die
Minutenuhr
funktioniert
unabhängig
vom Gerät,
weist
Minuten
eingestellt
werden.
Den
Drehregler
(Abb.
15)
die
eingestellte
Zeit
abgelaufen
unabhängig
Gerät,
weist
durch
einvom akkustisches
Den
(Abb.auf
zuerst
imkann
Uhrzeigersinn
bis 15)
auf
ist
undDrehregler
maximal
60
durch
eindarauf
akkustisches
Warnsignal
hin,
dass
zuerst
imeingestellt
Uhrzeigersinn
auf
60
Minuten
drehenwerden.
undbis
dann
Minuten
Warnsignal
darauf
hin,
dass
die
eingestellte
Zeit
abgelaufen
60
Minuten
drehen
und
dann
gegen
den Uhrzeigersinn
die
Den
Drehregler
15)
die
eingestellte
Zeit (Abb.
abgelaufen
ist
und
kannZeit
maximal
auf die
60
gegen
den
Uhrzeigersinn
gewünschte
einstellen.
zuerst
im
Uhrzeigersinn
bis auf
ist
und
kann
maximal
auf
60
Minuten
eingestellt
werden.
gewünschte
Zeit
einstellen.
Nach
Ablauf drehen
der vorgegebenen
60
Minuten
und
dann
Minuten
eingestellt
werden.
Den
Drehregler
(Abb. 15)
Nach
Ablauf
der
Zeit ertönt
ein vorgegebenen
akkustisches
gegen
den
Uhrzeigersinn
die
Den
Drehregler
(Abb.bis 15)
zuerst
imdas
Uhrzeigersinn
auf
Zeit
ertönt
ein einstellen.
akkustisches
Signal,
sich
nach
einiger
gewünschte
Zeit
zuerst
imdas
Uhrzeigersinn
auf
60
Minuten
drehen
undbis
dann
Signal,
sich
nach
einiger
Zeit
automatisch
abstellt.
Nach
Ablauf drehen
der vorgegebenen
60
Minuten
und dann
gegen
den Uhrzeigersinn
die
Zeit
automatisch
abstellt.
Zeit ertönt
ein akkustisches
gegen
den Zeit
Uhrzeigersinn
gewünschte
einstellen. die
Signal,
das sicheinstellen.
nach einiger
gewünschte
Nach
Ablauf Zeit
der vorgegebenen
Zeit
abstellt.
Nachautomatisch
Ablauf der
Zeit
ertönt
ein vorgegebenen
akkustisches
Zeit
ertönt
ein nach
akkustisches
Signal,
das sich
einiger
ES
ES
mando por más de 15
mando
de no
15
segundos.por
SiES
elmás
quemador
segundos.
Sivolver
el quemador
se enciende,
a apretarno
el
se
enciende,
volver
a apretar
el
mando
sólo
dejar
ladepuerta
mando
portras
más
15
ES
mando
sóloSitras
la puerta
abierta
durante
minuto
como
segundos.
el1dejar
quemador
no
ES
abierta
durante
1 minuto
como
mínimo.
se enciende,
volver
a apretar
el
mando
por más de 15
mínimo.
mando
sólo
tras
dejar
la
puerta
mando por
más
de no
15
segundos.
Si
el
quemador
Si
el encendido
eléctrico
no
abierta
durante
minuto
como
segundos.
Sivolver
el1quemador
no
se
enciende,
a
apretar
el
Si
el encendido
eléctrico
no
funciona,
acercar
una
cerilla
mínimo.
se
enciende,
volver
a
apretar
el
mando
sólo
tras
dejar
la
puerta
funciona,
encendida acercar
al orificiouna
por elcerilla
cual
mando
sóloaltras
la el
puerta
abierta
durante
1dejar
minuto
como
encendida
orificio
por
cual
se
ve
el
quemador
y,
al
mismo
Si el encendido
eléctrico
no
abierta
1 minuto
como
mínimo.
se
ve eldurante
quemador
al mismo
tiempo,
apretar
el y,
mando
del
funciona,
acercar
una
cerilla
mínimo.
tiempo,
apretar
el
mando
del
termostato,
colocado
en
la
encendida al orificio por el cual
Si el encendido
eléctrico
termostato,
colocado
en 5no
lay
posición
de máximo,
entre
se
ve
el
quemador
y,
al
mismo
Si el encendido
eléctrico
noy
funciona,
una
cerilla
posición
deacercar
máximo,
entre
5del
10
segundos.
tiempo,
apretar
el
mando
funciona,
acercar
encendida
al orificiouna
por elcerilla
cual
10
segundos.
termostato,
encual
la
encendida
al colocado
orificioy,por
el
se
ve el quemador
al mismo
posición
de
máximo,
entre
5y
se ve el apretar
quemador
al mismo
tiempo,
el y,
mando
del
10
segundos.
tiempo,
apretar
el mando
termostato,
colocado
en del
la
ADVERTENCIA:
Si al
termostato,
colocadoentre
en 5 lay
posición de máximo,
girar el mando rotativo
posición
de máximo, entre 5 y
10
segundos.
GRILL
ELÉCTRICOnota un
del termostato
10
segundos.
GRILL
ELÉCTRICO
Grill
infrarrojo:
el horno
posee
comportamiento
anómalo
Grill
infrarrojo:
el horno
posee
un
de
energía.
La
del regulador
mando,
cierre
la llave
de
un
regulador
de
intensidad
de
de La
la
impulsión
del irradiación
gasenergía.
al horno
y
GRILL
ELÉCTRICO
intensidad
dedel
irradiación
de la
resistencia
grill
puede
llameinfrarrojo:
al centro
asistencia
Grill
elde
horno
posee
resistencia
del
grill
puede
regularse
de 1de
a MÁX.
con La
el
másregulador
cercano.
un
energía.
GRILL
ELÉCTRICO
regularse
de
a MÁX.
el
correspondiente
mandocon
intensidad
de1irradiación
de(fig.
la
GRILL
ELÉCTRICO
Grill
infrarrojo:
el
horno
posee
correspondiente
mando
(fig.
14).
Cuandodel
el grill
en
resistencia
grill está
puede
Grill
infrarrojo:
el
horno
posee
un
regulador
de
energía.
La
14).
Cuando
ela grill
está
en
marcha,
se
la luz
regularse
de 1enciende
con
el
un
regulador
de MÁX.
energía.
La
intensidad
irradiación
deluz
la
marcha,
enciende
interna
delsede
horno.
Para la
poner
correspondiente
mando
(fig.
intensidad
de
irradiación
de
la
resistencia
del
grill
puede
interna
del
horno.
Para
poner
en
marcha
el
motor
del
asador,
14). Cuandodel
el grill
está
en
resistencia
grill
puede
regularse
de
1 a MÁX.
con
el
en
marcha
el
motor
del
asador,
girar
el
mando
hasta
el
marcha, se
la luz
regularse
1enciende
a MÁX.
con
el
correspondiente
mando
(fig.
girar
eldelde
mando
hasta
el
interna
horno.
Para
símbolo
Segrill
oye
unponer
clic.
correspondiente
mando
(fig.
14). Cuando . el
está
en
símbolo
Se
oye
un aclic.
en
marcha
el .motor
delestá
asador,
Luego,
poner
el grill
mando
la
14).
Cuando
el
en
marcha,
se enciende
la luz
girar
elponer
hasta
el
Luego,
el (de
mando
a luz
la
potencia
deseada
0 ala
8).
marcha,
semando
enciende
interna del
horno.
Para
poner
potencia
deseada
aponer
8).clic.
símbolo
.motor
Se (de
oye
un
interna
del
Para
en
marcha
elhorno.
del0 asador,
en
marcha
el
motor
del
asador,
Luego,
el mando
a el
la
girar
elponer
mando
hasta
girar
mando
hasta
el
potencia
0 un
a 8).clic.
símboloel deseada
. Se (de
oye
símbolo
. Se
oye un aclic.
Luego,
ponerel
el
la
ATENCIÓN:
grillmando
no funciona
Luego, poner
mando
a la
potencia
deseada
(de
a 8).
ATENCIÓN:
el el
grill
no0funciona
si
el horno
está
encendido.
potencia
deseada
(de 0 a 8).
si
el horno
está encendido.
ATENCIÓN: el grill no funciona
si el horno está encendido.
ATENCIÓN:MECÁNICO
el grill no funciona
MINUTERO
ATENCIÓN:
el grill
no funciona
si elminutero
horno está
MINUTERO
MECÁNICO
El
esencendido.
una avisador
si elminutero
horno está
El
esencendido.
una
avisador
acústico
temporizado,
acústico
temporizado,
independiente
del funcionamiento
MINUTERO MECÁNICO
independiente
del
funcionamiento
del horno,
que se
El
minutero
es puede
una programar
avisador
del
horno,
que se puede
programar
para
un periodo
máximo
de 60
acústico
temporizado,
MINUTERO
MECÁNICO
para
un periodo
de 60
minutos.
independiente
del máximo
funcionamiento
MINUTERO
MECÁNICO
El
minutero
es
una
avisador
minutos.
El
de
(fig.
15) se
delmando
horno,
queregulación
se
puede
programar
El
minutero
es
una
avisador
acústico
temporizado,
El
mando
de en
regulación
(fig. de
15) las
se
ha
deungirar
el máximo
sentido
para
periodo
de
60
acústico
temporizado,
independiente
del
funcionamiento
ha
de del
girarreloj
enhasta
el sentido
de las
agujas
la posición
de
minutos.
independiente
delpuede
funcionamiento
del
horno,
que
se
programar
agujas
del de
reloj
hasta
la posición
de
60
minutos
y, regulación
luego,
se
ha
de15)girar
El
(fig.
se
delmando
horno,
que
se puede
programar
para
un periodo
máximo
degirar
60
60
minutos
y,en
luego,
se
de
en
sentido
contrario
asentido
lasha
agujas
del
ha
de
girar
el
de
las
para
un
periodo
máximo
de
60
minutos.
en
sentido
contrario
lasposición
agujas
del
reloj
posición
agujas
delhasta
reloj
hastaalala
de
minutos.
El
mandohasta
de regulación
(fig.
15) se
reloj
lase ha
posición
correspondiente
al tiempo
deseado.
60
minutosdey, regulación
luego,
de15)girar
El
mando
(fig.
se
ha
de
girar
en
el
sentido
de
las
correspondiente
al tiempo
deseado.
Transcurrido
dicho
tiempo,
se
en
sentido
contrario
las
agujas
ha
de del
girarreloj
endicho
el asentido
de del
las
agujas
hasta
la
posición
de
Transcurrido
tiempo,
se
produce
una señal
acústica
que
reloj
hasta
la
posición
agujas
del
reloj
hasta
la
posición
de
60
minutos
y,
luego,
se
ha
de
girar
produce
una señal
acústica
que
termina
automáticamente.
correspondiente
al tiempo
deseado.
60
minutos
y,
luego,
se
ha
de
girar
en
sentido
contrario
a
las
agujas
del
termina
automáticamente.
Transcurrido
dichoa las
tiempo, del
se
en
contrario
relojsentidohasta
la agujas
posición
produce
una señallaacústica
que
reloj
hasta
posición
correspondiente
al tiempo deseado.
termina
automáticamente.
correspondiente
al tiempo
deseado.
Transcurrido dicho
tiempo,
se
Transcurrido
dicho acústica
tiempo, que
se
produce una señal
NL
NL
dan 15 seconden in. Als de
dan
15 niet
seconden
Als de
brander
wordt in.
ontstoken,
NL
brander
wordt opnieuw
ontstoken,
druk danniet
de knop
in
druk
dan
de deur
knop minstens
opnieuw
in
nadat
u seconden
de
1
dan 15
in. Als de
NL
nadat
de hebt
deur
minstens
1
minuut
gelaten.
branderuopen
niet
wordt
ontstoken,
NL
minuut
open
druk dan
dehebt
knopgelaten.
opnieuw in
dan 15 seconden in. Als de
nadat
de deur minstens
1
dan 15u niet
seconden
Als de
brander
wordt in.
ontstoken,
Als
de open
elektrische
ontsteking
minuut
hebt
gelaten.
brander
niet
wordt
ontstoken,
druk
dan
de
knop
opnieuw
in
Als
elektrische
niet de
werkt,
houd ontsteking
dan een
druk
dan
de deur
knop
opnieuween
in
nadat
u de
1
niet
werkt,
houd minstens
brandende
lucifer
bijdan
het gat
nadat
u
de
deur
minstens
1
minuut
open
hebt
gelaten.
brandende
lucifer
bij
het
gat
waardoor
de
brander
zichtbaar
Als de open
elektrische
ontsteking
minuut
hebt
gelaten.
waardoor
de
brander
zichtbaar
is
en
houd
tegelijkertijd
de
niet werkt, houd dan een
is
en houdlucifer
tegelijkertijd
de
thermostaatknop
gedurende
brandende
bij
het gat
Als deseconden
elektrische
ontsteking
thermostaatknop
gedurende
5÷10
ingedrukt
op
waardoor
de
brander
zichtbaar
Als de
elektrische
ontsteking
niet
werkt,
houd
dan een
5÷10
seconden
ingedrukt
op
de
“max”
stand.
is
enwerkt,
houd
tegelijkertijd
de
niet“max”
houd
brandende
lucifer
bijdan
het een
gat
de
stand.
thermostaatknop
gedurende
brandendedelucifer
bij zichtbaar
het gat
waardoor
brander
5÷10
seconden
ingedrukt
op
waardoor
de brander
zichtbaar
is
en houd
tegelijkertijd
de
de
stand.tegelijkertijd de
is “max”
en houd
thermostaatknop
gedurende
WAARSCHUWING: In het
thermostaatknop
gedurende
5÷10 seconden ingedrukt
op
geval dat tijdens het draaien
5÷10
seconden
ingedrukt op
de
“max”
stand. GRILL
ELEKTRISCHE
van de thermostaatknop
een
de
“max” stand. GRILL
ELEKTRISCHE
Infrarood
de oven
is voorzien
afwijkendgrill:
gedrag
ervan
wordt
Infrarood
grill: desluit
oven
is de
voorzien
van
een energieregelaar.
waargenomen,
dan
kraan
van
een
energieregelaar.
De
stralingssterkte
van
de
van de uitgaande
gasleiding
ELEKTRISCHE
GRILL
De
de
grillweerstand
kan
met
de
naar stralingssterkte
degrill:oven
en isvan
bel knop
het
Infrarood
de
oven
voorzien
grillweerstand
kan
met1 de
knop
worden
van
tot MAX
dichtstbijzijnde
servicecentrum.
van
een ingesteld
energieregelaar.
ELEKTRISCHE
worden
ingesteld
van
1van
tot MAX
(Afb.
14).
Als deGRILL
grillfunctie
is
De
stralingssterkte
de
ELEKTRISCHE
GRILL
Infrarood
oven
is voorzien
(Afb.
14).grill:
Alsde
de
grillfunctie
is
ingeschakeld,
gaat
het
grillweerstand
kan
met
de
knop
Infrarood
grill:
de
oven
is
voorzien
van
een
energieregelaar.
ingeschakeld,
gaat
het
controlelampje
branden
en
worden
ingesteld
van
1 tot MAX
van
een
energieregelaar.
De
stralingssterkte
van
de
controlelampje
en
tegelijkertijd
de binnenverlichting
(Afb.
14). Als
debranden
grillfunctie
is
De
stralingssterkte
de
grillweerstand
met
de
knop
tegelijkertijd
dekan
binnenverlichting
van
de
oven.
Om
het van
motortje
ingeschakeld,
gaat
het
grillweerstand
kan
met
de
knop
worden
ingesteld
MAX
van
de draaispit
oven. Om
het1 tot
motortje
het
tevan
laten
werken
controlelampje
branden
en
worden
ingesteld
tot
MAX
(Afb.het
14).
Als de
grillfunctie
is
van
tevan
laten
werken
moet
dedraaispit
knop
tot
het1 symbool
tegelijkertijd
de
binnenverlichting
(Afb. 14).
Als de
grillfunctie
is
ingeschakeld,
gaat
het
moet
de
knop
tot
het
symbool
van
de
oven.
Om
het
motortje
worden
gedraaid.
U
hoort
ingeschakeld,
gaat
het
controlelampje branden
en
worden
gedraaid.
U
hoort
van
het
draaispit
te
laten
werken
een
klik.
Zet
de
knop
vervolgens
controlelampje
branden en
tegelijkertijd
de binnenverlichting
moet
deZet
knop
totvermogen,
het
symbool
een
klik.
deOm
knop
vervolgens
op het
van
tegelijkertijd
de
binnenverlichting
van
degewenste
oven.
het
motortje
op
het
gewenste
vermogen,
van
de stand
0 tot 8.
worden
gedraaid.
Uwerken
hoort
van
de
oven.
Om
het motortje
het
draaispit
te laten
de
0knop
totde
8.knop
van
het
te laten
werken
eenstand
klik.
Zet
vervolgens
moet
dedraaispit
tot
het
symbool
moet
de
knopgedraaid.
totvermogen,
het symbool
op hetworden
gewenste
van
U hoort
LET
OP:
werkt U
niet
als
de stand
0de
tot grill
8.
worden
gedraaid.
hoort
een
klik.
Zet
de
knop
vervolgens
LET
OP: de grill
niet als
de gasfunctie
vanwerkt
de oven
is
een
klik.
Zet
de
knop
vervolgens
op
het
gewenste
vermogen,
van
de
gasfunctie van de oven is
ingeschakeld.
op
het
gewenste
vermogen,
van
de
stand
0
tot
8.
ingeschakeld.
LET
OP:0de
de stand
tot grill
8. werkt niet als
de gasfunctie van de oven is
ingeschakeld.
LET
OP: de grill KLOK
werkt niet als
MECHANISCHE
LET
OP: de grill KLOK
werkt
niet als
de
de oven
is
MECHANISCHE
De gasfunctie
klok is eenvan
geluidssignaal
de
gasfunctie
de oven is
ingeschakeld.
De
klokenis werkt
eenvan
geluidssignaal
op tijd
onafhankelijk
ingeschakeld.
op
tijddeenoven.
werkt De
onafhankelijk
van
klok kan
MECHANISCHE
KLOK
van
de is
oven.
De voor
klok een
kan
worden
ingesteld
De klok
een geluidssignaal
worden
voor
maximale
duur onafhankelijk
van een
60
op
tijd eningesteld
werkt
MECHANISCHE
KLOK
maximale
duurDe van
60
minuten.
van de oven.
klok kan
MECHANISCHE
KLOK
De
klok
is
een
geluidssignaal
minuten.
De
regelknop
(Afb. voor
15) moet
worden
ingesteld
een
De
klok
is
een
geluidssignaal
op tijd
en
onafhankelijk
De
regelknop
(Afb.
15)worden
moet
met
de werkt
klok
maximale
duur
van
60
op tijddeen
werkt
onafhankelijk
van
De
kan
met
deoven.
klok
worden
meegedraaid
tot
de klok
stand
60
minuten.
van de ingesteld
oven.tot De
klok
kan
worden
voor
een
meegedraaid
de
stand
60
minuten
en vervolgens
De
regelknop
(Afb. voor
15) tegen
moet
worden
ingesteld
een
maximale
duur
van tegen
60
minuten
en
vervolgens
de
klok in
worden
om
met
de
klokgedraaid
worden
maximale
duur
van
60
minuten.
de
klok
worden
gedraaid
om
wijzerin met
de gewenste
tijd
meegedraaid
tot
de
stand
60
minuten.
De
regelknop
(Afb.
15) moet
de
wijzer
metvervolgens
de
gewenste
tijd
samen
teen
laten
vallen.
minuten
tegen
De
regelknop
(Afb. 15)worden
moet
met
delaten klok
samen
vallen.
Na klok
de te
vastgestelde
tijd klinkt
de
in
gedraaid
om
met
deworden
klokde
meegedraaid
tot
stand
60
Na
de vastgestelde
tijdworden
klinkt
een
geluidssignaal
dat
de
wijzer
met
de
gewenste
tijd
meegedraaid
tot
de
stand
60
minuten
en
vervolgens
tegen
een
geluidssignaal
dat
automatisch
stopt.
samen teen
laten
vallen.
minuten
vervolgens
tegen
de
klok in worden
gedraaid
om
automatisch
stopt.
Na klok
de vastgestelde
tijd klinkt
de
worden
gedraaid
om
wijzerin met
de gewenste
tijd
een
geluidssignaal
de wijzer
met de
gewenste dat
tijd
samen
te laten
vallen.
automatisch
stopt.
samen
laten vallen. tijd klinkt
Na
de te
vastgestelde
Na
een de vastgestelde
geluidssignaaltijd klinkt
dat
PT
PT
mais de 15 segundos. Em
mais
de falha
15PT
segundos.
caso de
de ignição Em
do
caso
de falha
de aignição
queimador,
volte
premir do
o
queimador,
a premir
o
manípulo
sóvolte
depois
de Em
ter
mais de 15
segundos.
manípulo
sóPT
depois
de ter
deixado
porta
aberta
durante
caso
dea falha
de
ignição
do
PT
deixado
a porta
aberta
durante
pelo
menos
1volte
minuto.
queimador,
a premir
o
mais
de 15
segundos. Em
pelo
menos
1 minuto.
manípulo
só
depois
de Em
ter
mais de
de falha
15 segundos.
caso
de
ignição
do
Se
a ignição
eléctrica
não
deixado
a falha
porta de
aberta
durante
caso
deignição
do
queimador,
volteeléctrica
aignição
premir
o
Se
a
não
funcionar,
aproxime
um
fósforo
pelo
menos
1volte
minuto.
queimador,
a
premir
o
manípulo
só
depois
de
ter
funcionar,
um orifício,
fósforo
aceso doaproxime
respectivo
manípulo
só
depois
de ter
deixado
a porta
aberta durante
aceso
do
respectivo
orifício,
permitindo
visualizar
o
Se a ignição
eléctrica
não
deixado
a porta
aberta
durante
pelo
menos
1e,
minuto.
permitindo
visualizar
o
queimador
aoummesmo
funcionar,
aproxime
fósforo
pelo
menos
1
minuto.
queimador
e,o manípulo
ao mesmo
tempo,
prima
do
aceso do
respectivo
orifício,
Se a ignição
eléctrica
não
tempo,
prima
manípulo
do
termóstato
na ovisualizar
posição
“máx”
permitindo
o
Se a ignição
eléctrica
não
funcionar,
aproxime
um fósforo
termóstato
nae,
posição
“máx”
durante
5÷10
segundos.
queimador
ao
mesmo
funcionar,
aproxime
um orifício,
fósforo
aceso
do
respectivo
durante
5÷10
segundos.
tempo,
prima
o manípulo
do
aceso do
respectivo
permitindo
visualizarorifício,
o
termóstato
posição “máx”
permitindo nae, visualizar
o
queimador
ao mesmo
durante
5÷10
segundos.
queimador
ao mesmo
tempo,
primae,o manípulo
do
ADVERTÊNCIA: Se, ao
tempo,
prima
manípulo
do
termóstato
na oposição
“máx”
rodar o botão do termostato,
termóstato
posição “máx”
durante
5÷10nasegundos.
GRILL
ELÉCTRICO
notar um
seu comportamento
durante
5÷10 segundos.
GRILL
Grill
de ELÉCTRICO
infra-vermelhos:
o forno
anómalo,
feche a torneira
Grill
de
infra-vermelhos:
forno
possui
regulador
de
de envioumdo gás
ao oforno
possui
um
de
potência.
A intensidade
da
e contacte
oregulador
centro de
GRILL
ELÉCTRICO
potência.
Ada
intensidade
da
irradiação
resistência
do
assistência
mais
próximo.
Grill
de infra-vermelhos:
o forno
irradiação
da regulada
resistência
grill pode um
ser
de 1do
a
possui
regulador
de
GRILL
ELÉCTRICO
grill
ser
de 1da
a
MAXpode
com
o respectivo
potência.
A regulada
intensidade
GRILL
ELÉCTRICO
Grill
de
infra-vermelhos:
o
forno
MAX
o Quando
respectivo
manípulocom
(Fig.
a
irradiação
da 14).
resistência
do
Grill
de
infra-vermelhos:
o
forno
possui
um
regulador
de
manípulo
14). Quando
a
função
grill(Fig.
é activada,
acendegrill
pode
ser
regulada
de 1de
a
possui
um
regulador
potência.
A
intensidade
da
função
grill
é activada,
acendese a luz
piloto
mesmo
MAX
com
oe, ao
respectivo
potência.
A
intensidade
da
irradiação
da
resistência
do
se
a luza luz
piloto
e, ao
tempo,
interna
domesmo
forno.
manípulo
(Fig.
14).
Quando
a
irradiação
resistência
grill
ser
regulada
de
1do
a
tempo,
a luz
interna
forno.
Parapode
ligar
oédamotor
dedo
rotação
função
grill
activada,
acendegrill
pode
ser
regulada
de
1o
a
MAXespeto,
com
o de
respectivo
Para
ligar
o
motor
rotação
do
deve
rodar
se
a luzcom
piloto oe, ao
mesmo
MAX
respectivo
manípulo
(Fig.deve
14). Quando
a
do
espeto,
rodar
o
tempo,
a luz
interna
do
forno.
manípulo
ao
símbolo
manípulo
(Fig.
14).
Quando
a,
função grillaté
é activada,
acendemanípulo
até
ao
símbolo
,
Para
ligar
o
motor
de
rotação
ouvindo-se
um
estalido.
De
função
grillpiloto
é activada,
se a luz
e, ao acendemesmo
do
deve
rodar De
o
ouvindo-se
um
seguida,
oaomanípulo
se
aespeto,
luza coloque
piloto
e,estalido.
tempo,
luz
interna
domesmo
forno.
seguida,
odemanípulo
na potência
pretendida,
da,
manípulo
até
ao
símbolo
tempo,
a coloque
luz
interna
dorotação
forno.
Para
ligar
o motor
na
pretendida,
da
posição
0 ao8.um
Para
ligar
motor
derodar
rotação
ouvindo-se
estalido.
De
do potência
espeto,
deve
o
posição
0 coloque
a 8. deveo manípulo
do
espeto,
rodar o,
seguida,
manípulo
até ao
símbolo
ATENÇÃO:
Osímbolo
grill não
na
potência
pretendida,
da
manípulo
atéum
ao
ouvindo-se
estalido.
De,
ATENÇÃO:
não
funciona0quando
é grill
accionada
posição
a 8.umO estalido.
ouvindo-se
De
seguida,
coloque
o
manípulo
funciona
quando
accionada
a
função de
gás doéforno.
seguida,
coloque
o manípulo
na
potência
da
a função
de
gáspretendida,
ATENÇÃO:
Odo forno.
grill não
na
potência
pretendida,
da
posição 0 a 8.
funciona0quando
é accionada
posição
a 8.
a função de gás do forno.
ATENÇÃO:
O
grill não
CONTA-MINUTOS MECÂNICO
ATENÇÃO:
O éMECÂNICO
grill
não
funciona
quando
accionada
CONTA-MINUTOS
O
conta-minutos
mecânico
é um
funciona
quando
accionada
a função
de
gás mecânico
doéforno.
O
conta-minutos
é um
avisador
acústico
de tempo,
a função de
gás do forno.
avisador
acústico
de tempo,
independente
do funcionamento
CONTA-MINUTOS
MECÂNICO
independente
do mecânico
funcionamento
do
forno, que pode
ser regulado
O conta-minutos
é um
do
forno,
que
pode
ser
por
um período
máximo
de 60
avisador
acústico
de regulado
tempo,
CONTA-MINUTOS
MECÂNICO
por
um período
de 60
minutos.
independente
do máximo
funcionamento
CONTA-MINUTOS
MECÂNICO
O
conta-minutos
mecânico
é um
minutos.
Rode
o manípulo
de
doconta-minutos
forno,
que pode
serregulação
regulado
O
mecânico
é um
avisador
acústico
deregulação
tempo,
Rode
o
manípulo
de
(Fig.
15)
para
a
direita
até
à
por
um período
máximo
de 60
avisador
acústico
de tempo,
independente
do
funcionamento
(Fig.
15)
para
a
direita
até
à
posição
60
minutos
e,
de
minutos.
independente
do
funcionamento
do
forno, que
pode
serpara
regulado
posição
60rode-o
minutos
e, de
seguida,
a
Rode
o
manípulo
de
regulação
do
forno,
querode-o
pode
serpara
regulado
por
um período
máximo
de 60
seguida,
a
esquerda
fazendo
coincidir
o
(Fig.
15)período
para
amáximo
direita
até 60
à
por
um
de
minutos.
esquerda
fazendo
o
indicador
com
ocoincidir
tempo
posição
60
minutos
e,
de
minutos.
Rode
o manípulo
indicador
com deo regulação
pretendido.
seguida,
rode-o
paratempo
a
Rode
o manípulo
regulação
(Fig.
15)
a de
direita
até à
pretendido.
Decorrido
opara
tempo
estabelecido,
esquerda
fazendo
coincidir
o
(Fig.
15)
para
a
direita
até
à
posição
60
minutos
e,
de
Decorrido
o tempo
é
emitido um
sinal estabelecido,
acústico
que
indicador
com
o e,
tempo
posição
60rode-o
minutos
de
seguida,
para que
a
é
emitido
um
sinal
acústico
pára
automaticamente.
pretendido.
seguida,
rode-o
para
a
esquerda
fazendo
coincidir
o
pára
automaticamente.
Decorrido ofazendo
tempo estabelecido,
esquerda
o
indicador com ocoincidir
tempo
é
emitido umcom
sinal acústico
que
indicador
o tempo
pretendido.
pára
automaticamente.
pretendido.
Decorrido
o tempo estabelecido,33
Decorrido
o tempo
é emitido um
sinal estabelecido,
acústico que
IT
DESCRIZIONE
COMANDI
GB
FR
FRONTALE DESCRIPTION
OF
THE DESCRIPTION DU BANDEAU
FRONT CONTROL PANEL
DE COMMANDE
FORNO A GAS CON GRILL GAS OVEN
GAS
GRILL
COMANDI (Fig. 16)
1. Termostato suola e grill gas
2. Manopola luce forno e
girarrosto
3. Spia forno a gas
4. Contaminuti meccanico
5. Spia funzionamento elettrico
WITH
GAS FOUR À GAZ AVEC GRIL
GAZ
CONTROLS (Fig. 16)
1. Lower burner and gas grill
temperature control knob
2. Oven and spit roaster
control knob light
3. Gas oven indicator light
4. Mechanical timer
5. Electrical indicator light
COMMANDES (Fig. 16)
1. Thermostat sole et gril gaz
2. Manette éclairage et broche
3. Voyant four
4. Minuterie mécanique
5. Voyant
fonctionnement
électrique
TERMOSTATO DEL FORNO
Il
termostato
serve
ad
impostare
la
temperatura
desiderata del forno ed è
completo
di
valvola
di
sicurezza. Quando è in
funzione si illumina la spia
verde.
OVEN
TEMPERATURE
CONTROL
The temperature control knob
serves to set the desired oven
temperature and is equipped
with a safety valve. When the
oven is in operation the green
light is illuminated.
THERMOSTAT DU FOUR
Le
thermostat
sert
à
programmer la température
désirée du four, il est équipé
d’une soupape de sûreté.
Quand il fonctionne le voyant
est vert.
Per accendere il bruciatore
inferiore premete la manopola
del termostato e ruotatela in
senso antiorario fino alla
temperatura desiderata.
To turn on the bottom burner,
push in the temperature control
knob and turn it anticlockwise
to the desired temperature.
Pour allumer le brûleur inférieur
appuyer la manette du
thermostat et la tourner en
sens antihoraire jusqu’à la
température voulue.
La posizione di minimo
corrisponde
ad
una
temperatura del forno di
130°C. Essa dispone di una
posizione d’arresto.
The
minimum
position
corresponds to an oven
temperature of 130°C. The
control knob has stop in the
minimum position.
La position de minimum
correspond à une température
du four de 130°C. Elle dispose
d’une position d’arrêt.
La posizione di massimo
corrisponde
ad
una
temperatura del forno di
250°C, e costituisce la
posizione finale del termostato.
The
maximum
position
corresponds to an oven
temperature of 250°C, and is
obtained when the knob is
turned fully anticlockwise.
La position de maximum
correspond à une température
du four de 250°C, et constitue
la position finale du thermostat.
Tenete premuta la manopola
per circa 5-10 secondi.
Durante questo tempo, il
bruciatore
viene
acceso
elettricamente,
l’elemento
termico viene riscaldato e
permette l’erogazione di gas al
bruciatore.
Hold the knob pressed in for 510 seconds. The burner will be
ignited electrically, and the
safety
valve
temperature
sensor will heat up thereby
allowing gas to continue to flow
to the burner.
Appuyer la manette pendant 510 secondes. Pendant ce
temps le brûleur est allumé
électriquement,
l’élément
thermique est chauffé et
permet la distribution du gaz au
brûleur.
Fig. 16 - Abb. 16 - Afb. 16
Fig. 17 - Abb. 17 - Afb. 17
34
DE
ES
NL
PT
BESCHREIBUNG DER
BEDIENBLENDE
DESCRIPCIÓN DEL FRONTAL BESCHRIJVING VAN HET DESCRIÇÃO FRONTAL DOS
DE MANDOS
FRONTBEDIENINGSPANEEL COMANDOS
GASOFEN MIT GASGRILL
HORNO DE GAS CON GRILL GASOVEN MET GASGRILL
DE GAS
BEDIENUNGSEINRICHTUNGEN
(Abb. 16)
1. Thermostat Boden und
Gasgrill
2. Drehregler
Innenbeleuchtung Ofen und
Bratspieß
3. Kontrolllampe Gasofen
4. Mechanische Minutenuhr
5. Kontrolllampe elektrischer
Betrieb
MANDOS (fig. 16)
1. Termostato de la solera y
grill de gas
2. Mando de la luz del horno y
del asador
3. Testigo del horno de gas
4. Minutero mecánico
5. Testigo de funcionamiento
eléctrico
BEDIENINGEN (Afb. 16)
1. Thermostaat bodem en
gasgrill
2. Knop ovenverlichting en
draaispit
3. Controlelampje gasoven
4. Mechanische klok
5. Controlelampje elektrische
werking
COMANDOS (Fig. 16)
1. Termóstato e grill a gás
2. Manípulo da luz do forno e
espeto
3. Luz piloto do forno a gás
4. Conta-minutos mecânico
5. Luz piloto de funcionamento
eléctrico
THERMOSTAT DES OFENS
Der Thermostat dient zum
Einstellen der gewünschten
Ofentemperatur und ist mit
einem
Sicherheitsventil
ausgestattet. Wenn er in
Betrieb ist, leuchtet das grüne
Lämpchen.
TERMOSTATO DEL HORNO
Sirve para programar la
temperatura deseada del
horno e incorpora una válvula
de seguridad. Cuando está en
marcha, el testigo verde se
enciende.
OVENTHERMOSTAAT
De thermostaat dient om de
gewenste temperatuur van de
oven in te stellen en is uitgerust
met een veiligheidsklep. Als de
thermostaat werkt, brandt het
groene controlelampje.
TERMÓSTATO DO FORNO
O termóstato serve para
programar a temperatura
pretendida do forno e está
equipado com uma válvula de
segurança. Quando está a
funcionar, a luz piloto verde
acende-se.
Zum Einschalten des unteren
Brenners den Drehregler des
Thermostats
drücken
und
gegen den Uhrzeigersinn auf die
gewünschte Temperatur stellen.
Para encender el quemador
inferior, apretar el mando del
termostato y girarlo en sentido
contrario a las agujas del reloj
hasta la temperatura deseada.
Druk op de thermostaatknop
en draai hem tegen de klok in
op de gewenste temperatuur
om de brander te ontsteken.
Para acender o queimador
inferior, prima o manípulo do
termóstato e rode-o para a
esquerda até à temperatura
pretendida.
Die Position min. entspricht
einer Ofentemperatur von
130°C. Sie hat auch eine
Einraststellung.
La posición de mínimo
corresponde
a
una
temperatura del horno de
130°C. Tiene una posición de
apagado.
De minimale stand stemt
overeen
met
een
oventemperatuur van 130°C.
Deze beschikt over een
stopstand.
A
posição
do
mínimo
corresponde
a
uma
temperatura do forno de
130°C. Esta dispõe de uma
posição de paragem.
Die Position max. entspricht
einer Ofentemperatur von
250°C und ist auch die
Endposition des Thermostats.
La posición de máximo
corresponde al tope del
termostato y calienta el horno a
250°C.
De maximale stand stemt overeen
met een oventemperatuur van
250°C en vormt de eindpositie van
de thermostaat.
A
posição
de
máximo
corresponde
a
uma
temperatura do forno de 250°C
e constitui a posição final do
termóstato.
Den Drehregler etwa 5 bis 10
Sekunden
lang
gedrückt
halten. In dieser Zeit wird der
Brenner elektrisch gezündet,
das
Heizelement
wird
aufgeheizt und macht so die
Versorgung des Brenners mit
Gas möglich.
Mantener apretado el mando
entre 5 y 10 segundos.
Durante este tiempo, el
quemador
se
enciende
eléctricamente, el elemento
térmico se calienta y el gas
llega al quemador.
Houd de knop ongeveer 5-10
seconden
ingedrukt.
De
brander wordt nu elektrisch
ontstoken,
het
verwarmingselement
wordt
verwarmd en maakt de
gastoevoer naar de brander
mogelijk.
Mantenha premido o manípulo
durante cerca de 5-10
segundos.
Durante
este
tempo, o queimador acende-se
electricamente, a resistência
aquece e permite a distribuição
do gás ao queimador.
FORNO A GÁS COM GRILL
A GÁS
35
Fig. 18 - Abb. 18 - Afb. 18
Fig. 19 - Abb. 19 - Afb. 19
36
*5
(#
GRILL GAS
)LGRILLAGAS$%6%FUNZIONARE
CONLAPORTASEMIAPERTAEDIL
PARACALOREDIPROTEZIONEFORNITO
INDOTAZIONEINSERITONELLE
FERITOIESOTTOILFRONTALECOMANDI
FRONTALECOMANDI
L’accensione
si
effettua
ruotando la manopola in senso
GAS GRILL
4HEGASGRILL-534ONLYBE
OPERATED WITH OVEN DOOR
SLIGHTLY OPEN AND THE HEAT
SHIELDSUPPLIEDINSERTEDINTHE
SLOTSUNDERTHECONTROLPANEL
To turn on the grill, turn the
knob clockwise to the position
ATTENZIONE: quando si usa il
grill le parti accessibili possono
divenire calde, tenete i bambini
a debita distanza.
WARNING: when using the grill,
accessible parts may become
hot, keep children at a safe
distance.
LUCE FORNO - GIRARROSTO
Questo commutatore serve per
l’accensione della luce forno e
per il girarrosto nei modelli
dove è fornito.
OVEN LIGHT - SPIT ROASTER
This knob is used to switch on
the oven interior light and the
spit roaster (on models so
equipped).
'3
GRIL GAZ
,EGRILGAZ$/)4FONCTIONNER
AVECLAPORTEENTROUVERTEET
LÏCRANDEPROTECTIONTHERMIQUE
FOURNI INSÏRÏ DANS LES FENTES
SOUS
LE
BANDEAU
DE
COMMANDE
L’allumage
s’effectue
en
and hold it pressed in tournant la manette en sens
horaire dans la position
orario nella posizione
for 5-10 seconds.
en la tenant appuyée
e tenendola premuta per 5 - 10
secondi.
pendant 5-10 secondes.
ATTENTION: lorsqu’on utilise
le gril, les parties accessibles
peuvent devenir chaudes ; ne
pas laisser les enfants s’en
approcher.
ÉCLAIRAGE FOUR - BROCHE
Ce commutateur sert à
l’allumage de l’éclairage du
four et la broche des modèles
équipés.
%&
&4
/-
15
GRILL A GÁS
¡.%#%33£2)/QUEOGRILLA
GÉSFUNCIONECOMAPORTA
ENTREABERTAEAPROTEC¥ÎOANTI
CALOR FORNECIDA DE SÏRIE
INSERIDA NAS ABERTURAS POR
BAIXODOPAINELDECOMANDOS
A ignição efectua-se rodando o
te draaien manípulo para a direita até à
op de stand
e mantendo-o
im Uhrzeigersinn auf
en hem gedurende 5-10 posição
de
y seconden ingedrukt te houden. premido
drehen und 5 bis 10 Sekunden posición
durante
5-10
lang gedrückt halten.
mantenerlo apretado entre 5 y
segundos.
10 segundos.
GASGRILL
$ER'ASGRILL-533IMMERMIT
HALB GEÚFFNETER 4àR UND DEM
MITGELIEFERTENUNDINDIE
3CHLITZE
UNTER
DER
"EDIENBLENDE EINGESTECKTEM
(ITZESCHUTZBLECH
BETRIEBEN
WERDEN
Zum Einschalten den Regler
GRILL DE GAS
#UANDOSEPONEENMARCHAEL
GRILLDEGASLAPUERTA4)%.%15%
%34!2SEMIABIERTAYSEHADE
INSTALARLAPROTECCIØNCONTRAEL
CALOR DEBAJO DEL FRONTAL DE
MANDOS
Para encender el grill, girar el
mando en el sentido de las
agujas del reloj hasta la
GASGRILL
$EGASGRILL-/%4ALTIJDMETHALF
GEOPENDEDEURWERKENENMET
DEBIJGELEVERDEBESCHERMPLAAT
IN DE GLEUVEN ONDER HET
FRONTBEDIENINGSPANEEL
De grill wordt ingeschakeld
door de knop met de klok mee
ACHTUNG: Wenn der Grill
benutzt wird, können die
zugänglichen
Teile
sehr
heiß werden. Kinder in
ausreichendem
Abstand
halten.
ATENCIÓN: cuando se utiliza
la parrilla las partes accesibles
pueden calentarse mucho,
será
necesario
mantener
a los niños a una distancia
adecuada.
LET OP: bij het gebruik van de
grill kunnen de toegankelijke
delen warm worden; houd de
kinderen op passende afstand.
ATENÇÃO: ao usar a grelha,
as partes acessíveis podem
esquentar, portanto mantenhas
as crianças distantes.
BELEUCHTUNG OFEN BRATSPIESS
Dieser Schalter dient zum
Einschalten
der
Innenbeleuchtung und des
Bratspießes bei den damit
ausgestatteten Modellen.
LUZ DEL HORNO Y ASADOR
Este conmutador sirve para
encender la luz del horno y
poner en marcha el asador si
el modelo lo posee.
OVENVERLICHTING
DRAAISPIT
Deze schakelaar schakelt de
ovenverlichting en het draaispit
in (voor de modellen die
hiermee zijn uitgerust).
LUZ DO FORNO - ESPETO
Este comutador serve para
ligar a luz do forno e para o
espeto, nos modelos em que é
fornecido.
37
0
38
VERSIONE VENTILATA
I nostri forni da 60 cm a gas,
possono avere
le
varie
funzioni anche nella versione
ventilata.
L'inserimento
del
solo
ventilatore
farà
circolare
all'interno del forno aria fredda
(ambiente), favorendo cosi' un
rapido scongelamento dei cibi
congelati.
La funzione ventilatore inserita
assieme al riscaldamento forte
proveniente dal bruciatore suola
permette la cottura dei cibi in
modo piu' delicato e uniforme
possibile rispetto al sistema
tradizionale con solo bruciatore
suola.
La cottura avviene piu'
rapidamente
rispetto
alla
cottura tradizionale. Il sistema
risulta idoneo per la cottura su
piu' ripiani ed anche per cibi di
diversa natura (pesce, carne,
ecc...)
Con questa funzione non e'
necessario il preriscaldamento,
ma per pasticceria e' comunque
preferibile farlo.
VENTILATED VERSION
Our 60cm gas ovens, also have
the various functions in the
ventilated version.
By turning on the ventilator
alone,
cold
air
(room
temperature) circulates inside
the oven thus helping to rapidly
thaw frozen foods. The
ventilator function turned on
together with the strong heat
coming from the bottom burner
makes it possible to cook foods
more evenly and delicately than
with the bottom burner alone.
Cooking is faster than in a
traditional oven. The system is
suitable for cooking foods of
different types (fish, meat etc)
on a number of levels.
Pre-heating is not needed with
this function, but for cakes it is in
any case preferable.
VERSION VENTILEE
Nos fours à gaz de 60 cm,
peuvent
avoir
différentes
fonctions même dans la version
ventilée.
L'introduction
du
ventilateur seulement fera
circuler de l’air froid (ambiant) à
l’intérieur du four ce qui
favorisera
ainsi
une
décongélation plus rapide des
aliments congelés. La fonction
ventilateur insérée avec le
réchauffement fort provenant
du brûleur de sole permet la
cuisson des aliments de la
façon la plus délicate et
uniforme possible par rapport
au système traditionnel avec un
seul brûleur de sole. La cuisson
a eu lieu plus rapidement que la
cuisson
traditionnelle.
Le
système est approprié pour la
cuisson sur plusieurs niveaux et
même pour les aliments de
différente nature (poisson,
viande, etc...). Grâce à cette
fonction le préchauffage n’est
plus nécessaire, mais pour la
pâtisserie il est toutefois
conseillé de le faire.
UMLUFTVERSION
Unsere Gasöfen zu 60 cm
können auch bei
der
Umluftversion
verschiedene
Funktionen haben. Wenn Sie
nur ein Gebläse einschalten,
wird
im
Ofen
kalte
(Raumtemperatur)
Luft
umgewälzt,
was
ein
schnelles
Auftauen
von
tiefgefrorenen
Speisen
erleichtert.
Die Gebläsefunktion, wenn sie
zusammen
mit
dem
Schnellheizen
über
die
Heizflamme im Ofenboden
eingeschaltet ist, ermöglicht ein
sanfteres und gleichförmigeres
Garen verglichen mit dem
herkömmlichen Verfahren. Das
System eignet sich zum Garen
auf mehreren Stufen auch
unterschiedlicher
Speisen
(Fisch, Fleisch, usw. …). Mit
dieser Funktion benötigen Sie
kein Vorheizen mehr, auch
wenn dies bei Backwaren
empfehlenswert ist.
VERSIÓN VENTILADA
Nuestros hornos de gas de 60
cm, pueden
tener
las
diversas funciones incluso en
la
versión ventilada. La
activación sólo del ventilador
hará
circular
aire
fría
(ambiente) dentro del horno,
favoreciendo de esta forma una
descongelación rápida de los
alimentos congelados. La
función ventilador activada
junto con el calentamiento
fuerte
proveniente
del
quemador inferior permite la
cocción de los alimentos de la
forma más delicada e uniforme
posible respecto al sistema
tradicional con sólo quemador
inferior. La cocción se efectúa
con más rapidez respecto a la
cocción tradicional. El sistema
es ideal para la cocción en
varios niveles y también para
alimentos de diverso tipo
(pescado, carne, etc...). Con
esta función no es necesario el
precalentamiento, pero para la
pastelería de todos modos es
preferible utilizarlo.
GEVENTILEERDE VERSIE
Onze 60 cm-ovens op gas,
kunnen ook in de geventileerde
versie over de verschillende
functies beschikken. Door alleen
de ventilator in te schakelen,
circuleert er koude lucht
(omgevingstemperatuur) in de
oven, waardoor een snelle
ontdooiing van het bevroren
voedsel bevorderd wordt. Als
de
ventilatorfunctie
wordt
ingeschakeld samen met de
sterke verwarming afkomstig
van de bodembrander, is het
mogelijk de gerechten op meer
delicate en gelijkmatige wijze te
koken, vergeleken met het
traditionele systeem met alleen
een bodembrander. Het koken
gebeurt sneller dan bij het
traditionele kookproces. Het
systeem is geschikt voor het
koken op meerdere niveaus en
ook voor andere soorten
gerechten (vis, vlees, etc...) Met
deze functie is voorverwarming
niet noodzakelijk, maar het
verdient hoe dan ook de
voorkeur deze in te schakelen
voor gebakjes.
VERSÃO VENTILADA
Os nossos fornos de 60 cm a
gás, podem ter as várias
funções também na versão
ventilada. A activação só do
ventilador fará circular, no
interior do forno, ar frio
(ambiente),
favorecendo
assim um descongelamento
rápido
dos
alimentos
congelados.
A função ventilador activada
junto com o aquecimento forte,
proveniente do queimador
inferior permite a cozedura dos
alimentos de maneira mais
delicada e uniforme possível
em relação ao sistema
tradicional só com o queimador
inferior. A cozedura realiza-se
mais rapidamente em relação à
cozedura tradicional. O sistema
está indicado para cozeduras
em várias camadas e também
para alimentos de vários tipos
(peixe, carne, etc...). Com esta
função não é necessário o
pré-aquecimento, mas para a
confeitaria é, todavia, preferível
efectuá-lo.
39
*5
0
40
(#
'3
SCONGELAMENTO
DEFROSTING
DECONGELATION
Selezionando una delle funzioni
di cottura ventilato e
regolando il termostato sullo
zero, il ventilatore farà
circolare all’interno del forno
aria fredda, favorendo
così un rapido scongelamento
dei cibi congelati.
By selecting one of the fan
cooking functions and setting
the thermostat to zero, the fan
allows cold air to circulate inside
the oven. In this way frozen
food can be rapidly defrosted.
En sélectionnant une des
fonctions de cuisson ventilée et
en réglant le ventilateur fera
circuler de l’air froid à l’intérieur
du
four, en provoquant de cette
manière une décongélation
rapide des aliments congelés.
COTTURA AL GRILL
GRILL COOKING
CUISSON AU GRIL
Tipo di cottura per la
grigliatura o doratura dei
cibi. Alcuni forni possono
essere completi di motorino
asta e spiedo per cottura al
girarrosto.
La griglia con il cibo da
cuocere va inserito nella 1°
o 2° posizione da sopra.
Preriscaldare
per
5’.
Ruotare la manopola del
termostato con
temperature da 1 a 8.
Use the grill to grill or brown
foods.
Some ovens may be
equipped with an electric
motor, spit and skewers for
turning on the spit.
Place the shelf with the food
to be cooked in the 1st or
2nd position from the top.
Pre-heat the oven for 5
mi-nutes.
Turn
the
thermostat to a temperature
between 1 and 8.
Type de cuisson pour griller
ou dorer les aliments.
Certains fours peuvent etre
munis d’un moteur de
piques et d’une broche pour
la cuisson en rotissoire.
La grille portant l’aliment a
cuire doit etre inseree a la
1e ou 2e position du
dessus.Prechauffer pendant
5’.
Tourner le bouton du
ther-mostat
sur
une
temperature comprise entre
1 et 8.
VENTILATORE DI
RAFFREDDAMENTO
Il ventilatore e posto sulla
superiore
forno
e
Ilparte
ventilatore
e del
posto
sulla
crea un
circolo del
d’aria
di
parte
superiore
forno
raf-freddamento
e
crea un circoloall’interno
d’aria di
del mobile e attraverso
la
raffreddamento
all’interno
portamobile
del forno
del
chestesso.
esce dalle
Entra in funzione
la
feritoie
sotto il quando
cruscotto
parteforno.
esteriore
forno
del
Entra del
in azione
raggiunge
60°Csica.accende
ogni
volta i che
e
ilAccendendo
forno in tutteil le forno
funzioni.
im-postando il termostato
a
Nell’eventualità
che ciò non
200°C, il ventilatore
entra inil
accada,
non accendete
funzione
dopo 10 ilmin
ca. Lo
forno
e chiamate
centro
di
spegnimento
ventilatore
assistenza
piùdel
vicino.
avviene quando la parte
esteriore del forno scende
sotto i 60°C.
Dopo un utilizzo del forno a
200°C il ventilatore si
spe-gne dopo 30 min. ca.
COOLING FAN
VENTILATEUR DE
REFROIDISSEMENT
Le ventilateur est place sur
la
superieure
du dans
four
Le partie
ventilateur
est situé
et
cree une
circulation
la partie
supérieure
du d’air
four
de
refroidissement
a
et crée
une recirculation
l’interieur
meuble et a
d’air de durefroidissement
travers
la porte
four
à l’intérieur
du du
meuble,
luimeme.
se les
metfentes
en
s’échappantIl par
marche
sous le quand
tableau lade partie
bord
externe
atteint
du four. du
Il sefour
déclenche
environ
chaque 60°C.
fois que vous
En
allumant
le fourquelque
et en
allumez
le four,
programmant
le Dans
thermostat
soit sa fonction.
cette
sur
200°C, len’allumez
ventilateurpas
se
éventualité,
met
enetmarche
10
le four
appelezapres
le centre
minutes
environ.
d’assistance
le plus proche.
L’extinction du ventilateur se
fait quand la partie externe
du four descend sous 60°C.
Apres une utilisation du four
a 200°C, le ventilateur
s’eteint apres environ 30
minutes.
The fan is positioned on the
upper
oftop
theofoven
and
The
fanpart
is on
the oven
createcirculates
a circle ofcooling
cooling air
and
air
on thethe inside
the
inside
cabinet,of which
furni-ture
andslots
through
exits
from the
under the
the
door of panel
the oven.
control
of the oven. It
It
is
turned
on
when
the
turns on every time you turn
temperature
outer
on
the oven inofall the
functions.
thenot
oven
reaches
Ifshell
this of
does
happen,
do
60°C.
not
turn the oven on and call
By nearest
switching
on the
oven
the
service
centre.
with the thermostat at 200°C
the fan starts working after
approx.10 min.
It is turned off when the
temperature of the outer
shell of the oven descends
under 60°C.
By switching off the oven
with the thermostat at 200°C
the fan stops working after
approx. 30 min.
%&
&4
/-
15
DESCONGELACIÓN
ONTDOOIEN
DESCONGELAÇÃO
Falls eine der Umluftfunktionen
ausgewählt und der Thermostat
auf Null gestellt wird, führt der
Ventilator Kaltluft in den Ofen
und fördert das schnelle
Auftauen der Tiefkühlkost.
Seleccionando una de las
funciones de cocción ventilada
y ajustando el termostato sobre
el cero, el ventilador hace
circular aire frío dentro del
horno, facilitando de esta
manera una descongelación
rápida de los alimentos
congelados.
Door één van de functies van
de bereiding met ventilatie te
kiezen en de thermostaat op nul
te zetten, laat de ventilator
koude lucht in de oven
circuleren,
waardoor
diepvriesproducten
snel
ontdooid worden.
Seleccionar uma das funções
de cozedura ventilada e
regulando o termóstato no zero,
o ventilador fará circular dentro
do forno o ar frio, favorecendo
assim
uma
rápida
descongelação dos alimentos
congelados.
G RILLEN
COCCIÓN AL GRILL
BEREIDING MET GRILL
MODO GRIL
Zum Grillen oder Braunen
der Speisen.
Einige
Backofen
sind
kom-plett mit Stabmotor und
Drehspies fur Spiesbraten
ausgestattet.
Der Rost mit dem Gargut
wird in der 1. oder 2.
Schiene
von
oben
eingeschoben.
Den Backofen 5 Minuten
vorheizen. Den Thermostat
Drehgriff auf Temperaturen
von 1 bis 8 drehen.
Tipo de coccion para asar
al grill o para dorar los
alimentos.
Nota:
Algunos
hornos
pueden estar equipados
con un motor giratorio y un
espeton para la coccion en
el asador. La parrilla con el
alimento a cocinar debe
posicionarse en la 1a o 2a
posicion de arriba.
Precalentar durante 5’ y
girar el termostato hasta
situarlo a temperaturas
entre 1 y 8.
Type bereiding voor het
grillen of bruinen van
voedsel.
Enkele ovens kunnen een
motortje hebben om de
stang voor bereiding aan
het spit te laten draaien.
Het rooster met het voedsel
dat bereid moet worden
moet op het 1e of 2e niveau
van bovenaf in de oven
worden geschoven.
Voorverwarmen gedurende
5 minuten.
De thermostaatknop op
temperaturen van 1 tot
8 draaien.
Modo
indicado
para
grelhados ou para gratinar
alimentos.
Alguns fornos podem estar
equipados com motor e
espeto
giratorio
para
assados ou churrasco.
Para
uma
utilizacao
correcta do Grill, inserir
sempre a grelha na 1a ou
2a posicao de cima no
forno. Aquecer previamente
por 5 minutos. Rodar o
botao do termostato com
temperaturas desde 1 ate
8.
K ÜH LVENTILAT
VENTILADOR
DE
ENFRIAMIENTO
El ventilador esta situado en
El ventilador se encuentra
la parte superior del horno y
en la parte superior del
crea una circulacion de aire
horno y crea un círculo de
de enfriamiento dentro del
aire de enfriamiento dentro
mueble y a traves de la
del mueble que sale por las
puerta del propio horno. Se
rendijas de la parte inferior
pone en marcha cuando la
del tablero del horno. Entra
parte exterior del horno
en acción cada vez que se
alcanza los 60°C aprox.
enciende el horno en todas
Encendiendo el horno y
las funciones. Si no sucede,
llevando el termostato a
no encienda el horno y llame
200°C, el ventilador se pone
al centro de asistencia más
en marcha al cabo de unos
cercano.
10 minutos. El ventilador se
apaga
cuando
la
temperatura de la parte
exterior
del
horno
desciende por debajo de los
60°C. Despues de utilizar el
horno a 200°C el ventilador
se apaga al cabo de unos
30 minutos.
KOELVENTILATOR
VENTILADOR
DE
ARREFECIMENTO
O ventilador esta situado na
O ventilador é colocado na
parte superior do forno e
parte superior do forno e
procura um circulo de ar de
garante a circulação do ar
arrefecimento dentro do
de arrefecimento dentro
movel e atraves da porta do
do móvel. O ar sai através
proprio forno.
das aberturas localizadas
Entra em funcao quando a
abaixo do painel do forno. O
parte exterior do forno
ventilador entra em função
atinge os 60°C aprox.
sempre que o forno é ligado,
Acendendo o forno e
com qualquer função. Se
programando o termostato
isso não acontecer, não
a 200°C, o ventilador entra
ligue o forno e contacte o
em funcao apos 10 min.
centro de assistência mais
aprox.
próximo.
A desligacao do ventilador
efectuase quando a parte
exterior do forno baixa para
la dos 60°C.
Depois de uma utilizacao do
forno a 200°C o ventila-dor
desliga-se apos 30 min.
aprox.
AUFTAUEN
OR
Der Kuhventilator befindet
Das Gebläse befindet sich
sich auf der oberen Seite
im oberen Teil des Ofens
des Backofens und dient zur
und erzeugt kühlenden
Kuhlung
sowohl
des
Luftstrom im Möbel, der
Ein-baumobels als auch der
aus den Schlitzen unter
Backofenture.
dem Armaturenbrett des
Der Ventilator schaltet sich
Ofens austritt. Das Gebläse
selbstattig ein, wenn das
geht immer dann an, wenn
ausere
Gehause
des
der Ofen mit allen seinen
Back-ofens eine Temperatur
Funktionen
eingeschaltet
von 60°C uberschreitet.
wird. Sollte dies nicht der
Wird der Backofen z.B. auf
Fall sein, dann schalten Sie
200°C eingestellt, schaltet
den Ofen nicht ein und rufen
sich die Kuhlung nach etwa
Sie das nächstgelegene
10 Min ein.
Kundendienstzentrum.
Der Ventilator schaltet sich
selbstattig aus, wenn das
ausere
Gehause
des
Backofens eine Temperatur
von
60°C
wieder
uberschreitet. z.B. schaltet
sich die Kuhl-ung nach
Betrieb auf 200°C nach
etwa 30 Min. aus.
De ventilator is in het
De ventilator bevindt zich
bovenste gedeelte van de
op het bovenste deel van
oven geplaatst en zorgt
de oven en creëert een
ervoor dat de koellucht
koelluchtcirculatie
binnen
binnenin het inbouwmeubel
het meubel, die door de
en door de deur van de
openingen
onder
het
oven zelf circuleert.
bedieningspaneel van de
Deze begint te werken
oven naar buiten stroomt.
wanneer de buitenkant van
Deze treedt in werking iedere
de oven ongeveer 60°C is.
keer als alle functies van de
Door de oven aan te zetten
oven worden ingeschakeld.
en de thermostaat op 200°C
Mocht dat niet gebeuren,
te
zetten,
begint
de
schakel de oven dan niet
ven-tilator na ongeveer 10
in en bel het dichtstbijzijnde
min. te lopen. De ventilator
servicecentrum.
wordt uitgeschakeld zodra
de buitenkant van de oven
onder de 60°C daalt.
Na de oven op 200°C te
hebben gebruikt, gaat de
ventilator na ongeveer 30
min. uit.
41
*5
(#
'3
CUOCERE AL FORNO
Scegliendo questa forma di
riscaldamento, potete usare il
forno come al solito e ricorrere
alle ricette dei libri di cucina.
Il piatto da cuocere deve
essere posto preferibilmente
nel piano centrale del forno.
COOKING IN THE OVEN
With this cooking method, you
can operate the oven in the
normal way and follow the
instructions in recipe books.
The food to be cooked should
preferably be placed on the
middle shelf of the oven.
CUISSON AU FOUR
En choisissant ce mode de
chauffage, vous pourrez utiliser
le four comme d’habitude et
utiliser les recettes.
Le plat à cuire doit être placé de
préférence sur le plan central du
four.
ATTENZIONE: L’uso prolungato
PIETANZA
dell’apparecchio a gas produce
MAIN COURSE
calore
e umidità nella cucina.
Questo
ALIMENTSpuò richiedere una
ventilazione supplementare tipo
l’apertura
di una(ROTOLO)
finestra o una
PASTA BISCOTTO
GENOESE SPONGE
ROLL)
ventilazione
più (SWISS
efficace,
per
PÂTE BISCUITS (ROULÉS)
esempio aumentando il livello
PASTA FROLLA (BISCOTTI)
diSHORT
ventilazione
meccanica dove
PASTRY (BISCUITS)
presente
(cappa
aspirante).
PÂTE BRISÉE
(BISCUIT)
WARNING: Prolonged use of ATTENTION: L’usage prolongé
TEMPERATURA
PRERISCALDARE
TEMPO DI
the gas appliance(oC)
produces heatCOTTURA
de l’appareil
au gaz produit
(min)
PREHEAT
and humidityTEMPERATURE
in the kitchen. ThisCOOKING
de laTIME
chaleur et de
l’humidité
(oC)
(min)
may require TEMPÉRATURE
additional ventilation TEMPS
dans DEla cuisine.
Pour cela,
PRÉCHAUFFER
(min)
such as opening(oC)
a window orCUISSON
une ventilation
supplémentaire
more effective ventilation such comme l’ouverture d’une fenêtre
- Yesefficace,
- OUI
15
20
210
as by increasing the level of ou une ventilationsiplus
mechanical ventilation where par exemple en augmentant le
present (extraction200hood).
niveau
de ventilation
mécanique
si - Yes - OUI
10 - 12
si celle-ci est présente (hotte
aspirante).
PASTA CON LIEVITO ARTIFICIALE
(SCHIACCIATA)
DOUGH WITH RAISING AGENT
(SCHIACCIATA)
PÂTE À LEVAIN ARTIFICIEL
200
25 - 30
si - Yes - OUI
190
20 - 25
si - Yes - OUI
180
40 - 50
si - Yes - OUI
PASTA SFOGLIA (SFOGLIATINE)
PUFF PASTRY (TARTLETS)
PÂTE FEUILLETÉE
190
20 - 30
si - Yes - OUI
SOUFFLÉ
SOUFFLÉ
SOUFFLÉ
180
35 - 40
si - Yes - OUI
SACHERTORTE
SACHERTORTE
SACHER TORTE
180
55 - 60
si - Yes - OUI
TORTA DI FRUTTA
FRUIT PIE
TARTE AUX FRUITS
160
160 - 180
si - Yes - OUI
PASTA PER BIGNÉ
CHOUX PASTRY
PÂTE À BEIGNETS
200
35 - 40
si - Yes - OUI
ARROSTO DI MANZO (CIRCA 1,5 KG)
ROAST BEEF (APPROX. 1.5 KG)
RÔTI DE BOEUF (ENV. 1,5 KG)
200
90 - 120
si - Yes - OUI
ARROSTO DI MAIALE (CIRCA 1,5 KG)
ROAST PORK (APPROX. 1.5 KG)
RÔTI DE PORC (ENV. 1,5 KG)
200
100 - 120
si - Yes - OUI
PIZZA
PIZZA
PIZZA
200
20 - 25
si - Yes - OUI
SFORMATO DI PESCE
BAKED FISH
QUICHE DE POISSON
180
50 - 60
si - Yes - OUI
SFORMATO DI VERDURE
BAKED VEGETABLES
GÂTEAU DE LÉGUMES
170
30 - 40
si - Yes - OUI
190 - 200
60 - 70
si - Yes - OUI
PAN DI SPAGNA (PICCOLO
FORME DI CARTA)
SPONGE CAKE (SMALL PAPER PASTRY
CASES)
PAIN D’ESPAGNE
PASTA LIEVITATA (STRUDEL
DI PAPAVERO)
LEAVENED DOUGH (STRUDEL)
PÂTE LEVÉE (STRUDEL)
POLLAME
POULTRY
VOLAILLE
42
%&
&4
/-
15
IM OFEN BRATEN/BACKEN
Bei dieser Heizart kann man den
Ofen wie üblich benutzen und
die Rezepte in den Kochbüchern
verwenden.
Das zu kochende Gericht sollte
vorzugsweise auf der mittleren
Etage platziert werden.
COCER EN EL HORNO
Con
esta
forma
de
funcionamiento, puede cocinar
las recetas que ya conoce o las
descritas en los libros de cocina.
Se aconseja colocar los
alimentos por cocer en la guía
central del horno.
BAKKEN MET DE OVEN
Als u voor deze vorm van
verwarming kiest, kunt u de oven
normaal gebruiken en recepten
uit kookboeken bereiden.
Het te bereiden gerecht moet bij
voorkeur op het middelste
rooster worden geplaatst.
COZINHAR NO FORNO
Escolhendo esta forma de
aquecimento, pode usar o forno
da forma habitual e utilizar as
receitas dos livros de cozinha.
O prato a cozinhar deve ser
colocado de preferência no
centro do forno.
ACHTUNG:
Der
längere ATENCIÓN: El uso prolongado
GERICHT
Gebrauch
del aparato de gas produce
ALIMENTOS des gasbetriebenen
GERECHTerzeugt Wärme und
Geräts
calor y humedad en la cocina.
PRATO
Feuchtigkeit in der Küche. Esto puede necesitar una
Dies
kann (BISKUITROULADE)
eine zusätzliche ventilación suplementaria como
BISKUITTEIG
PASTA PARA BIZCOCHO
(BRAZO)wie
Belüftung
erfordern,
la apertura de una ventana o
KOEKJESDEEG (ROL)
beispielsweise
das (ROLO)
Öffnen eines una ventilación más eficaz, por
MASSA DE BISCOITO
Fensters
eine effizientere ejemplo aumentando el nivel de
MÜRBTEIGoder
(KEKSE)
PASTAFLORA
(GALLETAS)
Lüftung
durch
Steigerung der ventilación mecánica donde se
KRUIMELDEEG (KOEKJES)
mechanischen
Belüftung, falls encuentra presente (campana
MASSA TENRA (BISCOITOS)
eine
solche vorhanden ist aspirante).
TEIG MIT KÜNSTL. HEFE (FLADEN, BLECHKUCHEN)
PASTA CON LEVADURA ARTIFICIAL (HOGAZA)
(Dunstabzugshaube).
LET OP: Het langdurige ATENÇÃO: O uso prolongado
TEMPERATUR (oC)
VORHEIZEN
KOCHZEIT (min)
gebruik
van het(oC)gasapparaat
do aparelho
produz calor e
TEMPERATURA
PRECALENTAMIENTO
TIEMPO DE COCCIÓN
(min) a gás
VOORVERWARMEN
BEREIDINGSTIJD
(min) na cozinha.
TEMPERATUUR
(oC) en vocht
produceert
warmte
in
humidade
Por este
PRÉ-AQUECER
TEMPERATURA (oC) TEMPO DE COZEDURA (mín)
de keuken. Hiervoor kan een motivo, pode ser necessária
extra ventilatie nodig zijn zoals uma ventilação adicional, como
Ja - Sí janela
- Ja - SIMou
het openen210van een raam of een15 -a20 abertura de uma
meer doeltreffende ventilatie, uma ventilação mais eficaz, por
bijvoorbeeld door het niveau exemplo aumentando o nível
- Sí - Ja - SIMse
12 ventilação Ja
200
van mechanische
ventilatie10 -de
mecânica,
te verhogen waar aanwezig presente (exaustor).
(afzuigkap).
200
25 - 30
Ja - Sí - Ja - SIM
190
20 - 25
Ja - Sí - Ja - SIM
180
40 - 50
Ja - Sí - Ja - SIM
BLÄTTERTEIG (GEFÜLLTE TASCHEN)
PASTA DE HOJALDRE (PASTELILLOS DE HOJALDRE)
BLADERDEEG (PLAKJES)
MASSA FOLHADA (PASTÉIS FOLHADOS)
190
20 - 30
Ja - Sí - Ja - SIM
SOUFFLÉ
SOUFFLÉ
SOUFFLÉ
SOUFFLÉ
180
35 - 40
Ja - Sí - Ja - SIM
180
55 - 60
Ja - Sí - Ja - SIM
160
160 - 180
Ja - Sí - Ja - SIM
200
35 - 40
Ja - Sí - Ja - SIM
200
90 - 120
Ja - Sí - Ja - SIM
200
100 - 120
Ja - Sí - Ja - SIM
200
20 - 25
Ja - Sí - Ja - SIM
180
50 - 60
Ja - Sí - Ja - SIM
170
30 - 40
Ja - Sí - Ja - SIM
190 - 200
60 - 70
Ja - Sí - Ja - SIM
DEEG MET BAKPOEDER (SAMENGEDRUKT)
MASSA COM FERMENTO ARTIFICIAL (ESMAGADA)
BISKUITTEIG, SANDKUCHEN (IN KLEINEN PAPIERFORMEN)
BIZCOCHO (PEQUEÑOS MOLDES DE PAPEL)
BISCUITGEBAK (KLEINE PAPIERVORMEN)
PÃO DE ESPANHA (PEQUENAS FORMAS DE PAPEL)
HEFETEIG (MOHNSTRUDEL)
PASTA FERMENTADA (STRUDEL CON SEMILLAS DE ADORMIDERA)
VOORDEEG (PAPAVERSTRUDEL)
MASSA LEVEDADA (STRUDEL DE PAPOILA)
SACHERTORTE
SACHER
SACHERTORTE
SACHERTORTE
OBSTTORTE
PASTEL DE FRUTAS
VRUCHTENTAART
TORTA DE FRUTA
BEIGNETTEIG
PASTA PARA LIONESAS
DEEG VOOR SOESJES
MASSA PARA CHOUX
RINDSBRATEN (CA. 1,5 KG)
ASADO DE VACA (APROX. 1,5 kg)
GEBRADEN RUNDVLEES (ONGEVEER 1,5 KG)
CARNE DE VACA (CERCA DE 1,5 KG)
SCHWEINSBRATEN (CA. 1,5 KG)
ASADO DE CERDO (APROX. 1,5 kg)
GEBRADEN VARKENSVLEES (ONGEVEER 1,5 KG)
CARNE DE PORCO (CERCA DE 1,5 KG)
PIZZA
PIZZA
PIZZA
PIZZA
FISCHAUFLAUF
PUDÍN DE PESCADO
VISSCHOTEL
GALANTINA DE PEIXE
GEMÜSEAUFLAUF
PUDÍN DE VERDURAS
GROENTENSCHOTEL
GALANTINA DE VERDURAS
GEFLÜGEL
AVES
GEVOGELTE
AVES
43
PIETANZA
TEMPERATURA
(oC)
TEMPERATURE
(oC)
TEMPÉRATURE
(oC)
TEMPO DI
COTTURA (min)
COOKING TIME
(min)
TEMPS DE
CUISSON (min)
PRERISCALDARE
PASTA BISCOTTO (ROTOLO)
GENOESE SPONGE (SWISS ROLL)
PÂTE BISCUITS (ROULÉS)
210
15 - 20
si - Yes - OUI
PASTA FROLLA (BISCOTTI)
SHORT PASTRY (BISCUITS)
PÂTE BRISÉE (BISCUIT)
200
10 - 12
si - Yes - OUI
PASTA CON LIEVITO ARTIFICIALE
(SCHIACCIATA)
DOUGH WITH RAISING AGENT
(SCHIACCIATA)
PÂTE À LEVAIN ARTIFICIEL
200
25 - 30
si - Yes - OUI
PAN DI SPAGNA (PICCOLO
FORME DI CARTA)
SPONGE CAKE (SMALL PAPER PASTRY
CASES)
PAIN D’ESPAGNE
190
20 - 25
si - Yes - OUI
180
40 - 50
si - Yes - OUI
PASTA SFOGLIA (SFOGLIATINE)
PUFF PASTRY (TARTLETS)
PÂTE FEUILLETÉE
190
20 - 30
si - Yes - OUI
SOUFFLÉ
SOUFFLÉ
SOUFFLÉ
180
35 - 40
si - Yes - OUI
SACHERTORTE
SACHERTORTE
SACHER TORTE
180
55 - 60
si - Yes - OUI
TORTA DI FRUTTA
FRUIT PIE
TARTE AUX FRUITS
160
160 - 180
si - Yes - OUI
PASTA PER BIGNÉ
CHOUX PASTRY
PÂTE À BEIGNETS
200
35 - 40
si - Yes - OUI
ARROSTO DI MANZO (CIRCA 1,5 KG)
ROAST BEEF (APPROX. 1.5 KG)
RÔTI DE BOEUF (ENV. 1,5 KG)
200
90 - 120
si - Yes - OUI
PIZZA
PIZZA
PIZZA
200
20 - 25
si - Yes - OUI
SFORMATO DI PESCE
BAKED FISH
QUICHE DE POISSON
180
50 - 60
si - Yes - OUI
SFORMATO DI VERDURE
BAKED VEGETABLES
GÂTEAU DE LÉGUMES
170
30 - 40
si - Yes - OUI
190 - 200
60 - 70
si - Yes - OUI
MAIN COURSE
ALIMENTS
PASTA LIEVITATA (STRUDEL
DI PAPAVERO)
LEAVENED DOUGH (STRUDEL)
PÂTE LEVÉE (STRUDEL)
POLLAME
POULTRY
VOLAILLE
44
PREHEAT
PRÉCHAUFFER
GERICHT
ALIMENTOS
GERECHT
PRATO
TEMPERATUR (oC)
TEMPERATURA (oC)
TEMPERATUUR (oC)
TEMPERATURA (oC)
KOCHZEIT (min)
TIEMPO DE COCCIÓN (min)
BEREIDINGSTIJD (min)
TEMPO DE COZEDURA (mín)
VORHEIZEN
PRECALENTAMIENTO
VOORVERWARMEN
PRÉ-AQUECER
210
15 - 20
Ja - Sí - Ja - SIM
200
10 - 12
Ja - Sí - Ja - SIM
200
25 - 30
Ja - Sí - Ja - SIM
190
20 - 25
Ja - Sí - Ja - SIM
180
40 - 50
Ja - Sí - Ja - SIM
BLÄTTERTEIG (GEFÜLLTE TASCHEN)
PASTA DE HOJALDRE (PASTELILLOS DE HOJALDRE)
BLADERDEEG (PLAKJES)
MASSA FOLHADA (PASTÉIS FOLHADOS)
190
20 - 30
Ja - Sí - Ja - SIM
SOUFFLÉ
SOUFFLÉ
SOUFFLÉ
SOUFFLÉ
180
35 - 40
Ja - Sí - Ja - SIM
180
55 - 60
Ja - Sí - Ja - SIM
160
160 - 180
Ja - Sí - Ja - SIM
200
35 - 40
Ja - Sí - Ja - SIM
200
90 - 120
Ja - Sí - Ja - SIM
200
100 - 120
Ja - Sí - Ja - SIM
200
20 - 25
Ja - Sí - Ja - SIM
180
50 - 60
Ja - Sí - Ja - SIM
170
30 - 40
Ja - Sí - Ja - SIM
190 - 200
60 - 70
Ja - Sí - Ja - SIM
BISKUITTEIG (BISKUITROULADE)
PASTA PARA BIZCOCHO (BRAZO)
KOEKJESDEEG (ROL)
MASSA DE BISCOITO (ROLO)
MÜRBTEIG (KEKSE)
PASTAFLORA (GALLETAS)
KRUIMELDEEG (KOEKJES)
MASSA TENRA (BISCOITOS)
TEIG MIT KÜNSTL. HEFE (FLADEN, BLECHKUCHEN)
PASTA CON LEVADURA ARTIFICIAL (HOGAZA)
DEEG MET BAKPOEDER (SAMENGEDRUKT)
MASSA COM FERMENTO ARTIFICIAL (ESMAGADA)
BISKUITTEIG, SANDKUCHEN (IN KLEINEN PAPIERFORMEN)
BIZCOCHO (PEQUEÑOS MOLDES DE PAPEL)
BISCUITGEBAK (KLEINE PAPIERVORMEN)
PÃO DE ESPANHA (PEQUENAS FORMAS DE PAPEL)
HEFETEIG (MOHNSTRUDEL)
PASTA FERMENTADA (STRUDEL CON SEMILLAS DE ADORMIDERA)
VOORDEEG (PAPAVERSTRUDEL)
MASSA LEVEDADA (STRUDEL DE PAPOILA)
SACHERTORTE
SACHER
SACHERTORTE
SACHERTORTE
OBSTTORTE
PASTEL DE FRUTAS
VRUCHTENTAART
TORTA DE FRUTA
BEIGNETTEIG
PASTA PARA LIONESAS
DEEG VOOR SOESJES
MASSA PARA CHOUX
RINDSBRATEN (CA. 1,5 KG)
ASADO DE VACA (APROX. 1,5 kg)
GEBRADEN RUNDVLEES (ONGEVEER 1,5 KG)
CARNE DE VACA (CERCA DE 1,5 KG)
SCHWEINSBRATEN (CA. 1,5 KG)
ASADO DE CERDO (APROX. 1,5 kg)
GEBRADEN VARKENSVLEES (ONGEVEER 1,5 KG)
CARNE DE PORCO (CERCA DE 1,5 KG)
PIZZA
PIZZA
PIZZA
PIZZA
FISCHAUFLAUF
PUDÍN DE PESCADO
VISSCHOTEL
GALANTINA DE PEIXE
GEMÜSEAUFLAUF
PUDÍN DE VERDURAS
GROENTENSCHOTEL
GALANTINA DE VERDURAS
GEFLÜGEL
AVES
GEVOGELTE
AVES
45
*5
Valori di riferimento
cuocere sulla griglia:
PIETANZA
46
(#
'3
per Guideline values for cooking Valeurs de référence pour
with the grill:
cuire au gril:
POSIZIONE
TEMPO DI
COTTURA (min)
COOKING TIME
(min)
TEMPS DE
CUISSON (min)
PRERISCALDARE
10
10 - 15
---
10
15 - 25
---
MAIN COURSE
POSITION
ALIMENTS
POSITION
BISTECCA
STEAKS
STEACK
COTOLETTA
CUTLET
CÔTELETTE
PREHEAT
PRÉCHAUFFER
%&
Hinweise zum Grillen:
&4
POSITION
ALIMENTOS
POSICIÓN
PRATO
STEAK
BISTEC
RUNDERLAP
BIFE
KOTELETTEN
CHULETA
SCHNITZEL
COSTELETA
15
Valores de referencia para Referentiewaarden voor het Valores de referência para
cocer en la parrilla:
bakken op het rooster:
cozinhar na grelha:
GERICHT
GERECHT
/-
STAND
POSIÇÃO
KOCHZEIT
(min)
TIEMPO DE
COCCIÓN (min)
BEREIDINGSTIJD
(min)
TEMPO DE
COZEDURA (mín)
VORHEIZEN
PRECALENTAMIENTO
VOORVERWARMEN
PRÉ-AQUECER
10
10 - 15
---
10
15 - 25
---
47
IT
GB
ESTRAZIONE DELLA
SUOLA: (vedi fig. 20)
REMOVAL OF THE BURNER EXTRACTION DE LA SOLE:
COVER PLATE: (see fig. 20) (voir fig. 20)
La suola copribruciatore è
bloccata nella parte davanti per
mezzo di 2 alette che sono
infilate in 2 asole; per estrarre
la suola, sollevare la parte
posteriore facendo perno sul
davanti e uscire dalle 2 feritoie.
The burner cover plate is
secured at the front by two tabs
inserted in two slots; to remove
the cover plate, raise the rear of
the plate so that it pivots at the
front and withdraw the tabs form
the slots.
Fig. 20 - Abb. 20 - Afb. 20
48
FR
La sole cache-brûleur est
bloquée dans la partie avant par
2 ailettes enfilées dans 2 fentes;
pour extraire la sole, soulever la
partie AR en faisant levier sur le
devant et sortir par les 2 fentes.
DE
ES
NL
HERAUSZIEHEN
DES DESMONTAJE
DE
LA VERWIJDEREN VAN
BODENS: (siehe Abb. 20)
SOLERA (véase fig. 20):
BODEM: (zie afb. 20)
Der Boden (Abdeckung des
Brenners) wird vorne durch zwei
Flügel gehalten, die in zwei
Langlöchern stecken; zum
Herausziehen den Boden hinten
anheben, vorne niederdrücken
und aus den zwei Schlitzen
herausziehen.
La solera que cubre el quemador
está bloqueada por la parte
delantera mediante 2 aletas
introducidas en 2 ranuras; para
quitar la solera, levantar la parte
posterior pivotándola en la
delantera y extraer las aletas de
las ranuras.
PT
DE RETIRAR A COBERTURA:
(consultar a fig. 20)
De bodem die de brander bedekt
is aan de voorkant geblokkeerd
met 2 ribben die in 2 gleuven zijn
gestoken. Til de achterkant op
door de plaat om de voorkant te
draaien en haal de ribben uit de
2 gleuven om de bodem te
verwijderen.
A cobertura do queimador está
fixa na parte da frente através
de 2 alhetas que estão inseridas
em duas ranhuras; para extrair
a cobertura, levante a parte de
trás fazendo alavanca à frente e
retire-a das 2 ranhuras.
49
IT
SOSTITUZIONE DELLA
LAMPADA DEL FORNO
REPLACING THE
OVEN LIGHT
IMPORTANTE:
La lampada del forno deve
avere precise caratteristiche:
a) struttura adatta alle alte
temperature (fino a 300
gradi)
b) alimentazione: vedere
valore V/Hz indicato sulla targa matricola
c) potenza 25 W.
d) attacco di tipo E 14
Prima di procedere, staccare l’apparecchio dalla
linea di alimentazione.
IMPORTANT:
The oven light must have
these precise features:
a) it must be able to resist
high temperatures (up
to 300°C)
b) power supply: see V/Hz
indicated on data plate.
c) power 25W.
d) E 14 connection.
Before proceeding, disconnect
the
appliance
from the main electricity
supply.
- per evitare danni, stendere
nel forno uno strofinaccio
per stoviglie
- svitare la protezione in vetro della lampada
- svitare la vecchia lampada
e sostituirla con la nuova
- rimontare la protezione in
vetro e togliere lo strofinaccio per stoviglie
- collegare nuovamente l’apparecchio alla linea di alimentazione.
50
GB
-
FR
REMPLACEMENT DE LA
LAMPE DU FOUR
IMPORTANT:
La lampe du four doit répondre à des caractéristiques bien précises :
a) structure adaptée à de
hautes
températures
(jusqu’à 300 degrés)
b) alimentation: voir valeur
V/Hz indiquée sur la
plaquette
d’identification.
c) puissance 25 W.
d) raccord de type E14
Avant de procéder à
l’opération
de
remplato prevent damage, place a cement, débrancher l’appareil du réseau d’alimentea cloth in the oven
unscrew the glass cover of tation,
the light
unscrew the old light bulb - pour éviter tout endomand replace it with the new
magement, placer dans le
four
un
essuie
de
one
vaisselle,
put back the glass cover
- dévisser la protection en
and remove the tea cloth
verre de la lampe,
connect the appliance to
the main electricity supply. - dévisser la lampe uséeet
la remplacer par une nouvelle,
- remonter la protection en
verre et enlever l’essuie
de vaisselle,
- brancher à nouveau l’appareil au réseau d’alimentation.
DE
AUSWECHSLUNG DER
OFENBELEUCHTUNG
WICHTIG:
Die Ofenbeleuchtung muss
folgende
Merkmale
aufweisen:
a) h o c h t e m p e r a t u r beständig (bis zu 300
Grad)
b) Stromversorgung: siehe
Anschlusswerte
V/Hz
auf dem Typenschild.
c) Leistung 25 W
d) Sockel E 14
Das Gerät zuallererst vom
Stromnetz abtrennen.
-
-
ES
CAMBIO DE LA
BOMBILLA DEL HORNO
IMPORTANTE:
La bombilla del horno
debe tener unas características
bien
determinadas:
a) estructura apta para las
altas
temperaturas
(hasta 300 grados)
b) alimentación: véase el
valor V/Hz indicado en
la chapa de matrícula.
c) potencia 25 W.
d) casquillo de tipo E14
Antes de proceder con el
cambio, se debe desenZur
Vermeidung
von chufar el aparato de la red
Schadensfällen, ist im eléctrica de alimentación.
Ofen ein Geschirrtuch
auszubreiten
- para evitar daños, poner
Lampenabdeckung
aus
en el horno un trapo para
Glas abschrauben
vajillas
Alte Lampe abschrauben - desenroscar la protección
und mit einer neuen Been vidrio de la bombilla
leuchtung auswechseln
- desenroscar la vieja bomLampenabdeckung wieder
billa y cambiarla por la
anmontieren
und
nueva
Geschirrtuch entfernen
- montar de nuevo la proDas Gerät erneut an das
tección en vidrio y quitar
Stromnetz anschließen.
el trapo para vajillas
- enchufar de nuevo el aparato a la línea de alimentación.
NL
PT
HET VERVANGEN VAN
HET LAMPJE VAN DE
OVEN
SUBSTITUIÇÃO DA
LÂMPADA DO FORNO
BELANGRIJK:
Het lampje van de oven
dient de volgende kenmerken te bezitten:
a) een structuur die geschikt is voor hoge temperaturen (tot 300°C).
b) voeding: zie de waarde
V/Hz die wordt vermeld
op de typeplaat
c) vermogen 25 W.
d) aanhechting van het
type E 14
Alvorens hiertoe over te
gaan, dient het apparaat
van de stroom losgekoppeld te worden.
IMPORTANTE:
A lâmpada do forno deve
haver características exactas:
a) estrutura adequada às
altas temperaturas (até
300 graus)
b) alimentação: vide valor
V/Hz indicado na placa
de matrícula.
c) potência 25 W.
d) casquilho tipo E 14
Antes de proceder, desligar o aparelho da linha de
alimentação.
- om schade te voorkomen,
dient men een theedoek in
de oven te leggen.
- draai de glazen bescherming van de lamp los
- draai het oude lampje los
en vervang het met een
nieuw
- breng de glazen bescherming weer aan en
verwijder de theedoek
- sluit het apparaat weer op
de stroom aan.
- para evitar danos, estender
no forno um pano da louça
- desapertar a protecção em
vidro da lâmpada
- desapertar a lâmpada
velha e substituí-la com a
nova
- tornar a montar a protecção
em vidro e tirar o pano da
louça
- ligar novamente o aparelho
à linha de alimentação.
51
IT
SMONTAGGIO DELLA
PORTA FORNO
REMOVING THE OVEN
DOOR
Lo smontaggio della porta
forno può essere facilmente
effettuato operando come
segue:
- aprire totalmente la porta;
- sollevare le due levette
indicate in fig. 21;
- richiudere la porta sul primo scatto di arresto determinato dalle due levette
sollevate in precedenza;
- sollevare la porta verso
l’alto e verso l’esterno del
forno per estrarla dalle
sedi;
The oven door can be
removed quickly and easily.
To do so, proceed as
follows:
- Open the door fully.
- Lift the two levers shown in
fig. 21.
- Close the door as far as
the first stop (caused by
the raised levers).
- Lift the door upwards and
outwards to remove it from
its mountings.
Per rimontare la porta, inserire le cerniere nelle apposite
sedi e quindi riportare le due
levette nella posizione di
chiusura.
Fig. 21 - Abb. 21 - Afb. 21
52
GB
FR
DEMONTAGE DE LA
PORTE DU FOUR
Le démontage de la porte du
four peut être effectué
facilement de la manière
suivante :
- ouvrir complètement la
porte;
- lever les deux manettes
indiquées sur la fig. 21;
- refermer la porte sur le
premier cran d’arrêt déterminé
par
les
deux
manettes soulevées au
préalable;
- lever la porte vers le haut
To replace fit the door, fit the
et vers l’extérieur du four
hinges in their mountings
pour l’ôter de son siège;
and lower the two levers.
Pour remonter la porte,
insérer les charnières dans
les logements prévus à cet
effet, puis remettre les deux
manettes en position de
fermeture.
Fig. 22 - Abb. 22 - Afb. 22
DE
ES
NL
PT
AUSBAUEN DER
OFENTÜR
DESMONTAJE DE LA
PUERTA DEL HORNO
DEMONTAGE VAN DE
OVENDEUR
DESMONTAGEM DA
PORTA FORNO
Die Backofentür kann mühelos ausgebaut werden. Dazu
folgendermaßen vorgehen:
- die Tür ganz öffnen;
- die zwei auf Abb. 21 dargestellten Hebel anheben;
- die Tür wieder bis zur
ersten, von den zwei zuvor
angehobenen Hebeln bestimmten
Einrastung
schließen;
- die Tür nach oben und
nach außen anheben und
herausnehmen;
El desmontaje de la puerta
del horno puuede ser fácilmente efectuado obrando
como sigue:
- abrir totalmente la puerta;
- alzar las dos palanquitas
indicas en fig. 21;
- volver a cerrar la puerta
después de la primera parada, consecuencia de la
subida previa de las dos
palanquitas;
- alzar la puerta hacia arriba
y hacia el exterior del
horno para extraerla;
De ovendeur kan gemakkelijk worden gedemonteerd,
als volgt:
- open de deur helemaal;
- til de twee hendeltjes die
worden aangeduid op afb.
21 op;
- sluit de deur op de eerste
stand
die
wordt
veroorzaakt door de twee
hendeltjes die zojuist zijn
opgetild;
- til de deur naar boven en
naar buiten op, om hem
van zijn plaats te halen;
A desmontagem da porta
forno pode ser facilmente
efectuada operando como a
seguir se indica:
- abrir totalmente a porta;
- elevar as duas alavancas
indicadas na fig. 21;
- fechar a porta no primeiro
disparo de batida determinado pelas duas alavancas
levantadas anteriormente;
- elevar a porta para cima e
para a parte de fora do forno para a extrair das
sedes;
Para volver a montar la
puerta, introducir las bisagras en las apropiadas
sedes y luego volver a colocar las dos palanquitas en
la posición de cierre.
Om de deur weer te plaatsen
moeten de scharnieren in
hun behuizingen worden
geplaatst en moeten de twee
hendeltjes weer worden
teruggezet in de sluitende
positie.
Para tornar a montar a porta,
inserir as dobradiças nas
sedes apropriadas e em
seguida tornar a levar as
duas alavancas na posição
de fecho.
Um die Tür wieder einzubauen, die Scharniere
wieder einsetzen und dann
die zwei Hebel in Schließstellung bringen.
53
IT
54
GB
FR
RISPETTO
DELL’AMBIENTE
RESPECT FOR THE
ENVIRONMENT
RESPECT DE
L’ENVIRONNEMENT
La documentazione del presente apparecchio utilizza
carta sbiancata, senza cloro,
oppure carta riciclata allo
scopo di contribuire alla protezione dell’ambiente
The documentation provided
with this oven has been
printed on chlorine free
bleached paper or recycled
paper to show respect for
the environment.
Gli imballaggi sono concepiti
per non danneggiare l’ambiente;
possono
essere
recuperati o riciclati essendo
prodotti ecologici.
Riciclando l’imballaggio, si
contribuirà ad un risparmio di
materie prime e ad una
riduzione del volume degli
scarti industriali e domestici.
The packaging has also
been designed to avoid environmental impact. Packaging material is ecological
and can be re-used or
recycled.
By recycling the packaging,
you will help save raw materials as well as reducing
the bulk of domestic and
industrial waste.
La documentation de cet
appareil est imprimée sur du
papier blanchi, sans chlore
ou sur du papier recyclé, de
façon à contribuer à la
sauvegarde
de
l’environnement.
Les emballages sont conçus
pour ne pas nuire à l’environnement; ils peuvent être
récupérés ou recyclés, car il
s’agit
de
produits
écologiques.
Le fait de recycler l’emballage permet de consommer moins de matières
premières et de réduire le
volume des déchets industriels et domestiques.
DE
ES
NL
PT
UMWELTVERTRÄGLICHKEIT
RESPETO POR EL MEDIO
AMBIENTE
RESPECT VOOR HET
MILIEU
RESPEITO PELO
AMBIENTE
Als Beitrag zum Umweltschutz wurde die Dokumentation dieses Geräts auf
chlorfrei gebleichtes oder
Recycling-Papier gedruckt.
La documentación de este
aparato
utiliza
papel
blanqueado, sin cloro, o
papel reciclado con el fin de
contribuir a la protección del
medio ambiente
De documentatie die bij dit
apparaat hoort is gemaakt
van zonder chloor gebleekt
papier of van recyclingpapier, als bijdrage tot de
milieubescherming
A documentação do presente aparelho utiliza papel
embranquecido, sem cloro,
ou papel reciclado com a
finalidade de contribuir para
a protecção do ambiente
Los embalajes están concebidos para no dañar el medio
ambiente; pueden ser recuperados o reciclados siendo
productos ecológicos. Reciclando el embalaje, se contribuirá a un ahorro de materias primas y a una reducción del volúmen de los desechos industriales y domésticos.
De verpakkingen zijn zo ontwikkeld dat ze het milieu niet
schaden; zij kunnen opnieuw
gebruikt
of
gerecycled
worden, aangezien het om
ecologische producten gaat.
Door de verpakking te recyclen wordt een bijdrage
geleverd aan de besparing
van grondstoffen en aan de
beperking van het volume
industrieel en huisvuil.
As embalagens são concebidas para não poluir o ambiente; podendo ser recuperadas ou recicladas sendo
produtos ecológicos. Reciclando
a
embalagem,
contribuirá a uma poupança
das matérias-primas e a uma
redução do volume dos
refugos industriais e domésticos.
Bei der Verpackung wurde
auf deren Umweltverträglichkeit Wert gelegt; sie kann
gesammelt oder recycelt
werden, da es sich um
umweltschonendes Material
handelt.
Durch Recycling der Verpackung wird zur Reduzierung des Rohstoffverbrauchs und des Volumens
von Industrie- und Hausmüll
beigetragen.
55
La Casa costruttrice declina ogni responsabilità per le possibili inesattezze contenute nel presente
opuscolo, imputabili ad errori di stampa o di trascrizione. Si riserva il diritto di apportare ai propri
prodotti quelle modifiche che ritiene necessarie o utili, senza pregiudicare le caratteristiche essenziali.
The manufacturer declines all responsibility for possible inaccuracies contained in this pamphlet, due
to printing or copying errors. We reserve the right to make on our own products those changes to be
considered necessary or useful, without jeopardizing the essential characteristics.
Dans un souci constant d’amélioration qualitative, le constructeur se réserve la possibilité d’apporter à
ses produits les modifications utiles, sans compromettre ses caractéristiques essentielles.
Le constructeur décline toutes responsabilité pour d’eventuelles inexactitudes contenues dans cette
notice, imputables à des erreurs d’impression ou de transcription.
Die Herstellerfirma übernimmt keinerlei Verantwortung für eventuell in dieser Broschüre enthaltene
Ungenauigkeiten, die auf Druckfehler zurückzuführen sind und behält sich das Recht vor an ihren
Produkten alle für notwendig erachteten Änderungen anzubringen, ohne die wesentlichen
Eigenschaften zu beeinflussen.
El fabricante declina toda responsabilidad por las posibles inexactitudes contenidas en el presente
documento, imputables a errores de impresión o relacionadas. El fabricante se reserva el derecho de
aportar a sus propios productos aquellas modificaciones que se considere necesarias o útiles, sin
perjudicar las características esenciales.
De Fabrikant wijst iedere verantwoordelijkheid af voor enige onjuistheden in deze brochure welke
geweten kunnen worden aan copie - of drukfouten. Hij behoudt zich het recht voor aan zijn eigen
produkten wijzigingen aan te brengen die hij noodzakelijk of nuttig acht zonder dat de wezenlijke
kenmerken erdoor varanderd worden.
O Fabricante não assume nenhuma responsabilidade acerca de eventuais inexactidões contidas na
presente publicação, devidas a erros de impressão ou de transcrição. Reserva-se o direito de efectuar
nos próprios produtos as eventuais modificações que considerar necessárias ou úteis, sem prejudicar
as características essenciais.
B O R E T T I B.V.
N.V. B O R E T T I S. A .
De Dollard 17
Rupelweg 16
1454 AT
2850 Boom
Watergang
T +31(0)20-4363439
T +32(0)3-4508180
F +31(0)20-4361326
F +32(0)3-4586847
S 0900-2352673 (service)
E [email protected]
E info@boret ti.com
Belgium
The Netherlands
Cod. 2.000.36.4
Scaricare