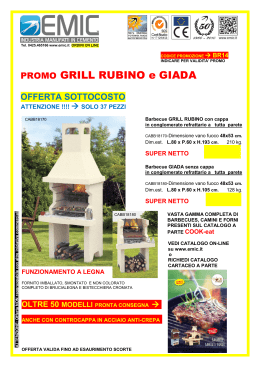
PALAZZETTI
Z577
1104
ISTRUZIONI DI MONTAGGIO
MAXIME
ISTRUZIONI PER UNA CORRETTA INSTALLAZIONE DEL BARBECUE
Il programma Maxime è composto da tutta una serie di elementi componibili da disporre ed aggiungere a piacere:
• MODULO MAXIME GRILL C/FORNO
• MODULO MAXIME LAVELLO
• MODULO MAXIME GAS 4 FUOCHI
• MODULO MAXIME PIANO LAVORO
• MODULO MAXIME ISOLA COTTURA A GAS
• MODULO MAXIME ISOLA LAVORO
• TAVOLO MAXIME COTTURA ELETTRICA
Prima di installare il vostro Barbecue siete pregati di osservare quanto segue:
Per evitare spiacevoli ritorni di fumi, eventuali ostacoli come: alberi, fabbricati, etc… dovranno essere ad almeno 6 metri dall’uscita della canna fumaria.
Quando avrete deciso il luogo più conveniente dove installare il barbecue, preparate un basamento a livello. È consigliabile posizionare il barbecue sopra
un piano rigido, molto ampio costruito in cemento o altro materiale, che con il tempo non provochi cedimenti.
Usate sempre un impasto di cemento normale per il fissaggio degli elementi che non sono sottoposti a tensioni dovute al calore. Per gli elementi in
prossimità del fuoco, come per esempio pareti laterali e di fondo, anelli, cappe, usate un impasto di: cemento refrattario 40%, terra refrattaria 40% e
cemento normale 20%. Per quanto riguarda le basette di cottura del forno, non fissatele mai, bensì appoggiatele ai rispettivi piani e quindi stuccate le
fessure con terra refrattaria, oppure con semplice cenere.
ISTRUZIONI PER UNA CORRETTA INSTALLAZIONE DEL GRILL
Prima di iniziare il montaggio vero e proprio procuratevi i seguenti materiali.
• Cemento normale quanto basta
• Terra refrattaria circa kg. 10
• Cemento refrattario circa kg. 10
• Oppure richiedete un sacchetto di malta refrattaria appositamente preparata per il fissaggio degli elementi del barbecue.
MONTAGGIO (solo) GRILL CON FORNO
Posizionare gli elementi del basamento 1a-1b-1c-1d accostandoli perfettamente uno all’altro e fissandoli con il cemento normale.
Ponete i piani 2a-2b-2g-2f sopra il basamento, come riportato in figura 1. Nel caso che i piani non siano perfettamente a livello, provvedete a
spessorare i basamenti nei punti necessari fino ad ottenere un livellamento ottimale. A questo punto fissatelo usando cemento normale. Il basamento
del modulo forno può essere montato con apertura inferiore, per acconsentire l’inserimento del carrello 6e (optional).
3. Ora siete pronti a montare la pareti 3a-3b-3c, inserendo il portalegna (3i) per avere la corretta posizione delle pareti. Procedete al fissaggio avendo
cura di distribuire in tutti i punti di giunzione un sottile strato di impasto di terra e cemento refrattari.
1.
2.
MONTAGGIO GRILL CON FORNO + LAVELLO E GAS
4. Posizionare gli elementi del basamento 1a-1b-1c-1d accostandoli perfettamente uno all’altro e fissandoli con il cemento normale.
5. Ponete i piani 2a-2b-2c-2e sopra il basamento, come riportato in figura 1. Nel caso che i piani non siano perfettamente a livello, provvedete a
spessorare i basamenti nei punti necessari fino ad ottenere un livellamento ottimale. A questo punto fissatelo usando cemento normale.
6. Ora siete pronti a montare la pareti 3a-3b-3c, inserendo il portalegna (3i) per avere la corretta posizione delle pareti. Procedete al fissaggio avendo
cura di distribuire in tutti i punti di giunzione un sottile strato di impasto di terra e cemento refrattari.
7. Proseguire inserendo gli elementi 2d, 6c,6f come riportato in figura.
MONTAGGIO FORNO
8. Ripassate i fori dentro ai quali vengono inseriti i 2 tiranti 4m.
9. Appoggiate ai piani (2b-2g-2f), senza far uso di malte, tutti gli elementi del forno.
10. Noterete che gli elementi del forno presentano una scanalatura sui bordi, sistemate il cordino in fibra ceramica applicando dei punti di silicone ad alte
11.
12.
13.
14.
15.
temperature (in dotazione). A questo punto unite gli elementi tra loro ed aggiungete o togliete il silicone ove lo riteniate necessario, al fine di coprire
bene i punti di giunzione.
Posizionare sopra il piano (2b) il materassino in fibra ceramica, e successivamente le basette del forno 4g-4h.
Gli elementi del girofumo 4d- 4l verranno fissati con il silicone.
Unite tutti gli elementi con i tiranti 4o. Si raccomanda di stringerli moderatamente. A forno caldo i tiranti si allungano. Evitate in questa fase di stringerli
ulteriormente.
Alla fine fissate il registro fumi 4q in corrispondenza del foro di uscita dei fumi.
Il barattolo contrassegnato dalla scritta “ELASTOGUM” contiene un prodotto elastico idrorepellente e resistente al calore che va applicato con un
pennello su tutte le giunzioni esterne del forno.
MONTAGGIO CAPPA METALLICA
16. Adagiare la cappa metallica 5 sopra le parti cementizie. Fissatela con le viti, sigillandola internamente con silicone rosso (dato in dotazione).
1
PORTINA FORNO IN GHISA
Si tratta di una portina in ghisa con sportello apribile in vetro pirofilo, appositamente studiata per evitare dispersioni di calore e per un utilizzo più razionale
del forno. Per il montaggio fissatela alla struttura cementizia utilizzando le apposite viti in dotazione, avendo cura di stuccare le fessure con silicone ad alte
temperature.
USO DEL GRILL
• Prima di ogni accensione è bene liberare il piano fuoco da eventuali residui di cenere o altro. Per facilitare l’accensione non utilizzare alcool o benzina o
altro prodotto liquido infiammabile, ma usate tavolette accendi-fuoco ecologiche a contenuto resinoso naturale.
• Accendere il fuoco ed attendere almeno 30 minuti prima di iniziare a cucinare. Non iniziare comunque a cucinare fino a che non si formano le braci.
• Per fare fuoco potete utilizzare la legna. Fate attenzione che sia ben secca. Usatene un massimo di 2 chili per volta. Evitate accuratamente di utilizzare
il Barbecue come inceneritore per bruciare scarti foglie o materiali trattati con vernici o altro.
• Le parti in legno dell’imballo, il cartone e la pellicola devono essere portati nei centri locali di riciclaggio materiali.
• Per il fuoco usare sempre legna stagionata, asciutta e ridotta in pezzatura di varie misure.
• Qualora il vostro barbecue sia munito di portalegna, distribuite nella parte inferiore di questo un buono strato di carta, e quindi sopra ad essa un buono
strato di schegge di legno e ramoscelli secchi e piccoli; legna di pezzatura più grande verrà posta sopra i due strati precedenti.
USATE SEMPRE GUANTONI DA FORNO E PRESINE, MENTRE CUCINATE E QUANDO SPOSTATE LA GRIGLIA.
COTTURE SULLA GRIGLIA
Le braci inizieranno a cadere da sole dal portalegna sul piano-fuoco ed andranno distribuite uniformemente sullo stesso; per facilitare la caduta, scuotete
leggermente i tizzoni attraverso le fessure del porta legna, usando l’apposito attrezzo. Fate scivolare la griglia pulita sulle scanalature e lasciatela scaldare
sopra le braci per qualche minuto a questo punto potrete distribuirvi sopra il cibo per la cottura. Se la cottura si dovesse protrarre per un tempo
sufficientemente lungo e le braci non bastassero, continuate ad alimentare il portalegna, avrete sempre un buon serbatoio di braci pronto per l’uso.
COTTURA SU PIETRA BIOPLATT
La cottura su pietra è la più antica del mondo. Ed è anche la più moderna perché è molto versatile e raffinata. Permette di esaltare il sapore degli
ingredienti, di cucinare senza grassi, di preparare piatti altrimenti difficili, di realizzare ricette gustosissime.
La pietra del Bioplatt ha la caratteristica di accumulare il calore e di trattenerlo a lungo, per poi cederlo uniformemente al cibo. Si può cucinare tenendo il
Bioplatt sul fuoco oppure, dopo averlo ben riscaldato appoggiandolo al centro di un robusto tavolo.
COTTURE NEL FORNO
Per la preparazione del fuoco seguite le indicazioni generali, sopra descritte. Fatte fuoco all’interno del forno, nella zona posteriore, tenendo chiusa la
portina.
Quando la temperatura segnalata dal termometro sarà di almeno 200°C. potrete preparare il forno per la cottura. Il tempo necessario al forno a raggiungere
la temperatura desiderata varia a seconda delle dimensioni del forno che avete scelto e del fuoco che avete fatto, in ogni caso questa fase richiederà circa 1
ora. I metodi ed i tempi di cottura variano molto, a seconda di cosa volete cuocere, le istruzioni che ci apprestiamo a darvi sono di carattere generale, e per
la cottura di pizze, pane, focacce, etc…
Appena la temperatura sarà sufficiente e le fiamme saranno spente, aprite il forno e pulite velocemente il piano dello stesso, spostando in un angolino sul
fondo le braci e la cenere residui.
Nel caso vi siano ancora fiamme eccessivamente alte e non possiate attendere oltre, eliminatele togliendo la legna incombusta che le provoca.
Chiudete il registro fumi, per evitare di disperdere il calore del forno.
Spargete farina sul piano di cottura, quindi appoggiate direttamente sopra lo stesso la pizza o il pane da cuocere; nel caso non siate ancora dei cuochi
provetti vi consigliamo di appoggiare il cibo su una normale teglia e di inserire il tutto nel forno stesso.
Dopo aver inserito la pietanza chiudete la portina il più presto possibile.
Potrete controllare la cottura attraverso il vetro; quando il cibo sarà cotto toglietelo dal forno usando gli appositi attrezzi.
La cottura in forno vi darà molte soddisfazioni, e con un minimo di esperienza potrete ottenere ottimi risultati.
COME CONSERVARE IL BARBECUE
•
Se avete comperato un modulo grezzo vi raccomandiamo di verniciarlo al più presto con gli appositi prodotti.
•
Quando il grill è bagnato, per esempio dopo una giornata di pioggia, per accenderlo vi raccomandiamo di fare un fuoco moderato per la prima ora, in
modo che si asciughi, completamente e si evitino così shock termici che potrebbero provocare cavillature sulla struttura.
•
Evitare di sovraccaricare il grill di legna provocando fiammate che escano dalla cappa, e non usatelo come inceneritore per le foglie, l’erba o altri rifiuti
di casa.
•
Non spegnere il fuoco con l’acqua.
•
Consigliamo di coprire il vostro Barbecue durante il periodo invernale.
ATTENZIONE
•
Eventuali cavillature delle strutture costituiscono il normale assestamento degli elementi refrattari e non comportano alterazioni nel funzionamento e
nella durata del barbecue.
•
Conservare il disegno del modello e l’etichetta con il codice a barre, ritagliandola dall’imballo. Vi serviranno per presentare all’azienda eventuali
reclami o ordini di ricambi.
•
Le misure sono indicative e possono subire variazioni.
•
Non lasciate bambini senza sorveglianza in vicinanza delle fiamme.
•
Ricordatevi che il barbecue é una struttura da utilizzare all’esterno; nel caso siate interessati ad un camino da utilizzare all’interno, vi raccomandiamo
di usare un PALEX PALAZZETTI appositamente studiato per tale utilizzo, scegliendo tra la vasta gamma a Vostra disposizione .
•
La ditta non si assume alcuna responsabilità per eventuali errori o inesattezze nel contenuto del presente opuscolo e si riserva il diritto di apportare ai
suoi prodotti, in qualunque momento e senza preavviso modifiche ritenute opportune per qualsiasi esigenza di carattere tecnico o commerciale.
2
GB
BARBECUE ASSEMBLY INSTRUCTIONS
To avoid unpleasant smoke downdrafts, there should be no obstacles, such as trees, buildings, etc., closer than 6 metres from the flue.
After deciding on the most convenient place to install the barbecue, prepare a levelled base for it. The barbecue should be installed on a wide sturdy
concrete base or other material to ensure that there will be no setting of the structure. Use a normal concrete mix to fix the elements which are not subject to
heat stresses. For the elements close to the fire, as for example the side and back walls, rings, hoods, use a mix of 40% refractory cement, 40% fireclay,
and 20% normal cement. Never cement in place the cooking base of the grills and ovens. They should simply rest on the support bases, with the joints filled
with fireclay or simply with ash.
INSTRUCTIONS FOR A PROPER INSTALLATION OF THE BARBECUE
Before starting to assemble the barbecue, you should have the following materials at hand:
• a sufficient quantity of normal cement
• about 10 kg of fireclay
• about 10 kg of refractory cement
Or with specific, ready to use assembly kit PALAZZETTI (optional) fix.
ASSEMBLY (ONLY) GRILL WITH OVEN
1. Position near each other the basement elements (1A -1B - 1C-1D) and fix them with normal cement
2. Level perfectly the support areas of elements (2a-2b-2g-2f) and fix them using normal cement (as shown in picture 1). ATTENTION! Oven base can
be built a bit lower to allow insert of trolley 6E (optional)
3. Insert firewood holder before building elements 3a-3b-3c, in order to have the correct distance between them and fix all element using a mixture of
fireclay and refractory cement.
ASSEMBLY GRILL WITH OVEN + SINK MODULE AND 4-GAS BURNER MODULE
1. Position near each other the basement elements (1A -1B - 1C-1D) and fix them with normal cement
2. Level perfectly the support areas of elements (2a-2b-2g-2f) and fix them using normal cement (as shown in picture 1).
3. Insert firewood holder before building elements 3a-3b-3c, in order to have the correct distance between them and fix all element using a mixture
of fireclay and refractory cement
4. Insert elements 2d-6c-6f as shown in picture
OVEN INSTALLATION INSTRUCTION
5. Go through the holes again into which the 2 stay bolts 4m will be inserted.
6. Put on the woktop (2b-2g-2f), without using any mortar, all the elements of the oven.
7. You will notice that the oven elements have a groove on the sides; place the ceramic fiber cord inside the groove and apply a thin layer of the
heat-resistant silicon supplied over it. Now join the elements together and add or remove silicone where you deem necessary so that the joints
are well covered.
8. Put on the table top (2b), the ceramic fibre mattress, then the parts no. 4g and 4h.
9. The walls no. 4d and 4l have to be fixed with silicon.
10. Join all the elements with the connecting rod (4o). Grasp them moderately. When the oven is hot the connecting rods become longer but in this
phase do not grasp them further on.
11. At the end fix the smoke register (4q) in correspondence of the of the smoke exit hole.
12. A tin marked „Elastogum“ contains an elastic moisture-repellent and heat-resistance product which must be applied to all the external oven joints
with a brush before painting the oven with its final finish.
ASSEMBLY METAL UNDER HOOD
Place metal under hood on cement parts. Fix it with screws and apply red silicon supplied in internal parts.
OVEN’S DOOR MADE OF CAST-IRON
It is a door made from cast-iron including a flap with fire-resistant glass. It has been specially developed to prevent any heat dispersion and to allow a more
rational use of the oven. For its installation, fix it to the cement structure using the proper brass screws and “fisher” which are delivered as standard kit. Take
special care in closing the clearance by using silicon resisting to high temperatures.
FINISHING
• Allow the sealing compounds and the cement mix used in the joints to dry for at least 4 days and prevent the structure from getting wet.
• In the case of barbecues purchased already finished, it is sufficient to retouch the sealing with the colour provided and to let it dry for at least one day.
• In the case of unfinished barbecues, we recommend that you paint it with the proper outdoor wall-paint – available on request – or with equivalent
resilient paint of the quarz rolled type, resistant to sudden changes in temperature.
• These waterproofing treatments are meant to prevent the formation of unsightly cracks due to sudden rises in temperature and to the moisture present
in outdoor constructions.
• Any further covering of insulation over the outer side of the oven will just emphasize the already outstanding performances of the oven itself, mainly
referred to its capacity of keeping the inner hot temperature for long time.
• The above mentioned covering can be effected on the installation place by means of ceramic fibre or rock-fibre, which will have to be then plastered
and varnished.
• If you paint the barbecue with the paint supplied by us, the primer should be allowed to thoroughly. Proceed with a first brushed coat; allow the paint to
dry, then apply a second coat by brush.
• For a classic stippled finish, use a normal paint roller immediately over the brushedon coat of paint. This should only be done during the second paintfinishing phase.
3
HOW TO TAKE CARE OF YOUR BARBECUE
• If you have purchased an unfinished barbecue, we suggest you paint it as soon as possible, using suitable products.
• If the barbecue is used when wet, for example after a rainy day, we suggest burning a slow fire for the first hour to ensure that it dries completely, and
to avoid thermal shocks which could cause cracks in the structure.
• Avoid burning too much wood on the barbecue at the one time. This would cause the flames to flare out of the hood. Do not use your barbecue as an
incinerator for leaves, grass or other household waste.
• The wooden, cardboard and plastic parts of the packaging must be taken to the local recycling centres.
• We recommend you protect your barbecue by covering it during the winter months.
USING YOUR BARBEQUE
•
Before firing your barbecue, the fire slab should always be cleaned of any ash or other residues.
•
Always use well-dried wood chopped into pieces of various sizes.
• Do not use spirit or petrol for lighting or re-lighting! Use only firelighters complying to EN 1860-3!
• Light the fire and wait at least 30 minutes before you start cooking. Do not start cooking until embers have formed.
• You can use firewood to light the fire. It must be perfectly dry. Use no more than 4 to 5 kilos a time.
• If your barbecue is equipped with a wood-holder, spread a good layer of paper on the holder bottom, and cover the paper with chips of wood or dry
tinder. Then place over these larger pieces of wood.
• To make it easier to light the fire, arrange the wood with care to avoid smothering the paper and tinder at the bottom.
ALWAYS USE OVEN GLOVES AND HOLDING PADS WHEN COOKING OR MOVING THE GRILL OR THE SPIT.
COOKING ON THE GRILL
The embers will start to fall on the fire by themselves, forming an even layer. To assist their fall, shake the burning wood with the stirring tool through the
spaces on the wood-holder. Slide the clean grill on the grooves and, after allowing it to heat up over the embers for a few minutes, place the food to be
cooked on it. If the embers are not sufficient to complete cooking, add more wood on the holder to have a steady source of embers ready. If the barbecue is
not equipped with a wood-holder, light up the pre-arranged bundle of wood. When the wood is almost completely burned and the embers are formed, leave
the wood which is still burning on the bottom and spread the embers on the cooking level.
COOKING ON THE STONE BIOPLATT
Cooking on a hot stone is the oldest method known to man. In many ways it is also the most modern method, because it is versatile and refined. The full
flavour of the ingredients is retained, and no fats are needed. Hard to prepare dishes are easy on the Bioplatt, and many delicious recipes can be used.
The stone accumulates heat, which is retained and released slowly to cook the food evenly. The stone can be placed on a burner or pre-heated and placed
in the centre of a strong table.
COOKING ON THE OVEN
To properly prepare the fire follow the general instructions given above.
Light up the fire in the back part of the oven and keep the door closed. Open the combustion air register of the oven’s door.
Heat the oven slowly. Burning a slow fire for the first time (2 kg. of wood) to avoid thermal shocks which could cause cracks in the structure.
The temperature of the oven depends on the fire lighted. In any case it is necessary about 1 hour to reach the right cooking temperature. The temperature is
shown on the black scale of the thermometer. The baking methods, the temperature and times may vary in a widely, depending on the food. The
instructions given apply in general to the baking of pizza, bread, cakes, etc….
As soon as the oven reaches a sufficient temperature and the fire dies down, open the oven and quickly clean the floor by pushing the residual embers and
ashes to a corner. If the flames are still too high and there is no time to wait, eliminate them by removing any still unburnt wood. Close the smokes register
in order to avoid heat dissipation. Sprinkle some flour on the floor of the oven and set the pizza or bread to bake directly on it. If you are still not experienced
with baking food in the oven, we suggest you set the food down on a normal oven tray and place it in the oven. Immediately close the door after placing the
food in the oven. The cooking process can be followed through the inspection port. When the food is baked, remove it from the oven with the suitable
utensils. Oven baking can be a source of great satisfaction, and with a little experience you can achieve excellent results.
ATTENTION
• Cracks appearing in refractory cement, especially if you have used the barbecue a lot, are a normal occurrence and have absolutely no influence on
how the barbecue works.
• Keep the drawing of the model and the label with the bar code, cutting it off the packaging. You will need them if you have any complaints to make or
for ordering spare parts.
• The measurements are indicative and can be modified.
• Do not turn the flames out with water.
• WARNING! Keep children and pets away.
• This barbecue will become very hot, do not move it during operation.
Your barbecue is designed only for outdoor use. If you are interested in a fireplace for indoor use, we recommend the wide range of PALEX
PALAZZETTI fire-places, specifically designed to be used indoor.
The manufacturer is not responsible for any mistakes or inaccuracies contained in this catalogue and is entitled to make any modifications deemed
necessary to meet technical or commercial requirements at any time and without giving prior notice.
4
Scaricare