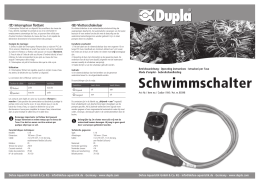
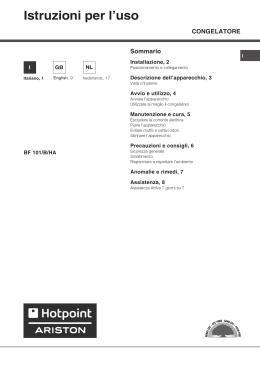
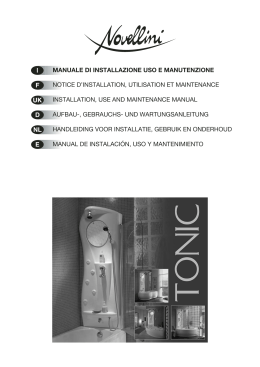
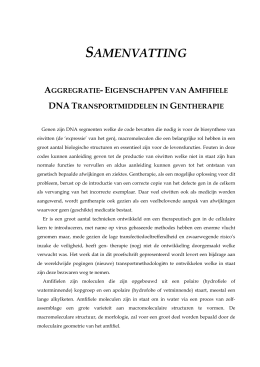
FAVORIT 55040
NL Gebruiksaanwijzing
EN User manual
IT Istruzioni per l’uso
2
19
36
2
www.aeg.com
INHOUD
1.
2.
3.
4.
5.
6.
7.
8.
9.
10.
VEILIGHEIDSVOORSCHRIFTEN . . . . . . . . . . . . . . . . . . . . . . . . . . . . . . . . . . . . . . . . . . . . . . . . 3
BESCHRIJVING VAN HET PRODUCT . . . . . . . . . . . . . . . . . . . . . . . . . . . . . . . . . . . . . . . . . . . 5
BEDIENINGSPANEEL . . . . . . . . . . . . . . . . . . . . . . . . . . . . . . . . . . . . . . . . . . . . . . . . . . . . . . . . 5
PROGRAMMA’S . . . . . . . . . . . . . . . . . . . . . . . . . . . . . . . . . . . . . . . . . . . . . . . . . . . . . . . . . . . . . 6
OPTIES . . . . . . . . . . . . . . . . . . . . . . . . . . . . . . . . . . . . . . . . . . . . . . . . . . . . . . . . . . . . . . . . . . . . 7
VOOR HET EERSTE GEBRUIK . . . . . . . . . . . . . . . . . . . . . . . . . . . . . . . . . . . . . . . . . . . . . . . . . 8
DAGELIJKS GEBRUIK . . . . . . . . . . . . . . . . . . . . . . . . . . . . . . . . . . . . . . . . . . . . . . . . . . . . . . . 11
ONDERHOUD EN REINIGING . . . . . . . . . . . . . . . . . . . . . . . . . . . . . . . . . . . . . . . . . . . . . . . . 13
PROBLEEMOPLOSSING . . . . . . . . . . . . . . . . . . . . . . . . . . . . . . . . . . . . . . . . . . . . . . . . . . . . . 14
TECHNISCHE INFORMATIE . . . . . . . . . . . . . . . . . . . . . . . . . . . . . . . . . . . . . . . . . . . . . . . . . . 18
VOOR PERFECTE RESULTATEN
Bedankt dat u voor dit AEG product heeft gekozen. Dit apparaat is ontworpen om vele jaren
uitstekend te presteren, met innovatieve technologieën die het leven gemakkelijker helpen
maken – functies die gewone apparaten wellicht niet hebben. Neem een paar minuten de tijd
om het door te lezen zodat u er optimaal van kunt profiteren.
Ga naar onze website voor:
Advies over gebruik, brochures, het oplossen van problemen en
onderhoudsinformatie:
www.aeg.com
Registreer uw product voor een betere service:
www.aeg.com/productregistration
Koop accessoires, verbruiksartikelen en originele reserveonderdelen voor uw
apparaat:
www.aeg.com/shop
KLANTENSERVICE
Wij raden altijd het gebruik van originele onderdelen aan.
Zorg er als u contact opneemt met de klantenservice voor dat u de volgende gegevens bij de
hand hebt.
De informatie staat op het typeplaatje. model, productnummer, serienummer.
Waarschuwing - Belangrijke veiligheidsinformatie.
Algemene informatie en tips
Milieu-informatie
Wijzigingen voorbehouden.
NEDERLANDS
1.
3
VEILIGHEIDSVOORSCHRIFTEN
Lees zorgvuldig de meegeleverde instructies voor installatie en gebruik van
het apparaat. De fabrikant is niet verantwoordelijk voor letsel en schade veroorzaakt door een foutieve installatie. Bewaar de instructies van het apparaat
voor toekomstig gebruik.
1.1 Veiligheid van kinderen en
kwetsbare mensen
• Laat het water stromen tot het schoon
is voordat u het apparaat aansluit op
nieuwe leidingen of leidingen die lang
niet zijn gebruikt.
• Zorg dat er geen lekkages zijn als u
het apparaat de eerste keer gebruikt.
• Der Wasserzulaufschlauch verfügt
über ein Sicherheitsventil und eine
Ummantelung mit einem innenliegenden Netzkabel.
WAARSCHUWING!
Gevaar voor verstikking, letsel of
permanente invaliditeit.
• Mensen, met inbegrip van kinderen,
met beperkte lichamelijke, zintuiglijke
of verstandelijke vermogens of gebrek
aan ervaring en kennis, mogen dit apparaat niet bedienen. Zij moeten onder toezicht staan of instructies krijgen
over het gebruik van dit apparaat van
iemand die verantwoordelijk is voor
hun veiligheid. Laat kinderen niet met
het apparaat spelen.
• Houd alle verpakkingsmaterialen uit
de buurt van kinderen.
• Houd alle reinigingsmiddelen uit de
buurt van kinderen.
• Houd kinderen en huisdieren uit de
buurt van het apparaat als de deur
open is.
1.2 Montage
• Verwijder alle verpakkingsmaterialen.
• Installeer en gebruik geen beschadigd
apparaat.
• Installeer of gebruik het apparaat niet
op een plek waar de temperatuur onder de 0 °C komt.
• Volg de installatie-instructies op die
zijn meegeleverd met het apparaat.
• Zorg ervoor dat het apparaat onder en
naast veilige installaties wordt geïnstalleerd.
Aansluiting aan de
waterleiding
• Zorg dat u de waterslangen niet beschadigt.
WAARSCHUWING!
Gefährliche Spannung.
• Ziehen Sie sofort den Netzstecker aus
der Steckdose, wenn der Wasserzulaufschlauch beschädigt ist. Wenden
Sie sich für den Austausch des Wasserzulaufschlauchs an den Kundendienst.
Aansluiting aan het
elektriciteitsnet
WAARSCHUWING!
Gevaar voor brand en elektrische
schokken.
• Dit apparaat moet worden aangesloten op een geaard stopcontact.
• Controleer of de elektrische informatie
op het typeplaatje overeenkomt met
de stroomvoorziening. Zo niet, neem
dan contact op met een elektromonteur.
• Gebruik altijd een correct geïnstalleerd, schokbestendig stopcontact.
• Gebruik geen meerwegstekkers en
verlengsnoeren.
• Zorg dat u de hoofdstekker en kabel
niet beschadigt. Neem contact op met
de service-afdeling of een elektro-
4
www.aeg.com
monteur om een beschadigde hoofdkabel te vervangen.
• Steek de stekker pas in het stopcontact als de installatie is voltooid. Zorg
ervoor dat het netsnoer na installatie
bereikbaar is.
• Trek niet aan het aansluitnoer om het
apparaat los te koppelen. Trek altijd
aan de stekker.
1.3 Gebruik
• Dit apparaat is bedoeld voor huishoudelijk gebruik of gelijksoortige toepassingen zoals:
– Personeelskeukens in winkels, kantoren of andere werkomgevingen
– Boerderijen
– Door gasten in hotels, motels en andere residentiële omgevingen
– Bed-and-breakfast accomodaties.
WAARSCHUWING!
Gevaar voor letsel.
• De specificatie van het apparaat mag
niet worden veranderd.
• Doe messen en bestek met scherpe
punten in het bestekmandje met de
punten omlaag in horizontale positie.
• Laat de deur van het apparaat niet
open staan zonder toezicht om te
voorkomen dat er iemand over struikelt.
• Ga niet op de open deur zitten of
staan.
• Vaatwasmiddel is gevaarlijk. Volg de
veiligheidsinstructies op de verpakking van het vaatwasmiddel op.
• Speel niet met het water van het apparaat en drink het niet op.
• Verwijder de borden pas uit het apparaat als het programma is voltooid. Er
kan vaatwasmiddel op de borden zitten.
WAARSCHUWING!
Gevaar voor elektrische schokken, brand of brandwonden.
• Plaats geen ontvlambare producten of
items die vochtig zijn door ontvlambare producten in, bij of op het apparaat.
• Gebruik geen waterstralen of stoom
om het apparaat te reinigen.
• Het apparaat kan hete stoom laten
ontsnappen als u de deur opent terwijl
er een programma wordt uitgevoerd.
1.4 Verwijdering
WAARSCHUWING!
Gevaar voor letsel of verstikking.
• Haal de stekker uit het stopcontact.
• Snijd het netsnoer van het apparaat af
en gooi dit weg.
• Verwijder de deurgreep om te voorkomen dat kinderen en huisdieren opgesloten raken in het apparaat.
NEDERLANDS
2. BESCHRIJVING VAN HET PRODUCT
1
2
11
10
9
8 7
5
6
4
3
1 Bovenste sproeiarm
7 Glansmiddeldoseerbakje
2 Onderste sproeiarm
3 Filters
8 Afwasmiddeldoseerbakje
4 Typeplaatje
10 Onderrek
5 Zoutreservoir
11 Bovenkorf
9 Bestekmand
6 Waterhardheidsknop
3. BEDIENINGSPANEEL
1
2
A
B
C
3
D
E
5
1 Aan/uit-toets
3 Toets startuitstel
2 Programmakeuzetoetsen
4 Indicatielampjes
4
5
6
www.aeg.com
5 Functietoetsen
Indicatielampjes
Omschrijving
Indicatielampje einde programma.
Zoutindicatielampje. Dit indicatielampje is uit als het programma werkt.
Glansmiddelindicatielampje. Dit indicatielampje is uit als het
programma werkt.
Multitab-indicatielampje.
4. PROGRAMMA’S
Programma1)
2)
3)
4)
5)
6)
Mate van
Programma
vervuiling
fasen
Type lading
Bereidingsduur
(min)
Energie(kWh)
Water
(l)
Sterk bevuild
Serviesgoed, bestek en pannen
Voorspoelen
Afwassen 70 °C
Spoelgangen
Drogen
140-150
1.5-1.7
16-18
Alles
Serviesgoed, bestek en pannen
Voorspoelen
Afwassen 45°C of
70°C
Spoelgangen
Drogen
90-140
1.1-1.8
12-23
Pas bevuild Afwassen 60 °C
Serviesgoed Spoeling
en bestek
30
0.9
9
Normaal
bevuild
Serviesgoed
en bestek
Voorspoelen
Afwassen 50 °C
Spoelgangen
Drogen
155-167
0.99-1.0
4
13-14
Alles
Voorspoelen
12
0.1
4
1) De druk en temperatuur van het water, de variaties in stroomtoevoer, de opties en de
hoeveelheid vaat kunnen de programmaduur en de verbruikswaarden veranderen.
2) Dit programma heeft een spoelfase bij hoge temperatuur voor betere resultaten voor
de hygiëne. Tijdens de spoelfase blijft de temperatuur gedurende 10 tot 14 minuten op
70 °C.
3) Het apparaat detecteert de mate van vervuiling en de hoeveelheid serviesgoed in de
korven. De temperatuur en hoeveelheid water, het energieverbruik en de
programmaduur worden automatisch aangepast.
NEDERLANDS
7
4) Met dit programma kunt u een pas bevuilde lading afwassen. Het biedt goede
afwasresultaten in een kort tijdsbestek.
5) Dit is het standaard programma voor testinstituten. Dit programma biedt het meest
efficiënte water- en energieverbruik voor normaal bevuild serviesgoed en bestek.
6) Gebruik dit programma om het serviesgoed snel te spoelen. Hierdoor kunnen
voedselresten niet aan het serviesgoed vastkoeken en ontstaan er geen vieze geurtjes in
het apparaat.
U hoeft voor dit programma geen afwasmiddel te gebruiken.
Aanwijzingen voor testinstituten
Stuur voor alle benodigde informatie over testprestaties een e-mail naar:
[email protected]
Schrijf het productnummer (PNC) op dat u op het typeplaatje vindt.
5. OPTIES
5.1 Multitab optie
Activeer deze optie alleen als u gecombineerde afwastabletten gebruikt.
Deze optie stopt de stroom van glansmiddel en zout. De bijbehorende indicatielampje gaan uit.
De programmaduur kan stijgen.
De multitabfunctie
inschakelen.
Schakel de multitab-functie in of
uit, voordat u een programma
start. U kunt de functie niet inschakelen of uitschakelen als er
een programma bezig is.
1. Druk op de aan-/uittoets om het apparaat te activeren.
2. Zorg dat het apparaat in de instelmodus staat. Zie ‘HET PROGRAMMA INSTELLEN EN STARTEN'.
3. Druk tegelijkertijd op de functietoetsen (D) en (E) en houd de functietoetsen ingedrukt, totdat het multitab-indicatielampje aan gaat.
De functie blijft aan tot u de
functie uitschakelt. Druk tegelijkertijd op de functietoetsen (D)
en (E) en houd de functietoetsen
ingedrukt, totdat het multitab-indicatielampje uit gaat.
Voer deze stappen uit als u stopt met
het gebruik van alles-in-1-tabeltten en
apart vaatwasmiddel,
glansspoelmiddel en vaatwaszout gaat
gebruiken:
1. Schakel de multitabfunctie uit
2. Stel de waterontharder in op het
hoogste niveau.
3. Zorg ervoor dat het zoutreservoir en
het glansmiddeldoseerbakje vol zijn.
4. Start het kortste programma met een
spoelfase, zonder vaatwasmiddel en
zonder servies.
5. Stel de waterontharder af op de waterhardheid in uw omgeving.
6. Stel de hoeveelheid glansmiddel in.
5.2 Geluidssignalen
De geluidssignalen klinken onder de volgende omstandigheden:
• Het programma is voltooid
• Het niveau van de waterontharder is
elektronisch gewijzigd.
• Er een storing in het apparaat optreedt.
Fabrieksinstelling: Aan.
De geluidssignalen kunnen worden uitgeschakeld.
Hoe schakelt u geluidssignalen uit
1. Druk op de aan-/uittoets om het apparaat te activeren. Zorg ervoor dat
het apparaat in de instelmodus staat,
zie ‘Een programma instellen en starten'.
2. Druk tegelijkertijd op functietoetsen
(B) en (C) en houd deze toetsen inge-
8
www.aeg.com
drukt totdat de indicatielampjes van
functietoetsen (A), (B) en (C) gaan
knipperen.
3. Druk op functietoets (C),
• De indicatielampjes van de functietoetsen (A) en (B) gaan uit.
• Het indicatielampje van functietoets (C) blijft knipperen.
• Het eindlampje gaat branden.
4. Druk op de functietoets (C). Het indicatielampje voor het einde gaat uit
en de geluidssignalen worden uitgeschakeld.
5. Schakel het apparaat uit om de instelling te bevestigen.
Hoe schakelt u geluidssignalen in
1. Zie 'De geluidssignalen uitschakelen',
stap (1) tot en met (3).
2. Druk op functietoets (C),
• De indicatielampjes van de functietoetsen (A) en (B) gaan uit.
• Het indicatielampje van functietoets (C) blijft knipperen.
• Het eindlampje gaat uit.
3. Druk op de functietoets (C). Het eindlampje gaat aan en de geluidssignalen werken.
4. Schakel het apparaat uit om de instelling te bevestigen.
6. VOOR HET EERSTE GEBRUIK
1. Controleer of het ingestelde niveau
van de waterontharder juist is voor
de waterhardheid in uw omgeving.
Als dat niet het geval is, dan stelt u
de waterontharder in. Neem contact
op met uw plaatselijke waterinstantie
voor informatie over de hardheid van
het water in uw omgeving.
2. Het zoutreservoir vullen.
3. Vul het glansmiddeldoseerbakje.
4. Draai de waterkraan open.
5. Er kunnen wasmiddelen in het apparaat achtergebleven zijn. Start een
programma om ze te verwijderen.
Gebruik geen wasmiddel en gebruik
de mandjes niet.
Activeer de multitabfunctie als u
gecombineerde vaatwastabletten gebruikt. Deze tabletten bevatten vaatwasmiddel, glansspoelmiddel en andere middelen. Zorg ervoor dat deze tabletten geschikt zijn voor de waterhardheid in uw omgeving. Zie de
instructies op de verpakking van
de producten.
6.1 De waterontharder
instellen
Hard water bevat een grote hoeveelheid
mineralen die schade aan het apparaat
en slechte schoonmaakresultaten kan
veroorzaken. De waterontharder neutraliseert deze mineralen.
Het vaatwaszout houdt de waterontharder schoon en in goede staat. Zie de tabel om de waterontharder af te stellen
op het juiste niveau. Dit zorgt ervoor dat
de waterontharder de juiste hoeveelheid
regenereerzout en water gebruikt.
U moet de waterontharder handmatig en elektronisch instellen.
NEDERLANDS
9
Waterontharder
afstelling
Waterhardheid
Duits
graden
(°dH)
Nederlands
graden
(°fH)
mmol/l
Clarke
graden
Handmatig
Elektronische
51 - 70
91 - 125
9.1 - 12.5
64 - 88
2 1)
10
43 - 50
76 - 90
7.6 - 9.0
53 - 63
2 1)
9
37 - 42
65 - 75
6.5 - 7.5
46 - 52
21)
8
29 - 36
51 - 64
5.1 - 6.4
36 - 45
21)
7
23 - 28
40 - 50
4.0 - 5.0
28 - 35
21)
6
19 - 22
33 - 39
3.3 - 3.9
23 - 27
21)
51)
15 - 18
26 - 32
2.6 - 3.2
18 - 22
1
4
11 - 14
19 - 25
1.9 - 2.5
13 - 17
1
3
4 - 10
7 - 18
0.7 - 1.8
5 - 12
1
2
<4
<7
< 0.7
<5
12)
12)
1) Fabrieksinstelling.
2) Gebruik geen zout op dit niveau.
Handmatig instellen
Zet de waterhardheidsknop in stand 1 of
2.
Elektronische instelling
1. Druk op de aan-/uittoets om het apparaat te activeren. Zorg ervoor dat
het apparaat in de instelmodus staat,
zie ‘Een programma instellen en starten'.
2. Druk tegelijkertijd op functietoetsen
(B) en (C) en houd deze toetsen ingedrukt totdat de indicatielampjes van
functietoetsen (A), (B) en (C) gaan
knipperen.
3. Druk op functietoets (A).
• De indicatielampjes van de functietoetsen (B) en (C) gaan uit.
• Het indicatielampje van functietoets (A) blijft knipperen.
• Het geluidssignaal klinkt en het het
eindlampje knippert om het niveau
van de waterontharder te tonen.
– Het aantal keer knipperen van
het eindindicatielampje en het
aantal geluidssignalen duiden
het niveau aan van de waterontharder.
Voorbeeld: 5 geluidssignalen en
5 knipperingen + pauze + 5 geluidssignalen en 5 knipperingen
= niveau 5.
4. Druk herhaaldelijk op functietoets (A)
om de instelling te wijzigen. Elke
keer dat u op functietoets (A) drukt,
gaat u naar het volgende niveau.
5. Schakel het apparaat uit om te bevestigen.
10 www.aeg.com
6.2 Het zoutreservoir vullen
LET OP!
Gebruik alleen vaatwaszout. Andere producten kunnen het apparaat beschadigen.
Water en zout kunnen uit het
zoutreservoir stromen als u het
bijvult. Gevaar voor roest. Start
om dit te voorkomen een programma nadat u het zoutreservoir heeft bijgevuld.
1.
2.
3.
4.
5.
Draai de dop linksom om het zoutreservoir te openen.
Doe een liter water in het zoutreservoir (alleen de eerste keer).
Vul het zoutreservoir met zout voor
afwasautomaten.
Verwijder het zout rond de opening
van het zoutreservoir.
Draai de dop rechtsom om het zoutreservoir te sluiten.
6.3 Het glansmiddeldoseerbakje vullen
A D
LET OP!
Gebruik alleen glansspoelmiddel
voor afwasautomaten. Andere
producten kunnen het apparaat
beschadigen.
B
Het glansspoelmiddel helpt om
tijdens de laatste spoelfase het
servies te drogen zonder strepen
en vlekken.
C
1.
Druk op de ontgrendelknop (D) om
de deksel (C) te openen.
2. Vul het glansmiddeldoseerbakje (A)
niet verder dan de aanduiding 'max'.
3. Verwijder gemorst glansmiddel met
een absorberend doekje om te voorkomen dat er te veel schuim ontstaat.
4. Sluit de deksel. Zorg ervoor dat het
ontgrendelknopje op zijn plaats
dichtklikt.
B
A
M AX
4
3 2
1
+
-
C
D
U kunt het schuifje voor de vrij te
geven hoeveelheid (B) instellen
tussen stand 1 (laagste hoeveelheid) en stand 4 of 6 (hoogste
hoeveelheid).
NEDERLANDS
11
7. DAGELIJKS GEBRUIK
1. Draai de waterkraan open.
2. Druk op de aan-/uittoets om het apparaat te activeren. Zorg dat het apparaat in de instelmodus staat. Zie
‘EEN PROGRAMMA INSTELLEN EN
STARTEN'.
• Vul het zoutreservoir als het zoutindicatielampje brandt.
• Vul het glansmiddeldoseerbakje
als het indicatielampje van het
glansmiddel brandt.
3. Ruim de rekken in.
4. Voeg vaatwasmiddel toe.
5. U dient het juiste programma in te
stellen en te starten voor het type lading en de mate van vervuiling.
7.1 De rekken inruimen
Zie de meegeleverde folder voor
voorbeelden voor het inruimen
van de rekken.
• Gebruik het apparaat alleen om voorwerpen af te wassen die vaatwasbestendig zijn.
• Doe geen voorwerpen in het apparaat
die gemaakt zijn van hout, hoorn, aluminium, tin en koper.
• Plaats geen voorwerpen in het apparaat die water kunnen absorberen
(sponzen, keukenhanddoeken).
• Verwijder alle voedselresten van de
voorwerpen.
• Maak aangebrande voedselresten op
de voorwerpen zachter.
• Plaats holle voorwerpen (bijv. kopjes,
glazen en pannen) met de opening
naar beneden.
• Zorg ervoor dat serviesgoed en bestek niet in elkaar liggen. Meng lepels
met ander bestek.
• Zorg er voor dat glazen andere glazen
niet aanraken
• Leg kleine voorwerpen in de bestekmand.
• Leg lichte voorwerpen in het bovenrek. Zorg ervoor dat de voorwerpen
niet verschuiven.
• Zorg er voor dat de sproeiarmen vrij
kunnen ronddraaien voordat u een
programma start.
7.2 Vaatwasmiddel gebruiken
Gebruik niet meer dan de juiste
hoeveelheid vaatwasmiddel. Zie
de instructies van de vaatwasmiddelfabrikant.
Vaatwastabletten lossen niet helemaal op bij korte programma's
en er blijven resten van het vaatwasmiddel achter op het servies.
Wij raden aan dat u vaatwastabletten gebruikt bij lange programma's.
12 www.aeg.com
LET OP!
Gebruik alleen wasmiddel voor
afwasautomaten.
D A B
1.
30
20
2.
3.
C
A
B
4.
D
5.
30
20
+
32
-
1
4
MAX
Druk op de ontgrendelknop (B) om
de deksel (C) te openen.
Doe de vaatwastablet in het doseerbakje (A) .
Als het programma over een voorspoelfase beschikt, plaats dan een
kleine dosis afwasmiddel in doseerbakje (D).
Als u vaatwasmiddeltabletten gebruikt, plaatst u deze in het doseerbakje (A).
Sluit de deksel. Zorg ervoor dat het
ontgrendelknopje op zijn plaats
dichtklikt.
C
7.3 Een programma instellen
en starten
4. Sluit de deur van het apparaat. Het
programma wordt gestart.
Instelmodus
Een programma starten met
een uitgestelde start
Het apparaat moet in de instelmodus
staan om bepaalde acties te accepteren.
Het apparaat staat in de instelmodus als
na activatie alle programmalampjes aan
zijn.
Als het bedieningspaneel andere instellingen toont, houd dan de functietoetsen (B) en (C) tegelijkertijd ingedrukt tot
het apparaat in instelmodus staat.
Een programma starten
zonder een uitgestelde start
1. Draai de waterkraan open.
2. Druk op de aan-/uittoets om het apparaat te activeren. Zorg dat het apparaat in de instelmodus staat.
3. Druk op de toets van het programma
dat u wilt instellen.
• Het bijbehorende programmalampje blijft branden.
• Alle andere programmalampjes
gaan uit.
1. Stel het programma in.
2. Blijf op de toets startuitstel drukken
tot het aantal uur wordt weergegeven dat u wilt instellen. U kunt 3 of 6
uur instellen.
• Het controlelampje startuitstel
gaat branden.
3. Sluit de deur van het apparaat. Het
aftellen start. Als het aftelproces voltooid is, wordt het programma gestart.
De deur openen als het
apparaat in werking is
Als u de deur opent, stopt het apparaat.
Als u de deur weer sluit, gaat het apparaat verder vanaf het punt van onderbreking.
NEDERLANDS
De uitgestelde start annuleren
13
Aan het einde van het
programma.
Druk tegelijkertijd op functietoetsen (B)
en (C) en houd de functietoetsen ingedrukt tot het controlelampje uitgestelde
start uit gaat en alle programmatoets-indicatielampjes aan gaan.
Wanneer het programma is voltooid,
klinkt er met tussenpozen een geluidssignaal en wordt het indicatielampje einde op het display weergegeven.
1. Druk op de aan/uit-toets om het apparaat te deactiveren.
2. Draai de waterkraan dicht.
Als u een uitgestelde start annuleert, gaat het apparaat terug
naar de instelmodus. U moet het
programma opnieuw instellen.
• Laat de borden afkoelen voordat u deze uit het apparaat
neemt. Hete borden zijn gevoelig voor beschadigingen.
• Ruim eerst het onderrek en
dan het bovenrek uit.
• Er kan water liggen aan de zijkanten en op de deur van het
apparaat. Roestvrij staal koelt
sneller af dan borden.
Het programma annuleren
Druk tegelijkertijd op functietoetsen (B)
en (C) en houd de functietoetsen ingedrukt, totdat alle programmatoets-indicatielampjes aan gaan.
Controleer of er afwasmiddel in
het afwasmiddeldoseerbakje
aanwezig is voordat u een nieuw
programma start.
8. ONDERHOUD EN REINIGING
WAARSCHUWING!
Schakel het apparaat uit en trek
de stekker uit het stopcontact
voordat u onderhoudshandelingen verricht.
Vuile filters en verstopte sproeiarmen verminderen de wasresultaten.
Controleer regelmatig de filters
en reinig deze zo nodig.
8.1 De filters reinigen
1.
C
B
A
Draai het filter (A) linksom en verwijder het.
14 www.aeg.com
2.
A1
3.
4.
5.
A2
6.
7.
Haal om het filter (A) te demonteren, (A1) en (A2) uit elkaar.
Verwijder het filter (B).
Reinig de filters met water.
Zorg er voordat u het filter (B) terugplaatst voor dat er geen etensresten
of vuil in en rond de rand van de opvangbak zit.
Zorg ervoor dat het filter (B) juist
wordt geplaatst onder de 2 geleiders (C).
Monteer het filter (A) en zet het terug in filter (B). Rechtsom draaien
tot het vastzit.
Een onjuiste plaatsing van de filters kan leiden tot slechte wasresultaten en het apparaat beschadigen.
8.2 De sproeiarmen reinigen
8.3 Buitenkant reinigen
Probeer niet de sproeiarmen te verwijderen.
Als etensresten de openingen in de
sproeiarmen hebben verstopt, verwijder
deze dan met een smal en puntig voorwerp.
Maak het apparaat schoon met een
vochtige, zachte doek.
Gebruik alleen neutrale schoonmaakmiddelen. Gebruik geen schuurmiddelen, schuursponsjes of oplosmiddelen.
9. PROBLEEMOPLOSSING
Het apparaat start of stopt niet tijdens
de werking.
Raadpleeg voordat u contact opneemt
met de service-afdeling, de informatie
die volgt voor oplossing van het probleem.
Bij sommige problemen knipperen bepaalde lampjes continu en/of met tussenpozen en wordt er tegelijkertijd
een alarmcode weergegeven.
Foutcode
Probleem
• Het lampje van het ingestelde programma knippert continu.
• Het eindlampje knippert 1 keer onderbroken.
Het apparaat wordt niet met water gevuld.
• Het lampje van het ingestelde programma knippert continu.
• Het eindlampje knippert 2 keer onderbroken.
Het apparaat pompt geen water af.
NEDERLANDS
Foutcode
Probleem
• Het lampje van het ingestelde programma knippert continu.
• Het eindlampje knippert 3 keer onderbroken.
Anti-overstromingsbeveiliging is aan.
15
WAARSCHUWING!
Schakel het apparaat uit voordat
u controles uitvoert.
Probleem
Mogelijke oorzaak
Mogelijke oplossing
Het programma
start niet.
De stekker zit niet in het
stopcontact.
Sluit de stekker aan.
De deur van het apparaat
is open.
Sluit de deur van het apparaat.
De zekering in de zekering- Vervang de zekering.
kast is doorgebrand.
Het apparaat wordt
niet met water gevuld.
Het apparaat
pompt geen water
weg.
Startuitstel is ingesteld.
Annuleer de uitgestelde
start of wacht tot het einde
van het aftellen.
De waterkraan is gesloten.
Draai de waterkraan open.
De waterdruk is te laag.
Neem contact op met het
waterleidingbedrijf.
De waterkraan is verstopt
of aangezet met kalkaanslag.
Maak de waterkraan
schoon.
Het filter in de watertoevoerslang is verstopt.
Maak de filter schoon.
De watertoevoerslang is
geknikt of gebogen.
Zorg ervoor dat de positie
van de slang correct is.
Het beschermingssysteem
tegen lekkage is aan. Er
zijn waterlekkages in het
apparaat.
Draai de waterkraan dicht
en neem contact op met de
service-afdeling.
De gootsteenafvoer is geblokkeerd.
Ontstop de gootsteenafvoer.
De waterafvoerslang is geknikt of gebogen.
Zorg ervoor dat de positie
van de slang correct is.
Schakel het apparaat na de controles in.
Het programma gaat verder vanaf het
punt waar het werd onderbroken.
Als het probleem opnieuw optreedt,
neemt u contact op met onze service-afdeling.
Als de display andere alarmcodes aangeeft, neemt u contact op met onze service-afdeling.
16 www.aeg.com
9.1 De was- en droogresultaten zijn niet naar tevredenheid
Storing
Mogelijke oorzaak
Mogelijke oplossing
De borden zijn niet
schoon.
De filters zijn verstopt.
Reinig de filters.
De filters zijn niet juist gemonteerd en geplaatst.
Zorg ervoor dat de filters
juist zijn gemonteerd en geinstalleerd.
De sproeiarmen zijn verstopt.
Verder het vuil met een
dun, puntig voorwerp.
Het programma is niet geschikt voor het type lading
en de mate van vervuiling.
Zorg ervoor dat het programma geschikt is voor het
type lading en mate van
vervuiling.
Onjuiste positie van de
items in de mandjes. Water kan niet alle items afwassen.
Zorg ervoor dat de positie
van de items in de rekken
juist is en dat het water eenvoudig alle items kan afwassen.
De sproeiarmen konden
niet vrij draaien.
Zorg ervoor dat de positie
van de items in de rekken
juist is en dat de sproeiarmen niet worden geblokkeerd.
Er is te weinig of geen afwasmiddel gebruikt.
Zorg ervoor dat u de juiste
hoeveelheid vaatwasmiddel
gebruikt in het doseerbakje
voordat u een programma
start.
Er zit geen vaatwasmiddel
in het doseerbakje.
Zorg ervoor dat er vaatwasmiddel in het doseerbakje
zit voordat u een programma start.
Het zoutreservoir is leeg.
Zorg ervoor dat er vaatwaszout in het zoutreservoir zit.
Het ingestelde niveau van
de waterontharder is onjuist.
Controleer of het ingestelde niveau van de waterontharder juist is voor de waterhardheid in uw omgeving.
De dop van het zoutreservoir zit los.
Draai de dop vast.
De vrijgegeven hoeveelheid glansmiddel is te
hoog.
Stel de hoeveelheid glansmiddel lager in.
.
Er zitten kalkresten
op de borden.
Witte strepen of
vlekken of een
blauwe waas op
glazen en serviesgoed.
NEDERLANDS
Storing
Mogelijke oorzaak
17
Mogelijke oplossing
Er is te veel vaatwasmiddel Zorg ervoor dat u de juiste
gebruikt.
hoeveelheid vaatwasmiddel
gebruikt in het doseerbakje
voordat u een programma
start.
Opgedroogde waterdruppels op de
glazen en de borden.
De vrijgegeven hoeveelheid glansmiddel is te
laag.
Stel de hoeveelheid glansmiddel hoger in.
De kwaliteit van het vaatwasmiddel kan de oorzaak
zijn.
Probeer een ander merk
vaatwasmiddel.
Het serviesgoed is
nat.
Het programma had geen
droogfase.
Een programma instellen
met droogfase.
Het serviesgoed is
nat en mat.
Het glansmiddeldoseerbakje is leeg.
Zorg ervoor dat er glansspoelmiddel in het glansmiddeldoseerbakje zit.
De kwaliteit van het glans- Probeer een ander merk
middel kan de oorzaak zijn. glansmiddel.
De kwaliteit van de gecombineerde vaatwastabletten kan de oorzaak
zijn.
9.2 Het inschakelen van het
glansmiddeldoseerbakje
Het glansmiddeldoseerbakje kan alleen
worden geactiveerd als de multitabfunctie is ingeschakeld.
1. Druk op de aan-/uittoets om het apparaat te activeren. Zorg ervoor dat
het apparaat in de instelmodus staat,
zie ‘Een programma instellen en starten'.
2. Druk tegelijkertijd op functietoetsen
(B) en (C) en houd deze toetsen ingedrukt totdat de indicatielampjes van
functietoetsen (A), (B) en (C) gaan
knipperen.
• Probeer een ander merk
gecombineerde vaatwastabletten.
• Activeer de glansmiddeldosering en gebruik het
glansmiddel samen met
de gecombineerde vaatwastabletten.
3. Druk op functie-toets (B).
• De indicatielampjes van de functietoetsen (A) en (C) gaan uit.
• Het indicatielampje van functietoets (B) blijft knipperen.
• Het eindlampje gaat uit.
4. Druk op functie-toets (B).
• Het eindlampje gaat branden. Het
glansmiddeldoseerbakje is aan.
5. Schakel het apparaat uit om de instelling te bevestigen.
6. Stel de hoeveelheid glansmiddel in.
7. Vul het glansmiddeldoseerbakje.
18 www.aeg.com
10. TECHNISCHE INFORMATIE
Afmeting
Breedte / hoogte / diepte
(mm)
Aansluiting op het
elektriciteitsnet
Zie het typeplaatje.
Voltage
596 / 818-898 / 555
220-240 V
Tijd
50 Hz
Waterdruk
Min. / max. (bar / MPa)
(0.5 / 0.05 ) / (8 / 0.8 )
Watertoevoer 1)
Koud water of warm water2)
Vermogen
Couverts
Energieverbruik
Modus aan
0.99 W
Modus uit
0.10 W
max. 60 °C
12
1) Sluit de slang aan op een kraan met 3/4”-schroefdraad.
2) Als het hete water door alternatieve, milieuvriendelijkere energiebronnen geproduceerd
wordt (bijv. zonnepanelen en windenergie), gebruik dan een heetwatervoorziening om
het energieverbruik te verminderen.
11. MILIEUBESCHERMING
Recycle de materialen met het
symbool . Gooi de verpakking in
een geschikte verzamelcontainer om
het te recyclen.
Help om het milieu en de
volksgezondheid te beschermen en
recycle het afval van elektrische en
elektronische apparaten. Gooi
apparaten gemarkeerd met het
symbool niet weg met het
huishoudelijk afval. Breng het
product naar het milieustation bij u
in de buurt of neem contact op met
de gemeente.
ENGLISH
19
CONTENTS
1.
2.
3.
4.
5.
6.
7.
8.
9.
10.
SAFETY INSTRUCTIONS . . . . . . . . . . . . . . . . . . . . . . . . . . . . . . . . . . . . . . . . . . . . . . . . . . . . .
PRODUCT DESCRIPTION . . . . . . . . . . . . . . . . . . . . . . . . . . . . . . . . . . . . . . . . . . . . . . . . . . . .
CONTROL PANEL . . . . . . . . . . . . . . . . . . . . . . . . . . . . . . . . . . . . . . . . . . . . . . . . . . . . . . . . . .
PROGRAMMES . . . . . . . . . . . . . . . . . . . . . . . . . . . . . . . . . . . . . . . . . . . . . . . . . . . . . . . . . . . .
OPTIONS . . . . . . . . . . . . . . . . . . . . . . . . . . . . . . . . . . . . . . . . . . . . . . . . . . . . . . . . . . . . . . . . .
BEFORE FIRST USE . . . . . . . . . . . . . . . . . . . . . . . . . . . . . . . . . . . . . . . . . . . . . . . . . . . . . . . . .
DAILY USE . . . . . . . . . . . . . . . . . . . . . . . . . . . . . . . . . . . . . . . . . . . . . . . . . . . . . . . . . . . . . . . .
CARE AND CLEANING . . . . . . . . . . . . . . . . . . . . . . . . . . . . . . . . . . . . . . . . . . . . . . . . . . . . . .
TROUBLESHOOTING . . . . . . . . . . . . . . . . . . . . . . . . . . . . . . . . . . . . . . . . . . . . . . . . . . . . . . .
TECHNICAL INFORMATION . . . . . . . . . . . . . . . . . . . . . . . . . . . . . . . . . . . . . . . . . . . . . . . . .
20
22
22
23
24
25
28
30
31
34
FOR PERFECT RESULTS
Thank you for choosing this AEG product. We have created it to give you impeccable
performance for many years, with innovative technologies that help make life simpler –
features you might not find on ordinary appliances. Please spend a few minutes reading to get
the very best from it.
Visit our website for:
Get usage advice, brochures, trouble shooter, service information:
www.aeg.com
Register your product for better service:
www.aeg.com/productregistration
Buy Accessories, Consumables and Original spare parts for your appliance:
www.aeg.com/shop
CUSTOMER CARE AND SERVICE
We recommend the use of original spare parts.
When contacting Service, ensure that you have the following data available.
The information can be found on the rating plate. Model, PNC, Serial Number.
Warning / Caution-Safety information
General information and tips
Environmental information
Subject to change without notice.
20 www.aeg.com
1.
SAFETY INSTRUCTIONS
Before the installation and use of the appliance, carefully read the supplied instructions. The manufacturer is not responsible if an incorrect installation and
use causes injuries and damages. Always
keep the instructions with the appliance
for future reference.
• The first time you use the appliance,
make sure that there is no leakage.
• The water inlet hose has a safety valve
and a sheath with an inner mains cable.
1.1 Children and vulnerable
people safety
WARNING!
Risk of suffocation, injury or permanent disability.
• Do not let persons, children included,
with reduced physical sensory, reduced mental functions or lack of experience and knowledge use the appliance. They must have supervision or
instruction for the operation of the appliance by a person who is responsible
for their safety. Do not let children
play with the appliance.
• Keep all packaging away from children.
• Keep all detergents away from children.
• Keep children and pets away from the
appliance door when it is open.
1.2 Installation
• Remove all the packaging.
• Do not install or use a damaged appliance.
• Do not install or use the appliance
where the temperature is less than 0
°C.
• Obey the installation instruction supplied with the appliance.
• Make sure that the appliance is installed below and adjacent to safe structures.
Water connection
• Make sure not to cause damage to the
water hoses.
• Before you connect the appliance to
new pipes or pipes not used for a long
time, let the water flow until it is clean.
WARNING!
Dangerous voltage.
• If the water inlet hose is damaged, immediately disconnect the mains plug
from the mains socket. Contact the
service to replace the water inlet hose.
Electrical connection
WARNING!
Risk of fire and electrical shock.
• The appliance must be earthed.
• Make sure that the electrical information on the rating plate agrees with
the power supply. If not, contact an
electrician.
• Always use a correctly installed shockproof socket.
• Do not use multi-plug adapters and
extension cables.
• Make sure not to cause damage to the
mains plug and to the mains cable.
Contact the Service or an electrician to
change a damaged mains cable.
• Connect the mains plug to the mains
socket only at the end of the installation. Make sure that there is access to
the mains plug after the installation.
• Do not pull the mains cable to disconnect the appliance. Always pull the
mains plug.
ENGLISH
1.3 Use
• This appliance is intended to be used
in household and similar applications
such as:
– Staff kitchen areas in shops, offices
and other working environments
– Farm houses
– By clients in hotels, motels and other residential type environments
– Bed and breakfast type environments.
WARNING!
Risk of injury.
• Do not change the specification of this
appliance.
• Put knives and cutlery with sharp
points in the cutlery basket with the
points down or in a horizontal position.
• Do not keep the appliance door open
without supervision to prevent to fall
on it.
• Do not sit or stand on the open door.
• Dishwasher detergents are dangerous.
Obey the safety instructions on the
detergent packaging.
• Do not drink and play with the water in
the appliance.
21
• Do not remove the dishes from the
appliance until the programme is
completed. There can be detergent
on the dishes.
WARNING!
Risk of electrical shock, fire or
burns.
• Do not put flammable products or
items that are wet with flammable
products in, near or on the appliance.
• Do not use water spray and steam to
clean the appliance.
• The appliance can release hot steam if
you open the door while a programme
operates.
1.4 Disposal
WARNING!
Risk of injury or suffocation.
• Disconnect the appliance from the
mains supply.
• Cut off the mains cable and dispose of
it.
• Remove the door catch to prevent
children and pets to get closed in the
appliance.
22 www.aeg.com
2. PRODUCT DESCRIPTION
1
2
11
10
9
8 7
5
6
4
3
1 Upper spray arm
7 Rinse aid dispenser
2 Lower spray arm
3 Filters
8 Detergent dispenser
4 Rating plate
10 Lower basket
5 Salt container
11 Upper basket
9 Cutlery basket
6 Water hardness dial
3. CONTROL PANEL
1
2
A
B
C
3
D
E
5
1 On/off button
3 Delay button
2 Programme buttons
4 Indicators
4
ENGLISH
23
5 Function buttons
Indicators
Description
End indicator.
Salt indicator. This indicator is off while the programme operates.
Rinse aid indicator. This indicator is off while the programme
operates.
Multitab indicator.
4. PROGRAMMES
Programme1)
2)
3)
4)
5)
6)
Degree of
soil
Type of
load
Programme
phases
Duration
(min)
Energy
(kWh)
Water
(l)
Heavy soil
Crockery,
cutlery, pots
and pans
Prewash
Wash 70 °C
Rinses
Dry
140-150
1.5-1.7
16-18
All
Crockery,
cutlery, pots
and pans
Prewash
Wash 45 °C or 70
°C
Rinses
Dry
90-140
1.1-1.8
12-23
Fresh soil
Crockery
and cutlery
Wash 60 °C
Rinse
30
0.9
9
Normal soil
Crockery
and cutlery
Prewash
Wash 50 °C
Rinses
Dry
155-167
0.99-1.0
4
13-14
All
Prewash
12
0.1
4
1) The pressure and the temperature of the water, the variations of the mains supply, the
options and the quantity of dishes can change the programme duration and the
consumption values.
2) This programme has a high temperature rinsing phase for better hygiene results. During
the rinsing phase, the temperature stays at 70 °C for 10 to 14 minutes.
3) The appliance senses the degree of soil and the quantity of items in the baskets. It
automatically adjusts the temperature and quantity of the water, the energy
consumption and the programme duration.
4) With this programme you can wash a load with fresh soil. It gives good washing results
in a short time.
24 www.aeg.com
5) This is the standard programme for test institutes. With this programme you have the
most efficient use of water and energy consumption for crockery and cutlery with normal
soil.
6) Use this programme to quickly rinse the dishes. This prevents the remaining food to
bond on the dishes and bad odours to come out from the appliance.
Do not use detergent with this programme.
Information for test institutes
For all the necessary information for test performance. send an email to:
[email protected]
Write down the product number (PNC) that is on the rating plate.
5. OPTIONS
5.1 Multitab option
Activate this option only when you use
the combi detergent tablets.
This option deactivates the flow of rinse
aid and salt. The related indicators are
off.
The programme duration can increase.
Activating the multitab
function
Activate or deactivate the multitab function before the start of a
programme. You cannot activate
or deactivate this function while a
programme operates.
1. Press the on/off button to activate
the appliance.
2. Make sure that the appliance is in
setting mode. Refer to ‘SETTING
AND STARTING A PROGRAMME'.
3. Press and hold function buttons (D)
and (E) at the same time until the
multitab indicator comes on.
The function stays on until you
deactivate it. Press and hold
function buttons (D) and (E) at
the same time until the multitab
indicator goes off.
If you stop to use the combi
detergent tablets, before you start to
use separately detergent, rinse aid
and dishwasher salt, do these steps:
1. Deactivate the multitab function.
2. Set the water softener to the highest
level.
3. Make sure that the salt container and
the rinse aid dispenser are full.
4. Start the shortest programme with a
rinsing phase, without detergent and
without dishes.
5. Adjust the water softener to the water hardness in your area.
6. Adjust the released quantity of rinse
aid.
5.2 Acoustic signals
The acoustic signals operate in these
conditions:
• The programme is completed.
• The level of the water softener is adjusted electronically.
• The appliance has a malfunction.
Factory setting: On.
It is possible to deactivate the
acoustic signals.
How to deactivate the acoustic signals
1. Press the on/off button to activate
the appliance. Make sure that the appliance is in setting mode, refer to
‘Setting and starting a programme’.
2. Press and hold function buttons (B)
and (C) at the same time until the indicators of function buttons (A), (B)
and (C) start to flash.
3. Press function button (C),
• The indicators of function buttons
(A) and (B) go off.
• The indicator of function button (C)
continues to flash.
• The end indicator comes on.
ENGLISH
4. Press function button (C). The end indicator goes off, the acoustic signals
are deactivated.
5. Deactivate the appliance to confirm
the setting.
How to activate the acoustic signals
1. Refer to ‘How to deactivate the
acoustic signals’, step (1) through (3).
2. Press function button (C),
• The indicators of function buttons
(A) and (B) go off.
25
• The indicator of function button (C)
continues to flash.
• The end indicator is off.
3. Press function button (C). The end indicator comes on, the acoustic signals are active.
4. Deactivate the appliance to confirm
the setting.
6. BEFORE FIRST USE
1. Make sure that the set level of the
water softener agrees with the water
hardness in your area. If not, adjust
the water softener. Contact your local
water authority to know the water
hardness in your area.
2. Fill the salt container.
3. Fill the rinse aid dispenser.
4. Open the water tap.
5. Processing residues can stay in the
appliance. Start a programme to remove them. Do not use detergent
and do not load the baskets.
6.1 Adjusting the water
softener
Hard water contains a high quantity of
minerals that can cause damage to the
appliance and bad washing results. The
water softener neutralises these minerals.
The dishwasher salt keeps the water
softener clean and in good conditions.
Refer to the table to adjust the water
softener to the right level. It makes sure
that the water softener uses the correct
quantity of dishwasher salt and water.
If you use the combi detergent
tablets, activate the multitab
function. These tablets contain
detergent, rinse aid and other
added agents. Be sure that these
tablets are applicable to the water hardness in your area. Refer
to the instructions on the packaging of the products.
You must adjust the water softener manually and electronically.
Water softener
adjustment
Water hardness
German
degrees
(°dH)
French
degrees
(°fH)
mmol/l
Clarke
degrees
Manual
Electronic
51 - 70
91 - 125
9.1 - 12.5
64 - 88
2 1)
10
43 - 50
76 - 90
7.6 - 9.0
53 - 63
2 1)
9
37 - 42
65 - 75
6.5 - 7.5
46 - 52
21)
8
29 - 36
51 - 64
5.1 - 6.4
36 - 45
21)
7
23 - 28
40 - 50
4.0 - 5.0
28 - 35
21)
6
26 www.aeg.com
Water softener
adjustment
Water hardness
German
degrees
(°dH)
French
degrees
(°fH)
mmol/l
Clarke
degrees
Manual
Electronic
19 - 22
33 - 39
3.3 - 3.9
23 - 27
21)
51)
15 - 18
26 - 32
2.6 - 3.2
18 - 22
1
4
11 - 14
19 - 25
1.9 - 2.5
13 - 17
1
3
4 - 10
7 - 18
0.7 - 1.8
5 - 12
1
2
<4
<7
< 0.7
<5
12)
12)
1) Factory position.
2) Do not use salt at this level.
Manual adjustment
Turn the water hardness dial to the position 1 or 2.
Electronic adjustment
1. Press the on/off button to activate
the appliance. Make sure that the appliance is in setting mode, refer to
‘Setting and starting a programme’.
2. Press and hold function buttons (B)
and (C) at the same time until the indicators of function buttons (A), (B)
and (C) start to flash.
3. Press function button (A).
• The indicators of function buttons
(B) and (C) go off.
• The indicator of function button (A)
continues to flash.
• Intermittent acoustic signals operate and the end indicator flashes
showing the current setting of the
water softener.
– The number of flashes of the
end indicator and the number of
the acoustic signals show the
level of the water softener.
E.g. 5 acoustic signals and 5
flashes + pause + 5 acoustic signals and 5 flashes = level 5.
4. Press function button (A) again and
again to change the setting. Each
time you press function button (A)
you go to the next level.
5. Deactivate the appliance to confirm
the setting.
ENGLISH
27
6.2 Filling the salt container
CAUTION!
Only use dishwasher salt. Other
products can cause damage to
the appliance.
Water and salt can come out
from the salt container when you
fill it. Risk of corrosion. To prevent it, after you fill the salt container, start a programme.
1.
2.
3.
4.
5.
Turn the cap counterclockwise and
open the salt container.
Put 1 litre of water in the salt container (only for the first time).
Fill the salt container with dishwasher salt.
Remove the salt around the opening
of the salt container.
Turn the cap clockwise to close the
salt container.
6.3 Filling the rinse aid dispenser
A D
CAUTION!
Only use rinse aid for dishwashers. Other products can cause
damage to the appliance.
B
The rinse aid, during the last rinsing phase, helps to dry the
dishes without streaks and stains.
C
B
A
M AX
4
3 2
1
+
Press the release button (D) to open
the lid (C).
2. Fill the rinse aid dispenser (A), no
more than the mark 'max'.
3. Remove the spilled rinse aid with an
absorbent cloth to prevent too much
foam.
4. Close the lid. Make sure that the release button locks into position.
1.
-
C
D
You can turn the selector of the
released quantity (B) between
position 1 (lowest quantity) and
position 4 or 6 (highest quantity).
28 www.aeg.com
7. DAILY USE
1. Open the water tap.
2. Press the on/off button to activate
the appliance. Make sure that the appliance is in setting mode. Refer
to ’SETTING AND STARTING A PROGRAMME’.
• If the salt indicator is on, fill the salt
container.
• If the rinse aid indicator is on, fill
the rinse aid dispenser.
3. Load the baskets.
4. Add the detergent.
5. Set and start the correct programme
for the type of load and soil.
7.1 Loading the baskets
Refer to the supplied leaflet with
examples of the load of the baskets.
• Only use the appliance to wash items
that are dishwasher-safe.
• Do not put in the appliance items
made of wood, horn, aluminium, pewter and copper.
• Do not put in the appliance items that
can absorb water (sponges, household
cloths).
• Remove remaining food from the
items.
• Make soft the remaining burned food
on the items.
• Put hollow items (cups, glasses and
pans) with the opening down.
• Make sure that cutlery and dishes do
not bond together. Mix spoons with
other cutlery.
• Make sure that glasses do not touch
other glasses.
• Put small items in the cutlery basket.
• Put light items in the upper basket.
Make sure that the items do not move.
• Make sure that the spray arms can
move freely before you start a programme.
7.2 Using the detergent
Do not use more than the correct
quantity of detergent. Refer to
the instructions on the detergent
packaging.
Detergent tablets do not fully
dissolve with short programmes
and detergent residues can stay
on the dishes.
We recommend that you use detergent tablets with long programmes.
ENGLISH
CAUTION!
Use only detergents for dishwashers.
D A B
1.
30
20
2.
3.
C
4.
A
30
B
29
D
5.
Press the release button (B) to open
the lid (C).
Put the detergent in the compartment (A) .
If the programme has a prewash
phase, put a small quantity of detergent in the compartment (D).
If you use detergent tablets, put the
tablet in the compartment (A).
Close the lid. Make sure that the release button locks into position.
20
32
-
1
4
MAX
+
C
7.3 Setting and starting a
programme
4. Close the appliance door. The programme starts.
Setting mode
Starting a programme with
delay start
The appliance must be in setting mode
to accept some operations.
The appliance is in setting mode when,
after the activation, all the programme
indicators come on.
If the control panel shows other conditions, press and hold function buttons
(B) and (C) at the same time until the appliance is in setting mode.
Starting a programme without
delay start
1. Open the water tap.
2. Press the on/off button to activate
the appliance. Make sure that the appliance is in setting mode.
3. Press the button of the programme
you want to set.
• The related programme indicator
stays on.
• All the other programme indicators
go off.
1. Set the programme.
2. Press the delay button again and
again until the indicator of the number of hours you want to set comes
on. You can set 3 or 6 hours.
• The delay indicator comes on.
3. Close the appliance door. The countdown starts. When the countdown is
completed, the programme starts.
Opening the door while the
appliance operates
If you open the door, the appliance
stops. When you close the door, the appliance continues from the point of interruption.
Cancelling the delay start
Press and hold function buttons (B) and
(C) at the same time until the delay indi-
30 www.aeg.com
cator goes off and all the programme indicators come on.
When you cancel a delay start,
the appliance goes back to setting mode. You have to set the
programme again.
1. Press the on/off button to deactivate
the appliance.
2. Close the water tap.
• Let the dishes become cold
before you remove them from
the appliance. Hot dishes can
be easily damaged.
• First remove the items from
the lower basket, then from
the upper basket.
• There can be water on the
sides and on the door of the
appliance. Stainless steel becomes cool more quickly than
the dishes.
Cancelling the programme
Press and hold function buttons (B) and
(C) at the same time until all the programme indicators come on.
Make sure that there is detergent
in the detergent dispenser before you start a new programme.
At the end of the programme
When the programme is completed, an
intermittent acoustic signal operates and
the end indicator comes on.
8. CARE AND CLEANING
WARNING!
Before maintenance, deactivate
the appliance and disconnect the
mains plug from the mains socket.
Dirty filters and clogged spray
arms decrease the washing results.
Make a check regularly and, if
necessary, clean them.
8.1 Cleaning the filters
1.
Turn the filter (A) counterclockwise
and remove it.
2.
To disassemble the filter (A), pull
apart (A1) and (A2).
Remove the filter (B).
Wash the filters with water.
Before you put the filter (B) back,
make sure that there are no residues
of food or soil in or around the edge
of the sump.
C
A
B
A1
A2
3.
4.
5.
ENGLISH
6.
7.
31
Make sure that the filter (B) is correctly positioned under the 2 guides
(C).
Assemble the filter (A) and put it
back in filter (B). Turn it clockwise
until it locks.
An incorrect position of the filters
can cause bad washing results
and damage to the appliance.
8.2 Cleaning the spray arms
Do not remove the spray arms.
If the holes in the spray arms are clogged, remove remaining parts of soil with
a thin pointed object.
Only use neutral detergents. Do not use
abrasive products, abrasive cleaning
pads or solvents.
8.3 External cleaning
Clean the appliance with a moist soft
cloth.
9. TROUBLESHOOTING
The appliance does not start or it stops
during operation.
Before you contact the Service, refer to
the information that follows for a solution to the problem.
With some problems, different indicators flash continuously or intermittently at the same time to show an alarm
code.
Alarm code
Problem
• The indicator of the set programme
flashes continuously.
• The end indicator flashes 1 time intermittently.
The appliance does not fill with water.
• The indicator of the set programme The appliance does not drain the waflashes continuously.
ter.
• The end indicator flashes 2 times intermittently.
• The indicator of the set programme The anti-flood device is on.
flashes continuously.
• The end indicator flashes 3 times intermittently.
WARNING!
Deactivate the appliance before
you do the checks.
Problem
Possible cause
The programme
does not start.
The mains plug is not con- Connect the mains plug.
nected in the mains socket.
Possible solution
32 www.aeg.com
Problem
The appliance does
not fill with water.
Possible cause
Possible solution
The appliance door is
open.
Close the appliance door.
The fuse in the fuse box is
damaged.
Replace the fuse.
The delay start is set.
Cancel the delay start or
wait for the end of the
countdown.
The water tap is closed.
Open the water tap.
The water pressure is too
low.
Contact your local water
authority.
The water tap is clogged or Clean the water tap.
there is limescale on it.
The filter in the water inlet
hose is clogged.
Clean the filter.
The water inlet hose has a
kink or a bend.
Make sure that the position
of the hose is correct.
The anti-flood device is on. Close the water tap and
There are water leakages in contact the Service.
the appliance.
The appliance does
not drain the water.
The sink spigot is clogged.
Clean the sink spigot.
The water drain hose has a
kink or a bend.
Make sure that the position
of the hose is correct.
After the checks are completed, activate
the appliance. The programme continues from the point of interruption.
If the problem occurs again, contact the
Service.
If the display shows other alarm codes,
contact the Service.
9.1 The washing results and drying results are not satisfactory
Problem
Possible cause
Possible solution
The dishes are not
clean.
The filters are clogged.
Clean the filters.
The filters are not correctly
assembled and installed.
Make sure that the filters
are correctly assembled and
installed.
The spray arms are clogged.
Remove remaining soil with
a thin pointed object.
The programme was not
applicable for the type of
load and soil.
Make sure that the programme is applicable for
the type of load and soil.
ENGLISH
Problem
Possible cause
33
Possible solution
Incorrect position of the
Make sure that the position
items in the baskets. Water of the items in the baskets is
could not wash all items.
correct and that the water
can easily wash all items.
Limescale particles
on the dishes.
The spray arms could not
turn freely.
Make sure that the position
of the items in the baskets is
correct and does not cause
the blockage of the spray
arms.
The quantity of detergent
was not sufficient.
Make sure that you add the
correct quantity of detergent in the dispenser before you start a programme.
There was no detergent in
the detergent dispenser.
Make sure that you add detergent in the dispenser before you start a programme.
The salt container is empty.
Make sure that there is dishwasher salt in the salt container.
The set level of the water
softener is incorrect.
Make sure that the set level
of the water softener agrees
with the water hardness in
your area.
The cap of the salt contain- Tighten the cap.
er is loose.
Whitish streaks and
stains or bluish layers on glasses and
dishes.
The released quantity of
rinse aid is too much.
Decrease the released
quantity of rinse aid
.
The quantity of detergent
was too much.
Make sure that you add the
correct quantity of detergent in the dispenser before you start a programme.
The released quantity of
rinse aid was not sufficient .
Increase the released quantity of rinse aid.
The quality of the detergent can be the cause.
Try a different brand of detergent.
The dishes are wet.
The programme had no
drying phase.
Set a programme with the
drying phase.
The dishes are wet
and matt.
The rinse aid dispenser is
empty.
Make sure that there is rinse
aid in the rinse aid dispenser.
The quality of the rinse aid
can be the cause.
Try a different brand of
rinse aid.
Dry water drop
stains on glasses
and dishes.
34 www.aeg.com
Problem
Possible cause
Possible solution
The quality of the combi
detergent tablets can be
the cause.
• Try a different brand of
combi detergent tablets.
• Activate the rinse aid dispenser and use the rinse
aid together with the
combi detergent tablets.
9.2 How to activate the rinse
aid dispenser
The activation of the rinse aid dispenser
can occur only with the multitab option
activated.
1. Press the on/off button to activate
the appliance. Make sure that the appliance is in setting mode, refer to
‘Setting and starting a programme'.
2. Press and hold function buttons (B)
and (C) at the same time until the indicators of function buttons (A), (B)
and (C) start to flash.
3. Press function button (B).
4.
5.
6.
7.
• The indicators of function buttons
(A) and (C) go off.
• The indicator of function button (B)
continues to flash.
• The end indicator is off.
Press function button (B).
• The end indicator comes on. The
rinse aid dispenser is active.
Deactivate the appliance to confirm
the setting.
Adjust the released quantity of rinse
aid.
Fill the rinse aid dispenser.
10. TECHNICAL INFORMATION
Dimensions
Width / Height / Depth
(mm)
Electrical connection
Refer to the rating plate.
Voltage
Frequency
596 / 818-898 / 555
220-240 V
50 Hz
Water supply pressure
Min. / max. (bar / MPa)
Water supply 1)
Cold water or hot water2)
(0.5 / 0.05 ) / (8 / 0.8 )
Capacity
Place settings
12
Power consumption
Left-on mode
0.99 W
Off-mode
0.10 W
max. 60 °C
1) Connect the water inlet hose to a water tap with a 3/4'' thread.
2) If the hot water comes from alternative sources of energy, (e.g. solar panels, aeolian
energy), use the hot water supply to decrease energy consumption.
ENGLISH
11. ENVIRONMENT CONCERNS
Recycle the materials with the
symbol . Put the packaging in
applicable containers to recycle it.
Help protect the environment and
human health and to recycle waste
of electrical and electronic
appliances. Do not dispose
appliances marked with the symbol
with the household waste. Return the
product to your local recycling
facility or contact your municipal
office.
35
36 www.aeg.com
INDICE
1.
2.
3.
4.
5.
6.
7.
8.
9.
10.
ISTRUZIONI DI SICUREZZA . . . . . . . . . . . . . . . . . . . . . . . . . . . . . . . . . . . . . . . . . . . . . . . . . . .
DESCRIZIONE DEL PRODOTTO . . . . . . . . . . . . . . . . . . . . . . . . . . . . . . . . . . . . . . . . . . . . . .
PANNELLO DEI COMANDI . . . . . . . . . . . . . . . . . . . . . . . . . . . . . . . . . . . . . . . . . . . . . . . . . .
PROGRAMMI . . . . . . . . . . . . . . . . . . . . . . . . . . . . . . . . . . . . . . . . . . . . . . . . . . . . . . . . . . . . . .
OPZIONI . . . . . . . . . . . . . . . . . . . . . . . . . . . . . . . . . . . . . . . . . . . . . . . . . . . . . . . . . . . . . . . . . .
PREPARAZIONE AL PRIMO UTILIZZO . . . . . . . . . . . . . . . . . . . . . . . . . . . . . . . . . . . . . . . . . .
UTILIZZO QUOTIDIANO . . . . . . . . . . . . . . . . . . . . . . . . . . . . . . . . . . . . . . . . . . . . . . . . . . . . .
PULIZIA E CURA . . . . . . . . . . . . . . . . . . . . . . . . . . . . . . . . . . . . . . . . . . . . . . . . . . . . . . . . . . . .
RISOLUZIONE DEI PROBLEMI . . . . . . . . . . . . . . . . . . . . . . . . . . . . . . . . . . . . . . . . . . . . . . . .
DATI TECNICI . . . . . . . . . . . . . . . . . . . . . . . . . . . . . . . . . . . . . . . . . . . . . . . . . . . . . . . . . . . . .
37
39
39
40
41
42
45
48
49
52
PER RISULTATI PERFETTI
Grazie per aver scelto di acquistare questo prodotto AEG. Lo abbiamo creato per fornirvi
prestazioni impeccabili per molti anni, grazie a tecnologie innovative che vi semplificheranno
la vita - funzioni che non troverete sui normali elettrodomestici. Vi invitiamo di dedicare
qualche minuto alla lettura per sapere come trarre il massimo dal vostro elettrodomestico.
Visitate il nostro sito web per:
ricevere consigli, scaricare i nostri opuscoli, eliminare eventuali anomalie, ottenere
informazioni sull'assistenza.
www.aeg.com
registrare il vostro prodotto e ricevere un servizio migliore:
www.aeg.com/productregistration
acquistare accessori, materiali di consumo e ricambi originali per la vostra
apparecchiatura:
www.aeg.com/shop
SERVIZIO CLIENTI E MANUTENZIONE
Consigliamo sempre l’impiego di ricambi originali.
Quando si contatta l'Assistenza, accertarsi di disporre dei seguenti dati.
Le informazioni si trovano sulla targhetta di identificazione. Modello, numero dell'apparecchio
(PNC), numero di serie.
Avvertenza / Attenzione - Importanti Informazioni di Sicurezza
Informazioni e consigli generali
Informazioni in materia di sicurezza ambientale
Con riserva di modifiche.
ITALIANO
1.
37
ISTRUZIONI DI SICUREZZA
Leggere attentamente le istruzioni fornite prima di installare e utilizzare l'apparecchiatura. Il produttore non è responsabile se un'installazione ed un uso non
corretto dell'apparecchiatura provocano
lesioni e danni. Tenere sempre le istruzioni a portata di mano in caso di necessità durante l'utilizzo.
1.1 Sicurezza dei bambini e
delle persone vulnerabili
AVVERTENZA!
Rischio di soffocamento, lesioni o
invalidità permanente.
• Non permettere alle persone, compresi i bambini, con capacità fisiche,
sensoriali o mentali ridotte, o con
mancanza di esperienza e conoscenza
di utilizzare l'apparecchiatura, a meno
che tale utilizzo non avvenga sotto la
supervisione o la guida di una persona
responsabile della loro sicurezza. Non
consentire ai bambini di giocare con
l'apparecchiatura.
• Tenere i materiali di imballaggio fuori
dalla portata dei bambini.
• Tenere i detersivi fuori dalla portata
dei bambini.
• Tenere i bambini e gli animali domestici lontano dalla porta dell'apparecchiatura quando è aperta.
1.2 Installazione
• Rimuovere tutti i materiali di imballaggio.
• Non installare e utilizzare l'apparecchiatura se è danneggiata.
• Non collocare o usare l’apparecchiatura in un luogo in cui la temperatura
possa scendere al di sotto di 0°C.
• Osservare le istruzioni per l'installazione fornite con l'apparecchiatura.
• Assicurarsi che l'apparecchiatura sia
installata sotto e vicino a parti adeguatamente ancorate a una struttura fissa.
Collegamento dell’acqua
• Accertarsi di non danneggiare i tubi di
carico e scarico dell'acqua.
• Prima di collegare l’apparecchiatura a
tubazioni nuove o non utilizzate per un
lungo periodo, far scorrere l’acqua finché non è limpida.
• La prima volta che si usa l’apparecchiatura, accertarsi che non vi siano
perdite.
• Il tubo di carico dell'acqua dispone di
una valvola di sicurezza e una guaina
con un cavo elettrico interno.
AVVERTENZA!
Pericolo di tensione.
• Se il tubo di carico è danneggiato,
scollegare immediatamente la spina
dalla presa elettrica. Contattare il Centro di Assistenza per sostituire il tubo
di carico dell’acqua.
Collegamento elettrico
AVVERTENZA!
Rischio di incendio e scossa elettrica.
• L'apparecchiatura deve disporre di
una messa a terra.
• Verificare che i dati elettrici riportati
sulla targhetta del modello corrispondano a quelli dell'impianto. In caso
contrario, contattare un elettricista.
• Utilizzare sempre una presa antishock
elettrico correttamente installata.
• Non utilizzare prese multiple e prolunghe.
• Accertarsi di non danneggiare la spina
e il cavo di alimentazione. Contattare
il Centro di Assistenza o un elettricista
38 www.aeg.com
qualificato per sostituire un cavo danneggiato.
• Inserire la spina di alimentazione nella
presa solo al termine dell'installazione.
Verificare che la spina di alimentazione rimanga accessibile dopo l'installazione.
• Non tirare il cavo di alimentazione per
scollegare l’apparecchiatura. Tirare solo la spina.
1.3 Uso dell’apparecchiatura
• L'apparecchiatura è destinata all'uso
domestico e applicazioni simili, come:
– Cucine di negozi, uffici e altri ambienti di lavoro
– Fattorie
– Clienti di hotel, motel e altri ambienti residenziali
– Bed and breakfast.
AVVERTENZA!
Rischio di lesioni.
• Non apportare modifiche alle specifiche di questa apparecchiatura.
• Sistemare i coltelli e le posate appuntite nel cestello portaposate con
l’estremità rivolta verso il basso o in
posizione orizzontale.
• Non tenere la porta dell’apparecchiatura aperta senza supervisione per evitare di caderci.
• Non sedersi o salire sulla porta aperta.
• I detersivi per la lavastoviglie sono pericolosi. Osservare le istruzioni di sicu-
rezza riportate sulla confezione del detersivo.
• Non bere o giocare con l’acqua all’interno dell’apparecchiatura.
• Non rimuovere i piatti dall'apparecchiatura fino al completamento del
programma. Potrebbe rimanere del
detersivo sulle stoviglie.
AVVERTENZA!
Rischio di scossa elettrica, incendio o ustioni.
• Non appoggiare o tenere liquidi o
materiali infiammabili, né oggetti facilmente incendiabili sull'apparecchiatura, al suo interno o nelle immediate vicinanze.
• Non usare acqua spray né vapore per
pulire l'apparecchiatura.
• L'apparecchiatura può rilasciare vapore caldo se si apre la porta durante lo
svolgimento del programma.
1.4 Smaltimento
AVVERTENZA!
Rischio di lesioni o soffocamento.
• Staccare la spina dall'alimentazione
elettrica.
• Tagliare il cavo di alimentazione e
smaltirlo.
• Rimuovere il blocco porta per evitare
che bambini e animali domestici rimangano chiusi all’interno dell’apparecchiatura.
ITALIANO
2. DESCRIZIONE DEL PRODOTTO
1
2
11
10
9
8 7
5
6
4
3
1 Mulinello superiore
7 Contenitore del brillantante
2 Mulinello inferiore
3 Filtri
8 Contenitore del detersivo
4 Targhetta dati
10 Cestello inferiore
5 Contenitore del sale
11 Cestello superiore
9 Cestello portaposate
6 Selettore della durezza dell'acqua
3. PANNELLO DEI COMANDI
1
2
A
B
C
3
D
4
E
5
1 Tasto on/off
3 Tasto Partenza ritardata
2 Tasti programmi
4 Spie
39
40 www.aeg.com
5 Tasti funzione
Spie
Descrizione
Spia di fine.
Spia del sale. La spia è spenta durante l'esecuzione del programma.
Spia del brillantante. La spia è spenta durante l'esecuzione del
programma.
Spia della funzione Multitab.
4. PROGRAMMI
Programma1)
2)
3)
4)
5)
6)
Grado di
Programma
sporco
fasi
Tipo di carico
Durata
(min)
Energia
(kWh)
Umidità
(l)
Sporco intenso
Stoviglie miste, posate
e pentole
Ammollo
Lavaggio 70°C
Risciacqui
Asciugatura
140-150
1.5-1.7
16-18
Tutto
Stoviglie miste, posate
e pentole
Ammollo
Lavaggio 45°C o
70°C
Risciacqui
Asciugatura
90-140
1.1-1.8
12-23
Sporco fresco
Stoviglie e
posate
Lavaggio 60°C
Risciacquo
30
0.9
9
Grado di
sporco normale
Stoviglie e
posate
Ammollo
Lavaggio 50°C
Risciacqui
Asciugatura
155-167
0.99-1.0
4
13-14
Tutto
Ammollo
12
0.1
4
1) I valori di consumo e di durata possono variare a seconda della pressione e della
temperatura dell'acqua, delle variazioni dell'alimentazione elettrica, delle opzioni
selezionate e della quantità di stoviglie.
2) Questo programma prevede una fase di risciacquo ad alta temperatura per garantire
migliori risultati igienici. Durante la fase di risciacquo, la temperatura viene mantenuta a
70°C per 10 - 14 minuti.
3) L'apparecchiatura rileva il grado di sporco e la quantità di stoviglie presenti nei cestelli.
Regola automaticamente la temperatura e quantità dell'acqua, il consumo di elettricità e
la durata del programma.
ITALIANO
41
4) Con questo programma è possibile lavare un carico di stoviglie con sporco fresco.
Garantisce buoni risultati di lavaggio in breve tempo.
5) Programma standard per gli istituti di prova. Questo programma consente un utilizzo
più efficiente di acqua ed elettricità per lavare stoviglie e posate con grado di sporco
normale.
6) Utilizzare questo programma per un risciacquo veloce delle stoviglie. Ciò evita la
formazione di cattivi odori all'interno dell'apparecchiatura.
Non utilizzare il detersivo con questo programma.
Informazioni per gli istituti di prova
Per le informazioni necessarie, relative alle prestazioni inviare una mail a:
[email protected]
Riportare il numero del prodotto (PNC) che si trova sulla targhetta dei dati.
5. OPZIONI
5.1 Opzione Multitab
Attivare questa opzione solo se si utilizza
il detersivo in pastiglie multifunzione.
Questa opzione disattiva l'erogazione di
brillantante e sale. Le rispettive spie sono disattivate.
La durata del programma può aumentare.
Disattivazione della funzione
Multitab
Attivare o disattivare la funzione
Multitab prima di avviare un programma. Non è possibile attivare
o disattivare questa funzione
mentre è in corso un programma.
1. Premere il tasto On/Off per accendere l’apparecchiatura.
2. Verificare che l'apparecchiatura sia in
modalità impostazione. Fare riferimento a "IMPOSTAZIONE ED AVVIO
DI UN PROGRAMMA".
3. Premere e tenere premuti contemporaneamente i tasti funzione (D) e (E)
fino a quando la spia della funzione
Multitab si accende.
La funzione resta attiva finché
non la si disattiva. Premere e tenere premuti contemporaneamente i tasti funzione (D) e (E) fino a quando la spia della funzione Multitab si spegne.
Se si decide di non utilizzare più il
detersivo in pastiglie multifunzione,
prima di utilizzare detersivo,
brillantante e sale per lavastoviglie
separati, procedere come segue:
1. Disattivare la funzione Multitab.
2. Impostare il decalcificatore dell'acqua sul livello più alto.
3. Assicurarsi che il contenitore del sale
e del brillantante siano pieni.
4. Avviare il programma più breve con
una fase di risciacquo, senza detersivo e senza stoviglie.
5. Regolare il decalcificatore dell’acqua
in base alla durezza dell'acqua locale.
6. Regolare il dosaggio del brillantante.
5.2 Segnali acustici
I segnali acustici entrano in funzione in
queste condizioni:
• Al termine del programma di lavaggio.
• Il livello del decalcificatore dell'acqua
è regolato elettronicamente.
• Se l'apparecchiatura presenta un problema.
Impostazione dalla fabbrica: On.
È possibile disattivare i segnali
acustici.
Disattivazione dei segnali acustici
1. Premere il tasto On/Off per accendere l’apparecchiatura. Verificare che
l'apparecchiatura sia in modalità im-
42 www.aeg.com
2.
3.
4.
5.
postazione, fare riferimento al capitolo 'Impostazione ed avvio di un programma'.
Premere e tenere premuti contemporaneamente i tasti funzione (B) e (C)
fino a quando le spie dei tasti funzione (A), (B) e (C) lampeggiano.
Premere il tasto funzione (C).
• Le spie dei tasti funzione (A) e (B) si
spengono.
• La spia del tasto funzione (C) continua a lampeggiare.
• La spia di fine si accende.
Premere il tasto funzione (C). La spia
di fine si spegne, i segnali acustici sono disattivati.
Spegnere l'apparecchiatura per confermare l'impostazione.
Attivazione dei segnali acustici
1. Consultare la sezione "Disattivazione
dei segnali acustici", eseguire i punti
da (1) a (3).
2. Premere il tasto funzione (C),
• Le spie dei tasti funzione (A) e (B) si
spengono.
• La spia del tasto funzione (C) continua a lampeggiare.
• La spia di fine è spenta.
3. Premere il tasto funzione (C). La spia
di fine si accende, i segnali acustici
sono attivati.
4. Spegnere l'apparecchiatura per confermare l'impostazione.
6. PREPARAZIONE AL PRIMO UTILIZZO
1. Accertarsi che il livello del decalcificatore dell'acqua preimpostato dalla
fabbrica sia conforme alla durezza
dell'acqua locale. In caso contrario,
regolare il decalcificatore dell'acqua.
Contattare l'ente locale di erogazione idrica per conoscere la durezza locale dell'acqua.
2. Riempire il contenitore del sale.
3. Riempire il contenitore del brillantante.
4. Aprire il rubinetto dell’acqua.
5. Potrebbero rimanere dei residui di lavorazione all'interno dell'apparecchiatura. Avviare un programma per
eliminarli. Non utilizzare il detersivo e
non caricare stoviglie.
Se si utilizza del detersivo in pastiglie multifunzione, attivare la
funzione Multitab. Queste pastiglie contengono agenti che incorporano le funzioni di detersivo, brillantante e sale. Assicurarsi
che le pastiglie scelte siano adeguate alla la durezza dell'acqua
locale. Fare riferimento alle indicazioni riportate sulla confezione
dei prodotti.
6.1 Regolare il decalcificatore
dell’acqua
L'acqua dura contiene un'elevata quantità di minerali che possono causare danni
all’apparecchiatura e risultati di lavaggio
scadenti. Il decalcificatore dell’acqua
neutralizza tali minerali.
Il sale per lavastoviglie mantiene il decalcificatore dell’acqua pulito e in buone
condizioni. Fare riferimento alla tabella
per regolare il decalcificatore dell’acqua
sul livello corretto. Ciò assicura che il decalcificatore dell’acqua utilizzi l’esatta
quantità di sale per lavastoviglie.
Il decalcificatore dell’acqua deve
essere regolato manualmente ed
elettronicamente.
ITALIANO
43
Regolazione
del decalcificatore
dell'acqua
Durezza dell'acqua
Gradi
tedeschi
(°dH)
Gradi
francesi
(°fH)
mmol/l
Gradi
Clarke
Manuale
Elettronica
51 - 70
91 - 125
9.1 - 12.5
64 - 88
2 1)
10
43 - 50
76 - 90
7.6 - 9.0
53 - 63
2 1)
9
37 - 42
65 - 75
6.5 - 7.5
46 - 52
21)
8
29 - 36
51 - 64
5.1 - 6.4
36 - 45
21)
7
23 - 28
40 - 50
4.0 - 5.0
28 - 35
21)
6
19 - 22
33 - 39
3.3 - 3.9
23 - 27
21)
51)
15 - 18
26 - 32
2.6 - 3.2
18 - 22
1
4
11 - 14
19 - 25
1.9 - 2.5
13 - 17
1
3
4 - 10
7 - 18
0.7 - 1.8
5 - 12
1
2
<4
<7
< 0.7
<5
12)
12)
1) Impostazione di fabbrica.
2) Non utilizzare il sale a questo livello.
Impostazione manuale
Ruotare il selettore della durezza dell'acqua nella posizione 1 o 2.
Impostazione elettronica
1. Premere il tasto On/Off per accendere l’apparecchiatura. Verificare che
l'apparecchiatura sia in modalità impostazione, fare riferimento al capitolo 'Impostazione ed avvio di un programma'.
2. Premere e tenere premuti contemporaneamente i tasti funzione (B) e (C)
fino a quando le spie dei tasti funzione (A), (B) e (C) lampeggiano.
3. Premere il tasto funzione (A).
• Le spie dei tasti funzione (B) e (C) si
spengono.
• La spia del tasto funzione (A) continua a lampeggiare.
• Vengono emessi segnali acustici
intermittenti e la spia di fine lampeggia per indicare l'impostazione
corrente del decalcificatore dell'acqua.
– Il numero di lampeggiamenti
della spia di fine e quello dei segnali acustici indica il livello del
decalcificatore dell'acqua.
Ad es. 5 segnali acustici e 5 lampeggiamenti + pausa + 5 segnali
acustici e 5 lampeggiamenti = livello 5.
4. Premere ripetutamente il tasto funzione (A) per modificare l'impostazione. Ogni volta che si preme il tasto
44 www.aeg.com
funzione (A) si passa al livello successivo.
5. Spegnere l'apparecchiatura per confermare l'impostazione.
6.2 Riempire il contenitore del sale
ATTENZIONE
Utilizzare solo sale per lavastoviglie. Altri prodotti potrebbero
danneggiare l'apparecchiatura.
Acqua e sale possono fuoriuscire
dal contenitore del sale durante
il riempimento. Rischio di corrosione. Per evitarla, avviare un
programma dopo aver riempito il
contenitore del sale.
1.
2.
3.
4.
5.
Ruotare il tappo in senso antiorario e
aprire il contenitore del sale.
Versare 1 litro d’acqua nel contenitore del sale (solo la prima volta).
Riempire il contenitore del sale.
Togliere l'eventuale sale rimasto attorno all'apertura del contenitore.
Riavvitare il tappo in senso orario
per chiudere il contenitore del sale.
ITALIANO
45
6.3 Riempire il contenitore del brillantante
A D
ATTENZIONE
Utilizzare solo prodotti brillantanti specifici per lavastoviglie. Altri
prodotti potrebbero danneggiare l'apparecchiatura.
B
Durante l’ultima fase di risciacquo, il brillantante favorisce l'asciugatura delle stoviglie senza
striature e macchie.
C
1.
B
A
M AX
4
3 2
1
+
-
C
D
Premere il pulsante di sgancio (D)
per aprire il coperchio (C).
2. Riempire il contenitore del brillantante (A) non oltre il segno di
“max.”.
3. Rimuovere l'eventuale brillantante
fuoriuscito con un panno assorbente, per evitare che si formi troppa
schiuma.
4. Chiudere il coperchio. Assicurarsi
che il pulsante di sgancio si blocchi
in posizione.
È possibile ruotare il selettore
del dosaggio (B) tra la posizione
1 (quantità minima) e la posizione
4 o 6 (quantità massima) a seconda della versione.
7. UTILIZZO QUOTIDIANO
1. Aprire il rubinetto dell’acqua.
2. Premere il tasto on/off per accendere
l’apparecchiatura. Verificare che l'apparecchiatura sia in modalità impostazione. Fare riferimento a “IMPOSTAZIONE ED AVVIO DI UN PROGRAMMA”.
• Se la spia del sale è accesa, riempire il contenitore del sale.
• Se la spia del brillantante è accesa,
riempire il contenitore del brillantante.
3. Caricare i cestelli.
4. Aggiungere il detersivo.
5. Impostare e avviare il programma
corretto per il tipo di carico ed il grado di sporco.
7.1 Caricare i cestelli
Fare riferimento all'opuscolo in
dotazione per gli esempi su come caricare i cestelli.
• Utilizzare l’apparecchiatura esclusivamente per lavare articoli idonei al lavaggio in lavastoviglie.
• Non introdurre nell’apparecchiatura
articoli di legno, osso, alluminio, peltro o rame.
• Non inserire nell'apparecchiatura oggetti che possano assorbire acqua
(spugne, panni).
• Eliminare i residui di cibo dalle stoviglie.
46 www.aeg.com
• Ammorbidire le tracce di bruciato nelle stoviglie.
• Disporre gli utensili cavi (tazze, bicchieri e padelle) con l’apertura rivolta
verso il basso
• Assicurarsi che le posate e i piatti non
aderiscano tra loro. Mescolare i cucchiai con le altre posate.
• Verificare che i bicchieri non si tocchino l’un l’altro.
• Disporre gli oggetti piccoli nel cestello
per le posate.
• Sistemare gli oggetti leggeri nel cestello superiore in modo tale che non
possano muoversi.
• Prima di avviare un programma, assicurarsi che i mulinelli possano ruotare
liberamente.
7.2 Utilizzo del detersivo
Non usare una dose di detersivo
superiore alla quantità raccomandata. Osservare le istruzioni riportate sulla confezione del detersivo.
Il detersivo in pastiglie non si
scioglie durante i programmi
brevi e i residui di detersivo possono rimanere sulle stoviglie.
Consigliamo di utilizzare il detersivo in pastiglie con i programmi
lunghi.
ATTENZIONE
Utilizzare solo detersivi per lavastoviglie.
D A B
1.
30
20
2.
3.
C
A
B
4.
D
5.
30
20
Premere il pulsante di sgancio (B)
per aprire il coperchio (C).
Mettere il detersivo nel rispettivo
contenitore (A).
Se il programma prevede una fase di
prelavaggio, mettere una piccola
quantità di detersivo nel contenitore
(D).
Se si usa detersivo in pastiglie, mettere la pastiglia nel contenitore (A).
Chiudere il coperchio. Assicurarsi
che il pulsante di sgancio si blocchi
in posizione.
32
-
1
4
MAX
+
C
7.3 Impostazione ed avvio di
un programma
Modalità impostazione
L’apparecchiatura deve essere in modalità impostazione per accettare alcune
operazioni.
L'apparecchiatura è in modalità impostazione se, dopo l'attivazione, tutte le spie
del programma si accendono.
Se il pannello dei comandi indica altre
condizioni, tenere premuti contemporaneamente i tasti funzione (B) e (C) finché
l’apparecchiatura entra in modalità impostazione.
ITALIANO
Avvio del programma senza
partenza ritardata
1. Aprire il rubinetto dell’acqua.
2. Premere il tasto On/Off per accendere l’apparecchiatura. Verificare che
l'apparecchiatura sia in modalità impostazione.
3. Premere il tasto del programma che
si desidera impostare.
• La spia del programma corrispondente rimane accesa.
• Tutte le altre spie dei programmi si
spengono.
4. Chiudere la porta dell'apparecchiatura. Il programma si avvia.
Avvio del programma con
partenza ritardata
1. Impostare il programma.
2. Premere di nuovo il tasto Partenza ritardata finché non si accende la spia
relativa al numero di ore che si desidera impostare. Si può impostare 3 o
6 ore.
• Si accende la spia Partenza ritardata.
3. Chiudere la porta dell'apparecchiatura. Si avvia il conto alla rovescia. Appena è completato il conto alla rovescia, il programma si avvia.
Apertura della porta durante il
funzionamento
dell'apparecchiatura
Se si apre la porta, l'apparecchiatura si
blocca. Quando si chiude nuovamente la
porta, l'apparecchiatura riprende dal
punto in cui era stata interrotta.
Come annullare la partenza
ritardata
Premere e tenere premuti contemporaneamente i tasti funzione (B) e (C) fino a
47
quando la spia della Partenza ritardata si
spegne e tutte le spie dei programmi si
accendono.
Quando si annulla la partenza ritardata, l'apparecchiatura ritorna
in modalità impostazione. In questo caso occorre selezionare nuovamente il programma.
Annullamento del programma
Premere e tenere premuti contemporaneamente i tasti funzione (B) e (C) fino a
quando tutte le spie dei programmi si
accendono.
Verificare che vi sia del detersivo
nell'apposito contenitore prima
di avviare un nuovo programma.
Al termine del programma
Quando il programma è completato,
verrà emesso un segnale acustico intermittente e la spia di fine verrà visualizzata.
1. Premere il tasto On/Off per spegnere
l’apparecchiatura.
2. Chiudere il rubinetto dell'acqua.
• Lasciare raffreddare le stoviglie
prima di estrarle dall'apparecchiatura. Le stoviglie calde
possono essere più facilmente
danneggiabili.
• Vuotare prima il cestello inferiore e quindi quello superiore.
• Sulle pareti laterali e sulla porta dell'apparecchiatura può
formarsi della condensa perché l'acciaio inox si raffredda
più velocemente della ceramica.
48 www.aeg.com
8. PULIZIA E CURA
AVVERTENZA!
Prima di eseguire qualunque intervento di manutenzione, spegnere l'apparecchiatura ed
estrarre la spina dalla presa.
Filtri sporchi e mulinelli ostruiti riducono i risultati di lavaggio.
Eseguire controlli periodici e pulirli, se necessario.
8.1 Pulizia dei filtri
1.
Ruotare il filtro (A) in senso antiorario e rimuoverlo.
2.
Per smontare il filtro (A), estrarre
(A1) e (A2).
Rimuovere il filtro (B).
Sciacquare i filtri con acqua.
Prima di rimontare il filtro (B), assicurarsi che non vi siano residui di cibo
o sporco all'interno o attorno al bordo del pozzetto.
C
A
B
A1
3.
4.
5.
A2
6.
7.
Assicurarsi che il filtro (B) sia posizionato in modo corretto al di sotto
delle 2 guide (C).
Montare il filtro (A) e riposizionarlo
all'interno del filtro (B). Ruotarlo in
senso orario finché non si blocca in
posizione.
Un’errata posizione dei filtri può
comportare scadenti risultati di
lavaggio e danni all’apparecchiatura.
8.2 Pulizia dei mulinelli
Non rimuovere i mulinelli.
Se i fori dei mulinelli sono ostruiti da residui di sporco, liberarli servendosi di un
oggetto a punta fine.
8.3 Pulizia esterna
Pulire l'apparecchiatura con un panno
inumidito e morbido.
Utilizzare solo detergenti neutri. Non
usare prodotti abrasivi, spugnette abrasive o solventi.
ITALIANO
49
9. RISOLUZIONE DEI PROBLEMI
L'apparecchiatura non si avvia o si blocca durante il funzionamento.
Prima di contattare il Centro di Assistenza, consultare le seguenti informazioni
per tentare di trovare una soluzione al
problema.
In caso di problemi di malfunzionamento, delle spie lampeggiano in modo continuo o ad intermittenza contemporaneamente per indicare un codice allarme.
Codice allarme
Problema
• La spia del programma impostato
lampeggia costantemente.
• La spia di fine programma lampeggia una volta in modo intermittente.
L'apparecchiatura non carica acqua.
• La spia del programma impostato
L'apparecchiatura non scarica l'acqua.
lampeggia costantemente.
• La spia di fine programma lampeggia due volte in modo intermittente.
• La spia del programma impostato
lampeggia costantemente.
• La spia di fine programma lampeggia tre volte in modo intermittente.
Il dispositivo antiallagamento è attivo.
AVVERTENZA!
Spegnere l'apparecchiatura prima di eseguire i controlli.
Problema
Causa possibile
Il programma non si La spina non è inserita nelavvia.
la presa di alimentazione.
Possibile soluzione
Inserire la spina nella presa.
La porta dell'apparecchiatura è aperta.
Chiudere la porta dell'apparecchiatura.
Il fusibile è danneggiato.
Sostituire il fusibile.
È stata impostata la parten- Annullare la partenza ritarza ritardata.
data o attendere il termine
del conto alla rovescia.
L'apparecchiatura
non carica acqua.
Il rubinetto dell’acqua è
chiuso.
Aprire il rubinetto dell’acqua.
La pressione dell'acqua è
troppo bassa.
Contattare l’ente erogatore
locale.
Il rubinetto dell'acqua è
ostruito o intasato dal calcare.
Pulire il rubinetto dell’acqua.
Il filtro nel tubo di carico
dell'acqua è ostruito.
Pulire il filtro.
Il tubo di carico dell’acqua
è strozzato o piegato.
Controllare che il tubo sia
stato installato correttamente.
50 www.aeg.com
Problema
L'apparecchiatura
non scarica l'acqua.
Causa possibile
Possibile soluzione
Il dispositivo antiallagamento è attivo. Ci sono
perdite d'acqua nell'apparecchiatura.
Chiudere il rubinetto
dell’acqua e contattare il
Centro di Assistenza.
Lo scarico del lavello è
ostruito.
Pulire lo scarico del lavello.
Il tubo di scarico dell’acqua Controllare che il tubo sia
è strozzato o piegato.
stato installato correttamente.
Una volta effettuati questi controlli, accendere l'apparecchiatura. Il programma
riprende dal punto in cui era stato interrotto.
In caso di ricomparsa dell'anomalia, contattare il Centro di Assistenza.
Se il display mostra altri codici di allarme, contattare il Centro di Assistenza.
9.1 I risultati di lavaggio e di asciugatura non sono soddisfacenti.
Problema
Causa possibile
Possibile soluzione
Le stoviglie non sono pulite.
I filtri sono ostruiti.
Pulire i filtri.
I filtri non sono montati e
installati correttamente.
Controllare che i filtri siano
montati e installati correttamente.
I mulinelli sono ostruiti.
Rimuovere i residui di sporco servendosi di un oggetto
appuntito.
Il programma non era corretto per il tipo di carico
ed il grado di sporco.
Accertarsi che il programma
selezionato sia corretto per
il tipo di carico e il grado di
sporco.
Sistemazione non corretta
delle stoviglie nei cestelli.
L'acqua non ha raggiunto
tutte le stoviglie.
Assicurarsi che la posizione
delle stoviglie nei cestelli sia
corretta e che l’acqua possa
raggiungerle senza problemi.
I mulinelli non ruotavano li- Assicurarsi che la posizione
beramente.
delle stoviglie nei cestelli sia
corretta e non blocchi la rotazione dei mulinelli.
È stata utilizzata una dose
insufficiente di detersivo.
Assicurarsi di aver aggiunto
la corretta quantità di detersivo nel contenitore prima
di avviare un programma.
Non era presente il detersivo nel contenitore.
Assicurarsi di aver aggiunto
il detersivo nel contenitore
prima di avviare un programma.
ITALIANO
51
Problema
Causa possibile
Possibile soluzione
Ci sono depositi di
calcare sulle stoviglie.
Il contenitore del sale è
vuoto.
Assicurarsi che vi sia del sale per lavastoviglie nel contenitore.
Il livello impostato del decalcificatore dell'acqua
non è corretto.
Accertarsi che il livello del
decalcificatore dell'acqua
preimpostato dalla fabbrica
sia conforme alla durezza
dell'acqua locale.
Il tappo del contenitore
del sale è lento.
Avvitare a fondo il tappo.
Su bicchieri e stovi- La quantità di brillantante
glie rimangono del- erogata è eccessiva.
le striature biancastre o delle macchie o striature
bluastre.
È stata utilizzata una dose
eccessiva di detersivo.
Ridurre il dosaggio del brillantante
.
Assicurarsi di aver aggiunto
la corretta quantità di detersivo nel contenitore prima
di avviare un programma.
Tracce di gocce
La quantità di brillantante
d'acqua che si sono erogata era insufficiente.
asciugate su bicchieri e stoviglie.
Aumentare il dosaggio del
brillantante.
La causa potrebbe essere
la qualità del detersivo.
Cambiare marca di detersivo.
Le stoviglie sono
bagnate.
Il programma non includeva una fase di asciugatura.
Impostare un programma
con una fase di asciugatura.
Le stoviglie sono
bagnate ed opache.
Il contenitore del brillantante è vuoto.
Assicurarsi che sia presente
del brillantante nel contenitore.
La causa potrebbe essere
la qualità del brillantante.
Cambiare marca di brillantante.
La causa potrebbe essere
la qualità del detersivo in
pastiglie multifunzione.
• Cambiare marca di detersivo in pastiglie multifunzione.
• Attivare il contenitore del
brillantante e utilizzare il
brillantante insieme al detersivo in pastiglie multifunzione.
9.2 Come attivare il
contenitore del brillantante
L'attivazione del contenitore del brillantante può avvenire solo con l'opzione
Multitab attiva.
1. Premere il tasto On/Off per accendere l’apparecchiatura. Verificare che
l'apparecchiatura sia in modalità impostazione, fare riferimento al capitolo 'Impostazione ed avvio di un programma'.
52 www.aeg.com
2. Tenere premuti contemporaneamente i tasti funzione (B) e (C) fino a
quando le spie dei tasti funzione (A),
(B) e (C) lampeggiano.
3. Premere il tasto funzione (B).
• Le spie dei tasti funzione (A) e (C)
si spengono.
• La spia del tasto funzione (B) continua a lampeggiare.
• La spia di fine è spenta.
4. Premere il tasto funzione (B).
• La spia di fine si accende. Il contenitore del brillantante è attivo.
5. Spegnere l'apparecchiatura per confermare l'impostazione.
6. Regolare la quantità di brillantante rilasciata.
7. Riempire il contenitore del brillantante.
10. DATI TECNICI
Dimensioni
Larghezza x Altezza x Profondità (mm)
596 / 818-898 / 555
Collegamento elettrico Fare riferimento alla targhetta dati.
Tensione
220-240 V
Frequenza
50 Hz
Pressione dell’acqua di Min./max. (bar/MPa)
alimentazione
(0.5 / 0.05 ) / (8 / 0.8 )
Collegamento dell'acqua 1)
Acqua fredda o calda2)
max. 60°C
Capacità
Coperti
Assorbimento elettrico
Modalità left-on
0.99 W
Modalità Off
0.10 W
12
1) Collegare il tubo di carico dell'acqua a un rubinetto con filettatura 3/4".
2) Consigliamo il collegamento all'acqua calda se prodotta mediante utilizzo di fonti di
energia alternativa (per es. pannelli solari, impianti eolici) per ridurre il consumo di
energia.
11. CONSIDERAZIONI AMBIENTALI
Riciclare i materiali con il simbolo .
Buttare l'imballaggio negli appositi
contenitori per il riciclaggio.
Aiutare a proteggere l’ambiente e la
salute umana e a riciclare rifiuti
derivanti da apparecchiature
elettriche ed elettroniche. Non
smaltire le apparecchiature che
riportano il simbolo insieme ai
normali rifiuti domestici. Portare il
prodotto al punto di riciclaggio più
vicino o contattare il comune di
residenza.
ITALIANO
53
54 www.aeg.com
ITALIANO
55
156958892-A-052013
www.aeg.com/shop
Scaricare