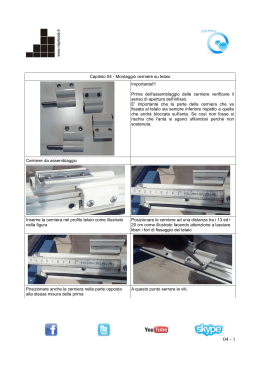
L41_ muratura-wall
istruzioni di montaggio
®
Inserire il falso telaio nel vano in modo che la rasatura finale in gesso risulti allineata.
Il falso telaio viene fornito con un pannello di irrigidimento. Prima di murare definitivamente,
verificare la planarità del telaio e delle cerniere con il filo a piombo.
Insert the subframe in the rough opening keeping the aluminium profile flush with
the wall. The subframe is provided with a template for easier installation. Check flatness
of the frame and hinges with a plumb line.
falso telaio
subframe
Assemblare i tre elementi dello stipite e del controstipite in alluminio
utilizzando le viti in dotazione.
Assemble the three elements of the door casing and the three jambs
with the screws.
3
Inserire il telaio nel vano, controllare la verticalità del montante cerniere e fissarlo
al falso telaio con le viti in dotazione.
Insert the frame in the opening.
Check for verticality and fasten it to the subframe with the screws .
2
4
Avvitare le cerniere nelle apposite sedi predisposte sul traverso
superiore ed inferiore dell'anta.
5
Screw the hinges in their seats prepared on the top rail
and bottom rail of the door leaf.
Fit the door in the opening and screw-in the hinges onto the frame. Check for correct
rotation of the door leaf and adjust the gap between the door leaf and jamb on
the lock side. Fasten the jamb to the subframe with the screws.
Fit the weather seal in its seat on the frame.
C
A
6
B
Inserire l'anta nel vano e avvitare le cerniere sul telaio. Verificare la corretta
rotazione del battente e regolare la distanza tra il battente e il montante lato serratura.
Fissare il montante al falso telaio con le viti in dotazione. Inserire la guarnizione di battuta
nell' apposita sede del telaio.
A
D
Posizionare del silicone (poco e per punti) nella cava del controtelaio
e inserire il tutto sul telaio.
Apply the silicone (just a little, in beads) in the groove of the casing
and insert the entire assembly on the frame.
7
Per montare le rosette del gruppo serratura utilizzare le viti fornite in dotazione.
Mounting the handle use the standard screws provided.
L41_ muratura-wall
istruzioni di montaggio
1
telaio
frame
2
battente
door leaf
®
2
EH2
H
EH1
EL1
L
EL2
L
H
EL1/EH1
EL2/EH2
larghezza
luce nett a
altezza
luce netta
Ingombro
max est. stipite
Ingombro
stipite
cm 60
cm 70
cm 80
cm 90
cm 210
cm 210
cm 210
cm 210
cm 61,6x210,8/300,8
cm 71,6x210,8/300,8
cm 81,6x210,8/300,8
cm 91,6x210,8/300,8
cm 64,8x212,4/302,4
cm 74,8x212,4/302,4
cm 84,8x212,4/302,4
cm 94,8x212,4/302,4
L
H
EL1/EH1
EL2/EH2
opening width
opening
height
subframe
height
frame external
dimensions
23" 5/8
27" 1/2
31" 1/2
35" 3/8
82" 5/8
82" 5/8
82" 5/8
82" 5/8
24" 1/2 x
28" 1/4 x
32" 1/8 x
36" 1/8 x
83" / 118" 3/8
83"/ 118" 3/8
83"/ 118" 3/8
83"/ 118" 3/8
25" 1/2 x
29" 1/2 x
33" 3/8 x
37" 3/8 x
83" 5/8 / 119"
83" 5/8 / 119"
83" 5/8 / 119"
83" 5/8 / 119"
1
L41_ cartongesso-drywall
istruzioni di montaggio
®
Inserire il falso telaio nel vano in modo che la rasatura finale in gesso risulti allineata.
Il falso telaio viene fornito con un pannello di irrigidimento. Prima di murare definitivamente,
verificare la planarità del telaio e delle cerniere con il filo a piombo.
Insert the subframe in the rough opening keeping the aluminium profile flush with
the wall. The subframe is provided with a template for easier installation. Check flatness
of the frame and hinges with a plumb line.
falso telaio
subframe
Assemblare i tre elementi dello stipite e del controstipite in alluminio
utilizzando le viti in dotazione.
Assemble the three elements of the door casing and the three jambs
with the screws.
3
Inserire il telaio nel vano, controllare la verticalità del montante cerniere e fissarlo
al falso telaio con le viti in dotazione.
Insert the frame in the opening.
Check for verticality and fasten it to the subframe with the screws .
2
4
Avvitare le cerniere nelle apposite sedi predisposte sul traverso
superiore ed inferiore dell'anta.
5
Screw the hinges in their seats prepared on the top rail
and bottom rail of the door leaf.
Fit the door in the opening and screw-in the hinges onto the frame. Check for correct
rotation of the door leaf and adjust the gap between the door leaf and jamb on
the lock side. Fasten the jamb to the subframe with the screws.
Fit the weather seal in its seat on the frame.
C
A
B
Inserire l'anta nel vano e avvitare le cerniere sul telaio. Verificare la corretta
rotazione del battente e regolare la distanza tra il battente e il montante lato serratura.
Fissare il montante al falso telaio con le viti in dotazione. Inserire la guarnizione di battuta
nell' apposita sede del telaio.
D
A
6
Posizionare del silicone (poco e per punti) nella cava del controtelaio
e inserire il tutto sul telaio.
Apply the silicone (just a little, in beads) in the groove of the casing
and insert the entire assembly on the frame.
7
Per montare le rosette del gruppo serratura utilizzare le viti fornite in dotazione.
Mounting the handle use the standard screws provided.
L41_ cartongesso-drywall
istruzioni di montaggio
1
zanca
bracket
2
telaio
frame
3
battente
door leaf
®
3
L1
EH2
H1
H
EH1
EL1
L
EL2
L
H
EL1/EH1
EL2/EH2
larghezza
luce nett a
altezza
luce netta
Ingombro
max est. stipite
Ingombro
stipite
cm 60
cm 70
cm 80
cm 90
cm 210
cm 210
cm 210
cm 210
cm 61,6x210,8/300,8
cm 71,6x210,8/300,8
cm 81,6x210,8/300,8
cm 91,6x210,8/300,8
cm 64,8x212,4/302,4
cm 74,8x212,4/302,4
cm 84,8x212,4/302,4
cm 94,8x212,4/302,4
L
H
EL1/EH1
EL2/EH2
opening width
opening
height
subframe
height
frame external
dimensions
23" 5/8
27" 1/2
31" 1/2
35" 3/8
82" 5/8
82" 5/8
82" 5/8
82" 5/8
24" 1/2 x
28" 1/4 x
32" 1/8 x
36" 1/8 x
83" / 118" 3/8
83"/ 118" 3/8
83"/ 118" 3/8
83"/ 118" 3/8
25" 1/2 x
29" 1/2 x
33" 3/8 x
37" 3/8 x
83" 5/8 / 119"
83" 5/8 / 119"
83" 5/8 / 119"
83" 5/8 / 119"
2
1
Scarica