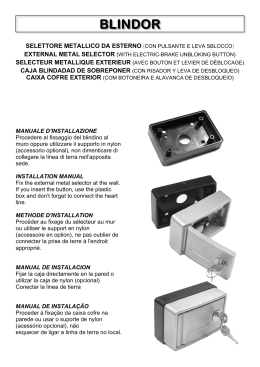
REV. 2010-01-10 - IX Ed.
IST RUZIONI P ER IL MONTAGGIO DELLE ARMA T URE
KINGDOM ALLUMINIO
CUT-OFF IA_038
INSTRUCTIONS FOR ASSEMBLING FIXTURES
Lanterna in pressofusione KINGDOM CUT-OFF art. IA_038 TP
• montaggio a testapalo e su mensola
1. Inserire il raccordo filettato 3/4” sulla ghiera in ottone alla sommità del
palo o della mensola*, facendolo attraversare dal cavo elettrico (non
fornito) e lasciandone fuori una misura adeguata per arrivare al vano
cablaggio alla sommità della lanterna.
2. Inserire la ghiera isolante nel foro della griffa e bloccarla superiormente
con l’apposita rondella (vedi schema a lato).
TP
3. Posizionare la lanterna verticalmente, inserendo la griffa nel raccordo
sino ad appoggiarla sulla ghiera di ancoraggio.
4. Inserire la rondella autobloccante, il dado di bloccaggio e serrarlo con chiave esagonale
da 32 mm.
5. Svitare le 4 viti di fissaggio tetto ed aprire la lanterna per accedere al cablaggio.
6. Far scorrere il cavo fuoriuscente dal raccordo negli appositi anelli di guida sino al vano
cablaggio. Collegare il cavo al cablaggio tramite l’apposito connettore.
7. Rimontare il tetto ed alimentare la linea
N.B.: Il collegamento deve essere effettuato secondo la norma CEI 64–7 fasc. 800
“Impianti elettrici di illuminazione pubblica e similari”.
Dado di bloccaggio
Fixing nut
Rondella autobloccante
Locking washer
Rondella isolante
Isolation washer
Ghiera isolante
Isolation ring
Ghiera di ancoraggio
Base ring
* Nelle Mensole in Ferro Battuto con attacco TP (testapalo), lo spezzone filettato da 3/4” è già presente e
solidale alla mensola.
Die cast lantern KINGDOM CUT-OFF art. IA_038 TP
• assembly on pole top and bracket
1. Screw the 3/4” gas threaded brass connecting tube into the top of the pole or bracket,
having first passed the electric cable (not included) through the connecting tube and leav ing sufficient length of cable to allow connection in the cable box at the top of the lantern.
2. Place the Insulation ring and lock it with the special washer (see scheme).
3. Place the lantern vertically over the connecting tube so that it sits on the base ring.
4. Place the locking washer and screw on the fixing nut and tighten with a hexagonal 32mm
spanner.
5. Unscrew the four screws and open the lantern head to gain access to the cable box.
6. Pass the cable which came out from the threaded tube through the guide rings provided
into the cable box. Connect the cable to the terminals.
7. Replace the lantern head, tighten screws and turn on the electric power.
Note: The electrical connections must be made according to the Standard CEI 64–7
leaflet 800 “Electrical illumination for public and similar installations”.
* In the Wrought Iron Brackets TP (top mounting), the 3/4” gas threaded connection tube is provided locked
on the bracket.
Viti 6x10 TCEI fissaggo tetto
Lantern’s head 6x10 TCEI screws
Avvertenza: il diffusore asimmetrico contenuto nella lanterna è stato progettato per
produrre un’illuminazione uniforme del suolo.
Tuttavia, per la presenza del portalampade, l’intensità luminosa è ridotta nella direzione
opposta ad esso. Al momento dell’installazione, orientare quindi la lanterna conside rando lo schema sopra.
Warning: the asymmetrical optic included into this frame is designed to give an even
diffusion of light on the ground.
Meanwhile the lamp holder causes a lower diffusion of light in the opposite direction
from it. When installing the frame, please refer to the scheme above.
Raccordo filettato
Threaded tube
SCHEDA PRODOTTO
DATASHEET
LANTERNE CUT-OFF VETRATE
Serie:
IA_038 KINGDOM ALLUMINIO CUT-OFF
AVVERTENZE PER LA CORRETTA INSTALLAZIONE
1. Per il collegamento al sezionat ore utilizzare cavo elettrico 2x1
H07RN-F, spellandone 27mm con puntalini compresi (vedi
disegno).
2. Gli apparecchi di Classe II devono essere installati in modo che
le parti metalliche esposte non siano in contatto elettrico con parti
dell’installazione elettrica collegate ad un conduttore di protezione.
3. Verificare che la tensione e la frequenza della corrente
d’alimentazione corrispondano a 230 V - 50 Hz.
4. La lanterna deve essere montata in posizione verticale.
5. Alimentare l’apparecchio solo a collegamento avvenuto.
Annotare sulla tabella cablaggi la potenza riportata in etichetta
AVVERTENZE PER LA MANUTENZIONE
1. Sostituire gli schermi danneggiati.
2. Sostituire subito le lampade con il bulbo esterno danneggiato.
3. Togliere tensione prima di sostituire la lampada e/o
l’alimentatore.
4. Per le versioni a Ioduri Metallici usare lampade Osram
HQIE70WDL (70W) / HQIE100WDL (100W) / HQIE150WDL
(150W) o equivalenti.
INSTRUCTIONS TO INST ALL ITEMS CORRECTLY
1. For connecting with terminal block use cable 2x1 H07RN-F,
peeling 27mm including the wire connectors (see drawing).
2. The Class II lanterns must be fitted so that the exposed
metal parts are not in contact with electrical parts connected to
a safety conductor.
3. Check that the voltage and power frequency correspond to
230V/50Hz.
4. The lantern must be fitted vertically.
5. Connect lanterns to the mains only after the installation is
completed.
Mark on the wiring table the power declared on the label.
MAINTENANCE NOTES
1. Replace any cracked protective shield.
2. Replace promptly lamps with damaged exterior bulb.
3. Turn the power off before changing the bulb.
4. In Metal Halide wiring use Osram lamps HQIE70WDL
(70W) / HQIE100WDL (100W) / HQIE150WDL (150W) or
equivalent.
Keep these instructions for future maintenance use.
N.B.: Il collegamento deve essere effettuato secondo la norma CEI
64–7 fasc. 800 “Impianti elettrici di illuminazione pubblica e
similari”.
Note: The electrical connection s must be made according to
the Standard CEI 64–7 leaflet 800 “Electrical illumination for
public and similar installations”.
Apparecchio conforme alle norme: EN 60598-1:2009, EN 60598-23 Edizione IV e ai requisiti essenziali della Direttiva Bassa
Tensione 2006/95/CE. Gli apparecchi cablati per lampade a vapori
di sodio alta pressione e ioduri metallici comprendono la
protezione termica sugli utilizzatori.
Luminaires are in compliance with the standards: EN 605981:2009, and in compliance with the essential requirements of:
L.V.D. 2006/95/CE. The fixtures wired with sodium vapour
lamp or metal halide lamp includes the thermal protection on
the devices.
dati riportati in etichetta:
21,0
410x410x785
0,20
Scaricare