http://sales.butlertechnik.com/webasto/webasto-air-heater-spare-parts/hl18
Workshop handbook
Manuel d atelier
Manuale per officina
1
HL 18 B
(Petrol I Essence I Benzina)
'
HL 18 D
(Diesel I Gas-oil I Gasolio)
HL 18 D
(Reduced Heat)
(Regime partial)
(Potenza ridotta)
(Diesel I Gas-oil I Gasolio)
HL 18 D (TRS)
(Diesel I Gas-oil I Gasolio)
Air Top 18 D
(Diesel I Gas-oil I Gasolio)
,_._lebasto
www.butlertechnik.com
http://sales.butlertechnik.com/webasto/webasto-air-heater-spare-parts/hl18
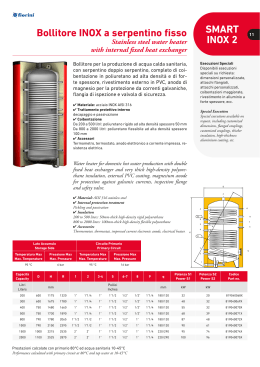
Foreword
Avant-propos
This repair shop manual is intended to provide all the
necessary information for familiarization with all versions
of the Air Heater Series HL 18 Petrol and Diesel as well
as AirTop 18 Petrol and Diesel. The AirTop heaters are
an upgrade development of the HL heaters. The manual
does not replace the Webasto training course, but is used
in many cases as a useful reference guide for initial
operation, maintenance, repair, or for removal and
installation of the heaters.
Due to the complex technical details, different
applications and continuous progress in development, the
repair shop manual cannot cover the complete range of
possible problems. Additional Webasto publications have
to be queried as required:
Ce manuel d'atelier doit fournir les informations
necessaires pour se familiariser avec toutes les versions
de la serie d'appareil de chauffage HL 18 Essence et
Gas-oil ainsi que Air Top 18 Essence et Gas-oil. Les
appareils de chauffage Air Top sont le perfectionnement
des appareils HL. Ce manuel ne remplace pas le stage
d'instruction de Webasto, mais dans bien des cas, ii sera
un conseiller utile lors de la mise en marche initiale ainsi
que pour l'entretien, et reparations ou encore pour le
montage et le demontage.
Etant donne le nombre et la complexite des details
d'ordre technique, la diversite des champs d'application
et !'evolution constante des appareils de chauffage, ce
manual ne peut, lui seul, aborder tous les problemes
qui se presentent. En cas de besoin, ii convient de se
referer d'autres specifications Webasto telles que :
a
a
Operating Instructions
HL 18 B
HL 18 D
HL 18 D (Part-Load)
HL 18 D (TRS)
Air Top 18
Installation Instructions HL 18 B
HL 18 D
HL 18 D (Part-Load)
HL 18 D (TRS)
Air Top 18
HL 18 B
Spare Parts List
HL 18 D
HL 18 D (Part-Load)
HL 18 D (TRS)
AirTop18
Accessories for Heaters
Catalogue
Accessories Air Ducting
Brochure
Les instructions
de service
Les notices de montage
Les listes de pieces
de rechange
Le catalogue
Technical Bulletins
Webasto Information Publications
La brochure
Note
Because the air heaters' exterior is identical in
appearance they are marked on their identification label
with the designations "Petrol" or "Diesel". Air Top 18
heaters can be identified by the mat grey finish of their
housing, the TRS type by a sticker marked with the words
"product in accordance with TRGVS/TRS".
The heaters may only be operated with the specified fuel
(Diesel version may also use fuel oil EL) and the
appropriate electrical power connection;
Electrical components for specific voltages are marked
"red" for heaters operating on 12 Volts and "green" for
heaters operating on 24 Volts.
2
r--------
HL 18 B
HL1S D
HL 18 D (Charge partielle)
HL 18 D (TRS)
Air Top 18
HL 18 B
HL 18 D
HL 18 D (Charge partielle)
HL 18 D (TRS)
Air Top 18
HL 18 B
HL 18 D
HL 18 D (Charge partielle)
HL 18 D (TRS)
Air Top 18
Accessoires pour appareils
de chauffage
Accessoires pour systemes
de canalisations d'air
Les informations techniques
Les informations Webasto
Remarque
L'aspect exterieur des appareils de chauffage HL 18 Bet
HL 18 D etant identique, ils seront differencies par des
autocollants portant !'inscription "Essence" ou "Gas-oil".
Les appareils de chauffage Air Top 18 sont
reconnaissables par leur boitier gris matte. La version
TRS se distingue par l'autocollant "Produit repond au
TRGVS/TRS".
Ces appareils de chauffage ne doivent fonctionner
qu'avec le carburant prescrit (pour diesel egalement
mazout EL) et ne doivent etre branches que sur le
courant electrique prevu pour chaque modele.
Les elements electriques sont reperes en "rouge" pour
les appareils de chauffage 12 Volts et en ''vert" pour les
appareils 24 Volts.
www.butlertechnik.com
0
http://sales.butlertechnik.com/webasto/webasto-air-heater-spare-parts/hl18
CONTENTS
1
Technical Data ...... ............................................................................................................................................1o
1.1 Technical Data of Heaters ........................................................................................................................... 1O
1.2 Permissible Diameters and Lengths of Connecting Pipes and Ducts ......................................................... 11
1.3 Summary of Heater Variants ....................................................................................................................... 11
2
General Description .........................................................................................................................................12
2.1 Air Heaters HL 18 BID ................................................................................................................................. 12
2.2 Air Heaters Air Top 18 ................................................................................................................................. 13
3
Initial Operation ................................................................................................................................................14
3.1 General Notes ............................................................................................................................................. 14
3.2 Bleeding the Fuel Supply System ............................................................................................................... 14
3.3 Combustion Check ...................................................................................................................................... 14
4 Troubleshooting .................................................................................................................................................15
5
Description of Operation ................................................................................................................................. 18
5.1 Sequence of Operation (Heaters with Control Unit SG 1559) ..................................................................... 18
5.1 .1
5.1 .2
5.1 .3
5.1 .4
5.1 .5
Switching on the Heater ................................................................................................................. 18
Combustion Operation ................................................................................................................... 18
Start after Control Idle .................................................................................................................... 18
Switching off the Heater .................................................................................................................18
Switch-off upon Failure .................................................................................................................. 18
5.2 Sequence of Operation (Heaters with Control Unit SG 1561 GT and Control Unit SG 1561 GS,
Order No. 24189A) ...................................................................................................................................... 19
5.2.1
5.2.2
5.2.3
5.2.4
5.2.5
5.2.6
5.2.7
6
Switching on the Heater ................................................................................................................. 19
Combustion Operation ................................................................................................................... 19
Start after Control Idle ....................................................................................................................20
Start of Part-Load Operation (only for HL 18 D) ............................................................................ 20
Start of Full-Load Operation .......................................................................................................... 20
Switching off the Heater ................................................................................................................. 21
Switch-off upon Failure ..................................................................................................................21
Components .....................................................................................................................................................22
6.1 Heater Components ....................................................................................................................................22
6.1.1
6.1 .2
6.1.3
6.1.4
6.1.5
4
Electric Motor (Drive) with Combustion Air Fan ............................................................................. 22
Combustion Air Fan ....................................................................................................................... 23
Combustion Air Adjustment Screw (Grubscrew) ........................................................................... 23
Fuel Connection complete with Fleece (Evaporator) ..................................................................... 24
Glow Plug (not in Air Top!) .............................................................................................................25
www.butlertechnik.com
http://sales.butlertechnik.com/webasto/webasto-air-heater-spare-parts/hl18
6.1.6
6.1.7
6.1.8
6.1.9
6.1.10
Glow Pin (Air Top only) .................................................................................................................. 25
Flame Detector .............................................................................................................................. 26
Overheat Switch and Safety Switch ............................................................................................... 27
Heat Exchanger ............................................................................................................................. 29
Burner Tube ................................................................................................................................... 29
6.2 Fuel System Components ...........................................................................................................................30
6.2.1
6.2.2
6.2.3
6.2.4.
Dosing Pump .................................................................................................................................30
Fuel Tap .........................................................................................................................................31
Fuel Filter ........................................................................................................................................31
Fuel Tank Tap ................................................................................................................................ 31
6.3 Exhaust and Combustion Air System Components .................................................................................... 33
6.3.1
6.3.2
6.3.3
6.3.4
:c
Pressure Balancer (Exhaust/Suction Feedthrough) ...................................................................... 33
Exhaust Silencer ................................................................. ;.......................................................... 33
Flexible Exhaust Pipe .................................................................................................................... 33
Combustion Air Pipe ...................................................................................................................... 33
6.4 Electrical System Components ................................................................................................................... 34
6.4.1
6.4.2
6.4.3
6.4.4
6.4.5
6.4.6
7
Control Unit ....................................................................................................................................34
Wiring Harness ..............................................................................................................................37
Glow Plug Dropping Resistor 0.61 Q (Option) ............................................................................... 38
Glow Plug Dropping Resistor 0.27 n (Option) ............................................................................... 38
Resistor (Part-Load) ...................................................................................................................... 38
Pulsing Glow Relay (Option) .......................................................................................................... 39
Repair and Disassembly Instructions ............................................................................................................. 40
7.1 General Important Notes for Repairs .......................................................................................................... 40
7.1.1
7.1.2
7.1.3
Removal and Installation of Heater ................................................................................................ 40
Work on the Vehicle .......................................................................................................................40
Heater Test Run ............................................................................................................................ 40
7.2 Tools and Test Equipment .......................................................................................................................... 41
7.2.1
7.2.2
7.2.3
7.2.4
Hose Clamp ................................................................................................................................... 41
Test Unit ........................................................................................................................................ 41
Glow Plug Wrench ......................................................................................................................... 41
Test Equipment .............................................................................................................................. 42
7.3 Performing Modifications ..............................................................................................................................42
7.3.1
7.3.2
Conversion ta a Modified Heat Exchanger with Housing ............................................................... 42
Conversion of'Control Unit SG 1559 to Control Unit SG 1561 GT with Integral
Glow Pulsing ..................................................................................................................................46
7.4 Disassembly Instructions ............................................................................................................................ 52
8
Maintenance .....................................................................................................................................................53
8.1. Test and Maintenance Procedures .............................................................................................................. 53
8.2 Functional Test .............................................................................................................................................53
8.3 Spares Provisioning .....................................................................................................................................53
9
Wiring diagrams ............................................................................................................................................. 142
www.butlertechnik.com
5
http://sales.butlertechnik.com/webasto/webasto-air-heater-spare-parts/hl18
1 Technical Data
1.1
Technical Data of Heaters
Electrical Components:
Control unit, motor, dosing pump, glow plug of HL 18 or
glow pin of AirTop 18, part-load resistor (only for HL 18 D
and AirTop 18), digital timer (not for TRS), and
incandescent lamp (for switch) are either for 12 or 24
Volts operation. The components flame detector,
overheat switch, and safety switch are identical in both 12
and 24 Volts heaters.
Unless limit values are indicated, the following technical
data are subject to the normal tolerances for heaters of
approx. ±10% at an ambient temperature of +20 °C and
at rated voltage.
+
Test symbol
~
Design
Air heater with evaporator burner
Full-Load
Part-Load
Heat output
kW
kW
Fuel
Fuel consumption
Full-Load
Part-Load
kg/h
kg/h
Rated input
(not in starting operation)
Full"Load
Part-Load
1,7 !1460 kcal/h)
1, 0 860 kcal/h)
Petrol
DIN 51600
DIN 51607
Diesel Fuel DIN 51601
or grades and blends
permitted by the engine
manufacturer
concerned. Fuel oil EL
DIN 51603
0, 18 (0,23 l/h)
18 !0,20 11hl
0,10 0,121/h
-
o,
-
oc
oc
oc
Permissible storage temperature
- control unit
- heater
- dosing pump
oc
oc
oc
oc
Permissible combustion air intake temperature
Warm air flow
0,5 mbar
0,25 mbar
Full-Load
Part-Load
C02 in exhaust gas (at Full-Load)
- permissible functional range
- adjustment value at rated voltage
CO in exhaust gas
12 or 24
-legal max.
- with no wind max.
- at 100 km/h max.
HC in exhaust gas (at rated load with no wind)
10 ... 14 or 20 ... 28
w
w
Permissible ambient temperature in operation
- control unit
-heater
- dosing pump
25,
15
25
-
-40 ... +60
-40 ... +75
-40 ... +20
-40 ... +85
-40 ... +85
-40 ... +85
+40 max.
m3/h
m3/h
55
55
41
-
Vol.%
Vol.%
. 9,5 ... 12,0
10,0 ... 10,5
Vol.%
Vol.%
Vol.%
ppml
0,2
0,1 1000 ppm
0,2 2000 ppm
Vol.%
0,01 (100 ppm) max.
rooo
0,02 (200 ppm) max.
NOx in exhaust gas (at rated load with no wind)
Smoke No.
< 6,0
< 0,5
- Bacherach
- Bosch
Dimensions Heater:
Tolerance ± 3 mm)
Length
Width
Height
mm
mm
mm
Dimensions Dosing Pump:
Tolerance ± 3 mm)
Length
Width
Height
mm
mm
mm
Dimensions Control Unit:
Tolerance± 2 mm)
* Control unit with Support
Length
Width
Height
mm
mm
mm
Heater
Control Unit
Dosing Pump
"
.'
S192
1,7 (1460 kcal/h)
v-
Operating voltage
Weights
~
S194
V-
Rated voltage
346
123
130
'
152
74
70
97 •
150 *
43,5 *
97
102
36
kg
kg
kg
Heater Types:
HL 1@ B - air heater with petrol fuel
HL 18 P - air heater with Diesel fuel
AirTgp 18 with part-lgad gperation - air heater with Diesel
fuel
10
HI 18 Di Air Top 18
TRS I Part-Load
HI 188
Heater
2,90
0,27
0,35
HL 18 p with part-lgad gperatign - air heater with Diesel
fuel. Control in. heating operation with full load or
alternatively with partload. (red1,1ced heating performance
and power consumption)
HL 18 D (TBS). AirJgp 18 (1BS) - air heater with Diesel
fuel and special installation kit, in particular for use in
www.butlertechnik.com
J
http://sales.butlertechnik.com/webasto/webasto-air-heater-spare-parts/hl18
1.2
Permissible Diameters and Lengths of
Connecting Pipes and Ducts
Fuel line, suction side
(see also para. 6.2.4)
- Internal diameter
- Max. length
- Max. suction height
1.3
Summary of Heater Variants
Heater
Type
mm
m
m
3
3
see para. 6.2.4
Fuel line, pressure side
- Internal diameter
- Max. length
- Pressure height
mm
m
m
2 bis 3
10
see para. 6.2.4
Combustion air intake pipe *
- Min. internal diameter
- Max. length
- Max. bends
- min. bending radius
mm
m
22
1,5
270°
50
mm
1 Technical Data
Voltage
HL 18 B.61
HL 18
HL 18
HL 18
HL 18
HL 18
D.01
D.02
D.03
D.05
D.06
Operation Remarks
v
12 v
24 v
24 v
12 v
24 v
24 v
Petrol
with glow plug
Diesel
Diesel
Diesel
Diesel
Diesel
with glow plug
full load
with glow plug 12V full load
with glow plug
full load
with glow plug
full load/part load
with glow plug
full load/part load
Diesel
Diesel
Diesel
with glow pin
with glow pin
with glow pin
full load/part load
full load/part load
full load/part load
v
Diesel
with glow plug
full load/part load
12
*
*
*
*
*
Air Top 18
Air Top 18
Air Top 18 TRS
12V
24V
HL 18 TRS
24
full load
* Spare only after 01.01.93
Exhaust pipe*
- Min. internal diameter
- Max. Length
- Max. bends
- min. bending radius
mm
m
mm
22
1,5
270°
50
Warm air duct
- Min. internal diameter
- min. bending radius
mm
mm
55
see para. 6.5.1
* Combustion air intake and exhaust lines:
The total length of the combustion air intake and exhaust lines having
an inside diameter of 22 mm in each case may amount to as much as
3000 mm if a silencer is used an to as much as 5000 mm if no silencer
is used.
The total angle of bends (smallest bending radius 50 mm) must not
exceed 540° for both the combustion air intake line and the exhaust
line.
,
'·'
www.butlertechnik.com
11
2 General Description
http://sales.butlertechnik.com/webasto/webasto-air-heater-spare-parts/hl18
2
General Description
2.1
Air Heaters HL 18 B/D
The heater consists of the heat exchanger, burner, and
drive assemblies.
The glow plug (6) and the flame detector (7) are secured
to the burner head in such a way that they are easily
accessible for maintenance. The combustion air fan
supplies the required amount of air, which can be
adjusted by means of a set screw (refer to para. 6.1 .3)
and which flows through ports into the burner tube.
1
3 4
2
5
6
The "mixture" formed by evaporation of the fuel on the
evaporator (burner fleece) (5) is ignited by the cycled
glow plug (6). Heater start is performed under full-load
condition. Cumbustion takes place in the burner tube (9)
inserted in the heat exchanger (10).
The overheat switch (8) is secured to the heat exchanger
(10). A dosing pump (16) ~nd a control unit (12), e.g. SG
1559 or SG1561 GT, are required to operate the heater.
7 8 9 10 11
20
12
0
Webasto
• '@
0
~T[TtTTJ
Lt-.!-'tJ
[!1 - ":" T ,.0
13
..
1
2
3
4
5
6
7
8
9
10
11
12
13
Fresh Air Intake :
Fresh Air Fan
Motor
Combustion Air Fan
Evaporator *
Glow Plug
Flame Detector
Overheat Switch
Burner Tube
Heat Exchanger
Warm Air Outlet
Control Unit 1561
Digital Timer (not for TRS)
Figure 1:
12
14
15
16
17
18
19
20
21
22
23
Exhaust Silencer
Safety Switch
Dosing Pump
Combustion Air Intake
Hose
}
Solenoid Valve
(only for TRS)
Control Unit TRS
Pressure Balancer
Mechanical Room Thermostat
Part-Load Resistor
• different for Diesel and Petrol versions
Air Heater HL 18 B and HL 18 D
www.butlertechnik.com
22
http://sales.butlertechnik.com/webasto/webasto-air-heater-spare-parts/hl18
2 General Description
2.2
Air Heaters Air Top 18
The heater consists of the heat exchanger, burner, and
drive assemblies.
The "mixture" formed by evaporation of the fuel on the
evaporator (burner fleece) (5) is ignited by the cycled
glow pin (6). Heater start is performed under full-load
condition. Cumbustion takes place in the burner tube (9)
inserted in the heat exchanger (10).
The glow plug (6) and the flame dete.ctor (7) are secured
to the burner head in such a way that they are easily
accessible for maintenance. The combustion air fan
supplies the required amount of air, which can be
adjusted by means of a set screw (refer to para. 6.1.3)
and which flows through ports into the burner tube.
1
2
3
4
5
6
The overheat switch (8) is secured to the heat exchanger
(10). A dosing pump (20) and a control unit (16) are
required to operate the heater.
8
9
10
11
13
14
•
20
1
2
3
4
5
6
7
8
9
10
11
12
13
14
15
16
17
18
19
20
21
22
Fresh Air Intake
Fresh Air Fan
Motor
CombUstion Air Fan
Evaporator *
Glow Pin
Flame Detector
Overheat Switch
Burner Tube
Heat Exchanger
Warm Air Outlet
Mechanical Room Thermostat
Figure 2:
Digital Timer (not for TRS)
Switch
Part-Load Resistor
Control Unit
Exhaust Outlet
Safety Switch
Combustion Air Intake
Dosing Pump
Exhaust Tube
Exhaust Silencer
* different for Diesel and Petrol versions
Air Heater Air Top 18
www.butlertechnik.com
13
3 Initial Operation
3
Initial Operation
3.1
General Notes
http://sales.butlertechnik.com/webasto/webasto-air-heater-spare-parts/hl18
By continnous activation and -de-activation the dosing
pump is operated until the line is filled.
CAUTION
Do not overfill heater with fuel.
After installing the heater, carefully bleed the fuel supply
system of the vehicle, observing the guidelines of the .
vehicle manufacturer.
In case of a fuel line stJcked empty or a fuel tank emptied
by driving the heater should be started several times with
the engine running to keep the load. on the battery to a
minimum.
During test operation of the heater check all connections
for leaks and loose fittings. Should the heater enter a
failure condition during operation, troubleshooting
according to para. 4 is to be performed.
3.2
3.3
Combustion Check
After the heater test run - also after replacement of the
combustion air fan - the C02 value in the exhaust has to
be measured (observe voltage ; C02 measurement is to
be performed only with the vehicle engine running!)
Bleeding the Fuel Supply System
After heater switch-on the dosing pump must first fill the
complete fti:eJ:supply. ~ystem. Should combustion not yet
commenc$.:t'.Jpon,the first start (including a repeat of the
start), the•'t:i.eater'. has to· l:>e switched off and then
switched on again (several times if required).
In case the C02 value is out of tolerance, the combustion
air fan (refer·to- Para. 6.1.2) o~ th'e..!LJef supply quantity
(refer to Para. -6.2:1) has to be ~~ecke.9. Y'J.hen replacing
the combustion._air fan {drive) and/e.r th&'.dosing pump,
the co2 value has to be checked. and r~:.adjusted as
.required (refer to Para..6.t.3}'. ' ' ·
·.
With a completely empty fuel system, the filling·time , ,
might require in the worst case up to 12 minutes ··
depending on the)ength of the fuel line and the.frequency
of the dosing:pu.m~: (approx. 50 seconds for each meter
of fuel line wltl1~·a. . di'.ameter of d = 2 mm).
.
\
'
~
A quick fill of the fuel supply linei -might'however be
achieved as follows:
· ·
.
;
the plus connection of the dosing pump is
connected with +30 via a push-button switch
(e.g. order no. 375.004) (refer to Fig.)
)
+30
'··
Push-Button Switch
Fuse
c-{j--)
cJ-o-)
EJ
SA
e.g. 375.004
LfJ·
t
/!
.
.
~
. ..
www.butlertechnik.com
14
Dosing Pump
111
Troubleshooting is facilitated
by use of the test unit {refer to para. 7.2.2).
http://sales.butlertechnik.com/webasto/webasto-air-heater-spare-parts/hl18
Heater enters "Switch-off upon Failure" condition (only HL 18 BID with control unit SG 1559 or SG 1561 GT)
_ _. . NO
Switch on heater
I
YES
Does operation
indicator eight
illuminate?
I
~
Check electric leads, pilot lamp and
fuses F1
-
Charge
battery
~
Check electric leads for
earth contact
-
Check drive assy and electric leads for earth contact
and short-circuiting
Is the voltage correct?
Undervolt~eactlvalion atter
violation of
er threshold for
>20s
12V• 9,5V±5%
24V~ 19,5V± 5%
I
*
Is fuse F2
serviceable?
I
Is fuse F1
serviceable?
I
I
I
Check glow plug
I
Check electrical leads and connections
for breaks
Is the glow plug on?
I
I
Is the dosing pump
pulsin~? ~after 30 s
glowt1me?
-
Start interrupled by switch-off upon failure:
-J
Start continues, but dosing
pump not pulsing:
-
Check drive assy and
electric leads
~
Dosing pump does not
deliver any fuel:
I
I
I
I
Replace fuse F1
I
Check glow plug
Check control unit
Check flame detector and electric leads for earth
contact and short-circuiting
Check overheat switch and electric
leads
Check safety switch
I
Is the drive assy
working?
I
Replace fuse F2
I
Check
Check
control ..... dosing
unit
pump
I
Does exhaust pipe
~et hot
s combustion in the
heater)?
-l
-
Tank
empty
Check exhaust pipe and
combustion air pipe for
dostructions
Check fuel pipe for kinks
and leaks
Check solenoid valve
(HL 18 D TRS only)
I
Check dosing
pump with
dampener
Check fuel system integration~suction
height, low pressure in tank). ollow
installation instructions.
I
Does the glow plug
switch off within the
safety time (90 s)?
I
Does the heater go to
switch-off upon failure
after a short period of
combustion
(flame-out)?
-
-J
Check flame detector ~see para.
q.1.7) and electric lea s
Check amount of fuel delivered by
dosing pump
deactivation with
* NoSG undervoltage
1559
~ C~eck CO~ value and adjust, replace
l
dnve assy 1 necessary
Check part-load resistor (HL 18 D only).
Item might not be installed or connected.
15
www.butlertechnik.com
4 Troubleshooting
http://sales.butlertechnik.com/webasto/webasto-air-heater-spare-parts/hl18
Heater in proper operation delivers not enough heat
(only HL 188/D with control unit SG1559 or SG1561GT)
---NO
Heater switched on
YES
Does heater operate
in full-load?
(speed at 5000)
Switch in "part-load" position
Room thermostat has interrupted
operation?
Wrong wiring or wrong motor
12V cable sw/rt
24V 111• cable sw/gn
111
Is C02 value within
limits'!
•
Check exhaust silencer and exhaust
pipes
Check dosing pump delivery (is pump
installed in the right place?)
Check drive assy (check
speed/para. 6.1.1)
Adjust C0 2 value
Clean heat exchanger; replace fleece
------------------------------------,
Heater goes to switch-off upon failure during heater operation (only HL 18 BID)
Does the heater work
properly during
heating operation?
16
Check dosing pump if installed in right
place and observe ambient temperature
when engine is hot
Check C0 2 value
Does the overheat switch trip?
Check max. permissible resistance of fresh air supply
Does the safety switch have continuity?
Check safety switch
www.butlertechnik.com
See para: "Is the C02
value within limits?"
http://sales.butlertechnik.com/webasto/webasto-air-heater-spare-parts/hl18
Troubleshooting (quick failure diagnosis)
(only HL 18 B/D with control unit SG 1559
or SG 1561 GT or SG 1561 GS)
I
4 Troubleshooting
I
Check and, if necessary, repair or replace
7'
~
'-.:::
~
~
S'
<o §
,..,
·~ v,°'' ·~ ~
~
i2'
&
{Jj
§ 0 7 !:'
~
·~ !-..
b
~
~ & ~ s 0
~
~ ~
#'
~ !-.. [;j §; ~ .p ~
·~ .>:;-O:i ~0 ~
g:
~
Jf8o§~O'?$"'(
~g:'b'~q,0
~
~
~8~ 0 ~~.~~~~.§61~
ff 0ii;' -&' "",,g> 0~ ~~O;, ~.§ ~~ ;:s~ ~~ lb'·~ ;:;;~ 0~ ~ 0~
.c;
0 't:
§: §; ~ {!i & ~0 .>:: "f::
r§' 0 )./
CJ.:ofl &' ·'!::'0
oCJ
0s0?ii<ff
:<::'''!:i'l::'
0
,f;i
~
if
t'
s
t
if
$~$efd~~$&&~~~~&0ef~
Fault pattern
Does not work when switched on
Comb.established only after switching on several times
No ignition voltage
Low ignition voltage
Motor starts immediately
*
Motor does not start
Combustion does not start
Combustion stops
Combustion produces white smoke
Combustion produces black smoke
Heater overheats
Motor does not switch off in run-down
Dosing pump pulsing not audible
Dosing pump pulsing irregular
Switch-off upon failure after approx. 360 seconds
Switch-off upon failure after approx.
80 seconds
Motor stops in Part-Load operation (HL 18 D)
*
'°'
t'
••••
•• •• •• •
• • ••• • •
• •
••• ••
• • ••
•• •
• • •• •• • • • ••
•
•
•
•
•
••
• • • • • • ••
•• •
••
•
•
•
•
•
'
Possible open circuit glow plug/glow pin (SG 1561 GT and 1561 GS only)
Heater operates immediately without preheating
(only HL 18 BID with control unit SG 1561 GT)
---NO
Is voltage correct?
Undervoltage
deactivation after
violation of lower
threshold for
YES
Note: Check and replace if required control unit SG 1559
of HL 18 B/D
Load battery
> 20s.
12V = 9,5V ± 5%
24V = 19,5V ± 5%
Is fuse F2
serviceable?
Check glow plug
Ground short of glow plug
Is control unit
serviceable?
Replace fuse F2
Replace glow plug
Replace control unit
www.butlertechnik.com
17
http://sales.butlertechnik.com/webasto/webasto-air-heater-spare-parts/hl18
5 Description of Operation
5
Description of Operation
5.1
Sequence of Operation (Heaters with Control
Unit SG 1559) (also refer to functional diagram)
5.1.4 Switching off the Heater
The following description refers to circuit diagram 8 80143000-0001 , see 9, circuit diagram page 48.
When the heater is switched off manually or via the
preset timer P, operation indicator light H1 extinguishes.
If the heater is switched off by the room thermostat,
operation indicator light H1 remains illuminated during the
control idle period.
- Dosing pump Y is switched off.
- Run-down cycle starts immediately.
5.1.1 Switching oh the Heater
5.1.4.1
A positive voltage is permanently applied via fuse F1 to
control unit terminal 81 and via F2 to control unit terminal
82. When the heater is switched on, a cycled positive
control voltage is also applied via control unit terminal 83
to the electronics of the control unit.
- Operation indicator light H1 illuminates.
- Relay K3 is energised.
- Glow plug is switched on by means of relay K1.
- After glow time (approx. 30 sec) a cycled positive
voltage is applied via transistor V101 to control unit
terminal AS. Dosing pump Y is supplied from control
unit terminal AS via the overheat switch 82.
- The safety delay time (approx. 90 sec) and
preliminary fuel flow period (approx. S sec) begin.
- After the preliminary fuel flow period, motor M is
switched on via relay K2 and control unit terminal A2.
If combustion is established during the safety delay time,
flame etector B1 signals "bright" and relay K1 is deenergised. The safety delay time is reset and the glow
plug switched off. This process takes approximately 15
seconds, when ignition is correct.
The run-down cycle comprises of the cool-down period of
the flame detector (approx. 20 sec) and an electrical rundown of 60 sec. If the flame detector does not signal
"dark" after 80 sec, the electrical run-down of 60 sec is
initiated by the control unit thereby switching off the
heater in any case after 140 sec.
During the run-down cycle the drive assembly continues
operation. The run-down ventilates and degasses the
combustion chamber and cools down the heat exchanger
in order to prevent damage by overheating.
At the end of the run-down cycle relay K2 is de-energised
and motor M stops. The heater is now off.
5.1.5 Switch-off upon Failure
The heater automatically stops operation in case of
failure condition. Operation indicator light H1 remains
illuminated. The control unit in "switch-off upon failure"
condition can be reset by switching it off (it must remain
off for at least 1 sec) after rectification of the fault.
Repeat start:
If combustion is not established within the safety delay
time, a second start attempt is performed automatically
(for details refer to functional diagram).
S.1.5.1
5.1.2 Combustion Operation
-
The heater, now in operation, continues to operate until
control voltage at control unit terminal 83 is interrupted.
This is caused either by manual manipulation or by the
preset operating time limitation of timer P or by the room
thermostat.
·
Note: Depending on the heat requirement the heater may
remain in "combustion" or "control idle" (means heater
off) condition for some time.
-
5.1.3 Start after Control Idle
If the heater is operated with a room thermostat, a new
starting process is automatically initiated ( refer to S.1.1)
as soon as the room thermostat drops below the preset
temperature.
18
Run-down Cycle
Switch-off upon Failure after No Flame
Condition
For switch-on refer to S.1.1 .
If combustion is not established during the safety
delay time, relay K2 is de-energised after 90 sec, the
motor M stops.
The cycled voltage applied to control unit terminal AS
via transistor V101 is removed.
After approximately 30 sec of glow time, the cycled
positive voltage is re-applied via transistor V101 to
control unit terminal AS.
The safety delay time (approx. 90 sec) and preliminary fuel flow period (approx. S sec) commence.
After the preliminary fuel flow period, motor M is
switched on again via relay K2 and control unit
terminal A2 and a second start attempt commences. If
during this second start attempt combustion is not
established within the safety delay time, the control
unit enters the "switch-off upon failure" condition.
www.butlertechnik.com
)
http://sales.butlertechnik.com/webasto/webasto-air-heater-spare-parts/hl18
5 Description
5.1.5.2
Switch-off upon Failur8' after Flame-out
(e. g. lack of fuel)
If a flame-out occurs during combustion and/or the flame
detecto( 81 signals "dark", the glow plug is activated by
means of relay K1 for a maximum of 90 sec (safety delay
time). If combustion is re-established, the heater is again
in normal combustion mode, refer to 5.1.2.
If combustion is not achieved, the motor, dosing pump,
and glow plug are switched off after 90s sec safety delay
time. The control unit enters the "switch-off upon failure"
mode.
5.1.5.3
of Operation
Switch-off upon Failure by Overheating
If overheating occurs, overheat switch 82 cuts off the
power supply to the dosing pump. This stops fuel delivery
and the flame extinguishes. The sequence of operation
then continues as described in para. 5.1.5.2. Before the
heater is switched on again, the overheat switch must be
reset by pushing it in.
5.1.5.4
Switch-off upon Failure after Preheating and
Defective Flame Detector
If the flame detector signals "bright" at the end of the
preheating time (30 sec), the control unit enters the
"switch-off upon failure" mode.
Sequence of Operation (Functional Diagram Control
Unit) Normal Operation for Heaters with Control Unit
SG 1559
CD
I~
@)
(J)
®
8
~O
1,.9)
~
@
*
5.2
Switch-on
Preheating 30 sec
Fuel Feed 5 sec
Start
Safety Delay Time 90 sec
Combustion (safety delay time is interrupted)
Control Idle Start
Run-down max. 140 sec
Run-down 60 sec
Control Idle End
Switch-off
Off
C-i-............,.."'1--------,~+---1--""""°""""°"""""--I"'-..-....,_
D-1-...,.._...,_-+-+---+~+---1--""""°""""°*-+~t--+---+
E+----1-,.._......_~-----'-~+---!~-li-..,_.....__!----'----+
F+--+----1-.................--~---J~+--li-...__..,_..,_....,_
...~-t-~-t---1~t-+-.,.__..,_+--+
G+--+---t-~
*
If combustion is not established, repeat starting takes place
automatically (30 sec preheating, 90 sec safety delay time).
Sequence of Operation (Heaters with Control Unit
SG 1561 GT and Control Unit SG 1561 GS, Order No. 24189A)
(also refer to functional diagram)
The following description refers to the wiring diagrams,
see 9, Pages 50 to 63.
5.2.1 Switching on the Heater
A positive voltage is permanently applied via fuse F1 to
control unit terminal A2 and via F2 to control unit terminal
A1. When the heater is switched on, a cycled positive
control voltage is also applied via control unit terminal A6
to the electronics of the contro.I unit.
- Operation indicator light illuminates.
,'
- Relay K4 is energised.
- Glow plug is swi.tched on by means of relay K1 and is
cycled depending on the input voltage.
- After glow time (approx. 30 sec) a cycled positive
voltage is applied via transistor V101 to control unit
terminal D3 (SG 1561 GT) or C10 (SG 1561 GS).
Dosing pump Y is supplied via overheat switch 82 and
safety switch 83.
- The safety delay time (approx. 90 sec) and preliminary fuel flow period (approx. 5 sec) begin.
A Relay K3
B Operation Indicator Light (in item P)
C Room Thermostat (for appl.
example see Page 49)
D Relay K1 for Glow Plug
E Transistor V101 for Dosing Pump
F Relay K2 for Motor M
G Flame Detector 81
-
After the preliminary fuel flow period, motor M is
switched on again via relay K2 and control unit
terminal D1/C4.
If during the safety delay time a flame is available, the
flame detector 81 signals "bright" and relay K1 deenergises. The safety delay time is reset and the glow
plug or glow pin is switched off. This process requires
approx. 15 sec when ignition is correct.
Note: On Air Top heaters with control unit 1561 GS the
motor starts after an instant breakaway in part-load and
switches to full load after 20 seconds.
Repeat start:
If combustion is not established within the safety delay
time, a second start attempt is performed automatically
(for details refer to functional diagram).
5.2.2 Combustion Operation
The heater, now in operation, continues to operate until control
voltage at control unit terminal A6 is interrupted. This is caused
either by manual manipulation or by the preset operating time
limitation of timer P or by the room thermostat.
Note: Depending on the heat requirement the heater may
remain in "combustion" or "control idle" (means heater off)
condition for some time.
www.butlertechnik.com
19
5 Description of Operation
http://sales.butlertechnik.com/webasto/webasto-air-heater-spare-parts/hl18
5.2.3 Start after Control Idle
In case the heater is operated with a room thermostat, a
new start cycle is automatically initiated as soon as the
room temperature drops below the switching threshold.
The operation indicator light is illuminated during the
complete control idle period.
Heaters HL 188/D (with glow plug) always start in fullload operation.
Air Top haters (with glow pin) start after an initial
breakaway in part-load and then switch to full-load after
20 seconds. After a minimum full-load operating time of
60 seconds, the part-load operation is resumed
depending on the switch position of the room thermostat.
5.2.4 Start of Part-Load Operation (only for HL 18 D)
Should the system be equipped with a room thermostat
83 (option), the thermostat closes during warm-up when
reaching the set room temperature. A positive control
voltage is applied to terminal A3. The dosing pump cycles
with the low frequency for part-load. After 20 sec also the
motor M operates with the lower part-load operating
speed. The heater now operates in low performance until
the room thermostat 83 has reached its lower switching
point.
During the complete part-load phase the operation
indicator light remains on.
5.2.5 Start of Full-Load Operation
When room temperature has reached the lower switching
point of the room thermostat 83, the thermostat opens.
Terminal A3 is no longer supplied with a positive control
voltage and the dosing pump Y cycles with the higher
frequency for full-load operation. After 1Osec also the
motor M switches back to the higher full-load operating
speed.
\
Sequence of Operation (Functional Diagram Control
Unit) Normal Operation for Heaters with Control Unit
SG 1561 GT
Heaters HL 18 BID without Part-Load Operation
Swltch·on
Preheating 30 sec (cycled)
Fuel Feed 5 sec
Start
Safety Delay nme 90 sec
Combustion (safety delay time is interrupted)
Control Idle Start
Optical Run-down max. 80 sec
Electrical Run-down 90 sec
Control Idle End
Switch-off
Off
*
*
A
B
C
D
In combustion is not established, repeat starting takes place
automatically (30 sec preheating, 90 sec safety delay time).
Relay K3
Operation Ind. Light (in ttem P)
Room Thermostat
Glow Plug (glow current is
cycled)
E Transistor V101 for Dosing Pump
F Relay K2 for Motor M
G Flame Detector 81
\I
Heaters HL 18 B/D with Part-Load Operation
Switch-on
Preheating 30 sec (cycled)
Fuel Feed 5 sec
Safety Delay Time 90 sec
Combustion • Full-Load
Room Temperature (rated value reached)
Switch-over from Full-Load to Part-Load (20 sec)
Combustion • Part-Load
Room Temperature (below rated value)
Switch-over from Part-Load to Full-Load (10 sec)
Switch-off
Optical Run-down max. 80 sec
Electronic Run-down max. 90 sec
Off
Minimum Full-Load Operating Time 60 sec (no interruption possible)
*
20
If combustion is not established after start of operation,
repeat starting takes place automatically (30 sec preheating,
90 sec safety delay time).
e-i-__..,...,.__...,__'!""49. . .•-I-....""""--...,__..,.__.,_..,..
....~..,_......-...,_-........-~1---+
C -t-~t---t---
o....-........
~-+--.-1--~-+-~+--~-+-~+-~1---+
....
E -t-~'1'-............~--~--i----
--oi-~t---+
......;.-....-.~..........,..;,-.,._......-t-
F -i-~t--i---
*
A Operation Ind. Light
B Part-Load Switch or Room
D Glow Plug (glow current is cycled)
E Dosing Pump (full-load/part-load)
Thermostat (full-load/part-load) F Combustion Air Fan
C Flame Detector
(full-load/part-load)
www.butlertechnik.com
)
http://sales.butlertechnik.com/webasto/webasto-air-heater-spare-parts/hl18
5 Description of Operation
5.2.6 Switching off the Heater
-
When the heater is switched off manually or via the
preset timer P, operation indicator light H1 extinguishes.
- Dosing pump Y is switched off.
- Run-down cycle starts immediately in full-load
operation.
5.2.6.1
After the preliminary fuel flow period, motor M is
switched on again via relay K2 and control unit
terminal D1/C4 and a second start attempt
commences. If during this second start attempt
combustion is not established within the safety delay
time, the control unit enters the "switch-off upon
failure" condition.
The heater run-down cycle is initiated.
Run-down Cycle
The run-down cycle comprises of the cool-down period of
the flame detector (approx. 20 sec) and an electrical rundown of 90 sec. If the flame detector does not signal
"dark" after 80 sec, the electrical run-down of 90 sec is
initiated by the control unit thereby switching off the
heater in any case after 170 sec.
During the run-down cycle the drive assembly continues
with maximum operation. The run-down ventilates and
degasses the combustion chamber and cools down the
heat exchanger in order to prevent damage by
overheating.
At the end of the run-down cycle relay K2 is de-energised
and motor M stops. The heater is now off.
5.2.7.2
If a flame-out occurs during combustion and/or the flame
detector B1 signals "dark", the glow plug is activated by
means of relay K1 for a maximum of 90 sec (safety delay
time). If combustion is re-established, the heater is again
in normal combustion mode, refer to 5.2.2.
If combustion is not achieved, the dosing pump and glow
plug are switched off after 90s sec safety delay time. The
control unit enters the "switch-off upon failure" mode. The
heater run-down cycle is initiated.
5.2.7.3
ForHL 18 D(TRS) only
The short run-down is automatically initiated when
- the heater is switched of normally,
- the vehicle engine is switched off (D+/61 no longer
supplied with voltage),
- a delivery installation is put into operation, whereby
the solenoid valve in the combustion air line closes
after 20 sec, the air fan however continuing run-down
operation for a max. of 170 sec.
Switch-off upon Failure after Flame-out
(e.g. lack of fuel)
Switch-off upon Failure by Overheating
If overheating occurs, overheat switch B2 cuts off the
power supply to the dosing pump. This stops fuel delivery
and the flame extinguishes. The sequence of operation
then continues as described in para. 5.2.7.2. Before the
heater is switched on again, the overheat switch must
be reset by pushing it in.
5.2.7.4
Switch-off upon Failure by Opening of
Safety Switch S3
5.2.7 Switch-off upon Failure
The heater automatically stops operation in case of
failure condition. Operation indicator light H1 remains
illuminated until switch-off with the master switch or the
digital timer. The control unit in "switch-off upon failure"
condition can be reset by switching it off (it must remain
off for at least 1 sec) after rectification of the fault.
5.2.7.1
-
-
-
Switch-off upon Failure after No Flame
Condition
For switch-on refer to 5.2.1,
If combustion is not establi$.hed during the safety
delay time, the cycled voltage to control unit terminal
D3 (8G 1561 GT) or C1 O (8G 1561 GS) via transistor
V101 is removed
After approximately another 30 sec of (afterglow time),
relay K2 is de-energised, motor M stops.
After approx. 30 sec preheating again cycled positive
voltage is re-applied to control unit terminal D3
(SG 1561 GT) or C1 O (8G 1561 GS) via transistor V101.
The safety delay time (approx. 90 sec) and preliminary fuel flow period (approx. 5 sec) commence.
If the heater is not secured properly in its support, 83
interrupts the power supply to the dosing pump. For
further sequence of operation refer to 5.2.7.3.
5.2.7.5
Switch-off upon Failure after Preheating and
Defective Flame Detector
If the flame detector signals "bright" at the end of the
preheating time (30 sec), the control unit enters the
"switch-off upon failure" mode with a run-down cycle.
5.2.7.6
Switch-off upon Failure TRS
(for HL 18 D-TR8 only)
After release of a TR8 switch-off there will be a run-down
with the control unit subsequently entering the "switch-off
upon failure" mode.
Before a re-start the On/Off switch must be selected
"Off".
The switch 82 may be operated only in case of emergency, as the heater is switched off without run-down.
www.butlertechnik.com
21
6 Components
6.1
http://sales.butlertechnik.com/webasto/webasto-air-heater-spare-parts/hl18
Heater Components
6.1.1 Electric Motor (Drive) with Combustion Air Fan
Description : The electric motor is a permanent magnet
motor for driving both the fresh air fan and the
combustion air fan. Both fans are mounted to the electric
motor.
A combustion air adjustment screw is provided on the
housing. The resistor of the part-load unit is separately
mounted next to the control unit.
Test : The function of the combustion air fan and the
electric motor can be tested using the test unit.
0,3 + 0,1 mm
Test of motor revolutions with motor installed and at rated
voltage:
HL 18 B/D
AirTop 18 B/D
FL
5000 min-1 (±10%)
5000 min-1 (±10%)
PL
3800 min- 1 (±10%)
3800 min-1 (±10%}
During test check for grinding noises.
Revolutions of
FL
4400 < min-1
4400 < min-1
PL
3350 < min-1
3350 < min-1
require the replacement of the combustion air fan with
electric motor.
If the CO2 -value cannot be adjusted to the permissible
value (at rated voltage 10.0... 10.5 Vol.%}, the fuel supply
rate is to be checked (refer to 6.2.1}. Should the supply
rate of the dosing pump be within its limits, the
combustion air fan is to be replaced.
Rated measure for gap between housing and blade
wheel = 0.3 + 0.1 mm
Caution: Other measures require replacement of
combustion air fan.
Removal :
-
22
..
Remove cap (wiring harness}
(Phillips screwdriver)
Remove seal from connector terminals
Electrically disconnect flame detector
(flame detector remains in housing)
Remove covers (inlet and outlet)
(Phillips screwdriver)
Separate upper and lower housing half shells
Unclip top of connector from bottom of connector
(screwdriver; disconnect connector terminals for
overheat switch and drive assembly.
-
Remove clamps from wiring harness and safety
switch and remove safety switch.
Dismount drive from housing
(Phillips screwdriver}
lnstallatlon: Proceed in reverse order of disassembly. As
an aid for assembly a hose clamp with clamp diameter
D. = 120 mm (Webasto Order No. 139.653} may be used
. together.
to' hold the two halves of the casing
Torque (drive} : 30 Nm
Electrical connection according to circuit diagram.
The gasket below the cap (wiring harness} as well as the
connector must be replaced. When fitting cap secure with
a torque of 0.5 Nm.
Note: After replacement of drive assembly the C02 -value
must be measured and readjusted as required (for
adjustment procedure/adjustment value refer to 6.1.3
"Combustion Air Adjustment Screw"}.
\
www.butlertechnik.com
'
http://sales.butlertechnik.com/webasto/webasto-air-heater-spare-parts/hl18
6 Components
6.1.2 Combustion Air Fan
Description: The combustion air fan is integral part of
the drive assembly (refer to 6.1.1 ). It is a highly accurate
circular duct fan for supply of the combustion air for the
heater.
Test: Check motor revolutions (refer to 6.1.1 ). Check
-value (refer to 6.1 .3).
co2
Removal/Installation: As for drive assembly (refer to
6.1.1 ).
Repair: The combustion air fan cannot be repaired. The
complete drive assembly must be replaced.
0,3
+ 0,1
mm
6.1.3 Combustion Air Adjustment Screw (Grubscrew)
Description: The combustion air adjustment screw is
used for precise adjustment of the ratio of combustion air
to the fuel delivered by the dosing pump (C0 2-setting).
Test/Repair: The combustion air adjustment screw is
self-locking. It must be replaced if it is too loose.
C02-Setting: After replacing the drive assembly (refer to
6.1.1) or the dosing pump (refer to 6.2.1) the C0 2-value
must be measured and re-adjusted as required.
C02-Adjustment Value: Outside the admissible
operating range, the C02-value must be set to 1010.5% at rated voltage by corrective setting of the
combustion air adjustment screw.
A screwdriver is used as tool (refer to Figure).
Caution: The combustion air adjustment screw is set
for the specified C02-value in the factory. Any readjustment may only be carried out after replacement
of the dosing pump or the drive assembly, or when
the combustion air fan is not operating properly.
2
1
2
3
Original Cable Harness
Adapter Cable Harness
Adjustment Opening
www.butlertechnik.com
23
6 Components
http://sales.butlertechnik.com/webasto/webasto-air-heater-spare-parts/hl18
Adjustment Procedure: Clockwise rotation: C0 2 -value
decreases (before measuring allow heater to operate for
approx. 5 min; heater must be switched off for adjustment
without adapter cable harness).
Coarse Adjustment: Screw in adjustment screw until flush
with housing.
Note: For adjustment with adapter cable harness the
heater does not have to be in switched-off condition. The
adapter cable harness has to be connected according to
the Figure.
Caution! The adapter cable harness must not remain
in the vehicle.
6.1.4 Fuel Connection complete with Fleece
(Evaporator)
Description: The fuel connection represents the end of
the burner tube. The fuel is fed to the combustion
chamber through the tube via the fleece (different for
petrol and Diesel).
Removal:
- Remove drive assembly (refer to 6.1.1 ).
- Loosen screws on fuel connection
(Phillips screwdriver).
- Remove fuel connection.
- Remove fleece.
~
/~\U
/·\00
'
Cooling Port
Test/Repair:
- Check fuel connection for obstructions and leaks.
- Fit new fleece.
Fit rubber grommet properly,
otherwise no correct C02
adjustment is possible
'
Caution: On petrol version do not remove
displacement wire?
Installation: Proceed in reverse order of removal. The
fleece must be renewed every time the connection is
installed. The fleece must not be glued into position. The
sealing surface (A) between the fuel connection and the
housing must be coated with sealing compound CURil T
(refer to Spare Parts List).
Note: The fleece is different for the HL 18 B and HL 18 D.
When the fleece is replaced, ensure that the correct
fleece is used (use genuine Webasto spares only).
24
www.butlertechnik.com
,,.-·
/
'
Diesel
http://sales.butlertechnik.com/webasto/webasto-air-heater-spare-parts/hl18
6 Components
6.1.5 Glow Plug (not in Air Top!)
6.1.6 Glow Pin (Air Top only)
Description: The filament of the glow plug ignites the
fuel-air mixture during the start of the heater. Glow plug
protective resistors might decrease the filament
temperature (refer to 6.4.1 ).
Description: The glow pin ignites the fuel-air mixture
during the start of the heater.
Removal:
Removal:
-
Remove cap (wiring harness)
(Phillips screwdriver).
Remove seal from connector terminals.
Unscrew glow plug and remove (19 mm socket spanner)
-
Remove cap (wiring harness)
(Phillips screwdriver).
Remove seal from connector terminals.
Remove screw (Phillips screwdriver) and withdraw
glow pin.
Test: During electrical test using a digital multimeter the
glow pin values must be the following:
Test: Power consumption
12
24
v
v
12 V (red)
Test voltage
Power consumption
Glow Pin
12 ± 0,2 v
24± 0,2V
max. 22A
max. 15 A
Resistance 24 °C
0,290 ... 0,340 Ohm
1,2 ... 1,4 Ohm
Test current
<5mA
<5mA
Any carbon deposits on the glow plug must be removed
by glowing the plug and careful cleaning, replace glow
plug if required.
24 V (green)
Installation: Proceed in reverse order of removal. When
securing cap (wiring harness) apply a torque of 0.5 Nm.
Note: A glow plug with carbon deposits may indicate
irregular combustion. In this case the C0 2-adjustment
and the combustion values (refer to 6.1.3) must be
checked.
Note for Glow Plug Replacement
Due to the manufacturing process the glow plugs of the
12 Volt type and 24 Volt type are nearly identical. For
clear identification the most distinctive features are
illustrated and listed in the table below including volt/
ampere and torque values.
Installation: Proceed in reverse order of removal. When
screwing in glow plug torque to 30 Nm and apply
Copaslip to thread.
When securing cap (wiring harness) apply a torque of
0.5 Nm.
ldent-No. 479594 12V
Glow Plug
Glow Pin
Caution: Glow plugs shall be handled with care and
not be unpacked before use.
~no
voltage identification
on12Vtype
~-
~24 v
~
ldent-No. 157915 24V
r----©---•I
Volt
max.
Ampere
Torque
value
Length of Sleeve
Wire Gauge
<D
@
Length of Filament
®
Total length
©
12
20
28 Nm
approx. 7 mm
1.1 mm
approx. 20 mm
64.5 ± 1 mm
24
13,3
28Nm
approx. 3 mm
0.8mm
approx. 30 mm
64 ± 1 mm
www.butlertechnik.com
25
6 Components
http://sales.butlertechnik.com/webasto/webasto-air-heater-spare-parts/hl18
6.1. 7 Flame Detector
Description: The flame detector consists of a
phototransistor protected by a tube. After flame-up the
tube begins to glow so that the flame detector signals
"flame".
Apply Copaslip
~
The flame detector has the following functions:
- switch off the glow plug (refer to para. 6.1.5) or glow
pin (refer to para. 6.1.6) after flame-up.
- initiate a repeat start via the control unit in case of a
no-flame condition.
- switch off the heater in case of a flame-out.
Test: Switch on heater a) If heater transits to switch-off upon failure (without
run-down) after approx. 30 sec, there is a short-circuit
in the electrical wiring or in the flame detector.
b) If heater switches off after successful start and
combustion operation of approx. 120 sec to perform a
repeat start and then enters the switch-off upon failure
state (without run-down) after a total of 240 sec, there
is an open circuit to the flame detector or a flame
detector internal defect.
Pressure Relief Port
0-Ring
(apply Copaslip)
E
E
><
x = 33 mm (new flame detector)
x = 42 mm (old flame detector)
Removal:
- Remove cap (wiring harness)
(Phillips screwdriver).
- Electrically disconnect flame detector.
- Remove flame detector. Pieces of flame detector in
combustion chamber may remain in the chamber.
Repair: The flame detector cannot be repaired and.must
be replaced as a complete assembly.
Installation: Prior to fitting the flame detector, the 0-ring
must be seated on the tip of the flame detector and thus
be pressed into the hole (apply Copaslip to 0-ring). Then
refit cap (wiring harness)(torque 0.5 Nm).
26
-
www.butlertechnik.com
Flame Detector
http://sales.butlertechnik.com/webasto/webasto-air-heater-spare-parts/hl18
6.1.8
Overheat Switch and Safety Switch
Removal:
6.1.8.1
Overheat Switch
Description: The overheat switch protects the heater
from undue high operating temperatures. When the
permissible temperature is exceeded, the overheat switch
cuts off the power supply to the dosing pump. The heater
changes to the "switch-off upon failure" operating
condition due to flame-out.
Test: After manual reset the overheat swtich is closed in
its cold state (electrical continuity). It opens as the'
temperature rises to 170 + 9 °C and does not reset
automatically. The sensing surface of the overheat switch
predominantly reacts upon radiated heat,· i.e. between
sensing surface and heat exchanger there must be a gap
(refer to relevant Figure).
(-
6.1.8.2
6 Components
Remove cap (wiring harness)
(Phillips screwdriver).
Remove seal from connector terminals.
Electrically disconnect flame detector (flame detector
remains in housing).
Remove covers (inlet and outlet)
(Phillips screwdriver)~
Remove upper and lower housing half shells.
Remove connector terminals for overheat switch from
plug upper part.
Remove cable clamps (cable to safety switch) from
motor (Phillips screwdriver).
Remove safety switch from intermediate housing
.(Phillips .screwdriver).
Carefully lever off the two lock washers (do not
. damage spigots) and remove .
Remove overheat switch.
Repair: The overheat switch cannot be repaired and has
to be replaced as a complete assembly. The heater has
to be removed for switch replacement.
Safety Switch
Description: The switch deactivates - in case the heater
is not properly secured in its support - the dosing pump
and thus the heater.
Test: Check for electrical continuity. The switch cannot
be repaired and has to be replaced as complete
assembly.
Installation: The washers {Viton) or serrated washers
(metal) located between heat exchanger and overheat
switch influence the overheat switch switching
characteristics.
When using the "proper" washers the switching range of
the overheat switch is corrected, thus preventing a
premature response. Noncompliance may cause heat
exchanger ,damage, i.e. it may burn out.
Steel Tube
Lock Washer
ldent-No.
474703
Lock Washer
ldent-No.
474703
Washers
(Viton)
ldent-No. 489948
Serrated washers
(Metal DIN 6798 A3,7)
ldent-No. 16129A
['·
[:.
Installation to Pre-modification Heat Exchangers
ldent-No. 122967 and ldent-No. 443689
www.butlertechnik.com
Installation to Post-modification Heat Exchanger
ldent-No. 2 1237A
27
6 Components
http://sales.butlertechnik.com/webasto/webasto-air-heater-spare-parts/hl18
It is therefore essential to identify the heat exchanger for
overheat switch installation (refer to Figure).
Caution!
For installation of overheat switch on premodification heat exchangers (ldent-No. 122967
and 443689) use washers, Vlton, (ldent-No.
489948) only (refer to Figure).
- For installation of overheat switch on modified
heat exchangers (ldent-No. 21237 A) use serrated
washers, metal, (ldent-No. 16129A9) only (refer to
Figure).
For installation use one pair of washers.
Old modification kit bags (ldent-No. 106050 and
465313) possibly in stock may only be used on the"
pre-modification heat exchanger (ldent-No. 122967
and 443689).
Position new serrated or Viton washers on spigots.
Locate overheat switch on spigots.
Press on new lock washers (type B) e.g. with steel
tube so that flange of overheat switch seats free from
play on the raised cast lugs.
- Insert connector terminals into top of connector.
- Clip on top of connector.
- Screw safety switch to intermediate housing.
- Secure cable clamps to motor housing.
- Fit upper half housing shell and seal for connector
terminals.
- Fit covers (cover with reflecting inner surface to outlet
side).
- Connect flame detector.
- Fit cap (wiring harness) and screw on.
- Install heater and perform test run.
Pre-modification Heat Exchanger
ldent-No. 122967 and ldent-No. 443689
-
Post-modification Heat Exchanger
ldent-No. 21237A
\
28
www.butlertechnik.com
http://sales.butlertechnik.com/webasto/webasto-air-heater-spare-parts/hl18
6 Components
6.1.9 Heat Exchanger
Description: Within the heat exchanger the heat
generated by combustion is transferred to the fresh air for
heating.
Removal:
- Remove drive assembly (6.1 .1)
Remove glow plug or glow pin (6.1.5 or 6.1.6).
Remove flame detector (6.1.7).
Loosen 3 screws of fuel connection (Phillips
screwdriver) and remove connection.
Loosen 3 screws on heat exchanger housing
(hexagon socket wrench) and remove heat exchanger.
for Overheat Switch
Test/Repair: Clean contaminated components. Ensure
that also the exhaust connection and return point (A) are
cleaned. Before installation renew fleece (refer to 6.1.4)
and clean burner tube (refer to 6.1.10).
Caution! In case not the same heat exchanger or the
same housing is installed, observe repair
instructions according to Chapter 7.3.1.
Installation: Proceed in reverse order of removal.
Caution: It is mandatory to replace gaskets and 0rings (use genuine spares). The three hexagon
socket head screws are to be torque-tightened with
3.5 + 0.5 Nm.
Note: The exhaust system (flexible tube and exhaust
silencer) have to be included in the cleaning, effort.
Test/Repair: Clean all contaminated components. In
case of a thermal deformation of the tube or the fleece
retaining ring ("A") the burner tube is to be replaced as a
complete assembly.
6.1.10
Burner Tube
Description: In the burner tube the combustion of the
fuel ignited by the glow plug (glow pin in Air Top units)
takes place.
Installation: Proceed in reverse order of removal.
Replace fleece (refer to 6.1.4) and gasket between heat
exchanger and housing.
Torque: 3.5 Nm
Removal:
- Remove covers (inlet and outlet)
(Phillips screwdriver).
Remove upper and lower housing half shells.
Remove glow plug or glow pin and flame detector
(referto6.1.5to6.1.7).
,
Disconnect drive assembly (Phillips screwdriver).
Loosen 3 screws on heat exchanger housing
(hexagon socket wrench) and remove heat
exchanges.
Loosen 3 screws on burner tube housing (Phillips
screwdriver) and remove burner tube.
3.5 +0.5 Nm
www.butlertechnik.com
29
6 Components
6.2
http://sales.butlertechnik.com/webasto/webasto-air-heater-spare-parts/hl18
Fuel System Components
6.2.1 Dosing Pump
Description: The dosing pump provides a controlled fuel
supply for the heater and is also a fuel shut-off device. The
pump operates on the magnetic piston pump principle.
Cycle Frequency in Operating Voltage Range:
FL
HL 18 B
HL 18 D
AlrTop 18
Hz 1.01
Hz 0.87
Hz 0.52
Hz 0.87
Hz 0.52
PL
Removal/Installation: After disconnecting the electrical
connections, hoses, hose clamps and the clamping ring
the dosing pump may be removed. Installation is in
reverse order.
Test: Internal Resistance
12
24
v
v
HL 18 B/D
AirTop 18
n 10.1 ± 5%
n 40.4 ± 5%
n 10.1
±5%
Q40.4± 5%
15 ...........,.._ _......,....__ __,---....---.
I>
~
14
1----+-~-+----+~--,...........,,...._------1
13
l---+~+--1---1--
12
!---+-+--+-
11
t----+---+---
10
t----+--
::J
g
2="'
-~
03
Cl
9
l---f--
8
t----+---+----1---1-----'f-----+------<
7
r-----+---+---1---1-~f-----+------<
I _ _.___.______
"T
12 V: 9
24 V: 18
10 .11
20 /. 22
..__..__..._~
12
24
13
26
14
28
15
30
PETROL - HL 18 B
Voltage U E (V)
15 ....--.--...-........-.....-........--.---.
I
>
14
t---+--+----+---+---+--+-----1
13
l---+--+---+-+----t--Y---1
12
~ 11
10
1---l--f--
c=--
-~
03
Cl
9
l-----+--
8
I---+--
7
i---+--+----+---+---+--+-----1
_T _ _.._--.___..__..__..._
_.___.
12 V: 9 · 10
24 V: 18 20
14
28
Voltage U E (V)
Delivery Volume V (ml)
1) Detach the fuel pipe from the heater and insert into a
measuring cylinder or, where space is restricted, plug
onto a graduated burette (capacity 100 ml).
2) Switch on heater.
Applicable to HL 188/D with SG 1559 and SG 1561 GT).
After 120 sec there will be an automatic switch-off
upon failure with a subsequent repeat start.
Applicable to AirTop 188/D with control unit 24Volts,
Order No. 241 .89A.
After 115 sec there will be an automatic switch-off
upon failure with a subsequent repeat start.
Independent of the type of control unit fuel is delivered
for 90 sec during a start cycle. Start and repeat start
correspond to 2 x 90 sec.
Repeat procedure, until fuel escapes.
Note: During measuring procedure check voltage at
control unit.
SG 1559
contacts C1 (+)and C2 (-)
SG 1561 GT
contacts 81 (+)and B2 (-)
SG Order No. 241 .89A
contacts C6 (+)and C1 (-)
3) For measurement switch heater on again and
determine fuel volume increase over 2 x 90 sec.
Switch-off is automatic.
::J
g
The pump fuel delivery rate may be checked by means
of a fuel quantity check.
11
22
12
24
13
26
15
30
DIESEL - HL 18 D
AirTop 18
4) For evaluation enter the data into the appropriate
graph. The .point of intersection must be within the
shaded area.
Repair:A defective dosing pump must be replaced. After
replacement the C02 -vah..1e has to be m.easured and readjusted if required (refer to 6.1.3).
Voltage UE (V)
Delivery volume V (ml) of the dosing pump after 180 secs.
pumping time plotted against the input voltage UE (V) at the
electronic control unit. Temp. Tu = +20 ± 2 (°C)
30
www.butlertechnik.com
http://sales.butlertechnik.com/webasto/webasto-air-heater-spare-parts/hl18
Note: If a priming pump is fitted, ensure that the delivery
pressure does not exceed the maximum permissible
pressure for the dosing pump input (refer to table).
Permissible fuel
delivery height H (m)
at max. permissible
overpressure (bar) In
the fuel supply line
0,00
1,5
1,25
1,4
2,50
1,3
3,75
1,2
5,00
1,1
6,25
1,0
7,50
0,9
8,75
0,8
10,00
0,7
Permissible fuel suction
height S (m)
6 Components
6.2.3 Fuel Filter
Description: The filter may be installed in the fuel
suction line between tank and dosing pump. Should
contaminated fuel be involved, the filter must be
retrofitted.
Test: Replace contaminated filter (use only Webasto
Filter, ldent-No. 487 171, refer to Installation Instructions
and Spare Parts List).
Check filter housing and connections for leaks.
at ma.x. permissible
overpressure (bar)
in the fuel tank
0,00 (B + D)*
- 0, 15 (B + D) *
6.2.4 Fuel Tank Tap
0,50 (B + D) *
- 0,11 (B + D) *
1,00 (D) *
- 0,07 (D) *
Description: The fuel tank tap js used to extract fuel
from the fuel tank. It has to be ensu~ed. that the
installation on the tank and the fuel line connection do not
show any leaks.
* B = Petrol
D =Diesel
The gap between the pipe end and the fuel tank floor is
intended to prevent dirt and water from entering the pipe.
6.2.2 Fuel Tap
Description: The fuel tap is used for fuel extraction and
bubble separation, therefore it must never be replaced by
a regular T-union. The flow speed, which may be too high
in standard T-unions, promotes the delivery of bubbles to
the dosing pump.
Note: The fuel tank must be sufficiently ventilated (e.g. at
filler cap).
E
E
~·
www.butlertechnik.com
31
6 Components
1
Fuel Tap Da 5,5 mm
Fuel Tap Da 8,0 mm
http://sales.butlertechnik.com/webasto/webasto-air-heater-spare-parts/hl18
Required parts for self-manufacture of fuel tap:
353 205
353 213
1
1
2
1
Banjo Bolt M14 x 1,5
DIN 7623
Ring Hose Coupling 14 x 5
DIN 7642
Copper Gaskets
DIN 7601
Copper Tube dia. 8 mm; length 30 mm
commercial standard
commercial standard
commercial standard
commercial standard
NutSW24
Fuel Tank
Gasket
Copper Tube
Banjo Bolt
Metal Fuel Tank
Ring Hose Coupling
g25 mm
Fuel Tapping from Metal Tank
with Tube Fuel Tap
Fuel Tapping from Fuel Tank Drain
FuelTap 25908A
Gasket
Metal Mounting Plate
E
E
~·
Fuel Tapping via Metal Mounting Plate
32
www.butlertechnik.com
http://sales.butlertechnik.com/webasto/webasto-air-heater-spare-parts/hl18
6.3
6 Components
Exhaust and Combustion Air System
Components
6.3.1 Pressure Balancer
(Exhaust/Suction Feedthrough)
Exhaust . .
Description: The pressure balancer is a component for
combustion air entry and exhaust exit and is connected to
the relevant pipes. The pressure balancer prevents a
"blow-out" of the flame in the heater and pressure
differentials between combustion air inlet and exhaust
outlet.
Note: As a rule the pressure balancer is required only for
heater with part-load operation. In boats and ships the
installation is mandatory. In the area of the ship outer wall
an insulation plate made of V2A-steel has to be inserted.
(
Test: Remove internal and external contaminations from
pressure balancer. Check for obstructions. Check hose
connections for secure fit.
Note: For boats and ships only an insulation of the
exhaust pipe using an insulation tape (ldent-No. 428 132,
yardware or 443 247, roll of 25 m) is permissible.
The insulation must be applied in three layers at least.
6.3.2 Exhaust Silencer
An alternative insulation may be applied using a heat
protective hose (flexible pipe; D; 28,0; ldent-No. 215 43A)
(refer to Accessories Catalogue).
Test: Check for obstructions and check C0 2-value as
required.
6.3.4 Combustion Air Pipe
The exhaust silencer is to be replaced in case of heavily
contaminated heat exchanger of flexible exhaust pipe.
Test: Check for obstructions. The opening is not to point
upwards in order to prevent the ingress of water.
Note: For boats and ships only an insulation of the
exhaust silencer using an insulation tape (ldent-No. 428
132, yardware or 443 247, roll of 25 m) is permissible.
The insulation must be applied in three layers at least.
Note: Observe maximum pipe lenghts according to
lnstallati.on Instructions.
The combustion air tap should be located in an area free
from dust.
In cases of extremely high dust concentrations, the
combustion air filter (ldent-No. 219 62A, refer to
Accessories Catalogue) has to be used. Filter
replacement and cleaning according to the
manufacturer's instructions.
Combustion
Air Filter
Condensation Drain Hole
6.3.3 Flexible Exhaust Pipe
Test: Check for contamination, damage, and reduced
cross-section (e.g. accumulation of condensation,
bends). The maximum drill lenghts according to the
Installation Instructions have to be observed.
www.butlertechnik.com
...
N
Mounting
Clamp
33
6 Components
6.4
http://sales.butlertechnik.com/webasto/webasto-air-heater-spare-parts/hl18
Electrical System Components
6.4.1 Control Unit
Description: Upon switch-on, the control unit performs
the complete functional control of the heater (refer to
5. "Description of Operation") by evaluating the signals of
the flame detector and the full-load/part-load functions of
the room thermostat and the change-over switch.
The heaters may be operated with different control units:
SG 1559
SG 1561 GT
Order No. 241 .89A
(SG 1561 GS)
for HL 188/D
for HL 18 BID
for Air Top 18/B/D and TRS
The following Figures give an overview of the use of the
control units 12 V and 24 V with the possibilities for
combination with pulsing glow relays and dropping
resistors for the glow plug. The conversion of SG 1559 to
SG 1561 GT (integral glow pulsing) is described in
Chapter 8.
Test: A test of the control units SG 1559 and SG 1561
GT is only possible with the Webasto test unit (refer to
7.2.2).
Removal/Installation: The control unit is to be installed
in a protected location with its connections pointing
downwards (also refer to 1.1, 7.1.2 and Installation
Instructions).
Repair: A defective control unit has to be replaced as a
complete unit.
For the TRS equipment with SG 1559 and SG 1561 GT
the control unit SG 1547 TRS is required additionally.
Note: Components like e.g. the control unit, pulsing glow
relay, and part-load resistor for 12 V are marked for
identification with red letters, the control units for 24 V
with green letters.
12-Volt-Unlts
12 V Glow Plug
·Control Unit SG 1559
ldent-No. 429 651
Relay Panel
(Dropping Resistor 0.15 '2)
~
12 V Pulsing Glow Relay
+
www.butlertechnik.com
34
+·
12 V Glow Plug
12 V Glow Plug
http://sales.butlertechnik.com/webasto/webasto-air-heater-spare-parts/hl18
6 Components
12-Volt-Units
,----1
Control Unit SG 1561 GT
ldent-No. 156 97B
12 V Glow Plug
Resistor with Mounting Bracket
12V/2.9n120W
(HL 18 D, Part-Load only)
+
12 VGlow Pin
Control Unit SG 1561 GS
ldent-No. 263 17A
Resistor with Mounting Bracket
12V/2.90J20W
(HL 18 D only, Part-Load)
24-Volt·Units
Resistor 0.61
+
n
12 V Glow Plug
~
Control Unit SG 1559
!dent-No. 429 678
':24 V Pulsing Glow Relay
+
12 V Glow Plug
~
24 V Pulsing Glow Relay
+
www.butlertechnik.com
Resistor 0.27
n
+
24 V Glow Plug
35
http://sales.butlertechnik.com/webasto/webasto-air-heater-spare-parts/hl18
6 Components
24-Volt-Unlts
I
l _ _ _ _ _ _I
12 V Glow Plug
Resistor 0.27 .n
Control unit SG 1561 GT
!dent-No. 156 98B
I
+
Resistor with Mounting Bracket
24V/ 11 .3D/20W
(HL 18 D only, Part-Load)
12 V Glow Plug
Resistor with Mounting Bracket
24V/11.3Q/20W
(HL 18 D only, Part-Load)
+
TRS
1111•
Control unti SG 1547 TRS
!dent-No. 105 604
+
24 VGlow Pin
Control unit SG 1561 GS
!dent-No. 241 89A
+
TRS
36
1111._
Control unit SG 1547 TRS
ldent-No. 105 604
www.butlertechnik.com
Resistor with Mounting Bracket
24V/ 11 .3Q/20W
(HL 18 D only, Part-Load)
I
I
'
http://sales.butlertechnik.com/webasto/webasto-air-heater-spare-parts/hl18
6.4.2 Wiring Harness
Description/Installation: According to the control unit in
use the appropriate wiring harness (refer to Figure) is
installed.
Control Unit SG 1559: For the heaters HL 18 D (Diesel)
6 Components
For 24 Volt heaters the wire bridge must be removed
from the yellow wire (ge) and replaced with a 0.61 n
resistor.
Coversions from SG 1559 to SG 1561 GT (integral glow
pulsing) retaining the wiring harness installed are
described in Chapter 7.
the standard wiring harness is used without
modifications. For the heaters HL 18 B (Petrol) the brown
wire (br) must be removed from socket A No. 8 (refer to
9. "Circuit Diagram").
(
Wiring Harness for Control Unit SG 1559
4
5
6
7
Wiring Harness for Control Unit SG 1561 GT
1
2
3
4
5
6
Control Unit
Digital Timer
.
Room Thermostat, electronic
or mechanical, or Switch
Part-Load Resistor
Fuse Holder
Ground
for 12 V: Wire Bridge
for 24 V: Dropping Resistor for 24 V
Glow Plug
Control Unit
Digital Timer
Room Thermostat, electronic
or mechanical, or Switch
Part-Load Resistor
Fuse Holder
Ground
Wiring Harness for Control Unit SG 1561 GS
www.butlertechnik.com
'J
37
6 Components
http://sales.butlertechnik.com/webasto/webasto-air-heater-spare-parts/hl18
6.4.3 Glow Plug Dropping Resistor 0.61
n (Option)
Description: 24 Volt heaters without glow pulsing require
a dropping resistor with 0.61 n when using a 12 V glow
plug.
Adjustment: Remove perforated cover. Loosen screw of
adjustable collar and slide collar.
Note: The dropping resistor may be substituted with a
pulsing glow relay and a 24 V glow plug.
6.4.4 Glow Plug Dropping Resistor 0.27
n (Option)
Description: The dropping resistor reduces the
temperature of the filament to increase the 24 V glow
plug life.
CAUTION: The temperature of the resistor might
increase up to 160 °C. During installation it has to be
observed, that there is proper ventilation and that no
flammable and temperature-sensitive components are in
its vicinity.
For heat dissipation, the mounting bracket must be
secured directly to metal. Should this not be possible, the
appropriate condition has to be provided by using heatconducting distance pieces.
6.4.5 Resistor (Part-Load)
Description: The resistor reduces the motor speed in the
part-load operation.
Test:
HL 18 B/D
v
24 v
12
38
AirTop 18 B/D
2.9Q
2.90
11.3 Q
11.3 Q
~7
~{fa/
~
www.butlertechnik.com
http://sales.butlertechnik.com/webasto/webasto-air-heater-spare-parts/hl18
6 Components
6.4.6 Pulslng Glow Relay (Option)
Descript ion: The pulsing glow relay protects the glow
plug from overload. At a 0.8 Hz cycle rate with switch-on
pulses of different length in time, the power sl'.lpply is
maintained constant in the voltage range from 11 .5 - 14 V
(23 - 28 V) .
Type of Protection
IP 52
Dust and Trickling Water Protection
(Connector at Bottom)
(Vertlcal lnstallatlon)
IP 50
Dust Protection
Installation Position Optional
Electrlcal Connection :
(Conversion/Retrofit)
-
Check of the two-pole connection for the pulsing
glow relay.
Wires with colours ge and ws: no check.
Wires 2 x yellow: check for continuity, replace wire as
required and re-check.
For connection refer to Figure.
4>0
I
n
Webasto
0
<O
NOTE: The brown ground wire is to be connected to the
battery minus in installations with battery switch.
(
Oo
U')
0
......
L_
www.butlertechnik.com
39
http://sales.butlertechnik.com/webasto/webasto-air-heater-spare-parts/hl18
7 Repair and Disassembly
Instructions
7.1
General Important Notes for Repairs
7 .1.1 Removal and Installation of Heater
Prior to performing any work on the heater, the power
cable of the vehicle battery supply must be disconnected.
As long as the heater is in operation, the main supply
from the battery must not be disconnected to prevent
the danger of overheating the heater with an
_associated response of the overheat switch.
When performing extensive heater repair, a complete
removal is advisable. The heater can be removed by
loosening its retaining clamp. Prior to removal the fuel
line has to be disconnected from the fuel connector. The
fuel connector must be plugged for sealing. The support
thus remains fully installed in the vehicle.
Caution: When assembling the heater it is mandatory
to renew all gaskets.
The three gaskets (combustion air inlet and exhaust
outlet) must be renewed prior to every installation. Should
it be required to remove the heater support, the gasket
below the support also has to be replaced. This gasket
will compensate for grooves up to a depth of max. 4 mm
or ridges up to 2 mm in height.
~I\ '1'~1
'--K_
Fuel Connection
When performing repairs, which result in a modification of
the installation, the Installation Instructions for the heater
have to be observed.
7.1.2 Work on the Vehicle
In the vicinity of the heater a temperature of 85 °C
(storage temperature) must not be exceeded (e.g. during
paint work on the vehicle).
7.1.3 Heater Test Run
The heater must no be operated - this also applies to
preset timing operation - in closed areas like garages and
repair shops without an exhaust venting system.
Operate heater for approx. 5 min., measure C0 2 value
and adjust when out of tolerance.
40
www.butlertechnik.com
\)
~
~I.:~-~~
~
Gaskets, Set
----
--~~----~--
http://sales.butlertechnik.com/webasto/webasto-air-heater-spare-parts/hl18
7 . Repair and Disasse.mbly
7.2
Instructions
Tools and Test Equipment
7.2.1 Hose Clamp
Description: As an assembly aid for the upper and lower
housing half shells of the inlet and outlet cover a hose
clamp with a clamp diameter D; = 120 mm (Webasto
Order No. 139.653) may be used.
7.2.2 Test Unit
Description: The test unit is suitable for:
a) complete test of heaters HL 18 Band HL 18 D,
12 and 24 Volts, in the vehicle
b) separate test of control unit, 12 and 24 Volts, in the
vehicle
250 95A
Test Unit (Bag):
157 49A
Test Unit:
Adapter Cable Harness for HL 18 with SG 1559
250 96A
Adapter Cable Harness for HL 18 with SG 1561 GT:
250 97A
c) For control unit SG 1561 GS no test unit is available.
Fo.r Control•Un_lts SG 1559
and SG.1561 GT only.
Not for SG 1561 GS
7.2.3 Glow Plug Wrench
Description: Pipe spanner SW19 (standard) or wrench
socket, extra long (19 mm I 1/2") and torque wrench (0.5
to 50 Nm).
/--
www.butlertechnik.com
41
http://sales.butlertechnik.com/webasto/webasto-air-heater-spare-parts/hl18
7 Repair and Disassembly
Instructions
7.2.4 Test Equipment
Supply Sources, e.g .:
C02 Indicator for measurement of C02value in exhaust:
H. MaihakAG
Semperstr. 26-38
D-2000 Hamburg 39
Hans G. Werner & Co.
Postfach 28 67
D-7000 Stuttgart 1
Bruno Ihrig
D-6054 Rodgau 2
Dudenhofen
C02 Measuring Unit AD50
S + G Schmitt Mef3geratebau GmbH
Rheinhorststr. 14
0-6700 Ludwigshafen
Tel.: 06 21 I 67 40 87
Soot Meter for measurement of soot number of exhaust
air:
Hans G. Werner & Co.
Postfach 28 67
0 -7000 Stuttgart 1
Vibration Speedometer for m,easurement of heater
motor speed:
Dr. E. Horn GmbH
Postfach 40
0-7036 Schonaich
Multimeter for measurement of voltage and current:
Standard
Installation Pliers Type CLIC 201 for hose clamps
between dosing' pump and membrane dampener
(refer to 6.2.1):
Webasto,
Order No. 104 602 straight
Order No. 104 606 bent
Adapter Cable Harness for C02 adjustment
Webasto, Order No. 489 913
7.3. Performing Modifications
V(arning! Not observing the following safety
precautions will result in a leakage on the heater with
exhaust fumes escaping; this provokes the danger of
an explosion or poisoning.
7.3.1 Conversion to a Modified Heat Exchanger
with Housing
Description: For air heaters HL 18 D and HL 18 B a
modified heat exchanger with modified housing has been
introduced from the following serial numbers and up:
HL 18 D 12V Serial No. 117 203 and up
HL 18 D 24V Serial No. 127 150 and up
HL 18 B 12V Serial No. 157 701 and up
The combustion air pipe, its gasket, and mounting are not
affected by this modification. The gasket of the
combustion air pipe must however be included in the
replacement. In order not to change the overheat switch
response characteristics by the different heat transition,
the switch is secured with two serrated lock washers (the
old washers have to be discarded) (refer to 6.1.8).
Only the following modification kit HL 18 WO/Housing,
Order No. 204 58A, may be used and must be
completely installed. Any type of cornpination of the new
modification kit with previously used components, seals,
etc. is not permissible.
The modification kit consists of:
-
Heat Exchanger
Housing
0-Ring
Seal
2 Serrated Lock Washers (for overheat switch)
2 Lock Washers (for overheat switch)
www.butlertechnik.com
42
)
)
http://sales.butlertechnik.com/webasto/webasto-air-heater-spare-parts/hl18
7 Repair and Disassembly
Heat Exchanger
(ldent-No. 21237A)
0-Ring
(ldent-No. 21251A)
Instructions
Housing
(ldent-No. 13077A)
Seal
(ldent-No. 115379)
Modified Heat Exchanger with Housing
The modified heat exchanger can be identified as
compared with the previous model by the following
features:
ldent No. 21237A (up to now: 122967)
modified rib arrangement (refer to @)
sealing surface projecting from housing
(refer to@)
Warning: The modified heat exchanger shall be used
only as a complete set together with the modified
housing and the 0-Ring. Any type of combination of
pre-modifiaction components with new components
is not permitted. Otherwise there will be a leakage on
the heater with exhaust fumes escaping; this
provokes the danger of an explosion or poisoning.
0
0-Ring
Modified Heat Exchanger
www.butlertechnik.com
43
http://sales.butlertechnik.com/webasto/webasto-air-heater-spare-parts/hl18
7 Repair and Disassembly
Instructions
0-Ring
Pre-modification Heat Exchanger
The modified housing differs from the pre-modification
model as follows:
ldent No. 13077A (up to now: 130770)
low location of sealing surface (refer to
@)
Warning: The modified housing shall be used only
as a complete set together with the O·Ring and the
modified heat exchanger. Any type of combination of
pre-modification components with new components
is not permitted. Otherwise there will be a leakage on
the heater with exhaust fumes escaping; this
provokes the danger of an explosion or poisoning.
---
Modified Housing
44
www.butlertechnik.com
http://sales.butlertechnik.com/webasto/webasto-air-heater-spare-parts/hl18
7 Repair and Disassembly Instructions
........
................
.........
,....,,.
1
..
t
I
-
' L._J
Pre-modification Housing
Component Combinations not permitted
www.butlertechnik.com
45
7 Repair and Disassembly
Instructions
http://sales.butlertechnik.com/webasto/webasto-air-heater-spare-parts/hl18
7.3.2 Conversion of Control Unit SG 1559 to Control
Unit SG 1561 GT with Integral Glow Pulsing
Description: The control unit SG 1561 GT is able to
substitute the previously used control unit 1559, if glow
plug dropping resistors, external pulsing glow relays, and
glow plugs are replaced according to the following
information:
Caution! Removal of the glow plug dropping resistor
(24 Volt type) requires a replacement of the glow plug
12V against a glow plug 24V.
A
-~®
~~
I
I
\
'----·-
G)
Control Unit 1559
©Ground
Cap, Heater
Q) Glow Plug Dropping Resistor (24V) or
®
@ Pulsing Glow Relay (12V or 24V)
@
@
Bridge (for 12V)
to Dosing Pump
O Relay Panel (12V)
Q), @,®and
Oare possible
install~tion variants
Before Conversion
Wiring Harness Connection: Heater to Control Unit~ with possible Installation Variants
46
www.butlertechnik.com
http://sales.butlertechnik.com/webasto/webasto-air-heater-spare-parts/hl18
7 Repair and Disassembly
Instructions
Conversion
For conversion of control unit 1559 to control unit
1561 GT with integral glow pulsing the connector
terminals must be removed from the 8-pole connector
and inserted again according to the Table and Figure.
Note: On HL 18 D only, terminal contact of wire (brown)
is connected to new socket "C" according to Figure.
The table is also applicable for conversion of selfproduction wiring harnesses.
From connector
Contact
Wire
Gau e *
A2
A3
A5
A7
A8 (Diesel only)
0.75
2.5
0.75
0.75
0.75
To connector (0)
Contact
mm2
mm2
mm2
mm2
mm2
*Up to a wire length of max. 7.5 m
01
04
03
06
C1
CD
I
New: Socket "C" (ldent-No. 178721 )
I
j_.l
ti
G)
When converting from control unit 1559 to control unit
1561 GT with integral glow pulsing, the voltage of the
glow plug must be identical with the voltage of the control
unit (refer to Para. 6.1.5).
Control Unit 1561 GT
©Ground
®
Heater/Control Unit 12V
Cap, Heater
Heater/Control Unit 24V
@
Bridge (instead of pulsing glow relay, glow
plug, dropping resistor, or relay panel)
@
to Dosing Pump
=
Glow Plug 12V
(ldent-No. 479594)
Glow Plug 24V
(ldent-No. 157915)
After Conversion
Wiring Harness Connection: Heater to Control Unit 1561 GT with Integral Glow Pulsing
www.butlertechnik.com
47
http://sales.butlertechnik.com/webasto/webasto-air-heater-spare-parts/hl18
7 Repair and·Disassembly
Instructions
<D Control Unit 1559
® Fuse Box or Flat Fuse Holder
@ to Battery (+)
©Ground
@ Not used
@
@
@
Digital Timer 1522
Illumination (terminal 58)
Continuous Heater Operation (terminal 15)
Before Conversion
Variant 1
Connection Standar~ w1;1ng Harness: Control Unit ~with Digital Timer and Flat Fuse Holder
48
www.butlertechnik.com
7 Repair and Disassembly
http://sales.butlertechnik.com/webasto/webasto-air-heater-spare-parts/hl18
Instructions
Conversion
Note: The table is also applicable for conversion of self-production wiring harnesses.
From connector (8)
Contact
81
82
83
To connector (A)
Contact
Wire
Gauge *
1.5 mm2
2.5 mm2
*Up to a wire length of max. 7.5 m
A2
A1
A6
A4 br
1.5 mm2
4.0 mm2
(manufacttJ re)
Caution/ Ground connection must
be made additionally during
conversion . Ensure a wire gauge
of 4.0 mm2 (this connection is
already provided on new wiring
harnesses).
For conversion of control unit 1559 to control unit
1561 GT with integral glow pulsing the connector
terminals must be removed from the 4-pole connector
and inserted again into the new 6-pole socket (ldent-No.
328529) according to the Table and Figure.
.
i
<D Control Unit 1561 GT
® Fuse Box or Flat Fuse Holder
@ to Battery (+)
©Ground
@Not used
@ Digital Timer 1522
@ Illumination (terminal 58)
@ Continuous Heater Operation (terminal 15)
After Conversion
Variant 1
Connection Standard Wiring Harness: Control Unit 1561 GT with Digital Timer and Flat Fuse Holder
www.butlertechnik.com
49
7 Re,palr and Dlsassembl'Y
Instructions
http://sales.butlertechnik.com/webasto/webasto-air-heater-spare-parts/hl18
1.5 mm 2
CD Control Unit 1559
@ Fuse Box or Flat Fuse Holder
@ to Battery (+)
©Ground
@
Digital Timer 1522
@
llluminatio'n (terminal 58)
·@ Continuous Heater Operation (terminal 15)
Before Conversion
Variant 2
Connection Wiring Harness: Control Unit~ with Digital Timer and Flat Fuse Holder
':
50
www.butlertechnik.com
7 Repair and·Disassembly
http://sales.butlertechnik.com/webasto/webasto-air-heater-spare-parts/hl18
,.--
Instructions
Conversion
Note The table is also applicable for conversion of self-production wiring harnesses.
From connector (B)
Contact
B1
B2
93
Wire
Gauge •
1.5 mm2
2.5 mm2
1.5 mm2
4.0 mm2
To connector (A)
Contact
*Up to a wire length of max. 7.5 m
A2
A1
A6
A4br
(man ufa~tu re)
©
1.5 mm2
2.5 mm2
~
/
=-==~
Caution!
Ground connection must be made
additionally during conversion.
Ensure a wire gauge of 4.0 mm2 (this
connection is already provided on
new wiring harnesses).
2.5 mm 2
For conversion of control unit 1559 to control unit
1561 GT with integral glow pulsing the connector
terminals must be removed from the 4-pole connector
and inserted again.into the new 6-pole socket (!dent-No.
328529) according to the Table and Figure. ·
.
<D Control Unit 1561 GT
®
Fuse Box or Flat Fuse Holder
@· to Battery (+)
©Ground
@ Digital Timer 1522
@ lllu.mination (terminal 58)
@ Cor'ltinuous Heater Operation (terminal 15)
,!
After Conversion .
Variant 2
Connection Wiring Harness: Control Unit 1951 GT with Digital Timer and Flat Fuse H,older
www.butlertechnik.com
51
http://sales.butlertechnik.com/webasto/webasto-air-heater-spare-parts/hl18
7
Overheat Switch
9
&
.&_
Observe Para. 6.1.5
~
Observe Para. 6.1.8
B
Observe Para. 6.1.3
~
Observe Para. 6.1.4
~
!::..
!."':.
,6.
f..!j.
5
\j40
Apply
. Grease • observe Para
Air Top
· 6.1.7
18 only, Observe P
HL 18 B/D
ara. 6.1.6
only
36
35
----&'"F'
T
----L
101
29
20
41
52
www.butlertechnik.com
1~ r
_110131/
--
)
__ /
http://sales.butlertechnik.com/webasto/webasto-air-heater-spare-parts/hl18
8 Maintenance
8 Maintenance
The heater should be started in regular time intervals
(monthly) also during the summer season. After or before
every heater operation period the following maintenace
should be performed for reasons of functional safety:
8.1
Test and Maintenance Procedures
8.2
(
Clean heater exterior (prevent the ingress of water)
Check electrical connections for corrosion and loose ·
contacts (also dosing pump and control unit).
After cleaning the engine compartment the electrical
connections have·to be dried as required:
Check exhaust silencer and exhaust pipes for
damage, loose fit, obstructions, and leaks.
Check combustion air pipe for damage (kink) and
obstructions.
Check connections of fuel lines, fuel taps, dosing
pump with membrane dampener, as well as heater for
leakage.
Functional Test
Check CQ2-value of exhaust air (refer to 6.1 .3) as well as
heating performance in the vehicle. In case of failures,
refer to 4., Troubleshoo~ing .
8.3
Spares Provisioning
A continuously updated Spare Parts List for spares
provisioning of heaters may be requested from Webasto.
Note: The heat exchanger must be replaced after 1O
years.
(
(
www.butlertechnik.com
53
http://sales.butlertechnik.com/webasto/webasto-air-heater-spare-parts/hl18
9 Wiring diagrams • Plans
de connexions • Scheml collegamenti elettrici
-3
SG 1559
c
A
@
2
F2
+
T
I
II G
I
I
-1-
!
:0
Ci
24·V 12V &
'[ [
i
i
~.
·'
i iR
br
\
~
..._.!!Lo -o -•br
&
br
./
Fig. 3: Automatic control for HL 18 BID, 12 and 24 volts, with dlgltal
timer and battery switch (B 8014-3000-0001) control unit SG 1559
Illus. 3: Branchement automatlque pour HL 18 BID, 12 et 24 V, avec
mlnuterle et roblnet de batterle (B 8014-3000-0001) Bottler de
commande SG 1559
Fig. 3: Comando automatlco per HL 18 B/D, 12 e 24 V, funzlonamento
con timer e staccabatterla (B 8014-3000-0001) Centrallna SG 1559
---
---
!!!!!!!!!!!!
<7.Sm
075mm2
1 Omm"
1,5mm2
25mm2
AnMM2
7,5· 15m
15mm2
1 Smm"
25mm 2
40mm2
~nMM2
Application examples, see Webasto Information No. 184
Exemple de montage, voir Information Webasto No. 184
Esempio d'impiego, vedere Information Webasto Nr. 184
Legend page 143
Legende page 143
Leggenda pagina 143
Functional diagram see page 19
Diagramme de fonction voir page 63
"
Per diagramma di funzionamento vedere page 107
®
Digital Timer P:
Positive at pin 9:continuous operation with
instant heat
No positive feed : heating for 1 hour only
@
Minuterie P:
Branchement 9 au plus: fonctionnement
lndefini pour Mise ein route immediate
Cosse 9 debrancMe: fonctlonnement 1 heure
@)
To vehicle terminal 7S, if available, otherwise
terminal 1S
@)
vers vehicule + 7S (sl present), sinon + 1S
®
®
eclairage du vehicule
®
Vehicle illumination
@
Dashed lines and relays K4 und KS applicable
only if battery switch 82 is used
@
142
For petrol heater remove this connection
@
/'
Wire Ganges
Sections des conducteurs
Sezlonl del cavl
Conduites rayees ainsi que relais K4 et KS
seulement necessaires lorsqu'il y a un robinet
de batterle 82
Pour chauttage a essence supprimer ce
branchement
www.butlertechnik.com
bl
br
ge
gn
gr
or
rt
SW
vi
WS
Wire colours
Couleurs des cables
Colorl del cavl
blue
bleu
blu
brown
brun
marron e_
yellow
jaune
giallo
green
vert
verde
grigio
gray
gris
I
orange orange aranc. I
red
rouge
rosso
black
noir
nero·
vi.-Oietto
violet
violet
white
blanc : b ianco
,{
I
I
0
I
/
®
Timer digitale P:
posltivo su attacco 9: furyiionamento continuato con riscaldamento'immediato
senza positivo su attaqco 9:
durata riscak:lamento 11 h
@)
al veicolo morsetto ·?s se esistente,
altrimenti morset!io 1S
®
illuminazione veicolo
@
llnee tratteggiate e rele K4 e KS solo con
impiego dell'interruttore batteria 82
®
per riscaldatore a benzina togliere questo
attacco
'\
http://sales.butlertechnik.com/webasto/webasto-air-heater-spare-parts/hl18
9 Wi:Fing diag,rams• Ptansd'e connexions·• Schemi coUegamenti elettrici
X4
Fig. 4: Appllcatlon example • 12 and 24 volts
Example applies to:
- operation with/without battery switch,
- operation with/without room thermostat,
- operation with ON - OFF switch.
~
Use In con)unctlon with automatic control wiring diagram B 8014-3000-0001 (page 142).
Dashed lines applieable only If battery swich S2 is used.
Illus. 4: Exemple de montage 12 et 24 Volt
Example de montage Valable pour:
- utilisation avec ou sans coupe-batterie
- utilisation avec ou sans thermostat d'ambiance,
- utilisation avec commutateur Marche/Arret
11
w
SW
ll
.--+1--1-..••
!IL
11
2
1~)111
w•ll ~"[ j
~-----~· I <Df~~
B3
Valable unlquement pour commande automatlque B 8014-3000-0001 (page 142)
Conduites rayees seulement necessaires lorsqu'il y a un rob,inet de batterie S2.
:•.____.
Fig. 4: Esempio d'impiego 12 e 24 V
L'esempio d'impiego e valido per:
- funzionamento con/senza interruttore batteria,
- funzionamento con/senza termostato ambiente,
- funzionamento con interruttore accems./spegnim.
br
t
X4
r-.J
T
+
II
! G
I
1
~kr---------j____
Valido solo per comando automatlco B 8014·3000-0001 (paglna 142)
Le llnee trattegglate sono in alternativa e solo con impiego dell'interruttore batteria S2.
©
i
Remove Wire terminal 4!
Supprime le branchement 4!
Togllere ii morsetto 41
Glow plug (of heater)
Bougie a inc. (a chauffage)
Candela (a riscaldatore
©
only for Oiesel heaters
seulement pour appareils diesel
solo .per versione diesel
__
--o-0--0-0-o-o--o-o-o.....!!Lo_..
Motor and flame detector (of heater)
Moteur et contrOleur de tlamme (a chauff.)
Motore e fotoresistenza (a riscaldatore)
~==~===~~=~~===~~~
~--------------i-~
4C::==:;i
!
}--S2
Item Description
Rep. Designation
Pos. Denomlnazlone
A1
(
(
Heater HL 18
~rfc~ci~~~;~uf~se HL 1a
•
2 pdle iris~lateq return
sa~$ masse
non collegato a massa
A2
Control unit
Boltier de commande
Central Ina
SG 1559
B1
Flame detector
Contr61eur de flamme
Fotoresistenza
ensure correct polaritiy
r,olarite importante
are atlenzione alla polarita
82
Thermostat
Thermostat
Termostato
Overheat
Limiteur de termperature
Termolimitatdre
83
Thermostat
Thermostat
Termostato
Room thermostat
Thermostat d'ambiance
Termostato ambiente
E
AB CD
Remarks
Remarques .
. Speclfioazlonl
•
•
•
•
Fuse
5A
Fusible 5A
Fusibile SA
Vehicle fuse DIN 72581
Securite DIN 72581
Fusibile DIN 72581
F2
Fuse
16A
Fusible 16A
Fusi bile 16A
Vehicle fuse DIN 72581
securite [)IN 72581
Fuslbile DIN 72581
G
Battery
Battene
Batterla
H1
Green LED
Vobantvert
LE verde
O~eration indicator (in item P or S1)
T moin de fdnction (dans re~ P)
spia fun~onamento (in pos. )
H2
Yellow LED
Vobant jaune
LE giallo
H3
Lamp
Voyant
Lampada
K1
Relay
Rela1s
Rele
K2
Relay
Rela1s
Reis
K3
Relay
Rela1s
Rele
K4
Relay
Rela1s
Rele
K5
~:::rs
Rele
fitted in the heater I dans l'appareil de chauffage I montato su riscaldatore
loose parts I livre separement I particolari forniti sciolti
only if required I option I solo a richiesta
fitted in vehicle I faisant partie du vehicule I componsnte del veicolo
e
permanent fitting I indispensable I corredo standard
O
\
•
•
•
possible, depend. on specification or build date
selon livraison ou definition
a seconda del corredo fornitura e del modello
Remarks
Remarques
Speclflcazlonl
M
Motor
Moteur
Motors
for drive assembly
de fonctionnement
per gruppo bruciatore
p
Digital timer
Minuterie
Timer digitale
for programmed operation
affichage digital
per funzionamento con·.preselezione
0
R
Resistor
Resistance
Resistenza
resistor for 24 V
resistance pour 24 v
supplementare per 24 V
0
S1
Switch
Commutateur
lnterruttore
on-off
S2
Switch
Commutateur
battery·switcn
robinet de batterle
lnterruttore
staccabatteria
S3
Switch
Commutateur
lnterruttore
safety switch
commutateur de st!icurlte
interruttore di sicurezza
V14
Diode
Diode
Diode
freewheel diode for Item Y (In Item· A2)
pour rep. Y (dans rep. A2)
per pos. Y (in pos. A2)
W1
Wiring harness
Faisceau
Fascia c·avi
control unit/heater/dosing pump
pour Rep. A2 I A1 /Y
centrallna/riscaldatore/pompa comb.
program•r.eady light (in item P)
pre-seleciion (dans rep. P~
spia preselez. attivata (in os. P)
W2
Wiring harness
Faisceau
Fascia cavl
fuse box/X4/control unit
boitier fusible/X4/boitier de com.
scatola fusubili/X4/centralina
symbol lighting (in item P)
eclairage (dans rep. P)
Hluminazione simboli (1n pos. P)
W3
Wiring harness
FaisceaU
Fascia cavi
adaptor X4 I S2
adapteur X4 I 82
adattore X4 I 82
itemA2)
dans reK A2)
In.pas. 2)
for glow plug
pour incandescence
per incandescenza
X1
itemA2)
dans rep. A2)
In pos. A2)
for Item M for drive assembly
p,our rep. M pour entrainement
per pos. M
itemA2)
dans reK. A2)
in pos. 2)
for purge cycle/reversed pol. protect.
pour arr~ retards
per corsa ritorno e protez. poll invert
onlfu needed with battery isolation
sw tch on negative pole
seulement pour montage avec
.coupe batteri~ dans (-)
necessarl solo ·con lnterruttore
batteria neJ (,-)
~-
Four-pole connector
contained in cap
Raccordement 4 pOles
Collegamento a spina quadripol.
dans le capot
nel connettore cavl
X2
Two·pole connector
Raccordement 2 pOles
C0llegamento a spina bipolare
contained in cap
dans le capot
nel connettore cavi
X3
Two•pole connector
Raccordement 2 pOles
Collegamento a splna bipolare
coaxial
coaxial
coassiale
0
X4
--
Eight·pole Connector
Raccordement 8 p6le.$
Collegamenlo a splna ottopol.
toW2orPorW3
dans W2 ou P
SU W2 opp. P
y
0
Dosing pump
· Pompe doseur
Pompa combustibile
www.butlertechnik.com
•
marche·arr~t
for item Y~in item A2)
pour rep. (dans rep. A2)
per pos. Y (In pos. A2)
t
t
t
•
on-off
V101 Transistor
Transistor
Transistor
•
AB CD
Item Description
Flep. Designation
Pos. Denomlnazlone
0
Glow PIUQ
Bougie a incandescence
Candela
F1
A
B
C
D
0
•
•
•
•
•
143
http://sales.butlertechnik.com/webasto/webasto-air-heater-spare-parts/hl18
9 Wiring diagrams • Plans de connexions • Schemi collegamenti elettrici
SG 1561 GT
X4
X5
[m:J
l!JJJ
~
m ; mff!1gj~~1
A
B
C
D
58~~~~~~~~~~~~~~~~~~~~~~~~~~~~~~~~~~~~~~~58
75(15)
75(15)
30
30
F1
~
F2~
,
SW
31======"'11"''*"==========================================================.....~======--31
...,.--():;;;>-..,=============================================================
$2
I
Fig. 5: Automatic control for HL 18 B/D,
12 and 24 volts, (25109A)
Fig. 5: Branchement automatique pour
HL 18 BID, 12 et 24 volts, (25109A)
e
e
Operation with switch (YlilllQ.ul
part-load operation)
Function:
Switching on "heater" with switch.
The heater is controlled manually from
"full heat" to "off" during the heating operation.
Green LED in switch: operation indicator.
O
O
o
(!)
®
®
Fonctlon avec l'interrupteur
(Bm le regime partiel)
Fig. 5: Comando automatico per
riscaldatore HL 18 BID, 12 e 24 Volt,
(25109A)
e
Funzionamento con interruttore
potenza ridotta)
(~
Fonctjonnement·
O
Mise en service "chauffage" avec
l'interrupteur
O L'appareil de chauffage est commute par
la main de "plein regime" "arrret" pendant le
chauffage.
O LED vert dans l'interrupteur: indicateur
de fonctionnement.
Funzjonamento:
Mediante interruttore portare su
"riscaldamento".
O Durante ii riscaldamento ii riscaldatore
viene commutato manualmente su "potenza
piena" a "potenza ridotta".
O LED verde nell'interruttore: controllo
accensione
CD
CD
a
For petrol heater, remove this
connection.
Heating.
Pour chauffage
branchement
cg) Chauffage
Ventilation
@
a essence supprimer ce
Ventilation
O
®
@
Rimuovere questo attacco per gli
apparecchi a benzina.
Riscaldamento
Ventilazione
Le.gend see page 155.
Legende voir la page 155.
Pet leggenda vedere pag. 155.
Functional diagram see page 20.
Diagramme de tonctlon voir page 64.
Pe.r dlagramma di funzionamento vedere
pag.108
144
www.butlertechnik.com
http://sales.butlertechnik.com/webasto/webasto-air-heater-spare-parts/hl18
9 Wiring diagrams • Plans de connexions • Schemi
coUegamenti elettrici
SG 1561 GT
X4
58
i~
X2 X3
X1
B
A
c
D
i m[~~~~]
!ID[[][!]
111~ [I)
1
58
75(15)
75(15)
30
30
F1~
F2~
SW
t:
(
mil ''+'-"f"'''+'"I
·O•OO•O•>>.l~~=O·OO•O·O·O·~•O·
X3
Fig. 6: Automatic control for HL 18 B/D,
12 and 24 volts, (25108A)
Fig. 6: Branchement automatique pour
HL 18 B/D, 12 et 24 volts, (25108A)
Fig. 6: Comando automatico per
riscaldatore HL 18 B/D, 12 e 24 Volt,
(25108A)
e
e
e
Eonctjonnement:
lnterrupteur: mise en circuit et mis hors
circuit.
O Le thermostat d'ambiance commute de
"mise en circuit" "mise hors circuit" l'appareil
de chauffage.
0 LED vert dans le thermostat d'ambiance:
indicateur de fonctionnement
Funzjonamento:
lnterruttore: spegnimento riscaldamento
O II termostato ambiente accende e
spegne ii riscaldatore
O LED verde nel termostato ambiente: spia
funzionamento
Operation with mechanical room
thermostat (Yill!'.l2.!.!1 part-load operation)
Function:
Switch: off· heating.
The room thermostat switches the heater
on and off.
0 Green LED in room thermostat:
operation indicator.
O
O
Fonction avec le thermostat d'ambi·
ance mecanique (U!li le regime partiel)
O
a
Q)
For petrol heater, remove this
connection.
@
@)
Warm.
Pour chauffage
branchement.
Chaud.
C.old.
Froid.
a essence supprimer ce
Funzionamento con termostato
ambiente meccanico (lillllD potenza
ridotta).
O
Rimuovere questo attacco per gli
apparecchi a benzina.
Galdo.
Fredda.
Legend see page 155.
Legende voir la page 155.
Per leggenda vedere pag. 155.
Functional diagram see page 20.
Diagramme de fonction voir page 64.
Per diagramma di funzionamento ve(fere
pag.108
www.butlertechnik.com
145
http://sales.butlertechnik.com/webasto/webasto-air-heater-spare-parts/hl18
9 Wiring diagrams • Plans de connexions • Schemi collegamenti elettrici
SG 1561 GT
X4
2
X6
XS
~
A
8
~IJDJ
~@]
X6
X3
M1 E 81 82
(J:rrr'l
·~ r·-·_,.)
·'-...,wh~w
..,il
S3
Fig. 7: Automatic control for HI 18 BID,
12 and 24 volts, (20247A)
Bild 7: Branchement automatique pour
HL 18 BID, 12 et 24 volts, (20247A)
Bild 7: Comando automatico per
riscaldatore HL 18 BID, 12 e 24 Volt,
{20247A)
e
e
e
Operation with digital timer 1522
(winl2.l.!1 part-load operation)
Function:
Switching on "heater" with digital timer;
pre-selection mode "instant heating" (definite
or indefinite).
O The heater operates in "full heat" during
heating time and is switched off either by
digital timer or manually.
O Green LED in digital timer: operation
indicator.
O
For petrol heater, remove this
connection.
Digital timer P:
- terminal 9 is connected to positive:
continnous operation with "instant heating";
- terminal 9 is not connected to positive:
heating period 1 hour.
Legend see page 155.
Functional diagram see page 20.
Fonction avec la montre de pre-selection (urui le regime partiel).
Eonctionnement:
Mise en service "chauffage avec la
montre de pre-selection; preselection
"chauffage immediat" (limitee ou illimitee).
O L'appareil de chauffage fonctionne en
"plein regime" et ii est hors circuit par la montre
ou la main.
O LED vert dans la montre de pre-selection: indicateur de fonctionnement.
O
a
Pour chauffage essence supprimer ce
branchement
Montre de pre-selection P:
- branchement 9 au plus: fonctionnement
indefini pour "mise en service immediate";
- sans branchement 9 au plus:
chauffage 1 heure.
Legende voir la page 155.
Diagramme de fOnctlon volr page 64.
www.butlertechnik.com
146
Funzionamento con timer digitale
1522 ~ potenza ridotta).
Funzjonamento:
Portare su "riscaldamento" con ii timer
digitale; tipo di preselezione "riscaldamento
immediate" (limitato o illiminiato).
O II riscaldatore funziona a "potenza piena"
e puo venire spento con ii timer o
manualmente
O LED verde nel timer digitale: spia
fu nzionamento
O
Rimuovere questo attacco per gli
apparecchi a benzina.
Timer digitale P:
- positivo su attacco 9: funzionamento
con riscaldamento immediato;
- senza positivo su attacco 9: durata
riscaldamento 1 ora.
Per leggenda vedere pag. 155.
Per diagramma di funz. vedere pag. 108
http://sales.butlertechnik.com/webasto/webasto-air-heater-spare-parts/hl18
9 Wiring diagrams • Plans de connexions • Schemi
collegamenti elettrici
SG 1561 GT
X4
XS~
X7
=~
X2 X3
m
A
Cs~
8
D
[!]
I
F1~
SS
c
r=Ji m1~g:i~~1
1
!Al IIHIHIJ
30
X1
30
I
F2~
(
M1 E 81 82
,,,~fv1
L...'-·~u..,Iii.,
r·-·J
L"\l-1
S3
31==--==""ll'======--===--=====*-================================================--===--=====-31
I
~-o-::>·4'========================-=======================================~
S2
Fig. 8: Automatic control for HL 18 BID,
12 and 24 volts, (20459A)
Bild 8: Branchement automatique pour
HL 18 BID, 12 et 24 volts (20459A)
Figura 8: comando automatico per
riscaldatore HL 18 BID, 12 e 24 Volt (20459A)
e
e
e
Operation with electronic room
thermostat (l1lli1.!:!2.!.I part-load operation)
Function:
Switching on "ventilation" with switch in
room thermostat.
0
Switching on "heater" with switch in room
thermostat: indefinite (permanent heating).
O The room thermostat controls the heater
within "full heat" to "off" during heating
operation.
O Green LED in room thermostat:
operation indicator.
O
~
For petrol heater, remove this connection.
Ventilation
Off.
Heating.
Cold.
Warm.
If an external temperature sensor is connected,
the wire bridge on the top of the housing must be
removed. After that the internal temperature sensor is not
in function. It is not possible to reset the systeml.
Legend see page 155.
Functional diagram see page 20.
Fonction avec le therm. d'ambiance
electronique (UDI le regime) partiel).
Fonctjonnement:
Mise en service "ventilation" avec
l'interrupteur de thermostat d'ambiance.
0
Mise en service "chauffage" avec
l'interrupteur de thermostat d'ambiance:
illimitee (chauffage permanent).
O Le thermostat d'ambiance commute
l'appareil de chauffage de "plain regime" a
"hors circuit".
O LED vert dans le thermostat d'ambiance:
indicateur de fonctionnement.
O
~
Pour chauffage a essence supprimer ce branchment.
Ventilation
Mise hors circuit.
Chauffage.
Froid.
Chaud.
Lorsqu'une sonde de temperature externe est reliee, la
connexion dolt ~tre separee de boilier de thetmostat. La
sonde de temperature interns n'est pas en fonctlon. II
n'est pas possible de rappeler le systemel.
Legende voir page 155.
.
Functional diagram see page 64.
www.butlertechnik.com
Funzionamento con termostato ambiente
elettronico (~ potenza ridotta)
Funzionamento·
mediante interruttore del termostato
ambiente portare su ,,ventilazione"
0
mediante interruttore nel termostato
ambiente portare su ,,riscaldamento": illimitato
(funzionamento continuo)
O Nel funzionamento di riscaldamento ii
riscaldatore viene regolato tramite ii termostato
ambiente tra ,,potenza piena" e ,,disinserimento".
O LED verde nel termostato ambiente: spia
di funzionamento
O
~
Rimuovere questo attacco per gli apparecchi a benzina.
Ventilazione
Spegnimento
Riscaldamento
Fredda
Galdo
Se si impiega un termosensore esterno e necessario
togliere ii ponte sul lato superiore del corpo . In !al modo
viene messo fuori servizlo II termosensore interno (non e
possibile alcun riprlstinol).
Per leggenda vedere pag. 155
Per dlagramma di funz. vedere pag. 108.
147
http://sales.butlertechnik.com/webasto/webasto-air-heater-spare-parts/hl18
9 Wiring diagrams • Plans de connexions • Schemi collegamenti elettrici
SG 1561 GT
3t
751:~)-----~r,...------------------------------------------:;(15)
1
1
X3
M1 E 81 82
(~~~'l
·~-., ..,ii., r·-·J
U
11\w
83
I
~-¢::=>~====================================================================
82
Fig. 9: Automatic control for HL 18 8/0,
12 and 24 volts, (20460A)
Fig. 9: 8ranchement automatique pour HL
18 8/D, 12 et 24 volts, (20460A)
Figura 9: comando automatico per
riscaldatore HL 18 BID, 12 e 24 Volt (20460A)
e
e
e
Operation with digital timer and electronic room thermostat (without part-load
operation)
Fonction avec la montre de preselection et le thermosat d.ambiance
electronique (llrul le regime partiel).
El.!rnili2D.;
Fonctjpnnement·
()
Switching on "ventilation" with switch in room
tliermostat.
Q
Switching on "heater" with digital timer; preselection "instant heating" (definite or indefinite).
0
Switching on "heater" with switch In room thermo-
()
Mise en service "ventilation" avec l'interrupteur de
i'Flermostat d'ambiance.
O Mise en service "chauffage" avec montre de pre-sel.;
preselection "chauff. imm9diat" (limitee ou illimitee).
Q
Mise en service "chauffage" avec l'interrupteur de
thermostat d'ambiance: illimitee.
O LED vert dans la montre de pre-selection: indicateur
stat: indefinite.
Q
Green LED in digital timer: operation indicator.
Green LED In room thermostat: operation indicator.
0
Q) For petrol heater, remove this connection.
® Digital timer P:
- pin 9 is connected to positive: idefinite operation
for "immediate heating";
- pin 9 is not connected to positive: heating period 1 hour
Ventilation
Off.
Heating.
Cool.
Warm.
If an external temperature sensor is connected, then the
wire bridge on the top of the housing must be cut. After
that the internal temperature sensor is not in function. It is
not possible to reset the system!.
I
@)
Legend see page 155.
Functional diagram see page 20.
148
Funzionamento con timer e
termostato ambiente elettronico (~
potenza ridotta)
Eunzionamento·
de fonctionnement.
0
mediante interruttore del termostato ambiente portare
su ,,ventilazione"
Q
mediante timer portare su ,,riscaldamento"; funzionamento di
preselezione riscaldamento immediato (limitato e illimitato)
mediante interruttore nel termostato ambients portare
su ,,riscaldamento"; illimitato
0
Q
Nel funzionamento di risoaldamento ii riscaldatore viene regolato
tramite ii termostato ambiente tra ,,potenza piena" e ,,disinserimento".
O
LED vert dans le thermostat d'ambiance: indicateur de
fonctionnehment.
O
Q) Pour chauffage a essence supprimer ce branchem ..
® Montre de pre-selection P:
Q) Rimuovere questo attacco per gli apparecchi a benzina.
- branchement 9 au plus: fonctionnement indefini pour
"mise en service immediate";
- sans branchement 9 au plus: chauffage 1 heure
Ventilation
Mise hors circuit.
Chauffage.
Froid.
Chaud.
@) Lorsqu'unse sonde de temperature lllillillll! est rellee, la
connexion doit ~tre separeee de boitier de thermostat. La
sonde de temperature interne n'est pas en fonction. II n'est
pas possible de rappeler le systemel.
- con positive su attacco 9; funzionamento continue nel
caso di riscaldamento immediato
- senza positivo su attacco 9; durata di riscaldamento 1 ora
Ventilazione
Spegnimento
Riscaldamento
Fred do
Caldo
@) Se si impiega un termosensore ~ e necessario
togliere ii ponte sul late superiore del corpo . In tal modo
viene messo fuori servizio ii termosensore interno (non
possibile alcun ripristino!).
Legende voir page 155.
Diagramme de fonction voir page 64.
Per leggenda vedere pag. 155.
Per diagramma di funz. vedere pag. 108.
I
www.butlertechnik.com
LED verde nel termostato ambiente: spia di
funzionamento
® timere P
i
e
9 Wiring diagrams• Plans de connexions• Schemi
http://sales.butlertechnik.com/webasto/webasto-air-heater-spare-parts/hl18
coHegamenti elettrici
SG 1561 GT
X4
X1
;~
X5
X2 X3
c
r=I m
.,
1
B
A
•4
•3
•2
ill
(!]
30
D
!ID C[l[fil[[]
rn1JJrn
30
F1~
SW
gn
bl
~-oi:::>-~==========================.......==================================-=
52
Fig. 10: Automatic control for HL 18 D Yillb.
part·load operation, 12 and 24,volts,
Fig. 10: Branchement automatlque pour HL
18 D ~ le regime partiel, 12 et 24 volts,
(20460A)
(20460A)
Fig. 10: Comando automatico per
riscaldatore HL 18 D .QQD potenza ridotta,
12 e 24 Volt, (20460A)
e
e
e
Operation with mechanical room
thermostat.
Eynction:
Switching on "heater" with switch in room
thermostat: indefinite (permanent heating).
O Dependent on position of switch S7 in
the room thermostat the heater is switched in
"full heat mode" or "reduced heat mode"
during heating operation.
O Green LED in room thermostat:
operation indicator
o
CD
R1 for reduced heat mode only.
Legend see page 155.
Functional diagram see page 20.
Fonctlon avec le thermostat
d'amblance mecanique.
Eonctjonnement:
Mlse en service "chauffage" avec
l'interrupteur de thermostat d'ambiance:
illimitee (chauffage permanent).
O Selan la position de l'interrupteur S7
dans le thermostat d'ambiance l'appareil de
chauffage commute en "plein regime" ou
"regime partial".
0
LED vert dans le thermostat d'ambiance:
indicateur de fonctionnement.
O
CD
R1 seulement pour le regime partial.
Legende voir page 155.
Diagramme de fonction voir page 64.
www.butlertechnik.com
Funzionamento con termostato
ambiente meccanico.
Eunzionamento:
Portare su "riscaldamento" azionando
l'interruttore del termostato ambiente:
funzionamento illiminato (continuato).
O A seconda della posizione dell'interruttore S7 nel termostato ambiente si puo
scegliere tra "potenza piena" e "potenza
ridotta"
0
LED verde nel termostato ambiente: spia
funzionamento
o
CD
R1 solo per potenza ridotta.
Per leggenda vedere pag. 155.
Per diagramme di funz. vedere pag. 108.
149
9 Wiring diagrams • Plans
de connexions • Schemi collegamenti elettrici
http://sales.butlertechnik.com/webasto/webasto-air-heater-spare-parts/hl18
SG 1561 GT
X4
X1
X2 X3
i~ ~ mi
A
B
F2~
F1~
SW
gn
X3
Fig. 11: Automatic control for HL 18 D with
part-load operation, 12 and 24 volts,
,
(14886A)
Fig. 11: Branchement automatique pour
HL 18 D ~ le regime partiel, 12 et 24
volts, (14886A)
Fig. 11 : Comando automatico per
riscaldatore HL 18 D ~ potenza ridotta,
12 e 24 Volt, (14886A)
e ,Operation with all-purpose switch.
e
e
&nction:
Switching on "heater" with switch S5:
indefinite (permanent heating).
0
Dependent on position of switch S5 the
heater is switched in "full heat mode" or
"reduced heat mode" during heating operation.
0
Green LED in switch S5: operation
indicator.
$1nctjonnement:
Mise en service "chauffage" avec l'interrupteur S5: illimitee (chauffage permanent)
0
Selon la position de l'interrupteur S5
l'appareil de chauffage commute en "plein
regime" OU "regime partiel".
0 LED vert dans l'interrupteur S5:
indicateur de fonctionnement
Funzionamento con interruttore
universale.
Funzjonamento:
Portare su "riscaldamento" azionando
nnterruttore universale: funzionamento
illimitato (continuato).
0 A seconda della posizione
dell'interruttore S5 nel termostato ambiente si
puo scegliere tra "potenza piena" e "potenza
ridotta".
0 LED verde nell'interruttore S5:
spia funzionamento.
0
R1 for reduced heat mode only.
R1 seulement pour le regime partial.
R1 solo per potenza ridotta.
Ventilation.
Ventilation.
Ventilazione.
Off.
Full heat.
Mise hors circuit.
Plein regime.
Arresto.
Reduced heat.
Regime partiel.
Potenza ridotta.
Legend see page 155.
Functional diagram see page 20.
150
Fonction avec l'interrupteur universe!
Legende volr page 155.
Diagram me de tonctlon volr page 614.
www.butlertechnik.com
Potenza piena.
Per leggenda vedere pag. 155.
Per diagramma di funz. vedere page 108.
9 Wiring diagrams • Plans de connexions • Schemi
http://sales.butlertechnik.com/webasto/webasto-air-heater-spare-parts/hl18
collegamentl elettrici
SG 1561 GT
X4
m~
X7
I[§]
~
oo [Z][ID
[l] oo rn
X1
X2 X3
A
l!l lfil III
!ID Ill CD
B
C
D
·
mt m1~~~~1
30
30
F1~
58
F2~
(
I
I
I
I
I
I
I
I
R1
CD
:SI
I
I
I
X3
Fig. 12: Automatic control for HL 18 D Wllb.
part-load operation, 12 and 24 volts,
(15725A)
:.
Fig. 12: Brahchement automatlque pour
HL 18 D ~le regime partlel, 12 et 24
volts, (15725A)
Fig. 12: Comando automatlco per
riscaldatore HL 18 D !ll2D. potenza ridotta,
12 e 24 Volt, (15725A)
•
Operation with electronic room
thermostat.
Fonctlon avec le thermostat
d,ambiance electronique.
e
e
~
O
Switching on "ventilation" with switch in room
iliermostat
O Switching on "heater" with switch in room thermostat:
indefinite (permanent heating).
O The room thermostat switches the heater from "full
heat" to "reduced heat" during heating operation.
Green LED in room thermostat: operation indicator.
0
R1 for reduced heat mode only.
Ventilation.
Off.
Heating.
Cool.
Warm
If an~ temperature sensor is connected,
then the wire bridge on the top of the housing must
be cut. After that the internal temperature sensor is not
in function. It is not possible to reset the system I.
Legend see page 155.
Functional diagram see page 20.
Eonctjonnement·
O Mise en service "ventilation" avec l'lnterrupteur de
thermostat d'ambiance.
O Mise en service "chauffage" avec l'lnterrupteur de
thermostat d'ambiance: lllimltee {chauffage permanent).
O Le thermostat d' ambiance commute I'apparel! de
chauffage de "plain regime" a "regime partial".
O LED vert dans le thermostat d'ambiance: indlcateur de
fonctlonnement.
R1 seulement pour le regime partial.
Ventilation.
Mise hors circuit.
Chauffage.
Froid.
Chaud.
Lorsqu'une sonde de temperature liAlema est relies, la
connexion dolt etre separeee de boltlar de thermostat.
La sonde de temperature lnterne n'est pas en
fonction. II n'est pas possible de rappeler le systemel.
Legende voir page 155.
Diagramme de fonction volr page 64.
Funzionamento con termostato
ambiente elettronico.
Funzjooamanto·
O Portare su "ventilazione" azionando l'nterruttore del
termostato ambients.
Portare su "riscaldamento" utilizzando lo stesso
interruttore: durata llllmitata.
O Durante ii riscsldamento I'apparecchio viene regolato
tra potenza plena e potenza rldotta ad opera del tarmostato
amblente.
O LED verde nel termostato ambiente: spia
funzionamento.
O
R1 solo per potenza ridotta.
Ventllazione.
Spegnimento.
Riscaldamer)lo.
Fredda,
Caldo.
Se si lmplega un termosensore ~ e necessario
togliere II ponte sul lato superiors del corpo. In tal
modo viene messo fuori servlzio ii termosensore
interno (none possibile alcun riprlstlno!),
Per leggenda vedere pag. 155.
Per diagramma di funzionam. ved. pag. 108.
www.butlertechnik.com
151
http://sales.butlertechnik.com/webasto/webasto-air-heater-spare-parts/hl18
9 Wiring diagrams • Plans de connexions • Schemi collegamenti elettrici
SG 1561 GT
a
X4
X7
X6
XS
X1
X2 X3
A
[~~~gj] [~~~~] i ~
B
C
Im
D
5s~~~~~-.~~~~~~~~~~~~~~~~~....,~~~~~~~~~~~~~~~~~~~~~~~~~~5B
,~~~~.--+-~~~~~~~~~~~~~~~~~~~~~~~~~~~~~~~~~~~~~~~~~75(15)
=========l=i;;l-;;===========================================1.--===========================~11""'"================:30
F1
Fig. 13: Automatic control for HL 18 D l!'lli1!:!.
part-load operation, 12 and 24 volts,
(14887A)
e
~
Fig. 13: Branchement automatlque pour HL
18 D ~le regime partlel, 12 et 24 volts,
(14887A)
e
F2
~
Fig. 13: Comando automatico per
riscaldatore HL 18 D ~ potenza ridotta,
12 e 24 Volt, (14887A)
e
Operation with digital timer and electronic
room thermostat.
Fonctlon avec la montre de pr8-selectlon et le
thermostat d 'amb. eleectron.
Funzionamento con timer digitale e
termostato amblente elettronlco.
Cf~~~~hing on ''ventilation" with switch in room
ElJ.olstil2n;
Mise en service "ventilation" avec l'interrupteur de thermostat
d'ambiance.
O Mise en service "chauffage" avec montre de pre-sel.;
preselection "chauff. immediat" (limitee ou illimltee).
Mise en service "chauffage" avec l'interrupteur de thermostat
d'ambiance: ilimitee.
() Le thermostat d'ambiance commute l'apparell de chauffage
"plain regime" "regime partial".
LED vM dans la montre de pre-selection: lndlceteur de fonctionnement.
LED vert dans le thermostat d'ambiance: indiceteur de fonctionnement
Eunzjonamento:
thermostat.
0 Switching on "heater" with digital timer; preselection "instant heating" (definite or Indefinite).
Switching on "heater" with switch in room thermostat:
indefinite.
O The room thermostat switches the heater from "full heat"
\g."reduced heat" during heating operation.
V Green LED in digital timer: operation indicator.
0 Green LEd in room thermostat: operation indicator.
0
0
<V
Rt for reduced heat mode only.
Digital timer P:
- pin 9 is connected to positive: idefinite operation for
"immediate heating";
- pin 9 is not connected to positive: heating period 1 hour.
Ventilation
Off.
Heating.
Cool.
Warm.
If an ~temperature sensor is connected,
then the wire bridge on the top of the housing must
be cut. After that the internal temperature sensor is
not in·function. It is not possible to reset the system I.
i
Legend see page 155.
Functional diagram see page 20.
152
O
0
ae
8
CD
©
1~
3~
a
Rt seulement pour le regime partial.
O Portare su "venlilazione" azionando 1·nterruttore del
termostato ambients.
0 Portare su "riscaldamento" azionando l'interruttore del
timer: durata ilimitata.
Portare su "riscaldamento" con ii timer digitals; tipo di
0
preselezione "riscaldamento immediate" (limitato o illimitato).
Durante ii riscaldamento I' apparecchio viene regolato tra
O
potenza piena e potenza ridotta ad opera del termostato
ambients.
LED verde nel timer digitals: spia funzionamento.
LED verde nel termostato ambiente: spia funzionamento.
8
CD
Rt solo per potenza ridotta.
Montre de pre-selection P:
- branchement 9 au plus: fonctionnement indeiini pour
"mise en service immediate":
- sans branchement 9 au plus: chauffage t heure.
@ Timer digitale P:
Ventilation
Mise hors circuit.
Chauttage.
Froid.
Chaud.
Lorsqu'une sonde de temperature~ est relies, la connexion
doit ~Ire separeee de boltier de thermostat. La sonde de
temperature inteme n'est pas en fonction.11 n'est pas possible de
rappeler le systemel.
I
Legende volr page 155.
www.butlertechnik.com
fonction volr page 64.
Diagramme de
- positivo su attacco 9: funzionamento con
riscaldamento immediate:
- senza positive su attacco 9: durata nscaldamento 1 hora.
Ventilazione
Spegnimento.
Riscaldamento.
Fredda.
Galdo.
Se si impiega un termosensore lllilerrJQ e necessario
togliere ii ponte sul lato superiors del corpo. In tal modo
viene messo fuori servicio ii termosensore interno (non e
possibile alcun ripristinol).
Per leggenda vedere pag. 155.
·
Per diagramma di funzlonam. ved. ag. 108.
http://sales.butlertechnik.com/webasto/webasto-air-heater-spare-parts/hl18
9 Wiring diagrams • Plans de connexions • Schemi collegamenti elettrici
SG 1561 GT
X4
~
2
X6
XS
X1
X2 X3
A
B
C
Im
D
ss----~"""'"--------------------------------~------ss
----1""""il---------------------------------------75{15)
===-=-'*"=l=-=-=-=-=-=-=========-=-========l11"==-=-=====-=-=-=-=-~1F========-=====30
F1~
F2
~
SW
(
Fig. 14: Automatic control for HL 18 D Yli1h
part-load operation, 12 and 24 vol,s, ,
(14885A)
Fig. 14: Branchement automatique pour
HL 18 D ~le regime partiel, 12 et 24
volts, (14885A)
Fig.14: Comando automatico per
riscaldatore HL 18 D QQD. potenza ridotta,
12 e 24 Volt, (14885A)
•
Operation with digital timer and mechanical room
thermostat.
ethermostat
Foncllon avec la montre de pre-selection et le
d"amb. mecanlque.
Funzlonamento con timer dlgitale e termostato
amblente meccanlco.
Function:
Switching on "heater" with digital timer;
pre-selection "immediate heating" (definite or
indefinite).
Requirements: switch 86 in room thermostat is
set in position "on"
0 The heater is switched from "full heat" to
"reduced heat" depends on position of switch,
and it is switched off if the rated temperature is
reached.
0
Green LED in digital timer: operation
indicator.
Eonctjonnement:
O
Mise en service "chauffage" avec montre
de pre-selection; "chauffage immediat" (limitee
ou illimitee). Supposition: l'interrupteur 86
dans le thermostat d'ambiance est mis en
position "marche".
O L'appareil de chauffage est commute de
"plein regime" "regime partial" et ii est hors
circuit si la temperature nominale est
rattrapee.
O LED vert dans la montre de preselection: indicateur de fonctionnement.
Funzjonamento:
0
Portare su "riscaldamento" mediante ii timer
digitale; tipo di preselezione "riscaldamento
immediato" (durata limitato o illimitato). Premessa:
portare su "on" f'interruttore S6 def termostato
ambiente.
O Durante ii riscaldamento l'apparecchio puo
essere regolato tra potenza piena e potenza ridotta a
seconda della posizione dell'interruttore e si spegne al
raggiungimento della temperatura di taratura.
O
LED verde nel timer digitale: spia
funzionamento ..
0
Q
®
Rt for reduced heat mode only.
Digital timer P:
- pin 90 is connected to positive: idefinlte operation for "immediate heating";
- pin 9 is not connected to positive: heating period t hour.
Legend see page 155.
Eunctlonal diagram see page 20.
a
G)
®
Rt seulement pour le regime partial.
Montre de pre-selection P:
- branchement 9 au plus: fonctlonnement indeflni pour
11
mise en service immediate";
- sans branchement .9 au plus: chauffage 1 heure.
Legende voir page 155.
Dlagramme de fonctlon volr page 6.4.
www.butlertechnik.com
e
G)
~
R1 solo per potenza ridotta.
Timer digitale P:
- positivo su anacco 9: tunzionamento con
riscaldamento Immediato;
- senza positivo su attacco 9: dulltta riscaldamento t ora.
Per leggenda vedere pag. 1~5.
Per diagramma di tunz. ved. pag. 108.
153
http://sales.butlertechnik.com/webasto/webasto-air-heater-spare-parts/hl18
9 Wiring diagrams • Plans de connexions • Schemi collegamenti elettricl
TRS
~X1
X2 X3
X4
F
E G
[ill] [ill]
A
•4
. H
0
o
l~~\E]
B
C
D
i ml [~~~~]
D+/01---------+-------------------------------0+/61
~
k
~
52
F2~
F1~
\
I
iI
I
I
I
®!
@
I
Fig.15: Automatic control for HL 18 D
(I.BS), 12 and 24 volts,, (20250A)
Fig. 15: Branchement automatique pour
HL 18 D IT.BSl, 12 et 24 volts, (20250A)
Fig.15: Comando automatlco per
HL 18 D .(!BS), 12 e 24 Volt, (20250A)
e
Operation with switch (l1Yi1!lill!l
reduced heat).
for vehicles transporting dangerous
goods according to TRS 002 and TRS 003.
e
Fonction avec l'interrupteur (Bili le
regime partiel).
•
pour les vehicules au transport de
marchandises dangereuses selon TRS 002
etTRS 003.
e Funzionamento coninterruttore (~
potenza ridotta).
e per veicoli adibiti al trasporto di
0
O
Pour le montage des chauffages sur des
vehicules de transport de matieres dangereuses, les
dispositions de TR8 002 et TR8 003 (directives
techniques du transport par route de produits
dangereux) doivent etre observees (pour
l'Allemagne). Vair !'Information E3-5.8 (ref. 770514)
pour les autres instructions.
Le commutateur 84 doit etre installe de tells
sorte, qu'il ferme son contact a p61e negatif lors de
la mise en service d'un dispositif d'acheminement.
O
i
i
e
For the installation of heaters HL 18 D (TR8)
in vehicles transporting dangerous goods the
instructions of TR8 002 and TR8 003 (technical
directions dangerous goods versions) must be
observed additionally to the german 8tVZO. Other
instructions see Technical Information E 3 - 5.8
(order no. 770514).
O The switch 84 has to be installed in such a
manner that it closes the minuscontact, when a
delivering device starts its operation.
Heating.
Ventilation.
Cable 1.
Cable 2.
m
Legend see page 155.
Functional diagram see page 20.
154
o
Chauffage.
Ventilation.
Cable 1.
Cable 2.
Legende voir la page 155.
Diagramme de fonctlon voir page 64.
www.butlertechnik.com
materiali pericolosi in conformita alle
norme TRS 002 e TRS 003.
Per ii montaggio su veicoli destinati al trasporto
di merci pericolose eammesso solo ii riscaldatore HL
18 D (TR8), che va montato in ottemperanza alle
norme TRS 002 e TR8 003 (direttive tecniche per
trasporto su strada di materiali pericolosi). Per ulteriori
disposizioni si rimanda all'lnformazione Webasto E3 5.8 (cat. nr. 770514).
O L'interruttore 84deve essere installato in modoche
ii suo contatto negativo venga chiuso, quando viene
messa in funzione un dispositivo di alimentazione.
Riscaldamento.
Ventilazione ..
Cavi 1.
Cavi 2.
Per leggenda vedere pag. 155.
Per diagramma di funzion. ved. pag.108.
http://sales.butlertechnik.com/webasto/webasto-air-heater-spare-parts/hl18
9 Wiring diagrams • Plans de connexions • Schemi collegamenti elettricl
Item Description
Rep. Designation
Pos. Denomlnazlone
Remarks
Remarques
Speciflcazioni
Item Description
Rep. Designation
Pos. Denomlnazlone
Remarks
Remarques
Specificazlonl
A1
Heater
Appareil de chauffage
Rrscaldatore
HL 18 8/D or HL 18 D (TRS)
HL 18 8/D OU HL 18 DYRS)
HL 18 8/D o HL 18 D ( RS)
R1
Resistance for reduced heat
Resistance de regime partial
Resistenza (potenza ridotta)
resistance to M1
resistance a M1
supplementare per M1
A2
Control unit
8o1tier de commande
Centralina
SG 1S61-GT TRS with Integral Glow Pulsing
SG 1S61-GT TRS avec cadence de combustion integree
SG 1S61-GT TRS con comando ad impulsi integrate
S2
Switch
Commutateur
lnterruttore
battery switch
robinet de batterie
interruttore batteria
A3
Control unit TRS/ADR
8o1tier de commande TRS/TMD
Centralina TRS
SG 1S47
S3
Switch
Commutateur
lnterruttore
safety switch
commutateur de securite
interruttoredi sicurezza
81
Flame detector
CantrOleur de flamme
Fotoresistenza
ensure correct polaritiy
r,alarite impartante
are attenzione alla polarita
S4
Switch
lnterruttore
Na+/Na- TRS or Switch on delivering device
Na+/Na- TRS cu Commutateur on delivering device
Na+/Na- TRS oinlerruttore nella apparecchiat. di alimentazione
82
Thermostat
Thermostat
Termostato
Overheat
Limiteur de termperature
Termolimitatore
$5
Switch
Commutateur
lnterruttore
heating I off I ventilation
chauffage I arret I ventilation
riscaldamento I spegnim. I ventilation
83
Thermostat
Thermostat
Termastata
Room thermostat
Thermostat d'ambiance
85
Switch
Commutateur
ventilat. I off I full heat I reduced heat
ventilat. I arret i plein reg. I rag. partial
ventilat. I spegnim. /pot. piene I pot. ridotta
E
Commutateur
lnterruttore
Termostato ambiente
Glow Plug
Bougie
S6
a incandescence
Switch
lnterruttore
on I off
marche I arret
riscaldamento I spegnimento
Commutateur
Candela
F1
Fuse
SA
Fusible 5A
Fusi bile 5A
plate fuse SAE J 1284
fusible plate SAE J 1284
fusibile piatto SAE J 1284
87
Switch
Commutateur
lnterruttore
full/reduced heat, reduced heaVoff
plain/part. regime, regime part./arret
pot. piena/pot. ridotta, pot. ridotta/spegnim.
F2
Fuse
2SA
Fusible 25A
Fusibile 2SA
plate fuse SAE J 1284
fusible plate SAE J 1284
fusibile piatta SAE J 1284
88
Switch
iin item 83k
Commutateur dans re~. 3)
lnterruttore
(in pas. 3)
ventilation I off I heating
ventilation I arret I chauffage
ventilation I spegnim. I rlscaldamento
H1
Green LED
~~b"~~~j~t
Orrrration indicator (in item P)
T main d.e fonctian (dans re~. P)
spia funzronamento (in pas. )
V16
V17
Diode
Diode
Diode
H2
Yellow LED
Vobant jaune
LE giallo
program ready light (in item P)
pre-selection (dans rep. P~
spia preselez. attivata (in cs. P)
V101 Transistor
Transistor
Transistor
H3
Lamps
Voyants
Lampada
symbol lighting (in item P)
eclairage (dans rep. P)
illuminazione simboli (rn pas. P)
X1
Connector
Raccordement
Collegamento
H4
Green LED
Voyant vert
LED verde
Operation indicator (in item 83)
Temoin de fonction (dans rep. 83)
spia funzionamento (in pas. 83)
X2
Connector
H6
Green light
Voyant vert
Lampada verde
Oceration indicator \in item SS)
T main de fonction dans rep. S5)
spia funzionamento (in pas. SS)
X3
K1
Relay
Relars
Rele
for glow plug
pour incandescence
per incandescenza
X4
Connector
Raccordement
Colle.0amento
2 poles
2 pOles
K2
Relay
Relais
Rele
(in item A2)
(dans reK A2)
(in pas. 2)
X5
Connector
Collegamento
2 poles
2 p61es
a spina bipolare
~~:~rs
(in item A2)
\dans
A2)
in pas. 2)
X6
Rele
Connector
Raccordement
Collegamento
8 poles
8 pOles
a spina 8 poli
Relay
Relars
Rele
titemA2)
dans rep. A2)
in pos. A2)
X7
Connector
Raccordement
Collegamento
a spina unipolare
KS
Relay
Relais
Rele
xa
X7
Connector
Raccordement
Collegamento
8 poles
8 p61es
a spina 8 poli
K6
Relay
Relars
Rele
only needed with battery isolation
switch on negative pole
seulement pour montage avec
coupe batterie dans (-)
y
Dosing pump
Pompa doseur
Pompa oosatrice
Y2
Solenoid valve TRS or Solenoid wilt for Combustion Air Pipe
pour Conduite d'air de combustion
reduced consumption
Electrovanne TRS cu Electrovanne conbuzlone aria comburente
avec reduction de consommation
Valvola magnetica trs rips. vazvola
K3
K4
M1
p
(initemA2)
(dans rep. A2)
(in pos.A2)
in itemA2
dans reR" A2
in pas. 2
4 poles
4 p61es
a Spina 4 poli
2 poles
2 pOles
Raccordement
a spina bipolare
Collegamento
2 poles
2 p61es
' a spina bipolare
Connector
Raccordement
Collegamento
a spina bipolare
Ra.ccordement
reK
necessari solo con interruttore
batteria nel (-)
.
Motor
Moteur
Motore
combustioh air fan
Digital timer
Manire de pre-selection
Timer digitale
for ~rogrammed operation
affichage digital
per funzlonamento con preselezione
turbine d'air de combustion
ve"t11atore aria comburente
-
1 pole
1 pOle
magnetica con oiminuzione di
lootenza
Wire colours
Couleurs des. cAbles
Colori del cavl
bl blue
bleu
blu
br brown
brun
marrone
ge yellow
jaune
giallo
gn green
vert
verde
gr gray
gris
grigio
or orange orange aranc.
rouge
rosso
rt red
nero·
SW black
noir
vi violet
violet
violetto
WS white
blanc
bianco
Wire Ganges
Sections des conducteurs
Sezioni dei cavi
-----
-
='
,._..
< 7,6m
n 75mm2
1 Omm 2
1,5mm"
25mm2
An~~2
7,S-15m
1 Smm2
1 Smm2
2,5mm2
40mm2
Rnmm2
www.butlertechnik.com
155
http://sales.butlertechnik.com/webasto/webasto-air-heater-spare-parts/hl18
9 Wiring diagrams • Plans de connexions • Schemi collegamenti elettrici
SG 1561 GS
A
X2
~or
~gn
~
c
B
m
X4
~
XS
30========================================~.====================i.======;;;:;;:::=~
~ F2
~ F1
X1
.... , ,, ",..-
,f
'•~
"'"·~·~·
A1
M1
-=-"=-~========================================;;;:;;:::=
52
Fig. 16: Automatic control for
Air Top 18, 12 and 24 volts
'
Fig. 16: Branchement
automatique pour
Air Top 18, 12 et 24 volts
a
Fig. 16: Comando automatico per
riscaldatore
Ait Top 18, 12 e 24 Volt
.A. For petrol heater, remove this
connection.
.A. Pour chauffage essence
supprimer ce branchement.
.A. Rimuovere questo attacco per
gli apparecchi a benzina.
Operation with mechanical room
thermostat.
Fonction avec le thermostat
d'ambiance mecanique.
Funzionamento con termostato
ambiente meccanico.
Legend see page 157.
Legende voir les pages 157.
Per leggenda vedere pag.157.
Wire Ganges
Sections des conducteurs
Sezioni dei cavi
---
< 7,5m
075mm2
1,0mm'
--
25mm2
4nmm2
-
156
1,5mm~
7,5-15m
15mm2
1 5mm'
25mm2
40mm 2
"nmm2
Wire colours
Couleurs des cables
Colori dei cavi
bleu
blu
bl blue
brun
marrone
br brown
giallo
ge yellow
jaune
vert
verde
gn green
gr gray
gris
grigio
or orange orange aranc.
rouge
rosso
rt red
noir
nero
SW black
vi violet
violet
violetto
www.butlertechnik.com
blanc
bianco
ws white
http://sales.butlertechnik.com/webasto/webasto-air-heater-spare-parts/hl18
9 Wiring diagrams • Plans de connexions • Scheml coUegamenti elettrici
58
Fig. 17: Example for application only required if battery switch
connected to negative(·)
Fig. 17: exemple d'utilisation necesslte seulement lorsque le
disjoncteur de batterie est sur pole negatif (-)
TIK5
Fig. 17: esempio di applicazlone necessario solo a interruttore d.
batteria su negativo (·)
_}1fv11
X6
(
Item Description
Rep. Designation
Pos. Denomlnazlone
Remarks
Remarques
Speclflcazlonl
H1
~~ba~~~de:
O~eration indicator \in item P)
T moin de fonction dans re~ P)
spia funzionamento (in pos. )
H2
Yellow LED
voi;ant jaune
LE giallo
program ready light (in item P)
pre-selection (dans rep. P~
spia preselez. attivata (in os. P)
H3
Lamps
Voyants
Lampada
symbol lighting (in item P)
eclairage (dans rep. P/
illuminazione simboli ( n pos. P)
H4
Green LED
Voyantvert
LED verde
O~eration indicator (in item 83)
T moin de fonction (dans re~ 83)
spia funzionamento (in pos. 3)
K1
Relay
Relars
Rele
for glow plug
pour incandescence
per incandescenza
K2
Relay
Rela1s
Rele
K3
Relay
Relars
Rele
K4
Relari
Relas
Rele
K5
Relay
Relars
Rele
K6
Relay
Rela1s
Rele
only needed with battery isolation
switch on negative pole
seulement pour montage avec
coupe batterie dans (-)
necessari solo con interruttore
batteria nel (-)
M1
Motor
Moteur
Motore
'Combustion air fan
turbine d'air de combust'ron
ventllatore aria comburente
p
Digital timer
Montre de pre-selection
Timer digitale
for programmed operation
affichage digital
per funzionamento con preselezione
R1
Resistance for reduced heat
Resistance de regime partial
Resistenza (potenza ridotta)
resistance to M1
resistance a M1
supplementare per M1
S2
Switch
Commutateur
lnterruttore
battery switch
robinet de batterie
staccabatteria
S3
Switch
Commutateur
lnterruttore
safety switch
commutateur de securite
interruttore di sicurezza
S6
Switch
Commutateur
lnterruttore
on I off
marche I arr~t
riscaldamento I spegnimento
S7
Switch
Commutateur
lnterruttore
full/reduced heat, reduced heaVoff
plain/part. regime, regime part./arr~t
pot. piena/pot. ridotta, pot. ridotta/spegnim.
SS
Switch
Commutateur
lnterruttore
Green LED
rn item A2)
dans reR' A2)
in pos. 2)
t
t
itemA2)
dans reR' A2)
in pos. 2)
itemA2)
dans
A2)
In pos. 2)
t
reR.
itemA2)
dans reg. A2)
in pos. 2)
t
item 83~
dans re~. 3)
in pos. 3)
ventilation I off I heating
ventilation I arr~t I chauffage
ventilation I spegnim. / riscaldamento
V16
V17
Item Description
Rep. Designation
Pos. Denomlnazlone
Remarks
Remarques
Speclflcazlonl
Diode
Diode
Diodo
V101 Transistor
Transistor
Translstore
A1
Heater
Appareil de chauffage
Riscaldatore
Air Top 18
X1
Connector
Raccordement
Collegamento
4 poles
4 pOles
a spina4 poli
A2
Control unit
Boitier de commande
Centralina
SG 1561-GS
X2
Connector
Raccordement
Collegamento
2 poles
2 pOles
a spina bipolare
81
Flame detector
ContrOleur de flamme
Fotoresistenza
ensure correct polaritiy
fiolarite importante
are attenzione alla polarita
X3
Connector
Raccordement
Collegamento
2 poles
2 pOles
a spina bipolare
82
Theimostat
Thermostat
Termostato
Overheat
Limiteur de termperature
Termolimitatore
X4
Connector
Raccordement
Collegamento
2 poles
2 pOles
a spina bipolare
83
Thermostat
Thermostat
Termostato
Room thermostat
Thermostat d'.ambiance
Termostato ambiente
X5
Connector
Raccordement
Collegamento
2 poles
2 pOles
a spina bipolare
E
Glow PIUQ
Bougie a incandescence
Candela
X6
Connector
Raccordement
Collegamento
8 poles
8 pOles
a spina 8 poli
F1
Fuse
5A
Fusible 5A
Fusi bile 5A
f.late fuse SAE J 1284
usible plate SAE J 1284
fusiblle piatto SAE J 1284
X7
Connector
Raccordement
Collegamento
1 pole
1 pOle
a spina unipolare
F2
Fuse
25A
Fusible 25A
Fusi bile 25A
f.late fuse SAE J 1284
uslble plate SAE J 1284
fusibile piatto SAE J 1284
y
Dosing pump
Pompa doseur
Pompa dosatrice
in itemA2
dans reR' A2
in pos. 2
www.butlertechnik.com
157
http://sales.butlertechnik.com/webasto/webasto-air-heater-spare-parts/hl18
9 Wiring diagrams • P.lans de connexions • Schemi collegamentl elettricl
Fig. 18: Example for appllcatlon In
connection with automatic control wiring
diagram Fig. 15 for Air Top 18
Fig. 18: exemple d 'utlllsatlon en rapport
avec le schema de connexion automatlque,
fig. 15 pour Air Top 18
Fig. 18: esemplo di appllcazlone In
collegamento con schema automatism! fig.
15 per Air Top 18
Connection control unit I part load resistor
I heater metering pump
connexion organe de commande/
resistance de regime partlel/apparell de
chauffage/pompe de dosage
Collegamento centralina/resistenza p.
potenza rldotta/rlscaldatore/pompa di
dosatrlce
1
10
11
12
Control unit
Plug connection, heater
Plug connection, metering pump
Part-load resistor
1
10
11
12
organe de commande
connecteur a fiches appareil de
chauffage
connecteur a fiches pompe de dosage
resistance de regime partial
·. .·
1
10
11
12
Centralina
Collegamento a spina riscaldatore
Collegamento a spina pompa di
dosatrice
Resistenza per potenza ridotta
Fig. 19: Example for application In
connection with automatic control wiring
diagram Fig. 15 for Air Top 18
Fig. 19: exemple d'utilisatlon en rapport
avec le schema de connexion automatlque,
fig. 15 pour Air Top 18
Fig. 19: esemplo di applicazlon&ln .,
collegamento con schema automatism! fig.
15 per Air Top 18
Connection control unit I fuse holder I
room thermostat (mechanical)
connexion organe de commande/portefuslbles/thermostat amblant (mecanlque)
Collegamento centrallna/portafuslblll/
termostato amblente (meccanlco)
1
2
3
4
5
158
Control unit
Fuse holder
To battery (+)
Ground(- )
Interior-temperature thermostat
(mechanical)
1
2
3
4
5
organe de commande
porte-tusibles
vars la batterie (+)
la masse (-)
.thermostat ambiant (mecanlque)
www.butlertechnik.com
1
2
3
4
5
Centralina
Portafusibili
alla batteria (+)
Massa (-)
. }e~mostato ambiente (meccanlco)
http://sales.butlertechnik.com/webasto/webasto-air-heater-spare-parts/hl18
9 Wiring diagrams • Plans de connexions • Sche.ml
coUegamenti elettrici
(
Fig. 20: Example for application In connection with
automatic control wiring diagram Fig. 15 for Air Top 18
Fig. 20: example d'utlllsatlon en rapport avec le schema
de connexion automaUque, fig. 15 pour Air Tc>p 18
Fig. 20: esemplo di appllcazlone In collegamento con
schema automatlsml flg.15 per Air Top 18
Connection control unit I fuse holder I room thermostat
(electronic)
connexion organe de commande/porte-fuslbles/
thermostat ambient (electronlque)
Collegamento centrallna/portafuslblll/termostato
amblente (elettronlbo)
1
2
3
4
5
Control unit
Fuse holder
To battery(+)
Ground(-)
Interior-temperature thermostat (electronic)
1
2
3
4
5
organe de commande
porte-fusibles
vars la batterie (+)
la masse (-)
thermostat ambiant (electronique)
1
2
3
4
5
Centralina
Portafusibili
alla batteria (+)
Massa(-)
Termostato ambiente (elettronico)
(
F1
@
'~~
®~
Fig. 21: Example for application In connection with
automatic control wiring diagram Fig. 15 for Air Top 18
Fig. 21: exemple d'utilisatlon en rapport avec le schema
de connexion automalique, fig. 15 pour Air Top 18
Fig. 21: esemplo di appllcazione In collegamento con
schema aulomatlsml fig. per 15 Air Top 18
Connection control unit I fuse holder I switch
connexion organe de commande/porte-fuslbles/commutateur
Collegamento centrallna/portafuslbill/interruttore
1
2
3
4
6
17
Control unit
Fuse holder
To battery (+)
Ground(-)
Switch
Remove the two while retension pins
1
2
3
4
6
17
organe de commands
porte-fusibles
vars la batterie (+)
la masse (-)
commutateur
Enlever les 2 goupilles blanches
1
2
3
4
6
17
Centralina
Portafusibili
alla batteria (+)
Massa(-)
lnterruttore
Rimuovere i due perni bianchi
www.butlertechnik.com
159
http://sales.butlertechnik.com/webasto/webasto-air-heater-spare-parts/hl18
9 Wiring diagrams • Plans de connexions • Schemi collegamenti elettrici
Fig. 22: Example for application for Air Top 18
Fig. 22: exemple d'utilisation pour Air Top 18
Fig. 22: esemplo di appllcazlone per Air Top 18
Ventilation operation by means of switch or
room thermostat (electronic)
aeration a I'aide du commutateur ou du
thermostat ambiant (electronlque)
Funzionamento a ventilazlone con lnterruttore o
termostato ambiente (elettronico)
Disconnect line bk/rd as shown in
figure and establish line connection
to switch, contact 3, or room thermostat (electronic), contact 1.
1
12
13
160
Control unit
Part-load resistor
Line connection of switch or room
thermostat (electronic).
wire color rd/bu to be used owing to
the danger of interchanging wires
separare circuito nero/rosso secondo
raffigurazione e instaurare
collegamento all'interruttore contatto
3 o al termostato ambiente
(elettronico) contatto 1
deconnecter le conducteur noir/rouge
et realiser une liaison au commutateur,
contact 3, ou au thermostat ambiant
(electronique), contact 1
12
13
organe de commande
resistance de regime partial
connecteur commutateur ou
thermostat ambiant (electronique).
utiliser des conducteurs de couleur
rouge/bleu pour eviter toute confusion
www.butlertechnik.com
1
12
13
Centralina
Resistenza per potenza ridotta
Collegamento circuito interruttore o
termostato ambiente (meccanico):
causa pericolo di scambio usare rosso/
blu
http://sales.butlertechnik.com/webasto/webasto-air-heater-spare-parts/hl18
9 Wiring diag.rams • Plans de connexions • Schemi
coltegamenti eleJtrici
/
c
Fig. 23: Example for appllcatlon In
connection with automatic control wiring
diagram Fig. 15 for Air Top 18
Fig. 23: exemple d 'utlllsatlon en rapport
avec le'SCh&ma·de connexion automatlque,
fig. 15 pour Air Top 18
Fig. 23: e"mplo di appllcazlone In
collegamento con schema automatism I fig.
15 per Air Top 18 .
Connection control unit I fuse holder I .
Timer 1522 (24 hours)
connexion organe de commande/portefuslbles/mlnuterle de preselectlon 1522 (24
heures)
Collegamento centrallna/portafuslblll/timer
dlgltale 1522 (24.ore)
1
2
3
4
8
14
15
15.1
16
(
Control unit
Fuse holder
To battery (+)
Ground(-)
Timer 1522 (24 hrs.)
Not used
Lighting (terminal 58)
If battery switch is connected to the
negative(·) side, see example for
application on page 63
If positive pole of terminal (75/15) is
connected to terminal 9:
continuous operation in "instant heat"
mode as long as ignition is on. If
positive pole of terminal (30) is
connected to terminal 9:
continuous operation in the "instant
heat" mode.
If positive pole is not connect~d to
terminal9.
l
heating duration 1 hour.
.
1
2
3
4
8
14
15
15.1
16
organe de commande
porte-fusibles
vers la batterie (+)
la masse (-}
minuterle de preselectlon 1522 (24 h)
vierge
eclairage (borne 58)
disjoncteur de batterie sur pOle negatlf:
se referer a example d'utilisation page
63
cote positif de la borne (75/15) sur
raccord 9:
service continu lors du chauffage
immediat tant qua l'allumage est
amorce cote positif de la borne (30)
sur raccord 9:
service continu lors du chauffage
immediat
sans p61e positif sur raccord 9:
duree de chauttage: 1 heure
1
2
3
4
8
14
15
15.1
Centralina
Portafusibili
alla batteria (+)
Massa(-)
Timer digitale 1522 (24 ore)
non occupato
llluminazione (morsetto 58)
con interruttore d. batteria su
negativo vedi esempio di applicazione
pag ~ 63
16
con positivo d. morsetto (75/15)
al collegamento 9:
ciclo c0ntinuo a riscaldamento
Immediato f.incM accensione accesa
con positivo d. morsetto (30)
al collegamento 9:
funzionamento continua a
riscaldamento immediato
senza positivo al collegamento 9:
ciclo di riscaldamento per 1 ora
(
\
www.butlertechnik.com
161
co.tleg~menti .elettrici
http://sales.butlertechnik.com/webasto/webasto-air-heater-spare-parts/hl18
9 · Wiring diagrams • Plans de connexions • Schemi
Fig. 24: .Example for. appllcatlon·In
connection -wlth·automatlc"control wiring
diagram Fig. 15 for Air Top 18
Fig. 24: exemple d 'utilisation en n1pport
avec le schema.de'Connexlon·automatlque,
fig. 15 pour Air Top 18 :
Fig. 24: esemplo·dl·.app11cazlone In .
collegamento con tchema.auto.matl.sml .fig.
15perAlrTop.18.
• ;,; . · ..,·"· .. · .;..
Connection control· unit I fuse holder I room
thermostat (mechanical) f. Tlmen 522 (24 ·
hours)
connexion or.ganede c.ommande/porte-.
fuslblestthermC11stat amblant'(mecanlqwe)/ .·
mlnuterle de preselectlon 1522 (24 heures)
Collegamento :centrallnatportafuslblllf .··
termostato amblente (:'meccanlco)/tlmer ·
dlgltale 1522 (24 ore)
1
2
3
4
5
8
14
15
15.1
16
Control unit
Fuse holder
To battery(+)
Ground(-)
Interior-temperature ·thermostat
(mechanical)
Timer 1522 (24 hrs.)
Not used
Lightir.ig ~terminal58)
If battery switch is connected to the
negative Vi side, see example for
application on page 63
If positive pole of'terminal (75/15) is
connected to terminal 9:
conti11uous operation in "instant heat"
mode as long as ignition is on. If
positive pole of terminal (30) is
connected to term'inal·9: ·
continuous-operation in the "instant
heat" mode.
If positive pole is not connected to
terminal9.
heating duration 1 hour.
1
1
2
3
organe decommande·
porte-fusibles
vers la batterie (+)
4
la masse (-)
5
thermostat ambiant (mecanique)
8
minuterie de preselection 1522 (24 h)
14
vierge
1'5 • . eclairage (bbrne 58)
15:1 . disjoncteur de batterie sur p61e
negatif: se reterer a exemple
d'utilisation page 63
cote positif de la borne (75115) sur
raccord Q:
service continu lors du chauffage
immediat tant que l'allumage est
amorce cote positi! c:fe la borne (30)
sur. raccord 9.: .. ··
.
. .
service continiJ lors du c~auffage
immediat
·
. ·,
sans. pole positif sur raccord .9:
duree de chauffage; 1 heure •
2
3
4
5
8
www.butlertechnik.com
ct62
14
15
15.1
16
Centralina
Portafusibili
alla batteria (+)
Massa(-)
Termostato ambiente (meccanico)
Timer digitals 1522 (24 ore)
non occupato
llluminazione (morsetto 58) .
con ·interruttore ct. batteria su negativo
vedi esempio di.applicazione·pag. 63
con positivo·d... morsetto (7515)
al collegamento.9:
ciclo continua a riscaldamento
immediate finche accensione accesa
con positive d. morsetto (30)
al collegamento 9:
funzionamento continue a
riscaldamento immediato
senza positiv.o at.collegamento 9:
ciclo di riscaldamento per 1·ora
----.)
.,
http://sales.butlertechnik.com/webasto/webasto-air-heater-spare-parts/hl18
9 Wiring diagrams • Plans de connexions • Scheml
collegamenti elettrici
(
(
Fig. 25: Example for appllcatl~n In
connection with automatic control wiring
diagram Fig. 15 for Air Top 18
Fig. 25: exemple d 'utilisatlon en rapport
avec le schema de connexion
automatlque, fig. 15 pour Air Top 18
Fig. 25: esemplo di appllcazlone In
collegamento con schema automatism! fig.
15 per Air Top 18.
Connection control unit I fuse holder I room
thermostat (electronic) I Timer 1522 (24
hours)
connexion organe de commande/porte·
fuslbles/thermostat ambient
(91ectronlque)/mlnuterle de pres91ectlon
1522 (24 heures)
Collegamento centrallna/portafuslbill/
termostato amblente (elettronlco)/tlmer
dlgltale 1522 (24 ore)
1
2
3
4
7
8
14
15
15.1
16
Control unit
Fuse holder
To battery(+)
Ground(-)
Interior-temperature thermostat
(electronic)
Timer 1522 (24 hrs.)
Not used
Lighting (terminal 58)
If battery switch is connected to the
negative(-) side, see example for
application on page 63
If positive pole of terminal (75115) is
connected to terminal 9:
continuous operation in "instant heat"
mode as long as ignition is on. If
positive pole of terminal (30) is
connected to terminal 9:
continuous operation in the "iri~tant
heat" mode.
If positive pole is not connected to
terminal9.
heating duration 1 hour.
1
2
3
4
7
8
14
15
15.1
16
organe de commande
porte-fusibles
vers la batterie (+)
la masse (-)
thermostat ambiant (electronique)
minuterie de preselection 1522 (24 h)
vierge
eclairage (borne 58)
d isjoncteur de batterie sur p61e
negatif: se referer example
d'utilisation page 130
cote positif de la borne (75/15) sur
raccord 9 :
service continu lors du chauffage
immediat tant que rallumage est
amorce cote pos,itif de la borne (30)
:sur raccord
service continu lors du chauffage
immediat
sans p61e positif sur raccord 9:
dun~e de chauffage: 1 heure
a
s: . "
1
2
3
4
7
8
14
15
15.1
16
Centralina
Portafusibili
alla batteria (+)
Massa(-)
Termostato ambiente (elettronico)
Timer digitale 152.2 (24 ore)
non occupato
llluminazione (morsetto 58)
con interruttore d . batteria su negativo
vedl esempio di applicazione pag. 63
con positivo d. morsetto (7515)
al collegamento 9:
ciclo continuo a riscaldamento
immediato finche accensione accesa
con positivo d. morsetto (30)
al collegamento 9:
funzionamento continuo a
riscaldamento immediato
senza positivo al collegamento 9:
ciclo di riscaldamento per 1 ora
www.butlertechnik.com
163
http://sales.butlertechnik.com/webasto/webasto-air-heater-spare-parts/hl18
9 Wiring diagrams• Plans
de connexions• Schemi collegamenti elettrici
F1
CD
"~~
®~
Fig. 26: Example for applicatlon .in
connection with automatic control wiring
diagram Fig. 15 for Air Top 18
Fig. 26: exemple d'utllisatlon en rapport
avec le schema de connexion
automatique, fig. 15 pour Air Top 18
Fig. 26: esempio di applicazlone in
collegamento con schema automatlsmi fig.
15 per Air Top 18 . ·
Connection control unit I fuse holder I
Timer (7 days)
connexion organe de commande/portefusibles/minuterie d~ preselectlon (7 )ours)
Collegamento centralina/portafusibili/timer
dlgltale 1522 (7 giorni)
1
2
3
4
9
14
15
15.1
16
Control unit
Fuse holder
To battery(+)
Ground(-)
Timer (7 days)
Not used
Lighting (terminal 58)
If battery switch is connected to the
negative(-) side, see example for
application on page 63
If positive pole of terminal (75/15) is
connected to terminal 9:
continuous operation in "instant heat"
mode as long as ignition is on. If
positive pole of terminal (30) is
connected to terminal 9:
continuous operation in the "instant
heat" mode.
If positive pole is not connected to
terminal9.
heating duration 1 hour.
1
2
3
4
9
14
15
15.1
16
organe de commande
porte-fusibles
vers la batterie (+)
lamasse (-)
minuterie de preselection (7 jours)
vierge
eclairage (borne 58)
disjoncteur de batterie sur pole
negatif: se referer example
d'utilisation page 63
cote positif de la borne (75/15) sur
raccord 9:
service continu lors du chauffage
immediat tant que l'allumage, est
amorce cote positif de la borne (30)
sur raccord 9:
service continu lors du chauffage
immediat
···
sans pole posliif ~ur raccord 9:
duree de chauffag~: 1 hei:lr,e
a
'·
www.butlertechnik.com
164
1
2
3
4
9
14
15
15.1
16
Centralina
Portafusibili
alla batteria (+)
Massa(-)
Timer digitale (7 gioni)
non occupato
llluminazione (morsetto 58)
con interruttore d. batteria su negativo
vedi esempio di applicazione pag. 63
con positivo d. morsetto (75/15)
al collegamento 9:
ciclo contlnuo a riscaldamento
immediato finche accensione accesa
con positivo d. morsetto (30)
al collegamento 9:
funzionamento contlnuo a
riscaldamento immediato
senza positivo al collegamento:
ciclo di riscaldamento per 1 ora
http://sales.butlertechnik.com/webasto/webasto-air-heater-spare-parts/hl18
9 Wlrlng·diagrams •Plans de connexions• Scheml
collegamenti elettrlcl
(
Fig. 27: Example for appllcatlon In
connection with automatic control wiri ng
diagram Fig. 15 for Air Top 18
Fig. 27: exemple d 'utlllsatlon en rapport
avec le schema de connexion
automatlque, fig. 15 pour Air Top 18
Fig. 27: esemplo di appllcazlone In
collegamento con schema automatism! fig.
15 per Air Top 18
Connection control unit I fuse holder I room
thermostat (mechanical) I timer (7 daya)
connexion organe de comma.nde/portefuslbles/thermostat amblant (mec.nlque)/
mlnuterle de preselectlon (7 )ours)
Collegamento centrallna/portafuslblll/
termostato amblente (meccanlco)/tlmer
dlgltale (7 glornl)
1
2
3
4
5
9
14
15
15.1
1
2
3
4
5
9
14
15
15.1
1
2
3
4
5
9
14
15
15.1
16
(
CoAtrol unit
Fus~ holder
To battery(+)
Ground (-)
Interior-temperature thermostat
(mechanical)
Timer (7 days)
Not used
Lighting (terminal 58)
If battery switch is connected to the
negative (-) side, see example for
application on page 63
If positive pole of terminal (75/15) is
connected to terminal 9:
continuous operation in "instant heat•
mode as long as ignition is on. If
positive pole of terminal (30) is
connected to terminal 9:
continuous operation in the "i~stant
heat" mode.
!
If positive pole is not connected to
terminal9.
heating duration 1 hour.
16
organe de commande
porte·fusibies
vers la batterie (+)
la masse (-)
thermostat ambiant (mecanique)
minuterie de preselection (7 jours)
vierge
eclairage (borne 58)
disjoncteur de batterie sur pale
negalif: se referer example
d'utilisation page 63
cote positif de la borne (75/15) sur
raccord 9:
service continu lors du chauffage
immediat tant que r allumage est
amorce cote positif de la borne (30)
sur raccord 9:
service continu lors du chauffage
. immediat
sans pOle positif sur raccord 9:
dun~e de chauffage: 1 heure
a
16
Centralina
Portafusibili
alla batteria (+)
Massa (-)
Termostato ambiente (meccanico)
Timer digitale (7 gioni)
non occupato
llluminazione (morsetto 58)
con interruttore d. batteria su negatlvo
vedi esempio di appiicazlone pag. 63
con positivo d. morsetto (75/15)
al collegamento 9:
ciclo continuo a riscaldamento
immediato fincM accensione accesa
con positivo d. morsetto (30)
al collegamento 9:
funzionamento continuo a
riscaldamento immediato
senza positivo al collegamento 9:
ciclo di riscaidamento per 1 ora
(
www.butlertechnik.com
165
http://sales.butlertechnik.com/webasto/webasto-air-heater-spare-parts/hl18
9 Wl·rlng diagrams·• Plans
de connexions• Scheml collegamenti·elettricl
' f~
@
F2
®
~·~
't
Fig. 28: Example·for application IFI
connection with automatic 'eor'ltrol•wlrlng
diagram Fig. 15 for Air Top 18
·
Fig. 28: example d ' utlllsatlon en rapport
avec le sch9n1a de connexion
automatlque;ttg. 15 pour Air Top 18
Fig. 28:· esemplo di appllcazlone In
collegamento 'con schema automatism! fig.
15 per Air Top 18
Connection control unit I fuse holder I room
thermostat (electronic ) I timer (7 'days)
connexion organe de commande/portefuslbles/thermostat ambient
(&lectronique)/minuterle de preselect lon (7
Jou rs)
Collegamento centralina/portafuslblll/
termostato amblente (elettronlco)/tlmer
digitale (7 glornl)
1
3
Control unit
Fuse holder
To battery(+)
4
Ground(~
7
Interior-temperature thermostat
(electronic)
Timer (7 days)
Not used
Lighting (terminal 58)
If battery switch is connected to the
negative(-) side, see example for
application on page 63 ·
If positive pole of terminal (75/15) is
•1
connected to terminal 9:
continuous operation in "instant heat"
mbde as long as ignition is on. If
positive pole of terminal (30) is
connected to terminal 9:
continuous operation in the "instant
heat" mode.
If positive pole is not connected to
terminal9.
heating duration 1 hour.
2
9
14
15
15.1
16
1
2
3
4
7
9
14
15
15.1
16
organe de commande
porte-fusibles
vers la batterie ( +)
lamasse(-)
thermostat amblant (ele~trbnique))
mlnuterie de preselection (7' jours)
'·
vierge
eclairage (borne 58)
disjoncteur de batterie sur pole
negatif: se reterer aexample
d'utilisation page 63
cote positif de la borne (75/ 15) sur
raccord 9:
service continu lors du chauffage
immediat tant que l'allumage est
amorce cote posltlf de la borne (30)
sur raccord 9:
service continu lors du chauffage
immediat
sans pole positif sur raccord 9:
duree de chauffage: 1 heure
1
2
3
4
7
9
14
15
15.1
16
Centralina
Portafusibili
alla batteria ( +)
Massa H
Termostato ambiente (elettronico)
Timer digitale (7 gioni) · ·
non occupato
llluminazione (morsetto 58)
con interruttore d. batteria su negative
vedi esempio di applicazione pag. 63
con positive d. morsetto (75/15)
al collegamento 9: ·
ciclo continua a riscaldamento
Immediato finche accensione accesa
con positive d. morsetto (30)
al collegamento 9:
funzionamento continue a
riscaldamento Immediato
senza positiv~·a1 collegamento 9:
clclo di riscaldamento per 1 ora
J
)
www.butlertechnik.com
. 166
http://sales.butlertechnik.com/webasto/webasto-air-heater-spare-parts/hl18
www.butlertechnik.com
Scaricare