ISTRUZIONI DI MONTAGGIO
ASSEMBLING INSTRUCTIONS
ITALIANO
Istruzioni di montaggio per argani ad asta serie “Monaco”
Caratteristiche:
– L’argano può essere montato sia a destra che a sinistra.
– Nel caso di argani senza finecorsa occorre utilizzare le apposite calotte con finecorsa destro o sinistro in relazione alla posizione
dell’argano.
– La manovra di sollevamento si deve realizzare TASSATIVAMENTE ruotando l’asta in senso orario (v. fig. 1).
OPERAZIONI:
– Stabilire la posizione dell’argano nel cassonetto assicurandosi che il rullo sia perfettamente normale all’argano e lo snodo sia allineato
al perno dell’argano.
– Trovare il finecorsa dell’argano prima di agganciare l’avvolgibile al rullo ruotando l’asta in senso antiorario fino a mandare la piastrina
B in appoggio sul dado A (il finecorsa provvede a fermare il movimento quando il telo è completamente abbassato).
ATTENZIONE: non intervenire sul dado A perché è stato tarato e bloccato per garantire l’azione autofrenante dell’argano.
Per argani senza finecorsa occorre solo inserire la calotta finecorsa nell’argano.
– Snodo cardanico: assicurarsi che il movimento dell’asta sia libero (diversamente occorre modificare la posizione dello snodo rispetto
all’argano).
– Snodo flessibile: consente anche un montaggio non perfettamente lineare; evitare comunque doppie variazioni di linea. La parte flessibile che sporge sotto la piastra deve essere compresa tra 5 e 15 mm. (v. fig. 2).
SI DECLINA OGNI RESPONSABILITÀ QUALORA NON VENGANO RISPETTATE LE ISTRUZIONI INDICATE.
montaggio a sinistra
fig. 1
montaggio a destra
fig. 2
253
ENGLISH
Assembling instructions for “Monaco” hand crank gears
DESCRIPTION:
– The gear can be mounted on the left or the right.
– If the gear does not stop at the end then it is necessary to use the appropriate caps with left or rights stops according to the position
of the gear.
– Lifting must be done ONLY by turning the crank clockwise (see fig. 1).
OPERATING:
– Establish the position of the gear in the case making sure that the tube is perfectly at right angles to the gear and the joint is aligned
with the pin of the gear.
– Find the end of the thread of the capstan before connecting the blind to the tube by turning the crank anticlockwise until the plate B
rests on the nut A (the gear will stop turning when the sheet is completely lowered).
IMPORTANT: do not move nut A because it has been set and blocked in order to ensure the automatic braking of the gear.
For gears without en of thread stops it is sufficient to simple screw on a cap.
– Universal joint: make sure that the crank is free to move (otherwise it will be necessary to change its position relative to the capstan).
– Flexible joint: mounting not exactly in line is possible but avoid two changes of alignment. The flexible part should protrude 5-15
mm below the plate. (see fig. 2).
NO RESPONSIBILITY IS ACCEPTED IF THE INSTRUCTIONS ABOVE ARE NOT FOLLOWED.
Assembly to left
fig. 1
Assembly to right
fig. 2
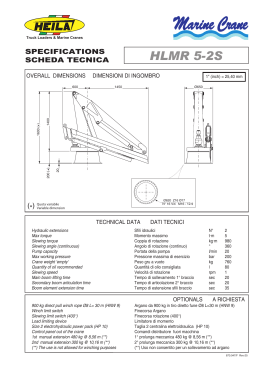
Scaricare