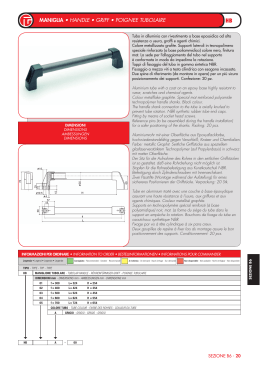
Livellometri Assestimetri idraulici Profiler Hydraulic settlement gauges Profiler Manuale d’uso/Instruction manual (09/04, Rev.2, D422F, D422M, D422P, D422R, D422SATO, D5HPG) Le informazioni contenute di seguito sono di proprietà di SISGEO S.r.l. Questo documento è soggetto a cambiamenti senza necessità di notifica ed è soggetto a restituzione su richiesta. Nessuna parte di questo manuale di istruzione può essere riprodotto in nessuna forma senza il permesso scritto di SISGEO S.r.l. The information contained herein is proprietary to SISGEO S.r.l. This document is subject to change without notification and is subject to return upon request. No part of this instruction manual may be reproduced in any form without written permission of SISGEO S.r.l. Redatto da / Written by Approvato DTE / Revised by INDICE CONTENTS 1. INTRODUZIONE 1. INTRODUCTION 2. DESCRIZIONE STRUMENTI 2. INSTRUMENTS DESCRIPTION LIVELLOMETRO DSM………………….….……… 2-1 DSM LEVELMETER SYSTEM………………….. 2-1 ASSESTIMETRO ELETTRICO DIFFERENZIALE…………………………………….. 2-4 DIFFERENTIAL SETTLEMENT SYSTEM…. 2-4 PROFILER………………………………………………. 2-8 PROFILER………………………………………………. 2-8 SATURATORE………………………..………………. 2-8 3. MODALITÀ D’INSTALLAZIONE SATURATOR……………….…………………………. 2-8 3. INSTALLATION PROCEDURE PREPARATION OF THE FLUID….…………… 3-1 PREPARAZIONE MISCELA PER RIEMPIMENTO CIRCUITI DSM E ASSESTIMETRICI DIFFERENZIALI……….. 3-1 INSTALLATION PROCEDURE FOR DSM.. 3-1 MODALITÀ DI INSTALLAZIONE DSM……. 3-1 Mounting of the sensor/vessel in the box..…………………………………………………... 3-4 Fissaggio della tazza DSM…………………. 3-4 Montaggio del gruppo trasduttore/serbatoio………………………… 3-4 Fissaggio della tubazione…………………… 3-6 Riempimento del circuito…………………… 3-7 − Riempimento in pressione…………… 3-7 − Riempimento per caduta……………3-11 Controlli a fine riempimento……………. 3-13 Positioning the instruments………………. 3-4 Positioning the hydraulic line...…………. 3-6 Circuit filling………………………………………. 3-7 − Pressure filling……………………….……. 3-7 − Gravity fillin……………..…………………3-11 Checks after the circuit filling…………. 3-13 Cable installation…………………………….. 3-13 Junction box installation………………….. 3-15 Stesura cavi…………………………………….. 3-13 Cables wiring……………………………………. 3-16 Posa in opera di eventuali scatole di derivazione………………………………………. 3-15 INSTALLATION PROCEDURE OF ELECTRIC DIFFERENTIAL SETTLEMENT GAUGE... 3-16 Cablaggio cavi…………………………………. 3-16 Positioning reference point…………….. 3-17 MODALITÀ DI INSTALLAZIONE DELL’ASSESTIMETRO ELETTRICO DIFFERENZIALE…………………………………… 3-16 Hydraulic circuit filling……………………… 3-17 − Gravity – drop filling……………….… 3-18 − Pressure filling………………………….. 3-21 Fissaggio del punto di riferimento assestimetrico………………………………….. 3-17 Embankment installation………………… 3-25 − Preparing the trench………………… 3-25 − Installing plate mounted settlement gauge……………………..…………………. 3-26 − Horizontal access tube installation…………………………………. 3-27 Riempimento del circuito idraulico….. 3-17 − Riempimento a caduta……………… 3-18 − Riempimento in pressione………… 3-21 Installazione in rilevato…………………… 3-25 − Preparazione del piano di posa…. 3-25 − Installazione con punti di misura su piastra………………………………………… 3-26 − Installazione con tubo guida orizzontale…………………………………. 3-27 Installazione in foro…………………………. 3-29 − Riempimento del circuito idraulico……………………………………… 3-29 − Installazione in foro non rivestito……………………………………… 3-29 − Installazione in foro rivestito……. 3-31 Livellometri-Assestimetri idraulici-Profiler Hydraulic settlement gauges-Profiler Borehole installation………………………… 3-29 − Filling the hydraulic circuit….……. 3-29 − Installation without casing……….. 3-29 − Installation with casing…………….. 3-31 − Check readings…………………………..3-31 − Cable installation………………………. 3-31 INSTALLATION OF THE PROFILER TUBE……………………………………………………. 3-32 Access tube installation…………………… 3-32 Benchmark………………………………………. 3-32 SISGEO s.r.l. I INDICE − − Misure di controllo a fine installazione………………………………. 3-31 Stesura cavi………………………………. 3-31 CONTENTS 4. TAKING MEASUREMENTS DSM AND ELECTRIC DIFFERENTIAL SETTLEMENT GAUGE…………………………….. 4-1 PROFILER………………………………………………. 4-2 MODALITÀ D’INSTALLAZIONE DEL PROFILER…………………………………………….. 3-32 Installazione della tubazione guida del profiler……………………………………………… 3-32 Preliminary operation………………………… 4-2 Performing the measurements…………. 4-3 Caposaldo di riferimento del profiler. 3-32 Recharge of internal battery……………… 4-5 4. ESECUZIONE DELLE MISURE DSM ED ASSESTIMETRO ELETTRICO DIFFERENZIALE…………………..………………… 4-1 5. DATA PROCESSING DSM AND ELECTRIC DIFFERENTIAL SETTLEMENT GAUGE…………………………….. 5-1 PROFILER………………………………………………. 4-2 Differential settlement computation………………………………………. 5-9 Operazioni preliminari………………..……… 4-2 Esecuzione delle misure……………………. 4-3 Data graphic presentation………………. 5-10 Ricarica della batteria………………………… 4-5 5. ELABORAZIONE DELLE MISURE DSM ED ASSESTIMETRO ELETTRICO DIFFERENZIALE………………..…………………… 5-1 PROFILER……………………………………………. 5-11 6. ACCESSORIES AND SPARES 7. MAINTENANCE Calcolo dei cedimenti differenziali…..… 5-9 MAINTENANCE OF IN PLACE INSTRUMENTS………………………………………. 7-1 Rappresentazione grafica dei risultati……………………………………………… 5-10 REPLACEMENT OF THE ELECTRIC SENSOR OF DSM………………………..……………………….. 7-1 PROFILER……………………………………………. 5-11 How to remove the old sensor…………. 7-1 6. ACCESSORI E RICAMBI How to mount a new sensor…….…..….. 7-1 7. MANUTENZIONE PROFILER………………………………………………. 7-3 MANUTENZIONE PER GLI STRUMENTI FISSI……………………………………………………… 7-1 SOSTITUZIONE DEL TRASDUTTORE ELETTRICO DEI DSM….…………………………. 7-1 SERVICE AND REPAIR…………………………… 7-4 Shipment……………………………………………. 7-4 8. APPENDICES Smontaggio del vecchio trasduttore…. 7-1 Montaggio del nuovo trasduttore……… 7-1 PROFILER………………………………………………. 7-3 1. SETTLEMENT MONITORING SYSTEM RECORD FORM………….……..………………….. 8-1 SERVIZIO E RIPARAZIONE…………………… 7-4 2. INSTALLATION SCHEME OF PROFILER………………………………………………. 8-2 Spedizione…………………………………………. 7-4 3. PROFILER RECORD FORM……..…………. 8-3 8. APPENDICI 1. MODULO RILEVAMENTO DATI ASSESTIMETRO ELETTRICO DIFFERENZIALE…………………………………….. 8-1 2. SCHEMA DI INSTALLAZIONE DEL PROFILER………………………………………………. 8-2 3. MODULO RILEVAMENTO DATI DEL PROFILER………………………………………………. 8-3 Livellometri-Assestimetri idraulici-Profiler Hydraulic settlement gauges-Profiler SISGEO s.r.l. II CAPITOLO 1: INTRODUZIONE CHAPTER 1: INTRODUCTION Livellometri-Assestimetri idraulici-Profiler Hydraulic settlement gauges-Profiler SISGEO s.r.l. 1. INTRODUZIONE 1. INTRODUCTION L’interazione terreno-struttura è un processo continuo che si sviluppa nel tempo, sia per l’azione della struttura sul terreno durante le varie fasi di costruzione e di esercizio, sia per l’effetto del comportamento dei terreni sulla struttura con riferimento per esempio, ad eventi sismici o variazioni del livello di falda. The soil-structure interaction is a continuous process developing in the time, beeing controlled both by the action of the structure on the soil during the construction and operation phases as by the soil behaviour on the foundation structures as result for example, of seismic event or of water table level variations. A causa delle variabilità laterali e verticali che generalmente i terreni presentano, il controllo del comportamento reale delle opere costituisce un metodo comodo per integrare la conoscenza dei terreni di fondazione e comunque per verificare che l’opera si comporti in maniera adeguata sia durante la costruzione che l’esercizio. As result of the lateral and vertical soil variability commonly found, monitoring the real behaviour of the works is a very effective method to increase the knowledge and to verify the quality during the construction and along the life. Una delle grandezze più significative a questo proposito risulta essere lo spostamento verticale detto anche assestamento o cedimento. La conoscenza dei cedimenti è importante nel caso di rilevati, sia di precarico che definitivi, per poter valutare lo stato di consolidamento. Gli strumenti idonei ad effettuare questa misura sono numerosi; essi sono basati su vari principi di funzionamento adatti alla misura di cedimenti superficiali e/o profondi, in punti singolari o multipunto, adatti ad essere misurati manualmente o automaticamente. Se la misura è automatica ed integrata con altre misure quali la pressione neutra, si ottiene un sistema di monitoraggio. La misura automatica è possibile usando gli assestimetri idraulici prodotti da SISGEO, secondo due principali tipologie: • • misura della pressione; vasi comunicanti. Gli assestimetri idraulici con trasduttore di pressione si basano sul principio della variazione di pressione di una colonna di liquido in funzione dell’altezza. Le differenze di quota che si verificheranno nel tempo, tra il punto di riferimento assestimetrico ed il punto di misura, determineranno proporzionali variazioni di pressione idraulica rilevabile da One of the most meaningfull measurand for this pourpose is the v e r t i c a l displacement or better the settlement. To know the amount of settlement is important, for example, for embankments (both preloading and permanent), to evaluate the consolidation level. There are a large number of instruments suitable for this pourpose; they are designed according to different principles, and they can measure both surface as deep movement in one point or in multiple points, for manual or for automatic reading. If the reading is automatic and other parameter as pore pressure are measured too, we have a basic monitoring system. Authomatic readings are possible using Sisgeo hydraulic instruments designed according to two different typologies: • • pressure measurement; comunicating vessel. The hydraulic settlement gauge with pressure transducer measure the fluid column pressure variation. The initial reading of differences of level among a reference instrument and the pressure transducers installed in the measuring points define a zero situation after that small settlements of the measuring points are detected by the fluid column pressure variations. It is then possible to compute the single relative settlement and, if the reference Livellometri-Assestimetri idraulici-Profiler Hydraulic settlement gauges-Profiler SISGEO s.r.l. 1-1 1. INTRODUZIONE 1. INTRODUCTION trasduttori elettrici posti nei punti di misura. point is fixed, or topographically levelled, to determine the absolute settlements. Correlando i segnali nel tempo, sarà possibile ricavare le corrispondenti variazioni di quota relativa e quindi ottenere i cedimenti assoluti verificatisi in corrispondenza dei punti di misura, qualora il punto di riferimento assestimetrico sia posto in una posizione fissa. Using transducers of proper range it is possible to monitor surface or deep settlements even if we have large distance among the reference tank and the measuring points. Usando trasduttori di pressione di idoneo fondo scala si possono misurare forti cedimenti sia superficiali che profondi, avendo forti dislivelli tra il serbatoio di riferimento ed il punto di misura. Il sistema risulta cioè molto flessibile perché consente contemporaneamente misure superficiali ed in profondità. Il collegamento idraulico risulta piuttosto agevole e l’installazione ne viene facilitata. La precisione risulta però nell’ordine di alcuni centimetri e solo riducendo molto il fondo scala, ovvero il massimo dislivello tra serbatoio di riferimento e il punto di misura è possibile ottenere alcuni millimetri. Per migliorare i risultati si deve minimizzare l’effetto tecnico; un modo semplice consiste nell’insatallare un trasduttore di pressione di riferimento, dello stesso tipo usato nei punti di misura, a fianco dello strumento di riferimento. Presupponendo che questo si comporti dal punto di vista tecnico come gli altri installati nei punti di misura, si potranno ottenere i cedimenti differenziali elaborando le misure rispetto al valore del trasduttore di riferimento. Hydraulic connection is quite simple and installation result quite easy. The final measuring accuracy is of some centimeters and only reducing the transducer range (i.e. the level interval between the refernce tank and the measuring point) it is possible to obtain millimetric accuracy). The tecnic effect must be reduce at least to obtain better result: A simple modo consist to install a reference pressure transduce, the same type used in the measuring points, near to the reference instrument. The differential settlements can be obtain by means data reference transducer processing, supposing the pressure transduce has a similar tecnical behaviour like these installs in the measuring points. The responce time is quite fast, in the order of one minute and the distance between the reference and measuring point can reach 200 m. Based on the same tecnique, Sisgeo has develloped a removable hydrostatic profiler to take manual measures of settlements along horizontal access tube up to 150 m long. La velocità di risposta è relativamente elevata, dell’ordine del minuto; la distanza tra riferimento e punto di misura può raggiungere i 200 m. The instrument is composed by a probe housing the pressure sensor connected by a metered electro hydraulic cable to a big reel. Usando questa stessa tecnica, SISGEO ha sviluppato un profilatore idrostatico removibile, il Profiler, che consente il rilievo manuale dei cedimenti lungo tubazioni orizzontali di lunghezza fino a 150 m. At the center of the reel, mounted on a tripod, is placed a reference tank and the read out unit. ll profilatore è composto da una sonda contenente un trasduttore di pressione collegato ad un rullo avvolgicavo, per mezzo di un cavo, formato da un tubo Readings are taken at regular step along the access tube and represent the level differences between the fluid surface in the tank and the probe. It is then possible to define the access tube profile in the vertical plane.Once know the absolute level of the benchmark it is Livellometri-Assestimetri idraulici-Profiler Hydraulic settlement gauges-Profiler SISGEO s.r.l. 1-2 1. INTRODUZIONE idraulico e da un cavo elettrico. All’interno del rullo avvolgicavo sono alloggiati un serbatoio di riferimento e la centralina di lettura. Le letture vengono eseguite ad intervalli regolari lungo la tubazione, e rappresentano la differenza di livello tra la sonda ed il livello di riferimento del liquido nel serbatoio. L’insieme dei punti misurati permette di definire il profilo del tubo nel suo piano verticale. Nota la quota assoluta del punto di riferimento posto sul blocco di calcestruzzo, (da rilievi topografici) si ricavano le quote assolute dei punti di misura che varieranno nel tempo in funzione del cedimento del terreno a cui la tubazione è solidale, o meglio, la differenza tra le quote assolute di ogni punto di misura rappresenta il cedimento. 1. INTRODUCTION possible to have the absolute settlements profile of the tube that will vary in the time following the behaviour of the soil in which the tube is embedded. The comunicating vessel settlement gauges are called also level meter. In the various measuring points are placed the vessels connected each other by a flexible hose. Level variation of a measuring point will cause variation of the fluid level inside the vessels. If we assume one of the vessels as reference point all the other measures will be referred as settlement. The fluid level height in the vessel can be detected in different way: • SISGeotecnica-Cise level meter is based on a floater / tensioning weight system, connected to an angular position sensor. • DSM type is based on the weighting of the fluid in the vessel. Gli assestimetri idraulici a vasi comunicanti sono anche denominati livellometri. Nelle diverse postazioni di misura sono collocate le tazze livellometriche poste in collegamento idraulico tra loro generalmente mediante un tubetto flessibile. Variazioni di quota di una postazione rispetto all’altra causano variazioni dell’altezza del fluido presente nelle tazze livellometriche. Una delle tazze viene presa come riferimento ed i cedimenti differenziali degli altri punti sono calcolati rispetto ad essa. La misura dell’altezza del fluido nella tazza può essere effettuata in vari modi: • • nel livellometro SISGeotecnica-Cise, tramite un sistema meccanico galleggiante-contrappeso collegato ad un trasduttore di posizione angolare; nel modello DSM, pesando la quantità di fluido presente nel serbatoio. Per esempio, nel caso più semplice di un circuito realizzato con due assestimetri, a seguito di uno spostamento differenziale, l’assestimetro più alto cederà liquido, e pertanto si verificherà, nel suo serbatoio, un abbassamento di livello del liquido mentre contemporaneamente il livello nel As an example if we consider a two vessel circuit with differential settlement, we will see that the in upper vessel the fluid level will lower while in the lower vessel will increase the level. In each vessel the fluid level variation will produce a weight variation and the transducer will measure the value. The measures of level variation are then processed to obtain the differential settlements among the vessels called measuring points and one vessel appointed as reference point. The displacement measured are therefore relative and only if the reference vessel is in a fixed point the settlements are absolute. The measuring range for the DSM model is ± 40 mm that mean all the vessels have to be installed exactly at the same level or anyway within the measuring range. The hydraulic connection result therefore very critical and delicate. The thermic variation on the circuit cannot Livellometri-Assestimetri idraulici-Profiler Hydraulic settlement gauges-Profiler SISGEO s.r.l. 1-3 1. INTRODUZIONE serbatoio dell’assestimetro più basso, ricevendo liquido, si innalzerà . In ogni serbatoio, la variazione di livello determinerà una variazione di peso; il trasduttore rileverà elettricamente tale variazione. I segnali relativi alle variazioni di livello vengono successivamente elaborati per ottenere gli spostamenti differenziali tra un predeterminato assestimetro del circuito considerato come punto di riferimento e gli altri assestimetri detti “di misura”. Gli spostamenti dei punti di misura vanno pertanto intesi come relativi a quello di riferimento; solo quando questo sia posizionato in un punto fisso, gli spostamenti relativi sono di fatto anche assoluti. Il campo di misura per il modello DSM è di ±40 mm. Questo significa che tra la tazza di riferimento ed i punti di misura, il dislivello non può essere superiore al fondo scala. Al fine dei collegamenti, ciò equivale ad un impianto alquanto delicato e critico. L’effetto delle variazioni di temperatura inoltre non può essere compensato semplicemente usando il fattore di correzione termico delle tazze perché l’influenza del circuito è preponderante. Nell’esperienza maturata da SISGEO, si è visto che il metodo più efficace per eliminare l’effetto delle variazioni diurne, è quello di eseguire un’interpretazione statistica dei dati che devono essere rilevati con frequenza oraria da un sistema di acquisizione automatico. 1. INTRODUCTION be compensated using thermal coefficient for the vessel because the circuit influence is the most important. In our experience the most effective system to eliminate the effect of daily thermal cycle is to make a statistical processing of data recorded every hour by an authomatic data acquisition system. In this way it is possible to obtain readings with 0,1 mm resolution and 1 mm accuracy. To improve the performances it is advisable to use aluminium rectangular channel instead of the plastic tube but this make even more difficult the installation. The respons time is long, specially for long circuit line, because the level stabilization in the vessel require some hours. The type of fluid is very important; Sisgeo use a mix: 50% water and 50% glycerine deaired under vacuum . The fields of application of these instruments are many: embankments, raft foundations, tanks, landfills, dams, bridges, special machinary foundation, buildings near underground excavation or tunnel, monuments, etc. Così facendo si ottengono delle misure con risoluzione di 0,1 mm e precisione del millimetro. Per migliorare le prestazioni si possono usare canalette di collegamento rigide invece dei tubi, complicando però l’installazione. La velocità di risposta è lenta perché, specie per circuiti di una certa lunghezza, il tempo di stabilizzazione del livello nelle tazze è di alcune ore. La scelta del fluido è molto importante; SISGEO usa una miscela 50% acqua, 50% glicerina disareata sottovuoto. Livellometri-Assestimetri idraulici-Profiler Hydraulic settlement gauges-Profiler SISGEO s.r.l. 1-4 1. INTRODUZIONE 1. INTRODUCTION I campi d’applicazione di questi strumenti sono molteplici: rilevati, platee di fondazione, serbatoi, discariche di rifiuti, dighe, ponti, fondazioni di macchine speciali, edifici nelle cui vicinanze vengono eseguiti scavi o gallerie, monumenti, ecc. Livellometri-Assestimetri idraulici-Profiler Hydraulic settlement gauges-Profiler SISGEO s.r.l. 1-5 CAPITOLO 2: DESCRIZIONE STRUMENTI CHAPTER 2: INSTRUMENTS DESCRIPTION Livellometri-Assestimetri idraulici-Profiler Hydraulic settlement gauges-Profiler SISGEO s.r.l. 2. DESCRIZIONE DEGLI STRUMENTI 2. INSTRUMENTS DESCRIPTION LIVELLOMETRO DSM DSM LEVELMETER SYSTEM SISGEO fornisce due diversi modelli di Livellometri DSM che si differenziano sia per forma ma soprattutto per il range di misura. SISGEO supplies two different models of DSM level meter systems which are different in shape and for measuring range. Entrambi si compongono di: • a protective housing in shape of painted • − un contenitore protettivo; il primo modello viene fornito con una scatola di protezione a tenuta stagna in acciaio inox verniciato (fig. 2.1), il secondo modello viene fornito con un corpo cilindrico in acciaio inox (fig. 2.2). Al loro interno sono alloggiati: Both consists of: stainless steel box (fig.2.1), or for second model a stainless steel cylindrical body (fig. 2.2). Inside there are: − a fluid vessel; − an internal hydraulic line; − an electric transducer to measure the fluid level inside the vessel; − a thermal resistor for temperature control (optional); un serbatoio per il liquido; Foro per il riempimento Filling hole Fori di fissaggio a parete Tubo di riferimento per controllo livello serbatoio Holes for wall fixing Serbatoio Vessel Reference tube to control vessel fluid level Trasduttore elettrico Electric transducer Cavo elettrico Electric cable Sensore di temperatura Pressacavo ingresso Temperature sensor Input cable gland Raccordo al circuito idraulico esterno Joint to external hydraulic line Scatola di centralizzazione Junction box Rubinetto Shut-off valve Fig. 2.1 – Livellometro DSM Fig. 2.1 – DSM settlement monitoring system − un circuito idraulico interno; − un trasduttore elettrico per misurare il livello del liquido all’interno del serbatoio; − una termoresistenza per il rilievo della temperatura (opzionale). • An hydraulic line consisting of: − an inner polyethylene tube O.D. 12 I.D. 10 mm and an outer thermal insulated plastic sheat; − hydraulic fittings. • An Livellometri-Assestimetri idraulici-Profiler Hydraulic settlement gauges-Profiler electric cable for instrument SISGEO s.r.l. 2-1 2. DESCRIZIONE DEGLI STRUMENTI • Un circuito idraulico composto da: − tubo in polietilene (fornito in rotolo, ∅10×12mm) e di una tubazione esterna coibentata; 2. INSTRUMENTS DESCRIPTION connection to the readout unit. • Self sealing connectors for signal cable wiring. − raccordi idraulici. • Un cavo elettrico che realizza il collegamento dello strumento all’unità di lettura. • Connettori autosigillanti per il cablaggio del cavo strumentale. Corpo cilindrico Cylindrical body Collari di fissaggio per parete Collar clamps for wall mounting Cavo elettrico Electric cable Tubo idraulico in polietilene Polyethylene hydraulic tube Piastra d’appoggio Anchor plate for embedment installation Fig. 2.2 – Livellometro DSM a range esteso Fig. 2.2 – DSM settlement monitoring system long range Il trasduttore elettrico si differenzia per i due modelli: The electric transducer is differented for two models: per il primo modello è montato alla base del serbatoio, rileva il peso del liquido e, quindi, le eventuali variazioni del suo livello all’interno del serbatoio. Il suo campo di misura è di ± 40 mm; first model it is assembled on the vessel base and it measures the weight of the fluid inside the vessel and, hence, any level variations inside the vessel. The range of the transducer is ± 40 mm; per il secondo modello viene usato un misuratore di livello con gallegiante con un second model use a linear level sensor with floater with a measuring range of 850 mm Livellometri-Assestimetri idraulici-Profiler Hydraulic settlement gauges-Profiler SISGEO s.r.l. 2-2 2. DESCRIZIONE DEGLI STRUMENTI 2. INSTRUMENTS DESCRIPTION campo di misura di 850 mm così da mantenere un campo di misura di ±50 mm anche con un dislivello tra i trasduttori di 750 mm. so that even in presence of a difference of 750 mm in elevation among the transducers the measuring range is ± 50 mm. LEGENDA/LEGEND Assestimetri Instruments Assestimetro di riferimento Datum instrument Circuito n.2 Circuit n.2 Sistema di acquisizione dati Data acquisition system Circuito idraulico Hydraulic line Circuito n.1 Circuit n. 1 Fig. 2.3 – Esempi di circuiti livellometrici DSM Fig. 2.3 – Examples of levellometer monitoring circuits Il liquido del circuito è una miscela 50% acqua e 50% glicerina disareata, ed è caratterizzato da una densità pressoché costante al variare della temperatura e da una bassa tensione di vapore. Esso è inoltre chimicamente inerte ai materiali che costituiscono il sistema e dal punto di vista ambientale non pericolosa. The system fluid is a deaired mix 50% water 50% glycerine having almost constant density even with temperature variations and low vapor pressure. Moreover it is chemically inert to the materials employed for the system and environmentally compatible. Livellometri-Assestimetri idraulici-Profiler Hydraulic settlement gauges-Profiler SISGEO s.r.l. 2-3 2. DESCRIZIONE DEGLI STRUMENTI ASSESTIMETRO ELETTRICO DIFFERENZIALE Il Sistema si compone di (fig. 2.4): 2. INSTRUMENTS DESCRIPTION DIFFERENTIAL SETTLEMENT SYSTEM The settlement monitoring system is composed of the following (fig. 2.4): • punto di riferimento assestimetrico del • reference point the same as described • punti di misura assestimetrici di diverso • one or more settlement monitoring cells tipo DSM descritto a pagina 2.1; tipo: − per rilevato, costituiti da una piastra di supporto in acciaio zincato su cui è montato il sensore di misura provvisto dei raccordi per il collegamento idraulico e del cavo elettrico per trasmettere il segnale. for DSM (pag. 2.1); to be fully embedded into the ground, made by following components: − a galvanised steel support plate; − a pressure sensor with an electric cable fitted to it; − fittings for the hydraulic connection; Fig. 2.4 – Assestimetri differenziali Fig. 2.4 – Differential settlement monitoring systems − per foro o per installazioni entro tubi guida orizzontali per consentirne il recupero, costituiti da un sensore di misura con cavo elettrico ed attacco idraulico; • un circuito idraulico composto da: − tubo in polietilene ∅ 8×6 mm (fornito in rotolo); − raccordi idraulici; • one or more settlement monitoring cells to be installed in boreholes or into horizontal access tube to allow subsequent instrument maintenance. Settlement cells are composed of: − a pressure sensor housed in a s.s. cylinder with electric cable; • an hydraulic circuit made up of: − polyethylene Livellometri-Assestimetri idraulici-Profiler Hydraulic settlement gauges-Profiler tube 8×6 mm SISGEO s.r.l. in 2-4 2. DESCRIZIONE DEGLI STRUMENTI • un cavo elettrico che realizza il collegamento dello strumento all’unità di lettura. I punti di misura vengono posizionati con configurazione diversa a seconda dell’applicazione (in rilevato con o senza tubo guida, in foro o entrambi) (fig. 2.4), collegati ad un serbatoio di riferimento e collegati tra loro in serie tramite una tubazione idraulica. La pressione del fluido nel circuito è rilevata in ogni punto di misura da un trasduttore di pressione con precisione centimetrica che produce un segnale elettrico proporzionale. Elaborando questi valori rispetto al punto di riferimento si ottengono i cedimenti differenziali. Le misure possono essere eseguite normalmente o in modo automatico. Il DSM usato come punto di riferimento rileva le variazioni dovute ai cambiamenti di temperatura, o alla compressione, o dilatazione del circuito idraulico, o all’evaporazione del liquido. 2. INSTRUMENTS DESCRIPTION diameter (supplied in rols); − hydraulic fittings; • an electric cable for instrument connection to the read-out unit. Depending on the type of application (embedded under an embankment with or without access tube, or in a borehole, or both) (fig. 2.4) the settlement gauges are installed in different configurations, connected by an hydraulic line to a reference point (vessel). The fluid pressure inside the hydraulic circuit is read at each settlement gauge by a pressure transducer that is accurate to a few centimetres. The monitored pressure refers to the liquid level in the datum cell vessel. The pressure variations caused by settlement determine variation of electric signals which are then processed to obtain the differential displacements between the various settlement gauges and the reference point. A choice of manual or automatic reading systems is available from the manufacturer. The DSM instrument used as reference point measure liquid level variations due to temperature changes, hydraulic circuit compression or expansion, or to evaporation. Livellometri-Assestimetri idraulici-Profiler Hydraulic settlement gauges-Profiler SISGEO s.r.l. 2-5 2. DESCRIZIONE DEGLI STRUMENTI 2. INSTRUMENTS DESCRIPTION Stazione stabile di riferimento Stable reference station Punti di misura Measuring points Trasduttore di pressione (punto di misura) opzionale di riferimento Optional reference pressure trasducer (masuring point) Stazione stabile di riferimento Stable reference station Punti di misura Measuring points Livellometri-Assestimetri idraulici-Profiler Hydraulic settlement gauges-Profiler SISGEO s.r.l. 2-6 2. DESCRIZIONE DEGLI STRUMENTI 2. INSTRUMENTS DESCRIPTION Livello liquido Liquid level Livello liquido Liquid level Linea idraulica Hydraulic line Max 100 m Linea idraulica Hydraulic line a. In foro b. In foro e in rilevato a. In borehole b. Under embankment and in borehole Livello liquido Liquid level Linea idraulica Hydraulic line Tubo polietilene Polietilene tube c. In rilevato all’interno di un tubo guida c. Under embankment with access tube Fig. 2.5 – Esempi di applicazioni dell’assestimetro elettrico differenziale Fig. 2.5 – Examples of settlement system applications Livellometri-Assestimetri idraulici-Profiler Hydraulic settlement gauges-Profiler SISGEO s.r.l. 2-7 2. DESCRIZIONE DEGLI STRUMENTI 2. INSTRUMENTS DESCRIPTION PROFILER Il profiler consiste di (fig. 2.6): • • tubo guida in polietilene ad alta densità in rotoli con diametro interno minimo di 45 mm (esterno 55 mm) da installare orizzontalmente in una trincea sotto la struttura da monitorare; sensore di misura costituito da un cilindro in acciaio inox che alloggia un trasduttore di pressione con fondo scala di 10.000 mm di colonna di fluido, per la misura della pressione idraulica del liquido contenuto nel circuito; • un rullo avvolgicavo in vetroresina di grande diametro che al centro contiene il serbatoio del fluido idraulico e la centralina di misura digitale provvista di display LCD con risoluzione del centimetro; • un cavo elettroidraulico per trasmettere i segnali elettrici del trasduttore di pressione con tubetto ∅ 8 mm contenente il fluido costituito da una miscela acqua-glicerina 1:1. La lunghezza può essere sino a 150 m con marcatura ogni metro; • un robusto treppiede su cui viene posizionato il rullo avvolgicavo. SATURATORE Il saturatore SISGEO (fig. 2.7): è un contenitore in acciaio inox con diametro 250 mm e capacità di circa 20 litri, fornito con un compressore portatile a batteria ricaricabile per pressurizzare il fluido disaerato. In posizione radiale sono posizionati la presa con attacco rapido per l’ingresso dell’aria e il rubinetto di scarico, mentre il tappo di riempimento del fluido disaerato è posizionato al centro del disco. All’interno del cilindro è collocata una robusta camera d’aria che viene riempita con l’aria compressa mettendo in pressione il fluido senza il rischio di formare bolle d’aria nel fluido disaerato. PROFILER The system consist of (fig. 2.6): • a polyethylene tube (O.D. 55mm, I.D. 45mm minimum) placed horizontally in a trench under the structure to be monitored; • a stainless steel probe equipped with a pressure transducer having a measuring range of 10.000 mm of fluid gradient; • a large diameter GRP reel housing, in the center, the tank for the fluid and the digital read out unit with LCD to read displacement of one centimeter; • an electro hydraulic cable to transmit the electric signal of the pressure transducer and to provide hydraulic connection through an O.D. 8 mm tube satured with the usual water-glycerine mix. The cable length can be up to 150 m with marks every meter; • a robust metal tripod on which the reel is mounted. SATURATOR SISGEO’s Saturator (fig. 2.7) is made by a stanless steel vessel with a diameter of 250 mm, capacity of about 20 liter.It is supplied with a portable compressor powered by rechargeble battery to pressurize the deaired fluid. On one side of the cilinder you can find a quick joint for connecting the compressor and the fluid outlet port with a valve while the fluid filling port is positioned in the central part. Inside the cylinderthe air under pressure fill a very strong rubber air chamber that pressurize the fluid without mixing, avoiding any air bubbles in the saturation fluid. On the valve an hidraulic fitting that allows the saturator connection to the DSM circuit to be filled. Livellometri-Assestimetri idraulici-Profiler Hydraulic settlement gauges-Profiler SISGEO s.r.l. 2-8 2. DESCRIZIONE DEGLI STRUMENTI 2. INSTRUMENTS DESCRIPTION Un rubinetto con raccordo permette il collegamento del saturatore al circuito assestimetrico da riempire. Rullo avvolgicavo Reel Centralina di misura Read out unit Treppiede Tripod Tubo di nylon Nylon tube Sensore Probe Sebatoio Reference tank Rullo avvolgicavo Reel Fig. 2.6 – Componenti del profiler Fig. 2.6 – Profiler components Fig. 2.7 – Saturatore Fig. 2.7 – Saturator Livellometri-Assestimetri idraulici-Profiler Hydraulic settlement gauges-Profiler SISGEO s.r.l. 2-9 CAPITOLO 3: MODALITÀ D’INSTALLAZIONE CHAPTER 3: INSTALLATION PROCEDURE Livellometri-Assestimetri idraulici-Profiler Hydraulic settlement gauges-Profiler SISGEO s.r.l. 3. MODALITÀ D’INSTALLAZIONE PREPARAZIONE MISCELA PER RIEMPIMENTO CIRCUITI DSM E ASSESTIMETRICI DIFFERENZIALI Il liquido utilizzato per il riempimento dei circuiti deve essere costituito da una miscela volumetrica di 50% di acqua distillata e 50% di glicerina (99,5% USP vegetale pura). Mescolare bene la miscela finchè la glicerina non entra in soluzione e aggiungere del colorante “blu di metilene”. 3. INSTALLATION PROCEDURE PREPARATION OF THE FLUID The fluid used for circuits has to be made by a 50% of distillated water and 50% of glycerin (99,5 USP – pure vegetal) volumetric mixture. Mix until the glycerin enter into solution. Then add the “blue of methylene” coloring fluid. We suggest to deair the fluid in order to reduce to minimum the air bubbles in the circuit. Si consiglia di disaerare la miscela così preparata in modo da migliorare il riempimento. A questo scopo procurarsi un adeguato recipiente ed una pompa per il vuoto. For this pourpose provide a proper recipient and a vacuum pump. MODALITÀ DI INSTALLAZIONE DSM INSTALLATION PROCEDURE FOR DSM Prima di fornire le istruzioni per l’installazione degli assestimetri DSM, desideriamo sottolineare che per la delicatezza di alcune operazioni è comunque consigliabile prevedere l’intervento di personale tecnico SISGEO. The following chapter describes the installation procedure for DSM settlement monitoring systems. We wish to remark that since some of the operations described are critical for successful installation, the intervention of SISGEO personal is advisable. Innanzi tutto si deve procedere al tracciamento a parete del circuito. Ciò può essere eseguito per mezzo di una livellazione ottica o anche con l’ausilio di una livella ad acqua di cantiere; tale operazione deve essere eseguita in modo accurato. Il campo di misura dello strumento è di ± 40mm, pertanto tutti quelli di un circuito dovranno essere installati in modo tale che l’eventuale dissalineamento ed il previsto range di misura rientrino in questo valore. Con il tracciamento vanno segnate le postazioni degli assestimetri, ed eventualmente anche di altri punti significativi del circuito. Gli assestimetri devono essere fissati in posizione verticale su di una parete, mentre il punto di riferimento va posizionato possibilmente all’esterno dell’area soggetta a cedimenti, o comunque in una posizione traguardabile otticamente. Vanno fissate a parete sia le scatole degli assestimetri, facendo riferimento ai punti segnati in precedenza, che i supporti per le tubazioni di collegamento. Solitamente si usano cavetti in acciaio tesi con arridatoi First of all the circuit track must be marked on the wall on a horizontal plane. This can be done by optical leveling or by means of a water level. This operation must be carried out accurately.Measuring range is ± 40mm, therefore all those of the same circuit will installed so that possible maladjustment and theforecast measuring range fit into this value. When marking the track the instruments positions must be marked, together with any other significant points in the circuit. Secondly the instruments containing the vessels must be fixed to the wall at the points previously marked, as well as the connection tubes supports. Usually these consist of steel wire stretched between the instruments at the same level of the hydraulic tube. When the optional circuit insulation is employed Sisgeo supply also fastening collars. Settlement monitoring instruments must be fixed to the wall in a vertical position, while the datum must be placed outside the possible settlement area or, in any case, in Livellometri-Assestimetri idraulici-Profiler Hydraulic settlement gauges-Profiler SISGEO s.r.l. 3-1 3. MODALITÀ D’INSTALLAZIONE lungo tutta la tratta di collegamento degli assestimetri. In corrispondenza dei punti di misura, il cavetto d’acciaio dovrà correre lungo il bordo inferiore della scatola contenente il sistema di misura. Il fissaggio della tubazione idraulica è quindi effettuato con fascette in plastica o, nel caso di utilizzo della coibentazione opzionale, vengono forniti dei collarini muniti di tasselli. Nel caso di circuiti DSM a vasi comunicanti per minimizzare gli effetti della variazione di temperatura del crcuito sullo strumento si possono installare dei vasi di espansione ogni 20 m (fig. 3.1). Se la distanza tra un DSM e l’atro è circa di 20 m, collocare il vaso di espansione al centro tra i due DSM, come illustrato nella figura 3.2. 3. INSTALLATION PROCEDURE an optically sightable position. In the case of DSM circuits, for minimizating the effects of temperature variation in the hydraulic line on the instruments, it is advisable to instal in the circuit expansion tank you every 20 m (fig.3.1). If the distance between two DSM is 20 m, place the expansion tank in the center between two DSN, as illustrated in figure 3.2. The correct installation is shown in the next figure (fig. 3.2). Fix the instruments in an horizontal plane otherwise liquid could flow out from the vessel if the difference in height is more than 50 mm. Nella figura successiva (fig. 3.2) viene mostrata la corretta installazione. Fare attenzione a non installare gli assestimetri in linea non orizzontale: il liquido potrebbe fuoriuscire dal serbatoio. Fori di fissaggio a parete Holes for wall fixing Linea idraulica Hydraulic line Vaso di espansione Expansion tank Vista frontale Front view Vista laterale Side view Fig. 3.1 – Vaso di espansione Fig. 3.1 – Expansion tanks Livellometri-Assestimetri idraulici-Profiler Hydraulic settlement gauges-Profiler SISGEO s.r.l. 3-2 3. MODALITÀ D’INSTALLAZIONE 3. INSTALLATION PROCEDURE Cavo elettrico (max 200m) Gauge elettric cable (max 200m) MULTIPLEX CR-10 ADK16MUX logger max 8 strum. D442M080 D442M080 Vaso di espansione Expansion tank D442M080 Tubo HDPE HDPE tube 10 m 10 m <80 mm Il circuito idraulico deve essere installato orizzontalmente Hydraulic line must be installed horizontally D442M080 Se > 50 mm il liquido fuoriesce If > 50 mm liquid over flow Distanza massima 200 metri Max distance 200 meter Tubo HDPE HDPE tube D442M080 ta ra er ion e t n la zio al lla inst a t ins rong w il li liqu quido id f fuo low ries out ce Fig. 3.2 – Modalità d’installazione Fig. 3.2 – Installation scheme Livellometri-Assestimetri idraulici-Profiler Hydraulic settlement gauges-Profiler SISGEO s.r.l. 3-3 3. MODALITÀ D’INSTALLAZIONE Fissaggio della tazza DSM 3. INSTALLATION PROCEDURE Positioning the instruments Per il fissaggio si segua la seguente procedura: To place the instruments proceed as follows: 1 . poggiare l’assestimetro alla parete avendo cura di controllare la sua messa in bolla; 1 . Hold the instrument against the wall and adjust its position by means of the water level; 2 . segnare sulla parete la posizione dei fori per il fissaggio, verificando che i raccordi di connessione per la tubazione siano orizzontali; 2. mark the fixing holes position on the wall and check that the tube fittings are on a horizontal plane; 3 . forare la parete e fissare l’assestimetro con tasselli ad espansione. Montaggio del gruppo trasduttore/serbatoio Il sensore di misura ed il serbatoio vengono forniti non montati sulla scatola, per evitare danneggiamenti durante il trasporto. In un sacchetto viene fornito il distanziale tra la cella e la scatola, le relative viti, la fascetta stringitubo. Nell’esecuzione delle operazioni di montaggio del trasduttore elettrico e del serbatoio, si raccomanda di maneggiare con cura il trasduttore, evitando di impugnarlo alle estremità e di sottoporlo a flessioni o torsioni (anche minime) in quanto, essendo questo un componente estremamente sensibile e delicato, potrebbe venire irrimediabilmente danneggiato compromettendo quindi il suo funzionamento. Per questo motivo impugnare il trasduttore nella parte centrale in corrispondenza del carter di protezione (di colore nero). Per una corretta individuazione delle parti coinvolte nelle operazioni di seguito riportate faremo riferimento alla figura 3.3. 1 .r i p o r r e l’intero gruppo trasduttore/serbatoio all’interno della scatola e fissarlo alla mensola di supporto con le viti dopo aver posizionato il distanziale; 3 . drill holes in the wall and fix the instrument by means of the screw anchors. Mounting of the sensor/vessel in the box The sensor/vessel assembly is supplied not mounted on the box to avoid damage during transport. In a small bag it is supplied the spacer the bolts and the tie clamp for the silicone tube. Handle with care the sensor avoiding to produce any flexion or twisting as it can be severely damage beeing very sensitive and delicate. It is reccomended to avoid to lift it by the ends. It has to be handled in the center where there is the black cover. For a better understanding we will refer to figure 3.3. 1. Put the assembly vessel-sensor inside the box and mount by the bolts with the spacer inserted; 2 . connect the silicone tube to the instrument hydraulic circuit and fix by the tie clamp; 3. fix by velcro tape the junction box on the housing; 4. connect the sensor cable according the following wiring scheme: 2. connettere il tubo in silicone al circuito idraulico interno in corrispondenza del raccordo maschio e fissarlo con una fascetta; 3 . fissare, con il velcro, la scatola di centralizzazione del cavo strumentale sulla Livellometri-Assestimetri idraulici-Profiler Hydraulic settlement gauges-Profiler SISGEO s.r.l. 3-4 3. MODALITÀ D’INSTALLAZIONE 3. INSTALLATION PROCEDURE parte interna della scatola che contiene l’assestimetro; 4 . cablare il cavo elettrico di collegamento del trasduttore al cavo dell’impianto utilizzando i connettori in dotazione, facendo riferimento al seguente schema: 1 2 Trasduttore in tensione 0 –20 mV FS Transducer in tension 0-20 m FS Rosso/Red Blu/Blue Transducer in current 4>20 mA GND 3 +segnale +signal 4 -segnale -signal 1 +Vcc Giallo/Yellow Verde/Green 2 Trasduttore in corrente 4>20 mA +Vcc Rosso/Red 3 -GND +Loop Nero/Black Bianco/White 5 . eseguire la misura di zero con il serbatoio vuoto. Tale misura è indispensabile in fase di elaborazione dei dati. 5 . take a zero reading with the empty vessel. This reading is necessary to process all the data. Livellometri-Assestimetri idraulici-Profiler Hydraulic settlement gauges-Profiler SISGEO s.r.l. 3-5 3. MODALITÀ D’INSTALLAZIONE 3. INSTALLATION PROCEDURE Serbatoio Vessel Trasduttore elettrico Electric transducer Distanziale Spacer Cavo dell’impianto Cable system Viti Bolts Tubo in silicone Silicone tube Cavo elettrico Electric cable Raccordo maschio Male fitting Scatola di centralizzazione Junction box Fig. 3.3 – Livellometro DSM Fig. 3.3 – DSM settlement monitoring system Fissaggio della tubazione Il modo più sicuro e rapido per installare la tubazione idraulica di collegamento è quello di fissarla mediante fascette in nylon posizionate ogni 30÷50 cm ad un cavetto in acciaio di almeno 2 mm di diametro, fissato tra due tasselli ad espansione posti lungo il percorso esattamente alla stessa quota, tesato mediante tenditori che minimizzino la catenaria tra i tasselli. Così facendo il tubo idraulico risulta anch’esso ben teso e senza catenarie tra i punti di fissaggio. Il collegamento delle estremità dei tubi in polietilene agli assestimetri, eseguita serrando la raccorderia, seguirà modalità differenti a seconda delle modalità di riempimento adottate, illustrate di seguito. Positioning the hydraulic line The suggested procedure is to fix it by plastic band to a 2 mm O.D. steel cable secured to eye bolts placed just at the ends of the hydraulic line to result horizontal. The cable will be provided with turnbuckles to be tensioned correctly to avoid any cable catenary. In this way the hydraulic tube will result horizontal. Connect polyethylene tube to the instruments tightening the fittings. This operation must be carried out in different ways according to the filling procedure chosen. Filling procedures are described in the following paragraphs. Livellometri-Assestimetri idraulici-Profiler Hydraulic settlement gauges-Profiler SISGEO s.r.l. 3-6 3. MODALITÀ D’INSTALLAZIONE Riempimento del circuito Il riempimento del circuito può essere effettuato in pressione (con saturatore SISGEO) o per caduta libera, a seconda della tipologia dei collegamenti idropneumatici e della lunghezza del circuito. N O T A : si consiglia il riempimento in pressione per tutti i circuiti idraulici; il riempimento per caduta è consigliato solo per circuiti di lunghezza inferiore o uguale a 10m. Riempimento in pressione Nel caso che il riempimento del circuito venga eseguito in pressione, collegare tutte le estremità dei tubi in polietilene agli assestimetri, ad eccezione delle due estremità del circuito che verranno lasciate libere (fig.3.4). 1. Riempimento del saturatore Posizionare la tanica contenente l’apposita miscela disaerata di acqua e glicerina ad un’altezza superiore rispetto al saturatore. Collegare la tanica mediante una tubazione, al raccordo del rubinetto del tubetto da non usare. Aprire il rubinetto. Il saturatore si riempirà per caduta libera. Durante questa operazione lasciare aperto l’altro rubinetto per consentire all’aria di fuoriuscire dal saturatore. Una volta riempito il saturatore, chiudere il rubinetto e scollegare la tubazione dalla tanica. Il saturatore ha una capacità di 20 litri e non deve mai essere pressurizzato oltre 0,4 MPa. Dopo averlo rienpito d’acqua, rovesciarlo con i rubinetti rivolti verso il basso. Tale operazione rede migliore la pressurizzazione e impedisce all’acqua di fermarsi nella parte alta del saturatore. 3. INSTALLATION PROCEDURE Circuit filling The system may be pressure filled (by means Sisgeo’s Saturator) or gravity filled, according to the type of hydraulic connections and circuit length. NOTE: pressure filling is recommended for all hydraulic systems; gravity filling is only recommended for system having 10 m maximum length. Pressure filling In case of pressure filling connect all the polyethylene tube ends to the instruments, with the only exception of the circuit ends which must be left free (fig. 3.4). 1. Saturator filling Put the tank with the deaired fluid heighter than the saturator. Connect the tank, through a tubing, on the fitting not to be used. Turn on the valve. The saturator will be filled with the fluid. During this phase the otherr port has to be open, in order to allow the air outlet from the saturator. Once the saturator is full, turn off the valve, disconnect the tubing that connect the tank to saturator. The saturator has a capacity exceeding 20 liter and never 0,4 Mpa pressure. Once the saturator is full of water, upset it with the valves toward down. This operation improves the pressurization and prevents the water to stop in the top side of the saturator. 2. Circuit filling Connect the hydraulic circuit to the probe of the saturator fitting on the valves. Open the valve. 2. Riempimento del circuito Connect the portable compressor to the quick joint on the upper flange. Collegare il circuito assestimetrico al saturatore tramite uno dei due raccordi posti sulle flange. Aprire il rubinetto. Make sure of the compressor is charged, otherwise charge it with appropriate battery. Livellometri-Assestimetri idraulici-Profiler Hydraulic settlement gauges-Profiler SISGEO s.r.l. 3-7 3. MODALITÀ D’INSTALLAZIONE Collegare il compressore portatile alla presa posta sulla flangia superiore del saturatore. Assicurarsi che il compressore sia carico, altrimenti caricarlo con l’apposita batteria in dotazione. Immettere aria nella membrana pneumatica avendo cura che la pressione in ingresso si mantenga costante. A questo punto il liquido contenuto nel saturatore andrà a riempire il circuito. Se durante il riempimento la pressione tende ad aumentare, significa che il saturatore è vuoto. E’ importante che il riempimento di un circuito avvenga in una sola operazione. Verificare pertanto che prima di iniziarla ci sia una sufficiente quantità di fluido. Indicativamente per tubi 6x8 mm servono circa 3 lt x 100 m, per tubi 10x12 mm servono circa 8 lt x 100 m. Ripristinare il livello di miscela nel modo già descritto in precedenza ricordando di scaricare la pressione dalla membrana pneumatica disconnettendo la pompa o il compressore dall’attacco rapido. La pressione dell’aria da immettere nel saturatore non deve essere minore di 100 kPa e maggiore di 400 kPa bar. Il valore della pressione da utilizzare sarà funzione della lunghezza del circuito da riempire e del diametro della tubazione del circuito. In qualsiasi caso si consiglia di eseguire il riempimento ad una pressione non troppo elevata per consentire un buon riempimento del circuito. Assicurarsi che tutti i rubinetti degli assestimetri siano chiusi, ad eccezione di quelli degli assestimetri estremi del circuito; far fuoriscire il liquido dall’estremità opposta del circuito lasciata libera, avendo cura di recuperarlo all’interno di un recipiente (fig.3.4-A). E’ bene avere a disposizione un secondo recipiente da sostituire al primo quando sarà necessario rabboccare il saturatore; ricordarsi di chiudere la valvola del saturatore e di dissipare la pressione prima di rabboccarlo, 3. INSTALLATION PROCEDURE Introduce the air into the air tube and check that the pressure remain steady. At this point the circuit will be filled with the fluid. If the pressure value tend to increase, this means that the saturator is empty. Please, note that it’s very importat to fill the circuit in one step so, check that the fluid quantity is enough. Quantity recomended: 3 Lt x 100 m for 6X8 mm tubing Re-estabilish the fluid level as described before and remember to disconnect the pump or the compressor from the quick joint in order to relief the pressure from the air tube. The air pressure must be in a range from 100 to 400 KPa. The pressure value to be used will depend on the length of the cyrcuit and the tubing diameter. Anyway, it is suggested to fill the circuit at low pressure, to obtain better results. Check if all the instruments shut-off valves are closed, except for the valve of the circuit end instruments; let the liquid flow out of the opposite free circuit end and collect it into a can (fig.3.4A). A second can should be provided to replace it when saturator refilling is required; remember to turn off the saturator valve and depressurise it before refill; let the liquid flow inside the circuit till all air bubbles are eliminated; be sure there are no bubbles left (if necessary, repeat this operation until no air bubbles are visible); connect the polyethylene tube free end from which the liquid flows out to the last instrument (check that the shut-off valve is open) and fill the vessel up to about three quarters, then close the valve (fig.3.4-B); open the remaining instruments shut-off valves one by one and fill the vessels up to about three quarters of their capacity, then close the valve (fig.3.4-C) (make sure that during this operation the saturator contains a sufficient amount of liquid, maintained at Livellometri-Assestimetri idraulici-Profiler Hydraulic settlement gauges-Profiler SISGEO s.r.l. 3-8 3. MODALITÀ D’INSTALLAZIONE dopodichè rimettere il liquido in pressione e riaprire la valvola. Lasciare scorrere il liquido all’interno del circuito fino a quando si è sicuri che non siano più presenti bolle d’aria (se necessario ripetere l’operazione facendo compiere al liquido più cicli); connettere l’estremità libera del tubo in polietilene dalla quale fuoriesce il liquido, all’assestimetro terminale (verificare che il rubinetto sia aperto) e riempire il serbatoio fino a circa tre quarti della sua altezza, dopo di che richiudere il rubinetto (fig.3.4B); aprire, uno alla volta, i rubinetti degli altri assestimetri e riempire i serbatoi fino a circa tre quarti della capacità, dopodichè richiudere il rubinetto (fig.3.4-C) (fare in modo che durante l’operazione all’interno del saturatore sia presente una discreta quantità di liquido mantenuto alla pressione di circa 1 bar); una volta riempiti tutti gli assestimetri, ad eccezione di quello posto in corrispondenza della pompa, chiudere la valvola del saturatore, dissiparne la pressione all’interno, disconnettere l’estremità del circuito dallo spezzone di tubo collegato al saturatore tenendolo ad un livello più alto dei serbatoi per evitare fuoriuscita di liquido, e connetterla all’assestimetro non ancora collegato (3.4-D); 3. INSTALLATION PROCEDURE about 1 bar pressure); once all the instruments are filled, except for the one in correspondence of the pump, turn off the saturator valve and depressurise it, disconnect the circuit from the tube connected to the saturator keeping the end of the circuit at a level higher than the vessels, and connect it to the instrument which has been left out (3.4-D); open all the instruments shut-off valves so that the liquid can balance inside the circuit by flowing through the vessels to the newly connected instrument’s vessel at the hydraulic line end. If the liquid inside the circuit is not enough, it is possible to add it from the upper part in one of the circuit vessels excluding the last connected (fig. 3.4-E); check that the circuit contains no air bubbles (if any, remove them by gently tapping on the tubing till they are collected into the nearest vessel), wait to let stabilise the liquid inside the system to stabilise. aprire i rubinetti di tutti gli assestimetri in modo che il liquido si riequilibri all’interno del circuito fluendo dai serbatoi degli assestimetri, al serbatoio dell’assestimetro da poco connesso, posto all’estremità del circuito idraulico. Se il liquido all’interno del circuito non è sufficiente, è possibile aggiungerne attraverso il foro di riempimento di in uno dei serbatoi del circuito eccetto che nell’ultimo serbatoio collegato (fig. 3.4-E). Controllare che nel circuito non siano presenti bolle d’aria (nel qual caso rimuoverle con piccoli colpetti sulla tubazione fino a portarle all’interno del serbatoio più vicino), attendere che il liquido all’interno del circuito si stabilizzi. Livellometri-Assestimetri idraulici-Profiler Hydraulic settlement gauges-Profiler SISGEO s.r.l. 3-9 3. MODALITÀ D’INSTALLAZIONE serbatoio vessel valvola (aperta) valve (open) 1 3. INSTALLATION PROCEDURE valvola (chiusa) valve (closed) tubo HDPE HDPE tube 2 spezzone di tub o piece of tube valvola (aperta) connpressore connpressor valve (open) 3 A valvola di chiusu ra b all valve valvola (aperta) valve (open) tubo HDPE HDPE tube 1 valvola (chiusa) valve (closed) tubo HDPE HDPE tube 2 spezzone di tubo piece of tube valvola (aperta) connpressore connpressor valve (open) 3 B valvola di chiusu ra b all valve valvola (aperta) valve (open) valvola (aperta) valve (open) tubo HDPE HDPE tube 1 tubo HDPE HDPE tube 2 spezzone di tubo piece of tube valvola (aperta) connpressore connpressor valve (open) 3 C va lvola di chiusu r a b all valve valvola (chiusa) valve (closed) tubo HDPE HDPE tube 1 valvola (chiusa) valve (closed) tubo HDPE HDPE tube 2 valvola (aperta) valve (open) connpressore connpressor 3 D valvola di chiusu r a b all valve valvola (aperta) valve (open) 1 tubo HDPE HDPE tube tanica con liquido tank 2 valvola (aperta) valve (open) valvola (aperta) valve (open) 3 E Fig. 3.4 – Modalità di riempimento del circuito idraulico in pressione Fig. 3.4 – Hydraulic system pressure filling procedure Livellometri-Assestimetri idraulici-Profiler Hydraulic settlement gauges-Profiler SISGEO s.r.l. 3-10 3. MODALITÀ D’INSTALLAZIONE 3. INSTALLATION PROCEDURE Riempimento per caduta Gravity filling Nel caso che il riempimento del circuito venga eseguito per caduta, collegare tutte le estremità dei tubi in polietilene agli assestimetri, ad eccezione di una delle due estremità del circuito, che verrà lasciata aperta per consentire il riempimento dello stesso, e procedere come segue (fig. 3.5): In case of gravity circuit filling connect all of the polyethylene tube ends to the instruments, except for one of the two circuit ends, which will be left open to allow circuit filling, then proceed as follows (fig.3.5): 1. assicurarsi che il rubinetto di tutti gli assestimetri sia chiuso; 2 . procurarsi un recipiente (tanica) provvisto di valvola di chiusura, all’estremità della quale va collegato uno spezzone di tubo di opportuna lunghezza (può essere lo stesso usato per il circuito idraulico), e riempirlo di liquido; 3 . porre la tanica con il liquido, al di sopra della quota del punto assestimetrico estremo, infilare l’estremità del tubo della tanica nel foro posto sulla sommità del serbatoio e procedere al suo riempimento; 4. una volta raggiunta circa la metà della capienza del serbatoio (controllabile tramite il tubo di livello), aprire lentamente il rubinetto posto alla base del serbatoio e lasciare che il liquido fluisca all’interno del circuito fino all’estremità lasciata aperta, avendo cura di recuperarlo all’interno di un altro recipiente (fig. 3.5-A); 5 . aggiungere liquido all’interno del serbatoio in modo da compensare la quantità che fluisce lungo il circuito (evitare di fare svuotare completamente il serbatoio onde prevenire la formazione di bolle d’aria all’interno della tubazione); 6 . lasciare scorrere il liquido all’interno del circuito fino a quando si è sicuri che non siano più presenti bolle d’aria; 7 . collegare all’assestimetro posto all’altra estremità del circuito, la tubazione del circuito idraulico lasciata aperta (fig.3.5-B); 8. aprire di volta in volta i rubinetti degli altri assestimetri, aspettando che il livello del liquido, che continua ad essere immesso nel circuito tramite la tanica, si porti a metà dell’altezza di ciascun serbatoio prima di aprire il rubinetto successivo (fig.3.5-B); 9 . quando il livello all’interno di tutti i serbatoi è stato raggiunto, chiudere il 1 . check that the shut-off valves of all the instruments are closed; 2 . procure a can fitted with a shut-off valve at whose end a suitable length of tube must be connected (the same tube as the hydraulic line’s can be employed). Fill the can with fluid; 3 . place the fluid filled can above the level of the end monitoring instrument previously connected to the system; open the protective box and put the end of the can tube through the hole at the top of the vessel. Then proceed to fill it; 4. once the liquid has reached about half the vessel capacity (check by means of the reference tube), slowly open the shut-off valve at the vessel base and let the liquid flow inside the circuit up to the open end. Collect the liquid into a new can (fig. 3.5A); 5. pour some more liquid into the vessel to compensate the amount flowing out in the circuit to prevent the vessel emptying and air bubbles entrapment inside the tubing; 6. let the liquid flow inside the circuit till all air bubbles are removed; make sure there are no air bubbles left; 7 . connect the open hydraulic system tube to the instrument at the opposite end of the circuit (fig. 3.5-B); 8. slowly open the remaining instruments shut-off valves one by one, and wait until the level of the fluid (which is still flowing out of the can into the circuit) has reached half of each vessel’s capacity before opening the next shut-off valve (fig.3.5-B); 9 . when the level in each vessel is reached close the can shut-off valve and remove the filling tube (fig. 3.5-C); 10. check once more that there are no air bubbles in the system (if any, remove them Livellometri-Assestimetri idraulici-Profiler Hydraulic settlement gauges-Profiler SISGEO s.r.l. 3-11 3. MODALITÀ D’INSTALLAZIONE 3. INSTALLATION PROCEDURE rubinetto della tanica e togliere il tubo usato per il riempimento (fig. 3.5-C); by gently tipping on the tube until they reach the nearest vessel). Wait to let the liquid inside the system. 10. controllare ancora che nel circuito non siano presenti bolle d’aria (nel qual caso rimuoverle con piccoli colpetti sulla tubazione fino a portarle all’interno del serbatoio più vicino), attendere che il liquido all’interno del circuito si stabilizzi. rubinetto (chiuso) valve (closed) serbatoio vessel 1 tubo HDPE HDPE tube tanica con liquido tank 2 rubinetto (chiuso) valve (closed) tubo HDPE HDPE tube 1 rubinetto (aperto) valve (open) tubo HDPE HDPE tube rubinetto (aperto) valve (open) 3 tanica con liquido tank 2 rubinetto (aperto) valve (open) 1 rubinetto (chiuso) valve (closed) rubinetto (aperto) valve (open) 3 rubinetto (aperto) valve (open) rubinetto (aperto) valve (open) 2 3 Fig. 3.5 – Modalità di riempimento del circuito idraulico a caduta Fig. 3.5 – Hydraulic system gravity filling procedure Livellometri-Assestimetri idraulici-Profiler Hydraulic settlement gauges-Profiler SISGEO s.r.l. 3-12 3. MODALITÀ D’INSTALLAZIONE Controlli a fine riempimento Terminato il riempimento del circuito, effettuare le misure di controllo per verificare che il livello ottimale (metà serbatoio) sia stato raggiunto in tutti gli strumenti. Il controllo potrà essere eseguito mediante la misura di ogni singolo strumento. Sulla base di quanto riportato sul certificato di taratura a corredo di ciascun assestimetro, il segnale in uscita sarà in mV o in mA. Nel caso di configurazione in mV, il segnale, a metà scala, dovrà essere di circa 12 mV, mentre per configurazione in mA, 13,5 mA. Nel caso in cui il circuito dovesse trovarsi nelle condizioni di troppo pieno (segnali superiori a 20mV / 20mA) o poco pieno (segnali prossimi a 5mV / 8mA), è possibile intervenire operando sul riempimento del serbatoio, togliendo o aggiungendo liquido, utilizzando una grossa siringa. Se qualche assestimetro dovesse trovarsi ancora nella situazione di troppo pieno o troppo vuoto, vuol dire che la sua posizione, rispetto alla linea di livello, è inesatta, per cui andrà riposizionato in modo corretto. Le operazioni di riempimento sono senza dubbio le più critiche per un buon funzionamento dell’impianto assestimetrico; si raccomanda pertanto di far eseguire tali operazioni a personale qualificato. Stesura cavi La trasmissione del segnale elettrico di ogni singolo strumento avviene tramite il cavo elettrico ad esso collegato, normalmente fornito in matasse. Sulla parte terminale del cavo elettrico è fissata una “targhetta” sulla quale sono riportati i dati identificativi del trasduttore (fig. 3.6). Nel caso di strumenti non provvisti di targhetta di identificazione o comunque quando su quest’ultima non è riportato il codice di progetto è necessario, in fase di posa in opera, segnare in modo permanente (ad esempio con un pennarello 3. INSTALLATION PROCEDURE Checks after the circuit filling Once the system is filled connect the electric cable to the terminal board, and take some readings to check that the optimal level (half capacity) has been reached inside all vessels. This check has to be carried out for each instrument. The output signal is in mV or mA, according to specifications shown on each instrument calibration certificate. For mV configuration, the signal should be, at half scale, around 12 mV, whereas for mA configurations it should be around 13.5 mA. If the circuit is over filled (signals over 20mV / 20mA) or viceversa (signals around 5mV / 8mA), fluid can be sucked or introduced into the filling can by means of a syringe. If after this operation some of the instruments are still over- or underfilled, it means that their positions relative to the fluid level line are incorrect, therefore the instruments must be repositioned. Undoubtely filling operations are most critical for the settlement monitoring system, therefore the possibility to have such operations carried out by qualified personel is strongly recommended. Cable installation The electric signal of each instrument is transmitted by means of an electrical cable. This cable is normally supplied in rolls. The cable end is supplied with an identification plate which contains the relevent details of the instrument (fig. 3.6). In the case of instruments not provided with an indentification plate or in any other situation where the identification details are inaccessible, it is vitally important to mark the cable end in permanent way during installation (for example with an indelible marker) so that the identity of the Livellometri-Assestimetri idraulici-Profiler Hydraulic settlement gauges-Profiler SISGEO s.r.l. 3-13 3. MODALITÀ D’INSTALLAZIONE indelebile), sull’estremità del cavo un codice che permetta di identificarli in fase di lettura ed eventualmente, se prevista, in fase di centralizzazione. Una volta che lo strumento è stato posto in opera, bisogna provvedere alla stesura del relativo cavo elettrico. Questa fase riveste un’importanza pari a quella della posa in opera del trasduttore, infatti l’eventuale determinazione di abrasioni o tagli sulla guaina di rivestimento possono, nel tempo, far insorgere perdite di isolamento con conseguente instabilità delle misure. 3. INSTALLATION PROCEDURE instrument is clear for reading or for wiring purposes. Once the instrument has been installed, the cable must be installed correctly. This operation is as critical as the transducer installation. If the cable sheath is damaged by abrasion or cutting, loss of insulation will produce unstable readings. Modello strumento Instrument model D313SV50 Numero di serie Serial number S/N D98376 60 m. MG7 Eventuale codice di progetto Possible project code Lunghezza cavo Cable length Fig. 3.6 – Esempio di targhetta di identificazione del trasduttore Fig. 3.6 – Example of transducer identification plate Se la stesura non viene eseguita correttamente, già dopo qualche metro iniziano a formarsi delle asole e con il proseguo delle operazioni, il cavo incomincia ad aggrovigliarsi. Ciò, oltre a determinare inevitabili perdite di tempo, può provocare il danneggiamento del cavo stesso con le conseguenze descritte sopra. Per evitare l’inconveniente si consiglia di non srotolare la matassa appoggiandola per terra ma di sorreggere la stessa come se fosse montata su di un rullo, infilando le braccia all’interno (fig. 3.7). The instrument cable is supplied as a coil, and unless the coil is unwound correctly there is a possibility of cable damage and a certainty that the cable will become hopelessly tangled To avoid this, it is advisable to unroll the cable keeping the arms in the center of the roll and turning it so that the cable comes out straight (fig. 3.7). Livellometri-Assestimetri idraulici-Profiler Hydraulic settlement gauges-Profiler SISGEO s.r.l. 3-14 3. MODALITÀ D’INSTALLAZIONE 3. INSTALLATION PROCEDURE Fig. 3.7 – Modalità di svolgimento del cavo Fig. 3.7 – Cable unroll modality Evitare se possibile, di lasciare tratti di cavo scoperto in modo da evitare danneggiamenti accidentali e prevenire eventuali atti vandalici. Nel caso in cui il percorso dei cavi è previsto interrato è opportuno predisporre una tubazione flessibile, di diametro adeguato, con pozzetti rompitratta ispezionabili, posti almeno ogni 30 metri. Se il cavo deve essere posizionato su parete, è preferibile proteggere lo stesso con una tubazione conduit preventivamente fissata alla parete tramite collarini in acciaio. Anche in questo caso vanno previste delle scatole rompitratta almeno ogni 30 metri e comunque in corrispondenza di percorsi curvilinei con angoli prossimi a 90 gradi. In caso di percorso aereo va teso un cavetto di acciaio: questo dovrà essere messo in tensione tramite tenditori posti sulle estremità. Per fissare i cavi elettrici si possono utilizzare delle fascette in materiale plastico o altri opportuni sistemi. Posa in opera di eventuali scatole di derivazione Terminata la stesura dei cavi si deve provvedere al fissaggio delle scatole di derivazione o pannelli di misura. Le cassette possono essere posizionate a parete, utilizzando normali tasselli con viti Damage to cables of these instruments can be particularly critical. As such, cables to the instruments should be protected by an additional barrier at all times. In the case of buried cables, we recommend that the cable is installed within a protective duct and that inspection covers are installed at a minimum of every 30 metres. If the cable is installed on a wall, the cable should be installed into a conduit fixed to the wall by steel brackets. Furthermore, inspection boxes should be placed at least every 30 metres or where there are sharp changes in direction. This will facilitate insertion of the cable into the conduit. If the cables have to be suspended between structures, a steel wire support is required. This steel wire should be tensioned by turnbukles mounted at each end. The electric cable can then be then secured to the wire by plastic cable ties. Junction box installation Once the cable installation has been completed, it will then be possible to install junction boxes or terminal units. The boxes can be fixed in place using standard anchor bolts or on purpose made support brackets made on site according to requirements. Livellometri-Assestimetri idraulici-Profiler Hydraulic settlement gauges-Profiler SISGEO s.r.l. 3-15 3. MODALITÀ D’INSTALLAZIONE in acciaio inox, oppure su appositi supporti da realizzare in cantiere a seconda delle esigenze. Cablaggio cavi Tagliare i cavi in modo che abbiano una lunghezza sufficiente a consentire un corretto posizionamento (sia estetico che funzionale). Prima di accorciare i cavi trascrivere il codice di progetto in una posizione che consenta di individuarli anche dopo la fase di cablaggio. Sguainare il cavo per una lunghezza opportuna (tale lunghezza dipende dalle dimensioni della scatola di derivazione o pannello di misura utilizzato) in modo che rimangano esposti i conduttori, spellare la parte terminale dei conduttori per circa 10 mm (eventualmente stagnare con saldatore). Infilare l’estremità del cavo all’interno del pressacavo e serrare. Prima di inserire ed avvitare i conduttori nella morsettiera è opportuno eseguire un controllo degli strumenti, tramite una centralina di lettura manuale, per verificarne la funzionalità. 3. INSTALLATION PROCEDURE Cable wiring Cut the cable in such a way to have enough length to obtain a correct installation (functional and aesthetic). Before cutting the cable, take note of the instrument code so that it will be possible to identify the instrument after cable cutting. Insert the cable end through the gland and tighten the gland nut. Cut the sheath to the required length (according to the box size) so that the leads are free. Strip back the conductor insulation of the wire by about 10 mm. If possible tin the exposed conductor with solder. Insert into the crimp pin. Before inserting the leads and locking the screws of the wiring terminals, check that the instrument is working correctly by taking a reading with a manual read out unit. MODALITÀ DI INSTALLAZIONE DELL’ASSESTIMETRO ELETTRICO DIFFERENZIALE INSTALLATION PROCEDURE OF ELECTRIC DIFFERENTIAL SETTLEMENT GAUGE E’ possibile installare l’assestimetro elettrico differenziale in rilevato e/o in foro di sondaggio. The electric settlement monitoring circuit is designed be installed under an embankment, or in a borehole, or in both. Di seguito si forniscono le istruzioni per l’installazione dell’assestimetro elettrico differenziale, sottolineando che per la delicatezza di alcune operazioni è opportuno prevedere l’intervento di personale tecnico SISGEO specializzato. The installation instructions for the settlement monitoring system are described below. However, as some steps are critical for successful results, the intervention of SISGEO qualified field technician is recommended. Prima di procedere all’installazione è necessario procurarsi i seguenti materiali: Before proceeding with installation the following materials should be provided: • • • • • • attrezzatura per lo scavo della trincea; digging equipment; punte da calcestruzzo (∅ 14 mm); • • • • • • • tasselli ad espansione (∅ 14 mm); • screw anchors (∅ 14 mm); sabbia e ghiaietto; compattatore vibrante (eventuale); livella da muratore; trapano a percussione; Livellometri-Assestimetri idraulici-Profiler Hydraulic settlement gauges-Profiler fine and coarse grained sand; compactor (if necessary); spirit level; hammer drill; concrete tips (∅ 14 mm); SISGEO s.r.l. 3-16 3. MODALITÀ D’INSTALLAZIONE 3. INSTALLATION PROCEDURE • • • • • • • • pinza regolabile multiposizione; Fissaggio del punto di riferimento assestimetrico chiavi fisse; chiavi a brugola; tanica provvista di valvola di chiusura; recipiente per la raccolta del liquido; siringa ipodermica da 10 a 20 cm3; asta in fibra di vetro; fascette di plastica o nastro adesivo. Il punto di riferimento assestimetrico deve essere fissato in posizione verticale su di una parete o comunque su di un opportuno sostegno all’esterno dell’area di possibile cedimento (o in una posizione traguardabile otticamente). Per l’installazione si proceda secondo quanto già dettagliato per il DSM (pag. 3.2). Durante le operazioni di fissaggio del punto di riferimento fare in modo che il punto corrispondente a metà serbatoio, (coincidente al livello del liquido quando il sistema assestimetrico sarà in esercizio), sia più alto della quota del piano di posa dei punti di misura nel seguente modo: − per i fondo scala > 1 m, compreso tra 1 metro ed il valore massimo del fondo scala diminuito dal valore del previsto movimento; − 65 cm al massimo per avere un campo di misure di ± 200 m. Riempimento del circuito idraulico Il circuito idraulico può essere saturato in due diversi modi: • • a caduta libera; in pressione saturatore). (con pompa o NOTA: Il riempimento in pressione fornisce migliori risultati sia perchè più rapido, sia perchè dà una saturazione migliore. Il riempimento a caduta è consigliato per circuiti idraulici corti (pochi metri) o per circuiti con un solo trasduttore. • • • • • • • • multiposition pliers; Positioning reference point open end wrenches; hex wrenches; can fitted with shut-off valve; can for liquid collection; fiber glass rod; hypodermic syringe 10 or 20 cm3; plastic clips or adhesive tape. The reference point must be installed in vertical position on a wall or suitable support outside the possible settlement area (or in a topographically visible position). To install the reference point proceed as just described for the DSM (pag. 3.2). When installing the reference point be sure that the mid line on the vessel (coinciding with the liquid level surface during settlement system operation), is higher in level than the measurement points. The minimum will be: − for instrument having full scale > 1 m, within 1 m and full scale maximum value reducing forecast move value; − 20 –30 cm for instrument having full scale < 1 m. Hydraulic circuit filling Hydraulic line saturation may take place in two different ways: • • filling by gravity drop; pressure filling (by means of pump or saturator). NOTE: The pressure filling method gives best results since it is quicker and, in addition, allows a higher degree of saturation. The gravity drop method is recommended for small-sized hydraulic circuits (up to a few metres) or those fitted with one transducer only. Filling operations must be carried out after the reference point has been installed (see previous paragraph). Filling, whether by Livellometri-Assestimetri idraulici-Profiler Hydraulic settlement gauges-Profiler SISGEO s.r.l. 3-17 3. MODALITÀ D’INSTALLAZIONE Le operazioni di riempimento devono essere eseguite dopo il fissaggio del punto di riferimento. Prima di eseguire il riempimento sia in caduta che in pressione, stendere il circuito idraulico, in prossimità del punto di installazione, svolgendo (e non tirando) contemporaneamente il tubo idraulico ed il cavo elettrico, forniti già collegati al trasduttore, facendo attenzione a non torcere i cavi ed il tubo idraulico. Riempimento a caduta Il riempimento a caduta avviene in modo diverso a seconda che il trasduttore sia montato su piastra o sia da foro. In entrambi i casi è necessario che prima del riempimento il circuito idraulico sia completamente assemblato, con trasduttore/i collegato/i al punto di riferimento assestimetrico. Per i trasduttori su piastra si proceda nel seguente modo: 1 . predisporre la tanica per il riempimento collegando alla sua valvola di chiusura uno spezzone di tubo (può essere lo stesso usato per il circuito idraulico) di opportuna lunghezza; 2. infilare l’estremità del tubo nel foro posto sulla sommità del serbatoio; 3 . assicurarsi che il rubinetto, posto alla base del serbatoio, sia chiuso; 4. porre la tanica al di sopra della quota del punto di riferimento assestimetrico e procedere al riempimento del serbatoio; 5. svitare dal raccordo dell’ultimo punto di misura, il tappo presente sull’estremità non collegata al circuito; 6 . aprire il rubinetto posto alla base del serbatoio e lasciare che il liquido fluisca all’interno del circuito fuoriuscendo dall’estremità lasciata aperta (avendo cura di recuperarlo all’interno di un recipiente) (fig.3.8); 7 .aggiungere liquido serbatoio in modo da quantità che fluisce lungo attentamente di all’interno del compensare la il circuito (evitare far svuotare 3. INSTALLATION PROCEDURE gravity drop or pressure, must be carried out after the following preliminary operations: laying out the hydraulic circuit nearby the installation place; unwind at the same time the hydraulic tube and the electric cable (without stressing on them) connected to the transducer. Make sure you do not twist the cables and hydraulic tube while you perform this operation. Gravity-drop filling The gravity drop procedure change if it is a plate-mounted or a borehole transducer. In either case, the hydraulic line must be fully assembled before filling and the transducer(s) must be connected to the reference point. For plate anchored settlement gauge proceed as follows: 1. connect a tube section of suitable length to the can valve (the hydraulic circuit tube may be used for this purpose) 2. insert the other tube end into the hole at the top of the vessel; 3 . check that the shut-off valve at the bottom of the vessel is closed; 4. position the tank at a higher point than that of the reference point and proceed to fill the vessel; 5 . on the last settlement gauge unscrew the plug mounted at the end not connected to te circuit; 6 . open the shut-off valve at the base of the vessel and let the liquid flow into the circuit out of the open end into a can (fig. 3.8); 7 . compensate te liquid loss in the circuit by pouring some more liquid into the vessel (make sure it never empties completely in order to prevent air bubbles from entering the circuit); 8. let the liquid flow inside the circuit to be sure no bubbles are left in it; 9. screw on the plug on the last settlement gauge and, at the same time, close the valve on the filling can. Liquid level compensation, if necessary, may be provided with the help of a large syringe. Livellometri-Assestimetri idraulici-Profiler Hydraulic settlement gauges-Profiler SISGEO s.r.l. 3-18 3. MODALITÀ D’INSTALLAZIONE 3. INSTALLATION PROCEDURE completamente il serbatoio onde prevenire la formazione di bolle d’aria all’interno del circuito); 8. lasciare scorrere il liquido all’interno del circuito fino a quando si è sicuri che non siano più presenti bolle d’aria; 9 . chiudere contemporaneamente il tappo sull’ultimo punto di misura e la valvola della tanica usata per il riempimento. Per l’eventuale aggiunta di liquido all’interno del serbatoio può essere utilizzata una capace siringa. serbatoio vessel rubinetto (aperto) valve (open) tubo HDPE punto di misura HDPE tube settlement gauge Fig. 3.8 – Schema di riempimento a caduta con trasduttori su piastra Fig. 3.8 – Gravity drop filling diagram for plate-anchored settlement gauge Per i trasduttori da foro il riempimento a caduta è consigliato per circuiti costituiti da una sola linea idraulica, e quindi con un solo trasduttore. 1 . Predisporre la tanica per il riempimento collegando alla sua valvola di chiusura uno spezzone di tubo (può essere lo stesso usato per il circuito idraulico) di opportuna lunghezza; 2 . infilare l’estremità del tubo nel foro posto sulla sommità del serbatoio; 3. assicurarsi che il rubinetto, posto alla base del serbatoio, sia chiuso; 4. porre la tanica al di sopra della quota del punto di riferimento assestimetrico e For borehole or removable gauges inside tube, gravity drop filling is recommended if the hydraulic circuit is made up of a single line and is, therefore, fitted with one transducer only. 1 . Connect a tube section of suitable length to the can valve (the hydraulic circuit tube may be used for this purpose); 2. insert the other tube end into the hole at the top of the vessel; 3 . check that the shut-off valve at the bottom of the vessel is closed; 4. position the can at a higher level than the reference point and proceed to fill the vessel; Livellometri-Assestimetri idraulici-Profiler Hydraulic settlement gauges-Profiler SISGEO s.r.l. 3-19 3. MODALITÀ D’INSTALLAZIONE procedere al riempimento del serbatoio; 5. svitare il raccordo del tubetto inox che si innesta sul trasduttore per consentire la fuoriuscita dell’aria durante il riempimento; 6. aprire il rubinetto posto alla base del serbatoio; 7 . lasciare scorrere il liquido all’interno della linea fino a quando si è sicuri che non siano più presenti bolle d’aria (controllare che non escano più bolle d’aria dal trasduttore) (fig. 3.9). Riempire una siringa di fluido disaerato e saturare le cavità del trasduttore a cui va collegato il tubetto d’acciaio; 3. INSTALLATION PROCEDURE 5 . unscrew the transducer’s steel tube fitting to let the fluid flowing out during filling; 6. open the shut-off valve at the base of the vessel; 7 . let the liquid flow inside the circuit until you are sure there are no air bubbles are left (fig. 3.9). Fill a syringe with deaired fluid and saturate the sensor cavity; 8 . close the valve of the tank used for filling and, at the same time, tighten the transducer fitting. 8. chiudere la valvola della tanica usata per il riempimento e contemporaneamente avvitare il dado del trasduttore. tubo HDPE HDPE tube cavo elettrico electrical cable tanica con liquido tank serbatoio vessel rubinetto (aperto) valve (open) rubinetto (aperto) tubo HDPE cavo elettrico serbatoio HDPE tube electrical cable vessel valve (open) Fig. 3.9 – Schema riempimento a caduta con trasduttore da foro Fig. 3.9 – Gravity drop filling diagram for borehole settlement gauge Livellometri-Assestimetri idraulici-Profiler Hydraulic settlement gauges-Profiler SISGEO s.r.l. 3-20 3. MODALITÀ D’INSTALLAZIONE 3. INSTALLATION PROCEDURE Riempimento in pressione Pressure filling Anche per il riempimento in pressione la modalità di saturazione varia a seconda del tipo di trasduttore ed è necessario che prima del riempimento il circuito idraulico sia completamente assemblato, con trasduttore/i collegato/i al punto di riferimento assestimetrico. As for gravity-drop filling, pressure filling also requires different procedures to be followed depending on the type of transducer installed. The hydraulic circuit must be fully assembled and connected to the reference point before the line can be filled. Preliminirmente si deve riempire il saturatore. Posizionare la tanica contenente l’apposita miscela disaerata di acqua e glicerina ad un’altezza superiore rispetto al saturatore. Collegare la tanica mediante una tubazione, al raccordo del rubinetto del tubetto da non usare. First we have ti fill the saturator. Put the tank with the deaired fluid heighter than the saturator. Connect the tank, through a tubing, on the fitting not to be used. Aprire il rubinetto. Il saturatore si riempirà per caduta libera. Durante questa operazione lasciare aperto l’altro rubinetto per consentire all’aria di fuoriuscire dal saturatore. Una volta riempito il saturatore, chiudere il rubinetto e scollegare la tubazione dalla tanica. Il saturatore ha una capacità di 20 litri Riempimento del circuito Collegare il circuito assestimetrico al saturatore tramite uno dei due raccordi posti sulle flange. Aprire il rubinetto. Collegare un compressore alla presa posta sulla flangia superiore del saturatore. Immettere aria nella membrana pneumatica avendo cura che la pressione in ingresso si mantenga costante. A questo punto il liquido contenuto nel saturatore andrà a riempire il circuito. Se durante il riempimento la pressione tende ad aumentare, significa che il saturatore è vuoto. E’ importante che il riempimento di un circuito avvenga in una sola operazione. Verificare pertanto che prima di iniziarla ci sia una sufficiente quantità di fluido. Indicativamente per tubi 6x8 mm servono circa 3 lt x100 m, per tubi 10x12 mm servono circa 8 lt x 100 m. Turn on the valve. The saturator will be filled with the fluid. During this phase the otherr port has to be open, in order to allow the air outlet from the saturator. Once the saturator is full, turn off the valve, disconnect the tubing that connect the tank to saturator. The saturator has a capacity exceeding 20 liter. Circuit filling Connect the hydraulic circuit to the probe of the saturator fitting on the valves. Open the valve. Connect a compressor to the quick joint on the upper flange. Introduce the air into the air tube and check that the pressure remain steady. At this point the circuit will be filled with the fluid. If the pressure value tend to increase, this means that the saturator is empty. Please, note that it’s very importat to fill the circuit in one step so, check that the fluid quantity is enough. Quantity recomended: 3 Lt x 100 m for 6X8 mm tubing Re-estabilish the fluid level as described before and remember to disconnect the pump or the compressor from the quick joint in order to relief the pressure from the air tube. The air pressure must be in a range from 100 to 400 KPa. The pressure value to be Livellometri-Assestimetri idraulici-Profiler Hydraulic settlement gauges-Profiler SISGEO s.r.l. 3-21 3. MODALITÀ D’INSTALLAZIONE Ripristinare il livello di miscela nel modo già descritto in precedenza ricordando di scaricare la pressione dalla membrana pneumatica disconnettendo la pompa o il compressore dall’attacco rapido. La pressione dell’aria da immettere nel saturatore non deve essere minore di 100 kPa e maggiore di 400 kPa bar. Il valore della pressione da utilizzare sarà funzione della lunghezza del circuito da riempire e del diametro della tubazione del circuito. In qualsiasi caso si consiglia di eseguire il riempimento ad una pressione non troppo elevata per consentire un buon riempimento del circuito. Per i trasduttori su piastra si proceda nel seguente modo: se il circuito assestimetrico è composto da un solo ramo, disconnettere l’estremità del tubo idraulico collegata al punto di riferimento; connettere il saturatore, pieno di liquido, al rubinetto posto sul punto di misura più esterno al circuito e porlo ad una quota di circa 20-30 cm più alta della quota di posa dei punti di misura. In caso di circuito composto da due rami lasciare aperto il raccordo sull’ultimo punto di misura del secondo ramo. Verificare che il rubinetto del punto di riferimento sia chiuso; Aprire il rubinetto del saturatore ed iniziare il riempimento (mettere in pressione il liquido con la pompa in dotazione); far fuoriuscire il liquido dal lato del circuito lasciato aperto fino a quando non arrivano più bolle d’aria (raccogliere il liquido che fuoriesce all’interno di un recipiente); aprire il rubinetto del punto di riferimento assestimetrico e riempire il serbatoio fino a circa metà della sua altezza dopo di che richiudere il rubinetto. In caso di circuito con un solo ramo va prima connesso il tubo al raccordo idraulico posto alla base del punto di riferimento (tale operazione va fatta mentre il liquido fuoriesce dal tubo) (fig. 3.10); 3. INSTALLATION PROCEDURE used will depend on the length of the cyrcuit and the tubing diameter. Anyway, it is suggested to fill the circuit at low pressure, to obtain better results. Check if all the instruments shut-off valves are closed, except for the valve of the circuit end instruments; let the liquid flow out of the opposite free circuit end and collect it into a can (fig.3.4A). A second should be provided to replace it when saturator refilling is required; remember to turn off the saturator valve and depressurise it before refill. For plate-anchored settlement gauge proceeds as follows: if the settlement circuit is made up of a single line, disconnect the hydraulic tube from the datum; connect the saturator to the valve on the block of the farest measurement point. Place the saturator at a height of 20-30 cm above the measurement point installation plane; For circuits composed of two lines, the port on the furthest measurement point of the second line should be left open (the first point in both lines is connected to the reference point). Then proceed as follows: check that the reference point is closed; start filling by opening the saturator valve; pressurise the liquid by means of the pump; let the liquid flow out of the circuit open end until no more air bubbles come out. Collect the liquid flowing out into a can; open the reference point shut-off valve and fill the vessel up to about half its height. Then close the valve again. If the circuit is a single line only, the hydraulic tube must first be connected to the fitting at the bottom of the datum. While this operation is carried out the liquid must be flowing out of the tube (fig. 3.10); Livellometri-Assestimetri idraulici-Profiler Hydraulic settlement gauges-Profiler SISGEO s.r.l. 3-22 3. MODALITÀ D’INSTALLAZIONE 3. INSTALLATION PROCEDURE serbatoio valvola (aperta) tubo HDPE punto di misura vessel valve (open) HDPE tube settlem ent gauge sa tura tor e s at ur at or compressore compre sso r Fig. 3.10 – Schema di riempimento in pressione con trasduttori su piastra Fig. 3.10 – Pressure filling diagram for plate anchored settlement gauge chiudere il riferimento; rubinetto del punto di smettere di pompare liquido e lasciare il saturatore connesso al circuito col rubinetto aperto (fare in modo che all’interno del saturatore sia presente una discreta quantità di liquido); dissipare la pressione nel circuito togliendo il connettore che collega la pompa al saturatore (attendere 10-15 min. affinché la pressione si sia dissipata); controllare che nel circuito non siano presenti bolle d’aria (nel qual caso va ripetuta tutta l’operazione smontando prima i trasduttori e svuotando il circuito) dopo di che chiudere il rubinetto a cui è connesso il saturatore e disconnettere il tubo utilizzato per il riempimento; aprire il rubinetto del punto di riferimento. Per i trasduttori da foro si proceda nel seguente modo: svitare il raccordo idraulico sul trasduttore per consentire la fuoriuscita dell’aria durante il riempimento; porre il saturatore con il liquido sul piano di calpestio, in corrispondenza del punto di riferimento assestimetrico; close the reference point shut-off valve; stop pumping the liquid. Leave the valve open and the saturator connected to the circuit (the saturator should contain a sufficient amount of liquid); depressurise the circuit by disconnecting the saturator (wait 10-15 min. for pressure dissipation); if air bubbles are visible in the hydraulic circuit, the entire operation must be repeated. Unscrew all transducers and empty the circuit. If there are no air bubbles, close the valve to which the saturator is connected and remove the filling tube. open the shut-off valve of the reference point. For borehole settlement gauges follow this procedure: unscrew the transducer steel tube fitting to let the fluid flowing out during filling; place the saturator at ground level on the reference point’s vertical line; connect the pump to the saturator, and by means of a suitable length of tube, connect the saturator valve to the T joint to connect to the hydraulic line(s); Livellometri-Assestimetri idraulici-Profiler Hydraulic settlement gauges-Profiler SISGEO s.r.l. 3-23 3. MODALITÀ D’INSTALLAZIONE collegare la pompa al saturatore e, con uno spezzone di tubo di opportuna lunghezza, la valvola del saturatore al raccordo idraulico a T al quale sono collegate le linee idrauliche (o la linea idraulica); assicurarsi che il rubinetto, posto alla base del serbatoio, sia chiuso; aprire il rubinetto del saturatore ed iniziare il riempimento pompando con continuità in modo da trasmettere pressione al liquido e favorire così l’afflusso di liquido attraverso le tubazioni (fig. 3.11-1) (una piccola quantità di fluido uscirà dai tubetti dei trasduttori, lasciati aperti). Dopo aver fatto fuoriuscire una certa quantità di fluido privo di bolle d’aria riempire completamente con la siringa con lo stesso fluido la cavità del trasduttore a cui viene collegato il raccordo idraulico. Serrare il raccordo ponendo attenzione che non vengano intrappolate bolle d’aria; una volta riempite le linee idrauliche, aprire il rubinetto posto alla base del serbatoio e lasciare che il liquido fluisca all’interno di esso (fig.3.11-2); quando il liquido ha raggiunto un’altezza pari a metà serbatoio, chiudere il rubinetto del serbatoio stesso; chiudere la valvola del saturatore e disconnetterlo dal raccordo a T chiudendo velocemente il foro con il tappo relativo; riaprire il rubinetto del punto di riferimento; 3. INSTALLATION PROCEDURE check that the shut-off valve at the base of the vessel is closed; open the saturator valve and start the filling. Drive the pump with a continuous movement to pressurise the liquid and let it flow through the piping (fig. 3.11-1). A certain amount of liquid will flow out of the tube disconneted from the transducers. when no more air bubbles come out, fill a syringe with deaired fluid and saturate the sensor cavity; To avoid overpressure on the transducer check pressure increase measuring it with to the read-out unit; connect the tube to the instrument fully tightening the transducers fitting nut; when the hydraulic lines are completely filled open the shut-off valve at the bottom of the vessel and let the liquid flow into the vessel (fig. 3.11-2); let the liquid fill half of the vessel and then shut the shut-off valve; close the saturator valve and remove it from the T joint; fit the plug into the port as quickly as possible; open the valve of the reference point; remove any air bubbles by tilting the tube and tipping with the finger until the bubble is inside the tank; complete the vessel filling up to half height by mean of a syringe with deaired fluid. rimuovere eventuali bolle d’aria facendole defluire verso il serbatoio inclinando il tubo e dando piccoli colpetti alla tubazione; rabboccare con una siringa il liquido all’interno del serbatoio che deve essere pieno per metà altezza. Livellometri-Assestimetri idraulici-Profiler Hydraulic settlement gauges-Profiler SISGEO s.r.l. 3-24 3. MODALITÀ D’INSTALLAZIONE 3. INSTALLATION PROCEDURE connpress ore c onnpress or saturatore saturator serbatoio vessel valvola (chiusa) valve (closed) tubo HDPE HDPE tube connpres s or e connpres sor saturatore saturator serbatoio vessel valvola (aperta) valve (open) tubo HDPE HDPE tube 1 2 Fig. 3.11 – Schema riempimento in pressione con trasduttori da foro Fig. 3.11 – Pressure filling scheme for borehole settlement gauge Installazione in rilevato L’installazione in rilevato può essere fatta in due diversi modi: • installazione con punti di misura su piastra (assestimetro fisso); • installazione con tubo guida orizzontale (assestimetro removibile). Preparazione del piano di posa 1. segnare sulla superficie del terreno le posizioni dove dovranno essere ubicati i punti di misura assestimetrici o del tubo guida; 2. scavare una trincea rettilinea profonda circa 50 cm, avente una larghezza al fondo di almeno 30÷35 cm; 3 . effettuare degli slarghi locali in corrispondenza delle posizioni dove dovranno essere ubicati i punti di misura (non richiesti nel caso del tubo); Embankment installation The circuit may be embedded under an embankment using two different procedures: • i nst a l l a t i o n wi t h p l a t e- a ncho red measuring points (in-place settlement monitoring circuit); • installation with horizontal access tube (removable circuit). settlement monitoring Preparing the trench 1 . mark the ground at the positions where the measuring points or access tube should be placed; 2. dig a trench in a straight line. Trench dimensions should be about 50 cm in depth and at least 30-35 cm wide at the bottom; 3. widen the trench at the places where the measuring points have to be installed Livellometri-Assestimetri idraulici-Profiler Hydraulic settlement gauges-Profiler SISGEO s.r.l. 3-25 3. MODALITÀ D’INSTALLAZIONE 4 . stendere sul fondo della trincea un letto di sabbia fine, compattata a mano o con vibratore, dello spessore di circa 10 cm. Installazione con punti di misura su piastra Per la loro installazione eseguire le operazioni descritte di seguito. − Posizionamento dei misura assestimetrici punti di 5 . Adagiare sul letto di sabbia, in corrispondenza degli slarghi, i punti di misura assestimetrici (fare in modo che siano tutti alla stessa quota); 6. stendere i cavi elettrici con andamento tale da consentirgli un ampio margine di movimento sia in fase di compattazione del rilevato che durante gli eventuali cedimenti. − Preparazione del circuito idraulico 7 . Stendere, all’interno della trincea, il tubo in polietilene (anche in questo caso l’andamento deve consentirgli ampie possibilità di movimento); 8. tagliare la tubazione in corrispondenza dei raccordi idraulici; 9. infilare il tubo in polietilene all’interno dell’eventuale guaina corrugata; 10. m o n t a r e i raccordi idraulici all’estremità dei diversi spezzoni di tubo; 11. serrare la raccorderia ai punti di misura ed al punto di riferimento assestimetrico. − Riempimento del circuito idraulico Una volta fissato il punto di riferimento e preparato il circuito idraulico si può procedere al riempimento come descritto in precedenza. − Chiusura della trincea 12. Terminate le fasi di riempimento e verificato il corretto funzionamento del circuito, ricoprire lo scavo con uno strato di sabbia di circa 30 cm di spessore compattato a mano o con vibratore (prestare attenzione a non arrecare danni alla strumentazione); 3. INSTALLATION PROCEDURE (this is not required in the case of tube installation); 4. cover the trench bottom with a layer of fine grained sand (about 10 cm thick) and compact it by hand or by means of a vibrator. Installing plate mounted settlement gauge Settlement gauge fitted with a plate anchor should be installed as follows. − Positioning the cells 5 . In the widened areas, place the settlement gauges on the sand-bed roughly at the same height; 6 . unreel the electric cable; allow extra length for embankment compaction or for possible settlement. − Preparing the hydraulic circuit 7. Unreel the polyethylene tube along the trench (leave length allowances in this case too); 8 . cut the tube at the places in which hydraulic connections are needed; 9 . insert the polyethylene tube into the corrugated external sheath if provided; 10. assemble the fittings on the ends of the tube lengths; 11. tighten the fittings at the measuring points and at the reference point. − Filling the hydraulic circuit After positioning the reference point and preparing the hydraulic circuit, fill it as just described. − Trench filling 12. At the end check the circuit’s operation, then fill the trench with an approx. 30 cm thick layer of sand. Compact it by hand or by means of a vibrator. Make sure no damage is caused to the instruments during compaction; 13. complete trench filling by adding a layer of coarse grained sand or gravel, then compact it by means of a vibrator or a roller. 13. completare il ricoprimento della trincea con uno strato di sabbia grossolana Livellometri-Assestimetri idraulici-Profiler Hydraulic settlement gauges-Profiler SISGEO s.r.l. 3-26 3. MODALITÀ D’INSTALLAZIONE 3. INSTALLATION PROCEDURE o ghiaietto compattandolo con rullo o vibratore. Horizontal access tube installtion Installazione con tubo guida orizzontale In case of installation of an access tube follow the instructions below: Per l’installazione con tubo guida, eseguire le operazioni descritte di seguito. − Posizionamento orizzontale del tubo 1 . Adagiare sul letto di sabbia della trincea il tubo guida orizzontale nella lunghezza desiderata; 2. ricoprire il tubo con successivi strati di sabbia, avendo cura di compattare il terreno, eventualmente mediante l’utilizzo di un apposito compattatore. − Riempimento del circuito idraulico Prima dell’inserimento dei punti di misura nel tubo guida, si deve eseguire il riempimento, a caduta o in pressione, delle tubazioni idrauliche seguendo le modalità descritte precedentemente. − Posizionamento dei punti di misura Si possono avere due casi. a. Il tubo è accessibile da entrambe le estremità: 1 . inserire nel tubo di accesso prima di installarlo un cavo d’acciaio (almeno con diametro di 2 mm) e bloccarlo ad entrambe le estremità; 2 . preparare gli strumenti stesi davanti ad una estremità del tubo d’accesso riportando sul cavo con un metro e marcando con nastro adesivo la distanza del punto d’installazione. Collegare con spezzoni di cavo d’acciaio gli strumenti tra loro così che rispettino le rispettive posizioni; 3. attaccare un capo del filo lasciato nel tubo d’accesso al primo strumento della batteria come sopra preparato e trascinarlo entro il tubo tirando l’altro capo del filo fino a quando il primo strumento e quindi anche gli altri saranno in posizione; questa operazione deve essere svolta lentamente in modo da permettere ad eventuali bolle d’aria di defluire verso il serbatoio del punto di riferimento che avrà il rubinetto aperto. − Positioning the horizontal tube 1 . on the sand layer on the trench bottom lay down the access tube; 2 . cover the tube with some layers of sand, compacting the ground using a compactor if necessary,. − Filling the hydraulic circuit Before inserting the cells into the access tube fill the hydraulic line by means of gravity-drop or pressure filling, according the above procedures. − Positioning the borehole settlement gauge We can face two cases. a. both tube ends are accessible: 1 . insert into the access tube, before installation a steel cable at least 2 mm diameter (available from Sisgeo) and fix it at both end of the tube; 2 . lay down in front of one end of the tube the instruments with their cabling and piping. Mark on the cable, with adhesive tape, the distance of t h e i n s t a l l a t i o n position. Connect by proper steel cable lengths the instruments to each other to obtain the desired string; 3. connect the end of the cable left in the access tube to the first instrument of the string and insert into the access tube by pulling the other end of cable until it will be in its position. This operation must be performed very slowly to let air bubbles (if any) to flow towards the reference point vessel (leave the valve open). b . Only one tube end is accessible beeing the other buried: 1 . use a fiber-glass rod whose length must exceed the distance between the furthest installation point and the beginning of the access tube. Use plastic clips or some adhesive tape; 2 . join together the fluid-filled hydraulic lines, the settlement gauges and the cables, then fasten them to the fiber-glass Livellometri-Assestimetri idraulici-Profiler Hydraulic settlement gauges-Profiler SISGEO s.r.l. 3-27 3. MODALITÀ D’INSTALLAZIONE b . Il tubo è accessibile da una sola estremità: 1 . munirsi di asta in fibra di vetro di lunghezza maggiore della distanza del punto di installazione più distante dalla testa del tubo guida, e di fascette di plastica o nastro adesivo; 2 . unire le tubazioni idrauliche già riempite, i punti di misura ed i cavi, all’asta in fibra di vetro, con fascette e nastro adesivo, posizionando i punti di misura alla distanza desiderata; 3. inserire la batteria così preparata nel tubo guida spingendo sull’asta in fibra di vetro; questa operazione deve essere svolta lentamente in modo da permettere ad eventuali bolle d’aria di defluire verso il serbatoio del punto di riferimento che avrà il rubinetto aperto. In alternativa all’asta in fibra di vetro, è possibile utilizzare una scatola di rinvio completa di carrucola (fig. 3.12) da installare in corrispondenza dell’estremità non accessibile del tubo guida. In questo modo le tubazioni idrauliche già riempite e collegate ai punti di misura ed ai cavi, vengono “tirate” nel tubo orizzontale tramite un cavo in acciaio precedentemente inserito nella carrucola e nel tubo, e collegato al primo trasduttore. 3. INSTALLATION PROCEDURE rod by means of clips or adhesive tape. Position the cells at the required distance; 3 . after assembling the string as described insert it into the access tube. This operation must be performed very slowly to let air bubbles (if any) to flow towards the reference point vessel. (leave the valve open). Instead of the fiber-glass rod, a dead- end pulley assembly may be used (fig. 3.12). This should be installed at the tube’s dead end (the end which is not accessible), so that the fluid-filled hydraulic tubes, the measuring points and the cables can be drawn along the horizontal tube by means of a steel wire previously inserted into the pulley and into the tube. This steel wire is connected to the first transducer. In any case finally check that no air bubbles are left inside the circuit; if any, push them along the tube into the vessel by tilting the tube and gently tipping it. Fill the vessel by means of a syringe. The liquid surface level must reach half of the vessel height. In ogni caso alla fine controllare che nel circuito non siano presenti bolle d’aria (nel qual caso farle defluire verso il serbatoio inclinando il tubo e dando piccoli colpetti sulla tubazione); rabboccare con una siringa il liquido all’interno del serbatoio che deve essere pieno per metà altezza. Livellometri-Assestimetri idraulici-Profiler Hydraulic settlement gauges-Profiler SISGEO s.r.l. 3-28 3. MODALITÀ D’INSTALLAZIONE 3. INSTALLATION PROCEDURE Tubo di protezione del cavo Cable protective tube Tubo guida Cavo traino Access tube Steel wire Fig. 3.12 – Scatola di rinvio con carrucola Fig. 3.12 – Dead-end pulley assembly In entrambi i casi, si ricorda di marcare sul tubo idraulico la distanza alla quale si vogliono installare i tubi di misura, prima della loro installazione. Before installation, mark on the hydraulic tube the distance at which the settlement gauges are to be installed. This should be done for both installation methods. Installazione in foro Borehole installation L’installazione del sistema assestimetrico può essere effettuta sia in foro di sondaggio rivestito che non rivestito. The settlement circuit may be installed in the borehole either with or without casing. Riempimento del circuito idraulico Filling the hydraulic circuit Dopo il fissaggio del punto di riferimento e dopo aver predisposto il circuito idraulico, si può eseguire il riempimento del circuito, sia a caduta che in pressione, nel modo precedentemente descritto. Install the reference point and prepare the hydraulic circuit. Fill the circuit according to the procedure described, either by gravity-drop filling or by pressure filling. Installazione in foro non rivestito Per l’installazione in foro non rivestito si proceda nel seguente modo: 1. porre il trasduttore, collegato al punto di riferimento tramite il tubo idraulico già riempito, in prossimità del boccaforo e calarlo progressivamente reggendolo per il cavo all’interno del foro di sondaggio, fino alla quota stabilita; 2 . iniettare una miscela cementizia plastica costituita da acqua, cemento e bentonite in proporzioni tali da renderla meccanicamente simile, per quanto possibile, al terreno circostante. Il cemento Installation without casing To install the settlement circuit without casing follow the procedure described below: 1 . connect the transducer to the reference point by means of the fluid filled hydraulic tube. Place the transducer at the borehole top and lower into the hole by the cable until it reaches the required depth; 2 . grout with a plastic mix made of water, cement and bentonite that are combined so as to render it similar as much as possible to the surrounding ground. The grouting has to be made from the borehole bottom by means of a small tube; Livellometri-Assestimetri idraulici-Profiler Hydraulic settlement gauges-Profiler SISGEO s.r.l. 3-29 3. MODALITÀ D’INSTALLAZIONE viene iniettato dal fondo foro tramite un tubetto; 3. per ogni trasduttore in più, ripetere i punti 1 e 2 dopo che la miscela cementizia precedentemente iniettata ha fatto presa, in modo da poter appoggiare il trasduttore successivo. Man mano che si procede con la cementazione del foro, si raccomanda di lasciare il tubo idraulico ed il cavo elettrico laschi in modo da consentire loro la possibilità di movimento in caso di cedimento del terreno (fig.3.13). serbatoio vessel 3. INSTALLATION PROCEDURE 3. for each new transducer, repeat points 1 and 2 above. Wait for the grouting mix to set before placing the next transducer on top of it. As far as the hydraulic tube and electric cable are concerned, during this operation leave extra length for ground settlement (fig. 3.13). rubinetto (aperto) valve (open) Punto di misura settlement gouge Miscela cementizia grouting mix Fig. 3.13 – Schema di installazione in foro senza rivestimento Fig. 3.13 - Borehole installation without casing Livellometri-Assestimetri idraulici-Profiler Hydraulic settlement gauges-Profiler SISGEO s.r.l. 3-30 3. MODALITÀ D’INSTALLAZIONE 3. INSTALLATION PROCEDURE Installazione in foro rivestito Installation with casing Per l’installazione in foro rivestito si consiglia di installare all’interno del rivestimento usato per perforare un tubo corrugato in plastica a perdere, cosi da poter effettuare l’installazione del DSM come già descritto. In ogni modo, data la complessità del procedimento, si consiglia di interpellare il servizio di assistenza SISGEO. In case of installation in a temporary case borehole we suggest to install a plastic corrugate sheat inside the temporary casing. So that after the drilling in gone away you can proceed as just explaned. It is therefore advisable to ask to SISGEO for defining the easyest procedure. Misure di controllo a fine installazione Once the circuit has been filled (by gravity-drop or pressure filling) and the cells have been installed in the borehole, wait some time until the fluid is stabilized inside the hydraulic line. Take readings at each instrument in order to monitor the circuit’s operation. The transducer output signals are in mV or in mA, according to the calibration certificate supplied with each instrument. Terminato il riempimento del circuito (a caduta o in pressione), e dopo aver installato i punti di misura in foro di sondaggio, lasciare trascorrere un tempo sufficiente alla stabilizzazione del liquido all’interno del circuito. Effettuare le misure di controllo per verificare il corretto funzionamento del sistema. Il controllo potrà essere eseguito mediante la misura di ogni singolo strumento. Sulla base di quanto riportato sul certificato di taratura a corredo di ciascun trasduttore, il segnale in uscita sarà in mV o in mA. Il livello ottimale del liquido all’interno del serbatoio dell’assestimetro di riferimento, dovrà essere pari a metà serbatoio; questo livello potrebbe variare a causa di variazioni di temperatura o compressione dei tubi idraulici: in tal caso si raccomanda di provvedere a ripristinare il livello ottimale del liquido, togliendone o aggiungendone tramite una siringa, per evitare errori nei segnali di misura. Le operazioni di riempimento sono senza dubbio le più critiche per il buon funzionamento dell’impianto assestimetrico, sia perché bisogna prestare attenzione all’eventuale formazione di bolle d’aria all’interno del circuito, sia perché nella fase di riempimento (soprattutto se in pressione) una non corretta esecuzione delle operazioni sopra descritte potrebbe danneggiare irreparabilmente i trasduttori pertanto, è consigliabile avvalersi di personale tecnico specializzato. Stesura cavi Per la stesura cavi, la posa in opera di Check readings The liquid level in the reference vessel should reach half of the vessel height; temperature variation or hydraulic lines compression, may cause level variation. In this case, the optimum level should be restored. Correct operation of the settlement monitoring circuit depends to a high degree on the filling operation, because air bubbles may be entrapped into the circuit and because during filling (especially pressure filling) any deviation from the procedures described above could produce severe damages of the transducers. Therefore we strongly recommend that this task will be performed by expert field technician. Cable installation For cable installation, joint box installation and wiring cable, see the paragraph at page 3.12. NOTE: All the electric differential settlement gauge trasducers, with particulary attention for the D422R010, must be connected outside to collect the atmosphere pressure, by means the pipe appropriate sites into the electrical cable. If the cable joint Livellometri-Assestimetri idraulici-Profiler Hydraulic settlement gauges-Profiler SISGEO s.r.l. 3-31 3. MODALITÀ D’INSTALLAZIONE eventuali scatole di derivazione ed il cablaggio dei cavi, si veda il paragrafo alla pagina 3.12. NOTA BENE: 3. INSTALLATION PROCEDURE are made and the protection airtght box on the terminals are used, to make sure to keep the connection with the pipe mension above. Tutti i trasduttori degli assestimetri elettrici differenziali ed in particolare il D422R010, devono essere collegati all’esterno per rilevare la pressione atmoferica mediante l’apposito tubetto situato all’interno del cavo elettrico. Se vengono eseguite giunte del cavo o usate scatole di protezione stagna sui terminali, assicurarsi che venga mantenuto il collegamento con il tubetto menzionato sopra. MODALITÀ D’INSTALLAZIONE DEL PROFILER Installazione della tubazione guida del profiler Lungo il profilo in esame, si realizza una trincea di 0.5÷1 m di profondità e 0.3÷0.5 m di larghezza. La base della trincea deve essere livellata e compattata. Sul fondo della trincea si stende uno strato di 150-300 mm di sabbia fine e si compatta. Sullo strato così preparato si distende la tubazione e con successivi strati di sabbia si ricopre il tubo, avendo cura di compattare il terreno, eventualmente mediante l’utilizzo di un apposito compattatore. All’interno della tubazione deve essere lasciato un cavetto d’acciaio per il trascinamento della sonda durante l’esecuzione delle misure. Almeno una delle estremità della tubazione dovrà essere accessibile, anche se si consiglia che tale accessibilità sia resa possibile da entrambe le parti. Caposaldo profiler di riferimento del INSTALLATION OF THE PROFILER TUBE Access tube installation A trench, 0.5÷1 m. deep and 0.3÷0.5 m. wide is excavated along the profile to be monitored. The bottom of the trench is covered with a 150÷300 mm thick layer of thin sand levelled and compacted. The tube is laid on the sand layer and covered with further layers of compacted sand. Inside the tube a draw steel cable is left to pull the probe through the tube. At least one of the profile tube end must be accessible, although accessiblity at both ends is advisable. Benchmark At the end of the tube a concrete pad incorporating a benchmark must be built. It will be used both as a base for the profiler measuring system, and as a reference point for the topographic surveys. The recommended dimensions of this pad are 1200x1200x300 mm approximately. All’estremità della tubazione dovrà essere realizzato un blocco di calcestruzzo con una borchia per livellazione topografica che servirà sia come punto di riferimento del sensore del profilatore che come punto di riferimento per le battute topografiche. Le dimensioni consigliate per tale blocco sono di: 1200x1200x300 mm circa. Livellometri-Assestimetri idraulici-Profiler Hydraulic settlement gauges-Profiler SISGEO s.r.l. 3-32 CAPITOLO 4: ESECUZIONE DELLE MISURE CHAPTER 4: TAKING MEASUREMENTS Livellometri-Assestimetri idraulici-Profiler Hydraulic settlement gauges-Profiler SISGEO s.r.l. 4. ESECUZIONE DELLE MISURE 4. TAKING MEASUREMENTS DSM ED ASSESTIMETRO ELETTRICO DIFFERENZIALE DSM AND ELECTRIC DIFFERENTIAL SETTLEMENT GAUGE Per i sistemi DSM è consigliabile usare sistemi di acquisizione dati automatici come precedentemente spiegato. Per misure di controllo è possibile comunque usare centraline portatili tipo C6004 o C800U. It is strongly recommended to use automatic data aquisition system for DSM as explained before. For checking pourposes it is anyway possible to use portable read out unit as our type C6004 or C800U. Analogamente avviene per gli assestimetri elettrici differenziali. Se gli strumenti sono provvisti di connettore collegarli direttamente alla centralina di misura. Se invece non è stato acquistato il connettore, collegare i fili del cavo elettrico, ai coccodrilli del cavo volante fornito a richiesta con la centralina, secondo il codice riportato. Accendere la centralina, attendere alcuni secondi per stabilizzare la misura ed eventualmente, seguendo le specifiche istruzioni d’uso della centralina, eseguire la misura. The same is suggested for the electric differential settlement gauge. If the instruments are fitted with a connector it is possible a direct connection to the read out unit. If the connector has not been ordered, the cocrodile clips of the flying cable, supplied on request with the read out unit, have to be connected to the instrument leads according the wiring code. Switch on the read out, wait some second to warm up and stabilize the reading and according to the instruction for the use of the read out take a reading. Nota Note Effettuare la prima misura con il serbatoio vuoto per ottenere l’“off set” dello strumento (vedi pagina 5-2). It is compulsory to take the first reading with the empty vessel to have the instrument “off set” (see page 52). Questa misura deve essere sempre sottratta da tutte le misure successive. Questa, e le successive misure con serbatoio pieno, vengono poi riportate sull’apposito modulo che Sisgeo vi propone in allegato. This reading has to be subtracted from all the further measurements. Report this “zero reading” and all the other following on the form that you can find in appendix. Se la centralina è del tipo datalogger quest’ultima operazione non è necessaria. If the read out unit has data logging capabilities this is done automatically. Qualora la misura risulti anomala, prima di intraprendere qualsiasi azione, rifare alcune volte la misura. If the reading are anomalous, take other readings to verify the value before any further action. Per ridurre l’influenza dell’effetto termico sulle misure, è consigliabile eseguirle alla stessa ora del giorno, annotando anche la temperatura, così che sia possibile conoscere le variazioni di temperatura per correggere eventualmente le misure in fase di elaborazione. To reduce the temperate effect on the reading it is advisasble to take the reading at the same hour of the day reporting also the temperature so that it can be possible to compute thermal correction to obtain a more correct reading. Livellometri-Assestimetri idraulici-Profiler Hydraulic settlement gauges-Profiler SISGEO s.r.l. 4-1 4. ESECUZIONE DELLE MISURE 4. TAKING MEASUREMENTS PROFILER Operazioni preliminari La precisione delle letture dipende dall’intero sistema di misura, che deve essere sottoposto a calibrazioni, tarature, verifiche e manutenzioni come più avanti specificato. Le operazioni di calibrazione e taratura ordinaria relativa al sensore di misura ed alla centralina vengono eseguite con frequenza semestrale nel laboratorio SISGEO. Prima e dopo l’esecuzione delle misure nei tubi profilatori, la strumentazione dovrà essere sottoposta a controlli di zero e di scala, chiamato test di calibrazione in sito che consiste nelle seguenti operazioni: 1 . identificare presso il tubo una postazione che consenta di avere un dislivello di circa 2 metri tra il rullo profiler, contenente centralina e serbatoio, e due punti fissi di riferimento; 2 . posizionare il serbatoio del Profiler (cioè tutto il rullo) sulla superficie di riferimento, accendere la centralina ed aspettare che il sistema si adegui termicamente ed elettronicamente, porre il sensore nella posizione “RIFERIMENTO CONTROLLO ZERO” ed azzerare il display agendo sull’apposita manopola (fig. 4.1 A); 3 . ubicare il sensore nella posizione “RIFERIMENTO CONTROLLO SCALA” e trascrivere il valore (fig 4.1 B). I punti 2 e 3 dovranno essere eseguiti in andata e in ritorno. I valori così ottenuti dovranno essere mediati, gli stessi, non dovranno superare il valore di ± 2 cm. L’operatore dovrà registrare, per ogni strumento profilatore, tutti questi dati esprimendo un giudizio di utilizzabilità del sistema. PROFILER Preliminary operation The precision of the measurements depend of the complete measuring system which must be calibrated, checked and maintenanced as below specified. It is recomended to return the system to SISGEO every 6 months for a calibration. Before and after the starting measurements inside the profiler tube, the instrument must be checked for the zero value and for the scale, performing a so called profiler calibration test. Proceed as follows: 1. Identify near the tube a place with a difference in height of approx 2 meter between the profiler reel, with readout unit and reference tank, and two reference points; 2 . place the profiler reference tank (all reel) on the reference surface, switch on the readout unit and wait some time to stabilize the electronic in temperature, place the probe in the position “ZERO REFERENCE CHECK” and read zero on the display by rotating the knob (fig.4.1 A); 3. place the probe in the position “SCALE REFERENCE CHECK” and write the value (fig. 4.1 B). The points 2 and 3 must be executed in the beginning and at the end of each tube survey. The obtained values must be averanged and must not exceed the values of ± 2 cm. The operator must record for each profiler instruments all values with an appraisal of system usability. Livellometri-Assestimetri idraulici-Profiler Hydraulic settlement gauges-Profiler SISGEO s.r.l. 4-2 4. ESECUZIONE DELLE MISURE 4. TAKING MEASUREMENTS Fig. 4.1 – Test di calibrazione del profiler Fig. 4.1 – Profiler calibration test Prima di iniziare ogni serie di misure giornaliere, effettuare eseguire le seguenti operazioni preliminari: • accertarsi dello stato di carica della batteria della centralina ed eventualmente provvedere alla sua ricarica; • eseguire il test di calibrazione del profiler come descritto sopra; • installare il treppiede sul blocco in calcestruzzo in prossimità dell’imbocco della tubazione; • • montare il rullo sul treppiede; accendere la centralina ed attendere che il sistema si adegui termicamente ed elettronicamente. Esecuzione delle misure L’esecuzione di una lettura consiste nell’annotare i valori che compaiono al display della centralina quando la sonda Profiler viene trascinata dentro il tubo Before starting measurements, carry out the following operations: • check the status of th e battery and if needed reacharge it; • perform the profiler calibration test as describe above; • mount the tripod on the concrete pad close to the end of the profile tube; • • mount the reel on the tripod; switch on the readout unit and wait some time to stabilize the electronic. Performing the measurements The survey consist of writing the values visible on the display of the readout unit when the profiler probe is moved inside the profiler tube. These values represent the hydrostatic pressure between the liquid level inside the reference tank and the probe placed in the precise position inside of the tube. It is very Livellometri-Assestimetri idraulici-Profiler Hydraulic settlement gauges-Profiler SISGEO s.r.l. 4-3 4. ESECUZIONE DELLE MISURE profilatore. Questi valori rappresentano la pressione idrostatica tra il livello del fluido nel serbatoio di riferimento ed il sensore di misura collocato in una precisa posizione all’interno della tubazione, è importante che il serbatoio di riferimento (rullo/profilatore) si trovi ad un livello sempre superiore a quello del tubo. Per migliorare la qualità dei risultati possono essere eseguite misure sia in andata che in ritorno entro la tubazione, tali misure possono essere ripetute più di una volta ed i valori risultanti dovranno essere mediati in tal modo che possa essere minimizzati gli errori di posizionamento della sonda nel tubo e più in generale errori di ripetibilità. Terminate le operazioni preliminari sopra descritte si procede come segue: 1. appoggiare la sonda a fianco del punto di riferimento situato sul blocco di calcestruzzo; 2 . svolgere il cavo elettroidraulico nella piazzola, azzerare il display agendo sull’apposita manopola. In tal modo otterremo che tutte le misure successive sono riferite alla stessa quota del punto di riferimento. 4. TAKING MEASUREMENTS important that the reference tank (reel/profiler) is at an higher level than the profiler tube. Measuring in both direction a tube may improve the quality of the results, as well as repeating them several times averanging the results to reduce at a minimum the errors of the probe positioning inside the tube and in general the repeteability erros. Once completed the preliminary operation decribed above, proceed as follows: 1. put the probe near the reference point placed on the concrete pad; 2 . uncoil the electro hydraulic cable, zeroing the display with appropriate knob. In this way all successive measurements are refered at the same level of the reference point. These operations are of fundamental importance and has to be done before and after every set of the tube measurements; the readings must be written in the appropriate profiler record form. 3 . connect the draw steel cable (left through the tube) to the end of probe and insert it in the tube. If the tube is accessible at both ends a man will pull the probe inside the tube up to its end; Queste operazioni sono di fondamentale importanza e devono essere effettuate sempre immediatamente prima e dopo la misura di una tubazione; i valori letti vanno riportati nell’apposito modulo per le misure. 4 . the operator on the readout will pull the cable at the first measuring mark referred to the tube end edge; 3. agganciare il cavetto di trascinamento della sonda (lasciato all’interno della tubazione già in fase di posa della tubazione stessa), alla parte terminale della stessa e inserirla all’interno della tubazione. Se la tubazione è stata installata con le due estremità del tubo accessibili, un operatore dovrà provvedere a trainare (senza strappi) la sonda con la tubazione di collegamento all’interno del tubo fino all’altra estremità; 6. pull again the cable for 1 m and read the value and so on up to when all the measurements are taken; 4. l’operatore che si trova alla centralina recupera la sonda fino a che la prima tacca di misura del cavo si posizioni nel punto di misura previsto (a bordo tubo); 5. once the reading is stable the operator will write it on the measuring report form; 7. go on in this way up to the end of the tube. 8. put the probe near the reference point placed on the concrete pad and write the value on the measuring report form; 9 . once completed the set of the measures, pull again the probe, switch off the readout unit and coil the cable on the reel; 5 . il valore viene letto sulla centralina non appena si sarà stabilizzato; 10. completed the readings set daily carry out the profiler calibration test as describe above. 6. The absolute height of the head benchmark recuperare (senza strappi) la sonda di Livellometri-Assestimetri idraulici-Profiler Hydraulic settlement gauges-Profiler SISGEO s.r.l. 4-4 4. ESECUZIONE DELLE MISURE 100 cm posizionando la successiva tacca del cavo nel punto previsto, quindi leggere il nuovo valore e trascriverlo sul modulo; 7 . procedere di seguito come ai punti precedenti fino ad estrarre la sonda dalla tubazione. 8. appoggiare la sonda a fianco del punto di riferimento situato sul blocco di calcestruzzo e trascrivere il valore sull’apposito modulo per le misure; 9 . Terminata la serie delle letture, recuperare la sonda, spegnere la centralina e avvolgere il cavo sul rullo; 10. Ultimata la serie di letture giornaliere, effettuare ii test di calibrazione in sito come illustrato sopra. La quota assoluta della testa della borchia sarà rilevata mediante livella di precisione con frequenza mensile. Il rilievo dovrà essere ripetuto ogni qualvolta si effettuano operazioni di variazione della quota testa tubo. In appendice sono riportati gli schemi da utilizzare in sito per il rilievo delle misure ottenute mediante profilatore. Nota: controllare il livello del liquido nel servatoio durante tutta la sequenza di misura. La sua variazione può essere dovuta alla temperatura. E’ di fondamentale importanza che il livello nel serbatoio di misura rimanga costante durante tutta la sequenza di misura. Ricarica della batteria L’unità di lettura montata a bordo del rullo è dotata di una batteria al piombo ermetica ricaricabile (12 V c.c. - 7 Ah) per l’alimentazione del sensore di misura e del display digitale. All'apparire sul display del simbolo batteria si dovrà provvedere alla sua ricarica. Per la ricarica della batteria, collegare l’apposito cavo elettrico in dotazione all’unità, al piccolo connettore sul rullo e ad una presa di rete 220 V. L’accensione del led rosso sul caricabatteria indicherà che si è in fase di ricarica; ad operazione completata, il led si spegnerà automaticamente e la batteria sarà a piena carica. Per la ricarica completa possono servire fino a 10÷12 ore; ad ogni modo, 4. TAKING MEASUREMENTS will be checked with topographic survey with monthly frequeny. The survey will be repeted every time that there are variations of height of tube head. In the annex there are the form for reporting the measures obtained. Note: during the measurements cycle check the liquid level inside the tank. Variation may be due to temperature, if they are relevant the operator must keep the level stable. It is very importat that level remain stable. Recharge of internal battery The readout mounted inside the reel is equipped with a rechargeable hermetic lead battery (12V dc - 3 Ah). When the battery is discharged on the display will appear the battery indication. To recharge the battery, connect the electric cable, provided with the unit to the proper connector on the reel and 220V Ac mains. When the red LED lights up, recharging is taking place. When completed, the LED will turn off automatically and the battery is fully charged. It may take up to 10÷12 hours to completely recharge the battery. However, it will not get damaged by a longer charging so that it is not necessary to disconnect the cable when the LED light of. If the readout unit is not used for some time, we suggest to recharge the battery periodically or to leave it connected to the mains permanently. With a fully-charged battery the unit can operate uninterruptely for about 24 hours. Livellometri-Assestimetri idraulici-Profiler Hydraulic settlement gauges-Profiler SISGEO s.r.l. 4-5 4. ESECUZIONE DELLE MISURE 4. TAKING MEASUREMENTS anche una carica più lunga non danneggia la batteria, quindi non è necessario interrompere la ricarica al momento dello spegnimento del led rosso. Nel corso di un lungo periodo di inattività della centralina, si consiglia di ricaricare periodicamente la batteria; al limite, lasciarla sempre collegata alla rete. Si rammenta che, con la batteria a piena carica, l’unità può operare ininterrottamente per circa 24 ore. Livellometri-Assestimetri idraulici-Profiler Hydraulic settlement gauges-Profiler SISGEO s.r.l. 4-6 CAPITOLO 5: ELABORAZIONE DELLE MISURE CHAPTER 5: DATA PROCESSING Livellometri-Assestimetri idraulici-Profiler Hydraulic settlement gauges-Profiler SISGEO s.r.l. 5. ELABORAZIONE DELLE MISURE 5. DATA PROCESSING DSM ED ASSESTIMETRO ELETTRICO DIFFERENZIALE DSM AND ELECTRIC DIFFERENTIAL SETTLEMENT GAUGE In funzione dello strumento le misure possono essere in tensione (mV) o in corrente (mA) da convertire in mm usando il fattore di sensibilità dello strumento riportato su ciascun certificato di taratura (fig. 5.1, fig. 5.2, fig. 5.3), già in funzione del fluido usato poiché la miscela acquaglicerina ha un peso specifico di 1,1555. Function of the instrument type measures may be in tension (mV) or current (mA) to be converted in mm using the sensitivity factor of the instrument reported on each calibration certificate (fig. 5.1, fig. 5.2, fig. 5.3), referred to specific fluid because the mix water glycerine has a specific weigh of 1,1555. Il fattore di sensibilità è un numero con cui dividere il valore elettrico misurato per ottenere il valore in unità ingegneristiche. The sensitivity factor is a number by which divide the electric value to obtain the engineering unit. D=L/S Where: D=L/S Dove: D= settlement in mm; D= cedimento in mm; L= electric reading; L= lettura elettrica; S= sensitivity factor. S= fattore di sensibilità. Se però si vuole ottenere una maggiore precisione nelle misure, invece di usare come fattore di sensibilità il numero S, ottenuto attraverso un’interpolazione lineare dei dati di taratura, si possono elaborare i dati per trovare la curva d’interpolazione polinomiale ottenendo un’equazione del tipo: 2 D= (L x A) + (L x B) + C Dove A, B, C sono i conversione polinomiale. fattori di Per semplicità di trattazione nel seguito ci riferiremo principalmente al fattore di sensibilità S e svilupperemo la spiegazione rifrendoci a misure effettuate manualmente. Usando centraline tipo datalogger o acquisitori dati automatici, quanto descritto viene già in parte fatto dalla centralina come meglio si può vedere consultando il relativo manuale. La misura effettuata in qualsiasi momento dopo l’installazione viene chiamata lettura di esercizio Les mentre la misura iniziale If more accurate reading is needed, instead of using the number S that is obtained by a linear interpolation of the calibration data, it is possible to process the same calibration date with a polynomial interpolation obtaining: D= (L2 x A) + (L x B) + C Where A, B, C are the sensitivity polynomial factor. For a more simple speech in the following we will refer to the sensitivity factor S (also said “linear sensitivity factor”) and to manual readings. Using datalogger or automatic data acquisition system most of the operation are just done automatically as you can better see on the specific manual. The reading taken at any time after installation is appelled “p e r f o r m a n c e reading” L es while the “initial reading”or “zero reading” is indicated as L0. Each of them to be converted in a settlement value has to be computed as follow: D=( Les – l0)/S Livellometri-Assestimetri idraulici-Profiler Hydraulic settlement gauges-Profiler SISGEO s.r.l. 5-1 5. ELABORAZIONE DELLE MISURE o misura di zero viene indicata con L0. Ognuna di queste misure per essere convertita in cedimento dovrà essere così calcolata: D= (Les – l0)/S Dove: Les = lettura di esercizio; l0 = “off-set” dello strumento in aria, rilevato prima dell’installazione e nel caso DSM con serbatoio vuoto. Il valore l 0 è importante sia rilevato accuratamente prima dell’installazione perché è un buon indicatore della salute dello strumento. Infatti il valore di zero non dovrà essere molto lontano da quello rilevabile dal certificato ma raramente sarà lo stesso perché le variazioni delle condizioni ambientali comportano una variazione rispetto al valore misurato in laboratorio. 5. DATA PROCESSING Where: Les = performance reading; l0 = “off-set” reading taken before installation with instrument in air or for DSM with empty vessel. It is very important to take a very accurate l0 value before installation because it is a good indicator of the working capability of the instrument. The l0 has to be similar to the value reported on the certificate but rarely will be the same because the variation of local enviromental condition are sensed by the instrument giving small differences. Moreover as l0 has to be subtracted from all the readings it is advisable to take it very accurately more than one time to verify the repeteability. Inoltre siccome il valore l0 dovrà essere sottratto da tutte le misure di esercizio successive, è consigliabile rilevarlo accuratamente magari anche più di una volta per verificare la ripetibilità. Livellometri-Assestimetri idraulici-Profiler Hydraulic settlement gauges-Profiler SISGEO s.r.l. 5-2 5. ELABORAZIONE DELLE MISURE 5. DATA PROCESSING Modello: assestimetro Sensore: estensimetrico Cliente: Lunghezza cavo: m CONDIZIONI DI PROVA : D422F001 Numero di Serie: D99100 Numero di Serie: 9/09.99 O.L.: 99100 Data: 8 ottobre 1999 Alimentazione [Vcc ] : 24 Temperatura [°C] : 25 Umidità [%] : 50 Pressione atmosferica [mbar] : 1000 La taratura è stata realizzata in accordo al Sistema di Qualità UNI EN ISO 9001 lunghezza letture [mA] statistiche m 1 up 1 down 2 up 2 down med.[mA] lin.[m] polin.[m] 0,000 0,885 1,769 2,653 3,538 4,421 5,306 6,191 7,073 7,958 8,842 4,031 5,621 7,211 8,812 10,405 12,003 13,610 15,203 16,795 18,394 19,988 4,028 5,608 7,198 8,797 10,402 11,998 13,605 15,203 16,805 18,388 19,992 4,028 5,605 7,213 8,814 10,428 12,010 13,610 15,213 16,803 18,386 19,988 4,025 5,603 7,192 8,796 10,395 11,988 13,596 15,212 16,809 18,395 19,980 4,028 5,609 7,204 8,805 10,408 12,000 13,605 15,208 16,803 18,391 19,987 0,007 0,882 1,764 2,651 3,538 4,419 5,308 6,195 7,078 7,956 8,840 0,006 0,882 1,764 2,651 3,538 4,420 5,308 6,195 7,078 7,956 8,839 m 0,000 1,000 2,000 3,000 4,000 5,000 6,000 7,000 8,000 9,000 10,000 25,000 15,000 10,000 mA 20,000 dati regr.lin. regr.polin. 5,000 0,000 RISULTATI Fattore di sensibilità lineare Fattori di sensibilità polinomiale [m] = A·[mA] NOTE : 2 + B·[mA] + C S [mA/m] 1,80675 A B C 2 [m/mA ] [m/mA] [m] -1,933E-05 5,539E-01 -2,225E+00 err.max. %F.S. 0,18088 err.max. %F.S. 0,17255 Le costanti di regressione sono state ottenute mediante il metodo dei minimi quadrati. L'errore riportato tiene conto degli effetti di linearità ed isteresi. m = metri di miscela acqua - glicerina Colleg.: rosso=+ Loop; nero=- Loop Fig. 5.1 – Test di calibrazione assestimetro elettrico differenziale foro Livellometri-Assestimetri idraulici-Profiler Hydraulic settlement gauges-Profiler SISGEO s.r.l. 5-3 5. ELABORAZIONE DELLE MISURE 5. DATA PROCESSING Model: settlemeter Sensor: strain gauge Customer: Cable Length: 0m TEST CONDITIONS : D422F001 Serial/Number: D99100 Serial/Number: 9/09.99 Job number: 99100 Date: 8 ottobre 1999 Power supply [Vdc] : 24 Temperature [°C] : 25 Humidity [%] : 50 Atmospheric pressure [mbar] : 1000 Calibration has been made according with Quality Assurance System UNI EN ISO 9001 length readings [mA] statistics m 1 up 1 down 2 up 2 down avg.[mA] lin.[m] polyn.[m] 0,000 0,885 1,769 2,653 3,538 4,421 5,306 6,191 7,073 7,958 8,842 4,031 5,621 7,211 8,812 10,405 12,003 13,610 15,203 16,795 18,394 19,988 4,028 5,608 7,198 8,797 10,402 11,998 13,605 15,203 16,805 18,388 19,992 4,028 5,605 7,213 8,814 10,428 12,010 13,610 15,213 16,803 18,386 19,988 4,025 5,603 7,192 8,796 10,395 11,988 13,596 15,212 16,809 18,395 19,980 4,028 5,609 7,204 8,805 10,408 12,000 13,605 15,208 16,803 18,391 19,987 0,007 0,882 1,764 2,651 3,538 4,419 5,308 6,195 7,078 7,956 8,840 0,006 0,882 1,764 2,651 3,538 4,420 5,308 6,195 7,078 7,956 8,839 m 0,000 1,000 2,000 3,000 4,000 5,000 6,000 7,000 8,000 9,000 10,000 data lin.regr. 25,000 15,000 mA 20,000 poly.regr. 10,000 5,000 0,000 RESULTS Linear sensitivity factor Polynomial sensitivity factors [m] = A·[mA] NOTES : 2 + B·[mA] + C S [mA/m] 1,80675 A B C 2 [m/mA ] [m/mA] [m] -1,933E-05 5,539E-01 -2,225E+00 max.err. %F.S. 0,18088 max.err. %F.S. 0,17255 Regressions constants have been obtained through minimum squares method. Resulting error depends on the effects of linearity and hysteresis. m = meters of water-glycerine fluid Wiring : red=+ Loop; black=- Loop Fig. 5.1 – Differential settlement system calibration sheet Livellometri-Assestimetri idraulici-Profiler Hydraulic settlement gauges-Profiler SISGEO s.r.l. 5-4 5. ELABORAZIONE DELLE MISURE 5. DATA PROCESSING Modello: assestimetro Sensore: estensimetrico Cliente: Lunghezza cavo: 0m CONDIZIONI DI PROVA : D422M080 Numero di Serie: D99100 Numero di Serie: 3100 O.L.: 99100 Data: 8 ottobre 1999 Alimentazione [Vcc ] : 24 Temperatura [°C] : 25 Umidità [%] : 50 Pressione atmosferica [mbar] : 1000 La taratura è stata realizzata in accordo al Sistema di Qualità UNI EN ISO 9001 letture [mV] lunghezza statistiche mm 1 up 1 down 2 up 2 down med.[mV] lin.[mm] polin.[mm] 0,000 20,000 40,000 60,000 80,000 4,620 8,320 12,020 15,720 19,420 4,622 8,324 12,019 15,722 19,420 4,622 8,321 12,021 15,721 19,423 4,622 8,321 12,020 15,722 19,423 4,621 8,321 12,020 15,721 19,421 0,002 20,002 39,994 60,001 80,002 -0,001 20,003 39,996 60,002 80,000 mm -10,000 0,000 10,000 20,000 30,000 40,000 50,000 60,000 70,000 80,000 90,000 25,000 20,000 15,000 mV dati regr.lin. regr.polin. 10,000 5,000 0,000 RISULTATI Fattore di sensibilità lineare Fattori di sensibilità polinomiale [mm] = A·[mV] NOTE : 2 + B·[mV] + C S [mV/mm] 0,18500 A B C 2 [mm/mV ] [mm/mV] [mm] -9,011E-05 5,408E+00 -2,499E+01 err.max. %F.S. 0,02206 err.max. %F.S. 0,01897 Le costanti di regressione sono state ottenute mediante il metodo dei minimi quadrati. L'errore riportato tiene conto degli effetti di linearità ed isteresi. mm = mm di miscela acqua - glicerina Colleg.: rosso=+Vcc; nero=GND; giallo=+Ch.1; bianco=-Ch.1 Fig. 5.2 – Test di calibrazione livellometro DSM - mV Livellometri-Assestimetri idraulici-Profiler Hydraulic settlement gauges-Profiler SISGEO s.r.l. 5-5 5. ELABORAZIONE DELLE MISURE 5. DATA PROCESSING Model: settlemeter Sensor: strain gauge Customer: Cable Length: 0m TEST CONDITIONS : D422M080 Serial/Number: D99100 Serial/Number: 3100 Job number: 99100 Date: 8 ottobre 1999 Power supply [Vdc] : 24 Temperature [°C] : 25 Humidity [%] : 50 Atmospheric pressure [mbar] : 1000 Calibration has been made according with Quality Assurance System UNI EN ISO 9001 readings [mV] length statistics mm 1 up 1 down 2 up 2 down avg.[mV] lin.[mm] polyn.[mm] 0,000 20,000 40,000 60,000 80,000 4,620 8,320 12,020 15,720 19,420 4,622 8,324 12,019 15,722 19,420 4,622 8,321 12,021 15,721 19,423 4,622 8,321 12,020 15,722 19,423 4,621 8,321 12,020 15,721 19,421 0,002 20,002 39,994 60,001 80,002 -0,001 20,003 39,996 60,002 80,000 mm -10,000 0,000 10,000 20,000 30,000 40,000 50,000 60,000 70,000 80,000 90,000 25,000 20,000 data mV 15,000 lin.regr. 10,000 poly.regr. 5,000 0,000 RESULTS Linear sensitivity factor Polynomial sensitivity factors [mm] = A·[mV] NOTES : 2 + B·[mV] + C S [mV/mm] 0,18500 A B C 2 [mm/mV ] [mm/mV] [mm] -9,011E-05 5,408E+00 -2,499E+01 max.err. %F.S. 0,02206 max.err. %F.S. 0,01897 Regressions constants have been obtained through minimum squares method. Resulting error depends on the effects of linearity and hysteresis. mm = mm of water - glycerine fluid Wiring : red=+Vcc; black=GND; yellow=+Ch.1; white=-Ch.1 Fig. 5.2 – DSM levelmeter system calibration sheet – mV Livellometri-Assestimetri idraulici-Profiler Hydraulic settlement gauges-Profiler SISGEO s.r.l. 5-6 5. ELABORAZIONE DELLE MISURE 5. DATA PROCESSING Modello: assestimetro Sensore: estensimetrico Cliente: Lunghezza cavo: 0m CONDIZIONI DI PROVA : D422M080 Numero di Serie: D99100 Numero di Serie: 3100 O.L.: 99100 Data: 8 ottobre 1999 Alimentazione [Vcc ] : 24 Temperatura [°C] : 25 Umidità [%] : 50 Pressione atmosferica [mbar] : 1000 La taratura è stata realizzata in accordo al Sistema di Qualità UNI EN ISO 9001 lunghezza letture [mA] statistiche mm 1 up 1 down 2 up 2 down med.[mA] lin.[mm] polin.[mm] 0,000 20,000 40,000 60,000 80,000 7,733 10,693 13,653 16,615 19,580 7,733 10,695 13,654 16,617 19,580 7,733 10,694 13,655 16,616 19,581 7,735 10,695 13,653 16,616 19,581 7,734 10,694 13,654 16,616 19,581 0,007 20,002 39,988 59,992 80,012 -0,003 20,006 39,997 59,997 80,002 mm -10,000 0,000 10,000 20,000 30,000 40,000 50,000 60,000 70,000 80,000 90,000 25,000 20,000 dati regr.lin. mA 15,000 regr.polin. 10,000 5,000 0,000 RISULTATI Fattore di sensibilità lineare Fattori di sensibilità polinomiale [mm] = A·[mA] NOTE : 2 + B·[mA] + C S [mA/mm] 0,14808 A B C 2 [mm/mA ] [mm/mA] [mm] -5,637E-04 6,769E+00 -5,231E+01 err.max. %F.S. 0,02406 err.max. %F.S. 0,01652 Le costanti di regressione sono state ottenute mediante il metodo dei minimi quadrati. L'errore riportato tiene conto degli effetti di linearità ed isteresi. mm = mm di miscela acqua - glicerina Colleg.: rosso=+ Loop; nero=- Loop Fig. 5.3 – Test di calibrazione livellometro DSM – mA Livellometri-Assestimetri idraulici-Profiler Hydraulic settlement gauges-Profiler SISGEO s.r.l. 5-7 5. ELABORAZIONE DELLE MISURE 5. DATA PROCESSING Model: settlemeter Sensor: strain gauge Customer: Cable Length: m TEST CONDITIONS : D422M080 Serial/Number: D99100 Serial/Number: 3100 Job number: 99100 8 ottobre 1999 Date: Power supply [Vdc] : 24 Temperature [°C] : 25 Humidity [%] : 50 Atmospheric pressure [mbar] : 1000 Calibration has been made according with Quality Assurance System UNI EN ISO 9001 length readings [mA] statistics mm 1 up 1 down 2 up 2 down avg.[mA] lin.[mm] polyn.[mm] 0,000 20,000 40,000 60,000 80,000 7,733 10,693 13,653 16,615 19,580 7,733 10,695 13,654 16,617 19,580 7,733 10,694 13,655 16,616 19,581 7,735 10,695 13,653 16,616 19,581 7,734 10,694 13,654 16,616 19,581 0,007 20,002 39,988 59,992 80,012 -0,003 20,006 39,997 59,997 80,002 mm -10,000 0,000 10,000 20,000 30,000 40,000 50,000 60,000 70,000 80,000 90,000 25,000 20,000 data mA 15,000 lin.regr. poly.regr. 10,000 5,000 0,000 RESULTS Linear sensitivity factor Polynomial sensitivity factors [mm] = A·[mA] NOTES : 2 + B·[mA] + C S [mA/mm] 0,14808 A B C 2 [mm/mA ] [mm/mA] [mm] -5,637E-04 6,769E+00 -5,231E+01 max.err. %F.S. 0,02406 max.err. %F.S. 0,01652 Regressions constants have been obtained through minimum squares method. Resulting error depends on the effects of linearity and hysteresis. mm = mm di miscela acqua - glicerina Wiring : red=+ Loop; black=- Loop Fig. 5.3 – DSM levelmeter system calibration sheet – mA Livellometri-Assestimetri idraulici-Profiler Hydraulic settlement gauges-Profiler SISGEO s.r.l. 5-8 5. ELABORAZIONE DELLE MISURE Calcolo dei cedimenti differenziali Una volta convertite le misure in mm, per calcolare il cedimento diffenziale tra il punto di riferimento ed il punto di misura all’istante della misura la relazione è la seguente: ∆H = (Des – D0)Mi - (Des – D0)R 5. DATA PROCESSING Differential settlement computation Once the readings are converted in mm to compute the differential settlement of a measuring vessel relative to the datum vessel, the following expression shall be used: ∆H = (Des – D0)Mi - (Des – D0)R dove: where: è la differenza tra il (Des – D0) Mi = cedimento in fase di esercizio e quello iniziale o di zero (D0) del punto di misura Mi (con i da 1 a n). (Des – D0) Mi = difference between a performance settlement measure and the initial or “zero measure ” (D 0 ) for the measuring vessel Mi (with i from 1 to n). (De – D0)R = è la differenza tra il cedimento in fase di esercizio e quella iniziale o di zero (D0 ) del punto di riferimento. between a (Des – D0)R = d i f f e r e n c e performance settlement measure and the initial or “zero measure” (D0) for the datum vessel. Per i sistemi DSM, qualora sia effettuata la misura di temperatura, la correzione delle misure avverrà secondo la seguente relazione. For DSM system if temperature value is recorded the correction of the reading will be according to: Lc = L – 0,018 ∆T Lc = L – 0,018 ∆T where: dove: Lc = è la misura in mm corretta. ∆T = è la differenza di temperatura con il relativo segno, tra quella di riferimento di 21°C e quella misurata. Il cedimento differenziale ∆H così calcolato tra il punto di riferimento ed il punto di misura all’istante i-esimo può essere confrontato con gli altri che sono stati calcolati precedentemente per poter valutare il comportamento dal punto di vista dei cedimenti differenziali nel tempo. In ogni caso, per eliminare dalle misure di ciascun circuito gli effetti termici giornalieri, è necessario adottare un’analisi statistica elaborando i dati con una regressione polinomiale del tipo di quelle presenti in Excel. In questo modo è possibile ottenere l’andamento delle misure, indipendentemente dalla variazione termica. Lc = is the correct reading. ∆T = i s the temperature difference between the reference temperature of 21°C and the measured one. Differential settlement ∆ H, as computed, between the datum and a measuring vessel at the time i is then compared to the others previously computed to obtain the settlement story. Anyway to eliminate from the measurements of each circuit the daily thermal effect it is necessary to adopt a statistical analisys, processing the data with a polynomial regression of the type you can find in Excel. In this way you obtain the measurements trend independently from the thermal variation. This means that you need to have a data acquisition system to take at least 6 readings for day. For a correct data processing it is good to Livellometri-Assestimetri idraulici-Profiler Hydraulic settlement gauges-Profiler SISGEO s.r.l. 5-9 5. ELABORAZIONE DELLE MISURE Per una corretta elaborazione dei dati, è bene traguardare periodicamente l’assestimetro di riferimento per verificare che il punto in cui è stato installato non abbia subito assestamenti nel tempo provocando così una variazione del carico idrostatico: nel caso di cedimento, sommare l’entità del movimento al ∆ H calcolato; nel caso di innalzamento, sottrarre l’entità del movimento al ∆ H calcolato. Rappresentazione risultati grafica dei Il miglior modo per rappresentare i risultati è un diagramma tempo-cedimenti differenziali. Se si dispone di un sistema di acquisizione dati automatico, diagrammando le varie misure si otterranno dei grafici del tipo illustrato in figura 5.1. Si può chiaramente osservare l’effetto delle variazioni termiche diurne che disturbano quello che è l’effettivo andamento dei cedimenti differenziali. 5. DATA PROCESSING take periodical topographic survey of the datum point to verify that it is really stable. In case it is instead moving it has to be taken into account in data processing. If the datum has a settlement the amount has to be summed to ∆H, in case it is uplifting the amount has to be subtracted from ∆H. Data graphic presentation The best way is to diagram the differential settlement vs. time for each point. If is available an automatic data acquisition you will obtain a graph as shown in figure 5.1. It is very easy to see the effects of the daily thermal cycle that is overimposed on the effective trend of differential settlement and therefore after processing the data with polynominal regression technique the results become very good. In the figure 5.4 it is shown a example of data processing for 2 vessels system. Si può inoltre vedere che elaborando invece le misure usando una regressione lineare il risultato è ben interpretabile. In figura 5.4 è riportato un esempio di elaborazione per un sistema con due punti di misura assestimetrici. 75,0 0 73,0 0 A 1 ( mm) 71,0 0 A 2 ( mm) (mm) 69,0 0 67,0 0 65,0 0 63,0 0 61,0 0 59,0 0 57,0 0 55,0 0 Data Fig. 5.4 - Diagramma (cedimenti differenziali/tempo) Fig. 5.4 - Differential settlement/time diagram Livellometri-Assestimetri idraulici-Profiler Hydraulic settlement gauges-Profiler SISGEO s.r.l. 5-10 5. ELABORAZIONE DELLE MISURE 5. DATA PROCESSING PROFILER PROFILER Nel caso del profiler si avrà che l’insieme delle misure iniziali lungo la tubazione fornirà un profilo della posizione del tubo nel piano verticale che costituirà la misura di riferimento (fig. 5.5). The set of initial readings along the access tube will define the tube profile in the vertical plane and will be considered the “tube zero reading” (fig. 5.5). Infatti, tutti i successivi rilievi della tubazione produrranno una serie di dati (profili) che dovranno essere sottratti al rilievo/profilo iniziale per fornire i valori dei cedimenti dei vari punti nel tempo. Anche la borchia di riferimento posta sul blocco di calcestruzzo all’estremità della tubazione sarà considerata allo stesso modo. • All the following survey of the access tube position will be sustracted from the “zero reading” to obtain the amount of settlement along the tube. Also the benchmark on the concrete pad at one end of the access tube will be checked with topographic survey. Li correct= (L Lettura in campo: Li corretto= (L iA1 +L )/2 – (L0 - L1 )/2 iR1 Reading in place: • iA1 +L )/2 – (L0 - L1 )/2 iR1 where: L iA1 = beginning reading with the Profiler; dove: L L i A 1 = lettura eseguita con Profiler in andata; L0 = initial reading of zero; L i R 1 = lettura eseguita con Profiler in ritorno; iR1 = end reading with the Profiler; L1 = final reading of zero; Settlement processing L0 = lettura di zero iniziale; • L1 = lettura di zero finale; The settlement of point i (∆ Hi) during a survey will be computed as follow: • Elaborazione dei cedimenti: Anche l Il cedimento del punto i (∆ Hi) durante il rilievo sarà calcolato come segue: ∆Hi = Li – Li(0) dove: = misura del punto i al momento del Li rilievo; Li(0) = misura iniziale del punto i. Se a seguito di rilevamenti topografici il punto di riferimento fosse soggetto a cedimenti, se ne dovrà tenere conto nell’elaborazione dei dati. Qualora la borchia di riferimento abbia subito cedimenti ∆Qi: ∆Qi = Q(0) – Q(t) ∆Hi = Li – Li(0) where: = reading at point i at the time of Li the survey; Li(0) = initial reading at point i. If following of topographic survey the reference point will be lowered, it must be taken into consideration for data processing. If the benchmark is lowering: ∆Qi = Q(0) – Q(t) where: Q(0) = benchmark initial absolute level; = benchmark absolute level at the Q(t) time of the survey. Livellometri-Assestimetri idraulici-Profiler Hydraulic settlement gauges-Profiler SISGEO s.r.l. 5-11 5. ELABORAZIONE DELLE MISURE 5. DATA PROCESSING dove: Therefore: Q(0) = è la quota assoluta iniziale della borchia iniziale; ∆Hi correct = ∆Hi - ∆Qi To have acceptable data it is neccesary that the calibration certificates are valid, the in place calibration tests are positive and the initial and final zero reading are not differing more than 10 cm. If the chek and calibration as the pag. 4-2 and 4-3 are not positive, the measure inside the tube will be done again. Q(t) = è la quota assoluta della borchia al momento del rilievo. Quindi: ∆Hi corretto = ∆Hi - ∆Qi E’ neccessario, affinchè le letture eseguite siano ritenute accettabili, che i certificati di taratura non siano scaduti di validità, che i test di calibrazione in sito siano positivi e che lo zero di inizio e fine lettura non differisca di un valore superiore a 10 cm. Se le calibrazioni e controlli di cui alla pag.4-2 e 4-3 risultassero positivi la misura nel tubo sarà da rifare considerando non accettabile quella eseguita. -15,0 -20,0 Lettura L 0 06/09/96 Lettura L 1 17/09/96 -25,0 Lettura L 2 24/09/96 Lettura L 3 03/10/96 Cedimenti (cm) Settlement (cm) -30,0 -35,0 -40,0 -45,0 -50,0 -55,0 -60,0 ,0 ,0 46 ,0 43 ,0 40 ,0 37 ,0 ,0 34 31 ,0 28 ,0 25 ,0 22 ,0 19 ,0 16 13 0 ,0 10 0 7, 4, 1, 0 -65,0 Distanze (m) Distance (m) Fig. 5.5 – Esempio di elaborazione dati profiler Fig. 5.5 – Example of profiler data processing Livellometri-Assestimetri idraulici-Profiler Hydraulic settlement gauges-Profiler SISGEO s.r.l. 5-12 CAPITOLO 6: ACCESSORI E RICAMBI CHAPTER 6: ACCESSORIES AND SPARES Livellometri-Assestimetri idraulici-Profiler Hydraulic settlement gauges-Profiler SISGEO s.r.l. 6. ACCESSORI E RICAMBI 6. ACCESSORIES AND SPARES Sono disponibili i seguenti accessori standard: • coibentazione per la tubazione del circuito idraulico, costituita da un tubo isolante in materiale plastico a cellule espanse e da un rivestimento adesivo in poliuretano espanso, consigliata in ambienti soggetti a sbalzi termici; • collarini muniti di tasselli assicurare la coibentazione tubazione idraulica in nylon; • • • • per alla miscela acqua/glicerina; terminale di misura con connettore; pannello di centralizzazione; The following accessory and spare parts are available: • hydraulic tube insulation made up of expanded-cell plastic tube and adhesive polyurethane foam lining. This is recommended where sudden changes in temperature are expected; • clips fitted with tabs for fastening the insulation to the hydraulic tube; • • water/glycerine mix; • measuring connector; terminal fitted with overvoltage protection. protezioni per sovratensioni. Livellometri-Assestimetri idraulici-Profiler Hydraulic settlement gauges-Profiler SISGEO s.r.l. 6-1 CAPITOLO 7: MANUTENZIONE CHAPTER 7: MAINTENANCE Livellometri-Assestimetri idraulici-Profiler Hydraulic settlement gauges-Profiler SISGEO s.r.l. 7. MANUTENZIONE 7. MAINTENANCE MANUTENZIONE PER GLI STRUMENTI FISSI • • Verificare, tramite misura, che il livello del liquido all’interno del serbatoio dell’assestimetro di riferimento sia a metà circa del serbatoio stesso ed in caso contrario ripristinarlo; MAINTENANCE OF IN PLACE INSTRUMENTS • By means of the readings check that the fluid level inside the vessels is at about half the vessels height; • check the hydraulic system’s tightness and make sure there are no leaks or faults along the line. controllare la tenuta idraulica del circuito idraulico, avendo cura che non ci siano eventuali perdite e lesioni lungo lo stesso. SOSTITUZIONE DEL TRASDUTTORE ELETTRICO DEI DSM REPLACEMENT OF THE ELECTRIC SENSOR OF DSM 3.3. Remeber the raccomandations of page Ricordarsi delle raccomandazioni di pagina 3.3. For a better understanding we will refer to fig.7.1. Per una corretta individuazione dei componenti faremo riferimento all’allegata figura 7.1. 2 . close rotating clockwise the knob of the valve to separe the vessel circuit from the system; Smontaggio del vecchio trasduttore 1 . disconnettere il cavo di collegamento del trasduttore dal cavo elettrico dell’impianto prendendo nota dell’accoppiamento dei conduttori; How to remove the old sensor 1. Disconnect the sensor cable inside the junction box taking note of the wiring code; 3. place a proper can under the silicone tube and the fitting, disconnect the tube and recover the fluid of the vessel; 2. chiudere, ruotando in senso orario, la manopola in modo da isolare il circuito idraulico interno dal circuito esterno; 4 . unscrew the tube fixing bolts of the sensor on the box paying care to keep the spacer; 3 . porre un contenitore sotto la connessione tra il tubo in silicone ed il raccordo maschio; disconnettere il tubo e recuperare tutto il liquido contenuto nel serbatoio; 5. take out the complete vessel assembly handling with care in the way recommended; 4. svitare e sfilare le 2 viti di fissaggio del trasduttore prestando attenzione a non perdere il distanziale; 5 .s f i l a r e l’intero blocco trasduttore/serbatoio dalla scatola tenendo presente le raccomandazioni riportate nell’introduzione in modo da non provocare danni al trasduttore che eventualmente potrebbe ancora essere riparato; 6. svitare e sfilare le 2 viti che fissano il trasduttore al serbatoio. Montaggio del nuovo trasduttore 1 . Fissare il nuovo trasduttore al serbatoio tramite le apposite viti. Seguire 6. unscrew the two bolts fixing the vessel to the sensor. How to mount a new sensor 1 . Mount the sensor on the vessel, handling with care, by the two bolts; 2 . mount the assembly vessel/sensor inside the box installing the spacer and locking the 2 screws; 3. insert the silicone tube on the fitting and fix it with a tie clamp; 4 . connect the sensor cable inside the junction box referring to the former wiring code; 5. take a very good “off set” reading with the empty vessel. it is very important as just explained for a correct data Livellometri-Assestimetri idraulici-Profiler Hydraulic settlement gauges-Profiler SISGEO s.r.l. 7-1 7. MANUTENZIONE scrupolosamente le raccomandazioni fatte in precedenza; 7. MAINTENANCE processing; 2 .r i p o r r e l’intero gruppo trasduttore/serbatoio all’interno della scatola e fissarlo alla mensola di supporto con le viti, dopo aver riposizionato il distanziale; 6. fill the vessel, with the fluid recovered throught the proper intake. This operation can be done using a large syringe or a can with a small tube in any case it is very important to avoid any pressure on the vessel and damage the sensor; 3 . riconnettere il tubo in silicone al circuito idraulico interno e fissarlo con una fascetta; 7. rotate the knob to open the valve and with soft tipping eliminate air bubbles if any; 4 . ricablare il cavo di collegamento del nuovo trasduttore, facendo riferimento allo schema di accoppiamento dei conduttori annotato in precedenza durante lo smontaggio del trasduttore; 8 . take a check reading to verifiy the good performances of the new sensor. 5 . eseguire la misura di “off set” con il serbatoio vuoto. Tale misura è indispensabile in fase di elaborazione dei dati; 6. effettuare il riempimento del serbatoio immettendo il liquido recuperato in precedenza dal foro presente alla sommità del serbatoio stesso. L’operazione può essere effettuata utilizzando una siringa o una tanica alla quale è stato collegato un tubicino flessibile, in ogni caso evitare di determinare pressioni sul serbatoio che potrebbero danneggiare il trasduttore; 7. aprire la manopola, ruotando in senso antiorario, e, con piccoli colpetti sul circuito idraulico interno, eliminare eventuali bolle d’aria; 8 . eseguire una lettura di controllo per verificare il corretto funzionamento del nuovo trasduttore. Livellometri-Assestimetri idraulici-Profiler Hydraulic settlement gauges-Profiler SISGEO s.r.l. 7-2 7. MANUTENZIONE 7. MAINTENANCE Foro per il riempimento Filling hole Serbatoio Vessel Viti fissaggio trasduttore/serbatoio Sensor/vessel fixing bolts Trasduttore elettrico Electric transducer Distanziale Spacer Cavo dell’impianto Cable system Viti fissaggio trasduttore/scatola Sensor/box fixing bolts Tubo in silicone Silicone tube Cavo elettrico Electric cable Manopola Valve knob Raccordo maschio Male coupling Fig. 7.1 – Livellometro DSM Fig. 7.1 – DSM settlement monitoring system PROFILER PROFILER Particolare cura è richiesta nell’utilizzo del tubo di collegamento sensore-centralina di misura. Esso va sempre mantenuto nell’apposito rullo portatubo e svolto solo durante le misure. Manutenzione e controlli regolari vanno effettuati sui componenti idraulici del sistema di misura. In particolare il livello del liquido presente nel serbatoio va sempre controllato prima di ogni misura. Controlli periodici vanno effettuati utilizzando la procedura descritta al punto “calibrazione del sistema”. Tali operazioni sono da effettuarsi prima e dopo ogni serie di misure e comunque ogni qualvolta si rinvenga qualche malfunzionamento nel sistema di misura. Particular care is required in handling the cable. It has always to be kept inside the reel and unreeled only during the survey. The level of the fluid in the tank has always to be checked before and after any survey. Periodic check of the calibration value of the system will be performed before and after survey and at any time there is a malfunctioning. Livellometri-Assestimetri idraulici-Profiler Hydraulic settlement gauges-Profiler SISGEO s.r.l. 7-3 7. MANUTENZIONE 7. MAINTENANCE SERVIZIO E RIPARAZIONE SERVICE AND REPAIR Controllo o riparazione di strumenti danneggiati può essere effettuata solo presso SISGEO o da tecnici tecnicamente preparati e autorizzati da SISGEO. In caso di riparazione, se possibile, spedire il set completo di accessori. Check or repair of damaged instrumentation has to be performed at the factory or by technically trained operators authorized from the factory. In case of recalibration or repairing, the full set of accessories supplied has to be returned if possible. Spedizione Proteggere gli strumenti durante il trasporto da urti utilizzando idonei contenitori. Inviare gli strumenti a: SISGEO S.r.l. Shipment Protect the instrument from shocks during the shipping in appropriate carrying case. Ship the instrumentation to : Via F. Serpero 4/F1 SISGEO S.r.l. 20060 Masate Milano Italy Via F. Serpero 4/F1 Att. Servizio Assistenza; 20060 Masate Milano Italy Telefono: ++39-02-95764130 Fax: ++39-02-95762011. Phone: ++39-02-95764130 Fax: ++39-02-95762011 Att. Service Department; Livellometri-Assestimetri idraulici-Profiler Hydraulic settlement gauges-Profiler SISGEO s.r.l. 7-4 CAPITOLO 8: APPENDICE CHAPTER 8: APPENDICES Livellometri-Assestimetri idraulici-Profiler Hydraulic settlement gauges-Profiler SISGEO s.r.l. 8. APPENDICE 1: MODULO RILEVAMENTO DATI ASSESTIMETRO ELETTRICO DIFFERENZIALE 8. APPENDIX 1: SETTLEMENT MONITORING SYSTEM RECORD FORM Assestimetro elettrico diffrenziale Settlement monitoring system Sigla di identificazione: Identification code: S/N: Cantiere/Site: Quota installazione s.l.m.: Elevation installation on s.l.: Ubicazione/Location: Data installazione: Installation date: DATI STRUMENTO/INSTRUMENT FEATURES Campo di misura: Range: Sensibilità K/Sensitivity K: A1:___________ A2:____________ A3:___________ R:____________ Unità elettrica misurata/Electric reading unit: A1, A2, A3:___________________ R:__________________________ Offset: A1:_________ A2:_______ A3:_________ R:_______ Lettura di zero/Zero value at installation: E0M:A1:________ A2:_______ A3:________: E0R______________ UNITA’ DI LETTURA/READOUT UNIT Modello/Type: DATA DATE DATA DATE DATA DATE Numero di matricola/Serial number: Lettura Assestimetro 1 Settlement 1 Reading EMi [mA] Quota relativa Assestimetro 1 Settlement 1 Relative heigh EMi/K [mm] Lettura Punto riferimento Reference point Reading ER [mV] Quota relativa Punto riferimento Reference point Relative heigh ER/K [mm] Spostamento relativo Relative movement ∆H [mm] Lettura Assestimetro 2 Settlement 2 Reading EMi [mA] Quota relativa Assestimetro 2 Settlement 2 Relative heigh EMi/K [mm] Lettura Punto riferimento Reference point Reading ER [mV] Quota relativa Punto riferimento Reference point Relative heigh ER/K [mm] Spostamento relativo Relative movement ∆H [mm] Lettura Assestimetro 3 Settlement 3 Reading EMi [mA] Quota relativa Assestimetro 3 Settlement 3 Relative heigh EMi/K [mm] Lettura Punto riferimento Reference point Reading ER [mV] Quota relativa Punto riferimento Reference point Relative heigh ER/K [mm] Spostamento relativo Relative movement ∆H [mm] SISGEO S.r.l. Via F. Serpero 4/F1-20060 Masate (MI) Tel:++39 02 95764130 - Fax:++39 02 95762011 SCHEDA RILEVAMENTO DATI FIELD DATA SHEET Rev. n. 0 Livellometri-Assestimetri idraulici-Profiler Hydraulic settlement gauges-Profiler Febbraio 1999 February 1999 Pagina n: ..../.... Page n: ..../.... SISGEO s.r.l. 8-1 8. APPENDICE 2: SCHEMA DI INSTALLAZIONE DEL PROFILER 8. APPENDIX 2: INSTALLATION SCHEME OF PROFILER INSTALLAZIONE PROFILER PROFILER INSTALLATION Data installazione: Installation date: Dati identificazione: Identification dates: Quota installazione s.l.m.: Elevation installation on s.l.: Profilo n°: Profile n°: Coordinate Coordinates X__________Y__________ Z_________ Controllo catena di misura / Checks on measuring chain Punto di riferimento Reference mark sonda-cavo di collegamento-centralina di misura/probe-cable-read out Prima delle lettura (cm) Before readings(cm) Dopo la lettura (cm) After readings (cm) Lettura al punto di riferimento Reading at reference mark H sup.=______ H inf.=______ H up =_______ H down=____ H sup.=______ H inf.=______ H up =_______ H down=____ L prima delle letture=_______ R before readings=_________ H. inf. – H. sup.=__________ H down – H up=___________ H. inf. – H. sup.=__________ H down – H up=___________ L dopo le letture=__________ R after readings=__________ Note/Notes: SISGEO S.r.l. Via F. Serpero 4/F1-20060 Masate (MI) Tel:++39 02 95764130 - Fax:++39 02 95762011 SCHEDA RILEVAMENTO DATI FIELD DATA SHEET Rev. n. 0 Livellometri-Assestimetri idraulici-Profiler Hydraulic settlement gauges-Profiler Febbraio 1999 February 1999 Pagina n: ..../.... Page n: ..../.... SISGEO s.r.l. 8-2 8. APPENDICE 3: MODULO RILEVAMENTO DATI DEL PROFILER 8. APPENDIX 3: PROFILER RECORD FORM PROFILER Cantiere: Site: Quota installazione s.l.m.: Elevation installation on s.l.: Coordinate: Coordinates: X________Y________ Z_______ Sigla di identificazione: Identification code: Ubicazione: Location: Data installazione: Installation date: Profilo n°: Profile n°: Distanza Distance Lettura Reading Distanza Distance Lettura Reading (m) (cm) (m) (cm) S/N: Distanza Distance Lettura Reading (m) (cm) Distanza Distance Lettura Reading (m) (cm) Distanza Distance Lettura Reading (m) (cm) 1.0 26.0 51.0 76.0 101.0 2.0 27.0 52.0 77.0 102.0 3.0 28.0 53.0 78.0 103.0 4.0 29.0 54.0 79.0 104.0 5.0 30.0 55.0 80.0 105.0 6.0 31.0 56.0 81.0 106.0 7.0 32.0 57.0 82.0 107.0 8.0 33.0 58.0 83.0 108.0 9.0 34.0 59.0 84.0 109.0 10.0 35.0 60.0 85.0 110.0 11.0 36.0 61.0 86.0 111.0 12.0 37.0 62.0 87.0 112.0 13.0 38.0 63.0 88.0 113.0 14.0 39.0 64.0 89.0 114.0 15.0 40.0 65.0 90.0 115.0 16.0 41.0 66.0 91.0 116.0 17.0 42.0 67.0 92.0 117.0 18.0 43.0 68.0 93.0 118.0 19.0 44.0 69.0 94.0 119.0 20.0 45.0 70.0 95.0 120.0 21.0 46.0 71.0 96.0 121.0 22.0 47.0 72.0 97.0 122.0 23.0 48.0 73.0 98.0 123.0 24.0 49.0 74.0 99.0 124.0 25.0 50.0 75.0 100.0 125.0 SISGEO S.r.l. Via F. Serpero 4/F1-20060 Masate (MI) Tel:++39 02 95764130 - Fax:++39 02 95762011 SCHEDA RILEVAMENTO DATI FIELD DATA SHEET Rev. n. 0 Livellometri-Assestimetri idraulici-Profiler Hydraulic settlement gauges-Profile Febbraio 2000 February 2000 Pagina n: ..../.... Page n: ..../.... SISGEO s.r.l. 8-3
Scaricare