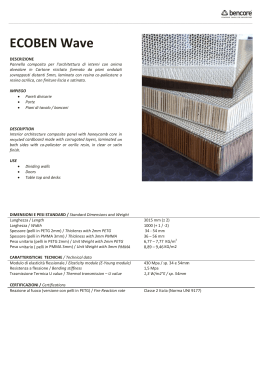
Installatie-instructie
NL
Installation instruction
GB
Instruction d’installation
F
Montageanleitung
D
Istruzione di montaggio
I
Woodstocker
+supplement
www.leenders.nl
NL
Maatschetsen
Installatie instructie basismodule
Installatie instructie supplement
3
4
6
GB
Connection sizes
Installation Instruction base module
Installation Instruction supplement
3
8
10
F
Mesures d’écarts standard
Instructions d’installation module de base module supplémentaire
Instructions d’installation module supplémentaire
3
12
14
D
Anschlußmaße Holz
Montageanleitung Basis
Montageanleitung Supplement
4
16
18
I
Misure per l’allacciamento Istruzioni di montaggio Woodstocker modulo baso
Istruzioni di montaggio Woodstocker supplemento
2
4
20
22
2000mm
Maatschetsen
Connection sizes
Mesures d’écarts standard
Anschlußmaße Holz
Misure per l’allacciamento
1250mm
1500mm
2000mm
1250mm
900mm
1500mm
3
Installatie instructies Woodstocker
Algemene instructies en voorschriften
• De WoodStocker dient door twee personen opgebouwd te worden.
• Controleer na montage of alle bevestigingspunten goed aansluiten.
Veiligheidsvoorschriften:
• De onderdelen kunnen scherp zijn, gebruik veiligheidshandschoenen.
• Draai bouten goed vast en buig lippen om (zie afb. 6) voor een stevige constructie.
Meegeleverde onderdelen (basismodule)
• 2x zijwand
• 4x staander
• 4x haakje
• 1x rooster
• 1x dakplaat
• 1x set dakgoot
• 6x inbus bolkop M5 RVS
• 6x moer M5 RVS Benodigde materialen en gereedschappen (niet bijgeleverd)
• Inbussleutel 3mm
• Steeksleutel s.w. 8
• Knijptang
Stap 1
Stap 2
• Opbouwen van zijwand inclusief haakjes.
• Rooster op haakjes plaatsen.
4 NL
Stap 3
Stap 4
• 3e staander (incl. haakje) aan rooster haken.
• Zijplaat aan staander haken.
• Laatste staander (incl. haakje) aan zijwand en rooster haken.
Stap 5
Stap 6
• Dakgoten tussen staanders haken.
• Dakplaat plaatsen.
• Dakplaat en dakgoten aan staanders verbinden m.b.v. bouten en moeren (inbussleutel 3mm en steeksleutel s.w.8).
• Middelste lippen ombuigen (knijptang).
NL
5
Installatie instructies WOODSTOCKER supplement
Algemene instructies en voorschriften
• De WoodStocker dient door twee personen opgebouwd te worden.
• Controleer na montage of alle bevestigingspunten goed aansluiten.
Veiligheidsvoorschriften:
• De onderdelen kunnen scherp zijn, gebruik veiligheidshandschoenen.
• Draai bouten goed vast en buig lippen om (zie afb. 5) voor een stevige constructie.
Meegeleverde onderdelen (supplement)
• 1x zijwand
• 2x staander
• 4x haakje
• 1x rooster
• 1x dakplaat
• 1x set dakgoot supplement
• 4x inbus bolkop M5 RVS
• 4x moer M5 RVS Benodigde materialen en gereedschappen (niet bijgeleverd)
• Inbussleutel 3mm
• Steeksleutel s.w. 8
• Knijptang
Stap 1
Stap 2
• Plaats twee haakjes in de daarvoor bestemde sleuven.
• Plaats het rooster op de haakjes.
6 NL
Stap 3
Stap 4
• Haak een staander (incl. haakje) aan het rooster.
• Haak de zijplaat aan de staander.
• Haak de tweede staander (incl. haakje) aan de zijwand.
• Dakgoten tussen de staanders haken.
• Plaats de dakplaat.
Stap 5
• Dakplaat en dakgoten aan de staanders verbinden m.b.v.
de bouten en moeren (inbussleutel 3mm en steeksleutel s.w.8).
• Middelste lippen ombuigen (knijptang).
NL 7
Installation instructions Woodstocker
General instructions and directions
• The WoodStocker has to be assembled by 2 persons.
• After assemblage check for all connection points to be well connected.
Safety recommendations
• The parts can be sharp so use safety gloves.
• Fasten nuts very well and bend edges (see pic. 6) for a robust construction.
Materials required (base module)
• 2x side wall
• 4x jambs
• 4x hooks
• 1x grating
• 1x roof plate
• 1x set of gutters
• 6x hexagonal screw bolts M5
stainless steel
• 6x nuts M5 stainless steel
Tool required (not provided)
• Hexagonal wrench 3mm
• Open-end wrench, j.w. 8
• Nippers
Step 1
Step 2
• Building up the side wall including hooks.
• Put the grating on the hooks.
8 GB
Step 3
Step 4
• 3rd jamb (incl. hook) to be fit on the hooks.
• Hook on the side wall on the jamb.
• Hook on the last jamb (incl. hook) on the side wall and grating.
Step 5
Step 6
• Hook the gutters between the jambs.
• Mount the roof plate. •
•
Roof plate and gutters to be connected to the jambs by means of bolts and nuts (hexagonal wrench 3mm and open-end wrench s.w.8).
Bend middle edges (nippers).
GB
9
Installatie instructies WOODSTOCKER supplement
General instructions and directions
• The WoodStocker has to be assembled by 2 persons.
• After assemblage check for all connection points to be well connected.
Safety recommendations
• The parts can be sharp so use safety gloves.
• Fasten nuts very well and bend edges (see pic. 5) for a robust construction.
Materials required (base module) (supplement)
• 1x side wall
• 2x jambs
• 4x hooks
• 1x grating
• 1x roof plate
• 1x set of gutters
• 4x hexagonal screw bolts M5
stainless steel
• 4x nuts M5 stainless steel
Tool required (not provided)
• Hexagonal wrench 3mm
• Open-end wrench, j.w. 8
• Nippers
Step 1
Step 2
• Place two hooks in the slots destined for.
• Put the grating on the hooks.
10 GB
Step 3
Step 4
• Hook on one jamb (incl. hook) on the grating.
• Hook the side wall on the jamb.
• Hook the second jamb (incl. hook) on the side wall.
• Hook the gutters between the jambs.
• Mount the roof plate.
Step 5
•
•
Roof plate and gutters to be connected to the jambs by means
of bolts and nuts (hexagonal wrench 3mm and open-end
wrench s.w.8).
Bend middle edges (nippers).
GB 11
Instructions d’installation Woodstocker
Instructions et recommandations générales
• Le WoodStocker se doit d’être monté par 2 personnes.
• Contrôlez bien tous les point de fixation après le montage.
Précautions:
• Utilisez des gants pour monter les parties en acier.
• Vissez solidement.
Pièces fournies pour une module de base
• 2x paroi à multiples trous
• 4x pilliers
• 4x crochets
• 1x grille
• 1x plaque de toit • 1x set de gouttière
• 6x vis allen M5 inox
• 6x écrous M5 inox
Outils nécéssaires (non-fournis)
• Clé allen 3mm
• Clé plate 8mm
• Clé à pinces
Etape 1
• Montez les 2 parois aux pilliers et fixez les crochets tel indiqué sur le croquis.
12 F
Etape 2
• Posez la grille sur les 2 crochets.
Etape 3
Etape 4
• Montez le 3eme pillier, puis insérez la 2eme paroi dans le pillier.
• Montez le 4eme pillier à la grille et à la paroi.
Etape 5
Etape 6
• Montez les gouttières par les crochets aux pilliers.
• Placez la plaque de toit.
• Fixez la plaque de toit et les gouttières à l’aide des vis et écrous
fournis. Pliez à l’aide d’une clé à pinces les lacets en acier.
F
13
Instructions d’installation module supplémentaire
Instructions et recommandations générales
• Le WoodStocker se doit d’être monté par 2 personnes.
• Contrôlez bien tous les point de fixation après le montage.
Précautions:
• Utilisez des gants pour monter les parties en acier.
• Vissez solidement.
Pièces fournies pour une module supplémentaire
• 1x paroi à multiples trous
• 2x pilliers
• 4x crochets
• 1x grille
• 1x plaque de toit • 1x set de gouttière
• 4x vis allen M5 inox
• 4x écrous M5 inox
Outils nécéssaires (non-fournis)
• Clé allen 3mm
• Clé plate 8mm
• Clé à pinces
Etape 1
Etape 2
• Rajouter pour toute module supplémentaire les 2 crochets au niveau du plancher tel indiqué sur le croquis.
• Posez la grille sur les 2 crochets.
14 F
Etape 3
Etape 4
• Emboîtez un pilier au niveau du plancher.
• Emboîtez la paroi.
• Emboîtez le second pilier au plancher et à la paroi.
• Montez les gouttières par les crochets aux pilliers.
• Placez la plaque de toit. Etape 5
• Fixez la plaque de toit et les gouttières à l’aide des vis et écrous
fournis. Pliez à l’aide d’une clé à pinces les lacets en acier.
F 15
Montageanleitung Woodstocker
Allgemeine Anweisungen und Vorschriften
• Der WoodStocker soll von zwei Personen augebaut te werden.
• Kontrolliere nach Montage ob alle Befestigungspunkten gut anschließen.
Sicherheitsvorschriften:
• Die Einzelteile können scharf sein, benützen sie Sicherheitshandschuhe.
O Drehe Bolzen gut fest und biege die Lippen um für eine feste Konstruktion. (Sehe Abb. 6)
Benötigte Materialen (Basismodel)
• 2x Seitenwand
• 4x Ständer
• 4x Häkchen
• 1x Grille
• 1x Dachplatte • 1x Satz Dachrinnen
• 6x Mutter M5 Rostfrei
Benötigte Werkzeuge (nicht mitgeliefert)
• Inbusschlüssel 3Mm
• Steckschlüssel S.W. 8
• Beißzange
Abbildung 1
Abbildung 2
• Aufbauen der Seitenwand einschließlich Häkchen.
• Grille auf die Häkchen stellen.
16 D
Abbildung 3
Abbildung 4
• 3e Ständer (samt Häkchen) an die Grille anhaken.
• Seitenwand an den Ständer anhaken.
• Letzter Ständer (samt Häkchen) an die Seitenwand
und Grille anhaken.
Abbildung 5
Abbildung 6
• Dachrinnen zwischen Ständer anhaken.
• Dachplatte stellen.
• Dachplatte und Dachrinnen mit Ständern verbinden mittels Bolzen und Mutter (Inbusschlüssel 3Mm und Steckschlüssel S.W.8).
• Mittlere Lippen umbiegen (Beißzange).
D
17
Montageanleitung Woodstocker supplement
Allgemeine Anweisungen und Vorschriften
• Der WoodStocker soll von zwei Personen augebaut te werden.
• Kontrolliere nach Montage ob alle Befestigungspunkten gut anschließen.
Sicherheitsvorschriften:
• Die Einzelteile können scharf sein, benützen sie Sicherheitshandschuhe.
• Drehe Bolzen gut fest und biege die Lippen um für eine feste Konstruktion. (Sehe Abb. 5)
Benötigte Materialen (Supplement)
• 1x Seitenwand
• 2x Ständer
• 4x Häkchen
• 1x Grille
• 1x Dachplatte • 1x Satz Dachrinnen
• 4x Inbus Kugelkopf M5 Rostfrei
• 4x Mutter M5 Rostfrei
Benötigte Werkzeuge (nicht mitgeliefert)
• Inbusschlüssel 3Mm
• Steckschlüssel S.W. 8
• Beißzange
Abbildung 1
Abbildung 2
• Stellen sie zwei Häkchen in die dafür bestimmte Schlitzen.
• Grille auf die Häkchen stellen.
18 D
Abbildung 3
Abbildung 4
• Haken sie einen Ständer (samt Häkchen) an die Grille an.
• Haken sie die Seitenwand an den Ständer.
• Haken sie den zweiten Ständer (samt Häkchen) an die Seitenwand.
• Dachrinnen zwischen der Ständer haken.
• Die Dachplatte stellen.
Abbildung 5
• Dachplatte und Dachrinnen mit den Ständern verbinden mittels Bolzen und Mutter (Inbusschlüssel 3Mm und Stecksleutel S.W.8).
• Mittlere Lippen umbiegen (Beißzange). D 19
Instruzione di montaggio Woodstocker module baso
Istruzioni e prescrizioni di carattere generale
• Il WoodStocker deve essere assemblato da due persone.
• A montaggio avvenuto, verificare che tutti i punti di fissaggio siano collegati correttamente.
Norme di sicurezza
• Poiché gli elementi possono essere taglienti, si consiglia di utilizzare dei guanti di sicurezza
• Serrare correttamente i bulloni e piegare i bordi (vedere la fig. 6) per avere una struttura robusta.
Elementi forniti a corredo (modulo base)
• 2x pareti laterali • 4x montanti
• 4x gancetti
• 1x basamento a griglia
• 1x copertura • 1x set grondaia
• 6x viti a testa tonda esagonale M5
in acciaio inox
• 6x dadi M5 in acciaio inox
Materiali ed utensili necessari (non forniti di serie)
• Chiave esagonale da 3 mm
• Chiave a tubo con apertura 8
• Tenaglia
Prima operazione
Seconda operazione
• Costruzione della parete laterale con installazione dei gancetti.
• Posare la griglia sui gancetti.
20 I
Terza operazione
Quarta operazione
• Agganciare il terzo montante (comprensivo di gancetto) alla griglia.
• Agganciare il pannello laterale al montante.
• Agganciare l’ultimo montante (comprensivo di gancetto)
alla parete laterale ed alla griglia.
Quinta operazione
Sesta operazione
• Agganciare le grondaie fra i montanti.
• Montare la copertura.
•
•
Collegare la copertura e le grondaie ai montanti con l’ausilio dei
bulloni e dei dadi (utilizzando la chiave esagonale da 3 mm e
la chiave a tubo con apertura 8).
Curvare i bordi centrali (con la tenaglia).
I
21
Instruzione di montaggio WOODSTOCKER Supplemento
Istruzioni e prescrizioni di carattere generale
• Il WoodStocker deve essere assemblato da due persone.
• A montaggio avvenuto, verificare che tutti i punti di fissaggio siano collegati correttamente.
Norme di sicurezza
• Poiché gli elementi possono essere taglienti, si consiglia di utilizzare dei guanti di sicurezza
• Serrare correttamente i bulloni e piegare i bordi (vedere la fig. 5) per avere una struttura robusta.
Elementi forniti a corredo (supplemento)
• 1x parete laterale
• 2x montanti
• 4x gancetti
• 1x basamento a griglia
• 1x copertura superiore
• 1x set grondaia
• 4x viti a testa tonda esagonale M5
in acciaio inox
• 4x dadi M5 in acciaio inox
Materiali ed utensili necessari (non forniti di serie)
• Chiave esagonale da 3 mm
• Chiave a tubo con apertura 8
• Tenaglia
Prima operazione
Seconda operazione
• Inserire due gancetti nelle apposite fessure.
• Posare la griglia sui gancetti.
22 I
Terza operazione
Quarta operazione
•
•
•
• Agganciare le grondaie fra i montanti.
• Montare la copertura.
Agganciare un montante (comprensivo di gancetto) alla griglia.
Agganciare il pannello laterale al montante.
Agganciare il secondo montante (comprensivo di gancetto)
alla parete laterale.
Quinta operazione
•
•
Collegare il pannello da soffitto e le grondaie ai montanti con
l’ausilio dei bulloni e dei dadi (utilizzando la chiave esagonale da
3 mm e la chiave a tubo con apertura 8).
Curvare i bordi centrali (con la tenaglia).
I 23
Woodstocker-H-manu-INT-10-2008
Harrie Leenders Haardkachels
Industrieweg 25, 5688 DP Oirschot, The Netherlands
Tel. +31 (0)499 572710, Fax +31 (0)499 573714
[email protected]
www.leenders.nl
Scaricare