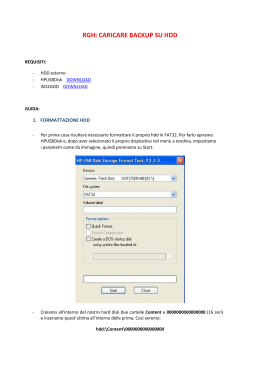
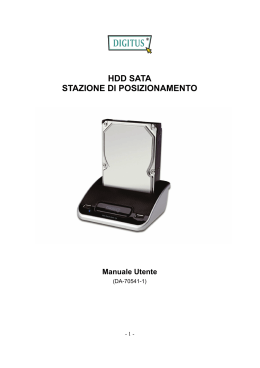
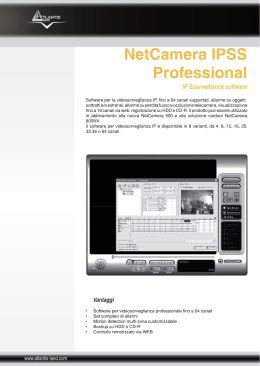
Videoregistratore
Digitale 4 ingressi
DVR
LCTVR662
Manuale d’installazione e d’uso
Installation Manual
Versione 0.1 – Luglio 2007
1
LCTVR662_Ver.1.0
NORME GENERALI DI SICUREZZA - General safety recommendations
Sicurezza delle persone - Safety warnings
Leggere e seguire le istruzioni - Tutte le istruzioni per la sicurezza e per l'operatività devono essere lette e
seguite prima che il prodotto sia messo in funzione.
Precauzioni particolari - Rispettare tassativamente l'ordine delle istruzioni di installazione e collegamento
descritte nel manuale. Verificare le indicazioni riportate sulla targa di identificazione: esse devono
corrispondere alla vostra rete elettrica di alimentazione ed al consumo elettrico. Conservate le istruzioni per
una consulta futura.
Read and follow the instructions - Read the installation instructions before connecting the system to its
power source. Follow these guidelines to ensure general safety.
In order to prevent injury, burns or electrical shock to yourself and others, follow the connection instruction
plan carefully.
Sicurezza del prodotto - Product Safety
Non posizionare in prossimità di liquidi oppure in un ambiente ad umidità eccessiva.
Non lasciare penetrare del liquido o corpi estranei all'interno dell'apparecchiatura.
Non ostruire le griglie di aerazione.
Non sottoporre all'esposizione dei raggi solari oppure in prossimità di fonti di calore.
Do not use the product in a wet location.
Never push a foreign object through an opening inside the product.
Slots and openings are provided for ventilation and should never be covered.
Do not place under direct sunlight or heat sources.
INFORMAZIONI SULL’AMBIENTE - ENVIRONMENT INFORMATION
Note per lo smaltimento del prodotto valide per la Comunità Europea
Questo prodotto è stato progettato e assemblato con materiali e componenti di alta qualità che possono
essere riciclati e riutilizzati. Non smaltire il prodotto come rifiuto solido urbano ma smaltirlo negli appositi
centri di raccolta. E’ possibile smaltire il prodotto direttamente dal distributore dietro l’acquisto di uno nuovo,
equivalente a quello da smaltire. Abbandonando il prodotto nell’ambiente si potrebbero creare gravi danni
all’ambiente stesso. Nel caso il prodotto contenga delle batterie è necessario rimuoverle prima di procedere
allo smaltimento. Queste ultime debbono essere smaltite separatamente in altri contenitori in quanto
contenenti sostanze altamente tossiche.
Il simbolo rappresentato in figura rappresenta il bidone dei rifiuti urbani ed è tassativamente vietato riporre
l’apparecchio in questi contenitori.
L’immissione sul mercato dopo il 1° luglio 2006 di prodotti non conformi al DLgs 151 del 25-07-05 (Direttiva
RoHS RAEE) è amministrativamente sanzionato.
Disposal of waste products for European Union
This products was designed to minimize their impact on the environment by reducing or eliminating
hazardous materials and designing for recyclables.
This product should be handed over to a designated collection point, e.g., on an authorized one -for-one basis
when you buy a new similar product or to an authorized collection site for recycling waste electrical and
electronic equipment. Improper handling of this kind of waste could have a possible negative impact on the
environment and human health due to potentially hazardous substances.
This symbol indicates that this product has not to be disposed of with your household waste, according to the
WEEE Directive.
For more information about where you can drop off your waste equipment for recycling, please contact your
local city waste authority, or your household waste disposal service.
GARANZIA - Warranty
Questa garanzia ha validità di 2 anni a partire dalla data di acquisto assicurata solo dietro presentazione della
fattura o scontrino rilasciati al cliente dal rivenditore.
L’assistenza gratuita non è prevista per i guasti causati da:
-Uso improprio del prodotto, immagazzinamento inadeguato, cadute o urti, usura, sporcizia, acqua, sabbia,
manomissione da personale non autorizzato del prodotto rispetto a quanto previsto nei manuali d’uso inclusi.
-Riparazioni, modifiche o pulizia effettuate da centri assistenza non autorizzati da HR EUROPE.
-Danni o incidenti le cui cause non possono essere attribuite alla HR EUROPE, comprendenti e non limitati a
fulmini, eventi naturali, alimentazione e ventilazione inadeguata.
This warranty is valid for 2 years from the date of purchase obtained only against presentation of the original
invoice/ cash ticket issued to the customer by the retailer.
Warranty repair service is excluded if damage or defects have been caused by:
-Improper use, incorrect storage, dropping or shocks, corrosion, dirt, water, handing or operation of the product
as referred to in the users’ manuals.
-Repairs, modifications or cleaning carried out at a service centre not authorized by HR EUROPE.
-Accidents or disasters or any cause beyond the control of HR EUROPE, including but not limited to lightning,
water, fire, improper supply voltage or ventilation.
2
LCTVR662_Ver.1.0
SOMMARIO
1.0 Introduzione .................................................................................................................. 5 1.1 Caratteristiche ........................................................................................................... 5 2.0 Riconoscimento parti .................................................................................................... 6 2.1 Vista frontale ............................................................................................................. 6 2.2 Vista posteriore ......................................................................................................... 7 2.3 Costruzione del sistema ............................................................................................ 7 3.0 Guida operativa ............................................................................................................. 8 3.1 Installazione HDD..................................................................................................... 8 3.2 Connettere la telecamera (video/sistema) ................................................................. 8 3.3 Power on ................................................................................................................... 8 3.4 Registrazione ............................................................................................................. 8 3.5 Riproduzione ............................................................................................................. 9 3.6 Controllo allarme ...................................................................................................... 9 3.7 Connettore allarme esterno ....................................................................................... 9 3.8 Schema di connessione degli allarmi. ..................................................................... 10 4.0 Menù di impostazione ................................................................................................. 10 4.1 Menu principale ...................................................................................................... 10 4.2 Impostazione sistema .............................................................................................. 11 4.3 Impostazioni telecamera ......................................................................................... 12 4.4 Impostazione di registrazione ................................................................................. 12 4.5 Programmazione registrazione ................................................................................ 13 4.6 Gestione HDD ......................................................................................................... 13 4.7 Caricare le impostazioni di default ......................................................................... 14 5.0 Back-up ....................................................................................................................... 14 5.1 Lettura con USB...................................................................................................... 14 5.2 Lettura tramite HDD ............................................................................................... 16 ATTENZIONE – CAUTION............................................................................................ 29 Appendice 1 – Appendix 1 ................................................................................................ 30 Specifiche Tecniche - Technical Features ........................................................................ 30 Appendice 2 – Appendix 2 ................................................................................................ 31 Tabella tempi di registrazione - Recording time table ...................................................... 31 3
LCTVR662_Ver.1.0
SUMMARY
1.0 Summary ..................................................................................................................... 18 1.1 Features ................................................................................................................... 18 2.0 Hardware overview .................................................................................................... 19 2.1 Front view ............................................................................................................... 19 2.2 Rear view ................................................................................................................ 20 2.3 System construction ................................................................................................ 20 3.0 Operation guide ........................................................................................................... 21 3.1 Install HDD ............................................................................................................. 21 3.2 Connect Camera (video/system) ............................................................................. 21 3.3 Power on ................................................................................................................. 21 3.4 Record ..................................................................................................................... 21 3.5 Playback .................................................................................................................. 22 3.6 Alarm control .......................................................................................................... 22 3.7 External alarm connector ........................................................................................ 22 3.8 Terminal connector ................................................................................................. 23 4.0 SETUP MENU............................................................................................................ 23 4.1 Main menu .............................................................................................................. 23 4.2 System set ............................................................................................................... 23 4.3 Camera Setup .......................................................................................................... 24 4.4 Record setup............................................................................................................ 24 4.5 Schedule Record ..................................................................................................... 25 4.6 HDD Management .................................................................................................. 25 4.7 Load default ............................................................................................................ 26 5.0 Back-up ....................................................................................................................... 26 5.1 Read by USB........................................................................................................... 26 5.2 Read by HDD .......................................................................................................... 28 ATTENZIONE – CAUTION............................................................................................ 29 Appendice 1 – Appendix 1 ................................................................................................ 30 Specifiche Tecniche - Technical Features ........................................................................ 30 Appendice 2 – Appendix 2 ................................................................................................ 31 Tabella tempi di registrazione - Recording time table ...................................................... 31 4
LCTVR662_Ver.1.0
1.0 Introduzione
Grazie per aver acquistato il nostro LCTVR662, 4canali, DVR stand-alone. Adottando la più avanzata
tecnologia digitale di compressione di immagini, il DVR fornisce un’intera soluzione di monitoraggio video,
trasmissione e registrazione di immagini.
1.1 Caratteristiche
●
●
●
●
●
●
●
●
●
●
●
●
●
●
●
Il sistema operativo separato permette la stabilità della qualità
Real time display 4 Canali
Nelle modalità “Normale” e “Allarmata”, velocità di registrazione regolabile, Max 30fps/25 fps
(NTSC/PAL)
Funzione di “Motion detection” per salvare spazio di immagazzinamento HDD. L’utente può
modificare la sensibilità del motion detection e dell’allarme sonoro quando è innescato il
movimento.
Si possono impostare separatamente luminosità e contrasto.
Max. compatibilità HDD 200GB
Ingressi allarme 4 canali e uscita allarme 1 canale
3 livelli di quantità di immagine registrata High/standard/ low (alto/standard/basso)
Modalità di registrazione manuale, su allarme e programmata
Ricerca riproduzione per tempo ed evento, X6 indetro e Avanti (X1; X2; X3)
Allarme di perdita video
Sovrascrittura.
Protezione Password dal cancellamento dell’HDD
In caso di interruzione della corrente durante la registrazione dell’immagine, il ripristino
dell’elettricità farà riprendere automaticamente la registrazione dopo il riavvio.
Protezione blocco-tasti
5
LCTVR662_Ver.1.0
2.0 Riconoscimento parti
2.1 Vista frontale
Rea l tim e 4c h DVR
1
1
2
3
2
3
4
QUAD
REC
POWER
REC
PLAY
6
7
8
9
10
11
12
FF
FR
PAUSE PLAY
PLAY
REC ALM HDD NET POW
MENU
UP DOWN ENTER
LED stato di accensione
LED stato di registrazione
LED stato di riproduzione
(1) Modalità schermo intero per canali 1-4 in modalità Quad
(2) usato come 1-4 nell’inserimento password
4
5
STOP
REW SEARCH
STOP
PAUSE
F FWD SEARCH
PLAY
MENU
▲
▼
ENTER
Tasto di avvio riavvolgimento veloce, velocità x6
Premere il tasto per interrompere la riproduzione/registrazione e
ritornare alla modalità display
(1) Pausa durante la riproduzione
(2) In modalità di riproduzione e registrazione premendo 5 volte il tasto
PAUSE compare una “L” nell’angolo in alto a destrea che simboleggia
che il blocco-tasti è attivo, ad eccezione del tasto RE. Premere altre 5
volte per togliere il blocco.
Premere il tasto per riprodurre avanti velocemente a velocità X1; X2;
X4; X6
Premere il tasto per riprodurre il video
Accedere al menu o ritonare
Opzioni di direzione
Accedere la sottomenu e cambiare le impostazioni dell’oggetto
selezionato
6
LCTVR662_Ver.1.0
2.2 Vista posteriore
13
Ventola
Ventola
14
USB
15
CAMERA IN
Ingresso video
16
VIDEO OUT
Uscita Video per monitor
17
ALARM IN / Relay
18
Power
19
FUSIBILE
Porta USB di Backup
Porta DB-9 . Entrata allarme 4 canali e uscita Relay 1 canale
Alimentazione
Fusibile
2.3 Costruzione del sistema
7
LCTVR662_Ver.1.0
3.0 Guida operativa
3.1 Installazione HDD
Step 1: Spegnere il DVR prima di installare o cambiare l’HDD.
Step 2: Aprire la custodia del DVR
Step 3: Impostare il Jumper presente sull’Hard Disk in posizione MASTER (ATTENERSI ALLE
DISPOSIZIONI DEL COSTRUTTORE DEGLI HARD DISK).
Step 4: Installare l’HDD all’interno del DVR
Step 5: Chiudere la custodia dell’HDD
3.2 Connettere la telecamera (video/sistema)
Facendo riferimento . paragrafo 2.2 , pagina 7 , connettere le telecamere agli ingressi BNC (indicazione
15)
3.3 Power on
Fornire Alimentazione al DVR
3.4 Registrazione
Premere il tasto
REC per attivare la modalità di registrazione, si accenderà la relativa spia.
Apparirà una scritta nell’angolo in basso dello schermo. Controllare la modalità di registrazione (MUX o QUAD),
Modalità di programmazione registrazione. Full record (+),Alarm record (*) o No record (-).
Il canale marcato con una “r” all’interno del quadrante indica che è impostato per registrare in “record mode”
8
LCTVR662_Ver.1.0
3.5 Riproduzione
Premere il tasto PLAY. Qualora
le registrazioni non fossero presenti a
video comparirà
”Nessun dato”
altrimenti la seguente interfaccia
RICERCA ORARIA
HDD:MASTER
ORA INIZIO
ORA FINE
2003/03/13 04:12:03
2004-3-15 21:12:03
> 01 TIME : 2003/03/21 07:51:13
02 TIME : 2003/03/13 21:59:03
Premere▲,▼ selezionare il file.
Premere FF
ENTER per impostare data e ora
Premere PLAY avviare la riproduzione
Premere MENU per uscire
●
Quando la modalità di registrazione è MUX , premere CH1~4 per selezionare il display a schermo
singolo. Quando la modalità di registrazione è QUAD , l’unica modalità di visualizzazione è la
modalità quad.
●
Premere I tasti
●
Premere “STOP” per interrompere la riproduzione e ritornare alla vista locale.
FR o
FF, per ravvolgere o far scorrere velocemente la registrazione
3.6 Controllo allarme
Il sistema può essere configurato per gestire tre tipi di allarme: Allarme esterno ,video loss alarm
(perdita video) e motion detection.
A. Quando gli allarmi sopra citati sono innescati la velocità di registrazione viene modificata in
velocità registrazione su allarme (MENU’ PRINCIPALE- SETUP REGISTRAZIONI).
B. L’allarme di perdita video (video loss) è attivato di default e non può essere cambiato. Si sentirà
l’allarme sonoro e apparirà il segnale V.LOSS sullo schermo.
3.7 Connettore allarme esterno
L’allarme esterno funziona solamente in modalità di registrazione (Allarmata), previa la connessione
della porta di allarme e GND. Quando l’allarme verrà innescato, il DVR agirà come segue :
A. Apparirà la scritta “ALM” nel canale corrispondente OSD
B. Verrà indicato il tempo di registrazione
C. La velocità di registrazione sarà cambiata da “normale” a “allarmata” (MENU’ PRINCIPALESETUP REGISTRAZIONI)
D. Se è stato impostato il setting A nella modalità di “schedule recording” (registrazione
programmata), registrerà solamente quando l’allarme è innescato o durante il periodo del
programma A
9
LCTVR662_Ver.1.0
3.8 Schema di connessione degli allarmi.
-
ALARM1—ALARM 4 entrata allarme telecamera
GND ------GND
NC -----RELAY NC uscita allarme N.C
COM------RELAY COM
NO- ---RELAY NO uscita allarme N.O
4.0 Menù di impostazione
Utilizzare “▲“o “▼” per selezionere gli oggetti, il simbolo “>” si sposterà come richiesto. L’oggetto
selezionato diventerà giallo. Premere il tasto “PLAY” per confermare la selezione.
Premere nuovamente il tasto “MENU” per salvare le modifiche e tornare indietro.
4.1 Menu principale
Premere il tasto “MENU” per
accedere al menu principale :
Menù principale
> Setup Sistema
Impostazioni Camera
Setup Registrazioni
Programmazione Oraria
Gestione HD
Default
Premere(▲-▼)per scorrere le voci
Premere(ENTER) per selezionare (MENU) per uscire
10
LCTVR662_Ver.1.0
4.2 Impostazione sistema
Selezionare Setup Sistema e premere
ENTER per accedere al menu
Setup Sistema
> Durata Buzzer
3 SEC
Allarme Video Loss
ON
Buzzer Motion
OFF
Imposta Password
Imposta Data e Ora
Premere(▲-▼)per scorrere le voci
Premere(ENTER) per selezionare (MENU) per uscire
① Durata Buzzer (DURATA ALLARME SONORO) 3 SEC (1~30 sec.)
② Allarme Video Loss (ALLARME DI PERDITA VIDEO) ON di default
③ Buzzer Motion (ALLARME SONORO DI MOVIMENTO) OFF di default
④ Imposta Password (IMPOSTARE PASSWORD): 6 numeri richesti, utilizzare “
per selezionare 1,2,3,4. N° di default:111111
”
Digitare le nuove impostazioni:
Password attuale:
Nuova Password:
Vecchia Password:--------Nuova Password:--------Conferma Password:---------
Se l’operazione ha avuto successo compare la scritta “password confermata“, altrimenti compare la
scritta “errore password“
⑤ Imposta Data e Ora (IMPOSTAZIONI DATA/ORA) Formato YYYY-MM-DD HH/MM/SS”
Esempio: “2003/06/13 15:54:59”
Imposta Data e Ora
2003/03/13
15:54:59^
Premere(▲-▼)per scorrere le voci
Premere(ENTER) per selezionare (MENU) per uscire
11
LCTVR662_Ver.1.0
4.3 Impostazioni telecamera
Dal “Menù Principale” selezionare
la voce “Impostazioni Camera” e
premere ENTER per accedere al Menù
di setup della telecamera
Impostazioni Camera
> Seleziona Camera
CH1
Registrazione
ON
Motion Detection
ON
Sensibilità MD
Luminosità
Standard
Contrasto
Standard
Tinta
Standard
Premere(▲-▼)per scorrere le voci
Premere(ENTER) per selezionare (MENU) per uscire
① Seleziona Camera (Selezione telecamera) : CH1/CH2/CH3/CH4
② Registrazione (Registrazione telecamera);ON di default (opzione ON/OFF)
③ Motion Detection: OFF di default (opzioni ON/OFF)
④ Sensibilità MD: 5 di default (opzioni 1~10)
⑤ Luminosità (Standard di luminosità): 5 di default (opzioni 1~10)
⑥ Contrasto (Standard di contrasto): 5 di default (opzioni 1~10)
⑦ Tinta (Standard di colore): 5 di default (opzioni 1~10)
4.4 Impostazione di registrazione
Dal “Menù Principale” selezionare
la voce “Setup Registrazioni” e premere
ENTER per accedere al relativo menù
Setup Registrazioni
> Modalità
MUX
Normale
15PS
Allarmata
5PS
Durata Allarme
5SEC
Qualità
Normal
Premere(▲-▼)per scorrere le voci
Premere(ENTER) per selezionare (MENU) per uscire
① Modalità (MODALITA’ REGISTRAZIONE): MUX di default (opzioni MUX/QUAD)
② Normale (Registrazione normale FPS): NTSC:15 di default (Opzione 1~5/7/10/15/30)
PAL:12 di default (opzioni 1~4/6/8/12/25 ) (FPS: Field per second –fotogrammi al secondo)
③ Allarmata(ALLARME REGISTRAZIONE FPS: NTSC:15 di default (opzioni 1~5/7/10/15/30) PAL:12
di default (opzioni1~4/6/8/12/25) (FPS: Field per second–fotogrammi al secondo)
④ Durata Allarme (TEMPO DI REGISTRAZIONE ALLARME): 10sec di default (opzioni 1~30)
⑤ Qualità (QUALITA’ DI REGISTRAZIONE);Normale di default (opzioni ALTA/NORMALE/BASSA );
Le impostazioni influenzano il tempo di registrazione come detto nel seguente riferimento
12
LCTVR662_Ver.1.0
4.5 Programmazione registrazione
Dal “Menù Principale” selezionare
la voce “Programmazione Oraria” e
premere ENTER per accedere al
menu relativo
Programmazione Oraria
+++++++++++++++++++++++++
^ ^ ^ ^ ^ ^ ^ ^ ^
0 3 6 9 12 15 18 21 24
Premere(▲-▼)per scorrere le voci
Premere(ENTER) per selezionare (MENU) per uscire
Nella tabella di programmazione sono presenti 24 cerchi che rappresentano le 24 ore.
E’ possibile abilitare la registrazione nelle due modalità (continua e/o allarmata) o disabilitare le
registrazioni.
+:
-:
*:
rappresenta registrazione completa
rappresenta l’assenza di registrazione
rappresenta registrazione su allarme
4.6 Gestione HDD
Dal “Menù Principale” selezionare la
voce “Gestione HD” e premere ENTER
per accedere al menu relativo
Gestione HD
> Sovrascrittura
Capacità HD Master
Spazio Utilizzato
Formatta HD Master
Capacità HD Slave
Spazio Utilizzato
Formatta HD Slave
Avviso Spazio Restante
ON/OFF
76GB
73GB 97%
NO
NO
5%
Premere(▲-▼)per scorrere le voci
Premere(ENTER) per selezionare (MENU) per uscire
① Sovrascrittura (MODALITA’ DI SOVRASCITTURA); ON di default ( opzioni ON/OFF). Impostando
ON le vecchie immagini verrano coperte dalle immagini correnti, altrimenti la registrazione si
interromperà quando l’HDD è pieno.
② Capacità HD Master (DIMENSIONE MASTER HDD): dimensione dell’Hard disk
③ Spazio Utilizzato (MASTER HDD USATO): Spazio occupato dalle registrazioni
④ Formatta HD Master: Premere ENTER per avviare la formattazione dell’Hard disk; è necessario
inserire la password per poter procedere con la formattazione:
PASSWORD INPUT:--------
13
LCTVR662_Ver.1.0
Immettere la Password utilizzando “
” per inserire 1 2 3 4
Se la password è corretta appare la scritta:
PASSWORD CORRETTA!
HARD DISK FORMATTATO
Se la password è errata:
PASSWORD ERRATA!
⑤ Capacità HD Slave (DIMENSIONE Slave HDD): dimensione dell’Hard disk
HDD N/A indica assenza HDD
⑥ Spazio Utilizzato (Slave HDD USATO): Spazio occupato dalle registrazioni
HDD N/A indica assenza HDD
⑦ Formatta HD Master: Premere ENTER per avviare la formattazione dell’Hard disk: Ref. ④
⑧ Avviso Spazio Restante: (Avvertimento HDD Pieno):10% default (Opzioni 5%/10%/15%)
Disabilitare la sovrascrittura e Impostare l’avvertimento di HDD pieno 15% (indica che l’allarme
sonoro scatterà quando ci sarà il 15% di spazio libero sull’HDD) Per l’impostazione del tempo
dell’allarme acustico fare riferimento alle impostazioni allarme.
4.7 Caricare le impostazioni di default
Dal “Menù Principale” selezionare la voce “Default” e premere ENTER per tornare alle impostazioni di
fabbrica del DVR. Questo cancellerà tutte le impostazioni dell’utente e le sostituirà con gli originali parametri
di default, fatta eccezione per la Password dell’HDD e la programmazione di registrazione.
5.0 Back-up
LCTVR662 fornisce 2 semplici modalità di Backup.
5.1 Lettura con USB
A. Connessione PC e Software:
Accedere al menu principale del DVR , connettere il PC al DVR attraverso il cavo USB. Il PC
installerà automaticamente I driver USB.
Per l’installazione attenersi ai seguenti passi:
1. Inserire il CD nel CD-ROM, Fare click su DVR_PLAY/set-up.exe per avviare l’installazione
14
LCTVR662_Ver.1.0
2.
Premere NEXT.
3.
Selezionare la lingua
4.
5.
Fare click su “Browser…” per impostare in percorso.
Installazione terminata.
B. Utilizzo del software DVR_PLAY.
Fare click su
proseguire
per accedere, selezionare HDD e sistema NTCS_PAL, premere OK per
15
LCTVR662_Ver.1.0
Appare la seguente interfaccia
1. Selezionare CH1~CH4 per accedere ai differenti canali delle telecamere.
Premere una volta e apparirà la visualizzazione a schermo intero del canale, premendo
nuovamente si torna alla modalità Quad
2. Lista eventi: Selezionare l’evento che si desidera rivedere “T” ”M” o “S” indicano la registrazione
normale, motion e allarmata. Le registrazioni sono indicate con l’orazio di inizio e fine registrazione:
4.STOP : arresta la riproduzione.
5.Back one frame : visualizza il fotogramma precedente
6.Backward play: riproduzione inverso.
7.Pause: pausa
8.Play: Riproduci
9.Play one frame: mostra l’ultimo fotogramma
10.Fast forward: avanti veloce: opzioni di velicità ×1 ×2 ×4 ×8.
11.Snap BMP: salva l’immagine in formato *.BMP e definisce il percorso
12.Print: stampa l’immagine corrente
13.Convert record to *.AVI format: converte la registrazione in formato AVI, per permettere all’utente di
utilizzare real player o media player per la riproduzione.
5.2 Lettura tramite HDD
1. Spegnere l’unità ed estrarre l’HDD
2. Connettere l’HDD al PC (il PC deve essere spento)
3. Accendere il DVR e il PC. Installare il software DVR PLAY nel PC
4.Premere
sopraindicati.
per riprodurre oppure rimuovere la registrazione dall’HDD con i passaggi
16
LCTVR662_Ver.1.0
N.B. - HR EUROPE s.r.l. si riserva di apportare modifiche al presente manuale senza ulteriori avvisi.
HR EUROPE s.r.l.
ROMA: sede legale e amministrativa; Via Giulianello, 1-7 – 00178 Roma, ITALIA – Tel +39 06 7612912 Fax +39 06 7612601
TORINO: sede operativa; Via G.B.Feroggio, 10 – 10151 Torino, ITALIA – Tel +39 011 453 53 23 Fax +39 011 453 70 49
SHANGHAI: ufficio di rappresentanza; Minhang Residence, Room 506, N°50 Jinzhu Road 200336 Shanghai, CHINA – Tel(Fax):+86 21
62086781 – e-mail: [email protected]
e-mail: [email protected] web: www.hrcctv.com – Codice Fiscale e Partita IVA 06397551000 – Iscrizione R.E.A. 966880
17
LCTVR662_Ver.1.0
1.0 Summary
Thank you for purchasing our LCTVR662, 4ch stand-alone DVR. Adopting the most advanced digital image
compression technology, they supply an entirely solution of video monitoring, Web image transmission and recording.
1.1 Features
•
Separated operation system enables stable quality
•
4ch real time display
•
Under normal recording mode and alarm recording mode, optional recording speed, Max 30fps/25fps
(NTSC/PAL)
•
•
Motion detection function to save HDD storage space. User can set up sensitivities of the motion detection and
buzzer alarm when motions are triggered
Can set up brightness/contrast individually
•
Max. HDD compatibility is 200GB or 120GB*2
•
4ch alarm inputs and1ch alarm output
•
3 levels of recording image quantity (high/standard/low)
•
Manual/Alarm/Schedule record mode
•
Time and event search playback, X6 backward and FF X1 X2 X3 playback
•
Video loss alarm
•
•
Overwrite or full information hint when HDD storage is going full
Password protection from HDD clearance
•
Such as while record image, cut the power/the restoration of electricity will recover recording automatically if
after re-starting
Key lock protection
•
18
LCTVR662_Ver.1.0
2.0 Hardware overview
2.1 Front view
Rea l tim e 4c h DVR
1
1
2
3
2
3
4
QUAD
REC
POWER
REC
PLAY
6
FF
FR
PAUSE PLAY
PLAY
REC ALM HDD NET POW
MENU
UP DOWN ENTER
Power status LED
Recording status LED
Playback status LED
(1) Full screen display mode for Ch1-4;Quad mode
4
5
STOP
(2) Used as 1-4 when keyword input
REW SEARCH
(Fast reward play key) speed x6。
Press the key to stop playback/recording and return display mode
STOP
(1) Pause when playback
7
(2) Under play and record mode ,press PAUSE 5 times,you
PAUSE
Can see a “L” on the right upper corner which means the key lock
is activated except RE key. Press 5 time again to release 。
8
9
10
11
12
F FWD SEARCH
PLAY
Press the key to play video forward。
Enter menu or return。
MENU
▲
Press the key to play forward at:X1;X2;X4 ;X6 speed
▼
ENTER
Direction option。
Enter the submenu and change the setting of the item selected
19
LCTVR662_Ver.1.0
2.2 Rear view
13
Fan
Fan
14
USB
USB backup port
15
CMAERA IN
Video inputs
16
VIDEO OUT
Video output for monitor
17
ALARM IN / Relay
18
Power
Power in
19
FUSE
Fuse
DB-9 Port. 4Ch alarm input and 1Ch relay output
2.3 System construction
20
LCTVR662_Ver.1.0
3.0 Operation guide
3.1 Install HDD
Step 1: Users should power off the DVR before installing or changing HDD.
Step 2: Open the cover of the DVR
Step 3: Jump the master and slave on the HDD.
Step 4: Install HDD inside
Step 5: Close the cover of the DVR
3.2 Connect Camera (video/system)
Ref. To 2.2.
3.3 Power on
Power in: DC 12V
3.4 Record
Press the
REC key to enter the Recording Mode ,Light on.
Statement shows in the bottom corner of the screen,Check the recording mode (MUX or QUAD, Recording location
(Master HDD or Slaver HDD), Schedule recording mode (Full record (+), Alarm record (*)or No record (-).
The channel which marked “R” in the center of the quad means it is set to record in the Record Mode
21
LCTVR662_Ver.1.0
3.5 Playback
Press the PLAY key. ”No data” marked
if no record, or the interface followed
SEARCH TIME
HDD:MASTER HDD
START TIME
END TIME
2003/03/13 04:12:03 - 2004-3-15 21:12:03
> 01 TIME : 2003/03/21 07:51:13
02 TIME : 2003/03/13 21:59:03
Press ▲,▼ to select.
Press REW SEARCH ENTER to setup HDD/DATE
Press PLAY to playback
Press MENU to Exit
●
Shows when playback at the left bottom corner: MUX [Master], ”Stop” when the record play finished.
●
When the record mode is MUX, press CH1~4 to select single screen display .when the record mode is QUAD,
can just view under quad mode.
●
Press
●
Shows on the bottom left when playback: “>>2
●
Shows the statement like “Stop” on the bottom left screen when play back.
●
Press “STOP” to stop the play back and back to the local view
Fr or
FF key, to play reward or play forward the record.
[Master]”.
3.6 Alarm control
There are three types of alarms that the system can be configured to handle (external alarm, video loss alarm and
motion detection
A. When types of alarm above were triggered, it changes recording speed as alarm recording speed
B. Video lost alarm is enable as default and cannot be changed. The buzzer will action and V.LOSS sign will be
indicated on the screen
3.7 External alarm connector
The external alarm is just functional in the record mode, under the connection of the alarm port and the GND,
when the alarm trigged, as follows:
A.Text ALM will displayed on OSD corresponding channel.
B.Relay action.
C.Recording speed will be switch from normal mode to alarm mode (refer to chapter 4 about recording setting).
D. If setting A has been set in schedule recording, will only perform recording when alarm is triggered during
schedule A period.
22
LCTVR662_Ver.1.0
3.8 Terminal connector
ALARM1—ALARM 4 camera alarm input
GND ------GND
NC -----RELAY NC Alarm output N.C
COM------RELAY COM
NO- ---RELAY NO Alarm output N.O
4.0 SETUP MENU
Use “▲“or“▼”to select items, “>”will follow. The item selected will become yellow. Press PLAY key to confirm the
selection.
Press MENU key again to save the change and return
4.1 Main menu
Press “MENU” button to enter the main menu:
Main Menu
> System Setup
Camera Setup
Record Setup
Schedule Record
HDD Management
Load Default
Press(▲ ▼)to select
Press(ENTER) to set (MENU) to exit
4.2 System set
Select SYSTEM SET and then press ENTER to
enter the menu
①
BUZZER DURATION :3 SEC (1~30 sec.
option)
②
VIDEO LOSS ALARM: ON for default
③
BUZZER OF MOTION: Off for default
④
SET PASSWORD: 6 numbers required,using“
SYSTEM SET
> Buzzer Duration
3 SEC
Video Loss Alarm
ON
Buzzer Of Motion
OFF
Set Password
Set Time/Date
Press(▲ ▼)to select
Press (ENTER) to set (MENU) to exit
”to set 1,2,3,4 default : 111111
Current Password--------New Password--------Password confirm---------
23
LCTVR662_Ver.1.0
Enter the setting. If succeed, it shows “password confirmed “. Otherwise, it shows “password error
⑤
Time and Date
2003/03/13 15:54:59^
“SET TIME/DATE:format as Y-MM-DD H/M/S”,ex
“2003/06/13 15:54:59,”:
Press(▲ ▼)to select
Press(ENTER) to set (MENU) to exit
4.3 Camera Setup
Press ENTER to enter the Camera Setup Menu。
Camera Setup
> Camera Select
CH1
CAMERA Record
ON
Motion Detection
ON
Brightness
Standard
Contrast
Standard
Hue
Standard
Press(▲ ▼)to select
Press(ENTER) to set (MENU) to exit
①
CAMERA SELECT:CH1/CH2/CH3/CH4 option.
② CAMERA RECORD:ON default (ON/OFF option)
③ MOTION DETECTION :OFF default (ON/OFF option)
④ BRIGHTNESS STANDARD: 5 default (1~10 option)
⑤ CONTRACT STANDARD : 5 default (1~10 optioin)
⑥ HUE STANDARD : 5 default (1~10 option)
4.4 Record setup
Press ENTER to enter the Record Setup menu:
①
RECORD MODE :MUX default (MUX/QUAD
option)
②
Record Setup
> Record Mode
MUX
Normal Record
15PS
Alarm Record
5PS
Alarm Record Time
5SEC
Record Quality
Normal
Press(▲ ▼)to select
Press(ENTER) to set (MENU) to exit
NORMAL RECORD FPS:NTSC:15 default (1~5/7/10/15/30 P option ),PAL:12 default(1~4/6/8/12/25 P
option) (FPS: Field per second)
③
ALARM RECORD FPS:NTSC:15 default (1~5/7/10/15/30 P option ),PAL:12 default(1~4/6/8/12/25 P option)
(FPS: Field per second)
④
ALARM RECORD TIME:10SEC default(1~30 option)。
⑤
RECORD QUALITY:NORMAL default (HIGH/NOMAL/LOW option)。The setting have influence of the
Recording time as the reference attached
24
LCTVR662_Ver.1.0
4.5 Schedule Record
Press ENTER to enter the Schedule
Record Menu
Schedule Record
+++++++++++++++++++++++++
^ ^ ^ ^ ^ ^ ^ ^ ^
0 3 6 9 12 15 18 21 24
Press(▲ ▼)to select
Press(ENTER) to set (MENU) to exit
There are 24 circles in the schedule table.
which represent 24 hours.
Fully record default (full record/no record/alarm record option )。
+: represents fully record
-: represent no record
*: represents alarm record
4.6 HDD Management
Press ENTER to enter the HDD Management
Menu
HDD Management
> Overwrite Mode
ON/OFF
Master HDD Size
76GB
Master HDD Used
73GB 97%
Master HDD Format
Slave HDD Size
NO
Slave HDD Used
NO
Slave HDD Format
HDD Space Warn
5%
Press(▲ ▼)to select
Press(ENTER) to set (MENU) to exit
①
OVERWRITE MODE:ON default(ON/OFF option), Setting ON, the old image will be covered by the
current image, otherwise, the record will stop when HHD is full.
②
MASTER HDD SIZE:The statement of the HDD (Unchangeable )
③
MASTER HDD USED:The statement of the HDD (Unchangeable)
④
MASTER HDD FORMAT :Press ENTER to enter the MASTER HDD FORMAT menu
PASSWORD INPUT:-------Using “
”to input 1,2,3,4,under correct password input:
PASSWORD CORRECT!
HARD DISK FOMARTED
If wrong password
PASSWORD INCORRCT
25
LCTVR662_Ver.1.0
⑤
SLAVE HDD SIZE:The statement of the HDD (Unchangeable)
HDD N/A indicates no HDD
⑥
SLAVE HDD USED :The statement of the HDD (Unchangeable).
HDD N/A indicates no HDD
⑦
SLAVE HDD FORMAT: Ref. 4
HDD Full Warning:10% default (5%/10%/15% option). Set HDD Full Warning as the HDD Overwrite Mode is
off.(15% stands for the buzzer when HDD is 15% left .The buzzer time setup refer to the Alarm Setup .Buzzer
accured.
4.7 Load default
Use the ENTER button to the factory default. This will clear all the user setting and replace it with the original default
parameters except the HDD password and schedule Record.
5.0 Back-up
LCTVR662 supply 2 easy backup ways
5.1 Read by USB
A、PC and Software connect :
Enter the DVT main menu, connect DVR and PC with the USB cable .The PC will install the USB drive automatically
Install as follow steps
1.Put the CD in the CD –Room, click the DVR_PLAY/set-up.exe to install
26
LCTVR662_Ver.1.0
2.Press NEXT,
3.Select language version
4.Click “Browser…” to set the path.
5. Finish installation
B. DVR_PLAY software using :
Click
to enter,select a physical HDD and NTCS_PAL system,Press OK to set。
Caution:No matter one or two HDD installed, just HDD1 chosen.
The interface following showed :
Select CH1~CH4 to change different camera channel.
One time press, full screen of the channel show. Press again to back to Quad mode
27
LCTVR662_Ver.1.0
2. Event list: Select the event need to review “T”、”M” or “S” stand for “normal record “、”motion
alarm record” ”external alarm record”. The record named by the start time and over time。
4.STOP : stop playing back.
5.Back one frame : display of the former picture
6.Backward play: play reward of the record
7.Pause
8.Play
9.Play one frame,display the latter picture
10.Fast forward, ×1、×2、×4、×8 speed option
11.Snap BMP,save the image as *.BMP format picture and definite the route
12.Print: print current picture
13.Covert record to *.AVI format, thus users can use realplayer or media player to play
5.2 Read by HDD
1. Power off the unit and Take out the HDD
2. Connet the HDD and a PC (PC must be power off)
3. Turn on the DVR and PC. Install DVR PLAY software on the PC
4.Press
to play or remove the record in the HDD by the step above.
28
LCTVR662_Ver.1.0
ATTENZIONE – CAUTION
* quando l’operazione è terminata, premere STOP in Media Player prima di sconnettere il cavo USB. Il DVR ritorna
in modalità display.
* Assicurarsi di spegnere il DVR e il PC prima della connessione.
* Solamente l’HDD master può essere riconosciuto come più di un HD installato
* la connessione USB può riconoscere HDD di dimensione minori di 120GB. In caso connettere direttamente l’HD al
PC.
* Si consiglia di utilizzare HD della stessa casa produttrice in caso di utilizzo di più di un HD nella stessa unità DVR.
* Prima di connettere il PC al DVR tramite USB interrompere qualsiasi operazione sul DVR
* When the operation finished, users should stop media player software before pull out USB cable. And DVR returns
to display mode.
* Make sure to power off the DVR and PC before connecting.
* Just the master HDD can be recognized if more than 1 HDD install
* USB can recognized the HDD less than 120GB. Otherwise, user should connect the HDD with PC directly.
* Same branding HDD is suggested if more than 1 HDD in a DVR unit.
* Before to stop any operation on the DVR when connecting it with PC through USB.
* Press Ctrl+Alt+V on Pc at the same time, the version No. will be showed. You can offer to authorized distributors
and server if necessary.
29
LCTVR662_Ver.1.0
Appendice 1 – Appendix 1
Specifiche Tecniche - Technical Features
Sistema / System
Play
Risoluzione
Resolution
Record
NTSC
PAL
720X480
720X576
640X224
640X272
Uscita/entrata video /
BNC
Video input/output
Fotogramma display /
Display Frame
Frame Rate di registrazione /
Recording Frame Rate (Quad)
Frame Rate di registrazione
/Recording Frame Rate (MUX)
Fomato Registrazione /Transito
Record/Transit format
Velocità di compressione /
Compress Rate
Modalità di registrazione /
Recording Mode
Modalità di riproduzione /
Playback Mode
On Screen Display & Setup
Ingresso allarme / Alarm input
Uscita Relay / Relay Output
Controllo Password /
X 4 /BNC
4x30 fields/sec
4x25 fields/sec
Max 30 fields/sec
Max 25 fields/sec
Max 30/4 fields/sec
Max 25/4 fields/sec
M-JPEG / MJPG-4
Low: 8K bytes/frame
Medium: 15K bytes/frame
High: 20K bytes/frame
Full /alarm /no record
FF: x1 x2 x3/REW:X6
Time/Date/Setup
X4
NO or NC Programmable Contact x 1
6 numbers
Password Control
Event record
Motion detection
Max .63 records/HDD
yes
Porta USB / USB port
yes
Video loss
yes
Blocco tasti / Key Lock
Ambiente di lavoro / Working
yes
environment
Alimentazione / Power input
Dimensioni / Dimensions (mm)
X 1
-10°C ~ 50°C
<95% RH
12VDC/5A
360(W) x 220(D) x 44(H)
30
LCTVR662_Ver.1.0
Appendice 2 – Appendix 2
Tabella tempi di registrazione - Recording time table
La lunghezza del tempo di registrazione è collegata alla velocità e alla qualità della registrazione.
Le tabelle sottostanti sono offerte come riferimento
Modalità di registrazione = MUX
Modalità di registrazione = Quad
* La lunghezza del tempo di registrazione in modalità quad è maggiore che in modalità muliplex, e Pal è più
breve di NTSC.
Recording time length is related to recording speed and recording quality.
Table below are offered for you reference
Record Mode = MUX
Record Mode =Quad
* Recording time length under quad mode is longer than multiplex mode and PAL is shorter than NTSC.
NTSC (F/S) Alta /
Qualità
High
registrazione
Standard
/ Recording
Bassa /
quality
Low
NTSC (F/S) Alta /
Qualità
High
registrazione
Standard
/ Recording
Bassa /
quality
Low
30 3 2 1
38hr
76hr
114hr
160hr
228hr
285hr
380hr
570hr
1140hr
57hr
114hr
171hr
240hr
342hr
428hr
570hr
855hr
1710hr
100hr
200hr
300hr
420hr
600hr
750hr
1000hr
1500hr
3000hr
3 2 1
30 80 Gb HDD Modalità di registrazione / Recording mode = QUAD 15 10 7 5 4 19hr
38hr
57hr
80hr
114hr
142hr
190hr
285hr
570hr
29hr
57hr
87hr
120hr
171hr
214hr
285hr
426hr
870hr
50hr
100hr
150hr
208hr
300hr
375hr
500hr
750hr
1500hr
PAL (F/S) Qualità
registrazione
/ Recording
quality
80 Gb HDD Modalità di registrazione / Recording mode = MUX 15 10 7 5 4 Alta /
High
Standard
Bassa /
Low
NTSC (F/S) Alta /
Qualità
High
registrazione
Standard
/ Recording
Bassa /
quality
Low
25 12 8 6 4 3 2 1 35hr
72hr
110hr
145hr
218hr
291hr
437hr
875hr
46hr
95hr
144hr
190hr
287hr
383hr
575hr
1150hr
98hr
204hr
306hr
408hr
612hr
816hr
1225hr
2450hr
30 15 10 7 5 4 3 2 12hr
25hr
37hr
50hr
75hr
100hr
150hr
300hr
16hr
33hr
50hr
66hr
100hr
133hr
200hr
400hr
34hr
70hr
106hr
141hr
212hr
283hr
425hr
850hr
* Suggerimento: è meglio utilizzare la funzione di motion detection in modo che il DVR possa aumentare il
tempo di archiviazione
* To suggest it is best to use the function of motion detetion so that DVR can improve to get more time for storage
31
LCTVR662_Ver.1.0
N.B. - HR EUROPE s.r.l. can change specifications in this manual without notice.
HR EUROPE s.r.l.
ROMA: legal and administrative office; 00178, ITALY, Rome, Via Giulianello, 1-7 – Tel +39 06 7612912 Fax +39 06 7612601
TORINO: operative office; 10151, ITALY, Turin, Via G.B.Feroggio, 10– Tel +39 011 453 53 23 Fax +39 011 453 70 49
SHANGHAI: representative office; Minhang Residence, Room 506, N°50 Jinzhu Road 200336 Shanghai, CHINA –
Tel(Fax):+86 21 62086781 – e-mail: [email protected]
e-mail: [email protected] web: www.hrcctv.com – Codice Fiscale e Partita IVA 06397551000 – Iscrizione R.E.A. 966880
32
LCTVR662_Ver.1.0
Scaricare