!
!
!
!
!
!
!
!
!
!
!
!
!
!
1
!
!
!
!
!
P-Link WiFi / P-Link 0.3 WiFi Kit
!
!
1 Indice
1
Indice ............................................................................................................................. 1
2
Sicurezza ....................................................................................................................... 2
3
Contenuto della confezione ........................................................................................ 3
4
Indicatori LED ............................................................................................................... 3
4.1 Pulsante WPS/Reset .............................................................................................. 3
4.2 Pulsante Security ................................................................................................... 4
5
Descrizione del dispositivo ......................................................................................... 4
6
Installazione .................................................................................................................. 4
6.1 Utilizzo con altri dispositivi powerline ................................................................. 4
6.1.1 Configurare una rete tra P-Link WiFi e P-Link 0.2 .............................................. 4
6.1.2 Aggiungere P-Link WiFi ad una rete esistente di P-Link 0.2 .............................. 5
6.2 Utilizzo di P-Link WiFi senza altri dispositivi powerline ..................................... 5
7
Connessione a P-Link WiFi ......................................................................................... 5
8
Interfaccia Grafica di P-Link WiFi ............................................................................... 6
8.1 Home ....................................................................................................................... 6
8.2 Impostazioni di Base ............................................................................................. 6
8.3 Impostazioni WPS .................................................................................................. 6
8.4 Impostazioni Avanzate .......................................................................................... 6
8.5 Sicurezza ................................................................................................................. 7
8.6 Filtraggio MAC ........................................................................................................ 7
8.7 Utilità di Sistema .................................................................................................... 7
8.8 Strumenti di Configurazione ................................................................................. 7
8.9 Aggiornamento ....................................................................................................... 7
8.10 Reset ..................................................................................................................... 7
9
Specifiche Tecniche ..................................................................................................... 8
!
1
TELE System
2 Sicurezza
Per un utilizzo sicuro dell’apparecchio, e per la vostra incolumità, vi preghiamo di leggere attentamente i seguenti
consigli riguardanti le misure di sicurezza.
ALIMENTAZIONE
Il dispositivo supporta esclusivamente alimentazione pari a 100-240 Volt AC, 50/60 Hz. Non aprire mai il dispositivo,
neanche in modalità di stand-by. All’interno del dispositivo possono essere presenti tensioni superiori a quella di
alimentazione che potrebbero mettere a repentaglio la sicurezza dell’utente. L'uso e/o l'apertura non autorizzata farà
decadere immediatamente la garanzia!
LIQUIDI
Tenere il dispositivo lontano da qualsiasi tipo di liquido. Non collocare sull’apparecchio oggetti contenenti liquidi come
vasi, umidificatori ecc. L’apparecchio non deve essere installato in luoghi in cui possa venire a contatto con spruzzi o
schizzi di liquidi o in ambienti con alto tasso di umidità dove possano formarsi condense. Nel caso in cui il dispositivo
venga accidentalmente in contatto con liquidi, togliere immediatamente la spina dalla presa di corrente (prestando
attenzione prima di toccarlo con le mani).
PICCOLI OGGETTI
Tenere lontano dal dispositivo i piccoli oggetti. La caduta di oggetti all’interno dell’apparecchio, attraverso le fessure per
la ventilazione, può causare seri danni.
PULIZIA
Prima di procedere ad operazioni di pulizia, staccate il dispositivo dalla presa di corrente. Per pulire l’esterno
dell'apparecchio, usare un panno morbido e asciutto o leggermente inumidito d’acqua. Evitare l’uso di acqua, prodotti
chimici o solventi.
VENTILAZIONE
Assicurarsi che nel luogo di installazione dell’apparecchio ci sia una buona circolazione d’aria per consentire una
sufficiente dissipazione del calore ed evitare surriscaldamenti. Le fessure per la ventilazione devono essere libere, non
ostruite dalla presenza di oggetti. Evitate di installare il dispositivo vicino a fonti di calore (termosifoni, stufe, ecc) o sopra
ad altre apparecchiature che producono calore.
AVVERTENZE
Tenere l’apparecchio fuori dalla portata dei bambini. I sacchetti di plastica degli imballaggi possono essere pericolosi.
Per evitare soffocamenti, tenere i sacchetti lontani dalla portata dei bambini. Non esporre il prodotto alla luce diretta del
sole. Non disperdere il prodotto nell’ ambiente per evitare potenziali danni per l’ ambiente stesso e la salute umana e per
facilitare il riciclaggio dei componenti/materiali contenuti in esso. Chi disperde questo prodotto
nell’ambiente o lo getta insieme ai rifiuti comuni è sanzionabile secondo legislazione vigente. Il produttore
istituisce un sistema di recupero dei RAEE del prodotto oggetto di raccolta separata e sistemi di
trattamento avvalendosi di impianti conformi alle disposizioni vigenti in materia.
Portare il prodotto non più utilizzabile presso un centro di raccolta autorizzato a gestire rifiuti di
apparecchiature elettriche ed elettroniche in quanto non può essere unito ai rifiuti comuni.
2
!
P-Link WiFi / P-Link 0.3 WiFi Kit
3 Contenuto della confezione
Verificare che all’interno della confezione siano presenti tutti i componenti elencati nella tabella sottostante. In caso di
componenti errati, mancanti o danneggiati, vi invitiamo a contattare il negozio o rivenditore che vi ha venduto il prodotto.
Vi suggeriamo inoltre di conservare imballaggio originale, in caso sia necessario spedire il prodotto in assistenza.
Per P-Link WiFi (cod. prodotto 23500060):
Nome
Quantità
Descrizione
P-Link WiFi
1
Powerline con funzionalità Wi-Fi
Manuale Utente
1
Manuale d’utilizzo
Cavo LAN
1
Cavo connessione Ethernet
Garanzia
1
Garanzia del prodotto
Per P-Link 0.3 WiFi kit (cod. prodotto 23500059):
Nome
P-Link WiFi
P-Link 0.2
Manuale Utente
Cavo LAN
Garanzia
Quantità
1
1
1
2
1
Descrizione
Powerline con funzionalità Wi-Fi
Powerline
Manuale d’utilizzo
Cavo connessione Ethernet
Garanzia del prodotto
4 Indicatori LED
P-Link Wi-Fi
WLAN: indicatore di attività della rete wifi
WPS: indicatore stato WPS (acceso se il processo di
accoppiamento è in corso)
3. LAN: indicatore connessione LAN (spento se cavo
ethernet non connesso, lampeggio se scambio dati)
4. PLC: indicatore attività powerline
5. PWR: indicatore di alimentazione
6. WPS/Reset: pulsante WPS/Reset
7. Ethernet: porta per connessione cavo ethernet
8. Security: pulsante security per criptare rete powerline
9. Spina: inserire la spina nella presa di corrente (a muro)
10. Antenne: 2 antenne esterne per rete wifi
P-Link 0.2 (powerline presente solo nel kit)
1.
2.
1.
2.
3.
4.
5.
6.
LAN: indicatore connessione LAN (spento se cavo
ethernet non connesso, lampeggio se scambio dati)
PLC: indicatore attività powerline
PWR: indicatore di alimentazione
Security: pulsante security per criptare rete powerline
Ethernet: porta per connessione cavo ethernet
Spina: inserire la spina nella presa di corrente (a muro)
4.1 Pulsante WPS/Reset
Il pulsante WPS/Reset ha diverse funzioni a seconda del tempo di pressione del tasto. Se viene premuto per più di 10
secondi allora viene effettuato un reset di fabbrica, cioè la parte wifi viene riportata alle impostazioni originarie. Se invece
il tasto WPS viene premuto per circa 3 secondi, allora viene attivato il WPS (WiFi Protected Setup). Il WPS è un
protocollo che permette la connessione di due dispositivi attraverso una rete wifi senza il bisogno di digitare alcuna
password di protezione. Nel caso di P-Link WiFi, il WPS può essere utile per connettere alcuni client a P-Link WiFi senza
digitare alcuna password di protezione. Per effettuare la connessione usando il pulsante WPS del dispositivo, fare
quanto segue:
•
Premere il pulsante WPS su P-Link WiFi per 1 secondo circa. Il led WPS si accenderà (indica che il WPS è
iniziato)
3
TELE System
Entro 2 minuti premere il pulsante WPS del client che si vuol far connettere alla rete wifi generata da P-Link
WiFi
Una volta concluso il processo di accoppiamento (sia che il processo vada a buon fine oppure no) il LED WPS si
spegnerà.
•
4.2 Pulsante Security
Anche il pulsante Security ha diverse funzioni a seconda del tempo di pressione del tasto. La sua funzione principale è di
proteggere lo scambio dati tra diversi dipositivi powerline introducendo una codifica sui dati trasmessi. Premendo tale
pulsante tra 1 e 3 secondi circa permetterà a P-Link WiFi di connettersi alla rete powerline già esistente (il LED PWR
lampeggerà durante tale processo). Se invece il pulsante viene premuto tra 5 ed 8 secondi permetterà a P-Link WiFi di
generare una password casuale, facendolo cosi abbandonare la rete powerline esistente (i LED PLC e PWR
lampeggeranno 3 volte). Se invece il tasto viene premuto tra 10 e 15 secondi allora le impostazioni della parte powerline
di P-Link WiFi verranno ripristinate alle condizioni di fabbrica ((i LED PLC e PWR lampeggeranno).
5 Descrizione del dispositivo
Per P-Link 0.3 WiFi kit (cod. prodotto 23500059):
Il kit contiene 2 dispositivi: 1 P-Link WiFi e 1 P-Link 0.2.
Per P-Link WiFi (cod. prodotto 23500060):
La confezione contiene un solo dispositivo, 1 P-Link WiFi.
Descrizione di P-Link 0.2 (solo per P-Link 0.3 WiFi kit)
P-link 0.2 è un dispositivo powerline ad alte prestazioni (fino a 500 Mbps) che consente di trasmettere dati attraverso il
sistema elettrico della propria casa. Non è un dispositivo che può funzionare da solo, prevede l’utilizzo di un altro
dispositivo almeno (un trasmettitore di dati e un ricevitore). Per questo kit, P-Link 0.2 deve essere collegato al proprio
modem/router attraverso un cavo ethernet (fungendo da trasmettitore) mentre P-Link WiFi funge da ricevitore, cioè
riceve i dati trasmessi da P-Link 0.2. Per avere maggiori dettagli sull’utilizzo della powerline P-Link 0.2, si consiglia di
leggere il manuale presente nel sito: http://www.telesystem-world.com/plink02.
Descrizione di P-Link WiFi
P-Link WiFi è un dispositivo powerline in grado di generare anche una rete WiFi. Può essere utilizzato singolarmente
senza altri dispositivi powerline (sfruttando solo le caratteristiche WiFi) ma anche accoppiato ad altri dispositivi powerline
P-Link 0.2.
Se utilizzato in una rete di uno o più dispositivi powerline P-Link WiFi può essere utilizzato come ricevitore, cioè riceve i
dati inviati da altri dispositivi powerline P-Link 0.2 e può smistarli in 2 modi:
•
al dispositivo connesso via cavo ethernet (questo può essere utile per quei dispositivi non dotati di scheda
wireless, come per esempio TV o ricevitori digitali)!
•
utilizzando una rete wireless: di default P-Link WiFi genera una rete wireless e può far accedere ad internet i
dispositivi connessi alla rete wifi da lui generata.!
Se utilizzato singolarmente allora P-Link WiFi deve essere collegato via cavo ethernet al proprio modem/router ADSL ed
è in grado di generare una rete WiFi per dare accesso internet ai client che saranno connessi alla rete wifi generata dal
dispositivo stesso.
6 Installazione
Nel ringraziarla per l’acquisto del nostro prodotto, la invitiamo a leggere attentamente le seguenti istruzioni, prima di
mettere in funzione l’apparecchio. Solo così si potrà ottenere il funzionamento ottimale mantenendo inalterate nel tempo
le caratteristiche di affidabilità originali. Suggeriamo inoltre di conservare questa guida in previsione di eventuali
consultazioni future.
P-Link WiFi può essere usato in 2 diverse modalità:
1. in accoppiata ad altri dispositivi powerline (P-Link 0.2)
2. singolarmente, connettendo P-Link WiFi al proprio modem/router ADSL.
Il modo di utilizzo in accoppiata ad altri dispositivi powerline è pensato per utenti che vogliano creare una rete powerline
ad alta velocità per estendere la propria connessione ad internet senza bisogno di cablare casa ma semplicemente
utilizzando il sistema elettrico. Il modo di utilizzo senza altri dispositivi powerline è pensato per chi vuole connettere PLink WiFi al proprio modem/router ADSL via cavo ethernet e generare una rete wireless per far accedere ad internet i
client wireless connessi a tale rete.
Di seguito potete trovare maggiori dettagli di installazione per le due modalità di utilizzo.
6.1 Utilizzo con altri dispositivi powerline
Questo utilizzo è pensato per un utente che abbia acquistato P-Link 0.3 WiFi kit oppure per un utente che abbia già
presente nella sua rete domestica dei dispositivi powerline P-Link 0.2.
Nella confezione P-Link 0.3 WiFi kit l’utente troverà un dispositivo P-Link WiFi (identificabile facilmente grazie alla
presenza delle antenne esterne) e un P-Link 0.2.!
6.1.1 Configurare una rete tra P-Link WiFi e P-Link 0.2
Nel caso in cui l’utente abbia acquistato un P-link 0.3 WiFi kit, i passi da seguire per la configurazione sono:
•
Connettere P-Link 0.2 al proprio modem/router attraverso il cavo ethernet in dotazione (basta connettere una
estremità del cavo ethernet alla porta ethernet del modem/router e l’altra estremità alla porta ethernet di P-Link
0.2). Saltare questo passaggio se si ha già una rete di P-Link 0.2 funzionante nella propria rete domestica.
4
!
P-Link WiFi / P-Link 0.3 WiFi Kit
Connettere P-Link 0.2 alla presa di corrente (si ricorda di evitare se possibile le prese multiple ma di utilizzare
solo prese a muro per avere una migliore velocità di trasmissione dati). Saltare questo passaggio se si ha già
una rete di P-Link 0.2 funzionante nella propria rete domestica.
•
Connettere P-Link WiFi ad una qualsiasi presa elettrica. Si ricorda che P-Link WiFi riceve i dati trasmessi da PLink 0.2 ed è in grado di smistare questi dati via porta ethernet (dando cosi accesso a internet al dispositivo
collegato a tale porta) e anche di generare una rete WiFi (in modo da dare accesso ad internet a tutti i client
connessi a tale rete WiFi
A questo punto la rete tra P-Link 0.2 e P-Link WiFi è perfettamente funzionante. Per maggiori dettagli sulla
configurazione di P-Link WiFi si rimanda al capitolo 6 e 7.
NOTA
La rete wifi generata da P-Link WiFi non è inizialmente protetta da password. Si consiglia di configurare P-Link WiFi
abilitando una protezione sulla rete wifi per evitare accessi non autorizzati alla propria rete domestica. Maggiori dettagli
su come effettuare questa modifica sono riportati nel capitolo 7.
•
6.1.2 Aggiungere P-Link WiFi ad una rete esistente di P-Link 0.2
Nel caso in cui l’utente abbia acquistato P-Link WiFi (quindi con un singolo P-Link WiFi in confezione) e volesse
aggiungere P-Link WiFi ad una rete powerline già esistente composta da 2 o più dispositivi P-Link 0.2, i passi da
eseguire sono i seguenti:
Se la rete powerline non è criptata (cioè l’utente non ha mai premuto il pulsante security sui dispositivi P-Link 0.2):
•
Semplicemente connettere P-Link WiFi ad una delle prese a muro (nello stesso impianto elettrico). Cosi
facendo P-Link WiFi sarà già operativo e sarà possibile usare la rete wifi generata da P-Link WiFi.
Se la rete powerline è criptata (cioè l’utente ha premuto il pulsante security su tutti i dispositivi P-Link 0.2 della rete):
•
Connettere P-Link WiFi ad una delle prese a muro (nello stesso impianto elettrico)
•
Premere il pulsante security su tutti i dispositivi P-Link 0.2 e sul P-Link WiFi (entro 2 minuti). In questo modo la
rete tra le powerline rimarrà criptata e P-Link WiFi si aggiungere ad essa.
NOTA
La rete wifi generata da P-Link WiFi non è inizialmente protetta da password. Si consiglia di configurare P-Link WiFi
abilitando una protezione sulla rete wifi per evitare accessi non autorizzati alla propria rete domestica. Maggiori dettagli
su come effettuare questa modifica sono riportati nella sezione Impostazioni Avanzate.
NOTA
Si ricorda che la il numero massimo di dispositivi che possono essere installati in una stessa rete powerline è 8, cioè un
trasmettitore (il dispositivo connesso al modem/router) e fino a 7 ricevitori.
!
6.2 Utilizzo di P-Link WiFi senza altri dispositivi powerline
Nel caso in cui l’utente abbia acquistato P-Link WiFi (quindi con un singolo P-Link WiFi in confezione) e voglia utilizzare
il dispositivo per generare una rete WiFi, i passi da eseguire sono i seguenti:
•
Connettere P-Link WiFi al proprio modem/router ADSL attraverso il cavo ethernet fornito nella confezione
•
Connettere P-Link WiFi ad una delle prese a muro. Cosi facendo P-Link WiFi sarà già operativo e sarà possibile
usare la rete wifi generata da P-Link WiFi. Il nome di default della rete è TELESystem-XXXX dove XXXX sono
le ultime 4 cifre del MAC address. Il MAC address del dispositivo è riportato sul retro del dispositivo stesso.
NOTA
La rete wifi generata da P-Link WiFi non è inizialmente protetta da password. Si consiglia di configurare P-Link WiFi
abilitando una protezione sulla rete wifi per evitare accessi non autorizzati alla propria rete domestica. Maggiori dettagli
su come effettuare questa modifica sono riportati nella sezione Impostazioni Avanzate.
NOTA
Si ricorda che la il numero massimo di dispositivi che possono essere installati in una stessa rete powerline è 8, cioè un
trasmettitore (il dispositivo connesso al modem/router) e fino a 7 ricevitori.
7 Connessione a P-Link WiFi
Una volta seguita la procedura di installazione presente nel precedente capitolo (in modo da far dialogare P-Link WiFi
con gli altri dispositivi P-Link 0.2 presenti nella propria rete domestica), l’utente può scegliere se configuare o meno
alcuni aspetti del dispositivo. Per fare questo P-Link WiFi offre una interfaccia grafica completa e di semplice utilizzo. In
questa sezione viene spiegato come accedere all’interfaccia grafica del dispositivo. Verrà spiegata la procedura per
computer con Windows XP o Windows Vista/7. Per iniziare connettere P-Link WiFi al proprio computer attraverso il cavo
ethernet in dotazione. L’interfaccia grafica di P-Link WiFi è raggiungibile all’indirizzo 192.168.8.1 ma prima bisogna
cambiare l’indirizzo IP della scheda di rete LAN del proprio PC in modo che rientri nella stesso segmento di rete, cioè
bisogna assegnare un indirizzo IP del tipo: 192.168.8.XXX (nel nostro caso assegneremo 192.168.8.2 al PC). Per
assegnare questo indirizzo IP al proprio PC, fare quanto segue:
Windows XP
•
•
•
•
Andare su Start->Pannello di Controllo->Reti e Connessioni
internet -> Connessioni di Rete
Selezionare la rete locale LAN, cliccare con il tasto destro
del mouse e selezionare Proprietà
Sulla scheda Generale selezionare Protocollo Internet
(TCP/IP) e cliccare su Proprietà subito sotto
Prendere nota dei valori riportati in modo da poter
Windows Vista/7
•
•
•
Cliccare su Start -> Pannello di controllo -> Reti e Internet
(in vista per Categoria) -> Centro Connessioni di Rete e
Condivisioni
Sotto Visualizza Reti Attive è presente la connessione LAN.
Sotto Tipo di accesso, cliccare su Connessione altra rete
locale (LAN) e dopo su Proprietà
Ora selezionare Protocollo Internet di versione 4
5
TELE System
ripristinare il PC alla fine di questa procedura
Selezionare Utilizza il Seguente indirizzo IP e impostare i
campi nel seguente modo:
indirizzo IP: 192.168.8.2
Subnet Mask: 255.255.255.0
Gateway predefinito: <vuoto>
Server DNS preferito: <vuoto>
Server DNS alternativo: <vuoto>
•
•
(TCP/IPv4) e poi cliccare Proprietà subito sotto
Selezionare Utilizza il seguente indirizzo IP e impostare i
campi nel seguente modo:
indirizzo IP: 192.168.8.2
Subnet Mask: 255.255.255.0
Gateway predefinito: <vuoto>
Server DNS preferito: <vuoto>
Server DNS alternativo: <vuoto>
A questo punto il computer è settato in modo da poter accedere all’interfaccia grafica di P-Link WiFi. Per fare questo
basta digitare in un qualsiasi browser (come ad esempio Google Chrome, Firefox, Safari, Opera, Internet Explorer)
l’indirizzo: http://192.168.8.1. A questo punto dovrebbe aprirsi una finestra di autenticazione per inserimento di
username e password. L’username e password di default sono rispettivamente admin e 1234. Nella sezione successiva
viene spiegata in dettaglio l’interfaccia grafica e le possibilità di configurazione di P-Link WiFi.
NOTA
Se si dovessero incontrare problemi nell’accedere all’interfaccia grafica o per avere maggiori dettagli riguardo la
procedura qui descritta, si prega di visitare il sito: http://www.telesystem-world.com/plinkwifi. Qui sono presenti
procedure dettagliate per sistemi operativi windows (XP, Vista, 7 e 8) e Mac OS.
ATTENZIONE
Una volta terminata la configurazione di P-Link WiFi, si ricorda che per navigare correttamente è necessario ripristinare
le impostazioni di rete originarie (di solito Ottieni automaticamente Indirizzo IP).
8 Interfaccia Grafica di P-Link WiFi
Questa sezione spiega all’utente le varie funzionalità e le possibilità di configurazione presenti nell’interfaccia grafica di
P-Link WiFi. Il menu dell’interfaccia grafica è composto a sinistra da una barra di navigazione divisa in diverse sezioni:
Home, Impostazioni Base, Impostazioni WPS, Impostazioni Avanzate, Sicurezza, Filtraggio MAC, Utilità di Sistema,
Strumenti di Configurazione, Aggiornamento e Reset. Nell’angolo in alto a destra è possibile scegliere la lingua dei vari
menu: le possibili scelte sono Inglese e Italiano.
Di seguito sono presentate maggiori informazioni sulle funzionalità delle sezioni dell’interfaccia grafica.
8.1 Home
Questa sezione è utile per controllare lo stato del dispositivo. Qui è possibile controllare lo stato della rete wifi come
anche vedere i client connessi e le proprietà LAN del dispositivo.
8.2 Impostazioni di Base
Questa sezione permette di effettuare alcune modifiche di base sulla rete wifi generata da P-Link WiFi. Qui è possibile
modificare la banda utilizzata (selezionare il protocollo tra 802.11b/g/n o misti), modificare il nome della rete wifi, il
numero di canale e i client connessi alla rete wifi.
NOTA
Si ricorda che la rete wifi di default generata da P-Link WiFi ha il nome composto cosi: TELESystem-XXXX dove XXXX
sono le ultime 4 cifre del MAC address. Il MAC address del dispositivo è riportato sia nella sezione Home dell’interfaccia
grafica che sul retro del dispositivo stesso.
8.3 Impostazioni WPS
Questa sezione riguarda le impostazioni WPS di P-Link WiFi. Il WPS (WiFi Protected Setup) è uno standard di
configurazione “automatica” per reti wifi che permette la connessione di dispositivi senza bisogno di digitare password di
protezione. In questa sezione è possibile attivare il WPS sulla rete 2.4 GHz, cambiare modalità di configurazione del
WPS (registrar o enrollee) o iniziare la procedura WPS (usando PBC o PIN).
Riguardo la modalità di configurazione WPS ci sono due possibilità:
•
Registrar: in questa modalità il dispositivo è in grado di rilasciare e revocare le credenziali di rete
•
Enrollee: in questa modalità il dispositivo vuole connettersi ad una rete wifi
Tipicamente P-Link WiFi, agendo come access point di default ha abilitato il WPS registrar. Cosi facendo sarà possibile
usare il WPS per connettere altri dispositivi alla rete generata da P-Link WiFi.
La procedura WPS può iniziare in 2 modi:
•
Usando PBC (Push-Button Configuration): in questa modalità basta premere il pulsante WPS di P-Link WiFi e,
entro 2 minuti, premere il pulsante WPS del secondo dispositivo.
•
Usando il PIN: in questa modalità basta riportare il PIN (generato dal secondo dispositivo) nell’apposito campo
e premere il pulsante Start PIN. Si consiglia di utilizzare la modalità PBC in quanto più semplice da utilizzare.
Per secondo dispositivo si intende un altro dispositivo come tablet o PC che vuole connettersi alla rete generata da PLink WiFi.
8.4 Impostazioni Avanzate
In questa sezione sono presenti dei parametri che possono fortemente influire sulle prestazioni di P-Link WiFi. Si
consiglia di non modificare tali impostazioni a patto di non essere a conoscenza dell’impatto che tale modifica può avere
sul dispositivo.
I parametri che possono essere modificati sono i seguenti:
•
Fragment threshold: lunghezza massima dei pacchetti inviati
•
RTS threshold: soglia alla quale viene usato il protocollo RTS/CTS
•
Beacon Interval: indica la frequenza del pacchetto “beacon”, utilizzato dal router per sincronizzare la rete wifi
6
!
P-Link WiFi / P-Link 0.3 WiFi Kit
•
•
•
•
•
•
•
DTIM Period: intervallo di DTIM (Delivery Traffic Indication Message)
Data Rate: velocità di trasmissione
N Data Rate: serve a cambiare la modulazione e/o lo schema di codifica per il protocollo N
Channel Width: Larghezza di canale
Preamble Type: permette al ricevitore di acquisire il segnale wireless e di sincronizzarsi con il trasmettitore
Broadcast ESSID: permette di “distribuire” il nome della rete ai dispositivi che lo richiedono
WMM: estensione wifi che permette di dare priorità a determinati tipi di pacchetti dati (come per esempio a
Voice Over IP) rispetto agli altri tipi di dati
CTS Protect: abilitare questa opzione permette in evitare collisioni in una rete con molti client
Potenza Trasmissione: potenza di trasmissione del segnale wifi
•
•
NOTA
Se l’utente non è sicuro dell’effetto che la modifica di tali valori può creare sul comportamento del dispositivo, si consiglia
di non modificare i valori di default dei parametri. Nel caso in cui si modifichino tali valori e si voglia tornare alle
impostazioni originarie del dispositivo, vi invitiamo ad eseguire un reset di fabbrica (la procedura è spiegata più avanti
nella sezione 7.8).
8.5 Sicurezza
In questa sezione è possibile modificare il tipo di protezione della password, il tipo di cifratura e il formato della chiave.
NOTA
Si ricorda che la rete wifi di default generata da P-Link WiFi non è protetta. Si consiglia di accedere subito a questa
sezione della pagina di configurazione in modo da abilitare una protezione.
8.6 Filtraggio MAC
In questa sezione è possibile introdurre in una tabella fino a 20 voci di MAC address. La tabella serve a limitare la
connessione alla rete wifi a solo quei dispositivi che hanno il MAC address incluso nella tabella stessa. Per abilitare la
tabella basta cliccare su Abilita il controllo degli accessi wireless.
8.7 Utilità di Sistema
In questa sezione è possibile cambiare la password di accesso al dispositivo (si ricorda che la password di default è
1234). Nel caso in cui si dovesse perdere la nuova password è sempre possibile effettuare un reset di fabbrica (come
spiegato nella sezione Strumenti di Configurazione). Inoltre è possibile cambiare l’indirizzo di default del dispositivo
(cioè 192.168.8.1) e le impostazioni di server DHCP.
8.8 Strumenti di Configurazione
Qui è possibile salvare le impostazioni correnti del dispositivo (le impostazioni verranno salvate nel proprio computer in
un file del tipo “config.bin”), caricare un file di impostazioni precedentemente salvato ed effettuare un reset di fabbrica. Il
reset di fabbrica può essere anche effettuato, come spiegato nella sezione 4.1, premendo (e tenendo premuto per circa
10-15 secondi) il pulsante WPS/Reset presente sul dispositivo.
8.9 Aggiornamento
In questa sezione è possibile aggiornare il software del dispositivo. Verificare periodicamente sul sito web TELE System
http://www.telesystem-world.com la presenza di nuovi software per il proprio dispositivo.!
8.10 Reset
Questa sezione permette di effettuare un riavvio forzato del dispositivo.
NOTA
Nel malaugurato caso in cui si dovessero riscontrare dei malfunzionamenti di P-Link WiFi, prima di contattare
l’assistenza si consiglia di effettuare un riavvio forzato. Se questo non dovesse essere risolutivo, suggeriamo inoltre di
effettuare il ripristino delle impostazioni di fabbrica del dispositivo e di ripetere la procedura di installazione.
TELE System Electronic Srl comunica, che a seguito di eventuali modifiche software e/o hardware aventi
l’obiettivo di migliorare il prodotto, si potrebbero evidenziare incongruenze tra il contenuto di questo manuale
ed il prodotto in possesso.
!
!
!
7
TELE System
!
9 Specifiche Tecniche
Powerline
Sicurezza:
Velocità PLC:
Standard:
Modulazione:
Banda:
Consumo max:
Rete:
128 bit AES
fino a 500 Mbps (PHY)
IEEE1901 e HomePlug AV, IEEE 802.3/802.3u
4096/1024/256/64/16/8-QAM, QPSK, BPSK and ROBO
2MHz~68MHz
2.5 W
fino a 8 dispositivi powerline
WiFi
Antenne:
2 antenne esterne
Frequenza:
2.4 GHz
Velocità WiFi:
fino a 300 Mbps
Protezione:
64/128-bit WEP, WPA, WPA2
Standard:
IEEE 802.11n, IEEE 802.11g, IEEE 802.11b, IEEE 802.3, IEEE 802.3u, 802.3ab IEEE802.3x
WPS:
versione 2.0 (solo password di tipo WPA2-PSK (AES))
Consumo max (powerline + wifi): 4.5 W
Generali
Temperatura di utilizzo:
Temperatura di stoccaggio:
Umidità Relativa:
Materiale case:
Colore case:
Alimentazione:
8
!
0 – 45 °C
-25 – 65 °C
5 – 95 %
plastica
bianco
100-240V-50/60 Hz
!
!
!
Codice Prodotto: 23500059 – P-Link 0.3 WiFi Kit
Codice prodotto 23500060 - P-Link WiFi
Tele System Electronic dichiara sotto la propria responsabilità che questo
prodotto soddisfa i requisiti fondamentali delle direttive europee
2004/108/CE (EMC - Electromagnetic Compatibility) , 2006/95/CE (LVD Low Voltage Directive).
ITALY
TELE System Electronic Srl
Via dell’Artigianato, 35
36050 Bressanvido (VI)
Internet: www.telesystem*world.com
Tel. assistenza clienti: 199 214 455
Rev00 del 21/12/12
!
!
!
!
!
!
!
!
!
!
!
!
!
!
!
!
1
!
!
!
!
!
P-Link WiFi / P-Link 0.3 WiFi Kit
!
!
!
1 Index
1
Index .............................................................................................................................. 1
2
Safety Regulation ......................................................................................................... 2
3
Contents inside product box....................................................................................... 3
4
LED indicators .............................................................................................................. 3
4.1
4.2
WPS/Reset button ...............................................................................................................3
Security button....................................................................................................................4
5
Product Description ..................................................................................................... 4
6
Installation .................................................................................................................... 4
6.1 Usage of P-Link WiFi with other powerline devices ........................................................4
6.1.1 Configuring a network between P-Link WiFi and P-Link 0.2 ..........................................4
6.1.2 Adding P-Link WiFi to an existent P-Link 0.2 network ....................................................5
6.2 Usage of P-Link WiFi without any other powerline device .............................................5
7
8
Connection to P-Link WiFi........................................................................................... 5
Web interface of P-Link WiFi ....................................................................................... 6
8.1
8.2
8.3
8.4
8.5
8.6
8.7
8.8
8.9
8.10
9
Home ....................................................................................................................................6
Basic Settings .....................................................................................................................6
WPS Setting.........................................................................................................................6
Advanced Settings..............................................................................................................6
Security ................................................................................................................................6
MAC filtering........................................................................................................................7
System Utility ......................................................................................................................7
Configuration Tools ............................................................................................................7
Upgrade ...............................................................................................................................7
Reset ..................................................................................................................................7
Technical Specifications ............................................................................................. 8
1
TELE System
2 Safety Regulation
We advise you to read the following advice concerning the safety regulations carefully in order to ensure safe use of the
appliance.
ELECTRICAL SUPPLY
The appliance should only be supplied by a current of 100-240 Volt AC, 50/60 Hz.
The appliance must not be repaired in any way by the user, in case of breakages or failures please refer to the nearest
center for assistance. Do not remove the cover. The inside of the appliance could contain higher voltages than that of
the supply voltage which could endanger the user. High voltage is also present when the appliance is on standby. The
device should be disconnected from the electrical supply before performing any intervention. Non-authorised removal
will mean that the warranty is no longer valid!
LIQUIDS
Keep the appliance far from any liquids. Do not place any objects containing liquids on the appliance, such as vases,
humidifiers etc. The appliance must not be installed in areas where it could come into contact with sprays or drops of
water or in an environment with a high level of humidity where condensation could occur.
If the device should accidentally come into contact with liquids, disconnect immediately from the wall. DO NOT TOUCH
the device until it has been disconnected.
SMALL OBJECTS
Keep the device away from coins or other small objects. Objects which fall into the appliance via the ventilation gaps
could cause serious damage.
CLEANING
Before cleaning, disconnect the device from the power supply. To clean the outside of the device use a soft and dry or
slightly damp cloth. Avoid using products which contain chemicals or solvents.
VENTILATION
Make sure that the area where the appliance is to be installed has good air circulation so that the heat can be dissipate
well in order to avoid overheating. In order to allow enough ventilation it is necessary to have a distance of at least 10
cm on either side of the appliance and 15cm above the appliance.
The vents must be kept clear from any obstructions such as newspapers, table cloths, furnature material, curtains,
carpets etc. Avoid installing the receiver close to any heat sources (i.e. radiators, stoves etc) or on top of any other
appliances which omit heat (video players, DVD etc).
WARNING!!!
Keep the appliance out of reach of children. The plastic bags used for packaging can be dangerous. To avoid suffocating
keep the bags out of reach of children. Do not expose the receiver or remote control to direct sunlight. The appliance
must be placed on a solid and stable base.
Connect the device to the power supply only after installation is complete. Remove the batteries from the
remote control if they will not be used for a long period of time. The remote control could be damaged by
any eventual battery leakages.
Dispose of the product correctly so as to avoid damage to the environment and human health as well as
to facilitate recycling of the components/materials used in the appliance. If the product is not disposed of
properly this could be punishable according to the involved law. The manufacturers recommend that the
parts are recycled seperately and are taken to sites which conform to current regulations.
2
!
P-Link WiFi / P-Link 0.3 WiFi Kit
3 Contents inside product box
Please check that all the items listed below are inside the product box. If any items is missing or damaged, contact the
store which sells the product. We recommend you to keep the original box in case you need to send the device to
assistance.
For P-Link WiFi (product code 23500060):
Name
Quantity
Description
P-Link WiFi
1
Powerline with Wi-Fi features
User Manual
1
User Manual
LAN Cable
1
Cable to be used for Ethernet connection
Warranty
1
Warranty card
For P-Link 0.3 WiFi kit (product code 23500059):
Name
P-Link WiFi
P-Link 0.2
User Manual
LAN Cable
Warranty
Quantity
1
1
1
2
1
Description
Powerline with Wi-Fi features
Powerline
User Manual
Cables to be used for Ethernet connection
Warranty card
4 LED indicators
P-Link Wi-Fi
WLAN: activity indicator for WiFi network
WPS: indicator for WPS status (the LED is on if WPS
pairing is on-going)
3. LAN: indicator for LAN status (off is ethernet cable
disconnected, blinking if data are transmitted)
4. PLC: powerline activity indicator
5. PWR: on if the device is switched on, off otherwise
6. WPS/Reset: WPS/Reset button
7. Ethernet: ethernet port for ethernet cable connection
8. Security: security button for encrypting powerline
network
9. Plug: to be inserted in power socket
10. Antennas: 2 external antennas for WiFi
P-Link 0.2 (this can be found only in the kit version)
1.
2.
1.
2.
3.
4.
5.
6.
LAN: indicator for LAN status (off is ethernet cable
disconnected, blinking if data are transmitted)
PLC: powerline activity indicator
PWR: on if the device is switched on, off otherwise
Security: security button for encrypting powerline
network
Ethernet: ethernet port for ethernet cable connection
Plug: to be inserted in power socket
4.1 WPS/Reset button
WPS/Reset button has several features with regards to the holding time of the button itself. If the button is pressed and
hold on for more than 10 seconds, then a factory reset is performed, that is the wifi part of the device is restored to its
factory settings. If the button is pressed and hold on for 1-2 seconds, then the WPS pairing process is started. The WPS
(WiFi Protected Setup) is a protocol that allows the connection of 2 devices using a wifi network without the need to digit
any wifi network password. For P-Link WiFi, the WPS could be useful for connecting a wifi client to P-Link WiFi. In order
to start the WPS procedure, please follow the procedure here below:
•
Press WPS button on P-Link WiFi for about 1 second. WPS LED will switch on (WPS procedure is started)
3
TELE System
Within 2 minutes press WPS client button (or start WPS via software on the device you want to connect to WiFi
network of P-Link WiFi)
Please consider that the WPS LED will go off when the WPS procedure will be completed (both in case of success
or fail).
•
4.2 Security button
Also Security button has different features with regards to the holding time of the button itself. The main function is to
protect data exchange among the powerline devices by adding an encryption. By pressing and holding the button from 1
to 3 seconds, P-Link WiFi will connect to the existent powerline network (of P-Link 0.2). If the button is pressed and
holded from 5 to 8 seconds, P-Link WiFi will generate a random password for encrypting the powerline network and i twill
leave the existing powerlne network (of P-Link 0.2). If the button is holded from 10 and 15 seconds, then a factory reset
is performed, that is the powerline part of the device is restored to its factory settings.
5 Product Description
For P-Link 0.3 WiFi kit (prod. code: 23500059):
The kit consists in 2 devices: 1 P-Link WiFi and 1 P-Link 0.2.
For P-Link 0.3 WiFi (prod. code: 23500060):
The product box consists in 1 device only: P-Link WiFi.
Usage of P-Link 0.2 (for P-Link 0.3 WiFi kit only):
P-Link 0.2 is an high-performance powerline device (up to 500 Mbps (PHY)) that allows the user to send data by using
the electrical system. This device can only work by coupling it with at least another device (a transmitter and a receiver).
In this kit P-Link 0.2 should be used as the transmitter (by connecting it to your broadband modem/router via ethernet
cable) while P-Link WiFi works as a receiver, that is it receives the data sent by P-Link 0.2. You can find the complete
User Manual of P-Link 0.2 here: http://www.telesystem-world.com/plink02.
Usage of P-Link WiFi:
P-Link WiFi is a powerline device with also wireless features.It can generate a wifi network and it can be used both with
and without any other powerline device (by using only its wireless features).
If it is used inside a P-Link 0.2 network, P-Link WiFi can receive the data sent by the P-Link 0.2 transmitter and then in
can send these data packets in 2 different ways:
•
to the device connected via ethernet cable to P-Link WiFi (like TV, digital decoders, game consoles and so on)
•
by using its wireless network: P-Link WiFi generates its own wireless network and it can send the received data
to all the wireless client connected to its network
P-Link WiFi can be used without the need to have any other powerline devices. By using the product in this way, P-Link
WiFi must be connected via ethernet to your broadband modem/router and it can generate a wireless network and
share internet with all the wireless active clients.
6 Installation
Please read carefully the following instructions before using the device. Only in this way the device can be used properly.
We recommend to keep this user guide as reference.
P-Link WiFi can be used in two different ways:
1. within a network of P-Link 0.2 devices
2. without the need of any other powerline device
The first usage can help the user to extend your own network by using powerline devices while the second usage is
mainly oriented to the wireless capabilities of P-Link WiFi. In next sections you can find more details on the usage of PLink WiFi.
6.1 Usage of P-Link WiFi with other powerline devices
You can use P-Link WiFi with other powerline devices if you have P-Link 0.3 WiFi Kit or if you already had a P-Link 0.2
powerline network inside your home network.
6.1.1 Configuring a network between P-Link WiFi and P-Link 0.2
If the user purchased P-Link 0.3 WiFi kit, he will find into the product box both a P-Link WiFi device (you can easily
recognize it thanks to the external antennas) and a P-Link 0.2 powerline. With those 2 devices it is possible to extend
your own local network in the following way:
•
Connect P-Link 0.2 to your modem/router by using the ethernet cable in the product box.
•
Connect P-Link 0.2 to a power socket (please avoid to use multiple power socket because this can strongly
affect the speed rate for transmission).
•
Connect P-Link WiFi to another power socket. P-Link WiFi will receive the data transmitted from the P-Link 0.2
device attached to the modem/router and it can send the received data using both ethernet port (in order to give
internet access to a device which has only ethernet interface) and its WiFi network (in order to give internet
access to all the clients connected to that WiFi network).
Now the network between P-Link 0.2 and P-Link WiFi is working. For any further detail about the configuration of P-Link
WiFi please see chapter 6 and 7.
NOTE
4
!
P-Link WiFi / P-Link 0.3 WiFi Kit
The WiFi network generated from P-Link WiFi by default is not protected with any password. We strongly reccomend you
to conigure P-Link WiFi by adding a WiFi password. By doing so the user can prevent unauthorized access to his own
home network. You can find more details about how to perform such change in chapter 7.
6.1.2 Adding P-Link WiFi to an existent P-Link 0.2 network
If the user purchased P-Link WiFi (so in the product box you can find a single P-Link WiFi) and/or he wants to add P-Link
WiFi to an existent network with 1 or more P-Link 0.2 devices, please follow the procedure below:
If the powerline network is not encrypted (that is if the user never pressed Security button on the P-Link 0.2 devices):
•
Simply connect P-Link WiFi to a power socket (in the same electrical system). In this way P-Link WiFi will be
completely working and it will be possible using the wifi network generated by P-Link WiFi.
If the powerline network is encrypted (that is the user pressed Security button on all the P-Link 0.2 devices inside the
network):
•
Connect P-Link WiFi to a power socket (in the same electrical system).
•
Press Security button on all P-Link 0.2 devices inside the network and on P-Link WiFi (within 2 minutes). In this
way the powerline network will be encrypted and P-Link WiFi will be added to that network.
NOTE
The WiFi network generated from P-Link WiFi by default is not protected with any password. We strongly reccomend you
to conigure P-Link WiFi by adding a WiFi password. By doing so the user can prevent unauthorized access to his own
home network. You can find more details about how to perform such change in chapter 7.
NOTA
Please remember that the maximum number of nodes supported by the powerline network is 8, that is 1 powerline
transmitter (the one connected to the modem/router) and 7 powerline receivers.
6.2 Usage of P-Link WiFi without any other powerline device
If the user purchased P-Link WiFi (so in the product box you can find a single P-Link WiFi) and/or he wants to use the
device in order to generate a WiFi network, please follow the procedure below:
•
Connect P-Link WiFi to your broadband modem/router by using the ethernet cable
•
Connect P-Link WiFi to a power socket
Now the device is fully operative and you can use the wireless network generated by P-Link WiFi. Please notice that the
default name of the WiFi network is TELESystem-XXXX where XXXX represents the last 4 digits of MAC address of the
device. You can find the MAC address of the device on the back of the product itself.
7 Connection to P-Link WiFi
Once finished the installation procedure explained in previous chapter, the user can choose if configuring some features
of P-Link WiFi device. In order to do this, P-Link WiFi has a complete web interface. In this section we will explain how to
access to the web interface of the device. As a reference we will report the procedure for Windows XP, Windows Vista
and 7. Please connect the P-Link WiFi to your own PC by using the ethernet cable. You can find the web interface of PLink WiFi at the address 192.168.8.1 but you need to change the IP address of your PC in order to have the same
network segment of P-Link WiFi, that is you need to assign a static IP address as the following: 192.168.8.XXX (we will
assign to the PC the following IP address: 192.168.8.2). The procedure is the following:
Windows XP
•
•
•
•
•
Go to Start->Control Panel->Network and Internet
Connection -> Network Connections
Select LAN network, click with right mouse key and select
Properties
On General tab select Internet Protocol (TCP/IP) and click
on Properties button below
Write down the values in order to restore that values once
this procedure is completed.
Select Use the following IP address and use those values:
IP address: 192.168.8.2
Subnet Mask: 255.255.255.0
Default Gateway: <empty>
Preferred DNS Server: <empty>
Alternate DNS Server: <empty>
Windows Vista/7
•
•
•
•
•
Go to Start -> Control Panel -> Network and Internet (in
view for Categories) -> Network and Sharing Center
On “View your active network” you can find Local Area
Connection. Click on it and then on Properties
Now select Internet Protocol version 4 (TCP/IPv4) and then
click on Properties button below.
Write down the values in order to restore that values once
this procedure is completed.
Select Use the following IP address and use those values:
IP address: 192.168.8.2
Subnet Mask: 255.255.255.0
Default Gateway: <empty>
Preferred DNS Server: <empty>
Alternate DNS Server: <empty>
Now your PC is configured in order to have access to the web interface of P-Link WiFi. You only need to open your
browser (Google Chrome, Firefox, Safari, Opera or Internet Explorer) and digit the following address: http://192.168.8.1.
A popup window should appear and username and password will be asked. Default username and password are the
following: admin and 1234. Next section will give you more details on the features of P-Link WiFi you can configure.
NOTE
If you face any issue in accessing the web interface or only for having more details about the procedure described above
you can visit this website: http://www.telesystem-world.com/plinkwifi. Here you can find more detailed procedures for
operating system such as windows (XP, Vista, 7 e 8) and Mac OS.
ATTENTION
Once finished the configuration of P-Link WiFi, the user must restore the original settings of the local network in his own
PC for using internet (usually Obtain an IP address automatically).
5
TELE System
8 Web interface of P-Link WiFi
This chapter can help the user to understand the features of P-Link WiFi and the chance of configurations via web
interface. The interface consists in a navigation bar with the following sections: Home, Basic Settings , WPS Setting,
Advanced Settings, Security, MAC filtering, System Utility, Configuration Tool, Upgrade, Reset.
8.1 Home
This section is useful to check the device status. You can check the status of the wifi network, see active clients and LAN
properties.
8.2 Basic Settings
In this section the user can choose the basic settings of the wifi network of P-Link WiFi. You can change the band
(protocol 802.11b/g/n or mixed), change WiFi network name and channel number. You can also see the active clients by
clicking the button “Show Active Clients”.
NOTE
The default name for WiFi network generated by P-Link WiFi is this one: TELESystem-XXXX where XXXX represents
the last 4 digits of MAC address. You can find the MAC address of the device in section Home but also on the back
panel of the product itself.
8.3 WPS Setting
This section contains information about WPS (WiFi Protected Setup). It is a standard that allows an automatic
configuration for wifi networks, that is a device which use WPS can connect to a wifi network without the need to digit the
password for that network. In this section you can choose if disable or enable the WPS feature, change the configuration
mode of WPS (registrar or enrollee) or start the WPS procedure (by using PBC or PIN method).
Concerning the configuration mode of WPS, there are two chances:
•
Registrar: in this mode the device can issue or revoke credentials to a network
•
Enrollee: in questa mode the device seeks to join a network
Usually P-Link WiFi, working as an access point, need to work as WPS registrar. In this way you can use WPS for
connecting clients to the WiFi network generated by P-Link WiFi.
WPS procedure can start in 2 different ways:
•
Using PBC (Push-Button Configuration): you need only to press WPS button of P-Link WiFi and then press,
within 2 minutes, the WPS button on the device you need to connect to the WiFi network.
•
Using PIN: you need to share the PIN from the device to P-Link WiFi and then press Start PIN button. We
suggest to use PBC mode because it is more fast and simple.
8.4 Advanced Settings
This section allows the change of parameters that can strongly influence the performances of the WiFi network
generated by P-Link WiFi. Only experienced user with a techincal knowledge about wireless network should change
those parameters.
The parameters are the following:
•
Fragment threshold: max length of sent packages
•
RTS threshold: threshold for using protocol RTS/CTS
•
Beacon Interval: frequency interval of “beacon” package, used by the user for syncing WiFi network
•
DTIM Period: DTIM (Delivery Traffic Indication Message) period
•
Data Rate: data rate in Mbps
•
N Data Rate: change modulation for N protocol
•
Channel Width: width of channel
•
Preamble Type: it allows the receiver to “lock” wireless signal and sync with the transmitter
•
Broadcast ESSID: the name of the network is shared with the devices that ask for it
•
WMM: wifi extension that can increase priority for some kind of data (like Voice Over IP) with regards to other
data packages
•
CTS Protect: enable this feature can help in avoiding collisions in a network with several clients
•
TX power: wifi signal transmission power
NOTE
If the user does not know for sure the effects that the change of these parameteres can have on the behaviour of the
device we strongly reccommend TO NOT CHANGE the default values. If the user change these values and wants to
come back to the default values it is always possible to perform a factory reset (please see section 7.8).
8.5 Security
In this section you can change the protection of WiFi network, the encryption type and the format of the password.
NOTE
The WiFi network generated by default is open, that is not protected with any password. We reccomend to change the
protection in this section of the web interface.
6
!
P-Link WiFi / P-Link 0.3 WiFi Kit
8.6 MAC filtering
In this section you can enter up to 20 entries in the table of MAC addresses. This table is useful if you want to restrict the
access of the wifi network to the only clients that have their MAC addresses listed in the table. If you want to enable MAC
filtering just click on the box Enable Wireless Access Control.
8.7 System Utility
In this section you can change several parameters such as the password for accessing the web interface (the default
password is 1234), the default IP address and subnet mask of the device (by default 192.168.8.1 / 255.255.255.0) and
the settings for DHCP server. If the user change the password for accessing the web interface and he loses the new
password, it is always possible to perform a factory reset (see section 7.8) in order to reset the password to the default
one (1234).
8.8 Configuration Tools
In this section you can save the wifi settings of the device (the setting will be stored in a file named “config.bin”), load the
settings previously stored and perform a factory reset. The factory reset can be performed also as explained in section
4.1, that is by pressing (and holding for about 10-15 seconds) WPS/Reset button on the P-Link WiFi.
8.9 Upgrade
In this section you canupgrade the software of the device. We suggest to check periodically TELE System website (
http://www.telesystem-world.com ) for new software upgrades for your device.!
8.10 Reset
This section allows you to perform a reset. For reset we do not mean factory reset but a forced reboot of the device.
NOTE
If you are experiencing strange behaviours of the device, before contacting customer service we suggest to perform a
reset (forced reboot). If this is not enough please try to perform a factory reset and repeat the installation procedure from
the beginning.
TELE System Electronic Srl informs that, because of hardware/software changes due to device improvements,
there should be differences between the contents of this user manual and the product itself.
!
!
!
7
TELE System
!
9 Technical Specifications
Powerline
Security:
PLC speed:
Standards:
Modulation:
Band:
Power Consumption:
Network:
128 bit AES
up to 500 Mbps (PHY)
IEEE1901 and HomePlug AV, IEEE 802.3/802.3u
4096/1024/256/64/16/8-QAM, QPSK, BPSK and ROBO
2MHz~68MHz
max 2.5 W
up to 8 powerline
WiFi
Antennas:
Frequency:
WiFi speed:
Protection:
Standards:
WPS:
Power Consumption:
2 external antennas
2.4 GHz
up to 300 Mbps
64/128-bit WEP, WPA, WPA2
IEEE 802.11n, IEEE 802.11g, IEEE 802.11b, IEEE 802.3, IEEE 802.3u, 802.3ab IEEE802.3x
version 2.0 (only WPA2-PSK (AES) password)
max 4.5 W (powerline + wifi)
Generali
Temperature:
Temperature:
Humidity:
Case material:
Case color:
Input voltage:
0 – 45 °C (operative)
-25 – 65 °C (storage)
5 – 95 %
plastic
bianco
100-240V-50/60 Hz
8
!
!
!
!
Product Code: 23500059 – P-Link 0.3 WiFi Kit
Product Code: 23500060 – P-Link WiFi
TELE System Electronic states that this product meets the basic
European requirements of 2004/108/EC (EMC - Electromagnetic
Compatibility) and 2006/95/EC (LVD - Low Voltage Directive).
ITALY
TELE System Electronic Srl
Via dell’Artigianato, 35
36050 Bressanvido (VI)
Internet: www.telesystem*world.com
Rev00 del 21/12/12
!
!
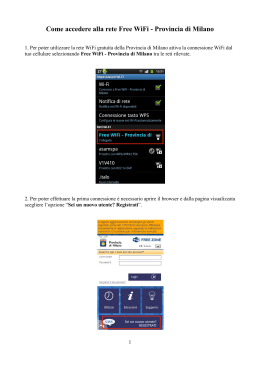
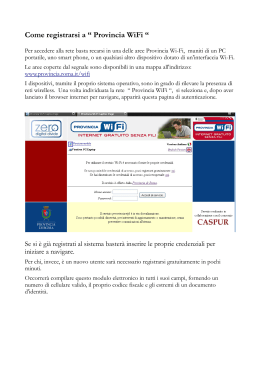
Scaricare