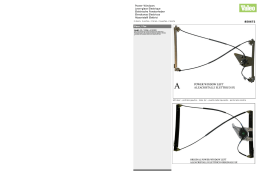
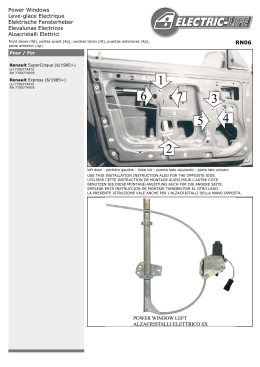
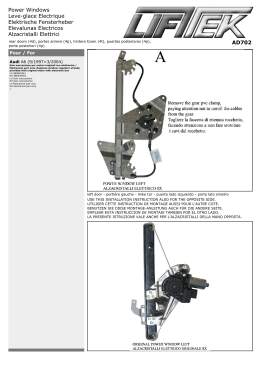
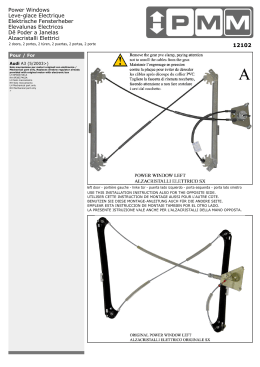
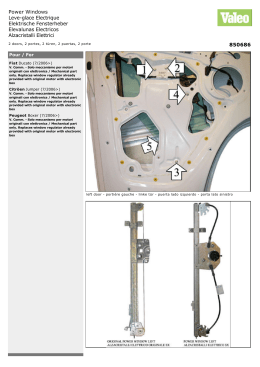
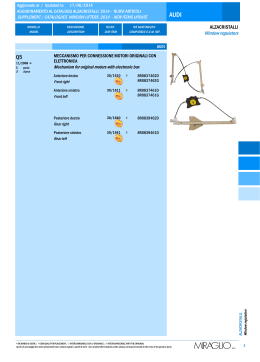
Power Windows
Leve-glace Electrique
Elektrische Fensterheber
Elevalunas Electricos
Alzacristalli Elettrici
front doors (4d), portes avant (4p), vordere türen (4t), puertas anteriores (4p),
porte anteriori (4p)
850674
Pour / For
Audi
Audi A4 (11/1994>9/2001)
Solo meccanismo per motori originali con elettronica /
Mechanical part only. Replaces window regulator already
provided with original motor with electronic box
>
left door - portière gauche - linke tür - puerta lado izquierdo - porta lato sinistro
AD707
15-06-2007
ENGLISH
ENGLISH
USE THIS INSTALLATION INSTRUCTION ALSO FOR THE OPPOSITE SIDE.
A) Remove door trim. Remove the inside door trim, complete with glass and window regulator. Unclamp the glass from the
window regulator to replace. Detach the window regulator from the panel.
B) Fix the two power window rails onto the panel into the original positions 1, 2, 3 and 4 and the motor plate into positions 5
and 6 with the rivets supplied. Lower the window onto the window plates and block it onto positions 10 and 11.
C) Re-mount the inside panel, complete with glass and window regulator into the door. Remove the pvc gear clamp (photo A).
D) Insert the motor plate into positions 7, 8 and 9 and secure it with the three screws supplied.
E) Wire as per wiring diagram. Check correct window operation before re-installing door trim.
F) PLEASE NOTE! To re-establish the auto function on the replacement regulator, turn the ignition on and operate the window
switch to close the window.
ENGLISH
FRANÇAIS
FRANÇAIS
UTILISER CETTE INSTRUCTION DE MONTAGE AUSSI POUR L'AUTRE COTE.
A) Demonter le panneau. Demonter le panneau interieur de la porte, complete avec glace et leve-vitre. Debloquer la vitre du
leve-vitre a remplacer. Detacher le leve-vitre du panneau.
B) Fixer les deux guides du leve-vitre electrique sur le panneau aux points 1, 2, 3 et 4 et la plaque du moteur aux points 5 et
6 avec les rivets fournis. Faire descendre la vitre sur le support de la vitre et le bloquer sur les points 10 et 11.
C) Remonter le panneau interieur complete avec glace et leve-vitre dans la porte. Demonter l'engranage en Pvc (photo A).
D) Inserer le moteur sur les points 7, 8 et 9 et le fixer avec les trois vis fournis.
E) Effectuer les liaisons electriques. Verifier le fonctionnement de la vitre avant de remonter le panneau.
F) ATTENTION! Apres avoir pose la piece de rechange, la fermeture et l'ouverture automatique ne fonctionnent pas. Pour
retablir cette fonction veuillez suivre le manuel d'usage de la voiture.
FRANÇAIS
DEUTSCH
DEUTSCH
BENUTZEN SIE DIESE MONTAGE-ANLEITUNG AUCH FÜR DIE ANDERE SEITE.
A) Demontieren Sie die Türverkleidung. Entfernen Sie das Tür-Innen-Paneel, komplett mit Glas und Fensterheber. Lösen Sie
das Glas aus dem Fensterheber zu ersetzen. Entfernen Sie das Fensterheber aus dem Paneel.
B) Befestigen Sie die zwei Führungsschienen an den Punkten 1, 2, 3 und 4 und die Motor-Platte an den Punkten 5 und 6 mit
den beigefügten Nieten. Setzen Sie die Seitenscheibe in den Klemmbacken des Fensterhebers ein und befestigen Sie die
Seitenscheibe in den Punkten 10 und 11.
C) Bauen Sie das Tür-Innen-Paneel, komplett mit Glas und Fensterheber, in der Tür wieder ein. Entfernen Sie die PVC Binder
am Fensterhebergetriebe (Abb. A).
D) Setzen Sie den Motor an den Punkten 7, 8 und 9 ein und befestigen Sie ihn mit den drei beigefügten Schrauben.
E) Verlegen Sie die elektrische Verkabelung. Vor der endgültigen Montage der Türverkleidung überprüfen Sie die einwandfreie
Funktion des elektrischen Fensterhebers.
F) ACHTUNG! Sollte, nach dem Einbau des Fensterhebers, das automatische Öffnen und Schliessen nicht funktionieren, folgen
Sie das Verwendung-Handbuch des Fahrzeugs.
DEUTSCH
ESPAÑOL
ESPAÑOL
EMPLEAR ESTA INSTRUCCION DE MONTAJE TAMBIEN POR EL OTRO LADO.
A) Desmontar el panel de la puerta. Sacar el panel interior, completo de vidrio y elevalunas. Desbloquear el vidrio de el
elevalunas a sustituir. Desprender el elevalunas de el panel.
B) Fijar las dos guias del elevalunas electrico en el panel en los puntos n° 1, 2, 3 y 4 y la placa del motor en los puntos n° 5 y
6 con los remaches suministrados. Hacer descender el cristal y sujetarlo en los puntos nº 10 y 11.
C) Remontar el panel interior, completo de vidrio y elevalunas en la puerta. Desmontar la banda de PVC (foto A).
D) Introducir el motor en los puntos 7, 8 y 9 y fijarlo con los tres tornillos suministrados.
E) Efectuar las conexiones eléctricas. Verificar el funcionamiento antes de montar el panel de la puerta.
F) ATENCION! Despues del montaje del elevalunas, las lunas habran perdido la funcion de automatismo, “Comfort”. Para
restablecer esta funcion, seguir el folleto de las instrucciones del coche.
ESPAÑOL
ITALIANO
ITALIANO
LA PRESENTE ISTRUZIONE VALE ANCHE PER L'ALZACRISTALLI DELLA MANO OPPOSTA.
A) Smontare il pannello portiera. Togliere il pannello interno porta, completo di vetro e alzacristalli. Sbloccare il vetro
dall’alzacristalli da sostituire. Staccare l’alzacristalli dal pannello.
B) Fissare le due guide dell’alzacristalli elettrico sul pannello nei punti n° 1, 2, 3 e 4 e la piastra motore nei punti n° 5 e 6
mediante i rivetti forniti. Far scendere il vetro nelle piastre cristallo e bloccarlo nei punti n° 10 e 11.
C) Rimontare il pannello interno completo di vetro e alzacristalli in portiera. Togliere la fascetta di ritenuta rocchetto (foto A).
D) Inserire il motore nei punti n° 7, 8 e 9 fissandolo con le tre viti in dotazione.
E) Eseguire i collegamenti elettrici. Controllare il funzionamento dei cristalli prima di rimontare il pannello portiera.
F) ATTENZIONE! Dopo che l'alzacristalli ricambio è stato installato, la chiusura ed apertura automatica NON FUNZIONA. Per
ripristinare tale funzione utilizzare le istruzioni del manuale d’uso vettura.
Scaricare