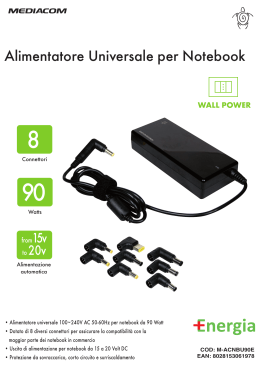
ART. 13/430
ELCART
servizio automatico documentazione tecnica
PAGINA 1 DI 2
MANUALE DI ISTRUZIONI
ART. 13/430
ISTRUZIONI OPERATIVE
Si prega di leggere attentamente queste istruzioni per un
uso
appropriato e sicuro.
ZIONI
RATIVE
OPERATIVE
OPERATIVE
4. Accendete l’apparecchio USB.
5. Nota bene: La spia LED si accenderà e rimarrà accesa
solo se impostata su di un qualsiasi voltaggio.
amente
eleggere
attentamente
queste
attentamente
istruzioni
queste queste
istruzioni
per unistruzioni
uso
per appropriato
un uso
per un
appropriato
uso
e sicuro.
appropriato
e sicuro.
e sicuro.
A. Connessione al computer Notebook
1. Potete connettere il vostro computer a questo alimentatore AVVERTENZE:
collegando ad esso la spina staccabile di cui è corredato. 1. Non provocate un cortocircuito sui terminali di uscita.
ssione
onnessione
e al computer
al computer
al computer
Notebook
Notebook
2. Assicuratevi
che laNotebook
polarità
sia quella giusta. Si prega 2. Assicuratevi che venga utilizzato il corretto voltaggio,
ostro
tere
connettere
ilcomputer
vostro
il
computer
vostro
a
questo
computer
a
alimentatore
questo
a
questo
alimentatore
alimentatore
collegando
ad esso
collegando
ad
la esso
spina
ad
esso
spinadato
lastaccabile
spina
diche
cuistaccabile
èundi voltaggio
cui è di cuicontinuo
è
di notare che la polaritàcollegando
dell’adattatore
piccolo
èlastaccabile
in eccesso potrebbe
ato.
preimpostata come positiva alla punta.
danneggiare il vostro computer Notebook.
che
olarità
ratevi
la polarità
che
sia quella
la polarità
sia giusta.
quella
sia Si
giusta.
quella
prega
giusta.
Sidiprega
notare
Si di
prega
che
notare
la
di polarità
che
notare
la polarità
che
dell’adattatore
la polarità
dell’adattatore
dell’adattatore
piccolo
piccolo
è di usare
piccolo
è questo
è alimentatore con apparecchi
3. Non
tentate
ositiva
come
ostatapositiva
alla
come
punta.
positiva
alla
punta.
alla
punta. notebook ha una polarità positiva
Quanto
il vostro
computer
che richiedano un intensità di corrente superiore a 8,5
alla punta, dovete collegare la spina piccola dell’adattatore
AMP per 12-16V; a 7,7 AMP per 18V; a 7,25 AMP per
er
computer
vostro
notebook
computer
notebook
hatale
una
notebook
ha
polarità
ha
polarità
positiva
una
polarità
positiva
alla‘+’punta,
alla dovete
punta,
alla
punta,
dovete
collegare
collegare
la spina
collegare
lapiccola
spinala
in
modo
che
iluna
simbolo
positivo
sipositiva
trovi
sullo
stesso
latodovete
18,5-19V;
a piccola
7spina
AMP piccola
per 19,5-20V; a 6,5 AMP per 22V ed
ale
modo
ore che
in della
tale
modo
il simbolo
che
tale
il simbolo
che
positivo
ilpresente
simbolo
positivo
‘+’ si sull’estremità
trovi
positivo
‘+’ si
sullo
trovi
‘+’stesso
sisullo
lato
stesso
sullo
stesso
latoscritta
della
lato‘TIP’
scritta
della
‘TIP’
scritta
presente
‘TIP’
scritta
‘TIP’
deltrovi
cavo.
Ildella
simbolo
a 6presente
AMP
per
24V presente
(144 Watt max).
cavo.
simbolo
ità delIl‘+’
cavo.
simbolo
‘+’indica
indica
Il simbolo
‘+’
che
indica
‘+’
il foro
che
indica
centrale
il foro
che
centrale
ha
iluna
foro
una
centrale
polarità
ha una
ha
polarità
positiva.
una polarità
positiva.positiva.
che
il foro
centrale
ha
polarità
positiva.
4. Non tentate di aprire questo dispositivo.
5. Scollegatelo dalla rete elettrica quando non è in uso.
6. Se il cavo dell’alimentatore è danneggiato, il dispositivo
deve essere restituito al produttore o ad un suo agente
per la sostituzione del cavo. Questo alimentatore deve
avere la messa a terra.
itàpolarità
della polarità
della della
spina piccola
spina piccola
estremità
estremità
del cavo
estremità
del cavo
del cavo
spina piccola
a positiva
punta positiva
punta positiva
dell-adattatore
dell-adattatore
dell-adattatore
3. Spostate il selettore del voltaggio cc sulla posizione
ate
ettore
el voltaggio
il selettore
del desiderata.
voltaggio
CD
delsulla
voltaggio
CD
posizione
sulla
CD
posizione
sulla
desiderata.
posizione
desiderata.
(addesiderata.
es.a(ad
12V/14V/15V/16V
es. (ad
12V/14V/15V/16V
a 8,5A; a18V
8,5A;
a a18V
8,5A;
a 18V a
(ad
es.
12V/14V/15V/16V
8,5A;
18Ves.
a 12V/14V/15V/16V
18,5V/19V
9V
25A;a 19,5V/20V
7,25A;
a 7,25A;
19,5V/20V
a 7A;
19,5V/20V
22V
a 7A;
6,5A
22V
a 7A;
oppure
a19,5V/20V
6,5A
22V aoppure
24V
6,5A
oppure
6A)
24V
prima
a 6A)
24V
diprima
acollegarlo
6A) diprima
collegarlo
aldivostro
collegarlo
al vostro
al vostro
7,7A;
18,5V/19V
aa7,25A;
aa 7A;
22V
a 6,5A
Potete
ebook.
ter notebook.
trovare
Potete
l’indicazione
trovare
Potete
l’indicazione
del
l’indicazione
voltaggio
del
voltaggio
richiesto
del voltaggio
richiesto
sul
vostro
richiesto
suladattatore
vostro
sul adattatore
vostro
CA originale
adattatore
CA originale
o CA originale
o
o
oppure
24Vtrovare
a 6A)
prima
di collegarlo
al
vostro
computer
(VI
PREGHIAMO
(VI
PREGHIAMO
(VI
PREGHIAMO
DI
NOTARE
DI
NOTARE
CHE
DI
NOTARE
UNA
CHE
ERRATA
UNA
CHE
ERRATA
UNA
ERRATA
ale
rno
manuale
dell’utente
del manuale
dell’utente
del
dell’utente
computer.
del
computer.
del
computer.
notebook. Potete trovare l’indicazione del voltaggio
ONE
STAZIONE
L VOLTAGGIO
DEL VOLTAGGIO
DEL NON
VOLTAGGIO
NON
IN GRADO
ÈNON
IN GRADO
ÈDIIN
ALIMENTARE
GRADO
DI ALIMENTARE
DI
ALIMENTARE
IL VOSTRO
IL VOSTRO
COMPUTER
IL VOSTRO
COMPUTER
COMPUTER
richiesto
sul È
vostro
adattatore
CA
originale
o all’interno
BOOK
REBBE
E POTREBBE
E DANNEGGIARLO.
POTREBBE
DANNEGGIARLO.
DANNEGGIARLO.
SE NON
SIETE
NON
SE SIETE
SICURI,
NON
SIETE
SICURI,
NONSICURI,
PROVATE
NON PROVATE
NON
MAI
PROVATE
A MAI AMAI A
del
manuale
dell’utente
del SE
computer.
(VI
PREGHIAMO
EGARLO
OSTRO
O AL VOSTRO
COMPUTER.
AL
COMPUTER.
CONTATTATE
COMPUTER.
CONTATTATE
CONTATTATE
UN RIVENDITORE
UN RIVENDITORE
UN RIVENDITORE
LOCALE!!!).
LOCALE!!!).
DI VOSTRO
NOTARE
CHE UNA
ERRATA
IMPOSTAZIONE
DEL LOCALE!!!).
ricamento
ratevi
he il caricamento
che totale
il
caricamento
non
totale
ecceda
non
totale
ecceda
la
tensione
non
ecceda
la
tensione
d’uscita
la
tensione
d’uscita
stimata
d’uscita
stimata
dell’alimentatore.
stimata
dell’alimentatore.
dell’alimentatore.
VOLTAGGIO NON È IN GRADO DI ALIMENTARE IL
ma
ate
etto
ilprima
cavetto
elettrico
ilVOSTRO
cavetto
elettrico
all’alimentatore
elettrico
all’alimentatore
all’alimentatore
e inserite
e inserite
solo successivamente
e inserite
solo Esuccessivamente
solo successivamente
la spinalaCA
spina
nella
laCA
spina
presa
nella
CA
presa
nella presa
COMPUTER
NOTEBOOK
POTREBBE
o.
si
iaLa
accenderà
LED
spia
si LED
accenderà
immediatamente.
si accenderà
immediatamente.
immediatamente.
DANNEGGIARLO.
SE NON SIETE SICURI, NON
dete
r.omputer.
il computer.
PROVATE MAI A COLLEGARLO AL VOSTRO
ED
ene:
spia
si La
accenderà
LED
spia
si LED
accenderà
e si
rimarrà
accenderà
e rimarrà
accesa
e rimarrà
accesa
solo seaccesa
solo
impostata
se solo
impostata
susediimpostata
unsu
qualsiasi
di unsuqualsiasi
voltaggio.
di un qualsiasi
voltaggio.
voltaggio.
COMPUTER.
CONTATTATE
UN
RIVENDITORE
LOCALE!!!).
nessione
one
d unad
apparecchio
unad
apparecchio
un apparecchio
4.
Assicuratevi
che il carico totale non ecceda la tensione
gare
vostro
collegare
il vostro
apparecchio
il
vostro
apparecchio
con
USB questo
con
USB questo
con
alimentatore
questo
alimentatore
(ad
alimentatore
es.(adserie
es.
(adiPod
serie
es. iPod
serie iPod
d’uscita apparecchio
stimataUSB
dell’alimentatore.
Mp4/PDA/DV/DC/
C/
A/DV/DC/
apparecchi
apparecchi
per
apparecchi
giochi
per
portatili
giochi
per
portatili
….
giochi
Ecc.)
portatili
….
mentre
Ecc.)
….
mentre
state
Ecc.)
caricando
mentre
state
caricando
state
il
vostro
caricando
il
Notebook
vostro
il
Notebook
vostro
Notebook
5. Collegate prima il cavetto elettrico all’alimentatore e
ndo
oa si
inesso
trova
modalità
siininserite
trova
modalità
standby.
insolo
modalità
standby.
standby.
successivamente
la spina CA nella presa a
aggio
dalla
’uscitaporta
d’uscita
dalla
USB
porta
dalla
USB
porta
questo
diUSB
questo
alimentatore
di questo
alimentatore
è
alimentatore
di 5VCD
è di 500mA.
5VCD
è di 5VCD
500mA.
Assicuratevi
500mA.
Assicuratevi
che
Assicuratevi
il che il che il
muro.
Ladispia
LED
si accenderà
immediatamente.
la
tensione
la tensione
d’uscita
la tensione
d’uscita
stimatad’uscita
stimata
dell’alimentatore.
stimata
dell’alimentatore.
dell’alimentatore.
mento
otale
n ecceda
non
totale
non ecceda
6. ecceda
Accendete
il computer.
ma
ate
etto
ilprima
cavetto
elettrico
cavetto
elettrico
all’alimentatore
elettrico
all’alimentatore
all’alimentatore
e LED
inserite
inserite
solo successivamente
e inserite
solo
solo successivamente
la spinalaCA
spina
nella
laCA
spina
presa
nella
CA
presa
nella presa
7. ilNota
bene:
La spia
sieaccenderà
e successivamente
rimarrà
accesa
o.
si
iaLa
accenderà
LED
spia
si LED
accenderà
immediatamente.
si
immediatamente.
immediatamente.
solo
seaccenderà
impostata
su di un qualsiasi voltaggio.
dete
pparecchio
hio USB.
l’apparecchio
USB. USB.
ED
ene:
spia
si La
accenderà
LED
spia
si LED
accenderà
e si
rimarrà
accenderà
e rimarrà
accesa
e rimarrà
accesa
solo seaccesa
solo
impostata
se solo
impostata
susediimpostata
unsu
qualsiasi
di unsuqualsiasi
voltaggio.
di un qualsiasi
voltaggio.
voltaggio.
B. Connessione ad un apparecchio USB
1. Potete collegare il vostro apparecchio USB con questo
alimentatore (ad es. serie iPod /Mp3/Mp4/PDA/DV/DC/
MADE IN CHINA
apparecchi per giochi portatili …. Ecc.) mentre state
NZE:
caricando il vostro Notebook o quando esso si trova in
etocircuito
ovocate
un cortocircuito
un
sui
cortocircuito
terminali
suistandby.
terminali
di sui
uscita.
terminali
di uscita.
di uscita.
modalità
ga
ratevi
heutilizzato
venga
che
il corretto
utilizzato
il d’uscita
corretto
voltaggio,
il corretto
voltaggio,
dato
voltaggio,
che
dato
un di
voltaggio
che
dato
un che
voltaggio
continuo
un voltaggio
continuo
in eccesso
continuo
in eccesso
potrebbe
in eccesso
potrebbe
potrebbe
2. utilizzato
Ilvenga
voltaggio
dalla
porta
USB
questo
alimentatore
ggiare
lcomputer
vostroil computer
vostro
Notebook.
Notebook.
Notebook.
è di computer
5Vcc
500mA.
Assicuratevi che il carico totale non
questo
ntate
usaredialimentatore
questo
usare
questo
alimentatore
alimentatore
apparecchi
con
apparecchi
con
che
apparecchi
richiedano
che
richiedano
che
un intensità
richiedano
un intensità
di corrente
un intensità
di corrente
superiore
di corrente
superiore
superiore
ecceda
lacon
tensione
d’uscita
stimata
dell’alimentatore.
aAMP
7,25
AMP
a 7,25
perAMP
aelettrico
18,5-19V;
7,25per
AMP
18,5-19V;
aper
7 AMP
18,5-19V;
a per
7 AMP
19,5-20V;
a 7per
AMP
19,5-20V;
aper
6,519,5-20V;
AMP
a 6,5 AMP
a 6,5 AMP
AMP
V;
r 12-16V;
a 7,7
per
AMP
12-16V;
aCollegate
7,7
per
AMP
a18V;
7,7prima
per
18V;
18V;
3.
ilper
cavetto
all’alimentatore
e
per
6
V AMP
ed
24V
a per
6(144
AMP
24V
Watt
per
(144
24V
max).
Watt
(144
max).
Watt max). la spina CA nella presa a
inserite
solo
successivamente
questo
ntate
apriredidispositivo.
questo
aprire
questo
dispositivo.
dispositivo.
muro.
La spia
LED si accenderà immediatamente.
dalla
e
gatelo
elettrica
rete
dalla
elettrica
quando
rete elettrica
quando
non è in
quando
non
uso.è innon
uso.
è in uso.
ELCART
DISTRIBUTION
via Michelangelo
Buonarroti,
46osuo
-ad
20093
Cologno
avo
tatore
l’alimentatore
dell’alimentatore
è
danneggiato,
è danneggiato,
èil danneggiato,
dispositivo
il dispositivo
deve
ilSPA
dispositivo
essere
deve
restituito
essere
deve essere
restituito
al produttore
restituito
al produttore
oaladproduttore
un
uno suo
ad
un suo Monzese (Milano) ITALY
eione
sostituzione
per del
la Tel.
sostituzione
cavo.
delQuesto
cavo.
delQuesto
alimentatore
cavo. Questo
alimentatore
deve
alimentatore
avere
develaavere
messa
develaavere
amessa
terra.
la messa
a terra.
terra.
++39(0)2/25.11.73.10
Fax
++39(0)2/25.11.76.10
sito ainternet:
www.elcart.com e-mail: [email protected]
La divulgazione dei dati contenuti in questa scheda è da ritenersi un servizio puramente informativo e nonSMP-150WUSB
costituisce alcun
vincoloSMP-150WUSB
da parte della Elcart in merito a prestazioni ed utilizzo del prodotto.
SMP-150WUSB
ART. 13/430
ELCART
servizio automatico documentazione tecnica
PAGINA 2 DI 2
INSTRUCTION MANUAL
ART. 13/430
OPERATING INSTRUCTIONS
For proper and safe operations, please read these
instructions carefully before use
4. Switch on your USB device.
5. Please note: The LED indicator will come on and stay on
only when set on any voltage.
TRUCTIONS
ONS A. Connection with Notebook computer
CAUTION:
NG INSTRUCTIONS
tions,
e operations,
please
please
these
readinstructions
these
instructions
carefully
carefully
beforewith
use.
before
1. Youread
can
connect
your notebook
computer
this use.
power 1. Do not short circuit the output terminals.
and safe operations, please read these instructions carefully before use.
supply by connecting the detachable adaptor plug.
2. Ensure correct voltage is used as continuous excess
2. Ensure
correct computer
polarity. Please note that the polarity of
voltage could damage your notebook computer.
on
h
Notebook
with
Notebook
computer
nection the
with
Notebook
computer
small
adaptor
plugs
issupply
presetby
with
the
tip the3.
Doadaptor
not try
to use this power supply with appliance
ect
notebook
your notebook
computer
computer
with thiswith
power
this
power
supply
connecting
by positive
connecting
the detachable
detachable
adaptor
n connectpolarity
your notebook computer with this power supply by connectingrequiring
the detachable
adaptor
more than
8.5Amp for 12-16V; 7.7Amp for 18V;
7.25Amp
for 18.5-19V; 7Amp for 19.5-20V; 6.5Amp for
y.
t polarity.
Please note
Please
thatnote
the that
polarity
the polarity
of the small
of theadaptor
small adaptor
plugs isplugs
presetiswith
preset
the
with
positive
the positive
e correctWhen
polarity.
notecomputers
that the polarity
the small
preset
thefor
positive
yourPlease
notebook
are withofpositive
tip adaptor
polarity,plugs is22V
andwith
6Amp
24V (144 watts max.)
arity. please connect the small adaptor plug in such a manner that 4. Do not attempt to open this unit.
the
symbol
‘+’ appears
in front
of the
‘TIP’
5. Remove
when not in use.
ook
puters
computers
are positive
withare
positive
with
positive
tip polarity,
tip polarity,
please
connect
please
connect
themarking
small
the
adaptor
small adaptor
plug
in such
plug in
afrom
suchmains
a
notebookthe
computers
are The
with ‘+’
positive
tip polarity,the
please
connectisthe 6.
small
adaptor
plug
in such
a power supply is damaged, the
cable
end.
center
If the
supply
cord
of this
positive
symbolon
symbol
‘+’ appears
‘+’ appears
in
front in
of front
thesymbol
marking
of themeans
marking
‘TIP’ on‘TIP’
the
cable
on hole
theend.
cable
The
end.
‘+’
The
symbol
‘+’ symbol
at the positive
symbol
‘+’ appears in front of the marking ‘TIP’ on the cable
end.
The should
‘+’ symbol
with
positive
pole
power
supply
be
returned to the manufacturer or
with
holepositive
is with positive
pole. pole.
center hole is with positive pole.
his agent for the cord to be replaced. This power supply
must be earthed.
oltage
electorselector
at the desired
at the desired
voltage voltage
position.position.
(ie. 12V/14V/15V/16V
(ie. 12V/14V/15V/16V
at 8.5A;at18V
8.5A;
at 7.7A;
18V at 7.7A;
e DC voltage selector at the desired voltage position. (ie. 12V/14V/15V/16V at 8.5A; 18V at 7.7A;
Set
the
selector
atbefore
voltage
19.5V/20V
7.25A; 3.
19.5V/20V
at 7A;
22V
atDC
7A;
at voltage
6.5A
22V at
or 6.5A
24V
at
or 6A)
24V
atthe
6A)desired
you
before
connect
you
connect
it to yourit notebook
to your notebook
19V at 7.25A; 19.5V/20V at 7A; 22V at 6.5A or 24V at 6A) before you connect it to your notebook
position.
(ie.voltage
12V/14V/15V/16V
at original
8.5A;
18V
at in
7.7A;
ndmay
the find
required
the
required
voltage
setting
in
setting
your original
in your
AC
adaptor
AC adaptor
or
theorcomputer
in the computer
user’s user’s
ter. You may
find the required
voltage
setting at
in your
original
AC
adaptor or in the computer user’s
7.25A;
19.5V/20V
7A;
22V atCANNOT
6.5A
TE
SE THAT
NOTE 18.5V/19V
AN
THAT
INCORRECT
AN at
INCORRECT
VOLTAGE
VOLTAGE
SETTING
SETTING
CANNOT
POWERPOWER
UP YOUR
UP YOUR
l(PLEASE orNOTE
THAT
AN
INCORRECT
VOLTAGE
CANNOT POWER UP YOUR
24V
at
6A)
before
you
connect
it to COMPUTER.
yourSETTING
notebook
UTER
COMPUTER
AND CAN
ANDBE
CAN
DAMAGED
BE DAMAGED
YOUR
COMPUTER.
YOUR
IF YOUIFARE
YOUUNSURE,
ARE UNSURE,
BOOK COMPUTER
AND
CAN find
BE the
DAMAGED
YOUR
COMPUTER.
IF YOU ARE UNSURE,
computer.
You
may
required
voltage
setting
TO
NECT
CONNECT
IT WITH
ITYOUR
WITH
COMPUTER.
YOUR
COMPUTER.
CONSULT
CONSULT
WITH
YOUR
WITH
LOCAL
YOUR LOCAL
DEALER!!!).
DEALER!!!).
R TRY TO CONNECT
IT
WITH
YOUR
COMPUTER.
CONSULT
WITH
YOUR
LOCAL DEALER!!!).
original
AC the
adaptor
or
in the
computer
user’s
ading
total loading
doesinnotyour
does
exceed
not exceed
the rated
output
ratedcurrent
output
of
current
the
power
of thesupply.
power supply.
sure the total
loading(PLEASE
does not exceed
theTHAT
rated output
current of the power supply.
manual
NOTE
AN AC
INCORRECT
ower
rd to the
cordpower
to thesupply
power first
supply
andfirst
thenand
insert
thenAC
insert
plug
into
plug
yourinto
wall
your
socket.
wall socket.
The LED
The LED
ct the power
cord to theSETTING
power supply
first and
then insert
plug into your wall socket. The LED
VOLTAGE
CANNOT
POWER
UPAC
YOUR
antly.
ght instantly.
or will light NOTEBOOK
instantly.
COMPUTER AND CAN BE DAMAGED
rter.
computer.
on your computer.
YOUR
COMPUTER.
IF stay
YOU
ARE
UNSURE,
The
indicator
LED indicator
will come
willoncome
and stay
on and
on
only
on
when
only
set
when
on any
set voltage.
onNEVER
any voltage.
note: The TRY
LED indicator
will comeIT
on WITH
and stay
on only
when set on any voltage.
TO CONNECT
YOUR
COMPUTER.
CONSULT
WITH YOUR LOCAL DEALER!!!).
on
h USB
with device
USB
device
nection
withsure
USB
4.
Make
thedevice
total
loading
does
not
exceed
the rated
ect
USB
your
device
USB with
device
thiswith
power
this
supply
power
(i.e.
supply
iPod
(i.e.
series/Mp3/Mp4/PDA/DV/DC/Portable
iPod
series/Mp3/Mp4/PDA/DV/DC/Portable
n connect output
your USB
device
withpower
this power
supply (i.e. iPod series/Mp3/Mp4/PDA/DV/DC/Portable
current
of
the
supply.
…etc)
hile charging
while charging
your notebook
your notebook
or in standby
or in standby
mode. mode.
devices…etc)
while charging
your
notebook
in standby
mode.
5.of Connect
thesupply
power
cord
the or
power
supply
first
andthe
m
SBthe
port
USB
this
portpower
of this
power
issupply
5VDCto
is500mA.
5VDC
500mA.
Make
sure
Make
the
sure
total
loading
total loading
does notdoes not
tput from the
USB
portAC
of this
power
supply
is 5VDC
500mA.
then
insert
plug
into
your
wall
socket.
The Make
LED sure the total loading does not
ut
edcurrent
output of
current
the power
of thesupply.
power supply.
d the rated indicator
output current
of the
power supply.
will first
light
instantly.
ower
rd to the
cordpower
to thesupply
power
supply
and
first
thenand
insert
thenAC
insert
plugAC
intoplug
yourinto
wall
your
socket.
wall socket.
The LED
The LED
ct the power
cord on
to the
power
supply first and then insert AC plug into your wall socket. The LED
6.
Switch
your
computer.
antly.
ght instantly.
or will light
instantly.
7. Please
note: The LED indicator will come on and stay on
revice.
USB device.
on your USB
device.
only
when
set
on stay
anyand
voltage.
DThe
indicator
LED indicator
will come
willon
come
and
on
on
stay
only on
when
only
set
when
on any
set voltage.
on any voltage.
note : The LED indicator will come on and stay on only when set on any voltage.
B. Connection with USB device
1. You can connect your USB device with this power
:
supply
(i.e. iPod series/Mp3/Mp4/PDA/DV/DC/Portable
eircuit
output
theterminals.
output
terminals.
short circuit
the output
terminals.
game
devices…etc)
while charging
your notebook
or innotebook
et voltage
is used as
is used
continuous
as continuous
excess voltage
excess
voltage
could damage
could
damage
your notebook
your
computer.
computer.
e correct voltage
is used
as continuous excess voltage could damage your notebook computer.
standby
mode.
se
ower
thissupply
powerwith
supply
appliance
with appliance
requiringrequiring
more than
more
8.5Amp
than 8.5Amp
for 12-16V;
for 12-16V;
7.7Amp7.7Amp
for 18V;for 18V;
try to use
appliance
more supply
than 8.5Amp
for 12-16V; 7.7Amp for 18V;
2. this
Thepower
outputsupply
from with
the USB
port requiring
of this power
is
8.5-19V;
; 7Amp for
7Amp
19.5-20V;
for 19.5-20V;
6.5Amp6.5Amp
for 22V for
and22V
6Amp
andfor
6Amp
24V for
(144
24V
watts
(144
max.)
watts max.)
mp for 18.5-19V;
for 19.5-20V;
6.5Amp
for 22V
and 6Amp
5VDC7Amp
500mA.
Make sure
the total
loading
does for
not24V (144 watts max.)
nt to
this
open
unit.this unit.
attempt toexceed
open this
theunit.
rated output current of the power supply.
when
mains
not
when
in use.
not in use.
Connect
power
ve from 3.
mains
when the
not in
use. cord to the power supply first and
f cord
this of
power
this
supply
power supply
isAC
damaged,
is damaged,
power
the supply
power
supply
should
should
be returned
be returned
to the to the
then
plug
intothe
wall
socket.
The LED
supply cord
of insert
this power
supply
isyour
damaged,
the power
supply should be returned to the
gent
or hisforagent
theindicator
cord
for the
to be
cord
replaced.
to
be
replaced.
This
power
This
supply
power
must
supply
be
must
earthed.
be
earthed.
willthe
light
instantly.
acturer or his agent for
cord
to be replaced. This power supply mustSMP-150WUSB
be earthed.
SMP-150WUSB
MADE IN CHINA
SMP-150WUSB
this
osalproduct
ofELCART
this productDISTRIBUTION
ect Disposal
of this product
SPA via Michelangelo Buonarroti, 46 - 20093 Cologno Monzese (Milano) ITALY
++39(0)2/25.11.73.10
++39(0)2/25.11.76.10
sitoother
internet:
marking
ThisTel.
marking
indicates
indicates
that thisthat
product
this Fax
product
should
should
not be not
disposed
be disposed
with
with otherwww.elcart.com e-mail: [email protected]
This marking
indicates
thatè dathis
product
should informativo
not bee non
disposed
with
other
La divulgazione
dei dati contenuti
in questa scheda
ritenersi
un servizio puramente
costituisce alcun
vincolo
da parte della Elcart in merito a prestazioni ed utilizzo del prodotto.
ehold
household
wastes wastes
throughout
throughout
the EU.theToEU.
prevent
To prevent
possiblepossible
harm toharm
the to the
household wastes throughout the EU. To prevent possible harm to the
onment
environment
or human
or human
health from
healthuncontrolled
from uncontrolled
waste disposal,
waste disposal,
recycle recycle
it
it
environment or human health from uncontrolled waste disposal, recycle it
Scaricare