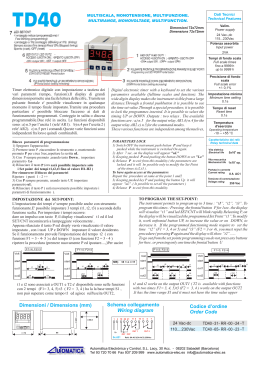
TC 40
7
MULTISCALA, MONOTENSIONE, MULTIFUNZIONE.
MULTIRANGE, MONOVOLTAGE, MULTIFUNCTION.
Dati Tecnici
Technical Features
Dimensioni 48x48mm
Dimensions 48x48mm
LED SET/CNT:
- Lampeggio veloce (programmazione) /
Fast blinking (programming);
- Lampeggio a 1hz (conteggio )/Blinking at 1Hz (timing);
- Sempre acceso (fine tempo)/Fixed ON (Stopped timing);
- Spento (reset) /OFF (reset)
24 Vac-,dc
115...230Vac
1
OUT2 / LED OUT2: 6 LED
ACCESO (USCITA ON) ; -SPENTO (USCITA OFF)
Potenza assorbita
Input power
LED OUT1/LED OUT1 :
ACCESO =USCITA ON ; -SPENTO= USCITA OFF
-ON= output ON ; OFF= output OFF)
2VA
-ON =output ON ; -OFF = output OFF
Tempi di fondo scala
Full scale times
fino a 9999 h
up to 9999 h
FRONTALE PROGRAMMAZIONE PARAMETRI E SET POINTI
2 PULSANTE
Programming and SET-POINTFrontal button
5 PULSANTE FRONTALE START/STOP/RESET
START/STOP/RESET Frontal button
4 PULSANTE FRONTALE UP (INCREMENTO IMPOSTAZIONI)
3
UP frontal button (setting increasing)
Timer elettronico digitale con impostazione a tastiera dei
vari parametri (tempo, funzioni).Il display di grandi
dimensioni permette una facile lettura delle cifre..Tramite un
pulsante frontale e' possibile visualizzare in qualunque
momento il tempo finale impostato.Tramite una procedura
particolare e' possibile bloccare l'accesso ai dati di
funzionamento programmati. Conteggio in salita o discesa
programmabile.Due relè in uscita. Le funzioni disponibili
sono : a) n.5 per l’uscita 1 (rele' AR1). b) n.4 per l’uscita 2 (
rele' AR2). c) n.5 per i comandi.Queste varie funzioni sono
indipendenti fra loro e quindi combinabili.
out1
out2
t3i
NB)
t2
t3
t3 < o = t1
t3d
44.5
OUT2
1
2
4 5
6
7
8
OUT 1
DOWN
V~
48
98
8 A AC1
Tensione di commutazione
Voltage rating
250 Vac
t2
t1
Sc.565
t1
t2
t1
t2
t3i
t3d
t3i
t3d
out2
t1 and t2 works on the output OUT1 ( t2 is available with functions
with two times F1= 3, 4, 5)
t3 (F2 = 3, 4 ) works on the output OUT2 .It has the time range S1
Schema collegamento
Wiring diagram
P
UP
Portata in corrente
Current rating
out1
t3i
9
10 11
Codice d’ordine
Order Code
12
START/STOP
U
t1
out2
t1 e t2 sono associati a OUT1 e T2 e' disponibile sono nelle funzioni
con 2 tempi (F1= 3, 4, 5)
t3 ( F2 = 3, 4 ) ha la la base tempi S1 , non può superare come tempo
OUT1
t2
out1
out2
SET
CNT
Vita meccanica
Mechanical life 1x10⁷ op.
start
t1
out1
Dimensioni / Dimensions (mm)
5x10⁵ op.
F1=3; F2=4
start
t2
t1
t3d
Vita elettrica
Electrical life
Volt
Volt
t1
Temperatura
d'esercizio
Caratteristiche dei relè
Relay technical data
F1=3; F2=3
start
t1
Tempo di reset
Reset time
0.1s
TO PROGRAM THE SET-POINT:
The instrument permits to program up to 3 time : “t1”, “t2”, “t3”. To
program this times : Pressing the frontal button P for 1sec. the
display will visualize “t1” and led SET/CNT will blink rapidly.
Releasing P, on the display will be visualized the programmed Set
Point “t1”.To modify it, work onfrontal button UP, to increase the
value or on DOWN, to decrease it. If the programmed functioning
mode require to set the time “t2” (F1 = 3, 4 or 5) and “t3” (F2 = 3
or 4), you must repet the procedure ( pressing P again and the display
will show “t2”......
To go out from the set points programming you do not press any
F1=4; F2=4
t2
t1
Impostazione minima
Minimum time setting
0.1s
-10 -- +55 °C
PARAMETERS LOCK
1) Switch OFF the instrument,push button P and keep it
pushed while the instrument is switched On again.
2) After 7 sec. on the display will appear "uL"
3) Keeping pushed P and pushing the button DOWN to set "Lo"
4) Release P to exit from this modality.( the parameters are
locked and it will be possible only to modify the Set Point
of the times ti,t2,t3 ).
To have again access at the parameters
Repeat the procedure at same at the point 1 and2
3) Keeping pushed key P and pushing the button Up it will
appear "uL" .( Is possible to set all the parameters )
4) Release P to exit from this modality.
Volt
start
Precisione di fondo
scala
Full scale error
+/- 0,1%
Operating temperature
IMPOSTAZIONE dei SET-POINT:
L'impostazione dei tempi e' sempre possibile anche con strumento
funzionante.E' possibile impostare 3 tempi (t1, t2, t3) a seconda della
funzione scelta. Per impostare i tempi occorre:
dare un impulso con tasto P, il display visualizzera' t1 ed il led
SET/CNT incomincerà a lampeggiare velocemente .
Appena rilasciato il tasto P sul disply verrà visualizzato il valore
impostato , con i tasti UP e DOWN impostare il valore desiderato.
Se il funzionamento prevede l'impostazione del tempo t2 ( con
funzioni F1 = 3 - 4- 5 ) e del tempo t3 (con funzioni F2 = 3 - 4 ) ripetere
la procedura (premere nuovamente P ed ipostare....,)Per uscire
F1=4; F2=3
PULSANTE FRONTALE DOWN (DECREMENTO IMPOSTAZIONI)
DOWN frontal button (setting decreasing)
Digital electronic timer with a keyboard to set the various
parameters available (fulltime scales and function). The
wide digits display makes the instrument visible from a large
distance.Through a frontal pushbutton it is possible to see
the time set value.Through a special procedure, it is possible
to lock the programmes inserted. It is possible to select the
timing UP or DOWN .Outputs : two relays . The available
functions are : a) n.5 for the output relay AR1.b) n.4 for the
output relay AR2.c) n.5 for the command modes.
These various functions are independent among themselves,
Blocco parametri di programmazione
1) Spegnere l'apparecchio
2) Premere tasto P ,riaccendere lo strumento e, mantenendo
premuto P per circa 5sec,aspettare la scritta uL
3) Con P sempre premuto ,usando tasto Down , impostare
parametro Lo
4) Rilasciare il tasto P (ora sarà possibile impostare solo
i Set point dei tempi t1,t2,t3 fino al valore H1-H2 )
Per rimuovere il blocco dei parametri
Ripetere i punti 1 - 2 ++
3) Con P sempre premuto, usando tasto UP, impostare parametro
uL
4) Rilasciare il tasto P ( sarà nuovamente possibile impostare i
parametri di funzionamento ).
Volt
Valim.
Power supply
OUT 2
24 Vac-dc
110....230Vac
TC40 - 65 - RR - 00 - 24 - T
TC40 - 65 - RR - 00 - 23 - T
RST CNT
Relè: 8A-AC1(3A-AC3) 250Vac
108
Automática Electrónica y Control, S.L. Lacy, 30 Acc. - 08202 Sabadell (Barcelona)
Tel 93 720 70 66 Fax 937 209 999 www.automatica-elec.es [email protected]
t1
MODELLO TC40 MODEL
PROGRAMMAZIONE PARAMETRI
PARAMETERS SETTING PROCEDURE
Durante il conteggio non è possibile entrare in programmazione dei
parametri.
Per impostare i parametri di funzionamento
- premere il tasto P per 7sec; dopo 4sec verrà visualizzato il primo parametro
"F1".
-Rilasciando il pulsante P viene visualizzato il valore impostato in F1.
-Per modificarne il valore usare i tast UP e DOWN.
Programmato il valore desiderato premere nuovamente P ed il disply visualizzarà
il parametro successivo, Premendo e rilasciando P è possibile visializzare i
parametri e i relativi valori uno dopo l’altro e ,con i pulsanti UP e DOWN,
impostare il tempo desiderato. Per uscire dalla programmazione non premere
alcun pulsante per 20sec o premere una volta il pulsante U.
F1 = Impostazione funzionamento OUT1:
1
2
3
4
5
= Ritardo all’eccitazione (relè eccitato dopo il tempo impostato)
= Eccitazione passante ( relè eccitato per il tempo impostato)
= Lavoro-Pausa ciclo continuo
= Pausa-Lavoro ciclo continuo
= Pausa-Lavoro ciclo unico
F2 = Impostazione funzionamento OUT2:
0
1
2
3
= non abilitato
= Out 2 si comporta come OUT1
= Attivo durante il conteggio
= Out 2 si comporta come OUT1 con T3 indipendente
( visualizzato sul disply “ t3i”)
During the counting is not possible to enter in the parameters programming.
To set the functioning parameters,
- to push button P and keep it pushed for 7sec. After 4 sec. the label of the first
parameter ("F1") appear.
-Now it possible to release P and it will appear the value programmed for the
parameter "F1".
- To modify this value work on the buttons UP or DOWN.
Once the desired value has been programmed, pushing again P the display will
show the label of the successive parameter. Pushing and releasing P it's possible
to visualize all the parameters labels (when P is pushed) and the relative
programming (when P is released) one after the other and with the buttons UP
and DOWN is possible to set the value. To go out from the parameters
programming you have not to push any buttons for 20sec or pressing only one
time the button U.
F1 = Out 1 working mode setting:
F1
1
2
3
4
5
F2 = Out 2 working mode setting:
F2
0 = Relay OFF
1 = OUT 2 follows the work mode of OUT 1
2 = ON during the timing
3 = Out 2 follows the work of OUT1 with time T3 absolute
(The time T3 is visualized on the disply as “ t3i”)
4 = OUT 2 follows OUT 1 with time T3 relative to T1 (in advance )
(The time T3 is visualized on the display as “t3d”))
4 = Out 2 si comporta come OUT1 con T3 dipendente da T1 (in anticipo)
visualizzato sul disply “ t3di”
S1 = Impost. fondo scala tempo T1 e T3 (solo con F1=3,4,)
= 9999 h
= 99h 59m
= 99m 59s
= 9m 59s 9/10s
1
2
3
4
S2 = Impost. fondo scala tempo T 2 (solo con F1=3,4,5)
= 9999 h
= 99h 59m
= 99m 59s
= 9m 59s 9/10s
1
2
3
4
= Delay ON
= ON Timing
= Recycler continuous cycle ; relay ON during first time
= Recycler continuous cycle ; relay ON during second time
= Temporized impulse Delay-on single cycle ; relay ON during second time
Set the full scale time T 1 and T3 (only with F2=3,4)
S1
S1
= 9999 h
= 99h 59m
= 99m 59s
= 9m 59s 9/10s
1
2
3
4
Set the full scale timeT 2 (only with F1=3,4,5)
S2
S2
= 9999 h
= 99h 59m
= 99m 59s
= 9m 59s 9/10s
1
2
3
4
H1 = Tempo max. T1
H1
H1
= Max. Time of T1
H2 = Tempo max. T 2 (solo con F1=3,4,5)
H2
H2
= Max. Time of T2 (only with function F1=3,4,5)
C = Impostazione tipo conteggio
1
2
C = Set Timing mode
C
= UP (conteggio in incremento)
= DOWN (conteggio in decremento)
b = Impostazione memoria
1
= Con memoria (in caso di black -out,il valore viene memorizzato)
2
3
= Parametro non abilitato
= Senza memoria
E = Modo funzionamento comando esterno CNT EN
{
= UP TIMING
2
=DOWN TIMING
b = Memory setting
B
1 = With memory (during the black-out,the value is memorized)
2 = Not avalable mode
3 = Without memory
= Working mode of the external command CNT EN
E
E
1 = START/STOP (Segue gli impulsi di CNT )
2
1
= Bistable START/STOP ( It follows the CNT EN pulses)
1
con “ t=1” = RESET+START/STOP( Segue gli impulsi di CNT )
2
con “t=2” = RESET/START/STOP (Segue gli impulsi di EN)
{
with “ t=1” = Bistable RESET+START/STOP (Timer follows the CNT EN pulses)
with “t=2” = Bistable RESET / START / STOP (Timer follows the CNT EN pulses )
3 = START/STOP (Segue la chiusura del comando CNT )
( il tasto frontale U disponibile solo per RESET)
3 = Monostable START / STOP ( It follows closured the CNT EN command)
( in this funtioning the frontal button U works only as RESET )
4 = RESET+START/STOP (Segue la chiusura del comando CNT)
(tasto frontale disponibile solo per RESET)
4
t = Modo funzionamento tasto frontale U : Star/stop
t
t
= Monostable RESET+START / STOP (It follows the CNT command)
( in this funtioning the frontal button U works only as RESET )
= Working mode of the frontal button U :Star/stop
1 = RESET+START/STOP
(premuto resetta il timer e fà partire il ciclo;premuto nuovamente ferma il conteggio .)
1 = RESET-START/STOP
(if pushed reset the timing and restart another cycle;
pusched again stops th etiming ,the next time reset the timer and begin a new timing)
2 = RESET/START/STOP (ad ogni pressione si ha in sequenza Reset -Start-Stop )
2 = RESET/START/STOP (At every operation there is a sequence): reset, -lstart - stop
3 = RESET(lo Start e lo Stop devono arrivare dal comando esterno CNT EN)
3 = only RESET(; start and stop command have to come from externalcommand CNT EN)
IMPOSTAZIONE TEMPO
Sullo strumento sono programmabili 3 tempo : t1-t2-t3
Premere il pulsante frontale P per 1s, il disply visualizzerà “t1” (il led SET/CNT
lampeggerà velocemente)
Rilascando P verrà visualizzato il valore impostato
Per modificare il valote del tempo “T1” usare i pulsanti UP ( incremento) o DOWN
(decremento)
Se la funzione impostata richiede l’impostazione del tempo T2 (visualizzato “t2” (F1 =
3,4,5) ripetere le operazioni precedenti e la funzione impostata richiede l’impostazione
del tempo T3(“t3”) con funzioni (F2 = 3,4) ripetere le operazioni precedenti. Per uscire
dalla programmazione non premere alcun pulsante per 6sec o premere una volta il
pulsante U.
t1
00.00
6.45.0
t2
TIME SETTING PROCEDURE
On the instrument are possible to set 3 times : “t1”, “t2”, “t3”.
Pushingfrontal button P and keeping it pushed for 1 sec. 8the display will visualize “t1”
and led SET/CNT will blink rapidly).
Releasing P on the display will be visualized the programmed Set Point “t1”.To modify
its value, you use
the buttons
UP
(to increase
the value) or
DOWN (to decrease it). If the programmed functioning mode require the set of time
“t2” (with functions F1 = 3, 4 or 5) and time “t3” (functions F2 = 3 or 4) you must repeat
the previous procedure.To go out from the time setting procedure ,you have not to
push any buttons for 6sec or press only onr time the button U.
Scaricare