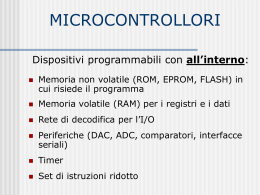
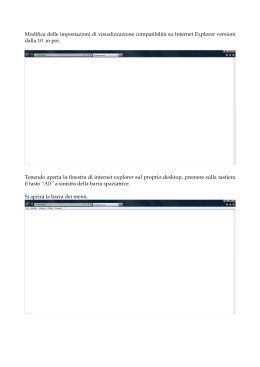
QU
H
H
H
A
RT
IT
IFI
H★H
H
H
H H
HHH
H
EM
L
D
E
T
C
EWI-H
R410A
E
Y SY
S
IEWIHFX
0301
69204.50
M
MA
AN
NU
UA
ALLEE D
DII FFU
UN
NZ
ZIIO
ON
NA
AM
MEEN
NTTO
O • D
DIIR
REEC
CTTIIO
ON
NS
S FFO
OR
R U
US
SEE
M
BEED
DIIEEN
NU
UN
NG
GS
SA
AN
NLLEEIITTU
UN
NG
G
MA
AN
NU
UEELL D
DEE FFO
ON
NC
CTTIIO
ON
NN
NEEM
MEEN
NTT • B
Pompe di calore ad Inverter
Heat pumps with Inverter
Pompes à chaleur avec Inverter
Wärmepumpen mit Inverter
CARATTERISTICHE GENERALI • FEATURES
Infromazioni generali • General information
Componenti principali • Main components
Descrizione dei componenti • Component description
MISURE DI SICUREZZA • SAFETY MEASURES
Usi impropri • Improper uses
FUNZIONAMENTO • OPERATING
Informazioni aggiuntive • Other informations
Telecomando a raggi infrarossi • Infrared remote control
Batterie • Batteries
Segnalazioni e tasti di controllo • Indications and controls
Impostazione dell’ora attuale • setting current time
Funzioni basilari • Basic operation
Campo di funzionamento • Working range
Orientamento del flusso d’aria • To adjust the air flow
Accensione temporizzata • Timer On
Spegnimento temporizzato • Timer Off
Spegnimento temporizzato ad un’ora • One-hour off timer
Modalità Full Power • Full Power Operation
Funzionamento con plasmacluster • Working with Plasmacluster
Operazione di autopulitura • Self-cleaning operation
Manutenzione • Maintenance
Se il condizionatore non funziona • If the air conditioner does not work
CARACTERISTIQUES • EIGENSCHAFTEN
Informations générales • Allgemeine Informationen
Composants principaux • Hauptbestandteile
Description des composants • Beschreibung der Bauteile
MESURES DE SECURITE • SICHEREITSMAßNAHMEN
Usages impropres • Unsachgemäßer Gebrauch
FONCTIONNEMENT • BETRIEB
Autres informations • Weitere Anweisungen
Telecommande à rayons infrarouges • Infrarot-Fernbedienung
Batteries de la telecommande • Batterien
Signalisations et touches de contrôle • Kontrollleuchten und Bedientasten
Reglage de l’heure actuelle • Einstallung der aktuellen Uhrzeit
Fonctions de base • Grundfunktionen
Limites de fonctionnement • Betribsbereich
Orientation du flux d’air • Einstellung des Luftstroms
Mise en marche temporisé • Progammiertes Einschalten
Arrêt temporisé • Progammiertes Ausschalten
Arrêt temporisé à 1 heure • In 1 Stunde Progammiertes Ausschalten
Mode Full Power • Betriebsart Full Power
Fonctionnement avec le Plasmacluster • Betrieb mit Plasmacluster
Opération d'auto-nettoyage • Selbstreinigung
Entretien • Periodische Kontrolle
Si le climatiseur ne marche pas • Wenn das Klimagerät nicht Anläuft
4
5
6
7
8
10
11
12
13
14
15
16
17
18
19
20
21
22
23
24
26
27
28
29
30
31
32
33
34
35
3
OSSERVAZIONI
REMARKS
Conservare il manuale in luogo asciutto, per evitare il
deterioramento, per almeno 10 anni per eventuali riferimenti futuri.
Leggere attentamente e completamente tutte le informazioni contenute in questo manuale.
Prestare particolarmente attenzione alle norme d’uso
accompagnate dalle scritte “PERICOLO” o “ATTENZIONE” in quanto, se non osservate, possono causare danno
alla macchina e/o a persone e cose.
Store the manual in a dry location to avoid deterioration, as
they must be kept for at least 10 years for any future reference.
All the information in this manual must be carefully read
and understood.
Pay particular attention to the operating standards with
“DANGER” or “WARNING” signals as their disrespect can
cause damage to the machine and/or persons or objects.
Per anomalie non contemplate da questo manuale, interpellare tempestivamente il Servizio Assistenza di zona.
If any malfunctions are not included in this manual, contact
the local Aftersales Service immediately.
AERMEC S.p.A. declina ogni responsabilità per qualsiasi
danno dovuto ad un uso improprio della macchina, ad una
lettura parziale o superficiale delle informazioni contenute
in questo manuale.
AERMEC S.p.A. declines all responsibility for any damage
whatsoever caused by improper use of the machine, and a
partial or superficial acquaintance with the information contained in this manual.
Il numero di pagine di questo manuale è: 36.
This manual has 36 pages.
DC INVERTER
DC INVERTER
Le nuove unità serie CWI-H sono dotate di un nuovo compressore ad inverter in corrente continua (DC Inverter), che
permette di migliorare l'efficienza del sistema riducendo i
consumi medi stagionali.
New CWI-H series are equipped with a new inverter direct
current compressor, which enables the system to work more
efficiently by reducing the average seasonal consumption.
COMPONENTI PRINCIPALI • MAIN COMPONENTS
1
2
3
4
5
6
7
Mobile di copertura • Casing
Scheda di controllo • Control card
Gruppo ventilante • Fan section
Ricevitore • Receiver
Batteria di scambio termico • Heat exchange coil
Deflettore mandata aria • Air delivery louvre
Filtro aria • Air filter
8
9
10
11
12
13
1
Telecomando • Remote-controller
Valvola inversione ciclo • Cycle reverse valve
Compressore “DC Inverter” • “DC Inverter” Compressor
Raccordi frigoriferi • Refrigeration couplings
Display • Display
Plasmacluster • Plasmacluster
7
5
13
12
3
11
6
4
1
2
5
8
9
3
10
4
DESCRIZIONE DEI COMPONENTI
COMPONENT DESCRIPTION
1 MOBILE DI COPERTURA
È caratterizzato da dimensioni contenute e da un’estetica
estremamente gradevole.
Sulla parte frontale sono disposti i led di segnalazione.
Il tasto ausiliario AUX è sotto il pannello frontale di copertura.
1 CASING
Features compact dimensions and a particularly attractive
design.
Leds are on the front side.
AUX auxiliary pushbutton is under the front panel of the
casing.
2 SCHEDA DI CONTROLLO
La scheda elettronica a microprocessore svolge le seguenti
funzioni:
- controllo e gestione del ciclo di sbrinamento;
- controllo della temperatura dello scambiatore interno nel
funzionamento in raffreddamento;
- controllo della temperatura dello scambiatore interno nel
funzionamento in pompa di calore per evitare possibili
correnti di aria fredda;
- protezione da assorbimenti elettrici eccessivi.
2 CONTROL CARD
The electronic microprocessor-control card performs the following functions:
- controls and manages the defrosting cycle;
- regulates the indoor exchanger temperature in cooling
mode;
- regulates the indoor exchanger temperature in heat pump
mode to prevent cold air currents;
- protects against excessive power absorption.
3 GRUPPO VENTILANTE
Unità esterna: Costituito da un ventilatore assiale, bilanciato staticamente e dinamicamente, con griglia di protezione
a norme CEI 107-34.
Unità interna: Il gruppo ventilante è costituito da un ventilatore di tipo tangenziale estremamente compatto e silenzioso.
3 FAN UNIT
Outdoor unit: Comprises one dynamically and statically
balanced axial fan complete with CEI standard (107-34)
safety grill.
Indoor unit: Comprises an extremely compact and noiseless
cross-flow fan.
4 RICEVITORE
Ricevitore di segnale infrarosso emesso dal telecomando.
4 RECEIVER
Receiver for the remote control infrared signal.
5 BATTERIA DI SCAMBIO TERMICO
È realizzata in tubo di rame con alette in alluminio di tipo
turbolenziato.
5 HEAT EXCHANGE COIL
Comprises copper piping and turbo-type aluminium fins.
6 DEFLETTORE MANDATA ARIA
L’unità è dotata di un deflettore motorizzato e di alette verticali orientabili manualmente in modo da direzionare il flusso dell’aria in modo ottimale.
6 AIR DELIVERY LOUVRE
The unit is equipped with a motor-driven louvre and vertical
fins which may be moved manually to optimise the air flow
direction.
7 FILTRO ARIA
È rigenerabile, con trattamento antimuffa e facilmente
estraibile per la pulizia.
Il filtro di accumulo della polvere ed il filtro deodorante
sono inclusi come accessori di questa unità. Durante il funzionamento del condizionatore d’aria, il filtro rimuove polvere e fumo di tabacco dall’aria e rilascia aria pulita.
7 AIR FILTER
Re-usable air filter treated with mould inhibitor. Easy to
remove for cleaning.
The dust collection filter and the deodorant filter are packed
as accessory of this unit. During operation of the air conditioner, the filters remove dust and tobacco smoke from the
air and discharges clean air.
8 TELECOMANDO
Il telecomando permette di impostare tutti i parametri di
funzionamento dell’apparecchio, tali parametri vengono
visualizzati su di un display a cristalli liquidi facilitando così
le operazioni di programmazione. Il telecomando è alimentato con 2 batterie stilo da 1,5 V di tipo R 03 AAA e funziona fino ad una distanza di 7 metri dall’unità.
8 REMOTE CONTROLL
The remote controll allows you to set all the equipment operating parameters. These parameters are displayed on a
liquid crystal display to facilitate programming. The remotecontroller is powered by 2 x 1.5 V “pencil” batteries, type R
03 AAA, and operates up to a maximum distance of 7
metres from the unit.
9 VALVOLA INVERSIONE CICLO
Inverte il flusso di refrigerante al variare del funzionamento
estivo / invernale.
9 CYCLE REVERSE VALVE
It inverts the refrigerant flow in accordance with
summer/winter operation variations.
10 COMPRESSORE “DC Inverter”
Compressore ermetico rotativo, isolato acusticamente. È
dotato di separatore di liquido, che protegge il compressore
da un’eventuale ritorno di liquido refrigerante proveniente
dalle unità interne.
10 “DC Inverter” COMPRESSOR
Hermetic rotary compressor, complete with sound insulation. A liquid separator is also present, it protects the compressor from the return of refrigerant liquid from the indoor
units.
11 RACCORDI FRIGORIFERI
Raccordi frigoriferi per il collegamento tra le unità.
11 REFRIGERATION COUPLINGS
Refrigeration couplings for interconnecting the units.
12 DISPLAY
Display luminoso integrato nel pannello frontale delle unità
interne, consente la visualizzazione dello stato di funzionamento dell’unità e delle condizioni ambientali.
12 DISPLAY
Luminous display built into the front panel on the internal
units, used to indicate the unit's operating status and
ambient conditions.
13 PLASMACLUSTER
Lo ionizzatore all’interno del condizionatore d’aria, libera
nella stanza, ioni a gruppi, che consistono in una massa
collettiva di ioni positivi e negativi.
I gruppi di ioni eliminano i funghi presenti nell’aria e deodorano decompondo le molecole che causano odori.
13 PLASMACLUSTER
The ionizer inside the air conditioner will release cluster
ions, which are collective mass of positive and negative
ions, into the room.
The cluster ions reduce airborne mold fungus and deodorize/decompose odorcausing molecules.
5
USI IMPROPRI
IMPROPER USES
NON STRATTONARE IL CAVO ELETTRICO
È molto pericoloso tirare, calpestare, schiacciare o fissare con chiodi o puntine il cavo
elettrico di alimentazione.
Il cavo danneggiato può provocare corti circuiti e danni alle persone.
DO NOT PULL THE FEEDING CABLE
It is very dangerous to pull, crush or nail
the feeding cable.
A damaged cable may cause short circuits
and damages to the people.
USARE IL TELECOMANDO PER ACCENDERE E
SPEGNERE IL CONDIZIONATORE
Non spegnere il condizionatore sfilando la spina
dalla presa di alimentazione.
L’operazione, se ripetuta di frequente, può danneggiare il cavo, la presa o la spina con conseguenti rischi per le persone.
USE THE REMOTE CONTROL TO SWITCH
ON AND OFF THE AIR CONDITIONER
Do not unplug the feeding cable to switch off
the air conditioner.
This operation, when repeated often, may
damage the cable, the plug and the socket
and become dangerous for the people.
ORIENTARE CORRETTAMENTE IL
GETTO D’ARIA
L’aria che esce dal condizionatore non deve
investire direttamente le persone; infatti, anche
se a temperatura maggiore di quella dell’ambiente, può provocare sensazione di freddo e conseguente disagio.
Orientare manualmente solo le alette verticali.
Per il deflettore orizzontale utilizzare il tasto
SWING del telecomando.
ADJUST THE AIR FLOW DIRECTION
The air leaving the air conditioner should not rush
directly against the people in the room.
In fact, although it comes out at a higher temperature it might create unpleasant sensations of coldness.
Only the angle of the vertical louvers must be
adjusted manually.
For the horizontal air deflector, use the SWING
key on the remote control.
NON USARE IL CONDIZIONATORE IN
MODO IMPROPRIO
Il condizionatore non va utilizzato per allevare, far nascere e crescere animali.
DO NOT USE THE AIR CONDITIONER
IN A WRONG WAY
The air conditioner must not be used to
rise animals.
NON INFILARE OGGETTI SULL’USCITA
DELL’ARIA
Non inserire oggetti di nessun tipo nelle feritoie di uscita dell’aria (sia unità interna che
esterna).
Ciò potrebbe provocare ferimenti alla persona e danni al ventilatore.
DO NOT INSERT OBJECT IN THE AIR
DELIVERY
Do not insert any object in the air delivery
vents (both indoor and outdoor units).
This might cause injuries to the people
and damages to the fan.
ANOMALIE DI FUNZIONAMENTO
In caso di funzionamento anomalo dell’unità (intervento degli
allarmi), dopo aver eliminato la causa dell’intervento, procedere ad un reset dell’apparecchio. Se il problema si ripresenta, chiamare tempestivamente il Servizio Assistenza di zona.
MALFUNCTIONS
In the event of unit malfunctions (alarm blocks), after
having eliminated the cause of the block, reset the unit.
SIMBOLI DI SICUREZZA • SAFETY SYMBOL
6
Pericolo:
Tensione
Pericolo:
Organi in movimento
Pericolo!!!
Danger:
Power supply
Danger:
Movings parts
Danger!!!
INFORMAZIONI AGGIUNTIVE
ADDITIONAL INFORMATION
Le unità della serie EWI-H sono condizionatori inverter monosplit a pompa di calore, con telecomando che permette il controllo di tutte le funzioni. Questi condizionatori sono in grado di
adattarsi automaticamente a tutte le condizioni di impiego che si
possono presentare nell’arco della giornata e nello scorrere delle
stagioni, sono programmati per mantenere una condizione di
benessere nell’ambiente climatizzato, decidendo autonomamente se funzionare a freddo o a caldo e quando non fosse necessaria tutta la loro potenza, riducendo il consumo energetico.
The EWI-H series of monosplit heat-pump air conditioners
comes with remote control handset for control over all unit
functions.
These units automatically adjust to all operating conditions,
throughout the day and through the seasons, to ensure optimal room comfort always. The units actually decide how
much heating or cooling is required, thus reducing energy
consumption.
LIMITI DI FUNZIONAMENTO
OPERATION LIMITS
TEMPERATURA • TEMPERATURE
INTERNA
ESTERNA
INDOOR
OUTDOOR
RAFFRESCAMENTO
MAX
32°C BS / 23°C BU
43°C BS
COOLING
MIN
21°C BS / 15°C BU
21°C BS
RISCALDAMENTO
MAX
27°C BS
24°C BS / 18°C BU
HEATING
MIN
20°C BS
-8,5°C BS / -9,5°C BU
The unit is powered by 230V (±10%).
Tensione di alimentazione 230V (±10%).
The air conditioner is equipped with control devices which
Il condizionatore è equipaggiato di dispositivi di controllo che
proteggono l’unità dal funzionamento in condizioni pericolose.
prevent the unit to work under dangerous conditions.
In certe condizioni tali dispositivi possono intervenire impeUnder certain conditions, these devices may cut in and stop
the air conditioner:
dendo il funzionamento del condizionatore. Se il condizionaIf the air conditioner works continuously on cooling mode
tore funziona in modo continuativo in raffreddamento all’interno di un ambiente con elevata umidità relativa (indicativameninside a room with high relative humidity (higher than 80%)
te superiore all’80%) si avrà formazione di condensa sulla
there might be the production of condensate by air delivery
mandata dell’aria dell’unità interna. Tale condensa, potrebbe
of the indoor unit.
The condensate might collect on the object underneath or
depositarsi sul pavimento e sugli eventuali oggetti sottostanti.
on the floor.
INTERRUZIONE DI CORRENTE
Se viene a mancare la tensione il condizionatore si ferma.
Al ritorno della corrente, il condizionatore ripartirà con le stesse
impostazioni che aveva al momento dell’arresto, con l’esclusione delle funzioni timer, che dovranno essere riprogrammate.
AVVIAMENTO RITARDATO DEL COMPRESSORE
Ogni volta che il compressore nell’unità esterna si ferma, il
riavvio è ritardato per evitare di sovraccaricare il compressore dell’unità esterna e non può essere modificato.
SOSTE NEL FUNZIONAMENTO IN RISCALDAMENTO
All’avviamento con la funzione riscaldamento, il ventilatore
l’unità interna potrebbe non funzionare per 2 - 5 minuti al
fine di evitare che dall’unità esca aria fresca.
Durante il funzionamento in riscaldamento, è possibile che
sull’unità esterna si formi ghiaccio, il sistema di sbrinamento automatico provvede ad eliminarlo, durante la funzione di sbrinamento i ventilatori interno ed esterno si fermano per circa 5-10 minuti.
Una volta completato il ciclo di sbrinamento, l’unità riprende il normale funzionamento in riscaldamento.
SUGGERIMENTI PER RISPARMIARE ENERGIA
I condizionatori inverter EWI-H sono progettati per contenere il consumo energetico. Seguendo alcune semplici norme
è possibile un ulteriore sensibile risparmio energetico:
- Impostando il termostato 1°C in più della temperatura desiderata nel funzionamento in rinfrescamento e 2°C in meno nel
funzionamento in riscaldamento, si risparmierà circa il 10%.
- Impostando una temperatura più bassa del necessario durante l’operazione di raffreddamento, si consumerà più energia.
- Evitando la luce solare diretta nei locali da rinfrescare, si
risparmierà energia.
- Chiudere porte e finestre durante il funzionamento delle unità.
- Impostare la giusta direzione del flusso dell’aria per ottenere la migliore circolazione.
- Mantenere pulito il filtro dell’aria.
- Controllare che i periodi di funzionamento non si protraggano oltre il necessario, per questo occorre sfruttare al meglio
le funzioni di avviamento e spegnimento temporizzato.
- Staccare la tensione dall’interruttore generale, se l’unità
rimarrà ferma per un lungo periodo.
BLACK OUT
In the event of power failure, the unit will shut down. When
power is returned, the unit restarts with the same settings
made before the blackout, with the exception of the timer
function, which must be reprogrammed.
COMPRESSOR START-UP DELAY
Every time the compressor in the outdoor unit shuts down,
restarting is delayed for a certain time to prevent it from
overloading. This delay cannot be modified.
INTERVALS DURING HEATING OPERATION
At the start-up of the heating function, the unit fan is normally disabled for 2 - 5 minutes in order to prevent the fan
from delivering cold air.
During heating operation, ice could form on the outdoor
unit; in this case, the ice will be eliminated by the automatic
defrost system. During the defrosting cycle, indoor and outdoor fans shut down for 5-10 minutes.
The unit returns to normal heating operation when the
defrosting cycle has been completed.
ENERGY-SAVING TIPS
Inverter EWI-H air-conditioners are designed for energy-efficient operation.
To reduce energy consumption even further, follow the suggestions below:
- Setting the thermostat 1°C higher than the temperature
setting required during cooling, or 2°C lower during heating will cut energy consumption by approximately 10%.
- Do not set the cooling temperature lower than the one
actually required.
- Prevent direct sunlight in rooms to be cooled.
- Keep doors and windows closed while the unit is operating.
- Adjust the air flow to optimise circulation.
- Always keep the air filter clean.
- Do not keep the unit operating longer than is actually
necessary to achieve room comfort; take advantage of the
timed start-up and shutdown functions.
- Disconnect the power before prolonged periods of unit
disuse.
7
TELECOMANDO A RAGGI INFRAROSSI
INFRARED REMOTE CONTROL
1 - TRASMETTITORE
Invia i segnali al ricevitore sul condizionatore. Deve essere
tenuto rivolto verso il ricevitore.
1 - TRANSMITTER
It sends the impulse to the receiver of the air conditioner.
It must be directed towards the receiver.
2 - DISPLAY A CRISTALLI LIQUIDI
Indica il tipo di funzionamento, l’impostazione del TIMER e
la temperatura scelta.
2 - LIQUID CRYSTAL DISPLAY
It shows the operation mode, the TIMER and temperature
setting.
1
3 - DISPLAY
Permette di visualizzare dal display
dell’unità interna, la temperatura della
stanza, la temperatura esterna ed il livello di potenza impiegata.
4 - MODALITÀ “FULL POWER”
Permette di selezionare il funzionamento
a piena potenza.
2 4 - “FULL POWER” OPERATION
To select operation at full power.
5 - ON / OFF
5 - ACCENSIONE - SPEGNIMENTO
Permette di accendere e spegnere il condizionatore.
6 - IMPOSTAZIONE TEMPERATURA
Permette di impostare la temperatura
ambiente desiderata (tra 18 e 32 °C).
Il tasto
fa aumentare la temperatura;
il tasto
la fa diminuire.
Ogni pressione dei tasti corrisponde alla
variazione di 1 °C.
7 - PROGRAMMAZIONE (MODE)
Permette di selezionare il tipo di funzionamento desiderato.
8 - VELOCITÀ VENTILATORE (FAN)
Permette di impostare la velocità del
ventilatore dell’unità interna (automatica, alta, bassa o ultrabassa).
3 - DISPLAY
The display panel on the indoor unit
shows the room temperature, outdoor
temperature and the level of power
used.
6 - TEMPERATURE SETTING
3
It selects the required room temperature
4 (between 18 and 32 °C).
5 Use button
to increase and button
DISPLAY
to lower the selected temperature.
6 Each touch of either button corresponds
7 to 1 °C variation.
8 It switches on or off the air conditioner.
9 7 - “MODE” OPERATION PUSH BUT10 TON
It selects the required operation mode.
11
FULL
POWER
MODE
1h
8 - FAN SPEED BUTTON (FAN)
FAN
SWING
CLEAN
SET/C
9 - SPEGNIMENTO TEMPORIZZATO
DOPO 1 ORA
Permette di programmare lo spegnimento ritardato del condizionatore (ritardo
fisso di un’ora).
10 - ACCENSIONE TEMPORIZZATA
Permette di programmare l’accensione
ritardata del condizionatore (da 0,5 a 12 ore).
11 - SPEGNIMENTO TEMPORIZZATO
Permette di programmare lo spegnimento ritardato del condizionatore (da 0,5 a 12 ore).
12 Use this button to set indoor unit fan
13 speed (automatic,high, low or soft).
14 9 - TIMER SET
15 Use this button to set the stop time (1
16 hour fixed delay).
17
10 - TIMER SET
18 It can be used to set the start time (0,5
19 to 12 hours ahead).
11 - TIMER SET
Use this button to set the stop time (0,5
to 12 hours ahead).
12 - PLASMACLUSTER
13 - TIME FORWARD
Use to set the clock forward.
12 - PLASMACLUSTER
14 - TIME BACK
Use to set the clock back.
13 - AVANZAMENTO ORARIO
Permette di far avanzare l’orario.
15 - AUTOPULITURA
14 - ARRETRAMENTO ORARIO
Permette di far arretrare l’orario
16 - TIMER “OFF” (C)
Switches the timer OFF.
15 - AUTOPULITURA
17 - BATTERY COMPARTMENT
Indicates the battery compartment.
16 - ESCLUSIONE TEMPORIZZATORE (C)
Serve per disattivare il funzionamento del TIMER.
18 - CLOCK
Displays time.
17 - VANO BATTERIE
Indica il vano batterie.
19 - MOTOR-DRIVEN AIR DEFLECTOR
This key operates the deflector on the indoor unit, improving air distribution inside the conditioned room.
18 - OROLOGIO
Permette di visualizzare l’ora.
19 - DEFLETTORE MOTORIZZATO
Questo tasto permette di mettere in movimento il deflettore
sull’unità interna, per ottenere una migliore distribuzione
dell’aria all’interno della stanza condizionata.
8
UTILIZZO DEL TELECOMANDO
– Rivolgere il trasmettitore del telecomando verso il ricevitore del condizionatore mentre si effettuano le impostazioni.
Se i segnali vengono captati correttamente il condizionatore emetterà un “segnale acustico”.
– Per la ricezione non devono esistere ostacoli (mobili o
tende) tra trasmettitore e ricevitore.
– Il telecomando è in grado di trasmettere fino a una distanza di 7 metri dal condizionatore.
USE OF THE REMOTE CONTROL
– Use the remote control directed towards the receiver of
the air conditioner.
If the impulses are received properly, a beep will be heard
from the air conditioner.
– No obstacles must be allowed between transmitter and
receiver.
– The remote control can transmit its impulse within 7
meter distance from the receiver.
DISPLAY A CRISTALLI LIQUIDO
LIQUID CRYSTAL DISPLAY
20 - IMPOSTAZIONE TERMOSTATO
PER FUNZIONAMENTO AUTOMATICO E DEUMIDIFICAZIONE
Nel funzionamento automatico e in
deumidificazione le barre indicano la
variazione di temperatura impostata
rispetto al valore standard.
21 - SIMBOLO AUTOPULITURA
22 - INDICATORE DI TRASMISSIONE
Appare ogni volta che si preme un
tasto e indica la trasmissione del
segnale.
20
21
24
C
22
23
AUTO
25
26
20 - THERMOSTAT SETTINGS FOR
AUTOMATIC OPERATION AND
DEHUMIDIFICATION
During automatic operation and
dehumidification, the bars indicate
temperature variation in relation to
the standard value.
AM
PM
21 - SELF CLEAN INDICATOR
AM
PM
22 - TRANSMISSION INDICATOR
It appears every time any button is
pushed to show the transmission of
the impulse.
23 - TIPO DI FUNZIONAMENTO
Il simbolo indica il tipo di funzionamento impostato:
= automatico
= riscaldamento
= raffreddamento
= deumidificazione
= solo ventilazione
27
28
29
23 - MODE INDICATOR
The type of operation selected is indicated by the symbol:
= automatic
= heating
= cooling
= dehumidification
= ventilation only
24 - TEMPERATURA
L’indicazione della temperatura impostata appare selezionando i programmi di riscaldamento o raffreddamento.
24 - TEMPERATURE INDICATOR
The temperature set is displayed when the heating or cooling programs are selected.
25 - INDICATORE DI FUNZIONAMENTO A PIENA
POTENZA
Indica il funzionamento a piena potenza.
25 - “FULL POWER” INDICATOR
It is displayed when the full power operation is selected.
26 - VELOCITÀ DEL VENTILATORE
Il simbolo indica la velocità selezionata per il ventilatore:
= automatico
= massima
= media
= minima
26 - FAN SPEED INDICATOR
The fan speed selected is shown by the symbol:
= automatic
= high
= medium
= low
27 - ORARIO - AVVIAMENTO TEMPORIZZATO
Indica l’ora oppure, se impostato, l’orario di avviamento
programmato.
27 - TIME - TIMED START-UP
Displays the current time or programmed start-up time setting.
28 - SPEGNIMENTO TEMPORIZZATO
Indica l’orario di spegnimento programmato, se impostato,
l’indicazione di spegimento ad una ora.
28 - TIMED SHUTDOWN
Displays the programmed shutdown time or shutdown after
1 hour timer function.
29 - SIMBOLO PLASMACLUSTER
29 - PLASMACLUSTER INDICATOR
N.B.:
– Non fissare il supporto del telecomando vicino a una sorgente di calore o sotto la luce del sole. Evitare l’esposizione
del telecomando ad umidità eccessive o ad urti (si potrebbero avere deformazioni, rotture o perdita del colore).
NOTE:
– Do not leave the remote control near a heat source or
under direct sun rays.
Do not expose at excessive humidity or shocks to avoid
deformations, breaks or color losses.
9
BATTERIE
Usare due batterie al manganese o alcaline da
1,5 volt (stilo) ad alte prestazioni : R 03 (AAA).
Per sostituire le pile:
– Premere sul coperchio del vano batterie del
telecomando e farlo slittare nella direzione
della freccia.
– Sostituire le batterie facendo attenzione a
rispettare la polarità indicata.
Importante
– Le batterie hanno una durata media di 10 mesi
con un utilizzo normale.
– Le due batterie devono essere identiche.
– Rimuovere le batterie dal telecomando se si
prevede di non utilizzarlo per lunghi periodi.
– Quando il telecomando funziona solo in prossimità del condizionatore è il momento di
sostituire le batterie.
+
-
+
BATTERIES
Use 2 manganese or alkaline 1,5 V, high performance batteries: R 03 (AAA).
To replace the batteries:
– Push the battery cover of the remote control
and slide as marked by the arrow.
– Replace the batteries keeping the polarity as
marked by the signs.
Important
– The batteries last 10 months approx. if used
normally.
– The two batteries must be the same.
– Remove the batteries from the remote control
if not used for long time.
– When the remote control works only close to
the receiver, change the batteries.
SEGNALAZIONI E TASTI DI CONTROLLO
INDICATIONS AND CONTROLS
COMANDI AUSILIARI SULL’UNITÀ INTERNA
AUXILIARY INDOOR UNIT CONTROLS
PULSANTE “AUX” (COMANDI AUSILIARI)
Si usa quando il telecomando è fuori servizio.
Permette l’accensione nel solo funzionamento AUTOMATICO e lo spegnimento del condizionatore.
Per accendere:
Sollevare il pannello anteriore dell’unità interna e premere
il tasto AUX sul pannello operativo.
-La spia rossa FUNZIONAMENTO
sull’unità si illuminerà e l’unità comincerà il funzionamento nel modo AUTOMATICO.
-La velocità del ventilatore e l’impostazione della temperatura sono impostate su AUTOMATICO.
Per spegnere:
Premere nuovamente il tasto AUX sul pannello operativo.
-La spia rossa FUNZIONAMENTO
sull’unità si spegnerà.
"AUX" BUTTON (AUXILIARY CONTROLS)
This control allows AUTOMATIC unit operation and shutdown.
Use these controls if the remote control handset is not available.
To activate:
Lift the front panel on the indoor unit; press the AUX key on
the control panel.
-The red OPERATION lamp
will come on and the unit
will commence AUTOMATIC mode operation.
-Fan speed and temperature settings are made by AUTOMATIC.
To deactivate:
Press the AUX key on the control panel.
-the red OPERATION lamp
will go out.
Se viene premuto il tasto AUX durante il funzionamento
normale, l’unità si spegne.
SELETTORE “H-L” DI POTENZA (SOLO EWI130H-130H)
Quando si installa il condizionatore in una abitazione con
limiti di potenza elettrica, impostare il SELETTORE DI
POTENZA “H-L” su “L”.
Il condizionatore d’aria funzionerà a potenza ridotta, evitando così sovracarichi nell’impianto elettrico dell’abitazione e l’interruzione di energia per l’intervento degli interruttori di protezione in seguito ad eccessivo assorbimento.
H = 12A (massimo amperaggio)
L = 8A (massimo amperaggio).
RICEVITORE
Capta i segnali provenienti dal telecomando. É posizionato
sulla parte frontale dell’unità interna.
H-L
AUX
RICEVITORE I-R
I-R RECEIVER
10
If the AUX key is pressed during normal operation, the unit
will shut down.
"H-L" POWER SELECTOR (ONLY EWI130H-130H)
If the unit has been installed in a home with electric power
restrictions, set the "H-L" POWER SELECTOR to "L".
The unit will operate at reduced power to prevent overloading the domestic power system and thus avoid blackouts
caused by intervention of circuit breakers.
H = 12A (maximum amperage)
L = 8A (maximum amperage).
RECEIVER
Detects the signals given by the remote control. The receiver is positioned at the front of the indoor unit.
SEGNALAZIONI SULL’UNITÀ INTERNA
INDICATIONS ON INDOOR UNIT
ION SIGN
INDICATORI LUMINOSI DI FUNZIONAMENTO
Sul pannello frontale dell’unità interna sono posizionate
delle spie luminose che indicano il funzionamento
dell’unità.
MONITOR DI POTENZA
Indica su 4 livelli la potenza impiegata.
INDICATORE DI TEMPERATURA
Indica la temperatura interna o la temperatura esterna.
SPIA TEMPORIZZATORE ARANCIO
Si accende quando il temporizzatore è inserito.
SPIA FUNZIONAMENTO ROSSA
Si accende quando il condizionatore sta funzionando.
indicatore di potenza
power monitor
temp. stanza
room temp.
OPERATING STATUS LAMPS
The lamps on the front section of the indoor unit indicate
current unit operating status.
POWER MONITOR
Displays current level (out of four) of power used.
TEMPERATURE INDICATOR
Displays the current indoor or outdoor temperature.
TIMER LED (ORANGE)
It lights up when the timer is on.
OPERATION LED (RED)
It lights up when the air conditioner is working.
DISPLAY
FULL
POWER
temp.esterna
outdoor temp.
IMPOSTAZIONE DELL’ORA ATTUALE
Prima dell’avviamento dell’unità assicurarsi che l’orario
impostato sul telecomando sia esatto.
L’orario può essere impostato per la visualizzazione dell’ora
nel modo “12h” oppure nel modo “24h”.
Regolazione dell’orario:
1)Scegliere il modo di visualizzazione pre1h
MODE
ferito, per il modo “12h” premere una sola
volta il tasto CLOCK, per il modo “24h”
premere due volte il tasto CLOCK.
FAN
2) Impostare l’ora attuale, premere i tasti
CLEAN
SWING
AVANZAMENTO ORA o ARRETRAMENTO
ORA.
Tenere premuto il tasto per far avanzare o
retrocedere velocemente il display dell’ora.
3) Confermare l’ora esatta premendo il tasto
SET/C.
I due punti (:) lampeggiano per indicare che
l’orologio funziona.
NOTA: Quando è in funzione il TIMER l’orario non può
essere modificato.
SETTING CURRENT TIME
Before starting up the unit, check that the time displayed on
the remote control handset is correct.
The time can displayed in "12h" or "24h" mode.
Setting the time:
1) select the preferred display mode: for the
"12h" mode, press the CLOCK key once;
for the "24h" mode, press the CLOCK key
twice;
2) set the current time by pressing the TIME
FORWARD or TIME BACK keys accordingly
(press and hold the key to set the time
SET/C
forward or back rapidly);
3) when the time is correct, press the SET/C
key.
The two dots (:) on the display flash when
the clock is operating.
N.B. The clock time cannot be set while the
TIMER function is on.
11
FUNZIONI BASILARI
BASIC OPERATION
1) PREMERE IL TASTO MODE
Premere il tasto MODE per selezionare il funzionamento desiderato.
1) PRESS THE MODE KEY
Press the MODE key to select the desidered operation mode.
= automatico
= raffreddamento
= riscaldamento
= deumidificazione
= automatic
= cooling
DISPLAY
= heating
= dehumidification
FULL
POWER
2) PREMERE IL TASTO ACCESO - SPENTO
Il condizionatore entra in funzione e si accende la
spia rossa di funzionamento.
3) REGOLARE LA TEMPERATURA
Nel funzionamento Auto e Deumidificazione la
temperatura può essere cambiata di 1 o 2 °C in più
o in meno rispetto alla temperatura impostata dal
microprocessore.
Nel funzionamento in Riscaldamento e
Raffreddamento la temperatura può essere regolata
da un minimo di 18 °C ad un massimo di 32 °C.
MODE
FAN
SWING
4) PREMERE IL TASTO FAN (VENTILATORE)
Premere il tasto FAN per selezionare la velocità desiderata.
= automatica
= media
2) PRESS THE “ON/OFF” KEY
The conditioner starts running and the red led
lights up.
1h
= minima
= massima
CLEAN
SET/C
3) ADJUST THE TEMPERATURE
In the Auto and Dry mode, the temperature can
be changed in 1 °C increments within the range
of 2 °C higher to 2 °C lower from the temperature
autmatically determined by the air conditioner.
In the Heat and Cool mode, the temperature can
be set within the range of 18 °C to 32 °C.
4) PRESS THE FAN KEY
Press the FAN key to select the desidered fan speed.
= automatic
= medium
= low
= high
5) PREMERE IL TASTO ACCESO - SPENTO
Per spegnere l’unità, premere di nuovo il tasto
ACCESO/SPENTO.
5) PRESS THE “ON/OFF” KEY
To turn off the unit, press the ON/OFF button again.
INFORMAZIONI SUL FUNZIONAMENTO AUTOMATICO
Nella modalità Auto, l’impostazione della temperatura e del
modo di funzionamento sono automaticamente selezionati
in base alle temperature interna ed esterna al momento
dell’accensione dell’unità.
Durante il funzionamento, se la temperatura esterna cambia, le impostazioni della temperatura cambieranno come
mostrato in tabella.
Qualora vi fosse la necessità di rinfrescare durante il giorno
e di riscaldare durante la notte, o se la temperatura ambiente dovesse diventare più alta della temperatura impostata in
seguito all’uso di altre fonti di calore, il programma Auto
commuterà automaticamente il funzionamento da
Riscaldamento a Raffrescamento per mantenere una temperatura ambiente confortevole.
AUTOMATIC OPERATION
In the Auto mode, the temperature setting and mode are
automatically selected according to the room temperature
and outdoor temperature when the unit is turned on.
When the unit is set to Auto, temperature and operating
mode are automatically selected according to the current
indoor and outdoor temperatures.
The unit operating temperatures will adjust according to the
variations in the outdoor temperature (see table).
If there is a need to cool during the day and to heat at night,
or if the ambient temperature rises above the room temperature setting following the use of other heat sources, the Auto
program automatically switches between Heating and
Cooling as required to ensure a comfortable room temperature.
12
ORIENTAMENTO DEL FLUSSO D’ARIA
TO ADJUST THE AIR FLOW
Le alette deflettrici sulla mandata dell’aria sono di due tipi:
– verticali per orientare il flusso d’aria sul piano orizzontale;
– orizzontali (deflettore) per orientare il flusso d’aria sul
piano verticale.
The air vents by the air delivery are:
– vertical to direct the air flow on a horizontal level;
– horizontal to direct the air flow vertically.
ORIENTARE LE ALETTE MANUALI
– Ruotare le alette verticali come indicato nella figura in
basso.
– Sia in riscaldamento che in raffreddamento è consigliabile
che il flusso d’aria non investa direttamente le persone.
MANUAL TYPE
– Turn the vertical louvers as shown in the figure below.
– The air flow should never be directed against the people,
either in heating or cooling mode.
IL DEFLETTORE MOTORIZZATO ORIZZONTALE
Non orientare mai manualmente il deflettore motorizzato.
Qualsiasi intervento manuale sul deflettore può danneggiare il sistema e provocare malfunzionamenti.
In particolare possono verificarsi condensazioni sulla superficie del deflettore (in raffreddamento o in deumidificazione) e gocciolamenti sulle superfici sottostanti.
In riscaldamento o in sola ventilazione:
Il deflettore compie una rotazione di circa 90° in modo tale
che il flusso sia rivolto anche verso il basso.
In raffreddamento o deumidificazione:
Il deflettore descrive un angolo più stretto per impedire la
formazione di condensa sulla sua superficie.
THE HORIZONTAL AIR DEFLECTOR IS MOTOR-DRIVEN
Never make manual adjustments to the drive-type grille.
Any manual movement of the air deflector may damage
the system and cause malfunctions.
In particular, condensation may form on the surface of the
air deflector (cooling or dehumidification mode) with consequent dripping onto the surfaces below.
Heating or ventilation only mode:
The air deflector turns 90° approximately so that the air flow
blows also towards bottom.
Cooling or dehumidification mode:
The air deflector turns through a more acute angle to prevent condensate on its surface.
SWING
Il deflettore inizia ad oscillare in modo continuo.
Quando si arresta il movimento del deflettore (tasto
SWING), questo si ferma in una posizione che viene mantenuta finchè non viene rimesso in moto (tasto SWING) o finchè non si cambia tipo di funzionamento (tasto MODE).
SWING
The grille starts continuous oscillation.
When the air deflector is stopped (SWING key), it remains
still until it is started again (SWING key) or until the operation mode is changed (MODE key).
Regolare la direzione del flusso
dell’aria come mostrato in figura.
Adjust air flow direction as showed in
the figure.
Funzionamento in raffreddamento o in deumidificazione.
Cooling or dehumidification
mode.
Funzionamento in riscaldamento
o in sola ventilazione.
Heating mode or
ventilation only mode.
Modalità SWING.
SWING mode.
13
ACCENSIONE TEMPORIZZATA
1) PREMERE IL TASTO TIMER ATTIVATO (
L’indicatore TIMER ATTIVATO lampeggerà.
TIMED START-UP
)
2) PREMERE I TASTI AVANZAMENTO ORA ( )
O ARRETRAMENTO ORA ( )
A questo punto premere ripetutamente il tasto fino
ad impostare l’ora desiderata .
Ad ogni pressione del tasto il valore cambia di 10
minuti.
1) PRESS THE TIMER ON KEY (
)
The TIMER ON lamp will flash.
2) PRESS THE TIME FORWARD ( ) OR BACK
( ) KEYS.
Press the key repeatedly until the required time is
displayed .
The time changes by 10 minutes each time the key
is pressed.
DISPLAY
3) CONFERMA TIMER (SET/C)
FULL
POWER
Puntare il telecomando verso il ricevitore posto
sull’unità interna e premere il tasto (SET/C).
MODE
La spia arancione timer ( ) sull’unità interna si
accende.
FAN
Un segnale acustico “bip” verrà emesso dall’unità
CLEAN
SWING
interna quando riceverà il segnale.
Il condizionatore entrerà in funzione prima dell’
ora impostata, in modo che all’ora fissata la stanza
abbia già raggiunto la temperatura impostata.
L’anticipo viene calcolato dal microprocessore in
base alla temperatura ambiente e alla temperatura impostata.
3) CONFIRM TIMER (SET/C)
Point the remote control handset at the receiver
on the indoor unit, then press the key (SET/C).
The orange timer lamp ( ) on the unit will come on.
The indoor unit will beep when the signal has
been received.
The unit will start up before the setting to ensure
SET/C
that the room has reached the required temperature for the time set.
The pre-setting operation is calculated by the unit
microprocessor according to the current ambient
temperature and the temperature setting.
4) PREMERE IL TASTO (SET/C) PER DISATTIVARE IL TIMER
Il display torna a visualizzare l’ora corrente.
La spia arancione TIMER ( ) sull’unità interna si spegne.
Sarà cancellata anche la funzione SPEGNIMENTO TEMPORIZZATA, se era attiva.
Per verificare se il timer è inserito controllare la spia arancione sull’unità interna.
4) PRESS THE KEY (SET/C) TO DEACTIVATE THE TIMER.
The display returns to the current time.
The orange TIMER lamp ( ) on the unit will go out.
The TIMER OFF function will also be deactivated (if previously activated).
To see if the timer function is on, check whether the orange lamp on the indoor unit is on.
SPEGNIMENTO TEMPORIZZATO
TIMED SHUTDOWN
1h
1) PREMERE IL TASTO SPEGNIMENTO TIMER (
L’indicatore SPEGNIMENTO TIMER lampeggerà.
2) PREMERE I TASTI AVANZAMENTO ORA ( )
O ARRETRAMENTO ORA ( )
A questo punto premere ripetutamente il tasto fino
ad impostare l’ora desiderata .
Ad ogni pressione del tasto il valore cambia di 10
minuti.
)
1) PRESS THE TIMER OFF KEY (
)
The TIMER OFF key will flash.
2) PRESS THE TIME FORWARD ( ) OR BACK
( ) KEYS.
Press the key repeatedly until the required time is
displayed.
The time changes by 10 minutes each time the key
is pressed.
DISPLAY
3) CONFERMA TIMER (SET/C)
FULL
POWER
Puntare il telecomando verso il ricevitore posto
sull’unità interna e premere il tasto (SET/C).
MODE
La spia arancione timer ( ) sull’unità interna si
accende.
FAN
Un segnale acustico “bip” verrà emesso dall’unità
CLEAN
SWING
interna quando riceverà il segnale.
Il condizionatore si spegnerà all’ora impostata.
FUNZIONAMENTO CON SPEGNIMENTO TEMPORIZZATO ATTIVO.
Quando è impostato il modo spegnimento temporizzato, l’impostazione della temperatura della stanza viene regolata automaticamente per evitare che la stanza
diventi eccessivamente calda o fredda.
Un’ora dopo l’inizio del funzionamento con timer, la temperatura sarà variata:
–viene aumentata di 1 °C rispetto alla temperatura impostata se il condizionatore sta funzionando in RAFFREDDAMENTO o in DEUMIDIFICAZIONE;
– viene abbassata di 3 °C rispetto alla temperatura impostata se sta funzionando in RISCALDAMENTO.
1h
4) PREMERE IL TASTO (SET/C) PER DISATTIVARE IL TIMER
Il display torna a visualizzare l’ora corrente.
La spia arancione TIMER ( ) sull’unità interna si spegne.
Sarà cancellata anche la funzione ACCENSIONE TEMPORIZZATA, se era attiva.
Per verificare se il timer è inserito controllare la spia arancione sull’unità interna.
14
SET/C
3) CONFIRM TIMER (SET/C)
Point the remote control handset at the receiver
on the indoor unit, then press the key (SET/C).
The orange timer lamp ( ) on the unit will come
on.
The indoor unit will beep when the signal has
been received.
The unit will shut down at the time set.
UNIT OPERATION WITH TIMED SHUTDOWN
FUNCTION ON
When the timed shutdown function has been activated, the
room temperature setting is automatically adjusted to prevent the room from becoming excessively warm or cool.
One hour after the beginning of timed unit operation, the temperature will be varied as follows:
- unit is operating in COOLING or DEHUMIDIFICATION
mode: increased by 1°C over the temperature setting;
- unit in operating in HEATING mode: decreased by 3°C
below the temperature setting.
4) PRESS THE (SET/C) KEY TO DEACTIVATE THE TIMER.
The display returns to the current time.
The orange TIMER lamp ( ) on the unit will go out.
The TIMER ON function will also be deactivated (if previously activated).
To see if the timer function is on, check whether the orange lamp on the indoor unit is on.
SPEGNIMENTO TEMPORIZZATO DOPO 1 ORA
ONE-HOUR OFF TIMER
1) PREMERE IL TASTO SPEGNIMENTO TEMPORIZZATO
DOPO 1 ORA (
)
Il telecomando visualizza “1h”.
La spia arancione TIMER ( ) sull’unità si illumina.
L’unità smetterà di funzionare dopo un’ora.
1) TIMED SHUTDOWN AFTER 1 HOUR (
) KEY.
The remote control handset will display "1h".
The orange TIMER lamp ( ) on the unit will
come on.
The unit will shut down after one hour.
2) PER DISATTIVARE IL TIMER
Premere il tasto CANCELLA TIMER (SET-C).
La spia arancione TIMER ( ) sull’unità si spegne.
Oppure:
spegnere l’unità premendo il tasto ON/OFF.
La sia rossa FUNZIONAMENTO ( ) e la spia
arancione TIMER ( ) sull’unità si spegne.
DISPLAY
FULL
POWER
MODE
1h
FAN
CLEAN
SWING
La funzione SPEGNIMENTO DOPO UN’ORA ha
prorità sulle altre funzioni di ACCENSIONE E
SPEGNIMENTO TEMPORIZZATO.
Con l’unità ferma, agendo sul tasto SPEGNIMENTO TEMPORIZZATO DOPO 1 ORA (
),
l’unità si avvia e funziona per una ora.
Se sono impostati ACCENSIONE e/o SPEGNIMENTO TEMPORIZZATO, il tasto CANCELLA TIMER (SET-C), cancella
ogni impostazione.
2) TO DEACTIVATE THE TIMER, PROCEED AS FOLLOWS:
Press the CANCEL TIMER (SET-C) key.
The orange TIMER lamp ( ) on the unit will go
out.
Alternatively, switch the unit off by pressing the
ON/OFF key.
The red OPERATION key ( ) and the orange
TIMER lamp ( ) will go out.
The SHUTDOWN AFTER 1 HOUR function will
SET/C
override TIMED START-UP and SHUTDOWN
settings.
When the unit is off, press the SHUTDOWN
AFTER 1 HOUR key (
), to start up the
unit, which will shut down after one hour.
Press the CANCEL TIMER (SET-C) key to cancel all TIMED
START-UP and/or SHUTDOWN settings.
MODALITÀ FULL POWER
FULL POWER OPERATION
In questa modalità l’unità lavora a tutta potenza per rinfrescare o riscaldare rapidamente l’ambiente.
In this operation, the air conditioner works at full power to
make the room cool or warm so rapidly.
1) PREMERE IL TASTO “FULL POWER”
Sul display appare il simbolo
.
Sparisce l’indicazione della temperatura dal
display.
Durante il funzionamento Full Power non si possono regolare nè la temperatura nè la velocità del
ventilatore.
Disattivare il funzionamento Full Power dopo che
l’ambiente è sufficientemente fresco o caldo.
2) PREMERE DI NUOVO IL TASTO “FULL POWER”
PER DISATTIVARE LA MODALITÀ FULL POWER
1) PRESS THE “FULL POWER” KEY
The
symbol appears on the display.
The temperature display will go off.
You cannot set the temperature during the Full
Power operation. The fan speed also can not be
changed.
Cancel the Full Power operation after the room is
sufficiently cool or warm.
DISPLAY
FULL
POWER
MODE
2) PRESS THE “FULL POWER” KEY AGAIN TO
CANCEL THE FULL POWER MODE
1h
FAN
SWING
CLEAN
SET/C
15
FUNZIONAMENTO CON PLASMACLUSTER
WORKING WITH PLASMACLUSTER
Le unità della serie EWI-H sono dotate del purificatore
d’aria Plasmacluster, in grado di abbattere numerose
sostanze inquinanti e maleodoranti.
Units in the EWI-H range are fitted with a Plasmacluster air
purifier that is able to reduce airborne mold fungus and
decompose odor causing molecules.
Potete scegliere le funzioni di DEPURAZIONE, IONIZZAZIONE DELL’ARIA oppure FUNZIONAMENTO AUTOMATICO DEL PLASMACLUSTER.
To use PLASMACLUSTER, select PURIFICATION, AIR IONISATION or automatic operation of the PLASMACLUSTER.
1) PREMERE IL TASTO PLASMACLUSTER :
on
1) PRESS THE PLASMACLUSTER BUTTON :
on
Premere il tasto
per selezionare, durante il
funzionamento, il modo desiderato :
While the unit is running, press the button
select the required operating mode:
Plasmacluster Auto - Depurazione - Ionizzazione - Cancella
on
on
to
Auto Plasmacluster - Purification - Ionisation - Cancel
DISPLAY
FULL
POWER
on
MODE
Con una pressione del tasto
, si attiva la funzione “Plasmacluster Auto” (spia blu sul display
dell’unità).
Nel funzionamento Plasmacluster Auto, l’unità
attiverà automaticamente le funzioni di
Depurazione oppure Ionizzazione in funzione
delle condizioni di polvere ed inquinamento registrati dai sensori interni.
on
1h
FAN
SWING
CLEAN
SET/C
on
Con una seconda pressione del tasto
, si attiva la funzione “Depurazione” (spia blu sul display dell’unità).
on
Con una ulteriore pressione del tasto
si attiva la funzione
“Ionizzazione” (spia verde sul display dell’unità): l’unità arricchirà l’aria ambiente di ioni negativi rendendola simile all’aria
presente nelle foreste e nelle vicinanze di cascate d’acqua.
on
Press the button
, once to activate the "Auto
Plasmacluster" function (blue LED on the unit's
display).
When operating in Auto Plasmacluster mode, the
unit automatically activates the Purification or
Ionisation modes, depending on the dust and pollution conditions detected by sensors inside the
unit.
on
Press the button
, a second time to activate the
"Purification" function (blue LED on the unit's display).
on
Press the button
once again to activate the "Ionisation"
function (green LED on the unit's display). The unit adds
negative ions to the environment, making it similar to the air
found in forests and near waterfalls.
on
Per disattivare il Plasmacluster premere il tasto
fino a
quando il simbolo Plasma sul display del telecomando si
spegne. Anche la spia sull’unità si spegnerà.
To deactivate the Plasmacluster, press the button
until
the Plasma symbol on the remote control display switches
off. The LED on the unit will also switch off.
NOTA:
• L’impostazione per il funzionamento del Plasmacluster
verrà memorizzata e funzionerà alla stesso modo alla prossima accensione del ventilatore.
• Per spegnere la spia Plasma premere il tasto Display.
NOTE:
• The last setting for the Plasmacluster is memorised, so that
it will work in the same way the next time the fan is switched on.
• Press the Display button to switch the Plasma LED off.
Ionizzatore
Cluster ions
Funghi, odori
Mold fungus, odor Gruppi di ioni
Cluster ions
OH OH OH OH
OH
OH
16
OH
OH OH OH
OH
OPERAZIONE DI AUTOPULITURA
SELF-CLEANING OPERATION
L’operazione di AUTOPULITURA si attiva nelle modalità
sola ventilazione o riscaldamento consente di eliminare
tracce di umidità eventualmente presenti nel condizionatore, in maniera tale da contrastare il proliferare di funghi e
muffe; i funghi eventualmente già presenti non possono
essere eliminati con questa operazione.
L’operazione di AUTOPULITURA si deve eseguire ad ogni
cambio stagione ed in previsione di lunghe soste.
The SELF-CLEANING Operation will be performed with
FAN or HEAT mode, in order to reduce the growth of mold
fungus, and dry inside of the air conditioner unit.
Utilize the operation at seasonal change over terms.
Mold fungus already grown can not be eliminated by this
operation.
1) PREMERE IL TASTO AUTOPULITURA QUANDO L’UNITÀ NON É IN FUNZIONE:
Il telecomando visualizza il simbolo ( ).
1) PRESS THE SELF-CLEANING BUTTON WHEN
THE UNIT IS OFF:
The remote control will display the symbol ( ).
Sull’unità si accenderanno:
- la spia rossa di funzionamento ( ) ,
- la spia blu Plasmacluster (ION SIGN)
The following will light up on the unit:
- The red operating LED ( )
- The blue Plasmacluster LED (ION SIGN)
L’operazione di autopulitura dura circa 40 minuti.
Il tempo rimanente, in minuti, per completare la
pulizia verrà indicato nel display della temperatura nell’unità interna.
DISPLAY
The self-cleaning operation takes about 40 minutes.
The time remaining, in minutes, before completion
of cleaning is indicated on the temperature display
of the internal unit.
FULL
POWER
MODE
1h
FAN
Durante l’operazione di AUTOPULITURA non è
consentito impostare la temperatura, la velocità
del ventilatore, la direzione dell’aria e la programmazione di avviamento e spegnimento temporizzato.
SWING
Per interrompere l’operazione premere il tasto AUTOPULITURA “CLEAN”, oppure, spegnere l’unità premendo il tasto
ON/OFF.
Sull’unità si spegneranno:
- la spia rossa di funzionamento ( ),
- la spia blu Plasmacluster (ION SIGN) ,
- il display di indicazione della temperatura.
CLEAN
SET/C
The temperature, fan speed and direction of air
flow cannot be set while self-cleaning is in progress, and the start-stop timer cannot be programmed.
To interrupt the operation press the SELF-CLEANING
"CLEAN" button, or switch the unit off by pushing the
ON/OFF button.
The following will switch off on the unit:
- the red operating LED ( ),
- the blue Plasmacluster LED, (ION SIGN)
- the temperature display.
17
MANUTENZIONE
MAINTENANCE
ATTENZIONE: Assicurarsi di scollegare il cavo di alimentazione o di spegnere l’interruttore generale dell’impianto
prima di eseguire qualsiasi lavoro di manutenzione.
Per pulire l’unità interna usare panni o spugne morbidi
bagnati in acqua al massimo a 40 °C.
Per la pulizia del telecomando usare un panno morbido leggermente umido.
Non usare prodotti chimici o solventi per nessuna parte del
condizionatore.
Non spruzzare acqua sulle superfici esterne o interne del
condizionatore (si potrebbero provocare dei corti circuiti).
CAUTION: Disconnect the power cable and shut the unit
off at the main switch before carrying out any maintenance
on the unit.
Use clothes or sponges with warm water (40 °C) to clean
the unit inside.
Use a damp cloth to clean the remote control.
Do not use chemical cleansers in any part of the air conditioner.
Do not spray water on the surfaces (it might cause short circuits).
Pulire periodicamente il filtro dell’aria:
Una pulizia frequente del filtro (ogni due settimane) garantisce una maggiore efficienza di funzionamento.
Pulire il filtro con un aspirapolvere ed eventualmente con
acqua e detergente neutro.
Clean the air filter:
Frequent cleaning of the filter (every second week) ensures
greater operating efficiency.
Clean the filter with a vacuum cleaner and with water and
neutral detergent if necessary.
Pulire il filtro deodorante (verde):
Il filtro dovrebbe essere pulito ad ogni cambio di stagione:
- Estrarre i filtri dell’aria.
- Pulire il filtro con acqua e detergente neutro, risciaquare
completamente con acqua e asciugare al sole.
- Reinserire il filtro deodorante pulito sotto i fermi filtro,
posizionati sui filtri aria.
- Rimontare i filtri aria sull’unità.
Cleaning the deodorant filter (green):
The filter should be cleaned every season:
- Remove the air filters.
- Clean the filter with water and neutral detergent, rinse thoroughly with water, dry completely under sunlight.
- Set the clean deodorant filter under the filter stoppers located on the air filters.
- Reinstall the air filters.
Attenzione: ogni 3 anni è necessaria una sostituzione, in
quanto l’effetto deodorante deteriorerà.
Caution: replacement is necessary at interval of 3 years, as
the deodorising effect will deteriorate.
Sostituire il filtro di accumulo della polvere (grigio):
Il filtro dovrebbe essere cambiato ad ogni cambio di stagione:
- Estrarre i filtri dell’aria.
- estrarre il vecchio filtro di accumulo della polvere dai filtri
dell’aria.
- Inserire il nuovo filtro di accumulo della polvere, sotto i
fermi filtro nei filtri aria, con la parte nera rivolta verso
l’alto.
- Rimontare i filtri aria sull’unità.
Changing the dust collection filter (gray):
The filter should be changed every season:
- Remove the air filters.
- Take off the old dust collection filter from the air filters.
- Set the new dust collection filter, the back side facing
upward, under the filter stoppers located on the air filters.
- Reinstall the air filters.
Caution: the dirty dust collection filter is not washable for
reuse.
Attenzione: il filtro di accumulo della polvere non è lavabile a scopo di riuso.
1
2
3
3
2
1
18
Scaricare