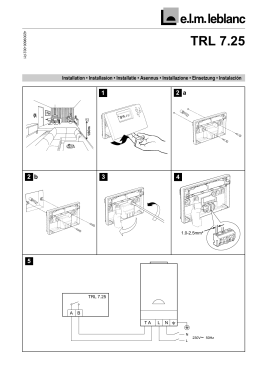
42009602-002 R1
TRL 1.25
Installation • Installasion • Installatie • Asennus • Installazione • Einsetzung • Instalación
2 b
1
2 a
3
4
1.0-2.5mm²
5
TRL 1.25
A
B
TA
L
N
N
L
230V~ 50Hz
6
7
8
9
10
GB
OPERATING YOUR THERMOSTAT
AUTOMATIC OPERATION
For normal operation press the AUTOmatic
button. The word AUTO will show on the
display and the Thermostat will control to the
programmed temperature levels.
TEMPERATURE INQUIRY
In normal operation the room temperature is
displayed. To check the programmed temperature setpoint, press and hold down the
button. The display will blank
temperature
briefly before displaying the setpoint. On
releasing the button the room temperature will
be displayed.
TEMPERATURE OVERRIDE
During normal operation the temperature
setpoint can be adjusted on a temporary basis
or
button.
by pressing the Temperature
temperature overrides are cancelled at the next
valid setpoint change time.
MANUAL OPERATION
To operate as a simple thermostat with a fixed
setpoint throughout the day, press the MANual
button. The word MAN will show on the display.
To adjust the manual temperature setpoint
press the temperature or button.
FROST PROTECTION
The minimum temperature setpoint of 5°C (in
AUTOmatic and MANual operation) provides
your home with constant frost protection.
D
F
I
NL
BETRIEB DER THERMOSTATSCHALTUHR
FONCTIONNEMENT DU
THERMOSTAT PROGRAMMABLE
USO DEL TERMOSTATO
PROGRAMMABILE
HOE GEBRUIKT U UW
THERMOSTAAT?
AUTOMATIKBETRIEB
Normalbetrieb: Taste Automatik betätigen. In
der Anzeige erscheint AUTO. Entsprechend
der
eingestellten
Zeiten
wird
die
Raumtemperatur geregelt.
MODE DE FONCTIONNEMENT
FUNZIONAMENTO AUTOMATICO
Per il funzionamento normale, premere il
pulsante AUTO. Sul display compare
l’indicazione AUTO e il termostato programmabile viene impostato per controllare
autonomamente i livelli di temperatura
programmati.
AUTOMATISCHE WERKING
Bij normaal gebruik: met een druk op de
AUTOmatisch toets. Het woord AUTO zal op
het scherm verschijnen en de thermostaat zal
ervoor zorgen dat de ingestelde temperaturen
verkregen worden.
TEMPERATURANZEIGE
Normalbetrieb: Anzeige der aktuellen
Raumtemperatur; Anzeige der programmierten
gedrückt
Raumtemperatur (Sollwert): Taste
halten; nach kurzer Zeit wird der Sollwert
angezeigt.
TEMPERATUR ÄNDERN
Während Normalbetrieb kann der Temperatursollwert befristet angepaßt werden. Tasten
temperatur oder drücken. Diese Änderung
ist nur für die Dauer der momentanen
Schaltstufe wirksam.
MANUELLER BETRIEB
Schiebeschalter in Stellung MANuell. Die
Schaltzeiten haben keine Wirkung, es wird
ständig eine Temperatur geregelt. Der
Temperatursollwert kann durch Drücken der
Tasten temperatur oder angepaßt werden.
FROSTSCHUTZ
(nur für Warmwasser-Heizsysteme)
Eine eingestellte Minimaltemperatur (5,0° C)
sorgt dafür, daß die Anlage bei längerer
Abwesenheit vor Frost geschützt ist.
AUTOMATIQUE
Pour un fonctionnement normal, presser la
touche “Automatique” - le mot AUTO apparaîtra
sur l’écran et le Thermostat Programmable
fonctionnera suivant les niveaux de température
programmés.
RECHERCHE DE TEMPERATURE
Normalement c’est la température ambiante qui
s’affiche sur l’écran. Pour vérifier le niveau de
température programmé, presser et maintenir
la touche , l’écran s’effacera brièvement puis
la température programmée apparaîtra en
relâchant la touche, la température ambiante
réapparaîtra.
CONSULTAZIONE DEL LIVELLO DI
TEMPERATURA
Durante il funzionamento normale, viene
visualizzata la temperatura ambiente. Per
controllare il livello di temperatura programmato, premere e tenere premuto il
pulsante temperatura . Il display lampeggia
brevemente, e poi visualizza la temperatura
ambiente.
CHANGEMENT MOMENTANE DE
TEMPERATURE
En fonctinnement normal, le niveau de
température choisi peut être modifié temporairement en pressant les touches
température ou .
Cette modification sera annulée à la prochaine
heure de changement de niveau.
ESCLUSIONE LIVELLO DI TEMPERATURA
IMPOSTATO
Durante il funzionamento normale, il valore di
temperatura impostato può essere modificato
temporaneamente premendo il pulsante
temperatura o . La funzione di esclusione
viene cancellata al cambio di temperatura
successivo.
FONCTIONNEMENT MANUEL
Pour utiliser le Thermostat Programmable
comme un simple thermostat, avec un niveau
de température constant toute la journée,
presser la touche “Manuel”, le mot MAN
apparaîtra sur l’écran. Pour choisir la valeur
de température, presser les touches
température ou .
FUNZIONAMENTO MANUALE
Per il fuzionamento come semplice termostato,
con un livello di temperatura fisso per tutta la
giornata, premere il pulsante MAN. Sul display
compare così l’indicazione MAN (manuale).
Per regolare il livello di temperatura manuale,
premere il pulsante temperatura o .
PROTECTION ANTIGEL
Une valeur minimale de 5°C (en automatique
ou manuel) assure une protection antigel
permanente.
PROTEZIONE ANTIGELO
lmpostando un livello di temperatura minimo di
5°C già prefissato, l’abitazione sarà protetta
costantemente dal gelo.
OPVRAGEN TEMPERATUUR
Bij normaal gebruik verschijnt op het scherm
de kamertemperatuur. Om het ingestelde
temperatuurinstelpunt te kontroleren drukt u op
Het scherm zal even uitvallen en
de toets.
dan het temperatuurinstelpunt geven. Wanneer
u de toets loslaat verschijnt na enkele sekonden
terug de kamertemperatuur.
TIJDELIJKE TEMPERATUURWIJZIGING
Bij normaal gebruik kunt u de temperatuur ook
tijdelijk wijzigen door op de toets
of
te
drukken. De tijdelijke temperatuurwijziging
vervalt zodra het eerstvolgend geprogrammeerd tijdstip bereikt wordt.
HANDBEDIENING
Druk de MANueel toets in, dan funktioneert de
thermostaat als een gewone thermostaat en
houdt hij de ganse dag de vastgestelde
temperatuur aan. Het woord MAN zal op het
scherm verschijnen.
Om het temperatuurinstelpunt manueel te
of .
wijzigen drukt u op de toets
VORSTBESCHERMING
Een minimum ingevoerde temperatuur van 5°C
biedt uw woning een blijvende vorstbeveiliging.
E
MODOS DE FUNCIONAMIENTO
DEL TERMOSTATO
PROGRAMABLE
MODO AUTOMATICO
Pulse el botón AUTO. La palabra AUTO
aparecerá en la pantalla.
CONSULTA DE LA TEMPERATURA
PROGRAMADA
El termostato muestra continuamente la
temperatura ambiente. Si desea visualizar la
temperatura de control programada para el
período en curso, pulse el botón . La pantalla
le mostrará dicho dato durante unos segundos.
CAMBIO EVENTUAL DE LA
TEMPERATURA PROGRAMADA
En cualquier momento, se puede cambiar
eventualmente la temperatura de control
o .
programada, pulsando los botones
Este cambio eventual de la temperatura
quedará cancelado al entrar el siguiente cambio
de nivel del programa.
MODO MANUAL
Para que el termostato funcione como un
termostato simple, con una tem-peratura fija
durante todo el tiempo, pulse el botón MAN.
La palabra MAN aparecerá en la pantalla. Para
cambiar la temperatura pulse los botones
o .
PROTECCION ANTIHIELO
La temperatura mínima seleccionable de 5°C
le proporcionará protección continua de la
instalación contra la congelación del agua en
las tuberías. Si va a ausentarse durante un
tiempo prolongado y desea programar esta
protección, seleccione modo manual y
programe 5°C.
A su vuelta, seleccione el modo de
funcionamiento que desee.
USER GUIDE
BEDIENUNGSANLEITUNG
GUIDE DE L’UTILISATEUR
MANUALE D’USO
GEBRUIKERSHANDLEIDING
GUIA DEL USUARIO
42009608-001 R4
GB
GB
BATTERY REPLACEMENT
The batteries which power the Thermostat
should last for about two years. A flashing
battery symbol will be displayed when the
batteries require changing. Remove the
controller from its wallplate and replace the
batteries as shown below.
Following battery replacement, replace on the
wallplate and press the reset button. Your
Thermostat will now require reprogramming as
detailed above.
ALWAYS USE NEW BATTERIES
Two AA size LR6 Duracell Alkaline cells are
recommended.
D
BATTERIE AUSTAUSCHEN
Der Uhrenthermostat wird über Batterien
versorgt (Lebensdauer ca. 2 Jahre).
Nachlassende Kapazität wird durch ein
Batteriesymbol (blinkend) angezeigt. Die
Batterien sollten ausgetauscht werden. Trennen
Sie das Reglergehäuse von der Grundplatte
(siehe Bild) und tauschen Sie die Batterien wie
dargestellt aus.
Nach dem Einlegen der neuer Batterien das
Reglergehäuse wieder an der Grundplatte
befestigen und Reset-Taste drücken. Ihr
Thermostat muß nun wie oben beschrieben neu
programmiert werden.
BITTE NUR NEUE BATTERIEN
VERWENDEN
Empfohlen: 2 LR6 Duracell Alkalizellen, Größe
AA
HINWEIS: Leere Batterien sind Sondermüll und
müssen daher entsprechend entsorgt werden!
F
REMPLACEMENT DES PILES
La durée de vie des piles équipant le
Thermostat Programmable est d’environ 2 ans.
Un symbole “Piles” clignotera sur l’écran
indiquant qu’il est temps de les changer.
Ôter le Thermostat Programmable de sa base
murale et remplacer les piles comme indiqué
ci-dessous.
Après avoir changé la batterie, remettre sur la
base murale et appuyer sur le bouton de remise
en route (reset). Votre thermostat aura besoin
d’être reprogrammé comme indiqué ci-dessus.
UTILISER TOUJOURS DES PILES NEUVES
Recommandation: 2 piles alcalines AA-LR6
Duracell.
I
SOSTITUZIONE DELLE BATTERIE
La durata delle batterie di alimentazione del
termostato programmabile è di circa 2 anni. Se
il simbolo delle batterie comincia a lampeggiare,
significa che queste devono essere sostituite.
Rimuovere l’unità di controllo dal supporto a
muro e procedere come illustrato nella figura.
Dopo la sostituzione delle batterie, rimettere
l’unità sul supporto a muro, quindi premere il
pulsante di reset. Il termostato deve ora essere
riprogrammato, come indicato qui sopra.
USARE SEMPRE BATTERIE NUOVE
Si raccomanda l’uso di due batterie alcaline
formato AA LR6 Duracell.
NL
VERVANGEN VAN BATTERIJEN
De meegeleverde batterijen moeten uw
thermostaat tot 2 jaar toe in werking houden.
Een knipperend batterijleegloopsymbool verschijnt op het scherm wanneer de batterijen
moeten vervangen worden.
Verwijder de thermostaat van de basis en
vervangen de batterijen
zoals hierna
afgebeeld.
Na vervanging van de batterij plaats terug op
de muurplaat en druk op de reset knop. Uw
thermostaat
moet
nu
opnieuw
op
bovenvermelde wijze worden geprogrammeerd.
GEBRUIK ALTIJD NIEUWE BATTERIJEN
Het verdient de aanbeveling twee Duracell LRV
Alkaline batterijen van AA formaat te gebruiken.
E
CAMBIO DE PILAS
La duración de las pilas será de unos dos años.
El símbolo de una pila parpadeando en la
pantalla indica que es necesario cambiar las
pilas. Separe el termostato de su base y
sustituya las pilas como se indica en el dibujo.
Después de cambiar las pilas, pulse el botón
de reajuste (RESET) y coloque el termostato
en su base. Programe nuevamente el
termostato siguiendo las instrucciones
generales.
UTILICE SIEMPRE PILAS NUEVAS
Se recomienda utilizar dos pilas alcalinas de
1,5V, LR6 Duracell, tamaño AA.
D
FEATURES
• One day heating program
• 4 temperature levels daily
• Built-in program
• Temporary override
• Automatic or Manual operation
• Battery powered to prevent loss of program
during power cuts
• Temperature inquiry
FUNKTIONEN
• Tagesprogramm
• 4 Schaltstufen/Tag
• Exakte Raumtemperatur-Regelung
• Werkseitiges Grundprogramm
• Temperaturänderung für befristete Zeit
• Automatik-, oder Manueller Betrieb
• Versorgung über Batterie
• Temperatur-Anzeige
The Thermostat will work with other controls in
your system to provide comfortable temperatures in your home when you want them.
Diese Thermostat-Schaltuhr wirkt auf eine
Gastherme (oder anderes Heizgerät) und sorgt
dafür, daß lhre Wohnung dann warm ist, wann
Sie es wollen.
F
CARACTERISTIQUES
• Programme de chauffage journalier
• 4 changements de niveaux de température
par jour
• Programme d’usine pré-établi
• Modification temporaire de température
• Fonctionnement automatique ou manuel
• Sauvegarde du programme par piles en cas
de coupure d’alimentation
• Affichage de température
Le thermostat programmable peut fonctionner
en liaison avec d’autres organes de réglages
de votre système de chauffage afin de procurer
les températures confortables que vous aurez
choisis.
NL
KENMERKEN
• 24 uur verwarmingsprogramma
• Tot 4 temperatuurwijzigingen per 24 uur
• Ingebouwd standaardprogramma
• Tijdelijke temperatuurafwijking
• Automatische of handbediende werking
• Batterijvoeding
• Temperatuurinstelpunt opvraagbaar
De thermostaat werkt samen met andere
kontroleapparaten in uw
verwarmingssysteem om in uw woning een
komfortabele temperatuur te doen heersen,
wanneer u dat wenst.
I
CARATTERISTICHE
• Programma di riscaldamento giornaliero.
• 4 livelli di temperatura giornalieri.
• Programma incorporato.
• Esclusione temperanea del livello di
temperatura impostato.
• Funzionamento automatico o manuale.
• Batteria di backup per il salvataggio dei dati
di programma in caso di interruzione della
corrente.
• Temperature selezionate consultabili.
Unito ad altri apparecchi di controllo, il
termostato programmabile permette di
raggiungere in qualsiasi momento la temperatura desiderata nella propria abitazione.
E
CARACTERISTICAS
• Programa de calefacción diario (24h)
• Hasta 4 cambios de nivel de temperatura
diarios
• Programa base prefijado en fábrica
• Posibilidad de modificar eventualmente,
para el período en curso, la temperatura
programada
• Funcionamiento manual o automático
• Alimentación por pilas para evitar la pérdida
del programa si se produce un corte de
corriente
• Tecla para consultar la temperatura de
control programada para el período en curso
GB
SETTING YOUR THERMOSTAT
D
F
I
NL
PROGRAMMATION DE VOTRE
THERMOSTAT PROGRAMMABLE
IMPOSTAZIONE DEL
TERMOSTATO PROGRAMMABILE
HOE STELT U UW
THERMOSTAAT IN?
PROGRAMACION DEL
TERMOSTATO PROGRAMABLE
TAG/UHRZEIT ÄNDERN
Die Abdeckung ist geöffnet.
MISE A L’HEURE CORRECTE
IMPOSTAZIONE DELL’ORA
INSTELLEN VAN DE JUISTE TIJD
PARA PONER EL RELOJ EN HORA
STADE 1
Soulever le couvercle avant de l’appareil et
presser la touche “Automatique”.
FASE 1
Aprire lo sportellino anteriore del termostato
programmabile e premere il pulsante AUTO.
STAP 1
Om de juiste tijd in te stellen: open het klepje
op de voorzijde van de thermostaat en druk op
de AUTOmatisch toets.
1.
Abra la tapa abatible situada en la parte
delantera del termostato y pulse el botón
AUTO.
STADE 2
Pour modifier l’heure, presser les touches
ou
du symbole
jusqu’à ce que l’heure
correcte soit affichée.
FASE 2
Per cambiare l’orario, premere il pulsante
o
finchè non è visualizzata l’ora corretta.
STAP 2
Om de tijd te veranderen drukt u op de toets
of
tot de juiste tijd op het scherm verschijnt.
2.
Para cambiar la hora, pulse los botones
o hasta que la indicación en pantalla coincida
con la hora exacta. Cada pulsación produce
un cambio de un minuto. Manteniendo el botón
pulsado, la indicación horaria cambiará
lentamente al principio y rápidamente después.
SETTING THE CORRECT TIME
STEP 1
Open the flap on the front of the Thermostat
and press the AUTOmatic button.
STEP 2
To change the time, press the
or
button until the correct time is displayed.
Each press of the button will change the time
by one minute. Holding the button down for
more than a few seconds will change the time
slowly at first, then quickly.
SETTING THE TEMPERATURE PROGRAM
The heating program has four temperature level
changes per day. Each can be set between
3.00am and 2.30am (on the next day) to allow
you to maintain the evening temperature after
midnight, if required. Each temperature level
can be set between 5°C and 30°C, and
adjusted in 0.5°C steps. The daily program is
repeated each day of the week.
STEP 3
button. The first
Press the program
temperature change time and setpoint will now
be flashing on the display to indicate they can
be changed.
STEP 4
or
button to adjust the first
Use the
temperature change time in steps of 30
minutes. Holding the button down will change
the time quickly.
STEP 5
or
button to adjust
Use the temperature
the first temperature setpoint in 0.5°C steps.
STEP 6
Press the program
button to display the
second temperature change time and setpoint.
or
button
Set these by pressing the
and temperature
or button.
STEP 7
Press the program button to display the third
temperature change time and setpoint. Set
or
button and
these by pressing the
the temperature or button.
STEP 8
to display the
Press the program button
fourth temperature change time and setpoint.
Set these by pressing the
or
button
and the temperature or button.
*NOTES*
1 Unwanted change times can be deleted by
holding the appropriate program button
through
down for a few seconds. The
displayed time and temperature will be
replaced by dashes and the change time
number will be removed.
2 The temperature change times must be set
in the correct order (1 to 4). If you attempt to
change this order, the display will flash the
next (or previous) change time number. This
is to warn you the next/previous change time
will be adjusted if you continue to press the
or
button.
REVIEWING YOUR PROGRAM
By using program
to
buttons you can
review the program you have set and make any
modifications which may be necessary.
E
EINSTELLEN DER THERMOSTATSCHALTUHR
Schritt 1
Taste AUTOmatik drücken. Die Uhrzeit und der
aktuelle Tag blinken (d.h. sie können verändert
werden).
Schritt 2
Tasten
oder
drücken, um die Uhrzeit
einzustellen. Kurzes Antippen bdeutet eine
Änderung um jeweils 1 Min. (Die Anzeige hört auf
zu blinken). Längere Betätigung bewirkt eine
schnellere Änderung der Uhrzeit.
EINGABE/ÄNDERUNG DES PROGRAMMS
Ihr Heizprogramm hat bis zu 4 Schaltstufen pro
Tag. Jede kann von 3.00 bis 2.30 (nächster Tag)
eingegeben werden, d.h. Ihre Heizperiode
endet nicht notwendigerweise um Mitternacht.
Für jede Schaltzeit kann die Temperatur
zwischen 5°C und 30°C (in Stufen von 0,5°C)
eingestellt werden. Das Tagesprogramm ist an
jedem Wochentag gültig.
Schritt 3
drücken; in der LCDTaste Schaltstufe
Anzeige blinken Uhrzeit und Solltemperatur der
ersten Schaltstufe. Dies zeigt an, daß sie
geändert werden können.
Schritt 4
oder
drücken, um die
Tasten
Schaltzeit in Schritten von 30 Min. einzustellen.
Längere Betätigung bewirkt eine schnellere
Änderung.
Schritt 5
Tasten temperatur
Solltemperatur in
einzustellen.
oder drücken, um die
Schritten von 0,5°C
Schritt 6
Taste Schaltstufe
drücken, in der LCDAnzeige blinken Uhrzeit und Solltemperatur der
zweiten Schaltstufe. Einstellen/Ändern der
Schaltzeit und Temperatur wie in Schritt 4 und
5 beschrieben.
Chaque pression sur les touche correspond à
un changement d’une minute. Une pression de
plus de quelques secondes vous permettra de
modifier l’heure d’abord lentement, ensuite très
rapidement.
PROGRAMMATION DES NIVEAUX
DE TEMPERATURE
Le programme de chauffage comporte 4
changements de niveaux de température par
jour. Ils peuvent être fixés entre 3.00h.AM et
2.30h.AM du jour suivant, pour vous permettre
de maintenir le niveau de température du soir
après minuit, si désiré. Chaque niveau de
température peut être choisi entre 5°C et 30°C
et ajusté par pas de 0.5°C. Le programme
journalier est répété chaque jour de la
semaine.
STADE 3
Presser la touche programme . La première
heure de changement de tem-pérature et le
niveau de température sont maintenant
clignotants sur l’écran, indiquant ainsi qu’ils
peuvent être modifiés.
STADE 4
ou
du symbole
Presser les touches
pour ajuster la première heure de changement
de température, par pas de 30 minutes. En
maintenant la touche pressée, vous changerez
d’heure plus rapidement.
STADE 5
ou
pour ajuster le
Presser les touches
premier niveau de température par pas de
0.5°C.
STADE 6
pour afficher
Presser la touche programme
la seconde heure de changement et le second
niveau de température. Pour cela, presser les
et les touches
touches ou du symbole
température ou
.
Schritt 8
Taste Schaltstufe drücken, und so verfahen
wie in Schritt 4 und 5.
STADE 7
pour afficher
Presser la touche programme
la troisième heure de changement et le
troisième niveau de température.
Ensuite, procéder comme décrit au stade 6.
2 Die Schaltzeiten müssen in aufsteigender
Reihenfolge eingegeben werden. Wenn Sie
eine Schaltzeit eingeben, die bereits belegt
ist, blinkt die entsprechende (nächste oder
vorhergehende) Schaltstufe. Dies zeigt an,
daß die nächste (oder vorhergehende)
Schaltzeit verschoben wird.
PROGRAMM ÜBERPRÜFEN
..
Durch Betätigen derTasten Schaltstufen
können Sie das eingegebene Programm
überprüfen und sofern erforderlich korrigieren.
3
1
4
+
Schritt 7
drücken, in der LCDTaste Schaltstufe
Anzeige blinken Uhrzeit und Solltemperatur der
dritten Schaltstufe. Einstellen/Ändern der
Schaltzeit und Temperatur wie in Schritt 4 und
5.
ANMERKUNG
..
1 Nicht benötigte Schaltstufen
können durch Betätigen (ca.3 Sek.) der
entsprechenden Taste gelöscht werden.
2
STADE 8
Presser la touche programme
comme décrit au stade 5.
et procéder
NOTES.1 Les heures de chargement non désirées
peuvent être désactivées en pressant la
touche approprié (de 2 à 4) pendant quelques
secondes. L’heure et la température sur
l’ecran seront remplacées par des traits et le
numéro supprime (2 à 4). L’heure de
changement, la température et le numéro
seront réactivés par pression sur la touche
du programme approprié.
2 Les heures de changement de niveau de
température doivent être programmées dans
l’ordre normal (1 à 4). Si vous essayez de
modifier cet ordre, l’écran fera clignoter le
nouveau (ou prévu) changement d’heure,
ceci pour vous prévenir que le nouveau (ou
prévu) changement d’heure sera ajusté si
vous continuez à presser les touches
ou
du symbole
.
RELECTURE DU PROGRAMME
En utilisant les touches de programme 1 à 4,
vous pourrez relire le programme que vous
avez établi et le modifier si nécessaire.
Ne pas presser la touche du programme
désactivé sinon vous le réactivez.
Ogni volta che si preme il pulsante, l’orario
incrementa di un minuto. Tenendo premuto il
pulsante per qualche secondo, l’ora cambierà
lentamente all’inizio, quindi rapidamente.
IMPOSTAZIONE DEL PROGRAMMA DI
TEMPERATURA
Il programma di riscaldamento prevede quattro
variazioni giornaliere del livello di temperatura.
É possibile impostare il livello fra le 3.00am e
le 2.30am (del giorno successivo) al fine di
mantenere la temperatura serale anche dopo
mezzanotte. Ogni livello di temperatura può
essere impostato fra 5°C e 30°C, regolandolo
ad incrementi di 0,5°C. Il programma
giornaliero viene ripetuto per ogni giorno della
settimana.
FASE 3
Premere il pulsante di programma . Il primo
orario di cambiamento di temperatura e il
livello di temperatura lampeggiano sul display
per indicare che possono essere modificati.
FASE 4
o
per regolare il
Usare il pulsante
primo orario di cambiamento temperatura ad
incrementi di 30 minuti. Tenendo premuto il
pulsante, l’orairo cambierà rapidamente.
FASE 5
o
per
Premere il pulsante temperatura
regolare il primo livello di temperatura da
impostare ad incrementi di 0,5°C.
FASE 6
per
Premere il pulsante di programma
richiamare sul display il secondo orario di
cambio temperatura e il livello da impostare.
Impostare i valori premendo il pulsante
o
e il pulsante temperatura o .
FASE 7
per
Premere il pulsante di programma
visualizzare il terzo orario di cambiamento
temperatura e il livello di temperatura.
Impostare questi valori premendo il pulsante
o
e il pulsante temperatura
o .
FASE 8
per
Premere il pulsante di programma
visualizzare il quarto orario di cambio
temperatura e il livello di temperatura.
Impostare i valori premendo il pulsante e il
o
e il pulsante temperatura
pulsante
o .
*NOTA*
Gli orari di cambiamento indesiderati possono
essere cancellati tenendo premuto il pulsante
di programma corrispondente (da
a ) per
qualche secondo. L’ora e la temperatura
visualizzati saranno quindi sostituiti da una
serie di trattini e il numero degli orari di
cambiamento verrà cancellato.
REVISIONE DEL PROGRAMMA
IMPOSTATO
Usando i pulsanti di programma da
a
è
possibile verificare il programma impostato e
apportarvi eventuali modifiche.
Telkens wanneer u op de toets drukt, verandert
de tijd met één minuut en houdt het scherm op
met knipperen. Als u de toets een paar
sekonden ingedrukt houdt, verandert de tijd
eerst traag, daarna snel.
INSTELLEN VAN HET
TEMPERATUURPROGRAMMA
Het verwarmingsprogamma kan per dag vier
keer op een andere temperatuur overschakelen. U kunt deze temperaturen instellen
tussen 3 uur’s morgens en 2u 30 de volgende
morgen om desgewenst de avondtemperatuur
ook na middernacht te laten voortduren.
U kunt de temperatuur telkens in stappen van
0,5°C instellen tussen 5°C en 30°C. Het
dagprogramma geldt voor alle dagen van de
week.
STAP 3
Druk op de tijdstiptoets . Het eerste tijdstip
en het eerste instelpunt voor temperatuurverandering beginnen nu te knipperen om aan
te geven dat ze kunnen gewijzigd worden.
STAP 4
Stel het eerste tijdstip voor temperatuurof
. U kunt
verandering in met de toets
dit tijdstip wijzigen in stappen van 30 minuten.
Als de toets ingedrukt houdt, verandert het
tijdstip snel.
STAP 5
of
om het eerste
Gebruik de toets
temperatuurinstelpunt in stappen van 0,5°C in
te stellen.
STAP 6
tijdstipteoets om het tweede
Druk op de
tijdstip en het tweede temperatuurinstelpunt
weer te geven op het scherm. Stel beide
of
en
waarden in door op de toetsen
of
te drukken.
STAP 7
om het derde
Druk op de tijdstipteoets
tijdstip en het derde temperatuurinstelpunt weer
te geven op het scherm. Stel beide waarden
in door op de toetsen
of
en
of
te
drukken.
STAP 8
Druk op de tijdstiptoets om het vierde tijdstip
en het vierde temparatuurinstelpunt weer te
geven op het scherm. Stel beide waarden in
of
en
of
te
door op de toetsen
drukken.
*OPMERKINGEN
1 Ongewenste tijdstipinstellingen kunnen
verwijderd worden door de betreffende tijdstiptoets meerdere sekonden in te drukken.
Tijdstip en temperatuur verdwijnen dan van
het scherm, en worden vervangen door
streepjes.
2 De tijdstippen moeten in de juiste volgorde
(van 1 tot 4) ingebracht worden. Wanneer u
deze volgorde wijzigt zal het volgende (of
vorige) tijdstip knipperen wanneer de
of
toetsen worden ingedrukt.
HOE WIJZIGT U EEN PROGRAMMA?
Met behulp van de tijdstipteotsen
tot
kunt u het ingevoerde programma kontroleren
en er alle nodige wijzigingen in aanbrengen.
PROGRAMACION DE LOS NIVELES DE
TEMPERATURA
El programa de calefacción ofrece la posibilidad de establecer hasta 4 niveles de
temperatura cada día. Con el fin de poder
mantener el nivel de confort después de
medianoche, el programa diario comprende
desde las 3:00 hasta las 2:30 (del día
siguiente). Cada nivel de temperatura puede
seleccionarse entre 5°C y 30°C en pasos de
0,5°C. El programa diario se repite
automáticamente cada día de la semana.
3.
Pulse el botón de programa . En pantalla
aparecerán, parpadeando, la hora del primer
cambio de nivel y su correspondiente
temperatura.
4.
o
para programar la
Use los botones
hora del primer cambio de nivel. La indicación
cambia de 30 en 30 minutos. Manteniendo el
botón pulsado, la indicación horaria cambiará
rápidamente.
5.
Use los botones
o
para programar la
temperatura correspondiente al primer nivel. La
indicación cambia en pasos de 0,5 °C.
6.
Pulse el botón de programa . En pantalla
aparecerán la hora del segundo cambio de nivel
y su correspondiente temperatura. Seleccione
la hora y temperatura deseadas mediante
o
y
o
los botones
respectivamente.
7.
Pulse el botón de programa . En pantalla
aparecerán la hora del tercer cambio de nivel
y su correspondiente temperatura. Seleccione
la hora y temperatura deseadas mediante los
botones
o y o respectivamente.
8.
Pulse el botón de program . En pantalla
aparecerán la hora del cuarto cambio de nivel
y su correspondiente temperatura. Seleccione
la hora y temperatura deseadas mediante los
o y o respectivamente.
botones
NOTAS:
1 Los cambios de nivel no deseados pueden
borrarse manteniendo pulsada durante unos
segundos el botón de cambio de nivel
a . La hora y
correspondiente, de
temperatura indicadas serán sustituidas por
guiones y el número de cambio de nivel
desaparecerá.
2 La programación de los diferentes cambios
de nivel de temperatura debe realizarse en
el orden correcto (1 a 4). Si intenta cambiar
este orden, aparecerá en la pantalla,
parpadeando, el número del siguiente (o
anterior) cambio de nivel, para advertirle que
si continúa pulsando el botón
o se
ajustará el cambio siguiente o el anterior.
COMPROBACION DE LA PROGRAMACION
Utilizando los botones de programa
a ,
podrá comprobar si la programación realizada
previamente es correcta y podrá efectuar las
correcciones oportunas, si fuera necesario.
10
5
1
2
3
4
-
+
MAN
AUTO
9
8
RESET
7
GB
6
I
1
2
3
4
5
6
7
8
9
10
Burner ON
Battery
LCD Display
Temperature Enquiry Button
Temperature Change Buttons
Reset Button
Auto Button
Manual Button
Time Change Buttons
Program Buttons
1
2
3
4
Indicatore Riscaldamento Acceso
Indicatore Livello di Carica Batterie
Visore a Cristalli Liquidi
Pulsante Consultazione Livelli di Temperatura
Impostati
5 Pulsanti Cambiamento Temperatura
6 Pulsanti di Reset
7 Pulsante per Funzionamento Automatico
8 Pulsante per Funzionamento Manuale
9 Pulsanti Cambiamento Ora
10 Pulsanti di Programma
1
2
3
4
5
6
7
8
9
10
Heizung AN
Batterie Leer
LCD Anzelge
Temperaturabfrage
Temperature Einstellen
RESET - Taste
Automatik Betrieb
Manueller Betrieb
Uhrzeit Einstellen
Schaltstufen
1
2
3
4
5
6
7
8
9
10
Indicateur de demande de chaleur
Indicateur d’usure des piles
Ecran à cristaux liquides
Touche d’interrogation du point de consigne
Touches de modification de temperature
Touche reset
Touch de fonctionnement automatique
Touch de fonctionnement manuel
Touches changement d’heure
Touches de programmation
D
NL
1
2
3
4
Symbool Voor Verwarming aan
Symbool Voor Batterij Leegloop
LCD Scherm
Toets Voor het Opvragen van de lngestelde
Temperatuur
5 Toetsen Voor Temperatuurinstelling
6 Resettoets
7 Toets Voor Automatische Werking
8 Handbedienings-Toets
9 Toetsen Voor Tijdinstelling
10 Tijdstiptoetsen
F
E
1
2
3
4
5
6
7
8
9
10
Indicación Calefacción
Indicación Pilas
Pantalla Cristal Líquido
Botón Consulta Temperatura Programada
Botones Cambio Temperatura
RESET
Botón Modo Automático
Botón Modo Manual
Botones Cambio Hora
Botones Programa (Cambios Nivel)
BUILT-IN PROGRAM / WERKSEITIGES GRUNDPROGRAMM /
PROGRAMME D’USINE PRE-ETABLI / PROGRAMMA INCORPORATO/
INGEBOUWD STANDAARDPROGRAMMA / PROGRAMA BASICO
1
2
3
4
07:00
09:00
17:00
23:00
21°C
19°C
21°C
16°C
PERSONAL PROGRAM / lHR PERSÖNLICHES PROGRAMM /
PROGRAMME PERSONNEL / PROGRAMMA PERSONALE /
PERSOONLIJK PROGRAMMA / PROGRAMA PERSONAL
1
2
3
4
Scaricare