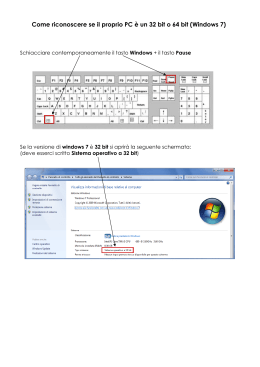
Capitolo 14
Mouse, Tastiera e Operazioni con
i Bit
Il mouse è stato progettato per essere un sostituto all’acquisizione di input da tastiera da parte
dell’utente. Mentre la progettazione GUI (interfaccia grafica utente) è progredita sin dai primi
giorni dalla comporsa delle finestre grafiche, l’evoluzione del mouse no. Probabilmente il più
grande cambiamento per il mouse è stato il passaggio da mouse ottico a mouse senza fili. Tuttavia
la funzionalità di base è rimasta pressoché la stessa. Assegnare una posizione (X,Y), fare clic a
sinistra, a destra, o nel tasto centrale e rilevare il suo stato up o down, controllare il movimento
della rotellina del mouse o muoversi in verticale quando la stessa si muove. Gambas supporta
naturalmente tutte le caratteristiche di base di cui sopra attraverso un approccio semplice mediante
il codice. Nelle prossime pagine, mostreremo come padroneggiare l’input del mouse e della tastiera.
Infine, come ultimo esercizio, creeremo un programma che mostra come usare gli operatori bit.
0.1
Operazioni con il mouse
In gambas possiamo utilizzare la classe Mouse per ottenere informazioni circa un evento del mouse.
Questa classe definisce le costanti utilizzate con le proprietà del mouse. La classe è STATIC e le
proprietà supportate sono:
Alt
Meta
ScreenX
Button
Middle
ScreenY
Control
Normal
Shift
Delta
Orientation
X
Left
Right
Y
La maggior parte di queste proprietà si intuiscono facilmente attraverso il loro stesso nome; tuttavia necessitano di qualche ulteriore spiegazione. Le proprietà Alt, Control, Meta e Shift
restituiscono il valore TRUE premendo i rispettivi tasti. La proprietà Normal può essere controllata per vedere se sono premuti altri tasti speciali. La proprietà Button può essere utilizzata per
vedere se si preme un tasto, ma si possono utilizzare anche le proprietà Left, Right e Middle
per fare la stessa cosa. Tutte queste proprietà restituiscono il valore TRUE quando viene premuto
un tasto è. La proprietà Delta restituisce il valore (offset) della rotellina del mouse, Orientation
può essere usato per determinare la direzione (avanti, indietro) del movimento della rotellina. Le
proprietà ScreenX e ScreenY restituiscono il valore assoluto del cursore basato sulla risoluzione
del desktop mentre X e Y restituiscono la posisione relativa alla finestra.
C’è solo un metodo per la classe Mouse, Move. Il metodo Move riposiziona il cursore del
mouse nelle coordinate X,Y specificate. Gli eventi del mouse che si possono gestire nei programmi sono Mousemove, MouseDown, Mouseup e Mousewheel. Qualsiasi modifica allo stato
corrente di tali eventi permette di creare una risposta codificata per essi. Quando codificate
le operazioni del mouse (o della tastiera) è molto importante utilizzare sempre le
costanti predefinite. L’utilizzo di qualsiasi altro metodo per acquisire o impostare le proprietà
1
This product is [C] 2005 by John W. Rittinghouse, all rights reserved. It is released to the
Gambas User Community under an Open Content License [OCL] and may not be distributed
under any other terms or conditions without the express written consent of the author.
2
A Beginner’s Guide to Gambas
non garantisce la compatibilità con le versioni successive di Gambas. La classe Mouse utilizza le
seguenti costanti per specificare la forma del cursore del mouse:
Arrow
Horizontal
SizeN
SizeS
SplitH
Blank
Pointing
SizeNE
SizeSE
SplitV
Cross
SizeAll
SizeNESW
SizeSW
Text
Custom
SizeE
SizeNW
SizeV
Vertical
Default
SizeH
SizeNWSE
SizeW
Wait
Ora creiamo un piccolo programma Gambas per spiegare come utilizzare il mouse. Dall’IDE di
Gambas creiamo un nuovo progetto con interfaccia grafica utente chiamato MouseOps, traducibile,
con controlli tipo PUBLIC. Create un nuovo form, Form1 e create una classe di avvio. Successivamente aggiungete una drawing area chiamata “da” nell’angolo in alto a sinistra della finestra del
Form1. Ridimensionatela a circa un centimetro quadrato. Ora aggiungiamo il codice. Prima di
tutto, quando il programma viene eseguito e la finestra è aperta, vogliamo impostare un’etichetta
che comunichi all’utente come pulire o uscire dalla finestra. Abbiamo bisogno inoltre di ridimensionare la drawing area per adattarla a tutto il form e impostare la proprietà della cached buffer
su TRUE in modo che il nostro disegno possa essere visualizzato all’utente. Ecco come fare:
’ Gambas class file
’when form opens at runtime, set a caption and resize the drawing area
PUBLIC SUB Form_Open()
ME.Caption = "Press space to clear, mousewheel exits..."
da.W = ME.W5
da.H = ME.H5
da.ForeColor = color.Black ’set the foreground color to black
’set cached property to true so we can store the drawing buffer
da.Cached = TRUE
draw.Begin(da) ’start to draw
’we will draw a horiz and vert line to section four quadrants
draw.Line(1,da.h/2,da.W1,da.h/2)
draw.Line(da.W/2, 1, da.W/2, da.H 1)
draw.End
END
Al movimento del mouse, desideriamo cambiare la forma del cursore in base al quadrante della
drawing area in cui si trova il mouse. Useremo l’evento Mousemove. Il codice è il seguente:
’if the mouse moves, we will update the cursor shape depending on the
’quadrant the mouse is located at
PUBLIC SUB da_MouseMove()
’check the top left quadrant
IF mouse.X <= da.W/2 AND mouse.Y <= da.H/2 THEN
da.Mouse = mouse.Pointing
’else we check the bottom left quadrant
ELSE IF
mouse.X <= da.W/2 AND mouse.Y >= da.H/2 THEN
da.Mouse = mouse.Cross
’else we check the top right quadrant
ELSE IF
mouse.X >= da.W/2 AND mouse.Y <= da.H/2 THEN
da.Mouse = mouse.SizeNWSE
’otherwise, it must be in the bottom right quadrant
ELSE IF
mouse.X >= da.W/2 AND mouse.Y >= da.H/2 THEN
da.Mouse = mouse.SizeNESW
This product is [C] 2005 by John W. Rittinghouse, all rights reserved. It is released to the
Gambas User Community under an Open Content License [OCL] and may not be distributed
under any other terms or conditions without the express written consent of the author.
A Beginner’s Guide to Gambas
3
’if it is anywhere else, make it the default
ELSE
da.Mouse = mouse.Default
ENDIF
Adesso che abbiamo impostato la forme del cursore, vogliamo verificare se l’utente preme un
pulsante del mouse per disegnare. Se viene premuto il tasto sinistro disegneremo dei punti. Se
viene premuto il tasto destro, tracceremo dei piccoli riquadri.
’check mouse button is pressed to see which one is pressed and
’draw points for left btn, boxes for the right
IF Mouse.Left THEN
’start to draw
Draw.Begin(da)
’little tiny dots
Draw.Point(Mouse.X, Mouse.Y)
Draw.End
ELSE ’if it is right button
Draw.Begin(da)
Draw.Rect(Mouse.X, Mouse.Y, 3, 3)
Draw.End
ENDIF
END
Ad ogni movimento della rotellina del mouse desideriamo terminare il programma.
’if the user moves the mouse wheel, we will terminate the application
PUBLIC SUB da_MouseWheel()
ME.Close
END
Se l’utente preme e rilascia un pulsante del mouse desideriamo ripristinare il cursore del mouse
allo stato normale.
’whenever a mouse button is released, reset mouse cursor to normal
PUBLIC SUB da_MouseUp()
da.Mouse = mouse.Default
END
Infine, se l’utente preme un tasto qualsiasi, vogliamo ripristinare la drawing area pulendo e
ridisegnando il quadrante invocando la stessa routine utilizzata per aprire il Form:
’check kbd events to clear the drawing area and redraw the quadrants
PUBLIC SUB Form_KeyPress()
da.Clear
Form_Open()
END
Questo è quanto. Quando eseguiamo il programma si dovrebbe vedere qualcosa che assomiglia
alla figura 1. Muovendo il mouse da quadrante a quadrante notiamo il cambiamento del cursore.
Provate entrambi i pulsanti destro e sinistro del mouse, premete la barra spaziatrice per cancellare
la drawing area e ricominciate. Quando siete soddisfatti e tutto funziona, muovete la rotellina del
mouse per terminato il programma. Adesso occupiamoci delle operazioni con la tastiera.
0.2
Operazioni con la tastiera
Questa classe viene utilizzata per ottenere informazioni sugli eventi della tastiera. Contiene tutte
le costanti predefinite che Gambas utilizza per rappresentare i tasti trovati sulla vostra tastiera.
This product is [C] 2005 by John W. Rittinghouse, all rights reserved. It is released to the
Gambas User Community under an Open Content License [OCL] and may not be distributed
under any other terms or conditions without the express written consent of the author.
4
A Beginner’s Guide to Gambas
Figura 1: L’evento MouseOps in esecuzione.
Come abbiamo sottolineato in precedenza, non si dovrebbero mai utilizzare direttamente i valori
integer dei tasti. Si dovrebbero sempre usare le costanti predefinite di Gambas. Questa classe è
STATIC e agisce come un array in sola lettura. Si può dichiarare una variabile intera e ottenere
il valore di una costante tasto utilizzando questa chiamata per convenzione:
DIM MyInteger AS Integer
MyInteger = Key [ Key AS String ]
Le proprietà che sono supportate per la classe Key sono Alt, Code, Control, Meta, Normal,
Shift, State e Text. La proprietà State può essere utilizzata per verificare o meno se viene
premuto un tasto speciale, la proprietà Text restituisce la rappresentazione del singolo carattere
per un certo tasto. Tutte le altre proprietà operano come le proprietà utilizzate con la classe Mouse
che abbiamo descritto nella sezione precendente. La classe Key supporta le seguenti costanti
predefinite.
Per i tasti cursore:
Up, Down, Left, and Right
Per i tasti funzione:
F1
F2
F3
F4
F5
F6
F7
F8
F9
F10 F11 F12
Per i tasti funzione shift:
F13 F14 F15 F16 F17 F18 F19 F20 F21 F22 F23 F24
Per glia ltri tasti:
BackSpace
Enter
Insert
Pause
SysReq
BackTab
Esc
Menu
Print
Tab
CapsLock
Escape
NumLock
Return
Delete
Help
PageDown
ScrollLock
End
Home
PageUp
Space
Creiamo un altro breve programma Gambas per dimostrare come usare la tastiera. Dall’IDE di
Gambas, create un nuovo progetto chiamato KbdOps con interfaccia grafica utente, traducibile
con controlli tipo PUBLIC. Create un nuovo form, Form1 e create una classe di avvio. Avremo
bisogno di utilizzare anche due etichette: una TextLabel e una Label. Prima, creiamo una TextLabel
chiamata TextLabel1 di circa 1/2 pollice di altezza ed estendetela per tutta la lunghezza del form.
This product is [C] 2005 by John W. Rittinghouse, all rights reserved. It is released to the
Gambas User Community under an Open Content License [OCL] and may not be distributed
under any other terms or conditions without the express written consent of the author.
5
A Beginner’s Guide to Gambas
Impostate la proprietà TextLabel1.Alignment su center. Adesso, create una Label (etichetta)
chiamata Label1 e posizionatela al di sotto del controllo TextLabel1. Mettetela a circa due pollici
di larghezza e mezzo pollice di altezza. Impostate la proprietà Label.Text a “Premere un tasto
qualsiasi ..” e impostate il controllo della dimensione del carattere a 14 punti in grassetto. Adesso
fate doppio clic sul form per aprire la finestra del codice. Aggiungete il seguente codice al nostro
programma:
’ Gambas class file
’we will check the key release event to see what to do
PUBLIC SUB Form_KeyRelease()
’whenever a key is released, check the code
SELECT key.code
CASE key.Tab ’if it is a tab key
textlabel1.Text = "Key code is: " & key.Code &
CASE key.BackSpace ’or backspace
textlabel1.Text = "Key code is: " & key.Code &
CASE key.CapsLock ’or caps lock
textlabel1.Text = "Key code is: " & key.Code &
CASE key.F1 ’or a Fkey
textlabel1.Text = "Key code is: " & key.Code &
CASE key.F2
textlabel1.Text = "Key code is: " & key.Code &
CASE key.F3
textlabel1.Text = "Key code is: " & key.Code &
CASE key.F4
textlabel1.Text = "Key code is: " & key.Code &
CASE key.F5
textlabel1.Text = "Key code is: " & key.Code &
CASE key.F6
textlabel1.Text = "Key code is: " & key.Code &
CASE key.F7
textlabel1.Text = "Key code is: " & key.Code &
CASE key.F8
textlabel1.Text = "Key code is: " & key.Code &
’if none of the above, is it printable? If so, show code
CASE ELSE
IF key.Code > 32 AND key.Code < 128 THEN
textlabel1.Text = "key code is: " & key.Code &
ELSE ’otherwise just the code
textlabel1.Text = "key code is: " & key.Code
ENDIF
END SELECT
END
’check key down event to filter out shift, control,
PUBLIC SUB Form_KeyPress()
IF key.Shift THEN
textlabel1.Text = "Key code is: " & key.Code &
ELSE IF key.Alt THEN
textlabel1.Text = "Key code is: " & key.Code &
ELSE IF key.Control THEN
textlabel1.Text = "Key code is: " & key.Code &
ELSE IF key.Code > 32 AND key.Code < 128 THEN
textlabel1.Text = "key code is: " & key.Code &
", TAB."
", Backspace."
", CapsLock."
", F1 key."
", F2 key."
", F3 key."
", F4 key."
", F5 key."
", F6 key."
", F7 key."
", F8 key."
and value
", " & Chr(key.Code)
alt, etc.
", SHIFT"
", ALT"
", CTRL"
", " & Chr(key.Code)
This product is [C] 2005 by John W. Rittinghouse, all rights reserved. It is released to the
Gambas User Community under an Open Content License [OCL] and may not be distributed
under any other terms or conditions without the express written consent of the author.
6
A Beginner’s Guide to Gambas
Figura 2: L’evento KdbOps in esecuzione.
ELSE IF key.Esc THEN ’if an ESC key is pressed
textlabel1.Text = "key code is: " & key.Code & ", ESC"
ELSE
textlabel1.Text = "key code is: " & key.Code
ENDIF
END
PUBLIC SUB Form_Open()
ME.Caption = " Keyboard Operations "
END
Come avete potuto vedere, il codice di cui sopra è piuttosto semplice e facile da comprendere.
Quando avviate il programma dovreste vedere qualcosa di simile alla figura 2.
0.3
Operazioni con i Bit
I bits sono le unità più piccole utilizzate per le operazioni del computer. Sono come atomi invisibili
di memoria raggruppati in gruppi chiamati bytes. Un byte è composto da un numero n di bits
che dipende dalla dimensione della macchina. Per esempio, in un sistema a otto-bit, ogni byte è
composto da 8 bit. I sistemi informatici moderni hanno sistemi operativi costruiti utilizzando 32
o 64 bit. La dimensione della parola dipende dalla quantità di memoria disponibile. Nei vecchi
sistemi a otto-bit per esempio, il sistema può assegnare la memoria, esprimendola in forma binaria
fino a 11111111. In altre parole, lo spazio della memoria è limitato a una dimensione che può
essere espressa con otto bit. Per un sistema a otto-bit gli intervalli di memoria si estendono
dal singolo byte in rappresentazione decimale di -65.537 a 65.538. In un moderno sistema a
32 bit, assume la forma binaria di 11111111111111111111111111111111 che può essere espressa
in notazione decimale come l’intervallo -2.147.483.648 a +2.147.483.647. Come si può vedere,
l’intervallo di memoria assegnabile con i sistemi a 32 bit è enorme!
Nelle applicazioni a livello di programmazione, in generale non c’è molta occasione di operare a
livello di bit ma di tanto in tanto la necessità si pone. Gambas fornisce tutti gli elementi necessari
per testare un bit, chiaramente cambiarlo (invertirlo), o impostarlo. Inoltre, le operazioni bit per
bit che è possibile eseguire includono la rotazione di un bit a destra o a sinistra e lo spostamento
a destra o a sinistra. La tabella seguente riassume le operazioni con i bit che è possibile eseguire
in Gambas:
Operazioni con i bits in Gambas
Operator
BTst
Syntax
Boolean = BTst(Number , Bit)
BClr
Value = BClr(Number , Bit)
Action taken
Test to see if a bit is set in operand1
using operand2
Clear a specific bit in operand1 using
operand2
This product is [C] 2005 by John W. Rittinghouse, all rights reserved. It is released to the
Gambas User Community under an Open Content License [OCL] and may not be distributed
under any other terms or conditions without the express written consent of the author.
7
A Beginner’s Guide to Gambas
Figura 3: Il programma BitOpt in modalità costruzione.
BSet
Value = BSet(Number , Bit)
BChg
Value = BChg(Number , Bit)
Shl
Value = Shl(Number , Bit)
Shr
Value = Shr(Number , Bit)
Rol
Value = Rol(Number , Bit)
Ror
Value = Ror(Number , Bit)
Return TRUE if the the bit specified
in operand2 of operand1 is set.
Returns operand1 with the bit specified
in operand2 inverted.
Returns operand1 with the bit specified
in operand2 shifted left one bit position.
Returns operand1 with the bit specified
in operand2 shifted right one bit position.
Returns operand1 rotated left operand2
bit positions.
Returns operand1 rotated right operand2
bit positions.
Ora creeremo nuovamente un altro piccolo programma Gambas per dimostrare come utilizzare
le funzioni bit. Dall’IDE di Gambas, create un nuovo progetto chiamato BitOps con interfaccia
grafica utente, traducibile con controlli tipo PUBLIC. Create un nuovo form, Form1 e create una
classe di avvio. Il notro programma prenderà un numero intero da 0 a 255 e visualizzerà i valori
esadecimali e binari corrispondenti. Il programma permetterà di selezionare uno degli otto bit
utilizzati per rappresentare il numero intero e di eseguire qualsiasi operazione in base al pulsante
cliccato. Il valore binario dell’intero verrà visualizzato in modo che l’utente potrà confrontare il
valore binario con il valore dell’intero come indicato inizialmente. Per questo programma, avremo bisogno di sette TextLabels, chiamate TextLabel1 fino a TextLabel7 ; due TextBoxes chiamate
TextBox1 e TextBox2. Infine nove bottoni chiamati RolBtn, RorBtn, ShlBtn, ShrBtn, ClearBtn,
TestBtn, SetBtn, ChangeBtn e QuitBtn. Posizionare i controlli sul form, come mostrato nella
figura 3. Una volta che avete finito di posizionare i controlli come mostrato nella figura 3, cliccate
due volte in una parte qualsiasi del form per entrare nella finestra del codice. Aggiungete il codice
seguente per la subroutine Form Open:
’ Gambas class file
PUBLIC SUB Form_Open()
ME.Caption = " bitOpns "
END
Ora il programma mostrerà la scritta “BitOpns” quando viene eseguito. Codifichiamo una procedura per l’uscita dall’applicazione. Doppio click sul pulsante Quit e aggiungiamo il seguente
codice:
PUBLIC SUB QuitBtn_Click()
ME.Close ’close the window
END
Se l’utente inserisce un valore qualunque nel campo TextBox2 per cambiare un bit, abbiamo
bisogno di aggiornare il form per riflettere i valori modificati. Ci preoccuperemo di quello da fare
con il nuovo valore più avanti nel codice. Per adesso, facciamo una semplice chiamata al metodo
Refresh:
This product is [C] 2005 by John W. Rittinghouse, all rights reserved. It is released to the
Gambas User Community under an Open Content License [OCL] and may not be distributed
under any other terms or conditions without the express written consent of the author.
8
A Beginner’s Guide to Gambas
PUBLIC SUB TextBox2_Change()
form1.Refresh ’refresh our display anytime the bit value changes
END
Quando l’utente specificha un valore intero nel campo TextBox1, il programma deve agire solo
quando viene premuto il tasto TAB. Questo causa l’evento LostFocus per il quale scriveremo il
codice corrispondente. Ecco cosa dobbiamo scrivere:
PUBLIC SUB TextBox1_LostFocus()
’we need a local int var to work with
DIM myInt AS Integer
’convert our string text value to an int
myInt = CInt(textbox1.text)
’check to see if it is in 8bit range
IF Int(myInt >= 0) AND (myInt < 256) THEN
Label2.Text = "Hex: " & Hex(myInt) ’convert hex value
label3.Text = "Bin: " & Bin(myInt) ’convert bin value
label7.Text = Str$(myInt) ’update our text fields
form1.Refresh ’refresh the form
ENDIF
END
Quando l’utente preme il pulsante Clear vogliamo cancellare il bit specificato per il numero intero
rappresentato dal primo parametro.
PUBLIC SUB ClearBtn_Click()
DIM i AS Integer
DIM result AS Integer
DIM myInt AS Integer
’convert our string text value to an int
myInt = CInt(textbox1.text)
’if the integer is between 0 and 255 process, otherwise ignore
IF Int(myInt >= 0) AND (myInt < 256) THEN
’convert string value to an int
result = CInt(TextBox2.Text)
’clear the bit
i = BClr(myInt, result)
’update the label displays
label5.Text = "Bclr: " & Bin(i)
label7.Text = Str$(i)
ENDIF
END
Quando l’utente preme il pulsante Set, vogliamo impostare il bit specificato per il numero intero rappresentato dal primo parametro. Questo è essenzialmente il contrario del caso discusso
precedentemente.
PUBLIC SUB SetBtn_Click()
DIM i AS Integer
DIM result AS Integer
DIM myInt AS Integer
’convert our string text value to an int
myInt = CInt(textbox1.text)
’if the integer is between 0 and 255 process, otherwise ignore
IF Int(myInt >= 0) AND (myInt < 256) THEN
’convert string value to an int
This product is [C] 2005 by John W. Rittinghouse, all rights reserved. It is released to the
Gambas User Community under an Open Content License [OCL] and may not be distributed
under any other terms or conditions without the express written consent of the author.
A Beginner’s Guide to Gambas
9
result = CInt(TextBox2.Text)
’set the bit
i = BSet(myInt, result)
’update the labels
label5.Text = "Bset: " & Bin(i)
label7.Text = Str$(i)
ENDIF
END
La funzione Bchg è in realtà solo un’operazione inversa. Quando il nostro utente clicca il pulsante
Change, viene eseguito il seguente codice:
PUBLIC SUB ChangeBtn_Click()
DIM i AS Integer
DIM result AS Integer
DIM myInt AS Integer
myInt = CInt(textbox1.text)
IF Int(myInt >= 0) AND (myInt < 256) THEN
result = CInt(TextBox2.Text)
i = BChg(myInt, result)
label5.Text = "Bchg: " & Bin(i)
label7.Text = Str$(i)
ENDIF
END
La funzione Shl sposta il valore di MyInt di n bit a sinistra, dove n è specificato dal secondo
paramentro. Quando il nostro utente clicca sul pulsante Shl viene eseguito il seguente codice:
PUBLIC SUB SHLBtn_Click()
DIM i AS Integer
DIM result AS Integer
DIM myInt AS Integer
myInt = CInt(textbox1.text)
IF Int(myInt >= 0) AND (myInt < 256) THEN
result = CInt(TextBox2.Text)
i = Shl(myInt, result)
label5.Text = "SHL: " & Bin(i)
label7.Text = Str$(i)
ENDIF
END
La funzione Shr sposta il valore di MyInt di n bit a destra, dove n è specificato dal secondo
paramentro. Quando il nostro utente clicca sul pulsante Shr viene eseguito il seguente codice:
PUBLIC SUB SHRBtn_Click()
DIM i AS Integer
DIM result AS Integer
DIM myInt AS Integer
myInt = CInt(textbox1.text)
IF Int(myInt >= 0) AND (myInt < 256) THEN
result = CInt(TextBox2.Text)
i = Shr(myInt, result)
label5.Text = "SHR: " & Bin(i)
label7.Text = Str$(i)
ENDIF
END
This product is [C] 2005 by John W. Rittinghouse, all rights reserved. It is released to the
Gambas User Community under an Open Content License [OCL] and may not be distributed
under any other terms or conditions without the express written consent of the author.
10
A Beginner’s Guide to Gambas
Figura 4: Funzioni di rotazione dei bits.
Nei vecchi sistemi a 8 bit era impossibile ottenere un numero maggiore di 255 a meno che non
fosse stato suddiviso in pezzi da 8 bit. Le operazioni venivano effettuate su ogni pezzo del numero.
Prima che le operazione fossero completate, era necessario ricomporre ogni nuovo numero insieme,
per ricreare l’intero numero. Tutto questo era effettuato utilizzando un bit di riporto. Le funzioni
Gambas ROL (rotazione a sinistra) e ROR (rotazione a destra) vengono impiegate per spostare i
bits nei numeri binari. Queste funzioni operano come mostrato in figura 4. ROL e ROR operano
in modo tale che il bit di riporto viene spostato nel bit finale che viene lasciato vuoto dal processo
di rotazione invece di inserire un valore pari a zero. ROL sposta il contenuto di un byte di un
posto a sinistra. ROL non piazza uno zero nel bit 0. Si sposta il bit di riporto dalla posizione
bit 7 alla posizione bit 0 del numero spostato. La posizione bit 0 viene liberata dalla rotazione
e l’istruzione ROL piazza il bit 7 nella posizione del bit di riporto. ROR opera come ROL ma
nella direzione opposta. Sposta di una posizione ogni bit di un byte a destra, posizionando il bit
di riporto nel bit 7 e il bit 0 nel bit di riporto.
’rotate left
PUBLIC SUB ROLBtn_Click()
DIM i AS Integer
DIM result AS Integer
DIM myInt AS Integer
myInt = CInt(textbox1.text)
IF Int(myInt >= 0) AND (myInt < 256) THEN
result = CInt(TextBox2.Text)
i = Rol(myInt, result)
label5.Text = "ROL: " & Bin(i)
label7.Text = Str$(i)
ENDIF
END
’rotate right
PUBLIC SUB RORBtn_Click()
DIM i AS Integer
DIM result AS Integer
DIM myInt AS Integer
myInt = CInt(textbox1.text)
IF Int(myInt >= 0) AND (myInt < 256) THEN
result = CInt(TextBox2.Text)
i = Ror(myInt, result)
label5.Text = "ROR: " & Bin(i)
label7.Text = Str$(i)
ENDIF
END
Se volete che il nostro programma verifichi se un bit è stato impostato, bisogna invocare la chiamata
Btst. Questa funzione restituisce TRUE se il bit specificato nell’operand2 dell’operand1 è TRUE.
This product is [C] 2005 by John W. Rittinghouse, all rights reserved. It is released to the
Gambas User Community under an Open Content License [OCL] and may not be distributed
under any other terms or conditions without the express written consent of the author.
A Beginner’s Guide to Gambas
11
Figura 5: Il programma BitOps in esecuzione.
PUBLIC SUB TestBtn_Click()
DIM i AS Boolean
DIM result AS Integer
DIM myInt AS Integer
myInt = CInt(textbox1.text)
IF Int(myInt >= 0) AND (myInt < 256) THEN
result = CInt(TextBox2.Text)
i = BTst(myInt, result)
label5.Text = "Btst: " & i
ENDIF
END
Questo è tutto quello che bisogna fare per il nostro programma. Salviamo il lavoro ed eseguiamo
il programma. Il risultato dovrebbe essere simile alla figura 5. Quando siamo soddisfatti della
funzionalità del programma salviamo il lavoro. Sarebbe un buon esercizio, in questo momento,
tornare indietro e modificare il codice al fine di garantire solo i valori interi inseriti nei due campi
Textbox. Inoltre si potrebbe consentire l’immissione dei numeri negativi per vedere quali risultati
produrrebbe. Lascerò l’esercizio a quelli fra di voi impazienti e sufficientemente ambiziosi per
provare - non è molto difficile e abbiamo già mostrato come fare le routine di convalida (ricordate
il capitolo sulle collezioni). Nel prossimo capitolo ci occuperemo delle operazioni con i database
in Gambas. La capacità di lavorare con i dati nei vostri programmi è essenziale e non possiamo
trascurare questo aspetto essenziale della programmazione nel nostro viaggio attraverso Gambas.
This product is [C] 2005 by John W. Rittinghouse, all rights reserved. It is released to the
Gambas User Community under an Open Content License [OCL] and may not be distributed
under any other terms or conditions without the express written consent of the author.
Scaricare