RB170 Geogr
aphi
cWi
r
el
essOut
door
► Contents
Chapter 1. Introduction............................................................................................... 4
1.1
Introducing the RB-170............................................................................ 4
1.2
Product Features ....................................................................................... 4
1.3
Package Contents ...................................................................................... 4
1.4
System Requirements ............................................................................... 5
1.5
Inline Power Injector (PoE) ..................................................................... 5
Chapter 2. Installation and Basic Configuration ...................................................... 6
2.1
Before You Start ........................................................................................ 6
2.2
Locate the RB-170 and Inline Power Injector Ports ............................. 7
2.3
Preparing Installation............................................................................... 9
2.4
Basic Configuration ................................................................................ 10
2.4.1 Basic Configuration Steps ................................................. 10
2.4.2 Logging into the Web Interface..................................... 10
2.4.3 Set Operating Mode, IP Address, Subnet Mask,
Default Route IP, DNS Server IP of RB-170.......................... 13
2.4.4 Set Wireless SSID for Wireless Interface................ 15
2.4.5 Set Wireless Encryption for Wireless Interface ... 16
2.4.6 Change Supervisor Account & Password ................. 17
2.4.7 Upgrade the Firmware......................................................... 18
Chapter 3. Network Topologies................................................................................. 20
3.1
Wireless Client Bridge-to-Central Wireless Bridge............................. 21
Chapter 4. All function on Device............................................................................. 22
4.1
BASIC ...................................................................................................... 22
4.1.1 LAN .................................................................................................. 22
4.1.2 WIRELESS.................................................................................... 24
4.2
ADVANCED ............................................................................................ 28
4.3
TOOLS..................................................................................................... 30
4.3.1 Admin................................................................................................... 30
4.3.2 Time...................................................................................................... 32
4.3.3 System .................................................................................................. 34
4.3.4 Firmware ............................................................................................. 35
4.4
Status ........................................................................................................ 37
4.4.1 Device Info ........................................................................................... 37
4.4.2 WIRELESS.......................................................................................... 38
4.4.3 Logs ...................................................................................................... 40
4.4.4 Statistics ............................................................................................... 42
Chapter 5. Specifications ........................................................................................... 44
Chapter 6. Default Settings ....................................................................................... 48
6.1
BASIC ...................................................................................................... 48
6.1.1 LAN ...................................................................................................... 48
6.1.2 WIRELESS.......................................................................................... 48
6.2
ADVANCE ............................................................................................... 49
6.3
TOOLS..................................................................................................... 49
2
Documento riservato © 2006 RayTalk Industries® Repubblica di San Marino.
Riservati tutti i diritti. Ogni oggetto o processo descritto in questo documento è di proprietà di RayTalk Industries® tranne quanto discusso ma espressamente riferito a terzi. Nessuna parte di questo documento o di quanto in esso
descritto può essere riprodotto, utilizzato, ingegnerizzato, trasmesso o messo a disposizione di chiunque mediante qualsiasi forma, o mediante ogni mezzo o supporto senza il permesso scritto degli autori e della RayTalk Industries®
Ogni abuso sarà perseguito a norma delle leggi vigenti.
6.3.1
6.3.2
6.3.3
6.3.4
ADMIN................................................................................................. 49
TIME.................................................................................................... 50
SYSTEM .............................................................................................. 50
FIRMWARE........................................................................................ 50
3
Documento riservato © 2006 RayTalk Industries® Repubblica di San Marino.
Riservati tutti i diritti. Ogni oggetto o processo descritto in questo documento è di proprietà di RayTalk Industries® tranne quanto discusso ma espressamente riferito a terzi. Nessuna parte di questo documento o di quanto in esso
descritto può essere riprodotto, utilizzato, ingegnerizzato, trasmesso o messo a disposizione di chiunque mediante qualsiasi forma, o mediante ogni mezzo o supporto senza il permesso scritto degli autori e della RayTalk Industries®
Ogni abuso sarà perseguito a norma delle leggi vigenti.
Chapter 1.
Introduction
Introducing the RB-170
1.1
The RB-170 is fully interoperable with IEEE 802.11b and g
compliant Outdoor Wireless Last-mile product. The RB-170 operates in
bridge mode, and connects to a point-to-multipoint network , for
maximum flexibility in configuring building-to-building networks and
WISP functions.
1.2
Product Features
¾
¾
¾
¾
¾
¾
¾
Outdoor enclosure in compliance with versatile industrial IP
(Ingress Protection) level covering IP67, IP66, IP55 and IP50
RF transmit power 802.11b mode @ 11Mbps data rate
RF transmit power 802.11g mode @ 54Mbps data rate
Embedded 9dBi patch directional antenna
Support 48VDC 0.375A Power-over-Ethernet(PoE)
MIB-I support
MAC address based access control
Hint: IP(Ingress Protection)
1.3
Package Contents
The product package contains the following items.
1. One (1) RB-170 Outdoor Wireless Access Point / Client Bridge
unit
2. One (1) 100~240VAC, 50~60Hz AC to 48V/0.375A DC switching
adapter
3. One (1) 48VDC, 0.375A Inline Power Injector (PoE)
4. One (1) wall/mast mounting kit
5. One (1) band clamp
6. One (1) 1.8m grounding wire (Optional)
7. One (1) User manual CD-disc
4
Documento riservato © 2006 RayTalk Industries® Repubblica di San Marino.
Riservati tutti i diritti. Ogni oggetto o processo descritto in questo documento è di proprietà di RayTalk Industries® tranne quanto discusso ma espressamente riferito a terzi. Nessuna parte di questo documento o di quanto in esso
descritto può essere riprodotto, utilizzato, ingegnerizzato, trasmesso o messo a disposizione di chiunque mediante qualsiasi forma, o mediante ogni mezzo o supporto senza il permesso scritto degli autori e della RayTalk Industries®
Ogni abuso sarà perseguito a norma delle leggi vigenti.
1.4
System Requirements
Installation of the RB-170 Outdoor Wireless Last Mile CPE
requires the following:
1. A Windows-based PC/AT compatible computer ( PC system
requirement:better than PIII 800 or other 100% compatible equipment , OS:
windows 2000/XP ) or Ethernet data device with an available
RJ-45 Ethernet port to run the configuration program or with
TCP/IP connection to the Ethernet network.
2. A 10/100 Base-T Ethernet RJ-45 Ethernet cable is connected to
Ethernet network.
3. An AC power outlet (100~240V, 50~60Hz) supplies the power.
1.5
Inline Power Injector (PoE)
The RB-170 is equipped with an Inline Power Injector module. The
Inline Power Injector (PoE) delivers both data and power to RB-170
unit via a signal Ethernet cable, and gives the following benefits to
improve the performance vs. installation cost ratio.
¾
This works great in areas where you may not have power , like
house roof.
¾
This also allows you to place the RB-170 unit closer to the
antenna, to make installation easier more thus reducing signal
loss over antenna cabling.
¾
Ethernet signal travels well over CAT 5 cable but 2.4GHz signal
doesn't do as well over antenna cabling.
¾
Ethernet cabling is much cheaper than Antenna cabling.
5
Documento riservato © 2006 RayTalk Industries® Repubblica di San Marino.
Riservati tutti i diritti. Ogni oggetto o processo descritto in questo documento è di proprietà di RayTalk Industries® tranne quanto discusso ma espressamente riferito a terzi. Nessuna parte di questo documento o di quanto in esso
descritto può essere riprodotto, utilizzato, ingegnerizzato, trasmesso o messo a disposizione di chiunque mediante qualsiasi forma, o mediante ogni mezzo o supporto senza il permesso scritto degli autori e della RayTalk Industries®
Ogni abuso sarà perseguito a norma delle leggi vigenti.
Chapter 2.
Installation and Basic Configuration
This chapter describes the procedures of installing the RB-170.
2.1
Before You Start
After unpacking the system, make sure the following items are present
and in good condition. Refer to below pictures for product image.
1. RB-170 Outdoor Wireless Access Point/Client Bridge unit
2. 100~240VAC, 50~60Hz AC to 48V/0.375A DC switching
adapter
3. Inline Power Injector (PoE) 48VDC, 0.375A
4. User manual CD-disk
5. Grounding wire 1.8m
6. Wall/mast mounting kit, including one (1) band clamp
1. Unit
2. Adapter
5. Grounding wire
6. Wall mount
3. PoE
4. CD
6
Documento riservato © 2006 RayTalk Industries® Repubblica di San Marino.
Riservati tutti i diritti. Ogni oggetto o processo descritto in questo documento è di proprietà di RayTalk Industries® tranne quanto discusso ma espressamente riferito a terzi. Nessuna parte di questo documento o di quanto in esso
descritto può essere riprodotto, utilizzato, ingegnerizzato, trasmesso o messo a disposizione di chiunque mediante qualsiasi forma, o mediante ogni mezzo o supporto senza il permesso scritto degli autori e della RayTalk Industries®
Ogni abuso sarà perseguito a norma delle leggi vigenti.
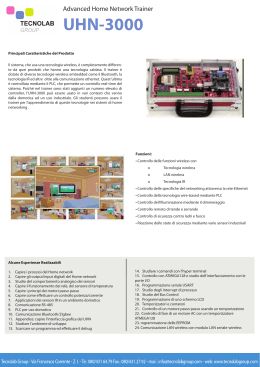
2.2
Locate the RB-170 and Inline Power Injector Ports
►
Interface on the RB-170 Unit
¾ Ethernet Port 1 : for connecting the 30m RJ-45 CAT-5
Ethernet cable.
►
Interface on the Inline Power Injector
¾ Data Input Port 2 : for connecting cross-over Ethernet Cable
to PC or straight Ethernet cable to Hub Switch Router .
¾ DC Input Port 3 : power adapter 48V, 0.375A DC input.
¾ Power & Data Output Port 4 : for connecting the 30m RJ-45
CAT-5 Ethernet Cable.
¾ Grounding Port 5 : for connecting grounding wire.
Device
4
5
2
3
POE picture1
POE picture2
1
Figure 2-1
Power and Data Interface location on the PoE denoted by numbers 1-6.
7
Documento riservato © 2006 RayTalk Industries® Repubblica di San Marino.
Riservati tutti i diritti. Ogni oggetto o processo descritto in questo documento è di proprietà di RayTalk Industries® tranne quanto discusso ma espressamente riferito a terzi. Nessuna parte di questo documento o di quanto in esso
descritto può essere riprodotto, utilizzato, ingegnerizzato, trasmesso o messo a disposizione di chiunque mediante qualsiasi forma, o mediante ogni mezzo o supporto senza il permesso scritto degli autori e della RayTalk Industries®
Ogni abuso sarà perseguito a norma delle leggi vigenti.
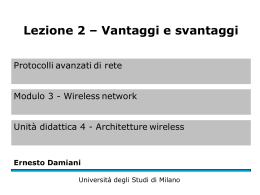
► Mount RB-170 on A Wall/Mast
The RB-170 can be mounted on the wall, you can use the Wall Mount
kit to mount the RB-170 as shown in Figure 2-2.
Figure 2-2
You can also mount the RB-170 to the mast as shown in Figure 2-3.
Figure 2-3
8
Documento riservato © 2006 RayTalk Industries® Repubblica di San Marino.
Riservati tutti i diritti. Ogni oggetto o processo descritto in questo documento è di proprietà di RayTalk Industries® tranne quanto discusso ma espressamente riferito a terzi. Nessuna parte di questo documento o di quanto in esso
descritto può essere riprodotto, utilizzato, ingegnerizzato, trasmesso o messo a disposizione di chiunque mediante qualsiasi forma, o mediante ogni mezzo o supporto senza il permesso scritto degli autori e della RayTalk Industries®
Ogni abuso sarà perseguito a norma delle leggi vigenti.
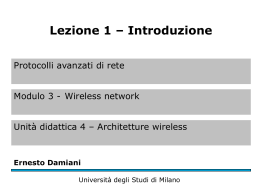
2.3
Preparing Installation
Before installing RB-170 for outdoor application or hard-to-reach
location, we recommend configuring and test all the devices first.
For configuring the RB-170, please follow the quick steps below to
power up the RB-170. Refer to Figure 2-4 for steps 1 through 5.
Figure 2-4
Step1 : Connect the DC plug of the AC/DC power adapter into the DC
Input Port of Inline Power Injector and the wall-mount plug into a
power outlet or power strip (refer to page 6). The Power LED on the
Inline Power Injector will light up.
Step2 : Run the cross-over type uplink Ethernet cable from Data Input
Port (refer topage 6) to the Ethernet port on a PC.
Step3 : Connect the 30m CAT 5 Ethernet cable into the RB-170 unit.
Hand tighten the connector.
Step4 : Connect the remaining end of the 30m CAT 5 cable into the PoE
labeled Bridge. This is the power side of the PoE that will power up
the RB-170.
When the RB-170 receives power over the Ethernet cable, the
RB-170 will start its boot up sequence and the Active LED on the Inline
Power Injector will light up.
You can configure the RB-170 via HTML browser, such as Microsoft
Internet Explorer or Netscape Navigator from a remote host or PC.
9
Documento riservato © 2006 RayTalk Industries® Repubblica di San Marino.
Riservati tutti i diritti. Ogni oggetto o processo descritto in questo documento è di proprietà di RayTalk Industries® tranne quanto discusso ma espressamente riferito a terzi. Nessuna parte di questo documento o di quanto in esso
descritto può essere riprodotto, utilizzato, ingegnerizzato, trasmesso o messo a disposizione di chiunque mediante qualsiasi forma, o mediante ogni mezzo o supporto senza il permesso scritto degli autori e della RayTalk Industries®
Ogni abuso sarà perseguito a norma delle leggi vigenti.
2.4
2.4.1
Basic Configuration
Basic Configuration Steps
This section describes a two-step BASIC configuration procedure to
setup RB-170.
Step1 : Modify the factory-default parameters on the web page
“/BASIC/LAN/”, and click Save Settings to save the changes, than
click Continue .
Step2 : Modify the factory-default parameters on the web page
“/BASIC/Wireless/”, and click Save Settings to save the changes,
than click Reboot the Device to take effect on the previous
configuration changes.
2.4.2
Logging into the Web Interface
The RB-170 supports access to the configuration system through the
use of an HTTP Interface.
► Web Configuration
Before configuring RB-170, the user needs to know the IP Address
assigned to the unit. When shipped from the factory, the IP Address
192.168.1.241 was assigned to the RB-170 by default. To start a
web connection, use http://192.168.1.241
► Web Access Procedures
Once you identify the IP Address assigned to RB-170, use web browser
to configure RB-170 through the HTTP Interface. The following
procedure explains how to configure each item.
Step1 : Open your browser and enter the IP Address
Step2 : Press <ENTER> key and the RB-170 Login screen appears as
shown in Figure 2-5.
10
Documento riservato © 2006 RayTalk Industries® Repubblica di San Marino.
Riservati tutti i diritti. Ogni oggetto o processo descritto in questo documento è di proprietà di RayTalk Industries® tranne quanto discusso ma espressamente riferito a terzi. Nessuna parte di questo documento o di quanto in esso
descritto può essere riprodotto, utilizzato, ingegnerizzato, trasmesso o messo a disposizione di chiunque mediante qualsiasi forma, o mediante ogni mezzo o supporto senza il permesso scritto degli autori e della RayTalk Industries®
Ogni abuso sarà perseguito a norma delle leggi vigenti.
Figure 2-5
Step3 : Enter “admin” in the Password fields, and click Log In to
enter the web configuration user interface screen as shown below.
Figure 2-6
►
Web Configuration Structure
11
Documento riservato © 2006 RayTalk Industries® Repubblica di San Marino.
Riservati tutti i diritti. Ogni oggetto o processo descritto in questo documento è di proprietà di RayTalk Industries® tranne quanto discusso ma espressamente riferito a terzi. Nessuna parte di questo documento o di quanto in esso
descritto può essere riprodotto, utilizzato, ingegnerizzato, trasmesso o messo a disposizione di chiunque mediante qualsiasi forma, o mediante ogni mezzo o supporto senza il permesso scritto degli autori e della RayTalk Industries®
Ogni abuso sarà perseguito a norma delle leggi vigenti.
The web configuration user interface shown above in Figure 2-6 is
grouped into a tree structure, and contains the following settings or
information.
▽ BASIC
● LAN
● WIRELESS
▽ ADVANCED
▽ TOOLS
● ADMIN
● TIME
● SYSTEM
● FIRMWARE
▽ STATUS
● DEVICE INFO
● WIRELESS
● LOGS
● STATISTICS
▽ HELP
● MENU
● BASIC
● ADVANCED
● TOOLS
● STATUS
● GLOSSARY
Move through the tree by clicking on an icon to expand or collapse the
tree. The nodes on the tree represent web pages that allow viewing and
modifying the parameters.
12
Documento riservato © 2006 RayTalk Industries® Repubblica di San Marino.
Riservati tutti i diritti. Ogni oggetto o processo descritto in questo documento è di proprietà di RayTalk Industries® tranne quanto discusso ma espressamente riferito a terzi. Nessuna parte di questo documento o di quanto in esso
descritto può essere riprodotto, utilizzato, ingegnerizzato, trasmesso o messo a disposizione di chiunque mediante qualsiasi forma, o mediante ogni mezzo o supporto senza il permesso scritto degli autori e della RayTalk Industries®
Ogni abuso sarà perseguito a norma delle leggi vigenti.
2.4.3 Set Operating Mode, IP Address, Subnet Mask, Default
Route IP, DNS Server IP of RB-170
► LAN Settings
These are the settings of the LAN (Local Area Network) interface for the
Access Point. The Access Point's local network (LAN) settings are
configured based on the IP Address and Subnet Mask assigned in this
section. The IP address is also used to access this Web-based
management interface. This option is available in the “/BASIC/LAN/”
page as shown in Figure 2-7.
Figure 2-7
► IP Address Mode. Select 'DHCP' to get the IP settings from a DHCP server
on your network. Select 'Static' to use the IP settings specified on this page.
13
Documento riservato © 2006 RayTalk Industries® Repubblica di San Marino.
Riservati tutti i diritti. Ogni oggetto o processo descritto in questo documento è di proprietà di RayTalk Industries® tranne quanto discusso ma espressamente riferito a terzi. Nessuna parte di questo documento o di quanto in esso
descritto può essere riprodotto, utilizzato, ingegnerizzato, trasmesso o messo a disposizione di chiunque mediante qualsiasi forma, o mediante ogni mezzo o supporto senza il permesso scritto degli autori e della RayTalk Industries®
Ogni abuso sarà perseguito a norma delle leggi vigenti.
► IP Address. The IP address of your bridge on the local area network. Your
local area network settings are based on the address assigned here. For example,
192.168.1.1.
►
Subnet Mask. The subnet mask of your bridge on the local area network.
► Default Gateway. This is the IP address of the gateway that connects you
to the internet.
14
Documento riservato © 2006 RayTalk Industries® Repubblica di San Marino.
Riservati tutti i diritti. Ogni oggetto o processo descritto in questo documento è di proprietà di RayTalk Industries® tranne quanto discusso ma espressamente riferito a terzi. Nessuna parte di questo documento o di quanto in esso
descritto può essere riprodotto, utilizzato, ingegnerizzato, trasmesso o messo a disposizione di chiunque mediante qualsiasi forma, o mediante ogni mezzo o supporto senza il permesso scritto degli autori e della RayTalk Industries®
Ogni abuso sarà perseguito a norma delle leggi vigenti.
2.4.4 Set Wireless SSID for Wireless Interface
► Wireless Network Name (Also called the SSID)
When you are browsing for available wireless networks, this is the name
that will appear in the list (unless Visibility Status is set to Invisible, see
below). This name is also referred to as the SSID. For security purposes,
it is highly recommended to change from the pre-configured network
name. This option is available in the “/BASIC/WIRELESS/” page as
shown in Figure 2-8
Figure 2-8
15
Documento riservato © 2006 RayTalk Industries® Repubblica di San Marino.
Riservati tutti i diritti. Ogni oggetto o processo descritto in questo documento è di proprietà di RayTalk Industries® tranne quanto discusso ma espressamente riferito a terzi. Nessuna parte di questo documento o di quanto in esso
descritto può essere riprodotto, utilizzato, ingegnerizzato, trasmesso o messo a disposizione di chiunque mediante qualsiasi forma, o mediante ogni mezzo o supporto senza il permesso scritto degli autori e della RayTalk Industries®
Ogni abuso sarà perseguito a norma delle leggi vigenti.
2.4.5
Set Wireless Encryption for Wireless Interface
The RB-170 supports 64-bit and 128-bit WEP encryption.
For 64-bit WEP encryption, an encryption key is 10 hexadecimal
characters (0-9 and A-F) or 5 ASCII characters.
For 128-bit WEP encryption, an encryption key is 26 hexadecimal
characters or 13 ASCII characters.
Modify the WEP encryption parameters on the web page
“/BASIC/WIRELESS/WIRELESS SECURITY MODE”. Choice “WEP”
Enter 1~15 characters into the WEP Key field, than click Save
Setting ,Reboot the Device.
16
Documento riservato © 2006 RayTalk Industries® Repubblica di San Marino.
Riservati tutti i diritti. Ogni oggetto o processo descritto in questo documento è di proprietà di RayTalk Industries® tranne quanto discusso ma espressamente riferito a terzi. Nessuna parte di questo documento o di quanto in esso
descritto può essere riprodotto, utilizzato, ingegnerizzato, trasmesso o messo a disposizione di chiunque mediante qualsiasi forma, o mediante ogni mezzo o supporto senza il permesso scritto degli autori e della RayTalk Industries®
Ogni abuso sarà perseguito a norma delle leggi vigenti.
2.4.6
Change Supervisor Account & Password
Enter the TOOLS > ADMIN page. Figure 2-9 below shows the TOOLS/
ADMIN page.
Figure 2-9
► ADMIN PASSWORD
Change the ADMIN PASSWORD’s user name and password in the
ADMIN PASSWORD Account field, and click Save Setting ,than
Reboot the Device. to take effect on the previous configuration
changes.
17
Documento riservato © 2006 RayTalk Industries® Repubblica di San Marino.
Riservati tutti i diritti. Ogni oggetto o processo descritto in questo documento è di proprietà di RayTalk Industries® tranne quanto discusso ma espressamente riferito a terzi. Nessuna parte di questo documento o di quanto in esso
descritto può essere riprodotto, utilizzato, ingegnerizzato, trasmesso o messo a disposizione di chiunque mediante qualsiasi forma, o mediante ogni mezzo o supporto senza il permesso scritto degli autori e della RayTalk Industries®
Ogni abuso sarà perseguito a norma delle leggi vigenti.
2.4.7
►
Upgrade the Firmware
Update the Firmware
Enter the TOOLS > FIRMWARE page as shown in Figure 2-10 to
upgrade RB-170. Here, user must select which file you want to
upgrade it (Program image), then click Upload button to start the
upgrade process.
Hint: It takes about 1 min, to complete the restart process.
Figure 2-10
18
Documento riservato © 2006 RayTalk Industries® Repubblica di San Marino.
Riservati tutti i diritti. Ogni oggetto o processo descritto in questo documento è di proprietà di RayTalk Industries® tranne quanto discusso ma espressamente riferito a terzi. Nessuna parte di questo documento o di quanto in esso
descritto può essere riprodotto, utilizzato, ingegnerizzato, trasmesso o messo a disposizione di chiunque mediante qualsiasi forma, o mediante ogni mezzo o supporto senza il permesso scritto degli autori e della RayTalk Industries®
Ogni abuso sarà perseguito a norma delle leggi vigenti.
Caution The Part 15 radio device operates on a non-interference basis with
other devices operating at this frequency when using integrated antennas. Any
changes or modification to the product not expressly approved by Original
Manufacture could void the user's authority to operate this device.
Caution To meet regulatory restrictions and the safety of the installation,
product to be professionally installed.
strongly recommends this
19
Documento riservato © 2006 RayTalk Industries® Repubblica di San Marino.
Riservati tutti i diritti. Ogni oggetto o processo descritto in questo documento è di proprietà di RayTalk Industries® tranne quanto discusso ma espressamente riferito a terzi. Nessuna parte di questo documento o di quanto in esso
descritto può essere riprodotto, utilizzato, ingegnerizzato, trasmesso o messo a disposizione di chiunque mediante qualsiasi forma, o mediante ogni mezzo o supporto senza il permesso scritto degli autori e della RayTalk Industries®
Ogni abuso sarà perseguito a norma delle leggi vigenti.
Chapter 3.
Network Topologies
This chapter describes several common types of installations
implemented by using the RB-170’s line of Outdoor Wireless System.
This is by no means intended to be an exhaustive list of all possible
configurations, but rather shows examples of some of the more common
implementations. The RB-170 CPE can be configured to function as a
Wireless Client Router or Bridge to a central Outdoor RayTalk Access Point
see Figure 3-1 below.
Figure 3-1
The RB-170 CB performs in either router or bridge mode. In a
Point-to-Multipoint topology, all communication between network systems is done
through a centralized agent. Among the RB-170 Outdoor Wireless Last Mile CPE
products, the centralized agent is a RayTalk Central Bridge and the individual
network notes may be Bridge (RB-170).
To show the available Point-to-Multipoint topologies, the following examples are
provided.
Wireless Client Bridge-to-Central Wireless Bridge
20
Documento riservato © 2006 RayTalk Industries® Repubblica di San Marino.
Riservati tutti i diritti. Ogni oggetto o processo descritto in questo documento è di proprietà di RayTalk Industries® tranne quanto discusso ma espressamente riferito a terzi. Nessuna parte di questo documento o di quanto in esso
descritto può essere riprodotto, utilizzato, ingegnerizzato, trasmesso o messo a disposizione di chiunque mediante qualsiasi forma, o mediante ogni mezzo o supporto senza il permesso scritto degli autori e della RayTalk Industries®
Ogni abuso sarà perseguito a norma delle leggi vigenti.
3.1
Wireless Client Bridge-to-Central Wireless Bridge
Figure 3-2
Refer to Figure 3-2 for the following setup.
Note: The RB-170 CPE is the Wireless Client Bridge
Step 1 Set the RayTalk Central AP to perform a bridge (bridge IP
address: 192.168.1.1).
Step 2 Set Wireless parameters on the RayTalk Central AP to:
Channel (1) and SSID (wireless)
Step 3 Set the RB-170 to function in the bridge mode (IP
address: 192.168.1.241).
Step 4 Set Wireless parameters on the RB-170 to: Channel (1)
and SSID (wireless), and these parameters must be the same with
RayTalk Central AP.
Step 5 Left side subnet is transparent to the right side.
Step 6 DHCP server assign IP address to PC1 and PC2
21
Documento riservato © 2006 RayTalk Industries® Repubblica di San Marino.
Riservati tutti i diritti. Ogni oggetto o processo descritto in questo documento è di proprietà di RayTalk Industries® tranne quanto discusso ma espressamente riferito a terzi. Nessuna parte di questo documento o di quanto in esso
descritto può essere riprodotto, utilizzato, ingegnerizzato, trasmesso o messo a disposizione di chiunque mediante qualsiasi forma, o mediante ogni mezzo o supporto senza il permesso scritto degli autori e della RayTalk Industries®
Ogni abuso sarà perseguito a norma delle leggi vigenti.
Chapter 4.
4.1
All function on Device
BASIC
4.1.1 LAN
These are the IP address settings of the LAN (Local Area Network) for the
bridge. The bridge's local network (LAN) settings are configured based
on the IP Address and Subnet Mask assigned in this section. The IP
address is also used to access this Web-based management interface. It
is recommended that you use the default settings if you do not have an
existing network.
Figure 4-1
► IP Address Mode. Select 'DHCP' to get the IP settings from a DHCP
server on your network. Select 'Static' to use the IP settings specified on
this page.
►
IP Address. The IP address of your bridge on the local area network. Your
22
Documento riservato © 2006 RayTalk Industries® Repubblica di San Marino.
Riservati tutti i diritti. Ogni oggetto o processo descritto in questo documento è di proprietà di RayTalk Industries® tranne quanto discusso ma espressamente riferito a terzi. Nessuna parte di questo documento o di quanto in esso
descritto può essere riprodotto, utilizzato, ingegnerizzato, trasmesso o messo a disposizione di chiunque mediante qualsiasi forma, o mediante ogni mezzo o supporto senza il permesso scritto degli autori e della RayTalk Industries®
Ogni abuso sarà perseguito a norma delle leggi vigenti.
local area network settings are based on the address assigned here. For example,
192.168.1.1.
►
Subnet Mask. The subnet mask of your bridge on the local area network.
► Default Gateway. This is the IP address of the gateway that connects you to
the internet.
23
Documento riservato © 2006 RayTalk Industries® Repubblica di San Marino.
Riservati tutti i diritti. Ogni oggetto o processo descritto in questo documento è di proprietà di RayTalk Industries® tranne quanto discusso ma espressamente riferito a terzi. Nessuna parte di questo documento o di quanto in esso
descritto può essere riprodotto, utilizzato, ingegnerizzato, trasmesso o messo a disposizione di chiunque mediante qualsiasi forma, o mediante ogni mezzo o supporto senza il permesso scritto degli autori e della RayTalk Industries®
Ogni abuso sarà perseguito a norma delle leggi vigenti.
4.1.2
WIRELESS
The wireless section is used to configure the wireless settings for your
Access Point . Please note that changes made on this section may also
need to be duplicated on your Wireless Access Point.
To protect your privacy, use the wireless security mode to configure the
wireless security features. This device supports the wireless security
modes WEP and WPA-Personal. WEP is the original wireless encryption
standard. WPA provides a higher level of security.
Figure 4-2
►
Enable Wireless Radio
24
Documento riservato © 2006 RayTalk Industries® Repubblica di San Marino.
Riservati tutti i diritti. Ogni oggetto o processo descritto in questo documento è di proprietà di RayTalk Industries® tranne quanto discusso ma espressamente riferito a terzi. Nessuna parte di questo documento o di quanto in esso
descritto può essere riprodotto, utilizzato, ingegnerizzato, trasmesso o messo a disposizione di chiunque mediante qualsiasi forma, o mediante ogni mezzo o supporto senza il permesso scritto degli autori e della RayTalk Industries®
Ogni abuso sarà perseguito a norma delle leggi vigenti.
This option turns off and on the wireless connection feature of the bridge.
When you set this option, the following parameters are displayed.
►
Wireless Mode
Select 'Infrastructure' to connect to a wireless (AP) Access Point, select
'Ad-hoc' to connect to another bridge or wireless station.
►
Wireless Network Name
This is the name of the wireless access point that this station will
associate to. Leave this field blank to associate to any access point.
►
REGION ID
By default the value 4 will be selected. The default value 4 represents
FCC1_FCCA (USA). You have the option of selecting the region id if
necessary. 1: For 11b-only countries, 2: Israel, 4: USA, 5: Hong Kong, 6:
Canada, 7: Australia, 10: France, 11: Bulgaria, 12: Hungary & others, 13:
France & others, 116; Japan, 17: Japan, 18: Singapore, 19:Japan with
4.9G channels, 20: Korea, 22: Korea with 2.3G channels, 23: Latin
America, 25: Venezuela, 26 World0 (WO0 SKU), 27: World1 (WO1 SKU),
28: World2 (WO2 SKU), 29: World3 (WO3 SKU), 30: World4 (WO4 SKU),
31: World5 (W05 SKU).
►
Channel
A wireless network uses specific channels in the 2.4GHz wireless
spectrum to handle communication between clients. Some channels in
your area may have interference from other electronic devices. Your
wireless bridge will use the channel that is used by the access point it will
associate with. But you can select here your channel preference to help
optimize the performance and coverage of your wireless network.
►
Transmission Rate
By default the fastest possible transmission rate will be selected. You
have the option of selecting the speed if necessary.
►
802.11 Mode
If all of your devices can connect in 802.11g Mode, you can change the
mode to 802.11g only. If you have some devices that are 802.11b, leave
the setting at Mixed.
►
Super G™ Mode
Super G without Turbo: Performance enhancing features such as Packet
Bursting, FastFrames, and Compression.
►
WEP
A method of encrypting data for wireless communication intended to
25
Documento riservato © 2006 RayTalk Industries® Repubblica di San Marino.
Riservati tutti i diritti. Ogni oggetto o processo descritto in questo documento è di proprietà di RayTalk Industries® tranne quanto discusso ma espressamente riferito a terzi. Nessuna parte di questo documento o di quanto in esso
descritto può essere riprodotto, utilizzato, ingegnerizzato, trasmesso o messo a disposizione di chiunque mediante qualsiasi forma, o mediante ogni mezzo o supporto senza il permesso scritto degli autori e della RayTalk Industries®
Ogni abuso sarà perseguito a norma delle leggi vigenti.
provide the same level of privacy as a wired network. WEP is not as
secure as WPA encryption. To gain access to a WEP network, you must
know the key. The key is a string of characters that you create. When
using WEP, you must determine the level of encryption. The type of
encryption determines the key length. 128-bit encryption requires a
longer key than 64-bit encryption. Keys are defined by entering in a
string in HEX (hexadecimal - using characters 0-9, A-F) or ASCII
(American Standard Code for Information Interchange - alphanumeric
characters) format. ASCII format is provided so you can enter a string
that is easier to remember. The ASCII string is converted to HEX for use
over the network. Four keys can be defined so that you can change keys
easily. A default key is selected for use on the network.
Example:
64-bit hexadecimal keys are exactly 10 characters in length.
(12345678FA is a valid string of 10 characters for 64-bit
encryption.)
128-bit hexadecimal keys are exactly 26 characters in length.
(456FBCDF123400122225271730 is a valid string of 26 characters
for 128-bit encryption.)
64-bit ASCII keys are up to 5 characters in length (DMODE is a
valid string of 5 characters for 64-bit encryption.)
128-bit ASCII keys are up to 13 characters in length
(2002HALOSWIN1 is a valid string of 13 characters for 128-bit
encryption.)
►
WPA-Personal
This option selects Wi-Fi Protected Access (WPA) -- security standards
published by the Wi-Fi Alliance. This option uses Wi-Fi Protected Access
with a Pre-Shared Key (PSK). The WPA Mode further refines the variant
that the bridge should employ.
WPA Mode
WPA is the older standard; select this option if the Access Point that will
be used with the bridge only support the older standard. WPA2 is the
newer implementation of the stronger IEEE 802.11i security standard.
With the "WPA2" option, the bridge associates only with access points
that also support WPA2 security.
Cipher Type
The encryption algorithm used to secure the data communication.
TKIP. Use TKIP only. TKIP (Temporal Key Integrity Protocol) provides
per-packet key generation and is based on WEP.
26
Documento riservato © 2006 RayTalk Industries® Repubblica di San Marino.
Riservati tutti i diritti. Ogni oggetto o processo descritto in questo documento è di proprietà di RayTalk Industries® tranne quanto discusso ma espressamente riferito a terzi. Nessuna parte di questo documento o di quanto in esso
descritto può essere riprodotto, utilizzato, ingegnerizzato, trasmesso o messo a disposizione di chiunque mediante qualsiasi forma, o mediante ogni mezzo o supporto senza il permesso scritto degli autori e della RayTalk Industries®
Ogni abuso sarà perseguito a norma delle leggi vigenti.
AES. Use AES only. AES (Advanced Encryption Standard) is a very
secure block based encryption. Note that, if the bridge uses the AES
option, the bridge can associate with the access point only if the access
point is also set to use only AES.
TKIP and AES. The bridge negotiates the cipher type with the access
point, and uses AES when available.
Pre-Shared Key
The key is entered as a pass-phrase of up to 63 alphanumeric characters
in ASCII (American Standard Code for Information Interchange) format
at both ends of the wireless connection. It cannot be shorter than eight
characters, although for proper security it needs to be of ample length
and should not be a commonly known phrase. This phrase is used to
generate session keys that are unique for each wireless client.
Example:
Wireless Networking technology enables ubiquitous
communication
►
802.1X-Supplicant
This option selects IEEE802.1X to offer a protocol called EAP to wireless
LAN media and supports authentication methods.
EAP-Configuration
The EAP protocol in IEEE802.1x is called EAP encapsulation over LAN
(EAPOL). IEEE802.1X authentication server can return session keys to
the AP along with the accept message if configured to implement
dynamic key exchange. After sending the success message, AP uses the
session keys to establish, sign and encrypt an EAP key message that is
sent to the supplicant immediately. The supplicant can then use the
contents of the key message to define applicable encryption keys.
27
Documento riservato © 2006 RayTalk Industries® Repubblica di San Marino.
Riservati tutti i diritti. Ogni oggetto o processo descritto in questo documento è di proprietà di RayTalk Industries® tranne quanto discusso ma espressamente riferito a terzi. Nessuna parte di questo documento o di quanto in esso
descritto può essere riprodotto, utilizzato, ingegnerizzato, trasmesso o messo a disposizione di chiunque mediante qualsiasi forma, o mediante ogni mezzo o supporto senza il permesso scritto degli autori e della RayTalk Industries®
Ogni abuso sarà perseguito a norma delle leggi vigenti.
4.2
►
ADVANCED
MAC Cloning Mode
This feature controls the MAC Address of the Bridge as seen by other
devices (wired or wireless).
If set to "Ethernet Client", the MAC Address from the first Ethernet client
that transmits data through the Bridge will be used. This setting is useful
when connected to an Xbox or if there is only one Ethernet device
connected to the Bridge. When multiple Ethernet devices are connected
to the Bridge, it may not be obvious which MAC Address is being used.
If set to "WLAN Card", the MAC Address of the WLAN Card (typically
written on the back of the card) will be used. When multiple Ethernet
devices are connected to the Bridge, the MAC Address of the Bridge will
not change.
Figure 4-6
28
Documento riservato © 2006 RayTalk Industries® Repubblica di San Marino.
Riservati tutti i diritti. Ogni oggetto o processo descritto in questo documento è di proprietà di RayTalk Industries® tranne quanto discusso ma espressamente riferito a terzi. Nessuna parte di questo documento o di quanto in esso
descritto può essere riprodotto, utilizzato, ingegnerizzato, trasmesso o messo a disposizione di chiunque mediante qualsiasi forma, o mediante ogni mezzo o supporto senza il permesso scritto degli autori e della RayTalk Industries®
Ogni abuso sarà perseguito a norma delle leggi vigenti.
►
Fragmentation Threshold
This setting should remain at its default value of 2346. Setting the
Fragmentation value too low may result in poor performance.
►
RTS Threshold
This setting should remain at its default value of 2346. If you encounter
inconsistent data flow, only minor modifications to the value are
recommended.
►
802.11d Enable
Enables 802.11d operation. 802.11d is a wireless specification for
operation in multiple regulatory domains. This supplement to the 802.11
specifications defines the physical layer requirements (channelization,
hopping patterns, new values for current MIB attributes, and other
requirements to extend the operation of 802.11 WLANs in multiple
regulatory domains (countries). The current 802.11 standard defines
operation in only a fixed regulatory domain (country). This supplement
adds the requirements and definitions necessary to allow 802.11 WLAN
equipment to operate in multiple markets. Enable this option if you are
travelling and operating in several regulatory domains.
►
Transmit Power
Normally the wireless transmitter operates at 100% power. In some
circumstances, however, there might be a need to isolate specific
frequencies to a smaller area. By reducing the power of the radio, you
can prevent transmissions from reaching beyond your corporate/home
office or designated wireless area.
29
Documento riservato © 2006 RayTalk Industries® Repubblica di San Marino.
Riservati tutti i diritti. Ogni oggetto o processo descritto in questo documento è di proprietà di RayTalk Industries® tranne quanto discusso ma espressamente riferito a terzi. Nessuna parte di questo documento o di quanto in esso
descritto può essere riprodotto, utilizzato, ingegnerizzato, trasmesso o messo a disposizione di chiunque mediante qualsiasi forma, o mediante ogni mezzo o supporto senza il permesso scritto degli autori e della RayTalk Industries®
Ogni abuso sarà perseguito a norma delle leggi vigenti.
4.3
4.3.1
TOOLS
Admin
The Admin option is used to set a password for access to the Web-based
management. By default there is no password configured. It is highly
recommended that you create a password to keep your new bridge
secur
30
Documento riservato © 2006 RayTalk Industries® Repubblica di San Marino.
Riservati tutti i diritti. Ogni oggetto o processo descritto in questo documento è di proprietà di RayTalk Industries® tranne quanto discusso ma espressamente riferito a terzi. Nessuna parte di questo documento o di quanto in esso
descritto può essere riprodotto, utilizzato, ingegnerizzato, trasmesso o messo a disposizione di chiunque mediante qualsiasi forma, o mediante ogni mezzo o supporto senza il permesso scritto degli autori e della RayTalk Industries®
Ogni abuso sarà perseguito a norma delle leggi vigenti.
Figure 4-7
►
Admin Password
Enter a password for the user "admin", who will have full access to the
Web-based management interface.
►
User Password
Enter a password for the user "user", who will have read-only access to
the Web-based management interface.
►
Bridge Name
The name of the bridge can be changed here.
►
Web Idle Timeout
The amount of time before the administration session is closed when
there is no activity.
►
Save Configuration
This option allows you to save the bridge's configuration to a file on your
computer. Be sure to save the configuration before performing a
firmware upgrade.
►
Restore Configuration from File
Use this option to load previously saved bridge configuration settings.
31
Documento riservato © 2006 RayTalk Industries® Repubblica di San Marino.
Riservati tutti i diritti. Ogni oggetto o processo descritto in questo documento è di proprietà di RayTalk Industries® tranne quanto discusso ma espressamente riferito a terzi. Nessuna parte di questo documento o di quanto in esso
descritto può essere riprodotto, utilizzato, ingegnerizzato, trasmesso o messo a disposizione di chiunque mediante qualsiasi forma, o mediante ogni mezzo o supporto senza il permesso scritto degli autori e della RayTalk Industries®
Ogni abuso sarà perseguito a norma delle leggi vigenti.
4.3.2 Time
The Time Configuration option allows you to configure, update, and
maintain the correct time on the Access Point's internal system clock.
From this section you can set the time zone that you are in and set the
Time Server. Daylight saving can also be configured to automatically
adjust the time when needed.
Figure 4-8
32
Documento riservato © 2006 RayTalk Industries® Repubblica di San Marino.
Riservati tutti i diritti. Ogni oggetto o processo descritto in questo documento è di proprietà di RayTalk Industries® tranne quanto discusso ma espressamente riferito a terzi. Nessuna parte di questo documento o di quanto in esso
descritto può essere riprodotto, utilizzato, ingegnerizzato, trasmesso o messo a disposizione di chiunque mediante qualsiasi forma, o mediante ogni mezzo o supporto senza il permesso scritto degli autori e della RayTalk Industries®
Ogni abuso sarà perseguito a norma delle leggi vigenti.
►
Time Configuration
Time Zone
Select your local time zone from pull down menu.
Set the Date and Time Manually
You can either manually set the time for your bridge here, or you can
click the
button to copy the
time from the computer you are using. (Make sure that computer's time
is set correctly.)
Note: If the bridge loses power for any reason, it cannot keep its clock
running, and will not have the correct time when it is started again. To
maintain correct time for schedules and logs, you must enter the correct
time after you restart the bridge.
33
Documento riservato © 2006 RayTalk Industries® Repubblica di San Marino.
Riservati tutti i diritti. Ogni oggetto o processo descritto in questo documento è di proprietà di RayTalk Industries® tranne quanto discusso ma espressamente riferito a terzi. Nessuna parte di questo documento o di quanto in esso
descritto può essere riprodotto, utilizzato, ingegnerizzato, trasmesso o messo a disposizione di chiunque mediante qualsiasi forma, o mediante ogni mezzo o supporto senza il permesso scritto degli autori e della RayTalk Industries®
Ogni abuso sarà perseguito a norma delle leggi vigenti.
4.3.3 System
This section allows you to reboot the bridge, and restore it to the factory
default settings. Restoring the unit to the factory default settings will
erase all settings, including any rules that you've created.
Figure 4-9
►
Reboot the Device
This restarts the Access Point. Useful for restarting when you are not
near the device.
►
Restore all Settings to the Factory Defaults
This option restores all configuration settings back to the settings that
were in effect at the time the Access Point was shipped from the factory.
Any settings that have not been saved will be lost. If you want to save
your Access Point configuration settings, you can do so from the
Tools -> Admin page.
34
Documento riservato © 2006 RayTalk Industries® Repubblica di San Marino.
Riservati tutti i diritti. Ogni oggetto o processo descritto in questo documento è di proprietà di RayTalk Industries® tranne quanto discusso ma espressamente riferito a terzi. Nessuna parte di questo documento o di quanto in esso
descritto può essere riprodotto, utilizzato, ingegnerizzato, trasmesso o messo a disposizione di chiunque mediante qualsiasi forma, o mediante ogni mezzo o supporto senza il permesso scritto degli autori e della RayTalk Industries®
Ogni abuso sarà perseguito a norma delle leggi vigenti.
4.3.4
Firmware
The Firmware Upgrade section can be used to update to the latest
firmware code to improve functionality and performance.
Figure 4-10
To upgrade the firmware, follow these steps:
Click the Browse button to locate the upgrade file on your computer.
Once you have found the file to be used, click the Upload button below to start
the firmware upgrade process. This can take a minute or more.
Wait for the Access Point to reboot. This can take another minute or more.
Confirm updated firmware revision on status page.
35
Documento riservato © 2006 RayTalk Industries® Repubblica di San Marino.
Riservati tutti i diritti. Ogni oggetto o processo descritto in questo documento è di proprietà di RayTalk Industries® tranne quanto discusso ma espressamente riferito a terzi. Nessuna parte di questo documento o di quanto in esso
descritto può essere riprodotto, utilizzato, ingegnerizzato, trasmesso o messo a disposizione di chiunque mediante qualsiasi forma, o mediante ogni mezzo o supporto senza il permesso scritto degli autori e della RayTalk Industries®
Ogni abuso sarà perseguito a norma delle leggi vigenti.
►
Firmware Information
Here are displayed the version numbers of the firmware currently installed in your
Access Point and the most recent upgrade that is available.
►
Firmware Upgrade
Note: Firmware upgrade cannot be performed from a wireless device. To perform
an upgrade, ensure that you are using a PC that is connected to the Access Point
by wire.
Note: Some firmware upgrades reset the configuration options to the factory
defaults. Before performing an upgrade, be sure to save the current configuration
from the Tools -> Admin screen.
Upload
Once you have a firmware update on your computer, use this option to browse for
the file and then upload the information into the Access Point.
36
Documento riservato © 2006 RayTalk Industries® Repubblica di San Marino.
Riservati tutti i diritti. Ogni oggetto o processo descritto in questo documento è di proprietà di RayTalk Industries® tranne quanto discusso ma espressamente riferito a terzi. Nessuna parte di questo documento o di quanto in esso
descritto può essere riprodotto, utilizzato, ingegnerizzato, trasmesso o messo a disposizione di chiunque mediante qualsiasi forma, o mediante ogni mezzo o supporto senza il permesso scritto degli autori e della RayTalk Industries®
Ogni abuso sarà perseguito a norma delle leggi vigenti.
4.4
Status
4.4.1 Device Info
All of your Internet and network connection details are displayed on the
Device Info page. The firmware version is also displayed here.
Note: Some browsers have limitations that make it impossible to
update the WAN status display when the status changes. Some
browsers require that you refresh the display to obtain updated
status. Some browsers report an error condition when trying to
obtain WAN status.
Figure 4-11
37
Documento riservato © 2006 RayTalk Industries® Repubblica di San Marino.
Riservati tutti i diritti. Ogni oggetto o processo descritto in questo documento è di proprietà di RayTalk Industries® tranne quanto discusso ma espressamente riferito a terzi. Nessuna parte di questo documento o di quanto in esso
descritto può essere riprodotto, utilizzato, ingegnerizzato, trasmesso o messo a disposizione di chiunque mediante qualsiasi forma, o mediante ogni mezzo o supporto senza il permesso scritto degli autori e della RayTalk Industries®
Ogni abuso sarà perseguito a norma delle leggi vigenti.
4.4.2
WIRELESS
The wireless page allows you to view all the access points that can be
heard by your wireless bridge.
►
MAC Address
The Ethernet ID (MAC address) of the access point.
►
SSID
The network name that is used by this access point.
►
Channel
The wireless channel that this access point is operating on.
►
Mode
The transmission standard being used by the access point. Values are 11a, 11b, or
11g for 802.11b, or 802.11g respectively.
►
Privacy
The kind of wireless security employed by the access point ("none", "WPA",
"WEP").
►
Type
A value of "AP" indicates the detected device is an access point in infrastructure
38
Documento riservato © 2006 RayTalk Industries® Repubblica di San Marino.
Riservati tutti i diritti. Ogni oggetto o processo descritto in questo documento è di proprietà di RayTalk Industries® tranne quanto discusso ma espressamente riferito a terzi. Nessuna parte di questo documento o di quanto in esso
descritto può essere riprodotto, utilizzato, ingegnerizzato, trasmesso o messo a disposizione di chiunque mediante qualsiasi forma, o mediante ogni mezzo o supporto senza il permesso scritto degli autori e della RayTalk Industries®
Ogni abuso sarà perseguito a norma delle leggi vigenti.
mode; a value of "AdHoc" indicates that the detected device is operating in "ad
hoc" mode.
►
Signal
This is a relative measure of signal quality. The value is expressed as a percentage
of theoretical best quality. Signal quality can be reduced by distance, by
interference from other radio-frequency sources (such as cordless telephones or
neighboring wireless networks), and by obstacles between the bridge and the
access point.
39
Documento riservato © 2006 RayTalk Industries® Repubblica di San Marino.
Riservati tutti i diritti. Ogni oggetto o processo descritto in questo documento è di proprietà di RayTalk Industries® tranne quanto discusso ma espressamente riferito a terzi. Nessuna parte di questo documento o di quanto in esso
descritto può essere riprodotto, utilizzato, ingegnerizzato, trasmesso o messo a disposizione di chiunque mediante qualsiasi forma, o mediante ogni mezzo o supporto senza il permesso scritto degli autori e della RayTalk Industries®
Ogni abuso sarà perseguito a norma delle leggi vigenti.
4.4.3 Logs
The bridge automatically logs (records) events of possible interest in its
internal memory. If there is not enough internal memory for all events,
logs of older events are deleted, but logs of the latest events are retained.
The Logs option allows you to view the bridge logs. You can define what
types of events you want to view and the level of events to view.
Figure 4-12
40
Documento riservato © 2006 RayTalk Industries® Repubblica di San Marino.
Riservati tutti i diritti. Ogni oggetto o processo descritto in questo documento è di proprietà di RayTalk Industries® tranne quanto discusso ma espressamente riferito a terzi. Nessuna parte di questo documento o di quanto in esso
descritto può essere riprodotto, utilizzato, ingegnerizzato, trasmesso o messo a disposizione di chiunque mediante qualsiasi forma, o mediante ogni mezzo o supporto senza il permesso scritto degli autori e della RayTalk Industries®
Ogni abuso sarà perseguito a norma delle leggi vigenti.
►
What to View
Select the kinds of events that you want to view.
System
Bridge Status
►
View Levels
Select the level of events that you want to view.
Critical
Warning
Informational
►
Apply Log Settings Now
Click this button after changing Log Options to make them effective and
permanent.
►
Refresh
Clicking this button refreshes the display of log entries. There may be
new events since the last time you accessed the log.
►
Clear
Clicking this button erases all log entries.
►
Save Log
Select this option to save the bridge log to a file on you computer.
41
Documento riservato © 2006 RayTalk Industries® Repubblica di San Marino.
Riservati tutti i diritti. Ogni oggetto o processo descritto in questo documento è di proprietà di RayTalk Industries® tranne quanto discusso ma espressamente riferito a terzi. Nessuna parte di questo documento o di quanto in esso
descritto può essere riprodotto, utilizzato, ingegnerizzato, trasmesso o messo a disposizione di chiunque mediante qualsiasi forma, o mediante ogni mezzo o supporto senza il permesso scritto degli autori e della RayTalk Industries®
Ogni abuso sarà perseguito a norma delle leggi vigenti.
4.4.4
Statistics
The Statistics page displays all of the LAN, and Wireless packet transmit
and receive statistics.
Figure 4-13
►
Sent
The number of packets sent from the Access Point.
►
Received
The number of packets received by the Access Point.
►
TX Packets Dropped
The number of packets that were dropped while being sent, due to errors,
collisions, or Access Point resource limitations.
►
RX Packets Dropped
The number of packets that were dropped while being received, due to
errors, collisions, or Access Point resource limitations.
42
Documento riservato © 2006 RayTalk Industries® Repubblica di San Marino.
Riservati tutti i diritti. Ogni oggetto o processo descritto in questo documento è di proprietà di RayTalk Industries® tranne quanto discusso ma espressamente riferito a terzi. Nessuna parte di questo documento o di quanto in esso
descritto può essere riprodotto, utilizzato, ingegnerizzato, trasmesso o messo a disposizione di chiunque mediante qualsiasi forma, o mediante ogni mezzo o supporto senza il permesso scritto degli autori e della RayTalk Industries®
Ogni abuso sarà perseguito a norma delle leggi vigenti.
►
Collisions
The number of packets that were dropped due to Ethernet collisions (two
or more devices attempting to use an Ethernet circuit at the same time).
►
Errors
The number of transmission failures that cause loss of a packet. A noisy
radio-frequency environment can cause a high error rate on the wireless
LAN.
43
Documento riservato © 2006 RayTalk Industries® Repubblica di San Marino.
Riservati tutti i diritti. Ogni oggetto o processo descritto in questo documento è di proprietà di RayTalk Industries® tranne quanto discusso ma espressamente riferito a terzi. Nessuna parte di questo documento o di quanto in esso
descritto può essere riprodotto, utilizzato, ingegnerizzato, trasmesso o messo a disposizione di chiunque mediante qualsiasi forma, o mediante ogni mezzo o supporto senza il permesso scritto degli autori e della RayTalk Industries®
Ogni abuso sarà perseguito a norma delle leggi vigenti.
Chapter 5.
Specifications
The RB-170 Outdoor Wireless Last Mile CPE operates seamlessly in the 2.4
GHz frequency supporting the IEEE 802.11b/802.11g wireless standards.
It's the best way to add wireless capability to your existing wired network,
or to add bandwidth to your existing wireless installation.
To secure your wireless connectivity, it can encrypt all wireless
transmissions through 64/128-bit WEP data encryption and also
supports WPA/WPA2. A MAC address filter lets you select exactly which
stations should have access to your network.
44
Documento riservato © 2006 RayTalk Industries® Repubblica di San Marino.
Riservati tutti i diritti. Ogni oggetto o processo descritto in questo documento è di proprietà di RayTalk Industries® tranne quanto discusso ma espressamente riferito a terzi. Nessuna parte di questo documento o di quanto in esso
descritto può essere riprodotto, utilizzato, ingegnerizzato, trasmesso o messo a disposizione di chiunque mediante qualsiasi forma, o mediante ogni mezzo o supporto senza il permesso scritto degli autori e della RayTalk Industries®
Ogni abuso sarà perseguito a norma delle leggi vigenti.
Features
High Speed Data Rate Up to 54Mbps
Output Power up to 17 dBm (23dBm, 26dBm optional requirement)
IEEE 802.11b/g Compliant
Point-to-point, Point-to-multipoint Wireless Connectivity
WEP/WPA/WPA2/ IEEE 802.1x Authenticator support
WDS (Wireless Distribution System)
Dust tight and Watertight and Weatherproof (IP67/IP68)
Wide temperature range and robust mechanical design
Power-over-Ethernet (IEEE802.3af Compliant)
s
Data Rates
1, 2, 5.5, 6, 9, 11, 12, 18, 24, 36, 48, 54 Mbps
Standards
IEEE802.11b/g, IEEE802.1x, IEEE802.3,
IEEE802.3u
Compatibility
IEEE 802.11g/ IEEE 802.11b
Power Requirements
Active Ethernet (802.3af) – 48 VDC/0.35A
Regulation
Certifications
FCC Part 15/UL, ETSI 300/328/CE
RF Information
Atheros BB/MAC/RF
Frequency Band
2.400~2.484 GHz
Media Access Protocol
Carrier Sense Multiple Access with Collision
Avoidance (CSMA/CA)
Modulation Technology Orthogonal Frequency Division Multiplexing (OFDM),
DBPSK @ 1Mbps,
DQPSK @2Mbps,
CCK @ 5.5 & 11Mbps,
BPSK @ 6 and 9 Mbps,
QPSK @ 12 and 18 Mbps,
16-QAM @ 24 and 36 Mbps,
Documento riservato © 2006 RayTalk Industries® Repubblica di San Marino.
45
Riservati tutti i diritti. Ogni oggetto o processo descritto in questo documento è di proprietà di RayTalk Industries® tranne quanto discusso ma espressamente riferito a terzi. Nessuna parte di questo documento o di quanto in esso
descritto può essere riprodotto, utilizzato, ingegnerizzato, trasmesso o messo a disposizione di chiunque mediante qualsiasi forma, o mediante ogni mezzo o supporto senza il permesso scritto degli autori e della RayTalk Industries®
Ogni abuso sarà perseguito a norma delle leggi vigenti.
64-QAM @ 48 and 54 Mbps
Operating Channels
11 for North America, 14 for Japan, 13 for Europe,2
for Spain, 4 for France
Receive Sensitivity
(Typical)
-72dBm @ 54Mbps
Available transmit
power(Typical)
17dBm @1, 2, 5.5 and 11Mbps,
17dBm@6Mbps,
14dBm@54Mbps
Antenna
9dBi Internal
Networking Topology
Ad-Hoc, Infrastructure
Operation Mode
Client Bridge
Interface
One 10/100Mbps RJ-45 LAN Port
Security
IEEE802.1x authenticator /RADIUS client
(EAPMD5/TLS/TTLS) support in AP mode WPA / Pre
Share KEY (PSK)/TKIP MAC address filtering Hide
SSID in beacons Layer 2 Isolation
IP Auto-configuration
DHCP client/server
Management
Web-based configuration (HTTP)
Configuration
Firmware Upgrade
Upgrade firmware via web browser
Physical Dimensions
209.1(L)mm * 165.4(W)mm * 61.5(H)mm
Weight
600g (1.3 lbs)
Environmental
Temperature Range
-Operating: -20°C to 70°C (-4°F to 158°F)
-Storage: -40°Cto 80°C (-40°F to 176°F)
Humidity
(non-condensing)
5%~95% Typical
Package Contents
Water tight Outdoor Wireless Last Mile CPE unit
48V, 0.38A AC/DC adapter with wall-plug power
code. Inline Power Injector (PoE)
Documento riservato © 2006 RayTalk Industries® Repubblica di San Marino.
46
Riservati tutti i diritti. Ogni oggetto o processo descritto in questo documento è di proprietà di RayTalk Industries® tranne quanto discusso ma espressamente riferito a terzi. Nessuna parte di questo documento o di quanto in esso
descritto può essere riprodotto, utilizzato, ingegnerizzato, trasmesso o messo a disposizione di chiunque mediante qualsiasi forma, o mediante ogni mezzo o supporto senza il permesso scritto degli autori e della RayTalk Industries®
Ogni abuso sarà perseguito a norma delle leggi vigenti.
1.8m Grounding Cable
30m Ethernet Cable
User’s manual CD-ROM
Wall mounting kit
Mast mounting kit
Documento riservato © 2006 RayTalk Industries® Repubblica di San Marino.
47
Riservati tutti i diritti. Ogni oggetto o processo descritto in questo documento è di proprietà di RayTalk Industries® tranne quanto discusso ma espressamente riferito a terzi. Nessuna parte di questo documento o di quanto in esso
descritto può essere riprodotto, utilizzato, ingegnerizzato, trasmesso o messo a disposizione di chiunque mediante qualsiasi forma, o mediante ogni mezzo o supporto senza il permesso scritto degli autori e della RayTalk Industries®
Ogni abuso sarà perseguito a norma delle leggi vigenti.
Chapter 6.
6.1
Default Settings
BASIC
6.1.1
LAN
Parameter
Description
Default Value
Get LAN IP from
A name it can be easily
Static IP(Manual)
recognized by wireless clients
IP Address
In order to protect your
network from hackers and
unauthorized users
192.168.1.241
Subnet Mask
255.255.255.0
Gateway
0.0.0.0
Local Domain Name
NULL
6.1.2
WIRELESS
6.1.2.1 ENABLE
Parameter
Description
Enable Wireless
Default Value
Select
Radio
6.1.2.2 BASIC WIRELESS SETTING
Parameter
Description
Default Value
Wireless Mode
Infrastructure
Wireless Network
Name(SSID)
Default
REGION ID
30
Channel
2.437GHz – CH6
Transmission Rate
BEST(Automatic)
802.11 Mode
MIX 802.11g and 802.11b
Super G™ Mode
Super AG without Turbo
Documento riservato © 2006 RayTalk Industries® Repubblica di San Marino.
48
Riservati tutti i diritti. Ogni oggetto o processo descritto in questo documento è di proprietà di RayTalk Industries® tranne quanto discusso ma espressamente riferito a terzi. Nessuna parte di questo documento o di quanto in esso
descritto può essere riprodotto, utilizzato, ingegnerizzato, trasmesso o messo a disposizione di chiunque mediante qualsiasi forma, o mediante ogni mezzo o supporto senza il permesso scritto degli autori e della RayTalk Industries®
Ogni abuso sarà perseguito a norma delle leggi vigenti.
6.1.2.3 WIRELESS SECURITY MODE
Parameter
Description
Security Mode
6.2
Default Value
None
ADVANCE
Parameter
Description
Default Value
Fragmentation Threshold
2346
RTS
2346
802.11d
No Select
Transmit Power
High
6.3
TOOLS
6.3.1
ADMIN
6.3.1.1 ADMIN PASSWORD
Parameter
Password
Description
Web Login password
Verify Password
Default Value
Admin
Admin
6.3.1.2 USER PASSWORD
Parameter
Password
Description
Web Login password
Verify Password
Default Value
Admin
Admin
6.3.1.3 Administration
Parameter
Description
Default Value
Bridge Name
RB170
Web Idle Timeout
15
Documento riservato © 2006 RayTalk Industries® Repubblica di San Marino.
49
Riservati tutti i diritti. Ogni oggetto o processo descritto in questo documento è di proprietà di RayTalk Industries® tranne quanto discusso ma espressamente riferito a terzi. Nessuna parte di questo documento o di quanto in esso
descritto può essere riprodotto, utilizzato, ingegnerizzato, trasmesso o messo a disposizione di chiunque mediante qualsiasi forma, o mediante ogni mezzo o supporto senza il permesso scritto degli autori e della RayTalk Industries®
Ogni abuso sarà perseguito a norma delle leggi vigenti.
6.3.1.4 Save And Restore Configuration
6.3.2
TIME
6.3.2.1 TIME CONFIGURATION
Parameter
Description
Time Zone
Default Value
GTM-08:00,Tijuana
6.3.2.2 SET THE DATE AND TIME MANUALLY
6.3.3
SYSTEM
Parameter
Description
Default Value
Description
Default Value
Reboot the Device
Restore all Setting to the
Factory Defaults
6.3.4
FIRMWARE
Parameter
Upload File
Program Image
Upgrade bin
Documento riservato © 2006 RayTalk Industries® Repubblica di San Marino.
50
Riservati tutti i diritti. Ogni oggetto o processo descritto in questo documento è di proprietà di RayTalk Industries® tranne quanto discusso ma espressamente riferito a terzi. Nessuna parte di questo documento o di quanto in esso
descritto può essere riprodotto, utilizzato, ingegnerizzato, trasmesso o messo a disposizione di chiunque mediante qualsiasi forma, o mediante ogni mezzo o supporto senza il permesso scritto degli autori e della RayTalk Industries®
Ogni abuso sarà perseguito a norma delle leggi vigenti.
Scaricare