PSS2010/PSS4005
DIGITAL SWITCHING POWER SUPPLY
DIGITALE SCHAKELENDE VOEDING
ALIMENTATION NUMÉRIQUE À DÉCOUPAGE
FUENTE DE ALIMENTACIÓN CONMUTADA Y DIGITAL
DIGITALES SCHALTNETZGERÄT
ALIMENTATORE SWITCHING
USER MANUAL
GEBRUIKERSHANDLEIDING
NOTICE D’EMPLOI
MANUAL DEL USUARIO
BEDIENUNGSANLEITUNG
ISTRUZIONI
PSS2010 / PSS4005
-2-
VELLEMAN
PSS2010 / PSS4005 – DIGITAL SWITCHING POWER SUPPLY
1. Introduction
To all residents of the European Union
Important environmental information about this product
This symbol on the device or the package indicates that disposal of the device after its lifecycle could harm
the environment.
Do not dispose of the unit (or batteries) as unsorted municipal waste; it should be taken to a specialized
company for recycling.
This device should be returned to your distributor or to a local recycling service.
Respect the local environmental rules.
If in doubt, contact your local waste disposal authorities.
Thank you for buying this switching power supply! Please read the manual thoroughly before bringing this device into
service. If the device was damaged in transit, don't use it and contact your dealer.
2. Technical Specifications
Output voltage
Output current
Operating voltage
Power frequency
Power consumption
Power output
Voltage stability (U) with 100% load swing
Current stability with 100% load swing
Voltage stability with ±10% AC voltage change
Current stability with ±10% AC voltage change
Ripple at nominal load
Display
Fuse F1
Fuse F2
Weight
Dimensions (W x H x D)
Operating temperature
Max. relative humidity
Storage temperature
PSS2010
PSS4005
0-20Vdc ; 10mV steps
0-40Vdc ; 10mV steps
0-10A ; 10mA steps
0-5A ; 10mA steps
230Vac ±10%
50Hz
max. ±300VA
max. ±200W
≤10mV
≤5mA
≤0.05%
≤0.05%
±15mV rms
multi-line LCD with backlight
6.3A / 250V (slow) (order code FU6.3N)
1A / 250V (slow) (order code FU1N)
±3kg
± 275x135x300mm
0→40°C
±80% non-condensing
-20→+60°C
3. Controls and Connections
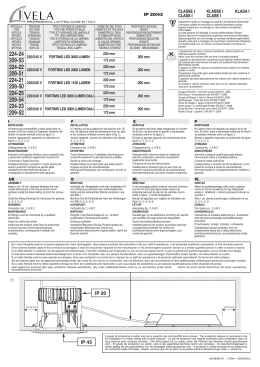
Front
1. Backlit LCD
2. Keypad
3. Adjustment wheel
4. 4mm safety socket for negative connection (-)
5. 4mm safety socket for positive connection (+)
6. 4mm safety socket for ground connection
7. Power switch (on/off)
PSS2010 / PSS4005
-3-
VELLEMAN
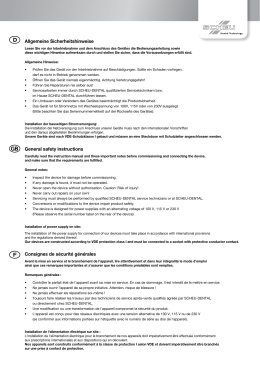
Rear
8. AC power input
9. RS-232 interface (with optocoupler) to connect to a PC
10. Ventilation slots
4. Safety Instructions
•
•
•
•
•
•
•
•
•
•
•
•
•
•
•
•
•
•
•
When this icon appears in the manual, there is a possible exposure to high voltage.
Keep this device away from rain and moisture, dust and combustible gases, fumes or solvents.
Select a location where the device is protected against extreme temperatures, away from heating devices.
Damage caused by user modifications or disregard of certain guidelines in this manual is not covered by the
warranty and the dealer will not accept responsibility for any ensuing injuries, defects or problems.
Do not use the device in circumstances that can create strong electrostatic fields such as thunderstorms etc.
Do not switch the device on immediately after it has been exposed to changes in temperature. Protect the device
against damage by leaving it switched off until it has reached room temperature.
Never cover or obstruct the cooling slots at the rear and the sides of the device ; this may cause overheating.
Never put the device on its front panel, as this may cause the front panel to break.
The device left the factory in a technically safe condition. To maintain this condition and to ensure safe operation,
it is essential for the user to observe the safety instructions and warning notes contained in this manual.
This device falls under protection class I. It is therefore essential that the device be connected to a 230Vac
earthed mains power supply.
Keep the device away from children and unauthorised users.
Unplug the mains lead before opening the housing. Open the housing with an appropriate screwdriver. Open the
housing only to replace a defective fuse. Replace a defective fuse only with a fuse of the same type and rating.
It is not recommended to wear conductive metal jewellery (rings, bracelets etc.) while operating power supplies.
Do not leave power supplies and loads switched on without supervision.
Be careful with voltages over 35Vdc as they can cause life-threatening electroshocks.
Make sure the power supply outputs, contact points and power leads are undamaged and sufficiently insulated.
Do not continue to use the device and have it repaired when it looks damaged or does not work normally.
Disconnect the device from the mains to clean it or when it is not in use. Handle the power cord by the plug only.
Do not shake the device. Avoid brute force when installing or operating the device.
Only use the device for its intended purpose. All other uses may lead to short circuits, burns, electroshocks,
crash, etc. Using the device in an unauthorised way will void the warranty.
5. Functionality
The device can be used for different applications thanks to its adjustable voltage and current (and thus power)
supply: the U, I and P values are shown on the LCD and are adjustable with the adjustment wheel.
A temperature circuit, equipped with a fan, protects the power supply from thermal overload.
An electronic current limiter protects the power supply from overload and short-circuits at the output: during an
overload or short-circuit, the output is reduced automatically until the overload or short-circuit is removed.
The device is also equipped with a PFC (Power Factor Compensation) function, which enhances the power supply's
efficiency. For example: a regular power supply uses only 70% of the mains power ; with PFC it can use up to 95%.
This means the energy waste drops from 30% to 5%.
6. Operation
a. Powering On the Device
1. Connect the AC power cable to the AC connector (fig. p.1 #8) and plug it into an earthed AC power socket
(230Vac/50Hz).
Make sure the earth lead is not interrupted at the power socket, in the cable or inside the power supply.
PSS2010 / PSS4005
-4-
VELLEMAN
2. Switch the power supply on by pressing the power button (fig. p.1 #7).
3. The device is automatically set to the maximum levels, which are displayed on the LCD (fig. p.1 #1).
The earth connectors on the front panel (fig. p.1 #6) and the RS-232 connector (fig. p.1 #9) are directly
connected to the protective earth lead.
b. Limit Adjustment ('LIMIT' keys)
1. Voltage limit (U): press the 'U' key in the left part of the keypad (fig. p.1 #2) until the 'U-const' symbol on the
display starts flashing. The voltage can now be adjusted in 1V-steps using the adjustment wheel (fig. p.1 #3).
When the limit is set, press the 'ENT' key (enter) to confirm (or exit without adjustment). If by accident the limit was
set erroneously, erase or reset it using the 'CE' key. This will result in a return to the previous value.
The output voltage can be adjusted during the operation.
2. Current limit (I): press the 'I' key in the left part of the keypad (fig. p.1 #2) until the 'I-const' symbol on the display
starts flashing. Adjust the current in 10mA-steps (fine) or 100mA-steps (norm) using the adjustment wheel (fig. p.1
#3). When the limit is set, press the 'ENT' key (enter) to confirm (or exit without adjustment). If by accident the limit
was set erroneously, erase or reset it using the 'CE' key. This will result in a return to the previous value.
3. Power limit (P): press the 'P' key in the left part of the keypad (fig. p.1 #2) until the 'P-const' symbol on the display
starts flashing. The power can now be adjusted in 1W-steps using the adjustment wheel (fig. p.1 #3). When the
limit is set, press the 'ENT' key (enter) to confirm (or exit without adjustment). If by accident the limit was set
erroneously, erase or reset it using the 'CE' key. This will result in a return to the previous value.
A power adjustment will automatically affect the current output ; the valid voltage setting is kept.
c. 'KEY INPUT' settings
•
•
•
•
Pressing the 'u' key will cause the output voltage to be adjusted up to the upper limit directly.
The 'ENT' key is used to confirm the limit setting (see "6.b. Limit adjustment").
The 'CE' key is used to clear / reset the limit setting (see "6.b. Limit adjustment").
The 'N' (normal) and 'F' (fine) keys can be used to modify the adjustment step at which the selected parameter is
adjusted. Only one mode can be selected: it's either fine (an 'f' appears on the display) or normal.
• The 'L' key locks and unlocks all keys and the adjustment wheel to avoid inadvertent adjustment. Only the power
switch (fig. p.1 #7) remains active. Locking is indicated by the 'Locking' symbol on the bottom line of the display.
Press the 'L' key for about 2 seconds to unlock the keypad.
d. Output Adjustment ('I/O' key)
The output of the power supply can be switched on or off with the 'I/O' key. The status of the output is shown on the
bottom line of the LCD. Upon switching the device on, the output is switched off until it is activated with the 'I/O' key.
e. PC Connection: 'REM' key
At the rear side of the device is an RS-232 interface (fig. p.1 #9), which allows connection to a PC. With appropriate
software, the power supply can be controlled by the PC. Press the 'REM' key to allow communication between the
power supply and the PC. "Remote" appears on the bottom line of the display. All controls on the device itself
become invalid (except for the power button). Press the 'REM' key again for approximately 2 seconds to interrupt PC
communication and to release the keypad.
7. Troubleshooting, Repair & Maintenance
Before returning the device to your dealer for repair, check the following:
• If there is no image:
Is the unit switched on?
Is the power cable well connected to the device and to the mains outlet?
Are the fuses OK?
PSS2010 / PSS4005
-5-
VELLEMAN
• Keys do not work: is the keypad locked? (consult "6.c. 'KEY INPUT' settings" and "6.e. PC Connection")
Disconnect the power supply from the mains and disconnect the loads from the power supply before opening it.
Be careful even then, for capacitors inside the device may still be charged.
If the device should be irreparable, dispose of it following the local legislation.
Clean the device with a dry, antistatic and lint-free cleaning cloth only.
Do not use carbonaceous agents, petrol or alcohol for cleaning purposes, as they may damage the housing
and/or interior parts. Furthermore, the fumes are inflammable and bad for your health.
Do not use sharp-edged tools, screwdrivers, metal brushes etc. for cleaning purposes to avoid damage.
The information in this manual is subject to change without prior notice.
PSS2010 / PSS4005 – DIGITALE SCHAKELENDE VOEDING
1. Inleiding en kenmerken
Aan alle ingezetenen van de Europese Unie
Belangrijke milieu-informatie betreffende dit product
Dit symbool op het toestel of de verpakking geeft aan dat, als het na zijn levenscyclus wordt weggeworpen,
dit toestel schade kan toebrengen aan het milieu.
Gooi dit toestel (en eventuele batterijen) niet bij het gewone huishoudelijke afval; het moet bij een
gespecialiseerd bedrijf terechtkomen voor recyclage.
U moet dit toestel naar uw verdeler of naar een lokaal recyclagepunt brengen.
Respecteer de plaatselijke milieuwetgeving.
Hebt u vragen, contacteer dan de plaatselijke autoriteiten inzake verwijdering.
Dank u voor uw aankoop! Lees deze handleiding grondig voor u het toestel in gebruik neemt. Als het toestel werd
beschadigd tijdens het transport, installeer het dan niet en raadpleeg uw dealer.
2. Technische specificaties
uitgangsspanning
uitgangsstroom
voeding
voedingsfrequentie
verbruik
uitgangsvermogen
spanningsstabiliteit (U) bij 100% belastingswissel
stroomstabiliteit bij 100% belastingswissel
spanningsstabiliteit bij ±10% AC spanningswissel
stroomstabiliteit bij ±10% AC spanningswissel
rimpel bij nominale belasting
scherm
zekering F1
zekering F2
gewicht
afmetingen (B x H x D)
werktemperatuur
Max. relatieve vochtigheid
opslagtemperatuur
PSS2010 / PSS4005
PSS2010
PSS4005
0-20Vdc ; stappen van 10mV
0-40Vdc ; stappen van 10mV
0-10A ; stappen van 10mA
0-5A ; stappen van 10mA
230Vac ±10%
50Hz
max. ±300VA
max. ±200W
≤10mV
≤5mA
≤0.05%
≤0.05%
±15mV rms
LCD met verschillende regels en achtergrondverlichting
6.3A / 250V (traag) (bestelcode FU6.3N)
1A / 250V (traag) (bestelcode FU1N)
±3kg
± 275x135x300mm
0→40°C
±80% niet-condenserend
-20→+60°C
-6-
VELLEMAN
3. Bedieningsknoppen en aansluitingen (zie figuren blz. 1)
Voorzijde
1. LCD met achtergrondverlichting
2. Toetsenpaneel
3. Regelwiel
4. 4mm veiligheidscontact voor negatieve aansluiting(-)
5. 4mm veiligheidscontact voor positieve aansluiting (+)
6. 4mm veiligheidscontact voor aarding
7. On/off-schakelaar
Achterzijde
8. AC voedingsingang
9. RS-232 interface (met optokoppel) om een PC
aan te sluiten
10. Ventilatie-openingen
4. Veiligheidsinstructies
•
•
•
•
•
•
•
•
•
•
•
•
•
•
•
•
•
•
•
Wanneer u dit icoon ziet in de handleiding, is er potentieel gevaar op blootstelling aan hoge spanningen.
Bescherm dit toestel tegen regen en vochtigheid, stof en brandbare gassen, dampen of solventen.
Bescherm dit toestel tegen extreme temperaturen en plaats het niet vlakbij verwarmingstoestellen.
Gebruik dit toestel niet in omstandigheden met sterke elektrostatische velden, zoals donderbuien etc.
De garantie geldt niet voor schade door gebruikerswijzigingen of het negeren van richtlijnen in deze handleiding
en uw dealer zal de verantwoordelijkheid afwijzen voor defecten of problemen die hier verband mee houden.
Om beschadiging te vermijden, zet u het toestel best niet aan onmiddellijk nadat het werd blootgesteld aan
temperatuurschommelingen. Wacht tot het toestel op kamertemperatuur gekomen is.
Bedek of blokkeer de ventilatie-openingen opzij en achteraan het toestel niet ; dit kan leiden tot oververhitting.
Plaats het toestel nooit op het frontpaneel ; dit is daar niet voor gemaakt en kan vrij gemakkelijk breken.
Het toestel wordt geleverd in een technisch veilige staat. Om deze staat te handhaven en een veilig gebruik te
garanderen, dient de gebruiker de veiligheidsinstructies en waarschuwingen in deze handleiding te respecteren.
Dit toestel valt onder beschermingsklasse I, en dient te worden aangesloten op een geaard 230Vac stopcontact.
Hou dit toestel uit de buurt van kinderen en onbevoegden.
Koppel het toestel los van de netspanning voor u de behuizing opent. Open de behuizing met een geschikte
schroevendraaier. Open de behuizing enkel om een kapotte zekering te vervangen. Vervang een kapotte
zekering enkel door een zekering van hetzelfde type en met dezelfde specificaties.
Het is niet raadzaam geleidende metalen sieraden (ringen, armbanden...) te dragen als u met een voeding werkt.
Laat geen voedingen en belastingen aanliggen terwijl er niemand in de buurt is.
Wees voorzichtig met spanningen boven 35Vdc want deze kunnen levensgevaarlijke elektroshocks veroorzaken.
Zorg dat de uitgangen, contactpunten en kabels van de voeding niet beschadigd en voldoende geïsoleerd zijn.
Gebruik het toestel niet en laat het nakijken als het er beschadigd uitziet of niet normaal werkt.
Trek de stekker uit het stopcontact (trek niet aan de kabel!) voordat u het toestel reinigt en als u het niet gebruikt.
Schud het toestel niet dooreen. Vermijd brute kracht tijdens de installatie en de bediening van dit toestel.
Gebruik het toestel enkel waarvoor het gemaakt is. Andere toepassingen kunnen leiden tot kortsluitingen,
brandwonden, elektroshocks enz. Bij onoordeelkundig gebruik vervalt de garantie.
5. Werking
Dit toestel kan worden gebruikt voor diverse toepassingen dankzij de regelbare spanning en stroom (dus ook
vermogen): de U, I en P waardes worden weergegeven op het LCD-scherm en zijn regelbaar via het regelwiel.
Een temperatuurcontrole uitgerust met een ventilator zorgt ervoor dat de voeding niet kan oververhitten.
Een elektronische stroombegrenzer beschermt de voeding tegen overbelasting en kortsluitingen aan de uitgang: in
dergelijke gevallen wordt het uitgangsvermogen automatisch beperkt tot de overbelasting of kortsluiting is verwijderd.
Het toestel is ook uitgerust met een PFC (Power Factor Compensation) functie, die de efficiëntie van de voeding
verhoogt. Een voorbeeld: een gewone voeding gebruikt slechts 70% van het inkomend vermogen ; met PFC kan dit
oplopen tot 95%. Dit betekent dat het energieverlies zakt van 30% tot 5%.
PSS2010 / PSS4005
-7-
VELLEMAN
6. Bediening
a. Het toestel aanzetten
1. Sluit de AC voedingskabel aan op het toestel (fig. p.1 #8) en op een geaard stopcontact (230Vac/50Hz).
Zorg dat de aarding niet wordt onderbroken aan het stopcontact, in de kabel of in de voeding.
2. Zet de voeding aan door op de on/off-schakelaar te drukken (fig. p.1 #7).
3. Bij het aanzetten van het toestel staan alle niveaus op de maximumwaarde ; dit wordt ook weergegeven op het
LCD-scherm (fig. p.1 #1).
Het aardingcontact op het frontpaneel (fig. p.1 #6) en de RS-232 connector (fig. p.1 #9) zijn direct verbonden
met de aarding van het toestel.
b. Limit regelingen ('LIMIT' toetsen)
1. Spanningslimiet (U): druk op 'U' links in het toetsenpaneel (fig. p.1 #2) tot 'U-const' op het scherm begint te
knipperen. Regel de spanning per 1V via het regelwiel (fig. p.1 #3). Is de limiet ingesteld, druk dan op 'ENT' (enter)
om te bevestigen (of de regeling te verlaten zonder aanpassing). Als een verkeerde waarde werd ingegeven, kan
deze worden gewist via de 'CE' toets. Het toestel zal terugkeren naar de vorige waarde.
De uitgangsspanning kan worden bijgeregeld terwijl het toestel werkt.
2. Stroomlimiet (I): druk op 'I' links in het toetsenpaneel (fig. p.1 #2) tot 'I-const' op het scherm begint te knipperen.
Regel de stroom per 10mA (fine) of 100mA (norm) via het regelwiel (fig. p.1 #3). Als de limiet ingesteld is, druk
dan op 'ENT' (enter) om te bevestigen (of de regeling te verlaten zonder aanpassing). Als een verkeerde waarde
werd ingegeven, kan deze worden gewist via de 'CE' toets. Het toestel zal terugkeren naar de vorige waarde.
3. Vermogenslimiet (P): druk op 'P' links in het toetsenpaneel (fig. p.1 #2) tot 'P-const' op het scherm begint te
knipperen. Regel het vermogen per 1W via het regelwiel (fig. p.1 #3). Als de limiet ingesteld is, druk dan op 'ENT'
(enter) om te bevestigen (of de regeling te verlaten zonder aanpassing). Als een verkeerde waarde werd
ingegeven, kan deze worden gewist via de 'CE' toets. Het toestel zal terugkeren naar de vorige waarde.
Een vermogenslimiet zal automatisch werken op de uitgangsstroom ; de spanningsinstelling blijft behouden.
c. 'KEY INPUT' regeling
•
•
•
•
Door op 'u' te drukken wordt de uitgangsspanning onmiddellijk op de maximumwaarde gezet.
De 'ENT' toets dient om de ingestelde limieten te bevestigen (zie "6.b. Limit regelingen ").
De 'CE' toets dient om de ingestelde limieten te wissen / herinitialiseren (zie "6.b. Limit regelingen ").
Met de 'N' (normal) en 'F' (fine) toetsen kan de regeltrap van het regelwiel worden ingesteld. Slechts 1 van deze 2
modes can actief zijn: ofwel is de regeltrap normaal ofwel fijn (waarbij een 'f' op het scherm verschijnt).
• Met de 'L' toets kunt u het toetsenpaneel en het regelwiel vergendelen om ongewenste regelingen te vermijden.
Enkel de on/off-knop (fig. p.1 #7) blijft actief. De vergrendeling wordt weergegeven door het 'Locking' symbool
onderaan het scherm. Druk gedurende ongeveer 2 seconden op 'L' om het toetsenpaneel te ontgrendelen.
d. Output regeling ('I/O' toets)
De uitgang van de voeding kan worden aan- of uitgezet met de 'I/O' toets. De status van de uitgang wordt
weergegeven onderaan het LCD-scherm. Wanneer het toestel wordt aangezet, staat de uitgang uit tot deze wordt
geactiveerd met de 'I/O' toets.
e. PC aansluiten: 'REM' toets
Achteraan het toestel zit een RS-232 aansluiting (fig. p.1 #9), die toelaat het toestel aan te sluiten op een PC. Met de
geschikte software kunt u de voeding sturen via uw PC. Fruk op 'REM' om de communicatie tussen de voeding en de
PC te activeren. Onderaan het scherm verschijnt "Remote". Alle toetsen op het toestel worden vergrendeld (behalve
de on/off-knop). Druk gedurende ongeveer 2 seconden op 'REM' om de communicatie met de PC te onderbreken en
het toetsenpaneel opnieuw te activeren.
PSS2010 / PSS4005
-8-
VELLEMAN
7. Troubleshooting, herstelling en onderhoud
Voor u het toestel terugbrengt naar uw verdeler voor herstelling, kunt u zelf deze punten controleren:
• Als er geen beeld is:
Staat het toestel aan?
Is de voedingskabel goed aangesloten op het toestel en op het stopcontact?
Zijn de zekeringen nog goed?
• Toetsen werken niet: is het toetsenpaneel vergrendeld? (zie "6.c. 'KEY INPUT' settings" en "6.e. PC
Connection")
Trek de stekker uit het stopcontact en koppel alle belastingen los van de voeding voor u deze gaat openen.
Wees zelfs dan nog voorzichtig, want condensatoren in het toestel kunnen nog geladen zijn.
Als het toestel niet meer kan worden hersteld, ontdoe er u dan van volgens de lokale regelgeving.
Reinig het toestel enkel met een droge, antistatische en niet-pluizende doek.
Gebruik geen koolstofhoudende producten, benzine of alcohol om het toestel te reinigen: deze kunnen de
behuizing en/of componenten binnenin beschadigen. Bovendien zijn hun dampen brandbaar en ongezond.
Gebruik evenmin scherpe werktuigen, schroevendraaiers, metalen borstels etc. om het toestel te reinigen.
De informatie in deze handleiding kan te allen tijde worden gewijzigd zonder voorafgaande kennisgeving.
PSS2010 / PSS4005 – ALIMENTATION NUMÉRIQUE À DÉCOUPAGE
1. Introduction et caractéristiques
Aux résidents de l'Union européenne
Des informations environnementales importantes concernant ce produit
Ce symbole sur l'appareil ou l'emballage indique que l’élimination d’un appareil en fin de vie peut polluer
l'environnement.
Ne pas éliminer un appareil électrique ou électronique (et des piles éventuelles) parmi les déchets
municipaux non sujets au tri sélectif ; une déchèterie traitera l’appareil en question.
Renvoyer les équipements usagés à votre fournisseur ou à un service de recyclage local.
Il convient de respecter la réglementation locale relative à la protection de l’environnement.
En cas de questions, contacter les autorités locales pour élimination.
Nous vous remercions de votre achat ! Lisez le présent manuel attentivement avant la mise en service de l'appareil.
Si l’appareil a été endommagé pendant le transport, ne l'installez pas et consultez votre revendeur.
2. Spécifications Techniques
Tension de sortie
Courant de sortie
Tension opérationnelle
Fréquence de puissance
Consommation
Sortie de puissance
Stabilité en tension (U) avec variation de charge 100%
Stabilité en courant avec variation de charge 100%
Stabilité en tension avec variation de tension CA ±10%
Stabilité en courant avec variation de tension CA ±10%
Ondulation à charge nominale
PSS2010 / PSS4005
PSS2010
PSS4005
0-20Vcc ; étapes 10mV
0-40Vcc ; étapes 10mV
0-10A ; étapes 10mA
0-5A ; étapes 10mA
230Vca ±10%
50Hz
max. ±300VA
max. ±200W
≤10mV
≤5mA
≤0.05%
≤0.05%
±15mV rms
-9-
VELLEMAN
Ecran
Fusible F1
Fusible F2
Poids
Dimensions (La x H x P)
Température opérationnelle
Humidité relative max.
Température de stockage
écran LCD rétro-éclairé à plusieurs lignes
6.3A / 250V (lent) (référence FU6.3N)
1A / 250V (lent) (référence FU1N)
±3kg
± 275x135x300mm
0→40°C
±80% sans condensation
-20→+60°C
3. Commandes et connections
Face avant
1. LCD rétro-éclairé
2. Clavier
3. Roue de réglage
4. Contact de sécurité 4mm pour connexion négative (-)
5. Contact de sécurité 4mm pour connexion positive (+)
6. Contact de sécurité 4mm pour connexion mise à la terre
7. Interrupteur (on/off)
Face arrière
8. Entrée de puissance CA
9. Interface RS-232 (avec optocouple) pour PC
10. Trous de ventilation
4. Prescriptions de sécurité
•
•
•
•
•
•
•
•
•
•
•
•
•
•
•
•
•
•
•
Quand cet icône apparaît dans la notice, il y a un risque d'exposition à une tension élevée.
Protégez l'appareil contre la pluie et l'humidité, de la poussière et des gaz, fumées ou solvants inflammables.
Protégez l'appareil contre des températures extrêmes et ne l'installez pas auprès d'appareils de chauffage.
N'utilisez pas l'appareil s'il y a une possibilité de champs électrostatiques comme pendant du tonnerre.
La garantie ne s'applique pas aux dommages par des modifications du client ou par la négligence des directives
de ce manuel et votre revendeur déclinera toute responsabilité pour les problèmes ou défauts qui en résultent.
Ne branchez pas l'appareil après exposition à des variations de température. Afin d’éviter des dommages,
attendez jusqu’à ce que l'appareil ait atteint la température ambiante avant de l'utiliser.
N' obstruez pas les trous de ventilation à l'arrière et aux côtés de l'appareil pour éviter de la surchauffe.
Ne mettez jamais l'appareil sur la face avant, comme ceci peut casser le panneau frontal.
L'appareil a quitté l'entreprise dans un bon état technique. Pour maintenir cet état et garantir une opération sûre, il
est essentiel que l'utilisateur respecte les prescriptions de sécurité et les avertissements dans cette notice.
Cet appareil ressort à la classe de protection I, ce qui implique que l'appareil doit être branché sur une prise de
courant 230Vca qui est mise à la terre.
Gardez l'appareil hors de la portée de personnes non qualifiées et de jeunes enfants.
Débranchez l’appareil avant d'ouvrir le logement. Ouvrez le logement avec un tournevis approprié. Ouvrez le
logement uniquement pour remplacer un fusible défectueux. Replacez un fusible uniquement par un fusible du
même type et avec les mêmes caractéristiques.
C'est déconseillé de porter des bijoux en métal conducteur (anneaux, bracelets etc.) pour opérer des alimentations.
Ne laissez pas d'alimentations et de charges allumés sans surveillance.
Soyez prudent avec des voltages de plus de 35Vcc comme ceux-ci peuvent causer des électrochocs mortels.
Veillez à ce que les sorties et points de contact de l'alimentation et les câbles sont intacts et suffisamment isolés.
Si l'alimentation a l'air endommagé ou ne marche pas normalement, ne l'utilisez pas et consultez votre revendeur.
Débranchez l’appareil s’il n’est pas utilisé ou pour le nettoyer. Tirez la fiche pour le débrancher ; non pas le câble.
Ne secouez pas l'appareil. Evitez de fortes pressions pendant l'installation ou l'opération de l'appareil.
N’utilisez l'appareil qu’à sa fonction prévue. Tout autre usage peut causer des courts-circuits, des brûlures, des
électrochocs etc. Un usage impropre annule d'office la garantie.
PSS2010 / PSS4005
- 10 -
VELLEMAN
5. Fonctionnalité
L'appareil peut être utilisé pour de différents applications grâce à la tension et le courant (et donc la puissance)
réglables: les valeurs U, I et P sont affichées sur l'écran LCD et réglables avec la roue de réglage.
Un circuit de température, équipé d'un ventilateur, protège l'alimentation contre la surcharge thermique.
Une limitation du courant électronique protège l'alimentation contre des surcharges et des courts-circuits à la sortie:
dans ces cas, la sortie est réduite automatiquement jusqu'à ce que la surcharge ou le court-circuit est enlevé.
L'appareil est également équipé d'une fonction PFC (Power Factor Compensation), qui optimalise l'efficacité de
l'alimentation. Par exemple: une alimentation régulière n'utilise que 70% de la puissance du réseau ; avec PFC le
pourcentage peut monter à 95, ce qui veut dire que la perte de puissance diminue de 30% à 5%.
6. Opération
a. Allumer l'appareil
1. Connectez le câble d'alimentation CA au connecteur CA (fig. p.1 #8) et branchez-le sur une prise de courant
230Vca/50Hz avec mise à la terre.
Veillez à ce que la mise à la terre ne soit pas interrompue à la prise, dans le câble ou dans l'alimentation.
2. Allumez l'alimentation en pressant l'interrupteur (fig. p.1 #7).
3. Après allumage, tous les paramètres sont tous mis au maximum, comme visible sur l'écran LCD (fig. p.1 #1).
Le connecteur de mise à la terre sur le panneau frontal (fig. p.1 #6) et le connecteur RS-232 (fig. p.1 #9) sont
directement connectés à la mise à la terre de l'appareil.
b. Réglage des limites (touches 'LIMIT')
1. Limite de tension (U): pressez la touche 'U' dans la partie gauche du clavier (fig. p.1 #2) jusqu'à ce que 'U-const'
sur l'écran commence à clignoter. Vous pouvez maintenant régler la tension par étapes de 1V par moyen de la
roue de réglage (fig. p.1 #3). Puis pressez 'ENT' (enter) pour confirmer (ou pour quitter). Si une valeur a été entrée
par malheur, pressez 'CE' pour l'effacer. La valeur précédente sera réintroduite.
La tension de sortie peut être modifié pendant l'opération.
2. Limite de courant (I): pressez la touche 'I' dans la partie gauche du clavier (fig. p.1 #2) jusqu'à ce que 'I-const' sur
l'écran commence à clignoter. Vous pouvez maintenant régler le courant par étapes de 10mA (fine) ou 100mA
(norm) par moyen de la roue de réglage (fig. p.1 #3). Puis pressez 'ENT' (enter) pour confirmer (ou pour quitter).
Si une valeur a été entrée par malheur, pressez 'CE' pour l'effacer. La valeur précédente sera réintroduite.
3. Limite de puissance (P): pressez la touche 'P' dans la partie gauche du clavier (fig. p.1 #2) jusqu'à ce que 'P-const'
sur l'écran commence à clignoter. Vous pouvez maintenant régler le courant par étapes de 1W par moyen de la
roue de réglage (fig. p.1 #3). Puis pressez 'ENT' (enter) pour confirmer (ou pour quitter). Si une valeur a été entrée
par malheur, pressez 'CE' pour l'effacer. La valeur précédente sera réintroduite.
Une modification de la puissance portera automatiquement sur le courant ; la limite de tension reste inchangée.
c. Réglages 'KEY INPUT'
•
•
•
•
En pressant la touche 'u', vous mettez immédiatement la tension de sortie au niveau limite.
La touche 'ENT' sert à confirmer le réglage d'une limite (voir "6.b. Réglage des limites").
La touche 'CE' sert à effacer le réglage d'une limite (voir "6.b. Réglage des limites ").
Les touches 'N' (normal) et 'F' (fine) servent à modifier l'étape de réglage du paramètre sélectionné. Vous ne
pouvez sélectionner qu'un mode à la fois: ou bien c'est 'fine' (une 'f' apparaît sur l'écran) ou c'est normal.
• La touche 'L' verrouille et déverrouille toutes les touches et la roue de réglage pour éviter des modifications
involontaires. Seul l'interrupteur (fig. p.1 #7) reste opérationnel. Le verrouillage est signalisé par le symbole
'Locking' en bas de l'écran. Pressez la touche 'L' pendant environ 2 secondes pour déverrouiller le clavier.
PSS2010 / PSS4005
- 11 -
VELLEMAN
d. Réglage de la sortie (touche 'I/O')
Vous pouvez activer et désactiver la sortie de l'alimentation avec la touche 'I/O'. L'état de la sortie est affiché en bas
de l'écran LCD. Après allumage de l'appareil, la sortie est inactive jusqu'à ce qu'elle soit activée avec la touche 'I/O'.
e. Connexion ordinateur: touche 'REM'
A l'arrière de l'appareil se trouve une interface RS-232 (fig. p.1 #9), qui permet la connexion à un ordinateur. Avec un
logiciel approprié, vous pouvez utiliser l'ordinateur pour commander l'alimentation. Pressez la touche 'REM' pour
autoriser la communication entre l'alimentation et l'ordinateur. "Remote" apparaît en bas de l'écran. Toutes les
touches de l'appareil sont verrouillées (sauf l'interrupteur). Pressez la touche 'REM' pendant environ 2 secondes
pour interrompre la communication avec l'ordinateur et pour déverrouiller le clavier.
7. Troubleshooting, Réparations & Entretien
Avant de retourner l'appareil à votre revendeur pour réparation, vérifiez le suivant:
• S'il n'y a pas d'image:
L'appareil est allumé?
Le câble d'alimentation est bien connecté à l'appareil et branché sur une prise de courant?
Les fusibles sont OK?
• Les touches ne fonctionnent pas: le clavier est verrouillé? (voir "6.c. Réglages 'KEY INPUT'" et "6.e. Connexion
ordinateur ")
Débranchez l'alimentation du réseau et déconnectez les charges avant de l'ouvrir. Soyez toujours prudent par
après, car des condensateurs dans l'appareil peuvent encore être chargés.
Si l'appareil est irréparable, en défaites-vous selon la réglementation locale.
Nettoyez l'appareil uniquement avec un chiffon sec, antistatique et non pelucheux.
N'utilisez pas d'agents carboneux, d'essence ou d'alcool pour nettoyer l'appareil ; ceux-ci peuvent endommager
le logement et/ou les parties intérieures. En plus, leurs vapeurs sont inflammables et mauvais pour la santé.
N'utilisez pas d'outils aigus, de tournevis, de brosses métalliques etc. pour nettoyer l'appareil afin d'éviter des
dommages.
Toutes les informations présentées dans ce manuel peuvent être modifiées sans notification préalable.
PSS2010 / PSS4005 – FUENTE DE ALIMENTACIÓN CONMUTADA Y DIGITAL
1. Introducción
A los ciudadanos de la Unión Europea
Importantes informaciones sobre el medio ambiente concerniente este producto
Este símbolo en este aparato o el embalaje indica que, si tira las muestras inservibles, podrían dañar el
medio ambiente.
No tire este aparato (ni las pilas eventuales) en la basura doméstica; debe ir a una empresa especializada
en reciclaje. Devuelva este aparato a su distribuidor o un lugar de reciclaje local.
Respete las leyes locales en relación con el medio ambiente.
Si tiene dudas, contacte las autoridades locales para eliminación.
¡Gracias por haber comprado la PSS2010 & PSS4005! Lea cuidadosamente las instrucciones del manual antes de
usarla.
Si el aparato ha sufrido algún daño en el transporte no conecte el aparato a la red y póngase en contacto con su
distribuidor.
PSS2010 / PSS4005
- 12 -
VELLEMAN
2. Especificaciones
PSS2010
PSS4005
0-20Vcc ; pasos 10mV
0-40Vcc ; pasos 10mV
0-10A ; pasos 10mA
0-5A ; pasos 10mA
230Vca ±10%
50Hz
máx. ±300VA
máx. ±200W
≤10mV
Tensión de salida
Corriente de salida
Tensión de alimentación
Frecuencia de potencia
Consumo
Salida de potencia
Estabilidad de la tensión (U) con una variación de
carga 100%
Estabilidad de la corriente con una variación de carga
100%
Estabilidad de la tensión con una variación de tensión
CA ±10%
Estabilidad de la corriente con una variación de tensión
CA ±10%
Rizado a carga nominal
Pantalla
Fusible F1
Fusible F2
Peso
Dimensiones (An x Al x P)
Temperatura de funcionamiento
Humedad relativa máx.
Temperatura de almacenamiento
≤5mA
≤0.05%
≤0.05%
±15mV rms
pantalla LCD con varias líneas y retroiluminación
6.3A / 250V (lento) (referencia FU6.3N)
1A / 250V (lente) (referencia FU1N)
±3kg
± 275x135x300mm
0→40°C
±80% sin condensación
-20→+60°C
3. Ajustes y conexiones
Panel frontal
1. Pantalla LCD retroiluminada
2. Teclado
3. Rueda de ajuste
4. Contacto de seguridad 4mm para conexión negativa (-)
5. Contacto de seguridad 4mm para conexión positiva (+)
6. Contacto de seguridad 4mm para conexión puesta a
tierra
7. Interruptor on/off
Parte trasera
8. Entrada de potencia CA
9. Interface RS-232 (con optocoplador) para PC
10. Orificios de ventilación
4. Instrucciones de seguridad
•
•
•
•
•
•
•
•
Si este icono aparece en el manual, hay un riesgo de exposición a una tensión elevada.
No exponga el aparato a lluvia o humedad, polvo o gas, humos o disolventes inflamables.
Proteja el aparato contra temperaturas extremas y no lo instale cerca de aparatos de calefacción.
No utilice el aparato si se pueden producir campos electrostáticos como durante tormentas.
Daños causados por descuido de las instrucciones de seguridad de este manual invalidarán su garantía y su
distribuidor no será responsable de ningún daño u otros problemas resultantes.
No conecte el aparato si ha estado expuesto a grandes cambios de temperatura. Espere hasta que el aparato
llegue a la temperatura ambiente.
No cubra ni bloquee los orificios de ventilación de la parte trasera y los laterales del aparato para evitar el
sobrecalentamiento.
Nunca coloque el aparato en el panel frontal. Esto podría dañarlo.
El aparato ha salido de la fábrica en buen estado. Para mantener este estado y garantizar un funcionamiento
seguro, es muy importante que el usuario respete las instrucciones de seguridad y los avisos de este manual.
PSS2010 / PSS4005
- 13 -
VELLEMAN
• Este aparato pertenece a la clase de protección I. Por lo tanto, es esencial que el aparato esté conectado a una
toma de corriente de 230Vca que esté puesta a tierra.
• Mantenga el aparato lejos del alcance de personas no autorizadas y niños.
• Desconecte siempre el aparato antes de abrir la caja. Abra la caja con un destornillador apropiado. Abra la caja
sólo para reemplazar un fusible defectuoso. Reemplace un fusible fundido sólo por otro del mismo tipo y mismas
características.
• No lleve joyas de metal conductor (anillos, brazaletes etc.) al operar estas alimentaciones.
• No mantenga encendidas fuentes de alimentación y cargas sin vigilancia
• Sea cuidadoso con tensiones de más de 35Vcc. Podrían causar electrochoques mortales.
• Asegúrese de que las salidas, los puntos de contacto y los cables estén lo suficiente aislados y no estén
dañados.
• Si la fuente de alimentación está dañada o no funciona normalmente, no la utilice y contacte con su distribuidor.
• Desconecte siempre el aparato si no va a usarlo durante un largo período de tiempo o antes de limpiarlo. Tire
siempre del enchufe para desconectar el cable de red, nunca del propio cable.
• No sacuda el aparato. Evite presiones fuertes durante la instalación o el funcionamiento del aparato.
• Utilice sólo el aparato para aplicaciones descritas en este manual a fin de evitar p.ej. cortocircuitos, quemaduras,
descargas eléctricas, etc. Un uso desautorizado podría causar daños y anularía la garantía completamente.
5. Funcionamiento
Es posible utilizar el aparato para diferentes aplicaciones gracias a la tensión y la corriente (y, por consiguiente, la
potencia) ajustables: los valores U, I y P se visualizan en la pantalla LCD y se ajustan con la rueda de ajuste.
Un circuito de temperatura, equipado con un ventilador, protege la alimentación contra el sobrecalentamiento.
Una limitación de corriente electrónica protege la alimentación contra sobrecargas y cortocircuitos en la salida: en
estos casos, la potencia de salida disminuye automáticamente hasta que la sobrecarga o el cortocircuito hayan
desaparecido.
El aparato está también equipado con una función PFC (Power Factor Compensation), que optimiza el rendimiento
de la alimentación. Por ejemplo: una alimentación regular sólo utiliza el 70% de la potencia de la red ; con PFC el
porcentaje puede subir a 95, lo que quiere decir que la pérdida de potencia disminuye de 30% a 5%.
6. Operación
a. Activar el aparato
1. Conecte el cable de alimentación CA al aparato (fig. p.1 #8) y luego a una toma de corriente de 230Vca/50Hz con
puesta a tierra.
Asegúrese de que no se interrumpa la puesta a tierra en el enchufe, el cable o la alimentación.
2. Active la alimentación pulsando el interruptor on/off (fig. p.1 #7).
3. Después de la activación, todos los niveles se encuentran en la posición máxima, como se visualiza en la pantalla
LCD (fig. p.1 #1).
El conector de puesta a tierra del panel frontal (fig. p.1 #6) y el conector RS-232 (fig. p.1 #9) están directamente
conectados a la puesta a tierra del aparato.
b. Ajuste de los límites (teclas 'LIMIT')
1. Límite de tensión (U): pulse la tecla 'U' de la parte izquierda del teclado (fig. p.1 #2) hasta que 'U-const' empiece a
parpadear en la pantalla. Ahora, puede ajustar la tensión por pasos de 1V con la rueda de ajuste (fig. p.1 #3).
Luego, pulse 'ENT' (enter) para confirmar (o salirse). Si ha introducido un valor incorrecto, pulse 'CE' para
borrarlo. El aparato volverá al valor anterior.
Es posible modificar la tensión de salida durante la operación.
2. Límite de corriente (I): pulse la tecla 'I' de la parte izquierda del teclado (fig. p.1 #2) hasta que 'I-const' empiece a
parpadear en la pantalla. Ahora, puede ajustar la corriente por pasos de 10mA (fine) o 100mA (norm) con la rueda
PSS2010 / PSS4005
- 14 -
VELLEMAN
de ajuste (fig. p.1 #3). Luego, pulse 'ENT' (enter) para confirmar (o salirse). Si ha introducido un valor incorrecto,
pulse 'CE' para borrarlo. El aparato volverá al valor anterior.
3. Límite de potencia (P): pulse la tecla 'P' de la parte izquierda del teclado (fig. p.1 #2) hasta que 'P-const' empiece
a parpadear en la pantalla. Ahora, puede ajustar la corriente por pasos de 1W con la rueda de ajuste (fig. p.1 #3).
Luego, pulse 'ENT' (enter) para confirmar (o salirse). Si ha introducido un valor incorrecto, pulse 'CE' para
borrarlo. El aparato volverá al valor anterior.
Una modificación de la potencia afectará automáticamente a la corriente ; el límite de tensión se mantiene.
c. Ajustes 'KEY INPUT'
•
•
•
•
Pulsando la tecla 'u', coloque la tensión de salida inmediatamente en el nivel límite.
La tecla 'ENT' sirve para confirmar el ajuste de un límite (véase "6.b. Ajuste de los límites").
La tecla 'CE' sirve para borrar el ajuste de un límite (véase "6.b. Ajuste de los límites ").
Las teclas 'N' (normal) y 'F' (fino) sirven para modificar el paso de ajuste de la rueda de ajuste. Sólo se puede
seleccionar un modo a la vez: o bien 'fine' ('f' aparece en la pantalla) o bien 'normal'.
• La tecla 'L' bloquea y desbloquea todas las teclas y la rueda de ajuste para evitar modificaciones no deseadas.
Sólo el interruptor on/off (fig. p.1 #7) queda activo. El bloqueo se visualiza con el símbolo 'Locking' en la parte
inferior de la pantalla. Pulse la tecla 'L' durante aproximadamente 2 segundos para desbloquear el teclado.
d. Ajuste de la salida (tecla 'I/O')
Puede activar y desactivar la salida de la alimentación con la tecla 'I/O'. El estado de la salida se visualiza en la
parte inferior de la pantalla LCD. Después de haber activado el aparato, la salida queda inactiva hasta que se activa
con la tecla 'I/O'.
e. Conexión ordenador: tecla 'REM'
En la parte trasera del aparato se encuentra un interface RS-232 (fig. p.1 #9), que permite la conexión a un
ordenador. Con software apropiado, puede utilizar el ordenador para operar la alimentación. Pulse la tecla 'REM'
para autorizar la comunicación entre la alimentación y el ordenador. "Remote" aparece en la parte inferior de la
pantalla. Todas las teclas del aparato están bloqueadas (salvo el interruptor on/off). Pulse la tecla 'REM' unos 2
segundos para interrumpir la comunicación con el ordenador y para desbloquear el teclado.
7. Solución de problemas, Reparaciones & Mantenimiento
Antes de devolver el aparato a su distribuidor para su reparación, verifique lo siguiente:
• Si no hay imagen:
¿El aparato está encendido?
¿El cable de alimentación está bien conectado al aparato y a una toma de corriente?
¿Los fusibles están bien?
• Las teclas no funcionan: ¿el teclado está bloqueado? (véase "6.c. Ajustes 'KEY INPUT'" y "6.e. Conexión
ordenador ")
Desconecte la alimentación de la red y desconecte las cargas antes de abrirla. Sea siempre muy cuidadoso,
porque los condensadores del aparato todavía pueden estar cargados.
Si no se puede reparar el aparato, deshágase de él según las normas locales.
Limpie el aparato sólo con un paño seco, antiestático y sin pelusas.
No utilice productos carbonosos, gasolina ni alcohol para limpiar el aparato ; podrían dañar la caja y/o las partes
interiores. Además, los humos son inflamables y perjudiciales para la salud.
Para evitar daños, no utilice herramientas afiladas, destornilladores, cepillos metálicos etc. para limpiar el
aparato
Se pueden modificar las especificaciones y el contenido de este manual sin previo aviso.
PSS2010 / PSS4005
- 15 -
VELLEMAN
PSS2010 / PSS4005 – DIGITALES SCHALTNETZGERÄT
1. Einführung und Eigenschaften
An alle Einwohner der Europäischen Union
Wichtige Umweltinformationen über dieses Produkt
Dieses Symbol auf dem Produkt oder der Verpackung zeigt an, dass die Entsorgung dieses Produktes nach
seinem Lebenszyklus der Umwelt Schaden zufügen kann.
Entsorgen Sie die Einheit (oder verwendeten Batterien) nicht als unsortiertes Hausmüll; die Einheit oder
verwendeten Batterien müssen von einer spezialisierten Firma zwecks Recycling entsorgt werden.
Diese Einheit muss an den Händler oder ein örtliches Recycling-Unternehmen retourniert werden.
Respektieren Sie die örtlichen Umweltvorschriften.
Falls Zweifel bestehen, wenden Sie sich für Entsorgungsrichtlinien an Ihre örtliche Behörde.
Wir danken Ihnen für diesen Ankauf! Lesen Sie vor Inbetriebnahme des Gerätes diese Bedienungsanleitung
sorgfältig durch. Überprüfen Sie, ob Transportschäden vorliegen. Sollte dies der Fall sein, verwenden Sie das Gerät
nicht und wenden Sie sich an Ihren Händler.
2. Technische Daten
Ausgangsspannung
Ausgangsstrom
Spannungsversorgung
Frequenz
Stromverbrauch
Ausgangsleistung
Spannungsstabilität bei (U) bei 100% Laständerung
Stromkonstanz bei 100% Laständerung
Spannungsstabilität bei ±10% AC Laständerung
Stromkonstanz bei ±10% AC Laständerung
Ripple bei Nennlast
Schirm
Sicherung F1
Sicherung F2
Gewicht
Abmessungen (B x H x T)
Betriebstemperatur
Max. relative Feuchte
Lagertemperatur
PSS2010
PSS4005
0-20Vdc ; Stufen von 10mV
0-40Vdc ; Stufen von 10mV
0-10A ; Stufen von 10mA
0-5A ; Stufen von 10mA
230Vac ±10%
50Hz
max. ±300VA
max. ±200W
≤10mV
≤5mA
≤0.05%
≤0.05%
±15mV rms
LCD mit verschiedenen Zeilen und Hintergrundbeleuchtung
6.3A / 250V (langsam) (Artikelnummer FU6.3N)
1A / 250V (langsam) (Artikelnummer FU1N)
±3kg
± 275x135x300mm
0→40°C
±80% nicht kondensierend
-20→+60°C
3. Bedienelemente und Anschlüsse (siehe Abbildungen Seite 1)
Vorderseite
1. LCD mit Hintergrundbeleuchtung
2. Bedienkonsole
3. Drehschalter
4. 4mm Sicherheitskontakt für negativen Anschluss (-)
5. 4mm Sicherheitskontakt für positiven Anschluss (+)
6. 4mm Sicherheitskontakt für Erdung
7. EIN/AUS-Schalter
PSS2010 / PSS4005
Hinterseite
8. AC -Eingang
9. RS-232 Schnittstelle (mit Optokoppler) zum
Anschließen eines PC
10. Ventilationsöffnung
- 16 -
VELLEMAN
4. Sicherheitsvorschriften
Wenn Sie dieses Symbol in der Bedienungsanleitung sehen, gibt es ein potenzielles Risiko der Aussetzung an
hohe Spannungen.
• Schützen Sie das Gerät vor Regen und Feuchte, vor brennbaren Gasen, Dämpfen und Lösungsmitteln.
• Vor extremen Temperaturen schützen und nicht in der Nähe von Heizapparaten stellen.
• Verwenden Sie dieses Gerät nicht unter Umständen mit starken elektrostatischen Feldern, wie Gewitter usw.
• Bei Schäden, die durch Nichtbeachtung der Bedienungsanleitung oder eigenmächtige Änderungen verursacht
werden, erlischt der Garantieanspruch. Für daraus resultierende Folgeschäden übernimmt der Hersteller keine
Haftung.
• Um Beschädigung zu vermeiden, schalten Sie das Gerät nicht sofort ein, wenn es Temperaturschwankungen
ausgesetzt wurde. Lassen Sie es zuerst akklimatisieren.
• Bedecken oder blockieren Sie die Ventilationsöffnungen an der Seite und der Rückseite des Gerätes nicht; denn
das könnte zu Überhitzung führen.
• Das Gerät nie auf die Frontplatte stellen, sie wurde nicht dazu konzipiert und kann zerbrechen.
• Das Gerät wird in technisch sicherem Zustand geliefert. Um einen sicheren Betrieb zu gewährleisten muss der
Anwender die Sicherheitsvorschriften und Warnungen in dieser Anleitung befolgen.
• Das Gerät entspricht Schutzklasse I und muss an eine geerdete 230Vac Steckdose angeschlossen werden.
• Von Kindern und Unbefugten fern halten.
• Trennen Sie das Gerät vom Netz bevor Sie das Gehäuse öffnen. Öffnen Sie das Gehäuse mit einem geeigneten
Schraubendreher und öffnen Sie es nur zum Wechseln einer kaputten Sicherung. Ersetzen Sie die Sicherung nur
durch eine desselben Typs und mit denselben Spezifikationen.
• Es ist nicht ratsam, leitende Schmuckwaren aus Metall (Ringe, Armbänder) zu tragen wenn Sie mit einem
Netzgerät arbeiten.
• Lassen Sie keine Spannungsversorgungen und Lasten eingeschaltet ohne Beaufsichtigung.
• Seien Sie vorsichtig mit Spannungen über 35Vdc, denn diese könnten elektrische Schläge verursachen.
• Sorgen Sie dafür, dass die Ausgänge, Kontaktpunkte und Kabel der Spannungsversorgung nicht beschädigt und
gut isoliert sind.
• Verwenden Sie das Gerät nicht und lassen Sie es prüfen, wenn es beschädigt ist oder nicht normal funktioniert.
• Trennen Sie das Gerät vom Netz (ziehen Sie nicht am Kabel!), bevor Sie das Gerät reinigen oder nicht
verwenden.
• Vermeiden Sie Erschütterungen und rohe Gewalt bei der Installation und die Bedienung des Gerätes.
• Verwenden Sie das Gerät nur wozu es konzipiert wurde. Andere Applikationen können zu Kurzschlüssen,
Brandwunden, elektrischen Schlägen usw. führen. Bei unsachgemäßem Gebrauch erlischt der Garantieanspruch.
5. Betrieb
Dieses Gerät kann für verschiedene Applikationen benutzt werden dank regelbarer Spannung und regelbarem Strom
(also auch Leistung): die U, I und P-Werte werden auf dem LCD-Schirm gezeigt und können über den Drehschalter
geregelt werden.
Eine Temperatursteuerung mit einem Lüfter schützt das Gerät vor Überhitzung.
Ein elektronischer Strombegrenzer schützt das Netzteil vor Überlastung und Kurzschlüssen am Ausgang: in solchen
Fällen wird die Ausgangsleistung automatisch begrenzt bis die Überlastung oder der Kurzschluss beseitigt ist.
Das Gerät ist auch mit einem PFC (Power Factor Compensation)-Funktion, welche die Effizienz des Netzteils erhöht,
ausgestattet. Ein Beispiel: ein normales Netzteil benutzt nur 70% des Netzstroms; mit PFC kann dies bis 95%
ansteigen. Das bedeutet, dass der Energieverlust von 30% auf 5% sinkt.
PSS2010 / PSS4005
- 17 -
VELLEMAN
6. Bedienung
a. Das Gerät einschalten
1. Schließen Sie das AC-Stromkabel an das Gerät (Abb. S.1 #8) und an eine geerdete Steckdose an
(230Vac/50Hz).
Sorgen Sie dafür, dass die Erdung nicht an der Steckdose, im Kabel oder im Netzteil unterbrochen wird.
2. Schalten Sie das Schaltnetzgerät ein, indem Sie auf den EIN/AUS-Schalter (Abb. S.1 #7) drücken.
3. Beim Einschalten des Geräts sind alle Niveaus auf den Maximalwert eingestellt; das wird auch auf dem LCDSchirm gezeigt (Abb. S.1 #1).
Der Erdungskontakt auf der Frontplatte (Abb. S.1 #6) und der RS-232-Anschluss (Abb. S.1 #9) sind unmittelbar
mit der Erdung des Gerätes verbunden.
b. 'Limit'-Regelungen ('LIMIT' Tasten)
1. Spannungsbegrenzung (U) drücken Sie auf 'U' links auf der Bedienkonsole (Abb. S.1 #2) bis 'U-const' auf dem
Schirm blinkt. Regeln Sie mit dem Drehschalter (Abb. S.1 #3) die Spannung pro 1V. Wenn der Grenzwert
eingestellt ist, drücken Sie dann 'ENT' (Enter) zur Bestätigung (oder um die Regelung ohne Änderung zu
verlassen). Wenn ein falscher Wert eingegeben wurde, dann können Sie ihn mit der 'CE'-Taste löschen. Das
Gerät wird auf den vorigen Wert zurückgreifen.
Die Ausgangsspannung kann während des Betriebs angepasst werden.
2. Strombegrenzung (I): drücken Sie auf 'I' links auf der Bedienkonsole (Abb. S.1 #2) bis 'I-const' auf dem Schirm
blinkt. Regeln Sie mit dem Drehschalter (Abb. S.1 #3) den Strom pro 10mA (fein) oder 100mA (norm). Wenn der
Grenzwert eingestellt ist, drücken Sie dann 'ENT' (Enter) zur Bestätigung (oder um die Regelung ohne Änderung
zu verlassen). Wenn ein falscher Wert eingegeben wurde, dann können Sie ihn mit der 'CE'-Taste löschen. Das
Gerät wird auf den vorigen Wert zurückgreifen.
3. Leistungsbegrenzung (P): drücken Sie auf 'P' links auf der Bedienkonsole (Abb. S.1 #2)) bis 'P-const' auf dem
Schirm blinkt. Regeln Sie mit dem Drehschalter (Abb. S.1 #3) die Leistung pro 1W. Wenn der Grenzwert
eingestellt ist, drücken Sie dann 'ENT' (Enter) zur Bestätigung (oder um die Regelung ohne Änderung zu
verlassen). Wenn ein falscher Wert eingegeben wurde, dann können Sie ihn mit der 'CE'-Taste löschen. Das
Gerät wird auf den vorigen Wert zurückgreifen.
Eine Leistungsbegrenzung wird automatisch auf den Ausgangsstrom wirken; die Spannungseinstellung bleibt
ungeändert.
c. 'KEY INPUT'-Regelung
•
•
•
•
Dadurch, dass Sie auf 'u' drücken, wird die Ausgangsspannung automatisch auf den Maximalwert eingestellt.
Die 'ENT'-Taste dient zur Bestätigung der eingestellten Begrenzungen (siehe "6.b. Limit-Regelungen").
Die 'CE' -Taste dient zum Löschen/Rücksetzen der eingestellten Begrenzungen (siehe "6.b. Limit-Regelungen").
Mit den 'N' (normal) und 'F' (fein)-Tasten können Sie die Regelstufe des Drehschalters bestimmen. Nur ein dieser
2 Modi kann aktiv sein: die Regelstufe ist entweder normal oder fein ('f' erscheint auf dem Schirm).
• Mit der 'L'-Taste können Sie die Tasten und den Drehschalter sperren. So können Sie ungewünschte Regelungen
vermeiden. Nur die EIN-/AUS-Taste (Abb S.1 #7) bleibt aktiv. Die Tastatursperre wird durch das 'Locking'-Symbol
unten auf dem Schirm angezeigt. Drücken Sie 2 Sekunden auf 'L' um die Tastatursperre freizugeben.
d. Ausgangsregelung ('I/O-Taste)
Der Ausgang des Netzteils kann mit der 'I/O' Taste ein- oder ausgeschaltet werden. Der Zustand des Ausgangs wird
unten auf dem LCD-Schirm gezeigt. Wenn das Gerät eingeschaltet wird, ist dieser Ausgang ausgeschaltet bis der
mit der 'I/O'-Taste aktiviert wird.
PSS2010 / PSS4005
- 18 -
VELLEMAN
e. PC anschließen: 'REM'-Taste
An der Rückseite des Gerätes befindet sich einen RS-232-Anschluss (Abb. S.1 #9), der es ermöglicht, das Gerät an
einen PC anzuschließen. Mit der geeigneten Software können Sie das Schaltnetzgerät über den PC steuern.
Drücken Sie auf 'REM' um die Kommunikation zwischen Netzteil und PC zu aktivieren. Unten auf dem Schirm
erscheint "Remote". Alle Tasten können gesperrt werden (abgesehen von der EIN/AUS-Taste). Drücken Sie 2
Sekunden auf 'REM' um die Kommunikation mit dem PC zu unterbrechen und die Tasten erneut zu aktivieren.
7. Problemlösung, Reparatur, Wartung und Pflege
Bevor Sie das Gerät zur Reparatur zum Händler zurückbringen, können Sie mal einige Sachen selbst überprüfen:
• Wenn es kein Bild gibt:
Ist das Gerät eingeschaltet?
Ist das Stromkabel richtig an das Gerät und an die Steckdose angeschlossen?
Sind die Sicherungen noch in gutem Zustand?
• Tasten funktionieren nicht: sind sie gesperrt? (siehe "6.c. 'KEY INPUT'-Regelungen" und "6.e. PC-Verbindung")
Ziehen Sie den Stecker aus der Steckdose und trennen Sie alle Lasten vom Netzteil, bevor Sie es öffnen. Seien
Sie noch immer vorsichtig, denn die Kondensatoren im Gerät können noch immer geladen sein.
Wenn das Gerät nicht mehr repariert werden kann, sorgen Sie dafür, dass Sie bei der Entsorgung des Geräts die
lokalen Bedingungen erfüllen.
Nur mit einem trockenen, antistatischen und flusenfreien Tuch reinigen.
Verwenden Sie zum Reinigen keine kohlenstoffhaltigen Produkte, Benzin oder Alkohol: diese können das
Gehäuse und/oder die Komponenten in der Innenseite beschädigen. Außerdem sind die Dämpfe brennbar und
ungesund.
Verwenden Sie zum Reinigen auch keine scharfen Werkzeuge, Schraubendreher, Metallbürsten usw.
Alle Änderungen vorbehalten.
PSS2010 / PSS4005 – ALIMENTATORE SWITCHING
1. Introduzione e caratteristiche
A tutti i residenti dell’Unione Europea
Importanti informazioni ambientali relative a questo prodotto
Questo simbolo riportato sul prodotto o sull’imballaggio, indica che è vietato
smaltire il prodotto nell’ambiente al termine del suo ciclo vitale in quanto può
essere nocivo per l’ambiente stesso. Non smaltire il prodotto (o le pile, se utilizzate) come rifiuto urbano
indifferenziato; dovrebbe essere smaltito da un’impresa specializzata nel riciclaggio.
Per informazioni più dettagliate circa il riciclaggio di questo prodotto, contattare l’ufficio comunale, il
servizio locale di smaltimento rifiuti oppure il negozio presso il quale è stato effettuato l’acquisto.
La ringraziamo per aver acquistato l’alimentatore switching PSS4005 (PSS2010)! Si prega di leggere attentamente le
informazioni contenute nel presente manuale prima di mettere in servizio il dispositivo, al fine di salvaguardare la
propria sicurezza e di utilizzare l’apparecchio in modo appropriato. Assicurarsi che l’apparecchio non sia stato
danneggiato durante il trasporto; in tale evenienza, contattare il proprio fornitore.
PSS2010 / PSS4005
- 19 -
VELLEMAN
2. Specificazione tecniche
Tensione d’uscita
Corrente d’uscita
Tensione d’alimentazione
Frequenza di rete
Potenza assorbita
Potenza d’uscita
Stabilità in tensione (oscillazione del carico 100%)
Stabilità in corrente (oscillazione del carico 100%)
Stabilità in tensione (variazione 10% tensione
alim.)
Stabilità in corrente (variazione 10% tensione
alim.)
Ripple con carico nominale
Display
Fusibile F1
Fusibile F2
PSS2010
PSS4005
0-20Vdc ; passi 10mV
0-40Vdc ; passi 10mV
0-10A ; passi 10mA
0-5A ; passi 10mA
230Vac ±10%
50Hz
max. ±300VA
max. ±200W
≤10mV
≤5mA
≤0.05%
≤0.05%
±15mV rms
LCD multilinea con retroilluminazione
6.3A / 250V (ritardato, FU6.3N)
1A / 250V (ritardato, FU1N)
±3kg
± 275x135x300mm
0→40°C
±80% in assenza di condensa
-20→+60°C
Peso
Dimensioni
Temperatura operativa
Max. umidità relativa
Temperatura di stoccaggio
3. Controlli e collegamenti (vedere ill.)
Pannello frontale
Pannello posteriore
1.
2.
3.
4.
5.
6.
7.
8. Presa di alimentazione.
9. Interfaccia RS-232 (optoisolata) per
connessione a PC
10. Griglia di ventilazione.
Display LCD retroilluminato
Tastiera
Manopola di regolazione
Boccola da 4mm, polo negativo (-)
Boccola da 4mm, polo positivo (+)
Boccola da 4mm, collegamento di terra
Interruttore ON/OFF
4. Informazioni relative alle sicurezza
Questo simbolo riportato nel presente manuale indica che vi è il rischio di esposizione all’alta tensione.
• Proteggere il dispositivo da pioggia e umidità, polvere e gas combustibili, fumi o solventi.
• Installare il dispositivo in una posizione protetta da eccessivo calore.
• I danni derivanti dall’inosservanza delle indicazioni fornite nel presente manuale, non sono coperti da garanzia; il
venditore non sarà ritenuto responsabile di eventuali danni cagionati a cose o persone.
• Non utilizzare il dispositivo durante un temporale.
• Non mettere mai in funzione il dispositivo dopo che è stato esposto a cambiamenti significativi di temperatura; la
variazione di temperatura genera condensa all’interno dell’apparecchiatura! Per evitare danni, lasciare che il
dispositivo raggiunga la temperatura dell’ambiente in cui deve essere messo in funzione.
• Non ostruire mai la griglia di aerazione presente sul pannello posteriore onde evitare il surriscaldamento del
dispositivo.
• Non appoggiare mai il dispositivo sul proprio pannello frontale in quanto si potrebbe danneggiare.
PSS2010 / PSS4005
- 20 -
VELLEMAN
• Per mantenere il dispositivo in condizioni ottimali di funzionamento e per garantire la massima sicurezza, si prega
di leggere attentamente il presente manuale e di osservare tutte le note relative alla sicurezza in esso riportate.
• Questo dispositivo rientra nella classe di protezione I; è essenziale, quindi, che sia provvisto di collegamento di
terra. L’installazione deve essere effettuata da un tecnico qualificato.
• Tenere il dispositivo fuori dalla portata di bambini o di persone non autorizzate.
• Scollegare il dispositivo dalla rete prima togliere il coperchio. Utilizzare un cacciavite idoneo. Aprire il coperchio
solo per sostituire un fusibile bruciato. Utilizzare sempre fusibili aventi caratteristiche identiche a quello bruciato.
• Si consiglia di non indossare braccialetti metallici, anelli ecc... mentre si alimentano dei dispositivi.
• Non lasciare incustoditi i dispositivi sotto alimentazione.
• Prestare attenzione alle tensioni con valore superiore ai 35 Vdc in quanto potrebbero provocare elettroshock.
• Assicurarsi che le boccole d’uscita e i cavi di collegamento siano sempre in ottimo stato per garantire il massimo
isolamento.
• Evitare di utilizzare lo strumento se questo non funziona correttamente o risulta danneggiato in qualche sua parte.
• Scollegare il dispositivo dalla rete elettrica quando lo si deve pulire o quando non è utilizzato. Non tirare mai il
cavo per estrarre la spina dalla presa di rete.
• Evitare di scuotere o di urtare violentemente il dispositivo, sia durante l’installazione che durante l’utilizzo.
• Utilizzare il dispositivo solamente per lo scopo per cui è stato progettato. Ogni altro tipo di utilizzo potrebbe
causare malfunzionamenti, elettroshock, esplosioni di lampade, arresti di apparecchiature ecc... e determina la
decadenza della garanzia.
5. Utilizzo
Il dispositivo può essere utilizzato per molteplici applicazioni grazie alla possibilità di regolazione di tensione e
corrente (quindi della potenza erogata). I valori relativi alla Tensione (U), Corrente (I) e Potenza (P) d’uscita,
impostati mediante l’apposita manopola, sono visualizzati sull’ampio display LCD retroilluminato.
Il dispositivo è dotato di un circuito che, tramite ventola, protegge il gruppo d’alimentazione dal surriscaldamento e di
un limitatore di corrente che interviene in caso di sovraccarico o cortocircuito e rimane attivo fino a quando non viene
eliminata la causa. Nell’alimentatore è inoltre implementata la funzione PFC (Power Factor Compensation) che
permette d’incrementare l'efficienza del gruppo di alimentazione (il 95% contro il 70% ottenuto con gli alimentatori
tradizionali); ne consegue che l’energia dissipata si riduce dal 30 al 5%.
6. Funzionamento
a. Accensione del dispositivo
1. Collegare un capo del cavo di alimentazione alla presa di alimentazione (8) e l’altro ad una presa di rete (230
Vac/50 Hz).
Assicurarsi che il collegamento di terra non sia interrotto (nella presa, nel cavo, ecc).
2. Premere il pulsante POWER (7) per accendere il dispositivo.
3. Il dispositivo si imposta automaticamente sui massimi valori indicati sul display LCD (1).
La boccola di terra (6) presente sul pannello frontale e il connettore RS-232 (9) sono collegati direttamente al
conduttore di terra.
b. Regolazione dei limiti (tasti 'LIMIT')
1. Limite di Tensione (U): premere una volta il tasto 'U' (posizionato nella parte sinistra della tastiera ); la scritta “Uconst”, visualizzata dal display, comincia a lampeggiare. Il limite di tensione può essere ora regolato con passi da
1V mediante l’apposita manopola (3). Premere il tasto 'ENT' (enter) per confermare il nuovo valore o per uscire
dalla funzione se non è stata effettuata alcuna variazione. Se tale regolazione venisse eseguita erroneamente,
premere il tasto 'CE' per ripristinare il valore precedente. La tensione d’uscita non può essere regolata durante
questa operazione.
PSS2010 / PSS4005
- 21 -
VELLEMAN
2. Limite di Corrente (I): premere una volta il tasto 'I' (posizionato nella parte sinistra della tastiera ); la scritta 'Iconst', visualizzata dal display, comincia a lampeggiare. Regolare il valore di corrente con passi da 10 mA (fine) o
da 100 mA (norm) mediante l’apposita manopola (3). Premere il tasto 'ENT' (enter) per confermare il nuovo valore
o per uscire dalla funzione se non è stata effettuata alcuna variazione. Se tale regolazione venisse eseguita
erroneamente, premere il tasto 'CE' per ripristinare il valore precedente.
3. Limite di Potenza (P): premere una volta il tasto 'P' (posizionato nella parte sinistra della tastiera ); la scritta 'Pconst', visualizzata dal display, comincia a lampeggiare. La potenza può ora essere regolata con passi da 1 W
mediante l’apposita manopola (3). Premere il tasto 'ENT' (enter) per confermare il nuovo valore o per uscire dalla
funzione se non è stata effettuata alcuna variazione. Se tale regolazione venisse eseguita erroneamente,
premere il tasto 'CE' per ripristinare il valore precedente.
La regolazione di potenza avrà un immediato effetto sul valore massimo della corrente disponibile in uscita,
mentre il valore di tensione rimarrà invariato.
c. Funzioni dei tasti 'KEY INPUT'
• Il tasto 'u' consente di effettuare la regolare della tensione d’uscita fino al limite massimo impostato.
• Il tasto 'ENT' viene utilizzato per confermare l’impostazione del limite (vedere capitolo 6. paragrafo b.
Regolazione dei limiti).
• Il tasto 'CE' viene utilizzato per cancellare/resettare l’impostazione del limite (vedere capitolo 6. paragrafo b.
Regolazione dei limiti)
• I tasti 'N' (normal) ed 'F' (fine) vengono utilizzati per impostare il passo di regolazione della grandezza selezionata
(la scritta “fine” appare sul display quando viene premuto il tasto “fine”).
• Il tasto 'L' permette di bloccare il funzionamento dei tasti e della manopola di regolazione onde evitare che le
impostazioni vengano modificate accidentalmente.
• Solo il pulsante “POWER” (7) risulta attivo. Il blocco delle funzioni viene evidenziato dalla scritta “Locked”
visualizzata nella parte bassa del display.
Tenere premuto per 2 secondi il tasto 'L' per ripristinare il normale funzionamento dei tasti.
d. Regolazione dell’uscita (tasto 'I/O')
L’uscita dell’alimentatore può essere abilitata o disabilitata mediante il tasto 'I/O'. Lo stato dell’uscita viene indicato
nell’angolo in basso a destra del display LCD.
Quando l’alimentatore viene acceso, l’uscita risulta disattivata (Output Off) e rimane in questo stato finchè non si
agisce sul tasto 'I/O'.
e. Collegamento al PC: tasto 'REM'
Sul pannello posteriore del dispositivo è disponibile un’interfaccia RS-232 (9) che permette il collegamento ad un PC.
È possibile gestire tutte le funzioni dell’alimentatore mediante un computer dotato di apposito software. Premere il
tasto 'REM' per attivare la comunicazione tra dispositivo e PC; sul display appare la scritta "Remote". Tutti i comandi
presenti sul dispositivo vengono disattivati eccetto quello di accensione e spegnimento (POWER). Tenere premuto
per almeno 2 secondi il tasto 'REM' per disattivare la comunicazione e ripristinare il normale funzionamento.
7. Analisi guasti, riparazione e manutenzione
Prima di restituire il dispositivo al venditore, per una eventuale riparazione, controllare quanto segue:
• Non vi è alcuna visualizzazione sul display:
o L’unità è stata accesa?
o Il cavo d’alimentazione è collegato correttamente al dispositivo e alla presa di rete?
o I fusibili sono integri?
PSS2010 / PSS4005
- 22 -
VELLEMAN
• I tasti non funzionano: La tastiera è bloccata? (consultare il capitolo “6. paragrafo c. Funzioni dei tasti 'KEY
INPUT' e paragrafo "e. Collegamento al PC: tasto REM”)
Prima di aprire il dispositivo, staccare il cavo di alimentazione dalla presa di rete. Prestare attenzione anche
dopo aver eseguito detta operazione in quanto i condensatori presenti nel dispositivo potrebbero essere ancora
carichi.
Se il dispositivo dovesse risultare irreparabile, rispettare le leggi locali vigenti in materia di smaltimento.
Per la pulizia del dispositivo non utilizzare solventi o alcol ma semplicemente un panno morbido inumidito con
acqua.
Durante l’operazione di pulizia, non utilizzare spazzole metalliche, cacciaviti o oggetti metallici in genere, onde
evitare di graffiare il contenitore.
Attenzione: le informazioni contenute nel presente manuale possono essere soggette a modifiche senza
alcun preavviso.
PSS2010 / PSS4005
- 23 -
VELLEMAN
Scaricare