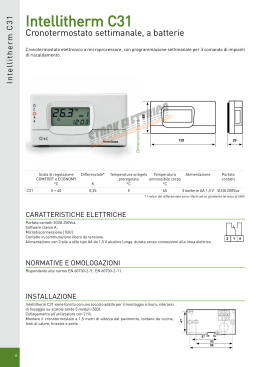
CRONOTERMOSTATO SETTIMANALE VIA RADIO
WIRELESS WEEKLY CHRONOSTAT
DESCRIZIONE DEI COMANDI
LEGENDA
A Tasto Pulizia: attiva la sospensione temporanea del
funzionamento.
B Tasto Vacanze: disattiva il dispositivo per un tempo
regolabile.
A
B
C
D
E
F
G
H
M
I
N
L
Fig. 1
O
P
P
2
C Tasto Programmazione: entra nei menu’ di programmazione
D Tasto dalla doppia funzione:
- Nel normale funzionamento attiva la funzione Manuale
24 ore / Manuale Permanente / Automatico.
- In ‘Impostazione Programma orario‘, imposta la
regolazione della temperatura in modalità di Riduzione.
E Tasto dalla doppia funzione:
- Nel normale funzionamento accende o spegne il
cronotermostato.
- In ‘Impostazione Programma orario‘, imposta la regolazione
della temperatura in modalità Spento/Antigelo.
F Tasto dalla doppia funzione:
- Nel normale funzionamento visualizza l’ora oppure la
temperatura.
- In ‘Impostazione Programma orario‘, imposta la
regolazione della temperatura in modalità Comfort.
G Tasto avanti
H Manopola regime ridotto
I Tasto OK (conferma)
L Tasto indietro
M Manopola regime di comfort
N Tasto reset
O Vano Portabatterie
P Sede viti per il fissaggio del corpo del cronotermostato alla
piastra a muro
- ITALIANO -
INDICAZIONI DISPLAY
24h
Di seguito viene indicato il significato dei simboli che possono apparire
a display:
P
Indicazione dello stato di carica delle batterie.
Il cronotermostato è in stato di programmazione.
Lampeggiante:
Programma pulizie attivato (il display visualizza il tempo
rimanente).
Lampeggiante:
Programma vacanze attivato (il display visualizza il tempo
rimanente).
Fissa:
Indica un’azione da parte dell’interfaccia telefonica.
Lampeggiante:
Indica che il comando da interfaccia telefonica è stato forzato da un comando da tastiera sul cronotermostato.
Batterie scariche; sostituire le batterie.
Regolazione della temperatura in modalità di Comfort.
Regolazione della temperatura in modalità di Riduzione.
Cronotermostato spento o regolazione della temperatura in
modalità OFF.
Il cronotermostato sta trasmettendo un comando radio.
Modo antigelo attivo, il cronotermostato regola alla
temperatura di antigelo.
Il cronotermostato è in modalità ‘Test’, cioè trasmette un
comando ogni 2 secondi per l’autoapprendimento dell’indirizzo radio sul ricevitore.
Uscita accesa, modo riscaldamento.
Visualizzazione temperatura pavimento.
Uscita accesa, modo raffrescamento.
24h
Regolazione della temperatura in modalità manuale
(Comfort) permanente.
Regolazione della temperatura in modalità manuale
(Comfort) fino alla mezzanotte.
3
Lampeggiante indica che il cronotermostato sta regolando
per mantenere la temperatura del pavimento all’interno dei
limiti impostati.
- ITALIANO -
GENERALITÀ
Questo dispositivo è un cronotermostato settimanale via radio
alimentato a batteria per il controllo della temperatura ambiente su
tre livelli: Comfort, Ridotto o Off/Antigelo.
La sua principale caratteristica è la mancanza di collegamenti elettrici,
infatti i segnali di accensione e spegnimento sono trasmessi all’unità
ricevente via radio, rendendo l’installazione di questo dispositivo
facile ed economica, specialmente dove non è disponibile un impianto
elettrico già esistente.
Il cronotermostato può essere impiegato sia in impianti di
riscaldamento che raffrescamento ed è dotato di un ampio display
retroilluminato per la visualizzazione di tutte le indicazioni funzionali,
il programma orario impostato, la temperatura ambiente rilevata o, a
scelta, dell’ora corrente.
Offre la possibilità di impostare fino a 7 programmi distinti, uno per
ogni giorno della settimana, con tempo di intervento minimo di 1/2 ora
nell’arco delle 24 ore.
MESSA IN FUNZIONE
Alla prima messa in funzione aprire lo sportellino che da’ accesso al
vano pile (O di Fig. 1) e inserire le pile rispettando le polarità indicate.
Le pile devono essere del tipo AA 1.5V alcaline.
Se necessario eseguire l’operazione di reset agendo con un
oggetto a punta attraverso l’apposito foro (N di Fig. 1); NON
USARE AGHI O STRUMENTI CHE POSSANO DANNEGGIARE
IRREPARABILMENTE IL CRONOTERMOSTATO.
I pulsanti presenti sotto lo sportellino inferiore sono 3:
‘OK’: Programmazione ora e giorno della settimana corrente (I di
Fig. 1);
‘ ‘: Avanti (G di Fig. 1);
‘ ‘: Indietro (L di Fig. 1);
Regolazione ora e giorno corrente
Per regolare l’orologio del cronotermostato eseguire le seguenti
operazioni:
1. Aprire lo sportellino che da’ accesso al vano pile.
2. Tenere premuto per almeno 2 secondi il pulsante ‘OK’, le cifre
dell’ora lampeggiano.
3. Regolare l’ora con i tasti ‘ ’ e ‘ ’.
4. Confermare con ‘OK’, le cifre dei minuti lampeggiano.
5. Regolare i minuti con i tasti ‘ ’ e ‘ ’.
6. Confermare con ‘OK’, il quadratino relativo al giorno della settimana
corrente lampeggia.
7. Regolare il giorno della settimana corrente con i tasti ‘ ’ e ‘ ’
(il giorno corrente viene evidenziato con un quadratino attorno
al numero corrispondente al giorno della settimana, 1 Lunedi’ ..
7 Domenica )
8. Confermare con ‘OK’.
Impostazione Riscaldamento / Raffrescamento
Il cronotermostato esce dalla fabbrica impostato in modalità di
riscaldamento.
Per modificare la modalità di regolazione tenere premuto per almeno
10 secondi il tasto ‘ ‘.
A. Se precedentemente il cronotermostato era impostato su
- ITALIANO 4
riscaldamento, verrà impostata la modalità di raffrescamento e sul
display si accendera’ il simbolo ‘ ‘ (Ventola) lampeggiante per
8 secondi.
B. Se precedentemente il cronotermostato era impostato su
raffrescamento, verrà impostata la modalità di riscaldamento e
sul display si accenderà il simbolo ‘ ‘ (Fiamma) lampeggiante per
8 secondi.
Durante il normale funzionamento, l’attivazione del riscaldamento
viene segnalata dall’icona ‘ ‘ Fiamma accesa mentre, al contrario
l’attivazione del raffrescamento viene segnalata dall’icona ‘ ‘
Ventola.
Regolazione temperatura di Comfort e Riduzione
La temperatura di Comfort viene impostata tramite la manopola ‘ ‘
(M di Fig. 1) mentre quella di Riduzione viene impostata tramite la
manopola ‘ ‘ (H di Fig. 1).
Nota: Normalmente, per avere una riduzione notturna, la
temperatura di riduzione dovrà avere un valore inferiore a quella
di comfort.
Il cronotermostato effettuerà la regolazione della temperatura
ambiente in modalità di comfort o riduzione in accordo con il
programma orario impostato (vedere paragrafo ‘IMPOSTAZIONE
PROGRAMMA ORARIO’).
CONFIGURAZIONE DEL SISTEMA RADIO
Prima di installare il cronotermostato via radio nella posizione
desiderata, è necessario controllare che il ricevitore riceva
correttamente i suoi segnali. L’operazione si effettua attivando
la funzione ‘Test’ dal menù utente, oppure usando la scorciatoia,
premendo contemporaneamente i pulsanti ‘OK’ e ‘ ’ (con
cronotermostato acceso).
In modalità ‘Test’ il cronotermostato visualizza sul display la scritta
‘TEST’ e trasmette continuamente al ricevitore comandi di accensione
e spegnimento con una pausa tra l’uno e l’altro di circa 2 secondi; ogni
volta che il cronotermostato trasmette un comando radio sul display
si accende il simbolo ‘
’.
La modalità ‘Test’, può essere terminata dal menù utente o spegnendo
il cronotermostato con il pulsante ’ ’. In ogni caso la modalità ‘Test’
termina automaticamente dopo circa 17 minuti.
La modalità ‘Test’ deve essere usata per auto-apprendere l’indirizzo
del cronotermostato sul ricevitore e successivamente nel ricevitore il
relè della relativa uscita deve continuamente accendersi e spegnersi
ogni 2 secondi, lo stato è indicato anche dal relativo Led. Se questo
avviene, il cronotermostato comunica correttamente con il ricevitore.
Quando si posiziona il cronotermostato nella zona desiderata,
assicurarsi che i due dispositivi comunichino ancora correttamente.
Se il termostato viene posizionato troppo lontano dal ricevitore,
il relè di uscita rimarrà sempre acceso o sempre spento: in questo
caso si consiglia di trovare una migliore posizione magari più vicina al
ricevitore, ed assicurarsi che non sia in vicinanza di schermi metallici,
o di mura in cemento armato che potrebbero indebolire la trasmissione
radio.
La qualità del segnale può essere monitorata nel ricevitore, vedere la
relativa documentazione per maggiori informazioni.
- ITALIANO 5
INSTALLAZIONE
Modalità di sgancio della
piastra a muro dalla base
del cronotermostato.
Fig. 2
6
Fig. 3
- ITALIANO -
ATTENZIONE
- Per una corretta regolazione della temperatura ambiente si consiglia di installare il cronotermostato a circa 1,5 m dal pavimento
e lontano da fonti di calore, correnti d’aria o da pareti particolarmente fredde (ponti termici).
- E’ obbligatorio, al fine di garantire la sicurezza elettrica, fissare il corpo del cronotermostato alla piastra a muro tramite le due viti
(in dotazione) che trovano sede all’interno del vano portapile.
- L’installazione ed il collegamento elettrico del termostato devono essere eseguiti da personale qualificato ed in conformità alle
leggi vigenti.
- Prima di effettuare qualsiasi collegamento accertarsi che la rete elettrica sia scollegata.
L’installazione del dispositivo è prevista per il montaggio direttamente sulla parete utilizzando i tasselli in dotazione oppure in scatole di derivazione
da incasso (o da parete) standard da due o tre moduli.
Per installare il dispositivo eseguire le seguenti operazioni:
1. Sganciare la piastra a muro innestata sotto la base del cronotermostato come indicato in
Fig. 2.
2. Fissare la piastra direttamente sulla parete o su scatole di derivazione da 2 o 3 moduli
tramite le due sedi per viti con interasse 60 mm oppure 85mm facendo attenzione a fare
passare i cavi nella feritoia come indicato in Fig. 3.
3. Eseguire i collegamenti elettrici seguendo lo schema di collegamento di Fig. 4.
4. Avvicinare il cronotermostato alla piastra a muro facendo dapprima coincidere i dentini
della base con gli appositi fori della piastra e successivamente esercitare sul dispositivo
una pressione verso il basso fino a far scattare i dentini plastici della piastra; quindi
fissare il corpo del cronotermostato alla piastra a muro tramite le due viti in dotazione
SENSORE
INTERFACCIA
REMOTO
TELEFONICA
che trovano sede all’interno del vano portapile (Fig. 3).
5. Inserire le batterie nel vano batterie (O di Fig. 1); vedi paragrafo ‘INSERIMENTO/
Fig. 4
SOSTITUZIONE BATTERIE’.
- ITALIANO 7
IMPOSTAZIONE MENU’ UTENTE
Il menù utente permette di impostare alcuni parametri di funzionamento
del cronotermostato.
Per entrare nella regolazione dei parametri del cronotermostato,
premere il tasto ‘ P ‘, il display visualizzerà l’icona ‘ P ‘ (in basso a
destra) e la scritta ‘ PrOG ‘. Premendo ripetutamente il tasto ‘ P ‘ si
scorre tra i parametri utente:
‘ PrOG ’ Impostazione Programma Orario
‘ tESt ’
Attivazione funzione Test
‘ AFr ’
Impostazione funzione Antigelo
‘ MOrE ’ Accesso a menù parametri avanzato
Premendo il tasto ‘OK’ si visualizza il valore del parametro e lo si può
modificare con i pulsanti freccia ‘ ’ e ‘ ’.
Per uscire dal menù dei parametri utente, premere il tasto ‘OK’ per
confermare le modifiche effettuate oppure ‘ ’ per uscire senza
salvare le modifiche. In ogni caso dopo 20 secondi senza premere
alcun tasto il cronotermostato esce automaticamente.
‘ PrOG ‘: IMPOSTAZIONE PROGRAMMA ORARIO
Normalmente il cronotermostato visualizza sul display il programma
orario impostato per il giorno corrente.
Il giorno della settimana corrente è visualizzato a sinistra con un
quadratino attorno al numero corrispondente al giorno: 1 Lunedì ..
7 Domenica.
La fascia di trattini superiore visualizza il programma orario dalle
0.00 alle 12.00 (mattino) a passi di mezz’ora, mentre la fascia di
trattini inferiore visualizza il programma dalle 12.00 alle 24.00
(pomeriggio). I trattini visualizzano la modalità di funzionamento del
cronotermostato, Comfort, riduzione, Off/Antigelo per ogni mezz’ora
del giorno, come illustrato di seguito:
Modalità di riduzione:
un trattino acceso (inferiore).
Giorni della settimana:
1 Lunedì .. 7 Domenica.
Il quadratino indica il
giorno o il gruppo di
giorni corrente.
Modalità spento / antigelo:
Modalità di comfort:
nessun trattino acceso.
due trattini accesi.
Per impostare il programma orario proseguire come descritto nel
seguito.
Nota: Si uscirà dalla regolazione senza memorizzare il
programma impostato se per più di 30 secondi non si
preme alcun tasto, oppure confermando in sequenza le
impostazioni mediante il pulsante ‘OK’ senza effettuare
alcuna modifica.
1. Selezionare il parametro ‘PrOG’ e premere il tasto ‘OK’: il display
visualizza l’icona ‘ P ’, la scritta ‘dAy’ ed i quadratini corrispondenti
al giorno o al gruppo di giorno lampeggianti.
2. Premere i tasti ‘ ‘ e ‘ ‘ per impostare la combinazione di giorni
da programmare.
- ITALIANO 8
Di seguito vengono elencate le quattro combinazioni disponibili:
‘ ’. Premendo ripetutamente si possono richiamare ciclicamente
i 4 programmi con differenti fasce orarie a 1, 2, 3 o 4 attivazioni
giornaliere:
(Lu) (Ma) (Me) (Gi) (Ve) (Sa) (Do)
I° combinazione
di giorni
1
2
3
4
5
II° combinazione
di giorni
1
2
3
4
5
6
1
2
3
4
5
6
III° combinazione
di giorni
IV° combinazione
di giorni
(Programma
Giorno per
Giorno)
1
2
3
4
5
6
6
7
PRIMA FASCIA ORARIA
Modalità comfort
Modalità riduzione
6.00 .. 23.00
23.00 .. 6.00
7
7
SECONDA FASCIA ORARIA
Modalità comfort
Modalità riduzione
6.00 .. 8.00
8.00 .. 17.00
17.00 .. 23.00
23.00 .. 6.00
TERZA FASCIA ORARIA
Modalità comfort
Modalità riduzione
6.00 .. 8.00
8.00 .. 11.00
11.00 .. 13.00
13.00 .. 17.00
17.00 .. 23.00
23.00 .. 6.00
7
Nota: Per ogni combinazione di giorni, il programma che si
imposterà sarà uguale per tutti i giorni di ogni singolo
gruppo.
3. Premere il tasto ‘ OK ‘ per confermare l’impostazione effettuata; il
display visualizza il programma orario precedentemente impostato
per quel giorno o gruppo di giorni. Il display inoltre visualizza le ore
0.00 e il trattino lampeggiante sull’intervallo compreso tra le ore
0.00 e le ore 0.30 a indicare la mezz’ora selezionata per la modifica.
4. Per agevolare l’operazione di programmazione, si può richiamare un
programma orario predefinito scegliendone uno tra i 4 disponibili.
Per richiamare un programma orario predefinito premere il tasto
9
QUARTA FASCIA ORARIA
Modalità comfort
Modalità riduzione
6.00 .. 8.00
8.00 .. 11.00
11.00 .. 13.00
13.00 .. 17.00
17.00 .. 19.00
19.00 .. 21.00
21.00 .. 23.00
23.00 .. 6.00
- ITALIANO -
5. Se le fasce orarie non rappresentano la programmazione desiderata
è possibile modificarle a piacimento procedendo come segue:
selezionare la fascia oraria preimpostata che più si avvicina alla
programmazione desiderata.
Ad ogni intervallo orario (ogni trattino corrisponde a mezz’ora)
impostare la modalità di regolazione premendo uno dei seguenti
tasti:
Modalità di Comfort:
Premere il tasto ‘ ‘.
Spento / antigelo:
Premere il tasto ‘ ‘.
Modalità di Riduzione:
Premere il tasto ‘ ‘.
Spostamento cursore orario:
Premere il tasto ‘ ’ o ‘ ‘.
Ad ogni pressione del tasto che imposta la modalità di regolazione,
il cursore orario si sposta automaticamente sulla mezz’ora
successiva.
Comfort
Spento
Riduzione
Conferma
6. Impostato il programma orario per il giorno o per il gruppo di giorni
selezionato, premere il tasto ‘ OK ’.
Il display visualizzerà il programma orario del giorno o dei gruppi di
giorni successivi fino a coprire l’intera settimana.
7. Impostato il programma per l’intera settimana (ripetendo i punti
4 e 5), premere il tasto ‘OK’. Il cronotermostato memorizza il
programma impostato e sul display viene visualizzata la scritta
‘MEMO’ e si uscirà automaticamente dalla regolazione del
programma orario.
ISTRUZIONI RAPIDE PER L’IMPOSTAZIONE DEL
PROGRAMMA ORARIO
• Premere il tasto ‘ P ’.
• Il dispaly visualizza ‘ PrOG ’ con l’icona ‘ P ‘ accesa.
• Premere il tasto ‘ OK ’.
• Il display visualizza la scritta ‘ dAY ‘
• Premere i tasti ‘
‘e‘
‘ per scegliere una delle quattro
combinazioni di giorni preimpostate.
• Premere il tasto ‘ OK ’ per confermare la scelta effettuata.
• Il display visualizza le ore 00:00 con il relativo trattino, in alto a
sinistra, lampeggiante.
• Premere uno dei seguenti tasti a seconda della modalità di
regolazione della temperatura che si vuole impostare:
Modalità di Comfort:
Premere il tasto ‘ ‘.
Spento / antigelo:
Premere il tasto ‘ ‘.
Modalità di Riduzione:
Premere il tasto ‘ ‘.
Spostamento cursore orario:
Premere il tasto ‘ ’ o ‘ ‘.
Ad ogni pressione del tasto che imposta la modalità di regolazione,
il cursore orario si sposta automaticamente sulla mezz’ora
successiva.
• Impostato il programma orario per il giorno o per il gruppo di giorni
selezionato, premere il tasto ‘ OK ’.
Il display visualizzerà il programma orario del giorno o dei gruppi di
giorni successivi fino a coprire l’intera settimana.
• Impostato il programma per l’intera settimana, premere il tasto
‘OK’. Il cronotermostato memorizza il programma impostato
e sul display viene visualizzata la scritta ‘MEMO’ e si uscirà
automaticamente dalla regolazione del programma orario.
- ITALIANO 10
‘tESt’: ATTIVAZIONE FUNZIONE TEST
Permette di attivare/disattivare la funzione ‘Test’ per
l’autoapprendimento dell’indirizzo radio sul ricevitore:
On
funzione ‘Test’ attiva
OFF funzione ‘Test’ disattiva
Per maggiori informazioni, vedere il paragrafo ‘Configurazione del
sistema radio’.
‘AFr’: IMPOSTAZIONE FUNZIONE ANTIGELO
La funzione di Antigelo consente di selezionare una temperatura
minima che viene mantenuta quando il cronotermostato è spento,
in modo tale da preservare l’ambiente e l’impianto qualora la
temperatura ambiente scende al di sotto del valore impostato.
Il dispositivo esce dalla fabbrica con l’antigelo impostato a
+3°C.
ATTENZIONE: La funzione è attiva solo se il dispositivo è stato
impostato in modalità Riscaldamento.
Per regolare la temperatura di Antigelo eseguire le seguenti
operazioni:
1. Selezionare il parametro ‘AFr’ e premere il tasto ‘OK’.
2. Il display visualizza la temperatura di Antigelo precedentemente
impostata.
3. Premere i tasti ‘ ’ e ‘ ‘ per modificare il valore (compreso
tra OFF, 0,5°C..25°C); ogni modifica viene memorizzata
automaticamente.
4. Per uscire premere il tasto ‘ OK ’ oppure attendere 10 secondi
senza premere alcun tasto.
‘MOrE’: IMPOSTAZIONE MENU’ PARAMETRI AVANZATO
Il menù parametri avanzato permette all’installatore di configurare il
funzionamento del cronotermostato.
ATTENZIONE
Il cronotermostato viene fornito con dati preimpostati per un
funzionamento ottimale.
La modifica di tali valori deve essere effettuata da personale
qualificato.
Per accedere al menù parametri avanzato selezionare il parametro
‘MOrE’ e tenere premuto per 2 secondi il tasto ‘OK’, il display
visualizzerà il primo parametro avanzato. Premendo ripetutamente il
tasto ‘ P ‘ si scorre tra i parametri:
‘OFS’
Offset temperatura ambiente
‘HYSt’
Isteresi regolazione temperatura ambiente
‘tMIn’
Tempo minimo accensione relè
‘Entc’
Configurazione sensore NTC esterno
‘LinF’
Limite inferiore temperatura pavimento
‘LSUP’
Limite superiore temperatura pavimento
Premendo il tasto ‘OK’ si visualizza il valore del parametro e lo si può
modificare con i pulsanti freccia ‘ ’ e ‘ ’.
Per uscire dal menù dei parametri avanzati, premere il tasto ‘OK’
per confermare le modifiche effettuate oppure ‘ ’ per uscire senza
salvare le modifiche. In ogni caso dopo 20 secondi senza premere
alcun tasto il cronotermostato esce automaticamente.
- ITALIANO 11
‘OFS’: OFFSET TEMPERATURA AMBIENTE
Con l’Offset è possibile correggere la temperatura ambiente rilevata di
±9,9 °C, in modo da correggere eventuali errori sistematici di lettura
dovuti ad un eventuale posizionamento del cronotermostato in zone
inadatte a rilevare la temperatura dell’ambiente.
Il dispositivo esce dalla fabbrica con l’Offset impostato a 0,0°C.
‘HYSt’: ISTERESI REGOLAZIONE TEMPERATURA AMBIENTE
Con questo parametro è possibile personalizzare la regolazione della
temperatura ambiente modificando l’isteresi nel range 0,1 .. 5,0 °C.
Il dispositivo esce dalla fabbrica con Isteresi impostata a 0,2°C.
‘tMIn’: TEMPO MINIMO ACCENSIONE USCITA
Questo parametro permette di ridurre il numero di cicli di accensione
e spegnimento dell’uscita, funzione utile nel caso il cronotermostato
debba pilotare una stufa a pellet la quale non può essere accesa e
spenta a intervalli troppo brevi. Una volta che l’uscita del relè sul
ricevitore viene accesa in seguito alla necessità di riscaldare (o
raffreddare) l’ambiente, essa non si spegnerà più fino al trascorrere del
‘Tempo minimo’ impostato. Il parametro può essere impostato nel range
0 .. 90 minuti a passi di 10 minuti. Il dispositivo esce dalla fabbrica con
‘Tempo minimo’ impostato a 0, cioè con funzione disabilitata.
‘Entc’: CONFIGURAZIONE SENSORE NTC ESTERNO
Il cronotermostato possiede un ingresso per il collegamento di un
sensore NTC esterno opzionale oltre al sensore interno.
Il sensore esterno può essere usato per rilevare la temperatura
ambiente nel caso il cronotermostato debba essere installato in una
posizione non adatta alla rilevazione della temperatura ambiente. In
alternativa il sensore esterno può essere configurato per misurare la
temperatura del pavimento, funzione utile nei sistemi di riscaldamento
a pavimento.
Con il sensore esterno sul pavimento il cronotermostato potrà tenere
conto di un limite minimo o massimo della temperatura del pavimento
durante la regolazione della temperatura ambiente.
Il parametro può essere impostato con i seguenti valori:
‘no’: Nessun sensore esterno collegato.
‘rOOM’: Sensore esterno collegato per rilevare la temperatura
ambiente.
‘FLOH’: Sensore esterno collegato per rilevare la temperatura del
pavimento, ma non viene visualizzata sul display.
‘FLOS’: Sensore esterno collegato per rilevare la temperatura del
pavimento, che può essere visualizzata sul display.
‘LinF’: Limite inferiore temperatura pavimento
‘LSUP’: Limite superiore temperatura pavimento
In questi parametri è possibile impostare una temperatura minima e
massima del pavimento.
Nel caso in cui il sensore esterno sia collegato e configurato per
rilevare la temperatura del pavimento, il cronotermostato nel regolare
la temperatura ambiente darà precedenza ai limiti di temperatura entro
cui deve rimanere il pavimento. In riscaldamento si potrà impostare
un limite inferiore a cui il pavimento non deve scendere in modo da
non sentire mai il pavimento freddo, mentre si potrà impostare un
limite massimo oltre al quale il pavimento non deve salire in modo da
garantire il massimo benessere.
- ITALIANO 12
Il cronotermostato segnala quando sta regolando per mantenere nei
limiti la temperatura del pavimento facendo lampeggiare sul display
il simbolo ‘ ’.
Il limite inferiore della temperatura del pavimento è impostabile nel
range 10..30 °C, mentre il limite superiore nel range 35..50 °C.
I limiti possono essere disabilitati configurando il limite sotto al valore
minimo premendo il tasto ‘ ’ fino a far apparire il valore ‘no’.
Il dispositivo esce dalla fabbrica con i limiti disabilitati.
CONTROLLO DI UNA STUFA A PELLET
Il cronotermostato radio può essere configurato per regolare
la temperatura ambiente accendendo e spegnendo una stufa a
pellet. L’uscita del ricevitore dovrà essere collegata all’ingresso di
accensione/spegnimento della stufa a pellet.
Allo scopo di limitare il numero di accensioni e spegnimenti della stufa
configurare i parametri:
- HYSt: Isteresi regolazione temperatura ambiente a 1,0 °C
- tMIn: tempo minimo accensione relè a 30 minuti
CONDIVISIONE DEL PROGRAMMA ORARIO CON ALTRI
TERMOSTATI RADIO
In un sistema radio formato da un cronotermostato e più termostati
semplici uno per ogni stanza, è possibile far regolare anche i termostati
semplici con il programma orario impostato sul cronotermostato.
Ciò si può ottenere utilizzando un modulo ricevitore a più canali
e associando le uscite controllate dai termostati a quella del
cronotermostato. In questo modo un cronotermostato e i termostati
ad esso associati formano una ‘zona’.
Per esempio in un’abitazione si potrebbe creare una zona giorno e una
zona notte con regolazione su più stanze secondo fasce orarie diverse
programmabili su due cronotermostati.
Vedere le istruzioni del modulo ricevitore per la procedura di
associazione.
I canali associati riceveranno dal cronotermostato l’indicazione di
fascia oraria e quindi l’informazione di quale temperatura, comfort o
ridotta, usare per la regolazione. Anche lo stato di spento o antigelo
viene ricevuto dai termostati associati.
Se il cronotermostato sta regolando ad una temperatura di comfort i
termostati associati regoleranno secondo il setpoint impostato sulla loro
manopola, se invece il cronotermostato sta regolando una temperatura
ridotta i termostati associati regoleranno con una temperatura di
riduzione impostabile sul modulo ricevitore. Analogamente se il
cronotermostato è spento con funzione di antigelo a 5°C, anche i
termostati associati regoleranno la temperatura di antigelo 5°C.
PROGRAMMA PULIZIE
Questo programma è particolarmente utile quando vengono fatte le
pulizie e si aprono le finestre rendendo inutile sia il riscaldamento
che il raffreddamento dei locali. In queste condizioni l’uscita viene
tenuta spenta per un periodo di due ore. Per attivare il programma
premere il tasto ‘ ‘: sul display si accende l’icona ‘ ‘ e, al posto
dell’orologio, viene visualizzato il tempo mancante al ripristino del
normale funzionamento.
Si ritorna alla precedente modalità di funzionamento dopo due ore
oppure effettuando una nuova pressione del tasto ‘ ‘.
- ITALIANO 13
PROGRAMMA VACANZE
Nel caso in cui si desideri assentarsi per un periodo relativamente
lungo è consigliabile attivare il Programma Vacanze che permette di
sospendere il modo attivo di funzionamento per il numero di ore (da 1
a 95) oppure di giorni (da 1 a 99) desiderato.
Al termine del conteggio, ore oppure giorni, il cronotermostato si
riporterà nel modo di funzionamento precedente l’attivazione del
Programma Vacanze. Durante lo spegnimento sarà comunque sempre
attiva la funzione antigelo e sul display verrà visualizzato il simbolo ‘ ‘
e il conto alla rovescia del tempo rimanente al termine del programma.
Nota: L’accesso al programma vacanze, NON è consentito quando è
attivo il ‘ programma pulizia ‘.
Per attivare il programma vacanze procedere come segue:
1. Premere il tasto ‘
‘: il display visualizza il simbolo ‘
‘e
l’indicazione ‘ h 00 ‘.
2. Premere i tasti ‘ ’ e ‘ ’ per regolare il tempo di vacanza; ogni
modifica viene memorizzata automaticamente.
Fino a 95 ore la programmazione è indicata in ore e il display mostrerà
‘ h XX ‘. Superando tale valore si passerà automaticamente alla
programmazione del tempo di vacanze in giorni e il display mostrerà ‘ d
XX ‘. Sarà possibile incrementare o decrementare l’ora o il giorno di una
unità alla volta, con valori compresi tra 0 .. 95 ore e 4 .. 99 giorni.
3. Per attivare il programma vacanze per il tempo impostato, premere
nuovamente il pulsante ‘ OK ’ oppure attendere 20 secondi senza
premere alcun tasto; il display visualizza l’icona ‘ ’ lampeggiante
e il tempo residuo allo scadere del periodo di vacanza.
4. Per uscire dalla funzione vacanza e ripristinare il normale
funzionamento, premere il tasto ‘ ‘ oppure ‘ ‘.
SPEGNIMENTO - FUNZIONE ANTIGELO
Per accendere o spegnere il cronotermostato premere il tasto ‘ ‘.
Quando il cronotermostato è spento il display mostrerà la scritta
‘ OFF ’ e l’uscita rimarrà sempre spenta.
Se la funzione antigelo è attiva e il cronotermostato è in modalità di
riscaldamento, sul display comparirà il simbolo ‘ ‘ e la temperatura
ambiente verrà regolata secondo il valore impostato sulla temperatura
di antigelo (vedi paragrafo ‘IMPOSTAZIONE MENU’ UTENTE‘).
INSERIMENTO / SOSTITUZIONE BATTERIE
Il display mostra costantemente lo stato di carica delle batterie
tramite il simbolo ‘
‘. La carica delle batterie è massima se
all’interno del simbolo tutti e tre gli indicatori di livello sono accesi.
Al contrario le batterie sono scariche e devono essere sostituite
quando il simbolo appare completamente vuoto ‘
‘.
Il simbolo ‘
‘ lampeggia solo nel caso in cui le batterie siano
troppo scariche per permettere una trasmissione radio.
Per la sostituzione procedere come segue:
1. Aprire lo sportellino che da’ accesso al vano pile (Fig. 1).
2. Estrarre le pile eventualmente facendo leva con un utensile.
3. Inserire le nuove pile che devono essere alcaline da 1.5V tipo AA.
4. Solo nel caso in cui il cronotermostato non risponda correttamente
eseguire un reset tramite il tasto indicato in N di Fig. 1; NON
USARE AGHI O STRUMENTI CHE POSSANO DANNEGGIARE
IRREPARABILMENTE IL CRONOTERMOSTATO.
5. Controllare l’esattezza dell’ora e, se necessario, riprogrammare l’ora.
- ITALIANO 14
FUNZIONAMENTO AUTOMATICO / MANUALE 24h /
MANUALE PERMANENTE
Con il tasto ‘ ‘, il cronotermostato può essere forzato a regolare
la temperatura ambiente indipendentemente dalla programmazione
oraria effettuata, secondo la temperatura impostata tramite la
manopola ‘ ‘.
Premendo ripetutamente il tasto ‘ ‘, si passa in modo ciclico tra gli
stati: Automatico, Manuale 24 ore e Manuale Permanente.
I 2 modi di funzionamento ‘Manuale’ sono visualizzati sul display con il
24h
simbolo ‘ ‘ manuale 24h e con il simbolo ‘ ‘ manuale permanente.
Il modo di funzionamento ‘Manuale 24h’ è uno stato temporaneo
che dura fino alla mezzanotte del giorno corrente dopodichè il
cronotermostato ritorna automaticamente nel modo Automatico
cioè a seguire il programma orario impostato, mentre il modo di
funzionamento ‘Manuale Permanente’ rimane attivo finchè non viene
modificato con il pulsante ‘ ’.
RETROILLUMINAZIONE
L’accensione della retroilluminazione del display si verifica in seguito
alla pressione di un qualsiasi tasto. Lo spegnimento è automatico
dopo 20 secondi dall’ultima pressione del tasto.
INDICAZIONE ORA / TEMPERATURA
Premendo il pulsante ‘
‘ si può scegliere in qualsiasi momento
se visualizzare sul display l’ora corrente o la temperatura ambiente
rilevata.
Se è stato collegato un sensore esterno per rilevare la temperatura
del pavimento ed è stato configurato perché ne venga visualizzata la
temperatura sul display, premendo il pulsante ‘
‘ si potrà ciclare
tra la visualizzazione di ora, Temperatura ambiente e Temperatura
pavimento. La temperatura pavimento viene indicata sul display con
il simbolo ‘ ’.
TEMPO DI CAMPIONAMENTO
Al fine di ottimizzare la durata delle batterie, il cronotermostato rileva
la temperatura ambiente e trasmette i dati al ricevitore ogni 3 minuti.
E’ quindi normale che la temperatura visualizzata non venga aggiornata
immediatamente e che per vedere accendersi o spegnersi l’uscita si
debba aspettare fino a 3 minuti, in alternativa premendo il pulsante
‘OK’ nella schermata principale si può forzare un aggiornamento.
Per lo stesso motivo allo scadere della mezz’ora del programma
orario non si avrà un cambio di stato immediato ma sarà necessario
attendere fino a 3 minuti nel caso peggiore per vedere il nuovo stato.
COLLEGAMENTO AD INTERFACCIA TELEFONICA
Il cronotermostato offre la possibilità di poter collegare ai morsetti 8 e
9 un’interfaccia telefonica con funzionamento continuo (relè a tenuta).
L’utilizzo di una idonea interfaccia telefonica non necessita di alcuna
impostazione sul cronotermostato; per l’utilizzo dell’interfaccia
telefonica si rimanda al relativo manuale istruzioni.
Tramite l’interfaccia telefonica è possibile Spegnere il cronotermostato
oppure Attivarlo in modalità Manuale Permanente.
A seconda dei comandi ricevuti dall’interfaccia telefonica il
cronotermostato agirà in base alla seguente logica di funzionamento:
1. Contatto chiuso dell’interfaccia telefonica:
Il cronotermostato forza il funzionamento in modalità ‘Manuale
- ITALIANO 15
contatto (il cronotermostato si accende).
3. Verificare tramite le funzioni dell’interfaccia telefonica che
il contatto sia chiuso.
4. Inviare all’interfaccia telefonica un comando di apertura del
contatto (il cronotermostato si spegne).
Durante tale sequenza non dovranno intervenire comandi
da tastiera in quanto sono prioritari rispetto ai comandi da
interfaccia.
Permanente’: sul display vengono visualizzati i simboli ‘ ‘ e ‘ ‘.
2. Contatto aperto dell’interfaccia telefonica, dopo (e solo dopo)
una precedente chiusura, se non sono intervenuti comandi da
tastiera (Manuale/Off):
Il cronotermostato viene spento e sul display compare la scritta
‘OFF‘ e viene visualizzato il simbolo ‘
‘. Qualora fosse attiva la
funzione di ‘Antigelo’ sul display viene visualizzato il simbolo ‘ ‘.
ATTENZIONE: I comandi da tastiera sono sempre prioritari
rispetto ai comandi ricevuti dall’interfaccia telefonica.
Se sul cronotermostato viene premuto il pulsante ‘
’ o ‘ ’, il
dispositivo modificherà il proprio stato e l’icona ‘ ’ lampeggerà ad
indicare che il comando da interfaccia è stato forzato da un comando da
tastiera. L’icona ‘ ’ smetterà di lampeggiare se l’interfaccia telefonica
invierà al cronotermostato il medesimo comando effettuato da tastiera
oppure se l’interfaccia telefonica verrà resettata. In tale condizione lo
stato imposto da tastiera non verrà variato, e il cronotermostato si
predisporrà a ricevere un eventuale nuovo comando.
ATTENZIONE
Se si invia da interfaccia telefonica un comando di spegnimento
al cronotermostato (contatto aperto dell’interfaccia telefonica),
è opportuno verificare che tale comando sia stato eseguito
dal cronotermostato, eseguendo la seguente procedura di
riallineamento:
1. Verificare tramite le funzioni dell’interfaccia telefonica che
il contatto sia aperto eventualmente inviando un comando di
spegnimento.
2. Inviare all’interfaccia telefonica un comando di chiusura del
CARATTERISTICHE TECNICHE
Alimentazione:
Durata Batterie:
Frequenza:
Modulazione:
Potenza in uscita (ERP):
Tipo antenna:
Max. distanza dal ricevitore:
Temperatura ambiente
Campo di regolazione:
comfort:
riduzione:
Isteresi:
Tipo di sensore:
Risoluzione:
16
2 x 1,5V, pile alcaline (Tipo AA)
> 2,5 anni
868,150 MHz
GFSK
< 1 mW
Interna
>300 m in campo libero
>50 m all’interno di edifici dipendente
dall’edificio e dall’ambiente)
5,0 .. 35,0°C
5,0 .. 35,0°C
0,2°C configurabile 0,1 .. 5,0 °C
NTC 4K7 ohm ±1% @ 25°C
0,1°C (T > 0,0°C)
0,2°C (T < 0,0°C)
- ITALIANO -
Range:
-9,9°C .. +50,0°C
Precisione:
±1,0°C
Temperatura pavimento (sensore esterno)
Campo di regolazione:
limite inferiore: 10 .. 30°C
limite superiore: 35°C .. 50°C
Tipo di sensore:
NTC 4K7 ohm ±1% @ 25°C
Risoluzione:
0,1°C (T > 0,0°C)
0,2°C (T < 0,0°C)
Range:
-9,9°C .. +60,0°C
Precisione:
±1,0°C
Massima lunghezza dei fili
verso il sensore remoto:
15 m
Antigelo:
OFF/0.5°C .. 25.0°C (Default 3.0°C)
Offset:
± 5.0°C. (Default 0.0°C)
Spegnimento retroilluminazione: 20 secondi da ultima pressione
Grado di protezione:
IP 30
Classe di isolamento:
II ( )
Numero di cicli manuali:
1.000
Temperatura di funzionamento: 0°C .. +40°C
Temperatura di stoccaggio: -10°C .. +50°C
Limiti di umidità:
20% .. 80% RH non condensante
Contenitore:
Materiale:
ABS+PC V0 autoestinguente
Colore: Calotta: Bianco segnale (RAL 9003)
Base:
Grigio antracite (RAL 7016)
Peso:
~ 250 gr.
RIFERIMENTI NORMATIVI
Il prodotto è conforme alle seguenti norme (EMC 2004/108/
LVD 2006/95/ ):
CEI-EN-60730-1 (2002)
CEI-EN-60730-2-7 (1998)
CEI-EN-60730-2-9 (1998)
ETSI EN 301 489-3 v1.4.1
ETSI EN 300 220-2 v2.1.1
e
DIMENSIONI (in mm)
GARANZIA
Nell’ottica di un continuo sviluppo dei propri prodotti, il costruttore si
riserva il diritto di apportare modifiche a dati tecnici e prestazioni senza
preavviso. Il consumatore è garantito contro i difetti di conformità
del prodotto secondo la Direttiva Europea 1999/44/ nonché il
documento sulla politica di garanzia del costruttore. Su richiesta è
disponibile presso il venditore il testo completo della garanzia.
- ITALIANO 17
NOTE:
________________________________________
________________________________________
________________________________________
________________________________________
______________________________________________________________________________________________________________________________
_______________________________________________________________________________________________________________________________________________________________________
_________________________________________
_________________________________________
________________________________________
________________________________________
________________________________________
________________________________________
______________________________________________________________________________________________________________________________
______________________________________________________________________________________________________________________________
_________________________________________
_________________________________________
________________________________________
________________________________________
________________________________________
________________________________________
______________________________________________________________________________________________________________________________
______________________________________________________________________________________________________________________________
_________________________________________
_________________________________________
________________________________________
________________________________________
________________________________________
________________________________________
18
DESCRIPTION OF CONTROLS
LEGEND
A Cleaning Button: activates temporary suspension of
operation.
B Vacation Button: deactivates the device for a
programmable period of time.
A
B
C
D
E
F
G
H
M
I
N
L
Fig. 1
O
P
P
19
C Programming Button: enters the programming menu
D Button with double function:
- In normal operation: activates the function 24 hours
Manual / Permanent Manual / Automatic
- In schedule programming: sets the regulation
temperature into Economy mode
E Button with double function:
- In normal operation: turns on and off the chronostat
- In schedule programming: sets the regulation
temperature into Off / Antifreeze mode
F Button with double function:
- In normal operation: displays current time or
temperature
- In schedule programming: sets the regulation
temperature into Comfort mode
G Forward button
H Economy mode knob
I OK button (confirmation)
L Back button
M Comfort mode knob
N Reset button
O Battery compartment
P Screws holes for fixing the chronostat body to the wall
mount plate
- ENGLISH -
DISPLAY SYMBOLS
24h
In the following is explained the meaning of some symbols which may
appear on the display:
P
Battery status indication.
The chronostat is in programming mode.
Flashing:
Cleaning program active (the remaining time is shown on
the display).
Flashing:
Vacation program active (the remaining time is shown on
the display).
Fixed:
Indicates that the telephone interface is active.
Flashing:
Indicates that the remote command received by the
telephone interface has been overridden by another local
request through the chronostat buttons.
Batteries discharged; replace batteries.
Temperature regulation in Comfort mode.
Temperature regulation in Economy mode.
Chronostat switched Off or temperature regulation in Off
mode.
24h
Permanent temperature regulation in Comfort mode.
Antifreeze mode active, the Chronostat regulates the
Antifreeze temperature.
The chronostat is transmitting a radio command.
Output switched ON, heating mode.
The chronostat is in ‘Test’ mode, i.e. it transmits a
command every 2 seconds for the selflearning of its radio
address in the receiver.
Output switched ON, cooling mode.
Floor temperature visualization.
Temperature regulation in Comfort mode for 24 hours.
Flashing, means that the chronostat is regulating to
maintain the floor temperature within the defined limits.
20
- ENGLISH -
GENERALITIES
This device is a battery-powered digital weekly chronostat for
controlling room temperature on three levels: Comfort, Economy
or Off/Antifreeze.
Its main characteristic is the lack of electrical connections; indeed
the ON and OFF signals are transmitted to the receiving unit by radio,
making this device easy and cheap to install, especially when there is
no existing electrical system available.
The chronostat can be used in both heating and air conditioning
systems and it features a large backlit display which shows
all functional indications, the program schedule and the room
temperature reading or, alternatively, the current time.
It allows to set up to 7 different time schedules, each one different
for each day of the week, with a minimum intervention time of 1/2
hour during the 24 hours.
STARTING UP
When starting up for the first time open the battery lid and insert
the batteries in the battery compartment O in Fig. 1, observing the
polarities indicated. The batteries must be alkaline 1.5V type AA.
If necessary carry out a reset operation by inserting a pointed object
through the hole provided (N in Fig. 1); DO NOT USE NEEDLES
OR TOOLS THAT COULD IRREPARABLY DAMAGE THE
CHRONOSTAT.
The buttons present beneath the lower flap are 3:
‘OK’: For programming the time and current day of the week (I in
Fig. 1);
‘ ‘: Forward (G in Fig. 1);
‘ ’: Back (L in Fig. 1);
Setting the current time and day
To set the clock of the chronostat carry out the following steps:
1. Open the flap of the battery compartment.
2. Keep the ‘OK’ button pressed for at least 2 seconds; the hour
digits will start flashing.
3. Set the hour using buttons ‘ ‘ and ‘ ‘.
4. Confirm by pressing ‘OK’; the minute digits will start flashing.
5. Set the minutes using buttons ‘ ‘ and ‘ ‘.
6. Confirm by pressing ‘OK’; the box surrounding the current day of
the week will start flashing.
7. Set the current day of the week using buttons ‘ ‘ and ‘ ‘
(the current day is highlighted by a box surrounding the number
corresponding to the day of the week, 1 Monday .. 7 Sunday )
8. Confirm by pressing ‘OK’.
Setting the Heating / Cooling mode
The chronostat leaves the factory set in the heating mode.
The chronostat is factory set to heating mode. To modify the operating
logic, keep the ‘ ‘ button pressed for at least 10 seconds.
A. If the chronostat was previously set on heating, the cooling mode
will be set and the ‘ ‘ (fan) symbol will flash on the display for 8
seconds.
B. If the chronostat was previously set on cooling, the heating mode
will be set and the ‘ ‘ (flame) symbol will flash on the display for
8 seconds.
- ENGLISH 21
In any case the ‘Test’ mode will end automatically after approximately
17 minutes.
The ‘Test’ mode must be used to self-learn the address code of
the chonostat on the receiver, afterwards in the receiving unit the
relevant relay output should continuously toggle between On and
Off state, every 2 seconds. This output state in the receiver is
also displayed by its led. If this happens the chronostat is correctly
communicating with the receiver. When the chonostat is positioned
in the desired position, make sure that it still communicates properly
with the receiver.
If the chonostat is positioned too far away from the receiver,
the relay output will always remain On or Off. In this case, it is
recommended that a better position is found, possibly closer to the
receiver, and make sure that it isn’t in the vicinity of metal screens or
reinforced concrete walls which could weaken the radio transmission.
The signal quality can be monitored in the receiver; see the relative
documentation for further information.
During normal operation, the heating output activation is shown by
the flame icon ‘ ‘ whereas the cooling output activation is shown
by the fan icon ’ ’.
Setting the Comfort and Economy temperatures
The Comfort temperature is set by means of the ‘
‘ knob (M in
Fig. 1) whereas the Economy temperature is set by means of the ‘ ‘
knob (H in Fig. 1).
Note: In order to have a nighttime reduction, the economy
temperature must normally be set on a lower value than the
comfort temperature.
The chronostat will control the room temperature in the comfort or
economy mode according to the schedule programmed (see paragraph
‘SCHEDULE PROGRAMMING‘).
RADIO SYSTEM SET-UP
Before installing the chronostat in the desired position, it is necessary
to test whether the receiving unit correctly receives its radio signals.
The operation is carried out by activating the ‘Test’ mode in the user
menu or using the shortcut pressing together the buttons ‘OK’ and
‘ ’ (with chronostat turned on).
In ‘Test’ mode the chronostat’s display shows the text ‘TEST’ and
continuously transmits ON and OFF commands to the receiver with a
pause of 2 seconds between one and the next. Everytime a command
is trasmitted the symbol ‘
’ flashes on the display.
The ‘Test’ mode can be exited in the user menu or switching off the
chonostat by pressing the ‘ ’ button.
22
- ENGLISH -
INSTALLATION
Method for releasing the
wall mount plate from the
base of the chronostat.
Fig. 2
23
Fig. 3
- ENGLISH -
WARNING
- To adjust properly room temperature, install the thermostat far from heat sources, airstreams or particularly cold walls (thermal
bridges).
- In order to grant the electrical safety, it is mandatory to screw the chronostat body to the wall mount plate through the two
screws supplied which must be mounted in the battery holder.
- Installation and electrical wirings of this appliance must be made by qualified technicians and in compliance with the current
standards.
- Before wiring the appliance be sure to turn the mains power off.
The device is designed to be installed directly on the wall using the screw anchors provided or in a standard recess (or wall) mounted junction
box with two or three modules.
To install the device carry out the following steps:
1. Release the wall mount plate fitted under the base of the chronostat as shown in Fig. 2.
2. Fix the plate directly on the wall or onto 2 or 3 module junction boxes by means of the two
holes for screws (distance between centres: 60 mm or 85mm), taking care to pass the
wires through the opening as shown in Fig. 3.
3. Make the electrical connections following the connection diagram in Fig. 4.
4. Fit the chronostat onto the wall mount plate, first matching up the teeth on the base with
the holes provided on the plate and then pressing downward on the device until the plastic
teeth of the plate click into place; then fix the chronostat body to the wall mount plate
through the two screws supplied which must be mounted in the battery holder (Fig. 3).
REMOTE
TELEPHONE
SENSOR
INTERFACE
5. Insert the batteries in the battery compartment (O in Fig. 1); see paragraph ‘ HOW TO
INSERT/REPLACE THE BATTERIES ’.
Fig. 4
- ENGLISH 24
USER MENU SETTINGS
The user menu allows the user to set some configuration parameters
of the chonostat.
To enter in the menu press the ‘ P ‘ button, the display will show the
‘ P ’ icon (bottom right) and the text ‘ PrOG ‘. Pressing repeatedly the
‘ P ‘ button the following user parameters will be scrolled:
‘ PrOG ’ Schedule Programming
‘ tESt ’
Test mode activation
‘ AFr ’
Antifreeze Setting
‘ MOrE ’ Access to the advanced parameters menu
Press the ‘OK’ button to display the value of the parameter. To
modify the selected parameter use the arrow buttons ‘ ’ and ‘ ’.
Press the ‘OK’ button again to save and exit or press ‘ ’ to exit
without saving the changes.
In any case the chonostat exits automatically after 20 seconds of
no buttons activity.
‘ PrOG ‘: SCHEDULE PROGRAMMING
Normally the chonostat displays the programmed schedule for the
current day. The current day of the week is displayed on the left with
a box around the corresponding day’s number, 1 Monday .. 7 Sunday.
The dashes line in the top of the display shows the time schedule
from 0.00 to 12.00 AM with half an hour steps, while the dashes line
in the bottom shows the time schedule from 12.00 to 24.00 PM.
The dashes show the operating mode of the chonostat, Comfort,
Economy, Off/Antifreeze for every half an hour of the day as shown
in the following:
Economy mode:
one dash lit (bottom).
Days of the week:
1 Monday .. 7 Sunday.
The box indicates the
current day or group
of days.
Off/Antifreeze mode:
no dashes lit.
Comfort mode:
two dashes lit.
To set the program schedule proceed as described below:
Note: You will exit the programming mode without memorizing
the programmed schedule if more than 30 seconds elapse
and you do not press any button; or else you can confirm
the settings in sequence by pressing the ‘Ok’ button
without making any changes.
1. Select the parameter ‘PrOG’ and press ‘OK’: the display will show
the ‘ P ’ icon and the word ‘dAy’ and the boxes corresponding to
day or group of days will start flashing.
2. Press buttons ‘ ’ and ‘ ‘ to set the combination of days to be
programmed.
In the following the four available combinations are listed:
Note: For each day combination, the time schedule set will be
the same for all days within each single group.
- ENGLISH 25
3. Press the ‘OK‘ button to confirm the setting; the display will show
the schedule previously programmed for that day or group of days.
The display will show also the time 0.00 and the dash flashing on
the interval between the time 0.00 and 0.30 to indicate wich ‘half
hour’ is selected for the modification.
FIRST TIME SLOT
Comfort mode
Economy mode
6.00 .. 23.00
23.00 .. 6.00
SECOND TIME SLOT
Comfort mode
Economy mode
6.00 .. 8.00
8.00 .. 17.00
17.00 .. 23.00
23.00 .. 6.00
(Mo) (Tu) (We) (Th) (Fr) (Sa) (Su)
1st combination
of days
1
2
3
4
5
2nd combination
of days
1
2
3
4
5
6
1
2
3
4
5
6
3rd combination
of days
4th combination
of days
(Schedule
Day by Day)
1
2
3
4
5
6
6
7
7
THIRD TIME SLOT
Comfort mode
Economy mode
6.00 .. 8.00
8.00 .. 11.00
11.00 .. 13.00
13.00 .. 17.00
17.00 .. 23.00
23.00 .. 6.00
7
7
4. Set the operating mode; to make the programming operation easier,
the chronostat leaves the factory preset with 4 time slots. Press
the ‘ ’ button to scroll cyclically through the four combinations of
time slots preset in the factory.
The four time slots are preset as follows:
26
FOURTH TIME SLOT
Comfort mode
Economy mode
6.00 .. 8.00
8.00 .. 11.00
11.00 .. 13.00
13.00 .. 17.00
17.00 .. 19.00
19.00 .. 21.00
21.00 .. 23.00
23.00 .. 6.00
- ENGLISH -
5. If the time slots do not correspond to the desired schedule, it
is possible to change them manually by proceeding as follows:
select the pre-set time slot which mostly fits the required time
schedule.
For every time interval (each dash corresponds to a half hour) set
the operating mode by pressing one of the following buttons:
Comfort mode:
Press the ‘
‘ button.
Off / Antifreeze:
Press the ‘
‘ button.
Economy mode:
Press the ‘
‘ button.
Moving the time cursor:
Press button ‘ ’ or ‘ ‘.
Each time the button which sets the regulation mode is depressed,
the time cursor automatically jumps into the next half hour.
Comfort
Off
Economy
Confirm
6. After programming the schedule for the day or group of days
selected, press the ‘ OK ’ button.
The display will show the program schedule for the next day or
groups of days until the whole week is covered.
7. After programming the schedule for the entire week (repeating
the steps 4 and 5), press the ‘OK’ button. The chronostat will
memorize the schedule set and the word ‘MEMO’ will appear
on the display; the device will automatically exit the schedule
programming mode.
QUICK GUIDE FOR SETTING THE TIME SCHEDULE
• Press button ‘ P ’.
• The display shows ‘ PrOG ’ with the icon ‘ P ‘ turned on.
• Press button ‘ OK ’.
• The display shows ‘ dAY ‘
• Press buttons ‘ ‘ and ‘ ‘ in order to choose one of the four days
combinations available as pre-set.
• Press button ‘ OK ’ to confirm the choice.
• The display shows hour 00:00 with the relevant dash, in the
upside right, flashing.
• Press one of the following buttons to select the temperature
regulation level desired:
Comfort mode:
Press the ‘
‘ button.
Off / Antifreeze:
Press the ‘
‘ button.
Economy mode:
Press the ‘
‘ button.
Moving the time cursor: Press button ‘ ’ or ‘ ‘.
Each time the button which sets the regulation mode is depressed,
the time cursor automatically jumps into the next half hour.
• Once the time schedule for the day or group of days selected has
been set, press button ‘ OK ’.
The display will show the time schedule for the next day or group
of days until the whole week has been covered.
• Once the time schedule for the whole week has been set, press
button ‘ OK ’. The chronostat will store the program into its
memory and the word ‘ MEMO ’ is shown on the display, then it
will automatically quit the time schedule setting procedure.
- ENGLISH 27
‘tESt’: TEST MODE ACTIVATION
Allows to activate/deactivate the ‘Test’ mode for the selflearning of
the radio address in the receiver:
On
‘Test’ mode active
OFF ‘Test’ mode deactive
See the ‘Radio system set-up’ section for further details.
‘AFr’: ANTIFREEZE SETTING
The Antifreeze function allows you to select a minimum temperature
to be maintained when the chronostat is off, so as to protect both
the room and the equipment when the room temperature falls below
the set value.
The device leaves the factory with the Antifreeze function set on
3°C.
IMPORTANT: the function is active only when the device has
been set in the heating mode.
To set the Antifreeze temperature, carry out the following steps:
1. Select the parameter ‘AFr’ and press the ‘OK’ button.
2. The display will show the previously set Antifreeze temperature.
3. Press buttons ‘ ’ and ‘ ‘ to change the setting (between OFF,
0.5°C..25°C); every change will be automatically memorized.
4. To exit press the ‘ OK ’ button or else wait 10 seconds without
pressing any button.
WARNING
The chonostat is supplied with pre-set data for optimal
working. Modification of the advanced parameters must be
done only by qualified personnel.
To access the advanced parameters menu select the ‘MOrE’ parameter
and keep pressed for 2 seconds the ‘OK’ button, the display will show
the first advanced parameter. Pressing repeatedly the ‘ P ‘ button the
following advanced parameters will be scrolled:
‘OFS’
Room temperature offset
‘HISt’
Room temperature regulation hysteresis
‘tMIn’
Minimum output ON time
‘Entc’
External NTC sensor configuration
‘LinF’
Floor temperature lower limit
‘LSUP’
Floor temperature higher limit
Press the ‘OK’ button to display the value of the parameter. To
modify the selected parameter use the arrow buttons ‘ ’ and ‘ ’.
Press the ‘OK’ button again to save and go back or press ‘
’ to
exit without saving the changes.
In any case the chonostat exits automatically after 20 seconds of
no buttons activity.
‘OFS’: ROOM TEMPERATURE OFFSET
With the Offset parameter it is possible to correct the temperature
reading by ±9.9 °C in order to correct any systematic reading errors
The advanced parameters menu allows the installer to configure the
due to a positioning of the chronostat in areas unsuitable for room
chonostat’s working.
- ENGLISH 28
‘MOrE’: ADVANCED PARAMETERS MENU SETTINGS
temperature measure. The device is factory set with the Offset to
0.0°C.
‘HYSt’: ROOM TEMPERATURE REGULATION HYSTERESIS
With this parameter it is possible to customize the room temperature
regulation modifing the hysteresis in the 0.1 .. 5.0 °C range. The
device is factory set with the hysteresis to 0.2°C.
‘tMIn’: MINIMUM OUTPUT ON TIME
This parameter allows to reduce the number of ON/OFF cycles of the
output. This function is useful in case the chronostat drives a pellet
stove which cannot be switched On and Off for a too short time.
Once the receiver’s relay is switched On according to a heating
(or cooling) need of the room, it will not be switched Off until the
‘minimum On time’ is expired. The parameter can be set in 10 minutes
steps in the 0..90 minutes range.
The device is factory set with the ‘minimum On time’ to 0, i.e.
function disabled.
‘Entc’: EXTERNAL NTC SENSOR CONFIGURATION
The chronostat features an input for an optional external NTC sensor
as well as an internal sensor. The sensor can be used to read the room
temperature in case the chronostat must be installed in an unsuitable
position for room temperature measure. Alternatively the external
sensor can be configured for floor temperature reading, which can be
useful in an underfloor heating/cooling system. With the external floor
sensor the chronostat will be able to take into account a minimum
and a maximum floor temperature limit during the room temperature
regulation.
The parameter can be set with the following values:
‘no’: No external sensor wired.
‘rOOM’: External sensor wired to read room temperature.
‘FLOH’: External sensor wired to read floor temperature, but it can
not be shown on the display.
‘FLOS’: External sensor wired to read floor temperature, it can be
shown on the display.
‘LinF’: Floor temperature lower limit.
‘LSUP’: Floor temperature upper limit.
In these parameters it is possibile to set a minimum or maximum floor
temperature limit . In case the external sensor is wired and configured
to read the floor temperature, the chronostat will give priority to the
limits within the floor temperature must stay when regulating the
room temperature.
In heating mode it will be possible to set a lower limit under which
the floor temperature must not fall in order not to feel a cold floor,
while it will be possible to set a upper limit beyond which the floor
temperature must not rise in order to guarantee the maximum
wellness.
The chronostat alerts when it is regulating to maintain the floor
temperature within the limits blinking the ‘ ’ symbol on the display.
The floor temperature lower limit can be set in the 10..30 °C range,
while the upper limit can be set in the 35..50 °C range. The limits can
be disabled setting them under their minimum value pressing the ‘ ’
arrow button until the value ‘no’ appears. The device is factory set
with limits disabled.
- ENGLISH 29
CONTROL OF A PELLET STOVE
The chronostat can be configured for temperature regulation by
switching On and Off a pellet stove. The receiver’s output will have
to be connected to the On/Off input of the pellet stove. In order to
reduce the number of switching On and Off cycles of the stove,
configure the parameters:
- HYSt: Room temperature regulation hysteresis to 1.0 °C
- tMIn: Minimum output ON time to 30 minutes
TIME SCHEDULE SHARING WITH OTHER WIRELESS
THERMOSTATS
In a system made by one chronostat and some more plain thermostats
one in each room, it is possible to make the thermostats regulate
according the time schedule programmed in the chronostat.
This can be achieved using a multi-channel receiver and associating
the outputs driven by the themostats to the output driven by the
chronostat. In this way a chronostat and the thermostats associated
with it will form a ‘zone’. For example, in a home, it would be possible
to create the ‘living zone’ and the ‘bedroom zone’, with temperature
regulation in each room according to different time schedules
programmed on two different chronostats. See the receiver’s
documentation for instruction how to associate outputs. In the
receiver, associated channels will receive from the chronostat the
time slot information and therefore the information of which setpoint
temperature, comfort or economy, to use for the regulation. Also the
off or antifreeze states are received by the associated thermostats.
If the chronostat is regulating a comfort temperature, the associated
thermostats will regulate according to their setpoint knob temperature,
instead if the chronostat is regulating an economy temperature,
the associated thermostats will regulate according to a reduction
temperature which can be adjusted in the receiver. Likewise if the
chronostat is off with 5°C antifreeze function, also the associated
thermostats will regulate a 5°C antifreeze temperature.
CLEANING PROGRAM
This program is particularly useful during cleaning when windows are
open and it is pointless either to heat or air condition rooms. In such
cases the output will remain Off for a two hours period. To activate
the program press the ‘ ‘ button: on the display the ‘ ‘ icon will light
up and in place of the clock, the time remaining until the resumption
of normal operation will be displayed.
The device will go back to the previous operating mode after two
hours or if you press the ‘ ‘ button again.
VACATION PROGRAM
If you intend to be away for a relatively long period it is advisable
to activate the Vacation Program, which will suspend the active
operating mode for the desired number of hours (from 1 to 95) or
days (from 1 to 99).
At the end of the set number of hours or days, the chronostat will
go back into the operating mode it was in prior to activation of the
Vacation Program. While it is off, the Antifreeze function will still be
active and the ‘ ‘ symbol will be shown on the display, along with
the countdown of the time remaining until the end of the program.
Note: Access to the vacation program will NOT be enabled while the
- ENGLISH 30
‘ cleaning program ‘ is on.
To activate the vacation program proceed as follows:
1. Press the ‘ ‘ button: the display will show the ‘ ‘ symbol and
the time ‘ h 00 ‘.
2. Press buttons ‘
’ and ‘
‘ to set the vacation time; every
change will be automatically memorized.
Up to 95 hours, the programming is indicated in hours and the
display will show ‘ h XX ‘.
Once that value is exceeded, the device will automatically switch
to the mode for programming the vacation time in days and display
will show ‘ d XX ‘. It will be possible to increase or decrease the
hour or day by one unit at a time, with values ranging from 0 .. 95
hours and 4 .. 99 days.
3. To activate the vacation program for the set time, press the ‘ OK ’
button again or else wait 10 seconds without pressing any button;
The display will show the flashing ‘ ’ icon and the time remaining
until the end of the vacation period.
4. To deactivate the vacation function and resume normal operation,
press the button ‘ ’ button or ‘ ‘.
SWITCHING OFF - ANTIFREEZE FUNCTION
To switch the chronostat On or Off press the ‘ ‘ button. When the
chronostat is Off the display will show the text “OFF” and the output
will be always Off.
In case the antifreeze function has been configured and the
chronostat is in heating mode, the display will show also the ‘ ’
symbol and the room temperature will be regulated according to the
antifreeze value set in the relevant parameter (see paragraph ‘USER
MENU SETTINGS‘).
HOW TO INSERT / REPLACE BATTERIES
The battery charge status is constantly displayed by means of the
‘
‘ symbol.
The battery charge is at a maximum if all three level indicators are
lit inside the symbol.
Instead the batteries are depleted and must be replaced when the
symbol appears completely empty ‘
‘.
The ‘
‘ symbol flashes in case the batteries are too depleted to
allow a radio transmission
To replace the batteries proceed as follows:
1. Open the flap of the battery compartment (Fig. 1).
2. Remove the batteries, prying them out with the aid of a tool if
necessary.
3. Insert the new batteries, which must be alkaline 1.5V type AA.
4. Only if the chronostat does not respond correctly carry out a reset
operation by inserting a pointed object through the hole provided
(N in Fig. 1); DO NOT USE NEEDLES OR TOOLS THAT COULD
IRREPARABLY DAMAGE THE CHRONOSTAT.
5. Check that the time is set correctly; adjust the setting if necessary.
AUTOMATIC OPERATION / 24h MANUAL / PERMANENT
MANUAL OVERRIDE FUNCTION
By pressing the ‘ ‘ button, you can override the program schedule
and the chronostat will control the room temperature according to the
temperature set with the ‘ ‘ knob.
- ENGLISH 31
By pressing the ‘ ‘, button repeatedly you can switch from Automatic
to 24 hour Manual, from 24 hour Manual to Permanent Manual and
from Permanent Manual back to Automatic.
The
two ‘Manual’ modes are shown on the display with the symbol
24h
‘ ‘ manual 24h and with the symbol ‘ ‘ permanent manual.
‘Manual 24h’ mode is a temporary state which lasts until midnight of
the current day afterwards the chronostat returns to the ‘Automatic
mode’ i.e. to follow the programmed time schedule. The ‘permanent
manual’ mode remains always active until it is modified again with
the button ’ ’.
BACKLIGHTING
The display backlight turns on whenever and button is pressed. It turns
off automatically 20 seconds after the last pressing of a button.
TIME / TEMPERATURE INDICATION
Pressing the ‘ ‘ button at any time, the user can choose whether
to display the current time or the room temperature measured.
If an external sensor has been connected to the chronostat and
the chronostat has been configured to show the external sensor’s
reading, pressing repeatedly the ‘
‘ button the display will cycle
the time, room temperature, floor temperature visualization. The floor
temperature is indicated with the the ‘ ’ symbol on the display.
SAMPLING RATE
In order to optimize the battery life, the chronostat reads the room
temperature and transmits the data to the receiver every 3 minutes.
Therefore it is normal that the displayed temperature is not updated
immediately and one need to wait up to 3 minutes to see the output
switching On or Off. Alternatively pressing ‘OK’ button when in the
main screen, the user can force an update.
For the same reason, at the expiry of the time schedule’s half hour,
there will not be an immediate switch of the output, it will be
necessary to wait up to 3 minutes in the worst case to see the new
output state updated.
CONNECTION TO A TELEPHONE INTERFACE
The chronostat offers the option of connecting a telephone interface with
continuous operation (latching relay) to terminals 8 and 9.
Use of a suitable telephone interface does not require any setting
to be made on the chronostat; for directions on using the telephone
interface see the instruction manual provided.
Via a telephone interface it is possible to turn the chronostat Off or
turn it On in the Permanent Manual mode.
Depending on the commands received from the telephone interface the
chronostat will act according to the following operating logic:
1. Telephone interface contact closed:
The chronostat will switch into the ‘Permanent Manual’ mode: the
‘ ‘ and ‘ ‘ symbols will be shown on the display.
2. Telephone interface contact open, after (and only after) a previous
closure, if no buttons have been pressed (Manual/Off):
The chronostat will be switched off and the word ‘OFF‘ will be
displayed along with the ‘ ‘ symbol. If the ‘Antifreeze’ function
is active the ‘ ‘ symbol will be displayed.
IMPORTANT: the commands input by pressing the control
- ENGLISH 32
buttons will always have priority over the commands received
from the telephone interface.
If you press the ‘ ’ or ‘ ’ button on the chronostat, the device
will change its status and the ‘
’ icon will flash to indicate that
the interface command has been overridden by a command input with
a control button.
The ‘ ’ icon will stop flashing if the telephone interface sends the
chronostat the same command as the one made with the button or
if the telephone interface is reset. In such a case the status set by
means of the control button will not be changed and the chronostat
will be ready to receive a new command.
IMPORTANT
If an Off command is sent to the chronostat via the telephone
interface (contact open), it is a good idea to check that the
command has been executed by the chronostat by carrying out
the following realignment procedure:
1. Using the functions of the telephone interface, check that the
contact is open, sending an Off command if necessary.
2. Send a command to the telephone interface to close the
contact (the chronostat will turn on).
3. Using the functions of the telephone interface, check that the
contact is closed.
4. Send a command to the telephone interface to open the
contact (the chronostat will turn off).
During this sequence no commands should be input with
the control buttons as they have priority over the interface
commands.
TECHNICAL CHARACTERISTICS
Power supply:
2 x 1.5V, alkaline batteries (Type AA)
Battery life:
> 2,5 years
Frequency:
868,150 MHz
Modulation:
GFSK
Effective radiated power (ERP): < 1 mW
Antenna type:
Internal
Max. receiver distance:
>300 m in free air
>50 m in buildings (depending on
the building and environment)
Room temperature
Regulation range:
comfort:
5,0 .. 35,0°C
economy:
5,0 .. 35,0°C
Hysteresis:
0,2°C adjustable 0,1 .. 5,0 °C
Sensor type:
NTC 4K7 ohm ±1% @ 25°C
Resolution:
0,1°C (T > 0,0°C)
0,2°C (T < 0,0°C)
Range:
-9,9°C .. +50,0°C
Precision:
±1,0°C
Floor temperature (external sensor)
Regulation range:
Lower limit: 10 .. 30°C
Upper limit: 35°C .. 50°C
Sensor type:
NTC 4K7 ohm ±1% @ 25°C
Resolution:
0,1°C (T > 0,0°C)
0,2°C (T < 0,0°C)
- ENGLISH 33
Range:
Precision:
Wires’ maximum length to
the remote sensor:
Antifreeze:
Offset:
Backlight turns off:
Protection rating:
Insulation class:
Number of manual cycles:
Operating temperature:
Storage temperature:
Humidity limits:
Enclosure: Material:
Colour: Cover:
Base:
Weight:
DIMENSIONS (in mm)
-9,9°C .. +60,0°C
±1,0°C
15 m
OFF/0.5°C .. 25.0°C (Default 3.0°C)
± 5.0°C. (Default 0.0°C)
20 sec. after the last pressing of a
button
IP 30
II ( )
1,000
0°C .. +40°C
-10°C .. +50°C
20% .. 80% RH non-condensing
ABS+PC V0 self-extinguishing
Signal white (RAL 9003)
Anthracite (RAL 7016)
~ 250 gr.
WARRANTY
In the view of a constant development of their products, the
manufacturer reserves the right for changing technical data and
features without prior notice. The consumer is guaranteed against any
lack of conformity according to the European Directive 1999/44/EC as
well as to the manufacturer’s document about the warranty policy. The
full text of warranty is available on request from the seller.
NORMATIVE REFERENCES
The product complies with the following standards (EMC 2004/108/EC
and LVD 2006/95/EC):
CEI-EN-60730-1 (2002)
CEI-EN-60730-2-7 (1998)
CEI-EN-60730-2-9 (1998)
ETSI EN 301 489-3 v1.4.1
ETSI EN 300 220-2 v2.1.1
34
- ENGLISH -
NOTES:
________________________________________
________________________________________
________________________________________
________________________________________
______________________________________________________________________________________________________________________________
_______________________________________________________________________________________________________________________________________________________________________
_________________________________________
_________________________________________
________________________________________
________________________________________
________________________________________
________________________________________
______________________________________________________________________________________________________________________________
______________________________________________________________________________________________________________________________
_________________________________________
_________________________________________
________________________________________
________________________________________
________________________________________
________________________________________
______________________________________________________________________________________________________________________________
______________________________________________________________________________________________________________________________
_________________________________________
_________________________________________
________________________________________
________________________________________
________________________________________
________________________________________
35
@IST01540AAN 019584A0 200711
Scarica