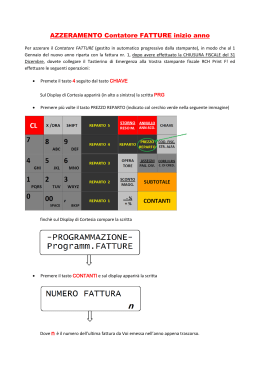
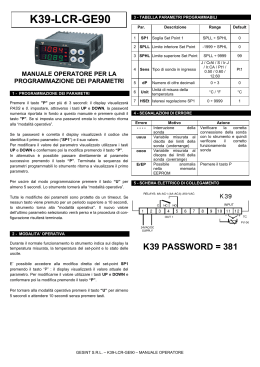
CRONOTERMOSTATO DIGITALE SETTIMANALE A BATTERIE
Impostazione Offset del sensore interno
‘ OFS1 ’
Impostazione Offset della sonda remota
‘ OFS2 ’
Impostazione Sonda di regolazione
‘ rEG ’
Impostazione programma Pulizie
‘ CLE ’
Impostazione programma Vacanze
‘ HOL ’
Impostazione funzione Riscaldamento/Raffrescamento ‘ H-C ’
Impostazione dati di Default
‘ dFLt ’
3.Premere il tasto ‘OK’ per entrare in modifica del parametro
selezionato; l’icona ‘ P ‘ lampeggia.
4.Configurare i dati relativi ad ogni singolo parametro, come illustrato
nel seguito.
5.Per uscire dalla programmazione dei parametri utente, premere il
tasto ‘ ’ oppure attendere 10 secondi senza premere alcun tasto.
Generalità
Questo dispositivo è un cronotermostato digitale a batterie
settimanale per il controllo della temperatura ambiente su tre livelli:
Comfort, Ridotto o Off/Antigelo. ll dispositivo può essere impiegato
sia in impianti di riscaldamento che raffrescamento.
Il cronotermostato è dotato di un ampio display retroilluminato per la
visualizzazione di tutte le indicazioni funzionali, il programma orario
impostato, la temperatura ambiente rilevata o, a scelta, dell’ora corrente.
Offre la possibilità di impostare fino a 7 programmi distinti, uno per
ogni giorno della settimana, con tempo di intervento minimo di 1/2 ora
nell’arco delle 24 ore.
Inoltre il dispositivo offre la possibilità di impostare il valore della
temperatura di Antigelo e la regolazione dell’Offset del sensore.
Messa in funzione
Alla prima messa in funzione:
- Inserire le pile rispettando le polarità indicate nell’apposito vano
(vedi paragrafo ‘INSERIMENTO/SOSTITUZIONE BATTERIE’).
-Regolare l’ora ed il giorno della settimana corrente.
-Impostare la modalità di funzionamento del cronotermostato
(parametro utente ‘H-C’): Riscaldamento (impostato in fabbrica) o
Raffrescamento.
Regolazione ora e giorno corrente
Per regolare l’orologio del cronotermostato eseguire le seguenti
operazioni:
1. Aprire lo sportellino che da’ accesso al vano pile.
2. Tenere premuto per almeno 2 secondi il pulsante ‘OK’, le cifre
dell’ora lampeggiano.
3. Regolare l’ora con i tasti ‘ ’ e ‘ ’.
4. Confermare con ‘OK’, le cifre dei minuti lampeggiano.
5. Regolare i minuti con i tasti ‘ ’ e ‘ ’.
6.Confermare con ‘OK’; il display visualizza la scritta ’dAY’ ed il
quadratino relativo al giorno della settimana corrente lampeggia.
7.Regolare il giorno della settimana corrente con i tasti ‘ ’ e ‘ ’
(il giorno corrente viene evidenziato con un quadratino attorno al
numero corrispondente al giorno della settimana, 1 Lunedi’ .. 7
Domenica )
8.Confermare con ‘OK’; l’uscita dalla regolazione dell’ora e del giorno
è automatico.
Regolazione temperatura di Comfort e Riduzione
Durante il normale funzionamento il display visualizza la temperatura
ambiente rilevata e l’icona relativa alla modalità di regolazione
corrente ‘
‘ oppure ‘ ‘.
Per visualizzare la relativa temperatura di setpoint impostata
premere una sola volta il tasto ‘
’o‘
’: il display visualizza la
temperatura di setpoint impostata, l’icona ‘SET °C‘ (a indicare che si
sta visualizzando la temperatura di setpoint) e l’icona ‘
‘ oppure
‘ ‘ a seconda se il termostato sta regolando in modalità di comfort
o riduzione.
Premendo i tasti ‘ ’ e ‘ ’ si modifica la temperatura di setpoint
visualizzata.
Premendo il tasto ‘
‘ mentre il display sta visualizzando la
temperatura di setpoint ‘Comfort’, il display passa a visualizzare
il setpoint ‘Riduzione’. Viceversa se il display stava visualizzando
il setpoint ‘Riduzione’, premendo il tasto ‘
‘ il display passa a
visualizzare il setpoint ‘Comfort’.
Premendo il tasto ‘
‘ oppure dopo alcuni secondi di inattività, il
display ritorna a visualizzare la temperatura ambiente.
Nota: Normalmente, per avere una riduzione notturna, la
temperatura di riduzione dovrà avere un valore inferiore a quella
di comfort.
Il cronotermostato effettuerà la regolazione della temperatura
ambiente in modalità di comfort o riduzione in accordo con il
programma orario impostato (vedere paragrafo ‘IMPOSTAZIONE
PARAMETRI UTENTE‘).
IMPOSTAZIONE PARAMETRI UTENTE
Per entrare nella regolazione dei parametri del cronotermostato,
procedere come segue:
1.Premere il tasto ‘ ‘; il display visualizzerà l’icona ‘ P ‘ (in basso
a destra) e la scritta ‘ PrOG ‘.
‘ per scorrere tra i parametri
2.Premere ripetutamente il tasto ‘
utente:
Impostazione Programma Orario
‘ PrOG ’
Impostazione Antigelo
‘ AFr ’
Impostazione Differenziale
‘ HYS ’
Impostazione Funzione di Ottimizzazione
‘ OPt ’
023712A6 TCW02B0001AN 180614
‘ PrOG ‘: IMPOSTAZIONE PROGRAMMA ORARIO
Normalmente la fascia circolare di trattini del display mostra la
modalità di funzionamento (Comfort, riduzione, Off/antigelo) del
cronotermostato, mentre la fascia verticale di sinistra mostra il giorno
della settimana corrente (1 Lunedì .. 7 Domenica) evidenziato con un
quadratino attorno al numero a cui si riferisce la programmazione.
Per facilitare l’operazione di programmazione è sufficiente ricordare
la seguente regola:
Modalità di riduzione:
un trattino acceso (interno).
Giorni della settimana:
1 Lunedì .. 7 Domenica.
Il quadratino indica il giorno
o il gruppo di giorni corrente.
Modalità spento / antigelo:
nessun trattino acceso.
Modalità di comfort:
due trattini accesi.
Per impostare il programma orario proseguire come descritto nel
seguito.
Nota:
Si uscirà dalla regolazione senza memorizzare il
programma impostato se per più di 10 secondi non si
preme alcun tasto, oppure confermando in sequenza le
impostazioni mediante il pulsante ‘OK’ senza effettuare
alcuna modifica.
1.Selezionare il parametro ‘PrOG’ e premere il tasto ‘OK’: il display
visualizza la scritta ‘dAy’, l’icona ‘ P ‘ ed i quadratini corrispondenti
al giorno o al gruppo di giorno lampeggianti.
2.Premere i tasti ‘ ’ e ‘ ’ per impostare la combinazione di giorni
da programmare.
Di seguito vengono elencate le quattro combinazioni disponibili:
(Lu) (Ma) (Me) (Gi)
(Ve) (Sa) (Do)
I° combinazione
di giorni
1
2
3
4
5
II° combinazione
di giorni
1
2
3
4
5
6
1
2
3
4
5
6
III° combinazione
di giorni
6
7
7
7
1
IV° combinazione
di giorni
2
3
4
(Programma
Giorno per Giorno)
5
6
7
Nota: Per ogni combinazione di giorni, il programma che si
imposterà sarà uguale per tutti i giorni di ogni singolo
gruppo.
3.Premere il tasto ‘ OK ‘ per confermare l’impostazione effettuata; il
display visualizza il programma orario precedentemente impostato per il
giorno o gruppo di giorni impostato e le ore 00.00 (cursore lampeggiante
sull’intervallo compreso tra le ore 00.00 e le ore 00.30).
4.Impostare la modalità di funzionamento.
Per agevolare l’operazione di programmazione, il cronotermostato
esce dalla fabbrica preimpostato con la seguente fascia oraria:
In alternativa, se la fascia oraria preimpostata non rappresenta
la programmazione desiderata è possibile variarla manualmente
procedendo come segue:
FASCIA ORARIA PREIMPOSTATA
Modalità comfort
Modalità riduzione
6.00 .. 8.00
8.00 .. 11.00
11.00 .. 13.00
13.00 .. 17.00
17.00 .. 23.00
23.00 .. 6.00
5.Ad ogni intervallo orario (ogni trattino corrisponde a mezz’ora)
impostare la modalità di regolazione premendo uno dei seguenti
tasti:
Modalità di Comfort:
Premere il tasto ‘
‘.
Spento / antigelo:
Premere il tasto ‘ ‘.
Modalità di Riduzione:
Premere il tasto ‘ ‘.
Spostamento cursore orario: Premere il tasto ‘ ’ o ‘ ‘.
Ad ogni pressione del tasto che imposta la modalità di regolazione,
il cursore orario si sposta automaticamente sulla mezz’ora
successiva.
1
Comfort
Spento
Riduzione
Conferma
6.Impostato il programma orario per il giorno o per il gruppo di giorni
selezionato, premere il tasto ‘ OK ’.
Il display visualizzerà il programma orario del giorno o dei gruppi di
giorni successivi fino a coprire l’intera settimana.
7.Impostato il programma per l’intera settimana, premere il tasto ‘OK’.
Il cronotermostato memorizza il programma impostato e sul display
viene visualizzata la scritta ‘MEMO’ e si uscirà automaticamente
dalla regolazione del programma orario.
ATTENZIONE
-Se si desidera riportare la programmazione oraria
all’impostazione di fabbrica, è necessario accedere al
parametro utente ‘dFLt’ (impostazione dati di default); in
questo caso tutti i parametri utente saranno resettati ai
valori impostati in fabbrica.
- Se si esce dalla programmazione oraria senza aver premuto
il tasto ‘OK’, ovvero non si abilita la fase di memorizzazione,
NON verrà effettuata la memorizzazione del programma
orario e verrà reimpostato il programma precedente.
La memorizzazione avviene solo se viene abilitata la fase di
memorizzazione contraddistinta dalla scritta ‘MEMO’.
‘AFr’ IMPOSTAZIONE ANTIGELO
La funzione di Antigelo consente di selezionare una temperatura
minima che viene mantenuta quando il cronotermostato è spento, in
modo tale da preservare l’ambiente e l’impianto qualora la temperatura
ambiente scende al di sotto del valore impostato.
Il dispositivo esce dalla fabbrica con l’antigelo impostato a +3°C.
ATTENZIONE: La funzione è attiva solo se il dispositivo è stato
impostato in modalità Riscaldamento.
Per regolare la temperatura di Antigelo eseguire le seguenti operazioni:
1.Selezionare il parametro ‘AFr’ e premere il tasto ‘OK’.
2.Il display visualizza la temperatura di Antigelo precedentemente
impostata e l’icona ‘ P ‘ lampeggiante.
3.Premere i tasti ‘
‘e‘
‘ per modificare il valore (compreso
tra OFF, 0,5°C..25°C); ogni modifica viene memorizzata
automaticamente.
4.Per ritornare alla lista dei parametri utente, premere il tasto ‘ OK ’.
5.Per uscire dall’impostazione dei parametri utente e ripristinare il
normale funzionamento, premere il tasto ‘ ‘ oppure attendere 10
secondi senza premere alcun tasto.
‘HYS’ IMPOSTAZIONE DIFFERENZIALE
L’impostazione di questo parametro consente di definire l’isteresi, in
°C, che viene applicata al cronotermostato.
Per regolare il differenziale eseguire le seguenti operazioni:
1.Selezionare il parametro ‘ HYS ’ e premere il tasto ‘ OK ’.
2.Il display visualizza la temperatura precedentemente impostata e
l’icona ‘ P ‘ lampeggiante.
3.Premere i tasti ‘
‘e‘
‘ per modificare il valore (compreso
tra 0.1°C .. 5.0°C); ogni modifica viene memorizzata
automaticamente.
4.Per ritornare alla lista dei parametri utente, premere il tasto ‘ OK ’.
5.Per uscire dall’impostazione dei parametri utente e ripristinare il
normale funzionamento, premere il tasto ‘ ‘ oppure attendere 10
secondi senza premere alcun tasto.
‘OPt’ IMPOSTAZIONE FUNZIONE DI OTTIMIZZAZIONE
La funzione di ottimizzazione consiste nella possibilità di attivare
il riscaldamento o raffrescamento in anticipo rispetto all’orario
programmato, in modo da ottenere all’orario programmato la
temperatura impostata.
In sostanza il cronotermostato calcola il tempo necessario all’ambiente
per raggiungere la temperatura desiderata e, di conseguenza, anticipa
l’accensione programmata del tempo necessario per raggiungere lo scopo.
L’anticipo viene calcolato in base al gradiente medio delle ultime
24 ore con un massimo di 60 minuti di anticipo.
Per regolare la funzione di ottimizzazione eseguire le seguenti operazioni:
1.Selezionare il parametro ‘OPt’ e premere il tasto ‘OK’.
2.Il display visualizza ‘ on ‘ oppure ‘ Off ‘e l’icona ‘ P ‘ lampeggiante.
3.Premere i tasti ‘ ‘ per attivare (on) o ‘ ‘ per disattivare (Off) la
funzione; ogni modifica viene memorizzata automaticamente.
4.Per ritornare alla lista dei parametri utente, premere il tasto ‘ OK ’.
5.Per uscire dall’impostazione dei parametri utente e ripristinare il
normale funzionamento, premere il tasto ‘ ‘ oppure attendere 10
secondi senza premere alcun tasto.
‘OFS1’ IMPOSTAZIONE OFFSET DEL SENSORE INTERNO
Tramite questo parametro è possibile correggere la temperatura
rilevata dal sensore interno, di ±5°C, in modo da correggere eventuali
errori sistematici di lettura dovuti ad un eventuale posizionamento
del cronotermostato in zone inadatte a rilevare la temperatura
dell’ambiente. Il dispositivo esce dalla fabbrica con l’Offset impostato
a 0.0°C.
Per regolare la temperatura di Offset del sensore interno eseguire le
seguenti operazioni:
1.Selezionare il parametro ‘ OFS1 ’ e premere il tasto ‘ OK ’.
2.Il display visualizza la temperatura di Offset precedentemente
impostata e l’icona ‘ P ‘ lampeggiante.
3.Premere i tasti ‘
‘e‘
‘ per modificare il valore (compreso
tra -5.0°C .. +5.0°C); ogni modifica viene memorizzata
automaticamente.
4.Per ritornare alla lista dei parametri utente, premere il tasto ‘ OK ’.
- ITALIANO -
5.Per uscire dall’impostazione dei parametri utente e ripristinare il
normale funzionamento, premere il tasto ‘ ‘ oppure attendere 10
secondi senza premere alcun tasto.
‘OFS2’ IMPOSTAZIONE OFFSET DELLA SONDA REMOTA
Tramite questo parametro è possibile correggere la temperatura
rilevata dalla sonda remota, di ±5°C, in modo da correggere eventuali
errori sistematici di lettura dovuti ad un eventuale posizionamento della
sonda remota in zone inadatte a rilevare la temperatura dell’ambiente.
Il dispositivo esce dalla fabbrica con l’Offset impostato a 0.0°C.
Per regolare la temperatura di Offset della sonda remota eseguire le
seguenti operazioni:
1.Selezionare il parametro ‘ OFS2 ’ e premere il tasto ‘ OK ’.
2.Il display visualizza la temperatura di Offset precedentemente
impostata e l’icona ‘ P ‘ lampeggiante.
3.Premere i tasti ‘
‘e‘
‘ per modificare il valore (compreso
tra -5.0°C .. +5.0°C); ogni modifica viene memorizzata
automaticamente.
4.Per ritornare alla lista dei parametri utente, premere il tasto ‘ OK ’.
5.Per uscire dall’impostazione dei parametri utente e ripristinare il
normale funzionamento, premere il tasto ‘ ‘ oppure attendere 10
secondi senza premere alcun tasto.
‘rEG’ IMPOSTAZIONE SONDA DI REGOLAZIONE
Con questo parametro si definisce se la sonda da usare per la regolazione
della temperatura ambiente è quella interna al cronotermostato oppure
quella remota collegata al connettore ‘ B ‘ di Fig. 6.
Per impostare questo parametro eseguire le seguenti operazioni:
1.Selezionare il parametro ‘ rEG ’ e premere il tasto ‘ OK ’.
2.Il display visualizza ‘ In ‘ oppure ‘ Out ‘ e l’icona ‘ P ‘ lampeggiante.
‘e‘
‘ per modificare il valore (In: sensore
3.Premere i tasti ‘
interno - Out: sonda remota); ogni modifica viene memorizzata
automaticamente.
4.Per ritornare alla lista dei parametri utente, premere il tasto ‘ OK ’.
5.Per uscire dall’impostazione dei parametri utente e ripristinare il
normale funzionamento, premere il tasto ‘ ‘ oppure attendere 10
secondi senza premere alcun tasto.
ATTENZIONE: Se la sonda di regolazione è impostata sulla
sonda esterna ‘ Out ‘, in caso di guasto o assenza della sonda, la
regolazione della temperatura verrà automaticamente spostata
sulla sonda interna, pur rimanendo il parametro impostato su
‘ Out ‘.
‘CLE’ IMPOSTAZIONE PROGRAMMA PULIZIE
Questo programma è particolarmente utile quando vengono fatte le
pulizie e si aprono le finestre rendendo inutile sia il riscaldamento che
il raffreddamento dei locali. In queste condizioni il relè viene bloccato
in Off per un periodo pari a due ore.
Nota: L’accesso al programma pulizie, NON è consentito quando è
attivo il ‘ programma vacanze ‘.
Per attivare il programma pulizie selezionare il parametro ‘ CLE ’ e
premere il tasto ‘ OK ’: sul display compare l’icona ‘ ‘ lampeggiante
e, al posto dell’orologio, viene visualizzato il tempo mancante al
ripristino del normale funzionamento.
Si ritorna alla precedente modalità di funzionamento dopo due ore
oppure effettuando una nuova pressione del tasto ‘ ’.
‘HOL’ IMPOSTAZIONE PROGRAMMA VACANZE
Nel caso in cui si desideri assentarsi per un periodo relativamente
lungo è consigliabile attivare il Programma Vacanze che permette di
sospendere il modo attivo di funzionamento per il numero di ore (da 1
a 95) oppure di giorni (da 4 a 99) desiderato.
Al termine del conteggio, ore oppure giorni, il cronotermostato si
riporterà nel modo di funzionamento precedente l’attivazione del
Programma Vacanze. Durante lo spegnimento, se il dispositivo è stato
impostato in modalità Riscaldamento, sarà comunque sempre attiva
la funzione antigelo e sul display verrà visualizzato il simbolo ‘ ‘ e
il conto alla rovescia del tempo rimanente al termine del programma.
Nota: L’accesso al programma vacanze, NON è consentito quando è
attivo il ‘ programma pulizia ‘.
Per attivare il programma vacanze procedere come segue:
1.Selezionare il parametro ‘ HOL ’ e premere il tasto ‘ OK ’; il display
visualizza il simbolo ‘
‘, l’indicazione ‘ h 00 ‘ e l’icona ‘ P ‘
lampeggiante.
2.Premere i tasti ‘ ’ e ‘ ’ per regolare il tempo di vacanza; ogni
modifica viene memorizzata automaticamente.
Fino a 95 ore la programmazione è indicata in ore e il display mostrerà
‘ h XX ‘. Superando tale valore si passerà automaticamente alla
programmazione del tempo di vacanze in giorni e il display mostrerà
‘ d XX ‘. Sarà possibile incrementare o decrementare l’ora o il giorno
di una unità alla volta, con valori compresi tra 1 .. 95 ore e 4 .. 99
giorni.
3.Per attivare il programma vacanze per il tempo impostato, premere
nuovamente il pulsante ‘ OK ’ oppure attendere 10 secondi senza
premere alcun tasto; il display visualizza l’icona ‘ ’ lampeggiante
e il tempo residuo allo scadere del periodo di vacanza.
Se non è stato impostato il tempo di durata delle vacanze (h:00),
si uscirà dalla regolazione e si tornerà al normale funzionamento
premendo il tasto ‘ OK ’ oppure ‘ ‘ oppure attendendo 10 secondi
senza premere alcun tasto.
4.
Per uscire dalla funzione vacanza e ripristinare il normale
funzionamento, premere il tasto ‘ ‘.
‘H-C’ IMPOSTAZIONE RISCALDAMENTO/RAFFRESCAMENTO
Questa impostazione consente di invertire la logica di funzionamento
del relè a seconda che si stia pilotando un dispositivo di riscaldamento
o di raffrescamento.
ATTENZIONE:Il cronotermostato esce dalla fabbrica impostato
in modalità di riscaldamento.
Per modificare la logica di funzionamento deve essere seguita la
seguente procedura:
023712A6 TCW02B0001AN 180614
1.Selezionare il parametro ‘ H-C ’ e premere il tasto ‘ OK ’; il display
visualizza la modalità di regolazione corrente e l’icona ‘ P ‘
lampeggiante.
2.Premere i tasti ‘ ’ e ‘ ’ per selezionare la modalità di regolazione
desiderata; ogni modifica viene memorizzata automaticamente.
3.Per ritornare alla lista dei parametri utente, premere il tasto ‘ OK ’.
4.Per uscire dall’impostazione dei parametri utente e ripristinare il
normale funzionamento, premere il tasto ‘ ‘ oppure attendere 10
secondi senza premere alcun tasto.
Durante il normale funzionamento, l’attivazione della modalità di
riscaldamento viene segnalata dall’icona ‘
‘ accesa mentre, al
contrario l’attivazione della modalità raffrescamento viene segnalata
dall’icona ‘ ‘ sempre accesa.
‘dFLt’ IMPOSTAZIONE DATI DI DEFAULT
Tramite questo parametro è possibile effettuare il reset dei parametri
utente in modo da portare tutti i parametri ai valori di default impostati
in fabbrica.
Procedere come segue:
1.Selezionare il parametro ‘ dFLt ’ e premere il tasto ‘ OK ’; il
dispositivo imposta automaticamente i dati di default ed il display
visualizza la scritta ‘ -dF- ‘ e l’icona ‘ P ‘ lampeggiante.
2.Per ritornare alla lista dei parametri utente, premere il tasto ‘ OK ’.
3.Per uscire dall’impostazione dei parametri utente e ripristinare il
normale funzionamento, premere il tasto ‘ ‘ oppure attendere 10
secondi senza premere alcun tasto.
ATTENZIONE!
L’impostazione dei Dati di Default azzererà tutte le impostazioni
fatte dall’Utente, quali ad esempio Programma Orario, Estate/
Inverno, Set-Point e tutti gli altri dati programmabili.
Spegnimento - Funzione antigelo
Per disattivare il cronotermostato premere il tasto ‘ ‘.
Il display mostrera’ la scritta ‘ OFF ’.
Se il cronotermostato e’ stato impostato in modalità di riscaldamento
sara’ attiva la funzione antigelo e sul display comparirà il simbolo
‘
‘; in tal caso la temperatura ambiente sarà regolata secondo
il valore impostato per la temperatura di antigelo (vedi paragrafo
‘IMPOSTAZIONE PARAMETRI UTENTE‘).
FUNZIONAMENTO AUTOMATICO / MANUALE 24h /
MANUALE permanente
Con il tasto ‘ ‘, il cronotermostato può essere forzato a regolare
la temperatura ambiente indipendentemente dalla programmazione
oraria effettuata, secondo la temperatura di comfort impostata.
Premendo ripetutamente il tasto ‘ ‘, si passa in modo alternato
da Automatico a Manuale 24 ore, da Manuale 24 ore a Manuale
Permanente, e da Manuale Permanente si ritorna in Automatico.
Durante il funzionamento in manuale il display non visualizza il
programma orario, ma soltanto la temperatura ambiente, lo stato
24h
del relè (eventuale accensione simboli ‘ ‘ o ‘
‘), il simbolo ‘ ‘
(manuale 24h) oppure ‘ ‘ (manuale permanente) ed il simbolo ‘
‘.
Premendo una prima volta il tasto ‘ ‘ si attiva la modalità Manuale
24 ore ed il cronotermostato resta in manuale fino alle ore 23:59,
dopodichè ritorna nel modo Automatico.
Nota: Se è attivo lo stato di Manuale 24h e viene attivato il programma
Vacanze, allo scadere della funzione Vacanze, se sono state superate le
ore 23.59, il cronotermostato ritornerà al funzionamento Automatico
seguendo il programma orario impostato.
Premendo ancora una volta il tasto ‘ ‘ si forza il funzionamento
in modalità Manuale Permanente il cronotermostato resta in manuale
fintanto che non si preme nuovamente il tasto ‘ ‘.
VISUALIZZAZIONE Ora / Temperatura
Premendo ciclicamente il pulsante ‘
‘ si possono visualizzare
sul display alternativamente l’ora corrente, la temperatura ambiente
rilevata dal sensore interno, contradistinta dall’icona ‘
‘, e la
temperatura ambiente rilevata dalla sonda remota (se collegata)
contradistinta dall’icona ‘
‘. Le temperature rilevate vengono
viusualizzate corrette dal valore di Offset impostato.
Nel caso in cui il parametro ‘ rEG ‘ sia stato impostato su ‘ Out ‘
ma la sonda remota non è stata collegata o è danneggiata il display
visualizzarà rispettivamente la scritta ‘ SEnS OPEN ‘ oppure
‘
SEnS SHrt ‘ con l’icona ‘
‘ accesa.
ATTENZIONE: Il cronotermostato, al fine di ottimizzare la durata
delle batterie, rileva la temperatura ambiente ogni 3 minuti e, di
conseguenza, decide l’attivazione o disattivazione del relè.
COLLEGAMENTO AD INTERFACCIA TELEFONICA
Il cronotermostato offre la possibilità di poter collegare al connettore
‘ B ‘ di Fig. 6 un’interfaccia telefonica con funzionamento continuo
(relè a tenuta).
L’utilizzo di una idonea interfaccia telefonica non necessita di alcuna
impostazione sul cronotermostato; per l’utilizzo dell’interfaccia
telefonica si rimanda al relativo manuale istruzioni.
Tramite l’interfaccia telefonica è possibile Spegnere il cronotermostato
oppure Attivarlo in modalità Manuale Permanente.
A seconda dei comandi ricevuti dall’interfaccia telefonica il
cronotermostato agirà in base alla seguente logica di funzionamento:
1.Contatto chiuso dell’interfaccia telefonica:
Il cronotermostato forza il funzionamento in modalità ‘Manuale
Permanente’: sul display vengono visualizzati i simboli ‘ ‘ e ‘ ‘.
2.Contatto aperto dell’interfaccia telefonica, dopo (e solo dopo)
una precedente chiusura, se non sono intervenuti comandi da
tastiera (Manuale/Off):
Il cronotermostato viene spento e sul display compare la scritta
‘OFF‘ e viene visualizzato il simbolo ‘
‘. Qualora fosse attiva la
funzione di ‘Antigelo’ sul display viene visualizzato il simbolo ‘ ‘.
ATTENZIONE: I comandi da tastiera sono sempre prioritari
rispetto ai comandi ricevuti dall’interfaccia telefonica.
‘, il
Se sul cronotermostato viene premuto il pulsante ‘ ‘ o ‘
dispositivo modificherà il proprio stato e l’icona ‘
‘ lampeggerà
ad indicare che il comando da interfaccia è stato forzato da un
2
comando da tastiera. L’icona ‘
‘ smetterà di lampeggiare se
l’interfaccia telefonica invierà al cronotermostato il medesimo comando
effettuato da tastiera oppure se l’interfaccia telefonica verrà resettata.
In tale condizione lo stato imposto da tastiera non verrà variato, e il
cronotermostato si predisporrà a ricevere un eventuale nuovo comando.
ATTENZIONE
Se si invia da interfaccia telefonica un comando di spegnimento
al cronotermostato (contatto aperto dell’interfaccia telefonica),
è opportuno verificare che tale comando sia stato eseguito
dal cronotermostato, eseguendo la seguente procedura di
riallineamento:
1.Verificare tramite le funzioni dell’interfaccia telefonica che
il contatto sia aperto eventualmente inviando un comando di
spegnimento.
2.Inviare all’interfaccia telefonica un comando di chiusura del
contatto (il cronotermostato si accende).
3.Verificare tramite le funzioni dell’interfaccia telefonica che il
contatto sia chiuso.
4.Inviare all’interfaccia telefonica un comando di apertura del
contatto (il cronotermostato si spegne).
Durante tale sequenza non dovranno intervenire comandi da
tastiera in quanto sono prioritari rispetto ai comandi da interfaccia.
Retroilluminazione
L’accensione della retroilluminazione del display si verifica in seguito
alla pressione di un qualsiasi tasto. Lo spegnimento è automatico dopo
20 secondi dall’ultima pressione del tasto.
INSERIMENTO / Sostituzione batterie
Il display mostra costantemente lo stato di carica delle batterie
‘.
tramite il simbolo ‘
La carica delle batterie è massima se all’interno del simbolo tutti e tre
gli indicatori di livello sono accesi.
Al contrario le batterie sono scariche e devono essere sostituite se
‘ (completamente vuoto). In questo caso
lampeggia il simbolo ‘
il relè viene posto in posizione di sicurezza (N.C.) ed il display visualizza
alternativamente l’ora (o la temperatura) e la scritta ‘BATT’. Se le
batterie non vengono sostituite a breve, anche i simboli ‘ ‘ o ‘ ‘
lampeggieranno ad indicare che il dispositivo è bloccato.
Per la sostituzione procedere come segue:
1. Aprire lo sportellino che da’ accesso al vano pile (Fig. 9).
2. Estrarre le pile eventualmente facendo leva con un utensile.
3. Inserire le nuove pile che devono essere alcaline da 1.5V tipo AA.
4.Controllare l’esattezza dell’orario ed eventualmente reimpostarlo.
Caratteristiche tecniche
Alimentazione:
2 x 1,5V, pile alcaline (Tipo AA)
Durata Batterie:
>1 anno
Spegnimento retroilluminazione:20 secondi da ultima pressione
Campo di regolazione:
comfort: 5°C .. 40°C
ridotta: 5°C .. 40°C
Differenziale asimmetrico:
0,1°C .. 5°C (Default 0,2°C)
Antigelo:
OFF / 0.5°C .. 25.0°C (Default 3.0°C)
Offset sensore interno:
± 5.0°C. (Default 0.0°C)
Offset sonda remota:
± 5.0°C. (Default 0.0°C)
Tipo di sensore interno:
NTC 10K Ohm ±1% @ 25°C
Tipo di sonda remota (opzionale):NTC 10K Ohm ±1% @ 25°C
Precisione:
±1.0°C
Risoluzione:
0.1°C. ( 0.0°C .. 50.0°C)
0.2°C. (-9.9°C .. -0.1°C)
Portata contatti:
5(1)A @ 250V~ SPDT
Ingresso Interfaccia Ext:
Segnale continuo di tipo On/Off.
Grado di protezione:
IP 30
Classe di isolamento:
II (
)
Numero di cicli manuali:
1.000
Numero di cicli automatici: 100.000
Tipo di azione:
1CU
Indice di tracking:
PTI 175
Situazione di polluzione:
2 (normale)
Categoria di sovratensione: II
Temperatura di funzionamento:0°C .. +40°C
Temperatura di stoccaggio: -10°C .. +50°C
Limiti di umidità:
20% .. 80% RH non condensante
Contenitore:Materiale: ABS+PC V0 autoestinguente
Colore:
Bianco segnale (RAL 9003)
Grigio chiaro (RAL 7035)
Peso:
~ 300 gr.
riferimenti normativi
Il prodotto è conforme alle seguenti norme (EMC 2004/108/
LVD 2006/95/ ):
EN-60730-1 (2011)
EN-60730-2-7 (1991)
EN-60730-2-9 (1995)
e
DIMENSIONI
GARANZIA
Nell’ottica di un continuo sviluppo dei propri prodotti, il costruttore si
riserva il diritto di apportare modifiche a dati tecnici e prestazioni senza
preavviso. Il consumatore è garantito contro i difetti di conformità
del prodotto secondo la Direttiva Europea 1999/44/ nonché il
documento sulla politica di garanzia del costruttore. Su richiesta è
disponibile presso il venditore il testo completo della garanzia.
- ITALIANO -
INSTALLAZIONE
4
ATTENZIONE
-Per una corretta regolazione della temperatura ambiente si
consiglia di installare il cronotermostato a circa 1,5 m dal
pavimento e lontano da fonti di calore, correnti d’aria o da
pareti particolarmente fredde (ponti termici).
-E’ obbligatorio, al fine di garantire la sicurezza elettrica,
fissare il corpo del cronotermostato alla piastra a muro
tramite le due viti (in dotazione) che trovano sede all’interno
del vano portapile.
-Qualora il carico pilotato dal relè del cronotermostato
funzioni a tensione di rete, è necessario che il collegamento
avvenga tramite un interruttore onnipolare conforme alle
norme vigenti e con distanza di apertura dei contatti di
almeno 3 mm in ciascun polo.
-L’installazione ed il collegamento elettrico del termostato
devono essere eseguiti da personale qualificato ed in
conformità alle leggi vigenti.
-Prima di effettuare qualsiasi collegamento accertarsi che la
rete elettrica sia scollegata.
L’installazione del dispositivo è prevista per il montaggio in scatole
di derivazione da incasso (o da parete) standard da due o tre moduli
oppure direttamente sulla parete utilizzando i tasselli in dotazione.
Avvicinare il cronotermostato alla piastra a muro facendo
dapprima coincidere i dentini della base con gli appositi fori
della piastra e successivamente esercitare sul dispositivo
una pressione verso il lato sinistro fino a far scattare i dentini
plastici della piastra.
Indicazioni display
Di seguito viene indicato il significato dei simboli che possono apparire
a display:
Indicazione dello stato di carica delle batterie.
2
Lampeggiante:
Batterie scariche; sostituire le batterie.
1
Regolazione della temperatura in modalità di Comfort.
Regolazione della temperatura in modalità di Riduzione.
Regolazione della temperatura in modalità Spento/Antigelo.
Cronotermostato spento: funzione antigelo inserita, il display
visualizza la scritta OFF.
Fig. 5
5
Attivazione in modalità riscaldamento.
Fissare il corpo del cronotermostato alla piastra a muro tramite
la vite in dotazione che trova sede all’interno del vano portapile
(Fig. 6).
Attivazione in modalità raffrescamento.
24h
Regolazione della temperatura in modalità di Comfort per
24 ore
24h
Regolazione della temperatura in modalità di Comfort
permanente
Per installare il dispositivo eseguire le seguenti operazioni:
1
P
Sganciare la piastra a muro innestata sotto la base del
cronotermostato come indicato in Fig. 1.
2
Fig. 1
Fissa:
Indica un’azione da parte dell’interfaccia telefonica.
Lampeggiante:
Indica che il comando da interfaccia telefonica è stato forzato
da un comando da tastiera sul cronotermostato.
1
Fig. 6
2
Fissare la piastra direttamente sulla parete o su scatole di
derivazione da 2 o 3 moduli tramite le due sedi per viti con
interasse 60 mm oppure 85mm facendo attenzione a fare
passare i cavi nella feritoia come indicato in Fig. 2.
6
Inserire le batterie nel vano batterie (I di Fig. 7); vedi paragrafo
‘INSERIMENTO/SOSTITUZIONE BATTERIE’.
DESCRIZIONE DEI COMANDI
I
A
B
C
D
E
Fig. 2
3
Eseguire i collegamenti elettrici facendo passare i fili tramite
l’apertura rettangolare della piastra a muro (Fig. 2), seguendo lo
schema di collegamento di Fig. 3.
H
F
G
SONDA
REMOTA
ROSSO
BIANCO
NERO
INTERFACCIA
TELEFONICA
Fig. 3
Collegare l’eventuale sonda remota o interfaccia telefonica
al connettore ‘B’ indicato in Fig. 4. Il carico va collegato alla
morsettiera ‘A’ indicata in Fig. 4.
A
B
Fig. 4
023712A6 TCW02B0001AN 180614
Fissa:
La temperatura visualizzata è quella rilevata dal sensore interno, ma
la regolazione della temperatura avviene mediante la sonda remota.
Lampeggiante:
La visualizzazione e la regolazione della temperatura ambiente
avviene mediante l’utilizzo del sensore interno.
Fissa:
La temperatura visualizzata è quella rilevata dalla sonda remota, ma
la regolazione della temperatura avviene mediante il sensore interno.
Lampeggiante:
La visualizzazione e la regolazione della temperatura ambiente
avviene mediante l’utilizzo della sonda remota.
Fig. 7
ISTRUZIONI RAPIDE PER L’IMPOSTAZIONE DEL
PROGRAMMA ORARIO
LEGENDA
A Tasto dalla doppia funzione:
CARICO
Fissa: Indica l’accesso ai parametri utente
Lampeggiante: Indica la possibilità di modificare il parametro
utente selezionato
Lampeggiante:
Programma pulizie attivato (il display visualizza il tempo rimanente)
Lampeggiante:
Programma vacanze attivato (il display visualizza il tempo
rimanente)
-
Nel normale funzionamento attiva la funzione Manuale 24 ore /
Manuale Permanente / Automatico.
-
In ‘Impostazione Programma orario‘, imposta la regolazione della
temperatura in modalità di Riduzione.
B Tasto dalla doppia funzione:
-
Nel normale funzionamento accende o spegne il cronotermostato.
-
In ‘Impostazione Programma orario‘, imposta la regolazione della
temperatura in modalità Spento/Antigelo.
C Tasto dalla tripla funzione:
-
Nel normale funzionamento visualizza l’ora oppure la temperatura.
-
In ‘Impostazione Programma orario‘, imposta la regolazione della
temperatura in modalità Comfort.
-
In ‘Impostazione temperature di Set-Point’, visualizza la temperatura
di Comfort oppure di Riduzione
D Modifica le temperature di setpoint e i parametri di configurazione
(incrementando il valore).
E Modifica le temperature di setpoint e i parametri di configurazione
(decrementando il valore).
F Accede alla lista dei parametri utente.
G Tasto dalla doppia funzione:
-Nel normale funzionamento aggiorna i dati rilevati dal
cronotermostato
-In ‘Impostazione parametri utente‘, accede alla modifica del
parametro selezionato e successivamente conferma il valore
modificato
H Vano Portabatterie
I Sede viti per il fissaggio del corpo del cronotermostato alla piastra a
muro
3
•Premere il tasto ‘ P ’.
•Il dispaly visualizza ‘ PrOG ’ con l’icona ‘ P ‘ accesa.
•Premere il tasto ‘ OK ’; il display visualizza la scritta ‘ dAY ‘, l’icona
‘ P ‘ ed i quadratini corrispondenti ai giorni lampeggianti.
‘e‘
‘ per scegliere una delle quattro
•Premere i tasti ‘
combinazioni di giorni preimpostate.
•Premere il tasto ‘ OK ’ per confermare la scelta effettuata.
•Il display visualizza le ore 00:00 con il relativo trattino, in alto a
sinistra, lampeggiante.
•Premere uno dei seguenti tasti a seconda della modalità di
regolazione della temperatura che si vuole impostare:
‘.
Modalità di Comfort:
Premere il tasto ‘
Spento / antigelo:
Premere il tasto ‘ ‘.
Modalità di Riduzione:
Premere il tasto ‘ ‘.
Spostamento cursore orario: Premere il tasto ‘ ‘ e ‘ ‘.
Ad ogni pressione del tasto che imposta la modalità di regolazione,
il cursore orario si sposta automaticamente sulla mezz’ora
successiva.
•Impostato il programma orario per il giorno o per il gruppo di giorni
selezionato, premere il tasto ‘ OK ’.
Il display visualizzerà il programma orario del giorno o dei gruppi di
giorni successivi fino a coprire l’intera settimana.
•Impostato il programma per l’intera settimana, premere il tasto
‘OK’. Il cronotermostato memorizza il programma impostato
e sul display viene visualizzata la scritta ‘MEMO’ e si uscirà
automaticamente dalla regolazione del programma orario.
- ITALIANO -
INSTALLATION
4
WARNING
-To adjust properly room temperature, install the thermostat
far from heat sources, airstreams or particularly cold walls
(thermal bridges).
-In order to grant the electrical safety, it is mandatory to
screw the chronostat body to the wall mount plate through
the two screws supplied which must be mounted in the
battery holder.
-If the load controlled by the relay of the chronostat operates
with mains voltage, the connection must be made via an
omnipolar switch complying with current standards and with
a contact opening of at least 3 mm in each pole.
-Installation and electrical wirings of this appliance must be
made by qualified technicians and in compliance with the
current standards.
- Before wiring the appliance be sure to turn the mains power
off.
Move the thermostat to the wall plate by fitting first the teeth
of the base with the relevant holes of the plate and then exert
a pressure on the device to the left side until the plastic teeth
of the plate snap.
DISPLAY SYMBOLS
In the following is explained the meaning of some symbols which may
appear on the display:
Battery status indication.
2
Flashing:
Batteries discharged; replace batteries.
1
Temperature regulation in Comfort mode.
Temperature regulation in Economy mode.
Temperature regulation in Off / Antifreeze mode.
Chronostat off: antifreeze function active, the display shows
‘OFF’.
Fig. 5
Heating mode enabled.
5
The device is designed to be installed in a standard recess (or wall)
mounted junction box with two or three modules or else directly on
the wall using the screw anchors provided.
Secure the bodyof the programmable thermostat to the wall
plate using the supplied screw that is located inside the battery
compartment (Fig.6).
Cooling mode enabled.
24h
24h
To install the device carry out the following steps:
1
P
Release the wall mount plate fitted under the base of the
chronostat as shown in Fig. 1.
2
Fig. 1
2
1
Fix the plate directly on the wall or onto 2 or 3 module junction
boxes by means of the two holes for screws (distance between
centres: 60 mm or 85mm), taking care to pass the wires
through the opening as shown in Fig. 2.
Fig. 6
6
Insert the batteries in the battery compartment (I in Fig. 7);
see paragraph ‘ HOW TO INSERT/REPLACE THE BATTERIES ’.
DESCRIPTION OF CONTROLS
I
A
B
C
D
E
Fig. 2
3
Make electrical wirings by passing the wires through the
rectangular opening in the wall plate (Fig. 2), and according to
thediagram in Fig. 3.
H
LOAD
REMOTE
SENSOR
RED
WHITE
BLACK
TELEPHONE
INTERFACE
Connect the remote sensor (if present) or the phone interface
to connector ‘B’ shown in Fig. 4. The load must be wired to
terminal block ‘A’ shown in Fig. 4.
A
B
023712A6 TCW02B0001AN 180614
G
Permanent temperature regulation in Comfort mode.
Fixed: shows access to the user parameters
Flashing: meansthat the selecteduserparameter can be modified
Flashing:
Cleaning program active (the remaining time is shown on the
display).
Flashing:
Vacation program active (the remaining time is shown on the
display).
Fixed:
Indicates that the telephone interface is active.
Flashing:
Indicates that the remote command received by the
telephone interface has been overridden by another local
request through the chronostat buttons.
Fixed:
The temperature shown on the display is the one measured by
the internal sensor, yet the temperature regulation takes place
according to the remote sensor.
Flashing:
Both temperature shown and room temperature regulation refer
to the internal sensor.
Fixed:
The temperature shown on the display is the one measured by the
remote sensor, yet the temperature regulation takes place according
to the internal sensor.
Flashing:
Both temperature shown and room temperature regulation refer to
the remote sensor.
Fig. 7
QUICK GUIDE FOR SETTING THE TIME SCHEDULE
LEGEND
A Button with double function:
Fig. 3
Fig. 4
F
Temperature regulation in Comfort mode for 24 hours.
-
In normal operation: activates the function 24 hours Manual /
Permanent Manual / Automatic.
-
In schedule programming: sets the regulation temperature into
Economy mode.
B Button with double function:
-
In normal operation: turns on and off the chronostat.
-
In schedule programming: sets the regulation temperature into Off /
Antifreeze mode.
C Button with triple function:
-
In normal operation: displays current time or temperature.
-
In schedule programming: sets the regulation temperature into
Comfort mode.
-
In ‘Set-Point temperatures settings’, shows either the Comfort or the
Economy temperature
D Changes the setpoint temperature and the configuration parameters
(increasing the value).
E Changes the setpoint temperature and the configuration parameters
(decreasing the value).
F Gives access to the user parameters list.
G Button with double function:
-In normal operation updates the values sampled by the thermostat.
-In ‘User parameters settings’, enables the selected parameter
modification and confirms the modified value.
H Screw hole for fixing the chronostat body to the wall mount plate
I Battery compartment
3
•Press button ‘ P ’.
•The display shows ‘ PrOG ’ with the icon ‘ P ‘ turned on.
•Press key ‘ OK ’: the display shows the word ‘ dAY ’, the icon
‘ P ‘ and the squares corresponding to the flashing days.
•Press buttons ‘ ‘ and ‘ ‘ in order to choose one of the four
days combinations available as pre-set.
•Press button ‘ OK ’ to confirm the choice.
•The display shows hour 00:00 with the relevant dash, in the upside
right, flashing.
•Press one of the following buttons to select the temperature
regulation level desired:
Comfort mode:
Press the ‘
‘ button.
Off / Antifreeze:
Press the ‘
‘ button.
Economy mode:
Press the ‘
‘ button.
Moving the time cursor: Press button ‘ ’ or ‘ ‘.
Each time the button which sets the regulation mode is depressed,
the time cursor automatically jumps into the next half hour.
•Once the time schedule for the day or group of days selected has
been set, press button ‘ OK ’.
The display will show the time schedule for the next day or group
of days until the whole week has been covered.
•Once the time schedule for the whole week has been set, press
button ‘ OK ’. The chronostat will store the program into its
memory and the word ‘ MEMO ’ is shown on the display, then it
will automatically quit the time schedule setting procedure.
- ENGLISH -
BATTERY-POWERED DIGITAL WEEKLY Chronostat
Heating/Cooling function Setting
‘ H-C ’
Reset to default data
‘ dFLt ’
3.Press the ‘OK’ button to modify the selected parameter; the ‘ P ‘
icon flashes.
4.Configure the data associated with each individual parameter as
illustrated below.
5.To quit from the user parameters setting, press key ‘ ’ or wait 10
seconds wothout pressing any key.
‘ PrOG ‘: SCHEDULE PROGRAMMING
Usually the circular band of dashes in the display shows the operating
mode (Comfort, Economy, Off / antifrost) of the thermostat, while
the vertical strip on the left shows the current day of the week
(1=Monday .. 7=Sunday) high lighted with a square around the
number to which it relates programming.
To facilitate the programming operation it is sufficient to remember
this rule:
GENERALITIES
This device is a battery-powered digital weekly chronostat for
controlling room temperature on three levels: Comfort, Economy
or Off/Antifreeze. The device can be used both in heating and air
conditioning systems.
The chronostat features a large backlit display which shows all
functional indications, the program schedule and the room temperature
reading or, alternatively, the current time.
Allows to set up to 7 different time schedules, each one different for
each day of the week, with a minimum intervention time of 1/2 hour
during 24 hours.
In addition, the device offers the possibility of setting the Antifreeze
temperature and the sensor Offset value.
STARTING UP
When starting up for the first time:
-
Insert the batteriesobserving the polarity markingsshown
in the battery compartment (see ‘INSERTION / BATTERIES
REPLACEMENT’).
- Set the timeand day of thecurrent week.
-Setthe operating modeof the thermostat(user parameter ‘C-H’):
Heating (factory set) or Cooling.
Setting the current time and day
To set the clock of the chronostat carry out the following steps:
1.Open the flap of the battery compartment.
2. Keep the ‘OK’ button pressed for at least 2 seconds; the hour digits
will start flashing.
3.Set the hour using buttons ‘ ’ and ‘ ’.
4.Confirm by pressing ‘OK’; the minute digits will start flashing.
5.Set the minutes using buttons ‘ ’ and ‘ ’.
6.Confirm with ‘OK’; the display shows the word ’dAY’ and the
square symbol corresponding to the current day flashes.
7.Set the current day of the week using buttons ‘
’ and ‘
’
(the current day is highlighted by a box surrounding the number
corresponding to the day of the week, 1 Monday .. 7 Sunday )
8.Confirm by pressing ‘OK’; the output of the time and day setting is
automatic.
Comfort and Economy temperatures adjustment
During normal operation, the display shows the measured room
temperature and the icon for the current setting mode ‘
‘ or ‘ ‘.
To display the relevant set-point temperature, press once the button
‘ ’ or ‘ ’: the display shows the set-point temperature, the icon
‘SET °C‘ (meaning that you are viewing the setpoint temperature) and
icon ‘ ‘ or ‘ ‘ depending on whether the thermostat is regulating
in comfort mode or economy mode.
Pressing the ‘
’ and ‘
’ buttons the displayed setpoint
temperature can be changed.
Pressing the ‘
‘ while the display is showing the ‘Comfort’setpoint
temperature, the display changes to show the ‘Economy’ temperature.
Conversely, if the display was displaying the ‘Economy’setpoint,
by pressing the ‘
‘ button, the display changes to show the
‘Comfort’setpoint.
Pressing the ‘ ‘ or after a few seconds of inactivity, the display
returns to show the room temperature.
Note: Usually, in order to get a temperature reduction in the night,
the economy temperature should have a value lower than that of
comfort.
The programmable thermostat will then adjust the temperature in
comfort mode or economy modeaccording to the set time schedule
(see ‘SET USER PARAMETERS’).
SETTING THE USER PARAMETERS
To enter the mode for setting the chronostat parameters, proceed as
follows:
1.Press the ‘
‘ button; the display will show the ‘ P ‘ icon
(bottom right) and the word ‘ PrOG ‘.
2.Press the ‘
‘ button repeatedly to scroll through the user
parameters:
Schedule Programming
‘ PrOG ’
Antifreeze Setting
‘ AFr ’
HysteresisSetting
‘ HYS ’
Optimization Function Setting
‘ OPt ’
Internal sensor Offset setting
‘ OFS1 ’
Remote sensor Offset setting
‘ OFS2 ’
Regulation sensor choice setting
‘ rEG ’
House hold program Setting
‘ CLE ’
Vacation program Setting
‘ HOL ’
023712A6 TCW02B0001AN 180614
Economy mode:
one dash lit (internal).
Days of the week:
1 Monday .. 7 Sunday. The
box indicates the current
day or group of days.
Off/Antifreeze mode:
no dashes lit.
Comfort mode:
two dashes lit.
To set the program schedule proceed as described below:
Note:You will exit the programming mode without memorizing
the programmed schedule if more than 10 seconds elapse
and you do not press any button; or else you can confirm
the settings in sequence by pressing the ‘OK’ button
without making any changes.
1.Select parameter ‘PrOG’ and press button ‘OK’: the display shows
the word ‘dAy’, icon ‘ P ‘ and the square symbols corresponding
to the current day or group of flashes.
2.Press buttons ‘ ’ and ‘ ’ to set the combination of days to be
programmed.
In the following the four available combinations are listed:
(Mo) (To) (We) (Th)
(Fr)
(Sa) (Su)
1st combination
of days
1
2
3
4
5
2nd combination
of days
1
2
3
4
5
6
1
2
3
4
5
6
3rd combination
of days
6
7
7
7
1
4th combination
of days
2
3
4
(Schedule
Day by Day)
5
6
7
Note: For each day combination, the time schedule set will be
the same for all days within each single group.
3.Press the ‘ OK ‘ button to confirm the setting made; the display will
show the schedule previously programmed for the set day or group
of days and the time 00.00 (cursor flashing on the interval between
00.00 and 00.30).
4.Set the operating mode.
To facilitate the programming operation, the thermostat is factory
preset with the following time intervals:
TIME INTERVALS PRESET
Comfort mode
Economy mode
6.00 .. 8.00
8.00 .. 11.00
11.00 .. 13.00
13.00 .. 17.00
17.00 .. 23.00
23.00 .. 6.00
Alternatively, if the preset time interval doesn’t fit the required
needs, you can change it manually as follows:
5.For every time interval (each dash corresponds to a half hour) set
the operating mode by pressing one of the following buttons:
‘ button.
Comfort mode:
Press the ‘
Off / Antifreeze:
Press the ‘ ‘ button.
Economy mode:
Press the ‘ ‘ button.
Moving the time cursor:
Press button ‘ ’ or ‘ ‘.
Each time the button which sets the regulation mode is depressed,
the time cursor automatically jumps into the next half hour.
Comfort
Off
Economy
Confirm
1
6.After programming the schedule for the day or group of days
selected, press the ‘ OK ’ button.
The display will show the program schedule for the next day or
groups of days until the whole week is covered.
7.After programming the schedule for the entire week, press the ‘OK’
button. The chronostat will memorize the schedule set and the word
‘MEMO’ will appear on the display; the device will automatically
exit the schedule programming mode.
WARNING
- If you want to reset the time intervals to factory settings,
please reach the user parameter ’dFLt’ (the default data); In
this case, all user parameters will be reset to factory settings.
- If you exit the time programming without pressing the ’OK’
button, or you do not save the settings, the time program will
NOT be saved in memory and the previous program will be
restored.
Changes are stored in memory only when the if you enable
this operation with the phase characterized by the word
’MEMO’.
‘ AFr ’ ANTIFREEZE SETTING
The Antifreeze function allows you to select a minimum temperature to
be maintained when the chronostat is off, so as to protect both the room
and the equipment when the room temperature falls below the set value.
The device leaves the factory with the Antifreeze function set on 3°C.
IMPORTANT: the function is active only when the device has
been set in the heating mode.
To set the Antifreeze temperature, carry out the following steps:
1.Select the parameter ‘AFr’ and press the ‘OK’ button.
2.The display shows the Antifrost temperature previously set and the
‘ P ‘ icon flashes.
3. Press buttons ‘ ‘ and ‘ ‘ to change the setting (between OFF,
0.5°C..25°C); every change will be automatically memorized.
4.To return to the list of user parameters, press the ‘OK’ button.
5.To exit the user parameters setting and resume normal operation,
press the ‘ ‘ button or wait 10 seconds without pressing any
key.
‘HYS’ SETTING THE HYSTERESIS
This parameter allows you to set the hysteresis, in °C, which is
applied to the programmable thermostat.
To adjust the hysteresis perform the following steps:
1.Select the parameter ‘HYS’ and press ‘OK’.
2.The display shows the previously set temperature and the ‘ P ‘
icon flashes.
3.Press the ‘
‘ and ‘
‘ to change the value (between
0.1 °C .. 5.0 °C); each change is automatically saved.
4.To return to the list of user parameters, press the ‘OK’ button.
5.To exit the user parameter settings and resume normal operation,
press the ‘ ‘ button or wait 10 seconds without pressing any key.
‘ OPt ’ OPTIMIZATION SETTING
The optimization function consists in the option of turning on the
heating or cooling earlier than the scheduled time in order to reach the
set temperature by the scheduled time.
The chronostat calculates the time necessary in order to reach the
desired temperature and turns on the heating in advance accordingly,
by the amount of time necessary to achieve the target.
The amount of time in advance may be 60 minutes at most and is
calculated based on the average gradient of the previous 24 hours.
To set the optimization function carry out the following steps:
1.Select the parameter ‘OPt’ and press the ‘OK’ button.
2.The display shows ‘on’ or ‘Off’ and the ‘ P ‘ icon flashes.
3.Press button ‘ ‘ to activate (On) or ‘ ‘ to deactivate (Off) the
function; every change will be automatically memorized.
4.To return to the list of user parameters, press the ‘OK’ button.
5.To exit the user parameter settings and resume normal operation,
press the ‘ ‘ button or wait 10 seconds without pressing any key.
‘ OFS1 ’ INTERNAL SENSOR OFFSET SETTING
With this parameter it is possible to correct the temperature reading
of the internal sensor by ±5°C in order to correct any systematic
reading errors due to the positioning of the chronostat in areas
unsuitable for measuring the room temperature. The device leaves the
factory with the Offset set at 0.0°C.
To adjust the Offset value for the internal sensor, carry out the
following steps:
1.Select the ‘ OFS1 ’ parameter and press the ‘ OK ’ button.
2. The display shows the Offset temperature previously set and the
‘ P ‘ icon flashes.
‘ and ‘
‘ to modify the setting (range:
3.Press buttons ‘
-5.0°C .. +5.0°C); every change will be automatically stored
in memory.
4.To return to the list of user parameters, press the ‘OK’ button.
5.To exit the user parameter settings and resume normal operation,
press the ‘ ‘ button or wait 10 seconds without pressing any key.
‘ OFS2 ’ REMOTE SENSOR OFFSET SETTING
With this parameter it is possible to correct the temperature reading of
the remote sensor by ±5°C in order to correct any systematic reading
errors due to the positioning of the remote sensor in areas unsuitable
for measuring the room temperature. The device leaves the factory
with the Offset set at 0.0°C.
To adjust the Offset value for the remote sensor, carry out the
following steps:
1.Select the ‘ OFS1 ’ parameter and press the ‘ OK ’ button.
2. The display shows the Offset temperature previously set and the
- ENGLISH -
‘ P ‘ icon flashes.
‘ and ‘
‘ to modify the setting (range:
3.Press buttons ‘
-5.0°C .. +5.0°C); every change will be automatically stored
in memory.
4.To return to the list of user parameters, press the ‘OK’ button.
5.To exit the user parameter settings and resume normal operation,
press the ‘ ‘ button or wait 10 seconds without pressing any key.
2.To return to the list of user parameters, press the ‘OK’ button.
3.To exit the user parameter settings and resume normal operation,
press the ‘ ‘ button or wait 10 seconds without pressing any key.
WARNING!
Restoring the Default Data will reset all settings made by the
user, such as Time Program, Heating/Cooling, Set-Points and all
other programmable data.
‘ rEG ’ REGULATION SENSOR CHOICE SETTING
This parameter sets whether the room temperature regulation is
made based on the chronostat internal sensor or the remote sensor
connected to the connector ‘ B ‘ in Fig. 6.
For this parameter setting please find these directions:
1.Select parameter ‘ rEG ’ then press key ‘ OK ’
2.The display shows ‘In’ or ‘Out’ and the icon ‘ P ‘ flashes.
3.Press keys ‘ ‘ and ‘ ‘ to change the value (In: internal sensor Out: remote sensor); each change is automatically stored in
memory.
4.To return to the list of user parameters, press the ‘OK’ button.
5.To exit the user parameter settings and resume normal operation,
press the ‘ ‘ button or wait 10 seconds without pressing any key.
WARNING: When the regulation is set according to the remote
sensor ‘ Out ‘ and in case this sensor is missing or broken, the
temperature regulation will be performed according to the
internal sensor, even if the parameter remains set on ‘ Out ‘.
SWITCHING OFF - ANTIFREEZE FUNCTION
‘CLE’ SETTING CLEANING PROGRAM
This program is useful when you are cleaning your house and the
windows are open thus making unnecessary both the heating and
cooling of the premises. In these conditions, the relay is stuck in Off
for two hours.
Note: Access to the cleaning program is NOT allowed when the
programmable thermostat is in ‘holiday mode’.
To activate the cleaning program, select the parameter ‘CLE’ and
press the ’OK’ button: the display shows the ‘ ‘ icon flashing and,
in place of the clock, the time remaining before returning to normal
operation is shown.
The device will go back to the previous operating mode after two
hours or if you press the ‘ ’ button again.
‘HOL’ SET HOLIDAY PROGRAM
If you intend to be away for a relatively long period it is advisable
to activate the Vacation Program, which will suspend the active
operating mode for the desired number of hours (from 1 to 95) or
days (from 1 to 99).
At the end of the set number of hours or days, the chronostat will
go back into the operating mode it was in prior to activation of the
Vacation Program. While it is off, and in case the device has been set
to Heating mode, the antifrost function will be in any case active, and
the display will show the symbol ‘ ‘ and the countdown of the time
remaining to the end of the program.
Note: Access to the vacation program will NOT be enabled while the
‘ cleaning program ‘ is on.
To activate the vacation program proceed as follows:
1.Select the parameter ’HOL’ and press ’OK’; the display shows the
symbol ‘ ‘, the indication ’h 00’ and the ‘ P ‘ icon flashing.
‘ and ‘
‘ to set the vacation time; every
2.Press buttons ‘
change will be automatically memorized.
Up to 95 hours, the programming is indicated in hours and the
display will show ‘ h XX ‘.
Once that value is exceeded, the device will automatically switch to
the mode for programming the vacation time in days and display will
show ‘ d XX ‘. It will be possible to increase or decrease the hour
or day by one unit at a time, with values ranging from 1 .. 95 hours
and 4 .. 99 days.
3.To activate the holiday program for a given time, press again the
‘OK’ button or wait 10 seconds without pressing any key; the
display showsthe ‘ ’ icon flashing and the time remaining to the
end of the holiday period.
If you have not set the time duration of the holiday (h:00), you can
exit the adjustment and return to normal operation by pressing the
‘OK’ or ‘ ‘ or by waiting 10 seconds without pressing any key.
4.To deactivate the vacation function and resume normal operation,
press the button ‘ ‘.
‘H-C’ HEATING / COOLING SETTING
This setting is used to invert the operating logic of the relay according
to whether a heating or air conditioning unit is being controlled.
IMPORTANT: The chronostat leaves the factory set in the
heating mode.
To modify the operating logic, carry out the following procedure:
1.Select the parameter ’H-C’ and press ’OK’; the display shows the
current adjustment mode and the ‘ P ‘ icon flashes.
2.Press thebuttons ‘ ’ and ‘ ’ to select thedesired adjustment;
each change isautomatically saved.
3.To return to the list of user parameters, press the ‘OK’ button.
4.To exit the user parameter settings and resume normal operation,
press the ‘ ‘ button or wait 10 seconds without pressing any key.
During normal operation, if the heating mode is on, the ‘ ‘ icon will
remain lit, whereas if the cooling mode is on, the ‘ ‘ will remain
steadily lit.
‘dFLt’ SET DEFAULT DATA
With this parameterit ispossible to resetuser parametersin order
tobring back all theparameters to thefactory defaults.
Proceed as follows:
1.
Select the parameter ’dFLt’ and press ’OK’; the device
automatically sets the default data and the display will show ’-dF-’
and the ‘ P ‘ icon flashes.
023712A6 TCW02B0001AN 180614
To deactivate the chronostat press the ‘ ‘ button.
The display will show the word ‘ OFF ’.
If the chronostat has been set in the heating mode, the Antifreeze
function will be active and the ‘ ‘ symbol will appear on the display;
in such a case the room temperature will be controlled based on the
value set for the Antifreeze temperature (see paragraph ‘SETTING
THE USER PARAMETERS‘).
AUTOMATIC OPERATION / 24h MANUAL / PERMANENT
MANUAL OVERRIDE FUNCTION
With the key ‘ ‘, the thermostat may be forced to adjust the room
temperature according to the Comfort temperature setting, regardless
of the time programming settings.
By pressing the ‘
‘, button repeatedly you can switch from
Automatic to 24 hour Manual, from 24 hour Manual to Permanent
Manual and from Permanent Manual back to Automatic.
During manual operation the display doesn’t show the time schedule,
but only the room temperature, the state of relay (with possible
24h
symbols ‘ ‘ or ‘
‘), the symbol ‘ ‘ (24h manual) or ‘ ‘
(permanent manual) and the symbol ‘
‘.
Pressing the ‘ ‘ button once will activate the 24 hour Manual mode
and the chronostat will remain in this mode until the time 23:59 is
reached, after which it will go back into the Automatic mode.
Note: If the device is set in the 24h Manual mode and the Vacation
program is activated, after the Vacation period has elapsed, if it is
past the time 23.59, the chronostat will go back into the Automatic
mode and follow the set program schedule.
Pressing the ‘ ‘ button a second time will switch the chronostat into
the Permanent Manual mode and it will remain in this mode until you
press the ‘ ‘ button again.
TEMPERATURE / TIME DISPLAY
By repeatedly pressing the key ‘
‘ the display cycles on showing
the current time, the room temperature measured by the internal
sensor, explained with the icon ‘
‘, and the room temperature
measured by the remote sensor (if wired) explained by the icon
‘
‘. The values of temperature displayed are shown adjusted with
the set Offset value.
In case the parameter ‘ rEG ‘ is set on ‘ Out ‘ but the remote sensor is
not wired or is broken the display will show the words ‘ SEnS OPEN
‘ turned on.
‘ or ‘ SEnS SHrt ‘ with the icon ‘
IMPORTANT: In order to optimize battery life, the chronostat
reads the room temperature every 3 minutes and activates or
deactivates the relay accordingly.
CONNECTION TO A TELEPHONE INTERFACE
The programmable thermostat allows to connect a telephone interface
with continuous operation (latching relay) to the connector ‘ B ‘ in
Fig. 6.
Use of a suitable telephone interface does not require any setting
to be made on the chronostat; for directions on using the telephone
interface see the instruction manual provided.
Via a telephone interface it is possible to turn the chronostat Off or
turn it On in the Permanent Manual mode.
Depending on the commands received from the telephone interface the
chronostat will act according to the following operating logic:
1.Telephone interface contact closed:
The chronostat will switch into the ‘Permanent Manual’ mode: the
‘ ‘ and ‘ ‘ symbols will be shown on the display.
2.Telephone interface contact open, after (and only after) a
previous closure, if no buttons have been pressed (Manual/Off):
The chronostat will be switched off and the word ‘OFF‘ will be
displayed along with the ‘ ‘ symbol. If the ‘Antifreeze’ function
is active the ‘
‘ symbol will be displayed.
IMPORTANT: the commands input by pressing the control
buttons will always have priority over the commands received
from the telephone interface.
If you press the ‘ ‘ or ‘ ‘ button on the chronostat, the device
will change its status and the ‘ ‘ icon will flash to indicate that the
interface command has been overridden by a command input with a
control button.
The ‘ ‘ icon will stop flashing if the telephone interface sends the
chronostat the same command as the one made with the button or
if the telephone interface is reset. In such a case the status set by
means of the control button will not be changed and the chronostat
will be ready to receive a new command.
IMPORTANT
If an Off command is sent to the chronostat via the telephone
interface (contact open), it is a good idea to check that the
command has been executed by the chronostat by carrying out
the following realignment procedure:
1.Using the functions of the telephone interface, check that the
contact is open, sending an Off command if necessary.
2.Send a command to the telephone interface to close the
contact (the chronostat will turn on).
3.Using the functions of the telephone interface, check that the
contact is closed.
4.Send a command to the telephone interface to open the
2
contact (the chronostat will turn off).
During this sequence no commands should be input with the
control buttons as they have priority over the interface commands.
BACKLIGHTING
The display backlight turns on whenever and button is pressed. It
turns off automatically 20 seconds after the last pressing of a button.
HOW TO INSERT / REPLACE BATTERIES
The battery charge status is constantly displayed by means of the
‘
‘ symbol.
The battery charge is at a maximum if all three level indicators are lit
inside the symbol.
If the ‘
‘ symbol (completely empty) flashes, it means that the
batteries are depleted and must be replaced. In this case the relay is
placed in a safe position (N.C.) and the display shows alternatively the
time (or temperature) and the word ’BATT’. If the batteries are not
replaced soon, also the symbols ‘ ‘ or ‘
‘ will flash to indicate
that the device is locked.
To replace the batteries proceed as follows:
1. Open the flap of the battery compartment (Fig. 4).
2.Remove the batteries, prying them out with the aid of a tool if
necessary.
3. Insert the new batteries, which must be alkaline 1.5V type AA.
4.Check for correct time and date and eventually reset it.
TECHNICAL CHARACTERISTICS
Power supply:
2 x 1.5V, alkaline batteries (Type AA)
Battery life:
>1 year
Backlight turns off:
20 sec. after the last pressing of a button
Setting range: comfort: 5°C .. 40°C
economy: 5°C .. 40°C
Asymmetrical differential: 0,1°C .. 5°C (Default 0,2°C)
Antifreeze:
OFF/0.5°C .. 25.0°C (Default 3.0°C)
Offset internal sensor:
± 5.0°C. (Default 0.0°C)
Offset remote probe:
± 5.0°C. (Default 0.0°C)
Internal sensor type:
NTC 10K Ohm ±1% @ 25°C
Remote probe type (optional):NTC 10K Ohm ±1% @ 25°C
Precision:
±1.0°C
Resolution:
0.1°C. ( 0.0°C .. 50.0°C)
0.2°C. (-9.9°C .. -0.1°C)
Contact rating:
5(1)A @ 250V~ SPDT
Ext. Interface Input:
On/Off type continuous signal.
Protection rating:
IP 30
Insulation class:
II (
)
Number of manual cycles: 1,000
Number of automatic cycles:100,000
Type of action:
1CU
Tracking index:
PTI 175
Pollution situation:
2 (normal)
Overvoltage category:
II
Operating temperature:
0°C .. +40°C
Storage temperature:
-10°C .. +50°C
Humidity limits:
20% .. 80% RH non-condensing
Enclosure: Material: ABS+PC V0 self-extinguishing
Colour:
Signal white (RAL 9003)
Light grey (RAL 7035)
Weight:
~ 300 gr.
NORMATIVE REFERENCES
The product complies with the following standards (EMC 2004/108/EC
and LVD 2006/95/EC):
EN-60730-1 (2011)
EN-60730-2-7 (1991)
EN-60730-2-9 (1995)
DIMENSIONS
WARRANTY
In the view of a constant development of their products, the
manufacturer reserves the right for changing technical data and
features without prior notice. The consumer is guaranteed against any
lack of conformity according to the European Directive 1999/44/EC as
well as to the manufacturer’s document about the warranty policy. The
full text of warranty is available on request from the seller.
- ENGLISH -
Scaricare