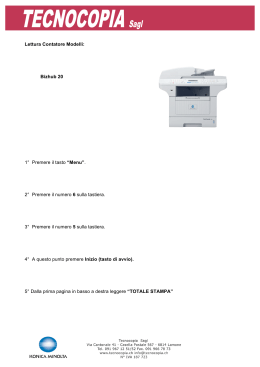
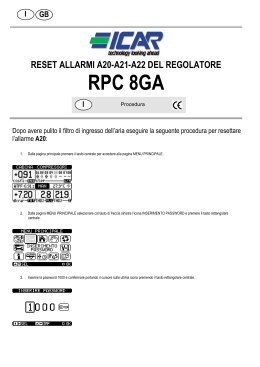
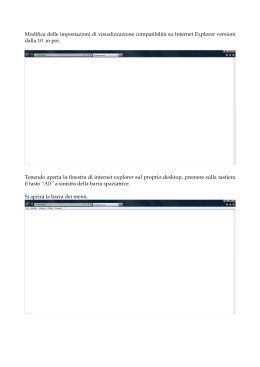
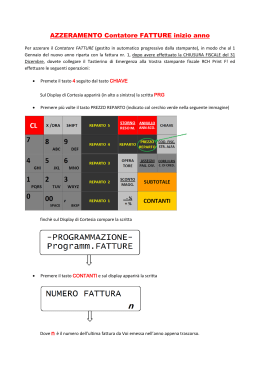
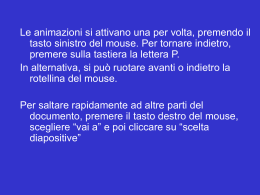
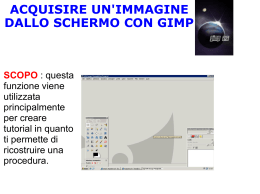
DVP-9004DT
Lettore DVD/MPEG4 9” con sintonizzatore digitale terrestre
integrato, USB e card reader
9” DVD/MPEG4 Player with built-in digital terrestrial tuner, USB and
card reader
Manuale d’uso
User manual
PANORAMICA DEL LETTORE DVD:
1
1. PRESA ANT TV
2. SCHERMO TFT
3. VASSOIO
4. COPERCHIO
5. TASTO APERTURA COPERCHIO
6. TASTO STOP/USB/SCHEDA
7. TASTO CH+/NAVIGAZIONE IN ALTO
8. TASTO FUNCTION & PLAY/PAUSE
9. TASTO VOLUME- / NAVIGAZIONE SX
10. TASTO VOLUME+ / NAVIGAZIONE DX
11. TASTO OK
12. TASTO PREVIOUS & F_BWD
13. TASTO SETUP/CH-/NAVIGAZIONE IN BASSO
14. TASTO NEXT & F_FWD KEY
15. INDICATORE DI CARICA
16. SENSORE
17. INDICATORE DI ALIMENTAZIONE
18. PRESA DC IN
19. SLOT SCHEDA SD/MMC
20. INTERRUTTORE ON/OFF
21. PRESA AV OUT
22. PRESA CUFFIE
23. PORTA USB
24. SPEAKER
2
24
18
19
20
21
22
23
6 7 8
3
4
5
9
10
11
12 13 14
15 16 17
Telecomando
1
14
2
3
4
5
6
7
8
9
10
15
11
1. TASTO MUTE
2. TASTO LANGUAGE
3. TASTO SCREEN ON/OFF
4. TASTO STOP & USB/CARD
5. TASTO VOLUME6. TASTO DVD/MENU
7. TASTO NAVIGAZIONE IN ALTO & CH+
8. TASTO NAVIGAZIONE SX
9. TASTO OK/PLAY/PAUSE
10. TASTO TV/RADIO
11. TASTI NUMERICI
12. TASTO PROGRAM/ANGLE/EPG
13. TASTO PREVIOUS & F_BWD
14. TASTO FUNCTION
15. TASTO SETUP
16. TASTO DISPLAY/INFO
17. TASTO VOLUME+
18. TASTO TITLE
19. TASTO NAVIGAZIONE DX
20. TASTO TTX
21. TASTO NAVIGAZIONE IN BASSO & CH22. TASTO SUBTITLE
23. TASTO AUDIO
24. TASTO SEARCH
25. TASTO REPEAT/FAV
26. TASTO ZOOM/SLOW
27. TASTO NEXT & F_FWD
16
17
18
19
20
21
22
23
24
12
13
25
26
27
1
COLLEGARE IL LETTORE DVD AD
ALTRE APPARECCHIATURE
CAUTELA:
y Utilizzare l’unità solo con l’adattatore di alimentazione per
y Si consiglia di collegare il lettore a un impianto TV
multisistema.
y
y Assicurarsi che il lettore e altre apparecchiature (TV e
amplificatore), che saranno collegati al lettore, siano in
modalità OFF e i cavi AC siano scollegati dalla rete di
alimentazione.
y Non bloccare i fori di ventilazione delle apparecchiature
collegate e assicurarsi che l’aria circoli liberamente.
y Leggere e seguire attentamente le istruzioni seguenti
prima di collegare altre apparecchiature.
y Osservare il codice cromatico quando si collegano cavi
audio e video. Se è fornito solo l’adattatore RCA, è
necessario un cavo RCA audio/video. Inserire un’estremità
dell’adattatore RCA nell’unità, quindi collegare il cavo RCA
audio/video all’adattatore RCA e alla TV.
AUDIO R AUDIO L VIDEO IN
S-VIDEO
y
y
y
y
auto consigliato. L’utilizzo con altri adattatori potrebbe
danneggiare l’unità.
L’adattatore di alimentazione per auto consigliato deve
essere utilizzato solo con questa unità. Non utilizzarlo con
altre apparecchiature.
Ai fini della sicurezza stradale, non utilizzare l’unità o
guardare video mentre si è alla guida.
Assicurarsi che l’unità sia saldamente in posizione per
evitare che fuoriesca dal veicolo in caso di incidente.
Se l’interno dell’accendisigari contiene cenere o polvere, la
sezione della spina può surriscaldarsi a causa di un
contatto scadente. Assicurarsi che l’accendisigari sia pulito
prima di utilizzarlo.
Dopo l’uso, scollegare l’adattatore di alimentazione per
auto dall’unità e dall’accendisigari.
SOSTITUZIONE FUSIBILE
FUSIBILE
YUV INPUT
AV AUDIO/VIDEO INPUT
CAP POSITIVO(+)
TV
NOTA: non estrarre il cap positivo(+) quando si sostituisce il
fusibile.
Cavo A/V
CARICARE LA BATTERIA INCORPORATA
Il lettore funziona con batteria al litio ricaricabile. Prima di
utilizzare la batteria, assicurarsi che sia carica altrimenti
caricarla. Spostare l’interruttore di linea in posizione OFF e
quindi collegare un’estremità dell’adattatore fornito alla rete di
alimentazione e l’altra estremità all’unità di carica della
batteria incorporata.
Nota:
1. La batteria è caricabile solo in modalità OFF.
2. Se l’unità non è utilizzata per lunghi periodi è consigliabile
caricare la batteria incorporata ogni tre mesi.
COLLEGARE L’ANTENNA AL LETTORE
CATV
OPERAZIONI
PREPARAZIONE
Accendere la TV e selezionare la modalità video.
Accendere il sistema audio collegato al lettore.
ingresso antenna
1. Quando il lettore è collegato all’antenna esterna,
assicurarsi che il programma TV sia disponibile dalla torre
di segnalazione.
2. La qualità del video dipende dall’intensità del segnale.
3. Quando il lettore è collegato all’antenna esterna,
assicurarsi che nelle vicinanze non vi siano edifici alti o
ostacoli che potrebbero bloccare il segnale.
AVVIO
1. Spostare l’interruttore POWER ON/OFF per accendere il
lettore.
2. Premere il tasto di apertura del coperchio per aprire il
vassoio del disco.
3. Mettere un disco sul vassoio.
4. Chiudere il vassoio manualmente e la riproduzione inizierà
in automatico.
5. Quando sulla TV appare uno schermo menu, premere il
tasto di navigazione o i tasti numerici per selezionare un
numero di traccia preferita, quindi premere OK per avviare
la riproduzione.
NOTA: se in modalità DVB-T, è necessario premere il tasto
FUNCTION sul telecomando oppure premere a lungo il tasto
FUNCTION sull’unità per passare in modalità DVD.
COLLEGAMENTO A UN ADATTATORE PER AUTO
L’adattatore di alimentazione per auto è progettato per
l’utilizzo in veicoli con dispositivo elettrico di messa a terra
negativa a 12 V.
ATTENZIONE:
Scollegare l’adattatore di alimentazione quando non è in uso.
Non utilizzarlo in veicoli con dispositivo a 24V.
REGOLARE IL VOLUME
Premere il tasto VOLUME+/- sul telecomando oppure tenere
premuto il tasto VOLUME +/- sull’unità per aumentare o
ridurre il volume.
inserire nella presa accendisigari
2
MUTE
Mentre l’apparecchio è acceso, il segnale audio dell’unità
principale può essere spento premendo il tasto MUTE.
Premerlo di nuovo per ripristinare il segnale audio.
5. E’ possibile cancellare la riproduzione programmata
annullando tutti gli elementi programmati.
ZOOM
Premere il tasto ZOOM consecutivamente per ingrandire
l’immagine 2,3, e 4 volte e per ridurla di 1/2,1/3,1/4 rispetto
alla grandezza normale.
Premere di nuovo questo tasto quando l’immagine è della
dimensione di 1/4 per tornare alla visualizzazione normale.
Per visualizzare l’immagine ingrandita scorrere con i tasti di
navigazione.
AVANTI/INDIETRO
Premere il tasto PREVIOUS mentre in funzione per tornare al
capitolo (DVD) o traccia (CD) precedenti. Premere il tasto
NEXT mentre in funzione per andare al capitolo (DVD) o
traccia (CD) successivi.
AVANZAMENTO/INVERSIONE VELOCE
Durante la riproduzione, tenere premuto il tasto F_FWD o
F_BWD per far avanzare o invertire velocemente il disco a
velocità normale, X2, X4, X8, X20.
Premere il tasto PLAY per ripristinare la velocità normale.
INFORMAZIONI OSD (ON SCREEN DISPLAY)
Quando il lettore è in funzione, premere il tasto DISPLAY
consecutivamente e lo schermo visualizzerà le informazioni in
sequenza (disco attuale, numero titolo, numero capitolo,
tempo di riproduzione, lingua audio, tipo di audio, lingua
sottotitoli e angolazioni multiple, ecc..).
ARRESTARE LA RIPRODUZIONE
Premere il tasto STOP durante la riproduzione per fermarla; il
lettore attiva la funzione di riavvio quando è premuto STOP in
modalità STOP; premendo di nuovo il tasto PLAY/PAUSE, la
riproduzione riprende dal punto in cui era stata
precedentemente fermata; aprire il vassoio del disco o
premere il tasto STOP ancora una volta per annullare la
funzione di riavvio. Tenere premuto il tasto STOP per
selezionare tra Disc, card e USB.
CAMBIARE LA LINGUA AUDIO (DVD)
E’ possibile cambiare la lingua audio in un’altra lingua
selezionata nelle impostazioni iniziali (questa operazione
funziona solo con dischi registrati con audio multilingue).
Premere il tasto AUDIO mentre è in funzione il DVD e l’audio
cambierà con una lingua visualizzata sullo schermo.
NOTA: quando non sono registrati audio multilingue, premere
questo tasto non servirà.
RIPRODUZIONE AL RALLENTATORE (DVD)
Tenere premuto il tasto SLOW sul telecomando durante la
riproduzione e il disco sarà riprodotto a ½ della velocità
normale. Ogni volta che si preme il tasto, la velocità del disco
rallenta (fino a 1/7 della velocità normale).
Premere il tasto PLAY/PAUSE per ripristinare la riproduzione
normale.
VISTA CON ANGOLAZIONI MULTIPLE (SOLO DVD)
Tenere premuto il tasto ANGLE per selezionare l’angolazione
desiderata della scena.
Nota: solo le inquadrature di DVD con scene
multiangolo hanno questa funzione.
CAMBIARE LA LINGUA DEI SOTTOTITOLI (SOLO DVD)
Premere il tasto SUBTITLE diverse volte durante la
riproduzione del DVD e la lingua dei sottotitoli cambierà in
una lingua selezionata e visualizzata sullo schermo;
quando appare la lingua desiderata, rilasciare il tasto per
visualizzare i sottotitoli in quella lingua.
Nota: questa funzione è attiva solo in DVD registrati con
sottotitoli multilingue.
REPEAT
Premendo il tasto REPEAT durante la riproduzione, si
ripeteranno un capitolo/titolo oppure tutti (per DVD), la
riproduzione di una traccia o di tutte le tracce (per CD), o le
sezioni tra due punti specifici (A-B).
CERCARE LA SCENA PREFERITA
1. Premere il tasto SEARCH durante la riproduzione ed
evidenziare l’elemento da riprodurre (titolo, capitolo o
punto del capitolo) con i tasti di navigazione.
2. Digitare il numero o il punto desiderato con i tasti numerici.
3. Premere il tasto OK per confermare e avviare la
riproduzione delle scene individuate.
4. Per uscire dal menu di ricerca, premere direttamente il
tasto SEARCH.
TORNARE AL MENU PRINCIPALE E RIPRODURRE IL
TITOLO (DVD)
Durante la riproduzione, premere il tasto DVD/MENU per
ritornare al menu principale e premere il tasto TITLE per
riprodurre il titolo.
RIPRODUZIONE MP3/MPEG 4
1. Caricare il disco MP3/MPEG 4 sul vassoio. Un menu dei
supporti apparirà sullo schermo, selezionare un tipo di
supporto corrispondente (foto, audio, video) per riprodurre
il disco con il tasto di navigazione destro/sinistro e premere
il tasto OK per confermare. Lo schermo TV mostrerà le
cartelle del supporto selezionato su disco.
2. Selezionare la cartella desiderata con i tasti di navigazione
e quindi premere il tasto OK per confermare.
3. I file in questa cartella saranno visualizzati. Selezionare la
traccia scelta con i tasti di navigazione e premere il tasto
OK per avviare la riproduzione.
4. Premere i testi NEXT e PREVIOUS per selezionare la
traccia direttamente.
5. Premere REPEAT per cambiare la modalità di
riproduzione.
RIPRODUZIONE PROGRAMMATA (FINO A 16 MEMORIE)
1. Premere PROGRAM durante la riproduzione per
visualizzare il menu programmazione.
2. Selezionare l’elemento(i) da memorizzare con i tasti di
navigazione e quindi digitare i numeri di titoli/capitoli
desiderati con i tasti numerici.
Esempio: Traccia 3, premere "3"
Traccia 12, premere "1" e quindi "2"
Traccia 21, premere "2" e quindi "1"
3. Per avviare la riproduzione programmata, selezionare
PLAY sul menu; premere nuovamente il tasto PROGRAM
per uscire dal programma.
4. Per annullare tutti gli elementi, premere il tasto PROGRAM
e accedere al menu programmazione per prima cosa,
quindi usare i tasti di navigazione per selezionare
<CLEAR> sul menu e premere il tasto OK per annullare
tutti gli elementi programmati.
3
RIPRODUZIONE CD KODAK PICTURE / JPEG
Caricare un CD Kodak picture / JPEG sul vassoio, quindi
selezionare l’opzione PICTURE per riprodurre il disco con il
tasto di navigazione destro/sinistro e premere OK per
confermare.
La slideshow del CD Kodak Picture inizia automaticamente.
Le cartelle del CD JPEG sono visualizzate sullo schermo TV;
usare i tasti di navigazione per selezionare la cartella
desiderata e quindi premere OK per confermare.
I file in questa cartella saranno visualizzati permettendovi di
selezionare le vostre foto preferite con i tasti di navigazione in
alto/basso. Premere OK per avviare la riproduzione.
Un’anteprima della foto e le informazioni corrispondenti
(risoluzione, dimensione, data) saranno visualizzate
scorrendo i nomi dei file.
tasto di navigazione destro/sinistro per la riproduzione e
premere il tasto OK per confermare. Le cartelle sono
visualizzate sullo schermo, usare i tasti di navigazione per
selezionare la cartella desiderata e la traccia da riprodurre.
2. Premere i tasti NEXT o PREVIOUS per andare avanti o
indietro.
Nota: tenere premuto il tasto STOP per selezionare tra
chiavetta USB, scheda e disco con il tasto di navigazione
destro/sinistro, confermare premendo il tasto OK.
Nota: durante la riproduzione del file MP3, premere
nuovamente il tasto TITLE per ritornare al menu dei supporti.
Se il lettore sta riproducendo un file MPEG 4 o un file
immagine, premere il tasto TITLE due volte per visualizzare il
menu dei supporti (premere il tasto TITLE nuovamente per
visualizzare la lista dei file, due volte per visualizzare il menu
dei supporti).
CAUTELA: per evitare scariche elettrostatiche non toccare
la porta USB e lo slot della scheda durante la riproduzione.
OPERAZIONI CD KODAK PICTURE / JPEG
1. MODALITA’ DI RIPRODUZIONE
Premere REPEAT per cambiare la modalità di riproduzione.
Durante la riproduzione, premere STOP per accedere alla
modalità anteprima.
IMPOSTAZIONI INIZIALI
La pagina delle impostazioni iniziali vi aiuterà a configurare il
vostro lettore come desiderate. Le impostazioni completate
sono salvate nella CPU del lettore fino a successive
modifiche.
2. FOTO AVANTI/INDIETRO
Premere NEXT per passare alla foto successiva o
PREVIOUS per tornare a quella precedente.
PROCEDURE DI ROUTINE PER LE IMPOSTAZIONI
INIZIALI
1. Tenere premuto il tasto SETUP sull’unità oppure premere il
tasto SETUP sul telecomando per accedere al menu.
2. Usare i tasti di navigazione per selezionare il parametro da
modificare, la pagina con ulteriori parametri di
impostazione è visualizzata sullo schermo TV. Usare
nuovamente i tasti di navigazione per fare le modifiche e
premere il tasto OK per confermarle.
3. Usare i tasti di navigazione per passare a un’altra
impostazione sulla pagina principale.
4. Premere il tasto SETUP sul telecomando e tenerlo premuto
fino all’uscita dal menu di setup.
3. RUOTA FOTO
Premere i tasti di navigazione destro/sinistro per ruotare la
foto in senso orario e antiorario rispettivamente.
4. CAPOVOLGI FOTO
Premere il tasto di navigazione in alto per girare la foto verso
l’alto o verso il basso.
Premere il tasto di navigazione in basso per girare la foto
verso destra o sinistra.
5. ZOOM IN/OUT
Premere il tasto ZOOM consecutivamente per ingrandire
l’immagine 2,3, e 4 volte e per ridurla di 1/2,1/3,1/4 rispetto
alla grandezza normale.
Premere di nuovo questo tasto quando la foto è della
dimensione di 1/4 per tornare alla visualizzazione normale.
Se la foto è ingrandita, potete utilizzare i tasti di navigazione
per visualizzare le parti bloccate della foto.
1. SETUP SISTEMA
1.1 TV SYSTEM – per selezionare la modalità TV.
Selezionare questa opzione a seconda della vostra TV.
1.2 SCREEN SAVER – quando il lettore non è utilizzato per
diversi minuti, un logo DVD si muoverà sullo schermo TV per
proteggerlo.
Opzioni: On: screen saver abilitato
Off: screen saver disabilitato
1.3 TV TYPE – per selezionare la modalità TV scan.
Configurare a seconda della vostra TV.
Opzioni: 4:3PS: modalità Normal Pan & scan
4:3LB: modalità normal Letter box
16:9: modalità wide screen
1.4 PASSWORD – digitare la password per sbloccare il
sistema. Procedere come indicato:
1.4.1 Digitare SYSTEM SETUP, selezionare PASSWORD
scorrendo il tasto di navigazione in basso, e quindi premere il
tasto di navigazione destro per selezionare la casella di
inserimento.
1.4.2 Digitare la password utente "0000" per sbloccare, in
questo caso, selezionare la casella di inserimento
nuovamente per cambiare la password digitando quattro
nuovi caratteri numerici e quindi premere il tasto OK per
confermare. Quando cambiate la password, è necessario
digitare la nuova password per sbloccare il sistema.
1.4.3 Se dimenticate la password, usate la password del
supervisore "8200" per sbloccare il sistema.
6. MODALITA’ TRANSIZIONE SLIDESHOW
Durante la riproduzione della slideshow, premere il tasto
PROGRAM ciclicamente per selezionare un effetto di
transizione nella riproduzione delle foto.
REGOLAZIONE LUMINOSITA’ E COLORE
Durante la riproduzione, premere ripetutamente il tasto
SCREEN ON/OFF per regolare colore e luminosità per il
pannello LCD con i tasti di navigazione destro/sinistro.
Tenere premuto il tasto SCREEN ON/OFF per
accendere/spegnere lo schermo.
SUPPORTO MEMORIA ESTERNO (USB&SD/MMC CARD)
Preparare il lettore per l’uso di un supporto di memoria
esterno.
1. Spostare l’interruttore POWER su ON, inserire una
chiavetta USB contenente il file di supporto nella porta
USB o inserire la scheda SD/MMC nello slot. Dopo che la
chiavetta USB o la scheda SD/MMC sono state rilevate e
lette, è visualizzato sullo schermo il menu dei supporti.
Selezionare il tipo di supporto (foto, audio, video) con il
4
NOTA: se è digitata la password sbagliata in stato di sblocco,
il sistema si bloccherà.
1.5 RATING – impostare il rating del lettore. Per cambiare il
filtro famiglia, digitare prima la password di sblocco.
Opzioni: 1 KID SAFE / 2 G / 3 PG / 4 PG 13 / 5 PG-R / 6R / 7
NC-17 / 8 ADULT
1.6 DEFAULT – per ripristinare le impostazioni di fabbrica.
Opzioni: RESTORE.
TELETEXT
Premere il tasto TTX per visualizzare le informazioni teletext
(la sorgente segnale deve essere supportata).
2. SETUP LINGUA
2.1 OSD LANGUAGE – per selezionare una lingua sullo
schermo diversa.
2.2 AUDIO LANG – per selezionare la lingua di ascolto
desiderata.
(solo DVD, è necessario il supporto software)
2.3 SUBTITLE LANG – per selezionare la lingua dei
sottotitoli preferita.
(solo DVD, è necessario il supporto software)
2.4 MENU LANG - per selezionare la lingua del menu
preferita.
(solo DVD, è necessario il supporto software)
INFORMAZIONI PROGRAMMI
Premere il tasto INFO durante la modalità di riproduzione
DVB per visualizzare le informazioni dettagliate dei
programmi (la sorgente di segnale deve essere supportata).
ELECTRONIC PROGRAM GUIDE
Premere il tasto EPG sul telecomando per accedere alla
guida elettronica dei programmi in modalità DVB (la sorgente
di segnale deve essere supportata).
LINGUA
Premere il tasto LANGUAGE sul telecomando per passare
alle lingue diverse fornite dai programmi TV in modalità DVB
(la sorgente di segnale deve essere supportata).
SOTTOTITOLI
Premere il tasto SUBTITLE per selezionare ciclicamente le
lingue dei sottotitoli fornite dai segnali TV (la sorgente di
segnale deve essere supportata).
3. SETUP VIDEO
3.1 BRIGHTNESS – per impostare la luminosità dello
schermo.
Opzioni: 0/2/4/6/8/10/12
3.2 CONTRAST – per impostare l’effetto di contrasto dello
schermo.
Opzioni: 0/2/4/6/8/10/12
3.3 HUE – per impostare la tonalità del colore dello schermo.
Opzioni: -6/-4/-2/0/+2/+4/+6
3.4 SATURATION – per impostare il livello di saturazione
dello schermo.
Opzioni: 0/2/4/6/8/10/12
PREFERITI
Premere il tasto FAV per abilitare o disabilitare la funzione
Preferiti dopo aver configurato la classe dei canali nel menu
di setup, e premere il menu di navigazione in alto/basso per
cambiare il canale tra i preferiti selezionati nel menu di setup.
MENU DI SETUP DVB-T
1. Tenere premuto il tasto SETUP sull’unità o premere il tasto
SETUP sul telecomando, il menu di setup apparirà subito
sullo schermo.
2. Usare il tasto di navigazione destro/sinistro per cambiare
tra le tre interfacce del setup principale. Premere il tasto
di navigazione in alto/basso per evidenziare le opzioni di
configurazione ed entrare nel sottomenu corrispondente
come indicato. Dopo la configurazione, usare il tasto
SETUP per ritornare all’interfaccia del setup principale.
3. Premere brevemente il tasto SETUP sul telecomando
oppure tenere premuto il tasto SETUP sull’unità per uscire
dal menu di setup.
4. SETUP SPEAKER
4.1 DOWNMIX
Opzioni: LT/RT – modalità mix dx/sx
STEREO – selezionare questa opzione se non
possedete un amplificatore a 5.1. canali.
OPERAZIONI DVB
AVVIO
y Assicurarsi che l’antenna TV sia collegata adeguatamente
al vostro lettore.
y Accendere il lettore. Premere il tasto FUNCTION sul
telecomando oppure tenere premuto il tasto FUNCTION
sull’unità per passare alla modalità DVB-T.
Sullo schermo è visualizzata una finestra di dialogo relativa
alla prima installazione. Selezionare YES per eseguire
l’installazione per la prima volta, quindi selezionare altre
opzioni indicate nelle finestre di dialogo successive per
terminare l’installazione per la prima volta; selezionare NO
per uscire da questa interfaccia.
1. Guida ai canali
TV channels – per accedere alla lista dei canali TV e
selezionare/ordinare i canali TV desiderati.
Radio channels – per accedere alla lista di canali Radio e
selezionare/ordinare i canali Radio desiderati.
Channels class – selezionare questa opzione per modificare
i programmi come desiderate.
Channels edit – selezionare questa opzione per modificare il
nome dei canali, spostare o eliminare i canali come
desiderate.
2. Configurazione sistema
TV Setting
TV system: per selezionare il sistema TV.
TV type: per selezionare la modalità TV scan. Configurare a
seconda della vostra TV.
Opzioni: 4:3PS: modalità Normal Pan & scan
4:3LB: modalità Normal Letter box
16:9: modalità wide screen
CERCARE UN PROGRAMMA
Premere il tasto CH+/- per cambiare il numero di canale. Un
canale desiderato può essere raggiunto utilizzando questi
due tasti.
Dopo aver selezionato il canale desiderato, la
programmazione si avvierà immediatamente.
CAMBIARE TRA TV/RADIO
Durante la modalità di riproduzione DVB, premere il tasto
TV/RADIO sul telecomando per passare alla modalità RADIO
(la sorgente segnale deve essere supportata).
5
SPECIFICHE TECNICHE
Video setting
BRIGHTNESS – per impostare la luminosità dello schermo.
CONTRAST – per impostare l’effetto di contrasto dello
schermo.
HUE – per impostare la tonalità di colore dello schermo.
SATURATION – per impostare il livello di saturazione dello
schermo.
Lingua
Selezionare una delle lingue desiderate per il sistema.
Filtro famiglia
Change pin-It è usato per cambiare la password.
1) Digitare la vecchia password nella riga OLD PIN
2) Digitare la nuova password nella riga NEW PIN
3) Digitare nuovamente la nuova password nella riga
CONFIRM
La password utente di default è 0000.
Channel lock-it è usato per bloccare i canali.
Time setting
Time zone-it è usato per selezionare il fuso orario locale.
System info
Selezionando questa opzione, sono visualizzate le
informazioni sul sistema: aggiorna data, informazioni
sintonizzatore, versione F/W, versione modello ecc..
Alimentazione: AC/DC 100-240V~60/50Hz
Consumo: 9W
Sistema TV: PAL/NTSC
Massimo numero di canali TV DVB-T in ricezione: 350
Massimo numero di canali radio in ricezione: 140
Compatibilità con I formati AVI, MPEG4, XVID, MP3
Temperatura operativa: +5°C to +35°C
Dimensioni: 248(Lungh.) x 185.6(Largh.) x 39.2(Prof.) mm
Uscita segnale audio
1. DVD (audio lineare)
(1) Risposta in frequenza: 20Hz-20KHz (campionatura
48KHz) & 20Hz-20KHz (campionatura 96KHz)
(2) Rapporto S/N: >45dB
(3) Gamma dinamica: 60dB
2. CD audio:
(1) Risposta in frequenza: 20Hz-20KHz
(2) Rapporto S/N: >45dB
(3) Gamma dinamica: 60dB
Specifiche soggette a modifica senza preavviso.
3. Installazione
Auto scan-selezionare un paese dalla riga<select area>,
accedere alla riga <start scan> con il tasto di navigazione per
iniziare a esplorare i canali.
Manual scan-scorrere l’opzione di esplorazione manuale,
apparirà una finestra di dialogo sullo schermo da impostare,
quindi selezionare l’opzione <start scan> per iniziare a esplorare i
canali.
Default setup-selezionare questa opzione per ripristinare le
impostazioni di fabbrica.
6
PRECAUZIONI NELL’UTILIZZO DEL DISCO
y Tenere il disco per i bordi per non sporcare la superficie con le impronte. Sporco, graffi e impronte possono far saltare
y
y
y
y
y
y
il disco o causare distorsioni.
Non scrivere sul lato con l’etichetta con una penna a sfera o altri utensili di scrittura.
Non applicare etere di petrolio, solvente, e liquidi antistatici.
Fare attenzione a non far cadere il disco o piegarlo.
Installare solo un disco sul vassoio.
Non chiudere il vassoio se il disco non è adeguatamente installato.
Assicurarsi di riporre il disco in una custodia quando inutilizzato.
RISOLUZIONE PROBLEMI
Se il vostro lettore DVD non funziona adeguatamente, controllate le voci seguenti prima di contattare un centro assistenza
autorizzato.
Problema
L’unità non si accende o si
spegne improvvisamente
Il telecomando non funziona
Immagine o suono assenti
y
y
y
y
y
y
y
y
y
y
y
y
Suono assente
y
y
Immagine e suono assenti
Video o suono distorti
y
y
Risoluzione
Assicurarsi che l’adattatore sia saldamente inserito.
Spegnere e quindi riaccendere.
Controllare che la batteria sia inserita in direzione "+" e "-" correttamente.
La batteria può essere scarica. Sostituirla con una nuova.
Controllare che la trasmissione del segnale sia diretta al sensore del lettore DVD.
Rimuovere l’eventuale ostacolo.
Controllare che i cavi A/V siano adeguatamente collegati.
Controllare che il disco sia un DVD, DVD-RW o CD AUDIO.
Non usare un disco graffiato o sporco.
Controllare che il lato del disco con l’etichetta sia rivolto verso l’alto.
Le lenti della testina di lettura del lettore DVD potrebbero essere sporche. Contattare il
centro di assistenza per la pulizia delle lenti.
Controllare che il canale TV sia impostato su VIDEO o AV se il lettore è collegato a una
TV.
Controllare il volume. Se è impostato su zero, aumentare il volume.
Controllare che le cuffie non siano inserite nella presa. Gli speaker non funzionano con
le cuffie inserite.
Controllare che la batteria sia correttamente installata e l’adattatore collegato.
Usare un disco senza graffi o ammaccature.
ISTRUZIONI DI SICUREZZA IMPORTANTI
y
y
y
y
y
y
y
y
y
y
Non versare liquidi sull’apparecchio. Non appoggiare sull’apparecchio oggetti contenenti liquidi (ad es. vasi).
Per togliere del tutto la potenza assorbita scollegare completamente l’adattatore AC/DC dalla rete di alimentazione.
Non appoggiare sul dispositivo sorgenti di fiamme libere, come candele accese.
La distanza minima intorno al dispositivo per una ventilazione sufficiente è 2,0 cm. La ventilazione non deve essere impedita
coprendo le aperture di ventilazione con oggetti, quali giornali, tovaglie, tende ecc.
Il dispositivo è adatto per l’uso in climi tropicali e/o moderati.
Attenersi alle disposizioni per lo smaltimento delle batterie.
CAUTELA: pericolo di esplosione se la batteria è sostituita in modo inappropriato. Usare solo batterie uguali o equivalenti.
La batteria non deve essere esposta a calore eccessivo, come raggi del sole, fuoco o simili.
La pressione del suono eccessiva di cuffie e auricolari può causare gravi danni all’udito.
La piastra della marcatura si trova sulla parte superiore del dispositivo.
7
Questo apparecchio è conforme alla Direttiva 2004/108/CE relativa al rispetto dei
requisiti essenziali di compatibilità elettromagnetica (E.M.C.).
Questo apparecchio è conforme alla Direttiva 2006/95/CE che riguarda le prescrizioni relative alla sicurezza
degli apparecchi elettronici e loro accessori collegati alla rete, per uso
domestico o analogo uso generale (L.V.D.).
Questo apparecchio è conforme al D.M. 28 Agosto 1995 N. 548,
pubblicato sulla G.U. N. 301 del 28/12/95 (rispetto delle frequenze
utilizzabili in Italia dai ricevitori di radiodiffusione sonora e televisiva).
Questo apparecchio e’ fabbricato nel rispetto delle disposizioni di cui al D.M.
26/03/92 ed in particolare e’ conforme alle prescrizioni dell’Art.1 dello stesso
Decreto Ministeriale.
Questo apparecchio è conforme ai requisiti essenziali ed alle altre disposizioni pertinenti
stabilite dalla Direttiva 1999/5/CE (R&TTE).
A causa della continua evoluzione dei prodotti, le caratteristiche ed il
disegno di questo modello possono variare senza preavviso.
"L'Azienda declina ogni responsabilità per l'utilizzo improprio del prodotto"
o
o
o
o
o
Non esporre la batteria ad eccessiva umidità;
Non far entrare in contatto la batteria con sostanze liquide;
Tenere la batteria a debita di stanza da campi magnetici, fonti di calore e fiamme libere;
Non invertire la polarità della batteria;
Sostituire la batteria solamente con un’altra dello stesso tipo o equivalente;
8
AVVERTENZE IMPORTANTI
• Questo apparecchio è conforme alla Direttiva 2004/108/CE, relativa al rispetto dei requisiti
essenziali di compatibilità elettromagnetica (E.M.C.).
• Questo apparecchio è conforme al D.M. 28 Agosto 1995 N. 548, pubblicato sulla G.U. N. 301
del 28/12/95 (rispetto delle frequenze utilizzabili in Italia dai ricevitori di radiodiffusione sonora
e televisiva).
• A causa della continua evoluzione dei prodotti, le caratteristiche ed il disegno di questo
modello possono variare senza preavviso.
• L'Azienda declina ogni responsabilità per l'utilizzo improprio del prodotto.
INFORMAZIONI IMPORTANTI PER L'UTENTE AI SENSI DELLA DIRETTIVA
"RAEE" 2002/96/CE E SUCCESSIVA MODIFICA 2003/108/CE SULLO
SMALTIMENTO DI APPARECCHIATURE ELETTRICHE ED ELETTRONICHE.
Ai sensi della Direttiva "RAEE" 2002/96/CE e successiva modifica 2003/108/CE,
questa apparecchiatura viene contrassegnata con il simbolo del contenitore di rifiuti
barrato. Per un futuro smaltimento di questo prodotto, si prega di tenere presente
quanto segue:
- E' vietato smaltire questa apparecchiatura come un comune rifiuto urbano: è
necessario rivolgersi ad uno dei Centri di Raccolta RAEE (Rifiuti di Apparecchiature
Elettriche ed Elettroniche) Autorizzato e predisposto dalla Pubblica Amministrazione.
E' possibile consegnare ad un negoziante questa apparecchiatura per il suo
smaltimento all'atto dell'acquisto di una nuova apparecchiatura dello stesso tipo.
- La normativa sopra citata, alla quale rimandiamo per ulteriori dettagli o
approfondimenti, prevede sanzioni in caso di smaltimento abusivo dei RAEE (Rifiuti di
Apparecchiature Elettriche ed Elettroniche).
CLASS 1
LASER PRODUCT
9
CONDIZIONI DI GARANZIA
La Società MELCHIONI S.p.A., distributrice
sul territorio italiano del marchio IRRADIO, vi
ringrazia per la scelta e vi garantisce che i
propri apparecchi sono frutto delle ultime
tecnologie e ricerche.
L’ apparecchio è coperto dalla garanzia
convenzionale per il periodo di DUE ANNI
dalla data di acquisto da parte del primo
utente. La presente garanzia lascia
impregiudicata la validità della normativa in
vigore riguardante i beni di consumo (art 1519
bis - nonies del Codice Civile).
I componenti o le parti che risulteranno
difettosi per accertate cause di fabbricazione
saranno riparati o sostituiti gratuitamente
presso la nostra rete d’assistenza autorizzata,
durante il periodo di garanzia di cui sopra.
La MELCHIONI SPA si riserva il diritto di
effettuare la sostituzione integrale
dell’apparecchio, qualora la riparabilità
risultasse impossibile o troppo onerosa, con
un altro apparecchio uguale (o simile) nel
corso del periodo di garanzia. In questo caso
la decorrenza della garanzia rimane quella del
primo acquisto: la prestazione eseguita in
garanzia non prolunga il periodo della
garanzia stessa.
Questo apparecchio non verrà mai
considerato difettoso per materiali o
fabbricazione qualora dovesse essere
adattato, cambiato o regolato, per conformarsi
a norme di sicurezza e/o tecniche nazionali o
locali, in vigore in un Paese diverso da quello
per il quale è stato originariamente progettato
e fabbricato.
Questo apparecchio è stato progettato e
costruito per un impiego esclusivamente
domestico: qualunque altro utilizzo fa
decadere la garanzia.
La garanzia non copre:
• le parti soggette ad usura o logorio, né quelle
parti che necessitano di una sostituzione e/o
manutenzione periodica;
• l’uso professionale del prodotto;
• i mal funzionamenti o qualsiasi difetto dovuti
ad errata installazione, configurazione,
aggiornamento di software / BIOS / firmware
non eseguita da personale autorizzato
MELCHIONI SPA;
• riparazioni o interventi eseguiti da persone
non autorizzate da MELCHIONI SPA;
• manipolazioni di componenti
dell'assemblaggio o, ove applicabile, del
software;
• difetti provocati da caduta o trasporto,
fulmine, sbalzi di tensione, infiltrazioni di
liquidi, apertura dell'apparecchio, intemperie,
fuoco, disordini pubblici, aerazione
inadeguata o errata alimentazione;
• eventuali accessori, ad esempio: scatole,
borse, batterie, ecc. usate con questo
prodotto;
• interventi a domicilio per controlli di comodo
o presunti difetti.
10
CONDIZIONI DI GARANZIA
Il riconoscimento della garanzia da parte di MELCHIONI SPA, o dei suoi centri di assistenza
autorizzati, è subordinata alla presentazione di un documento fiscale che comprovi l’effettiva
data d’acquisto. Lo stesso non deve presentare manomissioni o cancellature: in presenza di
questi MELCHIONI SPA si riserva il diritto di rifiutare l’intervento in garanzia.
La garanzia non sarà riconosciuta qualora la matricola o il modello dell’apparecchio risultassero
inesistenti, abrasi o modificati.
La presente garanzia non comprende alcun diritto di risarcimento per danni diretti o indiretti, di
qualsiasi natura, verso persone o cose, causati da un’eventuale inefficienza dell’apparecchio.
Eventuali estensioni, promesse o prestazioni assicurate dal rivenditore saranno a carico di
quest’ultimo.
IL PRESENTE CERTIFICATO DEBITAMENTE COMPILATO IN OGNI SUA PARTE, DEVE
SEMPRE ACCOMPAGNARE L’APPARECCHIO IN CASO DI RIPARAZIONE ED E’ VALIDO
SOLO SE ACCOMPAGNATO DA UN DOCUMENTO FISCALE (scontrino o fattura).
Sig. .......................................................................................................................................
Via .......................................................................................................... n° ......................
CAP ........................ Città ................................................................. Prov. .....................
Modello ......... DVP-9004DT .......... Matricola ......................................................................
Rivenditore ...................................... Data acquisto ...........................................................
Per eventuali informazioni sui Centri di Assistenza autorizzati sul territorio italiano potete
contattare il numero telefonico: 02-57941, oppure consultate il nostro sito: www.melchioni.it
Timbro e firma del rivenditore per convalida del certificato di garanzia
11
OVERVIEW OF THE DVD PLAYER:
1
1. TV ANT JACK
2. TFT SCREEN
3. DISC TAKEN AREA
4. DISC COVER
5. DISC COVER OPEN KEY
6. STOP/USB/CARD KEY
7. CH+/NAVIGATION UP KEY
8. FUNCTION & PLAY/PAUSE KEY
9. VOLUME- / NAVIGATION LEFT KEY
10. VOLUME+ / NAVIGATION RIGHT KEY
11. OK KEY
12. PREVIOUS & F_BWD KEY
13. SETUP/CH-/NAVIGATION DOWN KEY
14. NEXT & F_FWD KEY
15. CHARGE INDICATOR
16. REMOTE SENSOR
17. POWER INDICATOR
18. DC IN JACK
19. SD/MMC CARD SLOT
20. POWER ON/OFF SWITCH
21. AV OUT JACK
22. PHONE JACK
23. USB PORT
24. SPEAKERS
2
24
18
19
20
21
22
23
6 7 8
3
4
5
9
10
11
12 13 14
15 16 17
Remote control unit
1
14
2
3
4
5
6
7
8
9
10
15
11
1. MUTE button
2. LANGUAGE button
3. SCREEN ON/OFF button
4. STOP & USB/CARD button
5. VOLUME- button
6. DVD/MENU button
7. NAVIGATION UP & CH+ button
8. NAVIGATION LEFT button
9. OK/PLAY/PAUSE button
10. TV/RADIO button
11. NUMERIC buttons
12. PROGRAM/ANGLE/EPG button
13. PREVIOUS & F_BWD button
14. FUNCTION button
15. SETUP button
16. DISPLAY/INFO button
17. VOLUME+ button
18. TITLE button
19. NAVIGATION RIGHT button
20. TTX button
21. NAVIGATION DOWN & CH- button
22. SUBTITLE button
23. AUDIO button
24. SEARCH button
25. REPEAT/FAV button
26. ZOOM/SLOW button
27. NEXT & F_FWD button
16
17
18
19
20
21
22
23
24
12
13
25
26
27
12
CONNECT DVD PLAYER TO OTHER
APPLIANCES
y Use the unit only with the recommended car power adaptor,
y It is recommended you connect the player to a
y The recommended car power adaptor is for use with this
CAUTIONS:
use with other car power adaptor might damage the unit.
multi-system TV.
unit only. Do not use it with other equipment.
y Ensure that this player and other appliances (TV set and
y In the interests of road traffic safety, do not operate the unit
amplifier) that will be connected to the player are set to
OFF mode and that the AC cords are disconnected from
the wall outlet.
y Avoid blocking ventilation holes of the connected
appliances and make sure air around there can circulate
freely.
y Read carefully and follow the instructions before
connecting other appliances.
y Ensure that you observe the color coding when connecting
audio, video cables. If the RCA adapter is supplied only, the
audio/video RCA cable is required. Plug one end of the
RCA adapter to the unit. Then connect the audio/video
RCA cable to the RCA adapter and the television.
AUDIO R AUDIO L VIDEO IN
S-VIDEO
or view video software while driving a vehicle.
y Make sure the unit is fastened securely to prevent from
moving outside of the vehicle in an accident
y When the inside of the cigarette lighter socket is dirty with
ashes or dust, the plug section may become hot due to
poor contact. Be sure to clean the cigarette lighter socket
before use.
y After use, disconnect the car power adaptor from both the
unit and cigarette lighter socket.
FUSE REPLACEMENT
FUSE
YUV INPUT
POSITIVE(+) CAP
AV AUDIO/VIDEO INPUT
NOTE: Don't throw out the positive(+) cap when replace the
fuse.
TV SET
CHARGE THE BUILT-IN BATTERY
The player is with a rechargeable lithium battery. Before using
the battery, please make sure it is charged. If not, charge it
first. Slide the power switch to OFF position and then connect
one end of the supplied adapter to the wall outlet and the
other end to the unit for charging the built-in battery.
Note:
1. The battery only could be charged at powering off mode.
2. If the unit is not in use for a prolonged period of time, it is
recommendable to charge the built-in battery each three
months.
A/V cable
CONNECTING THE AERIAL TO THE PLAYER
OPERATIONS
PREPARATION
Power on the TV set and select video input mode.
Power on the audio system which is connected to the player.
CATV
Aerial input
GET STARTED
1. Slide POWER ON/OFF switch to turn on the player.
2. Press disc cover open key to open the disc tray.
3. Place a disc onto the disc tray.
4. Close the disc tray by hand and the playback starts
automatically.
5. When a menu screen appears on the TV, press the
navigation buttons or press the numeric buttons to select a
preferred track number, then press OK button to start
playback.
NOTE: If at DVB-T mode, pressing FUNCTION button on the
remote or long pressing FUNCTION button on the unit for
switching the unit to DVD mode is necessary.
1. When this player is connect to the outdoor aerial, make
sure that the TV programme is available from the signal
tower.
2. The quality of video is depend on the signal strength.
3. When this player is connect to the outdoor aerial, in avoid
that the huge buildings or obstacle would block the signal.
CONNECTING TO A CAR ADAPTOR
The car power adaptor is designed for use with vehicles that
have a 12V, negative ground electrical system.
WARNING:
Disconnect the car power adaptor when not in use. Not in use
in 24V vehicles.
ADJUST THE VOLUME
Press VOLUME+/- button on the remote or press and hold
VOLUME +/- button on the unit to increase or reduce the
volume.
MUTE
While the power is on, the audio output of the main unit is to
be shut off by pressing the button. Press it again to resume
sound output.
To the cigarette lighter socket
13
SKIP AHEAD OR BACK
Press PREVIOUS button during play to skip previous chapter
(DVD) or a track (CD), Press NEXT button during play to skip
next chapter (DVD) or a track (CD).
ON SCREEN DISPLAY INFORMATION
When the player is in operation, press DISPLAY button
continuously, the screen will display parts of information
(current disc type, title number, chapter number, playtime,
audio language, audio type, subtitle language and multi angle,
etc) in a sequence.
RAPID ADVANCE/REVERSE
During playback, press and hold F_FWD button or F_BWD
button to scan the disc forward or backward at X2, X4, X8,
X20 normal speed.
Press PLAY button to resume normal play.
CHANGING AUDIO SOUNDTRACK LANGUAGE (DVD
DISC)
It is possible to change the audio soundtrack language to a
different language from the one selected at the initial settings
(This operation works only with discs on which multiple audio
soundtrack languages are recorded).
Press AUDIO button during DVD disc play, the sound track
will be changed with a selected sound track showing on the
screen.
NOTE: When no soundtrack languages are recorded,
pressing this button will not work.
STOP PLAYBACK
Press STOP button during playback to stop playback; the
player activates its resume function when STOP is pressed in
STOP mode; press PLAY/PAUSE button again, playback
resumes at the point it stopped previously; open the disc tray
or press the STOP button one more time to clear the resume
function.
Press and hold STOP button to make selection among Disc,
card and USB.
MULTI-ANGLE VIEWING (DVD ONLY)
Press and hold ANGLE button to select your desired angle to
view the scene.
Note: only the DVDs shot with multi-angle scenes have this
function.
SLOW-MOTION PLAY (DVD)
Press and hold SLOW button on the remote during playback,
the disc will be played at 1/2 normal speed at first, each time
this button is pressed, the play speed becomes slower (down
to 1/7 normal speed.)
Press PLAY/PAUSE button, normal play will resume.
CHANGING SUBTITLE LANGUAGE (DVD ONLY)
Press SUBTITLE button several times during DVD playback,
the subtitle language will be changed with the a selected
subtitle language showing on the screen;
When the desired language appears, release the button to
view the subtitle in that language.
Note: this function only works on the DVDs recorded with
multi-language subtitles.
REPEAT
Press REPEAT button during play, it will repeat play one
chapter/title or repeat all (for DVD disc), or repeat play a track
or all tracks (for CD), or repeat the sections between two
specific points (A-B).
SEARCH FOR PREFERRED SCENE
1. Press SEARCH button during play and highlight the item to
be played (Title, Chapter, or Chapter time)by navigation
buttons.
2. Input the desired number or time via the numeric buttons.
3. Press OK button to confirm and the playback from the
located scene starts.
4. To exit search menu, press SEARCH button directly.
RETURN TO MAIN MENU AND PLAY THE TITLE (DVD)
During playback, press DVD/MENU button to return to main
menu and press TITLE button to play the title.
MP3/MPEG 4 PLAYBACK
1. Load the MP3/MPEG 4 disc onto the disc tray. A media
menu shows on the screen, select a corresponding media
type (picture, audio, video) to play the disc with navigation
left/right button and press OK Button to confirm. Then the
TV screen will show folders of the selected media type on
the disc.
2. Select the folder you want by the navigation buttons and
then press OK button to confirm.
3. The files in this folder are displayed and select your
favourable track via navigation buttons and press OK
button to start playback.
4. Press NEXT and PREVIOUS button to select track directly.
5. Press REPEAT button to change play mode.
PROGRAM PLAY (UP TO 16 MEMORIES)
1. Press PROGRAM during playback to display the program
menu.
2. Select location(s) to be memorized via navigation buttons
and then enter desired Titles/Chapters numbers via
numeric buttons.
Example: Track 3, press "3"
Track 12, press "1" and then "2"
Track 21, press "2" and then "1"
3. To start programmed playback, select PLAY on the menu;
pressing PROGRAM button again to exit programming.
4. To clear all items, press the PROGRAM button to enter the
program menu first, then use navigation buttons to select
the <CLEAR> on the menu, press OK button to clear all
programmed items.
5. You can cancel the programmed playback by clearing all
the programmed items.
KODAK PICTURE CD / JPEG CD PLAYBACK
Load a Kodak picture CD/JPEG CD disc onto the disc tray,
then select the picture option to play the disc with navigation
left/right button and press OK Button to confirm.
Slide show of Kodak Picture CD begins automatically;
Folders of JPEG picture CD are displayed on the TV screen;
use the navigation buttons to select the desired folder and
then press OK button to confirm.
The files in this folder are displayed and you can select your
favourable pictures using the up/down navigation buttons and
press OK button to start playback.
Preview of the picture and the corresponding information of
the picture (resolution, size, date) will be displayed while you
scroll across the file names.
ZOOM PLAY
Press ZOOM button continuously to zoom in the picture by2,3,
and 4 times, zoom out by 1/2,1/3,1/4 normal size.
Press this button once more when the picture is at 1/4 size to
return to the normal size display.
Scroll to view the enlarged picture using Navigation buttons.
14
KODAK PICTURE CD / JPEG CD OPERATIONS
1. PLAY MODES
Press REPEAT button to change play mode.
During playback, press STOP to enter preview mode.
COMMON PROCEDURES FOR INITIAL SETTINGS
1. Press and hold SETUP button on the unit or press SETUP
button on the remote to access the setup menu.
2. Use the navigation buttons to select the item you want to
modify, setting page with further setting items displayed
shows on the TV screen. Again use navigation buttons to
make changes. Press OK button to confirm modifications.
3. Use navigation buttons to switch to another setting on the
main setting page.
4. Press SETUP button on the remote or press and hold
SETUP button on the unit to exit the setup menu.
2. SKIP TO NEXT/PREVIOUS PICTURE
Press NEXT button to skip to the next picture or PREVIOUS
button to the previous picture.
3. PICTURE ROTATIONS
Press RIGHT and LEFT navigation buttons to rotate the
picture Clockwise and anti-clockwise respectively.
1. SYSTEM SETUP
1.1 TV SYSTEM - it is used to select the TV mode.
Please select this option as per your TV set.
1.2 SCREEN SAVER - when the player is not in used for
several minutes, a running DVD logo will move across the TV
screen to protect the TV screen.
Options: On: Screen saver is enabled
Off: Screen saver is disabled
1.3 TV TYPE - it is used to select the TV scan mode, please
set as per your TV set.
Options: 4:3PS : Normal Pan & scan mode
4:3LB : normal Letter box mode
16:9 : 16:9 wide screen mode
1.4 PASSWORD - input password to unlock the system. The
steps are as follows:
1.4.1 Enter SYSTEM SETUP, select the PASSWORD item by
scrolling the down navigation button, and then press the right
navigation button to select the input box.
1.4.2 Input user's password "0000" to unlock it, in this case,
select the input box again to change the password by
inputting another new four numeric numbers and then press
OK button to confirm. When the password is changed, you
are needed to input the new one to unlock the system.
1.4.3 Once you forget your own password, use the
supervisor's password "8200" to unlock it.
NOTE: If wrong password was input in unlock status, the
system will lock.
1.5 RATING - Set the rating of this player. If you want to
change the rating of parental lock, please input the password
to unlock first.
Options: 1 KID SAFE / 2 G / 3 PG / 4 PG 13 / 5 PG-R / 6R / 7
NC-17 / 8 ADULT
1.6 DEFAULT - Reset to factory settings.
Options: RESTORE
4. PICTURE FLIP AND TURN
Press UP navigation button to flip the picture up or down.
Press DOWN navigation button to flip the picture left or right.
5. PICTURE ZOOM IN/OUT
Press ZOOM button continuously, the picture zooms in by 2, 3,
4 times or zooms out by 1/2, 1/3, 1/4 the original size.
Press this button once more when the picture getting 1/4 size
to return to the normal play.
If the picture is enlarged, you may use the navigation buttons
to view blocked parts of the picture.
6. SLIDE SHOW TRANSITION MODES
During slide show playback, press the PROGRAM button
cyclically to select one transition effect to play picture.
BRIGHTNESS AND COLOR ADJUSTMENT
During playback, press SCREEN ON/OFF button repeatedly
to adjust the color and brightness for the LCD via navigation
Left/Right button.
Press and hold the SCREEN ON/OFF button to turn on/off
the screen.
EXTERNAL MEMORY MEDIA OPERATION (USB&SD/MMC
CARD)
Prepare the player for External Memory media operation
1. Slide the POWER switch to ON position, Insert a USB data
traveller filled with media files into the USB port or plug the
SD/MMC card into the card slot. After the USB or the
SD/MMC card is successfully detected and read, a media
menu shows on the screen, select a corresponding media
type (picture, audio, video) via navigation right/left button
for play and press OK Button to confirm. Folders show on
the screen and use navigation buttons to select your
desired folder and track to play.
2. Press NEXT or PREVIOUS button to skip forward or
backward.
Note: Press and hold STOP button to make selection among
USB, card and disc via navigation LEFT/RIGHT button,
confirm by pressing OK button.
Note: During MP3 file playback, press TITLE button once to
return back to the media menu. If the player is playing MPEG
4 file or picture file, it is necessary to press TITLE button twice
for showing the media menu (Press TITLE button once to
display the file list, twice to show the media menu).
CAUTION: To avoid electronic static discharge, don't touch
the USB port and card slot during playback.
2. LANGUAGE SETUP
2.1 OSD LANGUAGE - It is used to select different On
Screen Display language for different user.
2.2 AUDIO LANG - select preferred audio language.
(DVD only, need disc software support)
2.3 SUBTITLE LANG - Select preferred subtitle language.
(DVD only, need disc software support)
2.4 MENU LANG - Select preferred disc menu language.
(DVD only, need disc software support)
3. VIDEO SETUP
3.1 BRIGHTNESS - to set the brightness for the display.
Options: 0/2/4/6/8/10/12
3.2 CONTRAST - to set the contrast effect for display.
Options: 0/2/4/6/8/10/12
3.3 HUE - to set the colour impression for display.
Options: -6/-4/-2/0/+2/+4/+6
3.4 SATURATION - to set the saturation level for display.
Options: 0/2/4/6/8/10/12
INITIAL SETTINGS
Initial settings page is for you to make your preferred settings
up for your player. Once the initial settings are done they are
retained in the CPU of the player until otherwise modified.
15
4. SPEAKER SETUP
4.1 DOWNMIX
Options: LT/RT - Left/Right mix mode
STEREO - Select this option if you don't have a 5.1
channels amplifier.
3. Short press SETUP button on the remote or press and hold
SETUP button on the unit to exit setup menu.
1. Channel Guide
TV channels - It is used to enter the TV channels list for you
to select or sort the TV channels as your desired.
Radio channels - It is used to enter the Radio channels list
for you to select or sort the Radio channels as your desired.
Channels class - Select this option to edit the programs as
your desired.
Channels edit - Select this option to edit the channels name,
move or delete the channels as your desired.
DVB OPERATIONS
GET STARTED
y Be sure the TV antenna is connected to your player
properly;
y Power on the player. Press FUNCTION button on the
remote or press and hold FUNCTION button on the unit to
switch to DVB-T mode.
A dialogue of first time installation shows on the screen,
select YES option to perform the first time installation, then
select other options indicated in the following dialogues to
finish the first time installation; select NO option to exit this
interface.
2. System config
TV setting
TV system: it is used to select TV system.
TV type: it is used to select the TV scan mode, please set as
per your TV set.
Options: 4:3PS : Normal Pan & scan mode
4:3LB : Normal Letter box mode
16:9 : 16:9 wide screen mode
Video setting
BRIGHTNESS - to set the brightness for the display.
CONTRAST - to set the contrast effect for display.
HUE - to set the colour impression for display.
SATURATION - to set the saturation level for display.
Language
Please select one of desired language for the system.
Parent Control
Change pin-It is used to change the password.
1) Enter old password in the OLD PIN row
2) Enter new password in the NEW PIN row
3) Enter the new password again in the CONFIRM row
The default user password is 0000.
Channel lock-it is used to lock the channels.
Time setting
Time zone-it is used to select local time zone.
System info
Select this option, the system info shows on the screen such
as: Update date, Tuner info, F/W version Model version etc.
SEARCH A PROGRAM
Press CH+/- button to change the channel number. A desired
channel can be reached using these two keys.
Once the desired channel is selected, it will start broadcasting
the selected channel immediately.
SWITCHING BETWEEN TV/RADIO
During DVB play mode, press TV/RADIO button on the
remote to switch to RADIO play mode (Need signal source
support).
TELETEXT
Press TTX button to display teletext information (Need signal
source support).
ELECTRONIC PROGRAM GUIDE
Press EPG on the remote button to enter into electronic
program guide in DVB mode (Need signal source support).
PROGRAM INFORMATION
Press INFO button during DVB play mode to show the
program detail information (Need signal source support).
3. Installation
Auto scan-select one of country from <select area> row, then
enter <start scan> row by navigation button to begin scanning
the channels.
Manual scan-scroll to manual scan option, a dialogue shows
on the screen for you to set, after then, select <start scan>
option to begin scanning the channels.
Default setup-select this option to restore the factory setting.
LANGUAGE
Press LANGUAGE button on the remote to change different
language supplied by TV programs in DVB mode (Need
signal source support).
SUBTITLE
Press SUBTITLE button to cycle through the subtitle
languages supplied by TV signals (Need signal source
support).
FAVORITE
Press FAV button to enable or disable the favorite function
after set the channels class on the setup menu, and press
navigation UP/DOWN menu to switch the channel among
your favorite channels selected on the setup menu.
DVB-T SETUP MENU
1. Press and hold SETUP Button on the unit or press SETUP
button on the remote, the setup menu will be called out on
the screen.
2. Use navigation LEFT/RIGHT button to switch among the
three different main setup interfaces. Press navigation
UP/DOWN button to highlight the setting options and enter
corresponding submenu as indication. After setting, use
SETUP button to go back main setup interface.
16
SPECIFICATIONS
DISC HANDLING PRECAUTIONS
Power source: AC 100-240V~60/50Hz
Power consumption: 9W
TV systems supported: PAL/NTSC
Maximum number of receivable TV channels (DVB-T): 350
Maximum number of receivable radio channels: 140
Compatible with AVI, MPEG4, XVID, MP3 files
Operating Temperature Range: +5°C to +35°C
Dimensions: 248(L) x 185.6(W) x 39.2(H) mm
y Hold the disc by the edge so the surface will not be
soiled with finger prints. Finger prints, dirt and
scratches can cause skipping and distortion.
y Do not write on the label side with a ball-point pen
or other writing utensils.
y Do not apply benzine, thinner, and liquid that
prevents against static electricity.
y Be careful not to drop or bend the disc.
y Install only one disc on the disc tray.
y Do not try to close the disc tray when the disc is
not installed properly.
y Be sure to store the disc in its case when not in
use.
Audio signal output:
1. DVD (linear audio)
(1) Frequency response: 20Hz-20KHz (48KHz sampling)
& 20Hz-20KHz (96KHz sampling)
(2) S/N ratio: >45dB
(3) Dynamic range: 60dB
2. CD audio:
(1) Frequency response: 20Hz-20KHz
(2) S/N ratio: >45dB
(3) Dynamic range: 60dB
Specifications are subject to change without notice.
TROUBLESHOOTING
If your DVD player does not seem to be functioning properly, check the items below before you contact an authorized service
center.
Symptom
Power does not turn on or
suddenly turns off.
Remote control won't work
No picture or sound
y
y
y
y
y
y
y
y
y
y
y
No sound
y
y
y
No picture and sound
Distorted video or sound
y
y
Check
Make sure the adapter is securely plugged in.
Turn the power off and then back on.
Check that the battery is inserted in the "+" and "-" direction properly.
The battery may be flat. Replace it with a new one.
Check that the signal transmission is directed at the remote control sensor on the DVD
player.
Remove the obstacle between the remote controller and remote control sensor.
Check that the A/V cables are securely connected.
Check that the disc is a DVD, DVD-RW or AUDIO CD.
Do not use a disc that has scratches or dirt.
Check that the label-side of the disc is facing up.
The pick-up lens of the DVD player may be dirty. Contact the service center for lens
cleaning.
Check that the TV channel is set to VIDEO or AV if viewing with a TV.
Check the volume setting. If set to zero, turn up volume level.
Check that the headphones are plugged into the PHONES socket. Speakers cannot be
used with the headphones.
Check that the battery is properly installed and the Adapter is properly connected.
Use a disc without scratches or dents.
IMPORTANT SAFETY INSTRUCTIONS
y The apparatus shall not be exposed to dripping or splashing and that no objects filled with liquids, such as vases, shall be
placed on the apparatus.
y When the AC/DC adapter is used as the disconnect device, the disconnect device shall remain readily operable. To be
completely disconnected the power input, the AC/DC adapter shall be disconnected from the mains completely.
y No naked flame sources, such as lighted candles, should be placed on the apparatus.
y Minimum distances 2.0cm around the apparatus for sufficient ventilation. The ventilation should not be impeded by covering
y
y
y
y
y
y
the ventilation openings with items, such as newspapers, table-cloths, curtains, etc.
The use of apparatus is in tropical and/or moderate climates.
Attention should be drawn to the environmental aspects of battery disposal.
CAUTION: Danger of explosion if battery is incorrectly replaced. Replace only with the same or equivalent type.
Battery shall not be exposed to excessive heat such as sunshine, fire or the like.
Excessive sound pressure from earphones and headphones can cause hearing loss.
The marking plate is located at the bottom of the apparatus.
17
Melchioni Spa
Via Friuli 18/a
20135 Milano (IT)
Tel. +39 02 5794213 Fax : +39 02 5794351
Scarica