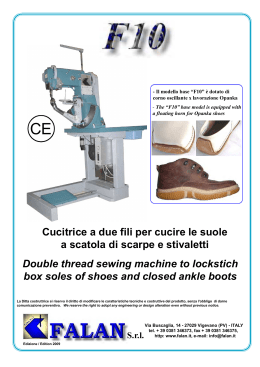
Bedien.713/723 ITALIEN./ENGL.
07.05.2004
10:22 Uhr
Seite 3
• Prima di togliere i coperchi e prima di applicare l’olio oppure prima di eseguire un qualsiasi intervento di manu
tenzione indicato nel presente manuale d’uso, staccare sempre dalla presa il cavo della macchina.
CONSERVARE CON CURA QUESTO MANUALE!
Questa macchina da cucire è indicata solo per l’uso domestico.
IMPORTANTI ISTRUZIONI DI SICUREZZA
Prima di utilizzare la macchina da cucire leggere tutto questo manuale ed osservare sempre durante la manipolazione con la macchina i provvedimenti di sicurezza di base.
PERICOLO – protezione contro l’incidente causato dalla corrente elettrica:
• Quando la macchina da cucire è attaccata alla presa, non dovrebbe rimanere inosservata. Staccare la mac
china da cucire dalla presa immediatamente dopo l’ultimazione del lavoro con la stessa o prima di fare l’inter
vento di pulizia sulla stessa.
• Staccare la macchina da cucire sempre dall’alimentazione anche prima di sostituire la lampadina. Per la sos
tituzione della lampadina utilizzare lo stesso tipo della lampadina con la potenza d’entrata di 15 watt.
AVVERTENZA – Per ridurre i rischi di ustioni, incendi, incidenti dovuti alla corrente elettrica o incidenti
causati alle persone:
• Non permettere affinché questa macchina da cucire sia utilizzata come un giocatolo. Se si trovano i bambini
in vicinanza della macchina da cucire al momento del funzionamento della stessa, bisogna dedicare a loro una
grande attenzione.
• Questa macchina da cucire deve essere utilizzata solo secondo lo scopo di utilizzo previsto e descritto in ques
to manuale. Utilizzare solo gli accessori consigliati dal produttore e riportati in questo manuale.
• Non lavorare mai con la macchina da cucire se il cavo elettrico o la presa dello stesso presenta difetti, se la
macchina da cucire non funziona in modo corretto, se è caduta, se è stata danneggiata o se è entrata a con
tatto con l’acqua. In tal caso consegnare la macchina da cucire al più vicino rivenditore autorizzato o traspor tarla al centro di assistenza tecnica ai fini dell’ispezione, riparazione o regolazione meccanica o elettrica della stessa.
• Non lavorare mai con la macchina da cucire se le aperture di aerazione sono otturate. Le aperture di aerazio
ne della macchina da cucire ed il pedale di comando devono essere mantenuti sempre puliti e senza presen
za dei resti di tessuti, polvere o pezzi di stoffe liberi.
• Non gettare e non inserire alcun oggetto in alcuna apertura della macchina da cucire.
• Non utilizzare questa macchina da cucire all’aperto.
• Non utilizzare questa macchina da cucire nei luoghi dove vengono utilizzati i prodotti con aerosol (prodotti in
spray) né nei luoghi dove si utilizza l’ossigeno.
• Se si vuole staccare la macchina da cucire dall’alimentazione, commutare prima l’interruttore generale in posi
zione “O” che significa lo spegnimento e solo dopo togliere la spina dalla presa.
• Togliendo la spina non tirare il cavo. Se si vuole staccare la macchina da cucire dalla presa, afferrare bene la
spina e tirarla fuori dalla presa ma non tirare mai il cavo.
• Non avvicinare le dita ad alcun componente mobile. Una particolare attenzione bisogna dedicare in vicinanza
all’ago della macchina da cucire.
• Utilizzare sempre la corretta piastra per l’ago. La piastra per l’ago scorretta può causare la rottura dell’ago.
• Non utilizzare mai l’ago piegato.
• Non tirare mai il tessuto durante la cucitura e non spingerlo eccessivamente. Questo movimento potrebbe pie
gare l’ago e causare la rottura dello stesso.
• Prima di procedere ai vari lavori attorno all’ago come per esempio infilatura del filo nell’ago, sostituzione dell’a
go, inserimento della spoletta oppure sostituzione del piedino, commutare la macchina da cucire in posizione
disinserita. machine en position d´arrêt.
1
Bedien.713/723 ITALIEN./ENGL.
07.05.2004
10:22 Uhr
Seite 4
IMPORTANT SAFETY INSTRUCTIONS
When using the sewing machine, basic safety precautions should always be followed, including
the following:
" Read all instruction before using."
! DANGER - To reduce the risk of electric shock:
The sewing machine should never be left unattended when plugged in. Always unplug this
sewing machine from the electrical outlet immediately after using and before cleaning.
Always unplug before changing the light bulb. Replace bulb with same type rated 15 watts.
! WARNING - To reduce the risk of burns, fire, electric shock, or injury to persons:
• Do not allow this machine to be used as a toy. Close attention is necessary when the sewing
machine is used by or near children.
• Use this sewing machine only for its intended use as described in this manual.
Use only aceessories recommended by the manufacturer as contained in this manual.
• Never operate this sewing machine if it has a damaged cord or plug, if it is not working properly,
if it has been dropped or damaged, or dropped into water, Return the sewing machine to the
nearest authorized dealer or service center for examination, repair, electrical or mechanical
adjustment.
• Never operate the sewing machine with any of the air openings blocked. Keep the ventilation
openings of the sewing machine and foot controller free from the accumulation of lint, dust
and loose cloth.
• Never drop or insert any object into any openings.
• Do not use this machine outdoors.
• Do not operate this machine where areosol (spray) products are being usecl or where oxygen
is being administered.
• To disconnect, turn the main switch to the symbol" O " position which represents off, then
remove plug from outlet.
• Do not unplug by pulling on the cord. To unplug, grasp the plug and pull, not the cord.
• Keep fingers away from all moving parts. Special care is requirecl around the sewing machine
needle.
• Always use the proper needle plate. The wrong plate can cause the needle to break.
• Do not use a bent needle.
• Do not pull or push the fabric while stitching. It may deflect the needle causing it to break.
• Cut off the power position when making and adjustments in the needle area. such as threading
the needle, changing the needle, threading the bobbin, or changing the presser foot.
• Always unplug the sewing rnachine from the electrical outlet when removing covers, lubricating,
or when making any other user service adjustments mentioned in this instruction manual.
" SAVE THESE INSTRUCTIONS "
" This sewing machinc is intended for household use.”
2
Bedien.713/723 ITALIEN./ENGL.
Indice
07.05.2004
10:22 Uhr
Seite 5
Intr oduzione br eve
Capitolo I
Funzioni importanti
Componenti principali
Capitolo II
Preparazione alla cucitura
Tavola estraibile per tessuti
Accessori
Alimentazione
Pedale di comando
Illuminazione della macchina da cucire
Sostituzione del piedino
Sostituzione dell’ago
Tabella degli aghi e dei fili
Come utilizzare i supporti per rocchetti
Estrazione e fissaggio della capsula della spoletta
Avvolgimento della spoletta
Inserimento del filo nella capsula della spoletta
Passaggio del filo inferiore verso sopra
Regolazione della tensione del filo superiore
Selettore del tipo del punto
Selezione del punto doppio
Selettore della lunghezza del punto
Selettore della larghezza del punto
Pulsante della cucitura inversa
Trasporto inferiore
Selettore della pressione del piedino
Capitolo III
Inizio della cucitura
Punto dritto
Inversione della cucitura
Utilizzo del guidafilo sulla piastra dell’ago
Punto ad angolo retto
Punto zigzag
Capitolo IV
Cucitura di giunture
Punto zigzag per orlo invisibile
Punto zigzag triplo
Orlatura
Punto dritto elastico triplo
(Modello 723)
Attaccatura bottoni
Cucitura asola per bottoni
Asola per bottoni con punto decorativo
Attaccatura di cerniere
Punto invisibile
Capitolo V
Punto decorativo
Punto a conchiglia
Punto doppio (Modello 723)
Punto a scacchiera (Modello 723)
Punto elastico saettato (Modello 723)
Cucitura applicazioni
Cucitura giunture (Modello 723)
Capitolo VI
Manutenzione della macchina da cucire
Rimozione del trasportatore e degli accessori dello stesso
Pulizia trasportatore
Oliatura macchina da cucire
Eliminazione difetti
3
Bedien.713/723 ITALIEN./ENGL.
07.05.2004
10:22 Uhr
Seite 6
A Brief Introduction
Contents
Chapter I
Straight sewing……………………………….24
Imporatant Functions
Change sewing direction……………………25
Name of parts:……………………………5
Use leg wire on the needTe plate………….26
Chapter II
Right-angle drive……………………………..26
Preparation before sewing
Zigzag sewing………………………………..77
Extendable………………………………..6
Chapter IV
Accessory…………………………………7
Join fabric
Power supply……………………………..8
Zigzag over-lock……………………………..28
Foot controller…………………………….8
Triple zigzag stitching……………………….29
Sewinglamp……………………………….9
Triple stretch straight stitching
Remove and attach presser foot………..l0
(Model 723)…………………………………..30
Change the needle………………………11
Button sewing………………………………..31
Thread and needle chart………………..12
Make a buttonhole…………………………..33
How to use spool holder………………...13
Buttonhole with decorative stitching……….35
Remove and attach the bobbin case…..14
Zipper insertion………………………………36
Wind the bobbin………………………….15
Blind hem……………………………………..37
Attach bobbin into bobbin case………...16
Chapter V
Machine threading……………………….17
Decorative stitching
Draw up lower threading………………..18
Shell stitchin………………………………….38
Upper threading tension………………...19
Double Action stitching (Model 723) ………39
Pattern selection dial…………………….20
Net stitching (Model 723)…………………...40
Select double action stitch………………20
Box-shaped elastic stitching (Model 723)…43
Stitch length selection dial………………21
Pad stitching………………………………….42
Stitch width selection dial………………..21
Edge joining (Model 723)…………………...43
Reverse sewing button…………………..22
Chapter VI
Lower feed dog…………………………...22
Remove the shuttle and its accessories
Presser foot pressure selection dia…….23
Clean feed dog……………………………… 45
Chapter III
Oil the machine………………………………46
Start sewing
Obstacle avoidance………………………….48
4
Bedien.713/723 ITALIEN./ENGL.
07.05.2004
Chapter I Important
Functlons
10:22 Uhr
Seite 7
CapitoloI:
Funzioni
Kapitel l
importanti
Wichtige Funktionen
Name of parts:
Componenti
principali:
Hauptbestandteile:
1 Pulsante inversione direzione
2 Selettore tipo punto
1 Rückwärtstaste
3 Selettore lunghezza punto
2 Stichmuster-Drehschalter
4 Fermo avvolgimento spoletta
35 Stichlängen-Drehschalter
Spoletta per cucire
Supporto spoletta
46 Stichbreiten-Drehschalter
Coperchio superiore
S7 Spulengreifer
8 Guida filo
6 Spulenträgerarm
9 Leva filo
7 Garnrollenhalter
10 Tensione filo
8 AufspuI-Spannungsscheibe
11
Coperchio lampadina
12
Piedino per cucire
9 Fadenvorspannung
13
piedino
10 Leva
Gelenkfadenhebel
14 Tagliaasole
11 Fadenspannungsscheibe
15 Piastra dell’ago
12 Obere Abdeckung
16 Piano estraibile per tessuto
13(cassetta
Drehschalter
Nähfußdruck
per accessori)
1 Reverse button
17
14 Maniglia
Fadenhaken
18
15 Volantino
Nähfußhebel
19 Presa pedale di comando
16 Stichplatte
20 Accensione/Spegnimento
17 Ausziehbarer Anschiebetisch
21 Vite dell’ago
Zubehörfach)
22 (mit
Piano
di lavoro estraibile
23
del piedino
18 Leva
Tragegriff
2 Pattern selection dial
3 Stitch length selection dial
4 Bobbin winding regulator
5 Bobbin winding shaft
6 Spool holder
7 Wind thread tension disc
8 Thread retainer
9 Thread take-up lever
IO Uppercover thread tension
disc
11 Top cover
12 Presser foot pressure
regulation selection dial
13 Ripper
14 Presser foot lever
15 Needleplate
16 Extendable cloth plate
(accessory' case)
l7 Lifter
18 Balance wheel
19 Handrad
19 Switch button
20 Kippschalter
20 Power
21 Fußanlasserbuchse
2I Needle clamp screw
22 Nadelhalterschraube
22 Freearm cloth plate
23 Freiarmtisch
23 Presser foot elevator lever
5
Bedien.713/723 ITALIEN./ENGL.
07.05.2004
10:22 Uhr
Seite 8
Capitolo II:
Preparazione alla cucitura
Chapter lI
Preparation before Sewing
Externdable cloth plate
Tavola estraibile per tessuti
La tavola estraibile per tessuti può aumentare il
The extendable cloth plate can not nolyenlarge
piano di lavoro durante la cucitura e può essere
working. Space while sewing but also can be easily
facilmente smontata. Può essere utilizzato
disassembled. The free-arm cloth plate can also be
anche il piano di lavoro estraibile per la cucitura
used.
per i luoghi difficilmente accessibili.
Smontaggio della
tavola estraibile
per tessuto:
Smontare la tavola
estraibile per tessuto
come indicato sul disegno. Applicazione della
Disassembe the extendable cloth plate:
tavola sul tessuto: Applicare la tavola estraibile
Disassembe the cloth plate as shown in the
sul tessuto (in particolare facendo il punto
illustration.
zigzag sulla piastra).
Fit over the cloth plate:
Join the extendable cloth plate(namely,platform
stiching)
Vantaggi ed utilizzo del
punto zigzag sul piano di
lavoro estraibile
• Trasporto del tessuto
accumulato davanti all’ago
durante la cucitura delle
tasche, arricciamenti ed orli
lungo la circonferenza vita.
• Cucitura manici, orli nella circonferenza
vita, gambe dei pantaloni o altri tipi di
abbigliamento con forma oblunga.
• Rammendo sulle ginocchia, gomitoli ed
abbigliamento da bambino.
Merits and application of free-arm cloth
plate stitching
Avoid cloth piled up in front of needle while sewing
pockets, tucks and waist edges. Sew sleeves, waist
edges, trouser legs or other roundshaped costumes.
Darn knees, elbows and children clothes.
6
Bedien.713/723 ITALIEN./ENGL.
07.05.2004
10:22 Uhr
Seite 9
Accessori
Accessories
1) Piedino per cerniere
1) Zipper foot
2) Piedino per asole
2) Buttonhole foot
3) Guida cucitura
3) Deflector gate
4) Tagliaasole
4) Buttonhole cutter
5) Cacciavite
5) Screw driver
6) Spolette
6) Shuttle
7) Kit di aghi
7) Needle
8) Olio
8) Oil
7
Bedien.713/723 ITALIEN./ENGL.
07.05.2004
10:22 Uhr
Seite 10
Alimentazione
Power Supply
Prima di allacciare la macchina all’alimentazione occorre verificare se la tensione e la
frequenza indicata sulla macchina corrispondo alle caratteristiche dell’alimentazione
erogata.
It is to be determined that the voltage
and frequency indicated on the machine
should be identical to the supply prior to
connected to the power.
1.Connect machine plug (5) to, machine interface (4)
2.Connect attaching plug (1) to receptacle (3).
3.Switch on sewing lamp with switch button (2).
1. Collegare il cavo di alimentazione del pedale di comando
(5) – in modo tale affinché il cavo passi tra il pedale di
comando e la presa - nella relativa presa (4) sulla macchina
da cucire.
2. Inserire la spina (1) nella presa (3).
3. Accendere l’illuminazione con l’interruttore (2).
(1) Presa di alimentazione
(2) Interruttore (3) Presa elettrica
(4) Presa della macchina da cucire
(5) Spina del cavo del pedale di
comando (6) Pedale di comando
(1) Attachplug
(2) Switchbutton
(3) Receptacle
(4) Machine interface
(5) Machine plug
(6) Foot controller
Foot controller
Foot controller
may change speed of
sewing. The tighter the
switch is pressed, the faster stitching goes.
Pedale di comando
Con l’aiuto del pedale di comando
si può regolare la velocità della
cucitura. Più sarà premuto il pedale
di comando, più alta sarà la velocità della cucitura.
8
Bedien.713/723 ITALIEN./ENGL.
07.05.2004
10:22 Uhr
Seite 11
Illuminazione della macchina
da cucire
Sewing lamp
Illuminazione della macchina
da cucire
Sewing lamp
Sewing lamp hulb stands at the back of top
cover.Take -the top cover when changing the bulb
(front screw).
La lampadina dell’illuminazione si trova dietro il
coperchio superiore. Per la sostituzione della lampadina occorre togliere il coperchio superiore (vite
si trova sul lato anteriore).
! Note
Switch off the power before replacing a bulb.
Annotazione
Take out a bulb:
Prima della sostituzione della lampadina spegnere
l’alimentazione.
-Hold it and screw off to the left.
Fit over a bulb:
-Hold it and screw on to the right.
Estrazione lampadina:
Tenere la lampadina e svitarla verso sinistra.
Inserimento di una lampadina nuova:
Tenere la lampadina ed avvitarla verso destra.
9
Bedien.713/723 ITALIEN./ENGL.
07.05.2004
10:22 Uhr
Seite 12
Sostituzione del piedino
Remote and Attach
Presser Foot
Estrazione:
Removing:
Girando il volantino in direzione verso di voi alzare
l’ago in posizione più alta. Equilibrare il piedino.
Premere la levetta sul supporto del piedino e liberare lo stesso.
Turn forward the balance wheel while raising
the needle to the highest position. Leveling up
the presser foot. Hold back the lever on the
foot bearer while releasing the presser foot.
Installing:
Inserimento:
Fit over the presser foot so that its plate dowel
is just opposite to the groove. Lower the presser foot lever and its presser foot will be fixed
to the place.
Inserire il piedino in modo tale affinché la parte
piatta si trovi direttamente contro la scanalatura.
Far scendere la levetta del piedino ed il piedino si
fissa nel suo posto.
10
Bedien.713/723 ITALIEN./ENGL.
07.05.2004
10:22 Uhr
Seite 13
Sostituzione dell’ago
Changing the needle
Turn forward the balance wheel while raising
the needle to the high level and lower the presser foot. Loosen the needle clamp bolt by turning it anti-clockwise.Remove the used needle
and insert the new one with its flat side facing
the back. While inserting the needle, the needle
should be pressed as firmly as possible up into
the needle clamp, which should he tightened
with a screwdriver.
Girando il volantino in direzione verso di voi alzare
l’ago in posizione più alta e far scendere il piedino.
Girando nel senso antiorario liberare la vite dell’ago.
Estrarre l’ago utilizzato ed inserire un ago nuovo
affinché il lato piatto sia in direzione posteriore.
Inserendo l’ago spingerlo il più possibilmente in
direzione verso sopra nel morsetto dell’ago e stringere la vite con il cacciavite.
Annotazione
! Note
Eseguire il controllo negli intervalli regolari per
essere certi che l’ago non è piegato o smussato.
Relativamente ai tessuti in maglia, seta fine e tessuti in seta può capitare spesso la formazione dei nodi
e delle suture saltate che vengono spesso causate
dagli aghi danneggiati.
Regular checking should be done to ensure that
the needle is never twisted or blunt.Knitting
materıals, lıne silk or silk fabrıcs may frequently
encounter knots and skipping stitches, which
are often caused by the damaged needles.
11
Bedien.713/723 ITALIEN./ENGL.
07.05.2004
10:22 Uhr
Seite 14
Tabella degli aghi e dei fili
Grandezza ago
Materiale
N. 60 (N. 7)
N. 70 (N. 10)
Seta fine
Crespo
N. 80 (N. 12)
Popeline
Seta pura
N. 80-90 (N. 12-14)
Tessuto in lana
Parametri del
filo cotone
70-80
50-60
Parametri del
filo seta
100-140
80-lOO
40-50
60-70
Cotone
N. 90-100 (N. 14-16)
Lana
30-40
50-60
N. 90-100 (N. 14-18)
Punti elastici
N. 70 (N. 10)
Tessuto in tela jeans
Tessuto in maglieria
30
70-80
45-50
100-140
Thead and needle char t
Needle size
Material
Cotton thread
Specification
Silk thread
Specification
No.60(#7)
No.70(#10)
Fine silk
Crepe
70-80
1 00- 1 40
No.80(#12)
Poplin
Pure Silk
50-6U
8O-100
No.8U-90(#12-14)
woolen cloth
Cotton
40-50
60-70
No.90-100(#14-16)
Wool
30-40
50-60
No.90-100(#14-18)
Jeans Materials
30
45-50
Elastic stitching
No.70(#10)
Knitting Materials
70-80
100-140
12
Bedien.713/723 ITALIEN./ENGL.
07.05.2004
10:22 Uhr
Seite 15
Come utilizzare i supporti
per rocchetti
How to use spool holder
I supporti per rocchetti vengono utilizzati per la
tenuta dei rocchetti. Prima della cucitura estrarre i
supporti per rocchetti dal coperchio della macchina da cucire.
Spool holder is used lo hold spools.Pulling up the
spool holder when sewing.
Pressdown the machine when it is packed.
(1) upper tread (2) hole (3) knot
Prima di deporre la macchina da cucire ripristinare la posizione del supporto per rocchetti nel
coperchio della macchina da cucire.
(1) filo superiore (2) apertura
(3) nodo
Instruction:
In case that the thread in use is easily
tangled with spool holder or knotted, you can
pull the thread through the hole as shown in the
ill ustration. While keeping the hole facing the
spool.
Annotazione:
Nel caso in cu il filo utilizzato si attorciglia o fa
nodi facilmente con il supporto per rocchetti, si
può far passare il filo attraverso l‘apertura (come
si vede sulla figura) specificando che l’apertura
deve essere girata verso il rocchetto.
13
Bedien.713/723 ITALIEN./ENGL.
07.05.2004
10:23 Uhr
Seite 16
Estrazione e fissaggio della
capsula della spoletta
Remove and load the
bobbin case
Sollevamento del coperchio del braccio
Live the Cover
(1) Coperchio del braccio
Girando il volantino in direzione verso di voi alzare l’ago in posizione più alta. Afferrare la linguetta
di estrazione spoletta e togliere la capsula della
spoletta dalla navetta.
(1) Cover
Turn forward the balance wheel to raise the
needle. Hold on to the bobbin exit and pull out the
bobbin case.
(2) Bobbin exit
Press the bobbin case handle to the innermost to
ensure joining when loading it into the bobbin
case.
(2) Linguetta di estrazione della spoletta
Per inserire la spoletta nella navetta spingere la
linguetta della capsula al massimo dentro per
assicurare il corretto fissaggio.
(3) Bobbin case handle
(3) Linguetta della capsula della spoletta
14
Bedien.713/723 ITALIEN./ENGL.
07.05.2004
10:23 Uhr
Seite 17
Avvolgimento della spoletta
(1) Tirare il volantino in direzione destra per allontanarlo
dalla macchina.
(2) Far passare il filo dalla spoletta attraverso la tensioncina
dell’avvolgimento del filo.
(3) Far passare il filo attraverso l’apertura nella spoletta ed
inserire la stessa sull’alberello.
(4) Girare la spoletta verso destra.
(5) Tenere fermo l’estremità del filo e premere ripetutamente il pedale di comando. Fermare la macchina dopo
qualche giro. Tagliare il filo superfluo vicino alla spoletta.
(6) Premere di nuovo il pedale di comando. Avvolgere il filo
finché la spoletta non sia piena e poi fermare la macchina. Premere l’alberello verso destra e tagliare il filo.
(7) Premere il volantino verso sinistra affinché si avvicina
alla macchina (posizione originaria).
Annotazione: Dopo la ultimazione dell’avvolgimento occorre
premere l’albero della spoletta in direzione sinistra.
W inding
(1) Pull out the balance wheel to the right so as to break
contact with machine
(2) Draw thread from the spool through the bobbin
winder tension disc.
(3) Pull thread through the hole in the bobbin and insert the
bobbin into the bobbin shaft.
(4) Turn the bobbin to the right.
(5)Hold the end of the thread and keep stepping down
the foot controller. Stop the after several turns.Cut the
excess thread close to the bobbin.
(6) Stop down again the foot controller. Wind thread
until the bobbin is full and stop the machine. Push the
shaft to the left and cut the thread.
(7) Push the balance wheel to the left to close contact
(to the original position).
Instruction: The bobbin shaft is to be pushed to
the left when the winding finished.
15
Bedien.713/723 ITALIEN./ENGL.
07.05.2004
10:23 Uhr
Seite 18
Inserimento del filo nella
capsula della spoletta
Put thread into the
bobbin case
1
2
3
Load bobbin in bobbin case. Make sure that the
thread is pulled out in the direction indicated by
the arrowhead (clockwise).
(2) Pull thread into the slit of bobbin case.
(3) And then, pull thread through bobbin tension
regulator spring to the outlet hole.
(1) Inserire la spoletta nella capsula. Assicurarsi
che il filo è estratto fuori in direzione indicata
dalla freccia (in senso orario).
(2) Inserire il filo nella scanalatura della capsula
della spoletta.
(3) Dopodiché passare il filo attraverso la molletta
del regolatore della tensione della spoletta vici
no all’apertura di uscita.
Instruction: pull thread out about 10 cm.
Annotazione: Lasciare il filo estratto di circa 10 cm.
16
Bedien.713/723 ITALIEN./ENGL.
07.05.2004
10:23 Uhr
Seite 19
Inserimento del filo sulla
macchina
Alzare il piedino e girando il volantino in direzione
avanti spostare il tendifilo in posizione più alta.
Inserire il rocchetto sul supporto per rocchetti in modo
tale com’è riportato sulla figura.
Dalla parte posteriore del rocchetto tirare il filo.
(1) Far passare il filo attraverso il tendifilo.
(2) Tenere il filo e passarlo attraverso la tensioncina
del filo e dopodiché nel guidafilo a forma della U.
(3) Tirare strettamente il filo e farlo passare attraverso
la fessura del tendifilo.
(4) Dopodiché tirare il filo verso sotto e farlo passare
attraverso il guidafilo.
(5) Tirare di nuovo il filo e farlo passare attraverso il
gancetto guidafilo.
(6) Far passare il filo attraverso l’ago dalla parte
anteriore alla parte posteriore.
Consiglio: Tagliare il filo con le forbici affilate per
inserirlo meglio nell’ago.
Machine threading
Turning forward the balance wheel and move thread
take-up lever to the highest positon.
Raise presser foot and insert the spool into
spoolholder as shown in the illustration.
Draw thread from the back side of the spool.
(1) Wind thread past thread retainer by both hands.
(2) Hold the thread and pull it into the thread tension
disc and then past the thread plate.
(3) Pull up the thread tightly and let it through the slit
of thread take-up lever from the right side.
(4) Then pull down thread and let it through the
thread hook.
(5) Pull down thread and let it go through the catch
the thread hook.
(6) Pull thread through needle hole from the front to
the back.
Instruction: Cut the thread with sharp scissors so
as to make easy threading.
17
Bedien.713/723 ITALIEN./ENGL.
07.05.2004
10:23 Uhr
Seite 20
Inserimento del filo
inferiore verso sopra
Draw up lower thread
(1) Alzare il piedino e tenere leggermente con la
mano sinistra il filo superiore.
(1) Lift presser foot and hold the upper thread
lightly with your left hand.
(2) Girare con il volantino in direzione verso di voi
finché il tendifilo non si porti alla posizione più
alta. Tirare il filo superiore per poter estrarre
su il filo inferiore.
(2) Keep turning forward the halance wheel until
thread take-up Iever is at its highest position.Pull
the upper thread so as to pull up the lower thread.
(3) Leave about 5 cm of both threads and pull
them under the presser foot then toward the back
of the presser foot. Leave 5 cm of both threads.
(3) Tirare entrambi i fili di circa 5 cm e farli passa
re sotto il piedino verso la parte posteriore.
18
Bedien.713/723 ITALIEN./ENGL.
07.05.2004
10:23 Uhr
Seite 21
Regolazione della tensione
del filo superiore
Tension adjustment
of upper thread
While doing straight stitching, both upper and
lower threads must be knotted between the two
layers of garment.
(1) Adjust selection dial of thread tension disc
within the window.
(1) Regulated indicator
(2) The smaller the tension of upper thread is bigger, turn up the ındıcator.
(3) The tension of upper thread ıs smaller, turn
down the indicator.
Durante la cucitura con i punti dritti il filo superiore e
quello inferiore devono essere uniti tra gli strati
dell’abbigliamento.
[1] Con il regolatore della tensioncina impostare la
giusta tensione del filo.
(1) Valore impostato a nuovo
[2] Più basso è il valore numerico, minore è la tensione del filo superiore.
[3] Più alto è il valore numerico, maggiore è la tensione del filo superiore.
The tension of upper thread in case of
zigzag stitching.
Tensione del filo superiore nel caso della cucitura
con i punti zigzag
Affinché sia raggiunto un buon risultato durante la
cucitura con i punti zigzag, il filo superiore deve essere teso meno rispetto alla cucitura con il punto dritto.
Il filo superiore si dovrebbe vedere sul lato opposto.
In order to achieve good effect of zigzagging, the
tension of upper thread should be less than that
of straight stitching.
The upper thread should be visible from the
reverse.
19
Bedien.713/723 ITALIEN./ENGL.
07.05.2004
10:23 Uhr
Seite 22
Selettore del tipo del punto
Pattern selection dial
(Modell 713)
(Modell 723)
Il filo viene fatto passare attraverso il tessuto e sul
selettore del tipo del punto s’imposta il tipo desiderato del punto.
Needle is pulled out from fabric and the desired
size of stitching should he selected on the selection dial.
Selezione del punto doppio
(Modello 723)
Select Double Action stitching (Model 723)
As for stitching Double Action stitching, its length
should be adjusted into “(1)-(10)”.
Wıth the following adjustment, the length of stitchcould be selected as you like.
"-" refers to thick stitch in Iength.
"+" refers to sparse stitch in length.
Per il punto doppio impostare l’intervallo (1) – (8).
Con l’aiuto della regolazione seguente si può scegliere la lunghezza del punto secondo il vostro
bisogno.
“+“ significa il punto fitto in lunghezza
”-“ significa il punto rado in lunghezza
Instruction: Width of stitch changes between
selection dial 2 and 3 should be different as shown
in illustration Model 713 / 723).
Annotazione: La larghezza del punto viene cambiata regolando il selettore tra il valore 2 e 3 (vedi
la figura: Modello 713/723) nel modo adeguato.
20
Bedien.713/723 ITALIEN./ENGL.
07.05.2004
10:23 Uhr
Seite 23
(Modello 723)
(Modello 713)
Selection dial for length of stitch
Selettore della lunghezza del punto
In dipendenza dal punto selezionato può capitare che
per il risultato ottimo bisogna cambiare la lunghezza del
punto. Più alto è il numero del valore impostato, più
lungo sarà il punto.
Impostazione “…“ è adatta per la cucitura delle asole.
L’intervallo da 0,5 a 4 può essere utilizzato per i punti
zigzag, …
Il valore corretto per il punto elastico dovrebbe essere
“(1) – (10)“. Com’è possibile migliorare la qualità del
punto elastico? Se non si è contenti del punto elastico,
si può impostare il selettore al segno “-“ ed il punto s’infittisce. Impostando il selettore al segno “+“ il punto si
dirada. Selettore della larghezza del punto (non è a disposizione con il modello 713/723)
Con l’aiuto del selettore della larghezza del punto si può
selezionare la larghezza adeguata del punto.
Più alto è il numero del valore impostato, più largo è il
punto. Se la larghezza del punto è minore, l’aspetto del
punto può cambiare sul lato destro (esempio).
-Turn the selection dial with help adjust stitch to its
ideal length.
- The bigger the number is,the longer the stitch is .
„……” is the correct range of adjustment for making
buton holes
-Range from 0.5 to 4 could be used for zigzag stitching
-The correct elastic stitch value should be "(1)-(10)“
How to make the elastic stitch better?
In case the elastic stitch turns out to be unsatisfactory,
you may turn the selection dial to “ - " and in this way,
stitches would be thicker while turning to “+" they would
be more sparse.
Instruction: while turning the selection dial. The needle should be stopped at a rather high position above
fabric.
Annotazione: Durante l’utilizzo del selettore l’ago
dovrebbe essere fermo in posizione alta sopra il tessuto.
21
Bedien.713/723 ITALIEN./ENGL.
07.05.2004
10:23 Uhr
Seite 24
Pulsante della cucitura inversa
Reverse button
Se si preme il pulsante della cucitura inversa, la
macchina effettuerà solo la cucitura inversa.
If the reverse button is always pressed down, the
machine will do reverse stitching all the time.
Trasportatore inferiore
Lower feed dog
[1] Alzare il coperchio
(1) Coperchio
[2] Tirando l’albero far funzionare il trasportatore inferiore e spostarlo in direzione
indicata dalla freccia com’è
riportato sulla figura.
(2) Azionare la levetta
dentata.
[3] Alzare il trasportatore
tirando la levetta dentata in
direzione verso sotto e
spostarla in direzione indicata dalla freccia fino al fine
corsa “A” com’è riportato
sulla figura.
(1) Life the cover
(1) Cover
(2) Lower the feed dog by
pulling down the shaft and
moving it towards the direction inclicated by the arrow
head as shown in the
illustration.
(2) Lower teeth lever
(3) Raise the feed dog by
pulling down the lower
teeth lever and moving it
towards the direction indicated and reach "A" by the
arrowhead as shown in the
illustration.
Annotazione: Durante la
cucitura normale tutto il
trasportatore dovrebbe
essere alzato
completamente.
Instruction: for ordinary
sewing, all the feed dog
shall be raised.
22
Bedien.713/723 ITALIEN./ENGL.
07.05.2004
10:23 Uhr
Seite 25
Regolatore della pressione
del piedino
Foot pressure selection dial
For ordinary sewing, selection dial is present
at " 3 ". And its pressure drops to " 2 " when
sewing appliques, mesh fabrics and embroidery.
As for chiffon, lace, yarn and other miscellaneous
fine materials, you may put the dial to
" 3 ". Cotton flannel and braided stretch textile
should be adjusted to " 1 ".
Durante la cucitura normale il selettore dovrebbe
essere impostato al valore “3”. Durante la cucitura
delle applicazioni, abbellimenti e punti pieni il
selettore dovrebbe essere impostato al valore “2”.
Nel caso della cucitura della mussolina, pizzo, filato e di altri materiali fini il selettore può essere
impostato al valore “3”. Durante la cucitura della
flanella di cotone e dei tessuti filati si può impostare il selettore al valore “1”.
(1) Regulatory value indication
(1) Indicazione del valore dell’impostazione
23
Bedien.713/723 ITALIEN./ENGL.
07.05.2004
10:23 Uhr
Seite 26
Capitolo III: Inizio della cucitura
Chapter III Start Sewing
Strait stitching
Cucitura con punto dritto
(1) Pattern selection dial: 1 or 2
(2) stitch length: 1.5 - 4
(3) presser foot for needlework: zigzag
(4) pressure of thread tension disc: 2-6
(1) impostazione del selettore del tipo del punto: 1 oppure 2
(2) lunghezza del punto: 1,5 – 4
(3) larghezza del punto: 5 oppure 0 (non è a disposizione
con il modello 713/723)
(4) piedino: per il punto zigzag
(5) pressione della tensioncina: 2-6
Relevez le pied à coudre et déposez le tissu à côté du
guide-fil, situé sur la surface de couture et ce, de telle
manière que le bord du tissu couvre les marques dessinées sur la surface de couture. Faites tourner la roue
manuelle vers vous et introduisez l´aiguille dans le tissu.
Abaissez le pied à coudre et assurez-vous que le fil soit
bien dirigé vers l´arrière. Appuyez sur la commande de
pied. Le tissu commence à se déplacer le long du guidefil et le pied à coudre va automatiquement l´entraîner.
Afin que l´extrémité du fil soit solide, appuyez sur la touche de la marche arrière et effectuez quelques points
inversés. Relevez le pied à coudre. Retirez le tissu et
tirez sur le fil en direction de l´arrière. Coupez les deux
fils. Veillez à laisser une longueur de fil suffisante en vue
d´une utilisation ultérieure.
Raise presser foot and put cloth beside leg wire of needle
plate.Turn forward the balance wheel and lower the needle down into the fabric. Lower presser foot and make
sure that thread is placed backward. Step down fool controller. Fabric will go along leg wire and is carned forward
automatically by feed dog.
In order to make end of thread firm, please press the
reverse stitch buton and do several reverse stitches.
Raise presser foot extract fabric and pull the thread backward. Clip both threads with a cutter. Leave certain length
of thread for future use.
24
Bedien.713/723 ITALIEN./ENGL.
07.05.2004
10:23 Uhr
Seite 27
Modifica della direzione
della cucitura
Change sewing direction
Stop the machine, and turn the balance wheel to
bring the needle down into the fabric.
Raise the presser foot.
Turn the fabric to change direction as desired.
Lower the presser foot to resume sewing.
Fermare la macchina da cucire e girare il volantino in direzione verso di voi affinché l’ago penetri
nel tessuto. Alzare il piedino e girare il tessuto in
direzione desiderata. Far scendere il piedino e
continuare nella cucitura.
25
Bedien.713/723 ITALIEN./ENGL.
07.05.2004
10:23 Uhr
Seite 28
The strips of leg wir e on the needle plate
The Strips of leg wire on the needle plate is of great
help to maintaining width between the needle and the
thread
Instruction: these data conforrn to the distance between
strips of leg wire and the needle.
(1) Strips of leg wire
(2) Comer
(3) Needle plate
(4) Hole of needle plate
(5) The width of sewing to the center of needle
Utilizzo del guidafilo sulla piastra dell’ago
I guidafili sulla piastra dell’ago possono aiutare significativamente
Die Markierungen auf der Stichplatte sind von großem Nutzen,
durante il mantenimento della distanza tra l’ago ed il filo.
um den Abstand der Naht zur Kante beizubehalten.
Hinweis: Die folgenden Daten beziehen sich auf den Abstand
Annotazione: I dati seguenti corrispondono alla distanza tra il
coutureStrichplattenmarkierung.
guidafilo e l’ago.
(1) Guidafilo
(1) Guide-fils
(2) Angolo
(2) Coin
(3) Piastra dell’ago
(3) Surface de
(4) Apertura nella piastra dell’ago
(4) Orifice dans la surface de couture
(5) Larghezza della cucitura verso il
(5) Largeur de la couture par rapport
centro dell’ago
au centre de l´aiguille
Figure on the needle plate
Spacing in cm
10
1.0
15
1.5
20
2.0
3/8
1.0
4/8
1.3
5/8
1.6
6/8
1.9
Numero sulla piastra
dell’ago
Fessura in cm
10
1.0
15
1.5
20
2.0
3/8
1.0
4/8
1.3
5/8
1.6
6/8
1.9
Punto ad angolo retto
Right-angle stitch
Beim Nähen eines rechten Winkels ist darauf zu achten,
Facendo i punti ad angolo retto dovrebbe essere mantenuta la
dass
zumdiStoffrand
ein Abstand
von 1,6 cm eingehalten wird.
distanza
1,6 cm dall’orlo
del tessuto.
Halten
Sie
die
Nähmaschine
an,
wenn der
sich
Quando l’orlo del tessuto sarà allineato
con Stoffrand
l’angolo, fermare
la
auf
gleicher
Höhe ilmit
der Eckmarkierung
auf der
macchina
e girare
volantino
in direzione verso
di Stichplatte
voi affinché
befindet.
Bewegen
l’ago scenda
giù. Sie das Handrad auf sich zu, so dass
die
Nadel
sich ineden
Stoff
senkt~attorno
Heben all’ago
Sie denper
Nahfuß
und la
Alzare
il piedino
girare
il tessuto
cambiare
drehen
Sie
den Stoff
in die
direzione
finché
l’orlo solange
del tessuto
nongewünschte
sia allineatoRichtung,
a 1,6 cm con il
guidafilo.
bis
seine Kante mit der Stichplattenmarkierung
Far cm
calare
il piedinoSenken
ed iniziare
cucitura
inund
direzione
1,6
abschließt.
Sie la
den
Nähfuß
fahrennuova.
Sie
(2) Filo
mit
demdall’angolo
Nähen fort. (2) Faden Eckmarkierung
While doing right stitches, a space of
1.6 cm should bekept apart from
the edge of fabric
When the edge of fabric is aligned with
the corner. stop the machine and
turn (forward) the balance wheel
to lower the needle.
Raise the presser foot, turn the fabric
around the needle
to change direction until its edge is
aligned with the strip of leg wire of
1.6cm. Lower the presser foot and sew
in the new direction.
(2) Thread from the corner
26
Bedien.713/723 ITALIEN./ENGL.
07.05.2004
10:23 Uhr
Seite 29
Punto zigzag
Zigzag Stitching
(1) selettore del tipo del punto: 3
(2) lunghezza del punto: ……. – 4
(3) larghezza del punto: 5 (non è a disposizione
con il modello 713/723)
(4) piedino: per il punto zigzag
(5) tensioncina del filo: 2-6
(1) pattern selection dial:3
(model 713); 3-5(model 73 3)
(2) stitch length: IIIIIIIIII 1 - 4
(3) presser foot: zigzag
(4)thread tension disc: 2-6
I punti zigzag semplici vengono utilizzati spesso
per l’orlatura, cucitura asole e per cucitura di
nastri elastici.
Simple zigzag stitches are often used for hemming.
Making button holes and elastic bends.
27
Bedien.713/723 ITALIEN./ENGL.
07.05.2004
10:23 Uhr
Seite 30
Capitolo IV: Cucitura di giunture
Chapter IV Clothes
stitching
Punto zigzag per orlo invisibile
Zigzag over-lock
(1) selettore del tipo del punto: 3
(2) lunghezza del punto: M1-2
(3) larghezza del punto: 5 (non è a disposizione
con il modello 713/723)
(4) piedino: per il punto zigzag
(5) tensioncina del filo: 4-6
(1) pattern selection dial:3 (model 713)
3-58 ( model.723 )
(2) stitch length:Ml-2
(3) presser foot: zigzag
(4) thread tension disc:4-6
Questo punto viene utilizzato per l’orlatura
affinché non si sfilacci l’orlo del tessuto.
The stitch is used for making over-lock so that
thread at the edge of cloth shall not fall apart.
28
Bedien.713/723 ITALIEN./ENGL.
07.05.2004
10:23 Uhr
Seite 31
Punto zigzag triplo
T riple zigzag
(1) selettore del tipo del punto: 4
(2) lunghezza del punto: 0,5-1,5
(3) larghezza del punto: 5 (non è a disposizione
con il modello 713/723)
(4) piedino: zigzag
(5) tensioncina del filo: 4-6
(1) pattern selection dial:3 (model 713)
3-58 ( model.723 )
(2) stitch length:Ml-2
(3) presser foot: zigzag
(4) thread tension disc:4-6
Questo punto viene utilizzato per materiali sintetici
o altri che facilmente formano le pieghe. Viene utilizzato anche per l’orlatura affinché il tessuto non si
sfilacci. E’ adeguato per cucire nastri elastici e per
rammendare. Dovrebbe essere lasciato il nastro
con i punti cuciti per l’orlatura di almeno 1,5 cm.
Dopo la cucitura ultimata tagliare con le forbici il
nastro con i punti cuciti per l’orlatura.
The stitch is used for synthetic materials and other materials that get folds easily.
It also suits over-lock so as to avoid threads falling apart.
It is fit for sewing elastic bends and darning.
A strip of hemming-stitch with 1.5 cm is to be left.
Cut off the strip of hemming-stitching after sewing.
29
Bedien.713/723 ITALIEN./ENGL.
07.05.2004
10:23 Uhr
Seite 32
Punto dritto elastico triplo
(Modello 723)
T riple stretch straight
stritching (Model 723)
(1) selettore del tipo del punto: 1 oppure 2
(2) lunghezza del punto: (1) – (8)
(3) larghezza del punto: 5 oppure 0 (non è a
disposizione con il modello 713/723)
(4) piedino: zigzag
(5) tensioncina del filo: 4-6
(1) pattern selection dial: 1 or 2
(2) stitch length: (1)-(10)
(3) presser foot: zigzag
(4) thread tension disc: 4-6
Due punti in avanti e poi un punto indietro garantiscono che i punti saranno resistenti. Prima di
eseguire questo punto unire i singoli pezzi con
spilli. Questo punto è più adatto per cucire il
cavallo dei pantaloni.
Two stitches forward and then one stitch backward
will make the stitching firm. Prior to stitching garment pıeces, make a sample by using pins. Such
stitches are most suitable for sewing crotches.
30
Bedien.713/723 ITALIEN./ENGL.
07.05.2004
10:23 Uhr
Seite 33
Attaccatura di bottoni
713
Button sewing
723
(1) stitch selection dial:( model 7l3); 3-5 (model723)
(aslong as fit for button sewing) (2) stitch length:
could be adjusted to any figure (3) presser foot:making presser foot for button sewing (4) thread tension
disc pressure 1-3 (5) lower feed dog (See page 16)
Tape the button over the marked position.A pin can
be placed on the presser foot to form a stem to make
winding thread around the button easier.
(1) selettore dei punti: 3
(2) lunghezza del punto: libera
larghezza del punto: selezionare la larghezza del
punto che si addice all’attaccatura del bottone
(non è a disposizione con il modello 713/723)
(3) piedino: piedino per l’attaccatura di bottoni
(4) tensioncina del filo: 1-3
(5) abbassamento del piedino (vedi pagina 16)
Align both holes of the button with groove slots while
placing the left button hole directly under the needle point.
Low presser foot
Posare il bottone sul luogo desiderato. Con l’aiuto dell’ago attaccato sul piedino per bottoni si forma durante la
cucitura la strada che faciliterà l’avvolgimento del filo sul
lato inferiore del bottone. Impostare il selettore del punto
a “2” per i modelli 713/723.
Allineare entrambi i buchi del bottone con le scanalature
e collocare il buco sinistro del bottone direttamente sotto
la punta dell’ago. Abbassare il piedino.
31
Bedien.713/723 ITALIEN./ENGL.
07.05.2004
10:23 Uhr
Seite 34
Impostare il selettore del tipo del punto.
Eseguire circa 5 punti ed inserire l’ago.
-Turn pattern selection dial
-turn the stitch width just up to the top of right
button hole. Make 5 stitches approximately and
raise the needle.
Se si vuole che la presa del bottone sia più resistente, lasciare prima del taglio con le forbici un
estremità libera del filo di circa di 20 cm. Far passare il filo superiore attraverso il buco del bottone
verso sotto e con alcuni giri avvolgerlo attorno
all’attacco del bottone.
Far passare il filo indietro e far il nodo.
To get a thicker button handle, cut the thread wıth
20 cm left. Bring the upper thread down through
the button hole and wind it around the button handle for several turns.
Draw the thread to the back and make a knot.
Instruction: raise the teed dog again after sewing
buttons.
Annotazione: Dopo l’attaccatura del bottone
alzare di nuovo il piedino.
32
Bedien.713/723 ITALIEN./ENGL.
07.05.2004
10:23 Uhr
Seite 35
Cucitura di asole per bottoni
Buttonholes
(1) selettore del tipo del punto: vedi figura = 12
(2) lunghezza del punto: IIIII3 (0,5-1)
(3) larghezza del punto: 5 (non è a disposizione
con il modello 713/723)
(4) piedino: per cucitura di asole per bottoni
(5) pressione tensioncina del filo: 3-5
(1) satural pattern selection dial: see the drawing 1
(2) stitch length:
(0,5-1)
(3) presser foot: making buttonholes
(4) thread tension disc tension: 3-5
La larghezza del punto viene scelta come qualsiasi nell’intervallo di IIIII4 tra „0“ e „1“ secondo la
lunghezza del punto.
(1) Per i punti più fitti impostare il selettore a “0”.
Per cucire le asole per bottoni sul materiale leggero sono adeguati i punti pieni.
(2) Per i punti meno fitti impostare il selettore a
“1”. I punti liberi sono adeguati per i materiali più
duri.
Stitch width is to be chosen arbitranly with in
range according to variation of stitch length.
(1) For thicker stitching, adjust selection dial to "O".
Satin stitches suit lightweight material.
(2) For thicker stitching, adjust selection dial to "1”.
Loose stitches suit heavyweıght material.
Instructron: Make trial stıtchıng on some small
cloth so as to find out the optimum effect.
Annotazione: Se si vuole raggiungere il risultato migliore, eseguire la cucitura di prova su
un piccolo pezzo di tessuto.
33
Bedien.713/723 ITALIEN./ENGL.
07.05.2004
10:23 Uhr
Seite 36
[1] Segnare accuratamente la posizione dell’asola per bottone sul tessuto.
[2] Far passare la guida [A] in avanti in modo tale affinché il segno sul piedino per bottoni [C] sia allineato con il segno originale sul tessuto [B].
Abbassare il piedino.
Annotazione: I segni sulla guida dovrebbero essere tagliati in cm.
[3] Impostare il selettore del tipo del punto a = 1´. Fare i punti in avanti finché non si arrivi ai segni davanti ai bottoni. Poi fermare la cucitura in modo
tale affinché l’ago rimanga sopra a sinistra.
[4] Impostare il selettore del tipo del punto a 4/2. Eseguire 4-6 punti e poi
fermare la cucitura in modo tale affinché l’ago rimanga sopra a destra.
[5] Impostare il selettore del tipo del punto a = 3. Eseguire i punti in direzione posteriore finché non si arrivi ai segni dietro i bottoni e poi fermare la
cucitura affinché l’ago rimanga sopra a destra.
[6] Impostare il selettore del tipo del punto a 4/2. Eseguire 4-6 punti e poi
fermare la cucitura in modo tale affinché l’ago rimanga sopra a sinistra.
[7] Dopo la cucitura delle asole per bottone togliere il tessuto.
Infilare lo spillo attraverso la parte posteriore dell’asola affinché non sia
tagliata involontariamente la fine del filo durante il taglio dell’asola per bottone. Tagliare attentamente l’asola per bottone con il tagliaasole.
(1) Make the marks of buttonhole carefully on the material.
(2) Pull forward slide (A),keep the mark (C)on it in conformity to the initial
mark (B),The mark on the presser foot should be aligned with that of the
material Lower the presser foot.
Instruction: marks on the slide should be carved in cm.
(3) Adjust stitch selection dial to
Keep stitching forward until come to
the marks in front of the buttons and then stop sewing with needle
pausing at top left.
(4) Adjust stitch selection dial to
Make 4-6 stitches before stopping
sewing with needle pausing at top right.
(5) Adjust stitch selection dial to
Keep stitching backward until come to
the marks at the back of buitons and then stop sewing with needle pausing
at top right.
(6) Adjust stitch selection dial to
Make 4-6 stitches before stopping
sewing with needle pausing at top left.
(7) After sewing: buttonholes, take out fabrics. Insert a pin at the back hole
of buttonhole so that the end of thread of buttonhole will not be cut off mis
takely. Cut
out the buttonhole carefully with a buttonhole cutter.
34
Bedien.713/723 ITALIEN./ENGL.
07.05.2004
10:23 Uhr
Seite 37
Asola per bottoni con
punto decorativo
Buttonholes with
decorative stitching
(1) selettore del tipo del punto: BH
(2) lunghezza del punto: ((((((( (0,5-1)
(3) larghezza del punto: 5 (non è a disposizione con il
modello 713/723)
(4) piedino: per la cucitura delle asole per bottoni
(5) pressione tensioncina del filo: 3-5
(1) pattern selection dial:BH
(2) stitch length: IIIIIIIIII (0,5-1)
(3) presser foot: making buttonholes
(4) thread tension disc tension: 3-5
1. Alzare la piastra per cucire i bottoni e girare i fili inse
riti attraverso il braccio metallico sulla parte posteriore
del piedino per bottoni. (1) Braccio del filo regolabile
2. Infilare l’estremità del filo in direzione in avanti sotto il
piedino per cucire e posizionarlo sotto il centro del
piedino per bottone.
3. Tenere il filo ben stretto ed infilarlo nella forchetta
sulla parte anteriore del piedino per bottone.
4. Prima di iniziare la cucitura far scender l’ago nel tes
suto e far scendere anche il piedino.
5. Premere attentamente il pedale di comando in modo
tale affinché ogni lato dell’asola per bottone s’inseris
ca nei fili infilati.
6. Estrarre il tessuto e tagliare il filo.
7. Tirare da sinistra i fili inseriti e afferrarli ben stretti.
8. L’estremità del filo dovrebbe arrotolarsi sull’ago per
rammendo. Far passare il filo indietro e tagliarlo.
1. Raise the foot plate of buttonholes sewing hang the
laid in threads on the cam at the back of presser foot,
(1) Positioning cam
2. Draw forward the end of additional thread under the
presser foot and place it under the center of presser foot.
3. Hold tightly the additional thread and hook the fork in
front of the presscr foot.
4. Bring the neddle into the fabrics before starting sewing
and lower the presser foot.
5. Slowly step down foot controller buttonholes, with each
face of buttonholes encasing the laid-in threads
6.Take out fabrics and clip sewing thread.
7. Pull the laid-in threads from left side and hold it tightly.
8.The end of thread should be wound to darning needle.
Draw the thread to the back and clip.
Instruction: while cutting out buttonholes, pay attention
to the instruction on Page 25.
Annotazione: Durante il taglio delle asole seguire le
istruzioni sulla pagina 25.
35
Bedien.713/723 ITALIEN./ENGL.
07.05.2004
10:23 Uhr
Seite 38
Attaccatura di cerniere
Zipper sewing
(1) selettore del tipo del punto: 1
(2) lunghezza del punto: 1,5-4
(3) larghezza del punto: 5 (non è a disposizione
con il modello 713/723)
(4) piedino: per l’attaccatura di cerniere
(5) pressione tensioncina del filo: 4-6
(1) pattern selection dial: 1
(2) stitch length: 1,5-4
(3) presser foot: zipper
(4) thread tension disc pressure: 4-6
Collocare la cerniera sul tessuto oppure fissarla
con l’aiuto di spilli.
Collocare la cerniera sotto il piedino per cerniere.
Far passare il filo indietro e far scendere il piedino. Cucire la parte sinistra della cerniera nella
parte più vicina ai dentini della cerniera. Allo stesso modo cucire insieme la cerniera ed il tessuto.
Successivamente, girare il tessuto e cucire la
parte destra della cerniera, allo stesso modo
come la parte destra.
Stick a zipper or needle it to the fabrics and place it
under foot plate. Draw the thread to be back and
lower the presser foot. Sew on the left sıde of the
zıpper by guıdıng the zipper teeth as close as possible to the needle drop. Fabrics and zipper should
be stitched tightly at the same time Pivot fabric to
the opposite side and the way to stitch the other
side of zipper should be identical to that of the left
side.
36
Bedien.713/723 ITALIEN./ENGL.
07.05.2004
10:23 Uhr
Seite 39
Orlo invisibile
713
Blind hemming
723
(1) Pattern selection dial: 5-6 (mod.713); 7-8 (mod. 723
(1) selettore del tipo del punto: 5-6 (Modello 713)
(2) lunghezza del punto: 1-3
(3) larghezza del punto: 5 (non è a disposizione con il
modello 713/723)
(4) piedino: zigzag + guida cucitura
(5) pressione tensioncina del filo: 4-6
(2) stitch length: 1-3
(3) presser foot: zigzag plus guiding plate
(4) thread tension disc pressure: 4-6
(1) Folding method for fabrics
(1) Back side of fabrics
(2) 0.4-0.7cm
(2) Lower presser foot, release the screw of the fixed
presser foot and push forward the guiding plate between the screw and foot plate groove. Fix the screw
and make sure that the stopper of guilding plate should
be installed in the middle of foot plate.
(3) raisc the presser foot, place fabrics under the foot
[1] Modo di piegatura del tessuto
(1) Parte posteriore del tessuto
(2) 0,4-0,7 cm
[2] Far scendere il piedino, allentare la vite del piedino e
spostare la guida di cucitura in direzione in avanti tra la
vite ed il centro del piedino. Stringere la vite ed assicurarsi che l’incastro della guida di cucitura si trovi al centro
del piedino.
[3] Alzare il piedino e collocare il tessuto sotto lo stesso
affinché la piegatura sia girata verso l’incastro della guida
di cucitura. Far scendere il piedino e cucire lentamente
per avere il lavoro meglio sotto il controllo. Durante la
penetrazione dell’ago a sinistra per quanto riguarda il
punto zigzag, la piegatura viene cucita vicinissimo all’orlo.
Bisogna essere attenti affinché il tessuto piegato sia sempre lungo la guida di cucitura.
[4] Se stiriamo la parte destra superiore del tessuto, i
buchi lasciati dall’ago saranno quasi impercettibili.
while keeping tucks facing the stopper of the guiding
plate. Lower the presser foot and stitch slowly in order
to command a better control.
The needle on the left zlgzag should be brought just
into tucks. Pay attention to the tucks, which are to be
placed at the side of stopper of guiding plate while
sewing.
(4) When rıght upper layer of cloth ıs ıroned upward,
its stitches are hardly to be perceived.
37
Bedien.713/723 ITALIEN./ENGL.
07.05.2004
10:23 Uhr
Seite 40
Capitolo V: Cucitura con
punti decorativi
Chapter V Decorative
stitching
Punto a conchiglia
Shell stitching
713
723
(1) selettore del tipo del punto: 7 (Modello 713)
(2) lunghezza del punto: 2
(3) larghezza del punto: 5 (non è a disposizione
con il modello 713/723)
(4) piedino: zigzag
(5) pressione tensioncina del filo: 6-8
(1) pattern selection dial: 7 (mod.713; 9 (mod. 723)
(2) stitch length: 2
(3) presser foot: zigzag
(4) thread tension disc pressure: 6-8
L’orlo del tessuto piegato dovrebbe essere collocato accanto al piedino ed all’ago a destra dal
tessuto affinché sia creato il punto a conchiglia.
Folded cloth lace should be placed beside the presser foot and needle on the right of the cloth so as to
work out shell stitching.
38
Bedien.713/723 ITALIEN./ENGL.
07.05.2004
10:24 Uhr
Seite 41
Punto doppio
Double Action stitching
Modello 723
Model 723
(1) selettore del tipo del punto: 1-8
(1) pattern selection dial:1-10
(2) lunghezza del punto: (1) – (8)
(2) stitch length: 1-10
(3) larghezza del punto: 5 (non è a disposizione
(3) presser foot:zigzag
con il modello 713/723)
(4) thread tension disc pressure: 2-6
(4) piedino: zigzag
With following adjustment, the stitch length could be
(5) pressione tensioncina del filo: 2-6
selected as you like.
Adjustment to " - " reters to thick stitch in length.
Adjustment to " + " refers to sparse stitch in length.
Con l’aiuto dell’impostazione successiva si può
scegliere la lunghezza del punto secondo i propri
bisogni.
Impostando “+“ significa scegliere il punto rado in
lunghezza.
Impostando “-“ significa scegliere il punto fitto in
lunghezza.
39
Bedien.713/723 ITALIEN./ENGL.
07.05.2004
10:24 Uhr
Seite 42
Punto a scacchiera
Reticulate stitching
Modello 723
Model 723
(1) selettore del tipo del punto: 4
(2) lunghezza del punto: (1) – (8)
(3) larghezza del punto: 5 (non è a disposizione
con il modello 713/723)
(4) piedino: zigzag
(5) pressione tensioncina del filo: 4-6
(1) pattern selection dial: 4
Segnare con i punti il tessuto in alcune file dritte a
distanza di 1 cm. Come lunghezza del punto scegliere l’impostazione “4“. Il filo superiore e quello
inferiore vengono annodati sempre sul lato. Dall’altro
lato tirare il filo inferiore e creare la piegatura regolare. Dopodiché fissare il filo sull’altro lato. Creare la
cucitura con punti a scacchiera e con punti decorativi attraverso la parte centrale della piegatura.
Dopodiché estrarre i fili di guida che servivano per la
piegatura.
Straight stitch the tucked side with spacing of 1 cm.
Select "4” for its stitch length.
Knot the thread on one side.Tighten lower thread
and make tucks with even spaces.
Fıx the thread on the other side. Make a reticulate
and decoratıve stitching along the middle of
tucks.Then, extract the tuck stitches.
Instruction: Decrease upper thread tension will
make tuck decoration easy.
(2) stitch length: 1-10
(3) presser foot:zigzag
(4) thread tension disc pressure: 4-6
Annotazione: Riducendo la tensione del filo superiore
si facilita la formazione della piegatura decorativa.
40
Bedien.713/723 ITALIEN./ENGL.
07.05.2004
10:24 Uhr
Seite 43
Punto elastico saettato
713
Box shaped elastic
stitching
723
(1) selettore del tipo del punto: 8
(2) lunghezza del punto: 1
(3) larghezza del punto: 5 (non è a disposizione
con il modello 713/723)
(4) piedino: zigzag
(5) pressione tensioncina del filo: 4-6
(1) pattern selection dial: 8 (mod. 713); 10 (mod. 723)
Questi punti sono molto adatti per la cucitura dei
nastri elastici più larghi di 3 mm sui polsi dell’abbigliamento da bambino. Dopo la cucitura stringere il nastro elastico.
Questi punti sono adatti per la cucitura dei tessuti
pesanti. Piegare due tessuti senza sutura e
cucirli insieme.
The stitches are most suitable to sewing the elastic
cords over 3 mm of children's sleeves.Tighten the
elastic cord after sewing.
Such stitches are aiso good to sewing heavyweight
Fold the two seamless fabrics and stitch them
together.
(2) stitch length: 1
(3) presser foot: zigzag
(4) thread tension disc pressure: 4-6
41
Bedien.713/723 ITALIEN./ENGL.
07.05.2004
10:24 Uhr
Seite 44
Cucitura applicazioni
713
Pad stitching
723
(1) selettore del tipo del punto: 3
(2) lunghezza del punto: 0,5-1
(3) larghezza del punto: 5 (non è a disposizione
con il modello 713/723)
(4) piedino: zigzag
(5) pressione tensioncina del filo: 1-4
(6) pressione piedino: 2
(1) pattern selection dial: 3 (mod. 713); 5 (mod. 723)
Premere l’applicazione sul tessuto o stirarla per
quanto riguarda i tessuti non filati. Cucire attentamente l’applicazione lungo il bordo. Tagliare eventualmente il tessuto che eccede. Infilare l’ago nel
tessuto se si dove cambiare la direzione della
cucitura. Alzare il piedino e girare il tessuto a destra o a sinistra.
Adhere tightly the decorative parts to the fabrics or
iron it with solvable non-woven textiles. Stitch
around the decorative parts and make sure that
suture beyond the decorative parts should disappear. Insert the needle into the cloth when encountering corner. Raise the presser foot and pivot the
cloth to the left or right.
Instruction: After sewing, adjust the selecıion dial
(2) stitch length: 0,5-1
(3) presser foot: zigzag
(4) thread tension disc pressure: 1-4
(5) presser foot presser: 2
Annotazione: Dopo la cucitura impostare il
selettore del piedino a “3“.
42
Bedien.713/723 ITALIEN./ENGL.
07.05.2004
10:24 Uhr
Seite 45
Cucitura giunture
Edge joint
Modello 723
Model 723
(1) selettore del tipo del punto: 8
(2) lunghezza del punto: 1-2
(3) larghezza del punto: 5 (non è a disposizione
con il modello 713/723)
(4) piedino: zigzag
(5) pressione tensioncina del filo: 4-6
(1) pattern selection dial: 10
Annotazione: La cucitura delle giunture è possibile dall’impostazione del selettore della lunghezza del punto a (1)-(8).
Piegare entrambi i lati di circa 1-5 cm e stirare i
bordi. Le parti piegate dovrebbero rimanere attaccate sui tessuti non filati con la fessura di circa di
0,3 cm. Eseguire lentamente la cucitura e assicurarsi che ogni punto raggiunge il bordo piegato.
Fold in both sides with 1.5 cm each and iron it. The
folded sides should be fixed to non-woven textiles
with spacing of 0.3 cm. Slowly stitch and make sure
that each stitch should reach the folding edges.
(2) stitch length: 1-10
(3) presser foot: zigzag
(4) thread tension disc pressure: 4-6
43
Bedien.713/723 ITALIEN./ENGL.
07.05.2004
10:24 Uhr
Seite 46
Capitolo VI: Manutenzione della
macchina da cucire
Chapter VI Maintainance of
Machine
Rimozione del trasportatore e degli
Remove the pendular shuttle and its
accessori dello stesso
assemblies
Annotazione: Spegnere l’illuminazione ed estrarre la
spina dalla presa. Alzare l’ago in posizione più alta e
sollevare il coperchio. Estrarre la capsula della spoletta dalla macchina. Girare entrambi i morsetti ed
estrarre l’anello di sostegno del trasportatore.
Instruction: switch off lamp or pull plug out.
Take out the pendular shuttle: Raise needle to its
highest position and lift shuttle Gover. Remove the
bobbin case from the machine, Uncover shuttle lever
and draw out the shuffle retaining ring.
Annotazione: Pulire il trasportatore prima con uno
spazzolino e dopo con uno strofinaccio morbido e
secco.
Instruction: clean the feed dog with a brush and
soft and dry rag
(1) Bobbin case
(2) Shuttle lever
(3) Shuttle retaining ring
(4) Pendular shuttle
(5) Shuttle carrıer
1) Capsula della spoletta
(3) Anello di sostegno
(5) Coperchio del trasportatore
(2) Morsetto
(4) Involucro
Installation of the pendular shuttle: hold shuttle center pin and fit carefully black into the shuttle carrier.
Refit shuttle retaining ring and make sure that the
following Center pin is fixed in the Slot of the shuttle
canier. Lock retaining ring by turning levers back into
position. Refit bobbin case with bobbin
Installazione: del trasportatore: Tenere il coperchio
centrale del trasportatore ed infilarlo attentamente nel
supporto del trasportatore.
Infilare l’anello di supporto del trasportatore ed assicurarsi che il perno centrale sia bloccato nella scanalatura del supporto. Ripristinando la posizione della
linguetta bloccare l’anello di supporto. Ripristinare la
posizione della spoletta nella capsula.
(6) Perno centrale
(7) Scanalatura
(6) Center pin
44
(7) Slot
Bedien.713/723 ITALIEN./ENGL.
07.05.2004
10:24 Uhr
Seite 47
Pulizia del trasportatore
Cleaning the feed dog
Instruction: switch off lamp and pull plug out bef
lore cleaning Ihe feed dog.
Remove the needle and presser foot. Remove the
screw on the left hand side of the needle plate
with the screwdriver.
Remove the needle plate. Clean the feed dog
teeth with a brush and refit the needle plate.
Fit the presser foot and it is ready for sewing
Annotazione: Prima di pulire il trasportatore
spegnere l’illuminazione ed estrarre la spina dalla
presa.
Togliere l’ago ed il piedino. Con l’aiuto del cacciavite togliere la vite sul lato sinistro della piastra
dell’ago.
Estrarre la piastra dell’ago. Con l’aiuto dello spazzolino fine pulire i dentini e ripristinare la posizione della piastra dell’ago. Inserire il piedino e l’ago.
A questo punto la macchina è pronta per cucire.
Instruction: to obtain first rate effect of needlework. Frequent cleaning is required for frequent
use.
Annotazione: Se la macchina da cucire viene utilizzata spesso e se si vuole garantire il risultato
perfetto della cucitura, eseguire spesso la pulizia.
45
Bedien.713/723 ITALIEN./ENGL.
07.05.2004
10:24 Uhr
Seite 48
Oliatura della
macchina da
cucire
Oil the works
Instruction: Apply only
one or two drops of machine oil, or cloth will be stained. If the machine should
not run well after being out
of use for a long period,
apply a few drops of oil
before running it and the
result will be the same as
the well thumbed condition
Annotazione: Applicare
solo una o due gocce di olio
altrimenti si rischia di sporcare il tessuto. Se la macchina da cucire è lasciata
fuori uso per un lungo
periodo di tempo e se poi
non funziona bene, applicare qualche goccia di olio
prima della messa in funzione
della stessa. Grazie a questo fatto si garantisce
alla macchina da cucire un lungo ciclo di vita.
Oiling the back
of top
Remove the cover, screw and top cover
Oiling the parts as shown in the illustration.
(1) Cover (2) Screw (3) Top cover
Oliatura delle parti sotto il
coperchio superiore
Oil the pendular shuttle
Rimuovere il coperchio, la vite ed il coperchio
superiore. Oliare i componenti indicati con la
freccia (vedi la figura).
(1) Coperchio
(2) Vite (3) Coperchio superiore
Refer to description of figure and Page 44.
Oiling is required for the positions marked in the
illustration
(4) Cover
Oliatura del trasportatore
Vedi la descrizione nella figura sulla pagina 32.
I luoghi indicati nella figura devono essere oliati.
(4) Coperchio
46
Bedien.713/723 ITALIEN./ENGL.
07.05.2004
10:24 Uhr
Seite 49
Eliminazione difetti
Difetto
Causa
Spiegazione
1. Scorretta infilatura del filo superiore.
Vedi pagina 17
Rottura del filo
2. Eccessiva tensione del filo superiore.
Vedi pagina 19
superiore
3. Ago curvo o smussato.
Vedi pagina 11
4. Scorretta collocazione dell’ago.
Vedi pagina 11
5. Tessuto non viene trasportato durante la cucitura.
Vedi pagina 24
6. Filo troppo forte o troppo fine.
Vedi pagina 11
1. Scorretta infilatura del filo inferiore.
Vedi pagina 16
2. All’interno del gancetto si trovano fibre fini.
Pulire la capsula
Rottura del filo
inferiore
della spoletta
3. Spoletta danneggiata o non funziona bene.
Sostituire la
spoletta
Rottura dell’ago
1. Scorrette installazione dell’ago.
Vedi pagina 11
2. Ago curvo o smussato.
Vedi pagina 11
3. Vite del morsetto dell’ago lenta.
Vedi pagina 11
4. Eccessiva tensione del filo superiore.
Vedi pagina 19
5. Tessuto non viene trasportato durante la cucitura.
Vedi pagina 24
6. L’ago per il tessuto da cucire è troppo debole.
Vedi pagina 11
7. Scorretta impostazione del selettore del tipo del
Vedi pagina 20
punto.
1. Scorretta collocazione dell’ago.
Vedi pagina 11
2. Ago curvo o smussato.
Vedi pagina 11
I punti vengono
3. Né l’ago né il filo sono adeguati per la cucitura.
Vedi pagina 11
saltati
4. Scorretta infilatura del filo superiore.
Vedi pagina 17
47
Bedien.713/723 ITALIEN./ENGL.
07.05.2004
10:24 Uhr
Seite 50
Obstacle avoidance
Malfunction
Upper thread breaks
Cause
Explanation
1.Upper thread is not correctly installed.
See Page l7
2.Upper thread tension is too tight.
See Page 19
3.Needle is bent or dull.
See Page 11
4.Needle is misplaced.
See Page 11
5.Fabrics are not pivoted backward after
See Page 24
sewing.
6.Thread is either too thick or too thin.
See Page 12
l.Lower thread is not threaded properly in
See Page 16
the shuttle hook.
Lower thread breaks
Needlebreaks
2.There is fine hair inside hook.
Clean the bobbin
3.Bobbin is damaged and reperation out of
case
order.
Replace bobbin
I.Needle is not correctly installed.
See Page 11
2.Needle is bent or dull.
See Page l l
3.Needle clamp screw goes loose.
See Page 11
4.Upper thread tension is tov tight.
See Page 19
5.Pabrics are not pivoted backward after
See Page 24
sewing.
6.Needle is too thin to the cloth to be stitched.
See Page 12
7.Pattern selection dial is not turned
SeePage 20
properly.
Skipping stitch
l.Needle is incorrectly installed!
See Page 11
2.Needle is bent or dull.
See Page 11
3.Neither needle nor thread is fit for sewing.
See Page 11
4.Upper threading is not correct.
See Page 17
48
Bedien.713/723 ITALIEN./ENGL.
07.05.2004
Difetto
Causa
Spiegazione
1. Eccessiva tensione del filo superiore.
Vedi pagina 19
2. Scorretta cucitura.
Vedi pagina 17
3. L’ago per il tessuto da cucire è troppo forte.
Vedi pagina 11
4. Punti per il tessuto da cucire sono troppo lunghi.
Vedi pagina 39
Raggrinzimenti
10:24 Uhr
Seite 51
* Se deve essere cucito il tessuto troppo fine, sotto il
tessuto deve essere collocata la fodera di tessuto
non filato.
1. Tensione insufficiente del filo superiore.
Vedi pagina 19
Occhiello nella
2. Scorretta combinazione della grandezza dell’ago.
Vedi pagina 11
cucitura
dello spessore del filo e del tessuto. Sia eccessiva o
debole.
Scorretto trasporto
1. Il trasportatore è sporcato dalle fibre fini.
Vedi pagina 46
del tessuto
2. Il trasportatore non è attivo (alzato).
Vedi pagina 22
3. I punti sono troppo corti.
Vedi pagina 39
1. L’interruttore generale è disinserito.
Vedi pagina 8
2. Il filo è attorcigliato nel gancetto.
Vedi pagina 45
3. Il volantino si trova in posizione di filarello.
Vedi pagina 15
Rumorosità e
1. Il filo è attorcigliato nel gancetto.
Vedi pagina 45
lentezza del
2. Il trasportatore è sporcato dalle fibre sottili.
Vedi pagina 45
funzionamento
3. La macchina da cucire non è oliata
Vedi pagina 47
La machina non
funziona
della macchina
sufficientemente.
49
Bedien.713/723 ITALIEN./ENGL.
07.05.2004
Malfunction
10:24 Uhr
Seite 52
Cause
Explanation
I. Upper thread tension is too tight.
See Page 19
2.Threading is not correct
See Page 17
3.Needle is too thick tc, the cloth to be
See Page 12
stitched.
Fabric puckers
4.Stitches are too big to the cloth to
be sewn.
Non-woven lining under the cloth is re
quired for very thin cloth to be stitched.
Loop in seam.
l.Upper thread pressure it too weak.
See Page 19
2.The combination of needle size / thread
See Page 12
size / fabric is incorrect, either too thick or
too thin.
Fabric does not feed ptoperly
Machine does not work.
1.Feed dog is stained by tine hair.
See Page 45
2.Feed dog is not hoisted.
See Page 22
3.Stitching is too small.
See Page 21
l.Main power switch is turned off.
See Page 8
2.thread in the hook is tangled.
See Page 44
3.Clutch release switch ıs set at bobbin
See Page 15
mark.
Machine is noisy and
l.thread in the hook is tangled.
See Page 44
works slowly.
2.feed dog is stained by fine hair.
See Page 45
Insuffıcient oiling.
See Page 46
50
Scarica