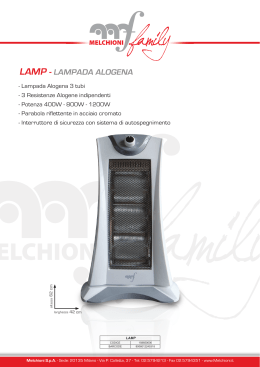
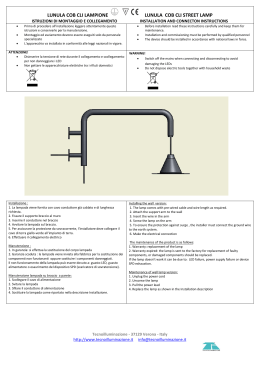
Manuale utente - User manual
EVO 12 H ZW
EVO 12 H ZS
EVO 25 H ZW
EVO 25 H ZS
Evolution 12-25 H
ATTENZIONE:
SAFETY WARNING:
Prima di usare questi apparecchi,
leggere attentamente le istruzioni che seguono.
Spotlight srl non potrà essere ritenuta responsabile di
danni derivanti dalla non osservanza di dette istruzioni.
Before using this product,
read the present instructions carefully.
Spotlight srl will not be responsible for damage
resulting from instructions not being followed.
1
10
2
9
8
3
7
6
5
11
4
Evolution 12
Evolution 25
(optional on Evolution 25)
15
15
12
13
14
12
Cod: FORC EVO25/S
13
2
Evolution 12-25 H
DESCRIZIONE DEL PROIETTORE
riportate sull’etichetta dell’apparecchio
• Ricordarsi di collegare la fune di sicurezza, se previsto
dalle norme di sicurezza locali
• ll proiettore può essere usato sia sospeso, sia montato
su cavalletto, ribaltando la forcella.
Riferendosi ai disegni nella pagina a fianco:
①
②
③
④
⑤
⑥
⑦
⑧
⑨
⑩
⑪
⑫
Staffa di sospensione
Pomello apertura tettucci anteriori
Guide porta accessori con tettuccio di ritenzione
Molla per bloccaggio tettuccio di ritenzione
Etichette graduate per controllo zoom
Maniglia a leva per regolazione lenti (zoom)
Pomello per bloccaggio rotazione set ghigliottine
Maniglia per rotazione set ghigliottine
Maniglia a leva per regolazione inclinazione faro
Staffa per ancoraggio fune di sicurezza
4 Leve comando ghigliottine
Slitta con portalampada regolabile e lente asferica
condensatrice
⑬ Apertura bacinella
⑭ Molla di ritegno piattello portalampada
⑮ Regolazione inclinazione supplementare forcella
(opzione per versione 2500W)
CAMBIACOLORI (opzionale): inserire la flangia del cambiacolori nell’apposita guida ③ finchè non è possibile
richiudere il tettuccio e far scattare la molla di ritegno
④. Collegare la fune di sicurezza al gancio apposito del
faro ⑩.
Se necessario fare scorrere il punto di attacco della
forcella sul faro per riportare in bilanciamento il faro.
ACCESSORI: gli accessori previsti per questo tipo di faro
sono elencati nella tabella accessori e possono essere
montati tramite le guide ③.
ATTENZIONE: se visibilmente danneggiate
sostituire immediatamente la lampada
e/o la lente
INDICAZIONI GENERALI
Il proiettore ora in Vs possesso risponde alle direttive
73/23 CEE in quanto conforme alle norme EN 60598-1
e EN 60598-2-17.
La targhetta che è sistemata sul fianco del proiettore,
contiene le seguenti informazioni:
CONNESSIONI ELETTRICHE
Il vostro faro è stato progettato per una tensione di
alimentazione da 220 a 240V. Il cavo di alimentazione
risponde alle norme CEI 20-35.
• Modello
• Massima tensione di alimentazione in V
• Massima potenza della lampada in W
• Indice di protezione IP
• Massima temperatura ambiente ammissibile in °C
• Massima temperatura del corpo del proiettore in °C
• Distanza minima da ogni superficie infiammabile
• Informazioni per riconoscere la posizione 0° del faro:
quando la punta della freccia è rivolta verso l’alto
• Angolo massimo di inclinazione verso l’alto e
verso il basso. Questi limiti, imposti dal costruttore
della lampada, non devono essere superati, pena
una riduzione della vita utile della lampada o il
deterioramento del faro
Prima e durante l’installazione osservare le seguenti
norme:
• Verificare sempre l’efficienza del collegamento a terra
della linea in uso.
• L’apparecchio è previsto per uso all’interno: pertanto
deve essere protetto dall’umidità e dalla pioggia se
usato in condizioni diverse
• Non impiegare lampade diverse da quelle indicate
nella tabella lampade
• Verificare che il voltaggio della lampada corrisponda con
il voltaggio di rete
• Sull’apparecchio non sono montati fusibili che dovranno
essere installati sulla linea
• L’apparecchio può essere collegato a un dimmer
INSTALLAZIONE
• Il proiettore è progettato esclusivamente per impiego
professionale.
• Non installare il proiettore a contatto o vicino ad una
superficie infiammabile
• Si prega di prestare la dovuta attenzione alle note
ATTENZIONE: Gli apparecchi devono essere
sempre collegati a terra
3
Evolution 12-25 H
ACCENSIONE E PUNTAMENTO
- inserire il piattello nella guida più in basso per
lampada da 1200W
- inserire il piattello nella guida più in alto per
lampada da 1000W.
• Per il puntamento dell’apparecchio ricordarsi di non
superare mai la posizione di funzionamento indicata
sull’etichetta del faro.
• Il proiettore deve essere collocato rispettando la
distanza minima dall’oggetto che si deve illuminare,
indicata sull’etichetta del faro.
PULIZIA
Per una maggiore resa del faro, occorre tener puliti il
più possibile le lenti e lo specchio.
Per fare questo, dopo aver scollegato il faro dalla rete
di alimentazione, si possono aprire i tettucci ② e la
bacinella ⑬, e con uno straccio inumidito di alcool,
pulire sia le lenti che lo specchio
Tramite la maniglia laterale ⑨ si può allentare il
bloccaggio del faro in una certa posizione e modificare
la sua inclinazione. Lo stesso si può fare riguardo alla
rotazione dell’asse verticale , facendolo ruotare sul
perno di aggancio al traliccio.
Con le maniglie a leva ⑥ si effettua la regolazione
dello zoom, allargando o stringendo il fascio di luce .
Tramite le quattro ghigliottine ⑪ si può sagomare il
fascio di luce per ottenere effetti speciali.
Per ruotare il gruppo delle ghigliottine: allentare il
pomello ⑦, utilizzare la maniglia ⑧ per la rotazione, e
bloccare nella nuova posizione con il pomello ⑦.
MANUTENZIONE
Sottoporre il faro a revisione almeno una volta
all’anno per controllare l’integrità delle parti elettriche
e meccaniche. A tal fine utilizzare solo rivenditori
qualificati, a garanzia di un corretto e completo
intervento.
Alla prima accensione dell’apparecchio potrà verificarsi
una leggera emissione di fumo; ciò è normale e dovuto
alla ricottura delle vernici nei punti più vicini alla
lampada.
RICICLAGGIO
Il prodotto deve essere riciclato o smaltito
secondo la direttiva 2002/96/CE
INSTALLAZIONE E CAMBIO DELLA LAMPADA
ATTENZIONE:
Per motivi di sicurezza, scollegare sempre
l'apparecchio dalla rete di alimentazione
prima di aprirlo per cambiare la lampada.
Aprire la bacinella portalampada tramite il pomello ⑬
(da tirare verso retro per il modello 1200W, o facendo
ruotare 1⁄4 di giro la chiusura per il modello 2500W).
Togliere la vecchia lampada e inserire la nuova lampada
nello zoccolo curando di non toccare il bulbo in quarzo.
ATTENZIONE:
Per montare lampade da 1000W o 1200W con centro
luce differente, bisogna spostare il piattello su cui
e’ fissatto il portalampada in una guida differente
all’interno del profilo della slitta.
E’ necessario ruotare la molla di ritegno ⑭ per spostare
tale piattello:
4
Evolution 12-25 H
DESCRIPTION OF THE PROJECTOR
• The projector can be either suspended, or mounted on
a stand, positioning the yoke upside-down.
Refer to figures on left page:
①
②
③
④
⑤
⑥
⑦
⑧
⑨
⑩
⑪
⑫
⑬
⑭
⑮
Suspension clamp
Knob for opening the above cover
Accessory guides with retaining clip
Spring-loaded latch lock
Label grade for zoom control
Lever handle for lens adjustment (Zoom)
Shutters rotation locking knob
Lever handle for shutter-set rotation
Lever handle for tilt regulation
Safety bond attachment
Levers for shutters adjustment
Adjustable lamp tray and aspherical condenser lens
Lamp holder tray access knob
Lamp base plate retaining spring
Adjustment for inclination of supplementary angle
(option for 2500W models)
COLOUR CHANGER (optional): Insert the flange of the
colour changer into its guide ③ so that the latch
remains closed and the retaining spring is released ④.
Connect the safety cable to the special hook of the
projector ⑩.
If necessary change the hanging position of the yoke on
the fixture to restore correct balancing.
ACCESSORIES: The accessories foreseen for this projector
are listed in the price list and can be mounted by
inserting into the appropriate guides ③.
WARNING: replace immediately the lamp
and/or lens if visibly damaged.
INTRODUCTION
ELECTRICAL CONNECTIONS
The projector you have bought satisfies directives 73/
23/EEC as it complies with standards EN 60598-1 and
EN 60598-2-17.
The label located on the side of the projector contains
the following information:
• model
• maximum supply voltage in V
• maximum power of the projector in W
• the index of protection IP
• maximum allowed ambient temperature in C°
• maximum temperature of the projector body in C°
• minimum distance from any inflammable surface
• information to find the position 0° of the projector:
when the tip of the arrow points upwards
• maximum angle of inclination upwards and
downwards. These limits, set by the lamp
manufacturer, should not be exceeded as they would
reduce the projector’s life
Your projector has been designed for a supply voltage
of 220-240V.
The power cable complies with standards CEI 20-35.
Before an during the installation, follow the
instructions below:
• Always check the efficiency of the ground connection
of the electrical line you use.
• The product is intended for indoor use: consequently
it has to be protected from humidity and rain, if used
in different conditions
• Do not use lamps other than indicated on the table
(Appendix A) on the back cover
• Verify that the lamp voltage to be used is correct for
the main voltage
• Fuse is not foreseen on the luminaire and it has to be
installed on the line
• The luminaire can be connected to dimmer
INSTALLATION
• The luminaire is intended for professional use only
• Do not mount the luminaire on or near a flammable
surface
• Please note carefully the notes written on the label of
the luminaire
• Do not forget to connect a safety rope, if required by
local country safety regulations
WARNING: The luminaire must always be
earthed
5
Evolution 12-25 H
INSERTING AND CHANGING THE LAMP
CLEANING
For utmost projector performance, both the lens and
the reflector must be kept as clean as possible.
To do so, after disconnecting the projector from the
mains, it can be opened ②-⑬ and both the lens and
reflector cleaned with a soft cloth dampened with
alcohol.
WARNING: For safety reasons always
disconnect the projector from the mains
before opening it to change the lamp.
MAINTENANCE
Open the projector lamp holder tray by means of the
knob ⑬ (pulling backwards for model 1200W, or
rotating 1/4 turn for model 2500W).
Remove the old lamp and insert the new lamp into the
socket, taking care not to touch the quartz bulb.
The projector must be serviced at least once a year to
check the integrity of its electrical and mechanical parts.
For this purpose, you should conctact only a qualified
dealer, to ensure proper service.
IMPORTANT NOTICE:
To mount a 1000W or 1200W lamp with different light
center, the base plate of the lampholder must be shifted
into a different guide of the lamp tray side tracks. The
retaining spring ⑭ should be rotated to allow the base
plate to slide out:
- insert base plate on the lower guide for 1200W lamp
- insert base plate on the upper guide for 1000W lamp
RECYCLING
The product must be recycled or disposed of,
according to Directive 2002/96/CE.
FOCUS AND REGULATION
• When focusing the luminaire do not exceed the
working position indicated on the label of the lantern
• The luminaire should be at the minimum distance
from the object it is illuminating, indicated on the
label
Using the side handle ⑨ it is possible to loosen the
projector when it is locked in a certain position and
thus change its inclination.
The same can be done as regards its rotation with
respect to the vertical axis.
The zoom is adjusted with lever handles ⑥ by
widening or narrowing the light. beam.
Using the 4 shutters ⑪, you can shape the light beam
to obtain special effects.
To rotate the shutter-set: loosen the knob ⑦, rotate by
using the handle ⑧, then lock in the new position by
using the knob ⑦.
At the first switch, the projector paint may overheat,
producing some smoke; this is normal and it is due to
overburning in the hottest spots closer to the lamp
6
Evolution 12-25 H
ACCESSORI PER EVOLUTION
ACCESSORIES FOR EVOLUTION
Telaio porta gelatina per EVO12
Colour filter frame for EVO12
TC S12
Telaio porta gelatina per EVO25
Colour filter frame for EVO25
TC S25
Rete di protezione per EVO12
Safety mesh for EVO12
R S12
Rete di protezione per EVO25
Safety mesh for EVO25
R S25
Fune di sicurezza
Safety bond
FUNE
Telaio porta gobos per gobos tipo B per EVO12
B-size gobo holder for EVO12
PGB 130
Telaio porta gobos per gobos tipo A per EVO25
A-size gobo holder for EVO25
PGA 185
Telaio porta gobos per gobos tipo B per EVO25
B-size gobo holder for EVO25
PGB 185
Diaframma ad iride per EVO12
Iris diaphragm for EVO12
DIA 10
Diaframma ad iride con black out per EVO12
Iris diaphragm with black-out for EVO12
DIA 10 BO
Diaframma ad iride per EVO25
Iris diaphragm for EVO25
DIA 20
Diaframma ad iride con black out per EVO25
Iris diaphragm with black-out for EVO25
DIA 20 BO
Forcella snodata per EVO25
Double-jointed yoke for EVO25
FORC EVO25/S
Gancio di sospensione in alluminio ad attacco
rapido per tubi Ø 50 mm
Aluminium, trigger, hook clamp for 50 mm
diameter tubes
GAR
Gancio a “C” Teatro in acciaio verniciato nero per
tubi da Ø 30 a 50 mm
Theatre C-hook in black painted steel for 30
to 50 mm diameter tubes
GAC
Gancio a “C” TV in fusione di alluminio (richiede
l’adattatore PIVOT DIN)
TV C-hook in die-cast aluminium (PIVOT DIN
adapter required)
A8
7
Evolution 12-25 H
EVO 12 H ZW - Evolution 12 - 1000/1200W zoom 20°- 41°
���
���
���
���
���
���
���
Kg 10,5
EVO 25 H ZW - Evolution 25 - 2000/2500W zoom 18°- 38°
Kg 11
EVO 25 H ZS - Evolution 25 - 2000/2500W zoom 8°- 22°
���
���
����
����
���
���
���
���
���
���
���
���
���
���
���
EVO 12 H ZS - Evolution 12 - 1000/1200W zoom 12°- 24°
���
Kg 22
���
Kg 26
Lampade \ Lamps
Evolution 12
Theater
(3050 °K)
Cine/TV
(3200 °K)
Evolution 25
Theater
(3200 °K)
lm
t(h)
V
13000
750
230
55
21500
750
230
67
27600
400
230
GX9.5
55
16500
100
230
GX9.5
55
25000
200
230
1200
GX9.5
67
30000
200
230
2000
G22
90
50000
400
230
2500
G22
90
65000
400
230
Tipo/Cod
W
T21
650
GX9.5
55
T19
1000
GX9.5
T29
1200
GX9.5
CP67
650
CP70
1000
CP90
CP92
CP91
certified quality management system ISO 9001 : 2008
Spotlight s.r.l.
Via Sardegna 3
20098 S. Giuliano Milanese
Milano - Italy
Tel. +39.02.98830.1
Fax +39.02.98830.22
E-mai: [email protected]
www.spotlight.it
Scaricare