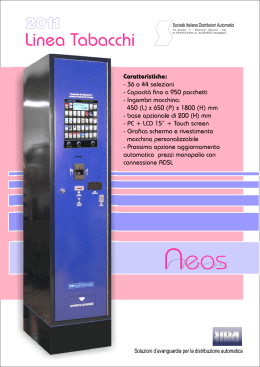
SET NO TOUCH 868
code AD00316
MASTER NO TOUCH 868
code ACG6154
Patent EP10706772 - EP2345019
RICEVITORE 868 MHz -RÉCEPTEUR 868 MHz - 868 MHz RECEIVER - EMPFÄNGER 868 MHz - RECEPTOR 868 MHz
NO TOUCH 868
code ACG8048
Patent EP10711742 - EP2347398 - EP1722059
I FOTOCELLULA SENZA FILI SOSTITUTIVA DELLA COSTA PER PREVENIRE GLI IMPATTI CON PORTE
SEZIONALI E SERRANDE AVVOLGIBILI
F PHOTOCELLULE SANS FIL REMPLAÇANT LA BARRE POUR PRÉVENIR LES IMPACTS AVEC LES
PORTES SECTIONNELLES ET LES VOLETS ROULANTS
G WIRELESS VERTICAL PHOTOCELL SUBSTITUTING THE SAFETY EDGE TO PREVENT IMPACTS WITH
B SECTIONAL DOORS AND SPRING ROLLING SHUTTERS
D KABELLOSE FOTOZELLEN ALS ERSATZ DER SCHALTLEISTE ZUR ANSCHLAGVERMEIDUNG BEI
SEKTIONALTOREN UND ROLLTOREN
E FOTOCÉLULA VERTICAL SIN CABLES DE LA COSTA PARA PREVENIR IMPACTOS EN LAS PUERTAS
S SECCIONALES Y PUERTAS ENROLLABLES
I
F
LA FOTOCELLULA NO TOUCH 868 DEVE ESSERE IN VISTA DELL’ANTENNA 868 MHz !
NON POSIZIONATE MASTER NO TOUCH 868 DIETRO A MURI, PANNELLI METALLICI O ALTRI TIPI DI OSTACOLI CHE POSSANO IMPEDIRE LA
COMUNICAZIONE RADIO CON LA FOTOCELLULA NO TOUCH 868 E IL TRASMETTITORE RED
LA PHOTOCELLULE NO TOUCH 868 DOIT ÊTRE EN VUE DE LA ANTENNE 868 MHz !
NE PAS POSITIONNEZ MASTER NO TOUCH 868 DONC DERRIÈRE DES MURS, PANNEAUX MÉTALLIQUES, OU AUTRES TYPES D’OBSTACLES QUI
POURRAIENT COMPROMETTRE LA TRANSMISSION RADIO AVEC PHOTOCELLULE NO TOUCH 868 ET TRANSMETTEUR RADIO RED
G PHOTOCELLS NO TOUCH 868 MUST BE VISIBLE TO THE 868 MHZ AERIAL !
DO NOT INSTALL MASTER NO TOUCH 868 BEHIND WALLS, METAL FRAMES OR PANELS, OR OTHER KIND OF OBSTACLES THAT COULD PREVENT
B
THE PROPER RADIO COMMUNICATION WITH THE NO TOUCH 868 PHOTOCELL AND THE RED RADIO TRANSMITTER
D
E
S
FOTOZELLE NO TOUCH 868 MUSS WEGEN DER ANTENNE 868 MHz SEIN !
NICHT INSTALLIEREN MASTER NO TOUCH 868 HINTER MAUERN, METALLPLATTEN ODER ANDERE ARTEN VON HINDERNISSEN, DIE DEN
FUNKVERKEHR MIT FOTOZELLE NO TOUCH 868 UND RED RADIO-SENDER BEEINTRÄCHTIGEN KÖNNEN
LA FOTOCELULA NO TOUCH 868 DEBE ESTAR EN VISTA DE L’ANTENNA 868MHz !
NO DEBEN INSTALAR MASTER NO TOUCH 868 EN UN LUGAR DETRÁS DE LAS PAREDES, DE PANELES DE METAL O DE OTRO TIPO DE OBSTÁCULOS
QUE PUEDAN IMPEDIR LA COMUNICACIÓN POR RADIO CON FOTOCÉLULA NO TOUCH 868 Y TRANSMISOR RADIO RED.
MASTER
NO TOUCH 868
MASTER
NO TOUCH 868
NO - NEIN !
SI - OUI - YES - JA !
ITALIANO pag. 05 / FRANÇAIS pag. 15 / ENGLISH page 25 / DEUTSCH pag. 35 / ESPAÑOL pag. 45
I
F
ISTRUZIONI DI SICUREZZA IMPORTANTI PER
L’INSTALLAZIONE
INSTRUCTIONS DE SECURITE IMPORTANTES POUR
L’INSTALLATION
- ATTENZIONE -
- ATTENTION -
PER LA SICUREZZA DELLE PERSONE É IMPORTANTE CHE VENGANO SEGUITE
TUTTE LE ISTRUZIONI
POUR LA SECURITE DES PERSONNES IL EST IMPORTANT QUE TOUTES LES
INSTRUCTIONS SOIENT SUIVIES
1° - Questo libretto d’istruzioni è rivolto esclusivamente a personale
specializzato che sia a conoscenza dei criteri costruttivi e dei dispositivi di
protezione contro gli infortuni per i cancelli, le porte e i portoni motorizzati
(attenersi alle norme e alle leggi vigenti).
2° - L’installatore prima di procedere con l’installazione deve prevedere l’analisi
dei rischi della chiusura automatizzata finale e la messa in sicurezza dei punti
pericolosi identificati (seguendo le norme EN 12453/EN 12445).
3° - Prima di eseguire qualsiasi operazione di installazione, regolazione,
manutenzione dell’impianto, togliere la tensione agendo sull’apposito
interruttore magnetotermico collegato a monte dello stesso.
1° - Ce livret d’instructions est adressé exclusivement à un personnel
spécialisé qui connaît les critères de construction et les dispositifs de
protection contre les accidents concernant les portails, les portes et les
grandes portes motorisés (s’en tenir aux normes et aux lois en vigueur).
2° - L’installateur avant de procéder à l’installation, doit prévoir l’analyse des
risques de la fermeture automatisée finale et la mise en sécurité des points
identifiés dangereux (en suivant les normes EN 12453/EN 12445).
3° - Avant l’exécution de toute opération d’installation, de réglage, d’entretien
de l’installation, couper le courant en agissant sur l’interrupteur
magnétothermique à cet effet, branché en amont de l’installation.
LA DITTA RIB NON ACCETTA NESSUNA RESPONSABILITÀ per eventuali danni
provocati dalla mancata osservanza nell’installazione delle norme di sicurezza e
delle leggi attualmente in vigore.
LA SOCIETE RIB N’ACCEPTE AUCUNE RESPONSABILITE pour d’éventuels
dommages provoqués par la non-observation dans l’installation, des normes de
sécurité et des lois actuellement en vigueur.
CONSERVARE CON CURA QUESTE ISTRUZIONI
CONSERVER SOIGNEUSEMENT CES INSTRUCTIONS
I dati descritti nel presente manuale sono puramente indicativi.
RIB si riserva di modificarli in qualsiasi momento.
Realizzare l’impianto in ottemperanza alle norme ed alle leggi vigenti.
Les données figurant dans le présent manuel sont fournies à titre purement
indicatif.
RIB se réserve le droit de les modifier à tout moment, sans aucun préavis.
Effectuer l’installation en conformité avec les normes et les lois en vigueur.
CONTROLES ET ENTRETIEN
CURA E MANUTENZIONE
La dispositifs de sécurité doivent être maintenus en condition de travail efficace
en respectant les instructions du fabricant.
I dispositivi di sicurezza devono essere mantenuti in condizioni di lavoro efficienti
e manutenuti in accordo con le istruzioni del fabbricante.
Vérifications périodiques à effectuer tous les 3 mois:
- Nettoyer les optiques de l’émetteur et du récepteur à l’aide d’un chiffon sec.
- Vérifier la présence et la lisibilité du marquageinitial du produit.
- Vérifier l’intégrité des roues qui consentent le mouvement d’oscillation sur
l’émetteur et le récepteur.
- Vérifier, porte à l’arrêt en position intermédiaire, qu’aussi bien l’émetteur que le
récepteur s’articulent correctement et que le ressort remplisse bien sa fonction
de rappel.
- Vérifier l’intégrité des batteries.
Verifiche periodiche da eseguire ogni 3 mesi:
- Pulire le lenti presenti sul trasmettitore e ricevitore, usando un panno asciutto.
- Verificare la presenza e la leggibilità della marcatura iniziale del prodotto.
- Verificare l’integrità delle ruote che consentono il movimento di oscillazione del
trasmettitore e del ricevitore.
- Verificare con porta a metà corsa e piegando prima il trasmettitore e poi
il ricevitore la funzionalità delle molle che devono consentire il ritorno del
movimento di oscillazione.
- Verificare l’integrità delle batterie.
2
G
B
IMPORTANT SAFETY
INSTALLATION
INSTRUCTIONS
FOR
D
THE
WICHTIGE SICHERHEITS
INSTALLATIONEN
ANLEITUNGEN
FÜR
DIE
- ATTENTION -
- ACHTUNG -
FOR THE SAFETY OF THE PEOPLE IT IS IMPORTANT TO FOLLOW ALL THE
INSTRUCTIONS.
FÜR DIE SICHERHEIT DER PERSONEN IST ES WICHTIG, DASS ALLE
ANWEISUNGEN GENAU AUSGEFÜHRT WERDEN
1° - This handbook is exclusively addressed to the specialized personnel
who knows the constructive criteria and the protection devices against the
accidents for motorized gates, doors and main doors (follow the standards
and the laws in force).
2° - Before proceeding with the installation, the installer must forecast the risks
analysis of the final automatized closing and the safety of the identified
dangerous points (following the standards EN 12453/EN 12445).
3° - Before carrying out any installation, regulation or maintenance operation of
the system, take off the voltage by operating on the special magnetothermic
switch connected upstream it.
1° - Diese Betriebsanleitung dient ausschließlich dem Fachpersonal, welche
die Konstruktionskriterien und die Sicherheits-Vorschriften gegen Unfälle für
Tore, Türen und automatische Tore kennt (geltende Normen und Gesetze
beachten und befolgen).
Vor der Installierung muss für die automatische Schließung und zur
2° - Sicherheitsgewährung der identifizierten kritischen Punkte, eine Risiko
Analyse vorgenommen werden mit der entsprechenden Behebung der
identifizierten, gefährlichen Punkte. (die Normen EN 12453/EN 12445
befolgend).
3° - Vor jeglichem Eingriff, sei es Installation, Regulation oder Wartung der Anlage,
muss vorher die Stromzufuhr unterbrochen werden, den dafür bestimmten
Magnetthermo-Schalter drücken, der am Eingang der Anlage installiert ist.
THE RIB COMPANY DOES NOT ACCEPT ANY RESPONSIBILITY for possible
damages caused by the non observance during the installation of the safety
standards and of the laws in force at present.
DIE FIRMA RIB ÜBERNIMMT KEINE VERANTWORTUNG für eventuelle Schäden,
die entstehen können, wenn die Installierungsvorschriften die den gültigen
Sicherheitsnormen entsprechen, nicht eingehalten werden.
KEEP THESE INSTRUCTIONS WITH CARE
INSTALLATIONSVORSCHRIFTEN BEACHTET WERDEN
Data described by this manual are only Indicative.
RIB reserves to modify them at any time.
Install the system complying with current standards and regulations.
Die in diesem Handbuch aufgeführten Daten sind ausschließlich empfohlene
Werte. RIB behält sich das Recht vor, das Produkt zu jedem Zeitpunkt zu
modifizieren.
Die Anlage muss in Übereinstimmung mit den gültigen Normen und Gesetzen
montiert werden.
MAINTANANCE
PFLEGE UND WARTUNG
The safety accessories must be maintained in good and efficient conditions in
accordance with the manufacturer’s instructions.
Die Sicherheitsvorrichtungen müssen in einwandfreiem Zustand gehalten und
gemäß den Anweisungen des Herstellers verwaltet werden.
Every 3 months, the following periodical maintenance must be carried out:
- Cleaning the lenses of the transmitter and receiver, using a dry cloth.
- Verify the presence and readability of the original markings on the product.
- Check the integrity of the wheels that guarantee the swinging movement of the
transmitter and receiver.
- With the door positioned half way up, check the functionality and strength of
the springs that command the return in position of the transmitter and receiver.
- Verify the conditions of the batteries.
Regelmäßige Überprüfungen muss alle 3 Monate ausgeführt werden:
- Reinigen Sie die Linsen auf dem Sender und dem Empfänger, mit einem
trockenen Tuch.
- Überprüfen Sie das Vorhandensein und die Lesbarkeit der ersten Markierung
des Produktes.
- Überprüfen Sie die Integrität der Räder, die die Bewegung von Schwingung des
Senders und des Empfängers ermöglichen.
- Überprüfen Sie, mit Tür in hälftiger Fahrt, und biegen Sie zuerst den Sender und
dann den Empfänger, die Funktionalität der Federn, die Rückkehr der Bewegung
von Schwingung ermöglichen müssen.
- Überprüfen Sie die Integrität der Batterien.
3
E
S
IMPORTANTES INSTRUCCIONES DE SEGURIDAD PARA LA
INSTALACIÓN
- CUIDADO UNA INCORRECTA INSTALACIÓN PUEDE CAUSAR GRAVES DAÑOS
1° - Este manual de instrucciones está exclusivamente dirigido a personal
especializado que conozca los criterios de construcción y de los dispositivos
de protección contra accidentes con cancelas, puertas y portales motorizados
(atenerse a las normas y a las leyes vigentes).
2° - El instalador antes de proceder con la instalación tiene que hacer una analisis
de los riesgos del cierre automatizado final y la puesta en seguridad de los
puntos identificados como peligrosos (siguiendo las normas EN 12453 / EN
12445).
3° - Antes de ejecutar cualquier operación de instalación, ajuste o mantenimiento
del sistema, quitar la corriente accionando el respectivo interruptor
magnetotérmico conectado antes del mismo.
LA EMPRESA RIB NO ES RESPONSABLE por eventuales daños provocados por la
falta de respeto de las normas de seguridad, durante la instalación y de las leyes
actualmente vigentes.
CONSERVAR CUIDADOSAMENTE ESTAS INSTRUCCIONES
Los datos descritos en el presente manual son sólamente indicativos.
RIB se reserva de modificarlos en cualquier momento.
Realizar el sistema respetando las normas y las leyes vigentes.
CUIDADO Y MANTENIMIENTO
Los dispositivos de seguridad deben mantenerse en buenas condiciones de
trabajo eficiente de acuerdo con las instrucciones del fabricante.
Las averiguas y el mantenimiento periódicos que se realizan cada 3 meses:
- Limpiar las lentes en el transmisor y el receptor, con un paño seco.
- Verificar la presencia y la legibilidad del marcado inicial del producto.
- Comprobar la integridad de las ruedas que permiten el movimiento de oscilación
del transmisor y el receptor.
- Comprobar la integridad de las resortes que garantizan el corecto movimiento
de giro de los accessorioes doblando antes el transmisor y luego el receptor
- Verificar la integridad de las baterías.
4
I
MASTER NO TOUCH 868 può gestire due sicurezze:
NO TOUCH 868 è conforme alla norma EN13849-2:2013 e congiuntamente ad un
quadro elettronico dotato di AUTOTEST è un dispositivo di protezione di Classe 2.
Il sistema verifica costantemente la presenza dei vari dispositivi di sicurezza e dello stato
delle batterie, soddisfacendo completamente l’esigenza di una sicurezza attiva su tutti i tipi
di porte a movimento verticale.
- FOTOCELLULA NO TOUCH 868 (cod. ACG8048). LE FOTOCELLULE NO TOUCH 868
SONO ACCESE SOLO DURANTE L’AZIONAMENTO DELLA PORTA. Grazie alla funzione
SLEEP MODE, quando la porta è ferma le fotocellule si spengono e ciò mantiene la carica
delle batterie nel tempo.
- Sicurezza aggiuntiva: TRASMETTITORE RED (cod. ACG6202) collegato a contatto NC
(non fornito) da applicare alla porta pedonale inserita sulla porta principale. Funziona solo
se è già programmata la fotocellula NO TOUCH 868.
IL TRASMETTITORE RED È SEMPRE ATTIVO E IN CASO DI APERTURA DELLA PORTA
PEDONALE (e quindi di apertura del contatto NC al quale è collegato) BLOCCA
L’AZIONAMENTO DELLA PORTA PRINCIPALE.
NO TOUCH 868 è un dispositivo brevettato ideato per garantire la sicurezza di automazioni
quali serrande e portoni sezionali.
Le fotocellule NO TOUCH 868 prevengono il contatto con eventuali ostacoli grazie al loro
raggio infrarosso distante circa 13 cm dal bordo inferiore della porta.
NO TOUCH 868 non richiede l’adozione di sistemi raccogli cavo perché funziona a batterie
e via radio.
Il particolare sistema di “basculamento” permette il controllo in ogni condizione di
movimento, anche in presenza di vibrazioni.
Il sistema è composto da quattro elementi:
1 - Ricetrasmettitore radio 868 MHz, MASTER NO TOUCH 868 (cod. ACG6154), collegato
al quadro elettronico di comando della porta.
2 - Antenna 868MHz
3 - Trasmettitore infrarosso.
4 - Ricevitore infrarosso con ricetrasmettitore radio 868 MHz che dialoga costantemente
con la scheda MASTER NO TOUCH 868.
2
RIFERIMENTI NORMATIVI PER PORTE AUTOMATICHE VERTICALI
Una volta ultimata l’installazione della macchina ci si deve sincerare che sia conforme alla
norma EN13241-1.
RIB NON PUÓ CONSIDERARSI RESPONSABILE PER EVENTUALI DANNI CAUSATI DA UN
USO IMPROPRIO, ERRONEO O IRRAGIONEVOLE.
Restrizioni d’uso: Le fotocellule NO TOUCH 868 non possono essere utilizzate su
apparecchiature escluse dall’applicazione della EN12978, quali:
- apparati di protezione per installazione su porte destinate ad un uso differente rispetto a
quello sulle porte di accessi pedonali e veicolari coperti dalla norma e il cui principale uso
è quello di dare accesso sicuro in luoghi industriali, commerciali, pubblici o residenziali.
Alcuni esempi di esclusioni possono essere: chiuse e paratie; porte di ascensori; porte di
veicoli; porte principalmente usate per la custodia di animali; tende in tessuto per teatro;
barriere ferroviarie; barriere utilizzate solo per veicoli.
- dispositivi usati solo per il controllo normale e per l’arresto, incluso l’arresto di emergenza,
di porte motorizzate.
- apparati di sicurezza o dispositivi di sicurezza per l’uso su macchine diverse dalle porte.
ATTENZIONE: Eventuali modifiche del prodotto o della configurazione dell’apparato non
possono essere eseguite senza consultare il fabbricante o il suo rappresentante autorizzato.
L’installatore del dispositivo di sicurezza deve fornire all’utilizzatore finale quanto segue:
- i dispositivi di sicurezza devono essere fatti conoscere a tutte le persone coinvolte.
- le aree che danno accesso ai dispositivi devono essere tenute libere da ostacoli;
- i requisiti per la pulizia per evitare eventuali accumuli pericolosi di materiale;
- possibili dettagli per una procedura di riavvio da eseguire dopo una fermata di emergenza
o accidentale causata dal sistema di controllo.
La modifica del progetto o della configurazione dell’apparato senza la consultazione del
fabbricante o del suo rappresentante autorizzato può creare situazioni pericolose.
1
3
4
35
52,26
190,12
31,02
59
35
35
51,91
Misure in mm
5
I
MASTER NO TOUCH 868 (15/09/2014)
LAYOUT SCHEDA
DL2
S1
DL1
BUZZER
+
-
J3
J4
JP2
JP1
DL3
J1 =>
J2 =>
J1
DL4
J2
COM
=> comune dei contatti N.C.
CONTACT N.C.=> contatto normalmente chiuso da collegare all’ingresso Costa o Fotocellula del quadro elettronico di comando
POWER - 12/24 V
=> alimentazione negativa a 12/24V
POWER + 12/24 V
=> alimentazione positiva a 12/24V
AUTOTEST => alimentazione per AUTOTEST (vedi anche JP1 per la selezione alternata/continua)
ALARM N.C. => contatto normalmente chiuso da collegare all’ingresso STOP del quadro elettronico di comando
J3 =>
120/230 Vac
MORSETTI DA COLLEGARE ALL’USCITA LAMPEGGIATORE 120/230V 50/60Hz DEL QUADRO ELETTRONICO DI COMANDO
MORSETTO PER COLLEGAMENTO ANTENNA 868,3 MHz
J4 =>
12/24 V
MORSETTI DA COLLEGARE ALL’USCITA LAMPEGGIATORE 12/24V
DEL QUADRO ELETTRONICO DI COMANDO
ATTENZIONE ALLA POLARITA’ INDICATA SUL CIRCUITO STAMPATO
JP1 => SELEZIONE ALIMENTAZIONE AUTOTEST
JP1-
Jumper selezione modalità autotest con alimentazioni negative
JP1+/~ J umper selezione modalità autotest con alimentazioni positive o in alternata (da usare con quadro RIB modello J)
JP2 =>
A disposizione per implementazioni future
S1 =>
P ROG. RX Pulsante per programmazione
BUZZER =>
Segnala tramite suoni differenti eventuali aggiustamenti da apportare durante l’installazione e gli stati di attenzione e allarme
LED
DL1 (bicolore)
DL2 (giallo) DL3 (rosso) DL4 (rosso) spento
=> funzionamento regolare
verde
=> fotocellula impegnata
rosso/verde
=> allarme
- presenza tensione di alimentazione 12-24V
- contatto N.C. CONTACT
- contatto N.C. ALARM
ATTENTIONE: MASTER NO TOUCH 868 NON può essere installato a più di 3 metri di distanza dal quadro di comando dell’automazione.
6
I
COLLEGAMENTI MASTER NO TOUCH 868 A QUADRO DOTATO DI USCITA LAMPEGGIATORE
ATTENZIONE: La funzione di AUTOTEST è fondamentale affinchè MASTER NO TOUCH 868 effettui le verifiche richieste dalla EN12978 par. 4.1 alle posizioni finali della corsa.
È QUINDI NECESSARIO CHE IL QUADRO DI COMANDO SUL QUALE VIENE APPLICATO MASTER NO TOUCH 868 DEBBA AVERE LA FUNZIONE DI AUTOTEST.
ATTENZIONE: INSERIRE MASTER NO TOUCH 868 ALL’INTERNO DI UN CONTENITORE PROTETTO. L’uso del prodotto all’interno di contenitori metallici può generare un
malfunzionamento del sistema. Si consiglia quindi, per una perfetta ricezione/trasmissione dei segnali di aggiungere l’antenna cod. ACG5451 che deve essere
applicata esternamente al contenitore e collegata al morsetto J3 del MASTER NO TOUCH 868.
ATTENZIONE: È consigliabile attivare sul quadro elettronico di comando la funzione di PRELAMPEGGIO, se disponibile.
ATTENZIONE: Verificare la presenza sul quadro elettronico di comando della protezione contro i corto circuiti tramite fusibile collegato in serie al secondario di alimentazione. In caso
non sia presente, collegare in serie all’alimentazione un fusibile ritardato (T) da 200 mA. Togliere tensione al quadro di comando dell’automazione prima di eseguire
i collegamenti al MASTER NO TOUCH.
+
! **
12/24V
Collegare al morsetto COM del quadro
elettronico di comando
Alimentazione
Collegare all’ingresso COSTA del quadro elettronico
12/24V
di comando. Se non disponibile utilizzare l’ingresso
FOTOCELLULA
Collegare all’uscita AUTOTEST del quadro
elettronico di comando
! **
120/230V 50/60Hz
Collegare all’ingresso di STOP del quadro elettronico di comando o ad
altro ingresso che fermi il movimento del motore
INGRESSO ALARM N.C.
Morsetto ALARM NC: è dedicato al collegamento in serie del comando di STOP del quadro
elettronico di comando.
In caso non sia presente l’ingresso di STOP, collegare il contatto ALARM NC in serie ad un
ingresso che consenta il blocco del quadro elettronico di comando.
ATTENZIONE: Rimuovere il ponticello sostitutivo del contatto NC di STOP dai morsetti del
quadro elettronico di comando.
* Collegamento OBBLIGATORIO per quadro elettronico di comando con
uscita lampeggiatore a 120/230V 50/60Hz
!*
ollegamento OBBLIGATORIO per quadro elettronico di comando
C
con uscita lampeggiatore a 12/24V . ATTENZIONE: RISPETTARE
LE POLARITA’ COME INDICATO SUL CIRCUITO STAMPATO
COLLEGAMENTO DELL’INGRESSO AUTOTEST
(come richiesto dalla norma EN13849-2:2013)
Se il quadro non è dotato di AUTOTEST, il test di controllo viene ignorato.
- Se il quadro utilizzato è dotato di AUTOTEST, posizionare il jumper JP1 del MASTER NO
TOUCH 868 in base all’alimentazione fornita dal quadro di comando utilizzato, attenendosi
al suo manuale.
- Collegare l’uscita AUTOTEST del quadro di comando al morsetto AUTOTEST
della scheda MASTER NO TOUCH 868 così da poter controllare il sistema
al termine di ogni apertura completa o all’inizio della chiusura dell’automazione.
- La chiusura viene effettuata solo se la scheda MASTER NO TOUCH 868 ha superato il
test di controllo.
- Se il controllo della scheda MASTER NO TOUCH 868 ha avuto esito negativo, il quadro
di comando blocca l’automazione e i led DL3 e DL4 sulla scheda MASTER NO TOUCH
868 si spengono. Il buzzer emette 2 toni ed il led bicolore DL1 lampeggerà rosso-verde
segnalando l’anomalia.
Per ripristinare il funzionamento:
- verificare i collegamenti dell’AUTOTEST e il posizionamento del ponticello JP1;
- premere il pulsante S1 PROG RX su MASTER NO TOUCH 868;
- i led DL3 e DL4 si accenderanno.
La scheda è pronta per un nuovo AUTOTEST.
ATTENZIONE: Il collegamento dell’uscita lampeggiatore del quadro di comando ai
morsetti J2 o J4 del MASTER NO TOUCH è obbligatorio anche nel caso non sia
presente un lampeggiatore sull’impianto.
Se il collegamento non viene eseguito la porta non funziona ed il buzzer emette 4
toni avvertendo del mancato collegamento.
INGRESSO COM
Morsetto comune di CONTACT NC e ALARM NC.
ATTENZIONE: al morsetto COM è obbligatorio collegare il COMUNE del quadro di comando.
In caso COM non venga collegato, il sistema va in allarme con segnale dato da 2 toni di
buzzer.
INGRESSO CONTACT N.C.
Morsetto CONTACT NC: è da collegare all’uscita COSTA o FOTOCELLULA del quadro
elettronico di comando.
ATTENZIONE: Eliminare eventuale ponticello, sostitutivo del contatto NC di COSTA o
FOTOCELLULA, dai morsetti del quadro elettronico di comando.
7
I
COLLEGAMENTI MASTER NO TOUCH 868 A QUADRO NON DOTATO DI USCITA LAMPEGGIATORE
CON QUADRO PER UN MOTORE MONOFASE 120/230Vac
N:B.: Disattivare completamente eventuali funzioni di rallentamento, partenza graduale, regolazione elettronica della forza.
COLLEGARE NEUTRO LINEA MONOFASE
120/230 Vac E COMUNE MOTORE
MONOFASE DA QUADRO DI COMANDO A J2
Collegare al morsetto COM del quadro
elettronico di comando
Collegare all’ingresso COSTA del quadro
elettronico di comando.
Se non disponibile utilizzare l’ingresso
FOTOCELLULA
F
Alimentazione
12/24V
N
MOTORE
V
Collegare all’uscita AUTOTEST
del quadro elettronico di
comando
U
Collegare all’ingresso di STOP del quadro elettronico di
comando o ad altro ingresso che fermi il movimento del
motore
W
CON QUADRO PER UN MOTORE TRIFASE 400Vac
COLLEGARE NEUTRO LINEA TRIFASE
400 Vac E COMUNE MOTORE TRIFASE
DA QUADRO DI COMANDO A J2
R
S
T
N
MOTORE
V
U
W
8
COLLEGAMENTI MASTER NO TOUCH 868 A QUADRO NON DOTATO DI USCITA LAMPEGGIATORE
CON QUADRO PER UN MOTORE 12/24Vdc
- Non è possibile collegare direttamente MASTER NO TOUCH 868 all’alimentazione motore del quadro di comando in quanto le polarità vengono invertite in apertura e chiusura
e il quadro ha la funzione di rallentamento in accostamento non disattivabile.
- +
MORSETTI USCITA ALIMENTAZIONE
LUCE DI CORTESIA A 24Vdc
SU QUADRO COMANDO MOTORE
COLLEGARE J2 A LINEA 120/230V SU QUADRO COMANDO
MOTORE TRAMITE RELÈ CON BOBINA 120/230Vac GESTITA
DA CONTATTO PULITO N.O. LUCE DI CORTESIA SU QUADRO
COMANDO MOTORE
N.O.
N.O.
*R1
F
N
* R1= RELÈ A UN CONTATTO CON BOBINA A
120/230Vac
* R1= RELÈ A UN CONTATTO CON BOBINA A
12/24V
COLLEGARE J4 A ALIMENTAZIONE ACCESSORI 12/24V SU QUADRO
COMANDO MOTORE TRAMITE RELÈ CON BOBINA 12/24V GESTITA DA
CONTATTO PULITO N.O. LUCE DI CORTESIA
*R1
N.O. N.O.
MORSETTI
CONTATTO
PULITO N.O.
LUCE DI
CORTESIA
9
LINEA 120/230Vac
-
+
MORSETTI
ALIMENTAZIONE
ACCESSORI
12/24V
SU QUADRO
COMANDO
MOTORE
I
I
MONTAGGIO FOTOCELLULE DI SICUREZZA NO TOUCH 868
ESISTONO DUE DIVERSE TIPOLOGIE DI FISSAGGIO:
NO TOUCH 1A
NO TOUCH 1B (STANDARD)
DISPOSITIVO FISSATO SOTTO LA PORTA
DISPOSITIVO FISSATO SUL FIANCO DELLA PORTA
staffa posizionata per fissaggio sotto la porta
staffa posizionata per fissaggio sul fianco della porta
guarnizione per coperchio
elettronica
guarnizione per coperchio
elettronica
coperchio
anello in gomma per vite
vite 2,9x9,5
anello in gomma per vite
vite 2,9x9,5
tappo
tappo
lente
lente
anello in gomma per vite
vite 2,9x9,5
anello in gomma per vite
vite 2,9x9,5
Foro
inserimento
codolo molla
NO TOUCH 1B
Foro
inserimento
codolo molla
NO TOUCH 1A
N.B.: Per un corretto grado di protezione IP fare attenzione ad inserire correttamente le guarnizioni.
CARATTERISTICHE TECNICHE NO TOUCH 868
Velocita max parte mobile
Alimentazione
Portata segnale infrarosso
coperchio
12 m/min
2 batterie 3,6V
5 m / 10 m
Frequenza radio
Portata segnale radio
Grado di protezione
10
868,3 MHz
20 m
IP54
PROGRAMMAZIONE MASTER NO TOUCH 868 E FOTOCELLULE NO TOUCH 868
A - VERIFICA DEL CORRETTO FUNZIONAMENTO DELLA FOTOCELLULA NO
TOUCH 868
- Il corretto funzionamento del TX NO TOUCH 868 è segnalato dal led verde DL6 che si
accende per 10 secondi all’inserimento della batteria da 3,6V.
- Su MASTER NO TOUCH 868 il led bicolore DL1 da rosso lampeggiante diventa verde
e un tono di buzzer segnala la corretta memorizzazione della sicurezza. Nello stesso
momento i led DL3 e DL4 si accendono ed il quadro di comando riceve i corretti segnali
delle sicurezze.
- Premere e rilasciare il pulsante S2 PROG. sull’RX NO TOUCH 868 (si attiva la fotocellula
per un tempo di 3 minuti per verificare l’allineamento).
Se le fotocellule sono correttamente allineate il led rosso DL5 si accende fisso.
SEGNALAZIONI ACUSTICHE
MASTER NO TOUCH 868 possiede un buzzer che segnala le fasi di installazione e lo stato
di attenzione in caso di batterie quasi scariche e scariche o lo stato di allarme in caso di
guasto di uno dei dispositivi.
D - ACCELEROMETRO
- Durante i 3 minuti che il led rosso DL5 rimane acceso, verificare che interponendo un
ostacolo il led rosso DL5 si spenga e contemporaneamente il led bicolore DL1 su MASTER
NO TOUCH 868 si accenda di colore verde per la durata dell’interposizione.
- Sulla scheda MASTER NO TOUCH 868 anche il led DL3 si deve spegnere indicando
l’avvenuto corretto scambio del contatto dedicato all’ingresso costa o fotocellula sul quadro
di comando.
Se il led rosso DL5 rimane spento verificare:
- il corretto montaggio dei supporti;
- su TX NO TOUCH la posizione del ponticello JP4 che regola la portata del segnale
infrarosso:
- se posizionato su L è impostata la portata di 5 metri.
- se posizionato su H è impostata la portata di 10 metri.
VERIFICA DEL CORRETTO FUNZIONAMENTO DELL’ACCELEROMETRO
- Con ACCELEROMETRO ATTIVO (jumper JP3 ON su RX NO TOUCH 868) verificare che
muovendo il RICEVITORE NO TOUCH 868 il led DL1 si accenda rosso fisso, il BUZZER
emetta 4 toni e i led DL3 e DL4 si spengano per 5 secondi.
- Dopo 5 secondi il led DL1 sarà spento e DL3-DL4 saranno accesi.
B - ALIMENTAZIONE MASTER NO TOUCH 868
Dopo avere eseguito tutti i collegamenti, alimentare il quadro di comando con MASTER NO
TOUCH 868.
Il led giallo DL2 si deve accendere e il buzzer deve emettere un suono per segnalare la
corretta alimentazione.
C - MEMORIZZAZIONE DELLA FOTOCELLULA NO TOUCH 868
L’ACCELEROMETRO non è compatibile con automazioni dotate di partenze graduali
o molto lente.
Escludere la partenza graduale oppure, se non è possibile, disattivare
l’ACCELEROMETRO. Se la porta è molto lenta disattivare l’ACCELEROMETRO.
- Eseguire una verifica funzionale della fotocellula installata attivando la movimentazione
dell’automazione e controllando che interponendo un ostacolo in chiusura la porta si fermi
ed inverta il moto.
- Nel caso la porta si fermi dopo la partenza con allarme segnalato da 5 toni di BUZZER,
significa che il movimento della porta non è stato rilevato dall’ACCELEROMETRO (a
causa della partenza graduale oppure della porta molto lenta), quindi per il corretto
funzionamento della porta bisogna escludere l’ACCELEROMETRO.
PER DISATTIVARE L’ACCELEROMETRO BISOGNA:
- spostare in OFF il jumper JP3 presente su RX NO TOUCH 868;
- premere il tastino S2 PROG;
- il buzzer a bordo di MASTER NO TOUCH 868 emetterà un tono per 3 secondi segnalando
la corretta disattivazione dell’ACCELEROMETRO.
ATTIVAZIONE DELL’ACCELEROMETRO
Per attivare l’ACCELEROMETRO bisogna:
- spostare in ON il jumper JP3 presente su RX NO TOUCH 868;
- premere il tastino S2 PROG;
- il buzzer a bordo di MASTER NO TOUCH 868 emetterà un tono per 3 secondi segnalando
la corretta attivazione dell’ACCELEROMETRO.
Inserire le batterie nei circuiti NO TOUCH e posizionarli all’interno dei contenitori già fissati
alle estremità della porta.
Per eseguire la memorizzazione seguire la seguente procedura:
- Premere il tasto S1 PROG RX che si trova su MASTER NO TOUCH 868 => il led bicolore
DL1 lampeggerà rosso per 1 minuto (tempo utile per eseguire la memorizzazione).
E - MEMORIZZAZIONE DEI TEMPI (SOLO CON ACCELEROMETRO ATTIVATO
- JP3 ON)
CON ACCELEROMETRO ATTIVATO SI RENDE NECESSARIA LA PROCEDURA DI
MEMORIZZAZIONE DEI TEMPI.
SE NON VIENE ESEGUITA E’ POSSIBILE CHE DOPO LA PARTENZA DELLA PORTA
QUESTA SI FERMI CON SEGNALAZIONE DI 5 TONI DI BUZZER.
- Premere il tastino S1 PROG RX su MASTER NO TOUCH 868, il led DL1 lampeggerà verde.
- Comandare la porta facendola aprire e chiudere completamente almeno due volte
consecutivamente.
- Attendere che il led verde DL1 si spenga, o in alternativa premere una volta il tasto S1 per
terminare la procedura.
F - MEMORIZZAZIONE DELLA SICUREZZA PORTA PEDONALE (Trasmettitore
RED cod. ACG6202)
- Premere il tasto S2 PROG sulla sicurezza RX NO TOUCH 868.
E’ possibile memorizzare una sicurezza per la porta pedonale solo se è già stata
programmata la fotocellula NO TOUCH 868.
Questa sicurezza è il Trasmettitore RED che serve a monitorare un contatto N.C. (non
fornito) montato sulla porta pedonale presente nella porta principale.
Per eseguire la memorizzazione seguire la seguente procedura:
- posizionare il dip switch n° 2 in ON (OBBLIGATORIO);
- alimentare il Trasmettitore RED tramite le batterie;
- premere il tasto S1 PROG. RX che si trova su MASTER NO TOUCH 868: il led bicolore DL1
si accende verde lampeggiando per 1 minuto (tempo utile per eseguire la memorizzazione);
11
I
I
- premere il tasto S2 PROG. TX sul Trasmettitore RED: su MASTER NO TOUCH 868 il led
bicolore DL1 da verde lampeggiante si spegne. Un tono di buzzer segnala la corretta
memorizzazione mentre il led rosso a bordo del Trasmettitore RED lampeggia 3 volte a
conferma della corretta memorizzazione.
VERIFICA DEL CORRETTO FUNZIONAMENTO DELLA SICUREZZA PORTA PEDONALE
Aprire la porta pedonale aprendo il contatto N.C. collegato al Trasmettitore
RED. Verificare che su MASTER NO TOUCH 868 i led DL3 e DL4 si spengano
e che un eventuale comando di apertura della porta non venga eseguito.
ANTENNA
Per comunicare con le sicurezze, MASTER NO TOUCH 868 è dotato di un pezzo di filo
elettrico che funge da antenna collegato al morsetto J3. Se si rende necessario migliorare
il segnale radio (per esempio con MASTER NO TOUCH 868 installato in un contenitore
metallico), collegare l’antenna 868,3 MHz (cod. ACG5451) al morsetto J3 rispettando il
collegamento del filo centrale e della massa, e posizionarla in modo che sia “in vista”
di tutte le sicurezze.
Per ottenere il corretto funzionamento del sistema è necessario che tra MASTER
NO TOUCH 868 e le sicurezze non ci siano ostacoli quali muri in cemento armato,
superfici in ferro, ecc. che potrebbero ostacolare le comunicazioni radio.
STATO DI ATTENZIONE (avviso di sostituzione batterie)
Lo stato di attenzione (WARNING) avverte l’utilizzatore dell’imminente necessità di sostituire
le batterie.
Quando le batterie di NO TOUCH 868 sono quasi scariche e raggiungono i 3,1V, il ricevitore
NO TOUCH 868 segnala via radio a MASTER NO TOUCH 868 lo stato di batteria quasi
scarica.
MASTER NO TOUCH 868 attiverà il BUZZER con un tono ogni 3 secondi per la durata di 1
minuto ogni volta che si darà un comando all’automazione.
Il led bicolore DL1 su MASTER NO TOUCH 868 si accenderà fisso di colore rosso.
Durante queste segnalazioni lo stato del sistema è ancora funzionante, ma è opportuno
sostituire al più presto le batterie evitando il blocco funzionale della porta che avviene al
raggiungimento dei 2,8 V.
STATO DI ALLARME (batterie completamente scariche o guasto)
Lo stato di allarme si attiva con batterie completamente scariche (2,8V) o in caso di guasto.
Su MASTER NO TOUCH 868 i led DL3 e DL4 si spengono e l’automazione resta ferma
mentre il led bicolore DL1 lampeggia alternativamente rosso-verde (sempre) ed il BUZZER
emette un tono alternato per 1 minuto.
Per eliminare l’allarme si dovranno sostituire le batterie o riparare il guasto.
PROCEDURA DI CANCELLAZIONE DELLA/E SICUREZZA/E
Per cancellare la/le sicurezza/e memorizzata/e su MASTER NO TOUCH 868 procedere nel
seguente modo:
- Premere e mantenere premuto il tasto S1 PROG. RX per 10 secondi.
- Al termine dei 10 secondi il led bicolore DL1 lampeggia per 6 volte alternativamente di
colore rosso e verde segnalando l’avvenuta cancellazione, mentre i led DL3 e DL4, se
erano accesi, si spengono.
CARATTERISTICHE TECNICHE FOTOCELLULA NO TOUCH 868 cod.
ACG8048
RICEVITORE NO TOUCH 868
- ALIMENTAZIONE
batterie al LITHIO 1 x AA 3,6V (>2,5 Ah)
5 µA
- ASSORBIMENTO A RIPOSO
- ASSORBIMENTO MASSIMO
25 mA
- TIPO DI MODULAZIONE
FSK
- VITA DELLE BATTERIE
circa 3 anni (con 10 cicli giornalieri)
- TEMPERATURA DI LAVORO
-20°C ÷ +60°C
- TEMPO MASSIMO DI RISPOSTA (TEMPO DI ATTIVAZIONE DEL RICEVITORE QUANDO
90 ms
IMPEGNATO) - TEMPO DI RIPRISTINO ALLA LIBERAZIONE
90 ms
- GRADO DI PROTEZIONE
IP54
- DIMENSIONI
Altezza totale con staffa = 190 mm; Larghezza =
34,60 mm;
Profondità = 32 mm
- PESO
0, 210 kg
DATI TECNICI SEGNALE RADIOFREQUENZA
- FREQUENZA
868,3 MHz
-108 dBm
- SENSIBILITA’
- POTENZA DI EMISSIONE
<25 mW
- PORTATA
20 m in spazio libero senza antenna
TRASMETTITORE NO TOUCH 868
- ALIMENTAZIONE
batterie al LITHIO 1 x AA 3,6V (>2,5 Ah)
- ASSORBIMENTO
3 µA
FSK
- TIPO DI MODULAZIONE
- VITA DELLE BATTERIE
circa 3 anni
- VITA BATTERIE CON JUMPER JP4 IN POSIZIONE ”L”
portata del segnale infrarosso 5 m:
3,1 anni
- VITA BATTERIE CON JUMPER JP4 IN POSIZIONE “H”
portata del segnale infrarosso 10 m:
1,2 anni
- TEMPERATURA DI LAVORO
-20°C ÷ +60°C
- GRADO DI PROTEZIONE
IP54
Altezza totale con staffa = 190 mm;
- DIMENSIONI
Larghezza = 35 mm;
Profondità = 51,91 mm
- PESO
0, 210 kg con batteria
DATI TECNICI SEGNALE INFRAROSSO
- LUNGHEZZA D’ONDA
890 nm
- PORTATA
10 m con jumper JP4 in posizione “H” su TX (di
default settata a 5 m con jumper JP4 in posizione
“L”)
CARATTERISTICHE TECNICHE MASTER NO TOUCH 868 cod. ACG6154
12/24V
110-240V 50/60Hz
10-30V
30 mA
100 mA
-20°C ÷ +60°C
125x55x28 mm
0,090 kg
4
3
Anni
- ALIMENTAZIONE
- TENSIONE APPLICABILE AL MORSETTO J2
- TENSIONE APPLICABILE AL MORSETTO J1
- ASSORBIMENTO A RIPOSO
- ASSORBIMENTO MASSIMO
- TEMPERATURA DI LAVORO
- DIMENSIONI
- PESO
DATI TECNICI SEGNALE RADIOFREQUENZA
- FREQUENZA
- SENSIBILITA’
- POTENZA DI EMISSIONE
- TIPO DI MODULAZIONE
- PORTATA
868,3 MHz
-108 dBm
<25 mW
FSK
20 m in spazio libero
2
1
0
5
10
20
Cicli giornalieri
Vita batterie
12
30
I
ATTENZIONE
NO !
SI !
PER ESTRARRE LA SCHEDA FARE LEVA SOLO NELLA ZONA
EVIDENZIATA DALLA RIGA VERDE DELL’ADESIVO APPLICATO.
Se si fa leva in altre parti è possibile danneggiare la scheda.
SOSTITUZIONE DELLE BATTERIE
La durata delle batterie LITHIO tipo AA da 3,6V è di circa 3 anni.
Nel caso di sostituzione delle batterie non è necessario rifare la programmazione.
- Sostituire le batterie facendo attenzione al rispetto delle polarità.
- Premere il tastino S2 PROG su RX NO TOUCH 868 per riattivare il funzionamento del
MASTER NO TOUCH 868.
L’automazione è pronta a ripartire in tutta sicurezza.
ATTENZIONE: Si ricorda che le batterie vanno smaltite secondo le Norme vigenti. In caso di
rottamazione delle sicurezze, si rammenta di togliere le batterie LITHIO tipo AA da 3,6V e di
smaltirle secondo le norme vigenti.
13
I
IN CASO DI DIFFICOLTA’
SINTOMO
VERIFICA
Tutti i led della scheda MASTER NO TOUCH 868 sono spenti
Verificare la presenza di tensione 12 o 24 V
MASTER NO TOUCH 868
Solo il led DL2 risulta acceso
- Nessuna sicurezza memorizzata. Eseguite la memorizzazione delle fotocellule NO TOUCH
868.
OPPURE
- La sicurezza della porta pedonale è attiva. Chiudere la porta pedonale presente nella porta
principale.
Dando un comando il buzzer emette 2 toni
- Autotest fallito. Verificare i collegamenti tra MASTER e quadro di comando, il settaggio di
JP1 e poi premere per un attimo il tasto S1 PROG RX o togliere e ridare tensione all’impianto.
OPPURE
- Errore di cablaggio del filo comune. Verificare che il filo comune del quadro sia collegato al
morsetto COM del MASTER NO TOUCH 868, poi premere per un attimo il tasto S1 PROG RX
o togliere e ridare tensione all’impianto.
Durante la memorizzazione delle sicurezze il buzzer emette 3 toni
Si sta tentando di memorizzare la sicurezza della porta pedonale prima della NO TOUCH 868.
Memorizzate prima la fotocellula NO TOUCH 868.
Dando un comando il buzzer emette 4 toni
Fili non collegati tra uscita lampeggiatore del quadro di comando e MASTER NO TOUCH
868. Collegarli e poi premere per un attimo il tasto S1 PROG RX o togliere e ridare tensione
all’impianto.
A porta ferma il buzzer emette 4 toni
Presenza di vibrazioni rilevate dall’accellerometro per forte vento o porta sollecitata
manualmente.
Dando un comando la porta tenta di aprire, poi si ferma e il buzzer emette 5 toni
Guasto sul ricevitore NO TOUCH 868. Dare un nuovo comando.
Se il problema persiste disattivare l’accellerometro.
Se ancora persiste sostituire il ricevitore della fotocellula NO TOUCH 868.
Dando un comando la porta tenta di aprire o chiudere, poi si ferma e il buzzer emette un tono
alternato per 1 minuto e led DL1 lampeggia in modo alternato rosso verde.
- Supervisione fallita. MASTER NO TOUCH 868 non riceve risposta dalla fotocellula a causa di
possibili ostacoli metallici che impediscono la comunicazione radio.
- Verificare che MASTER NO TOUCH 868 non sia stato installato in un contenitore metallico.
Eventualmente collegare all’esterno del contenitore metallico un’antenna 868,3 MHz (cod.
ACG5451).
ai morsetti di alimentazione POWER del
Il buzzer emette un tono ogni 3 secondi durante il funzionamento della porta per 1 minuto ed Sostituire al più presto le batterie delle/a fotocellule/a in quanto quasi scariche.
il led bicolore DL1 risulta acceso rosso fisso.
La porta non si muove, il buzzer emette un tono alternato per 1 minuto ed il led bicolore DL1
si accende verde-rosso alternato
Sostituire le batterie delle/a fotocellule/a in quanto scariche.
La porta non apre o non chiude ed il led bicolore DL1 è acceso di colore verde
Fotocellula non allineata o impegnata o batterie scariche sul trasmettitore fotocellula NO
TOUCH 868.
OPTIONAL
TRASMETTITORE RADIO RED
BATTERIE LITHIO AA
per contatto (non fornito) porta pedonale, da alimentare con 3 batterie stilo alcaline tipo
AA da 1,5V non incluse
cod. ACG6202
per fotocellule NO TOUCH 868 - 2 x 3,6V
14
cod. ACG9517
F
NO TOUCH 868 est conforme à la norme EN13849-2:2013 et associé à un tableau
électronique RIB doté d’AUTOTEST, c’est un dispositif de protection de classe 2.
Le système vérifie constamment la présence des différents dispositifs de sécurité et de l’état
des batteries, satisfaisant pleinement l’exigence d’une sécurité active sur tous les types de
porte à mouvement vertical.
NO TOUCH 868 est un dispositif breveté pensé pour garantir la sécurité des automatisations
comme les volets roulants et les portes sectionnelles.
Les photocellules NO TOUCH 868, grâce à leur rayon infrarouge placé à 13 cm du bord
inférieur de la porte, préviennent le contact avec d’éventuels obstacles.
NO TOUCH 868 ne demande pas l’adoption de systèmes enrouleurs ou regroupeurs de
câbles parce qu’il fonctionne à batterie et via radio.
Le système particulier de “basculement” permet le contrôle dans toutes les conditions de
mouvement, même en présence de vibrations.
Le système est composéa de trois éléments:
1 - Émetteur-récepteur radio 868 MHz, MASTER NO TOUCH 868 (code ACG6154), relié
au tableau électronique de commande de la porte.
2 - Antenne 868MHz
3 - Émetteur infrarouge.
4-
Récepteur infrarouge avec émetteur-récepteur radio 868 MHz qui dialogue
constamment avec la carte MASTER NO TOUCH 868.
2
1
3
4
- PHOTOCELLULE NO TOUCH 868 (code ACG8048). LES PHOTOCELLULES NO TOUCH
868 SONT ALLUMÉES SEULEMENT PENDANT L’ACTIONNEMENT DE LA PORTE. Grâce
à la fonction SLEEP MODE, quand la porte est à fixe les photocellules s’éteignent et ceci
maintient plus longtemps la charge des batteries.
- Sécurité additionnelle: ÉMETTEUR RED (code ACG6202) relié au contact NC (non
fourni) à appliquer à la porte piétonne insérée dans la porte principale. Fonctionne
uniquement si la photocellule NO TOUCH 868 est déjà programmée.
L’ÉMETTEUR RED EST TOUJOURS ACTIF ET EN CAS D’OUVERTURE DE LA PORTE
PIÉTONNE (et donc d’ouverture du contact NC auquel il est relié) BLOQUE
L’ACTIONNEMENT DE LA PORTE PRINCIPALE.
RÉFÉRENCES NORMATIVES POUR PORTES AUTOMATIQUES
VERTICALES
Une fois l’installation de l’appareil terminée, il faut s’assurer qu’elle soit conforme à la norme
EN13241-1.
RIB SE DÉCHARGE DE TOUTE RESPONSABILITÉ DES DOMMAGES CAUSÉS PAR UNE
UTILISATION NON CONFORME, ERRONÉE OU DÉRAISONNÉE
Restrictions de mode d’emploie: Les photocellules NO TOUCH 868 ne peuvent pas être
utilisées sur des appareillages exclus de l’application de l’EN12978, quels:
- appareils de protection pour installation sur des portes destinées à emploie différent par
rapport à cela sur les portes d’accès pour piétons et de véhicules couverts de la règle et le
principal emploie est cela de donner accès sûr en lieux industriels, commerciaux, publics
ou résidentiels. Quelques exemples d’exclusions peuvent être: écluses et cloisons; portes
d’ascenseurs; portes de véhicules; des portes principalement employées pour la garde
d’animaux; draperies en tissu pour théatre; barrières ferroviaires; des barrières utilisées
seulement pour véhicules.
- dispositifs employés seulement pour contrôle normal et pour arrête, inclus arrête
d’émergence, de portes motorisées.
- appareils de sûreté ou dispositifs de sûreté pour emploie sur des machines différentes
des portes.
ATTENTION: Des eventuelles modifications de produit ou de la configuration de l’appareil
ne peuvent pas être exécutées sans consulter le fabricant ou son représentant autorisé.
L’installateur du dispositif de sûreté doit fournir à l’utilisateur final tout ce qui suit:
- les dispositifs de sûreté doivent être connus de toutes les personnes appropriées;
- les aires qui donnent accès aux dispositifs doivent être tenues libres d’obstacles;
- les qualités pour le nottoyage à éviter eventuelles accumulations dangereuses de matériel;
- possibles spécifications pour une procédure de renvoi à exécuter après une arrêtée
d’émergence ou accidentelle causée du système de contrôle.
La modification du projet ou de la configuration de l’appareil sans la consultation du fabricant
ou de son représentant autorisé peut créer des situations dangereuses.
35
52,26
190,12
31,02
59
MASTER NO TOUCH 868 peut gérer deux sécurités:
35
35
51,91
Mesures en mm
15
F
MASTER NO TOUCH 868 (15/09/2014)
LAYOUT
DL2
S1
DL1
BUZZER
+
-
J3
J4
JP2
JP1
DL3
J1 =>
J2 =>
DL4
J2
COM
=> commun des contacts N.C.
CONTACT N.C.=> contact normalement fermé à relier à l’entrée Barre ou Photocellule du tableau électronique de commande
POWER - 12/24 V
=> alimentation négative à 12/24V
POWER + 12/24 V
=> alimentation positive à 12/24V
AUTOTEST => alimentation pour AUTOTEST (voir également JP1 pour la sélection)
ALARM N.C. => contact normalement fermé à relier à l’entrée STOP du tableau électronique de commande
J3 =>
J4 =>
J1
120/230 Vac
BORNES À RELIER À LA SORTIE CLIGNOTANT 120/230V 50/60Hz DU TABLEAU ÉLECTRONIQUE DE COMMANDE
BORNE POUR RACCORDEMENT ANTENNE 868,3 MHz
12/24 V
BORNES À RELIER À LA SORTIE CLIGNOTANT 12/24V
DU TABLEAU ÉLECTRONIQUE DE COMMANDE
ATTENTION À LA POLARITÉ INDIQUÉE SUR LE CIRCUIT IMPRIMÉ
JP1 => SÉLECTION ALIMENTATION AUTOTEST
JP1-Cavalier sélection modalité autotest avec alimentations négatives
JP1+/~ Cavalier sélection modalité autotest avec alimentations positives ou en courant alternatif (à utiliser avec tableau RIB modèle J)
JP2 =>
À disposition pour implémentations futures
S1 =>
PROG. RX Bouton pour programmation
BUZZER =>
Signale par différents sons les réglages éventuels à apporter durant l’installation ainsi que les états d’attention et d’alarme
LED
DL1 (bicolore)
DL2 (jaune) DL3 (rouge) DL4 (rouge) éteint => fonctionnement normal
vert
=> photocellule occupée
rouge/vert => alarme
- présence de tension d’alimentation 12-24V
- contact N.C. CONTACT
- contact N.C. ALARM
ATTENTION: MASTER NO TOUCH 868 NE PEUT PAS être installé à plus de 3 mètres de distance du coffret de commande de l’automatisme.
16
RACCORDEMENTS DE MASTER NO TOUCH 868 À UNE PLATINE MUNIE D’UNE SORTIE CLIGNOTANT
ATTENTION: La fonction AUTOTEST est obligatoire pour que le MASTER NO TOUCH 868 effectue les inspections exigées par la EN12978 par. 4.1 à des positions finales de la
course. IL EST NÉCESSAIRE QUE LE TABLEAU DE COMMANDE OÙ EST POSITIONNÉ MASTER NO TOUCH 868 DOIT AVOIR LA FONCTION DE L’AUTOTEST.
ATTENTION: INSERT MASTER NO TOUCH 868 DANS UN RÉCIPIENT PROTÉGÉ. L’utilisation du produit à l’intérieur de conteneurs métalliques peut produire un dysfonctionnement
du système. Nous conseillons par conséquent, pour une parfaite réception/émission des signaux d’ajouter l’antenne code ACG5451 qui doit être appliquée à
l’extérieur du conteneur et reliée à la borne J3 du MASTER NO TOUCH 868.
ATTENTION: Il est recommandé d’activer sur le tableau électronique de commande la fonction de PRÉCLIGNOTEMENT, si disponible.
ATTENTION: Vérifier la présence sur le tableau électronique de commande de la protection contre les court-circuits à l’aide d’un fusible relié en série au secondaire d’alimentation.
Dans le cas où il n’est pas présent, brancher en série à l’alimentation un fusible retardé (T) de 200 mA. Enlever la tension au tableau de commande de l’automatisation
avant d’effectuer les branchements au MASTER NO TOUCH 868.
+
! **
12/24V
Brancher à la borne COM du tableau
électronique de commande
Brancher à l’entrée BARRE PALPEUSE du tableau électronique
de commande. Si elle n’est pas disponible, utiliser l’entrée
PHOTOCELLULE
Alimentation
12/24V
Brancher à la sortie AUTOTEST du
tableau électronique de commande
avec sortie clignotant à 120/230V 50/60Hz
120/230V 50/60Hz
Brancher à l’entrée STOP du tableau électronique de commande ou à une
autre entrée qui arrête le mouvement du moteur
ENTRÉE ALARM N.C.
Borne ALARM NC: elle est dédiée au branchement en série de la commande de
STOP du tableau électronique de commande. Dans le cas où il n’y a pas d’entrée STOP,
relier le contact ALARME NC en série à une entrée qui permettent le blocage du tableau
électronique de commande.
ATTENTION: Éliminer l’éventuel cavalier, remplaçant le contact NC de STOP, des bornes du
tableau électronique de commande.
* Branchement OBLIGATOIRE pour tableau électronique de commande
! **
!*
ranchement OBLIGATOIRE pour tableau électronique de commande
B
. ATTENTION: RESPECTEZ LES
avec sortie clignotant à 12/24V
POLARITÉS TELLES QU’ELLES SONT INDIQUÉES SUR LE CIRCUIT
IMPRIMÉ
ATTENTION: le branchement de la sortie clignoteur du tableau de commande
aux bornes J2 ou J4 du MASTER NO TOUCH est obligatoire même quand aucun
clignotant n’est présent sur l’installation.
Si le branchement n’est pas effectué, la porte ne fonctionne pas et la cloche émet
4 sons, avertissant le branchement manquant.
ENTRÉE COM
Borne commune de CONTACT NC et d’ALARME NC.
ATTENTION: il faut obligatoirement brancher à la borne COM le COMMUN du tableau de
commande. Dans le cas où il n’est pas branché, le système entre en alarme avec un signal
de 2 sons de cloche.
ENTRÉE CONTACT N.C.
Borne CONTACT NC: elle est à relier à la sortie BARRE ou PHOTOCELLULE du tableau
électronique de commande.
ATTENTION: Éliminer l’éventuel cavalier, remplaçant le contact NC de BARRE ou
PHOTOCELLULE, des bornes du tableau électronique de commande.
BRANCHEMENT DE L’ENTRÉE AUTOTEST
(pour le respect de la norme EN13849-2:2013)
Si le tableau n’est pas muni d’un AUTOTEST, le test de contrôle sera ignore.
- Si le tableau utilisé est muni d’AUTOTEST, placer le cavalier JP1 du MASTER NO TOUCH
868 en fonction de l’alimentation fournie par le tableau de commande utilisé, en se tenant
aux indications du manuel.
- Relier la sortie AUTOTEST du tableau de commande à la borne AUTOTEST de la carte
MASTER NO TOUCH 868 de manière à pouvoir contrôler la fermeturae de l’automatisation.
- La fermeture est effectuée seulement si la carte MASTER NO TOUCH 868 a passé le test
de contrôle.
- Si le contrôle de la carte MASTER NO TOUCH 868 a un résultat négatif, le tableau de
commande bloque l’automatisation et les LEDs DL3et DL4 sur la carte MASTER NO TOUCH
868 s’éteignent. La cloche émet 2 sons et la LED bicolore DL1 clignotera rouge-vert en
signalant l’anomalie.
Pour réinitialiser le fonctionnement:
- vérifier les branchements de l’AUTOTEST et le placement du cavalier JP1;
- appuyer sur le bouton S1 PROG RX sur MASTER NO TOUCH 868;
- les LEDs DL3 et DL4 s’allument.
La carte est prête pour nouvel AUTOTEST.
17
F
F
RACCORDEMENTS DE MASTER NO TOUCH 868 À UNE PLATINE SANS SORTIE CLIGNOTANT
AVEC COFFRET POUR UN MOTEUR MONOPHASÉ 120/230Vac
N:B.: désactiver complètement toutes les fonctions éventuelles de ralentissement, démarrage graduel, réglage de la force.
RACCORDER LE NEUTRE DE LA LIGNE
MONOPHASÉ 120/230 Vac
AINSI QU’UNE MOTEUR
MONOPHASÉ AUX BORNES J2
Brancher à la borne COM du tableau
électronique de commande
F
Alimentation
Brancher à l’entrée BARRE PALPEUSE du
tableau électronique de commande. Si
elle n’est pas disponible, utiliser l’entrée
PHOTOCELLULE
12/24V
N
MOTEUR
V
Brancher à la sortie AUTOTEST du
tableau électronique de commande
U
Brancher à l’entrée STOP du tableau électronique
de commande ou à une autre entrée qui arrête le
mouvement du moteur
W
AVEC PLATINE POUR UN MOTEUR TRIPHASÉ 400Vac
RACCORDER LE NEUTRE DE LA LIGNE
TRIPHASÉ 400 Vac AINSI QU’UNE DES TROIS
PHASES MOTEUR AUX BORNES J2
R
S
T
N
MOTEUR
V
U
W
18
RACCORDEMENTS DE MASTER NO TOUCH 868 À UNE PLATINE SANS SORTIE CLIGNOTANT
AVEC COFFRET POUR UN MOTEUR 12/24Vdc
- Il n’est pas possible de raccorder directement MASTER NO TOUCH 868 à l’alimentation moteur car la polarité est inversée pour assurer la montée/descente et la tension
chute pour assurer le ralentissement en approche.
- +
SORTIE ALIMENTATION
ÉCLAIRAGE DE ZONE EN 24Vdc DUE LA
PLATINE DE COMMANDE
CONNECTER J2 A LA LIGNE 120/230V SUR PLATINE DE
COMMANDE MOTEUR PAR RELAIS AVEC BOBINE 120/230Vac
GEREE PAR CONTACT NET N.O. LUMIERE DE COURTOISIE SUR
PLATINE DE COMMANDE MOTEUR
N.O.
N.O.
*R1
F
N
* R1= RELAIS AVEC UN CONTACT ET BOBINE A
120/230Vac
* R1= RELAIS AVEC UN CONTACT ET BOBINE
A 12/24V
*R1
N.O. N.O.
BORNES
CONTACT
NET N.O. DU
LUMIERE DE
COURTOISIE
CONNECTER J4 A L’ALIMENTATION DES ACCESSOIRES 12/24V SUR
PLATINE DE COMMANDE MOTEUR PAR RELAIS AVEC BOBINE 12/24V
GEREE AVEC UN CONTACT NET N.O. DU LUMIERE DE COURTOISIE
19
LIGNE 120/230Vac
-
+
BORNES
D’ALIMENTATION
ACCESSOIRES
12/24V
SUR PLATINE DE
COMMANDE
MOTEUR
F
F
MONTAGE PHOTOCELLULES DE SÉCURITÉ NO TOUCH 868
IL EXISTE DEUX DIFFÉRENTES TYPOLOGIES DE FIXATION:
NO TOUCH 1A
NO TOUCH 1B (STANDARD)
DISPOSITIF FIXÉ SOUS LA PORTE
DISPOSITIF FIXÉ SUR LE CÔTÉ DE LA PORTE
bride positionnée pour fixation sous la porte
bride positionnée pour fixation sur le côté de la porte
joint pour couvercle
électronique
joint pour couvercle
électronique
couvercle
rondelle en caoutchouc
pour vis
rondelle en caoutchouc
pour vis
vis 2,9x9,5
vis 2,9x9,5
bouchon
lentille
bouchon
lentille
rondelle en caoutchouc
pour vis
vis 2,9x9,5
rondelle en caoutchouc
pour vis
vis 2,9x9,5
Trou d’insertion
queue du ressort
NO TOUCH 1B
Trou d’insertion
queue du ressort
NO TOUCH 1A
N.B.: Pour un bon degré de protection IP, faire attention à insérer correctement les joints.
CARACTÉRISTIQUES TECHNIQUES NO TOUCH 868
Vitesse max partie mobile
Alimentation
Portée signal infrarouge
12 m/min
2 batteries 3,6V
5 m / 10 m
couvercle
Fréquence radio
Portée signal radio
Degré de protection
20
868,3 MHz
20 m
IP54
PROGRAMMATION MASTER NO TOUCH 868 ET PHOTOCELLULES NO TOUCH 868
A - VÉRIFICATION DU BON FONCTIONNEMENT DE LA PHOTOCELLULE NO
TOUCH 868
- Le bon fonctionnement du TX NO TOUCH 868 est signalé par la LED verte DL6 qui s’allume
pendant 10 secondes à l’insertion de la batterie de 3,6V.
- Sur MASTER NO TOUCH 868 la LED bicolore DL1 passera du rouge clignotant à vert et un
son de cloche signalera la mémorisation de la sécurité. Au même moment, les LEDs DL3
et DL4 s’allument et le tableau de commande reçoit les signaux corrects des sécurités.
- Appuyer et relâcher le bouton S2 PROG. sur l’RX NO TOUCH 868 (la photocellule s’active
pendant 3 minutes pour vérifier l’alignement).
SIGNALISATIONS SONORES
MASTER NO TOUCH 868 possède une cloche qui signale les phases d’installation et l’état
d’attention en cas de batteries presque déchargées ou déchargées ou l’état d’alarme en
panne d’un des dispositifs.
D - ACCÉLÉROMÈTRE
Si les photocellules sont correctement alignées la LED rouge DL5 s’allume fixe.
- Pendant les trois minutes que la LED rouge DL5 reste allumée, vérifier qu’en interposant
un obstacle, celle-ci s’éteigne et que la LED bicolore DL1 sur MASTER NO TOUCH 868
s’allume en vert pendant toute la durée de l’interposition.
- Sur la carte MASTER NO TOUCH 868, la LED DL3 doit également s’éteindre, indiquant
le bon échange du contact dédié à l’entrée barre ou photocellule sur le tableau de
commande.
Si la LED rouge DL5 reste éteinte, vérifier:
- le bon montage des supports;
- sur TX NO TOUCH, la position du cavalier JP4 qui régule la portée du signal infrarouge:
- si positionné sur L, la portée est configurée à 5 mètres.
- si positionné sur H, la portée est configurée à 10 mètres.
B - ALIMENTER MASTER NO TOUCH 868
Après avoir effectué tous les branchements, alimenter le tableau de commande MASTER
NO TOUCH 868.
La LED jaune DL2 doit s’allumer et la cloche doit émettre un son pour signaler la bonne
alimentation.
C - MÉMORISATION DE LA PHOTOCELLULE NO TOUCH 868
Insérer les batteries dans les circuits NO TOUCH et les placer à l’intérieur des boîtiers déjà
fixés aux extrémités de la porte.
Pour effectuer la mémorisation, suivre la procédure suivante:
- Appuyer sur le bouton S1 PROG RX qui se trouve sur MASTER NO TOUCH 868 =>
la LED bicolore DL1 clignotera rouge pendant 1 minute (temps utile pour effectuer la
mémorisation).
L’ACCÉLÉROMÈTRE n’est pas compatible avec les automatisations dotées de départs
progressifs ou très lente.
Exclure le départ progressif ou, si cela n’est pas possible, désactiver
l’ACCÉLÉROMÈTRE. Si le port est très lent désactiver l’ACCÉLÉROMÈTRE.
- Effectuer une vérification fonctionnelle de la photocellule installée en activant le mouvement
de l’automatisation et en contrôlant qu’en interposant un obstacle à la fermeture, la porte
s’arrête et inverse son mouvement.
- Si la porte s’arrête après le départ avec une alarme signalée par 5 sons de CLOCHE,
cela signifie que le mouvement de la porte n’a pas été relevé par l’ACCÉLÉROMÈTRE
(en raison du départ progressif ou de la porte très lent), par conséquent, pour un
fonctionnement correct de la porte, il faut exclure l’ACCÉLÉROMÈTRE.
Pour le désactiver, il faut:
- déplacer sur OFF le cavalier JP3 présent sur RX NO TOUCH 868;
- appuyer sur le bouton S2 PROG;
- la cloche de MASTER NO TOUCH 868 émettra un son pendant 3 secondes, signalant la
désactivation de l’ACCÉLÉROMÈTRE.
ACTIVATION DE L’ACCÉLÉROMÈTRE
Pour activer l’ACCÉLÉROMÈTRE, il faut:
- déplacer sur ON le cavalier JP3 présent sur RX NO TOUCH 868;
- appuyer sur le bouton S2 PROG;
- la cloche de MASTER NO TOUCH 868 émettra un son pendant 3 secondes, signalant
l’activation de l’ACCÉLÉROMÈTRE.
VÉRIFICATION DU BON FONCTIONNEMENT DE L’ACCÉLÉROMÈTRE
- Avec l’ACCÉLÉROMÈTRE ACTIF (cavalier JP3 ON sur RX NO TOUCH 868) vérifier qu’en
déplaçant le RÉCEPTEUR NO TOUCH 868 la LED DL1 s’allume rouge fixe, la CLOCHE
émette 4 sons et les LEDS DL3 et DL4 s’éteignent pendant 5 secondes.
- Après 5 secondes, la LED DL1 s’éteint et DL3-DL4 s’allument.
E - MÉMORISATION
DES TEMPS (SEULEMENT AVEC ACCÉLÉROMÈTRE
ACTIVÉ - JP3 ON)
AVEC L’ACCÉLÉROMÈTRE ACTIVÉ, LA PROCÉDURE DE MÉMORISATION DES TEMPS
EST OBLIGATOIRE.
SI ELLE N’EST PAS EFFECTUÉE, IL EST POSSIBLE QU’APRÈS LE DÉPART DE LA PORTE
CELLE-CI S’ARRÊTE AVEC LA SIGNALISATION DE 5 SONS DE CLOCHE.
- Appuyer sur le bouton S1 PROG RX sur MASTER NO TOUCH 868, la LED DL1 clignotera
vert.
- Commander la porte en l’ouvrant et la fermant au moins deux fois à la suite.
- Attendre que la LED verte DL1 s’éteigne, ou bien appuyer une fois sur le bouton S1 pour
terminer la procédure.
F - MÉMORISATION DE LA SÉCURITÉ PORTE PIÉTONNE (Émetteur RED
code ACG6202)
- Appuyer sur le bouton S2 PROG sur la sécurité RX NO TOUCH 868.
Il est possible de mémoriser une sécurité pour la porte piétonne seulement si la photocellule
NO TOUCH 868 a déjà été programmée.
Cette sécurité est l’Émetteur RED qui sert à contrôler un contact N.C. (non fourni) monté
sur la porte piétonne présent dans la porte principale.
Pour effectuer la mémorisation, suivre la procédure suivante:
- position le DIP switch n° 2 sur ON (OBLIGATOIRE);
- alimenter l’Émetteur RED à l’aide des batteries;
- appuyer sur le bouton S1 PROG. RX qui se trouve sur MASTER NO TOUCH 868: la LED
bicolore DL1 clignote vert pendant 1 minute (le temps que se fasse la mémorisation);
21
F
F
- appuyer sur le bouton S2 PROG. TX sur l’Émetteur RED: sur MASTER NO TOUCH 868 la
LED bicolore DL1, de vert clignotant, s’éteint. Un son de cloche signale la mémorisation
tandis que la LED rouge de l’Émetteur clignote 3 fois pour confirmer la mémorisation.
VÉRIFICATION DU BON FONCTIONNEMENT DE LA SÉCURITÉ PIÉTONNE
Ouvrir la porte piétonne en ouvrant le contact N.C. relié à l’Émetteur RED. Vérifier que sur
MASTER NO TOUCH 868 les LEDs DL3 et DL4 s’éteignent et qu’une éventuelle commande
d’ouverture de la porte ne soit pas exécuté.
ANTENNE
Pour communiquer avec les sécurités, MASTER NO TOUCH 868 est muni d’un bout de
fil électrique qui sert d’antenne relié à la borne J3. S’il faut améliorer le signal radio (par
exemple avec MASTER NO TOUCH 868 installé dans un boîtier métallique), relier l’antenne
868,3 MHz (code ACG5451) à la borne J3 en respectant le branchement du fil central et de
la masse, et la placer de manière à ce qu’elle soit “visible” pour toutes les sécurités.
Pour obtenir le bon fonctionnement du système, il est nécessaire qu’entre MASTER
NO TOUCH 868 et les sécurités, il n’y ait pas d’obstacle comme des murs en béton
armé, des surfaces en fer, etc. qui pourraient entraver les communications radio.
ÉTAT D’AVERTISSEMENT (avis de remplacement des batteries)
L’état d’avertissement (WARNING) signale à l’utilisateur la nécessité imminente de
remplacer les batteries.
Quand les batteries du NO TOUCH 868 sont presque à plat et qu’elles atteignent 3,1V, le
récepteur NO TOUCH 868 signale par radio au MASTER NO TOUCH 868 l’état de batterie
presque à plat.
MASTER NO TOUCH 868 activera la CLOCHE qui émettra un son toutes les 3 secondes
pendant 1 minute à chaque fois que l’on donnera une commande à l’automatisation.
La LED bicolore DL1 sur MASTER NO TOUCH 868 s’allumera rouge fixe.
Pendant ce signalisations l’état du système est encore fonctionnel, mais il est nécessaire de
remplacer au plus vite les batteries en évitant le bloc fonctionnel de la porte qui se produit
à 2,8V.
ÉTAT D’ALARME (batteries complètement vides ou avarie)
L’état d’alarme s’active avec des batteries complètement à plat (2,8V) ou en cas de panne.
Sur MASTER NO TOUCH 868 les LEDs DL3 et DL4 s’éteignent et l’automatisation reste à
l’arrêt tandis que la LED bicolore DL1 clignote alternativement rouge-vert (toujours) et la
CLOCHE émet un son intermittent pendant 1 minute.
Pour éliminer l’alarme, il faudra changer les batteries ou réparer la panne.
PROCÉDURE D’ANNULATION DE LA/DES SÉCURITÉ(S)
Pour annuler la/les sécurités mémorisée(s) sur MASTER NO TOUCH 868, procéder de la
manière suivante:
- Appuyer et maintenir enfoncé le bouton S1 PROG. RX pendant 10 secondes.
- Au terme des 10 secondes la LED bicolore DL1 clignote 6 fois de couleur rouge et verte
pour confirmer l’annulation, tandis que les LEDs DL3 et DL4, si elles étaient allumées,
s’éteignent.
CARACTÉRISTIQUES TECHNIQUES PHOTOCELLULE NO TOUCH 868
code ACG8048
RÉCEPTEUR NO TOUCH 868
- ALIMENTATION
batteries LITHIUM 1 x AA 3,6V (>2,5 Ah)
5 µA
- CONSOMMATION AU REPOS
- CONSOMMATION MAXIMALE
25 mA
- TYPE DE MODULATION
FSK
- DURÉE DE VIE DES BATTERIES
environ 3 ans (avec 10 cycles quotidiens)
- TEMPÉRATURE DE TRAVAIL
-20°C ÷ +60°C
- TEMPS MAXIMUM DE RÉPONSE (TEMPS D’ACTIVATION DU RÉCEPTEUR QUAND
90 ms
OCCUPÉ)
- TEMPS DE RÉINITIALISATION À LA LIBÉRATION 90 ms
- DEGRÉ DE PROTECTION
IP54
- DIMENSIONS
Hauteur totale avec bride = 190 mm; Largeur = 34,60 mm;
Profondeur = 32 mm
- POIDS
0, 210 kg
DONNÉES TECHNIQUES SIGNAL RADIO
- FRÉQUENCE
868,3 MHz
-108 dBm
- SENSIBILITÉ
- PUISSANCE D’ÉMISSION
<25 mW
- PORTÉE
20 m sans obstacles
ÉMETTEUR NO TOUCH 868
- ALIMENTATION
batteries LITHIUM 1 x AA 3,6V (>2,5 Ah)
- CONSOMMATION
3 µA
FSK
- TYPE DE MODULATION
- DURÉE DE VIE DES BATTERIES
environ 3 ans
- DURÉE DES BATTERIES AVEC CAVALIER JP4 EN POSITION ”L”
portée du signal infrarouge 5 m:
3,1 ans
- DURÉE DES BATTERIES AVEC CAVALIER JP4 EN POSITION “H”
portée du signal infrarouge 10 m:
1,2 ans
-20°C ÷ +60°C
- TEMPÉRATURE DE TRAVAIL
- DEGRÉ DE PROTECTION
IP54
Hauteur totale avec bride = 190 mm;
- DIMENSIONS
Largeur = 35 mm;
Profondeur = 51,91 mm
0, 210 kg avec batterie
- POIDS
DONNÉES TECHNIQUES SIGNAL INFRAROUGE
- LONGUEUR D’ONDE
890 nm
- PORTÉE
10 m avec cavalier JP4 en position “H” sur TX
(par défaut réglée à 5 m avec cavalier JP4 en
position “L”)
CARACTÉRISTIQUES TECHNIQUES MASTER NO TOUCH 868 code
ACG6154
12/24V
110-240V 50/60Hz
10-30V
30 mA
100 mA
-20°C ÷ +60°C
125x55x28 mm
0,090 kg
4
3
868,3 MHz
-108 dBm
<25 mW
FSK
20 m sans obstacles
Ans
- ALIMENTATION
- TENSION APPLICABLE À LA BORNE J2
- TENSION APPLICABLE À LA BORNE J1
- CONSOMMATION AU REPOS
- CONSOMMATION EN FONCTIONNEMENT
- TEMPÉRATURE DE TRAVAIL
- DIMENSIONS
- POIDS
DONNÉES TECHNIQUES SIGNAL RADIO
- FRÉQUENCE
- SENSIBILITÉ
- PUISSANCE D’ÉMISSION
- TYPE DE MODULATION
- PORTÉE
2
1
0
5
10
20
Cycles au jour
durée piles
22
30
F
ATTENTION
NO !
OUI !
POUR EXTRAIRE LE CIRCUIT, FAIRE LEVIER UNIQUEMENT DANS
LA ZONE MISE EN EVIDENCE SUR L’ADHESIF PAR LE TRAIT VERT.
Il est possible d’endommager le circuit en cas de non respect
de cet avertissement.
REMPLACEMENT DES BATTERIES
La durée des batteries au LITHIUM de tipo AA de 3,6V est d’environ 3 ans.
Dans le cas d’un remplacement des batteries, il n’est pas nécessaire de refaire la
programmation.
- Remplacer les batteries en faisant attention aux polarités.
- Appuyer sur le bouton S2 PROG sur RX NO TOUCH 868 pour réactiver le fonctionnement
du MASTER NO TOUCH 868.
L’automatisation est prête à repartir en toute sécurité.
ATTENTION: Nous rappelons que les batteries sont à éliminer selon les normes en vigueur.
En cas de destruction des sécurités, nous vous rappelons d’enlever les batteries au LITHIUM
de type AA de 3,6V et de les éliminer selon les normes en vigueur.
23
F
EN CAS DE DIFFICULTÉ
SYMPTÔME
VÉRIFICATION
aux bornes d’alimentation POWER du MASTER NO
Toutes les LEDs de la carte MASTER NO TOUCH 868 sont éteintes
Vérifier la présence de tension 12 ou 24V
TOUCH 868
Seule la LED DL2 est allumée
- Aucune sécurité mémorisée. Effectuez la mémorisation des photocellules NO TOUCH 868.
OU
- La sécurité de la porte piétonne est active. Fermer la porte piétonne présente dans la porte
principale.
Après une commande, la cloche émet 2 sons
- Échec de l’autotest. Vérifier les branchements entre MASTER et tableau de commande, le réglage
de JP1 et ensuite appuyer pendant un instant sur le bouton S1 PROG RX ou débrancher et
rebrancher l’installation.
OU
- Erreur de câblage du fil commun. Vérifier que le fil commun du tableau de soit relié à la borne COM
du MASTER NO TOUCH 868, puis appuyer un instant sur le bouton S1 PROG RX ou débrancher
et rebrancher l’installation.
Pendant la mémorisation des sécurités la cloche émet 3 sons
Vous essayez de mémoriser la sécurité de la porte piétonne avant celle de la NO TOUCH 868.
Mémorisez tout d’abord la photocellule NO TOUCH 868.
Après une commande, la cloche émet 4 sons
Fils non branchés entre la sortie clignotant du tableau de commande et MASTER NO TOUCH 868.
Les brancher et ensuite appuyer un instant sur le bouton S1 PROG RX ou débrancher et rebrancher
l’installation.
La porte à l'arrêt, la cloche émet 4 sons
Présence de vibrations relevées par l’accéléromètre en cas de vent fort ou en cas de porte sollicitée
manuellement.
En donnant une commande, la porte tente d'ouvrir, puis s'arrête et la cloche émet 5 sons
Panne sur le récepteur NO TOUCH 868. Faire une autre commande.
Si le problème persiste désactiver l’accéléromètre.
Si cela persiste encore, remplacer le récepteur de la photocellule NO TOUCH 868.
En donnant une commande, la porte tente de s'ouvrir ou de se fermer, puis s'arrête et la cloche
émet un son alterné pendant 1 minute et la LED DL1 clignote rouge-vert.
- Échec de la supervision. MASTER NO TOUCH 868 ne reçoit aucune réponse de la photocellule à
cause de possibles obstacles métalliques qui empêchent la communication radio.
- Vérifier que MASTER NO TOUCH 868 ne soit pas installé dans un boîtier métallique. Brancher
éventuellement à l’extérieur du boîtier une antenne 868,3 MHz (code ACG5451).
La cloche émet un son toutes 3 secondes pendant le fonctionnement de la porte pendant 1 minute
et la LED bicolore DL1 est allumée rouge fixe.
Remplacer au plus vite les batteries de la/des photocellule(s) car celle(s)-ci sont presque à plat.
La porte ne bouge pas, la cloche émet un son alterné pendant 1 minute et la LED bicolore DL1
clignote vert-rouge
Remplacer les batteries de la/des photocellule(s) car celle(s)-ci sont à plat.
La porte ne s'ouvre pas ou ne se ferme pas et la LED bicolore DL1 est allumée de couleur verte
Photocellule non alignée ou occupée ou batteries à plat sur l’émetteur photocellule NO TOUCH 868.
OPTIONS
TRANSMETTEUR RADIO RED
BATTERIES LITHIO AA
pour contact (non fourni) porte piétonne, à alimenter par 3 piles alcalines de type AA de
1,5V non comprise
code ACG6202
pour photocellules NO TOUCH 868 - 2 x 3,6V
24
code ACG9517
G
B
NO TOUCH 868 complies with the standard EN13849-2:2013 and, in junction with a
RIB electric panel equipped with AUTOTEST, is a Class 2 protection device.
The system constantly monitors the presence of the various security devices and battery
status, satisfying the need for fully active security on all types of doors with vertical
movement.
NO TOUCH 868 is a patented device developed to guarantee safety in automations such as
shutters and sectional doors.
The NO TOUCH 868 photocells prevent contact with any obstructions, thanks to their infrared
ray which is 13cm away from the door.
NO TOUCH 868 does not require cable reel systems, because it operates with batteries
and via radio.
The particular system of “balance” allows the control of each movement condition, even
when vibrations are present.
The system is composed of three elements:
1 - 868 MHz radio transceiver, MASTER NO TOUCH 868 (cod. ACG6154) connected to
the door electric control panel.
2 - Aerial 868MHz
3 - Infrared transmitter.
4 - Infrared receiver with 868 MHz radio transceiver which constantly communicates
with the MASTER NO TOUCH 868.
2
1
3
4
- PHOTOCELL NO TOUCH 868 (code ACG8048). THE NO TOUCH 868 PHOTOCELLS ARE
ON ONLY WHEN THE DOOR IS IN OPERATION. Thanks to the SLEEP MODE function,
when the door is closed, the photocells are turned off, saving the battery life.
- Additional security: RED TRANSMITTER (code ACG6202) connected to NC (not
supplied) to be applied to the pedestrian door on the main door. It will only work if you
have already programmed the NO TOUCH 868 photocell.
THE RED TRANSMITTER IS ALWAYS ACTIVE AND WHEN THE PEDESTRIAN DOOR
IS OPENED (and thus the NC contact to which it is linked is open) LOCKS THE
OPERATION OF THE MAIN DOOR.
REFERENCE TO STANDARDS FOR AUTOMATIC VERTICAL DOORS
Once machine installation is complete it must be ascertained that it complies with standard
EN13241-1.
RIB MAY NOT BE HELD RESPONSIBLE FOR DAMAGES CAUSED BY IMPROPER, WRONG
OR UNREASONABLE USE.
Usage restrictions: The NO TOUCH 868 photocells cannot be used on devices excluded by
the application of the EN12978, such as:
- protection devices for the installation on doors used for a different purpose to those ones
used for pedestrian or veheicle access, covered by the norm which principal intent is that
of allowing a safe access to industrial, commercial, public and commercial sites. Some
examples of excluded accesses can be: sluice gates, dams, lift doors, vehicles’ doors, doors
used mainly to restrain animals, theatre curtains, railways barriers, barriers used only for
vehicles.
- Devices used only fo the standard control and for the stopping, including the emergency
stopping, of motorized doors.
- Safety systems and safety devices used on machineries different from doors.
ATTENTION: Any possible modification of the device, or of the configuration of the same cannot
be carried out without the clear authorization by the manufacturer or, by the local authorized
dealer.
The installer of the safety device must make sure that the end user know the
following:
- That the safety devices must be made known to all appropriate people.
- That the passages to reach the devices must be kept clear from any obtsacle.
- About the procedures for cleaning so to avoid the dangerous building up of material.
- The possible details for a restart of the system after an emergency or accidental stop caused
by the control system.
Any modification of the project or, of the configuration of the device, without discussing it first
with the manufacturer or with the local autorized dealer can cause dangerous situations.
35
52,26
190,12
31,02
59
MASTER NO TOUCH 868 can handle two security devices:
35
35
51,91
Measurements in mm
25
G
B
MASTER NO TOUCH 868 (15/09/2014)
LAYOUT
DL2
S1
DL1
BUZZER
+
-
J3
J4
JP2
JP1
DL3
J1 =>
J2 =>
COM
CONTACT N.C.
POWER - 12/24 V
POWER + 12/24 V
AUTOTEST ALARM N.C. J3 =>
J1
DL4
J2
=> common in NC contact
=> usually closed contact to be connected to the Strip or Photocell in the electric control panel
=> negative supply 12/24V
=> positive supply 12/24V
=> supply for AUTOTEST (see also JP1 for the selection)
=> usually closed contact to be connected to the STOP input on the electric control panel
120/230 Vac
TERMINALS TO BE CONNECTED TO THE 120/230V 50/60Hz BLINKER OUTPUT OF THE ELECTRONIC CONTROL PANEL
TERMINAL FOR CONNECTING THE 868,3 MHz ANTENNA
J4 =>
12/24 V
TERMINALS TO BE CONNECTED TO THE 12/24V
BLINKER OUTPUT OF THE ELECTRONIC CONTROL PANEL
PAY CLOSE ATTENTION TO THE POLARITY INDICATED ON THE PRINTED CIRCUIT
JP1 => AUTOTEST SUPPLY SELECTION
JP1-
Jumper autotest selection mode with negative supply
JP1+/~ J umper autotest selection mode with positive supply or AC (for use with RIB panel model J)
JP2 =>
A provision for future implementations
S1 =>
P ROG. RX Programming pushbutton
BUZZER =>
Signals, through different sounds, possible adjustments to be made during installation and events of warning or alarm
LED
DL1 (bi-colour)
DL2 (yellow) DL3 (red)
DL4 (red) off
=> normal operation
green => photocell engaged
red/green => alarm
- presence of supply voltage 12-24V
- N.C. CONTACT
- N.C. ALARM
ATTENTION: THE MASTER NO TOUCH 868 CANNOT be installed more than 3 metres away from the control panel of the door operator.
26
MASTER NO TOUCH 868 CONNECTIONS TO A CONTROL PANEL WITH AN OUTPUT TO SUPPLY A BLINKER
WARNING: MASTER NO TOUCH 868 performs the inspections required by EN12978 par. 4.1 to the final positions of the run only if the AUTOTEST function is available. IT’S
NECESSARY THAT THE CONTROL PANEL WHERE THE MASTER NO TOUCH 868 IS APPLIED, HAS THE AUTOTEST FUNCTION.
WARNING: INSERT MASTER NO TOUCH 868 IN A SHELTERED CONTAINER. The use of the product inside metal containers can generate a system malfunction. It is therefore
advised, for a perfect reception/transmission of the signals to add the antenna, code ACG5451, which should be applied externally to the container and connected
to the J3 terminal of the MASTER NO TOUCH 868.
WARNING: It is advisable to activate the function PRE-BLINKING on the electronic control panel, if available.
WARNING: Verify the presence of the protection against short circuits on the control panel through fuses connected in series to the second supply. In the event it is not present,
connect in series to the supply with a time-delay fuse (T) of 200 mA. Disconnect power to the automation control panel before making the connections to the MASTER
NO TOUCH.
+
! **
12/24V
Connect the terminal COM on the electronic
control panel
Connect the input STRIP on the electronic control panel. If not
available use the PHOTOCELL input
Power Supply
12/24V
Connect the AUTOTEST output on the
electronic control panel
!
!*
120/230V 50/60Hz
Connect the STOP input on the electronic control panel or other
input which stops the movement of the motor
INPUT ALARM N.C.
ALARM NC feed terminal: it is dedicated to the series connection of the STOP
command on the electronic control panel. In the event that the STOP input is not present,
connect the ALARM NC contact in series to an input which allows the electronic control
panel to be blocked.
WARNING: Remove any jumper, replacing the STOP NC contact, from the terminals of the
electronic control panel.
* COMPULSORY connection for electronic control panel with 120/230V
50/60Hz blinker output
** COMPULSORY connection for the electronic control panel with
12/24V
blinker output. WARNING: RESPECT THE POLARITY AS
INDICATED ON THE PRINTED CIRCUIT.
WARNING: The connection of the blinker output of the control panel to the
terminals J2 or J4 of the MASTER NO TOUCH is obligatory even in the event a
flashing light is not present on the installation.
If the connection fails the door does not work and the buzzer emits 4 warning
tones of connection failure.
INPUT COM
Common terminal of CONTACT NC and ALARM NC.
WARNING: The COM terminal is required to connect the COMMON to the control panel.
In the event that COM is not connected, the system alarm will signal and the buzzer will
sound 2 tones.
INPUT CONTACT N.C.
CONTACT NC terminal: is to be connected to the STRIP or PHOTOCELL output of the
electronic control panel.
WARNING: Remove any jumper, replacing the STRIP or PHOTCELL NC contact, from the
terminals of the electronic control panel.
CONNECTING AUTOTEST INPUT (for complying with the standard EN13849-2:2013)
If the panel is not equipped with AUTOTEST, the control test is ignored.
- If the panel is equipped with AUTOTEST, position the jumper JP1 of the MASTER NO
TOUCH 868 according to the power supply given by the control panel used, adhering to
its manual.
- Connect the AUTOTEST output of the control panel to the AUTOTEST terminal of the
MASTER NO TOUCH 868 so as to control the system at the end of each complete opening
or at the start of the closing operation of the automation.
- Closing will occur only if the MASTER NO TOUCH 868 has passed the control test.
- If the check of the MASTER NO TOUCH 868 has failed, the control panel blocks the
automation and DL3 and DL4 LEDs on the MASTER NO TOUCH 868 will turn off. The
buzzer emits 2 tones and the bi-colour LED DL1 will flash red-green, signalling an anomaly.
To restore the functioning:
- check the AUTOTEST connections and the position of the JP1 jumper;
- press the S1 PROG RX pushbutton on the MASTER NO TOUCH 868;
- the LEDs DL3 and DL4 will turn on.
The MASTER NO TOUCH 868 is ready for a new AUTOTEST.
27
G
B
G MASTER NO TOUCH 868 CONNECTIONS TO A CONTROL PANEL WITHOUT AN OUTPUT TO SUPPLY A BLINKER
B
FOR CONTROL PANEL ABLE TO MANAGE A 120/230Vac 1-PHASE MOTOR
WARNING: Disable completely slow speed, gradual start, adjustment of the force.
Connect the terminal COM on the electronic
control panel
Connect the input STRIP on the electronic
control panel. If not available use the
PHOTOCELL input
CONNECT THE NEUTRAL OF THE
1-PHASE POWER SUPPLY LINE
120/230Vac AND COMMON OF THE
MOTOR OUTPUT,
FROM CONTROL PANEL TO J2
F
Power Supply
12/24V
N
MOTOR
V
Connect the AUTOTEST output on the
electronic control panel
U
Connect the STOP input on the electronic control panel
or other input which stops the movement of the motor
W
FOR CONTROL PANEL ABLE TO MANAGE A 400Vac 3-PHASE MOTOR
CONNECT THE NEUTRAL OF THE 3-PHASE
POWER SUPPLY LINE 400Vac AND COMMON OF
THE MOTOR OUTPUT, FROM CONTROL PANEL
TO J2
R
S
T
N
MOTOR
V
U
W
28
MASTER NO TOUCH 868 CONNECTIONS TO A CONTROL PANEL WITHOUT AN OUTPUT TO SUPPLY A BLINKER
FOR CONTROL PANEL ABLE TO MANAGE A 12/24Vdc MOTOR
- It is not possible to connect directly MASTER NO TOUCH 868 to the motor power supply output of the control panel because polarities are exchanged in opening and closing
and control panel has slow speed in approaching which is not possible to disengage.
- +
24Vdc COURTESY LIGHT POWER SUPPLY
OUTPUTS TERMINAL BLOCKS ON CONTROL
PANEL
CONNECT J2 TO POWER SUPPLY LINE 120/230V ON
CONTROL PANEL THOUGHT 1 CONTACT RELAY WITH
120/230V BOBINE MANAGED BY A N.O. COURTESY LIGHT
OUTPUT CLEAN CONTACT ON CONTROL PANEL
N.O.
N.O.
*R1
F
N
* R1 = RELAY WITH 1 CONTACT AND 120/230Vac BOBINE
* R1 = RELAY WITH 1 CONTACT AND 12/24V
BOBINE
CONNECT J4 TO ACCESSORIES POWER SUPPLY LINE 12/24V ON CONTROL
PANEL THOUGHT 1 CONTACT RELAY WITH 12/24V BOBINE MANAGED BY A N.O.
COURTESY LIGHT OUTPUT CLEAN CONTACT ON CONTROL PANEL
29
*R1
N.O. N.O.
COURTESY LIGHT
TERMINAL BLOCKS
N.O. CLEAN CONTACT
ON CONTROL PANEL
POWER SUPPLY LINE
120/230Vac
-
+
ACCESSORIES
POWER SUPPLY
12/24V
TERMINAL BLOCKS
ON CONTROL PANEL
G
B
G
B
INSTALLING PHOTOCELLS NO TOUCH 868
THEY ARE TWO TYPES OF FIXING:
NO TOUCH 1A
NO TOUCH 1B (STANDARD)
FIXING THE DEVICE UNDER THE DOOR
FIXING THE DEVICE ON THE SIDE OF THE DOOR
Bracket positioned for fixing the device under the door
Bracket positioned for fixing the device on the side of the door
gasket for cover
electronics
gasket for cover
electronics
cover
rubber ring for screw
screw 2,9x9,5
cover
rubber ring for screw
screw 2,9x9,5
cap
cap
lens
lens
rubber ring for screw
screw 2,9x9,5
rubber ring for screw
screw 2,9x9,5
Insertion hole
for spring shank
NO TOUCH 1B
Insertion hole
for spring shank
NO TOUCH 1A
N.B.: For a correct degree of IP protection make sure to correctly insert the gaskets.
TECHNICAL CHARACTERISTICS OF NO TOUCH 868
Max. Speed of moving parts
Power
Infrared signal range
12 m/min
2 batteries 3,6V
5 m / 10 m
Radio frequency
Radio signal range
Degree of protection
30
868,3 MHz
20 m
IP54
PROGRAMMING MASTER NO TOUCH 868 AND PHOTOCELLS NO TOUCH 868
A - SETUP AND VERIFY THE CORRECT OPERATION OF THE NO TOUCH 868
PHOTOCELL
- The correct operation of the TX NO TOUCH 868 is signalled by the green DL6 which turns
on for 10 seconds after the insertion of the 3,6V battery.
- On the MASTER NO TOUCH 868 the bi-colour LED DL1 changes from red to green and a
buzzer tone signals the correct security set up. At the same time the LEDs DL3 and DL4
turn on and the control panel receives the correct safety devices signals.
ACOUSTIC SIGNALS
- Press and release the S2 PROG pushbutton on the RX NO TOUCH 868 (the photocell is
activated for 3 minutes to check the alignment)
If the photocells are correctly aligned the red LED DL5 will remain turned on.
MASTER NO TOUCH 868 has a buzzer which signals in the installation phases and the
warning status when batteries are almost dead or alarm status in the event of failure of
one of the devices.
D - ACCELEROMETER
- During the 3 minutes the red LED DL5 stays on, check that when inserting an obstacle,
the red LED DL5 turns off and simultaneously the bi-colour LED DL1 on the MASTER NO
TOUCH 868 turns green for the time the obstacle is inserted.
- On the MASTER NO TOUCH 868, the LED DL3 must also turn off indicating the correct
exchange of the contact on the strip or the photocell input of the control panel has
occurred.
If the red LED DL5 stays off, check;
- that supports are fixed correctly;
- that on the TX NO TOUCH the position of the jumper JP4 which controls the infrared
signal range:
- is positioned on L and set to a range of 5 metres.
- is positioned on H and is set to a range of 10 metres.
The ACCELEROMETER is not compatible with automated systems equipped with
gradual start or very slow.
Stop the gradual start function or, if not possible, deactivate the ACCELEROMETER. If
the door is very slow deactivate the ACCELEROMETER.
- Verify a functional check of the installed photocell by activating the automation movement
and checking that when inserting an obstacle, in the closing door, it stops and reverses
the motion.
- In the event the door stops after starting and the alarm signals 5 BUZZER tones, this means
that the movement of the door was not detected by the ACCELEROMETER (caused by the
gradual start or by the door very slow), therefore for the correct operation of the door,
it is necessary to exclude the ACCELEROMETER.
To deactivate the ACCELEROMETER you need to:
- move the JP3 jumper on the RX NO TOUCH 868 to OFF;
- press the S2 PROG pushbutton;
- the buzzer on board the MASTER NO TOUCH 868 will emit a tone for 3 seconds, signalling
successful deactivation of the ACCELEROMETER.
ACTIVATING THE ACCELEROMETER
To activate the accelerometer you need to:
- move the JP3 jumper on the RX NO TOUCH 868 to ON;
- press the S2 PROG pushbutton;
- the buzzer on board the MASTER NO TOUCH 868 will emit a tone for 3 seconds, signalling
successful activation of the ACCELEROMETER.
VERIFY THE CORRECT OPERATION OF THE ACCELEROMETER
- With ACCELEROMETER ACTIVE (jumper JP3 ON on the RX NO TOUCH 868) verify that
when moving the NO TOUCH 868 RECEIVER the LED DL1 turns on fixed red, the BUZZER
emits 4 tones and the LEDs DL3 and DL4 turn off for 5 seconds.
- After 5 seconds the DL1 LED will turn off and DL3-DL4 will turn on.
B - POWER UP MASTER NO TOUCH 868 SUPPLY
After making all connections, supply the control panel with MASTER NO TOUCH 868.
The yellow LED DL2 should be on and the buzzer should emit a sound to signal correct
power supply.
E - TIME SET UP (ONLY WITH ACCELEROMETER ACTIVE - JP3 ON)
C - PROGRAMMING PROCEDURE
Insert the batteries into the NO TOUCH circuits and position them in the internal container
already fixed to the edge of the door.
To run the set up perform the following procedure:
- Press the S1 PROG RX pushbutton which is found on the MASTER NO TOUCH 868 => the
bi-colour LED DL1 will flash red for 1 minute (time to run set up)
WITH THE ACCELEROMETER ACTIVE THE NECESSARY TIME STORAGE PROCEDURE IS
PERFORMED.
IF THIS PROCEDURE IS NOT MADE, IT IS POSSIBLE THAT AFTER THE DOOR STARTS,
THIS STOPS AND 5 BUZZER TONES ARE EMITTED.
- Press the S1 PROG RX pushbutton on the MASTER NO TOUCH 868, the LED DL1 will
flash green.
- Control the door to open and close it completely at least two times consecutively.
- Wait for the green LED DL1 to turn off, or alternatively press the S1 pushbutton once to
end the procedure.
F - SETTING
UP PEDESTRIAN DOOR SECURITY (RED transmitter code
ACG6202)
- Press the S2 PROG pushbutton on the safety RX NO TOUCH 868.
It is possible to set security for the pedestrian door only if you have already programmed the
NO TOUCH 868 photocell.
This security is the RED transmitter which monitors a NC contact (not supplied) installed on
the pedestrian door on the main door.
To run the set up perform the following procedure:
- position the dip switch n° 2 to ON (COMPULSORY);
- supply the RED transmitter through the batteries;
- press the S1 PROG. RX pushbutton which is found on the MASTER NO TOUCH 868: the
bi-colour LED DL1 will turn green and flash for 1 minute (time used to run set up)
- press the S2 PROG. TX pushbutton the RED transmitter: on the MASTER NO TOUCH 868
the bi-colour LED DL1 will stop flashing green and turn off . The buzzer will emit a tone
31
G
B
G
B
signalling while the red LED of the RED transmitter flashes 3 times to confirm the correct
set up.
VERIFY THE CORRECT OPERATION OF THE PEDESTRIAN DOOR SECURITY
Open the pedestrian door, opening NC contact connected to the RED transmitter. Verify that
on the MASTER NO TOUCH 868 the LEDs DL3 and DL4 turn off and that any door opening
command is not performed.
ANTENNA
To communicate with the safety devices, MASTER NO TOUCH 868 is equipped with a
piece of electrical wire which serves as an antenna connected to J3 terminal. If it becomes
necessary to improve the radio signal (for example when MASTER NO TOUCH 868 is
installed in a metal container), connect the 868.3 MHz antenna (code ACG5451) to the J3
terminal, respecting the connection of the central and ground wire, and position it in a way
that is ‘in sight’ by all safety devices.
To make the system work properly, it is necessary that between the MASTER NO
TOUCH 868 and the safety devices, there are not any obstacles such as concrete
walls, iron surfaces etc. which could interfere with radio signals.
WARNING STATUS (alert to change batteries)
The warning status (WARNING) alerts the user that it is imminently necessary to change
batteries.
When the batteries of NO TOUCH 868 are low and reach 3,1V, NO TOUCH 868 receiver
sends a signal via radio to MASTER NO TOUCH 868 that the batteries are nearly dead.
MASTER NO TOUCH 868 will activate the BUZZER with a tone every 3 seconds for a duration
of 1 minutes every time you give a command to the automation.
The bi-colour LED DL1 on MASTER NO TOUCH 868 will turn on fixed red.
During these status signals the system is still operating, but it is advisable to change the
batteries as soon as possible in order to avoid the door to stop operating, which happens
when the battery reaches 2,8 V.
ALARM STATUS (battery completely dead or failure)
The alarm status is active when the batteries are completely dead (2,8V) or in the event
of failure.
On the MASTER NO TOUCH 868the LEDs DL3 and DL4 turn off and automation remains
stationary while the bi-colour LED DL1 flashes alternate red-green (for the entire duration)
and the BUZZER emits an alternate tone for 1 minute.
To stop the alarm you must replace the batteries or repair the failure.
PROCEDURE FOR CANCELLATION OF SAFETY DEVICE/S
To cancel safety device/s stored on MASTER NO TOUCH 868 proceed in the following way:
- Press and keep pressed the PROG. RX pushbutton for 10 seconds.
- At the end of the 10 seconds, the bi-colour LED DL1 flashes 6 times alternatively from red
to green, signalling the cancellation, while the LEDs DL3 and DL4, if lighted, will turn off.
TECHNICAL CHARACTERISTICS OF MASTER NO TOUCH 868 code
ACG6154
NO TOUCH 868 RECEIVER
- SUPPLY
1 x LITHIUM AA 3.6V (>2.5 Ah) batteries
5 µA
- CONSUMPTION AT REST
- MAXIMUM CONSUMPTION
25 mA
- TYPE OF MODULATION
FSK
- BATTERY LIFE
about 3 years (with 10 daily cycles)
- WORKING TEMPERATURE
-20°C ÷ +60°C
- MAXIMUM TIME OF REACTION (TIME OF ACTIVATION OF THE RECEIVER WHEN
90 ms
ENGAGED)
- TIME FROM RECOVERY TO RELEASE 90 ms
- DEGREE OF PROTECTION
IP54
- DIMENSIONS
Total height with bracket = 190 mm; width = 34.60 mm;
depth = 32 mm
- WEIGHT
0,210 kg
TECHNICAL DATA OF RADIO FREQUENCY
- FREQUENCY
868,3 MHz
-108 dBm
- SENSITIVITY
- OUTPUT POWER
<25 mW
- RANGE
20 m in free space without antenna
NO TOUCH 868 TRANSMITTER
- POWER SUPPLY
1 x LITHIO AA 3.6V (>2.5 Ah) batteries)
- CONSUMPTION
3 µA
FSK
- TYPE OF MODULATION
- BATTERY LIFE
about 3 years
- BATTERY LIFE WITH JUMPER JP4 IN ”L” POSITION
Range of the infrared signal 5 m:
3,1 years
- BATTERY LIFE WITH JUMPER JP4 IN “H” POSITION
Range of the infrared signal 10 m:
1,2 years
- WORKING TEMPERATURE
-20°C ÷ +60°C
- DEGREE OF PROTECTION
IP54
Total height with bracket = 190 mm;
- DIMENSIONS
Width = 35 mm;
Depth= 51,91 mm
- WEIGHT
0,210 kg with battery
TECHNICAL DATA OF INFRARED SIGNAL
- WAVELENGTH
890 nm
- RANGE
10 m with jumper JP4 in “H” position on TX
(default set to 5 m with jumper JP4 in “L”
position)
12/24V
110-240V 50/60Hz
10-30V
30 mA
100 mA
-20°C ÷ +60°C
125x55x28 mm
0,090 kg
4
3
868.3 MHz
-108 dBm
<25 mW
FSK
20 m in open space
Years
- SUPPLY
- VOLTAGE APPLICABLE TO TERMINAL J2
- VOLTAGE APPLICABLE TO TERMINAL J1
- CONSUMPTION AT REST
- MAXIMUM CONSUMPTION
- WORKING TEMPERATURE
- DIMENSIONS
- WEIGHT
TECHNICAL DATA OF RADIO FREQUENCY
- FREQUENCY
- SENSITIVITY
- OUTPUT POWER
- TYPE OF MODULATION
- RANGE
TECHNICAL CHARACTERISTICS OF NO TOUCH 868 PHOTOCELL code
ACG8048
2
1
0
5
10
20
Daily cycles
batteries life
32
30
G
B
WARNING
NO !
YES !
TO PULL OUT THE CARD, MAKE SURE YOU APPLY A LEVERAGE
ONLY ON THE AREA INDICATED BY THE GREEN STICKER.
If you use different places you may run the risk of damaging
the card.
REPLACING THE BATTERIES
The duration of LITHIUM AA 3,6V batteries is about 3 years.
In the event of replacing the batteries it is not necessary to repeat programming.
- replace the batteries paying attention to the respective polarities.
- press the S2 PROG pushbutton on the RX NO TOUCH 868 to reactivate the operation of
MASTER NO TOUCH 868.
Automation of all safety devices is ready to operate.
WARNING: Remember that the batteries must be disposed of according to the legislations in
force. In the event of scrapping the safety devices, we recommend to remove the LITHIUM
AA 3,6V batteries and dispose of them according to legislations in force.
33
G
B
IN CASE OF ISSUES
SYMPTOM
CHECK
All the LEDs on the MASTER NO TOUCH 868 are turned off
Check the voltage is 12 or 24 V
TOUCH 868
Only the LED DL2 is on
- No safety devices are set up. Perform the photocells NO TOUCH 868 set up.
OR
- The safety device of the pedestrian door is active. Close the pedestrian door in the main door.
When giving a command the buzzer emits 2 tones
- Autotest failed. Check the connections between the MASTER and the control panel, set JP1
and then press the S1 PROG RX pushbutton for a moment or remove and restore the power
to the installation.
OR
- Incorrect wiring of the common wire. Check the common wire of the control panel is
connected to the COM terminal of the MASTER NO TOUCH 868, then press the S1 PROG RX
pushbutton for a moment or remove and restore the power to the installation.
During the set up of the safety devices the buzzer emits 3 tones
You are attempting to set up the safety device of the pedestrian door before the NO TOUCH
868. Set up the NO TOUCH 868 photocell first.
When giving a command the buzzer emits 4 tones
Wires not connected between the output blinker on the control panel and the MASTER NO
TOUCH 868. Connect them and then press the S1 PROG RX pushbutton for a moment or
remove and restore the power to the installation.
The door stops and the buzzer emits 4 tones
There is the presence of vibrations from the accelerometer because of strong wind or the door
is stimulated manually.
When giving a command the door tends to open, then closes and the buzzer emits 5 tones
Failure on NO TOUCH 86 receiver.
Give a new command.
If the problem persists, deactivate the accelerometer.
If it still persists replace the receiver of the NO TOUCH 868 photocell.
to the terminal of the supply POWER of the MASTER NO
When giving a command the door tends to open or close, then stops and the buzzer emits an - Supervision failed. MASTER NO TOUCH 868 does not receive a response from the photocell,
alternate tone for 1 minute and LED DL1 flashes alternately from red to green.
possibly caused by metallic obstacles which prevent radio communication.
- Check the MASTER NO TOUCH 868 has not been installed in a metallic container. If necessary
connect an external 868,3 MHz antenna (code ACG5451) to the metallic container.
The buzzer emits a tones every 3 seconds during door operation for 1 minute and the bicolour LED DL1 turns fixed red.
Replace the batteries of the photocell as soon as possible as they are low.
The door does not move, the buzzer emits an alternate tone for 1 minute and the bi-colour Replace the batteries of the photocell as they are dead.
LED DL1 turns alternate red-green.
The door does not open or close and the bi-colour LED DL1 turns green.
Photocell is not aligned or engaged or the battery is dead on the NO TOUCH 868 photocell
transmitter.
ACCESSORIES
RED RADIO TRANSMITTER
for contact (not supplied) pedestrian door.
3 x AA 1,5V alkaline batteries needed (not included) LITHIO AA BATTERIES
for NO TOUCH 868 photocells- 2 x 3,6V
code ACG6202
34
code ACG9517
D
NO TOUCH 868 ist konform mit der Norm EN13849-2:2013 und stellt gemeinsam
mit einer mit AUTOTEST ausgestatteten Steuertafel RIB eine Schutzvorrichtung der
Klasse 2 dar.
Das System kontrolliert ständig das Vorhandensein der verschiedenen Sicherheitsvorrichtungen
sowie den Zustand der Batterien und erfüllt so alle Auflagen einer aktiven Schutzvorrichtung
an allen Toren mit vertikaler Bewegung.
NO TOUCH 868 ist eine patentierte Vorrichtung zur Sicherung von automatischen Roll- und
Sektionaltoren.
Die Fotozellen NO TOUCH 868 vermeiden mittels eines etwa 13 cm vom unteren Rand des
Tors entfernten Infrarotstrahls den Kontakt mit jeglichen Hindernissen
NO TOUCH 868 benötigt keine Kabelführ-Systeme, weil sie mit Batterien funkgesteuert
arbeitet.
Das besondere „Schwing-System” garantiert die Kontrolle unter allen Bewegungsbedingungen,
auch beim Auftreten von Schwingungen.
Das System besteht aus vier Elementen:
1 - Funkempfänger/Sender 868 MHz, MASTER NO TOUCH 868 (Kode ACG6154), mit der
Steuertafel des Tors verbunden.
2 - Antenne 868MHz
3 - Infrarotsender.
Infrarotempfänger mit Funkempfänger/Sender 868 MHz der ständig mit der
4-
Leiterplatte MASTER NO TOUCH 868 kommuniziert.
2
1
3
4
- FOTOZELLE NO TOUCH 868 (Kode ACG8048). DIE FOTOZELLEN NO TOUCH 868
SCHALTEN SICH NUR BEIM BETÄTIGEN DES TORS EIN. Dank der Funktion SLEEP
MODE schalten sich die Fotozellen bei stillstehendem Tor aus, was die Lebensdauer der
Batterien verlängert.
- Zusätzliche Sicherheitsvorrichtung: SENDER RED (Kode ACG6202) verbunden mit
dem Kontakt NC (nicht im Lieferumfang) zur Anbringung an der integrierten Fußgängertür.
Funktioniert nur mit bereits programmierter Fotozelle NO TOUCH 868.
DER SENDER RED IST IMMER AKTIV UND BEIM ÖFFNEN DER INTEGRIERTEN
FUSSGÄNGER-TÜR (das heißt beim Öffnen des Kontakts NC, mit dem er verbunden
ist) VERHINDERT ER DIE BEWEGUNG DES HAUPTTORES.
HINWEIS AUF NORMEN FÜR AUTOMATISCHE VERTIKALTÜREN
Nachdem die Anlage installiert ist muss nachgewiesen werden, dass sie die Norm EN
13241-1 erfüllt.
RIB KANN NICHT FÜR SCHÄDEN; DIE SICH AUF UNSACHGEMÄSSE, FALSCHE
ODER UNANGEMESSENE BENUTZUNG ZURÜCKFÜHREN LASSEN, HAFTBAR GEMACHT
WERDEN.
Gebrauchseinschränkungen: Die Fotozellen NO TOUCH 868 können sich nicht auf Geräte
aus der EN12978, einschließlich ausgeschlossen werden:
- Schutzausrüstungen für den Einbau in Türen für einen anderen Zweck als der Fußgängerund Fahrzeugverkehr Zugangstüren von der Regel abgedeckt sind und deren Hauptzweck
ist es, einen sicheren Zugang zu Stellen für Industrie-, Handels-, Wohn-oder öffentliche.
Einige Beispiele für Ausschlüsse werden kann: Dämme und Schotten, Aufzugtüren,
Fahrzeug-Türen, verwendete Türen in erster Linie für die Lagerung von Tiere, Gewebe für
Theater-Vorhänge, Leitschienen, verwendete Schranken nur für Fahrzeuge.
- Geräte, die nur für die normale Steuerung und Abschaltung, einschließlich der Not der
Macht von Motortüren.
- Sicherheits-Ausrüstungen oder Sicherheitseinrichtungen für den Einsatz auf anderen
Maschinerien, die Türen nicht sind.
VORSICHT: Man kann nicht Änderungen am Produkt oder Gerät-Konfiguration ohne
Rücksprache mit dem Hersteller oder seinem Bevollmächtigten erfolgen.
Der Installer der Sicherheitseinrichtung muss dem Endbenutzer liefern, wie folgt:
- Sicherheitseinrichtungen müssen bekannt gemacht, alle geeigneten Personen sein.
- Gebiete, die den Zugang zu Geräten sollten frei von Hindernissen gehalten werden;
- Anforderungen an die Reinigung keine Ansammlung von gefährlichen Stoffen zu
verhindern;
- Mögliche Einzelheiten für einen Wiederaufnahme-Verfahren nach einem Stopp in einem
Notfall oder Unfall durch das Steuersystem verursacht ausgeführt werden.
Ändern Sie das Design oder die Konfiguration der Geräte ohne Rücksprache mit dem
Hersteller oder sein Bevollmächtigter können zu gefährlichen Situationen führen.
35
52,26
190,12
31,02
59
MASTER NO TOUCH 868 steuert 2 Sicherheitsvorkehrungen:
35
35
51,91
Abmessungen in mm
35
D
MASTER NO TOUCH 868 (15/09/2014)
LAYOUT LEITERPLATTE
DL2
S1
DL1
BUZZER
+
-
J3
J4
JP2
JP1
DL3
J1 =>
J2 =>
J1
DL4
J2
COM
=> Gemeinsamer Mittelanschluss N.C.
CONTACT N.C.=> Ruhekontakt (normalerweise geschlossen), der mit dem Kontaktleisten- oder Fotozelleneingang der elektronischen Steuertafel verbunden wird
POWER - 12/24 V
=> negative Stromzuführung bei 12/24V
POWER + 12/24 V
=> positive Stromzuführung bei 12/24V
AUTOTEST => Stromzuführung AUTOTEST (siehe auch JP1 zur Auswahl)
ALARM N.C. => Ruhekontakt (normalerweise geschlossen), der mit dem Eingang STOPP der elektronischen Steuertafel verbunden wird
J3 =>
120/230 Vac
KLEMMEN ZUM ANSCHLUSS DES BLINKLEUCHTEN-AUSGANG 120/230V 50/60Hz DER ELEKTRONISCHEN STEUERTAFEL
KLEMME ZUM ANSCHLUSS DER ANTENNE 868,3 MHz
J4 =>
12/24 V
KLEMMEN ZUM ANSCHLUSS DES BLINKLEUCHTEN-AUSGANG 12/24V
DIE AUF DER LEITERPLATTE ANGEGEBENE POLARITÄT BEACHTEN
DER ELEKTRONISCHEN STEUERTAFEL
JP1 => AUSWAHL STROMZUFÜHRUNG AUTOTEST
JP1-
Jumper Auswahl Modalität Autotest mit negativer Stromzuführung
JP1+/~ Jumper Auswahl Modalität Autotest mit positiver Stromzuführung oder Wechselstromstromzuführung (zu verwenden mit der Steuertafel RIB Modell J)
JP2 =>
Steht für Bestückungen zu einem späteren Zeitpunkt zur Verfügung
S1 =>
PROG. RX Programmier-Taste
BUZZER =>
Signalisiert durch verschiedene Töne eventuelle während der Installation durchzuführende Anpassungen sowie Warn- oder Alarmzustände
LED
DL1 (zweifärbig)
aus
=> regulärer Betrieb
grün
=> Fotozelle im Einsatz
Rot/grün => Alarm
DL2 (gelb) - Vorliegen der Versorgungsspannung 12-24V
DL3 (rot)
- Kontakt N.C. CONTACT
DL4 (rot)
- Kontakt N.C. ALARM
ACHTUNG: MASTER NO TOUCH 868 kann NICHT in mehr 3 Meter Abstand von der Steuerzentrale der Automatisierung installiert werden.
36
D
VERBINDUNGEN MASTER NO TOUCH 868 ZU STEUERUNG MIT BLINKER-AUSFAHRT
ACHTUNG: die AUTOTEST-Funktion ist wichtig, um MASTER NO TOUCH 868 die vorgeschriebenen Überprüfungen von EN12978 par.4.1 führt, während der letzten FlugPositionen. ES IST DAHER NOTWENDIG, DASS DIE STEUERUNG, AUF MASTER NO TOUCH 868 ANGEWENDET WIRD, DIE AUTOTEST-FUNKTION HABEN SOLLTE.
ACHTUNG: LAGEN SIE MASTER NO TOUCH 868 IN EINEM GESCHÜTZTEN GEHÄUSE. Der Einbau des Produkts in metallischen Gehäusen kann eine Fehlfunktion des Systems
bewirken. Es wird daher empfohlen, für einen perfekten Empfang/Sendung der Signale die Antenne Kode ACG5451 zu verwenden, die außen am Gehäuse
angebracht und mit der Klemme J3 des MASTER NO TOUCH 868 verbunden werden muss.
ACHTUNG: Wenn möglich, sollte auf der elektronischen Steuertafel die Funktion VORBLINKEN aktiviert werden.
ACHTUNG: Das Vorhandsein eines Kurzschlussschutzes durch eine dem Sekundärkreis vorgeschalteten Sicherung auf der elektronischen Steuertafel überprüfen. Sollte diese nicht
vorhanden sein, der Stromzuführung eine träge Sicherung (T) mit 200 mA vorschalten. Vor der Ausführung der Anschlüsse am MASTER NO TOUCH die Steuertafel
spannungsfrei schalten.
+
! **
12/24V
Mit der Klemme COM der elektronischen
Steuertafel verbinden
Mit dem Eingang KONTAKTLEISTE der elektronischen Steuertafel
verbinden. Wenn nicht vorhanden, den Eingang FOTOZELLE
verwenden
Stromzuführung
12/24V
Mit dem Ausgang AUTOTEST der
elektronischen Steuertafel verbinden
! **
!*
120/230V 50/60Hz
Mit dem Eingang STOPP der elektronischen Steuertafel oder einem
anderen Eingang verbinden, der die Motorbewegung anhält.
EINGANG ALARM N.C.
Klemme ALARM NC: dient zur Serienschaltung des Befehls STOPP der elektronischen
Steuertafel. Sollte der Eingang STOPP nicht vorhanden sein, den Alarmkontakt ALARM NC
einem Eingang vorschalten, der die Blockierung der elektronischen Steuertafel ermöglicht.
ACHTUNG: Eine eventuelle Überbrückung, Ersatz des Kontaktes NC STOPP, von den
Klemmen der elektronischen Steuertafel entfernen.
* Verbindung
ZWINGEND VORGESCHRIEBEN für elektronische
Steuertafel mit Ausgang Blinkleuchte mit 120/230V 50/60Hz
Verbindung ZWINGEND VORGESCHRIEBEN für elektronische
. ACHTUNG:
Steuertafel mit Ausgang Blinkleuchte mit 12/24V
DIE AUF DER LEITERPLATTE ANGEGEBENE POLARITÄT BEACHTEN
ACHTUNG: Die Verbindung des Ausgangs Blinkleuchte der Steuertafel mit den
Klemmen J2 oder J4 des MASTER NO TOUCH ist auch zwingend vorgeschrieben,
wenn in der Anlage keine Blinkleuchte vorhanden ist.
Wird dieser Anschluss unterlassen, funktioniert das Tor nicht und der Summer
signalisiert durch 4 Töne den fehlenden Anschluss.
EINGANG COM
Gemeinsame Klemme CONTACT NC und ALARM NC.
ACHTUNG: mit der Klemme COM muss der GEMEINSAME MITTELANSCHLUSS der
Steuertafel verbunden werden. Wird COM nicht verbunden, geht das System in den AlarmZustand über, der durch 2 Summer-Töne signalisiert wird.
EINGANG CONTACT N.C.
Klemme CONTACT NC: muss mit dem Ausgang KONTAKTLEISTE oder FOTOZELLE der
elektronischen Steuertafel verbunden werden.
ACHTUNG: Eine eventuelle Überbrückung, Ersatz des Kontaktes NC der KONTAKTLEISTE
oder FOTOZELLE, von den Klemmen der elektronischen Steuertafel entfernen.
ANSCHLUSS DES EINGANGS AUTOTEST (gemäß Norm EN13849-2:2013)
Verfügt die Steuertafel nicht über die Funktion AUTOTEST, wird dieser Test ignoriert.
- Verfügt die verwendete Steuertafel über die Funktion AUTOTEST, den Jumper JP1 des
MASTER NO TOUCH 868 gemäß der von der verwendeten Steuertafel zur Verfügung
gestellter Stromzuführung positionieren, sich dabei an das Bedienungshandbuch der
Steuertafel halten.
- Den Ausgang AUTOTEST der Steuertafel mit der Klemme AUTOTEST der Leiterplatte
MASTER NO TOUCH 868 verbinden, um das System am Ende jeder vollständigen Öffnung
oder zum Beginn der Schließung zu kontrollieren.
- Die Schließung erfolgt nur, wenn die Leiterplatte MASTER NO TOUCH 868 den Kontrolltest
bestanden hat.
- Fällt der Kontrolltest der Leiterplatte MASTER NO TOUCH 868 negativ aus, so blockiert die
Steuertafel das Tor und die Leds DL3 und DL4 auf der Leiterplatte MASTER NO TOUCH
868 schalten sich aus. Der Summer gibt 2 Töne von sich und die zweifärbige LED DL1
blinkt abwechselnd rot/grün und zeigt so die Anomalie an.
Um die normale Funktionsweise wieder herzustellen:
- die Anschlüsse des AUTOTEST und die Positionierung der Überbrückung JP1 kontrollieren;
- die Taste S1 PROG RX auf dem MASTER NO TOUCH 868 drücken;
- die Leds DL3 und DL4 schalten sich ein.
Die Leiterplatte ist zur Durchführung eines erneuten AUTOTESTS bereit.
37
D
VERBINDUNGEN MASTER NO TOUCH 868 ZU STEUERUNG MIT KEINE BLINKER-AUSFAHRT
MIT STEUERUNG FÜR EINEN EIN-PHASEN-MOTOR 120/230Vac
HINWEIS: Deaktivieren Sie komplett alle möglichen Funktionen der Verlangsamung, schrittweise Abfahrt, elektronische Einstellung der Kraft.
VERBINDEN SIE DEN NULLEITER DER
EIN-PHASEN-LINIE 120/230 Vac UND DEN
GEMEINSAMEN EIN-PHASEN-MOTOR, VON
ANTRIEBSSTEUERUNG ZU J2
Mit der Klemme COM der elektronischen
Steuertafel verbinden
F
Stromzuführung
Mit dem Eingang KONTAKTLEISTE der
elektronischen Steuertafel verbinden. Wenn
nicht vorhanden, den Eingang FOTOZELLE
verwenden
12/24V
N
MOTOR
V
Mit dem Ausgang AUTOTEST der
elektronischen Steuertafel verbinden
U
Mit dem Eingang STOPP der elektronischen Steuertafel
oder einem anderen Eingang verbinden, der die
Motorbewegung anhält.
W
MIT STEUERUNG FÜR EINEN DREI-PHASEN-MOTOR 400Vac
VERBINDEN SIE DEN NULLEITER DER
DREI-PHASEN-LINIE 400 Vac UND DEN
GEMEINSAMEN DREI-PHASEN-MOTOR,
VON ANTRIEBSSTEUERUNG ZU J2
R
S
T
N
MOTOR
V
U
W
38
VERBINDUNGEN MASTER NO TOUCH 868 ZU STEUERUNG MIT KEINE BLINKER-AUSFAHRT
MIT STEUERUNG FÜR EINEN MOTOR 12/24Vdc
- Sie können nicht direkt MASTER NO TOUCH 868, mit der Motorleistung der Antriebssteuerung verbinden. Der Grund ist folgender: die Polaritäten in der Öffnung und
Schließung umgekehrt werden und die Steuerung hat die Funktion der Verlangsamung in der Annäherung, die nicht deaktiviert Wird.
- +
AUSGANGSKLEMMEN-SPEISUNG HÖFLICHKEIT LICHT
24Vdc ÜBER
STEUERUNG DES MOTOR-ANTRIEBS
VERBINDEN SIE J2 MIT LINIE 120/230V ÜBER
STEUERUNG DES MOTOR-ANTRIEBS MIT RELAIS MIT
SPULE 120/230 Vac VON SAUBER KONTAKT N.O.
HÖFLICHKEIT LICHT BEHANDELT, ÜBER STEUERUNG DES
MOTOR-ANTRIEBS
N.O.
N.O.
*R1
F
N
* R1= RELAIS MIT EINEM KONTAKT MIT EINER
SPULE 120/230Vac
* R1= RELAIS MIT EINEM KONTAKT MIT
EINER SPULE 12/24V
*R1
N.O. N.O.
KLEMMEN SAUBER
KONTAKT N.O.
HÖFLICHKEIT LICHT
VERBINDEN SIE J4 MIT ZUBEHÖRSPEISUNG 12/24V ÜBER STEUERUNG
DES MOTOR-ANTRIEBS MIT RELAIS MIT SPULE 12/24V VON SAUBER
KONTAKT N.O. HÖFLICHKEIT LICHT BEHANDELT
39
LINIE 120/230Vac
-
+
KLEMMEN
ZUBEHÖRSPEISUNG
12/24V ÜBER
STEUERUNG DES
MOTOR-ANTRIEBS
D
D
MONTAGE SICHERHEITSVORRICHTUNG FOTOZELLE NO TOUCH 868
ES BESTEHEN ZWEI VERSCHIEDENE BEFESTIGUNGSMÖGLICHKEITEN:
NO TOUCH 1A
NO TOUCH 1B (STANDARD)
MONTAGE UNTER DEM TOR
MONTAGE SEITLICH AM TOR
Befestigungskonsole für Montage unter dem Tor
Befestigungskonsole für Montage seitlich am Tor
Dichtung für Abdeckung
Elektronik
Dichtung für Abdeckung
Elektronik
Abdeckung
Gummi-Beilegscheibe
für Schraube
Schraube 2,9x9,5
Gummi-Beilegscheibe
für Schraube
Schraube 2,9x9,5
Kappe
Linse
Abdeckung
Kappe
Linse
Gummi-Beilegscheibe
für Schraube
Schraube 2,9x9,5
Gummi-Beilegscheibe
für Schraube
Schraube 2,9x9,5
Bohrung zum
Einführen des Federschafts
NO TOUCH 1B
Bohrung zum
Einführen des Federschafts
NO TOUCH 1A
ZU BEACHTEN: für einen korrekten Schutzgrad IP auf das richtige Einsetzen der Dichtungen achten.
TECHNISCHE EIGENSCHAFTEN NO TOUCH 868
Max. Geschwindigkeit beweglicher Teil
Versorgung
Reichweite Infrarot-Signal
12 m/min
2 Batterien 3,6V
5 m / 10 m
Funkfrequenz
Reichweite Sender
Schutzgrad 40
868,3 MHz
20 m
IP54
D
PROGRAMMIERUNG MASTER NO TOUCH 868 UND FOTOZELLEN NO TOUCH 868
A - KONTROLLE DER KORREKTEN FUNKTIONSWEISE DER FOTOZELLE NO
TOUCH 868
- Die korrekt Funktionsweise der Vorrichtung TX NO TOUCH 868 wird durch die grüne Led
DL6 angezeigt, die sich für 10 Sek. beim Einsetzen der 3,6 V-Batterie einschaltet.
- Auf dem MASTER NO TOUCH 868 schaltet die zweifärbige Led DL1 von rot blinkend
auf grün um und der Summer signalisiert mit einem Ton die korrekte Speicherung der
Fotozelle. Gleichzeitig schalten sich die Leds DL3 und DL4 si ein und die Steuertafel
empfängt die korrekten Signale der Fotozellen.
- Die Taste S2 PROG. auf RX NO TOUCH 868 drücken und loslassen (die Fotozelle wird
für 3 Minuten aktiviert, um ihre Ausrichtung zu überprüfen). Sind die Fotozellen korrekt
ausgerichtet, so schaltet sich die rote Led DL5 im Dauerlicht ein.
AKUSTISCHE SIGNALE
MASTER NO TOUCH 868 ist mit einem Summer ausgestattet, der die Installationsphasen,
die Warnzustände bei fast entladenen Batterien und die Alarmzustände bei Störung einer
der Vorrichtungen anzeigt.
D - BESCHLEUNIGUNGSSENSOR
- Während der 3 Minuten, in denen die rote Led DL5 eingeschaltet bleibt, kontrollieren,
ob sich bei der Einführung eines Hindernisses die rote Led DL5 ausschaltet und die
zweifärbige Led DL1 auf dem MASTER NO TOUCH 868, solange das Hindernis vorhanden
ist, grün leuchtet.
- Auf der Leiterplatte MASTER NO TOUCH 868 muss sich auch die Led DL3 ausschalten,
womit sie den korrekten Wechsel des Eingangs Kontaktleiste oder Fotozelle auf der
Steuertafel anzeigt.
Schaltet sich die rote Led DL5 nicht ein, folgendes überprüfen:
- die korrekte Montage der Grundplatten;
- auf TX NO TOUCH die Position der Überbrückung JP4, welche die Reichweite des
Infrarot-Signals reguliert:
- ist sie auf L positioniert, so ist sie auf 5 Meter eingestellt.
- ist sie auf H positioniert, so ist sie auf 10 Meter eingestellt.
Der BESCHLEUNIGUNGSSENSOR ist nicht für Tore mit langsamem Start oder sehr
langsam geeignet.
Diesen Start ausschalten, oder wenn nicht möglich, den BESCHLEUNIGUNGSSENSOR
deaktivieren. Wenn die Tor ist sehr langsam aus den BESCHLEUNIGUNGSSENSOR
deaktivieren.
- Eine Funktionsprüfung der installierten Fotozelle durchführen, indem nach Betätigen des
Tores ein Hindernis eingeführt wird, die Schließbewegung muss unterbrochen werden und
der Motor muss auf Öffnen umschalten.
- Sollte das Tor nach dem Start im Alarm-Zustand stillstehen, der durch 5 SUMMER-Töne
angezeigt wird, bedeutet das, dass die Torbewegung vom BESCHLEUNIGUNGSSENSOR
nicht wahrgenommen wurde (aufgrund der langsamen Start oder die Tor sehr
langsam), für eine korrekte Funktionsweise des Tors muss der BESCHLEUNIGUNGSSENSOR
ausgeschlossen werden.
Zur Deaktivierung des BESCHLEUNIGUNGSSENSORS folgendermaßen vorgehen:
- den Jumper JP3 auf RX NO TOUCH 868 auf OFF stellen;
- die Taste S2 PROG drücken;
- der Summer am MASTER NO TOUCH 868 gibt einen Ton für 3 Sekunden von sich, der die
korrekte Deaktivierung des BESCHLEUNIGUNGSSENSOR signalisiert.
AKTIVIERUNG DES BESCHLEUNIGUNGSSENSORS
Zur Aktivierung des BESCHLEUNIGUNGSSENSORS folgendermaßen vorgehen:
- den Jumper JP3 auf RX NO TOUCH 868 auf ON stellen;
- die Taste S2 PROG drücken;
- der Summer am MASTER NO TOUCH 868 gibt einen Ton für 3 Sekunden von sich, der die
korrekte Aktivierung des BESCHLEUNIGUNGSSENSOR signalisiert.
B - VERSORGUNG MASTER NO TOUCH 868
KONTROLLE DER KORREKTEN FUNKTIONSWEISE DES BESCHLEUNIGUNGSSENSORS
- Bei AKTIVIERTEM BESCHLEUNIGUNGSSENSOR (Jumper JP3 ON auf RX NO TOUCH 868)
kontrollieren, ob sich bei Bewegung des EMPFÄNGERS NO TOUCH 868 die Led DL1 im
roten Dauerlicht einschaltet, der SUMMER 4 Töne von sich gibt und die Led DL3 und DL4
sich für 5 Sekunden ausschalten.
- Nach 5 Sekunden schaltet sich die Led DL1 aus und die Leds DL3-DL4 schalten sich ein.
Nach der Ausführung aller Anschlüsse die Steuertafel mit MASTER NO TOUCH 868 mit
Strom versorgen.
Die gelbe Led DL2 muss sich einschalten und der Summer muss einen Ton von sich geben,
mit dem er die korrekte Versorgung anzeigt.
C - SPEICHERUNG DER FOTOZELLE NO TOUCH 868
Die Batterien in die Stromkreise NO TOUCH einsetzen und die Fotozellen in das bereits am
Ende des Tors installierte Gehäuse einsetzen.
Zur Speicherung folgendermaßen vorgehen:
- Die Taste S1 PROG RX auf dem MASTER NO TOUCH 868 drücken => die zweifärbige Led
DL1 blinkt für 1 Minute rot (die zur Speicherung benötigt Zeit).
E - SPEICHERN
DER
ZEITEN
(NUR
BESCHLEUNIGUNGSSENSOR - JP3 ON)
BEI
AKTIVIERTEM
BEI AKTIVIERTEM BESCHLEUNIGUNGSSENSOR MÜSSEN DIE ZEITEN GESPEICHERT
WERDEN.
WIRD DIESER SCHRITT NICHT DURCHGEFÜHRT, SO IST ES MÖGLICH, DASS DAS TOR
NACH DEM START MIT 5 SUMMER-TÖNEN ANHÄLT.
- Die Taste S1 PROG RX auf dem MASTER NO TOUCH 868 drücken, die Led DL1 blinkt grün.
- Das Tor starten und dabei mindestens zwei aufeinanderfolgende Öffnungs- und
Schließzyklen ausführen lassen.
- Warten, bis sich die Led DL1 ausschaltet, oder als Alternative die Taste S1 drücken, um
den Vorgang zu beenden.
F - SPEICHERN DER SICHERHEITSVORRICHTUNG AUF DER INTEGRIERTEN
FUSSGÄNGER-TÜR (Sender RED Kode ACG6202)
- Die Taste S2 PROG auf der Sicherheitsvorrichtung RX NO TOUCH 868 drücken.
Eine Sicherheitsvorrichtung für die Fußgängertür kann nur nach Programmierung Fotozelle
NO TOUCH 868 erfolgen.
Diese Sicherheitsvorrichtung ist der Sender RED, der den auf der im Haupttor integrierten
Fußgängertür vorhandenen Kontakt N.C. (nicht im Lieferumfang) überwacht.
Für das Speichern folgendermaßen vorgehen:
- Den Dip-Schalter 2 auf ON stellen (ZWINGEND VORGESCHRIEBEN);
41
D
- Den Sender RED mit Batterien versorgen;
- Die Taste S1 PROG. RX auf dem MASTER NO TOUCH 868 drücken: die zweifärbige Led DL1
schaltet sich ein und blinkt grün für 1 Minute (die zum Speichern benötigte Zeit);
- Die Taste S2 PROG. TX auf dem Sender RED drücken: auf dem MASTER NO TOUCH 868
schaltet sich die zweifärbige grünblinkende Led DL1 aus. Ein Summer-Ton zeigt die korrekte
Speicherung an, während die rote Led am Sender RED zur Bestätigung 3 Mal blinkt.
KONTROLLE DER KORREKTEN FUNKTIONSWEISE DER SICHERHEITSVORRICHTUNG AN
DER INTEGRIERTEN FUSSGÄNGER-TÜR
Durch Öffnen der Fußgängertür wird der Kontakt N.C. geöffnet, der mit dem Sender RED
verbunden ist. Kontrollieren, ob sich auf dem MASTER NO TOUCH 868 die Leds DL3 und DL4
ausschalten und ein eventueller Befehl zur Toröffnung nicht ausgeführt wird.
ANTENNE
Zur Kommunikation mit den Sicherheitsvorrichtungen verfügt der MASTER NO TOUCH 868
über ein Stück elektrischer Leitung, das verbunden mit der Klemme J3 als Antenne dient.
Sollte es nötig sein, das Funksignal zu verstärken (zum Beispiel wenn der MASTER NO TOUCH
868 in einem Metallgehäuse installiert wird), die Antenne 868,3 MHz (Kode ACG5451) mit der
Klemme J3 verbinden, dabei den zentralen Draht und den Erdungsdraht respektieren, und sie
so positionieren, dass sie von allen Sicherheitsvorrichtungen „gesehen” wird.
Zur korrekten Funktionsweise des Systems dürfen zwischen MASTER NO TOUCH
868 und den Sicherheitsvorrichtungen keine Hindernisse wie Stahlbetonmauern,
Oberflächen aus Eisen usw. vorliegen, welche die Funkverbindung stören könnten.
WARN-ZUSTAND (Hinweis zum Auswechseln der Batterien)
Der Warn-Zustand (WARNING) weist den Anwender darauf hin, dass ein Batteriewechsel in
Kürze fällig wird. Sind die Batterien des NO TOUCH 868 fast leer und sinken auf 3,1V, so
signalisiert der Empfänger NO TOUCH 868 über Funksignal dem MASTER NO TOUCH 868
den Zustand der fast leeren Batterien.
MASTER NO TOUCH 868 aktiviert den SUMMER mit einem Ton alle 3 Sekunden für die Dauer
von 1 Minute, jedes Mal wenn ein Torbefehl gegeben wird.
Die zweifärbige Led DL1 auf dem MASTER NO TOUCH 868 schaltet sich im roten Dauerlicht
ein.
Während dieser Warnungen ist das System noch funktionstüchtig, die Batterien sollten
jedoch so rasch als möglich ausgewechselt werden, um einen Funktionsstillstand des Tor zu
vermeiden, zum dem es bei Erreichen von 2,8V kommt.
ALARMZUSTAND (Batterie völlig entleert oder Störung)
Der Alarmzustand wird bei völlig entleerter Batterie (2,8V) oder im Fall von Störungen
ausgelöst.
Am MASTER NO TOUCH 868 schalten sich die Leds DL3 und DL4 aus und das Tor steht still,
während die zweifärbige Led DL1 abwechselnd rot/grün blinkt (dauernd) und der SUMMER
für 1 Minute einen Wechselton erzeugt.
Um den Alarmzustand aufzuheben, müssen die Batterien ausgewechselt oder die Störung
behoben werden.
LÖSCHEN DER SICHERHEITSVORRICHTUNG/EN
Um die auf dem MASTER NO TOUCH 868 gespeicherten Sicherheitsvorrichtungen zu löschen,
folgendermaßen vorgehen:
- Die Taste S1 PROG. RX drücken und für 10 Sekunden gedrückt halten.
- Nach den 10 Sekunden blinkt die zweifärbige Led DL1 6 Mal abwechselnd rot und grün,
und zeigt so die erfolgreiche Löschung an, während die Leds DL3 und DL4 erlöschen, sollten
sie geleuchtet haben.
TECHNISCHE EIGENSCHAFTEN FOTOZELLE NO TOUCH 868
Kode ACG8048
EMPFÄNGER NO TOUCH 868
- VERSORGUNG
LITHIUM-Batterie 1 x AA 3,6V (>2,5 Ah)
5 µA
- STROMAUFNAHME IN RUHE
- MAXIMALE STROMAUFNAHME
25 mA
- MODULATIONSTECHNIK
FSK
- LEBENDAUER DER BATTERIEN
etwa 3 Jahre (mit Täglich 10 Bewegungszyklen)
- BETRIEBSTEMPERATUR
20°C ÷ +60°C
- MAXIMALE ANTWORTZEIT (ERREGUNGSZEIT WENN IN AKTION)
90 ms
- ENTREGUNGSZEIT BEI DER FREIGABE 90 ms
- SCHUTZGRAD
IP54
- ABMESSUNGEN
Gesamthöhe mit Befestigungskonsole = 190 mm;
Breite = 34,60 mm;
Tiefe = 32 mm
- GEWICHT
0, 210 kg
TECHNISCHE DATEN FUNKSIGNAL
- FREQUENZ
- EMPFINDLICHKEIT
- SENDESTÄRKE
- MODULATIONSTECHNIK
- REICHWEITE
SENDER NO TOUCH 868
- VERSORGUNG
LITHIUM-Batterie 1 x AA 3,6V (>2,5 Ah)
3 µA
- STROMAUFNAHME
- MODULATIONSTECHNIK
FSK
etwa 3 Jahre
- LEBENSDAUER DER BATTERIE - LEBENSDAUER DER BATTERIE MIT JUMPER JP4 IN STELLUNG ”L”
Reichweite des Infrarot-Signals 5 m: 3,1 Jahre
- LEBENSDAUER DER BATTERIE MIT JUMPER JP4 IN STELLUNG “H”
Reichweite des Infrarot-Signals 10 m: 1,2 Jahre
-20°C ÷ +60°C
- BETRIEBSTEMPERATUR
- SCHUTZGRAD
IP54
- ABMESSUNGEN
Gesamthöhe mit Befestigungskonsole = 190 mm; Breite = 35 mm; Tiefe = 51,91 mm
0, 210 kg mit Batterie
- GEWICHT
TECHNISCHE DATEN INFRAROT-SIGNAL
- WELLENLÄNGE
890 nm
- REICHWEITE
10 m mit Jumper JP4 auf Stellung “H” auf TX
(ursprünglich auf 5 m mit Jumper JP4 auf Stelllung
“L” eingestellt)
4
TECHNISCHE EIGENSCHAFTEN MASTER NO TOUCH 868 Kode ACG6154
12/24V
110-240V 50/60Hz
10-30V
30 mA
100 mA
-20°C ÷ +60°C
125x55x28 mm
0,090 kg
3
Jahre
- VERSORGUNGSSPANNUNG
- SPANNUNG AN DER KLEMME J2
- SPANNUNG AN DER KLEMME J1
- STROMAUFNAHME IN RUHE
- MAXIMALE STROMAUFNAHME
- BETRIEBSTEMPERATUR - ABMESSUNGEN
- GEWICHT
TECHNISCHE EIGENSCHAFTEN FUNKSIGNAL
- FREQUENZ
- EMPFINDLICHKEIT
- SENDESTÄRKE
- MODULATIONSTECHNIK
- REICHWEITE
868,3 MHz
-108 dBm
<25 mW
FSK
20 m im freien Raum
2
1
868,3 MHz
-108 dBm
<25 mW
FSK
20 m im freien Raum
0
5
10
20
Tägliche Zyklen
Batterien Lebensdauer
42
30
D
ACHTUNG
NEIN !
JA !
UM DIE KARTE ZU ENTFERNEN, HEBELN SIE, NUR IM
HERVORGEHOBENEN BEREICH VON GRÜNE LINIE DES
ANGEWANDTEN KLEBSTOFFS.
Wenn Sie in anderen Teilen hebeln, ist es möglich, die Karte
beschädigen.
AUSWECHSELN DER BATTERIE
Die Dauer einer LITHIUM-Batterie vom Typ AA da 3,6V liegt bei etwa 3 Jahren.
Nach dem Batteriewechsel muss keine erneute Programmierung mehr durchgeführt
werden.
- Die Batterien auswechseln, dabei auf die Polarität achten.
- Die Taste S2 PROG auf RX NO TOUCH 868 drücken, um die Funktion des MASTER NO
TOUCH 868 erneut zu aktivieren.
Das Tor kann nun wieder völlig sicher betätigt werden.
ACHTUNG: Es wird darauf aufmerksam gemacht, dass entladene Batterien den geltenden
gesetzlichen Bestimmungen gemäß entsorgt werden müssen. Bei der Verschrottung der
Sicherheitsvorkehrungen müssen die LITHIUM-Batterien vom Typ AA zu 3,6V entfernt und
gemäß den geltenden gesetzlichen Bestimmungen entsorgt werden.
43
D
BEIM AUFTRETEN VON SCHWIERIGKEITEN
ANZEICHEN
KONTROLLE
Alle Leds der Leiterplatte MASTER NO TOUCH 868 sind ausgeschaltet
Kontrollieren, ob die Spannung mit 12 o 24 V
MASTER NO TOUCH 868 vorhanden ist
Nur DL2 ist eingeschaltet
- Keine Sicherheitsvorrichtung gespeichert. Die Speicherung der Fotozellen NO TOUCH 868
durchführen, ODER
- Die Sicherheitsvorrichtung der integrierten Fußgängertür ist aktiv. Die Fußgängertür im
Haupttor schließen.
Bei einem Befehl erzeugt der Summer 2 Töne
Autotest nicht bestanden. Die Verbindungen zwischen MASTER Steuertafel und die
-
Einstellung von JP1 kontrollieren, dann für einen Augenblick die Taste S1 PROG RX drücken
oder die Spannungszufuhr zur Anlage unterbrechen und dann wieder erneut herstellen,
ODER
- Verkabelungsfehler des gemeinsamen Mittelanschlusses. Der gemeinsame Mittelanschluss
muss mit der Klemme COM des MASTER NO TOUCH 868 verbunden sein, dann für
einen Augenblick die Taste S1 PROG RX drücken oder die Spannungszufuhr zur Anlage
unterbrechen und dann wieder erneut herstellen.
Während der Speicherung der Sicherheitsvorrichtungen erzeugt der Summer 3 Töne
Es wird versucht, die Sicherheitsvorrichtungen der Fußgängertür vor den Fotozellen NO
TOUCH 868 zu speichern. Speichern Sie vorher die Fotozelle NO TOUCH 868.
Während eines Befehls erzeugt der Summer 4 Töne
Die Verkabelung zwischen Blinkleuchten-Ausgang der Steuertafel und dem MASTER NO
TOUCH 868 fehlt. Verbinden und dann für einen Augenblick die Taste S1 PROG RX drücken
oder die Spannungszufuhr zur Anlage unterbrechen und dann wieder erneut herstellen
Bei stillstehendem Tor erzeugt der Summer 4 Töne
Der Beschleunigungssensor stellt Schwingungen durch starken Wind oder willkürliche
Einwirkungen auf das Tor fest.
an den Versorgungsklemmen POWER des
Während eines Befehls versucht das Tor sich zu öffnen, hält aber an und der Summer erzeugt Störung des Empfängers NO TOUCH 868. Den Befehl erneut erteilen.
5 Töne
Bleibt das Problem weiter bestehen, den Beschleunigungssensor deaktivieren.
Besteht das Problem dennoch, den Empfänger der Fotozelle NO TOUCH 868 auswechseln.
Während eines Befehls versucht das Tor, zu öffnen oder zu schließen, hält aber an und - Fehlende Kontrolle. MASTER NO TOUCH 868 erhält keine Antwort von der Fotozelle aufgrund
der Summer erzeugt einen Wechselton für die Dauer von 1 Minute und die Led DL1 blinkt
von eventuellen metallischen Hindernissen, die die Funkverbindung unterbrechen.
- Kontrollieren, ob der MASTER NO TOUCH 868 in einem Metallgehäuse montiert wurde. In
abwechselnd rot und grün.
diesem Fall außen am Metallgehäuse eine Antenne 868,3 MHz (Kode ACG5451) montieren.
Während der Torfunktion erzeugt der Summer alle 3 Sekunden 1 Ton für die Dauer von 1 So bald als möglich die Batterien der Fotozelle/n auswechseln, die fast leer sind
Minute und die zweifärbige Led DL1 leuchtet im roten Dauerlicht.
Das Tor bewegt sich nicht, der Summer der Summer erzeugt einen Wechselton für die Dauer Die Batterien der Fotozelle/n sind leer.
von 1 Minute und die Led DL1 blinkt abwechselnd rot und grün
Das Tor öffnet oder schließt nicht und die zweifärbige Led DL1 leuchtet im grünen Dauerlicht
Fotozelle nicht ausgerichtet, im Einsatz oder die Batterien des Senders der Fotozelle NO
TOUCH 868 sind leer.
OPTIONEN
RED RADIO SENDER
BATTERIEN LITHIUM AA
für fussgänger Port Kontakt (nicht mitgeliefert), Versorgung mit Alkaline-Batterien vom Typ AA zu
1,5V, nicht im Lieferumfang enthalten
Kode ACG6202
für NO TOUCH 868 Fotozellen - 2 x 3,6V
44
Kode ACG9517
E
S
NO TOUCH 868 es un dispositivo conforme a la norma EN13849-2:2013 y, junto con un
cuadro electrónico RIB provisto de AUTOTEST, conforma un dispositivo de protección
de Clase 2.
El sistema verifica continuamente la presencia de diversos dispositivos de seguridad así como
el estado de las baterías, cumpliendo por completo con el requisito de seguridad activa en
todos los tipos de puerta de movimiento vertical.
NO TOUCH 868 es un dispositivo patentado ideado para garantizar la seguridad de las
automatizaciones de contraventana y puertas seccionales.
Gracias a su rayo infrarrojo situado a, aproximadamente, 13 cm del borde inferior de la puerta,
las fotocélulas NO TOUCH 868 previenen el contacto con posibles obstáculos.
NO TOUCH 868 no requiere el uso de sistemas recogecables, ya que funciona con baterías
y mediante radio.
El particular sistema de “basculamiento” permite el control en todas las condiciones de
movimiento, incluso en presencia de vibraciones.
El sistema está compuesto de quatro elementos:
1 - Transceptor de 868 MHz, MASTER NO TOUCH 868 (cód. ACG6154), conectado al cuadro
electrónico de mando de la puerta.
2 - Antenna 868MHz
3 - Transmisor infrarrojo.
4 - Receptor infrarrojo con transceptor de 868 MHz que se comunica constantemente con
la ficha MASTER NO TOUCH 868.
2
1
3
4
- FOTOCÉLULA NO TOUCH 868 (cód. ACG8048). LAS FOTOCÉLULAS NO TOUCH 868 SE
ENCIENDEN SÓLO DURANTE EL ACCIONAMIENTO DE LA PUERTA. Gracias a la función
SLEEP MODE, cuando la puerta está cerrada las fotocélulas se apagan, manteniendo la
carga de la batería.
- Seguridad adicional: TRANSMISOR RED (cód. ACG6202) conectado al contacto NC
(no suministrado) que se aplicará a la puerta peatonal insertada sobre la puerta principal.
Funciona sólo si la fotocélula NO TOUCH 868 ya ha sido programada.
EL TRANSMISOR RED ESTÁ SIEMPRE ACTIVO Y, EN CASO DE ABERTURA, DE LA
PUERTA PEATONAL (y por consiguiente, la abertura del contacto NC al cual está
conectado) BLOQUEA EL ACCIONAMIENTO DE LA PUERTA PRINCIPAL.
REFERENCIAS NORMATIVAS PARA PUERTAS AUTOMÁTICAS VERTICAL
Una vez ultimada la instalación de la máquina, es preciso asegurarse de que ésta sea
conforme a la norma EN13241-1.
RIB NO PUEDE CONSIDERARSE RESPONSABLE POR LOS EVENTUALES DAÑOS
DERIVADOS DEL USO IMPROPIO, ERRÓNEO O IRRACIONAL.
Restricciones de uso: las fotocélulas NO TOUCH 868 no se pueden utilizar en equipos que
no sean conformes a la EN 12978, como:
- Equipos de protección para instalación en puertas destinadas a un uso diferente al de las
puertas de acceso de peatones y vehículos conformes a la norma y cuyo uso principal es
el de permitir el acceso seguro a zonas industriales, comerciales, públicas o residenciales.
Algunos ejemplos de exclusión pueden ser los siguientes: puertas cerradas y mamparas,
puertas de ascensores, puertas de vehículos, puertas utilizadas, principalmente,
para guardar animales, telones para teatro, barreras ferroviarias y barreras utilizadas
exclusivamente para vehículos.
- Dispositivos utilizados exclusivamente para el control normal y para la parada, incluso de
emergencia, de puertas motorizadas.
- Aparatos o dispositivos de seguridad para el uso en máquinas diferentes a las puertas.
ATENCIÓN: No se pueden realizar modificaciones del producto ni configuraciones del
aparato sin consultar con el fabricante o su representante autorizado.
La persona encargada de la instalación del dispositivo de seguridad debe suministrar, al
usuario final, lo que se indica a continuación:
- todo el personal relacionado con el equipo, debe conocer los dispositivos de seguridad;
- las áreas que permiten el acceso a los dispositivos deben estar libres de obstáculos;
- los requisitos de limpieza para evitar posibles acumulaciones peligrosas de material;
- los posibles detalles para un proceso de reinicio que se debe realizar tras una parada de
emergencia o accidental provocada por el sistema de control.
Cualquier modificación en el diseño y configuración del aparato, sin consultar con el
fabricante o con su representante autorizado, puede provocar situaciones peligrosas.
35
52,26
190,12
31,02
59
MASTER NO TOUCH 868 puede operar dos formas de seguridad:
35
35
51,91
Medidas en mm
45
E
S
MASTER NO TOUCH 868 (15/09/2014)
ESQUEMA FICHA
DL2
S1
DL1
BUZZER
+
-
J3
J4
JP2
JP1
DL3
J1 =>
J2 =>
DL4
J2
COM
=> central de contactos N.C.
CONTACT N.C.=> contacto normalmente cerrado para conectar a la entrada Costa o Fotocélula del cuadro electrónico de mando
POWER - 12/24 V
=> alimentación negativa a 12/24V
POWER + 12/24 V
=> alimentación positiva a 12/24V
AUTOTEST => alimentación por AUTOTEST (ver también JP1 para la selección)
ALARM N.C. => contacto normalmente cerrado para conectar a la entrada STOP del cuadro electrónico de mando
J3 =>
J4 =>
J1
120/230 Vac
TERMINALES PARA CONECTAR LA SALIDA DE LUZ INTERMITENTE DE 120/230V 50/60Hz DEL CUADRO ELECTRÓNICO DE MANDO
TERMINAL PARA CONECTAR LA ANTENA DE 868,3 MHz
12/24 V
TERMINALES PARA CONECTAR A LA SALIDA DE LUZ INTERMITENTE 12/24V
DEL CUADRO ELECTRÓNICO DE MANDO
PRESTAR ATENCIÓN A LA POLARIDAD INDICADA EN EL CIRCUITO IMPRESO
JP1 => SELECCIÓN DE ALIMENTACIÓN AUTOTEST
JP1-
Jumper selección modalidad autotest con alimentaciones negativas
JP1+/~ Jumper selección modalidad autotest con alimentaciones positivas o alternas (para usar con el cuadro RIB, modelo J)
JP2 =>
A disposición para futuras implementaciones
S1 =>
PROG. RX Botón para programación
BUZZER =>
Indica a través de sonidos diferentes los posibles ajustes que se deben realizar durante la instalación, así como los estados de atención y la alarmas
LED
DL1 (bicolor)
DL2 (amarillo)
DL3 (rojo) DL4 (rojo)
apagado => funcionamiento regular
verde => fotocélula en uso
rojo/verde => alarmas
- presencia de tensión de alimentación 12-24V
- contacto N.C. CONTACT
- contacto N.C. ALARM
ATTENCIÓN: MASTER NO TOUCH 868 NO puede ser instalado a un distancia mayor de 3 metros desde el cuadro de maniobra del operador de la puerta.
46
CONEXIÓNES DESDE MASTER NO TOUCH 868 HASTA CUADRO DE MANIOBRA CON SALIDA PARA LUZ DESTELLANTE
ATENCIÓN: La función de AUTOTEST es esencial para que MASTER NO TOUCH 868 puede realizar las inspecciones requeridas por EN12978 par. 4.1 a las posiciones finales
de la carrera. ES NECESARIO QUE EL CUADRO DE MANDO EN EL QUE ES APLICADO MASTER NO TOUCH 868 DEBE TENER LA FUNCIÓN DE AUTOTEST.
ATENCIÓN: INSERT MASTER NO TOUCH 868 EN UN CONTENEDOR PROTEGIDO. El uso del producto en el interior de contenedores metálicos puede provocar el mal
funcionamiento del sistema. Por lo tanto, se aconseja para una perfecta recepción/transmisión de las señales añadir la antena cód. ACG5451 que debe ser
instalada fuera del contenedor y conectada al terminal J3 del MASTER NO TOUCH 868.
ATENCIÓN: Se recomienda activar en el cuadro electrónico de mando la función de PRE-INTERMITENTE, si está disponible.
ATENCIÓN: Verificar en el cuadro electrónico de mando la existencia de protección contra cortocircuitos a través del fusible conectado en serie al secundario de alimentación. De
no existir, conectar en serie a la alimentación un fusible retardado (T) 200 mA. Cortar la tensión del cuadro de mando de la automatización antes de proceder con las
conexiones al MASTER NO TOUCH.
+
! **
12/24V
Conectar al terminal COM del cuadro
electrónico de mando
Conectar a la entrada COSTA del cuadro electrónico
de mando. De no estar disponible, utilizar la entrada
FOTOCÉLULA
Alimentación
12/24V
Conectar a la salida AUTOTEST del
cuadro electrónico de mando
! **
120/230V 50/60Hz
Conectar a la entrada STOP del cuadro electrónico de mando o a otra
entrada que detenga el movimiento del motor
ENTRADA ALARM N.C.
Terminal ALARM NC: dedicado a la conexión en serie del mando STOP del
cuadro electrónico de mando. En el caso de no existir la entrada STOP, conectar el contacto
ALARM NC en serie a una entrada que permita el bloqueo del cuadro electrónico de mando.
ATENCIÓN: Retirar el posible puente, que sustituye al contacto NC de STOP, de los
terminales del cuadro electrónico de mando.
* Conexión OBLIGATORIA por cuadro electrónico de mando con salida
de luz intermitente a 120/230V 50/60Hz
!*
onexión OBLIGATORIA por cuadro electrónico de mando con
C
salida de luz intermitente a 12/24V . ATENCIÓN: RESPETAR LAS
POLARIDADES SEGÚN INDICA EL CIRCUITO IMPRESO
ATENCIÓN: La conexión de la salida de luz intermitente del cuadro de mando a los
terminales J2 o J4 del MASTER NO TOUCH es obligatoria también en el caso de
que no exista una luz intermitente en la instalación.
Si no se realiza la conexión, la puerta no funcionará y el timbre (buzzer) emitirá 4
tonos advirtiendo de la falta de conexión.
ENTRADA COM
Terminal central de CONTACT NC y ALARM NC.
ATENCIÓN: es obligatorio conectar al terminal COM la CENTRAL del cuadro de mando. Si
COM no estuviera conectado, el sistema dará la alarma con señales en forma de dos tonos
de timbre.
ENTRADA CONTACT N.C.
Terminal CONTACT NC: se debe conectar a la salida COSTA o FOTOCÉLULA del cuadro
electrónico de mando.
ATENCIÓN: Retirar el posible puente, que sustituye al contacto NC de COSTA o
FOTOCÉLULA, de los terminales del cuadro electrónico de mando.
CONEXIÓN DE LA ENTRADA AUTOTEST
(de conformidad con la norma EN13849-2:2013)
Si el cuadro no cuenta con AUTOTEST, se omitirá la prueba de control.
- Si el cuadro empleado cuenta con AUTOTEST, ubicar el jumper JP1 del MASTER NO
TOUCH 868 de acuerdo con la alimentación proporcionada por el cuadro de mando
utilizado, siguiendo el manual.
- Conectar la salida AUTOTEST del cuadro de mando al terminal AUTOTEST de la ficha
MASTER NO TOUCH 868 a fin de poder controlar el sistema al final de cada abertura
completa o al inicio del cierre de la automatización.
- El cierre se efectúa únicamente si la ficha MASTER NO TOUCH 868 ha pasado la prueba
de control.
- Si el control de la ficha MASTER NO TOUCH 868 ha tenido resultados negativos, el cuadro
de mando bloqueará la automatización y los led DL3 y DL4 en la ficha MASTER NO TOUCH
868 se apagarán. El timbre emite 2 tonos y el led bicolor DL1 parpadeará en rojo-verde
indicando la anomalía.
Para restablecer el funcionamiento:
- verificar las conexiones del AUTOTEST y la ubicación del puente JP1;
- pulsar el botón S1 PROG RX en el MASTER NO TOUCH 868;
- los led DL3 y DL4 se encenderán.
La ficha está lista para un nuevo AUTOTEST.
47
E
S
E
S
CONEXIÓNES DESDE MASTER NO TOUCH 868 HASTA CUADRO DE MANIOBRA SIN SALIDA PARA LUZ DESTELLANTE
CON CUADRO DE MANIOBRA PARA MOTOR MONOFÁSICO 120/230Vac
N.B.: Desactivar totalmente las funciones de deceleración, arranque gradual y adjuste electronico de la fuerza.
CONECTAR EL NEUTRO
LINEA MOTOR MONOFÁSICO 120/230 Vac Y
EL COMUN DEL MOTOR MONOFÁSICO DESDE
EL CUADRO DE MANIOBRA HASTA J2
Conectar al terminal COM del cuadro
electrónico de mando
Conectar a la entrada COSTA del
cuadro electrónico de mando. De no
estar disponible, utilizar la entrada
FOTOCÉLULA
F
Alimentación
12/24V
N
MOTOR
V
Conectar a la salida
AUTOTEST del cuadro
electrónico de mando
U
Conectar a la entrada STOP del cuadro electrónico de mando o
a otra entrada que detenga el movimiento del motor
W
CON CUADRO DE MANIOBRA PARA MOTOR TRIFÁSICO 400Vac
CONECTAR EL NEUTRO LINEA MOTOR
TRIFÁSICO 400Vac Y EL COMUN DEL
MOTOR TRIFÁSICO DESDE EL CUADRO
DE MANIOBRA HASTA J2
R
S
T
N
MOTOR
V
U
W
48
CONEXIÓNES DESDE MASTER NO TOUCH 868 HASTA CUADRO DE MANIOBRA SIN SALIDA PARA LUZ DESTELLANTE
CON CUADRO DE MANIOBRA PARA MOTOR 12/24Vdc
- No es posible conectar directamente el MASTER NO TOUCH 868 con el alimentación del motore desde el cuadro, porque las polaridàdes, en abre y cierre, se inverten, y
ademas el cuadro tiene la función de deceleración que no se puede desactivar.
- +
CONTACTOS DE SALIDA ALIMENTACION LUZ DE
SERVICIO A 24Vdc EN EL CUADRO DE COMANDO
MOTOR
CONECTAR J2 A LINEA 120/230V EN EL CUADRO DE
COMANDO MOTOR ATRAVEZ DE UNA RELAY CON BOBINADO
120/230Vac CONTROLADA POR UN CONTACTO LIMPIO N.O.
LUZ DE SERVICIO EN EL CUADRO DE COMANDO MOTOR
N.O.
N.O.
*R1
F
N
* R1= RELAY CON UN CONTACTO CON BOBINADO
A 120/230Vac
* R1= RELAY CON UN CONTACTO CON BOBINADO
A 12/24V
CONECTAR J4 CON ALIMENTACIÓN DE LOS ACCESSORIOS 12/24V EN EL CUADRO DE
COMANDO MOTOR, ATRAVEZ DE UNA RELAY CON BOBINADO 12/24V CONTRALADO
POR EL CONTACTO LIMPIO N.O. LUZ DE SERVICIO
49
*R1
N.O. N.O.
CONTACTOS
LIMPIOS N.O. LUZ
DE SERVICIO
LINEA 120/230Vac
-
+
CONTACTOS DE
ALIMENTACIÓN
ACCESSORIOS 12/24V
EN EL CUADRO DE
COMANDO MOTOR
E
S
E
S
MONTAJE DE LAS FOTOCÉLULAS NO TOUCH 868
EXISTEN DOS DIVERSAS TIPOLOGÍAS DE AJUSTE:
NO TOUCH 1A
NO TOUCH 1B (STANDARD)
DISPOSITIVO AJUSTADO DEBAJO DE LA PUERTA
DISPOSITIVO AJUSTADO EN EL LATERAL DE LA PUERTA
estribo colocado para fijación debajo de la puerta
estribo colocado para fijación en el lateral de la puerta
junta para cubierta
electrónica
junta para cubierta
electrónica
cubierta
anillo de goma para tornillo
tornillo 2,9x9,5
anillo de goma para tornillo
tornillo 2,9x9,5
tapón
tapón
lente
lente
anillo de goma para tornillo
tornillo 2,9x9,5
anillo de goma para tornillo
tornillo 2,9x9,5
Orificio de
inserción de guía
de resorte
NO TOUCH 1B
Orificio de
inserción de guía
de resorte
NO TOUCH 1A
N.B.: Para un adecuado grado de protección IP, prestar atención a la correcta inserción de las juntas.
CARACTERÍSTICAS TÉCNICAS NO TOUCH 868
Velocidad máx. parte móvil
Alimentación
Alcance señal infrarroja
cubierta
12 m/min
2 baterías de 3,6V
5 m / 10 m
Radiofrecuencia
Alcance de señal de radio
Grado de protección
50
868,3 MHz
20 m
IP54
PROGRAMACIÓN DE MASTER NO TOUCH 868 Y FOTOCÉLULAS NO TOUCH 868
A - VERIFICACIÓN DEL ADECUADO FUNCIONAMIENTO DE LA FOTOCÉLULA
NO TOUCH 868
- El adecuado funcionamiento del TX NO TOUCH 868 es indicado por el led verde DL6, el
cual se enciende durante 10 segundos al insertar la batería de 3,6V.
- En el MASTER NO TOUCH 868 el led bicolor DL1 rojo intermitente se vuelve verde y un
tono de timbre señala la correcta memorización del dispositivo de seguridad. En dicho
momento, los led DL3 y DL4 se encienden y el cuadro de mando recibe las señales
correctas de los dispositivos de seguridad.
- Presionar y soltar el botón S2 PROG. en el RX NO TOUCH 868 (se activa la fotocélula
durante 3 minutos para verificar la alineación). Si las fotocélulas están correctamente
alineadas, el led rojo DL5 se encenderá de forma fija.
SEÑALIZACIONES ACÚSTICAS
MASTER NO TOUCH 868 posee un timbre que señala las fases de instalación y el estado de
atención en caso de una descarga parcial o total de las baterías o el estado de alarma en
caso de fallo de uno de los dispositivos.
D - ACELERÓMETRO
- Durante los 3 minutos en que el led rojo DL5 está encendido, verificar que, al colocar un
obstáculo, este led rojo DL5 se apaga y, al mismo tiempo, el led bicolor DL1 en el MASTER
NO TOUCH 868 se enciende de color verde durante el tiempo de la interposición.
- En la ficha MASTER NO TOUCH 868, también el led DL3 se debe apagar indicando que se
ha producido el correcto intercambio del contacto dedicado a la entrada costa o fotocélula
del cuadro de mando.
Si el led rojo DL5 permanece apagado, verificar:
- el adecuado montaje de los soportes;
- en el TX NO TOUCH, la ubicación del puente JP4 que regula la capacidad de la señal
infrarroja:
- si colocado en L, está configurado el alcance de 5 metros.
- si colocado en H, está configurado el alcance de 10 metros.
B - ALIMENTAR MASTER NO TOUCH 868
Después de haber realizado todas las conexiones, alimentar el cuadro de mando con
MASTER NO TOUCH 868.
El led amarillo DL2 debe encenderse y el timbre debe emitir un sonido para señalar la
correcta alimentación.
C - MEMORIZACIÓN DE LA FOTOCÉLULA NO TOUCH 868
Insertar las baterías en los circuitos NO TOUCH y colocarlos en el interior de los contenedores
ya fijados en los extremos de la puerta.
Para realizar la memorización, seguir el siguiente procedimiento:
- Pulsar la tecla S1 PROG RX que se encuentra en el MASTER NO TOUCH 868 => el led
bicolor DL1 emitirá una luz intermitente roja durante 1 minuto (tiempo útil para llevar a
cabo la memorización).
El ACELERÓMETRO no es compatible con las automatizaciones provistas de salidas
graduales o muy lenta.
Excluir la salida gradual o bien, de no ser posible, desactivar el ACELERÓMETRO. Si
la puerta es muy lenta desactivar el ACELERÓMETRO.
- Realizar la verificación funcional de la fotocélula instalada activando el movimiento de la
automatización y controlando que, al colocar un obstáculo durante el cierre, la puerta se
detenga e invierta el movimiento.
- En caso de que la puerta se detenga después de la salida con alarma señalada por 5
tonos de TIMBRE, significará que el movimiento de la puerta no ha sido detectado por el
ACELERÓMETRO (debido a la salida graduales o a la puerta muy lenta), por lo tanto,
para el correcto funcionamiento de la puerta es necesario excluir el ACELERÓMETRO.
Para desactivar el ACELERÓMETRO es necesario:
- Poner en OFF el jumper JP3 existente en RX NO TOUCH 868;
- pulsar la tecla S2 PROG;
- el timbre en el MASTER NO TOUCH 868 emitirá un tono durante 3 segundos señalando la
adecuada desactivación del ACELERÓMETRO.
ACTIVACIÓN DEL ACELERÓMETRO
Para activar el ACELERÓMETRO, es necesario:
- poner en ON el jumper JP3 existente en RX NO TOUCH 868;
- pulsar la tecla S2 PROG;
- el timbre en el MASTER NO TOUCH 868 emitirá un tono durante 3 segundos señalando la
adecuada activación del ACELERÓMETRO.
VERIFICACIÓN DEL ADECUADO FUNCIONAMIENTO DEL ACELERÓMETRO
- Con el ACELERÓMETRO ACTIVO (jumper JP3 ON en RX NO TOUCH 868), verificar que al
mover el RECEPTOR NO TOUCH 868 el led DL1 se encienda de color rojo fijo, el TIMBRE
emita 4 tonos y los led DL3 y DL4 se apaguen durante 5 segundos.
- Después de 5 segundos el led DL1 se apagará y DL3-DL4 se encenderán.
E - MEMORIZACIÓN DE LOS TIEMPOS (SÓLO CON EL ACELERÓMETRO
ACTIVADO - JP3 ON)
CON EL ACELERÓMETRO ACTIVADO, ES NECESARIO EL PROCEDIMIENTO DE
MEMORIZACIÓN DE LOS TIEMPOS.
SI NO SE LLEVA A CABO, ES POSIBLE QUE DESPUÉS DE LA SALIDA DE LA PUERTA ÉSTA
SE DETENGA CON SEÑALIZACIÓN DE 5 TONOS DE TIMBRE.
- Pulsar la tecla S1 PROG RX en MASTER NO TOUCH 868, el led DL1 parpadeará de color
verde.
- Gestionar la puerta, abriéndola y cerrándola completamente al menos dos veces de forma
consecutiva.
- Esperar a que se apague el led verde DL1, o como alternativa pulsar una vez la tecla S1
para finalizar el procedimiento.
F - MEMORIZACIÓN
DEL DISPOSITIVO DE SEGURIDAD DE LA PUERTA
PEATONAL (Transmisor RED cód. ACG6202)
- Pulsar la tecla S2 PROG en el dispositivo de seguridad RX NO TOUCH 868.
Es posible memorizar un dispositivo de seguridad para la puerta peatonal sólo si está ya
programada la fotocélula NO TOUCH 868.
Dicha seguridad es el Transmisor RED que sirve para monitorear un contacto N.C. (no
suministrado) colocado en la puerta peatonal existente en la puerta principal.
Para realizar la memorización seguir el procedimiento a continuación:
- colocar el conmutador dip N° 2 en ON (OBLIGATORIO);
- alimentar el Transmisor RED mediante baterías;
51
E
S
E
S
- pulsar la tecla S1 PROG. RX ubicada en el MASTER NO TOUCH 868: el led bicolor DL1
parpadeará en color verde durante 1 minuto (tiempo útil para realizar la memorización);
- pulsar la tecla S2 PROG. TX en el Transmisor RED: en MASTER NO TOUCH 868 el led
bicolor DL1 que parpadea en color verde se apaga. Un tono de timbre indica la adecuada
memorización mientras el led rojo en el Transmisor RED parpadea 3 veces para confirmar
la adecuada memorización.
VERIFICACIÓN DEL ADECUADO FUNCIONAMIENTO DE LA SEGURIDAD DE LA PUERTA
PEATONAL
Abrir la puerta peatonal abriendo el contacto N.C. conectado al Transmisor RED. Verificar
que los led DL3 y DL4 en el MASTER NO TOUCH 868 se apaguen y que no se realice una
eventual orden de abertura de la puerta.
ANTENA
Para comunicarse con la seguridad, MASTER NO TOUCH 868 cuenta con una sección de
cable eléctrico que actúa como antena conectada al terminal J3. Si es necesario mejorar
la señal de radio (por ejemplo con el MASTER NO TOUCH 868 instalado en un contenedor
metálico), conectar la antena de 868,3 MHz (cód. ACG5451) al terminal J3 respetando la
conexión del cable central y de la masa y ubicarla de forma que esté “a la vista” de
todos los dispositivos de seguridad.
A fin de lograr el correcto funcionamiento del sistema, es necesario que no
existan obstáculos entre el MASTER NO TOUCH 868 y la seguridad, como muros
de cemento armado, superficies de fierro, etc., que puedan obstaculizar las
comunicaciones por radio.
CARACTERÍSTICAS TÉCNICAS FOTOCÉLULA NO TOUCH 868 cód.
ACG8048
RECEPTOR NO TOUCH 868
- ALIMENTACIÓN
baterías de LITHIO 1 x AA 3,6V (>2,5 Ah)
5 µA
- ABSORCIÓN EN REPOSO
- ABSORCIÓN MÁXIMA
25 mA
- TIPO DE MODULACIÓN
FSK
- VIDA ÚTIL DE LAS BATERÍAS
aproximadamente 3 años (con 10 ciclos diarios)
- TEMPERATURA DE TRABAJO
-20°C ÷ +60°C
- TIEMPO MAXIMO DE RESPUESTA (TIEMPO DE ACTIVACIÓN DEL RECEPTOR CUANDO ESTÁ
90 ms
OPERANDO)
- TIEMPO DE REINICIACIÓN DE LIBERACIÓN
90 ms
- GRADO DE PROTECCIÓN
IP54
Altura total con estribo = 190 mm;
- DIMENSIONES
Ancho = 34,60 mm;
Espesor= 32 mm
- PESO
0, 210 kg
DATOS TÉCNICOS DE LA SEÑAL DE RADIOFRECUENCIA
- FRECUENCIA
868,3 MHz
- SENSIBILIDAD
-108 dBm
- POTENCIA DE EMISIÓN
<25 mW
20 m en espacio libre sin antena
- ALCANCE
ESTADO DE ATENCIÓN (aviso de sustitución de baterías)
El estado de atención (WARNING) advierte al usuario sobre la inminente necesidad de
cambiar las baterías.
Cuando las baterías del NO TOUCH 868 están casi descargadas y alcanzan los 3,1V, el
receptor NO TOUCH 868 señala por radio al MASTER NO TOUCH 868 el estado de la batería
casi descargada.
MASTER NO TOUCH 868 activará el TIMBRE con un tono cada 3 segundos durante 1 minuto
cada vez que se dé una orden de automatización.
El led bicolor DL1 sobre el MASTER NO TOUCH 868 se encenderá de forma fija de color rojo.
Durante dichas señalizaciones, el estado del sistema aún está operativo, sin embargo, es
oportuno cambiar pronto las baterías evitando el bloqueo funcional de la puerta, el cual
ocurre al alcanzar los 2,8 V.
ESTADO DE ALARMA (baterías completamente descargadas o con fallos)
El estado de alarma se activa con baterías completamente descargadas (2,8V) o en caso
de fallo.
En el MASTER NO TOUCH 868, los led DL3 y DL4 se apagan y la automatización permanece
detenida mientras el led bicolor DL1 parpadea de forma alterna luces rojas - verdes
(siempre) y el TIMBRE emite un tono alternado durante 1 minuto.
Para eliminar la alarma, se deberán cambiar las baterías o reparar la avería.
PROCEDIMIENTO DE ELIMINACIÓN DEL (LOS) DISPOSITIVO(S) DE SEGURIDAD
Para eliminar el (los) dispositivo(s) de seguridad en el MASTER NO TOUCH 868, proceder
del siguiente modo:
- Pulsar y mantener presionada la tecla S1 PROG. RX durante 10 segundos.
- Transcurridos los 10 segundos, el led bicolor DL1 parpadeará 6 veces de forma alterna
luces de color rojo y verde señalando la eliminación, mientras que los led DL3 y DL4, si
estaban encendidos, se apagan.
TRANSMISOR NO TOUCH 868
- ALIMENTACIÓN
baterías de LITHIO 1 x AA 3,6V (>2,5 Ah)
- ABSORCIÓN
3 µA
FSK
- TIPO DE MODULACIÓN
- VIDA ÚTIL DE LAS BATERÍAS
aproximadamente 3 años
- VIDA ÚTIL DE LAS BATERÍAS CON JUMPER JP4 EN POSICIÓN “L”
Alacance de la señal infrarroja 5 m: 3,1 años
- VIDA ÚTIL DE LAS BATERÍAS CON JUMPER JP4 EN POSICIÓN “H”
Alcance de la señal infrarroja 10 m: 1,2 años
- TEMPERATURA DE TRABAJO
-20°C ÷ +60°C
- GRADO DE PROTECCIÓN
IP54
Altura total con estribo = 190 mm;
- DIMENSIONES
Ancho = 35 mm;
Espesor = 51,91 mm
- PESO
0, 210 kg con batería
DATOS TÉCNICOS DE LA SEÑAL INFRARROJA
- LONGITUD DE ONDA
890 nm
10 m con jumper JP4 en posición “H” en TX (por
- ALCANCE
defecto establecida a 5 m con jumper JP4 en
posición “L”)
4
CARACTERÍSTICAS TÉCNICAS MASTER NO TOUCH 868 cod. ACG6154
12/24V
110-240V 50/60Hz
10-30V
30 mA
100 mA
-20°C ÷ +60°C
125x55x28 mm
0,090 kg
DATOS TÉCNICOS DE LA SEÑAL DE RADIOFRECUENCIA
- FRECUENCIA
- SENSIBILIDAD
- POTENCIA DE EMISIÓN
- TIPO DE MODULACIÓN
- ALCANCE
868,3 MHz
-108 dBm
<25 mW
FSK
20 m en espacio libre
3
Años
- ALIMENTACIÓN
- TENSIÓN APLICABLE AL TERMINAL J2
- TENSIÓN APLICABLE AL TERMINAL J1
- ABSORCIÓN EN REPOSO
- ABSORCIÓN MÁXIMA
- TEMPERATURA DE TRABAJO
- DIMENSIONES
- PESO
2
1
0
5
10
20
Ciclos diarios
vida baterías
52
30
E
S
ATENCIÓN
NO !
SI !
PARA QUITAR LA TARJETA, LEVANTARLA UTILIZANDO SOLO EL
AREA INDICADA POR EL ADESIVO VERDE.
Si se utiliza un area diferente, es posible estropear la tarjeta.
CAMBIO DE BATERÍAS
La duración de las baterías LITHIO tipo AA de 3,6V es de, aproximadamente, 3 años.
En el caso de cambio de las baterías, no es necesario rehacer la programación.
- Cambiar las baterías prestando atención al respeto de las polaridades.
- Pulsar la tecla S2 PROG en el RX NO TOUCH 868 para reactivar el funcionamiento del
MASTER NO TOUCH 868.
La automatización está lista para reiniciar en total seguridad.
ATENCIÓN: Se recuerda que las baterías son desechadas según las normas vigentes. En
caso de destrucción de los dispositivos de seguridad, se recuerda retirar las baterías LITHIO
tipo AA de 3,6V y desecharlas según las normas vigentes.
53
E
S
EN CASO DE DIFICULTADES
SEÑAL
VERIFICACIÓN
Todos los led de la ficha MASTER NO TOUCH 868 están apagados
Verificar la existencia de tensión de 12 ó 24 V
del MASTER NO TOUCH 868
Sólo el led DL2 está encendido
- Ninguna seguridad memorizada. Realizar la memorización de las fotocélulas NO TOUCH
868.
O BIEN
- La seguridad de la puerta peatonal está activa. Cerrar la puerta peatonal existente en la
puerta principal.
Al dar una orden, el timbre emite 2 tonos
- Autotest fallido. Verificar las conexiones entre el MASTER y el cuadro de mando, el
establecimiento de JP1 y luego presionar por un momento la tecla S1 PROG RX o eliminar y
volver a enviar la tensión a la instalación.
O BIEN
- Error de cableado del cable central. Verificar que el cable central del cuadro esté conectado
al terminal COM del MASTER NO TOUCH 868, luego presionar por un momento la tecla S1
PROG RX o eliminar y volver a enviar la tensión a la instalación.
Durante la memorización de los dispositivos de seguridad el timbre emite 3 tonos
Se intenta memorizar la seguridad de la puerta peatonal antes que el NO TOUCH 868.
Memorice primero la fotocélula NO TOUCH 868.
Al dar una orden, el timbre emite 4 tonos
Cables no conectados entre la salida de la luz intermitente del cuadro de mando y el MASTER
NO TOUCH 868. Conectarlos y luego presionar por un momento la tecla S1 PROG RX o
eliminar y volver a enviar la tensión a la instalación.
Con la puerta detenida, el timbre emite 4 tonos
Existencia de vibraciones detectadas por el acelerómetro debido al fuerte viento o a la puerta
manipulada manualmente.
Al dar un orden la puerta intenta abrirse, luego se detiene y el timbre emite 5 tonos.
Fallo en el receptor NO TOUCH 868. Dar una nueva orden.
Si el problema, persiste desactivar el acelerómetro.
Si el problema aún persiste, cambiar el receptor de la fotocélula NO TOUCH 868.
en los terminales de alimentación POWER
Al dar una orden, la puerta intenta abrirse o cerrarse, luego se detiene y el timbre emite - Supervisión fallida. MASTER NO TOUCH 868 no recibe respuesta de la fotocélula debido a
un tono alternado durante 1 minuto y el led DL1 parpadea en modo alternado luces rojas
posibles obstáculos metálicos que impiden la comunicación vía radio.
y verdes.
- Verificar que el MASTER NO TOUCH 868 no haya sido instalado en un contenedor metálico.
Eventualmente conectar al exterior del contenedor metálico una antena de 868,3 MHz (cód.
ACG5451).
El timbre emite un tono cada 3 segundos durante el funcionamiento de la puerta durante 1
minuto y el led bicolor DL1 se enciende en color rojo de forma fija.
Cambiar lo más pronto posible las baterías de la(s) fotocélula(s) en cuanto estén casi
descargadas.
La puerta no se mueve, el timbre emite un tono alternado durante 1 minuto y el led bicolor
DL1 se enciende en color verde-rojo de forma alterna.
Cambiar las baterías de la(s) fotocélula(s) en cuanto se descarguen.
La puerta no abre o no cierra y el led bicolor DL1 está encendido de color verde
Fotocélula no alineada u operativa o baterías descargadas en el transmisor de fotocélula NO
TOUCH 868.
OPCIONALES
TRASMETTITORE RADIO RED
BATERÍAS LITHIO AA
para contacto (no incluido) para puerta peatones. Alimentar con 3 pilas estilo alcalinas
tipo AA de 1,5V no incluida
cód. ACG6202
para fotocélulas NO TOUCH 868 - 2 x 3,6V
54
cód. ACG9517
NOTES
55
56
57
58
®
automatismi per cancelli
automatic entry systems
R.I.B. S.r.l.
25014 Castenedolo - Brescia - Italy
Via Matteotti, 162
Tel. ++39.030.2135811
Fax ++39.030.21358279 - 21358278
www.ribind.it - [email protected]
AZIENDA CON SISTEMA
DI QUALITÀ CERTIFICATO
DA DNV
COMPANY WITH QUALITY
SYSTEM CERTIFIED
BY DNV
DICHIARAZIONE DI CONFORMITÁ - DÉCLARATION DE CONFORMITÉ
DECLARATION OF COMPLIANCE - ÜBEREINSTIMMNUGSERKLÄRUNG
DECLARACIÓN DE CONFORMIDAD
Dichiariamo sotto la nostra responsabilità che NO TOUCH 868 è conforme alle seguenti norme e Direttive:
NO TOUCH 868 se conforme aux normes suivantes:
We declare under our responsibility that NO TOUCH 868 is conform to the following standards:
Wir erklaeren das NO TOUCH 868 den folgenden EN-Normen entspricht:
Declaramos bajo nuestra responsabilidad que NO TOUCH 868 ed conforme a la siguientes normas y disposiciones:
EN 12978
EN 55014-1
EN 55014-2
EN 60335-1
EN 61000-3-2
EN 61000-3-3
2009
2012
2009
2013
2011
2009
EN 61000-6-1
EN 61000-6-2
EN 61000-6-3
EN 61000-6-4
EN 300 220-1
EN 300 220-2
2012
2006
2012
2012
2012
2007
EN 50371
EN 301489-1
EN 301489-3
EN 60950-1
2002
2011
2012
2012
Inoltre permette un’installazione a Norme - Permit, en plus, une installation selon les normes suivants
You can also install according to the following rules - Desweiteren genehmigt es eine Installation der folgenden Normen
Además permite una instalación según las Normas:
EN13849-2 2008 - EN 13241-1 2011
Come richiesto dalle seguenti Direttive - Conformément aux Directives
As is provided by the following Directives - Gemaß den folgenden Richtlinien
Tal y como requerido por las siguientes Disposiciones:
89/106/EEC - 1999/5/EC - 2004/108/CE - 2006/95/CE
Il presente prodotto non può funzionare in modo indipendente ed è destinato ad essere incorporato in un impianto costituito da ulteriori elementi. Rientra perciò nell’Art.
6 paragrafo 2 della Direttiva 2006/42/CE (Macchine) e successive modifiche, per cui segnaliamo il divieto di messa in servizio prima che l’impianto sia stato dichiarato
conforme alle disposizioni della Direttiva.
Le présent dispositif ne peut fonctionner de manière indépendante, étant prévu pour être intégré à une installation constituée d’autres éléments. Aussi rentre-t-il dans le
champ d’application de l’art. 6, paragraphe 2 de la Directive machines 2006/42/CEE et de ses modifications successives. Sa mise en service est interdite avant que
l’installation ait été déclarée conforme aux dispositions prévues par la Directive.
This product can not work alone and was designed to be fitted into a system made up of various other elements. Hence, it falls within Article 6, Paragraph 2 of the
EC-Directive 2006/42 (Machines) and following modifications, to which respect we point out the ban on its putting into service before being found compliant with what
is provided by the Directive.
Dieses Produkt kann nicht allein funktionieren und wurde konstruiert, um in einen von anderen Bestandteilen zusammengesetzten System eingebaut zu werden. Das
Produkt fällt deswegen unter Artikel 6, Paragraph 2 der EWG-Richtlinie 2006/42 (Maschinen) und folgenden.
El presente producto no puede funcionar de manera independiente y está destinado a ser incorporado en un equipo constituido por ulteriores elementos. Entra por lo
tanto en el Art. 6 párrafo 2 de la Directiva 2006/42/CEE (Máquinas) y sucesivas modificaciones, por lo que señalamos la prohibición de puesta en servicio antes de
que el equipo haya sido declarado conforme con las disposiciones de la Directiva.
Legal Representative
27/05/2014
(Rasconi Antonio)
59
Questo prodotto è stato completamente progettato e costruito in Italia · Ce produit a été complètement développé et fabriqué en Italie · This product has been completely
developed and built in Italy · Dieses Produkt wurde komplett in Italien entwickelt und hergestellt · Artìculo totalmente proyectado y producido en Italia
®
automatismi per cancelli
automatic entry systems
25014 CASTENEDOLO (BS) - ITALY
Via Matteotti, 162
Tel. +39.030.2135811
Fax +39.030.21358279
www.ribind.it - [email protected]
Cod. CVA2044 - 15042015 - Rev. 06
NO TOUCH 868
Scaricare