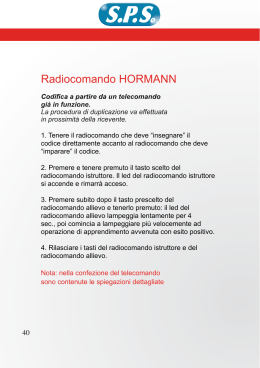
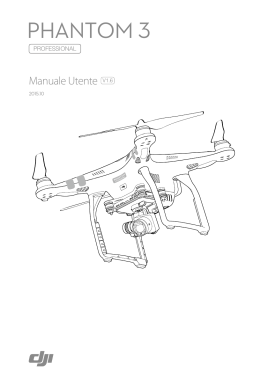
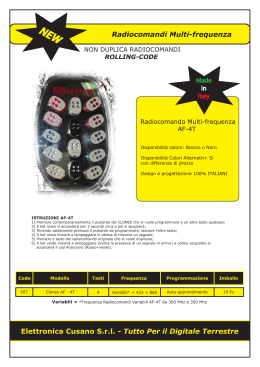
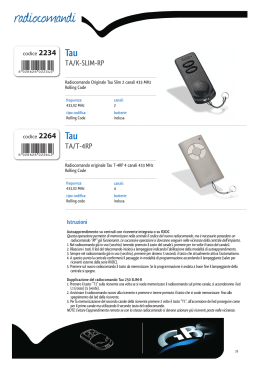
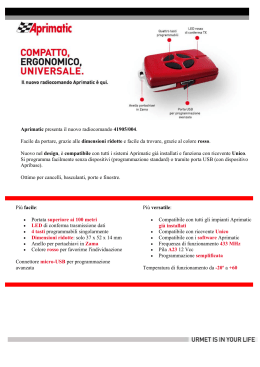
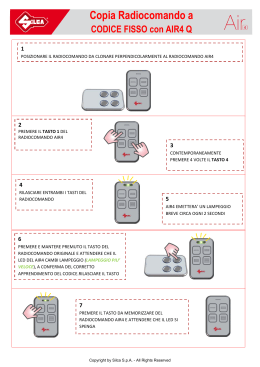
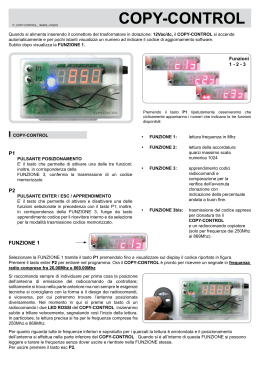
FRAME AUTOMATION
R-CONTROL
MANUALE
DI ISTRUZIONI
PER L’USO
ISTRUCTION
MANUAL
MODE
D’EMPLOI
BEDIENUNGSANLEITUNG
Italian Movements
MANUAL DE
ISTRUCCIONES
ИНСТРУКЦИЯ
ПО МОНТАЖУ
Italian Movements
R1-CONTROL
R6-CONTROL
L1
L2
L3
L4
L5
L6
L1
UP
UP
STOP
STOP
DOWN
DOWN
SELC
DIP-SWITCHES
2
DIP-SWITCHES
PROG
PROG
Italian Movements
SELG
ITALIANO
1. INFORMAZIONI GENERALI
Leggere attentamente prima di iniziare e rispettare le istruzioni riportate nel manuale. Conservare il presente
manuale per l’utilizzo. Prestare attenzione alla configurazione dei dip-switches, ai dati relativi alle prestazioni
(vedi “Dati tecnici").
2. TABELLA DATI TECNICI E MARCATURA
Il marchio CE attesta che il radiocomando è conforme ai requisiti essenziali di sicurezza e di salute previste
dalle direttive Europee di prodotto. Il marchio CE è individuabile tramite apposita targhetta adesiva applicata
esternamente il prodotto, in cui sono indicati alcuni dei dati presenti nella tabella a seguire:
Alimentazione
Frequenza
Canali
Portata in campo libero
Assorbimento Max
Dimensioni
Peso
R1-CONTROL
R6-CONTROL
MX00 AT 01N 0G 00
MX00 AT 02N 0G 00
2 x Lithium 3V (CR2032 230mAh)
2 x Lithium 3V (CR2032 230mAh)
434,15 MHz
434,15 MHz
1
6
300 mt
300 mt
< 25mA
< 25mA
120x52x19 mm
120x52x19 mm
40g
40g
Italian Movements
3
3. RADIOCOMANDO R1-CONTROL
I trasmettitori della serie R1-CONTROL permettono di comandare 1 automatismo o 1 gruppo di automatismi.
3.1 UP DOWN STOP Funzionamento dei tasti UP, DOWN e STOP
Aziona l’automatismo in Uscita/Salita
Aziona l’automatismo in Rientro/Discesa
Ferma l’automatismo
3.2 Funzionamento del tasto PROG e dei DIP-SWITCHES
Il tasto PROG ed i DIP-SWITCHES servono per programmare i radiocomandi R-CONTROL. Leggere
attentamente la sezione “PROGRAMMAZIONE DELLE FUNZIONI TRAMITE RADIOCOMANDO R-CONTROL”.
4. RADIOCOMANDO R6-CONTROL
I trasmettitori della serie R6-CONTROL permettono di comandare singolarmente o contemporaneamente
fino a 6 automatismi o gruppi di automatismi.
4.1 UP DOWN STOP Funzionamento dei tasti UP, DOWN e STOP
Aziona l’automatismo in Uscita/Salita
Aziona l’automatismo in Rientro/Discesa
Ferma l’automatismo
4.2
Funzionamento del tasto SELC
Permette di selezionare il canale da utilizzare per la trasmissione radio.
1. Premere il tasto SELC più volte fino a selezionare il canale desiderato: il led corrispondente rimane acceso
per qualche secondo.
2. Premere uno dei tasti UP, DOWN o STOP per trasmettere il comando.
Per selezionare tutti i canali contemporaneamente è sufficiente premere più volte il tasto SELC fino a quando
tutti i LED rimangono accesi. Per visualizzare il canale impostato premere una sola volta il tasto SELC.
4
Italian Movements
ITALIANO
4.3
Funzionamento del tasto SELG e programmazione di gruppi di canali
Permette di programmare e selezionare i GRUPPI di canali da utilizzare per la trasmissione radio. In totale
possono essere memorizzati fino a 8 gruppi di canali; memorizzato l'ottavo, un eventuale nuovo gruppo
sostituirà il primo.
1. Premere il tasto SELC fino a selezionare il primo canale da associare al gruppo.
2. Premere il tasto SELG: il led relativo al canale selezionato inizia a lampeggiare.
3. Premere il tasto SELC fino a selezionare il secondo canale da associare.
4. Premere il tasto SELG: il led relativo al canale selezionato inizia a lampeggiare.
5. Ripetere la procedura per tutti i canali desiderati: i led relativi rimangono accesi fino al termine della procedura.
6. Una volta selezionati tutti i canali aspettare che i led si spengano: il gruppo è stato memorizzato ed è possibile
visualizzarlo premendo il tasto SELG.
Quando i gruppi di canali sono più di uno, per selezionare il gruppo desiderato procedere come segue:
1. Premere il tasto SELG più volte fino a selezionare il gruppo desiderato:
i led corrispondenti rimangono accesi per qualche secondo.
2. Premere uno dei tasti UP, DOWN o STOP per trasmettere il comando.
Per cancellare tutti i gruppi memorizzati procedere come segue:
1. Premere e rilasciare il tasto SELG: viene visualizzato tramite i led l’ultimo gruppo utilizzato.
2. Prima che si spengano i led mantenere premuto il tasto SELC e contemporaneamente premere il tasto SELG.
3. Tenere premuti entrambi i tasti per qualche secondo fino a quando i led si spengono: i gruppi sono stati
cancellati.
3. PROGRAMMAZIONE FUNZIONI TRAMITE RADIOCOMANDO R-CONTROL
Utilizzando un radiocomando della serie R-CONTROL è possibile modificare le funzioni dell’attuatore.
R-CONTROL è dotato di 4 dip-switches grazie ai quali è possibile modificare le funzioni desiderate.
Italian Movements
5
3.1 LIWIN RADIO
UP
STOP
DOWN
SELC
DIP
FUNZIONE
1
Memorizzazione dei trasmettitori
3
Cancellazione di tutti i trasmettitori memorizzati
2-4
NON UTILIZZATI
SELG
DIP-SWITCHES
PROG
Dip-switch 1: Memorizzazione dei trasmettitori
Per memorizzare un radiocomando con un nuovo attuatore procedere come segue:
ATTENZIONE: Tutti gli altri interruttori devono essere impostati su OFF.
ATTENZIONE: il primo radiocomando che si memorizza determina la direzione di movimento del motore.
a)
b)
c)
d)
e)
f)
g)
h)
i)
Predisporre la connessione elettrica alla tensione 230 VAC ma non connettere l’attuatore.
Portare in posizione ON il dip-switch 1 del radiocomando.
Solo R6-CONTROL: premere il tasto SELC del radiocomando fino a quando viene visualizzato tramite i led il canale da memorizzare
Connettere l’attuatore alla tensione 230 VAC
Entro 5 secondi premere e tenere premuto (per circa 3/4 secondi) il tasto PROG del radiocomando
Rilasciare il tasto PROG
Portare in posizione OFF il dip-switch 1
Attendere 10 secondi
Premendo i pulsanti UP o DOWN l’attuatore si muove, o in apertura o in chiusura:
Per aggiungere un altro radiocomando nell’attuatore è necessario avere a disposizione un radiocomando precedentemente
memorizzato e procedere con i seguenti punti:
a) Solo R6-CONTROL: premere più volte il tasto il tasto SELC del radiocomando già programmato fino a quando viene
visualizzato tramite i led il canale memorizzato
b) Solo R6-CONTROL: premere più volte il tasto SELC del nuovo radiocomando fino a quando viene visualizzato tramite
i led il canale che si vuole memorizzare
c) Portare in posizione ON il dip-switch 1 del radiocomando 1
d) Premere e tenere premuto, per circa 10 secondi, il tasto PROG del radiocomando 1
e) Rilasciare il tasto PROG
f) Premere il tasto UP o DOWN del radiocomando 2: il radiocomando 2 viene programmato con la stessa logica del
radiocomando 1.
6
Italian Movements
3.2 SHOWIN RADIO
UP
STOP
DOWN
SELC
DIP
FUNZIONE
1
Memorizzazione dei trasmettitori
3
Cancellazione di tutti i trasmettitori memorizzati
2-4
NON UTILIZZATI
SELG
DIP-SWITCHES
PROG
3.1 Dip-switch 1: Memorizzazione dei trasmettitori
Per memorizzare un radiocomando con un nuovo attuatore procedere come segue:
ATTENZIONE: Tutti gli altri interruttori devono essere impostati su OFF.
ATTENZIONE: il primo radiocomando che si memorizza determina la direzione di movimento del motore.
a) Alimentare solo la centrale da programmare
b) Portare in posizione ON il dip-switch 1 del radiocomando.
c) Solo R6-CONTROL: premere più volte il tasto il tasto SELC del radiocomando fino a quando viene visualizzato tramite
i led il canale memorizzato
d) Premere e tenere premuto (per circa 5 secondi) il tasto PROG del radiocomando fino a quando il motore comincia a
muoversi in una direzione
e) Rilasciare il tasto PROG: il motore si ferma
f) Premere i pulsanti UP o DOWN secondo la direzione in cui si muoveva l’attuatore prima di fermarsi:
- se l’attuatore apriva premere il tasto UP; direzione acquisita:
tasto UP fa aprire l’attuatore, tasto DOWN fa chiudere l’attuatore
- se l’attuatore chiudeva premere il tasto DOWN; direzione acquisita:
tasto DOWN fa chiudere l’attuatore, tasto UP fa aprire l’attuatore.
Italian Movements
7
ITALIANO
Dip-switch 3: Cancellazione di tutti i radiocomandi memorizzati
Per cancellare tutti i radiocomandi memorizzati nell’attuatore è necessario avere a disposizione un radiocomando
precedentemente memorizzato e procedere con i seguenti punti:
a) Alimentare solo l’attuatore da resettare
b) Solo R6-CONTROL: premere più volte il tasto il tasto SELC del trasmettitore fino a quando viene visualizzato tramite
i led il canale memorizzato
c) Portare in posizione ON il dip-switch 3 del radiocomando
d) Premere e tenere premuto il tasto PROG del radiocomando per 10 secondi
e) Rilasciare il tasto PROG e portare in posizione OFF il dip-switch 3 del radiocomando
g)
Portare in posizione OFF il dip-switch 1
Provare ad azionare l’attuatore e verificare che funzioni secondo la logica sopra descritta. Se la logica è invertita è
necessario cancellare tutti i codici memorizzati (vedi 3.2) e ripetere le precedenti operazioni.
Per aggiungere un altro radiocomando nella centrale è necessario avere a disposizione un radiocomando
precedentemente memorizzato e procedere con i seguenti punti:
a) Solo R6-CONTROL: premere più volte il tasto il tasto SELC del radiocomando fino a quando viene visualizzato tramite
i led il canale memorizzato
b) Solo R6-CONTROL: premere più volte il tasto SELC del nuovo radiocomando fino a quando viene visualizzato tramite
i led o sul display il canale che si vuole memorizzare
c) Portare l’attuatore a metà corsa con il radiocomando 1
d) Portare in posizione ON il dip-switch 1 del radiocomando 1
e) Premere e tenere premuto, per circa 5 secondi, il tasto PROG del radiocomando 1 fino a quando l’attuatore comincia a muoversi
f) Rilasciare il tasto PROG, l’attuatore si ferma
g) Premere il tasto UP o DOWN del radiocomando 2: il radiocomando 2 viene memorizzato con la stessa logica del radiocomando 1.
3.2 Dip-switch 3: Cancellazione di tutti i radiocomandi memorizzati
Per cancellare tutti i radiocomandi memorizzati nella centrale è necessario avere a disposizione un radiocomando
precedentemente memorizzato e procedere con i seguenti punti:
a) Alimentare solo la centrale da programmare
b) Solo R6-CONTROL: premere più volte il tasto il tasto SELC del trasmettitore fino a quando viene visualizzato tramite
i led il canale memorizzato
c) Portare l’attuatore a circa metà corsa
d) Portare in posizione ON il dip-switch 3 del radiocomando
e) Premere e tenere premuto il tasto PROG del radiocomando fino a quando il motore si muove per circa un secondo in
entrambi i versi, indicando la fine della cancellazione
f) Rilasciare il tasto PROG e portare in posizione OFF il dip-switch 3 del radiocomando
Per cancellare tutti i codici con un radiocomando non memorizzato procedere come segue:
a) Portare l’attuatore a circa metà corsa
b) Disalimentare il sistema
c) Portare in posizione ON il dip-switch 3 di un radiocomando
d) Premere e tenere premuto il tasto PROG
e) Alimentare solo la centrale su cui si vuole effettuare la cancellazione: dopo circa 1 secondo l’attuatore si muove in
entrambi i versi segnalando la corretta cancellazione
f) Rilasciare il tasto PROG e portare in posizione OFF il dip-switch 3 del radiocomando
5. SOSTITUZIONE DELLA BATTERIA
La sostituzione della batteria va eseguita quando la portata radio diventa insufficiente alle proprie esigenze
d’utilizzo, o quando l’intensità del led di trasmissione è molto debole. Aprire lo sportello del vano batterie e
sostituire le due batterie rispettando la polarità indicata in figura 2.
8
Italian Movements
Le batterie contengono elementi chimici altamente inquinanti. Devono quindi essere smaltite utilizzando
gli opportuni accorgimenti secondo le Norme eco-ambientali vigenti (Fratelli Comunello SPA raccomanda
lo smaltimento per mezzo della raccolta differenziata). Il trasmettitore è costituito anch’esso da materiali
inquinanti, adottare quindi le medesime soluzioni per lo smaltimento. In caso di perdita di sostanze
elettrolitiche dalle batterie, sostituirle immediatamente evitando accuratamente ogni tipo di contatto con
tali sostanze.
7. GARANZIA
Il costruttore si rende garante del buon funzionamento del radiocomando. Esso s’impegna ad eseguire la
sostituzione dei pezzi difettosi, per vizi o difetti di costruzione, secondo quanto stabilito dal Codice Civile art.
1490. La garanzia copre i prodotti o le singole parti per un periodo di 36 mesi dalla data d’acquisto. La stessa
è valida se l’acquirente sia stato in grado di esibire la prova d’acquisto ed abbia soddisfatto le condizioni di
pagamento pattuite. La garanzia di buon funzionamento dei radiocomandi accordata dal costruttore, s'intende
nel senso che lo stesso s'impegna a riparare o sostituire gratuitamente, nel più breve tempo possibile, quelle
parti che dovessero guastarsi, per difetto di costruzione o vizio di materiale durante il periodo di garanzia.
L'acquirente non può vantare diritto ad alcun risarcimento per eventuali danni, diretti o indiretti, o altre
spese. Sono escluse dalla garanzia quelle parti fragili o esposte a usura come pure ad agenti procedimenti
corrosivi ecc. Il costruttore non risponde per eventuali danni causati da imperizia d'uso. Il costruttore non
risponde della garanzia se il prodotto è stato manomesso, smontato, privo di etichetta o comunque con
evidenti segni di urto o altro. Tentativi di riparazione da parte di terzi, non autorizzati dal costruttore, fanno
decadere la garanzia. Le riparazioni in garanzia sono sempre da intendersi "franco fabbrica produttore". Le
spese di trasporto relative (andata / ritorno) sono sempre a carico dell’acquirente.
8. CONFORMITA’ ALLA DIRETTIVA
Italian Movements
9
ITALIANO
6. PROTEZIONE DELL’AMBIENTE
R1-CONTROL
R6-CONTROL
L1
L2
L3
L4
L5
L6
L1
UP
UP
STOP
STOP
DOWN
DOWN
SELC
DIP-SWITCHES
PROG
PROG
10
Italian Movements
SELG
DIP-SWITCHES
Please read carefully and follow the instructions detailed in this manual. Keep the manual for use and future
maintenance. Pay attention to the configuration of the DIP-switches, to the data concerning the performance
(see “Technical Data”).
2. TABLE OF TECHNICAL DATA AND MARK
The CE mark certifies that the trasmitter conforms to the essential health and safety requirements laid down
by European product directives. The CE mark can be identified by the relevant adhesive label applied to the
outside of the product, on which are shown some of the data shown in the following table:
Power Supply
Frequency
Channels
Range in open field
Max . absorption
Dimensions
Weight
R1-CONTROL
R6-CONTROL
MX00 AT 01N 0G 00
MX00 AT 02N 0G 00
2 x Lithium 3V (CR2032 230mAh)
2 x Lithium 3V (CR2032 230mAh)
434,15 MHz
434,15 MHz
1
6
300 mt
300 mt
< 25mA
< 25mA
120x52x19 mm
120x52x19 mm
40g
40g
Italian Movements
11
ENGLISH
1. GENERAL INFORMATION
3. TRASMITTER R1-CONTROL
All the transmitters R1-CONTROL allow controlling 1 automation or group of automations for awnings and
shutters.
3.1
UP DOWN STOP
FUNCTIONING OF THE BUTTONS UP, DOWN AND STOP
Activates the automation GOING UP
Activates the automation GOING DOWN
It stops the automation
3.2
FUNCTIONING OF THE BUTTON PROG AND DIP-SWITCHES
The button PROG and the DIPSWITCHES program the functions of the control units controlled by the
transmitters R1-CONTROL. Read carefully the section “PROGRAMMING OF THE FUNCTIONS BY R-CONTROL
TRANSMITTERS” in the handbook of the control unit or in the one of the tubular motor with integrated
electronic card.
12
Italian Movements
4. TRASMITTER R6-CONTROL
Functioning of the buttons UP, DOWN and STOP
Activates the automation GOING UP
Activates the automation GOING DOWN
it stops the automation
ENGLISH
4.1
UP DOWN STOP 4.2
Functioning of the button SELC
By this button it is possible to select the channel to be used for the radio transmission.
1. Press button SELC until selected the desired channel: the corresponding led is on for some seconds
2. Press one of the buttons UP, DOWN or STOP to transmit the control
To select all the channels at the same time press several times the button SELC until all the leds are on.
To display the channel set, press once the button SELC.
4.3
Functioning of the button SELG
By this button it is possible to program and select the GROUPS of channels to be used for the radio
transmission. It is possible to store up to 8 groups of channels; stored the eighth, a new group will replace
the first one.
1. Press the button SELC until selected the first channel to link to the group
2. Press the button SELG: the led linked to the selected channel starts blinking
3. Press the button SELC until selected the second channel to link
4. Press the button SELG: the led linked to the selected channel starts blinking
5. Repeat the procedure for all the desired channels: the leds linked are on till the end of the procedure
6. Once selected all the channels wait for the leds to switch off: the group has been stored and it is possible
to display it by pressing the button SELG
When the groups are more than one, to select the desired group proceed as follows:
1. Press the button SELG several times until selected the desired group:
the leds linked to the channels are on for some minutes
2. Press one of the buttons UP, DOWN or STOP to transmit the control
Italian Movements
13
To delete all the groups stored proceed as follows:
1. Press and release the button SELG: the last group used is displayed by the leds.
2. Before all the leds switch off, press and keep pressed the button SELC and at the same time press the
button SELG
3. Keep pressed both the buttons for some seconds until the leds switch off: the groups have been deleted
4.4
Functioning of the button PROG and DIP-SWITCHES
The button PROG and the DIPSWITCHES program the functions of the control units controlled by the
transmitters R-CONTROL. Read carefully the section “PROGRAMMING OF THE FUNCTIONS BY R-CONTROL
TRANSMITTERS” in the handbook of the control unit or in the one of the tubular motor with integrated
electronic card.
5. REPLACING BATTERY
Replace the battery when the radio range power decrease or the led light intensity becomes too feeble. Open
the door of the battery compartment and replace the two batteries respecting the polarity shown by picture 2.
6. PROTECTION OF THE ENVIRONMENT
Batteries contain pollutant elements, must be disposed of in accordance with environmental regulations
(Fratelli Comunello S.p.A. advise to use a specific disposal system).Transmitter contains pollutant elements
too; follow the same procedure to dispose.
Should the batteries lose electrolytic substances, please replace them immediately avoiding with care any
contact with such substances.
14
Italian Movements
The manufacturer guarantees the correct operation of the trasmitter.
The manufacturer undertakes to replace parts which are faulty due to manufacturing faults or defects,
according to that laid down by Article 1490 of the Italian Civil Code. The guarantee covers the products or
individual parts for a period of 36 months from date of purchase.
This is valid if the purchaser is able to show the purchase receipt and has satisfied the agreed conditions of
payment.
The guarantee of correct operation of the trasmitter issued by the manufacturer means that the manufacturer
undertakes to repair or replace free of charge, in the shortest time possible, those parts that have become
faulty due to defects in construction or material defects during the period of the guarantee.
The purchaser cannot claim the right to any compensation for any damages, direct or indirect, or to other
costs.
The guarantee does not cover parts which are fragile or exposed to wear and tear, or to corrosive process
agents, etc.
The manufacturer cannot be held responsible for the guarantee if the product has been mishandled,
disassembled, had its label removed, or exhibits evidence of impact or other factors.
Attempts at repair by third parties who have not been authorised by the manufacturer will cause the
guarantee to become invalid.
Repairs under guarantee are always to be made “at the manufacturer’s factory”. The relevant transport
expenses (to and from the factory) are always payable by the purchaser.
8. DIRECTIVE CONFORMITY
Italian Movements
15
ENGLISH
7. GUARANTEE
R1-CONTROL
R6-CONTROL
L1
L2
L3
L4
L5
L6
L1
UP
UP
STOP
STOP
DOWN
DOWN
SELC
DIP-SWITCHES
PROG
PROG
16
Italian Movements
SELG
DIP-SWITCHES
1. INFORMATIONS GÉNÉRALES
2. TABLEAU DES CARACTERISTIQUES
TECHNIQUES ET MARQUAGE
Le marquage CE atteste que l'emetteur est conforme aux prescriptions essentielles de sécurité et de santé
prévues par les directives Européennes de produit. Le marquage CE se trouve sur l'étiquette autocollante
apposée à l'extérieur du produit et reporte les données principales indiquées dans le tableau suivant:
Alimentation
Fréquence
Channels
Portée en champ ouvert
Absorption Max.
Dimensions
Poids
R1-CONTROL
R6-CONTROL
MX00 AT 01N 0G 00
MX00 AT 02N 0G 00
2 x Lithium 3V (CR2032 230mAh)
2 x Lithium 3V (CR2032 230mAh)
434,15 MHz
434,15 MHz
1
6
300 mt
300 mt
< 25mA
< 25mA
120x52x19 mm
120x52x19 mm
40g
40g
Italian Movements
17
FRANÇAIS
Lire attentivement et respecter les instructions fournies dans cette notice. Conserver cette notice afin de
pouvoir la consulter lors des utilisations et opérations d'entretien futures. Accorder le maximum d'attention à
la configuration des micro-interrupteurs, aux données concernant les performances (voir « Caractéristiques
techniques »).
3. EMETTEUR R1-CONTROL
Les émetteurs de la série R1-CONTROL permettent de contrôler 1 automatisme ou groupe d'automatismes
pour stores et volets.
3.1
UP DOWN STOP
Fonctionnement des touches UP, DOWN et STOP
il actionne l'automatisme à la montée
il actionne l'automatisme à la descente
il arrêt l'automatisme
3.2
Fonctionnement de la touche PROG et des DIP-SWITCHES
La touche PROG et les DIP-SWITCHES programment les fonctions des centrales de commande contrôlées par
les émetteurs R-CONTROL. Lire attentivement la section « PROGRAMMATION DES FONCTIONS A TRAVERS
DES EMETTEURS DE LA SERIE R-CONTROL » dans le manuel de programmation de la centrale ou du moteur
tubulaire avec fiche électronique intégrée.
18
Italian Movements
4. EMETTEUR R6-CONTROL
Les émetteurs de la série R6-CONTROL permettent de contrôler 6 automatisme ou groupe d'automatismes
pour stores et volets.
Fonctionnement des touches UP, DOWN et STOP
il actionne l'automatisme à la montée
il actionne l'automatisme à la descente
il arrêt l'automatisme
4.2
Fonctionnement de la touche SELC
Elle permet de sélectionner le canal à utiliser pour la transmission radio
1. Appuyer et maintenir appuyée la touche SELC plusieurs fois jusqu'à sélectionner le canal désiré : le led
correspondant s'allume pour quelque seconde.
2. Appuyer une des touches UP, DOWN ou STOP pour transmettre la commande.
Pour sélectionner tous les canaux en même temps, il est suffisant appuyer
plusieurs fois la touche SELC jusqu'à quand tous les leds s'allument.
Pour visualiser le canal réglé, appuyer une seule fois la touche SELC.
4.2
Fonctionnement de la touche SELG
Elle permet de programmer et sélectionner les GROUPES de voies à utiliser pour la transmission radio. En
total, on peut mémoriser jusqu'à 8 groupes de voies; une fois mémorisé l'octave, un éventuel nouveau groupe
remplacera le premier.
1. Appuyer et maintenir appuyée la touche SELC jusqu'à sélectionner la première voie à associer au groupe.
2. Appuyer et maintenir appuyée la touche SELG: le led relative commence à clignoter.
3. Appuyer la touche SELC jusqu'à sélectionner la deuxième voie à associer.
4. Appuyer la touche SELG : le led relative à la voie sélectionnée commence à clignoter.
5. Répéter le procédé pour toutes les voies désirées : les leds relatives restent allumés jusqu'à la fin du
procédé.
6. Une fois sélectionnées toutes les voies, attendre que les leds s'éteignent: le groupe a été mémorisé et il
est possible le visualiser en appuyant la touche SELG.
Quand on a plusieurs groupes de canaux, pour sélectionner le groupe desire suivre ce procédé :
1. Appuyer la touche SELG plusieurs fois jusqu'à sélectionner le groupe désiré: les leds correspondants
restent allumés quelque seconde.
2. Appuyer une des touches UP, DOWN ou STOP pour transmettre la commande.
Italian Movements
19
FRANÇAIS
4.1
UP DOWN STOP
Pour effacer tous les groupes mémorisés, suivre ce procédé :
1. Appuyer et relâcher la touche SELG : le dernier groupe utilisé est visualize à travers les leds.
2. Avant que les leds s'éteignent, appuyer et maintenir appuyée la touché SELC et en même temps appuyer
la touche SELG.
3. Maintenir appuyées les deux touches quelque seconde jusqu'à quand les leds s'éteignent : les groupes
ont été effacés.
4.2
Fonctionnement de la touche PROG et des DIP-SWITCHES
La touche PROG et les DIP-SWITCHES programment les fonctions des centrales de commande contrôlées par
les émetteurs R-CONTROL. Lire attentivement la section « PROGRAMMATION DES FONCTIONS A TRAVERS
DES EMETTEURS DE LA SERIE R-CONTROL » dans le manuel de programmation de la centrale ou du moteur
tubulaire avec fiche électronique intégrée.
5. SUBSTITUTION DE LA BATTERIE
Quand la portée n'est plus suffisant ou quand l'intensité du LED de transmission c'est faible, il faut substituer
la batterie. Ouvrire le logement des batteries et remplacer-les en respectant la polarité indiquée dans
l'illustration 2.
6. PROTECTION DE L’ENVIRONNEMENT
Les batteries contiennent éléments chimiques qui peuvent polluer. Il faut l'écouler en employant tous les
moyens convenables selon les Normes écologiques en vigueur. L'émetteur aussi est constitué par matériaux
qui peuvent polluer; employer donc les memes solutions d'écoulement.
En cas de fuite de substances électrolytiques des piles, les remplacer immediatement, en evitant n'import
quel contact avec dites substances.
20
Italian Movements
Le constructeur se porte garant du bon fonctionnement de émetteur.
Il s'engage à procéder au remplacement des pièces défectueuses, suite à des vides ou à des défauts de
construction, conformément à ce qui est établi par l'art. 1490 du Code Civil italien. La garantie porte sur les
produits ou ses composants pour une durée de 36 mois à partir de la date d'achat.
La garantie sera appliquée dès lors que l'acheteur sera en mesure de présenter une preuve d'achat et qu'il
se sera acquitté des conditions de paiement concordées.
La garantie de bon fonctionnement de émetteur fournie par le constructeur s'applique en ce sens que
celui-ci s'engage à réparer ou à remplacer gracieusement, dans les plus brefs délais, toutes les pièces qui
s'endommageraient, par suite d'un défaut de construction ou d'un vice du matériau, pendant la période
couverte par la garantie.
L'acheteur ne peut prétendre à aucun droit ni à aucun dédommagement en cas de dommages éventuels,
directs ou indirects, ou d'autres frais.
La garantie ne couvre pas les parties fragiles ou sujettes à l'usure, l'action des agents corrosifs etc.
La garantie ne s'appliquera pas si le produit est altéré, démonté, sans étiquette ou présentant des signes
évidents de choc ou autre.
Toute tentative de réparation de la part de tiers, non agréés par le constructeur, annulera automatiquement
la garantie.
Les réparations couvertes par la garantie s'appliquent toujours « franco usine du producteur ». Les frais de
transport correspondants (aller/retour) sont toujours à la charge de l'acheteur.
8. CONFORMITÉ
Italian Movements
21
FRANÇAIS
7. GARANTIE
R1-CONTROL
R6-CONTROL
L1
L2
L3
L4
L5
L6
L1
UP
UP
STOP
STOP
DOWN
DOWN
SELC
DIP-SWITCHES
PROG
PROG
22
Italian Movements
SELG
DIP-SWITCHES
1. Allgemeine Informationen
Dieses Handbuch aufmerksam durchlesen und die darin enthaltenen Anweisungen beachten. Es für
zukünftige Benutzung und Wartung aufzubewahren. Die Konfiguration der Dip-Schalter, die entsprechenden
Leistungsdaten (siehe "technische Daten").
Das CE-Zeichen bestätigt, dass der Sender den wesentlichen Sicherheits- und Gesundheitsanforderungen
entspricht, die von der europäischen Richtlinie des Geräts vorgeschrieben sind. Das CE-Zeichen ist als
Klebekennzeichen an der Außenseite des Geräts angebracht; einige der in der nachfolgenden Tabelle
angegebenen Daten sind dort aufgelistet:
Versorgung
Frequenz
Canali
Sendbereich ins Freifeld
Max. Stromaufnahme
Ausmaße
Gewicht
R1-CONTROL
R6-CONTROL
MX00 AT 01N 0G 00
MX00 AT 02N 0G 00
2 x Lithium 3V (CR2032 230mAh)
2 x Lithium 3V (CR2032 230mAh)
434,15 MHz
434,15 MHz
1
6
300 mt
300 mt
< 25mA
< 25mA
120x52x19 mm
120x52x19 mm
40g
40g
Italian Movements
23
DEUTSCH
2. Tabelle der technischen Daten und Kennzeichnung
3. SENDER R1-CONTROL
Die Sender der Serie R1-CONTROL ermöglichen die Steuerung von 1 Automatismus oder einer Gruppe von
Automatismen für Vorhänge und Rollläden.
3.1
UP DOWN STOP Functionsweise der tasten UP, DOWN und STOP
Aktiviert den Automatismus beim HEBEN.
Aktiviert den Automatismus beim SENKEN.
Stoppt den Automatismus.
3.2
Functionsweise der taste PROG und der DIP-SWITCHES
Die Taste PROG und die DIP-SWITCHES dienen zur Programmierung der Funktionen, der von den Sendern
R1-CONTROL gesteuerten Steuergehäusen. Lesen Sie sorgfältig im Abschnitt “PROGRAMMIERUNG DER
FUNKTIONEN MITTELS SENDERN DER SERIE R-CONTROL” im Handbuch des Steuergehäuses oder des
Rohrmotors mit integrierter elektronischer Platine.
24
Italian Movements
4. SENDER R6-CONTROL
Die Sender der Serie R6-CONTROL ermöglichen die einzelne oder gleichzeitige Steuerung von bis zu 6
Automatismen oder Gruppen von Vorhängen oder Rollläden.
Functionsweise der tasten UP, DOWN und STOP
Aktiviert den Automatismus beim HEBEN.
Aktiviert den Automatismus beim SENKEN.
Stoppt den Automatismus.
4.1
Functionsweise der taste SELC
Ermöglicht die Auswahl des zur Funkübertragung zu verwendenden Kanals.
1. Betätigen Sie mehrmals die Taste SELC, bis der gewünschte Kanal gewählt ist. Die entsprechende Led
bleibt für einige Sekunden erleuchtet.
2. Betätigen Sie eine der Tasten UP, DOWN oder STOP, um den Befehl zu übertragen.
Zur gleichzeitigen Auswahl aller Kanäle genügt es, mehrmals die Taste SELC zu betätigen, bis alle LED
eingeschaltet bleiben. Betätigen Sie zur Anzeige des eingerichteten Kanals einmal die Taste SELC.
4.1
Functionsweise der taste SELG
Ermöglicht die Programmierung und Auswahl der zur Funkübertragung zu verwendenden GRUPPEN von
Kanälen. Insgesamt können bis zu 8 Kanalgruppen gespeichert werden. Nach Speicherung der 8. ersetzt eine
eventuelle neue Gruppe die erste.
1. Betätigen Sie die Taste SELC, um den ersten, der Gruppe zuzuweisenden Kanal zu wählen.
2. Betätigen Sie die Taste SELG: die dem Kanal entsprechende Led beginnt zu blinken.
3. Betätigen Sie die Taste SELC, um den zweiten, der Gruppe zuzuweisenden Kanal zu wählen.
4. Betätigen Sie die Taste SELG: die dem Kanal entsprechende Led beginnt zu blinken.
5. Wiederholen Sie den Vorgang für alle gewünschten Kanäle: die entsprechenden Led bleiben bis zum Ende
des Vorgangs eingeschaltet.
6. Warten Sie nach Auswahl aller Kanäle ab, ob die Led verlöschen: die Gruppe wurde gespeichert und kann
bei Betätigung der Taste SELG angezeigt werden.
Handelt es sich um mehr als eine Kanalgruppe ist zur Auswahl der gewünschten Gruppe wie folgt vorzugehen:
1. Betätigen Sie mehrmals die Taste SELG, um die gewünschte Gruppe zu wählen: die entsprechenden Led
bleiben einige Sekunden eingeschaltet.
2. Betätigen Sie eine der Tasten UP, DOWN oder STOP, um den Befehl zu übertragen.
Gehen Sie zum Löschen aller gespeicherten Gruppen wie folgt vor:
Italian Movements
25
DEUTSCH
4.1
UP DOWN STOP 1. Betätigen und lassen Sie die Taste SELG los: die zuletzt verwendete Gruppe wird angezeigt.
2. Betätigen und halten Sie vor dem Verlöschen der Led die Taste SELC gedrückt und betätigen Sie gleichzeitig
die Taste SELG.
3. Halten Sie beide Tasten für einige Sekunden gedrückt, bis die Led verlöschen: die Gruppen wurden
gelöscht.
4.4
Functionsweise der taste PROG und der DIP-SWITCHES
Die Taste PROG und die DIP-SWITCHES dienen zur Programmierung der Funktionen, der von den Sendern
R-CONTROL gesteuerten Steuergehäusen. Lesen Sie sorgfältig im Abschnitt “PROGRAMMIERUNG DER
FUNKTIONEN MITTELS SENDERN DER SERIE R-CONTROL” im Handbuch des Steuergehäuses oder des
Rohrmotors mit integrierter elektronischer Platine.
5. AUSTAUSCH DER BATTERIE
Der Austausch der Batterie erfolgt, wenn die Funkreichweite für die Einsatzerfordernisse nicht ausreichend
ist oder wenn die Intensität der Übertragungs-Led sehr schwach ist. Öffnen Sie die Klappe des Batteriefachs
und tauschen Sie die beiden Batterien unter Beachtung der in Abbildung 2 angegebenen Polarität aus.
6. UMWELTSCHUTZ
Die Batterien enthalten die Umwelt stark belastende chemische Elemente. Sie müssen unter Einsatz der
entsprechenden Maßnahmen gemäß den gültigen Umweltschutzbestimmungen entsorgt werden (Fratelli
Comunello SPA empfiehlt die Entsorgung durch getrennte Müllsammlung). Auch der Sender besteht aus
umweltbelastenden Materialien. Deshalb müssen die gleichen Lösungen bei der Entsorgung zur Anwendung
kommen. Bei einem Auslaufen von Elektrolyten aus den Batterien müssen diese sofort ausgetauscht werden,
wobei darauf zu achten ist, jeglichen Kontakt mit diesen Stoffen sorgfältig zu vermeiden.
26
Italian Movements
Der Hersteller garantiert für den ordnungsgemäßen Betrieb des Sender.
Er verpflichtet sich laut italienischem bürgerlichem Gesetzbuch, Art. 1490, zur Auswechslung defekter
Teile, die aufgrund von Herstellungsfehlern oder Defekten bei der Produktion auftreten. Die Geräte- und
Teilgarantie besitzt eine Dauer von 36 Monaten ab Kaufdatum.
Die Garantie ist gültig, wenn der Käufer die Funktionsprüfung beim Kauf ausführen konnte und die
festgelegten Zahlungsbedingungen erfüllt hat.
Bei der vom Hersteller festgelegten Betriebsgarantie für Sender verpflichtet er sich, das Gerät oder die Teile
schnellstmöglich zu reparieren oder auszuwechseln, bei denen aufgrund eines Konstruktionsdefekts oder
Materialschadens eine Funktionsstörung innerhalb der Garantiedauer auftritt.
Der Käufer besitzt kein Recht auf Entschädigung oder den Ersatz von Spesen aufgrund evtl. erlittener
direkter oder indirekter Schäden.
Die Garantie umfasst keine zerbrechlichen Teile bzw. Verschleißteile; ebenso wenig sind Schäden
eingeschlossen, die aufgrund eines Einsatzes korrosiver Mittel.
Die Herstellergarantie verlischt, wenn das Gerät verändert oder demontiert wird, das Etikett fehlt oder falls
ein offensichtliches Zeichen für ein Anstoßen oder eine ähnliche Beschädigung vorliegt.
Die Garantie verfällt, wenn versucht wird, das Gerät durch Dritte und ohne die Autorisierung des Herstellers
reparieren zu lassen.
Eine Reparatur auf Garantie erfolgt immer "vor Ort beim Hersteller". Die entsprechenden Versandspesen
(An- und Absendung) gehen zu Lasten des Käufers.
8. KONFORMITÄTSERKLÄRUNG
Italian Movements
27
DEUTSCH
7. Garantie
R1-CONTROL
R6-CONTROL
L1
L2
L3
L4
L5
L6
L1
UP
UP
STOP
STOP
DOWN
DOWN
SELC
DIP-SWITCHES
PROG
PROG
28
Italian Movements
SELG
DIP-SWITCHES
1. INFORMACIÓN GENERAL
Lea atentamente y respete las instrucciones incluidas en el manual. Conserve este manual para la utilización
y el mantenimiento futuros. Preste atención a la configuración de los dip-switch, a los datos relativos a las
prestaciones (véanse “Datos técnicos").
2. Tabla de datos técnicos y marcado
R1-CONTROL
R6-CONTROL
MX00 AT 01N 0G 00
MX00 AT 02N 0G 00
Alimentac
2 x Lithium 3V (CR2032 230mAh)
2 x Lithium 3V (CR2032 230mAh)
Frecuencia
434,15 MHz
434,15 MHz
Canales
Alcance a campo abierto
Absorcion Max.
Dimensiones
Peso
1
6
300 mt
300 mt
< 25mA
< 25mA
120x52x19 mm
120x52x19 mm
40g
40g
Italian Movements
29
ESPAÑOL
La marca CE certifica que el emisor es conforme con los requisitos esenciales de seguridad y de salud
previstos por las directivas europeas de producto. La marca CE puede localizarse en la chapa adhesiva
específica aplicada en el exterior del producto, en la que se indican algunos de los datos presentes en la
siguiente tabla:
3. EMISOR R1-CONTROL
Los emisores de la serie R1-CONTROL permiten controlar 1 automatismo o grupo de automatismos para
toldos y persianas.
3.2
UP
DOWN
STOP
Funcionamento da las teclas UP, DOWN y STOP
Acciona el automatismo en SUBIDA
Acciona el automatismo en BAJADA
Para el automatismo
3.3
Funcionamento da la tecla PROG y de los DIP-SWITCHES
La tecla PROG y los DIP-SWITCHES son utilizados para programar las funciones de los cuadros de maniobras
controlados por los emisores R-CONTROL. Leer atentamente la sección « PROGRAMACIÓN DE LAS
FUNCIONES MEDIANTE EMISORES DE LA SERIE R-CONTROL » en el manual de instrucciones
del cuadro de maniobras o del motor tubular con tarjeta electrónica integrada.
30
Italian Movements
4. EMISOR R6-CONTROL
Los emisores de la serie R6-CONTROL permiten controlar singularmente o contemporáneamente hasta 6
automatismos o grupos de automatismos para toldos y persianas.
4.1
UP
DOWN
STOP
Funcionamento da las teclas UP, DOWN y STOP
Acciona el automatismo en SUBIDA
Acciona el automatismo en BAJADA
Para el automatismo
4.3
Funcionamento da la tecla SELG
Permite programar y seleccionar los GRUPOS de canales a utilizar para la transmisión radio. En total, pueden
memorizarse hasta 8 grupos de canales ; memorizado el octavo, eventualmente un nuevo grupo substituiría
al primero.
1. Pulsar la tecla SELC hasta seleccionar el primer canal a asociar al grupo.
2. Pulsar la tecla SELG: el led correspondiente al canal seleccionado empieza a parpadear.
3. Pulsar la tecla SELC hasta seleccionar el segundo canal a asociar.
4. Pulsar la tecla SELG: el led correspondiente al canal seleccionado empieza a parpadear.
5. Repetir el procedimiento para todos los canales que se deseen: los led correspondientes permanecen
encendidos hasta el final del procedimiento.
6. Cuando todos los canales han sido seleccionados, esperar que los led se apaguen: el grupo ha sido
memorizado y es posible visualizarlo pulsando la tecla SELG.
Cuando los grupos de canales son más que uno, para seleccionar el grupo que se desee proceder de la
siguiente forma:
1. Pulsar la tecla SELG más veces hasta seleccionar el grupo que se desee: los led correspondientes
permanecen encendidos durante algunos segundos.
2. Pulsar una de las teclas UP, DOWN o STOP para transmitir el comando.
Italian Movements
31
ESPAÑOL
4.2
Funcionamento da la tecla SELC
Permite seleccionar el canal a utilizar para la transmisión radio
1. Pulsar la tecla SELC más veces hasta seleccionar el canal deseado: el led correspondiente permanece
encendido durante algunos segundos.
2. Pulsar una de las teclas UP, DOWN o STOP para transmitir el comando.
Para seleccionar todos los canales contemporáneamente, es suficiente pulsar más veces la tecla SELC hasta
que todos los led permanezcan encendidos. Para visualizar el canal programado, pulsar una sola vez la tecla
SELC.
Para cancelar todos los grupos memorizados proceder de la siguiente forma:
1. Pulsar y soltar la tecla SELG: se visualiza mediante el led el último grupo seleccionado.
2. Antes de que se apaguen los led, pulsar y mantener pulsadas las teclas SELC y SELG a la vez.
3. Mantener pulsadas ambas teclas durante algunos segundos hasta que los led se apaguen: los grupos han
sido cancelados.
4.4
Funcionamento da la tecla PROG y de los DIP-SWITCHES
La tecla PROG y los DIP-SWITCHES son utilizados para programar las funzione de los cuadros de maniobras
controlados por los emisores R-CONTROL. Leer atentamente la sección « PROGRAMACIÓN DE LAS
FUNCIONES MEDIANTE EMISORES DE LA SERIE R-CONTROL » en el manual de instrucciones del cuadro de
maniobras o del motor tubular con tarjeta electrónica integrada.
5. Sustitución de la pila
La sustitución de la pila tiene que efectuarse cuando el alcance radio se hace insuficiente a las propias
exigencias de utilización o cuando la intensidad del led de transmisión es muy débil. Abrir la tapa de las pilas
y sustituir las dos pilas respetando la polaridad como indicado en la figura 2.
6. Protección del medio ambiente
ATENCION: Las pilas contienen elementos químicos altamente contaminantes. Por eso hay que deshacerse
de las mismas procurando respetar las Normas eco-ambientales vigentes (Fratelli Comunello SPA
recomienda el reciclaje de las mismas a través de la recogida diferenciada). El emisor también está
constituido por materiales contaminantes, adoptar pues, las mismas soluciones que para el deshecho de
las pilas. En el caso de perdida de sustancia electrolitica de las baterias, hay que sustituirlas de inmediato
evitando qualquier contacto con estas sustancias.
32
Italian Movements
7. Garantía
El fabricante es garante del buen funcionamiento del emisor. Éste se compromete a efectuar la sustitución
de las piezas defectuosas, por vicios o defectos, según cuanto establecido por el Código Civil Art. 1490.
La garantía cubre los productos o las partes individuales durante un periodo de 36 meses desde la fecha
de compra. La misma es válida si el comprador puede mostrar una prueba de compra y ha respetado las
condiciones de pago establecidas.
La garantía de buen funcionamiento del emisor otorgada por el fabricante, se considera en el sentido que el
mismo compromete a reparar o sustituir gratuitamente, en el plazo de tiempo más breve posible, las partes
que se averíen, por defecto de fabricación o vicio de material durante el periodo de garantía.
El comprador no puede solicitar ningún resarcimiento por eventuales daños, directos o indirectos, u
otros gastos. Se excluyen de la garantía las partes frágiles o expuestas a desgaste así como a agentes
procedimientos corrosivos, etc.
El fabricante no responde de la garantía si el producto ha sido modificado, desmontado, se ha eliminado la
etiqueta o en cualquier caso presenta evidentes signos de golpes u otro.
Un intento de reparación por parte de terceros no autorizados por el fabricante anula la garantía.
Las reparaciones en garantía deben considerarse siempre "franco fábrica del fabricante". Los gastos de
transporte relativos (ida y vuelta) son siempre a cargo del comprador.
ESPAÑOL
8. CONFORMIDAD
Italian Movements
33
R1-CONTROL
R6-CONTROL
L1
L2
L3
L4
L5
L6
L1
UP
UP
STOP
STOP
DOWN
DOWN
SELC
DIP-SWITCHES
МИКРОПЕРЕКЛЮЧАТЕЛИ
В КОРПУСЕ DIP
PROG
34
Italian Movements
PROG
SELG
DIP-SWITCHES
МИКРОПЕРЕКЛЮЧАТЕЛИ
В КОРПУСЕ DIP
1. ОБЩАЯ ИНФОРМАЦИЯ
Внимательно прочитайте настоящую инструкцию и сохраните ее для дальнейшей эксплуатации
и технического обслуживания. Обратите особое внимание на технические данные, связанные с
эксплуатационными характеристиками изделия (Раздел «Технические Характеристики») и указания
по установке. Особое внимание обратите на конфигурации микропереключателей и технические
характеристики».
2. ЗНАК СЕ И ТАБЛИЦА С ТЕХНИЧЕСКИМИ
ХАРАКТЕРИСТИКАМИ
Наличие знака СЕ является подтверждением того, что продукция соответствует требованиям
безопасности, изложенным в директивах Европейского Сообщества. Знак СЕ наносится с наружной
стороны. На нём отображаются некоторые технические характеристики изделия, в том числе и те,
которые перечисляются в таблице ниже.
R6-CONTROL
MX00 AT 01N 0G 00
MX00 AT 02N 0G 00
2 литиевые батарейки, 3В,
CR2032
2 литиевые батарейки, 3В,
CR2032
Частота
434,15 МГц
434,15 МГц
Каналы
1
6
До 300 метров
До 300 метров
25 мА
25 мА
120 х 52 х 19 мм
120 х 52 х 19 мм
40гр.
40гр.
Источник питания
Дальность действия в
открытом пространстве
Максимальное потребление
тока при передаче
Габаритные размеры
Вес
Italian Movements
35
РУССКИЙ
R1-CONTROL
3. ПЕРЕДАЮЩЕЕ УСТРОЙСТВО
ДИСТАНЦИОННОГО УПРАВЛЕНИЯ R1 – CONTROL
Передающие устройство R1 – Control позволяют осуществлять дистанционное управление
автоматикой.
3.1 Функциональное назначение кнопок UP, DOWN, STOP
UP открыть
DOWN закрыть
STOP стоп
3.2 Функциональное назначение кнопки PROG и микропереключателей
При помощи кнопки PROG и микропереключателей осуществляется перепрограммирование
функций управления, выполненное на заводе-изготовителе.
36
Italian Movements
4. ПЕРЕДАЮЩЕЕ УСТРОЙСТВО
ДИСТАНЦИОННОГО УПРАВЛЕНИЯ R6 – CONTROL
4.1 Функциональное назначение кнопок UP, DOWN, STOP
UP открыть
DOWN закрыть
STOP стоп
4.2 Функциональное назначение кнопки SELC
С помощью данной кнопки выполняется выбор канала для передачи команд управления.
1. Нажимайте кнопку SELC до тех пор, пока не выберете нужный Вам канал. В течение нескольких
секунд будет гореть соответствующий светодиодный индикатор.
2. Для передачи команды управления системой нажмите одну из кнопок UP, DOWN, STOP.
Для выбора всех каналов одновременно нажимайте кнопку SELC несколько раз, пока не загорятся
все индикаторы.
Если групп несколько, выбор нужной группы осуществляется следующим образом:
1. Нажимайте кнопку SELG до выбора нужной Вам группы:
светодиодные индикаторы каналов будут гореть в течение нескольких секунд.
2. Для передачи команды управления нажмите одну из кнопок UP, DOWN, STOP.
Italian Movements
37
РУССКИЙ
4.3 Функциональное назначение кнопки SELG
Данная кнопка позволяет осуществлять программирование и выбор групп каналов, используемых
для одновременной передачи команд управления. Память устройства позволяет сохранять до
8 групп каналов. Когда количество сохранённых групп достигает 8, вновь созданная группа
автоматически заменяет первую из сохранённых групп.
1. Нажмите кнопку SELC для выбора первого канала, подключаемого к группе.
2. Нажмите кнопку SELG: индикатор выбранного канала начинает мигать.
3. Нажмите кнопку SELC для выбора второго канала, подключаемого к группе.
4. Нажмите кнопку SELG: индикатор выбранного канала начинает мигать.
5. Повторите данную процедуру для выбора нужного количества каналов, светодиодные индикаторы
будут гореть до её окончания.
6. По окончании выбора всех каналов подождите, пока индикаторы погаснут. Это означает, что
группа сохранена.
Для удаления всех групп выполните следующие действия:
1. Нажмите и отпустите кнопку SELG: загорятся индикаторы последней из использованных групп.
2. Перед тем, как все индикаторы погаснут, одновременно нажмите и удерживайте кнопки SELC и SELG.
3. Через несколько секунд индикаторы погаснут. Все группы удалены.
4.4 Функциональное назначение кнопки PROG и микропереключателей
При помощи кнопки PROG и микропереключателей осуществляется программирование функций
управления, выполненное на заводе-изготовителе.
5. ЗАМЕНА БАТАРЕЙ
Замена батарей необходима при значительном ослаблении мощности и интенсивности сигнала
светодиодных индикаторов. Откройте отсек для батарей, извлеките старые батарейки и замените
их новыми, в обязательном порядке соблюдая полярность, как показано на рисунке 2.
6. ОХРАНА ОКРУЖАЮЩЕЙ СРЕДЫ
В состав батарей входят загрязняющие окружающую среду компоненты – их утилизация должна
осуществляться надлежащим образом, в соответствии с действующими экологическими нормами
(компания Фрателли Комунелло С.п.А. рекомендует сдавать их в специальные приёмные пункты).
Передающее устройство также содержит компоненты, представляющие угрозу для окружающей
среды. Утилизация должна выполняться таким же образом.
В случае вытекания электролита из батарей замените их немедленно, старайтесь проявить
максимальную осторожность и избежать контакта с этим веществом.
38
Italian Movements
7. ГАРАНТИЯ
Надлежащая работа передающего устройства гарантирована производителем данного изделия.
Производитель обязуется осуществить замену дефектных компонентов, если эти дефекты возникли
при производстве привода. Гарантия распространяется на изделие, его компоненты и действует в
течение 36 месяцев.
Гарантия надлежащей работы передающего устройства, предоставляемая производителем,
означает, что производитель данного изделия берёт на себя обязательства выполнить бесплатный
ремонт или заменить в кратчайшие сроки компоненты, содержащие конструктивные дефекты или
дефекты материалов, обнаруженные в течение гарантийного срока.
Покупатель не вправе требовать компенсацию за прямой или косвенный ущерб, а также выплаты
прочих расходов.
Гарантия не распространяется на хрупкие и быстроизнашивающиеся компоненты, детали,
подвергающиеся воздействию веществ, вызывающих коррозию, перегрузке, компоненты с
естественным износом и т. д.
Производитель не несёт ответственности за повреждения, возникшие в результате некорректной
сборки, ненадлежащего монтажа, неправильной эксплуатации, избыточной нагрузки. По этой
причине мы рекомендуем осуществлять проверку работоспособности изделия не реже одного раза
каждые шесть месяцев.
Производитель отменяет действие предоставляемой им гарантии при некорректном обращении с
изделием, в случае демонтажа изделия, отсутствии ярлыка, наличии внешних воздействий.
Гарантия автоматически аннулируется, если ремонт изделия осуществлялся частными лицами или
организациями, не уполномоченными производителем изделия.
Ремонт по гарантии осуществляется в Сервисном центре производителя. Транспортные расходы
(доставка до дверей СЦ и вывоз изделия с территории СЦ) оплачивает покупатель
Italian Movements
39
РУССКИЙ
8. СООТВЕТСТВИЕ ДИРЕКТИВЕ ЕВРОПЕЙСКОГО
СООБЩЕСТВА
Notes
Notes
Notes
Notes
Notes
Notes
FRAME AUTOMATION
R-CONTROL
code: 91300105 / VS. 00 / Print 02-2011
Italian Movements
Fratelli Comunello S.p.A.,
Via Cassola, 64 - 36027 Rosà (Vicenza), Italy.
Tel. +39-0424.585.111 - Fax +39-0424.533.417
www.comunello.com/mowin
Italian Movements
Scaricare