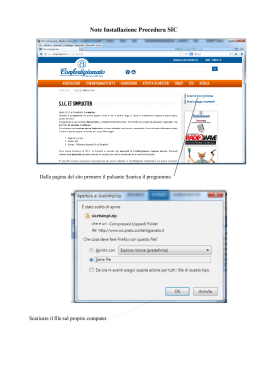
Pannelli di comando e visualizzazione MITHO IT Command and display panels MITHO EN Mitho PL KNX Manuale per l’Utente User’s Manual MithoKNX_Ute IT 24807970 13-01-14 Mitho HA KNX Mitho IT 2 Mitho INDICE INDICE . . . . . . . . . . . . . . . . . . . . . . . . . . . . . . . . . . . . . . . . . . . . . . . . . . . . . . . . . . . . . . . . . . . . . . . . . . . . . . . . . . . . . . . . Pag. 3 INFORMAZIONI GENERALI . . . . . . . . . . . . . . . . . . . . . . . . . . . . . . . . . . . . . . . . . . . . . . . . . . . . . . . . . . . . . . Pag. 6 6 6 7 7 8 8 9 Mitho PL KNX: caratteristiche tecniche . . . . . . . . . . . . . . . . . . . . . . . . . . . . . . . . . . . . . . . . . . . . . . . . . . . . . . . . . . . . . . Manutenzione ed utilizzo del Pannello . . . . . . . . . . . . . . . . . . . . . . . . . . . . . . . . . . . . . . . . . . . . . . . . . . . . . . . . . . . . . . Principali funzioni associate alle icone della schermata principale . . . . . . . . . . . . . . . . . . . . . . . . . . . . . . . . . Menù principale per impianti senza Centralino di Portineria . . . . . . . . . . . . . . . . . . . . . . . . . . . . . . . . . . . . . . . . . Mitho HA KNX: caratteristiche tecniche . . . . . . . . . . . . . . . . . . . . . . . . . . . . . . . . . . . . . . . . . . . . . . . . . . . . . . . . . . . . . Manutenzione ed utilizzo del Pannello . . . . . . . . . . . . . . . . . . . . . . . . . . . . . . . . . . . . . . . . . . . . . . . . . . . . . . . . . . . . . . Principali funzioni associate alle icone della schermata principale . . . . . . . . . . . . . . . . . . . . . . . . . . . . . . . . . IL MENÙ AMBIENTI . . . . . . . . . . . . . . . . . . . . . . . . . . . . . . . . . . . . . . . . . . . . . . . . . . . . . . . . . . . . . . . . . . . . . . . . Pag. Navigazione all’interno del menù “Ambienti” . . . . . . . . . . . . . . . . . . . . . . . . . . . . . . . . . . . . . . . . . . . . . . . . . . . . . . . Inviare comandi a tutti i dispositivi di uno o più “Ambienti” di una “Zona” . . . . . . . . . . . . . . . . . . . . . . . . . Comandi generali con filtro “Tapparelle” attivo . . . . . . . . . . . . . . . . . . . . . . . . . . . . . . . . . . . . . . . . . . . . . . . . . . . . . . . Comandi generali con filtro “Illuminazione” attivo . . . . . . . . . . . . . . . . . . . . . . . . . . . . . . . . . . . . . . . . . . . . . . . . . . . Comandi generali con filtro “Termoregolazione” attivo . . . . . . . . . . . . . . . . . . . . . . . . . . . . . . . . . . . . . . . . . . . . . . . Comandi generali con filtro “Attuatori ON/OFF” attivo . . . . . . . . . . . . . . . . . . . . . . . . . . . . . . . . . . . . . . . . . . . . . . . Controllo “Tapparelle” / “Veneziane” . . . . . . . . . . . . . . . . . . . . . . . . . . . . . . . . . . . . . . . . . . . . . . . . . . . . . . . . . . . . . . . . Forzatura di una tapparella o veneziana . . . . . . . . . . . . . . . . . . . . . . . . . . . . . . . . . . . . . . . . . . . . . . . . . . . . . . . . . . . . . Blocco di una tapparella o veneziana . . . . . . . . . . . . . . . . . . . . . . . . . . . . . . . . . . . . . . . . . . . . . . . . . . . . . . . . . . . . . . . . Controllo “Illuminazione” . . . . . . . . . . . . . . . . . . . . . . . . . . . . . . . . . . . . . . . . . . . . . . . . . . . . . . . . . . . . . . . . . . . . . . . . . . . . Opzioni di regolazione possibili per luci ON/OFF e luci dimmerate . . . . . . . . . . . . . . . . . . . . . . . . . . . . . . . . . . . Forzatura di un punto luce . . . . . . . . . . . . . . . . . . . . . . . . . . . . . . . . . . . . . . . . . . . . . . . . . . . . . . . . . . . . . . . . . . . . . . . . . . . Blocco di un punto luce . . . . . . . . . . . . . . . . . . . . . . . . . . . . . . . . . . . . . . . . . . . . . . . . . . . . . . . . . . . . . . . . . . . . . . . . . . . . . Opzioni possibili per luci RGB . . . . . . . . . . . . . . . . . . . . . . . . . . . . . . . . . . . . . . . . . . . . . . . . . . . . . . . . . . . . . . . . . . . . . . . . Controllo “Termoregolazione” . . . . . . . . . . . . . . . . . . . . . . . . . . . . . . . . . . . . . . . . . . . . . . . . . . . . . . . . . . . . . . . . . . . . . . . Profilo orario per cronotermostato (funzione svolta dal pannello) . . . . . . . . . . . . . . . . . . . . . . . . . . . . . . . . . . . Forzare il setpoint della temperatura impostata o la velocità delle ventole dei ventilconvettori con profilo attivo . . . . . . . . . . . . . . . . . . . . . . . . . . . . . . . . . . . . . . . . . . . . . . . . . . . . . . . . . . . . . Profilo orario per HVAC Master con controllo attraverso modalità . . . . . . . . . . . . . . . . . . . . . . . . . . . . . . . . . . . Profilo orario per HVAC Master con controllo attraverso set-point di temperatura . . . . . . . . . . . . . . . . . . . Creare un profilo di temperature giornaliero (valido per tutti i tipi di controllo) . . . . . . . . . . . . . . . . . . . . . . Copiare un profilo temperature in altri giorni della settimana (valido per tutti i tipi di controllo) . . . . . . . . . . . . . . . . . . . . . . . . . . . . . . . . . . . . . . . . . . . . . . . . . . . . . . . . . . . . . . . . . . Cronotermostato con profilo non attivo . . . . . . . . . . . . . . . . . . . . . . . . . . . . . . . . . . . . . . . . . . . . . . . . . . . . . . . . . . . . . HVAC Master con controllo modalità e profilo non attivo . . . . . . . . . . . . . . . . . . . . . . . . . . . . . . . . . . . . . . . . . . . . Set parametri (Cronotermostato) . . . . . . . . . . . . . . . . . . . . . . . . . . . . . . . . . . . . . . . . . . . . . . . . . . . . . . . . . . . . . . . . . . . . HVAC Master con controllo set-point e profilo non attivo . . . . . . . . . . . . . . . . . . . . . . . . . . . . . . . . . . . . . . . . . . . . Regolazione temperature di riferimento (Comfort, Stand-by, Eco) . . . . . . . . . . . . . . . . . . . . . . . . . . . . . . . . . . . Regolazione temperatura antigelo . . . . . . . . . . . . . . . . . . . . . . . . . . . . . . . . . . . . . . . . . . . . . . . . . . . . . . . . . . . . . . . . . . Altre voci di setup termico in impianti con controllo a due punti con ventilconvettori . . . . . . . . . . . . . . . Altre voci di setup termico in impianti con controllo PI senza ventilconvettori . . . . . . . . . . . . . . . . . . . . . . . Set parametri (HVAC Master con controllo modalità) . . . . . . . . . . . . . . . . . . . . . . . . . . . . . . . . . . . . . . . . . . . . . . . Set parametri (HVAC Master con controllo set point) . . . . . . . . . . . . . . . . . . . . . . . . . . . . . . . . . . . . . . . . . . . . . . . Regolazione parametri di funzionamento e unità di misura temperatura . . . . . . . . . . . . . . . . . . . . . . . . . . . . 3 10 10 12 12 12 13 14 15 16 16 17 17 17 18 18 19 20 20 21 21 22 22 23 23 24 24 24 24 25 25 26 26 26 IT Mitho INDICE IT Regolazione temperature di riferimento (profilo setpoint) . . . . . . . . . . . . . . . . . . . . . . . . . . . . . . . . . . . . . . . . . . . Controllo “Attuatori ON/OFF” . . . . . . . . . . . . . . . . . . . . . . . . . . . . . . . . . . . . . . . . . . . . . . . . . . . . . . . . . . . . . . . . . . . . . . . . Forzatura dello stato di un attuatore . . . . . . . . . . . . . . . . . . . . . . . . . . . . . . . . . . . . . . . . . . . . . . . . . . . . . . . . . . . . . . . . . Blocco dello stato di un attuatore . . . . . . . . . . . . . . . . . . . . . . . . . . . . . . . . . . . . . . . . . . . . . . . . . . . . . . . . . . . . . . . . . . . . Visualizzazione stato degli “Ingressi” . . . . . . . . . . . . . . . . . . . . . . . . . . . . . . . . . . . . . . . . . . . . . . . . . . . . . . . . . . . . . . . Controllo delle “Uscite” . . . . . . . . . . . . . . . . . . . . . . . . . . . . . . . . . . . . . . . . . . . . . . . . . . . . . . . . . . . . . . . . . . . . . . . . . . . . . . 26 27 27 27 28 28 IL MENÙ FUNZIONI . . . . . . . . . . . . . . . . . . . . . . . . . . . . . . . . . . . . . . . . . . . . . . . . . . . . . . . . . . . . . . . . . . . . . . . . Pag. Eseguire e memorizzare “Scenari KNX” . . . . . . . . . . . . . . . . . . . . . . . . . . . . . . . . . . . . . . . . . . . . . . . . . . . . . . . . . . . . . . Gestione Antifurto . . . . . . . . . . . . . . . . . . . . . . . . . . . . . . . . . . . . . . . . . . . . . . . . . . . . . . . . . . . . . . . . . . . . . . . . . . . . . . . . . . . Inserimento/disinserimento di tutte le aree . . . . . . . . . . . . . . . . . . . . . . . . . . . . . . . . . . . . . . . . . . . . . . . . . . . . . . . . . . Inserimento parziale delle aree . . . . . . . . . . . . . . . . . . . . . . . . . . . . . . . . . . . . . . . . . . . . . . . . . . . . . . . . . . . . . . . . . . . . . . Gestione dell’impianto di irrigazione . . . . . . . . . . . . . . . . . . . . . . . . . . . . . . . . . . . . . . . . . . . . . . . . . . . . . . . . . . . . . . . Creare/modificare un nuovo Ciclo di irrigazione . . . . . . . . . . . . . . . . . . . . . . . . . . . . . . . . . . . . . . . . . . . . . . . . . . . . . Impostare l’ora e i giorni di attivazione di uno scenario irrigazione . . . . . . . . . . . . . . . . . . . . . . . . . . . . . . . . . . . Attivazione forzata di un ciclo di irrigazione . . . . . . . . . . . . . . . . . . . . . . . . . . . . . . . . . . . . . . . . . . . . . . . . . . . . . . . . . Variazione della percentuale di irrigazione stagionale . . . . . . . . . . . . . . . . . . . . . . . . . . . . . . . . . . . . . . . . . . . . . . . Aggiungere/Programmare i singoli irrigatori . . . . . . . . . . . . . . . . . . . . . . . . . . . . . . . . . . . . . . . . . . . . . . . . . . . . . . . . Dati Energia . . . . . . . . . . . . . . . . . . . . . . . . . . . . . . . . . . . . . . . . . . . . . . . . . . . . . . . . . . . . . . . . . . . . . . . . . . . . . . . . . . . . . . . . . . Consultazione statistiche consumi elettrici . . . . . . . . . . . . . . . . . . . . . . . . . . . . . . . . . . . . . . . . . . . . . . . . . . . . . . . . . . Setup dati energia elettrica . . . . . . . . . . . . . . . . . . . . . . . . . . . . . . . . . . . . . . . . . . . . . . . . . . . . . . . . . . . . . . . . . . . . . . . . . . Consultazione statistiche consumi gas . . . . . . . . . . . . . . . . . . . . . . . . . . . . . . . . . . . . . . . . . . . . . . . . . . . . . . . . . . . . . . Consultazione statistiche consumi acqua . . . . . . . . . . . . . . . . . . . . . . . . . . . . . . . . . . . . . . . . . . . . . . . . . . . . . . . . . . . . Controllo carichi . . . . . . . . . . . . . . . . . . . . . . . . . . . . . . . . . . . . . . . . . . . . . . . . . . . . . . . . . . . . . . . . . . . . . . . . . . . . . . . . . . . . . Sezione “Profilo potenza” . . . . . . . . . . . . . . . . . . . . . . . . . . . . . . . . . . . . . . . . . . . . . . . . . . . . . . . . . . . . . . . . . . . . . . . . . . . . Impostazione parametri “Profilo potenza” . . . . . . . . . . . . . . . . . . . . . . . . . . . . . . . . . . . . . . . . . . . . . . . . . . . . . . . . . . . Sezione “Gestione carichi” . . . . . . . . . . . . . . . . . . . . . . . . . . . . . . . . . . . . . . . . . . . . . . . . . . . . . . . . . . . . . . . . . . . . . . . . . . . “Malfunzionamenti/Allarmi” . . . . . . . . . . . . . . . . . . . . . . . . . . . . . . . . . . . . . . . . . . . . . . . . . . . . . . . . . . . . . . . . . . . . . . . . Aggiungere un nuovo “Allarme” . . . . . . . . . . . . . . . . . . . . . . . . . . . . . . . . . . . . . . . . . . . . . . . . . . . . . . . . . . . . . . . . . . . . . 30 30 31 31 31 32 32 33 33 33 33 35 35 36 37 38 39 39 40 40 43 43 IL MENÙ PROGRAMMI . . . . . . . . . . . . . . . . . . . . . . . . . . . . . . . . . . . . . . . . . . . . . . . . . . . . . . . . . . . . . . . . . . . . Pag. Creare e gestire “Timer” . . . . . . . . . . . . . . . . . . . . . . . . . . . . . . . . . . . . . . . . . . . . . . . . . . . . . . . . . . . . . . . . . . . . . . . . . . . . . . Aggiungere un nuovo “Timer” . . . . . . . . . . . . . . . . . . . . . . . . . . . . . . . . . . . . . . . . . . . . . . . . . . . . . . . . . . . . . . . . . . . . . . . Setup parametri “Timer” . . . . . . . . . . . . . . . . . . . . . . . . . . . . . . . . . . . . . . . . . . . . . . . . . . . . . . . . . . . . . . . . . . . . . . . . . . . . . Creare e gestire “Scenari sequenza” . . . . . . . . . . . . . . . . . . . . . . . . . . . . . . . . . . . . . . . . . . . . . . . . . . . . . . . . . . . . . . . . . Aggiungere un nuovo “Scenario sequenza” . . . . . . . . . . . . . . . . . . . . . . . . . . . . . . . . . . . . . . . . . . . . . . . . . . . . . . . . . . “Logiche” . . . . . . . . . . . . . . . . . . . . . . . . . . . . . . . . . . . . . . . . . . . . . . . . . . . . . . . . . . . . . . . . . . . . . . . . . . . . . . . . . . . . . . . . . . . . . Programmare la “Sveglia” . . . . . . . . . . . . . . . . . . . . . . . . . . . . . . . . . . . . . . . . . . . . . . . . . . . . . . . . . . . . . . . . . . . . . . . . . . . . Programmare il “Salva schermo” . . . . . . . . . . . . . . . . . . . . . . . . . . . . . . . . . . . . . . . . . . . . . . . . . . . . . . . . . . . . . . . . . . . . Registrare e ascoltare “Messaggi audio” (Solo Mitho PL KNX) . . . . . . . . . . . . . . . . . . . . . . . . . . . . . . . . . . . . . . Registrare un messaggio audio . . . . . . . . . . . . . . . . . . . . . . . . . . . . . . . . . . . . . . . . . . . . . . . . . . . . . . . . . . . . . . . . . . . . . . 44 44 44 46 47 47 49 50 50 51 51 IL MENÙ CITOFONIA (SOLO PER PANNELLI MITHO PL KNX) . . . . . . . . . . . . . . . . . . . . . . . . . . Pag. Funzioni base . . . . . . . . . . . . . . . . . . . . . . . . . . . . . . . . . . . . . . . . . . . . . . . . . . . . . . . . . . . . . . . . . . . . . . . . . . . . . . . . . . . . . . . . Rispondere ad una chiamata . . . . . . . . . . . . . . . . . . . . . . . . . . . . . . . . . . . . . . . . . . . . . . . . . . . . . . . . . . . . . . . . . . . . . . . . Trasferire una chiamata verso altri interni . . . . . . . . . . . . . . . . . . . . . . . . . . . . . . . . . . . . . . . . . . . . . . . . . . . . . . . . . . . . 52 52 52 53 4 Mitho INDICE Ricevere una chiamata da altri interni (intercomunicazione) . . . . . . . . . . . . . . . . . . . . . . . . . . . . . . . . . . . . . . . . . Effettuare una chiamata verso altri interni (intercomunicazione) . . . . . . . . . . . . . . . . . . . . . . . . . . . . . . . . . . . . . Assegnare un nome ad un interno . . . . . . . . . . . . . . . . . . . . . . . . . . . . . . . . . . . . . . . . . . . . . . . . . . . . . . . . . . . . . . . . . . . Elenco chiamate da portiere . . . . . . . . . . . . . . . . . . . . . . . . . . . . . . . . . . . . . . . . . . . . . . . . . . . . . . . . . . . . . . . . . . . . . . . . . Visualizzare immagini da posti esterni . . . . . . . . . . . . . . . . . . . . . . . . . . . . . . . . . . . . . . . . . . . . . . . . . . . . . . . . . . . . . . . La segreteria videocitofonica . . . . . . . . . . . . . . . . . . . . . . . . . . . . . . . . . . . . . . . . . . . . . . . . . . . . . . . . . . . . . . . . . . . . . . . . Registrare un messaggio di segreteria . . . . . . . . . . . . . . . . . . . . . . . . . . . . . . . . . . . . . . . . . . . . . . . . . . . . . . . . . . . . . . . Consultare la segreteria videocitofonica . . . . . . . . . . . . . . . . . . . . . . . . . . . . . . . . . . . . . . . . . . . . . . . . . . . . . . . . . . . . . Funzione ufficio . . . . . . . . . . . . . . . . . . . . . . . . . . . . . . . . . . . . . . . . . . . . . . . . . . . . . . . . . . . . . . . . . . . . . . . . . . . . . . . . . . . . . 53 53 54 55 55 56 56 57 58 IL MENÙ SETUP . . . . . . . . . . . . . . . . . . . . . . . . . . . . . . . . . . . . . . . . . . . . . . . . . . . . . . . . . . . . . . . . . . . . . . . . . . . . . Pag. Melodie . . . . . . . . . . . . . . . . . . . . . . . . . . . . . . . . . . . . . . . . . . . . . . . . . . . . . . . . . . . . . . . . . . . . . . . . . . . . . . . . . . . . . . . . . . . . . . . Scegliere una melodia per le chiamate . . . . . . . . . . . . . . . . . . . . . . . . . . . . . . . . . . . . . . . . . . . . . . . . . . . . . . . . . . . . . . Data/Ora . . . . . . . . . . . . . . . . . . . . . . . . . . . . . . . . . . . . . . . . . . . . . . . . . . . . . . . . . . . . . . . . . . . . . . . . . . . . . . . . . . . . . . . . . . . . . Regolare le caratteristiche dei segnali acustici . . . . . . . . . . . . . . . . . . . . . . . . . . . . . . . . . . . . . . . . . . . . . . . . . . . . . . . Risposta segreteria (solo su pannelli MITHO PL KNX) . . . . . . . . . . . . . . . . . . . . . . . . . . . . . . . . . . . . . . . . . . . . . . . Generale . . . . . . . . . . . . . . . . . . . . . . . . . . . . . . . . . . . . . . . . . . . . . . . . . . . . . . . . . . . . . . . . . . . . . . . . . . . . . . . . . . . . . . . . . . . . . . Scelta lingua pannello . . . . . . . . . . . . . . . . . . . . . . . . . . . . . . . . . . . . . . . . . . . . . . . . . . . . . . . . . . . . . . . . . . . . . . . . . . . . . . . Gestione password . . . . . . . . . . . . . . . . . . . . . . . . . . . . . . . . . . . . . . . . . . . . . . . . . . . . . . . . . . . . . . . . . . . . . . . . . . . . . . . . . . Salvataggio/recupero copia impianto . . . . . . . . . . . . . . . . . . . . . . . . . . . . . . . . . . . . . . . . . . . . . . . . . . . . . . . . . . . . . . . Setup “Preferiti” . . . . . . . . . . . . . . . . . . . . . . . . . . . . . . . . . . . . . . . . . . . . . . . . . . . . . . . . . . . . . . . . . . . . . . . . . . . . . . . . . . . . . Setup “Scenari preferiti” (solo Mitho HA KNX) . . . . . . . . . . . . . . . . . . . . . . . . . . . . . . . . . . . . . . . . . . . . . . . . . . . . . . . . Display . . . . . . . . . . . . . . . . . . . . . . . . . . . . . . . . . . . . . . . . . . . . . . . . . . . . . . . . . . . . . . . . . . . . . . . . . . . . . . . . . . . . . . . . . . . . . . . Citofonia (Solo su pannelli Mitho PL KNX) . . . . . . . . . . . . . . . . . . . . . . . . . . . . . . . . . . . . . . . . . . . . . . . . . . . . . . . . . . Info Pannello . . . . . . . . . . . . . . . . . . . . . . . . . . . . . . . . . . . . . . . . . . . . . . . . . . . . . . . . . . . . . . . . . . . . . . . . . . . . . . . . . . . . . . . . . Reset dispositivo . . . . . . . . . . . . . . . . . . . . . . . . . . . . . . . . . . . . . . . . . . . . . . . . . . . . . . . . . . . . . . . . . . . . . . . . . . . . . . . . . . . . 59 59 59 60 60 60 61 61 61 62 62 62 63 63 64 64 5 IT Mitho INFORMAZIONI GENERALI Mitho PL KNX: caratteristiche tecniche 5 IT 1 2 3 4 1 – Altoparlante (vivavoce) 2 – Cornetta 3 – Microfono 4 – Display 16:9 touch screen 4,3” 5 – Alloggiamento penna per touch screen Manutenzione ed utilizzo del Pannello •Utilizzare il Pannello solo con la penna in dotazione; non utilizzare utensili, penne o altri strumenti appuntiti che potrebbero danneggiare il display e comprometterne il funzionamento. •Non esporre lo schermo LCD alla luce diretta del sole. •Per la pulizia utilizzare solo panni morbidi ed asciutti oppure leggermente inumiditi con acqua; non utilizzare alcun tipo di prodotto chimico. NOTA IMPORTANTE! La presenza o meno di alcune schermate o funzionalità illustrate nel presente manuale sono subordinate al tipo di impianto. 6 Mitho INFORMAZIONI GENERALI Principali funzioni associate alle icone della schermata principale La schermata principale permette di accedere rapidamente ed in maniera intuitiva a tutte le funzioni gestibili dal pannello e di avere un immediato feedback degli eventi che interessano il sistema. Menù principale per impianti senza Centralino di Portineria Blocco touch screen per pulizia schermo (30 s) Attivazione sveglia Sveglia attiva Sveglia non attiva Assenza linea BUS Ambienti Citofonia Funzioni Preferiti Programmi Setup Accesso alla schermata che permette di navigare tra le “Zone”, i relativi “Ambienti” e le “Funzioni” Luce scale Comando ausiliario Accesso alle “Funzioni” non associate ad un particolare ambiente: “Scenari KNX”, Antifurto, “Irrigazione”, Dati energia”, Controllo carichi” e “Allarmi”. Accesso alla programmazione di “Timer”, “Scenari sequenza”, “Logiche”, “Messaggi audio”, “Screen Saver” e “Sveglia”. Accesso alle funzioni Videocitofoniche L’icona lampeggiante indica la presenza di messaggi dal portiere o videocitofonici non letti In presenza di un centralino di portineria (funzione Building attiva), l’icona diventa Chiamata al Portiere Apriporta Attivazione telecamera del posto esterno videocitofonico Se è presente l’icona e il nome “Preferiti”, significa che non è stato ancora associato alcun elemento a questo pulsante; in questo caso, premendo su di esso, viene caricata la pagina del menu “Setup” relativa alla selezione della funzione “Preferiti”. Una volta definita una determinata funzione come “Preferita”, nella Home Page l’icona e il nome della funzione si aggiornano di conseguenza (il colore del pulsante rimane lo stesso). Tramite il menu “Setup” è sempre possibile modificare la funzione definita come “Preferita”. Esclusione suoneria (Privacy) Premere il pulsante per attivare/ disattivare la suoneria. Il pulsante giallo indica che la funzione è attiva Segreteria videocitofonica Premere il pulsante per attivare/ disattivare la segreteria. Il pulsante giallo indica che la segreteria è attiva Accesso alle Impostazioni generali del pannello Nota: Dopo 5 minuti di permanenza inattiva in una qualunque schermata il pannello ritornerà automaticamente alla schermata di apertura con luminosità dello schermo attenuata (secondo impostazioni di setup) o allo screensaver (se attivato). 7 IT Mitho INFORMAZIONI GENERALI Mitho HA KNX: caratteristiche tecniche IT Mitho HA KNX è l’innovativo pannello multifunzione a colori touch screen, pensato per la gestione e il controllo dell’impianto domotico. 2 1 1 – Display 16:9 touch screen 4,3” 2 – Alloggiamento penna per touch screen Manutenzione ed utilizzo del Pannello •Utilizzare il pannello solo con la penna in dotazione; non utilizzare utensili, penne o altri strumenti appuntiti che potrebbero danneggiare il display e comprometterne il funzionamento. •Non esporre lo schermo LCD alla luce diretta del sole. •Per la pulizia utilizzare solo panni morbidi ed asciutti oppure leggermente inumiditi con acqua; non utilizzare alcun tipo di prodotto chimico. NOTA IMPORTANTE! La presenza o meno di alcune schermate o funzionalità illustrate nel presente manuale sono subordinate al tipo di impianto. 8 Mitho INFORMAZIONI GENERALI Principali funzioni associate alle icone della schermata principale La schermata principale permette di accedere rapidamente ed in maniera intuitiva a tutte le funzioni gestibili dal pannello e di avere un immediato feedback degli eventi che interessano il sistema. Blocco touch screen per pulizia schermo (30 s) Attivazione sveglia Sveglia attiva Sveglia non attiva Assenza linea BUS Ambienti Preferito 1 Funzioni Preferito 2 Programmi Setup Accesso alla schermata che permette di navigare tra le “Zone”, i relativi “Ambienti” e le “Funzioni” Se è presente l’icona e il nome “Preferito”, significa che non è stato ancora associato alcun elemento a questo pulsante; in questo caso, premendo su di esso, viene caricata la pagina del menu “Setup” relativa alla selezione della funzione “Preferiti”. Una volta definita una determinata funzione come “Preferita”, nella Home Page l’icona e il nome della funzione si aggiornano di conseguenza (il colore del pulsante rimane lo stesso). Tramite il menu “Setup” è sempre possibile modificare la funzione definita come “Preferita”. Accesso alle “Funzioni” non associate ad un particolare ambiente: “Scenari KNX”, Antifurto, “Irrigazione”, Dati energia”, Controllo carichi” e “Allarmi”. Accesso alla programmazione di “Timer”, “Scenari sequenza”, “Logiche”, “Messaggi audio”, “Screen Saver” e “Sveglia”. Nella parte centrale della Home page possono essere attivati fino a tre Scenari KNX o Scenari sequenza. Per poter attivare tali funzionalità, è necessario accedere alle relative voci del menu “Setup”. Accesso alle Impostazioni generali del pannello Nota: Dopo 5 minuti di permanenza inattiva in una qualunque schermata il pannello ritornerà automaticamente alla schermata di apertura con luminosità dello schermo attenuata (secondo impostazioni di setup) o allo screensaver (se attivato). 9 IT Mitho IL MENÙ AMBIENTI Navigazione all’interno del menù “Ambienti” Dalla pagina principale selezionando il pulsante “Ambienti” si accede alla schermata che permette di visualizzare le “Zone” e gli “Ambienti” che compongono l’impianto domotico. IT Ambienti Citofonia Funzioni Preferiti Programmi Zona: Ambiente: Setup Per “Zona” generalmente si intende un raggruppamento di “Ambienti” (per esempio primo piano, zona giorno, giardino, zona relax ecc...) Per “Ambiente” generalmente si intende una stanza o un’area specifica dell’abitazione (per esempio ingresso, piscina, vialetto ecc...) Nota: I nomi delle zone e degli ambienti vengono assegnati solo durante le fasi di configurazione del pannello (con ETS o con Easy controller), non sono quindi modificabili dall’utente. “Zona” visualizzata Visualizza “Zona” precedente Visualizza “Zona” successiva Ritorno alla schermata precedente Ritorno al menù principale Piano Terra Attivazione filtro “Tapparelle” Ingresso Salotto Attivazione filtro “Attuatori ON/OFF” Attivazione filtro “Illuminazione” Bagno Cucina Attivazione filtro “Ingressi” Attivazione filtro “Termoregolazione” Lavanderia Veranda Attivazione filtro “Uscite” Elenco degli “Ambienti” appartenenti alla “Zona” visualizzata, i pulsanti permettono di scorrere gli “Ambienti” disponibili. Le icone poste ai lati della schermata fungono da filtro di visualizzazione. Selezionando una delle icone laterali, vengono mostrati solo gli “Ambienti” che contengono automazioni appartenenti alla categoria selezionata. Se nella “Zona” selezionata non esistono elementi che appartengono alla categoria selezionata, viene visualizzata una lista vuota. Deselezionando l’icona si visualizzano nuovamente tutti gli “Ambienti” associati alla “Zona”. Piano Terra Bagno Cucina Lavanderia 10 Mitho IL MENÙ AMBIENTI Selezionando uno degli “Ambienti” disponibili senza alcun filtro attivo, viene visualizzato l’elenco dei dispositivi controllabili contenuti all’interno dell’”Ambiente” . Piano Terra Ingresso Salotto Bagno Cucina Lavanderia Veranda I pulsanti permettono di scorrere l’elenco dei dispositivi. La fascia superiore indica quale “Zona” e relativo “Ambiente” è visualizzato. Piano Terra Ingresso Luce Ingresso 1 Luce Ingresso 2 0% 0% Tapparella 1 Tapparella 2 0% 0% Luce Esterna Convert 0% Cooling Nota: Il nome dell’”Ambiente” o della “Zona” è selezionato quando è di colore verde. Con “Zona” selezionata Per cambiare “Zona” premere sulle frecce laterali. Con “Ambiente” selezionato Per cambiare “Ambiente” premere sulle frecce laterali. Zona Zona Ambiente Ambiente Selezionando una delle icone laterali (filtri), vengono mostrati solo i dispositivi controllati appartenenti alla categoria selezionata. Piano Terra Ingresso Luce Ingresso 1 Luce Ingresso 2 0% 0% Nota: Se nell’ambiente non ci sono elementi appartenenti alla categoria selezionata, la lista risulterà vuota. Premere i pulsanti per cercare in altri “Ambienti” dispositivi controllabili appartenenti alla categoria selezionata. Luce Esterna 0% 11 IT Mitho IL MENÙ AMBIENTI Inviare comandi a tutti i dispositivi di uno o più “Ambienti” di una “Zona” Dalla pagina principale selezionare il pulsante “Ambienti”. IT Ambienti Citofonia Funzioni Preferiti Programmi Setup Selezionare uno dei filtri che consentono di visualizzare i dispositivi ai quali è consentito inviare comandi generali, che sono: Piano Terra Ingresso Salotto Bagno Cucina Lavanderia Veranda “Tapparelle” “Illuminazione” “Termoregolazione” “Attuatori ON/OFF”. Comandi generali con filtro “Tapparelle” attivo Piano Terra Bagno Premere il pulsante (selezione multipla) e selezionare il/gli ambienti all’interno dei quali si trovano i dispositivi che si intende comandare. Cucina Premere i pulsanti o per aprire o chiudere tutte le tapparelle all’interno del/degli “Ambienti” selezionati. Lavanderia Comandi generali con filtro “Illuminazione” attivo Piano Terra Nessuna luce è accesa nell’”Ambiente” Bagno Cucina Lavanderia Salotto Almeno una luce è accesa nell’”Ambiente” 12 Mitho IL MENÙ AMBIENTI Premere il pulsante (selezione multipla) e selezionare il/gli ambienti all’interno dei quali si trovano i dispositivi che si intende comandare. Piano Terra Bagno Cucina Lavanderia Salotto Premere il pulsante per accendere o il pulsante per spegnere tutte le luci all’interno del/degli “Ambienti” selezionati. Comandi generali con filtro “Termoregolazione” attivo Zona Notte Bagno Nessun termostato dell’”Ambiente” è attivo Camera Matrimoniale Almeno un termostato dell’”Ambiente” è in stato diverso da OFF/Building protection Cameretta Zona Notte Bagno Con filtro “Termoregolazione” attivo, premere il pulsante (selezione multipla) e selezionare gli ambienti all’interno dei quali si trovano i dispositivi che si intende comandare. Camera Matrimoniale 1 Premere il pulsante per poter modificare il modo di funzionamento di tutti i dispositivi selezionati scegliendo tra: Cameretta Imposta modalità HVAC 13 “Comfort” “Stand-by” “Economy” “Off” IT Mitho IL MENÙ AMBIENTI IT Con filtro “Termoregolazione” attivo, premere il pulsante (selezione multipla) e selezionare gli ambienti all’interno dei quali si trovano i dispositivi che si intende comandare. Zona Notte Bagno 2 Premere il pulsante per poter cambiare il tipo di funzionamento di tutti i dispositivi selezionati: Camera Matrimoniale Cameretta “Riscaldamento” “Raffrescamento” Seleziona il tipo di funzionamento Riscaldamento Raffrescamento Comandi generali con filtro “Attuatori ON/OFF” attivo Piano Terra Nessun “Attuatore” è in stato “ON” nell’”Ambiente” Cucina Lavanderia Almeno un “Attuatore” è in stato “ON” nell’”Ambiente” Premere il pulsante (selezione multipla) e selezionare il/gli ambienti all’interno dei quali si trovano i dispositivi che si intende comandare. Piano Terra Cucina Premere i pulsanti ON o OFF per comandare contemporaneamente gli “Attuatori” all’interno del/degli “Ambienti” selezionati. Lavanderia 14 Mitho IL MENÙ AMBIENTI Controllo “Tapparelle” / “Veneziane” Selezionare “Zona” e ”Ambiente” all’interno del quale è contenuto il dispositivo che si desidera controllare (vedi :”Navigazione all’interno del menù “Ambienti”” a pagina 10). Zona Notte Camera Matrimoniale Camera Matrimoniale 1 Camera Matrimoniale 2 0% 30 % Una breve pressione sul pulsante, aziona immediatamente l’apertura o la chiusura della tapparella (commutazione ciclica); per interrompere l’azione, premere nuovamente il pulsante; alla successiva pressione il senso di movimento viene invertito. Commutazione ciclica > Zona Notte Camera Matrimoniale Camera Matrimoniale 1 Camera Matrimoniale 2 30% 30 % > > > > ... Legenda azioni “Tapparella”/“Veneziana” ferma Apertura in corso Chiusura in corso Se la configurazione dell’impianto lo prevede, è possibile leggere all’interno del pulsante la percentuale di apertura della “Tapparella”/“Veneziana”. 0% = “Tapparella” completamente alzata 100% = “Tapparella” completamente abbassata Camera Matrimoniale 1 Una pressione prolungata sul dispositivo che si vuole controllare, provoca l’apertura di un pop-up contenente tutte le opzioni disponibili. Forzatura Controllo Tapparella/Veneziana “SU” “GIU” “STOP”, le freccie si colorano di verde quando l’azione è in corso. Blocco Controllo delle lamelle della veneziana, “APRI” “CHIUDI”. Ad ogni pressione di uno dei comandi viene eseguito uno step di movimento. Camera Matrimoniale 1 É anche possibile impostare la percentuale di apertura della Tapparella/Veneziana sul cursore centrale; nella parte superiore della barra viene visualizzato il valore impostato, la barra diventa di colore bianco quando il valore impostato viene raggiunto. 42% Forzatura Blocco 15 IT Mitho IL MENÙ AMBIENTI IT Forzatura di una tapparella o veneziana Camera Matrimoniale 1 Se necessario è possibile forzare la tapparella/veneziana in posizione sempre aperta o sempre chiusa: in questo caso i comandi provenienti da altri dispositivi, timer, scenari vengono ignorati fino alla rimozione della forzatura. 0% Forzatura Blocco Nessuna forzatura attiva Posizione aperta forzata (0%) Posizione chiusa forzata (100%) Camera Matrimoniale 1 Blocco di una tapparella o veneziana In fase di programmazione dell’impianto è possibile stabilire una particolare posizione di blocco per una tapparella/veneziana; quando la funzione “Blocco” viene attivata, la tapparella/veneziana raggiunge la posizione predefinita e i comandi provenienti da altri dispositivi, timer, scenari vengono ignorati fino alla rimozione del “Blocco”. 45% Forzatura Blocco Nessuna “Blocco” attivo “Blocco” attivo ATTENZIONE Nonostante le norme di sicurezza per gli elementi in movimento delle aperture, prevedano la presenza di adeguate protezioni di sicurezza, è bene assicurarsi che l’area sia sgombra prima di azionare le aperture/chiusure, allo scopo di evitare lesioni a persone o animali. 16 Mitho IL MENÙ AMBIENTI Controllo “Illuminazione” Selezionare “Zona” e ”Ambiente” all’interno del quale è contenuto il dispositivo che si desidera controllare (vedi :”Navigazione all’interno del menù “Ambienti”” a pagina 10). Zona Giorno Sala da Pranzo Dimmer Living room RGB Living room 0% Una breve pressione sul pulsante, accende o spegne il punto luce. Luce Disimpegno Punto luce spento Punto luce acceso I punti luce possono essere di tre tipi: Zona Giorno Sala da Pranzo Dimmer Living room RGB Living room Punto luce ON/OFF spento Punto luce ON/OFF acceso Punto luce dimmer spento Punto luce dimmer acceso Se la configurazione dell’impianto lo prevede, è possibile leggere all’interno del pulsante la percentuale di accensione della luce. 100% Luce Disimpegno Punto luce RGB spento Punto luce RGB acceso Una pressione prolungata sul dispositivo che si vuole controllare, provoca l’apertura di un pop-up contenente tutte le opzioni disponibili. Opzioni di regolazione possibili per luci ON/OFF e luci dimmerate Dimmer Living room 1 B I pulsanti 1, permettono di spegnere (0%) o accendere (100%) il punto luce. 33% Forzatura I pulsanti B, permettono di spegnere (-) o accendere (+) il punto luce in maniera progressiva, il pulsante permette di interrompere l’accensione/spegnimento progressivo alla percentuale desiderata. Blocco É anche possibile impostare la percentuale di dimmeraggio del punto luce sul cursore centrale: nella parte superiore della barra viene visualizzato il valore impostato. La barra diventa di colore bianco quando il valore impostato viene raggiunto. Forzatura di un punto luce Se necessario è possibile forzare il punto luce in modo che rimanga sempre acceso o sempre spento: in questo caso i comandi provenienti da altri dispositivi, timer, scenari vengono ignorati fino alla rimozione della forzatura. Nessuna forzatura attiva Forzatura luce spenta 17 Forzatura luce accesa IT Mitho IL MENÙ AMBIENTI IT Blocco di un punto luce In fase di programmazione dell’impianto è possibile stabilire una particolare configurazione di blocco per un punto luce; quando la funzione “Blocco” viene attivata, il punto luce raggiunge la configurazione programmata e i comandi provenienti da altri dispositivi, timer, scenari vengono ignorati fino alla rimozione del “Blocco”. Nessuna “Blocco” attivo “Blocco” attivo Opzioni possibili per luci RGB RGB Living room 3 7 9 I pulsanti C, permettono di portare la luminosità del punto luce al massimo (100%) o al minimo (0%). 6 4 Selezionando un punto qualunque dell’area D, è possibile scegliere la tonalità di colore desiderata per il punto luce. 5 Il cursore E, permette di regolare la luminosità del punto luce. Premendo il pulsante F, viene visualizzata una diversa modalità di regolazione del colore e della luminosità del punto luce. RGB Living room 3 7 9 Il campione di colore G, rappresenta l’ultima tinta creata e viene riproposta anche in caso di configurazione di un altro punto luce RGB. 8 Il pulsante H, ripristina la modalità di visualizzazione precedente. Il riquadro 9 corrisponde al feedback del colore (se gestito dal dispositivo comandato). 18 Mitho IL MENÙ AMBIENTI Controllo “Termoregolazione” Selezionare “Zona” e ”Ambiente” all’interno del quale è contenuto il dispositivo che si desidera controllare (vedi :”Navigazione all’interno del menù “Ambienti”” a pagina 10). Zona Notte Bagno Camera Matrimoniale Nessun termostato all’interno dell’”Ambiente” è attivo Almeno un termostato all’interno dell’”Ambiente” è in stato diverso da OFF/Building protection Cameretta Una volta selezionato l’ambiente desiderato viene visualizzato il termostato ad esso associato. Termostato Bagno Zona Notte Bagno 2 Termostato Bagno 1 Termostato Bagno 5 3 4 1.Nome assegnato al termostato 2.Modalità di funzionamento “Riscaldamento” - “Raffrescamento” 3.Modalità HVAC programmata. Questa informazione non viene visualizzata nel caso in cui il termostato sia di tipo HVAC Master/ set-point. 4. Temperatura e umidità rilevata vengono visualizzati ciclicamente. L’umidità viene visualizzata se il dato è disponibile. 5. La bandella è di colore bianco se il termostato è in stato diverso da OFF/Building protection. Nella categoria termoregolazione rientrano la funzione di Cronotermostato gestita direttamente dal pannello e la funzione di HVAC master, per la quale il pannello effettua un’attività di scheduler di profili in modalità HVAC (Comfort, Stand-by, Economy, OFF) o setpoint di temperatura. 19 IT Mitho IL MENÙ AMBIENTI IT Profilo orario per cronotermostato (funzione svolta dal pannello) Giorni della settimana. In giallo il giorno della settimana del quale si sta visualizzando il profilo Termostato Cameretta Giorno corrente lun Fasce di temperatura preprogrammate (modi): Comfort - Stand-by - Eco mar mer gio ven sab dom Asse delle ore del giorno Comf Ora corrente Stby Eco Modalità automatica attiva Velocità impostata del fancoil 1-2-3-A (automatica) Tipo di funzionamento (Riscaldamento Raffrescamento) del cronotermostato Velocità attiva dei fancoil 0-1-2-3 Modalità HVAC corrente del cronotermostato Temperatura impostata (set point) sul cronotermostato Il valore è lampeggiante se forzato temporaneamente Temperatura/umidità rilevata dal sensore esterno KNX Forzare il setpoint della temperatura impostata o la velocità delle ventole dei ventilconvettori con profilo attivo Termostato Cameretta lun mar mer gio Spia di attivazione valvola o attuatore (pallino pieno = ON, pallino vuoto = OFF) ven sab dom Premere in corrispondenza della casella che riporta il valore della temperatura programmata e impostare la temperatura desiderata mediante il cursore che appare. Le frecce laterali permettono di affinare il valore della temperatura impostata in decimi di grado. Comf Eco Stby La procedura per modificare la velocità delle ventole dei ventilconvettori è pressoché identica. Premere sull’icona che riporta la velocità della ventola programmata e scegliere la velocità desiderata tra 1 - 2 - 3 - AUTO. Termostato Cameretta I nuovi valori inseriti lampeggeranno, allo scopo di ricordare all’Utente che è in atto una forzatura della programmazione. Nota: Le modifiche apportate alla programmazione in corso hanno effetto fino al verificarsi di un cambio di modo nel profilo. 20 Mitho IL MENÙ AMBIENTI Profilo orario per HVAC Master con controllo attraverso modalità IT I termostati HVAC Master con profilo modalità HVAC prevedono 3 “Modi” di funzionamento: Comfort, Standby, Economy. Il comando delle valvole e degli attuatori è demandato al termostato locale. Giorni della settimana. In giallo il giorno della settimana del quale si sta visualizzando il profilo Termostato Cameretta Giorno corrente lun Fasce di temperatura preprogrammate (modi): Comfort - Stand-by - Eco mar mer gio ven sab dom Asse delle ore del giorno Comf Ora corrente Stby Eco Modalità automatica attiva Tipo di funzionamento (Riscaldamento Raffrescamento) del termostato controllato Temperatura impostata (set point) sul termostato controllato Il valore è lampeggiante se forzato temporaneamente Modalità HVAC corrente del termostato controllato Temperatura/umidità rilevata dal termostato controllato Profilo orario per HVAC Master con controllo attraverso set-point di temperatura I termostati HVAC Master con profilo setpoint di temperatura prevedono 5 fasce di temperatura al posto dei “Modi” di funzionamento. Il comando delle valvole e degli attuatori è demandato al termostato locale. Giorni della settimana. In giallo il giorno della settimana del quale si sta visualizzando il profilo Termostato Cameretta Giorno corrente lun mar mer gio Fasce di temperatura preprogrammate (setpoint): ven sab dom Asse delle ore del giorno Ora corrente Modalità automatica attiva Tipo di funzionamento (Riscaldamento Raffrescamento) del termostato controllato Temperatura impostata (set point) sul termostato controllato. Il valore è lampeggiante se forzato temporaneamente Temperatura/umidità rilevata dal termostato controllato 21 Mitho IL MENÙ AMBIENTI IT Creare un profilo di temperature giornaliero (valido per tutti i tipi di controllo) Termostato Cameretta Se il termostato ha un profilo attivo, il profilo non è modificabile. Premere il pulsante per disattivare il profilo. Premere il pulsante modifica profilo. Tracciare con il pennino in dotazione il diagramma temperatura/ore desiderato. Termostato Cameretta lun mar mer gio per accedere alla schermata di ven sab dom Comf Eco Premendo sul pulsante è possibile visualizzare l’asse temporale diviso in quarti d’ora per affinare la programmazione. Stby I pulsanti consentono di far scorrere la vista fino al punto desiderato. Una volta raggiunta la configurazione desiderata premere per tornare alla vista estesa e successivamente il pulsante per confermare le modifiche apportate. Termostato Cameretta Comf Eco Stby Copiare un profilo temperature in altri giorni della settimana (valido per tutti i tipi di controllo) Termostato Cameretta lun mar mer gio ven sab dom Selezionare il giorno della settimana del quale si vuole copiare il profilo e successivamente selezionare il pulsante . Comf Eco Stby Selezionare il o i giorni della settimana nei quali si vuole copiare il profilo e premere per eseguire la copia. 22 Mitho IL MENÙ AMBIENTI Cronotermostato con profilo non attivo Termostato Cameretta Premere il pulsante matico. per disattivare il profilo auto- Scegliere una delle modalità di funzionamento disponibili. “Comfort” - “Stand-by” “Economy” - “Off” Nota: Da questa schermata è possibile forzare temporaneamente il setpoint di temperatura associato alla modalità attiva e la velocità delle ventole dei ventilconvettori. Le modifiche apportate al modo in corso, avranno effetto fino alla variazione del modo o all’attivazione di un profilo automatico. HVAC Master con controllo modalità e profilo non attivo Termostato Cameretta Premere il pulsante matico. per disattivare il profilo auto- Scegliere una delle modalità di funzionamento disponibili del termostato controllato. 23 “Comfort” - “Stand-by” “Economy” - “Off” IT Mitho IL MENÙ AMBIENTI IT HVAC Master con controllo set-point e profilo non attivo Termostato Cameretta Premere il pulsante per disattivare il profilo automatico. Impostare il set point del termostato controllato mediante il cursore che appare. Le frecce laterali permettono di affinare il valore della temperatura impostata in decimi di grado. Le modifiche apportate al set point in corso, avranno effetto fino alla variazione del set point o all’attivazione di un profilo automatico. Set parametri (Cronotermostato) Regolazione temperature di riferimento (Comfort, Stand-by, Eco) Termostato Cameretta lun mar mer gio ven sab dom Il diagramma temperatura/ore riporta sull’asse delle temperature tre valori di riferimento chiamati Comfort, Stand-by e Eco. Le impostazioni di fabbrica prevedono: Comf Stby Eco Riscaldamento Raffrescamento Comfort 20°C 24°C Stand-by 16°C 28°C Eco 18°C 26°C Per variare tali valori premere il pulsante selezionare il parametro da modificare Termostato Cameretta “Comfort” “Stand-by” “Economy” e digitare nella tastiera che appare il nuovo valore di temperatura. DIFF DIFF1 DIFF2 Nota: Il valore assegnabile ad ogni fascia di temperatura è limitato dai valori della fascia immediatamente superiore e inferiore; se ad esempio, la fascia corrisponde a 20 °C e la fascia corrisponde a 16 °C, il valore della fascia potrà variare fra 16,1 °C e 19,9 °C. DIFF3 Regolazione temperatura antigelo Inserisci la temperatura nell’intervallo [18 40] Le impostazioni di fabbrica prevedono che l’impianto di riscaldamento garantisca una temperatura minima ambientale di 5.0°C per proteggere le tubature dell’impianto dal gelo; tale temperatura minima viene garantita anche a termostato disattivo ( “Off”). Per modificare la temperatura antigelo premere il pulsante e digitare il nuovo valore di temperatura. invio 24 Mitho IL MENÙ AMBIENTI Altre voci di setup termico in impianti con controllo a due punti con ventilconvettori Termostato Cameretta 2 3 1 1. Pulsante per variare il tipo di funzionamento (raffrescamento/riscaldamento) 4 2. Pulsanti per la modifica del tempo di inerzia delle ventole dei ventilconvettori DIFF DIFF1 DIFF2 DIFF3 3. Pulsante per la modifica dell’unità di misura della temperatura 5 4. Pulsante per la modifica del differenziale termico di regolazione. Il valore impostato sui termostati, per default è di 0,2 °C; ciò significa che se la temperatura richiesta dalla programmazione in un dato momento è di 20 °C, il comando di accensione verrà inviato su bus (ad es: all’attuatore che comanda la caldaia) nel momento in cui il cronotermostato rileva una temperatura di 19,8 °C e il comando per lo spegnimento verrà inviato nel momento in cui la temperatura raggiunge i 20,2 °C. Il differenziale termico può essere liberamente modificato per essere adattato alle diverse tipologie di riscaldamento (ventilconvettori, riscaldamento a pavimento, riscaldatori elettrici). 5. Pulsanti per la modifica del differenziale termico che provoca l’attivazione delle ventole dei ventilconvettori. Altre voci di setup termico in impianti con controllo PI senza ventilconvettori Termostato Bagno 6 BANDA INTEG 7 6. Banda proporzionale dell’algoritmo di controllo “proporzionale - integrale PWM” 7. Pulsante per variare l’impostazione del tempo d’integrazione relativo all’algoritmo di controllo “proporzionale - integrale PWM” 8. Pulsante per variare l’impostazione del tempo di ciclo relativo all’algoritmo di controllo “proporzionale - integrale PWM” 8 CICLO 25 IT Mitho IL MENÙ AMBIENTI Set parametri (HVAC Master con controllo modalità) IT Regolazione parametri di funzionamento e unità di misura temperatura Termostato Cameretta lun mar mer gio ven sab dom Per variare i parametri di funzionamento premere il pulsante . Comf Stby Eco 1. Pulsante per variare il tipo di funzionamento (raffrescamento / riscaldamento) 2. Pulsante per la modifica dell’unità di misura della temperatura 3. Pulsante per l’impostazione del periodo di ripetizione ciclica del valore del profilo orario. Premendo l’icona si attiva la tastiera. Termostato Cameretta 1 2 3 Set parametri (HVAC Master con controllo set point) Regolazione temperature di riferimento (profilo setpoint) Termostato Cameretta Se il termostato ha un profilo attivo, il profilo non è modificabile. Premere il pulsante per disattivare il profilo. Il diagramma temperatura/ore riporta sull’asse delle temperature cinque valori di riferimento. Le impostazioni di fabbrica prevedono: T1 T2 T3 T4 T5 Termostato Cameretta 1 Riscaldamento 4°C 16°C 18°C 20°C 22°C Raffrescamento 28°C 26°C 24°C 22°C 20°C Per variare tali valori premere il pulsante selezionare il parametro da modificare e digitare nella tastiera che appare il nuovo valore di temperatura. 2 1. Pulsante per variare il tipo di funzionamento (raffrescamento / riscaldamento) 2. Pulsante per la modifica dell’unità di misura della temperatura 3 26 Mitho IL MENÙ AMBIENTI 3. Pulsante per l’impostazione del periodo di ripetizione ciclica del valore del profilo orario. Premendo l’icona si attiva la tastiera. Nota: Il valore assegnabile ad ogni fascia di temperatura è limitato dai valori della fascia immediatamente superiore e inferiore; se ad esempio, la fascia T1 corrisponde a 20 °C e la fascia T3 corrisponde a 16 °C, il valore della fascia T2 potrà variare fra 16,1 °C e 19,9 °C. Controllo “Attuatori ON/OFF” Selezionare “Zona” e ”Ambiente” all’interno del quale è contenuto il dispositivo che si desidera controllare (vedi :”Navigazione all’interno del menù “Ambienti”” a pagina 10). Zona Giorno Cucina Presa Forno Presa Lavastoviglie Una breve pressione sul pulsante, accende o spegne l’attuatore. Attuatore OFF Attuatore ON Una pressione prolungata sul dispositivo che si vuole controllare, provoca l’apertura di un pop-up contenente tutte le opzioni disponibili. Presa Forno Forzatura dello stato di un attuatore Forzatura Se necessario è possibile forzare lo stato di un attuatore in modo che rimanga sempre ON o sempre OFF: in questo caso i comandi provenienti da altri dispositivi, timer, scenari vengono ignorati fino alla rimozione della forzatura. Blocco Nessuna forzatura attiva - Attuatore forzato in OFF - Attuatore forzato in ON Blocco dello stato di un attuatore In fase di programmazione dell’impianto è possibile stabilire una particolare configurazione di blocco per un attuatore; quando la funzione “Blocco” viene attivata, l’attuatore raggiunge la configurazione programmata e i comandi provenienti da altri dispositivi, timer, scenari vengono ignorati fino alla rimozione del “Blocco”. Nessuna “Blocco” attivo “Blocco” attivo 27 IT Mitho IL MENÙ AMBIENTI Visualizzazione stato degli “Ingressi” IT Selezionare “Zona” e ”Ambiente” all’interno del quale è contenuto il dispositivo che si desidera controllare (vedi :”Navigazione all’interno del menù “Ambienti”” a pagina 10). Esterno Terrazza Velocità vento Sensore pioggia ON 10 Km/h Tenda oscurante 80% Sensore pioggia 2 1 ON 3 1. Nome dell’ingresso 2. Per ingressi di tipo ON/OFF la bandella bianca indica che l’ingresso è in stato ON 3. Valore dell’Ingresso; in caso di ingressi numerici o analogici il valore misurato viene espresso con relativa unità di misura Nota: É possibile la sola consultazione dello stato degli ingressi non è possibile eseguire alcuna azione . Controllo delle “Uscite” Selezionare “Zona” e ”Ambiente” all’interno del quale è contenuto il dispositivo che si desidera controllare (vedi :”Navigazione all’interno del menù “Ambienti”” a pagina 10). Esterno Giardino Colore luci piscina 000 Comando cancello Chiuso Tenda oscurante 00% Avvia ciclo pulizia Avvia I pulsanti che comandano le uscite possono eseguire comandi semplici come l’attivazione o disattivazione di contatti o attivare uscite analogiche impostando il valore dell’uscita attraverso apposito pop-up.. Uscite bistabili Comando cancello 2 Esterno 1 Chiuso 3 Giardino Colore luci piscina 000 Comando cancello Aperto Tenda oscurante 00% Avvia ciclo pulizia Avvia 1. Nome dell’uscita 2. Per uscite di tipo bistabile la bandella bianca rappresenta l’ultimo comando inviato (se ON o 1) 3. Nome dell’ultimo comando inviato. I comandi sono inviati ciclicamente ad ogni pressione. 28 Mitho IL MENÙ AMBIENTI Uscite analogiche I pulsanti che comandano le uscite analogiche, una volta premuti, provocano l’apertura di una finestra nella quale è possibile imputare un valore all’uscita. I valori inseriti saranno leggibili sulla parte inferiore del pulsante. Colore luci piscina Nota: La finestra all’intero della quale si possono imputare i valori dell’uscita, adatterà il suo aspetto all’unità di misura espressa. 29 IT Mitho IL MENÙ FUNZIONI Eseguire e memorizzare “Scenari KNX” Dalla pagina principale selezionando il pulsante “Funzioni” si accede alla schermata che permette di visualizzare le “Funzioni”: Scenari KNX, Antifurto, Irrigazione, Dati energia, Controllo carichi, Allarmi. IT Ambienti Citofonia Funzioni Preferiti Programmi Setup Selezionare il pulsante “Scenari KNX” per accedere all’elenco degli scenari disponibili. Funzioni Dati energia Scenari KNX Per scenario si intende un insieme di attivazioni accomunate in un unico comando. Controllo carichi Antifurto Irrigazione Allarmi L’esecuzione di uno scenario avviene premendo il pulsante corrispondente. Scenari KNX Scenario Entra Scenario Esci Scenario Notte Scenario 1 I pulsanti scenario contrassegnati dall’icona se premuti per più di 2 secondi, memorizzano lo stato dei dispositivi associati allo scenario in quel momento; in seguito lo stesso pulsante premuto brevemente riporterà gli stessi dispositivi allo stato memorizzato. Scenari KNX Scenario Entra Scenario Esci Scenario Notte Scenario 1 Nota: L’invio del comando di memorizzazione è segnalato da un breve flash dell’icona . 30 Mitho IL MENÙ FUNZIONI Gestione Antifurto Dalla pagina principale del menù “Funzioni” selezionare il pulsante “Antifurto” per accedere all’elenco delle “Aree” disponibili. Funzioni Dati energia Scenari KNX Nota: L’icona “Antifurto” lampeggia in caso si verifichi almeno un allarme “Area”. In caso di allarme lampeggia l’icona “Funzioni” in home page. Controllo carichi Antifurto Irrigazione L’“Area” è un insieme di “Settori”, i settori solitamente sono dei raggruppamenti logici di sensori. Allarmi Inserimento/disinserimento di tutte le aree Antifurto Piano Terra Premere il pulsante rire tutte le aree Premere il pulsante serire tutte le aree Piano 1 e digitare la password per insee digitare la password per disin- Inserimento parziale delle aree Premere il pulsante (selezione multipla), selezionare una o più “Aree” pronte; successivamente premere il pulsante e digitare la password per inserire solo le aree selezionate. É richiesta una password Area pronta all’inserimento Nessun allarme in corso nell’Area Area selezionata pronta all’inserimento Nessun allarme in corso nell’Area Area non pronta all’inserimento Nessun allarme in corso nell’Area spazio Area inserita Nessun allarme in corso nell’Area invio Area inserita Allarme in corso nell’Area Premendo su un pulsante “Area” si accede alla visualizzazione dei settori che la compongono. I settori si possono inserire totalmente o parzialmente con la stesso modalità delle “Aree”. Il simbolo indica che in uno dei settori inseriti è in corso un allarme. Antifurto Piano terra Sensori finestre Volumetrico garage Volumetrico giardino Sensori mansarda Premere sul pulsante per accedere ad un breve elenco degli allarmi che hanno interessato l’impianto. 31 IT Mitho IL MENÙ FUNZIONI Gestione dell’impianto di irrigazione Dalla pagina principale del menù “Funzioni” selezionare il pulsante “Irrigazione” per accedere all’elenco dei cicli di irrigazione programmati. Il ciclo di irrigazione è una sequenza temporizzata di attivazioni dei singoli irrigatori, eseguita ciclicamente. Funzioni IT Scenari KNX Dati energia Controllo carichi Antifurto Irrigazione Per attivare un ciclo di irrigazione premere sul pulsante corrispondente, il ciclo verrà eseguito nei tempi e modalità programmate. Allarmi Ciclo non attivo Ciclo attivo Irrigazione Ciclo in esecuzione Prato EST Prato OVEST Irrigazione Siepe Irrigazione Viale Per eliminare un ciclo di irrigazione premere il pulsante e selezionare il ciclo da eliminare. Per modificare un ciclo in elenco premere il pulsante e selezionare il ciclo desiderato. Nota: •Solo un ciclo non attivo può essere modificato o eliminato. •L’accesso alla pagina di modifica di un ciclo di irrigazione attivo è consentito solo per visualizzarne i parametri e per forzare manualmente il ciclo. Creare/modificare un nuovo Ciclo di irrigazione Premere il pulsante e assegnare un nome al nuovo ciclo mediante la tastiera che apparirà. Premendo il tasto “Invio” si apre la finestra di programmazione di un cilo di irrigazione. Giorni della settimana. In azzurro i giorni della settimana nel corso dei quali verrà eseguito il ciclo Irrigazione Siepe lun mar mer gio Attivazione forzata del ciclo di irrigazione. Icona azzurra = forzatura attiva ven sab dom Giorno corrente Accesso alla programmazione dei singoli irrigatori Pulsante per la variazione percentuale del ciclo di irrigazione e indicazione della percentuale di variazione programmata Inizio programmato esecuzione ciclo. La fine ciclo viene calcolata automaticamente 32 Mitho IL MENÙ FUNZIONI Impostare l’ora e i giorni di attivazione di uno scenario irrigazione Irrigazione Siepe lun mar 2 mer 3 gio ven 1 sab dom Premere il pulsante 1; impostare l’ora in cui si desidera venga attivato il ciclo di irrigazione e confermare con . 4 Attivare mediante il pennino in dotazione i giorni della settimana nei quali il ciclo di irrigazione dovrà essere eseguito. Attivazione forzata di un ciclo di irrigazione I cicli di irrigazione sono programmati per essere eseguiti ad ore prestabilite del giorno; è possibile forzare l’esecuzione del ciclo giornaliero premendo il pulsante 2 . Variazione della percentuale di irrigazione stagionale Qualora la situazione meteorologica richieda la diminuzione o l’aumento della percentuale di bagnatura calcolato automaticamente, premere il pulsante 3; digitare il valore di variazione (-90% ... +400%) rispetto al valore preimpostato. Premere “invio” per confermare i dati immessi, il programma provvederà a ricalcolare i cicli di irrigazione e di conseguenza l’ora di fine esecuzione dello scenario di irrigazione in modo da soddisfare la richiesta. Aggiungere/Programmare i singoli irrigatori Siepe Lista irrigatori Ogni ciclo di irrigazione comanda l’attivazione di una serie di irrigatori. Per programmare i singoli irrigatori, premere il pulsante 4. Qualora la lista risulti vuota, è necessario premere il pulsante e scegliere in successione dalla lista degli irrigatori effettivamente presenti sull’impianto quello/ quelli da assoggettare al ciclo. Siepe Lista irrigatori Irrigatore Blocco 1A Irrigatore Blocco 2A Irrigatore Blocco 1B Irrigatore Blocco 2B Irrigatore Blocco 1C Irrigatore Blocco 2C 33 IT Mitho IL MENÙ FUNZIONI Per programmare o modificare la programmazione di uno degli irrigatori in elenco, premere il pulsante e selezionare l’irrigatore desiderato. Siepe IT Lista irrigatori Irrigatore Blocco 1A 03’ x 5 Irrigatore Blocco 1B 02’ x 5 Premendo il pulsante 5 si attiva la tastiera per l’impostazione del tempo continuo d’irrigazione senza pause, ossia la durata di funzionamento dell’irrigatore ogni volta che viene attivato dal ciclo di irrigazione. Irrigatore Blocco 1A Irrigazione continua 00:03:00 5 6 Pausa irrigazione 00:02:00 Premendo il pulsante 6, si attiva la tastiera per l’impostazione del numero di attivazioni dell’irrigatore durante il ciclo di irrigazione. 7 Premendo il pulsante 7 si attiva la tastiera per l’impostazione del tempo di pausa irrigazione, ossia il tempo di pausa che deve trascorrere tra la disattivazione dell’irrigatore e l’attivazione di quello successivo nel ciclo di irrigazione. Al termine della programmazione sotto al nome di ogni irrigatore componente il ciclo di irrigazione, sarà visualizzato il tempo di irrigazione ed il numero di ripetizioni. Siepe Lista irrigatori Irrigatore Blocco 1A 03’ x 5 Irrigatore Blocco 1B 02’ x 5 Irrigatore non attivo Irrigatore attivo Irrigazione in corso 34 Mitho IL MENÙ FUNZIONI Dati Energia Dalla pagina principale del menù “Funzioni” selezionare il pulsante “Dati energia”. Funzioni Scenari KNX Se l’impianto è dotato dei dispositivi di rilevamento necessari, nella pagina principale è possibile visualizzare una serie di dati informativi su consumi di energia elettrica, gas e acqua. Dati energia Controllo carichi Antifurto Irrigazione 1 Potenza istantanea dell’impianto. 2 Energia totale consumata dall’impianto. 3 Energia prodotta da impianti fotovoltaici o altre fonti. 4 Consumo cumulativo di gas rilevato. 5 Consumo cumulativo di acqua rilevato. Allarmi Dati energia 1 2 Potenza istantanea 2,3kW Energia consumata 22.350 kWh 3 Consultazione statistiche consumi elettrici Energia prodotta Premere il pulsante per visualizzare dati statistici relativi ai consumi elettrici domestici. 1,8 kWh Consumo cumulativo 4 844 m3 Consumo cumulativo Sull’asse orizzontale sono rappresentati i giorni della settimana o i mesi dell’anno. Sull’asse verticale viene rappresentata la quantità di energia prodotta/consumata con alcuni valori di riferimento presi a partire dal valore massimo misurato fino a quel momento. Il valore reale del consumo relativo al giorno/mese selezionato nella finestra è consultabile nella barra inferiore. Una linea bianca orizzontale indica il valore di soglia qualitativo impostato. 5 3743 m3 Dati energia Energia elettrica consumata Le frecce sui pulsanti con fondo azzurro permettono di visualizzare i dati sui consumi rilevati negli anni precedenti o successivi a quello visualizzato. Con il pulsante 6 selezionato (icona su sfondo colorato) le frecce sui pulsanti con fondo azzurro permettono di visualizzare i dati sui consumi rilevati nelle settimane precedenti o successive a quella visualizzata. Anno 2013 6 7 2,3 kW 3000 kWh (a) 350 kWh (m) 8 6 Permette di modificare ciclicamente la visualizzazione dei dati relativi all’energia consumata/prodotta da rappresentazione mese/anno (icona su sfondo nero) a rappresentazione settimana/giorno (icona su sfondo colorato). Con la visualizzazione giorno/settimana nella finestra centrale viene visualizzata la prima settimana relativa a quel mese; deselezionando l’icona si passa alla visualizzazione mese/ anno relativi alla settimana visualizzata prima della selezione. 7 Permette di modificare ciclicamente la visualizzazione dei dati relativi all’energia consumata o prodotta. Attivando l’opzione (icona sfondo colorato), nella finestra centrale viene visualizzato il grafico relativo all’energia prodotta, deselezionando l’icona si torna alla visualizzazione dell’energia consumata. 8 Permette di modificare ciclicamente l’unità di misura dei dati relativi all’energia consumata o prodotta. Attivando la visualizzazione “CO2” (icona sfondo colorato), l’unità di misura dei dati visualizzati nella finestra centrale e nella barra inferiore passano da “kWh” a “kg” ed i valori misurati e rappresentati nel grafico passano da “energia” a “CO2”; deselezionando l’icona, si torna alla rappresentazione dell’energia (kWh). 35 IT IL MENÙ FUNZIONI Mitho Dati energia 9 Visualizza il valore istantaneo relativo alla potenza elettrica (prodotta o consumata). A seconda del tipo di visualizzazione selezionata (vedi punti 6 7 e 8) vengono mostrati i dati relativi all’energia elettrica (prodotta o consumata): (g) Valore giornaliero (s) Valore settimanale (m) Valore mensile (a) Valore annuale IT Energia elettrica consumata Anno 2013 Settimana 42 lun mar 2,3 kW mer gio ven 75 kWh (s) 9 sab dom 10 kWh (g) Setup dati energia elettrica Premere il pulsante per accedere alla finestra di setup. Premendo il pulsante si attiva la tastiera per l’impostazione della soglia per la determinazione dell’indicazione qualitativa di superamento consumo; tale valore è riferito al consumo mensile e viene opportunamente scalato nel caso di visualizzazione giorno/settimana. Premendo il pulsante , si attiva la tastiera per per l’impostazione del valore iniziale (offset) che rappresenta il valore cumulativo dell’energia elettrica consumata prima che il dispositivo fosse installato nell’impianto. Premendo il pulsante , si attiva la tastiera per l’impostazione del valore di conversione tra energia e CO2. Premendo il pulsante , si attiva il pop-up di conferma per l’operazione di azzeramento locale contatori di energia: giornaliero, settimanale, mensile e annuale. Premendo il pulsante , si attiva il pop-up per l’impostazione del numero di fasce di tariffazione utilizzate dal fornitore per il calcolo della bolletta. Dati energia Energia elettrica consumata Soglia 50 Valore iniziale CO2 2000 kWh 0,531 Azzera contatori N° Tariffe 3 Dati energia Energia elettrica consumata lun mar mer gio ven sab dom Premere il pulsante per accedere alla schermata di modifica profilo di tariffazione. Nota: il profilo di tariffazione è valido per l’energia consumata Tracciare con il pennino in dotazione il diagramma di tariffazione seguendo le soglie indicate dal fornitore. Una volta raggiunta la configurazione desiderata premere il pulsante per confermare le modifiche apportate. Per copiare un profilo di tariffazione in altri giorni della settimana, selezionare il giorno della settimana del quale si vuole copiare il profilo e successivamente selezionare il pulsante . Selezionare il o i giorni della settimana nei quali si vuole copiare il profilo e premere per eseguire la copia. 36 Mitho IL MENÙ FUNZIONI Consultazione statistiche consumi gas Dati energia Potenza istantanea 2,3kW Energia consumata 22.350 kWh Premere il pulsante per visualizzare dati statistici relativi ai consumi di gas domestici. Energia prodotta 1,8 kWh Sull’asse orizzontale sono rappresentati i giorni della settimana o i mesi dell’ anno. Sull’asse verticale viene rappresentata la quantità di gas consumato con alcuni valori di riferimento presi a partire dal valore massimo misurato fino a quel momento. Il valore reale del consumo relativo al giorno/mese selezionato nella finestra è consultabile nella barra inferiore. Consumo cumulativo 844 m3 Consumo cumulativo 3743 m3 Dati energia Consumo gas 1 Anno 2013 1600 m3 (a) 1 Permette di modificare ciclicamente la visualizzazione dei dati relativi al gas consumato da rappresentazione mese/anno a rappresentazione settimana/giorno (icona su sfondo colorato). Con la visualizzazione giorno/settimana nella finestra centrale viene visualizzata la prima settimana relativa a quel mese; deselezionando l’icona si passa alla visualizzazione mese/anno relativi alla settimana visualizzata prima della selezione. 200 m3 (m) 2 Dati energia Consumo gas 2 A seconda del tipo di visualizzazione selezionata (vedi punto 1) vengono mostrati i dati relativi al consumo del gas: (g) Valore giornaliero (s) Valore settimanale (m) Valore mensile (a) Valore annuale Anno 2013 Settimana 42 lun mar mer gio ven 38 m3 (s) sab dom 5,2 m3 (g) 2 Premere il pulsante per accedere alla finestra di setup. Premendo il pulsante 3 si attiva la tastiera per l’impostazione della soglia per la determinazione dell’indicazione qualitativa di superamento consumo; tale valore è riferito al consumo mensile e viene opportunamente scalato nel caso di visualizzazione giorno/settimana. Premendo il pulsante 4, si attiva la tastiera per l’impostazione del valore iniziale (offset) che rappresenta il valore cumulativo del gas consumato prima che il dispositivo fosse installato nell’impianto. Premendo il pulsante 5, si attiva il pop-up di conferma per l’operazione di azzeramento contatori locali del gas: giornaliero, settimanale, mensile e annuale. Dati energia Consumo gas 3 Valore iniziale 4 Soglia 50 Azzera contatori 38 m3 Le frecce sui pulsanti con fondo azzurro permettono di visualizzare i dati sui consumi rilevati negli anni precedenti o successivi a quello visualizzato. Con il pulsante 1 selezionato (icona su sfondo colorato) le frecce sui pulsanti con fondo azzurro permettono di visualizzare i dati sui consumi rilevati nelle settimane precedenti o successive a quella visualizzata. 5 37 IT Mitho IL MENÙ FUNZIONI Consultazione statistiche consumi acqua Dati energia IT Potenza istantanea 2,3kW Energia consumata 22.350 kWh Premere il pulsante per visualizzare dati statistici relativi ai consumi domestici di acqua. Energia prodotta 1,8 kWh Sull’asse orizzontale sono rappresentati i giorni della settimana o i mesi dell’ anno. Sull’asse verticale viene rappresentata la quantità di acqua consumata con alcuni valori di riferimento presi a partire dal valore massimo misurato fino a quel momento. Il valore reale del consumo relativo al giorno/mese selezionato nella finestra è consultabile nella barra inferiore. Consumo cumulativo 844 m3 Consumo cumulativo 3743 m3 Dati energia Consumo acqua 1 Anno 2013 541 m3 (a) 1 Permette di modificare ciclicamente la visualizzazione dei dati relativi dell’acqua consumata da rappresentazione mese/anno a rappresentazione settimana/ giorno (icona su sfondo colorato). Con la visualizzazione giorno/settimana nella finestra centrale viene visualizzata la prima settimana relativa a quel mese; deselezionando l’icona si passa alla visualizzazione mese/anno relativi alla settimana visualizzata prima della selezione. 18,3 m3 (m) 2 Dati energia Consumo acqua Anno 2013 Settimana 42 lun mar mer gio ven 4,1 m3 (s) sab Le frecce sui pulsanti con fondo azzurro permettono di visualizzare i dati sui consumi rilevati negli anni precedenti o successivi a quello visualizzato. Con il pulsante 1 selezionato (icona su sfondo colorato) le frecce sui pulsanti con fondo azzurro permettono di visualizzare i dati sui consumi rilevati nelle settimane precedenti o successive a quella visualizzata. 2 A seconda del tipo di visualizzazione selezionata (vedi punto 1) vengono mostrati i dati relativi all’ acqua consumata: (g) Valore giornaliero (s) Valore settimanale (m) Valore mensile (a) Valore annuale dom 0,5 m3 (g) 2 Premendo il pulsante 3 si attiva la tastiera per l’impostazione della soglia per la determinazione dell’indicazione qualitativa di superamento consumo; tale valore è riferito al consumo mensile e viene opportunamente scalato nel caso di visualizzazione giorno/settimana. Premendo il pulsante 4, si attiva la tastiera per l’impostazione del valore iniziale (offset) che rappresenta il valore cumulativo dell’acqua consumata prima che il dispositivo fosse installato nell’impianto. Premendo il pulsante 5, si attiva il pop-up di conferma per l’operazione di azzeramento contatori locali dell’acqua: giornaliero, settimanale, mensile e annuale. Dati energia Consumo acqua 3 Valore iniziale 4 Soglia 50 Azzera contatori 38 m3 5 38 Mitho IL MENÙ FUNZIONI Controllo carichi Dalla pagina principale del menù “Funzioni” selezionare il pulsante “Controllo carichi”. Funzioni Scenari KNX Dati energia Controllo carichi Antifurto Irrigazione Allarmi Vengono visualizzate due sotto categorie: “Profilo potenza” e “Gestione carichi”. Se la funzione controllo carichi è attiva, allora entrambi i pulsanti hanno la bandella bianca. Controllo carichi Sezione “Profilo potenza” Profilo potenza In questa sezione, viene visualizzato il diagramma consumi/ore che permette di impostare il consumo massimo ammissibile in una determinato periodo della settimana; in questo modo si possono sfruttare al massimo i vantaggi previsti dai contratti “a fasce orarie” proposti dai diversi fornitori di energia elettrica. Gestione carichi Nota: il giorno visualizzato nel profilo è evidenziato in giallo, il giorno corrente è evidenziato dalla barretta bianca. Controllo carichi Premere il pulsante modifica profilo. Profilo potenza lun mar mer gio ven sab per accedere alla schermata di dom Tracciare con il pennino in dotazione il diagramma potenza/ore desiderato. Premendo sul pulsante è possibile visualizzare l’asse temporale diviso in quarti d’ora per affinare la programmazione. I pulsanti consentono di far scorrere la vista fino al punto desiderato. Una volta raggiunta la configurazione desiderata premere per tornare alla vista estesa e successivamente il pulsante per confermare le modifiche apportate. Controllo carichi Profilo potenza lun mar mer gio ven sab dom 39 IT Mitho IL MENÙ FUNZIONI IT Per copiare un “Profilo potenza” in altri giorni della settimana, selezionare il giorno della settimana del quale si vuole copiare il profilo e successivamente selezionare il pulsante . Controllo carichi Profilo potenza lun mer mar gio ven sab dom Selezionare il o i giorni della settimana nei quali si vuole copiare il profilo e premere per eseguire la copia. Impostazione parametri “Profilo potenza” Premere il pulsante per accedere alle opzioni di setup del “Profilo potenza”. Premendo su ognuno dei pulsanti 1 si attiva la tastiera per l’impostazione dei 5 valori che compongono il profilo di potenza visualizzato nel diagramma. Controllo carichi Profilo potenza Premendo l’icona 2 è possibile abilitare/disabilitare la priorità del comando manuale rispetto allo sgancio automatico dei carichi effettuato dal dispositivo. Se la funzione è abilitata (icona azzurra), il dispositivo ignora il fatto che, il carico che per la logica di controllo della funzione deve essere disattivo, sia stato attivato 1 2 3 4 manualmente per esempio da un diverso punto di comando. Disabilitando tale funzione, il pannello provvede nuovamente a sganciare il carico in caso di attivazione manuale. Premendo l’icona 3 si attiva la tastiera per l’impostazione del valore di consumo minimo oltre la soglia impostata, superato il quale il pannello procederà a verificare immediatamente se vi siano carichi programmati per il distacco. Premendo l’icona 4 si attiva il profilo creato o modificato (compare la bandella bianca sui pulsanti “Profilo potenza” e “Gestione carichi”). Nota: Quando il profilo è attivo non è consentita alcuna modifica ai parametri o del profilo stesso. Sezione “Gestione carichi” Controllo carichi Profilo potenza Dalla pagina principale “Controllo carichi” selezionare il pulsante “Gestione carichi” per visualizzare le quattro fasce orarie giornaliere sulla base delle quali è possibile definire la funzione, le priorità, i carichi gestiti e l’ordine di distacco e riattacco. Gestione carichi Nota: il giorno visualizzato nel profilo è evidenziato in azzurro, il giorno corrente è evidenziato dalla barretta bianca. 40 Mitho IL MENÙ FUNZIONI Giorno al quale le fasce orarie visualizzate fanno riferimento Controllo carichi Gestione carichi lun Giorno corrente mar mer gio ven sab dom Fascia oraria di controllo abilitata Fascia oraria di controllo non abilitata Pulsante per l’attivazione del controllo carichi programmato Nota: Quando il controllo carichi è attivo non è consentita alcuna modifica alla “Gestione carichi”. Premere il pulsante configurare. Lunedì -> Fascia 1 5 6 7 8 9 e selezionare la fascia oraria da Premendo l’icona 5 si attiva la tastiera per l’impostazione dell’ora di inizio della fascia selezionata. Premendo l’icona 6 si attiva la tastiera per l’impostazione dell’ora di fine della fascia selezionata. Premendo l’icona 7 si attiva una schermata attraverso la quale è possibile scegliere l’ordine di distacco dei carichi per la fascia oraria selezionata. • dal più prioritario al meno prioritario • dal meno prioritario al più prioritario • dal più gravoso al meno gravoso • dal meno gravoso al più gravoso Premere il pulsante per confermare le modifiche apportate. Ordine di distacco Priorità decrescente Priorità crescente Assorbimento decrescente Assorbimento crescente Premendo l’icona 8 si attiva una schermata attraverso la quale è possibile scegliere l’ordine di riattacco dei carichi per la fascia oraria selezionata. • Come il distacco • Inverso rispetto al distacco • Riattacco solo manuale Premere il pulsante per confermare le modifiche apportate. Ordine di riattacco Come il distacco Inverso al distacco Solo manuale 41 IT Mitho IL MENÙ FUNZIONI IT Premendo l’icona 9 si attiva una schermata attraverso la quale è possibile scegliere i carichi disponibili da assoggettare alla fascia di controllo selezionata. Lunedì -> Fascia 1 Priorità Carico Assorbimento Presa forno 1.20kW Nella parte centrale della pagina compare la lista dei carichi che sono controllati nella fascia oraria selezionata. Ogni elemento della lista delle attuazioni è composto da tre parti: la priorità (assegnata in base all’indice dell’elemento), il nome dell’oggetto ed il valore dell’assorbimento del carico. A sinistra vi sono i tasti per scorrere la lista. Premendo su uno dei carichi della lista, si attiva la tastiera per l’impostazione del valore di assorbimento del carico stesso. Lunedì -> Fascia 1 Premere il pulsante e scegliere uno dei carichi disponibili in elenco da assoggettare alla fascia di controllo selezionata, il carico scelto verrà aggiunto in coda all’elenco esistente. Seleziona un nuovo carico Presa Lavastoviglie Luci Parco Presa Lavatrice Presa Freezer Presa Garage Premere il pulsante posto accanto ad ognuno dei carichi per variarne la posizione in elenco, in su di una posizione. Lunedì -> Fascia 1 Priorità Carico Assorbimento Presa forno 1.20kW Presa freezer 0.50kW Premere il pulsante e selezionare uno dei carichi per eliminarlo dall’elenco. 42 Mitho IL MENÙ FUNZIONI “Malfunzionamenti/Allarmi” Dalla pagina principale del menù “Funzioni” selezionare il pulsante “Allarmi”. Mediante questa funzione è possibile ricevere segnalazioni di allarme visivo e sonoro al verificarsi di determinati eventi legati al risultato (Vero) di operazioni logiche. Funzioni Scenari KNX Dati energia Controllo carichi Antifurto Irrigazione Allarmi Aggiungere un nuovo “Allarme” Premere il pulsante e digitare sulla tastiera che apparirà un nome da assegnare all’allarme; premere il pulsante “invio” e scegliere dalla finestra che apparirà la logica che determina il verificarsi dell’”Allarme”. Al termine dell’operazione si ritorna alla pagina principale dove è riportato l’elenco degli allarmi programmati e il loro stato: Allarmi Allarme allagamento Allarme non abilitato Allarme abilitato Allarme in corso Al verificarsi di un allarme abilitato, il simbolo di allarme all’interno della bandella bianca lampeggia; l’icona “Funzioni” in home page e l’icona “Allarmi” in “Funzioni” lampeggiano con il segnale di allarme. Premendo il pulsante che rappresenta l’allarme si tacita l’eventuale segnale acustico e la bandella smette di lampeggiare; l’icona rimane invece attiva fino al perdurare della condizione di allarme. Allarmi Operazione logica Soglia vento Soglia acqua Premere il pulsante e selezionare uno degli allarmi per eliminarlo dall’elenco. Premere il pulsante e selezionare gli allarmi ai quali non si desidera associare un segnale acustico. Premere il pulsante per accedere all’elenco storico degli allarmi che hanno interessato l’impianto. Premere il pulsante e selezionare uno degli allarmi per eliminarlo dall’elenco. Premere il pulsante per eliminare tutto l’elenco allarmi. Allarmi Storico allarmi Allarme allagamento Allarme allagamento Allarme allagamento Nota: La melodia, gli squilli e il volume della suoneria associata a tutti gli allarmi vengono gestite nel menu “Setup”. Il segnale acustico è comunque ripetuto ogni minuto fino a tacitazione avvenuta o a fine condizione di allarme. 43 IT Mitho IL MENÙ PROGRAMMI Creare e gestire “Timer” Dalla pagina principale selezionando il pulsante “Programmi” si accede alla schermata che permette di visualizzare l’elenco delle funzioni che possono essere programmate. IT Ambienti Citofonia Funzioni Preferiti Programmi Setup Selezionare il pulsante “Timer” per accedere all’elenco delle temporizzazioni disponibili. Programmi Timer La funzione “Timer”, permette di temporizzare uno o più dispositivi/comandi disponibili secondo una programmazione giornaliera. Sveglia Scenari sequenza Salva schermo Messaggi audio Logiche Premendo il tasto relativo ad un timer questo viene attivato/disattivato in modo ciclico. Timer non abilitato Timer Timer abilitato Timer luci vialetto Timer cancello Premere il pulsante e selezionare uno dei “Timer” per eliminarlo dall’elenco. Per modificare la programmazione di un ”Timer” in elenco, premere il pulsante e selezionare il ”Timer” desiderato. NOTA: solo i timer non attivi possono essere cancellati o modificati. Aggiungere un nuovo “Timer” Inserisci il nome del timer Timer luci piscina Premere il pulsante e digitare sulla tastiera che apparirà un nome da assegnare al “Timer”. spazio invio 44 Mitho IL MENÙ PROGRAMMI Si accede alla pagina mediante la quale è possibile selezionare il dispositivo da temporizzare. La finestra di selezione presenta sui lati le icone che permettono di filtrare la visualizzazione delle tipologie di dispositivi temporizzabili. Le categorie sono: Timer luci piscina Seleziona oggetto Luce Viale Luce Ingresso Luce giardino EST Luce piscina1 Luce giardino OVEST Luce piscina2 “Illuminazione” “Attuatori ON/OFF” “Uscite” “Altro”, quest’ultimo filtro, una volta attivato, visualizza le seguenti categorie: - Scenari KNX (Esegui/Apprendi ) - Eventi videocitofonici -Antifurto (Inserimento/Disinserimento totale, Inserimento/Disinserimento settori) - Logica (Attiva/Disattiva) - Scenari sequenza (Avvia/Arresta) Timer luci piscina Luce piscina 1 ON/OFF “Tapparelle” Dimmer Selezionando il dispositivo da temporizzare si accede alla finestra mediante la quale è possibile scegliere il canale da temporizzare. Una volta scelto il canale si passa alla finestra per la programmazione della temporizzazione del dispositivo. Nota: il giorno visualizzato nel profilo è evidenziato in giallo, il giorno corrente è evidenziato dalla barretta bianca. Timer luci piscina Luce piscina 1 lun mar mer gio ven sab Premere il pulsante modificare il profilo. dom per abilitare la possibilità di Tracciare con il pennino in dotazione il diagramma di funzionamento desiderato. Premendo sul pulsante è possibile visualizzare l’asse temporale diviso in quarti d’ora per affinare la programmazione, i pulsanti consentono di far scorrere la vista fino al punto desiderato. Una volta raggiunta la configurazione desiderata premere per tornare alla vista estesa e successivamente il pulsante per confermare le modifiche apportate. Timer luci piscina Luce piscina 1 Per copiare una temporizzazione in altri giorni della settimana, selezionare il giorno della settimana del quale si vuole copiare la temporizzazione e successivamente selezionare il pulsante . Selezionare il o i giorni della settimana nei quali si vuole copiare la temporizzazione e premere per eseguire la copia. 45 IT Mitho IL MENÙ PROGRAMMI IT Setup parametri “Timer” Timer luci piscina Luce piscina 1 Premere il pulsante setup del “Timer”. Premendo su ognuno dei pulsanti 1 si attiva la tastiera per l’impostazione dei 5 valori che compongono il profilo del valore visualizzato nel diagramma (valori possibili quando il comando può assumere più valori, ad esempio le percentuali del dimmer). 1 3 per accedere alle opzioni di 2 Premendo l’icona 2 si attiva la tastiera per l’impostazione del periodo di ripetizione ciclica del valore del profilo orario. Premendo l’icona 3 si attiva il profilo creato o modificato (compare la bandella bianca sul pulsante del Timer impostato). Note: • Quando la temporizzazione è attiva non è consentita alcuna modifica ai parametri. • Il salvataggio di Timer e Scenari sequenza avviene in automatico ogni 1 minuto. É comunque possibile forzare manualmente il salvataggio dei dati selezionando il pulsante di memorizzazione su SD card nella sezione “Setup” -> “Generale”. 46 Mitho IL MENÙ PROGRAMMI Creare e gestire “Scenari sequenza” Dalla pagina principale del menù “Programmi” selezionare il pulsante “Scenari sequenza”. Mediante questa funzione è possibile programmare l’attivazione sequenziale di dispositivi componenti il sistema domotico. Programmi Timer Sveglia Scenari sequenza Salva schermo La pagina “Scenari sequenza” mostra la lista degli scenari programmati. Premendo il tasto relativo ad uno scenario questo viene avviato/arrestato in modo ciclico. Gli scenari in esecuzione sono segnalati dalla bandella bianca laterale. Messaggi audio Logiche Scenario in esecuzione Scenari sequenza Apri tapparelle Premere il pulsante e selezionare uno degli “Scenari sequenza” per eliminarlo dall’elenco. Finta presenza Per modificare la programmazione di uno “Scenario sequenza” in elenco, premere il pulsante e selezionare lo “Scenario sequenza” desiderato. NOTA: uno scenario in esecuzione non può essere eliminato o modificato. Aggiungere un nuovo “Scenario sequenza” Premere il pulsante e digitare sulla tastiera che apparirà un nome da assegnare allo “Scenario sequenza”. Accendi luci atrio Oggetto Azione Ritardo Una volta inserito il nome, si attiva la finestra per la programmazione dello scenario e della sequenza delle azioni. Premendo il pulsante si accede alla pagina mediante la quale è possibile selezionare i dispositivi da aggiungere alla lista della sequenza attivazioni. La finestra di selezione presenta sui lati le icone che permettono di filtrare la visualizzazione delle tipologie di dispositivi. Le categorie sono: Accendi luci atrio Seleziona oggetto Luce Viale Luce Ingresso Luce giardino EST Luce piscina1 Luce giardino OVEST Luce piscina2 “Tapparelle” “Illuminazione” “Attuatori ON/OFF” “Uscite” “Termoregolazione” “Altro”, quest’ultimo filtro, una volta attivato, visualizza le seguenti categorie: - Scenari KNX (Esegui/Apprendi ) - Eventi videocitofonici 47 IT Mitho IL MENÙ PROGRAMMI IT -Antifurto (Inserimento/Disinserimento totale, Inserimento/Disinserimento settori) - Logica (Attiva/Disattiva) Accendi luci atrio Luce viale ON/OFF Dimmer Una volta selezionato il dispositivo si accede alla finestra mediante la quale è possibile scegliere l’azione che deve svolgere. Ripetendo questa procedura è possibile aggiungere una serie di attuazioni che andranno a popolare la finestra che raccoglie la sequenza delle azioni Ogni elemento della lista è composto da tre parti: il nome dell’oggetto, l’azione che deve compiere ed il ritardo rispetto all’azione precedente. Premendo sull’area “Ritardo” di un elemento è possibile digitare il ritardo desiderato. Accendi luci atrio Oggetto Azione Ritardo Luce viale Premere il pulsante e selezionare uno degli elementi della lista per eliminarlo. Luce atrio Premere il pulsante e digitare sulla tastiera il numero di ripetizioni da assegnare alla sequenza. Premendo il pulsante e successivamente il pulsante , è possibile selezionare ingressi che possono richiamare/arrestare lo “Scenario sequenza”. Accendi luci atrio Lista ingressi La pagina permette la scelta dell’Ingresso da associare allo scenario sequenza. I tasti a fianco permettono di filtrare gli Ingressi dell’impianto mostrando, per esempio, solo gli oggetti in ingresso relativi alle luci o solo quelli relativi agli Ingressi e così via. La finestra di selezione presenta sui lati le icone che permettono di filtrare la visualizzazione delle tipologie di dispositivi. Il filtro “Altro”, una volta attivato, visualizza le seguenti categorie: - Eventi videocitofonici - Logica (Attiva/Disattiva) Accendi luci atrio Seleziona un nuovo ingresso Luce Viale Luce Ingresso Luce giardino EST Apri porta Luce giardino OVEST Luce piscina2 Una volta selezionato il dispositivo si accede alla finestra mediante la quale è possibile scegliere la funzione che deve svolgere per attivare e/o disattivare lo scenario. Nota: Premendo sul nome dello scenario è sempre possibile cambiarne il nome. 48 Mitho IL MENÙ PROGRAMMI Ogni elemento della lista degli Ingressi è composto da due parti: il nome dell’oggetto e l’azione che il valore che esso assume comporta. Accendi luci atrio Azioni per apriporta Premere il pulsante e selezionare uno degli “Ingressi” per eliminarlo dall’elenco. Premere il pulsante per aggiungere ingressi alla lista. Premendo direttamente su uno degli ingressi in lista, si accede ancora alla pagina in cui è possibile scegliere l’azione associata al valore che l’ingresso selezionato può assumere. Accendi luci atrio Lista ingressi Apriporta NOTA: il salvataggio di Timer e Scenari sequenza avviene in automatico ogni 1 minuto. É comunque possibile forzare manualmente il salvataggio dei dati selezionando il pulsante di memorizzazione su SD card nella sezione “Setup” -> “Generale”. “Logiche” Dalla pagina principale del menù “Programmi” selezionare il pulsante “Logiche”. Programmi Timer Sveglia Scenari sequenza La pagina Logiche mostra la lista delle logiche/condizioni presenti, predefinite in ETS o con Easy controller. Premendo il tasto relativo ad uno di questi elementi questo viene attivato/disattivato in modo ciclico. Salva schermo Messaggi audio Logiche Logica non attiva Logica attiva vera Logiche Luce comune Logica attiva falsa Soglia temperatura Premendo il pulsante e successivamente il pulsante che rappresenta la logica è possibile visualizzare gli ingressi della logica ed il loro stato/valore attuale. É possibile selezionare la melodia associata ad una logica vera/falsa nel menu “Setup”. 49 IT Mitho IL MENÙ PROGRAMMI Programmare la “Sveglia” IT Dalla pagina principale del menù “Programmi” selezionare il pulsante “Sveglia”. Programmi Timer Per impostare l’ora di sveglia selezionare il pulsante 1. Impostare ora e minuti nella pagina che appare e confermare con il tasto . Sveglia Scenari sequenza Salva schermo Nota: Programmando solo l’ora di sveglia la suoneria verrà riprodotta tutti i giorni. Messaggi audio Logiche Per impostare il giorno di sveglia selezionare il pulsante 2. Impostare giorno, mese e anno nella pagina che appare e confermare con il tasto . Sveglia Il giorno e l’ora impostati vengono visualizzati nella parte centrale dello schermo. Premere il pulsante 3 per attivare la sveglia impostata (icona blu = sveglia attiva). 3 1 Sulla finestra principale del pannello è possibile attivare/disattivare una sveglia programmata: Sveglia attiva Sveglia non attiva. 2 Programmare il “Salva schermo” Dalla pagina principale del menù “Programmi” selezionare il pulsante “Salva schermo”. Scegliere la modalità “Salva schermo” preferita fra le 3 disponibili. Disabilitato: allo scadere del tempo di stand-by lo schermo si oscura regolando la retroilluminazione secondo quando impostato nel menu “Setup”. Data/Ora: allo scadere del tempo di stand-by viene visualizzata una schermata nella quale sono riportate data e ora correnti. Salva schermo Disabilitato Data/Ora Slide show Carica Slide-show: con questa impostazione, allo scadere del tempo di stand-by viene visualizzata una serie di immagini caricate su SD card con effetto slide-show. Il pannello utilizza le immagini preesistenti nella SD card. É possibile anche memorizzare immagini personalizzate in SD card con le seguenti caratteristiche: 480x272 pixel, JPG o PNG. le immagini devono essere caricate sul pannello mediante il pulsante “Carica”. Il pulsante permette di visualizzare una anteprima del “Salva schermo” scelto. Nota: eventuali immagini presenti in precedenza verranno rimosse 50 Mitho IL MENÙ PROGRAMMI Registrare e ascoltare “Messaggi audio” (Solo Mitho PL KNX) La funzione “Messaggi audio” permette di registrare nella memoria del dispositivo un massimo di 6 messaggi audio della durata di 10” ciascuno. La presenza di messaggi non ascoltati é segnalata nella pagina principale mediante il lampeggio dell’icona “Programmi” e nella pagina “Programmi” con un pallino rosso riportante il numero di messaggi non ascoltati. Programmi Timer Sveglia Scenari sequenza Salva schermo Dalla pagina principale del menù “Programmi” selezionare il pulsante “Messaggi audio” per accedere all’elenco dei messaggi. Ogni messaggio riporta data e ora della registrazione. Messaggi audio Logiche Messaggio non ascoltato Messaggi audio Messaggio ascoltato 23-09-2013 22-09-2013 14:25 12:32 20-09-2013 18-09-2013 07:44 07:32 Selezionare un messaggio per avviare la riproduzione dello stesso. Riproduzione messaggio in corso Per eliminare un messaggio in elenco premere il pulsante e selezionare il messaggio da eliminare. Registrare un messaggio audio Nuovo messaggio audio Premere il pulsante e successivamente il pulsante per avviare la registrazione del messaggio; durante la registrazione, l’icona è rimpiazzata da quella su sfondo rosso che permette di terminare la registrazione. Una volta registrato il messaggio, premere l’icona per salvare il messaggio e ritornare alla pagina “Messaggi audio”. L’icona permette invece di riascoltare il messaggio registrato; una volta premuta, viene sostituita dall’icona su sfondo verde che permette di interrompere la riproduzione. La registrazione può essere sovrascritta più volte, poiché viene salvata solo alla pressione dell’icona ; una volta salvata, non è più modificabile. 51 IT IL MENÙ CITOFONIA (SOLO PER PANNELLI MITHO PL KNX) Mitho Funzioni base Rispondere ad una chiamata IT Comfort Citofonia Funzioni Preferiti Programmi In caso di chiamata, la schermata principale viene automaticamente sostituita dalla schermata che mostra l’immagine del chiamante ripreso dal posto videocitofonico esterno. Setup 1 Premere il pulsante B per rifiutare la chiamata. Per rispondere alla chiamata sollevare il ricevitore oppure premere il pulsante A per attivare la modalità vivavoce. 1 Rispondendo alla chiamata si avranno a disposizione i seguenti comandi. 2 2 I pulsanti 3 e 4 consentono di ingrandire/rimpicciolire l’immagine visualizzata. Agendo con la penna in dotazione sull’immagine ingrandita è possibile spostare l’inquadratura nella posizione desiderata 4 3 3 5 5 Accesso al comando ausiliario e luce scale 6 Visualizza immagini da posto esterno successivo (se presente) 7 Apriporta del posto esterno visualizzato* 8 Accesso alle regolazioni video (luminosità, contrasto, colore) 9 Chiusura audio verso il chiamante (funzione mute) J Trasferimento chiamata (solo in presenza di dispositivi intercomunicanti) 6 7 8 J 9 *La chiave di colore verde indica che la porta è aperta, se il posto esterno è predisposto per inviare tale informazione. 4 52 IL MENÙ CITOFONIA (SOLO PER PANNELLI MITHO PL KNX) Mitho Trasferire una chiamata verso altri interni Premendo il pulsante J (fig. 4) apparirà un elenco degli interni verso i quali è possibile deviare la chiamata; selezionare l’interno desiderato, attendere risposta e chiudere la comunicazione per trasferire la chiamata. 5 Ricevere una chiamata da altri interni (intercomunicazione) Chiamata interni Inclusione video Messaggi portineria Messaggi segreteria L Nel caso in cui la chiamata provenga da altri posti interni (intercomunicazione) apparirà la finestra di fig. 6. Premere il pulsante K per rifiutare la chiamata Per rispondere alla chiamata sollevare il ricevitore (se presente) oppure premere il pulsante L per attivare la modalità vivavoce. K 6 Chiusura audio verso il chiamante (funzione mute) Effettuare una chiamata verso altri interni (intercomunicazione) M Comfort Citofonia Qualora si volesse effettuare una chiamata verso un posto interno procedere come segue. Funzioni Preferiti Dalla schermata principale selezionare l’icona “Citofonia” M. Programmi Setup 7 Si avrà accesso alla schermata che raccoglie le principali funzioni videocitofoniche dell’impianto. Chiamata interni Messaggi portineria N Inclusione video Selezionare l’icona “Chiamata interni” N. Messaggi segreteria 8 53 IT IL MENÙ CITOFONIA (SOLO PER PANNELLI MITHO PL KNX) Mitho Selezionare uno degli interni in elenco per avviare immediatamente la chiamata. IT Interno 1 Interno 2 Interno 3 Interno 4 Interno 5 Interno 6 9 O O Torna alla schermata precedente P Torna alla schermata principale Q Identificativo dell’interno chiamato P Chiamata interni Inclusione video Messaggi portineria Messaggi segreteria Chiusura audio verso il chiamante (funzione mute) Interno 2 10 Assegnare un nome ad un interno Interno 1 Interno 3 Per semplificare il riconoscimento degli interni è possibile assegnare a ciascuno di essi un nome. Interno 2 R Interno 5 Premere il pulsante R e selezionare l’interno al quale si vuole cambiare il nome. Interno 4 Interno 6 11 Digitare il nuovo nome dell’interno selezionato; premere il pulsante S per salvare e tornare alla finestra precedente. Modifica il nome dell’interno Interno 1 spazio invio S 12 54 IL MENÙ CITOFONIA (SOLO PER PANNELLI MITHO PL KNX) Mitho Elenco chiamate da portiere Chiamata interni Messaggi portineria Qualora l’impianto videocitofonico preveda la presenza di un centralino di portineria, sarà possibile consultare una lista delle chiamate senza risposta effettuate dalla portineria verso il nostro interno. Inclusione video 1 Messaggi segreteria Dalla schermata principale (fig. 7) selezionare l’icona “Citofonia” e successivamente l’icona “Messaggi portineria” 1. 13 Si accede alla schermata contenente l’elenco delle chiamate in ordine cronologico; il pulsante cancella tutte le voci in elenco. 1. Portineria - 14:08:59 11-07-2013 Nota: Qualora vi siano messaggi dal centralino di portineria non letti, l’icona “Messaggi portineria” lampeggerà. 2. Portineria - 10:13:27 11-07-2013 3. Portineria - 16:11:10 11-07-2013 4. Portineria - 08:51:01 11-07-2013 14 Visualizzare immagini da posti esterni Chiamata interni Messaggi portineria 2 Dalla schermata principale selezionare l’icona 2, immediatamente sarà possibile visualizzare le immagini riprese dalle telecamere dei posti esterni (se più di uno). Inclusione video Messaggi segreteria 3 Accesso al comando ausiliario e luce scale 4 Visualizza immagini da posto esterno successivo (se presente) 5 Apriporta del posto esterno visualizzato* 6 Accesso alle regolazioni video (luminosità, contrasto, colore) 7 Torna alla schermata precedente 8 Apri/Chiudi audio verso posto esterno visualizzato 15 3 4 5 6 H G *La chiave di colore verde indica che la porta è aperta, se il posto esterno è predisposto per inviare tale informazione. 16 55 IT IL MENÙ CITOFONIA (SOLO PER PANNELLI MITHO PL KNX) Mitho La segreteria videocitofonica IT Mitho PL KNX consente di registrare delle videochiamate dal posto esterno in caso di assenza o di impossibilità alla risposta. Quando la funzione segreteria è attiva, in caso di chiamata, sul posto esterno può essere riprodotto un messaggio, preregistrato dall’utente, che avvisa il chiamante della possibilità di lasciare un videomessaggio (es. “L’utente chiamato non è al momento disponibile, se volete potete lasciare un messaggio dopo il bip.”). Il videomessaggio, riportante data e ora della chiamata, verrà archiviato e potrà essere visionato successivamente consultando la segreteria. Registrare un messaggio di segreteria Comfort Citofonia Funzioni Preferiti Programmi 2 1 Dalla schermata principale selezionare l’icona “Setup” 1; Setup 17 Selezionare l’icona “Risposta segreteria”. Setup Melodie Generale Data/Ora La schermata che appare, contiene i comandi necessari per registrare e riascoltare il messaggio da lasciare in segreteria. Display Risposta segreteria Nota: Il messaggio di segreteria può avere una durata massima di 10 secondi al termine della riproduzione del messaggio il posto esterno emetterà un segnale acustico. Citofonia 18 Una volta registrato il messaggio sarà possibile, mediante il pulsante , decidere se esso debba essere riprodotto in caso di chiamata senza risposta. Setup Icona verde Riproduzione messaggio attiva Icona grigia Riproduzione messaggio NON attiva 19 56 IL MENÙ CITOFONIA (SOLO PER PANNELLI MITHO PL KNX) Mitho Per attivare la segreteria videocitofonica (con o senza riproduzione del messaggio) premere l’icona 2 sulla schermata principale (fig. 17 ). Setup Icona gialla Segreteria Attiva Icona grigia Segreteria NON attiva 20 Consultare la segreteria videocitofonica Comfort Dalla schermata principale selezionare l’icona “Citofonia” 3 e successivamente l’icona “Messaggi segreteria” che riporta la segnalazione dei messaggi non letti 4. Citofonia 3 Funzioni Preferiti Programmi Setup 21 Chiamata interni Messaggi portineria La schermata che appare propone un elenco dei messaggi registrati in ordine cronologico, partendo dal più recente. I messaggi non letti sono evidenziati dalla bandella bianca. Inclusione video 4 Messaggi segreteria 22 Per visualizzare un messaggio videocitofonico premere sulla voce dell’elenco desiderata. Nota: La segreteria può contenere un massimo di 10 messaggi, l’undicesimo messaggio sovrascriverà il primo in ordine cronologico. 23 57 IT IL MENÙ CITOFONIA (SOLO PER PANNELLI MITHO PL KNX) Mitho Il pulsante 5 cancella il messaggio che si sta visualizzando. IT Nota: La presenza di messaggi videocitofonici non letti in segreteria è rivelata dall’icona “segreteria” in giallo lampeggiante sulla schermata principale. 5 24 Funzione ufficio Chiamata interni Inclusione video Messaggi portineria Messaggi segreteria Se la funzione ufficio è attiva 6, quando viene inviata una chiamata dal posto esterno, la porta ad esso abbinata viene aperta automaticamente. Nota: La funzione ufficio può essere utilizzata all’interno di un timer per programmare l’auto-apertura in base al giorno e alla fascia oraria. 6 25 58 Mitho IL MENÙ SETUP Ambienti Citofonia Funzioni Preferiti Programmi Dalla pagina principale selezionando il pulsante “Setup” si accede alla schermata che raggruppa tutte le impostazioni che riguardano il funzionamento globale del pannello. Setup Melodie Premendo sul pulsante “Melodie” si accede alla schermata che presenta un elenco delle tipologie di chiamata alle quali è possibile associare una delle suonerie disponibili. Setup Melodie Generale Data/Ora Display Risposta segreteria Citofonia Selezionare la chiamata. Setup Melodie Esterno Intercom Pianerot. Sveglia Portiere Touch Scegliere una melodia per le chiamate Setup Melodie Dall’elenco delle suonerie disponibili selezionare quella che si desidera associare alla chiamata. Classic Dejavu Future Galaxy Space Terramin Il pulsante centrale consente di ascoltare una anteprima della suoneria scelta. Premere il pulsante precedente. 59 per tornare alla schermata IT Mitho IL MENÙ SETUP IT Regolare le caratteristiche dei segnali acustici Esterno Dalla schermata principale “Melodie” selezionare il pulsante seguito dal segnale acustico del quale si vogliono modificare le caratteristiche. Il pulsante centrale consente di ascoltare il livello di volume scelto; premere il pulsante per confermare le modifiche apportate. Squilli Volume Pausa Data/Ora Premendo sul pulsante “Data/Ora” si accede alla schermata che permette di impostare data e ora sul pannello. Setup Data/Ora Melodie Generale Data/Ora Selezionare il pulsante 1 e utilizzare la schermata che appare per impostare l’ora corrente; premere il pulsante per confermare le modifiche apportate. Display Risposta segreteria Citofonia Selezionare il pulsante 2 e utilizzare la schermata che appare per impostare giorno, mese, anno corrente; premere il pulsante per confermare le modifiche apportate. Il pulsante 3 consente di scegliere il formato di visualizzazione dell’ora. Setup Data/Ora 1 3 Il pulsante 4 (premuto ripetutamente) consente di scegliere il formato di visualizzazione della data. 2 GG MM AA 4 Il pulsante 5 (attivo) abilita l’adattamento automatico del pannello all’ora legale (l’ultima domenica di marzo). 5 Risposta segreteria (solo su pannelli MITHO PL KNX) Vedi: “Registrare un messaggio di segreteria” a pag. 56 60 Mitho IL MENÙ SETUP Generale Premendo sul pulsante “Generale” si accede ad una schermata che raggruppa tutte quelle impostazioni generali che riguardano il funzionamento globale del pannello. Setup Melodie Generale Data/Ora Display Risposta segreteria Citofonia Scelta lingua pannello Setup Selezionare il pulsante 1 e utilizzare la schermata che appare per scegliere la lingua dell’interfaccia del pannello; dopo la scelta attendere qualche secondo il riavvio del pannello. Generale 1 2 Premere il pulsante precedente. per tornare alla schermata Gestione password Selezionare il pulsante 2 e utilizzare la schermata che appare per modificare la password (max 8 caratteri alfanumerici) associata ai livelli di accesso agli elementi del progetto ed alla funzione antifurto. Questa pagina è disponibile se almeno un elemento è protetto o la funzione antifurto è abilitata. Setup Gesione password Esempio di elemento protetto Premendo sulle relative icone si possono modificare le seguenti password: Tipologia di password Elementi accessibili Non protetti Con livello di accesso 1 Con livello di accesso 2 Con livello di accesso 3 Editing locale di timers e scenari sequenza Funzioni antifurto (*) (*) (*) (*) valida se gestione gerarchica Le password relative ai livelli , 1, 2 e 3, quando richieste, rimangono attive fino all’ingresso in modalità stand-by del pannello. La password relativa all’antifurto viene richiesta ad ogni accesso alle funzioni antifurto. Premere il pulsante per tornare alla schermata precedente. 61 IT Mitho IL MENÙ SETUP Setup IT Salvataggio/recupero copia impianto Generale Selezionare il pulsante 6 per salvare all’interno della scheda micro SD i dati di impianto impostati localmente nel pannello (timer, funzioni, etc.). Selezionare il pulsante 7 per recuperare dalla scheda micro SD i dati dell’impianto salvato. 6 7 Premere il pulsante precedente. per tornare alla schermata Setup “Preferiti” Setup Selezionare il pulsante 8 e utilizzare la schermata che appare per impostare la funzione dei pulsanti “Preferiti” presenti nella Home Page. Generale 8 In questa pagina sono presenti Preferito 1 e Preferito 2 (quest’ultimo solo nella versione Mitho HA KNX) a ciascun pulsante può essere associato un elemento dell’impianto. Come preferiti possono essere selezionati: - una Zona - un Ambiente - un Programma - una Funzione (se presente) Una volta selezionato un preferito, il relativo nome compare nell’apposita area del pulsante. 9 Setup Preferiti Premere il pulsante precedente. Preferiti per tornare alla schermata Preferiti Setup “Scenari preferiti” (solo Mitho HA KNX) Selezionare il pulsante 9 (presente solo su Mitho HA KNX) e utilizzare la schermata che appare per impostare la funzione dei tre pulsanti centrali presenti nella Home Page; quando nessuna impostazione è stata impostata come “Scenario preferito”, cliccando sulla relativa icona dalla Home Page si passa direttamente a questa pagina di impostazione. Setup Scenari preferiti Scenario Scenario In questa pagina sono presenti 3 scenari preferiti, per ciascuno è possibile definirne la funzione. Come scenari possono essere selezionati: - Scenari KNX - Scenari sequenza Scenario 62 Mitho IL MENÙ SETUP Display Premendo sul pulsante “Display” si accede ad una schermata che permette di regolare la luminosità del display. Setup Melodie Generale Data/Ora Display Risposta segreteria Citofonia Il cursore 1 permette di regolare la luminosità del display in condizioni di normale utilizzo. Setup Display 1 Il cursore 2 permette di regolare la luminosità del display quando si trova in modalità stand-by (luminosità attenuata). 2 Premere il pulsante precedente. Attivo Stand-by per tornare alla schermata Citofonia (Solo su pannelli Mitho PL KNX) Premendo sul pulsante “citofonia” si accede ad una schermata che permette di esegure il setup delle funzioni relative alla videocitofonia. Setup Citofonia 3 4 5 In impianti dotati di centralino di portineria, attivando la funzione “Building”, 3 verrà attivato sulla pagina principale del pannello il pulsante per la chiamata verso la portineria. 7 6 Il pulsante 4 abilitato, attiva la risposta automatica alle chiamate intercomunicanti provenienti da altri interni (funzione ascolto ambientale). Il pulsante 5 è utilizzato per la programmazione manuale. Il pulsante 6 è necessario all’identificazione del dispositivo qualora si stia programmando l’impianto da PC mediante software. Il pulsante 7 commuta ciclicamente lo standard del segnale video dell’ impianto tra PAL e NTSC. Premere il pulsante precedente. 63 per tornare alla schermata IT Mitho IL MENÙ SETUP Info Pannello Info IT Il pulsante , al centro dello schermo, permette di visualizzare una serie di informazioni tecniche sul pannello che possono tornare utili all’installatore per aggiornamenti del software o interventi tecnici. In particolare è possibile visualizzare l’indirizzo KNX del pannello 8. 8 Mitho PL KNX Mitho HA KNX Reset Reset Reset dispositivo Ogni volta che anomalie di funzionamento, interventi e altre ragioni tecniche richiedono il reset dell’apparecchio, premere leggermente il pulsante collocato all’interno dell’apertura al di sotto della scocca del dispositivo (vedi figura), utilizzando il pennino in dotazione; rilasciare il pulsante appena lo schermo si oscura e attendere che riappaia il menù principale prima di riprendere l’uso normale dell’apparecchio. Nota: Questa operazione NON comporta la cancellazione di eventuali programmi che saranno ripristinati, assieme agli altri dati, al riavvio dell’apparecchio. 64 Mitho CONTENTS CONTENTS . . . . . . . . . . . . . . . . . . . . . . . . . . . . . . . . . . . . . . . . . . . . . . . . . . . . . . . . . . . . . . . . . . . . . . . . . . . . . . . . . . . Pag. 65 GENERAL INFORMATION . . . . . . . . . . . . . . . . . . . . . . . . . . . . . . . . . . . . . . . . . . . . . . . . . . . . . . . . . . . . . . . . Pag. Mitho PL KNX: technical characteristics . . . . . . . . . . . . . . . . . . . . . . . . . . . . . . . . . . . . . . . . . . . . . . . . . . . . . . . . . . . . . Maintenance and Use of the Panel . . . . . . . . . . . . . . . . . . . . . . . . . . . . . . . . . . . . . . . . . . . . . . . . . . . . . . . . . . . . . . . . . . Main functions associated with the icons on the main screen . . . . . . . . . . . . . . . . . . . . . . . . . . . . . . . . . . . . . . Main menu for systems without Porter Switchboard . . . . . . . . . . . . . . . . . . . . . . . . . . . . . . . . . . . . . . . . . . . . . . . . . Mitho HA KNX: technical characteristics . . . . . . . . . . . . . . . . . . . . . . . . . . . . . . . . . . . . . . . . . . . . . . . . . . . . . . . . . . . . Maintenance and Use of the Panel . . . . . . . . . . . . . . . . . . . . . . . . . . . . . . . . . . . . . . . . . . . . . . . . . . . . . . . . . . . . . . . . . . Main functions associated with the icons on the main screen . . . . . . . . . . . . . . . . . . . . . . . . . . . . . . . . . . . . . . 68 68 68 69 69 70 70 71 THE ROOMS MENU . . . . . . . . . . . . . . . . . . . . . . . . . . . . . . . . . . . . . . . . . . . . . . . . . . . . . . . . . . . . . . . . . . . . . . . . Pag. Navigation in the "Rooms" menu . . . . . . . . . . . . . . . . . . . . . . . . . . . . . . . . . . . . . . . . . . . . . . . . . . . . . . . . . . . . . . . . . . . . Send commands to all the devices in one or more "Room" of a "Zone" . . . . . . . . . . . . . . . . . . . . . . . . . . . . General commands with “Rolling shutters" filter active . . . . . . . . . . . . . . . . . . . . . . . . . . . . . . . . . . . . . . . . . . . . . . General commands with “Lighting" filter active . . . . . . . . . . . . . . . . . . . . . . . . . . . . . . . . . . . . . . . . . . . . . . . . . . . . . . General commands with “Temperature regulation" filter active . . . . . . . . . . . . . . . . . . . . . . . . . . . . . . . . . . . . . . General commands with “Actuators ON/OFF" filter active . . . . . . . . . . . . . . . . . . . . . . . . . . . . . . . . . . . . . . . . . . . . "Rolling shutters" / "Venetian Blinds" control . . . . . . . . . . . . . . . . . . . . . . . . . . . . . . . . . . . . . . . . . . . . . . . . . . . . . . . Priority/Over-riding a rolling shutter or Venetian blind . . . . . . . . . . . . . . . . . . . . . . . . . . . . . . . . . . . . . . . . . . . . . . . Blocking a rolling shutter or Venetian blind . . . . . . . . . . . . . . . . . . . . . . . . . . . . . . . . . . . . . . . . . . . . . . . . . . . . . . . . . . "Lighting" Control . . . . . . . . . . . . . . . . . . . . . . . . . . . . . . . . . . . . . . . . . . . . . . . . . . . . . . . . . . . . . . . . . . . . . . . . . . . . . . . . . . . . Possible options to adjust ON/OFF lights and dimmed lights . . . . . . . . . . . . . . . . . . . . . . . . . . . . . . . . . . . . . . . . Priority/over-riding a light point . . . . . . . . . . . . . . . . . . . . . . . . . . . . . . . . . . . . . . . . . . . . . . . . . . . . . . . . . . . . . . . . . . . . . Blocking a light point . . . . . . . . . . . . . . . . . . . . . . . . . . . . . . . . . . . . . . . . . . . . . . . . . . . . . . . . . . . . . . . . . . . . . . . . . . . . . . . . Possible options for RGB lights . . . . . . . . . . . . . . . . . . . . . . . . . . . . . . . . . . . . . . . . . . . . . . . . . . . . . . . . . . . . . . . . . . . . . . "Temperature regulation" Control . . . . . . . . . . . . . . . . . . . . . . . . . . . . . . . . . . . . . . . . . . . . . . . . . . . . . . . . . . . . . . . . . . . Timer profile for programmable thermostat (function carried out by panel) . . . . . . . . . . . . . . . . . . . . . . . . . Forcing the setpoint of the temperature set or the speed of the fans of the fan coil units with active profile . . . . . . . . . . . . . . . . . . . . . . . . . . . . . . . . . . . . . . . . . . . . . . . . . . . . . . . . . . . . . . . . . . . . . . . . . . . . . . . . . Timer profile for HVAC Master with control through modes . . . . . . . . . . . . . . . . . . . . . . . . . . . . . . . . . . . . . . . . . Timer profile for HVAC Master with control through temperature setpoint . . . . . . . . . . . . . . . . . . . . . . . . . . Create a daily temperature profile (valid for all types of control) . . . . . . . . . . . . . . . . . . . . . . . . . . . . . . . . . . . . . Copy a temperature profile to other days of the week (valid for all types of control) . . . . . . . . . . . . . . . . . . . . . . . . . . . . . . . . . . . . . . . . . . . . . . . . . . . . . . . . . . . . . . . . . . . . . . . Programmable thermostat with non-active profile . . . . . . . . . . . . . . . . . . . . . . . . . . . . . . . . . . . . . . . . . . . . . . . . . . HVAC Master with mode control and non-active profile . . . . . . . . . . . . . . . . . . . . . . . . . . . . . . . . . . . . . . . . . . . . . Set parameters (Programmable thermostat) . . . . . . . . . . . . . . . . . . . . . . . . . . . . . . . . . . . . . . . . . . . . . . . . . . . . . . . . HVAC Master with setpoint control and non-active profile . . . . . . . . . . . . . . . . . . . . . . . . . . . . . . . . . . . . . . . . . . . Reference temperature regulation (Comfort, Stand-by, Eco) . . . . . . . . . . . . . . . . . . . . . . . . . . . . . . . . . . . . . . . . . Anti-freeze temperature regulation . . . . . . . . . . . . . . . . . . . . . . . . . . . . . . . . . . . . . . . . . . . . . . . . . . . . . . . . . . . . . . . . . . Other temperature setup items in systems with control at two points with fan coil units . . . . . . . . . . . . Other temperature setup items in systems with PI control without fan coil units . . . . . . . . . . . . . . . . . . . . . Set parameters (HVAC Master with mode control) . . . . . . . . . . . . . . . . . . . . . . . . . . . . . . . . . . . . . . . . . . . . . . . . . . Set parameters (HVAC Master with setpoint control) . . . . . . . . . . . . . . . . . . . . . . . . . . . . . . . . . . . . . . . . . . . . . . . Adjustment of operating parameters and unit of temperature measurement . . . . . . . . . . . . . . . . . . . . . . . . 72 72 74 74 74 75 76 77 78 78 79 79 79 80 80 81 82 MithoKNX_Ute EN 24807970 13-01-14 65 82 83 83 84 84 85 85 86 86 86 86 87 87 88 88 88 EN Mitho CONTENTS EN Reference temperature adjustment (setpoint profile) . . . . . . . . . . . . . . . . . . . . . . . . . . . . . . . . . . . . . . . . . . . . . . . . “Actuators ON/OFF” Control. . . . . . . . . . . . . . . . . . . . . . . . . . . . . . . . . . . . . . . . . . . . . . . . . . . . . . . . . . . . . . . . . . . . . . . . . . Priority/Over-riding the state of an actuator . . . . . . . . . . . . . . . . . . . . . . . . . . . . . . . . . . . . . . . . . . . . . . . . . . . . . . . . . Blocking the state of an actuator . . . . . . . . . . . . . . . . . . . . . . . . . . . . . . . . . . . . . . . . . . . . . . . . . . . . . . . . . . . . . . . . . . . . State of "Inputs" display . . . . . . . . . . . . . . . . . . . . . . . . . . . . . . . . . . . . . . . . . . . . . . . . . . . . . . . . . . . . . . . . . . . . . . . . . . . . . "Outputs" control . . . . . . . . . . . . . . . . . . . . . . . . . . . . . . . . . . . . . . . . . . . . . . . . . . . . . . . . . . . . . . . . . . . . . . . . . . . . . . . . . . . . 88 89 89 89 90 90 THE FUNCTIONS MENU . . . . . . . . . . . . . . . . . . . . . . . . . . . . . . . . . . . . . . . . . . . . . . . . . . . . . . . . . . . . . . . . . . . Pag. 92 Implement and store "KNX Scenarios" . . . . . . . . . . . . . . . . . . . . . . . . . . . . . . . . . . . . . . . . . . . . . . . . . . . . . . . . . . . . . . 92 Burglar alarm management . . . . . . . . . . . . . . . . . . . . . . . . . . . . . . . . . . . . . . . . . . . . . . . . . . . . . . . . . . . . . . . . . . . . . . . . . 93 Arming/disarming all areas . . . . . . . . . . . . . . . . . . . . . . . . . . . . . . . . . . . . . . . . . . . . . . . . . . . . . . . . . . . . . . . . . . . . . . . . . . 93 Partial arming of areas . . . . . . . . . . . . . . . . . . . . . . . . . . . . . . . . . . . . . . . . . . . . . . . . . . . . . . . . . . . . . . . . . . . . . . . . . . . . . . . 93 Management of irrigation system . . . . . . . . . . . . . . . . . . . . . . . . . . . . . . . . . . . . . . . . . . . . . . . . . . . . . . . . . . . . . . . . . . . 94 Creating/changing a new Irrigation cycle . . . . . . . . . . . . . . . . . . . . . . . . . . . . . . . . . . . . . . . . . . . . . . . . . . . . . . . . . . . . 94 Setting the time and days of activation of an irrigation scenario . . . . . . . . . . . . . . . . . . . . . . . . . . . . . . . . . . . . . 95 Forced activation of an irrigation cycle . . . . . . . . . . . . . . . . . . . . . . . . . . . . . . . . . . . . . . . . . . . . . . . . . . . . . . . . . . . . . . 95 Variation of the percentage of seasonal irrigation . . . . . . . . . . . . . . . . . . . . . . . . . . . . . . . . . . . . . . . . . . . . . . . . . . . 95 Adding/Programming single irrigation devices . . . . . . . . . . . . . . . . . . . . . . . . . . . . . . . . . . . . . . . . . . . . . . . . . . . . . . 95 Energy Data . . . . . . . . . . . . . . . . . . . . . . . . . . . . . . . . . . . . . . . . . . . . . . . . . . . . . . . . . . . . . . . . . . . . . . . . . . . . . . . . . . . . . . . . . . 97 Consulting electrical consumption statistics . . . . . . . . . . . . . . . . . . . . . . . . . . . . . . . . . . . . . . . . . . . . . . . . . . . . . . . . . 97 Set up electric energy data . . . . . . . . . . . . . . . . . . . . . . . . . . . . . . . . . . . . . . . . . . . . . . . . . . . . . . . . . . . . . . . . . . . . . . . . . . 98 Consulting gas consumption statistics . . . . . . . . . . . . . . . . . . . . . . . . . . . . . . . . . . . . . . . . . . . . . . . . . . . . . . . . . . . . . . . 99 Consulting water consumption statistics . . . . . . . . . . . . . . . . . . . . . . . . . . . . . . . . . . . . . . . . . . . . . . . . . . . . . . . . . . . . 100 Loads control . . . . . . . . . . . . . . . . . . . . . . . . . . . . . . . . . . . . . . . . . . . . . . . . . . . . . . . . . . . . . . . . . . . . . . . . . . . . . . . . . . . . . . . . . 101 "Power profile" section . . . . . . . . . . . . . . . . . . . . . . . . . . . . . . . . . . . . . . . . . . . . . . . . . . . . . . . . . . . . . . . . . . . . . . . . . . . . . . 101 Setting "Power profile" parameters . . . . . . . . . . . . . . . . . . . . . . . . . . . . . . . . . . . . . . . . . . . . . . . . . . . . . . . . . . . . . . . . . . 102 "Loads management" section . . . . . . . . . . . . . . . . . . . . . . . . . . . . . . . . . . . . . . . . . . . . . . . . . . . . . . . . . . . . . . . . . . . . . . . 102 "Malfunctions/Alarms" . . . . . . . . . . . . . . . . . . . . . . . . . . . . . . . . . . . . . . . . . . . . . . . . . . . . . . . . . . . . . . . . . . . . . . . . . . . . . . . 105 Add a new "Alarm" . . . . . . . . . . . . . . . . . . . . . . . . . . . . . . . . . . . . . . . . . . . . . . . . . . . . . . . . . . . . . . . . . . . . . . . . . . . . . . . . . . 105 THE PROGRAMS MENU . . . . . . . . . . . . . . . . . . . . . . . . . . . . . . . . . . . . . . . . . . . . . . . . . . . . . . . . . . . . . . . . . . . Pag. 106 Create and manage "Timers" . . . . . . . . . . . . . . . . . . . . . . . . . . . . . . . . . . . . . . . . . . . . . . . . . . . . . . . . . . . . . . . . . . . . . . . . 106 Add a new "Timer" . . . . . . . . . . . . . . . . . . . . . . . . . . . . . . . . . . . . . . . . . . . . . . . . . . . . . . . . . . . . . . . . . . . . . . . . . . . . . . . . . . . 106 Set up "Timer" parameters . . . . . . . . . . . . . . . . . . . . . . . . . . . . . . . . . . . . . . . . . . . . . . . . . . . . . . . . . . . . . . . . . . . . . . . . . . . 108 Create and manage "Sequences" . . . . . . . . . . . . . . . . . . . . . . . . . . . . . . . . . . . . . . . . . . . . . . . . . . . . . . . . . . . . . . . . . . . . 109 Add a new "Scenario sequence" . . . . . . . . . . . . . . . . . . . . . . . . . . . . . . . . . . . . . . . . . . . . . . . . . . . . . . . . . . . . . . . . . . . . . 109 "Logics" . . . . . . . . . . . . . . . . . . . . . . . . . . . . . . . . . . . . . . . . . . . . . . . . . . . . . . . . . . . . . . . . . . . . . . . . . . . . . . . . . . . . . . . . . . . . . . . 111 To programme the "Alarm clock" . . . . . . . . . . . . . . . . . . . . . . . . . . . . . . . . . . . . . . . . . . . . . . . . . . . . . . . . . . . . . . . . . . . . 112 To programme the "Screen Saver" . . . . . . . . . . . . . . . . . . . . . . . . . . . . . . . . . . . . . . . . . . . . . . . . . . . . . . . . . . . . . . . . . . . 112 To record and listen to "Audio messages" (Only Mitho PL KNX) . . . . . . . . . . . . . . . . . . . . . . . . . . . . . . . . . . . . 113 To record a voice mail . . . . . . . . . . . . . . . . . . . . . . . . . . . . . . . . . . . . . . . . . . . . . . . . . . . . . . . . . . . . . . . . . . . . . . . . . . . . . . . 113 THE DOOR ENTRY MENU (ONLY FOR MITHO PL KNX PANELS) . . . . . . . . . . . . . . . . . . . . . . . Pag. 114 Standard functions . . . . . . . . . . . . . . . . . . . . . . . . . . . . . . . . . . . . . . . . . . . . . . . . . . . . . . . . . . . . . . . . . . . . . . . . . . . . . . . . . . 114 Answering a call . . . . . . . . . . . . . . . . . . . . . . . . . . . . . . . . . . . . . . . . . . . . . . . . . . . . . . . . . . . . . . . . . . . . . . . . . . . . . . . . . . . . . 114 Transferring a call to other extensions . . . . . . . . . . . . . . . . . . . . . . . . . . . . . . . . . . . . . . . . . . . . . . . . . . . . . . . . . . . . . . . 115 66 Mitho CONTENTS Receiving a call from other extensions (intercom) . . . . . . . . . . . . . . . . . . . . . . . . . . . . . . . . . . . . . . . . . . . . . . . . . . . 115 Calling other extensions (intercom) . . . . . . . . . . . . . . . . . . . . . . . . . . . . . . . . . . . . . . . . . . . . . . . . . . . . . . . . . . . . . . . . . . 115 Assigning a name to an extension . . . . . . . . . . . . . . . . . . . . . . . . . . . . . . . . . . . . . . . . . . . . . . . . . . . . . . . . . . . . . . . . . . . 116 Porter call list . . . . . . . . . . . . . . . . . . . . . . . . . . . . . . . . . . . . . . . . . . . . . . . . . . . . . . . . . . . . . . . . . . . . . . . . . . . . . . . . . . . . . . . . 117 Display images from entry panels . . . . . . . . . . . . . . . . . . . . . . . . . . . . . . . . . . . . . . . . . . . . . . . . . . . . . . . . . . . . . . . . . . . 117 Video entry system voice mail . . . . . . . . . . . . . . . . . . . . . . . . . . . . . . . . . . . . . . . . . . . . . . . . . . . . . . . . . . . . . . . . . . . . . . . 118 Record a voice mail message . . . . . . . . . . . . . . . . . . . . . . . . . . . . . . . . . . . . . . . . . . . . . . . . . . . . . . . . . . . . . . . . . . . . . . . . 118 Checking the video answer phone . . . . . . . . . . . . . . . . . . . . . . . . . . . . . . . . . . . . . . . . . . . . . . . . . . . . . . . . . . . . . . . . . . 119 Office function . . . . . . . . . . . . . . . . . . . . . . . . . . . . . . . . . . . . . . . . . . . . . . . . . . . . . . . . . . . . . . . . . . . . . . . . . . . . . . . . . . . . . . 120 THE SETUP MENU . . . . . . . . . . . . . . . . . . . . . . . . . . . . . . . . . . . . . . . . . . . . . . . . . . . . . . . . . . . . . . . . . . . . . . . . . . Pag. 121 Melodies . . . . . . . . . . . . . . . . . . . . . . . . . . . . . . . . . . . . . . . . . . . . . . . . . . . . . . . . . . . . . . . . . . . . . . . . . . . . . . . . . . . . . . . . . . . . . 121 Select a call melody . . . . . . . . . . . . . . . . . . . . . . . . . . . . . . . . . . . . . . . . . . . . . . . . . . . . . . . . . . . . . . . . . . . . . . . . . . . . . . . . . 121 Date/Time . . . . . . . . . . . . . . . . . . . . . . . . . . . . . . . . . . . . . . . . . . . . . . . . . . . . . . . . . . . . . . . . . . . . . . . . . . . . . . . . . . . . . . . . . . . . 122 Adjust the characteristics of the acoustic alarms. . . . . . . . . . . . . . . . . . . . . . . . . . . . . . . . . . . . . . . . . . . . . . . . . . . . . 122 Door Answer (only on MITHO PL KNX panels) . . . . . . . . . . . . . . . . . . . . . . . . . . . . . . . . . . . . . . . . . . . . . . . . . . . . . . 122 General . . . . . . . . . . . . . . . . . . . . . . . . . . . . . . . . . . . . . . . . . . . . . . . . . . . . . . . . . . . . . . . . . . . . . . . . . . . . . . . . . . . . . . . . . . . . . . . 123 Panel language selection . . . . . . . . . . . . . . . . . . . . . . . . . . . . . . . . . . . . . . . . . . . . . . . . . . . . . . . . . . . . . . . . . . . . . . . . . . . . 123 Password handling . . . . . . . . . . . . . . . . . . . . . . . . . . . . . . . . . . . . . . . . . . . . . . . . . . . . . . . . . . . . . . . . . . . . . . . . . . . . . . . . . . 123 Save/recover system copy . . . . . . . . . . . . . . . . . . . . . . . . . . . . . . . . . . . . . . . . . . . . . . . . . . . . . . . . . . . . . . . . . . . . . . . . . . . 124 Set up "Favourites" . . . . . . . . . . . . . . . . . . . . . . . . . . . . . . . . . . . . . . . . . . . . . . . . . . . . . . . . . . . . . . . . . . . . . . . . . . . . . . . . . . 124 Set up "Favourite scenes" (only Mitho HA KNX) . . . . . . . . . . . . . . . . . . . . . . . . . . . . . . . . . . . . . . . . . . . . . . . . . . . . . . 124 Display . . . . . . . . . . . . . . . . . . . . . . . . . . . . . . . . . . . . . . . . . . . . . . . . . . . . . . . . . . . . . . . . . . . . . . . . . . . . . . . . . . . . . . . . . . . . . . . 125 Entry phone system (Only on Mitho PL KNX panels) . . . . . . . . . . . . . . . . . . . . . . . . . . . . . . . . . . . . . . . . . . . . . . . . 125 Info Panel . . . . . . . . . . . . . . . . . . . . . . . . . . . . . . . . . . . . . . . . . . . . . . . . . . . . . . . . . . . . . . . . . . . . . . . . . . . . . . . . . . . . . . . . . . . . . 126 Device reset . . . . . . . . . . . . . . . . . . . . . . . . . . . . . . . . . . . . . . . . . . . . . . . . . . . . . . . . . . . . . . . . . . . . . . . . . . . . . . . . . . . . . . . . . 126 67 EN Mitho GENERAL INFORMATION Mitho PL KNX: technical characteristics 5 EN 1 2 3 4 1 – Loudspeaker (hands-free) 2 – Receiver 3 – Microphone 4 – 4.3” touch screen 16:9 display 5 – Touchscreen pen housing Maintenance and Use of the Panel •Only use the pen provided with the Panel; do not use utensils, pens or other sharp instruments that could damage the display and prejudice its operation. •Do not expose the LCD screen to direct sun light. •Only use soft, dry or slightly damp cloths to clean the terminal; do not use any chemical products. IMPORTANT NOTE! Whether some screens or functionalities shown in this manual are present or not depends on the type of system used. 68 Mitho GENERAL INFORMATION Main functions associated with the icons on the main screen The main screen provides fast, intuitive access to the functions managed by the control panel. It also provides immediate feedback on events involving the system. EN Main menu for systems without Porter Switchboard Touchscreen lock for screen cleaning (30 s) Alarm clock activation Alarm clock on Alarm clock off No BUS line Rooms Door entry Functions Favourites Programs Setup Access to the screen that allows you to navigate between the “Zones”, the relative “Rooms” and the “Functions” Stair lighting Auxiliary command Access to the "Functions" not associated to a particular room: “KNX Scenes”, Burglar alarm, “Irrigation”, "Energy data”, "Loads Control” and “Alarms”. Access to programming of the “Timers”, “Sequences”, “Logics”, “Audio messages”, “Screen Saver” and “Alarm clock”. Access to the video entry system functions The flashing icon indicates the presence of unread messages from the porter or video entry systems If the icon and the word "Favourites" is displayed, it means that no element has been associated to this button yet; in this case, by pressing on it, the page for the "Setup" menu relating to the selection of the "Favourites" function is loaded. Once a particular function is defined as a "Favourite", the icon and the name of the function are updated accordingly on the Home Page (the colour of the button remains the same). Via the "Setup" menu it is always possible to change the function set as a "Favourite". Where there is a porter switchboard (Building function active), the icon becomes Porter Call Door lock release Video entry panel surveillance camera activation Ring disabling (Privacy) Press the button to activate/deactivate ring. The yellow button indicates that the function is on Video entry system voice mail Press the button to activate/deactivate voice mail. The yellow button indicates that voice mail is on Access to the panel's general settings Note: After 5 minutes of inactivity on any screen, the terminal will automatically return to the opening screen, and the screen brightness will be reduced (according to the setup settings), or to the screen saver (if activated). 69 Mitho GENERAL INFORMATION Mitho HA KNX: technical characteristics EN Mitho HA KNX is the innovative multifunctional touchscreen colour panel, designed to manage and control a home automation system. 2 1 1 – 4.3” touch screen 16:9 display 2 – Touchscreen pen housing Maintenance and Use of the Panel •Only use the pen provided with the panel; do not use utensils, pens or other sharp instruments that could damage the display and prejudice its operation. •Do not expose the LCD screen to direct sun light. •Only use soft, dry or slightly damp cloths to clean the terminal; do not use any chemical products. IMPORTANT NOTE! Whether some screens or functionalities shown in this manual are present or not depends on the type of system used. 70 Mitho GENERAL INFORMATION Main functions associated with the icons on the main screen The main screen provides fast, intuitive access to the functions managed by the control panel. It also provides immediate feedback on events involving the system. EN Touchscreen lock for screen cleaning (30 s) Alarm clock activation Alarm clock on Alarm clock off No BUS line Rooms Favourite 1 Functions Favourite 2 Programs Setup Access to the screen that allows you to navigate between the “Zones”, the relative “Rooms” and the “Functions” If the icon and the word "Favourite" is displayed, it means that no element has been associated to this button yet; in this case, by pressing on it, the page of the "Setup" menu relating to the selection of the "Favourites" function is loaded. Once a particular function is defined as a "Favourite", the icon and the name of the function are updated accordingly on the Home Page (the colour of the button remains the same). Via the "Setup" menu it is always possible to change the function set as a "Favourite". Access to the "Functions" not associated to a particular room: “KNX Scenes”, Burglar alarm, “Irrigation”, "Energy data”, "Loads Control” and “Alarms”. Access to programming of the “Timers”, “Sequences”, “Logics”, “Audio messages”, “Screen Saver” and “Alarm clock”. In the central area of the Home Page up to three KNX Scenes or Sequences can be activated. In order to activate these functionalities, it is necessary to access the relative items in the "Setup" menu. Access to the panel's general settings Note: After 5 minutes of inactivity on any screen, the terminal will automatically return to the opening screen, and the screen brightness will be reduced (according to the setup settings), or to the screen saver (if activated). 71 Mitho THE ROOMS MENU Navigation in the "Rooms" menu By pressing the "Rooms" button on the main page you access the screen that enables you to see the "Zones" and "Rooms" that make up the home automation system. EN Rooms Door entry Functions Favourites Programs Setup Zone: Room: A "Zone" is usually a collection of "Rooms", e.g. first floor, day zone, garden, relaxation zone, etc. A "Room" is usually a room or a specific area of the home, e.g. entrance, swimming pool, driveway, etc. Note: The names of the zones and rooms are assigned solely during the panel configuration stages (with ETS or Easy Controller), and cannot therefore be changed by the user. "Zone" displayed Display previous "Zone" Display next "Zone" Back to previous screen Ground Floor Back to main menu Activate "Rolling shutters" filter Entrance Living room Activate "Lighting" filter Bathroom Kitchen Activate "Entrances" filter Activate "Temperature Regulation" filter Laundry room Veranda Activate "Exits" filter Activate "Actuators ON/OFF" filter List of "Rooms" belonging to "Zone" displayed, the buttons let you scroll through the available "Rooms". The icons on the side of the screen act as display filters. By selecting one of the side icons, only the "Rooms" that contain automated devices belonging to the category selected are displayed. If there are no elements that belong to the category selected in the "Zone" selected, an empty list is displayed. By unselecting the icon you can once more see all the "Rooms" associated to the "Zone". Ground Floor Bathroom Kitchen Laundry room 72 Mitho THE ROOMS MENU By selecting one of the "Rooms" available without any active filter, the list of controllable devices contained within the "Room" is displayed. Ground Floor Entrance Living room Bathroom Kitchen Laundry room Veranda The buttons allow you to scroll through the list of devices. The upper section indicates which "Zone" and relative "Room" is displayed. Ground Floor Entrance Entrance lighting 1 Entrance lighting 2 0% 0% Shutter 1 Shutter 2 0% 0% External Lighting Convert 0% Cooling Note: The name of the "Room" or "Zone" is selected when it is green. With "Zone" selected To change "Zone" press on the side arrows. With "Room" selected To change "Room" press on the side arrows. Zone Zone Room: Room: By selecting one of the side icons (filters), only the controlled devices belonging to the category selected are displayed. Ground Floor Entrance Entrance lighting 1 Entrance lighting 2 0% 0% Note: If there are no elements belonging to the selected category in the room, the list is empty. Press the buttons to look for controllable devices belonging to the selected category, in other "Rooms". External Lighting 0% 73 EN Mitho THE ROOMS MENU Send commands to all the devices in one or more "Room" of a "Zone" On the main page select the "Rooms" button. EN Rooms Door entry Functions Favourites Programs Setup Select one of the filters that allow the display of devices that general commands can be sent to. These are: Ground Floor Entrance Living room Bathroom Kitchen Laundry room Veranda “Rolling shutters” “Lighting” “Temperature regulation” “Actuators ON/OFF”. General commands with “Rolling shutters" filter active Ground Floor Press button (multiple selection) and select the room(s) in which the devices to be commanded are. Bathroom Kitchen Press buttons or to open or close all the rolling shutters within the "Room(s) selected. Laundry room General commands with “Lighting" filter active Ground Floor No light is on in the "Room” Bathroom Kitchen Laundry room Living room At least one light is on in the "Room” 74 THE ROOMS MENU Mitho Ground Floor Press button (multiple selection) and select the room(s) in which the devices to be commanded are. Press button to turn on or button lights in the "Rooms" selected. Bathroom Kitchen Laundry room Living room General commands with “Temperature regulation" filter active Night zone Bathroom to turn off all the No thermostat in the "Room" is active. Double bedroom At least one thermostat in the "Room" is in a different state than OFF/Building protection Bedroom With the "Temperature regulation" filter active, press button (multiple selection) and select the rooms in which the devices to be commanded are. Night zone Bathroom 1 Press button in order to be able to change the mode of operation of all the devices selected, choosing from: Double bedroom Single bedroom Set HVAC mode 75 “Comfort” “Stand-by” “Economy” “Off” EN Mitho THE ROOMS MENU With the "Temperature regulation" filter active, press button (multiple selection) and select the rooms in which the devices to be commanded are. Night zone EN Bathroom 2 Press button in order to be able to change the type of operation of all the devices selected: Double bedroom Single bedroom “Heating” “Cooling” Select the type of operation Heating Cooling General commands with “Actuators ON/OFF" filter active Ground Floor No “Actuator” is “ON” in the ”Room” Kitchen Laundry room At least one “Actuator” is “ON” in the ”Room” Press button (multiple selection) and select the room(s) in which the devices to be commanded are. Ground Floor Press the ON or OFF buttons to control the "Actuators" in the "Room(s)" selected at the same time. Kitchen Laundry room 76 Mitho THE ROOMS MENU "Rolling shutters" / "Venetian Blinds" control Select the "Zone" and "Room" inside which the device to be controlled is contained (see: “Navigation in the “Rooms” menu” on page 72). Night zone Double bedroom Double bedroom 1 Double bedroom 2 0% 30 % Brief pressure on the button immediately activates the opening or closing of the rolling shutter (cyclic switching); to stop the action, press the button again; this subsequent pressing inverts the direction of movement. Cyclic switching > > > > > ... Actions key Night zone Double bedroom Double bedroom 1 Double bedroom 2 30% 30 % “Rolling shutter”/“Venetian blind” stationary Opening in progress Closing in progress If the system's configuration allows it, the percentage the "Rolling Shutter"/"Venetian blind" is open can be read on the button. 0% = “Rolling Shutter” fully raised 100% = “Rolling Shutter” fully lowered Prolonged pressure on the device to be controlled opens a pop-up window with all the available options. Double bedroom 1 Rolling shutter/Venetian blind "UP", "DOWN", "STOP" control; the arrows are green when the action is in progress. Priority Block Control of Venetian blind slats, "OPEN", "CLOSE". Each time one of the commands is pressed, a stage of movement is carried out. It is also possible to set the percentage opening of the Rolling shutter/Venetian blind on the central cursor, the value set is displayed in the upper part of the bar and the bar goes white when the value set has been reached. Double bedroom 1 42% Priority Block 77 EN Mitho THE ROOMS MENU Priority/Over-riding a rolling shutter or Venetian blind Double bedroom 1 EN If necessary it is possible to force the rolling shutter/ Venetian blind into an always open or always closed position: in this case the commands from other devices, timers, scenarios are ignored until removal of the over-ride. 0% Priority Block No active over-ride Open position forced (0%) Closed position forced (100%) Double bedroom 1 Blocking a rolling shutter or Venetian blind In the system programming phase it is possible to set a particular blocking position for a rolling shutter/ Venetian blind; when the "Block" function is activated, the rolling shutter/blind reaches the pre-set position and the commands arriving from other devices, timers, scenarios are ignored until the "Block" is removed. 45% Priority Block No "Block" active "Block" active ATTENTION Although safety standards for the moving parts of doors and windows require the presence of adequate safety protections, it is advisable to ensure that the area is clear before activating openings/closings, so as to prevent injury to persons or animals. 78 Mitho THE ROOMS MENU "Lighting" Control Select the "Zone" and "Room" inside which the device to be controlled is contained (see: “Navigation in the “Rooms” menu” on page 72). Living Area Dining Room Dimmer Living room RGB Living room Brief pressure on the button turns the light point on or off. 0% Hallway lighting Light point off Light point on There are three possible types of light point: Living Area Dining Room Dimmer Living room RGB Living room ON/OFF light point off ON/OFF light point on Dimmer light point off Dimmer light point on If the system's configuration allows it, the percentage of lighting on can be read on the button. 100% Hallway lighting RGB light point off RGB light point on Prolonged pressure on the device to be controlled opens a pop-up window with all the available options. Possible options to adjust ON/OFF lights and dimmed lights Dimmer Living room 1 B Buttons 1, enable the light point to be turned off (0%) or on (100%). 33% Priority Buttons B, enable the light point to be turned off (-) or on (+) progressively; button enables the progressive switching on/off to be halted at the desired percentage. Block It is also possible to set the percentage the light point is dimmed, on the central cursor: in the upper part of the bar the value set is displayed. The bar goes white when the value set is reached. Priority/over-riding a light point If necessary it is possible to force the light point so that it is always on or always off: in this case the commands from other devices, timers, scenarios are ignored until removal of the over-ride. No over-ride active Over-ride of light off 79 Over-ride of light on EN Mitho THE ROOMS MENU Blocking a light point EN In the system programming phase it is possible to set a particular blocking configuration for a light point; when the "Block" function is activated, the light point reaches the programmed configuration and the commands arriving from other devices, timers, scenarios are ignored until the "Block" is removed. No “Block” active “Block” active Possible options for RGB lights RGB Living room 3 7 9 Buttons C, enable the brightness of the light point to be taken to the maximum (100%) or minimum (0%). 6 4 By selecting any point on area D, it is possible to choose the colour tone desired for the light point. 5 The cursor E, enables the brightness of the light point to be adjusted. By pressing button F, a different mode of adjusting the colour and brightness of the light point is displayed. The colour sample G, represents the last shade created and is suggested again even if another RGB light point is being configured. RGB Living room 3 7 9 8 Button H, restores the previous display mode. Square 9 corresponds to the feedback of the colour (if managed by the device being controlled). 80 Mitho THE ROOMS MENU "Temperature regulation" Control Select the "Zone" and "Room" inside which the device to be controlled is contained (see: “Navigation in the “Rooms” menu” on page 72). Night zone Bathroom Double bedroom No thermostat in the "Room" is active. At least one thermostat in the "Room" is in a different state than OFF/Building protection Single bedroom Once the desired room is selected, the thermostat associated to it is displayed. Bathroom Thermostat Night zone Bathroom 1 2 Bathroom Thermostat Bathroom Thermostat 5 3 4 1.Name assigned to thermostat 2.Operating mode “Heating” - “Cooling” 3.HVAC mode programmed. This information isn't displayed if the thermostat is of an HVAC Master/setpoint type. 4. Temperature and humidity detected are displayed cyclically. The humidity is displayed if the data is available. 5. The band is white if the thermostat is in a different state than OFF/Building protection. The temperature regulation category includes the function of the Programmable thermostat directly managed from the panel and the HVAC master function, for which the panel carries out the activity of scheduler of profiles in HVAC mode (Comfort, Stand-by, Economy, OFF) or temperature setpoint mode. 81 EN Mitho THE ROOMS MENU Timer profile for programmable thermostat (function carried out by panel) EN Days of the week. The day of the week for which the profile is currently displayed is shown in yellow Single bedroom Thermostat Current day mon Pre-programmable temperature bands (modes): Comfort - Stand-by - Eco tue wed thu fri sat sun Hours of the day axis Comf Current time Stby: Eco Automatic mode active Fan coil units 1-2-3-A speed set (automatic) Type of operation (Heating - Cooling) of the programmable thermostat Active speed of fan coil units 0-1-2-3. Current HVAC mode of programmable thermostat Temperature set (set point) on the programmable thermostat The value flashes if it has been temporarily forced Temperature/humidity detected by external KNX sensor Forcing the setpoint of the temperature set or the speed of the fans of the fan coil units with active profile Single bedroom Thermostat mon tue wed thu fri Control light for activation valve or actuator (solid dot = ON, empty dot = OFF) sat sun Press in line with the box that gives the the programmed temperature value and set the desired temperature via the cursor that appears. The side arrows let you fine-tune the value of the temperature set in tenths of a degree. Comf Eco Stby: The procedure to change the speed of the fans of the fan coil units is almost exactly the same. Press on the icon that shows the speed of the fans programmed and choose the desired speed between 1 - 2 - 3 - AUTO. Single bedroom Thermostat The new values entered will flash, in order to remind the User that the programming is being forced. Note: The changes made to the programming in progress are effective until a change of mode appears in the profile. 82 Mitho THE ROOMS MENU Timer profile for HVAC Master with control through modes The HVAC Master thermostats with HVAC mode profile provide for 3 operating "Modes": Comfort, Standby, Economy. Control of the valves and actuators is delegated to the local thermostat. Days of the week. The day of the week for which the profile is currently displayed is shown in yellow Single bedroom Thermostat Current day mon Pre-programmable temperature bands (modes): Comfort - Stand-by - Eco tue wed thu fri sat sun Hours of the day axis Comf Current time Stby: Eco Automatic mode active Type of operation (Heating - Cooling) of the thermostat controlled Temperature set (set point) on thermostat controlled The value flashes if it has been temporarily forced Current HVAC mode of thermostat controlled Temperature/humidity detected by thermostat controlled Timer profile for HVAC Master with control through temperature setpoint The HVAC Master thermostat with the temperature setpoint profile foresees 6 temperature bands instead of operating "Modes". Control of the valves and actuators is delegated to the local thermostat. Days of the week. The day of the week for which the profile is currently displayed is shown in yellow Single bedroom Thermostat Current day mon tue wed thu Pre-programmed temperature bands (setpoints): fri sat sun Hours of the day axis Current time Automatic mode active Type of operation (Heating - Cooling) of the thermostat controlled Temperature set (setpoint) on thermostat controlled The value flashes if it has been temporarily forced Temperature/humidity detected by thermostat controlled 83 EN Mitho THE ROOMS MENU Create a daily temperature profile (valid for all types of control) Single bedroom Thermostat EN If the thermostat has an active profile, the profile cannot be changed. Press the button to deactivate the profile. Press the button Use the pen provided to trace the desired temperature/ hours diagram. Single bedroom Thermostat mon tue wed thu fri to access the change profile screen. sat sun Comf Eco Stby: Press button to view the time axis divided into quarters of an hour for fine-tuning the programming. Buttons let you scroll through the view until you get to the desired point. Once the desired configuration has been reached, press to return to the extended view and then press button to confirm the changes carried out. Single bedroom Thermostat Comf Eco Stby: Copy a temperature profile to other days of the week (valid for all types of control) Single bedroom Thermostat mon tue wed thu fri sat sun Select the day of the week from which you want to copy the profile and then select button . Comf Eco Select the day or days of the week to which you want to copy the profile and press to make the copy. Stby: 84 Mitho THE ROOMS MENU Programmable thermostat with non-active profile Single bedroom Thermostat Press button to deactivate the automatic profile. Choose one of the operating modes available. “Comfort” - “Stand-by” “Economy” - “Off” Note: From this screen you can temporarily over-ride the temperature setpoint associated to the active mode and the speed of the fans in the fan coil units. The changes carried out to the current mode will be effective until the mode is changed or an automatic profile is activated. HVAC Master with mode control and nonactive profile Single bedroom Thermostat Press button to deactivate the automatic profile. Choose one of the operating modes available in the thermostat controlled.. 85 “Comfort” - “Stand-by” “Economy” - “Off” EN Mitho THE ROOMS MENU HVAC Master with setpoint control and nonactive profile Single bedroom Thermostat EN Press button to deactivate the automatic profile. Set the setpoint of the thermostat controlled via the cursor that appears. The side arrows let you fine-tune the value of the temperature set in tenths of a degree. The changes carried out to the current setpoint will be effective until the setpoint is changed or an automatic profile is activated. Set parameters (Programmable thermostat) Reference temperature regulation (Comfort, Stand-by, Eco) Single bedroom Thermostat mon tue wed thu fri sat sun The temperature/hours diagram gives three reference values called Comfort, Stand-by and Eco on the temperature axis. Default settings are: Comf Stby: Eco Heating Cooling Comfort 20°C 24°C Stand-by 16°C 28°C Eco 18°C 26°C To change these values press button to select the parameter to change Single bedroom Thermostat “Comfort” “Stand-by” “Economy” and key in the new temperature value on the keyboard that appears. DIFF DIFF1 DIFF2 Note: The value which can be assigned to each temperature range is limited by the values of the next highest and next lowest range. For example, if range corresponds to 20 °C and range corresponds to 16 °C, the value of range may be between16.1 °C and 19.9 °C. DIFF3 Anti-freeze temperature regulation Insert temperature in range [18,40] Default settings cause the heating system to ensure a minimum ambient temperature of 5.0°C to protect the system’s pipes from freezing. This minimum temperature is also ensured even when the thermostat is deactivated. ( “Off”). To change the anti-freeze temperature press the button and key in the new temperature value. enter 86 Mitho THE ROOMS MENU Other temperature setup items in systems with control at two points with fan coil units Single bedroom Thermostat 2 EN 3 1 1. Button to change the type of operation (cooling/ heating) 4 2. Buttons to change the inertia time of the fan coil unit fans DIFF DIFF1 DIFF2 DIFF3 3. Button to change the unit of measurement of temperature 5 4. Button to change the temperature differential regulation The thermostat's default setting is 0.2 °C; this means that if the temperature requested by the programming at a given time is 20 °C, the command to switch on will be sent via the bus (e.g. to the actuator that controls the boiler) the moment the programmable thermostat shows a temperature of 19.8 °C and the command to switch off will be sent the moment the temperature reaches 20.2 °C. The heat differential can be changed at will to be adapted to different types of heating (fan coil units, under-floor heating, electric heaters). 5. Buttons to change the heat differential that causes the activation of the fans in the fan coil units. Other temperature setup items in systems with PI control without fan coil units Bathroom Thermostat 6 BAND INTEG 7 6. Proportional band of "PWM proportional - integral" control algorithm 7. Button to change the setting of the integration time relating to the "PWM proportional - integral" control algorithm 8. Button to change the setting of the cycle time relating to the "PWM proportional - integral" control algorithm 8 CYCLE 87 Mitho THE ROOMS MENU Set parameters (HVAC Master with mode control) Adjustment of operating parameters and unit of temperature measurement Single bedroom Thermostat EN mon tue wed thu fri sat sun To change the operating parameters press button . Comf Stby: Eco 1. Button to change the type of operation (cooling / heating) 2. Button to change the unit of measurement of temperature 3. Button to set the period of cyclic repetition of the value of the time profile. By pressing the icon the keyboard is activated. Single bedroom Thermostat 1 2 3 Set parameters (HVAC Master with setpoint control) Reference temperature adjustment (setpoint profile) Single bedroom Thermostat If the thermostat has an active profile, the profile cannot be changed. Press the button to deactivate the profile. The temperature/hours diagram shows five reference values on the temperature axis. Default settings are: T1 T2 T3 T4 T5 Single bedroom Thermostat 1 Heating 4°C 16°C 18°C 20°C 22°C Cooling 28°C 26°C 24°C 22°C 20°C To change these values press button , select the parameter to be changed and key in the new temperature value on the keyboard that appears. 2 1. Button to change the type of operation (cooling / heating) 2. Button to change the unit of measurement of temperature 3 88 Mitho THE ROOMS MENU 3. Button to set the period of cyclic repetition of the value of the time profile. By pressing the icon the keyboard is activated. Note: The value which can be assigned to each temperature range is limited by the values of the next highest and next lowest range. For example, if range T1 corresponds to 20 °C and range T3 corresponds to 16 °C, the value of range T2 may be between 16.1 °C and 19.9 °C. “Actuators ON/OFF” Control. Select the "Zone" and "Room" inside which the device to be controlled is contained (see: “Navigation in the “Rooms” menu” on page 72). Living Area Kitchen Socket Oven Socket Dish washer Brief pressure on the button turns the actuator on or off. Actuator OFF. Actuator ON. Prolonged pressure on the device to be controlled opens a pop-up window with all the available options. Oven socket Priority/Over-riding the state of an actuator Priority If necessary it is possible to force the actuator so that it is always ON or always OFF: in this case the commands from other devices, timers, scenarios are ignored until removal of the over-ride. Block No active over-ride - Actuator over-ridden to OFF - Actuator over-ridden to ON Blocking the state of an actuator In the system programming phase it is possible to set a particular blocking configuration for an actuator; when the "Block" function is activated, the actuator reaches the programmed configuration and the commands arriving from other devices, timers, scenarios, etc. are ignored until the "Block" is removed. No “Block” active “Block” active 89 EN Mitho THE ROOMS MENU State of "Inputs" display Select the "Zone" and "Room" inside which the device to be controlled is contained (see: “Navigation in the “Rooms” menu” on page 72). Entries EN Terrace Wind speed Rain sensor ON 10 Km/h Rain sensor Blackout blind 80% 2 1 ON 3 1. Name of input 2. For ON/OFF type inputs, the white strip indicates that the input is in the ON state. 3. Input Value; in the case of numbered or analogue inputs the value measured is expressed with a relative unit of measurement Note: The state of the inputs can only be consulted; no action can be taken. "Outputs" control Select the "Zone" and "Room" inside which the device to be controlled is contained (see: “Navigation in the “Rooms” menu” on page 72). Entries Garden Swimming pool lights colour 000 Gate control Closed Blackout blind 00% Start cleaning cycle Start The buttons that control the outputs can carry out simple commands such as activating or deactivating contacts or activating analogue outputs by setting the value of the output through the relevant pop-up. Bistable outputs Gate control 2 1 Closed 3 Entries 1. Name of output Garden Swimming pool lights colour 000 Gate control Open Blackout blind 00% Start cleaning cycle Start 2. For bistable outputs the white strip represents the last command sent (whether ON or 1) 3. Name of last command sent. The commands are sent cyclically each time the button is pressed. 90 Mitho THE ROOMS MENU Analogue outputs By pressing the buttons that control the analogue outputs, a window is opened in which it is possible to ascribe a value to the output. The values entered can be read on the lower part of the button. Swimming pool lights colour Note: The window in which you can ascribe the output's values will look different depending on the unit of measurement expressed. 91 EN Mitho THE FUNCTIONS MENU Implement and store "KNX Scenarios" By selecting the button "Functions" on the main page you access the screen that lets you see the "Functions": KNX Scenes, Burglar alarm, Irrigation, Energy data, Loads control, Alarms. EN Rooms Door entry Functions Favourites Programs Setup Select the "KNX Scenes" button to access the list of available scenes. Functions KNX scenes Energy data Burglar alarm Loads control Irrigation Alarms "Scenario" means a group of activations brought together under a single command. To implement a scenario press the corresponding button. KNX scenes Enter Scenario Exit Scenario Night-time scenario Scenario 1 If pressed for more than 2 seconds the scenario buttons marked with the icon store the state of the devices associated to the scenario at that moment; subsequently the same button, if pressed briefly, will take the same devices back to the stored state. KNX scenes Enter Scenario Exit Scenario Night-time scenario Scenario 1 Note: The sending of the command to store is marked by a brief flash of the icon. 92 Mitho THE FUNCTIONS MENU Burglar alarm management Select the "Burglar Alarm" button from the main page of the "Functions" menu to access the list of "Areas" available. Functions KNX scenes Energy data Burglar alarm Loads control Irrigation Alarms Note: The "Burglar Alarm" icon flashes in the event of there being at least one "Area" alarm. If there is an alarm, the "Functions" icon flashes on the Home Page. The "Area" is a group of "Sectors". The sectors usually are logical groupings of sensors. Arming/disarming all areas Burglar alarm Ground Floor Press button areas Press button all areas 1st floor and key in the password to arm all and key in the password to disarm Partial arming of areas Press button (multiple selection), select one or more ready "Areas"; then press button and key in the password to arm only the selected areas. Area ready for arming No alarm underway in Area Password required Selected area ready for arming No alarm underway in Area Area not ready for arming No alarm underway in Area space Area armed No alarm underway in Area enter Area armed Alarm underway in Area By pressing on an "Area" button you access the display of the sectors that make it up. The sectors can be totally or partially armed in the same way as the "Areas". The symbol indicates that an alarm is underway in one of the armed sectors. Burglar alarm Ground floor Window sensors Garage volumetric sensor Garden volumetric sensor Loft sensors Press button to access a short list of the alarms that have affected the system. 93 EN Mitho THE FUNCTIONS MENU Management of irrigation system Select the "Irrigation" button from the main page of the "Functions" menu to access the list of irrigation cycles programmed. The irrigation cycle is a timed sequence of activations of the single irrigation devices, run cyclically. Functions EN KNX scenes Energy data Burglar alarm Loads control Irrigation Alarms To activate an irrigation cycle press the corresponding button, the cycle will be carried out using the time periods and methods programmed. Cycle not active Cycle active Irrigation Cycle in course EAST lawn WEST lawn Hedge Irrigation Drive Irrigation To delete an irrigation cycle press button and select the cycle to be eliminated. To change a listed cycle press button and select the desired cycle. Note: •Only a non-active cycle can be changed or deleted. •Access to the page to change an active irrigation cycle is permitted only to view the parameters and manually over-ride the cycle. Creating/changing a new Irrigation cycle Press button and assign a name to the new cycle using the keyboard that will appear. By pressing the "Enter" key an irrigation cycle programming window is opened. Days of the week. The days of the week during which the cycle will be implemented are in blue Irrigation Hedge mon tue wed thu Forced activation of the irrigation cycle Blue icon = active over-ride fri sat sun Current day Access to programming of single irrigation devices Button for percentage variation of irrigation cycle and indication of the percentage of variation programmed Programmed start of cycle implementation The end of the cycle is calculated automatically 94 Mitho THE FUNCTIONS MENU Setting the time and days of activation of an irrigation scenario Irrigation Hedge mon tue 2 wed 3 thu fri 1 sat sun Press button 1; set the time at which you want the irrigation cycle to be activated and confirm with . 4 Use the pen provided to activate the days of the week on which the irrigation cycle is to be run. Forced activation of an irrigation cycle The irrigation cycles are programmed to run at pre-set times of day. If necessary, you can force the daily cycle to run by pressing button 2 . Variation of the percentage of seasonal irrigation If the weather conditions require a reduction or an increase in the percentage of irrigation automatically calculated, press button 3; key in the variation value (-90% ... +400%) of the pre-set value. Press “enter” to confirm the data entered. The program will re-calculate the irrigation cycles and therefore the time the irrigation scenario ends so as to fulfil the request. Adding/Programming single irrigation devices Hedge Sprinklers list Each irrigation cycle controls the activation of a series of irrigation devices. To programme the single irrigation devices, press button 4. If the list is empty, it is necessary to press button and then choose from the list of irrigation devices that are actually present on the system the one(s) to be part of the cycle. Hedge Sprinklers list Irrigation device Block 1A Irrigation device Block 2A Irrigation device Block 1B Irrigation device Block 2B Irrigation device Block 1A Irrigation device Block 1A 95 EN Mitho THE FUNCTIONS MENU To programme or change the programming of one of the listed irrigation devices, press button and select the desired irrigation device. Hedge EN Sprinklers list Irrigation device Block 1A 03’ x 5 Irrigation device Block 1B 02’ x 5 Pressing button 5 activates the keyboard for setting the continuous irrigation time, or the operating period of the irrigation device each time that the irrigation cycle is activated. Irrigation device Block 1A 5 Continuous irrigation time 00:03:00 6 Irrigation pause 00:02:00 Pressing button 6 activates the keyboard for setting the number of activations of the irrigation device during the irrigation cycle. 7 Pressing button 7 activates the keyboard for setting the pause in irrigation time, or the interval of time that must elapse between the deactivation of the irrigation device and the activation of the next one in the irrigation cycle. Once programming is completed, under the name of each irrigation device making up the irrigation cycle will be displayed the irrigation time and the number of repetitions. Hedge Sprinklers list Irrigation device Block 1A 03’ x 5 Irrigation device Block 1B 02’ x 5 Irrigation device not active Irrigation device active Irrigation in progress 96 Mitho THE FUNCTIONS MENU Energy Data From the main page of the "Functions" menu select the "Energy Data" button. Functions KNX scenes If the system is equipped with the necessary detection devices, a set of data on electricity, gas and water consumption will be displayed on the main page. Energy data Burglar alarm Loads control Irrigation Alarms 1 Instant Power of system. 2 Total energy consumed by system. 3 Energy produced by photovoltaic installations or other sources. 4 Cumulative consumption of gas measured. 5 Cumulative consumption of water measured. Energy data 1 Instant power 2.3kW 2 Consumed energy 22.350 kWh 3 Produced energy Consulting electrical consumption statistics 1.8 kWh Cumulative consumption Press button to see statistical data relating to the domestic electricity consumption. 4 844 m 3 Cumulative consumption The days of the week or the months of the year are given on the horizontal axis. On the vertical axis the quantity of energy produced/consumed is given, with some reference values taken starting with the maximum value measured up to the present moment. The real value of consumption relating to the day/month selected in the window can be read in the lower bar. A while horizontal line indicates the value of the qualitative threshold set. 5 3743 m3 Energy data Consumed electric energy The arrows on the buttons with a blue background allow you to see the data on consumption taken in the years before or after the one displayed. With button 6 selected (icon on coloured background) the arrows on the buttons with a blue background allow you to see the data on consumption taken in the weeks before or after the one displayed. Year 2013 6 7 2.3 kW 3000 kWh (a) 350 kWh (m) 8 6 Allows the display of data relating to energy consumed/produced to be changed cyclically from showing month/year (icon on black background) to showing week/day (icon on coloured background). With the day/week display the first week relating to that month is displayed in the central window; by deselecting the icon you can go to the month/year display relating to the week displayed before the selection. 7 Enables the display of the data relating to energy consumed or produced to be changed cyclically. By activating the option (icon on coloured background), the graphic relating to the energy produced is displayed in the central window, by deselecting the icon it returns to the display of the energy consumed. 8 Enables the unit of measurement of the data relating to energy consumed or produced to be changed cyclically. By activating the "CO2" display (icon with coloured background), the unit of measurement of the data displayed in the central window and in the lower bar goes from "kWh" to "kg" and the values measured and shown in the graphic go from "energy" to "CO2"; by deselecting the icon you return to the display of energy (kWh), 97 EN Mitho THE FUNCTIONS MENU 9 Displays the instantaneous value related to the electrical power (produced or consumed). Depending on the type of display selected (see points 6 7 and 8), the data relating to electric energy (produced or consumed) are displayed: (g) Daily value (s) Weekly value (m) Monthly value (a) Yearly value Energy data Consumed electric energy EN Year 2013 Week 42 mon tue 2.3 kW wed thu fri sat 75 kWh (s) 9 sun 10 kWh (g) Set up electric energy data Press button to access the setup window. Pressing button activates the keyboard for setting the threshold for determining the qualitative indication of consumption being exceeded; this value relates to the monthly consumption and is reduced proportionately for the day/week display. Pressing button activates the keyboard for setting the initial value (offset) that represents the cumulative value of the electric energy consumed before the device was installed on the system Pressing button activates the keyboard for setting the value for conversion between energy and CO2. Pressing button activates the pop-up to confirm the operation to locally reset the energy meters: daily, weekly, monthly and yearly. Pressing button activates the pop-up to set the number of tariff bands used by the supplier to calculate the bill. Energy data Consumed electric energy Thres. 50 CO2 Initial value 2000 kWh 0.531 Reset counters N° Fares 3 Energy data Consumed electric energy mon tue wed thu fri sat sun Press button screen. to access the change tariff profile Note: the tariff profile is valid for the energy consumed With the pen provided trace the tariff diagram following the thresholds indicated by the supplier. Once the desired configuration has been achieved, press button to confirm the changes made. To copy a tariff profile to other days of the week, select the day of the week whose profile you want to copy and then select button . Select the day or days of the week to which you want to copy the profile and press to make the copy. 98 Mitho THE FUNCTIONS MENU Consulting gas consumption statistics Energy data Instant power Consumed energy 2.3kW 22.350 kWh Press button to see statistical data relating to the domestic gas consumption. Produced energy 1.8 kWh The days of the week or the months of the year are given on the horizontal axis. On the vertical axis the quantity of gas consumed is given, with some reference values taken starting with the maximum value measured up to the present moment. The real value of consumption relating to the day/month selected in the window can be read in the lower bar. Cumulative consumption 844 m3 Cumulative consumption 3743 m3 Energy data Gas consumption 1 Year 2013 1600 m3 (a) 1 Allows the display of data relating to gas consumed to be changed cyclically from showing month/year to showing week/day (icon on coloured background). With the day/week display the first week relating to that month is displayed in the central window; by deselecting the icon you can go to the month/year display relating to the week displayed before the selection. 200 m3 (m) 2 Energy data 2 Depending on the type of display selected (see point 1) the data relating to the consumption of gas are shown: (g) Daily value (s) Weekly value (m) Monthly value (a) Yearly value Gas consumption Year 2013 Week 42 mon tue wed thu fri 38 m3 (s) sat sun 5.2 m3 (s) Press button to access the setup window. Pressing button 3 activates the keyboard to set the threshold for determining the qualitative indication of consumption exceeded; this value refers to the monthly consumption and is reduced proportionately for the day/week display. Pressing button activates the keyboard for setting the initial value (offset) that represents the cumulative value of the electrical energy consumed before the device was installed on the system Pressing button 5 activates the pop-up to confirm the operation to locally reset the gas meters: daily, weekly, monthly and yearly. 2 Energy data Gas consumption 3 Initial value 4 Thres. 50 Reset counters 38 m3 The arrows on the buttons with a blue background allow you to see the data on consumption taken in the years before or after the one displayed. With button 1 selected (icon on coloured background) the arrows on the buttons with a blue background allow you to see the data on consumption taken in the weeks before or after the one displayed. 5 99 EN Mitho THE FUNCTIONS MENU Consulting water consumption statistics Energy data EN Instant power Consumed energy 2.3kW 22.350 kWh Press button to see statistical data relating to the domestic water consumption. Produced energy 1.8 kWh The days of the week or the months of the year are given on the horizontal axis. On the vertical axis the quantity of water consumed is given, with some reference values taken starting with the maximum value measured up to the present moment. The real value of consumption relating to the day/month selected in the window can be read in the lower bar. Cumulative consumption 844 m3 Cumulative consumption 3743 m3 Energy data Water consumption 1 Year 2013 541 m3 (a) 1 Allows the display of data relating to water consumed to be changed cyclically from showing month/ year to showing week/day (icon on coloured background). With the day/week display the first week relating to that month is displayed in the central window; by deselecting the icon you can go to the month/ year display relating to the week displayed before the selection. 18.3 m3 (m) 2 Energy data Water consumption 2 Depending on the type of display selected (see point 1) the data relating to the consumption of water are shown: (g) Daily value (s) Weekly value (m) Monthly value (a) Yearly value Year 2013 Week 42 mon tue wed thu fri 4.1 m3 (s) sat The arrows on the buttons with a blue background allow you to see the data on consumption taken in the years before or after the one displayed. With button 1 selected (icon on coloured background) the arrows on the buttons with a blue background allow you to see the data on consumption taken in the weeks before or after the one displayed. sun 0.5 m3 (s) 2 Pressing button 3 activates the keyboard to set the threshold for determining the qualitative indication of consumption exceeded; this value refers to the monthly consumption and is reduced proportionately for the day/week display. Pressing button 4 activates the keyboard for setting the initial value (offset) that represents the cumulative value of the water consumed before the device was installed on the system. Pressing button 5 activates the pop-up to confirm the operation to locally reset the water meters: daily, weekly, monthly and yearly. Energy data Water consumption 3 Initial value 4 Thres. 50 Reset counters 38 m3 5 100 Mitho THE FUNCTIONS MENU Loads control From the main page of the "Functions" menu select the "Load control" button. Functions EN KNX scenes Energy data Burglar alarm Loads control Irrigation Alarms Two sub-categories are displayed: "Power profile" and "Loads management". If the loads control function is active, then both buttons have a white strip. Loads control "Power profile" section Power profile In this section the consumption/hours diagram is displayed which enables you to set the maximum consumption allowed in a set period of the week; in this way you can make best use of the advantages of the "time slot" contracts offered by the different electricity suppliers. Loads management Note: the day displayed in the profile appears in yellow, the current day is shown by the white strip. Press button Loads control Power profile mon tue wed thu fri sat to access the change profile screen. Use the pen provided to trace the desired power/hours diagram. sun Press button to view the time axis divided into quarters of an hour for fine-tuning the programming. Buttons let you scroll through the view until you get to the desired point. Once the desired configuration has been reached, press to return to the extended view and then press button to confirm the changes carried out. Loads control Power profile mon tue wed thu fri sat sun 101 Mitho THE FUNCTIONS MENU To copy a "Power profile" to other days of the week, select the day of the week whose profile you want to copy and then select button . Loads control Power profile EN mon tue wed thu fri sat sun Select the day or days of the week to which you want to copy the profile and press to make the copy. Setting "Power profile" parameters Press button options. Pressing on each of the buttons 1 activates the keyboard for setting the 5 values that make up the power profile displayed in the diagram. Loads control Power profile By pressing on icon 2 it is possible to enable/disable the priority of manual control compared to the automatic disconnecting of the loads carried out by the device. If the function is enabled (blue icon), the device ignores the fact that the power load, which according to the function's control logic should be disabled, has been enabled manually, for example from a different 1 2 to access the "Power Profile setup 3 4 control point. By disabling this function, the panel once again takes action to disconnect the power load should it be manually enabled. Pressing on icon 3 activates the keyboard for setting the minimum consumption value beyond the threshold set. Once the threshold is exceeded the panel will immediately check if there are power loads programmed for disconnection. Pressing icon 4 activates the profile created or changed (the white strip appears on the buttons "Power profile" and "Loads management"). Note: When the profile is active no change can be made to the parameters or to the profile itself. "Loads management" section Loads control Power profile From the main page "Loads control" select the button "Loads management" to display the four daily time slots based on which it is possible to set the function, the priorities, the loads managed and the order of disconnection and reconnection. Loads management Note: the day displayed in the profile appears in blue, the current day is shown by the white strip. 102 Mitho THE FUNCTIONS MENU Day to which the time slots displayed refer Loads control Loads management mon Current day tue wed thu fri sat EN sun Control time slot enabled Control time slot not enabled Button to activate the programmed loads control Note: When loads control is active no change can be made to "Loads management". Press button Monday -> Band 1 5 6 7 8 9 and select the time slot to configure. Pressing icon 5 activates the keyboard for setting the start time of the time slot selected. Pressing icon 6 activates the keyboard for setting the end time of the time slot selected. Pressing icon 7 activates a screen from which it is possible to choose the order the loads are disconnected for the time slot selected. • from highest to lowest priority • from lowest to highest priority • from most serious to least serious • from least serious to most serious Press button to confirm the changes made. Order of disconnection Decreasing priority Increasing priority Decreasing consumption Increasing consumption Pressing icon 8 activates a screen from which it is possible to choose the switch on order of the loads for the time slot selected. • Same as switch off • Reserve to switch off • Manual reconnection only Press button to confirm the changes made. Switch on order Same as switch off Reserve to switch off Manual only 103 Mitho THE FUNCTIONS MENU Pressing icon 9 activates a screen from which it is possible to choose the available loads to be assigned to the control band selected. Monday -> Band 1 EN Priority Load Consumption Oven socket 1.20kW In the central part of the page the list of loads controlled in the selected time slot appears. Each element in the list of implementations is made up of three parts: the priority (assigned based on the element index), the name of the object and the value of the consumption of the load. On the left are the keys to scroll through the list. Pressing on one of the loads in the list, activates the keyboard to set the consumption value of the load itself. Monday -> Band 1 Press button and choose one of the loads available on the list to assign to the selected control band, the chosen load will be added to the end of the existing list. Select a new load Dishwasher socket Garden lights Washing machine socket Freezer socket Garage socket Press button positioned next to each of the loads to change its position on the list, moving it up by one position. Monday -> Band 1 Priority Load Consumption Oven socket 1.20kW Freezer socket 0.50kW Press button it from the list. 104 and select one of the loads to delete Mitho THE FUNCTIONS MENU "Malfunctions/Alarms" From the main page of the "Functions" menu select the "Alarms" button. Via this function it is possible to receive visual and acoustic alarm warnings if certain events connected to the result (True) of logical operations occur. Functions KNX scenes Energy data Burglar alarm Loads control Irrigation Alarms Add a new "Alarm" Press button and, on the keyboard that will appear, key in a name to assign to the alarm; press the "enter" button and choose from the window that will appear the logic that determines the "Alarm" has occurred. At the end of the operation you return to the main page where the list of programmed alarms and their status is shown: Alarms Flood alarm Alarm not enabled Alarm enabled Alarm in progress When an enabled alarm goes off, the alarm symbol on the white strip flashes, the "Functions" icon on the home page and the "Alarms" icon on "Functions" flash with the alarm signal. By pressing the button that represents the alarm any acoustic signal is silenced and the band stops flashing; icon remains active, however, as long as the alarm condition persists. Alarms Logic operation Wind threshold Water threshold Press button and select one of the alarms to delete it from the list. Press button and select the alarms for which an associated acoustic signal is not required. Press button to access the historic list of the alarms that have affected the system. Press button and select one of the alarms to delete it from the list. Press button to delete the whole list of alarms. Alarms Alarm log Flood alarm Flood alarm Note: The melody, rings and volume of the ringtone associated to all the alarms is managed from the "Setup" menu. The acoustic signal is repeated every minute until it is silenced or the alarm condition ends. Flood alarm 105 EN Mitho THE PROGRAMS MENU Create and manage "Timers" By selecting the button "Programs" on the main page you access the screen that lets you see the list of functions that can be programmed. EN Rooms Door entry Functions Favourites Programs Setup Select the "Timers" button to access the list of available timers. Programs Clock alarm Timer The "Timers" function enables you to set timers for one or more available devices/commands according to a daily programming schedule. Screen saver Sequences Audio messages Logics By pressing the key relating to a time it is activated/ deactivated cyclically. Timer not enabled Timer Timer enabled Drive lights timer Gate timer Press button and select one of the "Timers" to delete it from the list. To change the programming of a "Timer" on the list, press button and select the desired "Timer". NOTE: only non-active timers can be cancelled or changed. Add a new "Timer" Insert timer name Swimming pool lights timer Press button and key in on the keyboard that will appear a name to assign to the "Timer”. space enter 106 Mitho THE PROGRAMS MENU This accesses the page through which it is possible to select the device to add a timer to. On the sides of the selection window there are icons that allow you to filter the display of the types of devices that can have a timer. The categories are: Swimming pool lights timer Select object Drive Light Entrance Light EAST garden light Swimming pool Light 1 WEST garden light Swimming pool Light 2 “Lighting” “Actuators ON/OFF” “Exits” “Other”, this last filter, once activated, displays the following categories: - KNX scenes (Carry out/Learn) - Video entry system events - Burglar alarm (Total Arming/Disarming, Sector Arming/Disarming) - Logic (Active/Inactive) - Sequences (Start/Stop) Swimming pool lights timer Swimming pool light 1 ON/OFF “Rolling shutters” Dimmer By selecting the device to be given a timer you access the window from which you can choose the timer channel. Once the channel is chosen you go on to the window for programming the timing of the device. Note: the day displayed in the profile appears in yellow, the current day is shown by the white strip. Swimming pool lights timer Swimming pool light 1 mon tue wed thu fri sat Press button profile. sun to enable the capacity to change the Use the pen provided to trace the desired operating diagram. By pressing on button it is possible to display the temporal axis divided into quarters of an hour to finetune the programming, the buttons let you scroll through the view to the desired point. Once the desired configuration has been reached, press to return to the extended view and then press button to confirm the changes carried out. Swimming pool lights timer Swimming pool light 1 To copy a timer setting to other days of the week, select the day of the week whose timer setting you want to copy and then select button . Select the day or days of the week to which you want to copy the timer setting and press to make the copy. 107 EN Mitho THE PROGRAMS MENU Set up "Timer" parameters Swimming pool lights timer Swimming pool light 1 EN Press the button options. Pressing on each of the buttons 1 activates the keyboard for setting the 5 values that make up the value profile displayed in the diagram (possible values when the command can have more than one value, for example the dimmer percentages). 1 3 to access the "Timers" setup 2 Pressing on icon 2 activates the keyboard for setting the cyclic repetition period of the value of the time profile. Pressing icon 3 activates the profile created or changed (the white strip appears on the button of the Timer set). Notes: • When the timer setting is active no change can be made to the parameters. • Saving the Timers and Sequences happens automatically every minute. It is possible, however, to manually force the saving of the data by selecting the button to store on the SD card in the "Setup" -> "General" section. 108 Mitho THE PROGRAMS MENU Create and manage "Sequences" From the main page of the "Programs" menu select the "Sequences" button. Via this function it is possible to programme the sequential activation of devices making up the home automation system. Programs Clock alarm Timer Screen saver Sequences The "Sequences" page shows the list of the programmed scenarios. By pressing the key relating to a scenario it is started/stopped cyclically. The scenarios being carried out are marked with the white side strip. Voice mail Logics Scenario in progress Sequences Open rolling shutters Press button and select one of the “Sequences” to delete it from the list. Fake presence To change the programming of a “Scenario sequence” on the list, press button and select the desired “Scenario sequence”. NOTE: a scenario that is in progress cannot be deleted or changed. Add a new "Scenario sequence" Press button and key in, on the keyboard that will appear, a name to assign to the “Scenario sequence”. Turn on atrium lights Object Action Delay Once the name is entered, the window for programming the scenario and the sequence of actions is activated. Pressing button accesses the page through which it is possible to select the devices to add to the list of the activations sequence. On the sides of the selection window there are icons that allow you to filter the display of the types of devices. The categories are: Turn on atrium lights Select object Drive Light Entrance Light EAST garden light Swimming pool Light 1 WEST garden light Swimming pool Light 2 “Rolling shutters” “Lighting” “Actuators ON/OFF” “Exits” “Temperature regulation” “Other”, this last filter, once activated, displays the following categories: - KNX scenes (Carry out/Learn) - Video entry system events 109 EN Mitho THE PROGRAMS MENU - Burglar alarm (Total Arming/Disarming, Sector Arming/Disarming) - Logic (Active/Inactive) Turn on atrium lights Drive Light EN ON/OFF Dimmer Once selected the device accesses the window through which it is possible to choose the action that it has to carry out. By repeating this procedure it is possible to add a series of implementations that will populate the window that brings together the sequence of the actions Each element in the list is made up of three parts: the name of the object, the action that must be carried out and the time delay from the previous action. By pressing on the "Delay" area of an element it is possible to key in the desired delay. Turn on atrium lights Object Action Delay Drive Light Press button and select one of the elements in the list to delete it. Atrium light Press button and key in on the keyboard the number of repetitions to assign to the sequence. By pressing button and then button , it is possible to select inputs that can recall/stop the "Scenario sequence". Turn on atrium lights Trigger list The page enables the input to be associated to the scenario sequence to be chosen. The keys at the side enable the system's inputs to be filtered, to show, for example only the objects input relating to lights or only those relating to entrances and so on. On the sides of the selection window there are icons that allow you to filter the display of the types of devices. The filter “Other”, once activated, displays the following categories: - Video entry system events - Logic (Active/Inactive) Turn on atrium lights Select a new trigger Drive Light Entrance Light EAST garden light Open door WEST garden light Swimming pool Light 2 Once selected the device accesses the window through which it is possible to choose the function that must be carried out to activate and/or deactivate the scenario. Note: By pressing on the name of the scenario it is always possible to change its name. 110 Mitho THE PROGRAMS MENU Each element of the list of inputs is made up of two parts: the name of the object and the action that the value it takes on leads to. Turn on atrium lights Actions to open door Press button and select one of the “Inputs” to delete it from the list. Press the button to add inputs to the list. By pressing directly on one of the inputs on the list, you again access the page on which it is possible to choose the action associated to the value that the selected input can take on. Turn on atrium lights Trigger list Door lock release NOTE: Saving the Timer and Sequences happens automatically every minute. It is possible, however, to manually force the saving of the data by selecting the button to store on the SD card in the "Setup" -> "General" section. "Logics" From the main page of the "Programs" menu select the "Logics" button. Programs Clock alarm Timer The Logics page shows the list of logics/conditions present, preset in ETS or with Easy Controller. By pressing the key relating to one of these elements it is activated/deactivated cyclically. Screen saver Sequences Voice mail Logics Logic off True logic on Logics Common light False logic on Temperature threshold By pressing button and then the button that shows the logic it is possible to view the logic's inputs and their status/present value. The melody associated to a true/false logic can be selected in the "Setup" menu. 111 EN Mitho THE PROGRAMS MENU To programme the "Alarm clock" From the main page of the "Programs" menu select the "Alarm clock" button. Programs EN Clock alarm Timer To set the time for the alarm clock select button 1. Set the hour and minutes on the page that appears and confirm with key . Screen saver Sequences Note: If you programme only the alarm time, the alarm clock will sound every day. Voice mail Logics To set the day for the alarm clock select button 2. Set the day, month and year on the page that appears and confirm with key . Alarm clock The day and the time set are displayed in the centre of the screen. Press button 3 to activate the alarm clock set (blue icon = active alarm). 3 1 On the main window of the panel it is possible to activate/deactivate a programmed alarm clock: Alarm clock on Alarm clock off 2 To programme the "Screen Saver" From the main page of the "Programs" menu select the "Screen saver" button. Choose the preferred "Screen saver" mode from the 3 available. Disabled: when the stand-by time runs out the screen darkens, adjusting the backlighting according to what is set in the "Setup" menu. Date/Time: when the stand-by time runs out a screen is displayed on which the current date and time are reported. Screen saver Disabled Date/Time Slide show Load Slide-show: with this setting, when the stand-by time runs out, a series of images loaded onto the SD card are displayed with a slide-show effect. The panel uses the pre-existing images on the SD card. It is also possible to store on the SD card personal images with the following characteristics: 480x272 pixel, JPG or PNG. the images must be loaded onto the panel using the "Load" button. Button allows you to see a preview of the chosen "Screen saver". Note: any images previously present will be removed 112 Mitho THE PROGRAMS MENU To record and listen to "Audio messages" (Only Mitho PL KNX) The "Audio messages" function lets you record a maximum of 6 voice mails each lasting 10" in the device's memory. The presence of new voice mails is marked on the main page by the flashing of the "Programs" icon and on the "Programs" page by a red dot with the number of new voice mails. Programs Timer Alarm clock Screen saver Sequences Select the "Audio messages" button from the main page of the "Programs" menu to access the list of messages. Each message gives the date and time of recording. Audio messages Logics New message Audio messages Old message 23-09-2013 22-09-2013 14:25 12:32 20-09-2013 18-09-2013 07:44 07:32 Select a message to start playback. Message playback in progress To delete a message on the list press button select the messages to be deleted. and To record a voice mail New audio message Press button and then button to start the recording of the message; during the recording, the icon is replaced by the icon on a red background that enables the recording to be ended. Once the message is recorded, press icon to save the message and return to the "Audio messages" page. The icon lets you listen again to the recorded message; once pressed, it is replaced by the icon on a green background that enables playback to be interrupted. The recording can be overwritten several times, as it is saved only upon pressing the icon ; once saved, it can no longer be changed, 113 EN THE DOOR ENTRY MENU (ONLY FOR MITHO PL KNX PANELS) Mitho Standard functions Answering a call EN Comfort Door entry Functions Favourites Programs Setup In the event of a call, the main screen is automatically replaced by the screen in which shows the image of the caller filmed from the entry panel. 1 Press button B to refuse the call To answer the call, lift the receiver or press button A to activate hands-free mode. When you answer the call, the following controls will be available. 1 2 2 3 4 Buttons 3 and 4 let you enlarge/reduce the displayed image. Use the pen on the enlarged image to move the view to the desired position 6 5 Access to auxiliary command and stair lighting 6 Display images from the next entry panel (if present) 7 Entry panel door release displayed* 8 Access to video adjustments (luminosity, contrast, colour) 9 Close audio contact to the caller (mute function) J Call transfer (only for intercommunicating devices) 3 5 7 8 J 9 *The green key indicates that the door is open, if the entry panel is set up to send this information. 4 114 THE DOOR ENTRY MENU (ONLY FOR MITHO PL KNX PANELS) Mitho Transferring a call to other extensions If you press button J (fig. 4), a list will appear of the extensions where you can transfer the call.Select the desired extension, wait for an answer and hang up to transfer the call. 5 Receiving a call from other extensions (intercom) Intercom call Camera view Porter messages Voice mail messages L If the call comes from other internal extensions (intercom), the window in figure 6 will appear. Press button K to refuse the call To answer the call, lift the receiver (if present) or press button L to activate hands-free mode. K 6 Close audio contact to the caller (mute function) Calling other extensions (intercom) If you want to make a call to another extension, proceed as follows. M Comfort Door entry Functions Favourites Programs Setup Select the “Door Entry system” M icon from the main screen. 7 You will have access to the screen that contains the main video entry control functions of the system. Intercom call Porter messages N Select the “Intercom call” icon N. Camera view Voice mail messages 8 115 EN THE DOOR ENTRY MENU (ONLY FOR MITHO PL KNX PANELS) Mitho Select one of the extensions listed to begin the call immediately. EN Intercom 1 Intercom 2 Intercom 3 Intercom 4 Intercom 5 Intercom 6 9 O O Back to the previous screen P Back to the main screen Q Identification of extension called P Intercom call Camera view Porter messages Voice mail messages Close audio contact to the caller (mute function) Intercom 2 10 Assigning a name to an extension Intercom 1 Intercom 3 To make it easier to identify extensions, you can give each one of them a name. Intercom 2 R Intercom 5 Press button R and select the extension whose name you want to change. Intercom 4 Intercom 6 11 Type in the new name of the selected extension. Press button S to save and go back to the previous window. Edit intercome name Intercom 1 space enter S 12 116 THE DOOR ENTRY MENU (ONLY FOR MITHO PL KNX PANELS) Mitho Porter call list Intercom call Porter messages If the video entry system includes a porter switchboard, it will be possible to consult a list of the unanswered calls made from the porter’s office to our apartment. Camera view 1 Voice mail messages From the main screen (fig. 7) select icon “Door entry” and then icon “Porter messages” 1. 13 You will now have access to the screen containing the call list in chronological order. Button cancels all the listed calls. 1. Porter switchboard - 14:08:59 11-07-2013 Note: If there are unread messages from the porter switchboard, the "Porter messages" icon will flash. 2. Porter switchboard - 10:13:27 11-07-2013 3. Porter switchboard - 16:11:10 11-07-2013 4. Porter switchboard - 08:51:01 11-07-2013 14 Display images from entry panels Intercom call Porter messages 2 Select icon 2 on the main screen. It will now be immediately possible to view images taken by the entry panel surveillance cameras (if more than one). Camera view Voice mail messages 3 Access to auxiliary command and stair lighting 4 Display images from the next entry panel (if present) 5 Entry panel door release displayed* 6 Access to video adjustments (luminosity, contrast, colour) 7 Back to the previous screen 8 Open/close entry panel audio displayed 15 3 4 5 6 H G *The green key indicates that the door is open, if the entry panel is set up to send this information. 16 117 EN THE DOOR ENTRY MENU (ONLY FOR MITHO PL KNX PANELS) Mitho Video entry system voice mail Mitho PL KNX lets you record video calls from the entry panel if you are not at home or cannot answer. EN When the voice mail function is active, if there is a call, a message can be shown on the entry panel, pre-recorded by the user, which informs the caller that it is possible to leave a video message (e.g., “The user you have called is not available at the moment. If you wish, you can leave a message after the beep.”). The video message, labelled with the time and date of the call, will be stored. You can view it later by consulting video answer phone. Record a voice mail message Select the “Setup” 1 icon from the main screen. Comfort Door entry Functions Favourites Programs 2 1 Setup 17 Select the “Door Answer” icon. Setup Melodies General Date/Time Display Door Answer The screen that appears contains the commands needed to record and listen to your voice mail message. Note: The voice mail message may last up to 10 seconds. After the message has played, the entry panel will emit an acoustic signal. Door entry 18 Once you have recorded your message, you will be able to use button to decide whether or not it should be played in the event of an unanswered call. Setup Green icon Message playing Grey icon Message NOT playing 19 118 THE DOOR ENTRY MENU (ONLY FOR MITHO PL KNX PANELS) Mitho To activate the video entry voice mail (with or without the message), press icon 2 on the main screen (fig. 17). Setup Yellow icon Voice mail active Grey icon Voice mail NOT active 20 Checking the video answer phone Comfort 3 From the main screen select the “Door Entry” 3 icon and then the “Audio messages” icon that shows there are unread messages 4. Door entry Functions Favourites Programs Setup 21 Intercom call Porter messages The screen that appears provides a list of recorded messages in chronological order, starting with the most recent. The unread messages are shown by the white band. Camera view 4 Voice mail messages 22 To view a video entry phone message, press the desired item in the call list. Note: The voice mail can hold a maximum of 10 messages. The eleventh message will overwrite the first in chronological order. 23 119 EN THE DOOR ENTRY MENU (ONLY FOR MITHO PL KNX PANELS) Mitho Button 5 deletes the message you are viewing. Note: The presence of unread video entry system messages on your voice mail is indicated by the yellow flashing “call list” icon on the main screen. EN 5 24 Office function Intercom call Camera view Porter messages Voice mail messages If the office function is active 6, when a call is sent from the entry panel, the door that matches it is opened automatically. Note: The office function can be used in a timer to programme automatic opening based on the day and the time slot. 6 25 120 Mitho THE SETUP MENU By selecting the "Setup" button from the main page you access the screen that brings together all the settings that involve the overall operation of the panel. Rooms Door entry Functions Favourites Programs Setup Melodies Press the “Melodies” button to access the screen which provides a list of the call types with which one of the available ringtones can be associated. Setup Melodies General Date/Time Display Door Answer Door entry Select the call. Setup Melodies Entries Intercom Floor Alarm clock Porter Touch Select a call melody Setup Melodies Select the ringtone you wish to associate with the call from the list of available ringtones. Classic Dejavu Future Galaxy Space Terramin The centre button ringtone chosen. Press 121 lets you listen to a preview of the button to return to the previous screen. EN Mitho THE SETUP MENU Adjust the characteristics of the acoustic alarms. Entries EN Rings From the main screen “Melodies” select button followed by the acoustic alarm the characteristics of which are to be changed. The centre button lets you hear the volume level chosen; press button to confirm the changes made. Volume Pause Date/Time Press on the "Date/Time" button to access the screen that lets you set the date and time on the panel. Setup Date/Time Melodies General Date/Time Display Door Answer Select button 1 and use the screen that appears to set the current time; press the button to confirm the changes made. Select button 2 and use the screen that appears to set the current day, month, year; press the button to confirm the changes made. Door entry Button 3 lets you choose the format for displaying the time. Setup Date/Time 1 3 Button 4 (pressed repeatedly), lets you choose the format for displaying the date. 2 DD MM YY 4 Button 5 (active) enables the automatic adjustment of the panel to legal time (the last Sunday in March). 5 Door Answer (only on MITHO PL KNX panels) See: “Record a voice mail message” on page 118 122 Mitho THE SETUP MENU General Press on the "General" button to access a screen the brings together all the general settings that relate to the overall operation of the panel. Setup Melodies General Date/Time Display Door Answer Door entry Panel language selection Setup Select button 1 and use the screen that appears to choose the panel interface language; after selection, wait a few seconds for the panel to restart. General 1 Press 2 button to return to the previous screen. Password handling Select button 2 and use the screen that appears to change the password (max 8 alphanumeric characters) associated to the access levels of the project elements and to the burglar alarm function. This page is available if at least one element is protected or the burglar alarm function is enabled. Setup Manage password Example of protected element By pressing on the relative icons the following passwords can be changed: Type of password Accessible elements Unprotected With access level 1 With access level 2 With access level 3 Local editing of timers and sequences Burglar alarm function (*) (*) (*) (*) valid if hierarchically managed The passwords relating to levels , 1, 2 and 3, when required, remain active until the panel enters stand-by mode. The password relating to the burglar alarm is required whenever the burglar alarm functions are accessed. Press button to return to the previous screen. 123 EN Mitho THE SETUP MENU Setup Save/recover system copy General EN Select button 6 to save on the micro SD the system data set locally on the panel (timer, functions, etc.). Select button 7 to retrieve the saved system data from the micro SD. 6 Press 7 button to return to the previous screen. Set up "Favourites" Setup Select button 8 and use the screen that appears to set the function of the "Favourites" buttons shown on the Home Page. General 8 This page gives Favourite 1 and Favourite 2 (the latter only in the Mitho HA KNX version); each button can have an element of the system linked to it. The following can be selected as favourites: - a Zone - a Room - a Program - a Function (if present) Once a favourite is selected, the relative name appears in the special area on the button. 9 Setup Favourites Press button to return to the previous screen. Favourites Favourites Set up "Favourite scenes" (only Mitho HA KNX) Select button 9 (only on Mitho HA KNX) and use the screen that appears to set the function of the three centre buttons on the Home Page; when no setting has been entered as a "Favourite scenario", by clicking on the relative icon on the Home Page you go straight to this setup page. Setup Favourite scenes Scenario Scenario On this page there are 3 favourite scenes, the function can be defined for each. The following can be selected as scenarios: - KNX scenes - Sequences Scenario 124 Mitho THE SETUP MENU Display Press on the "Display" button to access a screen that lets you adjust the brightness of the display. Setup EN Melodies General Date/Time Display Door Answer Door entry Cursor 1 lets you adjust the brightness of the display in normal use conditions. Setup Display Cursor 2 lets you adjust the brightness of the display when it is in stand-by mode (brightness reduced). Active 1 Press button Stand-by to return to the previous screen. 2 Entry phone system (Only on Mitho PL KNX panels) Press the "Door entry" button to access a screen that lets you carry out the setting up of the functions relating to the video entry system. Setup Door entry 3 4 5 In systems with a porter switchboard, by activating the “Building” function, 3 the button for the call to the switchboard will be activated on the main page of the panel. 7 6 Button 4 once enabled, activates the automatic answer to intercom calls coming from other extensions (environmental listening function). Button 5 is used to manually programme the system. Button 6 is needed to identify the device if the system is being programmed from a PC, Button 7 cyclically changes the standard of the video signal of the system between PAL and NTSC. Press button 125 to return to the previous screen. Mitho THE SETUP MENU Info Panel Info The button , in the centre of the screen, allows you to view a set of technical information on the panel, which could be useful for your installer in terms of software updates or technical operations. EN In particular it is possible to see the KNX address of the panel 8. 8 Mitho PL KNX Mitho HA KNX Reset Reset Device reset Any time that operating anomalies, servicing or other technical reasons require the unit to be reset, press lightly on the button located inside the opening under the body of the device (see figure), using the pen provided. Release the button as soon as the screen goes dark and wait for the main menu to reappear before resuming normal use of the unit. Note: This operation does NOT delete any programmes, which will be restored, along with other data, when the unit is restarted. 126
Scaricare