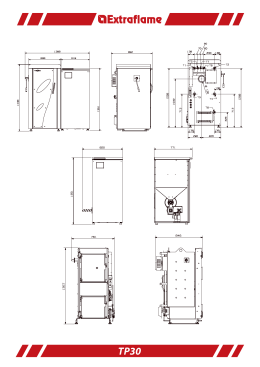
Certificazione
In accordo con la Direttiva 89/106/CEE (Prodotti da Costruzione), con la Direttiva Bassa Tensione
73/23/CEE, con la Direttiva 2004/108/CEE (Compatibilità Elettromagnetica), integrate dalla marcatura
CE secondo la Direttiva 93/68/CEE
According the Construction Products Directive 89/106/EEC, the Low Voltage Directive 73/23/EEC, the
EMC Directive 2004/108/EEC, amended by the CE-marking Directive 93/68/EEC.
Tipo di apparecchio - Type of equipment
: Residential space heating appliance fired by wood pellets
Marchio commerciale -Trademark
:
Modello - Type designation
: CONTESSA
Uso - Use
: Space heating in residential buildings
Costruttore - Manufacturer
Indirizzo - Address
: EXTRAFLAME S.p.A.
: Montecchio Precalcino - Vicenza - Italy
Luogo di produzione - Factory
Indirizzo - Address
: Montecchio Precalcino - Vicenza - Italy - 36030
: Via dell’Artigianato, 10
Rendimento alla potenza nominale
Appliance efficiency at nominal output
CO misurato alla potenza nominale
Measured CO at nominal output
: 81,5 %
: 0,019 %
In qualità di costruttore e/o rappresentante autorizzato della società all’interno della CEE, si dichiara sotto la
propria responsabilità che gli apparecchi sono conformi alle esigenze essenziali previste dalle Direttive su
menzionate.
Il presente certificato è relativo solo ed esclusivamente alla stufa e non riguarda in alcun modo l’impianto
che dovrà essere eseguito alla regola dell’arte come da libretto istruzioni allegato all’apparecchio.
As the manufacturer’s authorised representative established within EEC, we declare under out sole
responsibility that the equipment follows the provisions of the Directives stated above.
This certificate refers exclusively to the stove itself and not to the equipment which must be correctly
produced in strict accordance to the instructions manual accompanying the stove.
Firma persona autorizzata
Signature
AVVERTENZE
Prima di ogni accensione della macchina verificare sempre che il braciere sia completamente
libero e pulito.
E’ assolutamente vietato introdurre manualmente pellet all’interno del braciere.
All’interno della stufa si trovano 3 confezioni di sali disidratanti da rimuovere definitivamente prima di
accendere la stufa: 1 all’interno della camera di combustione, 2 all’esterno della stufa.
Per un ottimale funzionamento del prodotto, l’azienda invita l’utilizzatore a regolare l’afflusso del pellet in
base al tipo di combustibile utilizzato. Vedi sezione “Regolazione carico pellet” del libretto istruzioni.
L’apparecchio deve funzionare alla potenza 4 o 5 per 2 o 3 giorni in modo tale che le parti meccaniche
abbiano la possibilità di assestarsi.
WARNING
Always check before lighting the stove that the burning pot is completely free and clean.
Do not insert pellet manually into the combustion pot.
3 packagings dehydrating salts will be found in the stove to be removed completely before starting the
heater: 1 inside the burning chamber, 2 on the outside.
For a correct functioning of this product, the manufacturer kindly asks the final user to set the pellet
feeding according to the type of combustible. Please read the chapter “Pellet Feeding Adjustment” in “Use
and Maintenance Manual”.
This stove must function at middle power (power 4 or 5) for 2 or 3 days in order to allow a better
settlement of the mechanical components.
ACHTUNG
Vor jeder Anzündung immer kontrollieren, dass die Brennschale frei und sauber ist.
Es ist verboten die Pellet in die Schale mit Händen zu werfen.
Im Pelletsofen sind 3 Packungen Trockensalz zu finden die anlässlich der Inbetriebnahme entfernt werden
müssen:1 in der Brennkamer und 2 sind ausserhalb des Ofens.
Zum dem optimalen Betrieb dieses Produktes bittet Der Hersteller den Benutzer darum, die Pelletszufuhr
gëmaβ dem verwendeten brennstoff einzustellen. Lesen Sie bitte den Paragraph „Reglung der PelletsZufuhr“ in der „Bedienungs- und Aufstellungsanleitung“.
Das Gerät soll 2 oder 3 Tage auf Mittelleistung funktionieren (Stufe 4 oder 5) so dass die mechanischeTeile
sich einlaufen können.
ATTENTION
Avant d’allumer le poêle toujours contrôler que le brasier soit complètement libre et propre.
N’introduisez pas pellet manuellement dans le brasier.
A l’intérieur du poêle Vous retrouverez 3 paquets de sels déshydratants à enlever complètement , S.V.P.,
lors de la mise à feu : 1 dans le chambre de combustion, 2 à l’extérieur du poêle.
Pour un emploi optimal du produit, le producteur prie l’usager de bien vouloir régler le chargement du
pellet selon le type de combustible. Veuillez lire le paragraphe « Réglage charge Pellet » dans le « Manuel
d’instructions et entretien ».
L’appareil doit fonctionner à puissance 4 ou 5 pour 2 ou 3 jours, de façon que les parties mécaniques
puissent se tasser.
Stufa a pellet modello / pellet stove model : Contessa
06
EN 14785 : 2006
Caratteristiche
Features
U.M.
Peso
Altezza
Larghezza
Profondità
Diametro tubo scarico fumi
Diametro tubo aspirazione aria
Volume di riscaldamento max.
Potenza termica globale max
Potenza termica utile max
- potenza resa all’aria
- potenza resa all’acqua
Potenza termica utile min
- potenza resa all’aria
- potenza resa all’acqua
Consumo orario combustibile min
Consumo orario combustibile max
Capacità serbatoio
Tiraggio del camino consigliato
Tiraggio del camino alla potenza termica utile max
Tiraggio del camino alla potenza termica utile min
Potenza elettrica nominale
Tensione nominale
Frequenza nominale
Diametro tubo entrata/uscita acqua
Diametro tubo scarico automatico
Prevalenza pompa
Max pressione idrica di esercizio ammessa
CO misurato alla potenza termica utile max
CO misurato alla potenza termica utile min
Rendimento alla potenza termica utile max
Rendimento alla potenza termica utile min
Temperatura gas di scarico alla potenza termica utile max
Temperatura gas di scarico alla potenza termica utile min
Massa dei gas emessi alla potenza termica utile max
Massa dei gas emessi alla potenza termica utile min
Weight
Height
Width
Depth
Outlet fumes pipe diameter
Air intake pipe diameter
Max. heating volume
Max. overall thermal output
Max. useful thermal output
- power given back to air
- power given back to water
Min. useful thermal output
- power given back to air
- power given back to water
Min. hourly fuel consumption
Max. hourly fuel consumption
Tank capacity
Recommended flue pipe draft
Flue pipe draft at max. useful thermal output
Flue pipe draft at min. useful thermal output
Rated electric output
Rated voltage
Rated frequency
Water intake/outlet pipe diameter
Automatic discharge pipe diameter
Pump head
Max. admitted operating water pressure
CO measured at max. useful thermal output
CO measured at min. useful thermal output
Performance at max. useful thermal output
Performance at min. useful thermal output
Exhaust gas temperature at max. useful thermal output
Exhaust gas temperature at min. useful thermal output
Gas mass given off at max. useful thermal output
Gas mass given off at min. useful thermal output
kg
mm
mm
mm
mm
mm
m³
kW
kW
kW
kW
kW
kW
kW
kg/h
kg/h
kg
Pa
Pa
Pa
W
Vac
Hz
“
“
m
bar
%
%
%
%
°C
°C
g/s
g/s
Prove eseguite usando come combustibile pellet di legno con potere calorifico pari a 4.9 kWh/kg.
Tests done using wood pellet (as full) with heating power of 4.9 kWh/kg.
Valore
Value
147
1068
522
547
80
50
184
10.0
8.0
8.0
3.0
3.0
0.7
2.0
~ 21
~ 10
12
10
300
230
50
0.019
0.039
81.5
81.5
244
135
7.77
5.96
Poêle à pellets modèle / Pelletofenmodell : Contessa
06
EN 14785 : 2006
Données
Eigenschaften
U.M.
Poids
Hauteur
Largeur
Profondeur
Diamètre tuyau évacuation fumées
Diamètre tuyau aspiration air
Volume de réchauffement Max.
Puissance thermique totale max.
Puissance thermique utile max.
- puissance rendue à l’air
- puissance rendue à l’eau
Puissance thermique utile min.
- puissance rendue à l’air
- puissance rendue à l’eau
Consommation horaire combustible min.
Consommation horaire combustible max.
Capacité réservoir
Tirage de la cheminée conseillé
Tirage de la cheminée à la puissance thermique utile max.
Tirage de la cheminée à la puissance thermique utile min.
Puissance électrique nominale
Tension nominale
Fréquence nominale
Diamètre tuyau entrée/sortie eau
Diamètre tuyau évacuation automatique
Hauteur d’élévation pompe
Pression hydrique de service max. admise
CO mesuré à la puissance thermique utile max.
CO mesuré à la puissance thermique utile min.
Rendement à la puissance thermique utile max.
Rendement à la puissance thermique utile min.
Temp. gaz d’échappement à la puissance therm. utile
max.
Temp. gaz d’échappement à la puissance therm. utile min.
Masse des gaz émis à la puissance thermique utile max.
Masse des gaz émis à la puissance thermique utile min.
Gewicht
Höhe
Breite
Tiefe
Durchmesser Rauchabzugsrohr
Durchmesser Luftansaugrohr
Max. Heizvolumen
Max. globale Wärmeleistung
Max. Nutzwärmeleistung
- an die Luft abgegebene Leistung
- an das Wasser abgegebene Leistung
Min. Nutzwärmeleistung
- an die Luft abgegebene Leistung
- an das Wasser abgegebene Leistung
Mindestbrennstoffverbrauch pro Stunde
Maximaler Brennstoffverbrauch pro Stunde
Aufnahmevermögen Pelletspeicher
Empfohlener Zug des Kamins
Zug des Kamins bei maximaler Nutzwärmeleistung
Zug des Kamins bei minimaler Nutzwärmeleistung
Elektrische Nennleistung
Nennspannung
Nennfrequenz
Rohrdurchmesser Wassereinlass/-auslass
Durchmesser automatisches Rauchabzugsrohr
Förderhöhe Pumpe
Maximaler zugelassener Wasserdruck bei Betrieb
CO-Wert bei max. Nutzwärmeleistung
CO-Wert bei min. Nutzwärmeleistung
Leistung bei maximaler Nutzwärmeleistung
Leistung bei minimaler Nutzwärmeleistung
Abgastemperatur bei maximaler Nutzwärmeleistung
Abgastemperatur bei minimaler Nutzwärmeleistung
Ausgestoßene Abgasmenge bei max. Nutzwärmeleistung
Ausgestoßene Abgasmenge bei min. Nutzwärmeleistung
kg
mm
mm
mm
mm
mm
m³
kW
kW
kW
kW
kW
kW
kW
kg/h
kg/h
kg
Pa
Pa
Pa
W
Vac
Hz
“
“
m
bar
%
%
%
%
°C
°C
g/s
g/s
Le combustible utilisé pour effectuer ces essais ce sont des pellets en bois avec un pouvoir calorifique de 4.9 kW/H/Kg.
Die Testdaten wurden unter folgenden Bedingungen erhoben:
Brennmaterial: Holz-Pellets
Brennwert: 4.9 KW/h/kg.
Valeur
Wert
147
1068
522
547
80
50
184
10.0
8.0
8.0
3.0
3.0
0.7
2.0
~ 21
~ 10
12
10
300
230
50
0.019
0.039
81.5
81.5
244
135
7.77
5.96
ISTRUZIONI MONTAGGIO PIASTRELLE CONTESSA
INSTRUCTIONS FOR FITTING TILES ON CONTESSA
Il kit è composto da 2 particolari:
- 4 piastrelle laterali
- 1 copertura ceramica
The kit has two components:
- 4 side tiles
- 1 ceramic lid
1
2
Prima di procedere al montaggio
delle piastrelle è necessario
smontare sia i 2 laterali superiori in
ghisa (vedi figure 13-14-15-16) sia
i due fianchi (vedi figure 10-1112).
3
Before fitting the tiles, you have to
remove both the 2 upper sides in
cast iron (see Figures 13-14-1516) and the 2 side panels (see
Figures 10-11-12).
4
La sequenza di montaggio delle
piastrelle prevede di procedere dal
basso verso l’alto. Le maioliche
devono essere incastrate prima sul
lato posteriore e poi su quello
anteriore (vedi figure 2-3-4-5-6)
5
The tile fitting sequence goes from
bottom to top. The majolica tiles
must first be hooked on the back
side and then on the front side
(see Figures 2-3-4-5-6).
6
Dopo aver montato le due
maioliche su entrambi i lati è
possibile rimontare i due fianchi
facendo attenzione al particole
incastro raffigurato a fianco.
7
8
After the two majolica tiles have
been fitted on the sides, the two
side panels can be re-assembled,
paying attention to the particular
fixing method shown in the figure.
Essi dovranno poi essere fissati
con le 3 viti autofilettanti come
illustrato nelle figure 10-11-12.
The side panels are secured using
the 3 self-tapping screws as shown
in Figures 10-11-12.
9
10
11
12
Si potrà quindi procedere
rimontando i due laterali superiori
in ghisa come illustrato nelle figure
13-14-15-16.
Now you can proceed to re-fitting
the two upper sides in cast iron as
shown in Figures 13-14-15-16.
13
14
15
16
Infine per montare la copertura
superiore è necessario togliere i
pomelli avvitati sulle sommità delle
aste raschiatori, posizionare la
maiolica, quindi riavvitare i pomelli.
17
18
To fit the upper lid, you have to
remove the knobs screwed onto
the tops of the scraper rods, then
position the majolica lid and retighten the knobs.
INSTRUCTIONS DE MONTAGE DES PLANELLES CONTESSA
MONTAGEANLEITUNG KACHELN CONTESSA
Le kit se compose de deux groupes
d’éléments :
- 4 planelles de faïence, latérales
- 1 couverture en céramique
Der Bausatz besteht aus 2 Einzelteilen:
- 4 Seitenkacheln
- 1 Keramikdeckel
1
2
Avant de passer au montage des
planelles, il faudra démonter :
- les deux flancs supérieurs en fonte
- les deux revêtements latéraux
(selon figures 13-14-15-16)
3
Bevor die Montage der Kacheln
vorgenommen wird, müssen sowohl die
2 oberen seitlichen Gusseisenteile (siehe
Abb. 13-14-15-16) als auch die beiden
Seitenteile (siehe Abb. 10-11-12)
abmontiert werden).
4
La séquence de montage se passe de
bas en haut.
Les faïences doivent être serties sur le
côté arrière et, ensuite, sur le côté
frontal.
(selon figures 2-3-4-5-6)
5
Die Folge der Montage der Kacheln sieht
vor, von unten nach oben vorzugehen.
Die Majolikateile müssen zuerst an der
Hinterseite und danach an der
Vorderseite eingefügt werden (siehe
Abb. 2-3-4-5-6)
6
Après avoir serti les faïences des deux
côtés, avant et arrière, remonter les
deux
7
8
Nachdem die beiden Majolikateile an
beiden Seiten montiert wurden, können
die beiden Seitenteile wieder montiert
werden, wobei auf die besondere
Steckverbindung, die in der seitlichen
Abbildung gezeigt ist, zu achten ist.
Essi dovranno poi essere fissati con le 3
viti autofilettanti come illustrato nelle
figure 10-11-12.
Sie müssen danach mit den 3
selbstschneidenden Schrauben befestigt
werden, wie in den Abbildungen 10-1112 gezeigt.
9
10
11
12
Procéder en remontant les deux flancs
supérieurs en fonte (selon fig. 13-14-1516).
Danach können die beiden oberen
seitlichen Gusseisenteile wieder montiert
werden, wie in den Abbildungen 13-1415-16 gezeigt.
13
14
15
16
Enfin, pour le montage de la partie
supérieure, il faudra:
- dévisser les pommeaux des tiges de
raclage,
- poser la couverture en faïence
- et revisser les pommeaux sur le
filetage des tiges.
17
18
Um schließlich den oberen Deckel zu
montieren, müssen die an den Kopf der
Kratzerstangen angeschraubten Knäufe
entfernt werden. Die Majolikaplatte
positionieren, danach die Knäufe wieder
anschrauben.
Fascicolo istruzioni Contessa
REV 004 08.10.2007
Scaricare