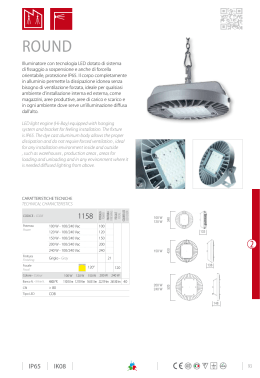
CENTRALE SV La centrale oggetto di questo manuale è concepita per il comando e azionamento di motori atti ad automatizzare serrande avvolgibili. AVVERTENZE IMPORTANTI Il costruttore fin da ora declina ogni responsabilità per danni a persone o cose dovuti ad un uso improprio del dispositivo, alla non osservanza delle indicazioni qui presenti o ad un’errata installazione. Non è pertanto consentita l’installazione della centrale prima di avere letto attentamente il seguente manuale di istruzioni L’installazione va affidata solamente a personale tecnico qualificato nel campo di applicazione del dispositivo in oggetto. Analoghe considerazioni valgono per le fasi programmazione e per eventuali interventi manutentivi che si rendessero necessari. DI SEGUITO VENGONO ELENCATE LE NORME DI RIFERIMENTO VIGENTI IN TERMINI DI NORMATIVE EUROPEE: Direttiva macchine 89/392 CEE EN 60204-1 (Sicurezza del macchinario, equipaggiamento elettrico delle macchine, parte 1: regole generali. EN 12445 (Sicurezza nell’uso di chiusure automatizzate, metodi di prova). EN 12453 (Sicurezza nell’uso di chiusure automatizzate, requisiti). IN PARTICOLARE, il Costruttore, non si assume responsabilità qualora l’impianto elettrico a monte dell’automazione non risponda alle vigenti normative. CARATTERISTICHE TECNICHE GENERALI: Alimentazione: Uscita lampeggiante: Uscita motore: Ingressi pulsante e dispositivo di sicurezza: Temperatura di esercizio: Ricevitore radio: Codici radio memorizzabili: Uscita aliment. ausiliaria: 230 Vac 50-60Hz 4,5W 230 Vac 40 W 230 Vac 1200 W 24 Vdc. da -20 a 85 °C. 433.92 MHz 120 (60+60) 24 Vac 3 W max. COLLEGAMENTI: CON.1 1 - Ingresso linea 230 Vac (Fase). 2 - Ingresso linea 230 Vac (Neutro). 3 - Uscita motore salita. 4 - Uscita motore comune. 5 - Uscita motore discesa. 6 - Ingresso lampeggiante 230 Vac (Neutro). 7 - Ingresso lampeggiante 230 Vac (Fase). CON.2 A - Uscita alimentazione servizi 24 Vac 3 W. B - Uscita alimentazione servizi 24 Vac 3 W. C - Ingresso pulsante comando apre-chiude (NA). D - Ingresso GND comune. E - Ingresso dispositivo sicurezza (NC). F - Ingresso polo caldo antenna. G - Ingresso massa antenna CON.3 B,V,G – Collegamento Costa Pneumatica FUNZIONAMENTO: Funzionamento Passo-Passo: il primo impulso (da radiocomando o da pulsante bassa tensione) comanda l’apertura fino allo scadere del tempo motore; il secondo impulso comanda la chiusura del serramento. Se si invia un impulso prima dello scadere del tempo motore, la centrale effettua l’arresto del moto, un ulteriore comando determina la ripresa del moto in senso opposto. Chiusura automatica : La centrale permette di richiudere il serramento (quando è sul fine corsa di apertura) in modo automatico senza l'invio di comandi supplementari. La scelta di questa modo di funzionamento è descritta nel modo di programmazione del Tempo di pausa. Dispositivo di sicurezza : La centrale permette l'alimentazione ed il collegamento di Fotocellule, Coste Pneumatiche. L'intervento nella fase di apertura non viene considerato, nella fase di chiusura provoca l'inversione del moto. Questo ingresso (CON2 D-E) se non utilizzato deve essere ponticellato. PROGRAMMAZIONE della CENTRALINA: Utilizzando i tasti SEL e SET della centralina è possibile abilitare/disabilitare e programmare il timer di richiusura automatica ed il tempo motore. Inoltre è possibile scegliere tra il funzionamento con Lampeggiante o Luce di cortesia della lampada collegabile e la memorizzazione di radiocomando per l’apertura/chiusura a distanza. Tasto SEL : Premendo più volte il tasto, si accenderanno in sequenza i 4 led (CODE, LAMP/CORT, T. MOT e T. PAUSA). Il LED lampeggiante indica la funzione corrispondente che è possibile abilitare e/o modificare (vedi tabella). La selezione resta attiva per 10 secondi, trascorsi i quali, la centrale ritorna allo stato di default se non vengono effettuati cambiamenti. Riferimento LED NOTE: Non essendo la centrale dotata di alcun dispositivo di sezionamento in riferimento alla alimentazione 230Vac prevedere sempre un sezionatore idoneo. Gli ingressi normalmente chiusi (NC) devono essere ponticellati se non usati LED Lampeggiante: Funzione Corrispondente: CODE Programmazione Radiocomandi Attiva LAMP/CORT. Impostazione Lampeggio O Luce di Cortesia Attivo T. MOT. Programmazione Tempo Motore Attiva T. PAUSA. Programmazione Timer Richiusura Attivo Tasto SET: permette la programmazione e/o l’abilitazione dell'informazione o del tempo secondo il tipo di funzione prescelta con il tasto SEL. (vedi Descrizione Dettagliata per ogni funzione). Programmazione Radiocomandi (funz. CODE) E’ possibile far funzionare la centralina con radiocomandi ad 1 solo tasto oppure a 2. Con un solo tasto la centralina funzionerà come per la pulsantiera bassa tensione mentre con due codici differenti si ottengono dei comandi distinti, il primo per la salita ed il secondo per la discesa. La programmazione dei codici di trasmissione del radiocomando è eseguita nel seguente modo: premere il tasto SEL, il LED “CODE” inizierà a lampeggiare. Inviare il primo codice premendo il tasto del radiocomando che si desidera memorizzare. Il LED “CODE” inizierà a lampeggiare velocemente non appena il codice sarà stato memorizzato. Se si desidera memorizzare anche un secondo tasto del radiocomando inviare il secondo codice mentre il LED CODE lampeggia velocemente, altrimenti attendere che il LED smetta di lampeggiare. Se non è inviato il secondo codice entro 10 secondi la centralina esce dalla fase di programmazione, selezionando il funzionamento con un solo codice del radiocomando. A programmazione ultimata il LED “CODE” rimarrà acceso fisso indicando che nella memoria è presente un codice. E’ possibile memorizzare fino a 120 codici totali. Nel caso che tutti i 60 codici siano stati memorizzati, ripetendo l'operazione di programmazione, tutti i 4 LEDS di segnalazione inizieranno a lampeggiare molto velocemente segnalando che non sono possibili ulteriori memorizzazioni. Programmazione dei codici a distanza. Questa procedura utile a centralina già installata, consente la programmazione del codice di trasmissione, senza intervenire direttamente sul tasto SEL della centrale, ma eseguendo l'operazione a distanza. La programmazione a distanza, si esegue nel seguente modo: - con memoria VUOTA: tenere premuto in modo continuo per un tempo maggiore a 10 secondi il tasto di un radiocomando. La procedura è analoga a quella descritta per la programmazione da pulsante SEL, ma in questo caso è il motore a segnalare l’apprendimento dei codici inviati. Il Motore segnalerà l’entrata in programmazione con dei movimenti brevi della serranda in salita e discesa analogamente ad ogni memorizzazione di codice andata a buon fine. - con codice già in memoria: tenere premuto in modo continuo per un tempo maggiore a 20 secondi il tasto di un radiocomando in precedenza memorizzato. La centrale entrerà in modo programmazione come descritto precedentemente. Cancellazione La cancellazione di tutti i codici memorizzati si esegue nel seguente modo: premere il tasto SEL 1 volta, il LED “CODE” inizierà a lampeggiare. Premere quindi il tasto SET per 1 secondo. Quando il LED CODE inizierà a lampeggiare più velocemente rilasciare il tasto. Dopo qualche secondo il LED si spegnerà segnalando che in memoria non è più presente nessun codice di radiocomandi. Selezione lampeggiatore o luce di cortesia (funz. LAMP/CORT) La centrale dispone di una uscita 230Vac 40W max. per il collegamento di un lampeggiante o di una luce di cortesia. Funzionamento Lampeggiatore: L'uscita 230 Vac. si attiverà ogni volta che l'automazione è in movimento, per la durata del tempo motore. Nel caso in cui sia memorizzato il Tempo di Pausa, il lampeggiatore sarà attivo anche durante la Pausa. Funzionamento Luce di Cortesia: L'uscita 230Vac. si attiverà per la durata di 3 minuti, ogni qualvolta che sarà impartito un comando di salita. Di default è abilitata la funzione di Lampeggiatore. Se si desidera abilitare la luce di cortesia, posizionarsi premendo 2 volte il tasto SEL, sul lampeggio del LED LAMP/CORT. Mentre il LED “LAMP CORT” lampeggia premere il tasto SET TIME, fino a che il LED LAMP/CORT. si accenderà permanentemente indicando la funzione Luce DI Cortesia abilitata. Ripetere l'operazione se si desidera ripristinare la configurazione precedente. In questo caso il LED LAMP/CORT si dovrà spegnere segnalando la funzione lampeggio abilitata. Programmazione tempo di lavoro (funz. T. MOT 4 minuti max) La centrale ha di default un tempo di lavoro abilitato pari a 30 sec. Se si desidera un tempo differente procedere alla programmazione (a serramento chiuso) come descritto di seguito: premere 3 volte il tasto PROG, fino a vedere il lampeggio del LED “T. MOT”. Mentre il LED lampeggia premere in modo continuo il tasto SET TIME. il serramento inizierà la fase di salita, al raggiungimento del punto desiderato lasciare il tasto SET. Il LED T. MOT resterà acceso fisso. Si consiglia di memorizzare un tempo più lungo di alcuni secondi dopo che il serramento ha raggiunto il finecorsa. Se si desidera un tempo di lavoro motore infinito (disabilitare quindi la funzione) posizionarsi con il tasto SEL sul lampeggio del LED T.MOT. Premere per meno di 1 secondo il tasto SET mentre il LED lampeggia. Il Led si spegnerà indicando che non è presente nessun tempo lavoro. Programmazione tempo richiusura automatica. (funz. T. PAUSA - 4 min. max.) La funzione di chiusura automatica è abilitata di default con un tempo di pausa pari a 20 secondi. Se si desidera modificare tale tempo procedere come segue: a serramento chiuso posizionarsi con il tasto SEL (premere 4 volte) sul lampeggio del LED “T. PAUSA” Mentre il LED lampeggia premere in modo continuo il tasto SET per un tempo corrispondente a quello desiderato. Se si desidera disabilitare la chiusura automatica, posizionarsi sul lampeggio del LED T. PAUSA e premere mentre il led lampeggia per meno di 1 secondo il tasto SET. Il LED si spegnerà indicando che la funzione non è attiva e la serranda dovrà essere quindi chiusa con un comando manuale. Reset di tutte le funzioni: Nel caso sia opportuno ripristinare la centrale alla configurazione di fabbrica, premere il tasto SEL e SET in contemporanea per 1 secondo, allo stesso tempo si otterrà l'accensione contemporanea di tutti i LED di segnalazione e subito dopo lo spegnimento. Anche i codici memorizzati verranno cancellati. CENTRALE SV Centrale électronique monophasée, pour l'automatisation des basculants et tabliers avec radio récepteur incorporée. CARACTÉRISTIQUES TECHNIQUES: - Alimentation : 230 Vac 50 Hz 4,5W max. - Sortie clignotant : 230 Vac 50Hz 40W max. - Sortie moteur : 230 Vac 50Hz 1200 W max. - Sortie alimentation aux : 24 Vac 3 W max. - Entrées Poussoir et Dispositif de sécurité: 24 Vdc - Température d'exercice : -10 55 °C - Récepteur radio : 433,92MHz - Transmetteurs en op. : 12-18 Bit ou Rolling Code - Codes TX max. en mémoire: 60 UP, 60 DOWN ou 60 P/P IMPORTANT POUR L’INSTALLATEUR Pour obtenir un fonctionnement correct de la partie radio récepteur, dans le cas de l'utilisation de deux ou plus centrales, on conseille l'installation à une distance d'au moins trois mètres l'une de l'autre. La centrale ne présente aucun dispositif de sectionnement de la ligne électrique 230 Vac, l’installateur devra donc mettre un dispositif de sectionnement dans l’installation. Le fixage des câbles d’ alimentation et liaison, doit être réalisé par l’assemblage des presse-câbles qui sont dans l’emballage Les entrées normalement fermées (NC) doivent avoir le pontet, si elles ne sont pas utilisées !! CARACTÉRISTIQUES FONCTIONNELLES : Fonctionnement pas à pas: Si on utilise la radiocommande ( LED CODE allumé ) avec le tableau poussoir en basse tension ( PUL ) pour l'entraînement du bâti, on aura le fonctionnement suivant: la première impulsion commande l'ouverture jusqu’à ce que le temps moteur s'arrête, la seconde impulsion commande la fermeture de la huisserie, si on envoie une impulsion avant la fin du temps moteur, la centrale effectue l'arrêt du moteur. Une autre commande détermine la reprise du mouvement en sens inverse. Fermeture Automatique : La centrale permet aussi de refermer l'huisserie en automatique, sans l’envoi de commandes supplémentaires. Le choix de cette modalité est décrit dans le mode de programmation de Temps de pause. Dispositif de sécurité : La centrale permet l'alimentation et la connexion de cellules photoélectriques, Côtes pneumatiques (NC). L’intervention dans la phase de fermeture provoque l’inversion de la marche. Il faut mettre un pontet si cette entrée n’est pas utilisée. PROGRAMMATION: CONNEXION DE LA BOITE A BORNES: CN1 : 1 2 3 4 5 6 7 : Entrée ligne 230 Vac (Phase). : Entrée ligne 230 Vac (Neutre). : Sortie moteur montée. : Sortie moteur commun. : Sortie moteur descente. : Entrée clignolant 230 Vac (Neutre). : Entrée clignolant 230 Vac (Phase). CN2 : A : Sortie alimentation services 24 Vac 3 W. B : Sortie alimentation services 24 Vac 3 W. C : Entrée commande ouverture-fermeture (NA). D : Entrée GND commun. E : Entrée dispositif de sécurité (NC). F :Entrée pole chaud antenne. G : Entrée masse antenne. Touche SEL: sélectionne le type de fonction à mémoriser, la sélection est indiquée par le clignotement du Led. En appuyant plusieurs fois sur la touche, vous pourrez vous positionner sur la fonction désirée. La sélection a un temps d’action de 10 secondes et le Led clignote; lorsque les 10 secondes seront passées la centrale retournera à la position de base. Touche SET: effectue la programmation de l’information selon le type de fonction choisie avec la touche SEL . Référence LED 1) CODE 2) LAMP/CORT. 3) T. MOTORE. 4) T. PAUSA. LED éteint Aucun code Clignotant Temps infini Sans fermeture aut. LED allumé Code inséré éclairage intérieur autom. Temps programmé Avec fermeture aut. 1) CODE : (Programmation de la radiocommande) Fonctionnement avec 1 ou 2 codes de la radiocommande. Pendant la programmation, il est possible mémoriser 1 ou 2 codes de la radiocommande, avec un code on a un fonctionnement cyclique (montée/descente), avec deux codes différents on obtient des commandes différentes, la première pour la côte et la deuxième pour la descente. Programmation : La programmation des codes de transmission de la radiocommande est effectuée de la façon suivante: presser le bouton SEL, LED CODE commencera a clignoter et en même temps envoyer le premier code choisi par la radiocommande désirée, en même temps le LED CODE commencera à clignoter rapidement et à envoyer le deuxième code à mémoriser. Le LED CODE restera allumé et la programmation sera terminée. Si le deuxième code n’est pas envoyé dans les 10 secondes la centrale sort de la programmation et choisit le fonctionnement avec un seul code de la radiocommande. Dans le cas où les 60 codes sont déjà mémorisés, si on répète la programmation, tous les 4 LEDS de signalisation clignoteront rapidement, signalant ainsi qu'il n'est pas possible d'effectuer d'autres mémorisations. Programmation du code de transmission à distance : Cette procédure permet la programmation du code de transmission, sans intervenir directement sur la touche SEL de la centrale, mais en effectuant l’opération à distance. 1) La programmation du code de transmission à distance avec une radiocommande qui a été mémorisée en précédence s’effectue de la façon suivante: envoyer de façon continue pendant plus que 10 secondes le code et la centrale entrera en programmation comme indiqué ci-dessus. 2) La programmation du code de transmission à distance avec la centrale sans code mémorisé en précédence s’effectue de la façon: envoyer de façon continue pendant plus que 20 secondes le code et la centrale entrera en programmation comme indiqué ci-dessus. Effacement : L’effacement de tous les codes mémorisés s’effectue de la façon suivante: appuyer sur la touche SEL, le led CODE commencera à clignoter, ensuite appuyer sur la touche SET, le led CODE s’éteindra et l’effacement sera complété. 2) LAMP/CORT. Eclairage intérieur: (Sélection clignotant ou éclairage intérieur automatique) La centrale a une sortie 230Vac pour la jonction d’ un clignotant ou de l’éclairage intérieur automatique. La centrale est fournie par le constructeur avec la fonction du clignotant habilitée. Si on veut connecter l’ éclairage intérieur automatique, s’en tenir aux instructions: positionnez-vous avec la touche SEL sur le clignotant du LED LAMP/CORT puis appuyer surla touche SET, au même moment le LED LAMP/CORT s'allumera de façon permanente. Si on désire retourner à la configuration précédente, répéter l'opération. Fonctionnement du clignotant: La sortie 230 Vac. se met en route chaque fois que l’automatisation est en mouvement pendant la durée du temps moteur. Dans le cas où on a mémorisé le Temps de Pause, le clignotant restera actif pendant la Pause. Fonctionnement éclairage intérieur: La sortie 230 Vac. se met en route pour 3 minutes, chaque fois que une commande côte est donnée. 3) T. MOTORE: (Programmation. temps de travail 4 minutes max.) La centrale est fournie par le constructeur avec un temps de travail du moteur préétabli de 30 sec. Si une programmation différente du temps de travail du moteur est nécessaire, celle ci devra être effectuée avec la huisserie fermée, de la façon suivante: se positionner avec la touche SEL, sur le led clignotant T. MOT. puis appuyer d’une façon continue sur la touche SET, à ce point la huisserie commencera la phase d’ouverture; quand on rejoint le point désiré, laisser la touche SET, et la mémorisation du temps moteur sera automatique et le Led T. MOT. restera allumé fixe. Si l'on désire un temps de travail infini, se positionner sur la touche SEL sur le clignotement du Led T.MOT. puis appuyer sur la touche SET moins d'une seconde; le Led s'étendra au même moment et l'opération sera complétée. On conseille de mémoriser un temps plus long de quelques secondes après que l'huisserie ait atteint la buttée de fin de course. 4) T. PAUSE: (Programmation du temps de fermeture automatique 4 min. max.) La centrale est fournie par le fabricant avec fermeture automatique (temps de pause: 15 sec.). Si il faut faire une reprogrammation du temps de fermeture automatique, elle doit être effectuée avec l'huisserie fermée et de la façon suivante: se positionner avec la touche SEL, sur le led clignotant T. PAUSE puis appuyer d’une façon continue sur la touche SET pour un temps pareil à celui de la pause désirée entre la fin de la phase d’ouverture et de fermeture de la porte, quand le temps désiré sera terminé, laisser la touche SET, la mémorisation du temps de fermeture automatique s’effectuera et le Led T. PAUSE restera allumé fixe. Si vous ne désirez pas la fermeture automatique, se positionner sur le clignotement du Led T. PAUSE puis appuyer sur la touche SET moins d'une seconde, le Led s'éteindra au même moment et l'opération sera complétée. RESET : Si vous devez rétablir la centrale à la configuration de la fabrication, appuyer sur les touches SEL et sur SET en même temps, et vous obtiendrez l’allumage simultané de tous les Led ROUGES de signalisation et tout de suite après l’extinction. SV ELECTRONIC CONTROL IMPORTANT NOTICE FOR THE INSTALLER Mono-phase electronic exchange, for the automation of sliding doors and rolling shutters with an incorporated radio receiver. TECHNICAL DATA: - Power supply: - Flashing light output: - Motor output: - Aux. power output: - Button and safety device input: - Working temperature: - Radio receiver: - Op. transmitters: - TX max. codes in memory: 230 Vac 50Hz 4,5W max. 230 Vac 50Hz 100W Resistive Load max. 50W Inductive Load max. 230 Vac 50Hz 650 W max. 24 Vac 3 W max. 24 Vdc -10 55 °C 433.92MHz 12-18 Bit or Rolling Code 60 UP, 60 DOWN or 60 P/P In order for the receiving part of the radio to function correctly, in cases where two or more centres are used, it is advised to install them at a distance of at least 3 metres from each other. The centre must not have any type of sectioning mechanism from the electrical line 230 Vac; it is therefore the responsibility of the installer to see the installation of a sectioning device within the plant. The fixing of the electricity and connection cables must be guaranteed by means of the assembly of the cable press that is supplied in the package. The input, which is labelled as normally closed (NC), must be jumped if not used!! OPERATING CHARACTERISTICS: Step by step operation: By using either the radio control (LED CODE on) or the low tension button panel (PUL) to operate the gates, commands will have the following effect: The first command impulse activates the opening mechanism until time expiry of the timing motor, the second command impulse closes the gate, if a command impulse is received before the time expiry of the timing motor, the direction of movement of the mechanism will be halted. A further input implements the re-starting of the motion in the opposite direction. Automatic closing: The control board may be set up automatically to close the gates. The set-up procedure is described under the instruction for setting the delay period. Safety device: The control board allows for the connection and control of Photocells, Tyre sensors (NC). Command from these devices are ignored during opening whilst the gate is closing they will reverse the direction of movement. If not used the terminals must be jumped. TERMINAL BOARD CONNECTION: PROGRAMMING: CN1 : 1. 2. 3. 4. 5. 6. 7. 230 Vac input (Phase) 230 Vac input (Neutral) Opening motor output Closing motor output Common motor output 230 Vac flash input (Neutral) 230 Vac flash input (Phase) CN2 : A B C D E F G : 24 Vac 3 W service feed output. : 24 Vac 3 W service feed output. : Open-close push button input (NA). : Common GND input. : Safety device input (NC). : Aerial earth input. : Aerial hot pole. SEL button: selects the type of function to be memorised, the selection is indicated by a flashing Led. By repeatedly pressing the button it is possible to choose the desired function. The selection will remain active for 10 seconds indicated by a flashing Led, if no other operations are executed during this period, the control board will return to its previous state. SET button: programmes the information relative the type of function previously selected with the SEL button. Led Reference 1) CODE Led Reference 2) LAMP/CORT. Led Off No code Led off Flashing Led On Code activated Led on Courtesy light 3) T. MOT. Unlimited timing Programmed delay 4) T. PAUSA No automatic close With automatic close 1) CODE: (Programming of the radio control) Functions with one or two remote control commands It is possible to memorise one or two remote control commands during the programming stage. One code can be used for a cyclical function (raising/lowering), whilst two different codes allows different commands, the first for raising and the second for lowering. Programming: The transmission code is programmed in the following manner: press the SEL button until the LED CODE flashes, immediately transmit the pre-selected code with the desired remote control, as soon as the LED CODE begins to flash rapidly send the second code to be memorised, when the LED CODE remains lit, the programming is complete. If the second code is not sent within 10 seconds the control unit will exit the programming phase and select the function with only one code of the remote control. When 60 codes have been stored all 4 LEDs will flash, indicating that no other codes can be stored. 3) T. MOT: (Programming the motor operating time max. 4 minutes) The control unit is factory supplied with a working time motor predefined equal to 30 sec. If a reprogramming of the motor operating time is needed, it must be effected through the closed frame in the following manner: set the SEL button on the T. MOT flashing led, then continuously press the SET button, the rolling shutter will start the opening; when you have reached the required height, release the SET button key and at the same time the motor time storage will be completed and the T. MOT. Led will remain lit and fixed. If you want an infinite motor time, using the SEL task when the Led T.MOT is flashing press for less than 1 second the SET button, at the same time the Led will shut off and the operation will be completed. It is advisable to memorise a time that is a few seconds longer after the frame has reached the end. 4) T. PAUSE: (Maximum programmed automatic wing closing 4 Programming through Radio command: This procedure, consents to enable the programming, without direct intervention of the SEL task on the panel, but executing the operation at a distance, allows the programming of transmission codes without the having to use the SEL button on the central direct. The ability of programming is executed in the following manner: send in a continuous manner for max. 20 seconds the codes of the radio command previously memorised, at the same time the panel will enter into programming mode as explained above. Programming through remote control can also be done without any code already stored simply by pressing in a continuous manner for 5-10 seconds a button of the remote and the panel will enter into programming mode (sliding door will move up and down). Ability of programming through Radio command: The panel is furnished by the builder with the radio command disabled, if you wish to enable the function, proceed in the following manner: the panel board is powered by an output of 230VAC, keeping the SELL task pressed, at the same time you will obtain a brief flashing of all the Leeds and the programming will be complete. If you wish to disable the function previously enabled, repeat the operation or follow the RESET procedure. Cancellation: To cancel all stored codes press the SEL button and LED CODE will start to flash. Then press the SET button. The procedure is now complete and LED CODE will stop flashing. 2) FLASHING / COURTESY LIGHT: (Selection of the flashing light or the courtesy light) The central has a 230 Vac output, for connection to a flashing light or a courtesy light. The central is supplied by the manufacturer with the flashing function predisposed. If you wish to set up the courtesy light function, proceed as follows: Go to the SEL button, when the LED LAMP / CORT light flashes then press SET, at the same time the LED/LAMP/CORT light will light up permanently. Repeat the operation if you wish to put the previous configuration back into operation. Flashing function: The 230 Vac output will be activated each time that the automation is moving, for the duration of the motor time. In cases where the time of pause is memorised, the flashing light will also be active during the pause. Functioning of the Courtesy light: The 230 Vac output will be activated for the entire duration of 3 minutes, each time that an ascent command is given. minutes) The manufacturer furnishes the board with an automatic closure (pause time equal to 15 sec.). If a reprogramming of the automatic closing time is needed, it must be effected in closed frame in the following manner: press the SEL button until the T. PAUSE led flashes, then press and hold down the SET button for a period equal to the desired pause interval between closing and opening operations, at the expiry of the desired time leave the SET button, at the same time the memorisation of automatic closing time will be determined and the Led T. PAUSE will be lit. If decided not to have the automatic closing, take position on the flash of the Led T. PAUSE after press the SET task for less than a second, at the same time the Led will shut off and the operation will be concluded. RESET : If it necessary to reset the program board to its default values, that is with no memorised data, press both SEL and SET buttons continuously, all the RED LEDs will flash at once
Scaricare