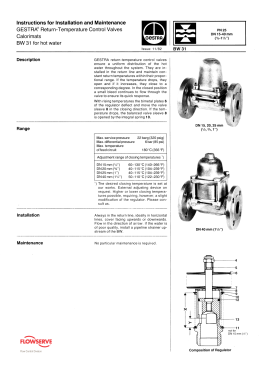
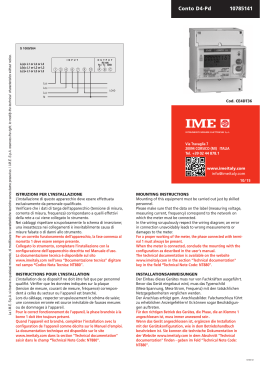
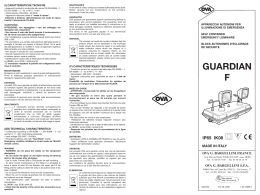
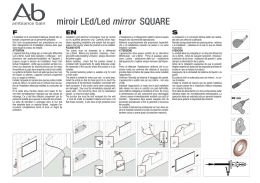
- GB -
Environment and recycling
Please help us to protect the environment by disposing of the packaging in accordance with
the national
regulations for waste processing.
Recycling of obsolete appliances
Appliances with this label must not be disposed off with the general waste. They must be
collected separately and disposed off according to local regulations.
-I-
Tutela dell'ambiente e riciclaggio
Affinché il vostro apparecchio non subisca danni durante il trasporto, esso è stato imballato
con cura. Per contribuire alla tutela del nostro ambiente, vi chiediamo di smaltire in modo
appropriato il materiale utilizzato per l'imballaggio dell'apparecchio.
Smaltimento degli apparecchi usati
Gli apparecchi che recano il contrassegno riportato a fianco non devono essere smaltiti
insieme ai rifiuti urbani, ma vanno raccolti e smaltiti separatamente. Lo smaltimento degli apparecchi
usati va eseguito a regola d'arte, in conformità con le prescrizioni e leggi vigenti localmente in materia.
- NL -
Milieu en recycling
Wij verzoeken u ons bij de bescherming van het milieu behulpzaam te zijn. Verwijder de
verpakking daarom overeenkomstig de voor de afvalverwerking geldende nationale
voorschriften.
Recycling van oude toestellen
Toestellen met dit kenmerk horen niet thuis in de vuilnisbak en zijn apart in te zamelen en
te
recyclen. De recycling van oude toestellen moet steeds vakkundig en volgens de ter plaatse
geldende voorschriften en wetgeving plaats vinden.
-F-
Environnement et recyclage
Nous vous demandons de nous aider à préserver l'environnement. Pour ce faire, merci de
vous débarrasser de l'emballage conformément aux règles nationales relatives au
traitement des déchets.
Collecte et recyclage des produits en fin de vie
Les appareils munis de ce symbole ne doivent pas être mis avec les ordures ménagères,
mais doivent être collectés séparément et recyclés. La collecte et le recyclage des produits en fin de
vie doivent être effectués selon les dispositions et les décrets locaux.
-D-
Entsorgung von Altgeräten in Deutschland
Geräte mit dieser Kennzeichnung gehören nicht in die Restmülltonne und sind getrennt zu
sammeln und zu entsorgen.
Die Hersteller sorgen im Rahmen der Produktverantwortung für eine umweltgerechte
Behandlung und Verwertung der Altgeräte.
Im Rahmen des Elektro- und Elektronikgerätegesetzes (ElektroG) und zum Schutz unserer
Umwelt ist eine kostenlose Rückgabe bei Ihrer kommunalen Sammelstelle möglich.
-E-
Medio ambiente y reciclaje
Ayúdenos a proteger el medio ambiente eliminando el embalaje con arreglo a la legislación
nacional sobre tratamiento de residuos.
Eliminación de aparatos viejos
No tirar los aparatos que lleven esta identificación junto con la basura no clasificada. Se
deben recoger y eliminar de forma especial. La eliminación de aparatos viejos se debe
realizar de forma adecuada y competente, de acuerdo con las normas y leyes locales vigentes.
DEKO_0/09022009
Please retain these instructions in a safe place for future reference.
Si prega di conservare con cura questo libretto di istruzioni per future
consultazioni.
Bewaar deze gebruiksaanwijzing zorgvuldig voor toekomstig gebruik.
Conserver cette notice pour toute consultation ultérieure.
Es wird gebeten, diese Gebrauchsanleitung für ein zukünftiges Nachschlagen
sorgfältig aufzubewahren.
Conservar las instruccione de uso.
min. 50cm
n°1
n°4-5X60mm
n°1
min.
20cm
n°4-8X50mm
n°2-3.5X9.5mm
min.
20cm
min. 20cm
1
2
5
3
6
7
195mm
400mm
4 mm
265mm
4
8
9
Always make observe the minimum distances from walls, furniture and/or objects, as indicated in
picture 2.
Never install the product on a surface made from wood or synthetic material.
This product is water resistant to IP24. It may therefore be used in bathrooms or other areas
subject to humidity provided it is never installed within the perimeter of bathtubs or showers
(Volume 1 of figure 2).
It must never be possible for people in the bath tub or shower to reach the adjustment knobs.
ENGLISH
OPERATING INSTRUCTIONS
Before operating the heater, please read these instructions thoroughly to avoid damage and
hazardous situations. Any use of this heater other than that stipulated in this instruction manual
may cause fire, electric shock or injury, and voids all warranties.
Warranty does not apply to any defect, deterioration, loss, injury or damage caused by, or as a result
of, the misuse or abuse of this heater. The rights dictated by State law are not prejudiced. None of the
terms of this warranty are to be taken as excluding any conditions or warranties implied by State law,
which cannot be excluded or modified.
4. Installation
After carefully reading section 3, proceed with installation following the sequence shown in
figures 4 to 7.
- Always remember to fix the 2 side screws (pic. 7) to avoid accidental release of the
product. Warning: if you do not respect this instruction the product may be instable!
Before any operation remove the packaging and check product integrity. In case of defects or damages
do not try to repair it yourself but contact your dealer.
Do not let children play with the packaging and protect the environment by disposing of the packaging
in accordance with the national regulations for waste processing.
5. Electrical connections
1. Your product
The product must be powered at a voltage of 230V AC 50Hz.
The product must be supplied with a cable and plug or with a cable for installation. If a product
with plug is installed in France, connect it to the mains power supply by cutting off the plug and
using a suitable connection box.
If the product is supplied with a cable for installation, connect it to the mains power supply using a
3-wire cable (Brown=Live, Blue=Neutral, Black=Pilot wire) and a connection box. If you do not
wish to use the pilot wire functions, just connect the phase and the neutral wires: the
product will work correctly even without the external programmer.
In bathrooms, kitchens or other humid areas, install the connection terminal at least 25cm off the
floor.
The electrical connection to the mains power supply must also include a 2-pole switch with a
minimum contact aperture of 3mm. As a priority, always abide you national wiring rules.
It is forbidden to connect the appliance to the earth circuit. DO NOT CONNECT THE PILOT
WIRE (BLACK) TO THE EARTH CIRCUIT.
If the product is powered through a 30mA differential switch, make sure the pilot wire is also
controlled by the differential switch.
Other than the heater you have chosen the package includes (picture 1):
- N° 1 metal bracket for wall mounting;
- N° 4 nylon plug expansion 8x50mm;
- N° 4 5x60mm cross head screws to fix wall brackets;
- N° 2 3.5x9.5mm cross head screws to fix the product;
Refer to your dealer is something is broken or missing.
2. For your safety
Make sure that the mains power supply matches the rated input: 230V AC, 50Hz.
Never allow animals or children to play with or touch the product. Attention! The panel may
become very hot while it is working (approximately 80°C = 176°F);
WARNING: In order to avoid overheating, do not cover the heater. Do not hang anything on
the heater and do not cover it while it’s working. This is clearly written on the cover of the product
or shown by the symbol
L
Phase (brown)
Pilot wire (black) – DO NOT CONNECT TO EARTH
Neutral (blue)
N
This product may not be used by people (children included) with reduced physical, sensorial or
mental capacities, or with inadequate experience and knowledge, unless they are under the
supervision of a person responsible for their safety or have been suitably instructed by the latter.
Children must be supervised to ensure they do not play with the product.
To prevent overheating, never cover the product inappropriately (pictures 8 and 9).
Do not use the product in rooms saturated with explosive gas, vapours generated by solvents or
paints or flammable vapours/gas.
If the cable and/or plug are damaged, do not repair them yourself but take the product to the
technical service or a qualified repair centre and have them repaired by specialised personnel in
order to avoid any risk of damage.
Always position the product so that the plug is immediately accessible.
Never position this appliance immediately underneath a power socket.
3. Safe positioning
Only use the product in its vertical position;
This product is fitted with a double electrical insulation circuit (class II) and therefore does not
require an earth connection;
6. Using the product
A
D
C
B
The product is fitted with a main on/off pushbutton (A), a slider to select desired working function
(B), a slider to set wished temperature (C) and a led showing the operating status (D).
The infrared receiver for the optional remote control is included in the pilot light’s eye (D).
The main pushbutton (A) controls the supply of the entire product. When switched on the internal
electronics is ready to be used. In case you have the optional remote control we suggest to use
this button only in case you will not use the product for al long period, in all other cases is
preferable to use the selector (B). Switching off the product by the pushbutton (A) causes, after
about 3 hours of internal autonomy, the loss of time/day information blocking the programmed
functioning until further data input.
The main pushbutton (A) deactivates the product apart of any possible input coming from the
pilot wire.
Slider selector (B) allows to select between one of the following working set:
STAND-BY
The product is supplied but heating elements are disconnected.
COMFORT
The product is supplied and works depending on the temperature set with the slider
(C).
ECO
The product is supplied and works depending on the temperature set with the slider
(C) decreased of 3,5°C.
FROST-FREE
The product is supplied and thermostat set is electronically forced to 7±3°C
(independently of temperature set with the slider (C)).
PROG
Functioning depends on inputs coming from the pilot wire (black) or from the
optional remote control.
The thermostat (C) maintains the required ambient temperature by automatically turning the
appliance on and off. The more the knob is moved to the right, the higher the temperature will be.
The highest position of the thermostat corresponds to approximately 30°C, the bottom one to
about 10°C.
To set optimum combination between room temperature and power consumption a specific range
of the thermostat has been highlighted as "comfort".
In case you need a frost free selection we suggest to use the function selector (B) and set it to
the " " position, without moving the thermostat (C) to the minimum.
The indicator led (D) gives different information by changing the way it lights on and exactly:
The light is on and red when the product is heating to reach desired temperature;
The light is on and green if the desired temperature has been reached and the product is
ready to operate to comfortably maintain it to the desired value;
The light continuously flashes in red colour if temperature electronic sensor is broken. The
product must be repaired by an authorised service only;
Using the thermostat
In a room with a temperature in excess of 30°C, the thermostat does not turn on the appliance
even if it is at maximum.
Vice-versa, in a room with a very low temperature (below 10°C), the thermostat keeps the heater
constantly on, even if it is at minimum.
To optimise use of the thermostat, proceed as follows:
set the thermostat (C) to maximum and wait until a comfortable temperature is reached;
move the thermostat (C) to the left until functioning led (D) turns yellow;
move the thermostat (C) to the right for a couple of millimetres;
in this position, the thermostat will maintain the selected ambient temperature.
Using the pilot wire
If the product is fitted with a power cable without plug, it can also be controlled with specific
programmers. The behaviour of the product depends on the voltage applied between the pilot
wire and the neutral wire, as shown in the following table:
MODE
HEATING
TEMPERATURE
COMFORT
TEMPERATURE SET
BY THERMOSTAT
COMPLETE
ALTERNATING SIGNAL
ECO
3°C LOWER THAN THE
TEMPERATURE SET
BY THE THERMOSTAT
NEGATIVE
ALTERNATING SIGNAL
SEMIWAVE
ANTIFREEZE
TEMPERATURE
MAINTAINED AT
APPROX. 7°C
POSITIVE ALTERNATING
SIGNAL SEMIWAVE
STOP
THE APPLIANCE IS
SWITCHED OFF
CYCLICAL EMISSION OF
A COMPLETE
ALTERNATING SIGNAL
Tc=300S To=3S
1°C REDUCTION
1°C LOWER THAN THE
TEMPERATURE SET
BY THE THERMOSTAT
2°C REDUCTION
2°C LOWER THAN THE
TEMPERATURE SET
BY THE THERMOSTAT
ORDER RECEIVED
WAVE SHAPE
NO SIGNAL
CYCLICAL EMISSION OF
A COMPLETE
ALTERNATING SIGNAL
Tc=300S To=7S
To
Tc
Note: the STOP input signal on the pilot wire will switch off the product even if the mode
selector is NOT in the "PROG" mode.
Using the remote (optional)
The optional remote control allows to set a "comfort" or "eco" temperature for each hour of the
day, all days independently.
Operating mode could be easily switched from the remote to the pilot wire and vice-versa.
With just one remote it is possible to transmit the same program to all the products of this series
you have installed. All details about programming are included in the instruction manual of the
remote control.
7. What to do in case of malfunctions
In the event of overheating, the safety device on the appliance automatically disables the heating
elements.
The product will resume automatic operation as soon as the temperature returns below the safety
limit.
Attention: the functioning led will not be switched off by the operation of the safety device.
If you notice irregular operation, damage to the heating panel or to the structure of the appliance,
disconnect the product from the mains power supply and contact your technical assistance centre or
dealer.
8. Maintenance
This product does not require any special maintenance.
Clean the product, especially the heating panel, with a dry cloth once every 6 months.
If the product requires repairing, contact an authorised technical service centre.
When replacing the power cable, use a 2x1.00mm2 or 3x1.00mm2 H05VV-F HAR type,
depending on the version. This operation, for cables both with and without plugs, must be
performed by qualified personnel and never by the end user in order to avoid damaging the
appliance and jeopardising personal safety.
ITALIANO
ISTRUZIONI PER L’USO
Si prega di leggere attentamente queste istruzioni, prima di utilizzare il prodotto, in modo da
evitare danneggiamenti o comunque il verificarsi di situazioni di pericolo. Qualsiasi utilizzo del
prodotto diverso da quanto indicato nel presente manuale può causare incendi, pericoli elettrici
o ferite e rende nulla qualsiasi garanzia.
La garanzia non si applica ad alcun difetto, deterioramento, perdita, ferimento o danneggiamento
riconducibili ad un uso non corretto del prodotto. Rimangono garantiti tutti i diritti di legge in materia.
Nessuna condizione di garanzia può escludere o modificare le condizioni di garanzia regolamentate da
leggi dello Stato che non possono essere a nessun titolo escluse o modificate.
Prima di ogni operazione, rimuovere con cura l’imballo e controllare la perfetta integrità del prodotto.
Nel caso si evidenziassero dei difetti o danni, non installare né cercare di riparare l’apparecchiatura,
ma rivolgersi al rivenditore.
Non lasciare l’imballo alla portata dei bambini e smaltirne le parti in conformità con le disposizioni
vigenti.
1. Il vostro prodotto
Il prodotto viene fornito dotato di (figura 1):
N°1 staffa metallica per l'installazione a muro;
N°4 tasselli in nylon da 8x50mm;
N°4 viti per tasselli da 5x60mm;
N°2 viti 3.5x9.5mm per il fissaggio del prodotto.
Qualora il prodotto sia danneggiato o qualche accessorio mancante contattate immediatamente il
vostro rivenditore.
2. Per la Vostra sicurezza
Assicuratevi che l’alimentazione di rete corrisponda ai dati di targa: 230V AC, 50Hz.
Non lasciate mai che animali o bambini giochino o tocchino il prodotto. Attenzione! Durante il
funzionamento il pannello può diventare molto caldo ( circa 80°C = 176°F);
IMPORTANTE: per evitare surriscaldamenti non ricoprite mai il prodotto. Non appoggiate
mai alcun oggetto o coperta sull’apparecchio mentre è in funzione. Questo è chiaramente scritto
sull’apparecchio o illustrato dal simbolo
Questo prodotto non deve essere utilizzato da persone (bambini inclusi) con capacità fisiche,
sensoriali o mentali ridotte, o con inadeguata esperienza e conoscenze, che non siano sotto la
supervisione di una persona responsabile per la loro sicurezza o che non siano da essa stati
adeguatamente istruiti. I bambini devono essere sorvegliati per assicurarsi che non giochino con
il prodotto.
Per evitare surriscaldamenti non ricoprite mai il prodotto in modo improprio (fig. 8 e 9).
Non utilizzate il prodotto in stanze sature di gas esplosivi, di vapori generati da solventi e vernici
o comunque di vapori/gas infiammabili.
Se il cavo e/o la spina sono danneggiati e devono essere riparati, non eseguite questa
operazione da soli, riportate il prodotto presso il centro di assistenza tecnica, o comunque in un
centro di riparazioni qualificato, perché è richiesto l’intervento di personale specializzato al fine di
evitare qualunque rischio di danneggiamento.
Il prodotto deve essere posizionato in modo tale che la presa di alimentazione sia sempre
raggiungibile.
Non collocate mai questo apparecchio immediatamente al di sotto di una presa di corrente
elettrica.
Il prodotto è dotato di un interruttore generale (A), di un selettore per l'impostazione della
funzione desiderata (B), di un comando per la regolazione della temperatura ambiente (C) e di
una spia luminosa di funzionamento (D).
Il ricevitore per il telecomando ad infrarossi opzionale è incorporato nella gemma della spia
luminosa (D)
L'interruttore generale (A) controlla l'alimentazione dell'intero prodotto; Quando il pulsante viene
premuto l'elettronica di controllo è pronta per essere utilizzata. Nel caso si utilizzi il telecomando
opzionale, si consiglia di spegnere questo interruttore solo qualora si preveda di non utilizzare il
prodotto per lunghi periodi. E' preferibile ricorrere invece al selettore (B) in tutti gli altri casi poiché
l'azionamento dell'interruttore (A) provoca, superata una autonomia di circa 3 ore, la perdita delle
informazioni relative al giorno e all'ora compromettendo il funzionamento programmato.
L'interruttore generale (A) disattiva il prodotto indipendentemente da qualsiasi comando possa
essere inviato tramite il filo pilota.
Il selettore di funzionamento (B) permette di scegliere fra una delle seguenti modalità:
3. Posizionamento sicuro
Utilizzate il prodotto solo in posizione verticale;
Il prodotto è costruito in doppio isolamento elettrico (classe II) e, pertanto, non richiede il
collegamento di terra;
Fate sempre attenzione affinché siano rispettate le distanze minime da pareti, mobili e/o oggetti
riportati in figura 2.
Non installate mai il prodotto su superfici di legno o di materiale sintetico.
Il prodotto ha un grado IP24 di protezione all’acqua. Può pertanto essere utilizzato nei bagni o
nei luoghi umidi ma mai installato all’interno del perimetro di vasche o docce (Volume 1 di figura
3).
Le manopole di regolazione non devono in nessun caso essere accessibili da parte di persone
che siano all’interno della vasca da bagno o della doccia.
4. Installazione
STAND-BY
Il prodotto è alimentato ma gli elementi riscaldanti sono disattivati.
Dopo aver letto attentamente le avvertenze di cui al precedente paragrafo 3 procedete al
fissaggio rispettando la sequenza illustrata nelle figure da 4 a 7.
COMFORT
Il prodotto è alimentato e funziona in dipendenza della temperatura impostata con il
selettore (C).
- Ricordate sempre di fissare le 2 viti laterali (fig. 7) per evitare lo sgancio accidentale del
prodotto. Attenzione: se non si rispetta la presente indicazione è possibile che il prodotto
sia instabile!
ECO
Il prodotto è alimentato e funziona in dipendenza della temperatura impostata con il
selettore (C) diminuita di 3,5°C.
5. Collegamenti elettrici
ANTI-GELO
Il prodotto è alimentato e la temperatura del termostato è forzata a 7±3°C
indipendentemente dalla posizione del selettore (C).
Il prodotto deve essere alimentato con la tensione di 230V AC 50Hz.
Il prodotto può essere fornito dotato di cavo con spina oppure di cavo per l’installazione. Nel caso
un prodotto con spina debba essere installato in Francia, il collegamento elettrico con la rete di
alimentazione deve essere eseguito tagliando la spina in dotazione e utilizzando una apposita
scatola di connessione.
Quando il prodotto viene fornito con il cavo per l’installazione, il collegamento deve essere
effettuato usando un cavo a 3 fili (Marrone=Fase, Blu=Neutro, Nero=Filo pilota) e una scatola di
connessione. Se non si desidera utilizzare le funzionalità del filo pilota limitarsi al
collegamento della fase e del neutro: il prodotto funzionerà correttamente anche senza la
presenza del programmatore esterno.
In locali umidi, nei bagni o nelle cucine, il morsetto di collegamento deve essere installato ad
almeno 25cm dal pavimento.
Il collegamento elettrico con la rete deve inoltre prevedere l’utilizzo di un interruttore bipolare con
una distanza minima di apertura fra i contatti di almeno 3mm. Rispettate sempre in modo
prioritario le regole di installazione vigenti nel vostro paese.
La connessione di terra è vietata. NON COLLEGATE A TERRA IL FILO PILOTA (NERO).
Se il prodotto deve essere alimentato attraverso un interruttore differenziale da 30mA di
sicurezza, accertarsi che anche il filo pilota sia sotto il controllo dell’interruttore differenziale.
L
Fase (marrone)
Filo Pilota (nero) – NON CONNETTERE LA TERRA
Neutro (blu)
N
PROG
Il funzionamento è regolato dagli impulsi applicati al filo pilota (nero) oppure dalla
programmazione trasmessa tramite il telecomando opzionale.
Il termostato (C) mantiene la temperatura ambiente desiderata accendendo e spegnendo
automaticamente l’apparecchio. Più il selettore viene spostato verso destra, più la temperatura
assicurata sarà elevata. La posizione massima del termostato corrisponde a circa 30°C, quella
minima a circa 10°C.
Per impostare una ottimale combinazione fra temperatura ambiente e consumi energetici è stata
evidenziata una specifica zona di regolazione contraddistinta con la dicitura "comfort".
Qualora si desideri regolare il prodotto per la protezione antigelo si consiglia di non portare il
selettore (C) al minimo ma di agire direttamente sul comando (B) impostandolo sulla funzione .
-
6. Uso del prodotto
La spia luminosa (D) fornisce differenti informazioni di funzionamento in base alla modalità di
accensione e precisamente:
Il led è acceso e di colore rosso quando il prodotto riscalda per raggiungere la temperatura
ambiente desiderata;
Il led è acceso e di colore verde quando la temperatura ambiente desiderata è stata raggiunta e il
prodotto è pronto a riscaldare per un suo confortevole mantenimento;
Il led lampeggia di colore rosso quando il sensore elettronico della temperatura è danneggiato. Il
prodotto deve essere riparato da un centro dio assistenza qualificato.
Uso del termostato
A
D
C
B
In una stanza ove la temperatura supera i 30°C è normale che il termostato, anche se
posizionato al massimo, non accenda il prodotto.
Viceversa, in una stanza con una temperatura troppo bassa (sotto i 10°C) è normale che il
termostato mantenga l’apparecchio continuamente acceso, anche se posizionato al minimo.
Per regolare al meglio il termostato consigliamo questa procedura:
posizionate il termostato (C) al massimo e fate funzionare l’apparecchio sino al
raggiungimento di una temperatura confortevole;
-
spostate il selettore verso sinistra fino a quando il led di funzionamento (D) non diventa
giallo;
traslate di qualche millimetro il selettore (C) verso destra;
in questa posizione il termostato manterrà la temperatura ambiente che avete prescelto.
Uso del filo pilota
Se dotato di cavo di connessione senza spina il prodotto può essere anche comandato
attraverso specifici programmatori. Il comportamento del prodotto dipende dalla tensione
applicata fra il filo pilota e il neutro secondo la seguente tabella:
ORDINE
RICEVUTO
FORMA
D’ONDA
MODALITÀ
OTTENUTA
TEMPERATURA DI
RISCALDAMENTO
COMFORT
TEMPERATURA IMPOSTATA
DAL TERMOSTATO
ECO
ABBASSAMENTO DI 3°C
RISPETTO ALLA TEMPERATURA
IMPOSTATA DAL TERMOSTATO
SEMIONDA NEGATIVA
DEL SEGNALE ALTERNATO
ANTI GELO
MANTENIMENTO DELLA
TEMPERATURA A CIRCA 7°C
SEMIONDA POSITIVA
DEL SEGNALE ALTERNATO
ARRESTO
L’APPARECCHIO VIENE
SPENTO
EMISSIONE CICLICA DI UN
SEGNALE ALTERNATO
COMPLETO Tc=300S To=3S
RIDUZIONE DI 1°C
ABBASSAMENTO DI 1°C
RISPETTO ALLA TEMPERATURA
IMPOSTATA DAL TERMOSTATO
RIDUZIONE DI 2°C
ABBASSAMENTO DI 2°C
RISPETTO ALLA TEMPERATURA
IMPOSTATA DAL TERMOSTATO
ASSENZA DI SEGNALE
ALTERNATA COMPLETA
EMISSIONE CICLICA DI UN
SEGNALE ALTERNATO
COMPLETO Tc=300S To=7S
To
Tc
Nota: Il segnale di arresto applicato al filo pilota provoca lo spegnimento del prodotto
anche se il selettore di modo non è in posizione "PROG".
Uso del Telecomando (opzionale)
Il telecomando opzionale consente di definire una temperatura "comfort" o "eco" di
funzionamento per ogni ora del giorno, per ogni giorno della settimana.
La modalità di funzionamento può essere facilmente cambiata da telecomando a filo pilota e
viceversa.
Con un solo telecomando è possibile trasmettere la medesima programmazione a tutti i prodotti
della serie acquistati; Tutte le informazioni di dettaglio per la programmazione vengono fornite
insieme al telecomando.
7. Sicurezza in caso di funzionamento anormale
In caso di surriscaldamento il sistema di protezione dell’apparecchio disattiva automaticamente
gli elementi riscaldanti.
Il funzionamento del prodotto riprenderà automaticamente non appena la temperatura sarà scesa
al di sotto dei limiti di sicurezza.
Attenzione: l'intervento del protettore termico non causa lo spegnimento del led di
funzionamento.
Se notate un funzionamento anomalo, il danneggiamento del pannello riscaldante o della
struttura dell’apparecchio, scollegate il prodotto dalla presa di corrente e contattate il servizio di
assistenza od il vostro rivenditore.
8. Manutenzione
Questo prodotto non richiede particolare manutenzione.
Vi raccomandiamo di pulire il prodotto ogni 6 mesi ed in particolare modo il pannello riscaldante
utilizzando un panno asciutto.
Qualora sia necessario riparare il prodotto contattate un centro di assistenza autorizzato.
Se deve essere sostituito il cavo di alimentazione ricordatevi che deve obbligatoriamente essere
utilizzato un cavo tipo 2x1.00 mm2 3x1.00mm2 H05VV-F HAR in funzione della versione
acquistata. Questa operazione, sia per i cavi dotati di spina che non, deve essere eseguita da
personale qualificato e mai dall’utente finale in modo da prevenire ogni rischio di
danneggiamento e possibile pericolo.
FRANÇAIS
3. Emplacement sûr
Utiliser l’appareil seulement en position verticale.
L’appareil dispose d’une double isolation électrique (classe II) et ne nécessite donc d'aucune
mise à la terre.
Respectez toujours scrupuleusement les distances minimales du mur, des meubles et(ou) objets
illustrés par la figure 2.
Ne montez jamais l’appareil sur des surfaces en bois ou en matériaux synthétiques.
L’appareil a un degré d’imperméabilité IP24. Vous pouvez donc l’utiliser dans les salles de bains
et les pièces humides mais vous ne devez jamais l'installer dans le périmètre des baignoires ou
douches (Volume 1 de la figure 2).
Les appareils de chauffage susceptibles d’être utilisés dans les salles de bains doivent être
installés de façon telle que les interrupteurs et autres dispositifs de commandes ne puissent pas
être touchés par une personne qui se trouve dans la baignoire ou la douche.
MODE D’EMPLOI
Avant d’utiliser le radiateur, lisez attentivement les instructions afin d’éviter tout danger ou
d’utilisation inappropriée de l’appareil. Toutes utilisations autres que celles décrites dans cette
notice seront considérées comme dangereuses et risquent de causer des incendies, des chocs
électriques ou des blessures et ne seront pas couverts par la garantie.
La garantie ne s’applique pas en cas de défaut, détérioration, dommages causés en raison d’un usage
impropre ou d’un abus dans l’utilisation du radiateur. Vous pouvez disposer de droits reconnus par la
loi de votre pays. Aucune disposition de la présente garantie ne peut avoir pour effet d’exclure quelque
garantie ou droit reconnu d’ordre public par la législation de votre pays.
Avant toute opération, otez l’emballage du produit et vérifiez si l’appareil n’est pas endommagé. En cas
de défaut, de choc ou de dommage, n’essayez pas de réparer l’appareil vous-même et contactez votre
revendeur.
Ne laissez pas les enfants jouer avec les emballages et protegez l’environnement en jetant les cartons
et les calages dans les endroits appropriés pour le recyclage.
4. Installation
Lisez avec attention les avertissements du paragraphe 3 ci-dessus avant de procéder à la
fixation en suivant les instructions illustrées par les figures 4 à 7.
Rappelez-vous toujours de fixer les 2 vis latérales (PIC. 7) pour éviter une chute
accidentelle du produit. Avertissement : si vous ne respectez pas cette instruction l’appareil
peut être instable.
1. Votre appareil
Dans le carton de l ‘appareil, vous devez trouver :
N. 1 Pattes métalliques pour fixation murale;
N. 3 cheville à expansion en nylon 8x50mm
N. 3 vis 5x60mm
N. 3 vis cruciformes 3.5x9.5mm pour fixer l’appareil
5. Branchements électriques
L’appareil doit être alimenté en 230V AC 50 Hz.
L’appareil peut être fourni avec un câble muni de fiche ou d'un câble pour installation. Si
l’appareil muni de fiche doit être installé en France, pour effectuer le branchement électrique sur
le secteur il vous faut couper la fiche et utiliser une boîte de connexion adéquate.
Si l’appareil est fourni avec un câble pour installation, effectuez le branchement avec un câble à
3 fils (Marron= Phase, Bleu = Neutre, Noir = Conducteur pilote) et une boîte de connexion. Si
vous ne voulez pas utiliser les fonctionnalités du fil pilote, il vous suffit de brancher la
phase et le neutre. L’appareil fonctionnera correctement même sans programmeur
extérieur. IL EST RECOMMANDE DE FAIRE INTERVENIR UN ELECTRICIEN
PROFESSIONNEL OU TOUT AUTRE PERSONNE AYANT LES QUALIFICATIONS
NECESSAIRES POUR L INSTALLATION
Dans les pièces humides, les salles de bains ou les cuisines, installez la borne de branchement à
25 cm minimum du sol.
Le branchement électrique sur le secteur doit aussi prévoir un interrupteur bipolaire, avec une
distance minimum d’ouverture entre les contacts de 3 mm.
Le branchement à la terre est interdit. NE PAS BRANCHER LE FIL PILOTE (NOIR) À LA
TERRE.
Si l’appareil piloté est protégé par un différentiel 30mA (ex : salle de bain), il est nécessaire de
connecter l’alimentation du fil pilote sur ce différentiel.
Contactez votre revendeur s’il vous manque des pièces.
2. Pour votre sécurité
Cet appareil est un radiateur, qui ne doit servir qu'à cette fonction.
Vérifiez si la tension du secteur est la même que celle de l'appareil. 230V AC, 50Hz.
Ne laissez jamais les enfants ou les animaux domestiques toucher ou jouer avec l’appareil.
Attention ! Lorsque l’appareil est en fonction, le panneau est parfois très chaud (80°C = 176°F
env.)
ATTENTION :afin d’éviter toute surchauffe, ne couvrez pas l’appareil. Il est clairement inscrit
sur l ‘appareil NE PAS COUVRIR ou le symbole ci dessous
L
Cet appareil n’est pas prévu pour être utilisé par des personnes (y compris enfants) dont les
capacités physiques, sensorielles ou mentales sont réduites, ou des personnes dénuées
d’expérience ou de connaissance, sauf si elles ont pu bénéficier, par l’intermédiaire d’une
personne responsable de leur sécurité, d’une surveillance ou d’instruction préalable concernant
l’utilisation de l’appareil
Pour éviter le risque de surchauffe, ne recouvrez jamais l’appareil de façon impropre (image 8 et
9).
N’utilisez pas cet appareil dans des atmosphères saturées en gaz explosifs, en vapeurs produits
par des solvants ou des peintures, ni en vapeurs/gaz inflammables.
Si le câble d’alimentation est endommagé, il doit être changé par le fabricant, son service de
maintenance ou une personne de qualification similaire afin d’éviter un danger.
Placez l’appareil de façon à ce que la prise de courant soit toujours accessible.
Ne placez jamais cet appareil juste en–dessous d’une prise de courant.
Phase (marron)
Fil pilote (noir) –
Neutre (bleu)
N
NE PAS BRANCHER LE FIL
PILOTE (NOIR) A LA TERRE
6. Usage de l’appareil
A
D
C
B
L’appareil est muni d’un bouton interrupteur (A); d’un sélecteur pour choisir le mode de
fonctionnement (B), d’un curseur pour la température d’ambiance souhaitée (C) et d’un témoin
lumineux indiquant le type de fonctionnement de l’appareil (D).
le récepteur infrarouge de la télécommande optionnelle est situé dans l’oeil du témoin lumineux
de fonctionnement.
le bouton principal (A) contrôle l’alimentation électrique de l’appareil. En position appuyée,
l’appareil est prêt à fonctionner. Dans le cas d’une utilisation de l’appareil avec la télécommande
(en option), nous vous conseillons d’utiliser ce bouton qu’en cas de période de non-utilisation
prolongée, sinon il est préférable d’utiliser seulement le sélecteur (B). Si le bouton interrupteur
(A) est éteint, après 3 heures, la programmation est perdue.
Dans le cas ou le bouton (A) est désactivé, l’appareil ne peut pas être controlé par le fil pilote.
Le sélecteur (B) permet de choisir les modes suivants :
Mode VEILLE
L’appareil est sous tension mais ne chauffe pas.
-
faites glisser le curseur du thermostat vers la gauche jusqu’à ce que le témoin lumineux (D)
devienne jaune.
faites encore glisser légèrement (2mm) le curseur du thermostat (C) vers la droite ;
dans cette position le thermostat maintiendra la température ambiante que vous avez
choisie.
Usage du fil pilote
Si l’appareil est muni d’un câble de connexion dépourvu de fiche, il peut être aussi commandé
par des programmeurs spéciaux. Le comportement de l’appareil dépend de la tension appliquée
entre le conducteur pilote et le conducteur neutre, conformément au tableau suivant :
ORDRES
REÇUS
MODE
OBTENU
TEMPÉRATURE DE
CHAUFFAGE
CONFORT
TEMPÉRATURE
CONFIGURÉE PAR LE
THERMOSTAT
ECO
ABAISSEMENT DE 3°C
PAR RAPPORT À LA
TEMPÉRATURE
CONFIGURÉE PAR LE
THERMOSTAT
SEMI-ONDE NÉGATIVE
DU SIGNAL
ALTERNATIF
HORS GEL
MAINTIENT DE LA
TEMPÉRATURE À
ENVIRON 7°C
SEMI-ONDE POSITIVE
DU SIGNAL
ALTERNATIF
STOP
L’APPAREIL EST
ÉTEINT
CONFORT – 1°C
ABAISSEMENT DE 1°C
PAR RAPPORT À LA
TEMPÉRATURE
CONFIGURÉE PAR LE
THERMOSTAT
CONFORT - 2°C
ABAISSEMENT DE 2°C
PAR RAPPORT À LA
TEMPÉRATURE
CONFIGURÉE PAR LE
THERMOSTAT
OSCILLOSCOPE
Réf/Neutre
ABSENCE DE SIGNAL
CONFORT
L’appareil est sous tension et fonctionne selon la position du curseur (C) de
controle de température.
ECO
L’appareil est sous tension et fonctionne selon la position du curseur (C) en
diminuant la température de 3.5°C
HORS GEL
L’appareil est sous tension, le thermostat est programmé électroniquement sur
7±3°C (indépendamment du curseur (C)).
PROG
Le fonctionnement dépend de la programmation établie soit par le fil pilote (noir)
soit par la télécommande (en option)..
Le thermostat (C) maintient la température ambiante souhaitée en contrôlant les périodes de
chauffe de l’appareil. Plus le curseur est placé vers la droite, plus la température sera élevée. La
position la plus forte du thermostat (à droite) correspond à peu près à 30°C, et la plus basse (à
gauche) à 10°C.
Afin de choisir la position optimale entre la température de la pièce souhaitée et la consommation
électrique de l’appareil, une plage de réglage « confort » a été inscrite sur le curseur (C).
Dans le cas où vous avez besoin d’une position hors gel, nous vous conseillons d’utiliser le
sans changer le thermostat (C), ni le mettre au
sélecteur de fonction (B) et choisir le mode
minimum.
Le témoin lumineux (D) s’illumine de differentes façons afin de donner des informations sur le
fonctionnement de l’appareil :
•
La lumière est allumée en rouge quand l’appareil chauffe pour atteindre la température
souhaitée.
•
La lumière est allumée en vert quand la température souhaitée est atteinte et que l’appareil
est prêt à réguler sa puissance pour maintenir la température.
•
Le temoin clignote en rouge pour indiquer que la sonde de température est défectueuse.
L’appareil doit être réparé par le service technique de votre revendeur ou par celui du
fabricant seulement.
Usage du thermostat
Dans une pièce où la température dépasse 30°C il est normal que le thermostat, même réglé sur
le maximum, ne mette pas l’appareil en fonction.
Vice et versa, dans une pièce où la température est trop basse (au-dessous de 5°C) il est normal
que le thermostat maintienne sans arrêt l’appareil allumé, même s’il est réglé au minimum.
Pour régler correctement le thermostat nous vous conseillons de procéder de la sorte :
réglez le thermostat (C) sur le maximum et faites fonctionner l’appareil jusqu’à ce que la
température ambiante soit confortable ;
SIGNAL ALTERNATIF
COMPLET 230V
EMISSION CYCLIQUE
D’UN SIGNAL
ALTERNATIF COMPLET
Tc=300S To=3S
EMISSION CYCLIQUE
D’UN SIGNAL
ALTERNATIF COMPLET
Tc=300S To=7S
To
Tc
NOTE : le signal STOP du fil pilote éteindra l’appareil quelque soit son mode sélectionné avec le
sélecteur (B)
Utilisation de la télécommande (en option) :
La télécommande optionnelle permet de sélectionner des modes « confort » et « éco » pour
chaque heure de la journée et chaque différent jour de la semaine.
Le mode de programmation peut facilement se permuter entre le fil pilote et la télécommande.
Avec une seule télécommande, il est possible de controler tous les appareils installés dans la
maison avec le même programme ou avec un programme adapté à chaque pièce. Tous les
détails d’utilisation de la télécommande sont décrits avec précision dans le manuel de la
télécommande.
7. Sécurité en cas de fonctionnement anormal
En cas de surchauffe le système de protection de l’appareil désactive automatiquement l’élément
chauffant et interrompt ainsi le fonctionnement de l’appareil.
L'appareil recommence à fonctionner automatiquement dès que la température superficielle
descend au-dessous de la limite de sécurité.
Attention : le témoin lumineux ne sera pas éteint par le système de protection de l’appareil.
Si vous remarquez que le fonctionnement est anormal, que le panneau chauffant ou le châssis de
l’appareil sont endommagés, débranchez l’appareil de la prise de courant et adressez-vous au service
après-vente ou à votre revendeur.
8. Entretien
Cet appareil n’a besoin d’aucun entretien particulier.
Nous vous recommandons de nettoyer l'appareil tous les 6 mois, en particulier le panneau
chauffant, à l'aide d'un chiffon sec.
Si l'appareil doit être réparé, adressez-vous à un service après-vente.
Si vous devez remplacer le câble d’alimentation n’oubliez que vous devez obligatoirement utiliser un
câble de, 2 x 1.00 mm2 H05VV-F HAR ou 3 x 1.00 mm2 H05VV-F HAR selon la version que vous avez
achetée. Qu’il s’agisse des câbles munis ou dépourvus de fiche. Si le câble d’alimentation est
endommagé, il doit être changé par le fabricant, son service de maintenance ou une personne de
qualification similaire afin d’éviter un danger.
Scarica