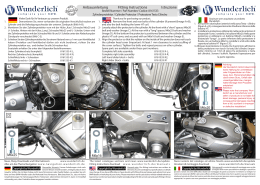
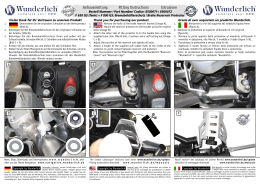
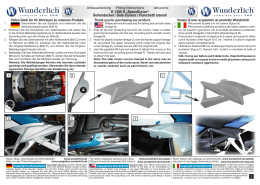
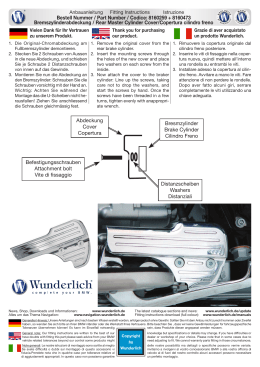
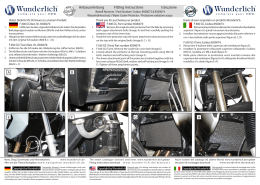
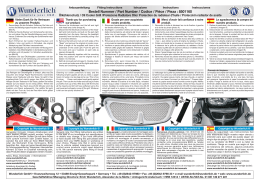
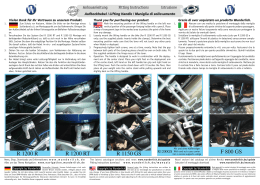
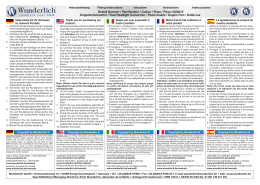
Anbauanleitung
Fitting Instructions
Istruzione
Instructions
Instrucciones
Vielen Dank für Ihr Vertrauen zu
unserem Produkt.
1. Demontieren Sie das linke vordere Verkleidungsteil durch herausdrehen der oberen
Befestigungsschraube und vorsichtigen
nach vorn ziehen (Bild B).
2. Entfernen Sie die 2 Befestigungsschrauben
des Ölkühlers und legen Sie ihn vorsichtig
auf ein Tuch oder ähnliches (Bild C).
3. Kleben Sie einen Streifen Moosgummi auf
die oberen und unteren Halter (Bild D).
4. Montieren Sie die oberen Halter mit den
Schrauben M4x8 und U- Scheiben an
den Ölkühlerschutz (Bild E). Hinweis: Die
oberen Halter können durch das Einpressgewinde identifiziert werden (Bild E1).
5. Schieben Sie vorsichtig den Ölkühlerschutz
über den Ölkühler (Bild F) und montieren
Sie die unteren Halter mit den Schrauben
M4x8 und U- Scheiben (Bild G).
6. Richten Sie den Ölkühlerschutz aus und
drehen Sie mit den Schrauben M5x16
und U- Scheiben die Halter fest (Bild H).
Hinweis: Die Mutter auf Bild H wird durch
das Einopressgewinde ersetzt.
7. Bauen Sie alle Teile wieder an.
Reinigungs-Tipp:
Das Reinigen der Ölkühlergitter is einfach, alles
was Sie brauchen sind einige Papier-Küchentücher, kochendes Wasser, einen Teebeutel
und eine Tasse. So geht‘s: Das angefeuchtete
Tuch leicht gegen das Gitter drücken. Hängen
Sie den Teebeutel in die Tasse, gießen Sie
heißes Wasser auf und lassen es ein wenig
ziehen. Trinken Sie gemütlich ihren Tee. Nach
etwa 20-30 Minuten sind die Insekten und
Dreck aufgeweicht. Der größte Teil geht direkt
mit dem Tuch ab, und der Rest kann leicht
gelöst und abgebürstet werden.
Copyright by Wunderlich ®
Thank you for purchasing our
product.
1. Remove the left side front fairing panel
by first removing the upper attachment
screw and then pulling the panel carefully
forwards (Image B).
2. Remove both oil cooler attachment bolts
and carefully place to cooler on a blanket
or similar to avoid damage (Image C).
3. Attach a suitable length of the supplied
rubber foam onto the supplied upper and
lower brackets (Image D).
4. Attach the upper brackets to the cooler grill
using the supplied M4x8 bolts and washers
(Image E). Note: The upper brackets can be
identified by the thread insert (Image E1).
5. Carefully slide the cooler grill over the
oil cooler (Image F) and attach the lower
bracket to the cooler grill using the M4x8
bolts and washers (Image G).
6. Align the cooler grill and secure the lower
to the upper bracket using M5x16 bolts and
washers (Image H). Note: The nut shown in
Image H is replaced by a threaded insert.
7. Reattach all previously removed parts.
Cleaning Tip:
Cleaning our cooler protectors is easy, and the
following simple supplies are all you need: A paper towel, hot water, one tea bag and a
cup. This is how it’s done: Press a wet paper towel gently against the
grill. Then use the hot water and tea bag to
make yourself a nice cup of tea. After about
20-30 minutes all the insects and dirt will have
softened up by the wet towel and will easily
come off the grill. Whatever is left can be
quickly brushed off.
Copyright by Wunderlich ®
Grazie di aver acquistato nostro
prodotto.
1. Smontare la carena anteriore sinistra
svitando la vite di fissaggio superiore e
tirandola con cautela in avanti (fig. B).
2. Rimuovere le 2 viti di fissaggio del radiatore
dell’olio e adagiarlo con cautela su un
panno o su una superficie simile (fig. C).
3. Incollare una striscia di gomma crepla sul
supporto superiore e inferiore (fig. D).
4. Montare i supporti superiori sulla protezione del radiatore dell’olio con le viti M4x8
e le rondelle (fig. E). Nota: i supporti superiori si possono riconoscere dalla filettatura
stampata (fig. E1).
5. Infilare con cautela la protezione del radiatore dell’olio sullo stesso (fig. F) e montare
i supporti inferiori con le viti M4x8 e le
rondelle (fig. G).
6. Centrare la protezione del radiatore dell’olio
e fissare i supporti con le viti M5x16 e le
rondelle (fig. H). Nota: il bullone nella fig. H
viene sostituito dalla filettatura stampata.
7. Rimontare tutti i pezzi.
Suggerimento per la pulizia:
Pulire la griglia del radiatore dell’olio è semplice, servono soltanto qualche panno di carta da
cucina, dell’acqua bollente, una bustina di tè
e una tazza. Procedete come segue: premete
leggermente contro la griglia il panno inumidito.
Mettete la bustina di tè nella tazza, versateci
sopra l’acqua calda e lasciate in infusione per
qualche minuto. Godetevi la vostra tazza di tè.
Dopo circa 20-30 minuti gli insetti e lo sporco si
saranno ammorbiditi. La maggior parte rimarrà
direttamente nel panno, il resto può essere facilmente staccato e rimosso con una spazzola.
Copyright by Wunderlich ®
Merci d’avoir fait confiance à
notre produit.
1. Démontez la pièce d’habillage avant de
gauche en dévissant d’abord la vis de fixation
supérieure, puis en retirant prudemment la
pièce vers l’avant (photo B).
2. Retirez les deux vis de fixation du radiateur
d’huile et posez-le prudemment sur un chiffon
ou une autre surface de tissu pour éviter des
endommagements (photo C).
3. Appliquez une bande de la mousse de caoutchouc fournie sur les supports supérieurs et
inférieurs inclus (photo D).
4. Montez les supports supérieurs sur le radiateur d’huile avec les vis M4x8 et les rondelles
fournies (photo E). Note : Les supports supérieurs peuvent être identifiés grâce aux inserts
de filetage (photo E1).
5. Poussez prudemment la protection de radiateur d’huile sur le radiateur d’huile (photo F)
et montez les supports inférieurs en utilisant
les vis M4x8 et les rondelles (photo G).
6. Alignez la protection de radiateur d’huile et
vissez les supports avec les vis M5x16 et les
rondelles (photo H). Indication : l’écrou de la
photo H est remplacée par l’insert de filetage.
7. Remontez toutes les pièces.
Conseil d’entretien :
Le nettoyage de la grille de protection du radiateur
d’huile est simple et vous avez pour cela simplement besoin des éléments suivants : Du papier
essuie-mains, de l’eau chaude, un sachet de thé
et une tasse Comment ça fonctionne ? Pressez
légèrement du papier essuie-mains humide contre
la grille. Mettez ensuite le sachet de thé dans la
tasse, versez de l’eau chaude et savourez votre
thé. Au bout d’environ 20 à 30 minutes le papier
humide aura détrempé les saletés et les insectes.
La plus grande partie se laisse directement
essuyer avec le papier essuie-mains et le reste
s’enlève facilement à l’aide d’une brosse.
Copyright by Wunderlich ®
BY
K 1300 R - Ölkühlerschutz / Oil Cooler Grill / Protezione Radiatore Olio / Protection de radiateur d’huile /Protección del radiador del aceite
W
CH
Bestell Nummer / Part Number / Codice / Pieza / Pièce: 8600144
UNDERL
I
Le agradecemos la compra de
nuestro producto.
1. Desmonte la pieza del revestimiento delantero izquierdo destornillando el tornillo
superior de fijación y tirando con prudencia
hacia delante (figura B).
2. Quite los 2 tornillos de fijación del radiador
de aceite y colóquelo con cuidado sobre un
paño o similar (figura C).
3. Pegue una tira de goma celular sobre los
soportes inferiores y superiores (figura D).
4. Monte los soportes superiores con los
tornillos M4x8 y las arandelas en U en la
protección del radiador de aceite (figura
E). Nota: los soportes superiores se puede
identificar por la rosca a presión (figura E1).
5. Empuje con precaución la protección del
radiador del aceite por encima del radiador
del aceite (figura F) y monte los soportes
inferiores con los tornillos M4x8 y las arandelas en U (figura G).
6. Alinee la protección del radiador del aceite
y apriete firmemente los soportes con los
tornillos M5x16 y las arandelas en U (figura
H). Nota: la tuerca de la figura H se sustituye
por la rosca a presión.
7. Vuelva a montar todas las piezas.
Consejo de limpieza:
La limpieza de la rejilla del radiador del aceite
es sencilla: todo lo que necesita son algunos
papeles de cocina, agua hirviendo, una bolsita
de té y una taza. Se hace así: presionar ligeramente el papel humedecido contra la rejilla.
Ponga la bolsita de té en la taza, vierta agua
hirviendo y déjelo reposar un poco. Tómese
cómodamente su té. Al cabo de unos 20-30
minutos los insectos y la suciedad se habrán
reblandecido. La mayor parte se irá directamente con el papel, y el resto se puede desprender
y cepillar fácilmente.
Copyright by Wunderlich ®
Genereller Hinweis: Unsere Anleitungen sind nach bestem
Wissen erstellt worden, erfolgen jedoch ohne Gewähr.
Sollten Sie mit dem Anbau nicht zurecht kommen
oder Zweifel haben, so wenden Sie sich bitte an Ihren
BMW-Händler oder die Werkstatt Ihres Vertrauens. Bitte
beachten Sie , dass wir keine Gewährleistungen für
fahrzeugspezifische Toleranzen übernehmen können! Es
kann im Einzelfall notwendig sein, dass Produkte diesen
angepasst werden müssen.
General note: Our fitting instructions are written to the
best of our knowledge but specifications or details may
change. If you have difficulties or have doubts with fitting
this part please seek advice from your BMW dealer or
workshop of your choice. Please note that in some cases
due to vehicle related tolerances beyond our control some
products might need adjusting to fit. We cannot warranty
parts fitting in those circumstances.
Note generali: Le nostre istruzioni di montaggio sono
scritte al meglio delle nostre possibilità ma dettagli o
specifiche possono venire variate. Se avete difficoltà o
dubbi sul montaggio di questo accessorio vi invitiamo
a rivolgervi al vostro concessionario BMW o alla vostra
officina di fiducia. Prendete nota che in qualche caso per
tolleranze relative al veicolo al di fuori del nostro controllo
alcuni accessori possono necessitare di aggiustamenti
appropriati. In questo caso non possiamo garantire un
perfetto montaggio.
Remarque d’ordre général: nos directives de montage sont
élaborées au mieux sur la base de nos connaissances,
mais nous ne saurions en garantir le résultat. Si vous
rencontrez des difficultés lors du montage ou si vous avez
des questions, veuillez contacter votre concessionnaire
BMW ou l’atelier de votre choix. Veuillez noter que nous
ne pouvons fournir aucune garantie quant aux tolérances
spécifiques du véhicules. Dans certains cas, il peut
être nécessaire d’ajuster les produits à ces tolérances
particulières.
Aviso de seguridad: Las instrucciones han sido elaboradas
según nuestra mejor ciencia y entender para que usted
las pueda seguir sin ningún tipo de peligro. En caso
de duda, contacte con su vendedor de BMW o con su
taller de confianza. !Tenga en cuenta que según el tipo
de tolerancia del vehículo, algunos productos podrían
necesitar de ajuste! En tal caso, no nos hacemos cargo
ni damos ninguna garantía.
News, Shop, Downloads + Informationen:
www.wunderlich.de
Kataloganforderung + Downloads:
www.wunderlich.de/katalog
Anleitung download (in Farbe):
www.wunderlich.de/manuals
Catalogue download (English):
www.wunderlich.de/update
General information, dealers and news:
www.wunderlich.de/International
Fitting instructions download (in full colour):
www.wunderlich.de/manuals
Download catalogo (italiano):
www.wunderlich.de/update
Informazioni generali, dealer e Novità:
http://www.wunderlich.it
Download istruzioni di montaggio (colore)
www.wunderlich.de/manuals
Télécharger les catalogues (francais):
www.wunderlich.de/update
Informations générales et distributeurs:
www.wunderlich.fr
Descargar los catálogos (español):
www.wunderlich.de/update
Informaciones generales, tiendas y noticias:
www.wunderlich.de/International
Descargar las instrucciones de montaje (color):
www.wunderlich.de/manuals
Télécharger les instructions de montage (en couleurs)
www.wunderlich.de/manuals
Wunderlich GmbH • Kranzweiherweg 12 • 53489 Sinzig•Gewerbepark • Germany • Tel. +49-(0)2642-97980 • Fax +49-(0)2642-9798 33 • e-mail [email protected] • web: www.wunderlich.de
Geschäftsführer/Managing Directors: Erich Wunderlich, Alexander de la Motte • Amtsgericht Andernach • HRB 12314 • USTID-Nr./VAT-No. 01 DE 149 271 221
1
A
B
C
D
E
F
+
M4x8
E
!
G
+
M4x8
H
I
+
M4x8
2
Scaricare