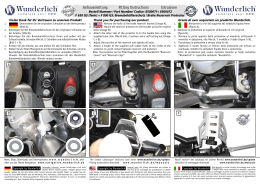
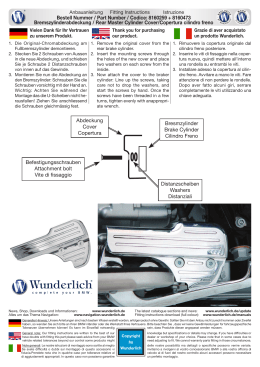
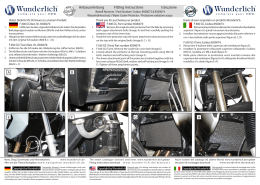
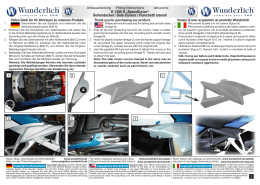
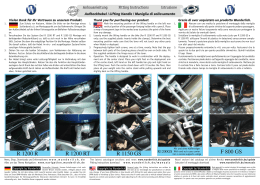
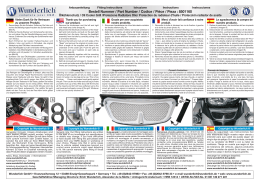
Anbauanleitung
Fitting Instructions
Istruzione
Bestell Nummer / Part Number/ Codice: 8161533
Zylinderprotektor / Cylinder Protector / Protezione Testa Cilindro
Vielen Dank für Ihr Vertrauen zu unserem Produkt.
1.
Demontieren Sie, wenn vorhanden die originalen Verschlußschrauben am
Zylinder und die Befestigungsschraube der unteren Zündspule (Bild A+B).
2. Montieren Sie den Zylinderprotektor vorn mit der Hülse „Kurz“, Schraube M6x20 und
U- Scheibe. Hinten mit der Hülse „Lang“, Schraube M6x25 und U- Scheibe. Unten wird
der Zylinderprotektor mit der Schraube M6x16 und U- Scheibe unter der Abdeckung der
Zündspule verschraubt (Bild C-E).
3. Schieben Sie den Zylinderprotektor bis Sie einem Abstand von ca 1 mm zum Ventildeckel
haben (Protektor und Ventildeckel dürfen sich nicht berühren), richten Sie den
Zylinderprotektor aus, und drehen Sie alle Schrauben fest.
Ersatzteile erhalten Sie unter den folgenden Bestellnummern:
Linker Zylinderschutz (komplett) 8161533-X-L,
Rechter Zylinderschutz (komplett) 8161533-X-R,
Schleifklotz links + Schrauben 8161533-X2,
Schleifklotz rechts + Schrauben 8161533-X1
A
Thank you for purchasing our product.
Remove the front and rear bolts of the cylinder (if present)(Image A+B),
and also the bolt holding the lower HT coil.
2- Loosely attach the protector to the cylinder: At the front with a “short” spacer, M6x20
bolt and washer (Image C). At the rear with a “long” spacer, M6x25 bolt and washer
(Image D). At the bottom the protector is positioned between the cylinder and the
plastic HT coil cover, and secured with an M6x16 bolt and washer (Image E).
3. Align the protector so that the rubber on the inside of the protector does not touch
the cylinder head cover (Important: At least 1 mm clearance to avoid scuffing of
the cover surface). Tighten the bolts and repeat process on other cylinder.
Spare parts are available under these part numbers:
Complete left side assembly 8161533-X-L,
Complete right side assembly 8161533-X-R,
Left hand slider block + bolts 8161533-X2,
Right slider block + bolts 8161533-X1
1.
B
Grazie per aver acquistato un prodotto
Wunderlich.
1. Rimuovere i due bulloni anteriorì nella zona Testa - cilindro
(figura A + B), conseguentemente il bullone inferiore della
bobina HT.
2. Installare la protezione utilizzando nella parte anteriore il
distanziale “corto“, rondella U e bullone M6x20. Nella parte
posteriore si utilizzano: un bullone M6x25, rondella U e
distanziale “lungo“. La parte inferiore della protezione è
fissata con un bullone M6x16, rondella U al di sotto della
copertura bobina HT (figura C-E).
3. Allineare la protezione in modo che il gommino all’interno
della protezione non tocchi la testa del cilindro (importante: minimo un 1mm di gioco fra protezione e testa
del cilindro). Serrare i bulloni. Ripetere l‘operazione per
la parte opposta.
C
M6x20
D
A
E
M6x25
Achtung:
die Wunderlich GmbH übernimmt
keine Haftung für unmittelbare
oder Folgeschäden am Fahrzeug, bzw. Personenschäden die
durch einen Sturz, Unfall oder
unsachgemäße bzw. mangelhafte Montage ihrer Produkte
entstehen!
Attention:
Please note that company Wunderlich as a manufacturer and
seller of products is not liable for
direct damage, personal injury or
consequential damages resulting
from a fall, accident or improper
or defective installation!
F
M6x16
News, Shop, Downloads und Informationen: www.wunderlich.de
Alles um das Thema Navigation: w w w . n a v i g a t i o n . w u n d e r l i c h . d e
The latest catalogue sections and news www.wunderlich.de/update
Fitting instructions download w w w . w u n d e r l i c h . d e / m a n u a l s
Nuovi sezioni del catalogo ed ultime Novità www.wunderlich.de/update
Istruzioni di montaggio download w w w.wunder lich.de/manuals
Genereller Hinweis: Unsere Anleitungen sind nach
bestem Wissen erstellt worden, erfolgen jedoch ohne
Gewähr. Sollten Sie mit dem Anbau nicht zurecht kommen oder Zweifel haben, so wenden Sie sich
bitte an Ihren BMW-Händler oder die Werkstatt Ihres Vertrauens. Bitte beachten Sie , dass wir keine
Gewährleistungen für fahrzeugspezifische Toleranzen übernehmen können! Es kann im Einzelfall
notwendig sein, dass Produkte diesen angepasst werden müssen.
General note: Our fitting instructions are written to
the best of our knowledge but specifications or details
may change. If you have difficulties or have doubts with fitting this part please seek advice from your
BMW dealer or workshop of your choice. Please note that in some cases due to vehicle related tolerances
beyond our control some products might need adjusting to fit. We cannot warranty parts fitting in those
circumstances.
Note generali: Le nostre istruzioni di montaggio sono scritte
Copyright by Wunderlich al meglio delle nostre possibilità ma dettagli o specifiche
possono variare. Se avete difficoltà o dubbi sul montaggio di questo accessorio vi invitiamo a rivolgervi al
vostro concessionario BMW o alla vostra officina di fiducia.Prendete nota che in qualche caso per tolleranze
relative al veicolo al di fuori del nostro controllo alcuni accessori possono essere soggetti ad aggiustamenti
appropriati. In questo caso non garantiamo un montaggio perfetto.
Copyright by Wunderlich
Copyright by Wunderlich
Scarica