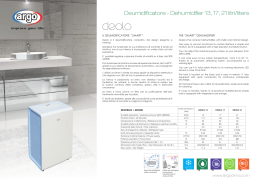
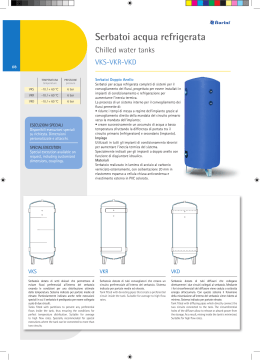
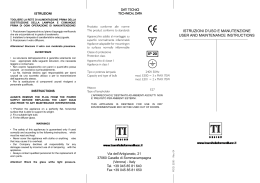
A
B
C
Dati tecnici / Technical data
F7030
NADER MIDI 2
Volume indicativo trattabile
Indicative handling volume
Capacità di condensazione L/24ore (a 30°C, 80% U.R.)
Condensate capacity L/24hour (at 30°C, 80% R.H.)
Capacità di condensazione L/24ore (a 25°C, 65% U.R.)
Condensate capacity L/24hour (at 25°C, 65% R.H.)
300m³
400m³
14.5
21.3
27.7
8.2
12.1
16.3
+5°C +32°C
Working limit temperature
Umidità relativa limite di lavoro
40%_100%
Working limit relative humidity
55.6 (200)
Tensione di alimentazione
Current absorption (at 30°C, 80%R.H.)
Corrente assorbita (a 20°, 65% U.R.)
Current absorption (at 25°C, 65%R.H.)
Potenza assorbita (a 30°, 80% U.R.)
Power absorption (at 30°C, 80%R.H.)
Potenza assorbita (a 25°, 65% U.R.)
Power absorption (at 25°C, 65%R.H.)
Carica gas refrigerante R134a
R134a refrigerating gas charge
2.52A
3.00A
1.44A
2.30A
2.65A
285W
440W
555W
250W
370W
460W
210g
265g
270g
15.8 bar
Refrigerating circuit maximum pressure
Noise level at 1 meter distance
48 dBA
Dimensioni: l×a×p (mm)
Weight(Kg)
Capacità serbatoio raccolta condensa
Condensate collection tank capacity
52 dBA
54 dBA
398×555×382
Dimensions: w×h×d (mm)
Peso(Kg)
83.3 (300)
1.56A
Pressione massima circuito frigorifero
Rumorosità a 1 metro di distanza
69.4 (250)
230V, 50Hz
Power supply voltage
Corrente assorbita (a 30°, 80% U.R.)
F7032
NADER MIDI 4
160m³
Temperatura limite di lavoro
Portata aria L/s (m³/ora)
Air flow rate L/s (m³/hour)
F7031
NADER MIDI 3
25.5
27.3
28.7
7 litri circa / about 7 liters
tab.1
Descrizione (A,B,C)
1.
2.
3.
4.
5.
Interruttore di livello
Spia serbatoio (rossa)
Spia sbrinamento (gialla)
Umidostato
Ventilatore
6.
7.
8.
9.
10.
Compressore
Scheda elettronica
Sonda temperatura
Evaporatore
Condensatore
11.
12.
13.
14.
Filtro deidratatore
Capillare
Manopola umidostato
Flusso d’aria
Simboli usati nel manuale
Simbolo
Significato
Descrizione
Nota
Seguire attentamente le istruzioni e i suggerimenti riportati.
Attenzione !
Pericolo generico. Non attenersi alle istruzioni può causare danni
alla macchina, alle persone o alle cose.
Introduzione
Gli apparecchi della serie
sono dei deumidificatori d'aria il cui scopo è di togliere l'umidità
dall'ambiente. Essi sono dotati di un circuito frigorifero, caricato con gas ecologico R134a, equipaggiato con un
sistema di sbrinamento a controllo elettronico. Questi apparecchi sono stati concepiti per un uso domestico e
non industriale.
Principio di funzionamento (C)
L'aria (14), da deumidificare, viene aspirata dall'apparecchio, tramite il ventilatore (5), e fatta passare
attraverso l'evaporatore (9) del circuito frigorifero. In questo modo la temperatura dell'aria viene abbassata
oltre il suo punto di rugiada e il vapore acqueo condensa in gocce d'acqua che vengono raccolte nell'apposito
serbatoio. Il grado di inquinamento dell'acqua raccolta è proporzionato al grado di inquinamento dell'ambiente.
L'aria così deumidificata viene fatta passare attraverso il condensatore (10) che ne innalza la temperatura ad un
valore leggermente superiore rispetto a quello iniziale. In questo modo la quantità di umidità contenuta nell'aria
ambiente viene gradualmente diminuita fino al valore desiderato. Questo comporta inoltre un abbassamento
dell'umidità nelle pareti e nel pavimento della camera, nonché nei materiali in essa contenuti.
Sbrinamento (B,C)
Quando la temperatura ambiente scende circa sotto i 16°C può formarsi del ghiaccio sulla serpentina
dell'evaporatore (9). Nei deumidificatori della serie
il ciclo di sbrinamento è automatico, ed è
comandato da un dispositivo elettronico (7), che rileva la presenza di ghiaccio sulla serpentina dell'evaporatore
(9). La fase di sbrinamento viene segnalata dall'accensione della spia gialla (3) sul pannello di controllo e
durante tale fase il compressore (6) rimane fermo. La durata del ciclo di sbrinamento dipende dalle condizioni
ambientali e dalla quantità di ghiaccio formatasi sull'evaporatore (9).
Serbatoio raccolta condensa (B)
Quando viene raggiunto il livello massimo dell'acqua nel serbatoio di raccolta della condensa, il deumidificatore
si ferma e si accende la spia rossa (2) del pannello di controllo. Aprendo lo sportello, posto anteriormente
all'apparecchio, è possibile estrarre il serbatoio. Lo svuotamento viene effettuato facendo scorrere lo sportellino
posizionato sulla parte superiore del serbatoio. Una volta svuotato il serbatoio è importante ricordarsi di
richiudere lo sportellino in quanto impedisce la fuoriuscita dell'acqua dal serbatoio quando questo viene spostato
o quando si muove il deumidificatore. Per rimettere in funzione l'apparecchio è necessario reinserire il serbatoio
nell'apposito scomparto e chiudere lo sportello.
La spia rossa (2) oltre ad indicare che il serbatoio di raccolta della condensa è pieno,
indica anche quando questo manca o è male inserito. Fin tanto che la spia rossa (2)
rimane accesa l'apparecchio non può funzionare in alcun modo.
E' possibile anche ottenere lo scarico continuo dell'acqua collegando un tubo di gomma di diametro interno 10
mm all'attacco posto nella parte inferiore del serbatoio. Per fare uscire il tubo dall'apparecchio utilizzare
l'apposito foro sul fondo del deumidificatore. Verificare che il tubo scarichi correttamente.
Norme di installazione
• I deumidificatori della serie
vanno semplicemente introdotti nell'ambiente da deumidificare e
messi in funzione. Per ottenere il massimo rendimento rispettare le seguenti norme:
M812-1
-5-
Deumidificatore modello Nader midi 2006
• assicurarsi che nell'ambiente in cui viene inserito il deumidificatore non siano mai superate le condizioni
limite di funzionamento della macchina (tab.1);
• il locale in cui viene inserito il deumidificatore deve essere chiuso;
• l'apparecchio deve funzionare sempre in posizione verticale con le quattro ruote rivolte verso il basso;
• il deumidificatore deve essere posto in modo da lasciare libere le griglie di entrata e di uscita dell'aria
(almeno 10 cm d'aria);
• assicurarsi che la tensione di alimentazione corrisponda a quella indicata in tab.2 e che l'impianto elettrico sia
conforme alle normative vigenti;
• si consiglia di mettere il deumidificatore nel punto più freddo del locale dove normalmente si accumula
l'umidità.
Posizionamento
Per spostare il deumidificatore farlo scorrere sul pavimento utilizzando le apposite ruote orientabili di cui
dispone. E' consigliabile mettere il deumidificatore vicino alla presa di corrente.
Messa in funzione (B)
Inserire la spina in una presa di corrente a 230V, 50Hz dotata di presa di terra e ruotare la manopola (13)
dell'umidostato. Le diverse posizioni della manopola permettono di ottenere diversi gradi di deumidificazione
secondo i dati indicativi riportati in tab.2.
Posizione
Grado di umidità relativa ottenibile
Esempio di ambiente
Spento
/
/
1
tra 80% e 65%
Cantine, ambienti non abitati
2
tra 65% e 50%
Locali utilizzati da persone
3
tra 50% e 40%
Lavanderia, luoghi in cui si vuole un
ridotto grado di umidità
40%
/
Continuo
tab.2
Manutenzione
I deumidificatori della serie
non richiedono particolari cure di manutenzione. E' consigliabile
spolverarli e tenere pulite le grate di entrata e di uscita dell'aria. In caso di malfunzionamento o di guasto
rivolgersi al proprio rivenditore. Il cavo di alimentazione ha un collegamento di tipo M; in caso di
danneggiamento, il cavo deve essere sostituito con uno originale (vedere il disegno esploso con i riferimenti per
pezzi di ricambio).
Prima di eseguire qualunque tipo di intervento sull'apparecchio staccare la spina di
alimentazione della corrente.
Immagazzinamento
• Conservare l'apparecchio in un ambiente con temperature comprese tra -25°C e +55°C.
• Quando l'apparecchio è ancora imballato rispettare le indicazioni sulla scatola.
• Non sovrapporre alla scatola altri materiali pesanti.
Verifiche da fare prima e dopo un lungo tempo di inattività
Prima
• Staccare la spina e svuotare il serbatoio di raccolta della condensa;
• coprire la macchina per proteggerla dalla polvere.
Dopo
• La ventola deve girare liberamente senza attriti;
• attivare l’apparecchio secondo le istruzioni contenute in questo manuale.
Smaltimento del prodotto
La macchina è costruita con metalli differenti, tutti riciclabili. Include anche un circuito frigorifero caricato con il
refrigerante ecologico R134a ad ALTA PRESSIONE, contenente anche olio sintetico. Sia il gas che l'olio non
vanno dispersi nell'ambiente. Pertanto, per la loro eliminazione, sarà necessario rivolgersi ad una ditta
specializzata.
Deumidificatore modello Nader midi 2006
-6-
M812-1
Description (A, B, C)
1.
2.
3.
4.
5.
Level switch
Tank pilot light (red)
Defrosting pilot light (yellow)
Humidistat
Fan
6.
7.
8.
9.
10.
Compressor
Electronic card
Temperature probe
Evaporator
Condenser
11.
12.
13.
14.
Dehydrator filter
Capillary
Humidistat knob
Air flow
Symbols used in the manual
SYMBOLS
MEANING
DESCRIPTION
Note
Carefully follow the instructions and suggestions given.
Warning!
Generic danger. Not following instructions can cause damages to
the machine, persons or things.
Introduction
The appliances of the
series are air dehumidifiers, the purpose of which is to remove
humidity from the environment. They are equipped with a refrigeration circuit, loaded with ecological gas
R134a, fitted with an electronic controlled defrosting system. These appliances were designed for a
domestic and not industrial use.
Operating principle (C)
The appliance uses a fan (5) to suck up the air (14) to be dehumidified and pass it through the
refrigerator circuit evaporator (9). In this way the temperature of the air is lowered to below its dew
point and the vapour condenses to form drops of water that are collected in the appropriate tank. The
amount of pollution in the water collected is proportional to the amount of pollution in the environment.
The air thus dehumidified is passed through the condenser (10) that raises its temperature slightly higher
than the initial value. In this way the quantity of humidity contained in the environmental air is gradually
decreased until it reaches the desired value. This means the humidity of the walls and floor of the room,
as well as the materials contained therein, is also lowered.
Defrosting (B, C)
When the room temperature drops below approximately 16°C, ice could form on the evaporator coil (9).
In the dehumidifiers of the
series the defrosting cycle is automatic, and is controlled by an
electronic device (7), that detects the presence of ice on the evaporator coil (9). The defrosting phase is
signalled by the yellow pilot light (3) on the control panel switching on; during this phase the compressor
(6) stops. The duration of the defrosting cycle depends on environmental conditions and the amount of
ice that has formed on the evaporator (9).
Condensate collecting tank (B)
When the water reaches the maximum level in the condensate collection tank, the dehumidifier stops and
the red pilot light (2) on the control panel switches on. The tank can be extracted by first opening the
front door of the appliance. The tank is emptied by sliding open the door at the top of the tank. Once
the tank has been emptied, it is important to remember to close the door since it prevents the water
from flowing out of the tank when the latter is moved or when the dehumidifier is moved. To restart the
appliance the tank must be put back into its lodging and this door also closed.
Besides indicating that the condensate collection tank is full, the red pilot light (2) also
indicates when the tank is missing or inserted badly. As long as the red pilot light (2) is
on, the appliance cannot operate at all.
The water can also be drained continuously by connecting a rubber hose with an internal diameter of 10
mm to the connector found under the tank. The hose will leave the appliance through the hole on the
dehumidifier bottom. Check that the hose drains properly.
Rules for installation
The dehumidifiers of the
series are simply placed in the room to be dehumidified and
started. To obtain maximum efficiency keep to the following rules:
• make sure that in the room, where the dehumidifier is installed, the conditions never exceed the
working limits of the machine (tab.1);
• the room where the dehumidifier is installed must be closed;
• the appliance must always operate in a vertical position with the four wheels turned downwards;
M812-1
-7-
Dehumidifier model Nader midi 2006
• the dehumidifier must be placed so that the air intake and outlet grids are left free (at least 10 cm air
space);
• make sure that the power supply voltage corresponds to that indicated in tab. 2 and that the electrical
installations comply with the regulations in force;
• it is advisable to place the dehumidifier in the coldest point of the room where humidity normally
collects.
Positioning
The dehumidifier is moved on the floor on its swivel wheels. It is advisable to install the dehumidifier
near an electricity output socket.
Start-up (B)
Plug the appliance into a 230V, 50Hz grounded socket, and turn the humidistat knob (13). The different
positions of the knob allow obtaining different degrees of dehumidification according to the data shown in
tab.2:
Position
Degree of relative humidity obtainable
Example of environment
Off
/
/
1
between 80% and 65%
Cellars and basements, uninhabited
rooms
2
between 65% and 50%
Rooms used by people
3
between 50% and 40%
Laundry rooms, places where a
reduced degree of humidity is
needed
40%
/
Continuous
tab.2
Maintenance
The dehumidifiers of the
series need no particular maintenance. It is advisable to dust them
and keep the air intake and outlet grids clean. Contact your dealer if it should function badly or break
down. The power supply cable has an M type connection; in the event of damages, an original
replacement cable must be used (see the exploded view with references for spare parts).
Before doing anything on the appliance disconnect the power supply by unplugging the
machine.
Storage
• Keep the appliance in a room with a temperature between –25°C and +55°C.
• When the appliance is still packed keep to the instructions on the box.
• Do not place other heavy material on the box.
Check-up to carry out before and after a long period of inactivity
Before
• Disconnect the plug and empty the condensate collection tank;
• cover the machine to protect it from dust.
After
• The fan must turn freely without gripping;
• put the machine working following this manual’s instructions.
Disposal of the product
The machine is made of different metals; all can be recycled. Its refrigeration circuit is charged with the
ecological refrigerant R134a under HIGH PRESSURE; it also contains synthetic oil. Both the gas and
the oil must not be dispersed in the environment. For the disposal is thus necessary to call a specialized
company.
Dehumidifier model Nader midi 2006
-8-
M812-1
Scarica