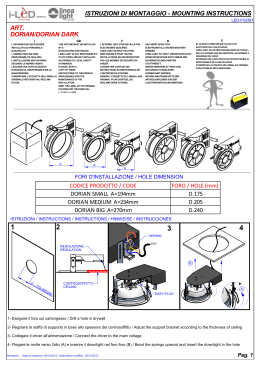
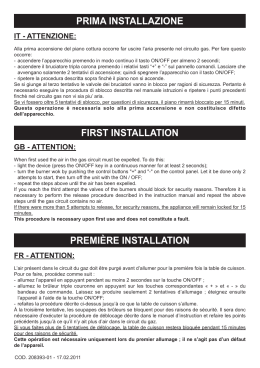
ELECTRONIC BUILT-IN-TIMER OPERATION INSTRUCTIONS
ISTRUZIONI D’USO DEL PROGRAMMATORE ELETTRONICO
NOTICE D’UTILISATION DU PROGRAMMATEUR ELECTRONIQUE
BEDIENUNGSANLEITUNG DER ELEKTRONISCHEN ZEITSCHALTUHR
INSTRUCCIONES DE USO DEL PROGRAMMADOR ELECTRONICO
EG
I
F
D
E
MOVABLE AIR CONDITIONER ● CLIMATIZZATORE PORTATILE
CLIMATISEUR MOBILE ● MOBILES KLIMAGERÄT
ACONDICIONADOR PORTATIL
37.4117.148.0
01/2002
ELECTRONIC BUILT-IN-TIMER 24 HOURS OR
EG
Technical data
– Programmed memory of up to 5 years without power supply due to Lithium battery
– Display 24 hours
– Daily and weekly programming possibility
– 8 switching ON programs, 8 switching OFF programs
TIME SETTING
MANUAL OFF
OPERATING MODE
PROGRAM MODE
PROGRAM SETTING
MANUAL ON
SWITCH
DAYS OF THE WEEK
ON/OFF INDICATION
SKIP MODE INDICATION
PROGRAMS STORING
8 ON PROGRAMS, 8 OFF PROGRAMS
SKIP MODE ON/OFF
MINUTES SETTING
DAYS OF THE WEEK SETTING
1: MONDAY, 7: SUNDAY
RESET BUTTON
HOURS SETTING
Operating modes of timer:
I:
the air conditioner is permanently ON (use directly the ON/OFF push button of the air conditioner to switch it OFF)
AUTO: the timer will switch on and off the air conditioner according to the selected program
0:
the air conditioner is permanently OFF (it can’t be switched ON neither with the ON/OFF push button of the air conditioner)
OPERATING INSTRUCTIONS FOR THE TIMER
1. Reset of the timer:
Be sure that the switch is in the RUN position and press down the reset button R with the tip of a pencil (the display will begin blinking).
2. Setting the current time and day:
Slide the switch into position, press down the button 1…7 until you set the day of the current week (indicated by an arrow ▲ on the display), press down
the button h to set the current hour, press down the button m to set the minutes. Slide again the switch into RUN position.
3. Selection of the days or the blocks of days to be set:
It is possible to set each single day and the following blocks of days, pressing the button 1…7:
1-2-3-4-5 (from Monday to Friday)
6-7 (Saturday and Sunday)
1-2-3-4-5-6 (from Monday to Saturday)
1-2-3-4-5-6-7 (from Monday to Sunday)
4. Programming the switching times:
●
Slide the switch into P position (the time indication on the display begins blinking, the bulb symbol and the number 1 of the first switching time are visualised).
●
Press down the button 1…7 until you set the day of the week or the block of days to be stored (an arrow ▲ corresponding to the selected day or many
arrows if you set a block of days will appear on the display).
●
Press down the button h and then the button m to set the switching ON hour.
●
Press the button P to set the switching OFF hour (the time indication on the display begins blinking again, the symbol of the bulb disappears and the
number 2 appears).
●
Confirm the day with the button 1…7 and set the switching OFF hour with the buttons h and m.
●
Repeat these operations sequentially up to 8 switching ON and 8 switching OFF programs maximum, divided among the days you want to set.
●
At the end of programming slide the switches into RUN and AUTO position.
NOTE: During the non set days the air conditioner will be OFF.
5. SKIP mode:
The SKIP mode (program override) can be set only during the automatic mode of the timer (AUTO) + (RUN); by pressing the skip button ➞
x the timer will
be switched into the opposite functional mode (from ON to OFF and vice versa); this mode remains activated up to the following set program.
When the skip mode is activated the skip symbol ➞
x appears on the display.
Pressing the SKIP button again will cancel the skip mode.
6. Visualisation, correction or deletion of the stored programs:
You can visualise the stored programs, during operation, sliding the switch into P position and pressing many times the P button.
In this way, you can modify the switching ON and OFF hours with the buttons h and m and delete one or more programs, pressing contemporary the buttons P and ➞
x.
2
ELECTRONIC BUILT-IN-TIMER 24 HOURS
Technical data
– Programmed memory without power supply: 150 hours
– Display 24 hours
– Daily and weekly programming possibility
– 6 switching ON programs, 6 switching OFF programs
EG
OPERATING MODE INDICATION
AUTO OFF - ON - AUTO ON - OFF
PROGRAM INDICATION
DAYS OF THE WEEK
SUMMER AND WINTER TIME INDICATION
RANDOM FUNCTION INDICATION
CURRENT DATE AND TIME SETTING
PROGRAMS STORING
6 ON PROGRAMS, 6 OFF PROGRAMS
MINUTES SETTING
HOURS SETTING
DAY OF THE WEEK SETTING
(OR GROUP OF DAYS)
RECALL FUNCTION: TO DISABLE AND
ENABLE THE PROGRAMMS
RESET BUTTON
OPERATING INSTRUCTIONS FOR THE TIMER
1. Reset of the timer:
Press down the RST (reset) button with the tip of a pencil.
2. Setting the current day and time:
Keep pressed down the TIME button while you are setting the current time or correcting it; press down the DAY button to set the current day (shown by the
english abbreviation on the display), press down the HR button to set the current hour, press down the MIN button to set the current minutes.
3. Selection of the days or the groups of days to be set:
Press down PRG (programming) button once: you will see “PROG 1 ON” on the display which indicates the switch-on time command to be entered.
Press the DAY button and the display will show you in sequence (each time you press it) the following groups of days or single days:
MO-TU-WE-TH-FR-SA-SU (group of days from Monday to Sunday)
MO-TU-WE-TH-FR-SA-SU (each day of the week, one by one)
MO-TU-WE-TH-FR (group of days from Monday to Friday)
SA-SU (Saturday and Sunday)
MO-TU-WE-TH-FR-SA (group of days from Monday to Saturday)
MO-WE-FR (Monday, Wednesday and Friday)
TU-TH-SA (Tuesday, Thursday and Saturday)
4. Programming the switching times:
After having pressed down the PRG button and then the DAY button until you set the day or the group of days to be stored (see section 3)
●
Press down the HR button and then the MIN button to set the switching ON hour.
●
Press the PRG button again to set the switching OFF hour (you will see “PROG 1 OFF” on the display which indicates the switch-off time command to
be entered).
●
Confirm the day or group of days with the DAY button and set the switching OFF hour with the HR and MIN buttons.
●
Repeat these operations in sequence up to 6 switching ON and 6 switching OFF programs maximum, divided among the days you want to set.
●
At the end of programming press the TIME button to switch to the current time, otherwise these switching times will not be executed. (However, the display will be switched to current time mode automatically if no button is pressed within about 2 minutes).
NOTE: During the non set days the air conditioner will be OFF.
5. Visualise, correct, disable and enable the stored programs:
You can visualise the stored programs, during operation, pressing many times the PRG button.
In this way, you can modify the switching ON and OFF hours with the HR and MIN buttons and disable or enable one or more programs, pressing the RCL
button (see RECALL function, section 6).
6. RECALL function:
The RECALL function allows you to disable a switching time of a program, without losing preset memory:
●
Press the PRG button until the preset memory you want to disable is present
●
Press RCL button, using the tip of a pencil (the set time disappears and the display shows “--:--” for the hours and minute, indicating that the specified
memory location will not be executed).
●
Press the TIME button to switch to the current time
●
You can enable again the switching time, following the same procedure and pressing again the RCL button.
7. SUMMER/WINTER TIME change-over:
●
To change from winter time to summer time, keep TIME button pressed while pressing one of the
button (the display will indicate the “+1h” sign
and the current time will be advanced one hour).
●
To change from summer time to winter time simply perform the step before (the “+1hr” sign will disappear from the display and the current time will retard one hour).
8. RANDOM function:
The programmed memories you have preset will be executed in a random delay from 2 to 32 minutes, in case of current interruption, using this function.
●
Keep the TIME button pressed while pressing PRG button (the display will indicate RND sign).
●
Press again the TIME and PRG button to cancel the random mode (the RND sign will disappear from the display).
9. Manual operation:
If you press one of the
buttons, you can set the timer manually; the display will show in the sequence: AUTO OFF-ON-AUTO ON-OFF
AUTO: the air conditioner is controlled by the timer (it is possible to change from AUTO ON to AUTO OFF or vice versa, if you want to switch on or off the air
conditioner without losing the control of the timer that will go on executing the other set programs).
ON:
the air conditioner is permanently ON (use directly the ON/OFF push button of the air conditioner to switch it OFF)
OFF:
the air conditioner is permanently OFF (it can’t be switched ON neither with the ON/OFF push button of the air conditioner)
3
PROGRAMMATORE ELETTRONICO 24 ORE O
Caratteristiche tecniche
– Riserva di carica senza alimentazione elettrica con batteria al litio di durata >= cinque anni
– Display 24 ore
– Programma giornaliero e settimanale
– 8 programmi d’accensione, 8 programmi di spegnimento.
REGOLAZIONE ORARIO
SPEGNIMENTO MANUALE
GIG
POSIZIONE DI FUNZIONAMENTO
FUNZIONAMENTO CON PROGRAMMATORE
IMPOSTAZIONE PROGRAMMI
ACCENSIONE MANUALE
SELETTORE
GIORNI DELLA SETTIMANA
INDICAZIONE ACCESO/SPENTO
INDICAZIONE FUNZIONE SKIP ATTIVA
MEMORIZZAZIONE PROGRAMMI
8 ACCENSIONI, 8 SPEGNIMENTI
INSERIMENTO FUNZIONE SKIP
IMPOSTAZIONE MINUTI
IMPOSTAZIONE GIORNO DELLA SETTIMANA
1 = LUNEDÌ, 7 = DOMENICA
TASTO D’AZZERAMENTO
IMPOSTAZIONE ORE
Modi di funzionamento del programmatore:
I:
il condizionatore è permanentemente acceso (può essere spento con il pulsante marcia/arresto sul pannello comando del condizionatore.
AUTO: il condizionatore funziona con il programmatore.
0:
il condizionatore è permanentemente spento (non può essere acceso neppure con il pulsante marcia/arresto del condizionatore).
ISTRUZIONI PER L’UTILIZZO DEL PROGRAMMATORE
1. Azzeramento del programmatore:
Accertarsi che il selettore sia sulla posizione RUN e premere il tasto R con la punta di una matita (l’indicazione sul display comincerà
a lampeggiare).
2. Impostazione del giorno della settimana e dell’orologio:
Spostare il selettore sulla posizione
, premere il tasto 1…7 fino ad impostare il giorno della settimana attuale (visualizzato con una
freccia ▲ sul display), premere il tasto h per impostare l’ora attuale, premere il tasto m per impostare i minuti. Rimettere il selettore
sulla posizione RUN.
3. Scelta dei giorni o dei blocchi dei giorni da programmare:
Premendo il tasto 1…7 è possibile programmare i giorni singolarmente e i seguenti blocchi di giorni:
1-2-3-4-5 (dal lunedì al venerdì)
6-7 (sabato e domenica)
1-2-3-4-5-6 (dal lunedì al sabato)
1-2-3-4-5-6-7 (dal lunedì alla domenica)
4. Impostazione dei programmi d’accensione e spegnimento:
●
Spostare il selettore sulla posizione P (l’indicazione dell’orario sul display comincia a lampeggiare, vengono visualizzati il simbolo della lampadina e il numero 1 della prima impostazione d’orario).
●
Premere il tasto 1..7 fino ad impostare il giorno o il blocco dei giorni che si vuole programmare (sul display appare una freccia ▲
in corrispondenza del giorno o tante frecce per il blocco dei giorni).
●
Premere il tasto h e successivamente il tasto m ed impostare l’ora d’accensione.
●
Premere il tasto P per impostare l’ora di spegnimento (l’indicazione dell’orario sul display ricomincia a lampeggiare, scompare il
simbolo della lampadina e appare il numero 2).
●
Confermare il giorno con il tasto 1..7 e impostare l’ora di spegnimento con i tasti h e m.
●
Ripetere queste operazioni, in sequenza, fino ad un massimo di 8 programmi di accensione e 8 di spegnimento, distribuiti per i
giorni che si intende programmare.
●
Al termine della programmazione, posizionare i selettori sulla posizione RUN e AUTO.
NOTA: Nei giorni non programmati il condizionatore rimarrà spento.
5. Funzione SKIP:
La funzione SKIP (salto programma) è attiva solo durante il funzionamento automatico del programmatore (AUTO) + (RUN) e permette
di cambiare da ON ad OFF e viceversa, premendo il tasto ➞
x ; questa funzione rimane attiva fino al successivo intervento programmato.
Quando la funzione skip è attiva sul display appare il simbolo ➞
x .
Per disattivare la funzione SKIP, premere nuovamente il relativo tasto.
6. Visualizzazione, correzione o cancellazione dei programmi memorizzati:
Per visualizzare i programmi memorizzati, durante il funzionamento, spostare il selettore su P e premere ripetutamente il tasto P.
È possibile, a questo punto, modificare gli orari di accensione e spegnimento con i tasti h e m e cancellare uno o più programmi, premendo contemporaneamente i tasti P e ➞
x .
4
PROGRAMMATORE ELETTRONICO 24 ORE
Caratteristiche tecniche
– Riserva di carica senza alimentazione elettrica : 150 ore
– Display 24 ore
– Programma giornaliero e settimanale
– 6 programmi d’accensione, 6 programmi di spegnimento.
INDICAZIONE MODO DI FUNZIONAMENTO
AUTO OFF - ON - AUTO ON - OFF
INDICAZIONE PROGRAMMA
GIORNI DELLA SETTIMANA
INDICAZIONE ORA SOLARE/LEGALE
IMPOSTAZIONE DATA E ORA CORRENTI
INDICAZIONE RANDOM ATTIVA
MEMORIZZAZIONE PROGRAMMI
6 ACCENSIONI, 6 SPEGNIMENTI
IMPOSTAZIONE MINUTI
IMPOSTAZIONE ORE
IMPOSTAZIONE GIORNO DELLA SETTIMANA
(O GRUPPO DI GIORNI)
TASTO RECALL : PER DISATTIVARE E
RIATTIVARE I PROGRAMMI
TASTO D’AZZERAMENTO
ISTRUZIONI PER L’UTILIZZO DEL PROGRAMMATORE
1. Azzeramento del programmatore:
Premere il tasto RST con la punta di una matita.
2. Impostazione del giorno della settimana e dell’orologio:
Tenere premuto il tasto TIME mentre si imposta o si corregge l’ora; premere il tasto DAY fino ad impostare il giorno della settimana attuale (visualizzato con
le abbreviazioni in inglese sul display), premere il tasto HR per impostare l’ora attuale, premere il tasto MIN per impostare i minuti.
3. Scelta dei giorni o dei blocchi dei giorni da programmare:
Premere il tasto PRG una volta: apparirà sul display “PROG 1 ON” che indica il programma di accensione da impostare.
Premere il tasto DAY e appariranno in sequenza (ad ogni pressione del tasto) i seguenti blocchi di giorni o giorni singoli:
MO-TU-WE-TH-FR-SA-SU (blocco di giorni da lunedì a domenica)
MO-TU-WE-TH-FR-SA-SU (giorno per giorno singolarmente, ad ogni pressione del tasto)
MO-TU-WE-TH-FR (blocco di giorni da lunedì a venerdì)
SA-SU (sabato e domenica)
MO-TU-WE-TH-FR-SA (blocco di giorni da lunedì a sabato)
MO-WE-FR (lunedì, mercoledì e venerdì)
TU-TH-SA (martedì, giovedì e sabato)
4. Impostazione dei programmi d’accensione e spegnimento:
Dopo aver premuto il tasto PRG e il tasto DAY per scegliere il giorno o il blocco di giorni da programmare (v. punto 3)
●
Premere il tasto HR e successivamente il tasto MIN ed impostare l’ora d’accensione.
●
Premere di nuovo il tasto PRG per impostare l’ora di spegnimento (apparirà sul display “PROG 1 OFF” che indica il programma di spegnimento da impostare).
●
Confermare il giorno o il gruppo di giorni con il tasto DAY e impostare l’ora di spegnimento con i tasti HR e MIN.
●
Ripetere queste operazioni, in sequenza, fino ad un massimo di 6 programmi di accensione e 6 di spegnimento, distribuiti per i giorni che si intende
programmare.
●
Al termine della programmazione, premere il tasto TIME per ritornare all’ora corrente, altrimenti la programmazione non ha luogo (il display torna comunque automaticamente all’ora corrente dopo 2 minuti, se nessun tasto viene premuto).
NOTA: Nei giorni non programmati il condizionatore rimarrà spento.
5. Visualizzazione, correzione, disattivazione e riattivazione dei programmi memorizzati:
Per visualizzare i programmi memorizzati, durante il funzionamento, premere ripetutamente il tasto PRG.
È possibile, a questo punto, modificare gli orari di accensione e spegnimento con i tasti HR e MIN e attivare o disattivare uno o più programmi, premendo
RCL (v. funzione RECALL al punto 6).
6. Funzione RECALL:
Se per qualsiasi ragione non si vuole fare eseguire un programma, senza però perdere la memoria impostata
●
Premere il tasto PRG fino a visualizzare il programma da disattivare.
●
Premere il tasto RCL con la punta di una matita (sul visore scompare l’orario impostato e appare “--:--”).
●
Premere il tasto TIME per tornare all’ora attuale.
●
Per riattivare il programma ripetere la stessa procedura.
7. Passaggio ORA LEGALE/ORA SOLARE:
●
Per passare dall’ora legale all’ora solare, tenere premuto il tasto TIME e premere uno dei tasti
(apparirà il simbolo “+1h” sul display e l’orario corrente avanzerà di un ora).
●
Per ritornare all’ora legale ripetere la stessa procedura (il simbolo “+1h” sparirà e l’orario corrente diminuirà di un’ora).
8. Funzione RANDOM:
I programmi impostati saranno eseguiti con un ritardo da 2 a 32 minuti, in caso di interruzione di corrente, utilizzando questa funzione
●
Tenere premuto il tasto TIME e premere il tasto PRG (sul display appare il simbolo “RND” per indicare che la funzione RANDOM é attiva).
●
Per disattivare la funzione ripetere la stessa procedura (il simbolo “RND” scompare dal display).
9. Funzionamento manuale:
Premendo uno dei tasti
si può intervenire manualmente sul funzionamento del programmatore; appariranno in sequenza: AUTO OFF - ON - AUTO ON - OFF
AUTO: il condizionatore funziona con il programmatore (é possibile passare da AUTO ON a AUTO OFF o viceversa: é una forzatura per accendere o spegnere il condizionatore, senza perdere il controllo del programmatore che continuerà a eseguire i programmi impostati di seguito).
ON:
il condizionatore è permanentemente acceso (può essere spento con il pulsante marcia/arresto sul pannello comando del condizionatore).
OFF:
il condizionatore è permanentemente spento (non può essere acceso neppure con il pulsante marcia/arresto del condizionatore).
5
I
PROGRAMMATEUR ELECTRONIQUE 24 HEURES OU
Caractéristiques techniques
– Sécurité de sauvegarde de programmes par pile lithium avec autonomie d’environ de 5 ans
– Afficheur 24 heures
– Programmation journalière et hebdomadaire
– 8 programmes ON , 8 programmes OFF
ARRET MANUEL
REGLAGE DE L‘HEURE
POSITION DE FONCTIONNEMENT
FONCTIONNEMENT AVEC LE PROGRAMMATEUR
REGLAGE DES PROGRAMMES
MISE EN MARCHE MANUELLE
GFG
SELECTEUR
JOURS DE LA SEMAINE
INDICATION MARCHE/ARRÊT
INDICATION FONCTION SKIP
MEMORISATION DES PROGRAMMES
8 PROGRAMMES ON, 8 PROGRAMMMES OFF
FONCTION SKIP ACTIVÉE
REGLAGE DES MINUTES
REGLAGE DU JOUR DE LA SEMAINE
1: LUNDI, 7: DIMANCHE
TOUCHE DE REMISE A ZERO
REGLAGE DE L‘HEURE
Fonctions du programmateur:
I:
le climatiseur fonctionne avec permanence (utiliser directement la touche marche/arrêt du climatiseur pour le arrêter)
AUTO: le climatiseur fonctionne selon les programmes choisis avec le programmateur
0:
le climatiseur est avec permanence arrêté (il ne peut être mis en marche pas même avec la touche marche/arrêt du climatiseur
NOTICE D’UTILISATION DU PROGRAMMATEUR
1. Remise à zéro du programmateur:
Assurez-vous que le sélecteur soit sur la position RUN et appuyez-vous la touche R avec la point d’un crayon (l’afficheur clignote).
2. Réglage du jour de la semaine et de l’heure actuelle:
Mettre le sélecteur sur la position
, choisir le jour actuel par la touche 1…7 (visualisé par une flèche ▲ dans l’afficheur), effectuer
la mise à l’heure par les touches h et m. Remettre le sélecteur sur la position RUN.
3. Choix des jours ou des groupes des jours:
Il est possible établir des programmes pour des jours particulières et pour les suivants groupes de jours, en appuyant la touche 1…7:
1-2-3-4-5 (de lundi a mardi)
6-7 (samedi et dimanche)
1-2-3-4-5-6 (de lundi a samedi)
1-2-3-4-5-6-7 (de lundi a dimanche)
4. Etablissement des programmes ON/OFF:
●
Mettre le sélecteur sur la position P (l’indication de l’heure dans l’afficheur clignote, apparaît le symbole de une ampoule et le nombre 1 de le premier réglage de l’heure).
●
Choisir le jour ou le groupe de jours par la touche 1…7 (une flèche ▲ apparaît dans l’afficheur en correspondance au jour ou
beaucoup de flèches en cas du groupe des jours).
●
Régler l’heure de mise en marche par les touches h et m.
●
Appuyer sur la touche P pour établir l’heur d’arrêt (l’indication de l’heure dans l’afficheur clignote de nouveau, le symbole de l’ampoule disparaît et apparaît le nombre 2).
●
Confirmer le jour par la touche 1…7 et régler l’heure d’arrêt par les touches h et m.
●
Répéter ces opérations, en séquence, jusque maximum 8 programmes ON et 8 OFF, distribués pour les jours que on veut programmer.
●
Quand le réglage des programmes est terminé, remettre les sélecteurs sur la position RUN et AUTO.
NOTE: Pendant les jours que n’ ont pas été programmés, le climatiseur est arrêté.
5. Fonction SKIP:
La fonction SKIP (saut de programme) est active seulement pendant le fonctionnement automatique du programmateur (AUTO) + (RUN);
en appuyant la touche ➞
x le programmateur change le mode de fonctionnement de ON en OFF et vice versa; cette fonction reste active jusqu’au programme suivant.
Si cette fonctionne est active le symbole ➞
x apparaît sur l’afficheur.
Pour désactiver la fonction SKIP, appuyer encore la même touche.
6. Visualisation, correction ou élimination des programmes établis:
Pour visualiser les programmes établis, pendant le fonctionnement, mettre le sélecteur sur la position P et appuyer plus fois sur la touche P.
Il est possible, de cette façon, modifier les heures de mise en marche et d’arrêt par les touches h et m et éliminer un ou plus programmes,
en appuyant a le même temps sur les touches P et ➞
x .
6
PROGRAMMATEUR ELECTRONIQUE 24 HEURES
Caractéristiques techniques
– Sécurité de sauvegarde de programmes : 150 heures
– Afficheur 24 heures
– Programmation journalière et hebdomadaire
– 6 programmes ON , 6 programmes OFF
INDICATION FONCTIONNEMENT
AUTO OFF - ON - AUTO ON - OFF
INDICATION PROGRAMME
JOURS DE LA SEMAINE
INDICATION HEURE SOLAIRE/LEGALE
REGLAGE DU JOUR ET DE L’HEURE
ACTUELS
INDICATION FONCTION RANDOM
F
MEMORISATION DES PROGRAMMES
8 PROGRAMMES ON, 8 PROGRAMMMES OFF
REGLAGE DES MINUTES
REGLAGE DE L‘HEURE
REGLAGE DU JOUR DE LA SEMAINE
(OU GROUPE DES JOURS)
TOUCHE RECALL : POUR DEACTIVER ET
ACTIVER LES PROGRAMMES
TOUCHE DE REMISE A ZERO
NOTICE D’UTILISATION DU PROGRAMMATEUR
1. Remise à zéro du programmateur:
Appuyez-vous la touche RST avec la point d’un crayon.
2. Réglage du jour de la semaine et de l’heure actuelle:
Maintenir appuyé la touche TIME pendant le réglage ou la correction de l’heure; appuyer sur la touche DAY jusqu'à régler le jour de la semaine(visualisé
par les abréviations en Anglais dans l’afficheur), effectuer la mise à l’heure par les touches HR et MIN.
3. Choix des jours ou des groupes des jours:
Appuyer sur la touche PRG une fois: “PROG 1 ON” apparaît dans l’afficheur qui indique le premier programme ON.
Appuyer sur la touche DAY et les suivants groupes de jours ou jours particulières apparient en séquence(chaque fois on appuie sur la touche):
MO-TU-WE-TH-FR-SA-SU (groupe des jours de lundi a dimanche)
MO-TU-WE-TH-FR-SA-SU (jours particulières, chaque fois on appuie sur la touche)
MO-TU-WE-TH-FR (groupe des jours de lundi a vendredi)
SA-SU (samedi et dimanche)
MO-TU-WE-TH-FR-SA (groupe des jours de lundi a samedi)
MO-WE-FR (lundi, mercredi et vendredi)
TU-TH-SA (mardi, jeudi et samedi)
4. Etablissement des programmes ON/OFF
Après avoir appuyé sur la touche PRG et sur la touche DAY pour choisir le jour ou le groupe des jours (voir point 3)
●
Régler l’heure de mise en marche par les touches HR et MIN.
●
Appuyer sur la touche PRG de nouveau pour établir l’heur d’arrêt (“PROG 1 OFF” apparaît dans l’afficheur qui indique le premier programme OFF).
●
Confirmer le jour ou groupe des jours par la touche DAY et régler l’heure d’arrêt par les touches HR et MIN.
●
Répéter ces opérations, en séquence, jusque maximum 6 programmes ON et 6 OFF, distribués pour les jours qu’ on veut programmer.
●
Quand le réglage des programmes est terminé, appuyer sur la touche TIME pour visualiser l’heure actuelle, au contraire la programmation n’à pas lieu
(l’affichage retourne toutefois automatiquement à l’heure actuelle après 2 minutes s’on n’appuie pas des touches).
NOTE: Pendant les jours que n’ ont pas été programmés, le climatiseur est arrêté.
5. Visualisation, correction, désactivation et activation des programmes établis
Pour visualiser les programmes établis, pendant le fonctionnement, appuyer plus fois sur la touche PRG.
Il est possible, de cette façon, modifier les heures de mise en marche et d’arrêt par les touches HR et MIN et désactiver ou activer un ou plus programmes,
en appuyant RCL (voir la fonctionne RECALL - point 6).
6. Fonction RECALL
Si ne voulez pas faire exécuter un programme pour n’importe quelle raison, sans cependant perdre la mémoire réglée
●
Appuyer sur la touche PRG jusqu'à visualiser le programme que vous volez désactiver.
●
Appuyer sur la touche RCL avec la point d’un crayon (dans l’affichage l’heure réglée disparaît et apparaît “--:--”).
●
Appuyer sur la touche TIME pour visualiser l’heure actuelle.
●
Pour activer de nouveau le programme, suivre la même procédure.
7. HEURE LEGALE / HEURE SOLAIRE
●
Pour changer de l’heure légale à l’heure solaire, maintenir appuyé la touche TIME et appuyer un de les touches
apparaît).
●
Pour retourner à l’heure légale suivre la même procédure (dans l’affichage le symbole “+1h” disparaît).
(dans l’affichage le symbole “+1h”
8. Fonction RANDOM
Les programmes réglés seront exécutés avec un retard de 2 à 32 minutes, en cas de interruption de courant, en utilisant cette fonction
●
Maintenir appuyé la touche TIME et appuyer la touche PRG (dans l’affichage le symbole RND apparaît à indiquer que la fonction RANDOM est active).
●
Pour désactiver la fonction suivre la même procédure (dans l’affichage le symbole RND disparaît).
9. Fonctionnement manuel:
En appuyant une de les touches
on peut régler manuellement le programmateur; dans l’afficheur apparent en séquence: AUTO OFF-ON-AUTO ON-OFF
AUTO: le climatiseur fonctionne selon les programmes choisis avec le programmateur (on peut changer de AUTO ON à AUTO OFF ou vice versa, si vous
voulez allumer ou éteindre le climatiseur sans perdre le contrôle du programmateur qui puis suivra à exécuter les programmes mémorisées)
ON:
le climatiseur fonctionne avec permanence (utiliser directement la touche marche/arrêt du climatiseur pour le arrêter
OFF:
le climatiseur est avec permanence arrêté (il ne peut être mis en marche pas même avec la touche marche/arrêt du climatiseur)
7
ELEKTRONISCHE ZEITSCHALT-UHR 24-STUNDEN-PROGRAMM ODER
Technische Eigenschaften
– Aufzugreserve, ohne elektrische Stromversorgung, mit 5 Jahren (oder mehr) Betriebsdauer Lithiumbatterie
– Display 24 Stunden
– Tägliches und wöchentliches Programm
– 8 Programme ON, 8 Programme OFF
EINSTELLUNG DER UHR
MANUELLE AUSSCHALTUNG
BETRIEB POSITION
BETRIEB MIT ZEITSCHLTUHR
EINSTELLUNG DER PROGRAMMEN
MANUELLE EINSCHALTUNG
WÄHLSCHALTER
GDG
TAGEN DER WOCHE
ON/OFF ANZEIGE
FUNKTION SKIP ANZEIGE
PROGRAMMSPEICHERUNG
8 ON PROGRAMME, 8 OFF PROGRAMME
EINSCHALTUNG DER FUNKTION SKIP
EINSTELLUNG DER MINUTEN
EINSTELLUNG VOM TAG DER WOCHE
1: MONTAG, 7: SONNABEND
RESET TASTE
EINSTELLUNG DER UHR
Betriebsarten der Zeitschaltuhr:
I:
das Klimagerät ist ständig ein (ON) (benutzen Sie die Ein/Aus Taste des Klimagerätes, um es auszuschalten)
AUTO: das Klimagerät arbeitet mit der Zeitschaltuhr
0:
das Klimagerät ist ständig aus (OFF) (es kann nicht mit der Ein/Aus Taste des Klimagerätes einschalten werden)
BEDIENUNGSANLEITUNG VOM ZEITSCHALTUHR
1. Reset der Zeitschaltuhr:
Vergewissern Sie sich, daß der Wählschalter auf der Position RUN ist und drücken Sie die Reset Taste R mit der Spitze einer Feder
(die Displayanzeige beginnt zu blinken).
2. Tag und Uhreinstellung:
Schieben Sie den Wählschalter auf die Position
, drücken Sie die Taste 1…7, um den Tag der aktuellen Woche einzustellen (ein
Pfeil ▲ erscheint auf dem Display), drücken Sie die Taste h, um die aktuelle Uhr einzustellen, drücken Sie die Taste m, um die Minuten
einzustellen. Schieben Sie den Wählschalter auf die Position RUN wieder.
3. Wahl der einstellenden Tagen oder Gruppen von Tagen:
Es ist möglich die einzigen Tagen und die folgenden Gruppen von Tagen einzustellen, indem Sie die Taste 1…7 drücken:
1-2-3-4-5 (von Montag bis Freitag)
6-7 (Sonnabend und Sonntag)
1-2-3-4-5-6 (von Montag bis Sonnabend)
1-2-3-4-5-6-7 (von Montag bis Sonntag)
4. Ein-Ausschalten Programme Einstellung
●
Schieben Sie den Schalter auf die Position P (die Uhranzeige auf dem Display beginnt zu blinken, das Zeichnen einer Glühbirne
und der Nummer 1 der ersten Uhreinstellung erscheinen).
●
Drücken Sie solange die taste 1…7, bis den Tag der Woche oder die Gruppe von Tagen eingestellt werden (ein Pfeil ▲ unter dem
entsprechenden Tag erscheint, oder viele Pfeile erscheinen, wenn Sie die Gruppe von Tagen gewählt haben).
●
Drücken Sie die Taste h und nachdem die Taste m, um den Einschaltuhrzeit einzustellen.
●
Drücken Sie die Taste P, um den Ausschaltuhrzeit einzustellen (die Uhranzeige auf dem Display beginnt wieder zu blinken, das
Zeichnen der Glühbirne verschwindet und der Nummer 2 erscheint).
●
Quittieren Sie den Tag mit der Taste 1…7 und stellen Sie den Ausschaltuhrzeit mit den Tasten h und m ein.
●
Wiederholen Sie diese Operationen, bis Maximum 8 ON Programme und 8 OFF Programme eingestellt werden, indem Sie unter
den eingestellenden Tagen verteilen.
●
Am Ende der Programme Einstellung, schieben Sie die Schaltern auf die Position RUN und AUTO.
ANMERKUNG: Während den nicht eingestellten Tagen bleibt das Klimagerät aus.
5. SKIP Betrieb:
Das Betrieb SKIP (Programm Sprung) kann nur während des automatischen Betriebs (AUTO) der Zeitschaltuhr eingestellt werden;
indem Sie die SKIP Taste ➞
x drücken, wechselt das Betriebsart des Klimagerätes von ON zu OFF und umgekehrt; das SKIP Betrieb
ist aktiv bis dem folgenden eingestellten Programm.
Wenn das SKIP Betrieb aktiv ist, erscheint das Zeichnen ➞
x auf dem Display.
Um das Betrieb SKIP auszuschalten, drücken Sie dieselbe Taste wieder.
6. Überprüfung, Korrektion oder Löschung der eingestellten Programmen
Um die eingestellte Programme während des Betriebs zu überprüfen, schieben Sie den Schalter auf P und drücken Sie vielen Malen
den Schalter P.
Es ist möglich, auf dieser Weise, die Ein-ausschaltuhrzeiten mit den Tasten h und m zu wechseln und ein oder mehr Programme zu
löschen, indem Sie gleichzeitig die Tasten P und ➞
x drücken.
8
ELEKTRONISCHE ZEITSCHALTUHR 24-STUNDEN-PROGRAMM
Technische Eigenschaften
– Aufzugreserve, ohne elektrische Stromversorgung: 150 Stunden
– Display 24 Stunden
– Tägliches und wöchentliches Programm
– 6 Programme ON, 6 Programme OFF
BETRIEBSART ANZEIGE
AUTO OFF - ON - AUTO ON - OFF
PROGRAMMANZEIGE
TAGEN DER WOCHE
SOMMER/WINTERZEIT ANZEIGE
TAG UND UHREINSTELLUNG
RANDOMANZEIGE
PROGRAMMSPEICHERUNG
6 ON PROGRAMME, 6 OFF PROGRAMME
EINSTELLUNG VOM TAG DER WOCHE
(ODER GRUPPE VON TAGEN)
RESET TASTE
EINSTELLUNG DER MINUTEN
EINSTELLUNG DER STUNDEN
RECALL TASTE : UM DIE PROGRAMMEN AUS/EINSCHALTEN
BEDIENUNGSANLEITUNG VOM ZEITSCHALTUHR
1. Reset der Zeitschaltuhr:
Drücken Sie die Reset Taste RST mit der Spitze einer Feder.
2. Tag und Uhreinstellung:
Halten Sie die Taste TIME gedrückt,während Sie die Uhr einstellen oder korrigieren; drücken Sie die Taste DAY, um den aktuellen Tag der Woche einzustellen (die Abkürzungen auf Englisch erscheinen auf dem Display), drücken Sie die Taste HR, um die aktuelle Stunde einzustellen, drücken Sie die Taste
MIN, um die Minuten einzustellen.
3. Wahl der einstellenden Tagen oder Gruppen von Tagen:
Drücken Sie die Taste PRG einmal: “PROG 1 ON” erscheint auf dem Display, daß die erste Einschaltuhrzeit eindeutet.
Drücken Sie die Taste DAY und die folgenden Gruppen von Tagen oder einzigen Tagen in Aufeinanderfolge erscheinen (jedes Mal die Taste gedrückt wird).
MO-TU-WE-TH-FR-SA-SU (von Montag bis Sonntag)
MO-TU-WE-TH-FR-SA-SU (die einzigen Tagen der Woche, jedes Mal die Taste gedrückt wird)
MO-TU-WE-TH-FR (von Montag bis Freitag)
SA-SU (Sonnabend und Sonntag)
MO-TU-WE-TH-FR-SA (von Montag bis Sonnabend)
MO-WE-FR (Montag, Mittwoch und Freitag)
TU-TH-SA (Dienstag, Donnerstag und Sonnabend)
4. Ein-Ausschalten Programme Einstellung
Nachdem die Taste PRG und die Taste DAY gedrückt zu haben, um die Gruppen von Tagen oder einzigen Tagen zu wählen
●
Drücken Sie die Taste HR und nachdem die Taste MIN, um die Einschaltuhrzeit einzustellen.
●
Drücken Sie nochmals die Taste PRG, um die Ausschaltuhrzeit einzustellen (“PROG 1 OFF” erscheint auf dem Display, daß die Ausschaltuhrzeit eindeutet).
●
Quittieren Sie den Tag oder Gruppe von Tagen mit der Taste DAY und stellen Sie die Ausschaltuhrzeit mit den Tasten HR und MIN ein.
●
Wiederholen Sie diese Operationen, bis Maximum 6 ON Programme und 6 OFF Programme eingestellt werden, indem Sie unter den eingestellenden
Tagen verteilen.
●
Am Ende der Programme Einstellung, drücken Sie die Taste TIME, um die aktuelle Zeit erscheinen zu machen; anders funktioniert die Programmen
nicht (auf jeden Fall erscheint die aktuelle Zeit nach 2 Minuten automatisch auf dem Display, wenn keine Taste gedruckt wird)
ANMERKUNG: Während den nicht eingestellten Tagen bleibt das Klimagerät aus.
5. Überprüfung, Korrektion, Ausschalten und Einschalten der eingestellten Programmen
Um die eingestellte Programme während des Betriebs zu überprüfen, drücken Sie vielen Malen die taste PRG.
Es ist möglich, auf dieser Weise, die Ein-Ausschaltuhrzeiten mit den Tasten HR und MIN zu wechseln und ein oder mehr Programme aus-einzuschalten,
indem Sie die Taste RCL drücken (Sieh RECALL Funktion am Punkt 6).
6. RECALL Funktion:
Wenn Sie einen Programm nicht ausführen machen wollen, ohne die Programmspeicherung einzubüßen
●
Drücken Sie die Taste PRG, bis zu dem ausschaltenden Programm.
●
Drücken Sie die Taste RCL mit der Spitze einer Feder (auf dem Display verschwindet die eingestellte Uhrzeit und “--:--” erscheint).
●
Drücken Sie die Taste TIME, um die aktuelle Zeit erscheinen zu machen.
●
Um das Programm wieder einzuschalten, wiederholen Sie dasselbe Verfahren.
7. WINTER/SOMMERZEIT
●
Um von Winterzeit zu Sommerzeit zu ändern, halten Sie die Taste TIME gedrückt und drücken Sie eine der Tasten
(das Zeichen “+1h” erscheint
auf dem Display und die Uhrzeit ändert).
●
Um zur Winterzeit zurückzukehren, wiederholen Sie dasselbe Verfahren (auf dem Display verschwindet das Zeichen “+1h” und die Uhrzeit ändert).
8. RANDOM Funktion:
Die eingestellte Programme werden mit einer Verzögerung von 2 zu 32 Minuten ausführen, wenn die Stromversorgung unterbrecht, indem Sie diese Funktion
benutzen
●
Halten Sie die Taste TIME gedrückt und drucken Sie die Taste PRG (das Zeichen RND erscheint auf dem Display).
●
Um diese Funktion auszuschalten, wiederholen Sie dasselbe Verfahren (auf dem Display verschwindet das Zeichen RND).
9. Manueller Betrieb:
Indem Sie eine der Tasten
drücken, können Sie die Zeitschaltuhr manuell einstellen; der Display wird in Aufeinanderfolge zeigen: AUTO OFF-ON-AUTO
ON-OFF
AUTO: das Klimagerät arbeitet mit der Zeitschaltuhr (es ist möglich von AUTO ON zu AUTO OFF ändern, wenn Sie das Klimagerät ein oder ausschalten
wollen, ohne die Programmspeicherung der Zeitschaltuhr einzubüßen; dann wird sie tatsächlich die eingestellte programme ausführen)
ON:
das Klimagerät ist ständig ein (ON) (benutzen Sie die Ein/Aus Taste des Klimagerätes, um es auszuschalten)
OFF:
das Klimagerät ist ständig aus (OFF) (es kann nicht mit der Ein/Aus Taste des Klimagerätes einschalten werden)
9
D
PROGRAMADOR ELECTRONICO 24 HORAS O
Características técnicas
– Reserva de carga sin alimentación eléctrica con pilas de litio durante cinco años o más
– Pantalla 24 horas
– Programa diario y semanal
– 8 programas ON, 8 programas OFF
REGULACION DEL RELOJ
PARADA MANUAL
POSICION DE FUNCIONAMIENTO
FUNCIONAMIENTO CON EL PROGRAMADOR
REGULACION DE LOS PROGRAMAS
ARRANQUE MANUAL
SELECTOR
DIAS DE LA SEMANA
INDICACION ENCENDIDO/APAGADO
GEG
INDICACION DE LA FUNCION SKIP
MEMORIZACION DE LOS PROGRAMAS
8 PROGRAMAS ON, 8 PROGRAMAS OFF
ACTIVACION DE LA FUNCION SKIP
REGULACION DE LOS MINUTOS
REGULACION DEL DIA DE LA SEMANA
1: LUNES, 7: DOMINGO
BOTON DE RESET
REGULACION DE LAS HORAS
Modos de funcionamiento del programador:
I:
el acondicionador está siempre encendido (usar directamente el pulsador arranque/parada del acondicionador para apagarlo)
AUTO: el acondicionador funciona con el programador
0:
el acondicionador está siempre apagado (no puede encenderse tampoco con el pulsador arranque/parada del acondicionador)
INSTRUCCIONES DE USO DEL PROGRAMADOR
1. Reset del programador:
Asegurarse de que el selector sea en la posición RUN y pulsar el botón R de reset con la punta de un lápiz (la indicación en la pantalla empieza a parpadear).
2. Regulación del día de la semana y de la hora curriente:
Desplazar el selector en al posición
, pulsar el botón 1…7 hasta regular el día de la semana corriente (visualizado par una flecha
▲ en la pantalla), pulsar el botón h para regular la hora corriente, pulsar el botón m para regular los minutos. Desplazar de nuevo el
selector en la posición RUN.
3. Elección de los días o de los bloqueos de días para programar:
Pueden programarse los días singularmente y los siguientes bloqueos de días, pulsando el botón 1…7:
1-2-3-4-5 (desde lunes hasta viernes)
6-7 (sábado y domingo)
1-2-3-4-5-6 (desde lunes hasta sábado)
1-2-3-4-5-6-7 (desde lunes hasta domingo)
4. Regulación de los programas de arranque y parada:
●
Desplazar el selector en la posición P (la indicación de la hora en la pantalla empieza a parpadear, aparece el símbolo de la bombilla y el numero 1 de la primera regulación de la hora).
●
Pulsar el botón 1…7 hasta regular el día de la semana o el bloqueo de los días que quieren programarse (en la pantalla aparece
una flecha ▲ correspondiente al día o muchas flechas si se elige el bloqueo de los días).
●
Pulsar el botón h y después el botón m para regular la hora de arranque.
●
Pulsar el botón P para regular la hora de parada (la indicación de la hora en la pantalla empieza de nuevo a parpadear, el símbolo de la bombilla desaparece y aparece el numero 2).
●
Confirmar el día con el botón 1…7 y regular la hora de parada con los botones h y m.
●
Repetir estas operaciones en secuencia hasta máximo 8 programas de arranque y 8 programas de parada, divididos entre los días
che se quieren programar.
●
Al final de la regulación de los programas, desplazar los selectores en la posición RUN y AUTO.
NOTA: Durante los días que no han sido programados, el acondicionador se quedará apagado.
5. Función SKIP:
La función SKIP (salto de programa) puede activarse solo durante el funcionamiento automático del programador (AUTO) + (RUN) y
permite de cambiar el modo de funcionamiento de ON hasta OFF y viceversa, pulsando el botón ➞
x ; esta función se queda activada
hasta el inicio del próximo programa memorizado.
Si la función SKIP está activada aparece en la pantalla el símbolo ➞
x .
Para anular la función SKIP, pulsar de nuevo el mismo botón.
6. Lectura, corrección o anulación de los programas memorizados:
Para leer los programas memorizados, durante el funcionamiento, desplazar el selector en P y pulsar varias veces el botón P.
Es posible, de esta manera, corregir las horas de arranque y parada con los botones h y m y anular un programa o más, pulsando
en el mismo tiempo los botones P y ➞
x .
10
PROGRAMADOR ELECTRONICO 24 HORAS
Características técnicas
– Reserva de carga sin alimentación eléctrica : 150 horas
– Pantalla 24 horas
– Programa diario y semanal
– 6 programas ON, 6 programas OFF
INDICACION MODO DE FUNCIONAMIENTO
AUTO OFF - ON - AUTO ON - OFF
INDICACION PROGRAMA
DIAS DE LA SEMANA
INDICACION ORARIO DE VERANO/DE INVIERNO
REGULACION DIA Y HORA CURRIENTES
INDICACION DE LA FUNCION RANDOM
MEMORIZACION DE LOS PROGRAMAS
6 PROGRAMAS ON, 6 PROGRAMAS OFF
REGULACION DE LOS MINUTOS
REGULACION DE LAS HORAS
REGULACION DEL DIA DE LA SEMANA
(O BLOQUEO DE DIAS)
BOTON RECALL : PARA APAGAR Y
ENCENDER LOS PROGRAMAS
BOTON DE RESET
E
INSTRUCCIONES DE USO DEL PROGRAMADOR
1. Reset del programador:
Pulsar el botón RST de reset con la punta de un lápiz.
2. Regulación del día de la semana y de la hora corriente:
Tener pulsado el botón TIME mientras se regula o se corrige el reloj; pulsar el botón DAY hasta regular el día de la semana corriente (visualizado par las
abreviaturas en inglés), pulsar el botón HR para regular la hora corriente, pulsar el botón MIN para regular los minutos.
3. Elección de los días o de los bloqueos de días para programar:
Pulsar el botón PRG una vez: en la pantalla aparece “PROG 1 ON” que indica la hora de arranque para programar.
Pulsar el botón DAY y aparecen en secuencia los siguientes bloqueos de días o los días singularmente:
MO-TU-WE-TH-FR-SA-SU (desde lunes hasta domingo)
MO-TU-WE-TH-FR-SA-SU (días singolos, cada vez se pulsa el botón)
MO-TU-WE-TH-FR (desde lunes hasta viernes)
SA-SU (sábado y domingo)
MO-TU-WE-TH-FR-SA (desde lunes hasta sábado)
MO-WE-FR (lunes, miércoles e viernes)
TU-TH-SA (martes, jueves y sábado)
4. Regulación de los programas de arranque y parada:
Después haber pulsado el botón PRG y el el botón DAY para elegir el día o el bloqueo de días para programar (véase punto 3)
●
Pulsar el botón HR y después el botón MIN para regular la hora de arranque.
●
Pulsar de nuevo el botón PRG para regular la hora de parada (en la pantalla aparece “PROG 1 OFF” que indica la hora de parada para programar).
●
Confirmar el día con el botón DAY y regular la hora de parada con los botones HR y MIN.
●
Repetir estas operaciones en secuencia hasta máximo 6 programas de arranque y 6 programas de parada, divididos entre los días que se quieren programar.
●
Al final de la regulación de los programas, pulsar el botón TIME para volver a la hora corriente, de otra manera la programación no funciona (de todo
modo la pantalla vuelve automáticamente a la hora corriente después de 2 minutos, si ningún botón es presionado).
NOTA: Durante los días que no han sido programados, el acondicionador se quedará apagado.
5. Lectura, corrección, activación y desactivación de los programas memorizados:
Para leer los programas memorizados, durante el funcionamiento, pulsar varias veces el botón PRG.
Es posible, de esta manera, corregir las horas de arranque y parada con los botones HR y MIN y desactivar o activar un programa o más, pulsando RCL
(véase la función RECALL al punto 6).
6. Función RECALL:
Si, por cualquiera razón, no se quiere hacer ejecutar un programa, sin pero perder la memoria programada
●
Pulsar el botón PRG hasta visualizar el programa para desactivar.
●
Pulsar el botón RCL con la punta de un lápiz (en la pantalla desaparece la hora programada y aparece “--:--”).
●
Pulsar el botón TIME para volver a la hora corriente.
●
Para activar de nuevo el programa, repetir el mismo procedimiento.
7. ORARIO DE INVIERNO/DE VERANO:
●
Para cambiar desde el orario de invierno hasta el orario de verano, tener pulsado el botón TIME y pulsar uno de los botones
rece “+1h” y la hora cambia).
●
Para volver al orario de verano repetir el mismo procedimiento (en la pantalla desaparece “+1h” y la hora cambia).
(en la pantalla apa-
8. Función RANDOM:
Los programas memorizados empezarán con un retraso de 2 hasta 32 minutos, en caso de interrupción de corriente, utilizando esta función
●
Tener pulsado el botón TIME y pulsar el botón PRG (en la pantalla aparece RND que indica la función RANDOM activa).
●
Para desactivar la función, repetir el mismo procedimiento (en la pantalla desaparece RND).
9. Funcionamiento manual:
Pulsando uno de los botones
se puede regular manualmente el programador; aparecerán en secuencia: AUTO OFF-ON-AUTO ON-OFF
AUTO: el acondicionador funciona con el programador (es posible pasar desde AUTO ON hasta AUTO OFF si queréis encender o apagar el acondicionador sin perder el control del programador; después el programador seguirá en efecto à ejecutar los programas memorizados
ON:
el acondicionador está siempre encendido (usar directamente el pulsador arranque/parada del acondicionador para apagarlo)
OFF:
el acondicionador está siempre apagado (no puede encenderse tampoco con el pulsador arranque/parada del acondicionador)
11
Scarica