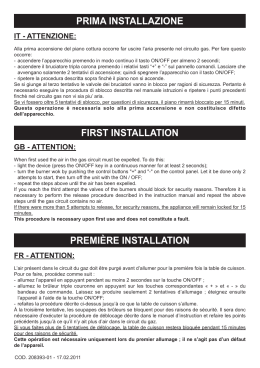
XB-TYPE, G&H-KNOB
PANEL MOUNTING 48mm
1
Knob, cup and axle orientation
3
4
5
6
7
8
9
10
Panel cutout
48
0
4,5
)
(4x
48
!
2
k!"
"Clic
Max. 1,5Nm
9
1. Position the first rubber seal
2. Assemble the lower adapter plate and switch with the seal
3. Socket head M4 bolts: 21mm
4. Drill holes in the enclose panel according to specifications
5. Position the second rubber seal
6. Assemble the adapter plates with the seal and wall/lid
7. Socket head M4 bolts: 9mm + panel thickness
8. Click the padlock cup onto the upper adapter plate
9. Place the knob into the padlock cup in the OFF position
10. Screw the knob
: With the indication window in the knob indicating 0 on a complete grey
background (OFF),the pin in the switch axle should point in the same direction!
EN
DE
1. Bringen Sie die Gummidichtung an
2. Montieren Sie die untere Adapterplatte und den Schalter mit der Dichtung
3. M4-Senkkopfschrauben: 21 mm
4. Bohren Sie den Spezifikationen gemäß Löcher in die Gehäuseplatte
5. Bringen Sie die Gummidichtung an
6. Montieren Sie die Adapterplatten mit der Dichtung an der Wand/Platte
7. M4-Senkkopfschrauben: 9 mm + Plattendicke
8. Klicken Sie die Vorhängeschloss-Mulde des Schalters auf die obere Adapterplatte
9. Bringen Sie den Schaltknopf in der Vorhängeschloss-Mulde in der OFF-Stellung an
10. Schrauben Sie den Knopf fest
: Wenn das Anzeigefenster im Knopf 0 auf einem vollständig grauen Hintergrund
anzeigt (OFF), muss der Stift in der Achse des Schalters in die gleiche Richtung weisen!
1. Placez le joint en caoutchouc
FR
2. Assemblez la plaque inférieure de l’adaptateur et l’interrupteur avec le joint
3. Boulons à tête creuse M4 : 21 mm
4. Percez des trous dans le couvercle selon les indications
5. Placez le joint en caoutchouc
6. Assemblez les plaques de l’adaptateur avec le joint et le mur/couvercle
7. Boulons à tête creuse M4 : 9 mm + épaisseur du couvercle
8. Insérez jusqu’au clic la coque du cadenas dans la plaque supérieure de l’adaptateur
9. Placez le bouton dans la coque du cadenas en position OFF
10. Vissez le bouton
: Lorsqu’un 0 sur fond complètement gris apparaît dans la fenêtre du bouton (OFF),
la tige de l’axe de l’interrupteur doit pointer dans la même direction!
1. Posizionare la prima guarnizione di gomma
IT
2. Unire l’adattatore inferiore e l’interruttore alla guarnizione
3. Viti brugola M4: 21mm
4. Praticare i fori prescritti sull’involucro
5. Posizionare la seconda guarnizione di gomma
6. Unire gli adattatori alla guarnizione e all’involucro/coperchio
7. Viti brugola M4: 9mm + spessore lamiera
8. Inserire a pressione lo scodellino lucchetto sull’adattatore superiore fino allo scatto
9. Inserire il pomello nello scodellino lucchetto assicurandosi che sia in posizione OFF
10. Avvitare il pomello
: Con finestra di spia sul pomello in posizione 0 su fondo totalmente grigio (OFF), il
pin asse interruttore deve essere rivolto nello stesso senso!
ES
1. Coloque la junta de goma
2. Monte la placa adaptadora y el interruptor con la junta
3. Tornillos con cabezal hembra M4: 21 mm
4. Practique orificios en el panel de la carcasa según las especificaciones
5. Coloque la junta de goma
6. Monte las placas adaptadoras con la junta y la tapa/pared
7. Tornillos con cabezal hembra M4: 9 mm + grosor del panel
8. Inserte la tapa del candado en la placa adaptadora superior hasta escuchar un chasquido
9. Coloque el botón en la tapa del candado en posición de apagado
10. Atornille el botón
: Si la ventana que muestra las indicaciones del botón indica 0 en un fondo
completamente gris (apagado), la patilla del eje del interruptor debe apuntar a la misma
dirección!
1. Plaats de rubberen afdichting
2. Monteer de onderste adapterplaat met de afdichting aan de schakelaar
3. M4 verzonkenkopbouten: 21mm
4. Boor gaten in het behuizingspaneel volgens specificaties
5. Plaats de rubberen afdichting
6. Monteer de adapterplaten met de afdichting aan het paneel
7. M4 verzonken kop bouten: 9mm + paneeldikte
8. Klik de hangslot-cup op de bovenste adapterplaat
9. Plaats de knop in de hangslot-cup in de OFF-positie
10. Schroef de knop vast
: Als het indicatieraampje in de knop 0 en een volledig grijs vlak aangeeft
(OFF) moet de pin in de as van de schakelaar in dezelfde richting wijzen!
Proprietary data of Santon. Disclosure to third parties of this document or any part thereof, or the content of this document and/or information there in, is not permitted, without prior written permission by Santon.
Santon reserves the right to make any modification to this manual or the information contained herein at any time without notice.
NL
article: 90A1384 | 03-2013
Scaricare