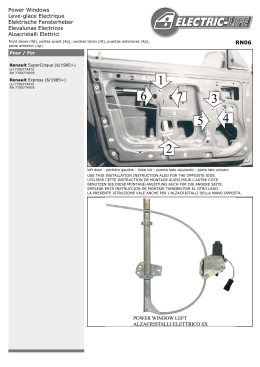
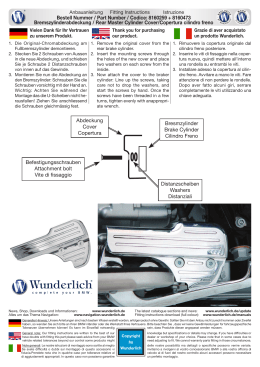
Anbauanleitung
Fitting Instructions
Istruzione
Bestell Nummer / Part Number / Codice: 1250168
R 1100/1150 RT Tankrucksack / Tank Bag / Borsa da Serbatoio
Vielen Dank für Ihr Vertrauen zu unserem
Produkt.
1. Entfernen Sie die Sitzbank vom Fahrzeug. Drehen Sie die
vorderen Befestigungsschrauben der Batterieabdeckung
heraus. Befestigen Sie den vorderen Halter mit M5x10
Schrauben und U-Scheiben am Tank (Abb. A).
2. Befestigen Sie den hinteren Halter an der Tankabdeckung
mit den Klettstreifen (vorher die Klebestelle mit geeigneten
Mittel entfetten) (Bild B). Optional: Kleben Sie auch den
2. (vorderen) Klettstreifen des Halters auf den Tank. Dies
schützt beim Fahren ohne Tankrucksack vor Flattern des
Halters.
3. Jetzt können Sie den Tankrucksack vorn befestigen (Bild
C) und dann hinten mit den Klettverschlüssen festziehen
(Bild D).
4. Zur Volumenvergrößerung öffnen Sie einfach den umlaufenden
Reißverschluss. Durch einhängen des Gummizuges in
die vorgesehenen Ösen und Längeneinstellung des
Gummibandes mit Hilfe der angebrachten Klammer können
Sie den Tankrucksack dann auf das gewünschte Packmaß
einstellen (Bild E). Kartenfach: hierzu wird ebenfalls
der Riemen am Schnapper des Kartenfachs entsprechend
eingestellt (Bild F).
5. Um das versehentliche Hupen bei aufgebaute Tankrucksack
zu verhindern, befestigen Sie den Hupenschutzbügel mit
der Schraube M8x25 und von unten mit Hülse, U- Scheibe
und selbstsichernder Mutter. Decken Die Mutter mit der
Schutzkappe abdecken und ein Stück Moosgummi zwischen
Bügel und Amatur kleben. (Bild G)
6. Zur Verwendung des Kartenfachs ohne den Tankrucksack
entfernen Sie das Steckschloss am entsprechenden Ende
des Tankrucksackes und bringen es am freien Riemen der
hinteren Befestigung an (Bild H). Das Kartenfach wird
dann auf den Klettstreifen der vorderen Befestigung gedrückt und mit Hilfe des Schnappers am Steckschloss des
hinteren Befestigungspads gesichert. Nun müssen Sie nur
noch die Länge des Riemens einstellen und das Kartenfach
festziehen.
7. Um den Tankrucksack als Rucksack zu benutzen, haken Sie
einfach die mitgelieferten Gurte vorne seitlich und hinten
mittig in die angebrachten Ösen ein.
A
B
C
D
1
E
F
2
G
H
Wunderlich GmbH - Kranzweiherweg 12 - 53489 Sinzig-Gewerbepark - Germany
Tel. +49-(0)2642-9798 80 - Fax +49-(0)2642-9798 33 [email protected] web: www.wunderlich.de
Geschäftsführer/Managing Director: Erich Wunderlich - Amtsgericht Andernach - HRB 12314 - USTID-Nr./VAT-No. 01 DE 149 271 221
News, Shop, Downloads und Informationen: w w w . w u n d e r l i c h . d e
Alles um das Thema Navigation: w w w . n a v i g a t i o n . w u n d e r l i c h . d e
The latest catalogue sections and news www.wunderlich.de/update
Fitting instructions download
w w w. w u n d e r l i c h . d e / m a n u a l s
Genereller Hinweis: Unsere Anleitungen sind nach bestem Wissen erstellt
oder Zweifel haben, so wenden Sie sich bitte an Ihren BMW-Händler oder die
für fahrzeugspezifische Toleranzen übernehmen können! Es kann im Einzelfall
General note: Our fitting instructions are written to the best of our
have doubts with fitting this part please seek advice from your BMW dealer
tolerances beyond our control some products might need adjusting to
Note generali: Le nostre istruzioni di montaggio sono scritte al meglio delle
Copyright
by
Wunderlich
worden, erfolgen jedoch ohne Gewähr. Sollten Sie mit dem Anbau nicht zurecht kommen
Werkstatt Ihres Vertrauens. Bitte beachten Sie , dass wir keine Gewährleistungen
notwendig sein, dass Produkte diesen angepasst werden müssen.
knowledge but specifications or details may change. If you have difficulties or
or workshop of your choice. Please note that in some cases due to vehicle related
fit. We cannot warranty parts fitting in those circumstances.
nostre possibilità ma dettagli o specifiche possono venire variate. Se avete difficoltà o
dubbi sul montaggio di questo accessorio vi invitiamo a rivolgervi al vostro concessionario BMW o alla vostra officina di fiducia.Prendete nota che in qualche caso per tolleranze relative al
veicolo al di fuori del nostro controllo alcuni accessori possono necessitare di aggiustamenti appropriati. In questo caso non possiamo garantire un perfetto montaggio.
Anbauanleitung
Fitting Instructions
Istruzione
Bestell Nummer / Part Number / Codice: 1250168
R 1100/1150 RT Tankrucksack / Tank Bag / Borsa da Serbatoio
Thank you for purchasing our product.
Remove the seat from the bike. Remove both front
screws of the battery cover. Attach the front mounting piece
with the supplied M5x10 bolts and washers (Image A).
2. Attach the rear mounting piece to the tank by sticking the
supplied "Velcro"-type pad to it (degrease the area beforehand)
(Image B). Note: If wanted, the additional self adhesive "Velcro"-type pads on the underside of the rear mounting pieces can
be attached to the tank as well. This will keep the mounting
pieces secure when riding without a tank bag.
3. The tank bag can be fitted now. Connect the plastic snaps at
the front of the tank bag with the corresponding snaps of the
front mounting piece (Image C). Slip the straps of the rear
mounting piece through the eyelets at the rear of the tank
bag. Pull the straps tight and secure (Image D).
4. To increase the volume of the tank bag, un-zip the zipper
around the circumference of the tank bag. By hooking the
elastic band into the hooks of the tank bag, you can adjust the
tension and keep the contents of the tank bag snug and secure
(Image E). The double sided map holder can be tightened as
well to compress the bag (Image F)
5. To avoid accidentally activating the horn when the handlebar
is turned to the left, install the horn guard bracket using the
supplied 8X25mm bolt, spacer and nut. Prior to installing, place
a piece of foam tape on the top side of the bracket. Place the
plastic cap on the nut (Img G).
6. The map pocket can be attached to the tank by itself. To do
so, remove the plastic snap from the tank bag and attach it
to the centre strap of the rear mounting piece (Image H). The
map pocket is held in place by attachment to the Velcro of the
front mounting piece and the plastic snap at the rear mounting
piece. Adjust the length of the rear strap to achieve a snug
fit.
7. The tank bag can also be worn as a back pack. To do so, attach
the supplied shoulder straps to the three "D"-shaped plastic
rings of the tank bag.
Grazie di aver acquistato un prodotto Wunderlich
Rimuovere la sella. Rimuovere le due viti della carena
serbatoio e installare il supporto anteriore utilizzando le viti
M5x10mm e rondelle come illustrato a figura A.
2. Installare il supporto posteriore applicando il nastro velcro al
supporto sella come illustrato a .figura B. Note:Vi consigliamo
togliere il nastro di protezione dal velcro ed incollarlo al serbatoio per assicurare il supporto una volta che la borsa non
venga utilizzata.
3. Collegare gli agganci rapidi della borsa al supporto anteriore
come illustrato a figura C e posteriormente tensionare le cinghie
a velcro, come illustrato a figura D. Registrare eventualmente
la posizione della borsa.
4. Per incrementare il volume della borsa, aprire lo zip che si trova
attorno alla circonferenza della borsa stessa. Agganciando
la fascia elastica negli appositi ganci della borsa, potrete
aggiustare la tensione e mantenere il contenuto della borsa
in modo comodo e sicuro(figura E). La tasca porta cartina
è tenuta semplicemente in posizione dal Velcro nella parte
frontale della base e dalla .fibbia di plastica sul dietro della
base. Regolare la lunghezza dello strap posteriore per ottenere
il giusto posizionamento (Fig. F).
5. Per evitare un ‘attivazione involontaria del clacson quando
la borsa è completamente estesa, montare la protezione
che vi è stata fornita utilizzando la vite 8X25mm, compresi
distanziale,rondella a U e dado. Prima del montaggio, applicare
la spuma in gomma alla parte superiore della protezione. In
fine inserire il tappo al dado centrale (figura G).
6. La tasca porta cartina può essere usata anche senza borsa e
solamente con la base. Per farlo, rimuovere una delle fibbie
dalla borsa ed allacciarla allo strap centrale della parte posteriore della base di montaggio. (Fig. H).
7. La borsa può anche essere usata come zainetto. Per farlo, attaccare le tre bretelle fornite nella confezione ai tre anelli a
„D“ della borsa.
1.
1.
Wunderlich GmbH - Kranzweiherweg 12 - 53489 Sinzig-Gewerbepark - Germany
Tel. +49-(0)2642-9798 80 - Fax +49-(0)2642-9798 33 [email protected] web: www.wunderlich.de
Geschäftsführer/Managing Director: Erich Wunderlich - Amtsgericht Andernach - HRB 12314 - USTID-Nr./VAT-No. 01 DE 149 271 221
News, Shop, Downloads und Informationen: w w w . w u n d e r l i c h . d e
Alles um das Thema Navigation: w w w . n a v i g a t i o n . w u n d e r l i c h . d e
The latest catalogue sections and news www.wunderlich.de/update
Fitting instructions download
w w w. w u n d e r l i c h . d e / m a n u a l s
Genereller Hinweis: Unsere Anleitungen sind nach bestem Wissen erstellt
oder Zweifel haben, so wenden Sie sich bitte an Ihren BMW-Händler oder die
für fahrzeugspezifische Toleranzen übernehmen können! Es kann im Einzelfall
General note: Our fitting instructions are written to the best of our
have doubts with fitting this part please seek advice from your BMW dealer
tolerances beyond our control some products might need adjusting to
Note generali: Le nostre istruzioni di montaggio sono scritte al meglio delle
Copyright
by
Wunderlich
worden, erfolgen jedoch ohne Gewähr. Sollten Sie mit dem Anbau nicht zurecht kommen
Werkstatt Ihres Vertrauens. Bitte beachten Sie , dass wir keine Gewährleistungen
notwendig sein, dass Produkte diesen angepasst werden müssen.
knowledge but specifications or details may change. If you have difficulties or
or workshop of your choice. Please note that in some cases due to vehicle related
fit. We cannot warranty parts fitting in those circumstances.
nostre possibilità ma dettagli o specifiche possono venire variate. Se avete difficoltà o
dubbi sul montaggio di questo accessorio vi invitiamo a rivolgervi al vostro concessionario BMW o alla vostra officina di fiducia.Prendete nota che in qualche caso per tolleranze relative al
veicolo al di fuori del nostro controllo alcuni accessori possono necessitare di aggiustamenti appropriati. In questo caso non possiamo garantire un perfetto montaggio.
Scarica