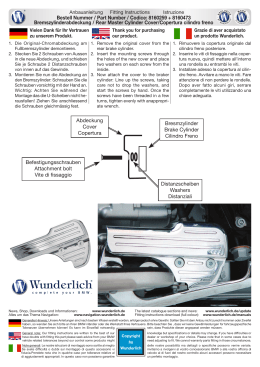
CRONÓGRAFO
Instrucciones de utilización y de seguridad
A
1
CRONOGRAFO
50
10
40
20
Indicazioni per l’uso e per la sicurezza
20
C
Instruções de utilização e de segurança
8
10
50
10
40
20
20
15
9
11 12
50
10
20
40
20
16 24H 08
12
D
04
Manecilla horaria
Minutero
Botón de inicio / parada (función cronómetro)
Ruedecilla de ajuste
Botón (para intervalo /desbloqueo de intervalo /
puesta a cero)
6 Indicación de la fecha
7 Indicador de segundos del cronómetro
14
16
15
15
5
Descripción de las piezas
1
2
3
4
5
Z30299D
CHRONOGRAPH
Uso adecuado
El cronógrafo indica la hora y la fecha, y se puede
emplear como cronómetro.
13
15
Bedienungs- und Sicherheitshinweise
Z30299A / B / D
16
04
16 24H 08
12
45
45
Z30299D
9
10
11
12
13
14
15
16
base de 24 horas)
Indicador de minutos del cronómetro
Indicador de segundos
Posición 1
Posición 2
Cierre
Segmento
Set de reparación para el modelo D
Desplazador para el modelo D
Volumen de suministro
Acortar la pulsera del reloj
(modelo Z30299D)
Nota: el reloj de pulsera se puede acortar moviendo
el cierre 13 o retirando segmentos 14 . Utilice únicamente el kit de reparación suministrado 15 .
Retirar segmentos (fig. D)
Indicación: los segmentos que se pueden retirar
están señalados con una flecha (véase fig. D). Están
unidos mediante pasadores. Estos pasadores se
pueden extraer en la dirección de la flecha con el
kit de reparación 15 . Utilice unas pinzas para retirar
los pasadores en caso necesario.
Mover el cierre (fig. C)
Indicación: el cierre 13 se mantiene en su posición
mediante una varilla elástica. Para ajustar el cierre 13 ,
coloque el cronógrafo en el set de reparación 15
y presione la varilla elástica hasta juntarla con el
desplazador 16 .
Coloque el cronógrafo de caballero en el set
reparación con la esfera hacia abajo 15 .
Retire los pasadores del segmento que desee
retirar (como se describe arriba) y quite el segmento 14 .
Indicación: si desea quitar varios segmentos
unidos 14 es suficiente con retirar los dos pasadores exteriores.
Vuelva a juntar el reloj de pulsera uniendo los
segmentos sueltos 14 con un pasador. Para
ello, presiónelos en la dirección contraria a la
indicada por la flecha en los segmentos contiguos 14 .
Indicación: para retirar uno o varios segmentos 14 directamente junto al cierre 13 presione
Abra el cierre 13 .
Mantenga presionada la varilla elástica (como
se ha descrito anteriormente) y cambie de sitio
el cierre 13 hasta el lugar deseado.
Suelte la varilla elástica para que pueda volver
a su posición original. El cierre 13 ya está fijado.
ES
Denominación del producto:
Cronógrafo
Modelo Nº: Z30299A / B / D
Versión:
08 / 2011
Utilizzo secondo
la destinazione d’uso
Il cronografo mostra l’orario e la data e può essere
utilizzato anche come cronometro.
Lancetta dei minuti
Lancetta dei minuti
Pulsante di Start / Stop (funzione cronometro)
Corona
Tasto (per tempo intermedio / rilascio tempo
intermedio / reset)
6 Unità di visualizzazione della data
7 Lancetta dei secondi del cronometro
ES
Funzionamento
Porre le unità di visualizzazione
di cronometro su “0” (ore 12)
Il cronometro scorre:
Premere il tasto Start / Stop 3 .
Premere il tasto 5 .
Material fornecido
Se nessuna tra le lancette del cronometro
si trova in posizione 0:
Estrarre la corona 4 fino a farle raggiungere
la posizione 2 12 .
Premere il tasto di Start / Stop 3 per 2 secondi.
La lancetta dei minuti del cronometro compie un
giro intero. Per porre la lancetta dei minuti del
cronometro su “60”, premere il tasto 5 .
Premere il tasto di Start / Stop 3 per 2 secondi. La
lancetta dei secondi del cronometro compie un
giro intero. Per porre la lancetta dei secondi del
cronometro su “12”, premere il tasto RESET 5 .
Nota: Le lancette del cronometro si muovono
velocemente, se il tasto 5 viene tenuto premuto.
Premere nuovamente la corona 4 nell’alloggiamento.
Segurança
GUARDE TODAS AS INDICAÇÕES DE SEGURANÇA E INSTRUÇÕES PARA CONSULTA FUTURA!
PT
El cronómetro indica el intervalo:
Pulse el botón 5 .
Pulse el botón de inicio / parada 3 .
Vuelva a pulsar el botón 5 .
Seguridad
¡CONSERVE TODAS LAS INDICACIONES DE
SEGURIDAD Y ADVERTENCIAS POR SI NECESITA
CONSULTARLAS MÁS ADELANTE!
Ambito di fornitura
Impostazione dell’orario
Se l’unità di visualizzazione dei secondi 10 si
trova in posizione “0” (ore 12), estrarre con
attenzione la corona 4 dall’alloggiamento fino
a quando essa raggiunge la posizione 2 12 .
Impostare i minuti e le ore desiderate ruotando
la corona 4 in senso orario.
Assicurarsi che nella visualizzazione di 24 ore 8
venga mostrata l’ora esatta. Se necessario, spostare le lancette dell’orario di 12 ore.
Dopo avere impostato l’ora premere nuovamente
la corona 4 nell’alloggiamento. L’orologio inizierà a mostrare l’ora desiderata.
Impostazione della data
IT/MT
PERIGO DE MORTE
E DE ACIDENTES PARA BEBÉS E
CRIANÇAS! Nunca deixe crianças
sem vigilância com o material da embalagem.
Existe perigo de asfixia. As crianças subestimam
frequentemente os perigos. Mantenha-as sempre
afastadas do produto. O produto não é um brinquedo.
Este aparelho não deve ser utilizado por pessoas
(incluindo crianças) com capacidades físicas,
sensoriais ou mentais limitadas ou pessoas sem
experiência e / ou conhecimento, a não ser que
estas sejam supervisionadas por alguém responsável pela segurança ou deste recebam instruções acerca do funcionamento do aparelho. As
crianças devem ser vigiadas para assegurar que
não brincam com o aparelho.
PERIGO DE MORTE! As pilhas
podem ser engolidas, o que constitui perigo de
morte. Se uma pilha for engolida, procure imediatamente ajuda médica.
Não coloque o aparelho em funcionamento se
este estiver danificado. Os aparelhos danificados
representam perigo de morte por choque eléctrico!
Não utilize o aparelho em hospitais
ou instalações médicas. Tal poderá causar
problemas de funcionamento em sistemas de
suporte de vida.
Não exponha o aparelho a
– temperaturas extremas,
– fortes vibrações,
– fortes esforços mecânicos,
– radiação solar directa,
– humidade.
Caso contrário, o aparelho pode ficar danificado.
Evite que a caixa do aparelho roce com demasiada força em têxteis. Tal pode resultar em cargas
estáticas e influenciar o resultado de medição.
Os danos causados por um manuseamento inadequado, pela inobservância do manual de ins-
PT
PT
Ajuste de la fecha
Tire cuidadosamente de la ruedecilla de ajuste 4
hasta la posición 1 11 .
Ajuste la fecha deseada girando la ruedecilla de
ajuste 4 en el sentido de las agujas del reloj.
Nota:
– La data può essere impostata solamente previa
rotazione in senso orario.
La data non deve essere impostata tra le ore
21:00 e le ore 01:00, poiché in caso contrario
la data non si modifica in modo corretto. Qualora la data dovesse essere regolata in questo
spazio temporale, prima di compiere tale operazione impostare l’ora a un altro orario. Correggere l’ora solo dopo avere impostato la data.
Dopo avere impostato la data premere nuovamente la corona 4 nell’alloggiamento.
Funzionamento del cronometro
Il tempo misurato viene mostrato dalle unità di visualizzazioni del cronometro 7 , 9 . Queste si muovono indipendentemente dalla lancetta delle ore e dei
minuti 1 , 2 e dalla lancetta dei secondi 10 . Il
cronometro può visualizzare un periodo massimo di
59 minuti e 59,8 secondi.
Start: Premere il tasto Start / Stop 3 .
Stop: Premere nuovamente il tasto Start / Stop 3 .
Reset: Premere il tasto 5 .
Utilizzo in occasione di una
partita di pallacanestro
(misurazione del tempo non
cumulativa):
Start: Premere il tasto Start / Stop 3 .
Stop (Tempo di sospensione): Premere il tasto
Start / Stop 3 .
Riavvio: Premere il tasto Start / Stop 3 .
Stop: Premere il tasto Start / Stop 3 .
Nota: Il riavvio e l’interruzione del cronometro possono essere eseguiti tutte le volte che si vuole premendo il tasto Start / Stop 3
Reset: Premere il tasto 5 .
IT/MT
truções ou uma intervenção por pessoal não
autorizado estão excluídos da garantia.
Nunca desmonte o aparelho. Reparações
indevidas podem causar perigos significativos
para o utilizar. As reparações só devem ser
efectuadas por pessoal especializado.
Indicações de segurança
relativas às pilhas
Retire as pilhas do aparelho, se este não for utilizado durante muito tempo.
CUIDADO! PERIGO DE EXPLOSÃO! Nunca recarregue as pilhas!
Ao colocar as pilhas, tenha em atenção a
polaridade correcta! Esta é indicada nos
compartimentos das pilhas.
Se necessário, limpe os contactos das pilhas e
do aparelho antes da sua colocação.
Remova imediatamante as pilhas gastas do
aparelho. Existe perigo de derrame de ácido!
Questa funzione offre la possibilità di fermare il cronometro su un risultato intermedio mentre il tempo
normale continua a scorrere.
Start: Premere il tasto Start / Stop 3 .
Tempo intermedio: Premere il tasto 5 .
Rilascio del tempo intermedio: Premere nuovamente il tasto 5 .
Nota: Il tempo intermedio e il rilascio del tempo intermedio possono essere eseguiti tutte le volte che si
vuole premendo il tasto 5 .
Conclusione della procedura: Premere il tasto
Start / Stop 3 .
Reset: Premere il tasto 5 .
IT
Assistenza Italia
Tel.:
02 36003201
e-mail: [email protected]
La confezione è prodotta in materiale riciclabile e biodegradabile, smaltibile nei
luoghi di raccolta differenziati.
Adaptar a bracelete do relógio
(modelos Z30299A / B)
Nota: Necessita de um alicate perfurador para
esta etapa.
ATENÇÃO PERIGO DE ESMAGAMENTO!
Certifique-se de que não coloca os dedos ou
outras partes do corpo entre o alicate perfurador.
Para adaptar a largura da bracelete do relógio,
faça um novo furo com o alicate perfurador na
posição necessária na bracelete do relógio.
IT/MT
Encurtar a bracelete do relógio
(modelo Z30299D)
Nota: a bracelete do relógio pode ser encurtada,
ajustando-se o fecho 13 ou retirando elos 14 . Para
isso, utilize o kit de reparação fornecido 15 .
Ajustar o fecho (fig. C)
Nota: O fecho 13 é mantido em posição através
de um pino de mola. Para ajustar o fecho 13 , coloque o cronógrafo no kit de reparação 15 e pressione
o pino de mola juntamente com a corrediça 16 .
Abra o fecho 13 .
Mantenha a mola pressionada (como descrito
em cima) e ajuste o fecho 13 como pretendido.
Largue a mola para a mesma voltar à posição
inicial. O fecho 13 está agora fixo.
Questo orologio è impermeabile all’acqua fino
a 5 bar (Inglese: 5 bar water resistant) ai sensi
delle disposizioni della norma DIN 8310. La
figura B mostra gli ambiti di utilizzo ammessi. Si
prega di tenere presente che l’impermeabilità
all’acqua non rappresenta una caratteristica durevole. Essa deve essere controllata annualmente e in modo particolare prima di sottoporre l’orologio a particolari sollecitazioni, giacché la
funzionalità dei componenti di impermeabilità
incorporati si riduce con l’utilizzo quotidiano.
Adattamento del cinturino
(modelli Z30299A / B)
Nota: Per questo passaggio è necessario utilizzare
una tenaglia perforatrice.
ATTENZIONE! PERICOLO DI SCHIACCIAMENTO! Fare attenzione a che le dita o altre
parti del corpo non finiscano tra la tenaglia perforatrice.
Eliminación
El embalaje está compuesto por materiales no contaminantes que pueden ser eliminados en el centro de reciclaje local.
Spostamento della chiusura
(vedi fig. C)
Porre i cronografi da uomo nel set di riparazione
con il quadrante verso il basso 15 .
Rimuovere i grani del segmento che si desidera
rimuovere (come sopra descritto) ed estrarre il
segmento 14 .
Nota: Qualora si desiderasse estrarre diversi
segmenti uniti 14 , è sufficiente rimuovere i due
grani esterni.
Rimontare il cinturino dell’orologio collegando i
segmenti 14 allentati con un grano. A tale scopo
Aprire la chiusura 13 .
Mantenere la barra elastica premuta (come descritto in precedenza) e spostare la chiusura 13
come desiderato.
EMC
Rimozione di segmenti (vedi fig. D)
Nota: I segmenti che possono essere rimossi sono
contrassegnati con una freccia (vedi fig. D). Essi sono
collegati gli uni agli altri per mezzo di grani. Questi
possono essere estratti con il set di riparazione 15
nella direzione mostrata dalla freccia. Per rimuovere
i grani utilizzare, se necessario, una pinzetta.
Nota: La chiusura 13 viene mantenuta in posizione
da una barra elastica. Per spostare la chiusura 13
porre il cronografo nel set di riparazione 15 e premere
la barra elastica con la corona 16 .
IT/MT
Relógio cronógrafo
Introdução
Guarde cuidadosamente este manual
de instruções. Se entregar este aparelho a
terceiros, entregue também todos os
respectivos documentos.
Definizione del prodotto:
Cronografo
N°. modello: Z30299A / B / D
Versione:
08 / 2011
Utilização correcta
O cronógrafo indica a hora e a data, podendo ser
utilizado como cronómetro.
Aggiornamento delle informazioni: 07 / 2011
N° Ident: Z30299A / B / D072011-5
Vi possono essere conseguenze
negative per l’ambiente a seguito
di uno smaltimento non corretto
delle batterie!
Descrição das peças
Ponteiro das horas
Ponteiro dos minutos
Botão Start / Stop (função de cronometragem)
Coroa
Botão (para tempo intermédio / início / reposição
do tempo intermédio)
6 Indicação da data
7 Ponteiro dos segundos do cronómetro
1
2
3
4
5
Le batterie non devono essere smaltite nella spazzatura
domestica. Esse possono contenere metalli pesanti
velenosi e devono essere trattate quali rifiuti speciali.
I simboli chimici dei metalli pesanti sono i seguenti:
Cd = Cadmio, Hg = mercurio, Pb = piombo. ConseIT/MT
PT
Lasciare la barra elastica così che essa possa
scattare di nuovo in posizione di partenza. La
chiusura 13 è ora fissata.
Accorciamento del cinturino
(modello Z30299D)
Nota: Il cinturino dell’orologio può essere accorciato
spostando la chiusura 13 oppure estraendo segmenti 14 . A tale scopo utilizzare il set di riparazione 15 in dotazione.
IT/MT
Coloque o cronógrafo de homem no kit de reparação 15 com o mostrador virado para baixo.
Retire as cavilhas dos segmentos que deseja retirar
(como descrito em cima) e retire o segmento 14 .
Nota: se desejar retirar diversos segmentos 14
interligados, basta retirar as duas cavilhas exteriores.
Junte novamente a bracelete ligando com uma
cavilha os segmentos 14 soltos. Para isso, pressione-a no sentido contrário ao das setas contra
os segmentos 14 juntos.
Nota: para retirar um ou mais segmentos 14 directamente no fecho 13 , desloque a mola com o
trinco 16 , retire o fecho 13 e prossiga tal como
descrito em cima.
¡Daño medioambiental debido a
un reciclaje incorrecto de las pilas!
ES
Per adattare la larghezza del cinturino eseguire
un nuovo foro nella posizione desiderata nel
cinturino con la tenaglia perforatrice.
gnare quindi le batterie usate ad un punto di raccolta
comunale.
fora, na direcção da seta, utilizando o conjunto de
reparações 15 . Se necessário, utilize uma pinça para
retirar as cavilhas.
Pb
Las pilas no deben eliminarse junto a los residuos
domésticos. Las pilas pueden contener metales pesados tóxicos que debe tratarse conforme a la normativa
aplicable a los residuos especiales. Los símbolo químicos de los metales pesados son: Cd = Cadmio,
Hg = Mercurio, Pb = Plomo. Las pilas deben reciclarse
en el punto de recolección específico para ello.
ES
IT/MT
Retirar segmentos (fig. D)
PT
Las pilas defectuosas o usadas deben ser recicladas
según lo indicado en la directiva 2006 / 66 / EC.
Para ello devuelva las pilas y / o el aparato en los
puntos de recogida indicados.
IAN 66976
Potete informarvi sulle possibilità di smaltimento del
prodotto consumato dall‘amministrazione comunale
e cittadina.
Nota: os segmentos que podem ser retirados estão
marcados com uma seta (ver fig. D). Estão interligados com cavilhas. Estas podem ser deslocadas para
PT
ES
Servicio España
Tel.:
902 59 99 22
(0,08 EUR/Min. + 0,11 EUR/
llamada (tarifa normal))
(0,05 EUR/Min. + 0,11 EUR/
llamada (tarifa reducida))
e-mail: [email protected]
Impermeabilità all’acqua
Batterie difettose o usate devono essere riciclate ai sensi
della Direttiva 2006 / 66 / EC. Smaltire le batterie
e / o l’apparecchio presso i punti di raccolta indicati.
Smaltimento
ES
No elimine el producto estropeado con
los desechos domésticos, sino hágalo de
manera correcta. Proteja así el medio
ambiente. Se puede informar en la oficina
competente de su administración sobre
los puestos de recogida y sus horarios
de atención al público.
ES
Adaptar la pulsera del reloj
(modelos Z30299A / B)
Indicación: Para realizar estos pasos se necesita
un sacabocados.
¡ATENCIÓN PELIGRO DE APLASTAMIENTO! Tenga cuidado de no introducir los
dedos u otras partes del cuerpo entre el sacabocados.
Para poder adaptar el ancho de la pulsera del
reloj, realice otro agujero con el sacabocados
en la posición deseada de la misma.
ES
Puede averiguar las posibilidades de eliminación
del producto estropeado en la administración de su
comunidad o ciudad.
Limpie el producto sólo por fuera con un paño
suave y seco.
Este reloj es resistente al agua hasta cinco bar (en
inglés: 5 bar water resistant) según DIN 8310. En
la figura B se muestran los ámbitos de aplicación
permitidos. Tenga en cuenta que la resistencia
al agua no es una propiedad permanente; por
Limpieza y mantenimiento
Pb
Pulire l’apparecchio solamente all’esterno con
un panno soffice e asciutto.
ção permitidas. Tenha em atenção que a resistência à água não é uma característica permanente. Anualmente e, sobretudo antes de
exposição a esforços especiais, esta deve ser
verificada, uma vez que os elementos de vedação
integrados perdem qualidade como resultado
do seu funcionamento e uso diário.
IAN 66976
Pulizia e cura
Em caso de inobservância destas indicações, as
pilha podem ser descarregadas para além da
sua tensão final. Neste caso, subsiste o perigo
de derrame. Caso as pilhas do seu aparelho
comecem a derramar, retire-as imediatamente,
de forma a evitar danos no aparelho!
As pilhas não devem ser depositadas no lixo
doméstico!
Cada consumidor é legalmente obrigado a
eliminar correctamente as pilhas!
Mantenha as pilhas longe do alcance das crianças, não as atire para o fogo, proteja-as contra
curto-circuitos e não as desmonte.
Evite o contacto com a pele, olhos e mucosas. No
caso de contacto com o ácido das pilhas, lave o
local afectado com bastante água e / ou consulte
um médico!
Esta función le ofrece la posibilidad, durante un proceso de parada, de parar un resultado provisional,
mientras que el proceso de parada normal continúa.
Inicio: pulse el botón de inicio / parada 3 .
Tiempo parcial: pulse el botón 5 .
Desbloqueo de tiempo parcial: vuelva a pulsar el botón 5 .
Nota: puede realizar todos los tiempos parciales y
desbloqueos de tiempos parciales que desee accionando el botón 5 .
Finalizar el proceso: pulse el botón de inicio /
parada 3 .
Reinicio: pulse el botón 5 .
IAN 66976
Resistencia al agua
tanto, es preciso comprobar que se conserva
anualmente y especialmente cuando el reloj
está sometido a un gran esfuerzo, puesto que
los elementos de estanquidad se van aflojando
debido a su función y al uso diario.
Servicio
Per la salvaguardia della tutela ambientale, quando il vostro prodotto non funziona più, non gettatelo nei rifiuti domestici
bensì nei luoghi adatti di raccolta.
MT
Assistenza Malta
Tel.:
80062230
e-mail: [email protected]
ES
Manejo en carrera de 5000
metros (medición de tiempos
parciales):
IT/MT
Assistenza
IT/MT
PT
Prestare attenzione alla polarità corretta quando
vengono inserite le batterie! La polarità è
riportata nel vano batteria.
Se necessario, pulire i contatti della batteria e
dell’apparecchio prima di inserire le batterie.
Rimuovere subito la batteria esaurita dall’apparecchio. Sussiste un notevole pericolo di perdita!
In caso di mancata osservanza di tali avvertenze,
la batteria può scaricarsi attraverso la sua tensione finale. Sussiste inoltre il pericolo di perdite.
In caso di perdite dalla batteria mentre questa si
trova nell’apparecchio, estrarla subito per evitare
danni all‘apparecchio medesimo!
Non smaltire le batteria con i rifiuti domestici!
Ogni consumatore è obbligato ai termini di legge
a smaltire la batteria secondo le regole vigenti!
Tenere le batterie fuori dalla portata dei bambini,
non gettare le batterie nel fuoco, non cortocircuitarle e non aprirle.
Evitare il contatto con pelle, occhi e mucose. In
caso di contatto con l’acido della batteria sciacquare abbondantemente il punto interessato e / o
rivolgersi alle cure mediche!
IT/MT
Utilizzo in una gara di 5000
metri (misurazione del tempo
intermedio):
Retire las baterías del aparato si no va a utilizar el
mismo durante un período de tiempo prolongado.
¡CUIDADO! ¡PELIGRO DE EXPLOSIÓN! ¡Nunca cargue las
baterías nuevamente!
Cuando coloque las baterías observe la polaridad correcta. Éste se indica en el compartimento
de las baterías.
Si es necesario, antes de introducir las baterías
limpie los contactos de las baterías y del aparato.
Retire inmediatamente las pilas agotadas del
aparato. Existe riesgo de sulfatación.
La inobservancia de estas indicaciones puede
provocar la descarga de las pilas por encima
ES
Rimuovere dall’apparecchio le batterie non utilizzate per parecchio tempo.
ATTENZIONE! PERICOLO DI
ESPLOSIONI! Non ricaricare mai
le batterie!
Este relógio é resistente à água até cinco bar
(Inglês: 5 bar water resistant) conforme a norma
DIN 8310. A figura B indica as áreas de utilizaPT
Manejo en partido de baloncesto
(medición acumulativa del
tiempo):
Inicio: pulse el botón de inicio / parada 3 .
Parada / tiempo muerto: pulse el botón de inicio / parada 3 .
Reinicio: pulse el botón de inicio / parada 3 .
Parada: pulse el botón de inicio / parada 3 .
Nota: puede realizar tantas paradas y reinicios
del cronómetro como desee accionando el botón
de inicio / parada 3 .
Reinicio: pulse el botón 5 .
Indicazioni di sicurezza
per le batterie
IT/MT
Resistência à água
Eviti di sfregare con forza l’involucro dell’apparecchiatura sui tessuti. Ciò potrebbe causare cariche statiche e dunque influenzare il risultato di
misurazione.
Prenda in considerazione il fatto che i danneggiamenti ad opera di maneggio scorretto, violazione delle istruzioni d’uso e causati da interventi di personale non autorizzato sono esclusi
dalla garanzia.
Non smonti assolutamente l’apparecchiatura. A
causa di riparazioni scorrette l’utente può essere
esposto a gravi pericoli. Faccia eseguire le riparazioni da personale qualificato.
Funzionamento per una gara
di corsa di 100 m (misurazione
standard del tempo)
Inicio: pulse el botón de inicio / parada 3 .
Parada: vuelva a pulsar el botón de inicio /
parada 3 .
Reinicio: pulse el botón 5 .
de su tensión final. En este caso, existe el riesgo
de que se sulfaten. En caso de que las pilas se
sulfaten, retírelas inmediatamente para evitar
daños en el aparato.
¡Las baterías no deben desecharse en la basura
doméstica!
¡Todos los usuarios están obligados a desechar
las baterías de forma adecuada!
Mantenga las pilas lejos del alcance de los niños.
No tire las pilas al fuego. No cortocircuite las
pilas y no intente desmontarlas.
Evite el contacto con la piel, ojos y mucosas. Si
se entra en contacto con el ácido de las baterías,
lave la parte afectada con abundante agua
y / o procure atención médica.
Indicaciones de seguridad
referentes a las baterías
Manejo en carrera de 100
metros (medición estándar):
ES
IT/MT
Nunca desarme el aparato. A causa de trabajos
de reparación no apropiados pueden producirse
peligros para el usuario. Encargue las reparaciones únicamente a personal técnico cualificado.
ES
Manejar el cronómetro
El tiempo medido es indicado por las manecillas del
cronómetro 7 , 9 . Estos se mueven de forma independiente con respecto al indicador de minutos 1 ,
2 y segundos 10 . El cronómetro puede mostrar un
periodo de tiempo de 59 min y 59,8 segundos como
máximo.
PERICOLO DI VITA! Le
batterie possono essere ingoiate con conseguente pericolo di vita. Se è stata ingoiata la
batteria, rivolgersi immediatamente alle cure di
un medico.
Non metta in funzione l’apparecchiatura se è
danneggiata. Apparecchiature danneggiate
possono mettere a repentaglio la Sua vita a
causa di una scossa elettrica!
Non faccia uso di quest’apparecchiatura negli ospedali o in istituti medici.
In questi luoghi l’apparecchiatura può causare
disturbi di funzionamento ai sistemi di mantenimento della vita.
Non esponga l’apparecchiatura
– a temperature estreme,
– a forti vibrazioni,
– a pesanti carichi meccanici,
– all’insolazione diretta,
– all’umidità.
Altrimenti rischia di danneggiare l’apparecchiatura.
IT/MT
Impostare la data desiderata ruotando la corona 4 in senso orario.
No se debe ajustar la fecha entre las 21:00 y
la 01:00, ya que puede ocurrir que no cambie
correctamente. Si a pesar de todo debe cambiar
la fecha a esa hora, cambie antes la hora a otro
momento. Vuelva a corregir la hora una vez haya
realizado el ajuste de la fecha.
Una vez realizado el ajuste de la fecha, vuelva
a introducir la ruedecilla de ajuste 4 en la carcasa.
ES
PERICOLO
PER L’INCOLUMITÀ DEI BAMBINI! Vietare l’accesso al materiale
d’imballaggio ai bambini, se non sotto sorveglianza di un adulto. Sussiste il pericolo di soffocamento
dei bambini con il materiale d’imballaggio. I
bambini non sono in grado di valutare l’entità dei
pericoli. Tenere i bambini lontani dall’apparecchio.
Il prodotto non è un giocattolo.
Non fare utilizzare questo articolo da persone
(ivi inclusi bambini) con capacità fisiche, sensoriali o mentali limitate. Inoltre il prodotto non può
essere utilizzato da persone che non conoscono
il suo funzionamento. In questo caso, una persona
responsabile per la sicurezza deve supervisionare
o dare indicazioni su come il prodotto debba essere utilizzato. I bambini devono essere sorvegliati
al fine di impedire che essi giochino con l’apparecchio.
IT/MT
ES
–
Tire cuidadosamente de la ruedecilla de ajuste 4
hasta la posición 2 12 cuando el segundero 10
se encuentre en la posición “0” (12 - horas).
Ajuste el minuto y la hora deseados girando la
ruedecilla de ajuste 4 en el sentido de las
agujas del reloj.
Asegúrese de que el indicador de 24 h 8 indique la hora correcta. En caso necesario, adelante
la hora hasta las 12 h.
Una vez realizado el ajuste de la hora, vuelva
a introducir la ruedecilla de ajuste 4 en la carcasa. El reloj marcará ahora la hora deseada.
Avvisi di sicurezza
generali
base di 24 ore).
Cronometro con indicazione dei minuti
Lancetta dei secondi
Posizione 1
Posizione 2
Chiusura
Segmento
Set di riparazione per modello D
16 Corona per modello D
Il cronometro mostra il tempo intermedio:
Premere il tasto 5 .
Premere il tasto Start / Stop 3 .
Premere nuovamente il tasto 5 .
Ajustar la hora
ES
9
10
11
12
13
14
15
ES
Nota:
– Sólo se puede ajustar la fecha girando en el
sentido de las agujas del reloj.
ES
IT/MT
Indicações gerais
de segurança
1 relógio cronógrafo
1 estojo de reparação para o modelo D
1 pilha tipo botão
1 manual de instruções
66976_aur_Chronograph_A_B_D_Content_LB5.indd 1
El cronómetro se para:
Pulse la tecla 5 o tire con cuidado de la corona 4 hasta la posición 1 11 hasta sacarla de
la carcasa y pulse la tecla 5 .
Estrarre con attenzione la corona 4 dall’alloggiamento fino a che non raggiunge la posizione 1 11 .
8 Indicação 24 horas (indica a hora com base
El cronómetro todavía marcha:
Pulse el botón de inicio / parada 3 .
Pulse el botón 5 .
IT/MT
IT/MT
nas 24 horas)
Indicador dos minutos do cronómetro
Ponteiro dos segundos
Posição 1
Posição 2
Fecho
Segmento
Kit de reparação para o modelo D
Corrediça para o modelo D
Ajustar los indicadores a “0”
(12 horas)
Sicurezza
Il cronometro è fermo:
Premere il tasto 5 oppure estrarre con attenzione la corona 4 dall’alloggiamento fino a
9
10
11
12
13
14
15
16
CONSERVI TUTTE LE ISTRUZIONI E GLI AVVISI
DI SICUREZZA PER CONSULTARLI IN FUTURO!
farle raggiungere la posizione 1 11 e premere
il tasto 5 .
Nota: Prima di impostare l’orario o la data, porre
le unità di visualizzazioni del cronometro 7 , 9 su
“0” (ore 12).
Indicación: antes de poder ajustar la hora o la
fecha, deberá ajustar los indicadores del cronómetro 7 , 9 a “0” (12 horas).
1 cronografo
1 set di riparazione per il modello D
1 batteria a bottone
1 libretto d’istruzioni d’uso
Descrizione dei componenti
1
2
3
4
5
premere il grano in direzione della freccia nei
segmenti adiacenti 14 .
Nota: Per rimuovere uno o più segmenti 14
direttamente alla chiusura 13 , premere la
barra elastica con il cursore 16 , rimuovere la
chiusura 13 e procedere come descritto in
precedenza.
Manejo
Si el indicador del cronómetro no se encuentra en la posición “0”:
Saque la corona 4 hasta la posición 2 12 .
Presione la tecla inicio / parada 3 durante 2
segundos. El indicador de minutos del cronómetro
dará una vuelta completa. Presione la tecla 5
para poner el indicador de minutos del cronómetro a “60”.
Presione la tecla inicio / parada 3 durante 2
segundos. El indicador de segundos del cronómetro dará una vuelta completa. Presione la tecla 5 para poner el indicador de segundos del
cronómetro a “12”.
Nota: El indicador del cronómetro se mueve
deprisa cuando se mantiene presionada la tecla 5 .
Presione otra vez la corona 4 en la carcasa.
8 Visualizzazione in 24 ore (mostra l’orario sulla
Introduzione
Conservate per bene queste istruzioni.
Consegnate anche tutti i documenti di
questo prodotto quando lo date a terzi.
Fecha de la información: 07 / 2011
N.º de ident.: Z30299A / B / D072011-5
ES
Cronografo
EMC
hacia fuera la varilla elástica con el pasador 16 ,
retire el cierre 13 y continúe como se describe
arriba.
batería, debe buscar asistencia médica inmediatamente.
No ponga el aparato en funcionamiento si está
dañado. Los aparatos dañados conllevan peligro
de muerte por descarga eléctrica.
No utilice el aparato en hospitales o instalaciones médicas. Podría producir interferencias con los dispositivos de auxilio vital.
No exponga el aparato a
– temperaturas extremas,
– vibraciones fuertes,
– grandes esfuerzos mecánicos,
– la radiación solar directa,
– la humedad.
De hacerlo podrían producirse daños en el
aparato.
Evite que la carcasa roce demasiado fuerte con
tejidos. Esto podría producir una carga estática
e influir en los resultados de la medición.
Observe que los daños producidos por manejo
incorrecto, no seguimiento del manual de instrucciones o manipulación por parte de personas
no autorizadas, están excluidos de la garantía.
¡PELIGRO
DE MUERTE O ACCIDENTE
PARA BEBÉS Y NIÑOS! No deje
nunca a los niños sin vigilancia con el material
de embalaje. Podrían asfixiarse con el material
de embalaje. Los niños a menudo subestiman los
peligros. Mantenga siempre el aparato fuera del
alcance de los niños. El producto no es un juguete.
Aquellas personas (incluidos niños) con limitaciones físicas, sensoriales o psíquicas o sin la
experiencia y / o los conocimientos suficientes
sólo podrán utilizar el aparato bajo la supervisión
de una persona responsable de su seguridad o
habiendo recibido de esta persona las indicaciones necesarias sobre cómo utilizar el producto.
Los niños deben estar vigilados para evitar que
jueguen con el aparato.
¡PELIGRO DE MUERTE!
Podrían tragarse las baterías, lo cual puede
suponer un peligro mortal. Si se ha tragado una
1 cronógrafo
1 juego de reparación para el modelo D
1 pila de botón
1 instrucciones de uso
ES
Indicaciones generales
de seguridad
8 Indicador de 24h (indica el tiempo sobre la
Introducción
Conserve adecuadamente estas instrucciones. Adjunte igualmente toda la documentación en caso de entregar el artefacto
a un tercero.
5
6
Operation and Safety Notes
15
7
CHRONOGRAPH WATCH
Cronógrafo
4
04
16 24H 08
12
45
RELÓGIO CRONÓGRAFO
B
3
2
PT
IT/MT
Utilização
para posicionar o ponteiro dos minutos do cronómetro em “60”.
Prima o botão Start / Stop 3 durante 2 segundos. O ponteiro dos segundos do cronómetro
efectua uma rotação completa. Prima o botão 5
para posicionar o ponteiro dos segundos do
cronómetro em “12”.
Nota: Os ponteiros do cronómetro movimentamse de forma rápida, se mantiver o botão 5
premido.
Volte a inserir a coroa 4 na caixa.
Nota: antes de configurar a hora e a data, os ponteiros do cronómetro 7 , 9 têm de ser colocados a “0”
(12 horas).
Colocar os ponteiros do
cronómetro no “0” (12 horas)
O cronómetro ainda está a contar:
Prima o botão Start / Stop 3 .
Prima o botão 5 .
O cronómetro está parado:
Prima o botão 5 ou extraia a coroa 4 cuidadosamente até à posição 1 11 da caixa e prima o botão 5 .
O cronómetro indica o tempo intermédio:
Prima o botão 5 .
Prima o botão Start / Stop 3 .
Prima novamente o botão 5 .
Se nenhum dos ponteiros do cronómetro
estiver na posição “0”:
Retire a coroa 4 até à posição 2 12 .
Prima o botão Start / Stop 3 durante 2 segundos. O ponteiro dos minutos do cronómetro
efectua uma rotação completa. Prima o botão 5
PT
Ajustar a hora
Puxe cuidadosamente a coroa 4 da estrutura até
à posição 2 12 quando o ponteiro dos segundos 10 se encontrar na posição “0” (12 horas).
Rodando a coroa 4 no sentido dos ponteiros do
relógio, ajuste as horas e os minutos pretendidos.
PT
28.07.11 17:09
Certifique-se que é indicada a hora correcta na
indicação de 24 horas 8 . Se necessário,
adiante 12 horas.
Volte a empurrar a coroa 4 para dentro da
estrutura após o ajuste das horas.
Agora o relógio inicia com as horas pretendidas.
Ajustar a data
Puxe cuidadosamente a coroa 4 da estrutura
até à posição 1 11 .
Rodando a coroa 4 no sentido dos ponteiros
do relógio, ajuste a data pretendida.
Nota:
– A data apenas pode ser ajustada com a rotação
no sentido dos ponteiros do relógio.
– A data não deve de ser ajustada entre as
21:00 e 01:00 horas, visto que, possivelmente,
a data não salta de forma correcta. No entanto,
caso tenha de ajustar a data nesse período de
tempo, altere primeiro a hora para um outro período de tempo. Corrija novamente a hora apenas após ajustar a data.
Volte a empurrar a coroa 4 para dentro da
estrutura após o ajuste da data.
Utilizar o cronómetro
O tempo medido é indicado pelos mostradores do
cronómetro 7 , 9 . Estes movem-se de forma independente em relação ao ponteiro das horas e minutos 1 , 2 e dos segundos 10 . O cronómetro pode
exibir um período de tempo de no máximo 59 minutos
e 59,8 segundos.
Utilização em corridas de 5000
metros (medição do tempo
intermédio):
Esta função permite-lhe apurar um tempo intermédio
durante um processo de cronometragem, enquanto
que o processo de cronometragem normal continua.
Start: prima o botão Start / Stop 3 .
Tempo intermédio: prima o botão 5 .
Activação do tempo intermédio: prima novamente o botão 5 .
Nota: pode activar a função de tempo intermédio
e iniciar a contagem intermédia as vezes que desejar, accionando o botão 5 .
Terminar o processo: prima o botão Start /
Stop 3 .
Reset: prima o botão 5 .
Utilização em corridas de 100
metros (medição padrão):
Start: prima o botão Start / Stop 3 .
Stop: prima novamente o botão Start/Stop 3 .
Reset: prima o botão 5 .
Reinício: prima o botão Start / Stop 3 .
Stop: prima o botão Start / Stop 3 .
Nota: pode reiniciar e parar o cronómetro as vezes
que desejar, accionando o botão Start / Stop 3 .
Reset: prima o botão 5 .
Utilização no basquetebol
(medição acumuladora):
Start: prima o botão Start / Stop 3 .
Stop / Time-out: prima o botão Start/Stop 3 .
PT
PT
PT
compliance with the operating instructions or interference with the device by unauthorised individuals.
Under no circumstances should you take the device
apart. Improper repairs may place the user in
considerable danger. Repairs should only be
carried out by specialist personnel.
If the above instructions are not complied with,
the battery may discharge itself beyond its end
voltage. There is then a danger of leaking. If the
battery has leaked inside your device, you
should remove it immediately in order to prevent
damage to the device!
Batteries must not be disposed of in the normal
domestic waste!
Every consumer is legally obliged to dispose of
batteries in the proper manner!
Keep batteries away from children. Do not throw
batteries into a fire. Never short-circuit them or
take them apart.
Avoid contact with the skin, eyes and mucous
membranes. Any parts of the body coming into
contact with battery acid should be rinsed off
with copious amounts of water and / or a doctor
contacted if necessary!
areas of use. Please note that the watertightness
is not a permanent feature. It should be checked
annually and particularly before subjecting it to
special conditions, as the function of the inbuilt
sealing elements diminishes with daily use.
Safety Instructions
for Batteries
Remove the battery from the device if it is not
going to be used for a prolonged period.
CAUTION! DANGER OF EXPLOSION! The batteries must never be
recharged!
When inserting the battery, ensure the correct
polarity! This is shown in the battery compartment.
If necessary, clean the battery and device contacts
before inserting the battery.
Remove a spent battery immediately from the
device. There is an increased danger of leaks!
Watertightness
This watch is watertight to 5 bar in accordance
with DIN 8310. Figure B shows the permissible
GB/MT
Service
metals are as follows: Cd = cadmium, Hg = mercury,
Pb = lead. That is why you should dispose of used
batteries at a local collection point.
Faulty or used batteries must be recycled in accordance with Directive 2006 / 66 / EC. Please return
the batteries and / or the device to the available collection points.
Disposal
Pb
The packaging is made entirely of recyclable materials, which you may dispose
of at local recycling facilities.
Hinweis: Das Uhrenarmband kann durch Verstellen
des Verschlusses 13 oder durch Herausnehmen von
Segmenten 14 gekürzt werden. Verwenden Sie hierzu
das mitgelieferte Reparaturset 15 .
Verschluss verstellen (Abb. C)
Hinweis: Der Verschluss 13 wird von einem Federstab in Position gehalten. Um den Verschluss 13 zu
verstellen, legen Sie den Chronographen in das Reparaturset 15 und drücken Sie den Federstab mit dem
Schieber 16 zusammen.
Öffnen Sie den Verschluss 13 .
Halten Sie den Federstab zusammengedrückt
(wie oben beschrieben) und verstellen Sie den
Verschluss 13 wie gewünscht.
Lassen Sie den Federstab los, damit er in die
Ausgangsposition zurückschnappen kann. Der
Verschluss 13 ist nun fixiert.
Hinweis: Die Segmente, die entfernt werden können,
sind mit einem Pfeil markiert (siehe Abb. D). Sie sind
mit Stiften miteinander verbunden. Diese können mit
dem Reparaturset 15 . in Pfeilrichtung herausgeschoben
werden. Um die Stifte zu entfernen, nehmen Sie
gegebenenfalls eine Pinzette zur Hilfe.
Legen Sie den Herrenchronographen mit dem
Ziffernblatt nach unten in das Reparaturset 15 .
Entfernen Sie die Stifte des Segments, das Sie
entfernen möchten (wie zuvor beschrieben) und
nehmen Sie das Segment 14 heraus.
Hinweis: Möchten Sie mehrere zusammenhängende Segmente 14 herausnehmen, genügt
es, nur die beiden äußeren Stifte zu entfernen.
Fügen Sie das Uhrenarmband wieder zusammen,
indem Sie die losen Segmente 14 mit einem Stift
verbinden. Drücken Sie diesen dazu gegen die
Pfeilberichtung in die aneinandergelegten Segmente 14 .
Hinweis: Um ein oder mehrere Segmente 14
direkt am Verschluss 13 zu entfernen, drücken
DE/AT/CH
Möglichkeiten zur Entsorgung des ausgedienten
Produktes erfahren Sie bei Ihrer Gemeinde oder
Stadtverwaltung.
Werfen Sie Ihr Produkt, wenn es ausgedient
hat, im Interesse des Umweltschutzes nicht
in den Hausmüll, sondern führen Sie es
einer fachgerechten Entsorgung zu. Über
Sammelstellen und deren Öffnungszeiten
können Sie sich bei Ihrer zuständigen Verwaltung informieren.
Defekte oder verbrauchte Batterien müssen gemäß
Richtlinie 2006 / 66 / EC recycelt werden. Geben Sie
Batterien und / oder das Gerät über die angebotenen
Sammeleinrichtungen zurück.
Pb
DE/AT/CH
Chronograph
Einleitung
9
10
11
12
13
14
15
16
Stoppuhr Minutenanzeige
Sekundenzeiger
Position 1
Position 2
Verschluss
Segment
Reparaturset für Modell D
Schieber für Modell D
DE/AT/CH
Stoppuhr zeigt die Zwischenzeit an:
Drücken Sie die Taste 5 .
Drücken Sie die Start / Stopp-Taste 3 .
Drücken Sie die Taste 5 erneut.
DE/AT/CH
The stopwatch is still running:
Press the start / stop button 3 .
Press the button 5 .
The stopwatch is not running:
Press the button 5 or pull the crown 4 carefully
out of the housing to position 1 11 and press
the button 5 .
Sicherheit
BEWAHREN SIE ALLE SICHERHEITSHINWEISE
UND ANWEISUNGEN FÜR DIE ZUKUNFT AUF!
Ziehen Sie die Krone 4 vorsichtig bis Position 2 12 aus dem Gehäuse, wenn sich der
Sekundenzeiger 10 in „0“ (12 - Uhr) Position
befindet.
Stellen Sie die gewünschte Minute und Stunde
ein, indem Sie die Krone 4 im Uhrzeigersinn
drehen.
Vergewissern Sie sich, dass in der 24 h-Anzeige 8 , die richtige Zeit angezeigt wird. Stellen
Sie die Zeit gegebenenfalls um 12 h vor.
Drücken Sie die Krone 4 nach dem Einstellen
der Uhrzeit wieder in das Gehäuse. Die Uhr
startet nun mit der gewünschten Uhrzeit.
The stopwatch shows the split time:
Press the button 5 .
Press the start / stop button 3 .
Press the button 5 again.
Adjusting the Time
Pull the crown 4 carefully out of the housing to
position 1 11 .
Adjust the chronograph to the desired date by
turning the crown 4 in a clockwise direction.
Note:
– The date can only be set by turning in a clockwise
direction.
– The date should not be adjusted between 9 p.m.
and 1 a.m., as it is possible that it will not turn
over correctly. If the date has to be adjusted
during this period, change the time beforehand
to a different period. You should only correct
the time after adjusting the date.
Press the crown 4 back into the housing after
adjusting the date.
GB/MT
Operation during a
100-Meter Race (standard
time measurement):
GB/MT
Operation during a 5000-Meter
Race (split time measurement):
Start: press the start / stop button 3 .
Stop: press the start / stop button 3 again.
Reset: press the button 5 .
Operation for Basketball
(accumulative time measurement):
This function offers you the possibility of timing an intermediate result while you are timing the main race,
with the standard timing continuing in the background.
Start: press the start / stop button 3 .
Split time: press the button 5 .
Split time release: press the button 5 again.
Note: the split time and split time release can be
performed as often as you wish by pressing the button 5 .
Final Stop: press the start / stop button 3 .
Reset: press the button 5 .
If none of the stop watch hands is in the
“0” position:
Pull out the crown 4 to position 2 12 .
Press the start / stop button 3 for about 2 seconds. The stopwatch minute hand makes a full
revolution. Press button 5 to set the stop watch
minute hand to “60”.
Press the start / stop button 3 for about 2 seconds. The stopwatch second hand makes a full
revolution. Press button 5 to set the stop watch
second hand to “12”.
GB/MT
GB/MT
GB/MT
GB/MT
GB/MT
LEBENS - UND
UNFALLGEFAHR FÜR KLEINKINDER UND KINDER! Lassen
Sie Kinder niemals unbeaufsichtigt mit dem Verpackungsmaterial. Es besteht Erstickungsgefahr
durch Verpackungsmaterial. Kinder unterschätzen
häufig die Gefahren. Halten Sie Kinder stets vom
Produkt fern. Das Produkt ist kein Spielzeug.
Dieses Gerät ist nicht dafür bestimmt, durch Personen (einschließlich Kinder) mit eingeschränkten
physischen, sensorischen oder geistigen Fähigkeiten oder mangels Erfahrung und / oder mangels
Wissen benutzt zu werden, es sei denn, sie werden
durch eine für ihre Sicherheit zuständige Person
beaufsichtigt oder erhielten von ihr Anweisungen,
wie das Gerät zu benutzen ist. Kinder sollten
beaufsichtigt werden, um sicherzustellen, dass
sie nicht mit dem Gerät spielen.
LEBENSGEFAHR! Batterien
können verschluckt werden, was lebensgefährlich
sein kann. Ist eine Batterie verschluckt worden,
muss sofort medizinische Hilfe in Anspruch
genommen werden.
Nehmen Sie das Gerät nicht in Betrieb, wenn es
beschädigt ist.
Verwenden Sie das Gerät nicht
in Krankenhäusern oder medizinischen Einrichtungen. Dieses kann dort zu Funktionsstörungen
von lebenserhaltenden Systemen führen.
Setzen Sie das Gerät keinen
– extremen Temperaturen,
– starken Vibrationen,
– starken mechanischen Beanspruchungen,
– keiner direkten Sonneneinstrahlung,
– keiner Feuchtigkeit aus.
Andernfalls droht eine Beschädigung des Gerätes.
Verhindern Sie, dass die Gerätegehäuse zu kräftig
an Textilien reiben. Dieses kann zur statischen
Aufladungen führen und das Messergebnis
beeinflussen.
Beachten Sie, dass Beschädigungen durch unsachgemäße Handhabung, Nichtbeachtung der
Bedienungsanleitung oder Eingriff durch nicht
autorisierte Personen von der Garantie ausgeschlossen sind.
Nehmen Sie das Gerät keinesfalls auseinander.
Durch unsachgemäße Reparaturen können erhebliche Gefahren für den Benutzer entstehen. Lassen
Sie Reparaturen nur von Fachkräften durchführen.
Entfernen Sie eine erschöpfte Batterie umgehend
aus dem Gerät. Es besteht erhöhte Auslaufgefahr!
Bei Nichtbeachtung der vorher genannten Hinweise kann die Batterie über ihre Endspannung
hinaus entladen werden. Es besteht dann die
Gefahr des Auslaufens. Falls die Batterie in Ihrem
Gerät ausgelaufen sein sollte, entnehmen Sie
diese sofort, um Schäden am Gerät vorzubeugen!
Batterien gehören nicht in den Hausmüll!
Jeder Verbraucher ist gesetzlich verpflichtet,
Batterien ordnungsgemäß zu entsorgen!
Halten Sie Batterien von Kindern fern, werfen Sie
Batterien nicht ins Feuer, schließen Sie Batterien
nicht kurz und nehmen Sie sie nicht auseinander.
Vermeiden Sie den Kontakt mit Haut, Augen und
Schleimhäuten. Bei Kontakt mit Batteriesäure
spülen Sie die betroffene Stelle mit reichlich
Wasser ab und / oder suchen Sie einen Arzt auf!
dung B zeigt die zulässigen Anwendungsbereiche.
Bitte beachten Sie, dass Wasserdichtigkeit keine
bleibende Eigenschaft ist. Sie sollte jährlich und
insbesondere vor besonderen Belastungen geprüft
werden, da die eingebauten Dichtelemente in
ihrer Funktion und im alltäglichen Gebrauch
nachlassen.
DE/AT/CH
Hinweis:
– Das Datum lässt sich nur durch Drehen im Uhrzeigersinn einstellen.
– Das Datum sollte nicht zwischen 21:00 und
01:00 Uhr eingestellt werden, da es dann eventuell nicht korrekt umspringt. Muss das Datum
dennoch in diesem Zeitraum eingestellt werden,
verstellen Sie die Uhrzeit zuvor auf einen anderen
Zeitraum. Korrigieren Sie die Uhrzeit erst nach
Einstellen des Datums wieder.
Drücken Sie die Krone 4 nach dem Einstellen
des Datums wieder in das Gehäuse.
DE/AT/CH
Sicherheitshinweise zu
Batterien
Entfernen Sie die Batterie, wenn sie längere Zeit
nicht verwendet worden ist, aus dem Gerät.
VORSICHT! EXPLOSIONSGEFAHR! Laden Sie Batterien niemals
wieder auf!
Achten Sie beim Einlegen auf die richtige Polarität!
Diese wird im Batteriefach angezeigt.
Reinigen Sie Batterie- und Gerätekontakt vor dem
Einlegen falls erforderlich.
Start: Drücken Sie die Start / Stopp-Taste 3 .
Stopp: Drücken Sie die Start / Stopp-Taste 3 erneut.
Rücksetzung: Drücken Sie die Taste 5 .
Diese Funktion bietet Ihnen die Möglichkeit während
eines Stoppvorgangs ein zwischenzeitliches Ergebnis
zu stoppen, wobei der normale Stoppvorgang weiterläuft.
Start: Drücken Sie die Start / Stopp-Taste 3 .
Zwischenzeit: Drücken Sie die Taste 5 .
Zwischenzeit-Freigabe: Drücken Sie die
Taste 5 erneut.
Hinweis: Die Zwischenzeit und Zwischenzeit-Freigabe können Sie beliebig oft durchführen, indem
Sie die Taste 5 betätigen.
Vorgang beenden: Drücken Sie die Start /
Stopp-Taste 3 .
Rücksetzung: Drücken Sie die Taste 5 .
Bedienung beim Basketball
(akumulative Zeitmessung):
Ziehen Sie die Krone 4 vorsichtig bis Position 1 11 aus dem Gehäuse.
Stellen Sie das gewünschte Datum durch Drehen
der Krone 4 im Uhrzeigersinn ein.
DE/AT/CH
DE/AT/CH
DE/AT/CH
Start: press the start / stop button 3 .
Stop / time-out: press the start / stop button 3 .
Re-start: press the start / stop button 3 .
Stop: press the start / stop button 3 .
Note: a re-start and stop of the stopwatch can be
performed as often as you like by pressing the start /
stop button 3 .
Reset: press the button 5 .
Wasserdichtigkeit
Cleaning and maintenance
Clean the product on the outside only with a soft,
dry cloth.
Uhrenarmband anpassen
(Modelle Z30299A / B)
Hinweis: Für diesen Arbeitsschritt benötigen Sie
eine Lochzange.
ACHTUNG QUETSCHGEFAHR! Achten Sie
darauf, dass Sie nicht mit den Fingern oder anderen Körperteilen zwischen die Lochzange geraten.
Um die Weite des Uhrenarmbandes anpassen
zu können, stanzen Sie mit der Lochzange ein
neues Loch an der benötigten Position in das
Uhrenarmband.
Diese Uhr ist wasserdicht bis 5 bar (Englisch:
5 bar water resistant) gemäß DIN 8310. Abbil-
DE/AT/CH
Bedienung beim 5000 Meter
Wettlauf (Zwischenzeitmessung):
Start: Drücken Sie die Start / Stopp-Taste 3 .
Stopp / Auszeit: Drücken Sie die Start / StoppTaste 3 .
Neustart: Drücken Sie die Start / Stopp-Taste 3 .
Stopp: Drücken Sie die Start / Stopp-Taste 3 .
Hinweis: Neustart und Stopp der Stoppuhr können
Sie beliebig oft durchführen, indem Sie die Start /
Stopp-Taste 3 betätigen.
Rücksetzung: Drücken Sie die Taste 5 .
Stoppuhr bedienen
Using the Stopwatch
The time measured is shown by the stopwatch displays 7 , 9 . These move independently of the hour
and minute hand 1 , 2 and the second hand 10 .
The stopwatch can display a maximum period of
59 minutes and 59.8 seconds.
Bedienung beim 100 Meter
Wettlauf (Standard-Zeitmessung):
Die gemessene Zeit wird von den Stoppuhranzeigen 7 , 9 angezeigt. Diese bewegen sich unabhängig von dem Stunden- und Minutenzeiger 1 , 2 und
dem Sekundenzeiger 10 . Die Stoppuhr kann einen
Zeitraum von maximal 59 Minuten und 59,8 Sekunden
anzeigen.
Datum einstellen
GB/MT
Setting the Date
DANGER TO LIFE! Batteries
can be swallowed, which may represent a danger
to life. If a battery has been swallowed, medical
help is required immediately.
Do not use the device if it is damaged. Damaged devices represent a danger of death!
Do not use the device in hospitals
or medical facilities, as otherwise this may result
in malfunctions of life-support systems.
Do not expose the device to
– extreme temperatures,
– strong vibrations,
– heavy mechanical loads,
– direct sunlight,
– moisture.
Otherwise there is a danger that the device will
be damaged.
Please prevent the housing of the device from
rubbing to strongly against textiles. This may result
in static charges and affect the results of the
measurements.
Please note that the guarantee does not cover
damage caused by incorrect handling, non-
Pull the crown 4 carefully out of the housing to
position 2 12 if the second hand 10 is in the “0”
(12 o’clock) position.
Adjust the chronograph to the desired minutes
and hours by turning the crown 4 in a clockwise
direction.
Please ensure that the correct time is shown in
the 24 h display 8 . Move the time 12 hours
forward if necessary.
After you have set the time, press the crown 4
back into the housing. The watch now starts with
the desired time.
DE/AT/CH
Uhrzeit einstellen
Safety
KEEP ALL THE SAFETY ADVICE AND INSTRUCTIONS IN A SAFE PLACE FOR FUTURE REFERENCE!
GB/MT
Note: The stop watch hands move quickly if you
keep button 5 pressed.
Press the crown 4 back into the housing.
Allgemeine
Sicherheitshinweise
1 Chronograph
1 Reparaturset für Modell D
1 Knopfzelle
1 Bedienungsanleitung
Hour hand
Minute hand
Start / stop button (stopwatch function)
Crown
Button (for split time / split time release / reset)
Date display
Stopwatch second hand
24 h display (shows the time on a 24-hour basis)
Stopwatch minutes display
PT
Resetting the Stopwatch
Displays to “0” (12 o’clock)
GB/MT
Lieferumfang
Wenn sich keiner der Stoppuhrzeiger in
der „0“-Position befindet:
Ziehen Sie die Krone 4 bis Position 2 12 heraus.
Drücken Sie die Start- / Stopp-Taste 3 2 Sekunden
lang. Der Stoppuhr-Minutenzeiger macht eine volle
Umdrehung. Drücken Sie die Taste 5 , um den
Stoppuhr-Minutenzeiger auf „60“ zu stellen.
Drücken Sie die Start- / Stopp-Taste 3 2 Sekunden
lang. Der Stoppuhr-Sekundenzeiger macht eine
volle Umdrehung. Drücken Sie die Taste 5 , um
den Stoppuhr-Sekundenzeiger auf „12“ zu stellen.
Hinweis: Die Stoppuhr-Zeiger bewegen sich
schnell, wenn die Taste 5 gedrückt gehalten wird.
Drücken Sie die Krone 4 wieder ins Gehäuse.
DE/AT/CH
Note: Before you can adjust the time or date, the
stopwatch displays 7 , 9 have to be reset to “0”
(12 o’clock).
GB/MT
GB/MT
Stoppuhr steht:
Drücken Sie die Taste 5 oder ziehen Sie die
Krone 4 vorsichtig bis Position 1 11 aus dem
Gehäuse und drücken Sie die Taste 5 .
Operation
Place the chronograph with the dial facing
downwards in the repair set 15 .
Sie den Federstab mit dem Schieber 16 zusammen, entfernen Sie den Verschluss 13 und fahren
Sie wie oben beschrieben fort.
Stoppuhr-Anzeigen auf „0“
(12 Uhr) stellen
1 chronograph watch
1 tooling kit for model D
1 button cell
1 directions for use
DANGER TO
LIFE AND ACCIDENT HAZARD
FOR TODDLERS AND SMALL
CHILDREN! Never allow children to play unsupervised with the packaging material. There is
a danger of suffocation from the packaging
material. Children frequently underestimate the
dangers. Children should be kept away from the
product at all times. This is not a toy.
Children or persons who lack the knowledge or
experience to use the device or whose physical,
sensory or intellectual capacities are limited
must never be allowed to use the device without
supervision or instruction by a person responsible
for their safety. Children must never be allowed
to play with the device.
DE/AT/CH
Reinigung und Pflege
Reinigen Sie das Produkt nur äußerlich mit einem
weichen trockenen Tuch.
Service
DE/AT/CH
AT
Service Österreich
Tel.:
0820 201 222
(0,15 EUR/Min.)
E-mail: [email protected]
IAN 66976
DE
Service Deutschland
Tel.:
01805772033
(0,14 EUR / Min. aus dem dt.
Festnetz, Mobilfunk max.
0,42 EUR / Min.)
E-mail: [email protected]
IAN 66976
CH
Service Schweiz
Tel.:
0842 665566
(0,08 CHF/Min., Mobilfunk
max. 0,40 CHF/Min.)
E-mail: [email protected]
IAN 66976
Entsorgung
Die Verpackung besteht aus umweltfreundlichen Materialien, die Sie über die
örtlichen Recyclingstellen entsorgen können.
DE/AT/CH
DE/AT/CH
DE/AT/CH
EMC
Produktbezeichnung:
Chronograph
Modell Nr.: Z30299 A / B / D
Version:
08 / 2011
© by ORFGEN Marketing
Stand der Informationen: 07 / 2011
Ident-Nr.: Z30299 A / B / D072011-5
IAN 66976
Milomex Ltd.
c/o Milomex Services
Hilltop Cottage
Barton Road
Pulloxhill
Bedfordshire
MK45 5HP
UK
Batterien dürfen nicht über den Hausmüll entsorgt
werden. Sie können giftige Schwermetalle enthalten
und unterliegen der Sondermüllbehandlung. Die
DE/AT/CH
Removing Segments (Fig. D)
Stundenzeiger
Minutenzeiger
Start- / Stopp-Taste (Stoppuhrfunktion)
Krone
Taste (für Zwischenzeit / Zwischenzeit Freigabe /
Reset)
6 Datumsanzeige
7 Stoppuhr Sekundenzeiger
8 24 h-Anzeige (zeigt die Zeit auf 24-h-Basis an)
Stoppuhr läuft noch:
Drücken Sie die Start / Stopp-Taste 3 .
Drücken Sie die Taste 5 .
General Safety
Information
Second hand
Position 1
Position 2
Fastener
Segment
Repair set for model D
Slider for model D
chemischen Symbole der Schwermetalle sind wie
folgt: Cd = Cadmium, Hg = Quecksilber, Pb = Blei.
Geben Sie deshalb verbrauchte Batterien bei einer
kommunalen Sammelstelle ab.
Umweltschäden durch falsche
Entsorgung der Batterien!
66976_aur_Chronograph_A_B_D_Content_LB5.indd 2
Open the fastener 13 .
Keep the spring bar squeezed together (as
described above) and adjust the fastener 13 as
desired.
Release the spring bar so that it can snap back
into the original position. The fastener 13 is now
fixed in place.
Note: The segments which can be removed are
marked with an arrow (see Fig. D). They are connected
together with pins. These can be pushed out in the
direction of the arrow with the repair set 15 . Use a pair
of tweezers if necessary in order to remove the pins.
1
2
3
4
5
6
7
8
9
PT
Remove the pins of the segment that you wish to
remove (as described above) and take out the
segment 14 .
Note: If you would like to take out more than one
consecutive segment 14 , it is sufficient to remove
the two outer pins.
Connect the watch strap together again by joining
the loose segments 14 with a pin. Press this pin
against the direction of the arrow into the adjacent
segments 14 .
Note: In order to remove one or more segments 14 directly on the fastener 13 , press out
the spring bar with the slider 16 , remove the
fastener 13 and proceed as described above.
Note: The fastener 13 is held in position by a spring
bar. In order to adjust the fastener 13 , place the
chronograph in the repair set 15 and press the spring
bar together with the slider 16 .
Teilebeschreibung
Hinweis: Bevor Sie die Uhrzeit oder das Datum
einstellen können, müssen die Stoppuhr-Anzeigen 7 ,
9 auf „0“ (12 Uhr) gestellt werden.
10
11
12
13
14
15
16
Scope of delivery
Proper Use
The chronograph shows the date and time and can
be used as a stopwatch.
Data das informações: 07 / 2011
N.º de ident.: Z30299A / B / D072011-5
Danos ambientais devido à
eliminação incorrecta das pilhas!
PT
1
2
3
4
5
Bedienung
Keep these instructions in a safe place. If
you pass the product on to anyone else,
please ensure that you also pass on all
the documentation.
Designação do produto:
Relógio cronógrafo
Modelo nr.°: Z30299A / B / D
Versão:
08 / 2011
As pilhas não podem ser eliminadas no lixo doméstico.
Podem conter metais pesados tóxicos e são consideradas resíduos perigosos. Os símbolos químicos dos
metais pesados são os seguintes: Cd = cádmio,
Hg = mercúrio, Pb = chumbo. Como tal, deposite as
Adjusting the Fastener (Fig. C)
Bestimmungsgemäße
Verwendung
GB/MT
Segmente entnehmen (Abb. D)
Pb
Der Chronograph zeigt die Zeit und das Datum an
und kann als Stopp-Uhr verwendet werden.
Batteries may not be disposed of with the usual domestic waste. They may contain toxic heavy metals
and are subject to hazardous waste treatment rules
and regulations. The chemical symbols for heavy
Introduction
Description of Parts
Eliminação
Bewahren Sie diese Anleitung gut auf. Händigen Sie alle Unterlagen bei Weitergabe
des Gerätes an Dritte ebenfalls mit aus.
Environmental damage through
incorrect disposal of the batteries!
GB/MT
Uhrenarmband kürzen
(Modell Z30299D)
As pilhas avariadas ou gastas têm de ser recicladas
de acordo com a directiva 2006 / 66 / EC. Entregue as pilhas e / ou o aparelho nos
locais específicos destinados à sua recolha.
A embalagem é feita de materiais não
poluentes que podem ser eliminados nos
contentores de reciclagem locais.
Last Information Update: 07 / 2011
Ident no.: Z30299A / B / D072011-5
Chronograph Watch
pilhas utilizadas num ponto de recolha adequado
do seu município.
EMC
No interesse da protecção do ambiente,
não deite fora este produto juntamente
com o lixo doméstico; entregue-o num
ponto de recolha adequado.
IAN 66976
EMC
Product description:
Chronograph Watch
Model No.: Z30299 A / B / D
Version:
08 / 2011
As possibilidades de reciclagem dos artigos utilizados poderão ser averiguadas no seu Município ou
Câmara Municipal.
Assistência
PT
Assistência Portugal
Tel.:
70778 0005
(0,12 EUR/Min.)
e-mail: [email protected]
Note: The watch strap can be shortened by adjusting
the fastener 13 or removing segments 14 . To this
purpose you should use the repair set 15 supplied.
Contact your local refuse disposal authority for more
details of how to dispose of your worn-out product.
IAN 66976
IAN 66976
Shortening the watch strap
(model Z30299D)
GB/MT
To help protect the environment, please
dispose of the product properly when it
has reached the end of its useful life and
not in the household waste. Information
on collection points and their opening
hours can be obtained from your local
authority.
MT
Service Malta
Tel.:
80062230
e-mail: [email protected]
Note: For this step you need a hole punch.
CAUTION – DANGER OF CRUSHING!
Please ensure that you do not put your fingers or
other parts of the body between the hole punch.
In order to be able to adjust the size of the
watch strap, punch a new hole at the required
position in the watch strap with the hole punch.
Limpeza e conservação
Limpe o produto somente na parte exterior com
um pano seco e macio.
Adjusting the watch strap
(models Z30299A / B)
GB/MT
GB
Service Great Britain
Tel.:
0871 5000 720
(0,10 GBP/Min.)
e-mail: [email protected]
DE/AT/CH
28.07.11 17:09
Scarica