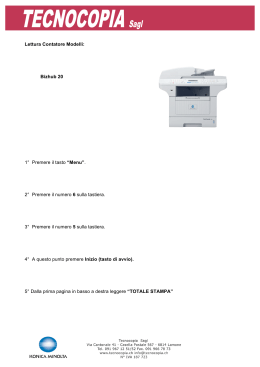
ARC20
RADIOCHIAVE
ARC20
CLASS 1.20
SRD1e
Bentel Security srl
CARATTERISTICHE GENERALI
L’ARC20 è una chiave elettronica via radio (Radiochiave) che permette di inserire e disinserire il vostro sistema di sicurezza, così pure altre funzioni gestite da tastiera con il vantaggio
che si può portare ovunque. In accordo con l’installatore si può decidere quali funzioni avere
a disposizione con la Radiochiave.
Per attivare ognuna delle quattro funzioni selezionate, tenere premuto per 1 secondo il tasto
appropriato. Ad ogni tasto sarà associata una funzione. Il LED posto tra i primi due tasti si
accenderà a conferma che il segnale è stato spedito al ricevitore della centrale.
FALSI ALLARMI
La Radiochiave è dotata di un tasto rosso (
) per i casi di emergenza (default) : per
l’attivazione è necessario tenerlo premuto per circa 3 secondi. Questo per ridurre le possibilità
di falsi allarmi.
Il segnale non sarà ricevuto se la Radiochiave non è nell’area di copertura del ricevitore.
Fig. 1La Radiochiave: vista esterna e vista interna
FUNZIONI PREDEFINITE
Inserimento Parziale (
): premere questo tasto per inserire il sistema di sicurezza in modo Parziale: in base alla centrale usata ed alla sua
programmazione, SOLO alcune zone possono provocare un allarme (in genere quelle usate per controllare porte e finestre), mentre altre zone sono
escluse permettendo all’utente di stazionarci senza provocare un allarme.
Inserimento (
Disinserimento (
Allarme Ausiliario (
): premere questo tasto per inserire il sistema di sicurezza: TUTTE le zone possono provocare un allarme.
): premere questo tasto per disinserire il sistema di sicurezza: NESSUNA zona (eccetto quelle 24 ore) può provocare un allarme.
): premere questo tasto per segnalare un pericolo generico (un malore, un’aggressione, ecc): in base alla Centrale usata
ed alla sua programmazione, saranno attivati i dispositivi di allarme (sirene, ecc.) e/o sarà comunicata, via telefono, la situazione di pericolo alle
persone e/o agli istituti opportuni (pronto soccorso, forze dell’ordine, ecc.).
Per rendere la chiave più adatta alle vostre necessità, sono disponibili altre opzioni che devono essere programmate dal vostro installatore.
Inoltre nella confezione è inclusa una serie alternativa di tasti in gomma.
SOSTITUZIONE DELLE BATTERIE
In normali condizioni le batterie durano dai 5 agli 8 anni. Mentre state premendo un tasto la chiave invierà lo stato delle proprie batterie al ricevitore della
centrale. Se le batterie della vostra chiave sono scariche il corrispondente LED sulla tastiera della vostra centrale (se predisposta) si accenderà.
Questa Radiochiave è alimentata da due batterie al Litio CR2025. Per sostituire le batterie, aprire la Radiochiave inserendo un cacciavite a taglio nella
apposita scanalatura e facendo leva delicatamente. Una volta aperta la Radiochiave, rimuovere la vite che blocca il PCB quindi il PCB stesso. Le batterie
saranno visibili, quindi sostituire semplicemente le vecchie batterie con le nuove.
! Rispettare la polarità della batteria, come mostrato in Figura 1. Un uso improprio delle batterie al Litio può causare sviluppo di calore,
esplosione o fuoco, e quindi può essere causa di lesioni alle persone.
Le batterie nuove devono essere dello stesso tipo o equivalente a quelle raccomandate dal costruttore. Non cercare di ricaricare le batterie
esauste. Smaltire le batterie usate solo nei siti predisposti.
NOTE PER L’INSTALLATORE
Ogni cambiamento della programmazione della chiave dovrebbe essere fatto dall’installatore.
Rimozione del ritardo di 3 secondi relativo al tasto Allarme Ausiliario (
il LED incominci a lampeggiare; premere infine il tasto Inserimento (
): premere e tenere premuti contemporaneamente tutti e 4 i tasti finchè
).
Per tornare alle condizioni di Default ripetere i passi precedenti.
Non premere nessun altro tasto quando si è in fase di programmazione.
!"
#
%&!'(')*
,#
$
++''
-
Fig. 2 Clip per portare la chiave in cintura: vista laterale
Le batterie fornite con la Radiochiave devono essere considerate materiale di consumo e, quindi, escluse dalla garanzia.
Con la presente, Bentel Security dichiara che questo prodotto è conforme ai requisiti essenziali ed alle altre disposizioni pertinenti stabilite dalla
direttiva 1999/5/CE.
La Dichiarazione di Conformità completa può essere trovata all’indirizzo www.bentelsecurity.com/dc.html.
Le specifiche tecniche del prodotto possono subire variazioni senza preavviso.
ARC20
WIRELESS KEY
ARC20
CLASS 1.20
SRD1e
Bentel Security srl
OPERATING INSTRUCTIONS
Congratulations on the purchase of the ARC20, BENTEL’s newest 4 button wireless key. This
key allows you to arm and disarm, as well as other keypad functions, with the convenience of
wireless portability. Together with your installer, you can decide which functions you wish to have
accessible from your portable key.
To activate, press and hold the appropriate button for approximately 1 second. The LED located
between button 1 and 2 will confirm that a signal has been sent to the control panel receiver.
FALSE ALARM PREVENTION
) key is a panic key. It will require the user to press and hold for approximately
By default, the (
3 seconds. This was designed to reduced the possibility of a false alarm.
Signals will not be received if the key is not within the range of the wireless receiver.
DEFAULT FUNCTIONS
Stay Arming (
) : Press this button to arm your system in the Stay mode. All perimeter
Fig. 1
The Wireless Key: external and internal view
zones will be armed, such as all window and door contacts, but the interior zones will remain
inactive, allowing you to stay on the premises without setting off an alarm.
Away Arming (
): Press this button to arm your system in the Away mode. Both the interior and exterior zones will be armed, allowing you
to exit the premises.
Disarm (
Panic (
): Press this button to disarm your system. You do not have to enter your access code when you use the key to disarm the system.
): Press this button to notify your central monitoring station of a situation requiring the police, such as a break- in.
Other options are available. Please discuss all ARC20 options with your installer in order to program the best possible combination to suit your needs.
As well for your convenience an optional rubber button insert has been included.
The operating mode of the functions described in this paragraph, depend on your Control panel and how it is programmed. Read the Control panel
instructions carefully, and ask your Installer for any necessary information.
REPLACING THE BATTERIES
Under normal condition the batteries can last from 5 to 8 years. During each button press the key will send the status of its battery to the control panel
receiver. If the battery is low the trouble light on the controls panel’s keypad will tutn ON.
To replace the batteries, remove the top cover by inserting a coin into the slot located on the bottom right corner and twist. Remove the screw at the center
of the board to expose the batteries. Replace both batteries with Panasonic CR-2025 lithium batteries (see above diagram).
The polarity of the batteries must be observed, as shown in Fig. 1. Improper handling of lithium batteries may result in heat generation, explosion or fire,
which may lead to personal injuries.
! WARNING: Danger of explosion if batteries are installed incorrectly. Replace only with the same or equivalent type recommended by the
manufacturer. Keep away from small children. If batteries are swallowed, promptly see a doctor. Do not try to recharge these batteries.
Used batteries should be disposed of properly, in accordance with the waste recovery and recycling regulations in your area.
NOTE TO INSTALLER
Removing the 3-second Delay on the Panic (
) Key.
Changing the programming will affect operation. This should been done by the installer.
- Press and hold all 4 buttons simultaneously until the LED begins to flash.
- Press the Away key (
).
- This are toggle features, to return to default, repeat the steps above.
Do not press any other buttons while in Programming mode.
!
"
# $%&
,
'"(
)*+,-.-/0
-$-#
,
#$
Fig. 2 Belt Clip Assembly: side view.
The transmitter batteries are considered shop supply, therefore, are not covered by the warranty.
Hereby, Bentel Security, declares that this device is in compliance with the essential requirements and other relevant provisions of Directive 1999/5/
EC. The complete R&TTE Declaration of Conformity can be found at www.bentelsecurity.com/dc.html.
ISTISBL1ARC20 0.1 261104 P7.0
The Manufacturer reserves the right to change the technical specifications of this product without prior notice.
Scaricare