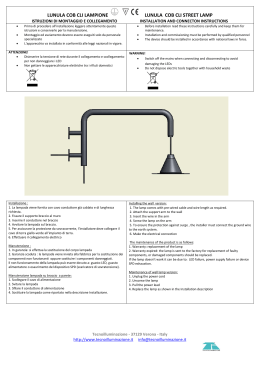
LUNULA LAMPIONE LUNULA STREET LAMP ISTRUZIONI DI MONTAGGIO E COLLEGAMENTO Prima di procedere all’installazione leggere attentamente queste istruzioni e conservarle per la manutenzione. Montaggio ed avviamento devono essere eseguiti solo da personale specializzato L‘apparecchio va installato in conformità alle leggi nazionali in vigore. INSTALLATION AND CONNECTON INSTRUCTIONS Before installation read these instructions carefully and keep them for maintenance. Installation and commissioning must be performed by qualified personnel The device should be installed in accordance with national laws in force. ATTENZIONE! Disinserire la tensione di rete durante il collegamento e scollegamento per non danneggiare i LED Non gettare le apparecchiature elettriche tra i rifiuti domestici WARNING! Switch off the mains when connecting and disconnecting to avoid damaging the LEDs Do not dispose electric tools together with household waste Installazione versione a parete: 1. La lampada viene fornita con cavo conduttore già cablato e di lunghezza richiesta, con fase colore marrone neutro colore blu. 2. Fissare il supporto braccio al muro con la vite A 3. Bloccare il braccio con le due viti B 4. Inserire il conduttore nel braccio 5. Avvitare la lampada sul braccio sino ad ottenere l’orientamento dei LED desiderato 6. Serrare a fondo la vite senza testa (grano) C per bloccare la lampada al braccio nella posizione richiesta. 7. Effettuare il collegamento elettrico Installing the wall version: 1. The lamp comes with pre-wired cable and wire length as required: phase brown colour, neutral blue colour. 2. Attach the support arm to the wall with screw A 3. Lock the arm with the two screws B 4. Insert the wire in the arm 5. Screw the lamp on the arm until the desired LED orientation 6. Tighten the screw (wheat) C to block the lamp to the arm at the required position. 7. Make the electrical connection Installazione versione sospesa su tesata: 1. La lampada viene fornita con cavo conduttore già cablato e di lunghezza richiesta, con fase colore marrone neutro colore blu. 2. Avvitare parzialmente la vite D 3. Inserire il cavo di sospensione nella apposita sede. La lampada rimane sospesa 4. Avvitare parzialmente le viti E 5. Posizionare la lampada e serrare a fondo le viti D ed E 6. Allentare il grano (vite senza testa ) F e ruotare la lampada sino ad ottenere l’orientamento dei LED desiderato. 7. Serrare a fondo la vite senza testa (grano) F 8. Effettuare il collegamento elettrico Install cable-mounted version : 1. The lamp comes with pre-wired cable and wire length as required: phase brown colour, neutral blue colour. 2. Partially tighten the screw D 3. Plug the power suspension in the appropriate area. The lamp is suspended. 4. Partially tighten both the E screws. 5. Place the lamp and tighten the screws D and E 6. Loosen the grub screw F and rotate the lamp until you get the desired orientation of the LED. 7. Tighten the screw F 8. Make the electrical connection Tecnoilluminazione - Via Carducci 26B - 37129 Verona - Tel/Fax +39 045 8003985 http://www.tecnoilluminazione.it [email protected] LUNULA LAMPIONE ISTRUZIONI MANUTENZIONE Prima di procedere all’installazione leggere attentamente queste istruzioni e conservarle per la manutenzione. Montaggio ed avviamento devono essere eseguiti solo da personale specializzato L‘apparecchio va installato in conformità alle leggi nazionali in vigore. LUNULA STREET LAMP MAINTENANCE INSTRUCTIONS Before installation read these instructions carefully and keep them for maintenance. Installation and commissioning must be performed by qualified personnel The device should be installed in accordance with national laws in force. ATTENZIONE! Disinserire la tensione di rete durante il collegamento e scollegamento per non danneggiare i LED Non gettare le apparecchiature elettriche tra i rifiuti domestici WARNING! Switch off the mains when connecting and disconnecting to avoid damaging the LEDs Do not dispose electric tools together with household waste La manutenzione del prodotto avviene nei seguenti termini: 1. In garanzia: si effettua la sostituzione del corpo lampada 2. Garanzia scaduta : la lampada viene inviata alla fabbrica per la sostituzione dei componenti non funzionanti . Il non funzionamento della lampada può essere dovuto a: guasto LED, guasto alimentatore o interruzione del fusibile di protezione. The maintenance of the product is as follows: 1. Warranty: replacement of the lamp 2. Warranty expired: the lamp is sent to the factory for replacement of faulty components. If the lamp doesn’t work it can be due to: LED failure, power supply failure or interruption of the fuse. Manutenzione scaricatore di sovratensione: In presenza dello scaricatore di sovratensione deve essere rilevato l’esaurimento attraverso il segnale acustico emesso (ronzio). 1. Svitare la vite G 2. Sostituire lo scaricatore H rispettando i collegamenti esistenti 3. Avvitare nuovamente la vite G Maintenance overvoltage protection: In presence of the surge arrester, the breakdown must be detected through the acoustic signal (buzz). 1. Unscrew the screw G 2. Replace the surge arrester H respecting the existing links 3. Tighten the screw G Manutenzione lampada su braccio a parete: 1. Scollegare il cavo di alimentazione 2. Allentare il grano (C) 3. Svitare la lampada 4. Sfilare il conduttore di alimentazione 5. Sostituire la lampada come riportato nel manuale di installazione Maintenance of wall lamp version: 1. Unplug the power cord 2. Loosen the grub screw (C) 3. Unscrew the lamp 4. Pull the power lead 5. Replace the lamp as shown in the installation manual Manutenzione lampada su tesata: 1. Scollegare il cavo di alimentazione 2. Allentare la vite D, togliere le viti E 3. sganciare la lampada dal cavo di sospensione 4. Allentare il grano F 5. Svitare la lampada 6. Sostituire la lampada come riportato nel manuale di installazione Maintenance of cable-mounted version: 1. Unplug the power cord 2. Loosen the D screw, remove the E screws 3. Detach the bulb from the suspension cable 4. Loosen the wheat F 5. Unscrew the lamp 6. Replace the lamp as shown in the installation manual Tecnoilluminazione - Via Carducci 26B - 37129 Verona - Tel/Fax +39 045 8003985 http://www.tecnoilluminazione.it [email protected]
Scarica